- Retro wiring in the interior
- Photos of interiors
- Collection of sockets/switches in retro style
- Do's and Don'ts
- Advantages and disadvantages
- Retro decorative wiring device
- Types of wiring "antique"
- Cables for retro wiring
- Design features of decorative open wiring
- Manufacturers and prices
- Retro wiring in a wooden house
- Features and differences in the installation of semi-antique electrical wiring in wooden houses.
- Main differences:
- Installation features:
- Safety
- Wiring Retro Wiring
- Retro wiring on stone walls
- Retro-style wiring - components with a photo in the interior
- Twisted retro wire
- Retro sockets and switches for exposed wiring
- Terminal blocks and distribution (soldering) boxes
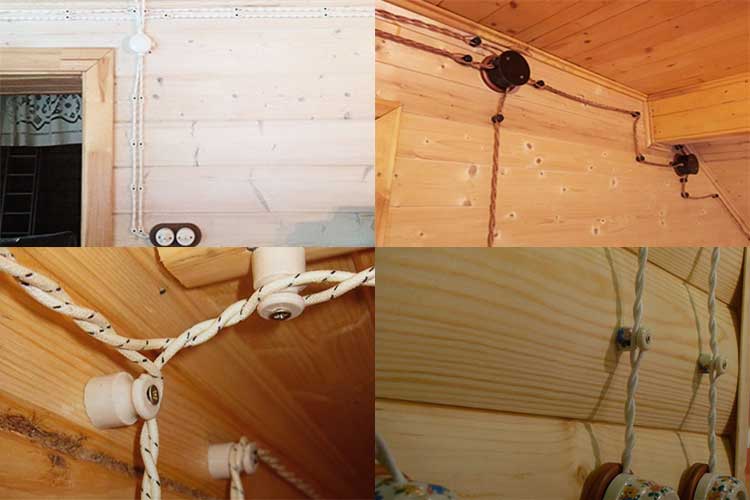
- Cartridges, passages and rollers (insulators) for retro wiring
- Lighting fixtures in vintage style
- Savings on mixed type installation
Retro wiring in the interior
In general, in order for open wiring to look good, you need to try very hard. After all, everything is in plain sight, all the flaws are striking. If retro wiring is done in a wooden house, then each incorrectly screwed screw leaves a trace that is difficult to disguise. Therefore, before starting work, draw everything on the plan, transfer all the markings to the walls, and only then start.If you are not sure if you placed the sockets / switches correctly, if you don’t know if they will look good in this particular place, try fixing the cord under the ceiling (even with masking tape, even with very thin carnations). So it will be more likely to imagine how everything will look together.
Combined version - in pipes and without
Another moment. If a wooden house still "sits down", pull the wires. If the log house has already settled or is made of glued laminated timber and you should not expect shrinkage, it is better not to pull the wires. They shouldn't sag, but they shouldn't be too tight either. In general, good luck! And for inspiration, a few photos of how you can make retro wiring.
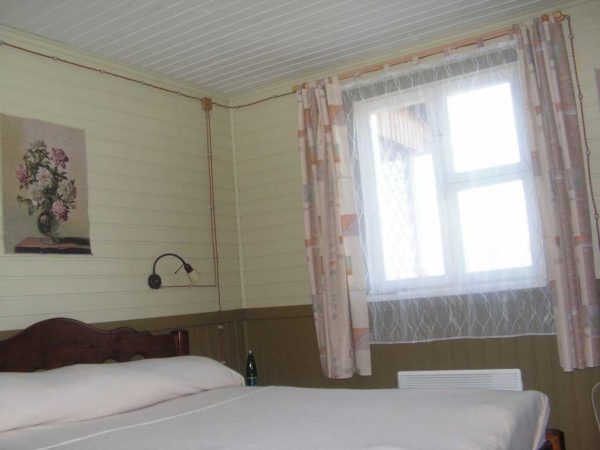
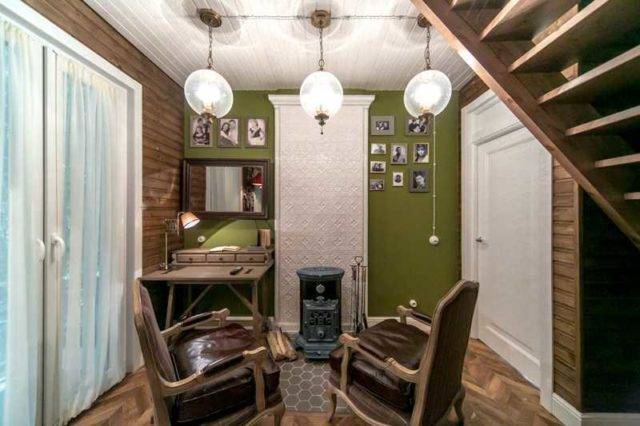
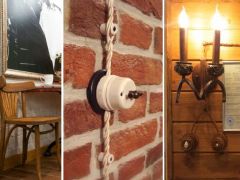
Photos of interiors
It is always better to look at several already "ready" premises. This makes it easier to understand what exactly you like and what not, to get a preliminary idea of \u200b\u200bhow everything might look.
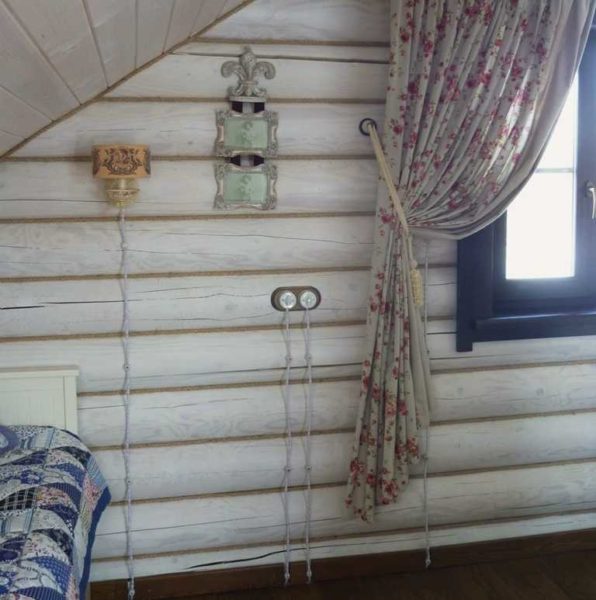
An example of wiring from below - the cable goes under the finished floor in a metal box, only twisted cords rise along the walls to the installation site of sockets and switches
The color of the socket can be in contrast with the wall, but it should also be present in other interior details.
They also look good on wallpaper, so retro wiring can be done in an apartment, but the style must match ....
This is an option with plastic mounting boxes and switches
Retro wiring can be done in pipes. They have a regular cable.
It looks like retro wiring from pipes in the interior
How can I organize a double outlet in a narrow space between windows

In the kitchen, retro-style wiring also looks quite organic.
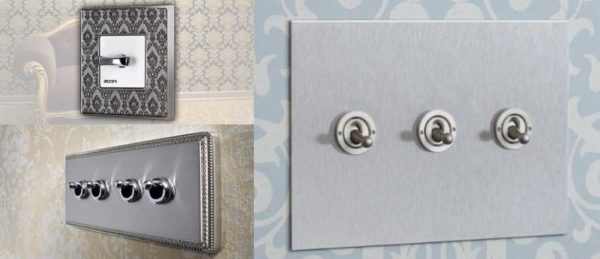
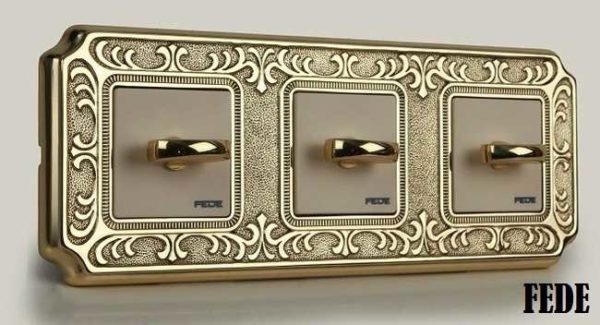
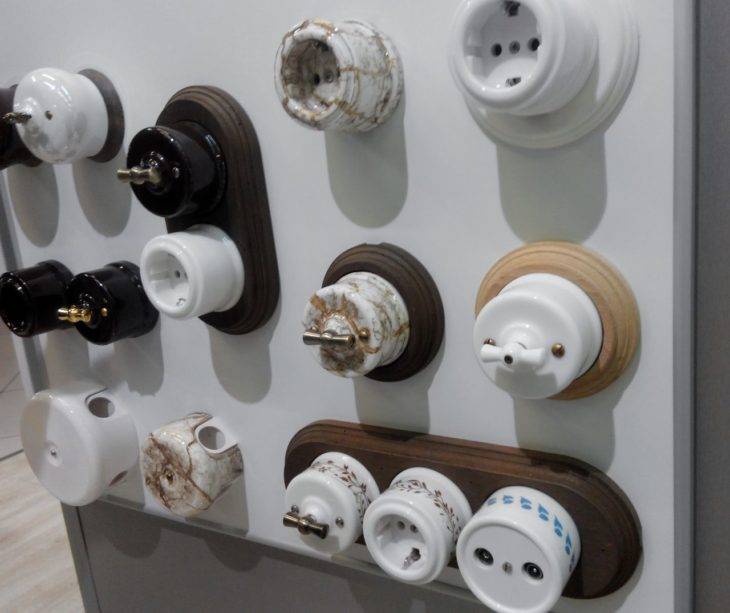
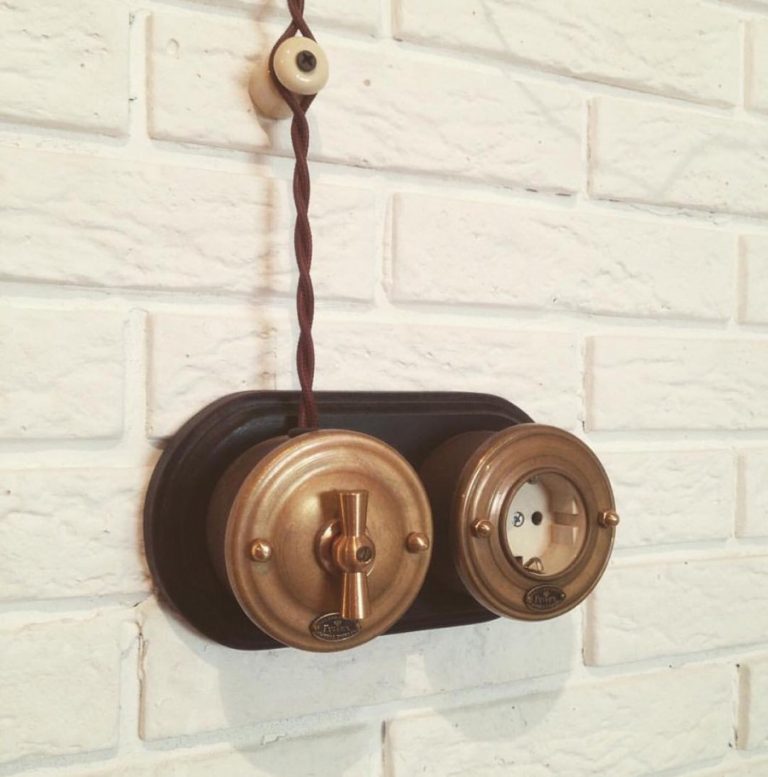
Collection of sockets/switches in retro style
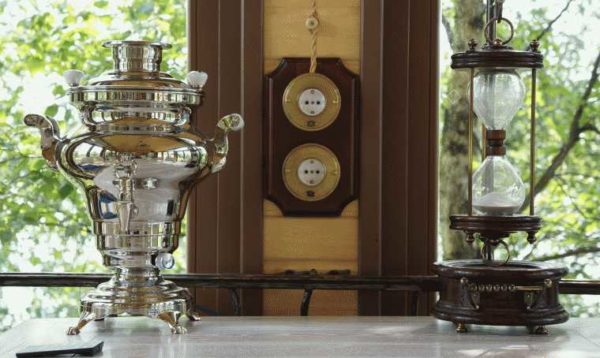
Often a specific thing can come up with the idea of \u200b\u200bdecorating the entire room. If we are talking about special retro-style electrical installation products, then even a socket or switch can become such a thing. We will lay out some collections and interesting models from different manufacturers below. They are different in design, maybe you will like something.

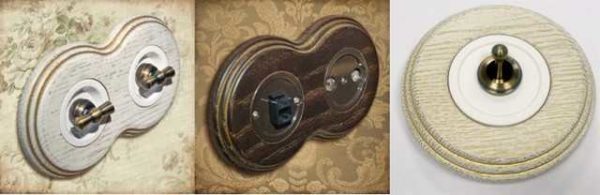
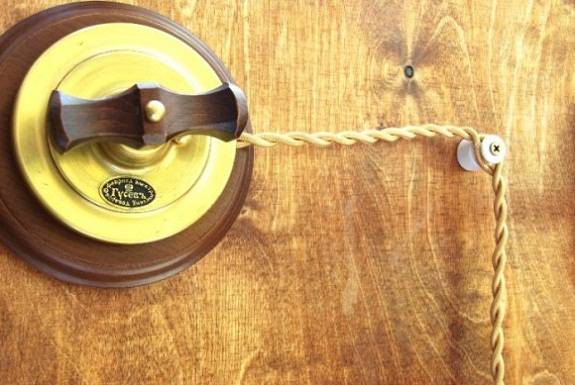
Most popular model retro switches - the so-called butterfly
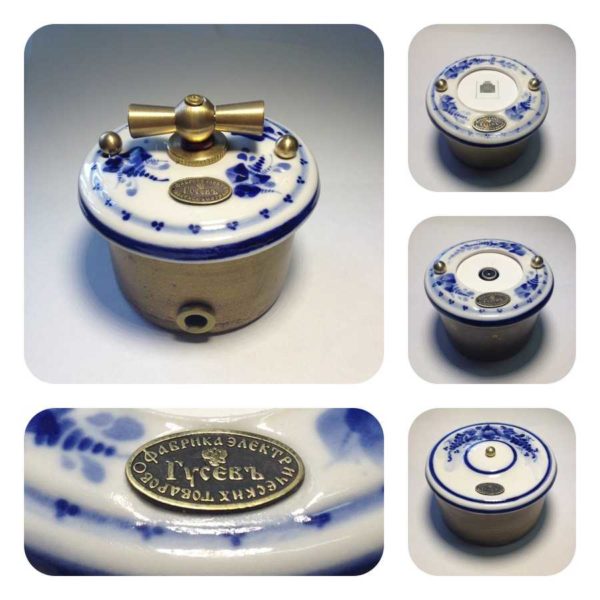
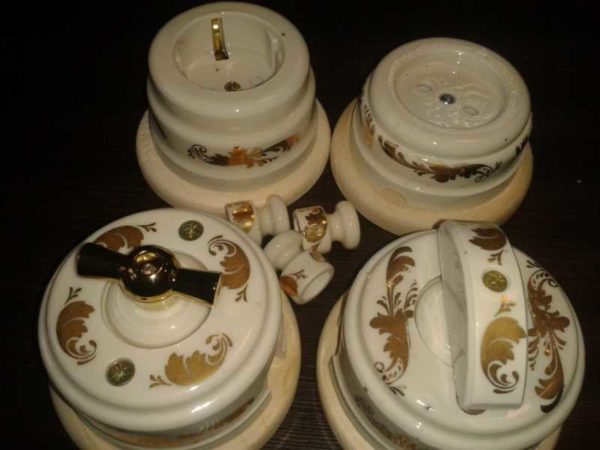
The Russian company Gusev produces painted porcelain sockets/switches
This is their electrician in white with brass fittings.
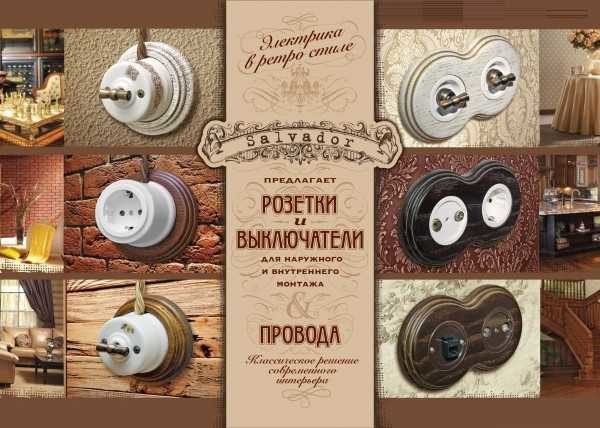
Another well-established firm is El Salvador.
These are their interesting twin sockets
The painting still looks good, but it requires the style to match
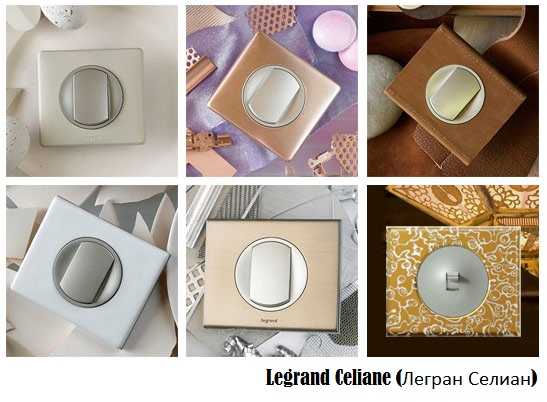
These porcelain switches are well known to Legrand. The style is completely different
There are some. They will be more combined with modern or retro style.
And such an option. It seems to fit even into the classics
Do's and Don'ts
Problems often arise due to violations instructions on how to wire. All technologies and methods relevant for laying electricity in stone or concrete walls are not suitable for wooden buildings. It is absolutely impossible to fasten an unprotected cable to a beam or lining!


The main line is not sewn up and not hidden under flammable interior elements. The domestic electrical network must not be subjected to overvoltage. Protective insulation should be protected from moisture, steam, dust and deformation of the cable.


A mouse can easily gnaw through a wire, and wiring damaged inside the walls will inevitably lead to a fire. From practice: even a small hearth of fire is extremely difficult to extinguish.

Advantages and disadvantages
Among the advantages of this type of electrification of a wooden house, it is worth noting:
- originality. A large selection of cables, switches and sockets allows you to choose the most suitable concept for a particular interior;
- ease of installation. The hidden method involves chasing walls and other time-consuming operations. Open mounting allows you to save time without making much effort;
- ease of repair. Cable damage is very easy to detect;
- safety. Cables are mounted using special insulators mounted on insulating gaskets. That is, one hundred percent protection against short circuit is provided.
Of course, this type of wiring is not without some drawbacks:
- lower strength compared to the closed method (careless movement can damage the cable);
- space limitation. Installation of overhead junction boxes, switches and sockets, hides space;
- inconvenience when renovating a house. Cables interfere with finishing work.
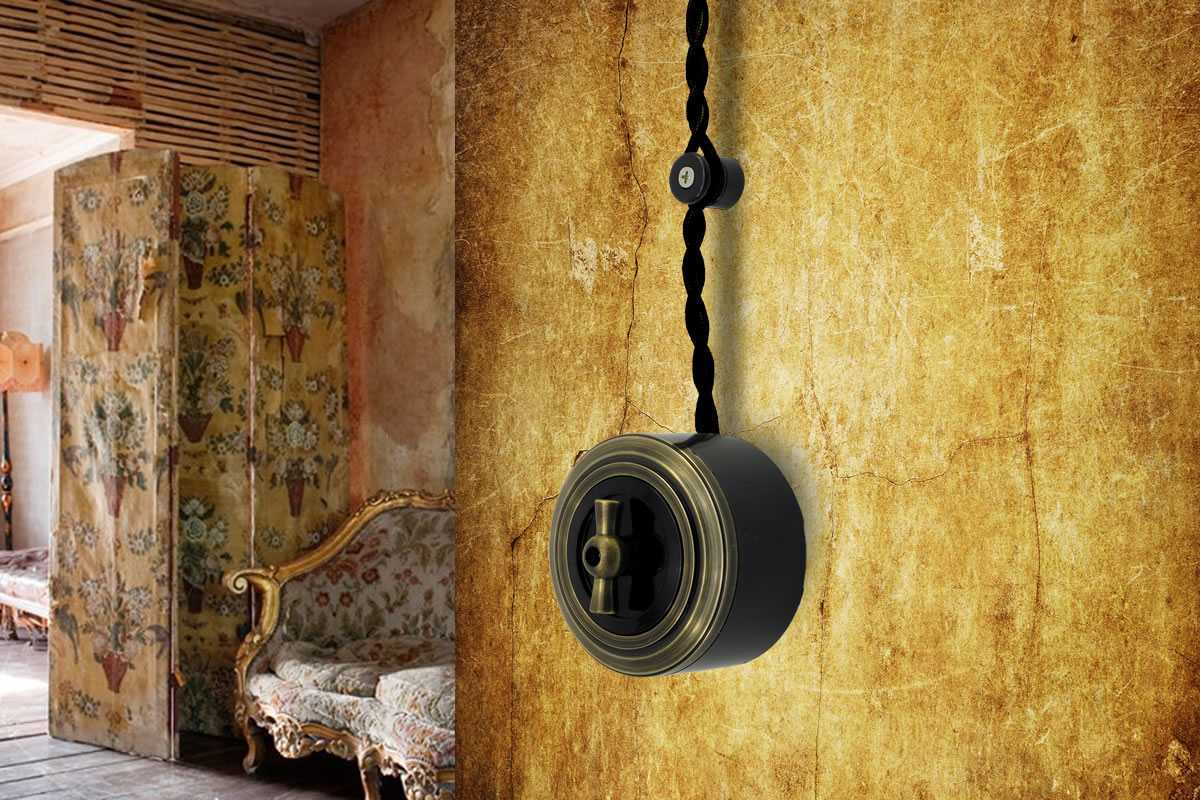
Retro decorative wiring device
At first glance, making vintage wiring is not difficult, since there is no need to ditch the walls, and especially if we do it in a house from a log, where there are no internal lining of walls and ceilings.
 Beautiful retro wiring in a modern wooden house
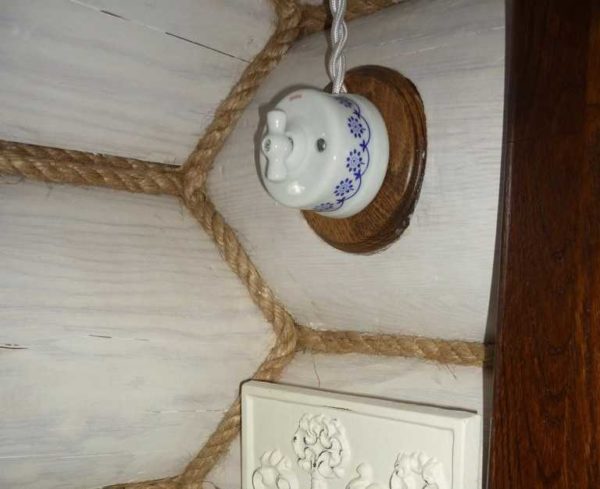
Such wiring was mounted at the beginning of the last century and was carried out using several single-core wires, where the fibers were twisted in a spiral.
Previously, there were no special junction boxes and therefore all wiring points were carried out on ceramic or more expensive porcelain insulating rollers. In order to prevent individual fibers from being visible, the craftsmen hid them under a special braid.
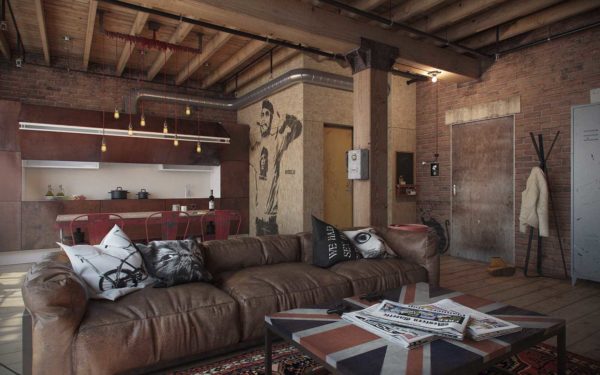
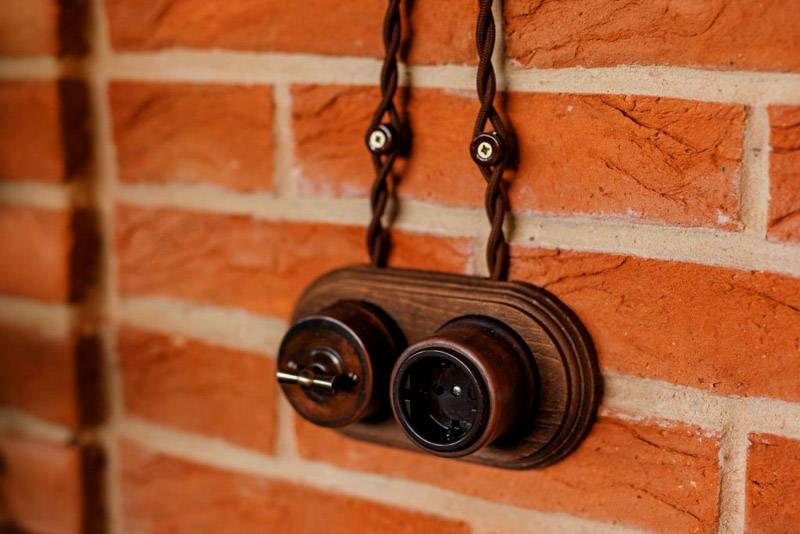
 White retro wiring on a brick wall of an interior in loft style
Naturally, this method in modern homes will be unsafe and unaesthetic, so experts offer their customers a retro wiring installation, which is located on the walls and ceiling.
In order for the wires to have an aesthetic appearance, manufacturers cover them with a special material.
Usually, to create a beautiful retro style, manufacturers use silk braid of various colors, depending on the color of the walls of a wooden house and the designer's idea. Before installing such wiring, it is treated with special non-combustible compounds. Copper wires for creating vintage wiring can be 0.5–2.5 mm in size. Sometimes, for greater effect, specialists use special engineering pipes.
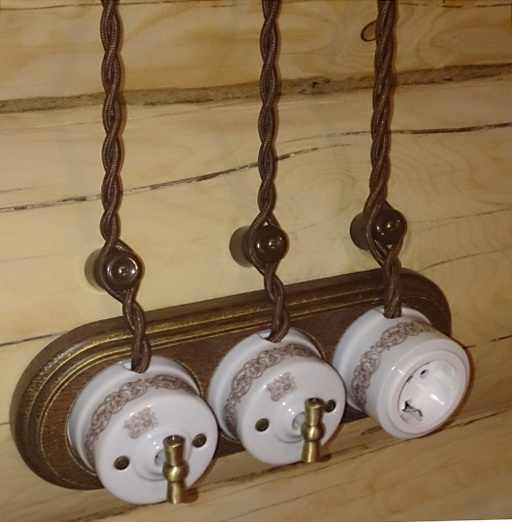
 Decorative wires and switches for installing beautiful vintage wiring in a wooden house
Also, manufacturers offer vintage sockets, switches and other devices in their own style to the cables in the kit.
Wooden houses are quite specific, since they do not always do internal facing work, which greatly complicates the laying of cables inside the walls. To do not spoil the appearance of the interior experts recommend making part of the wiring outdoor, that is, in a vintage style.
 Retro sockets and switches for vintage house wiring
This point is also due to the fact that the junction boxes cannot fit snugly against the wall, and mounting brackets are prohibited.
Types of wiring "antique"
There are several different types of "antique" wiring, which are very popular among log cabin owners today.
- Posting in retro style using vintage rollers. Today we can see this type of wiring in log cabins and ordinary houses that were built in the period 1920-1940 and did not undergo major repairs.
- Wiring device made of special type cables. It can be twisted and antique-styled wires.
Currently, domestic and foreign manufacturers offer not only wires for creating beautiful vintage wiring, but also all additional elements for it: insulators, branching boxes, sockets and switches. Today, the wiring of the Russian brand Gusev, as well as foreign manufacturers Bironi, Salvador, Villaris, is in the greatest demand.
 Styling retro wires and insulating rollers by Villaris
The first layer of such wiring is made of vinyl, and the second is made of cotton or silk fabric, which is impregnated with a special refractory compound. Manufacturers also offer wires wrapped in fiberglass.


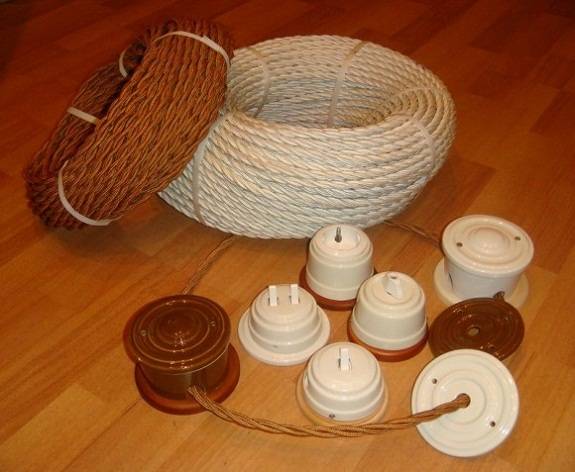
Cables for retro wiring
For open wiring, copper stranded wires with a cross section of 1.5 mm 2 and 2.5 mm 2 are produced. There are no other sizes. The conductors have a double PVC sheath, over which a decorative braid of technical silk or cotton is applied. These threads are impregnated with special anti-foam compounds, and some are additionally varnished.
Retro wiring in certain interiors looks very good
Design features of decorative open wiring
Cables are available in 2, 3 or 4 cores.For a retro wiring device in a wooden house, according to all the rules, a three-core cable is required, since grounding is mandatory according to new standards.
Since the cross section of a retro cable cannot be large, when designing electrical wiring, it is necessary to make a beam circuit. This means that each line is drawn separately. Accordingly, it is necessary to carefully consider where and how the tracks will pass, so that it looks pretty. In doing so, the following considerations should be taken into account:
- For lighting, a retro wire with a cross section of 1.5 mm 2 is used. On one such line, the maximum allowable load is 2 kW, but the total current consumption is not more than 10 A. For lighting, this is usually more than enough.
- A cable with a cross section of 1.5 mm 2 is pulled under sockets and socket groups. Here, as much as possible, you can connect a 3 kW load with a current consumption of not more than 16 A. This is also enough in the rooms, but in the kitchen it is a problem.
A large number of wires with open wiring is a problem
Regarding retro wiring in the kitchen of a wooden house, you should think carefully. Firstly, the thread braid will get dirty and it is problematic to return it to its original appearance. Although, if desired, you can use a wire in a vinyl or rubber sheath. Only the coating should be light-stabilised. These wires must be suitable for outdoor use.
Secondly, the finishing of the working area is most often tile, and this is where the main number of outlets is located. Therefore, it makes sense to reach the cable in the kitchen secretly (the best option is under the floor), to separate sockets along the work surface, also secretly, with an ordinary cable in a metal cable channel. And for lighting, switches use retro wires. So that the kitchen also does not get out of the general style.
Manufacturers and prices
If retro wiring is planned in a wooden house, the question arises of where to buy components and which cable is better. There is a twisted decorative cable for open laying of Russian and European production on the market. Europeans are represented by several firms. The best are Fontini, Gi Gambarelli, Cordon Dor, Bironi. Of this quartet, Gi Gambarelli has the best cable. It is stiff enough to sit well on insulators and is available in many different colors. But its main advantage is that it does not burn and has a fire certificate. It is worth remembering that retro wiring in a wooden house will be accepted by the fire inspection without problems only if there is a fire certificate.

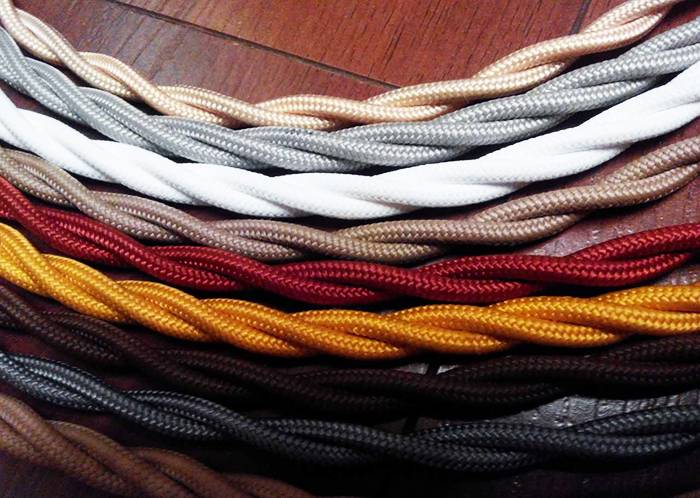
Retro wiring cables have many colors
The cheapest European wire is Fontini (Fontini), but it is too soft, does not adhere well to insulators. In order not to sag, you have to put them more often. But the biggest disadvantage is that it burns. Retro wiring from Cordon Dor (Gordon Dor) has many colors, but it looks “not very” and also sags. With all this, the overall quality of the wires is good. But it must be taken into account that the cost of one meter of a three-core cable is about $ 2-4 for a section of 1.5 square millimeters and $ 3-5 for thicker conductors.
With Russian manufacturers it is even more difficult - this topic is popular and new manufacturers are constantly appearing. Many of them are available only in regional markets, so no one has yet been able to track the quality and find a leader. In a pleasant way, the price of Russian-made retro wiring is changing. Competition is increasing, prices are becoming more affordable.
There have been several campaigns on this market for a long time - VILLARIS (Russian-Spanish), Gusev, Gemini Electro. They have already earned a certain reputation and the quality of their products can be trusted. Pretty good wiring. But prices are slightly above average. There are also young campaigns: Lindas, Retrika, Rybinskkabel, OTMgroup, Zion (Zion) and others.
Retro wiring in a wooden house
Outdoor retro wiring is quite common in modern cottage construction. In addition to the functional load, it is also used for interior design. In this article we will tell you how to make retro wiring with your own hands.
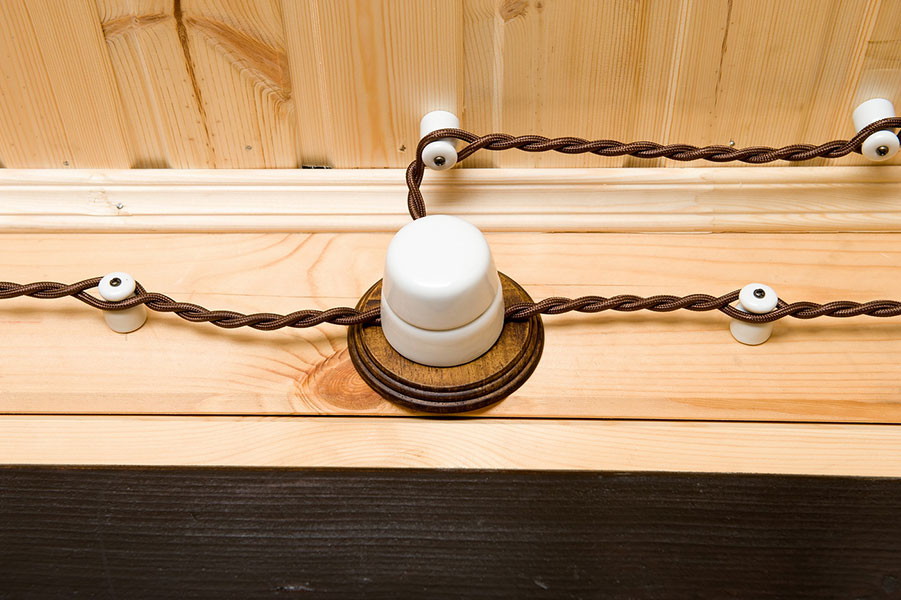
To begin with, let's figure out what it is? Antique retro wiring is represented by special cables twisted in a special way. They are laid directly on wall or ceiling structures, having previously fixed special insulators on them. The main thing is to observe a minimum distance of 10 millimeters between the wire and the surface, as this is required by fire safety.
Elements of retro wiring
The bottom layer of such products is made of a vinyl-based polymer, the outer layer is made of cotton materials that are impregnated with refractory compounds. A little less often, fiberglass is used for the top layer. For connoisseurs of luxury and wealth, there are silk-coated cables, but they are quite expensive.
The wires themselves in this system are made of copper. Their cross section along the line of sockets should be at least 2.5 millimeters, and along the lighting line at least one and a half.Sockets that are provided for connecting large electric heating equipment, for example, a water heater or a hob, should be equipped with thicker and more reliable cables.
Before choosing materials for retro wiring, it is necessary to carefully calculate all the loads on the future network. Doing this offhand is highly discouraged, since there is a possibility of serious damage and even a fire. If you do not have experience in such work and qualifications, then it is better not to risk it, but to entrust everything to specialists.
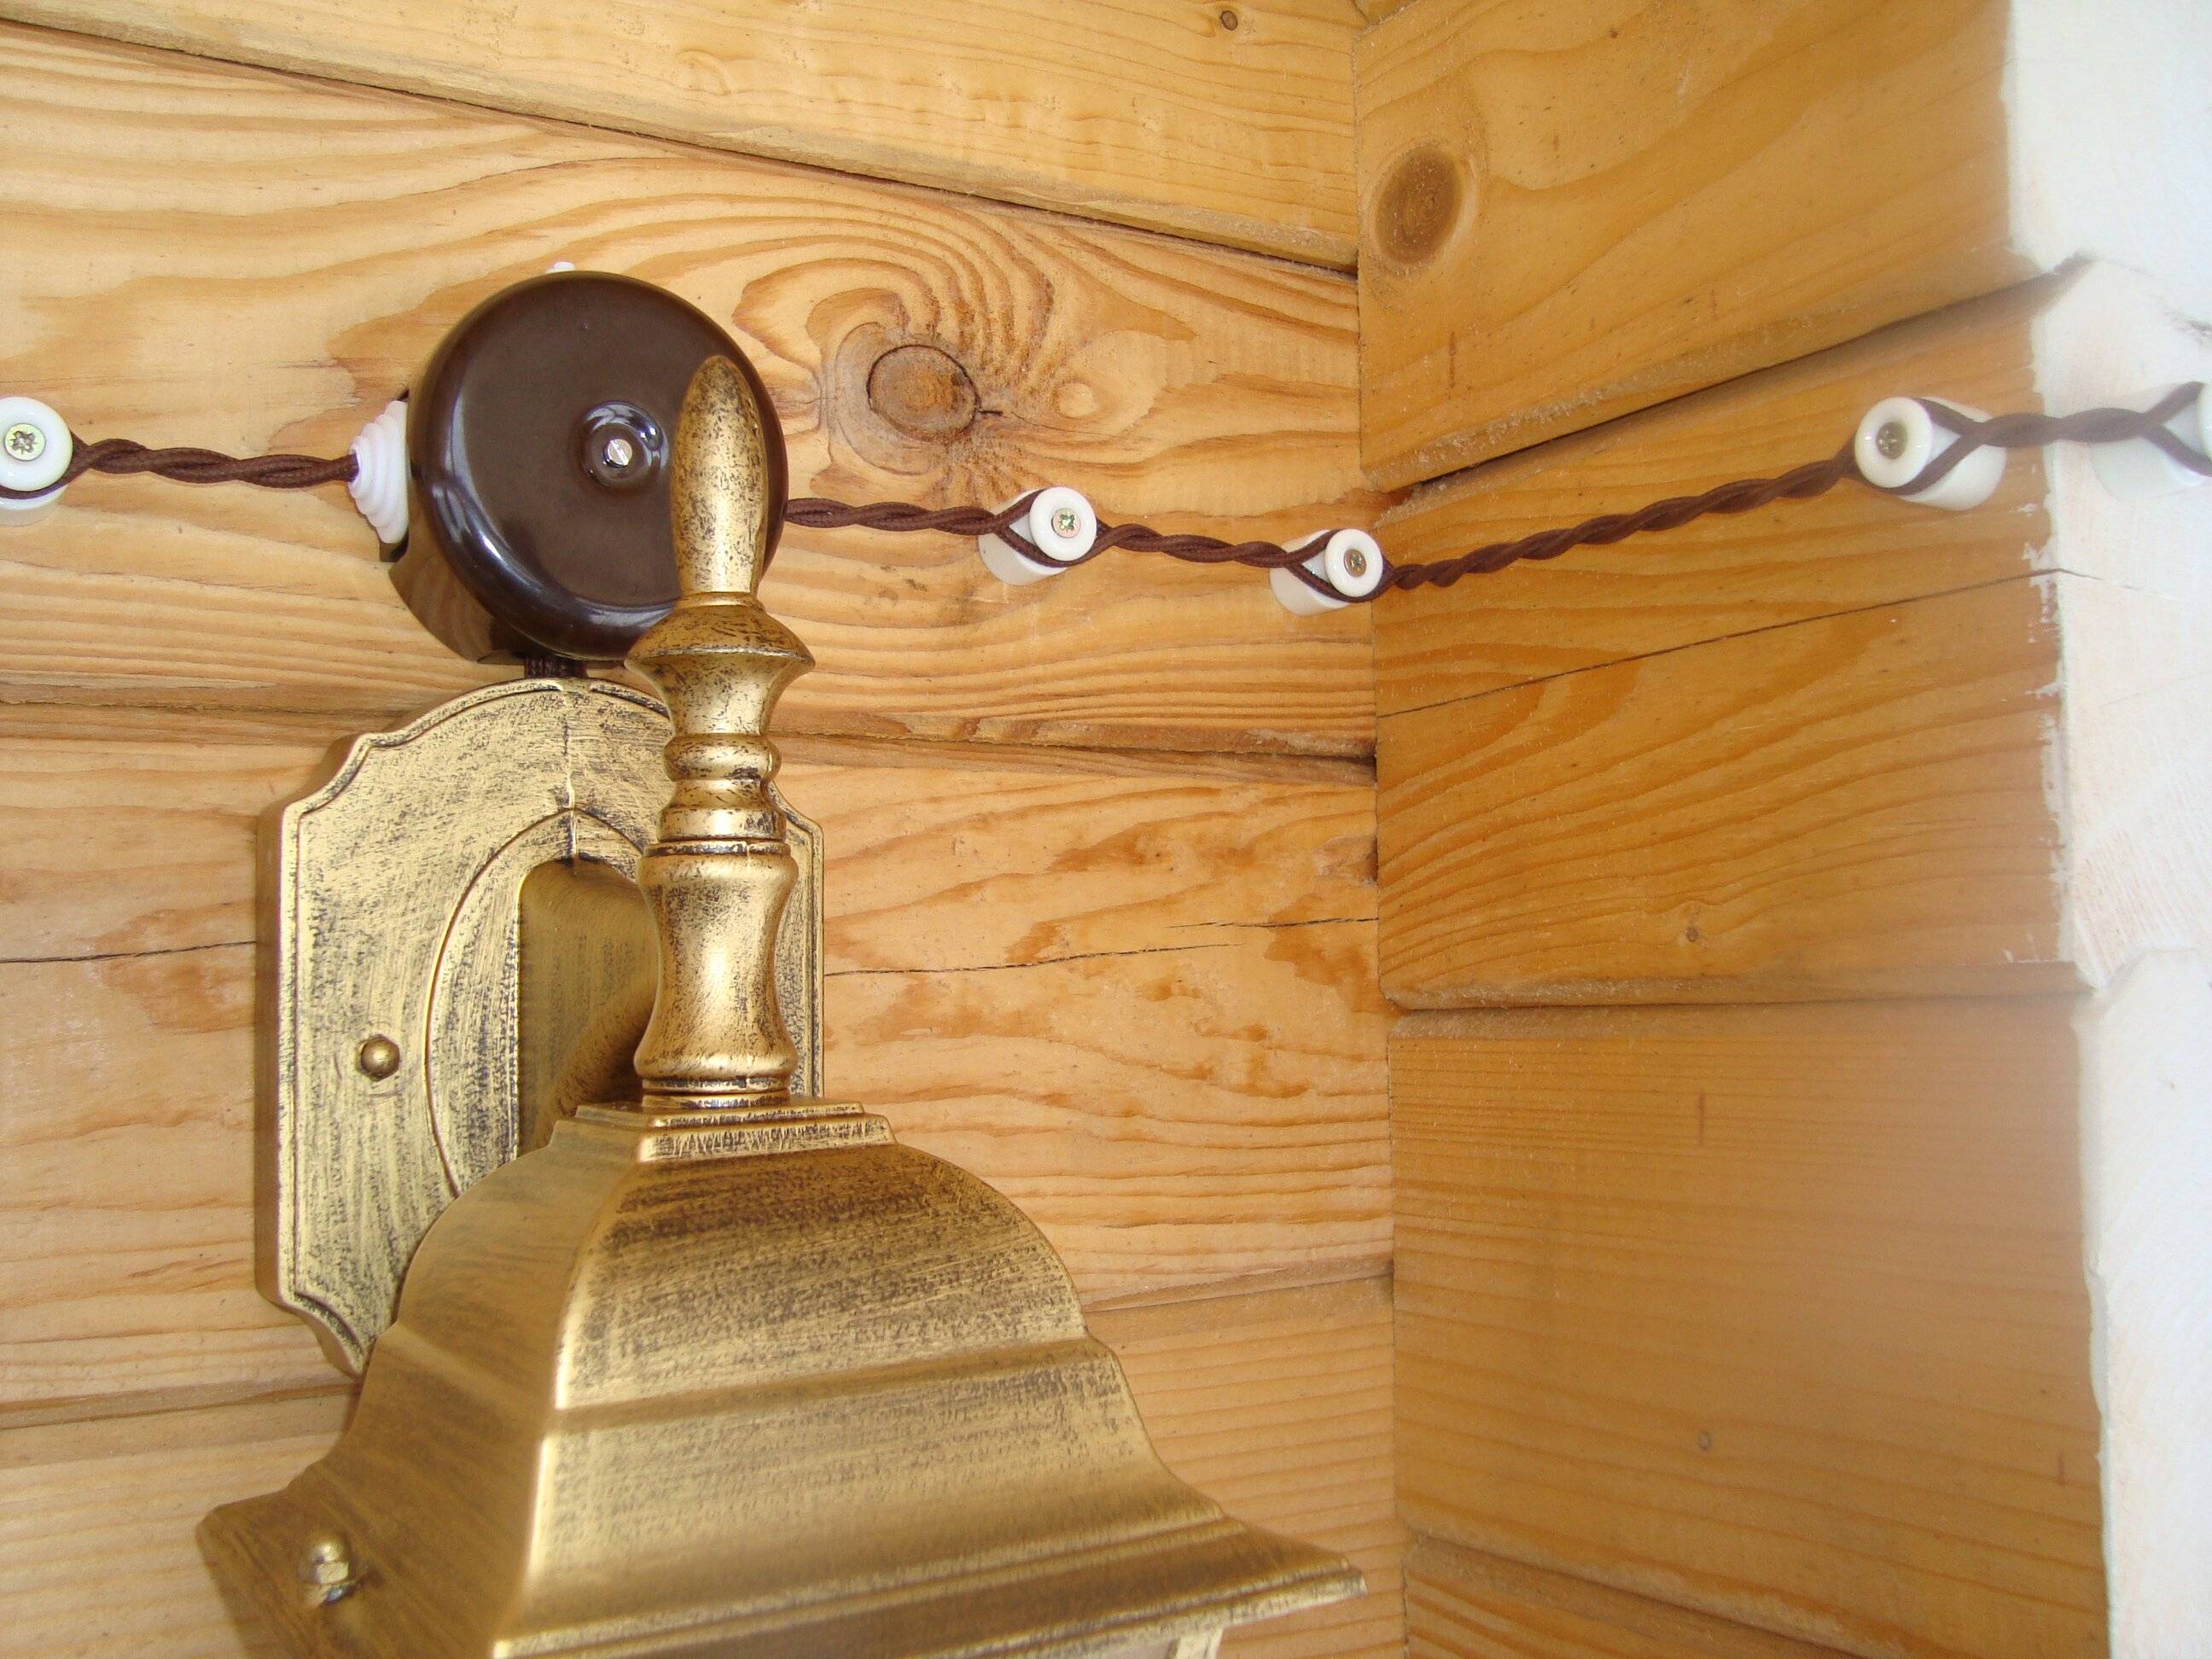
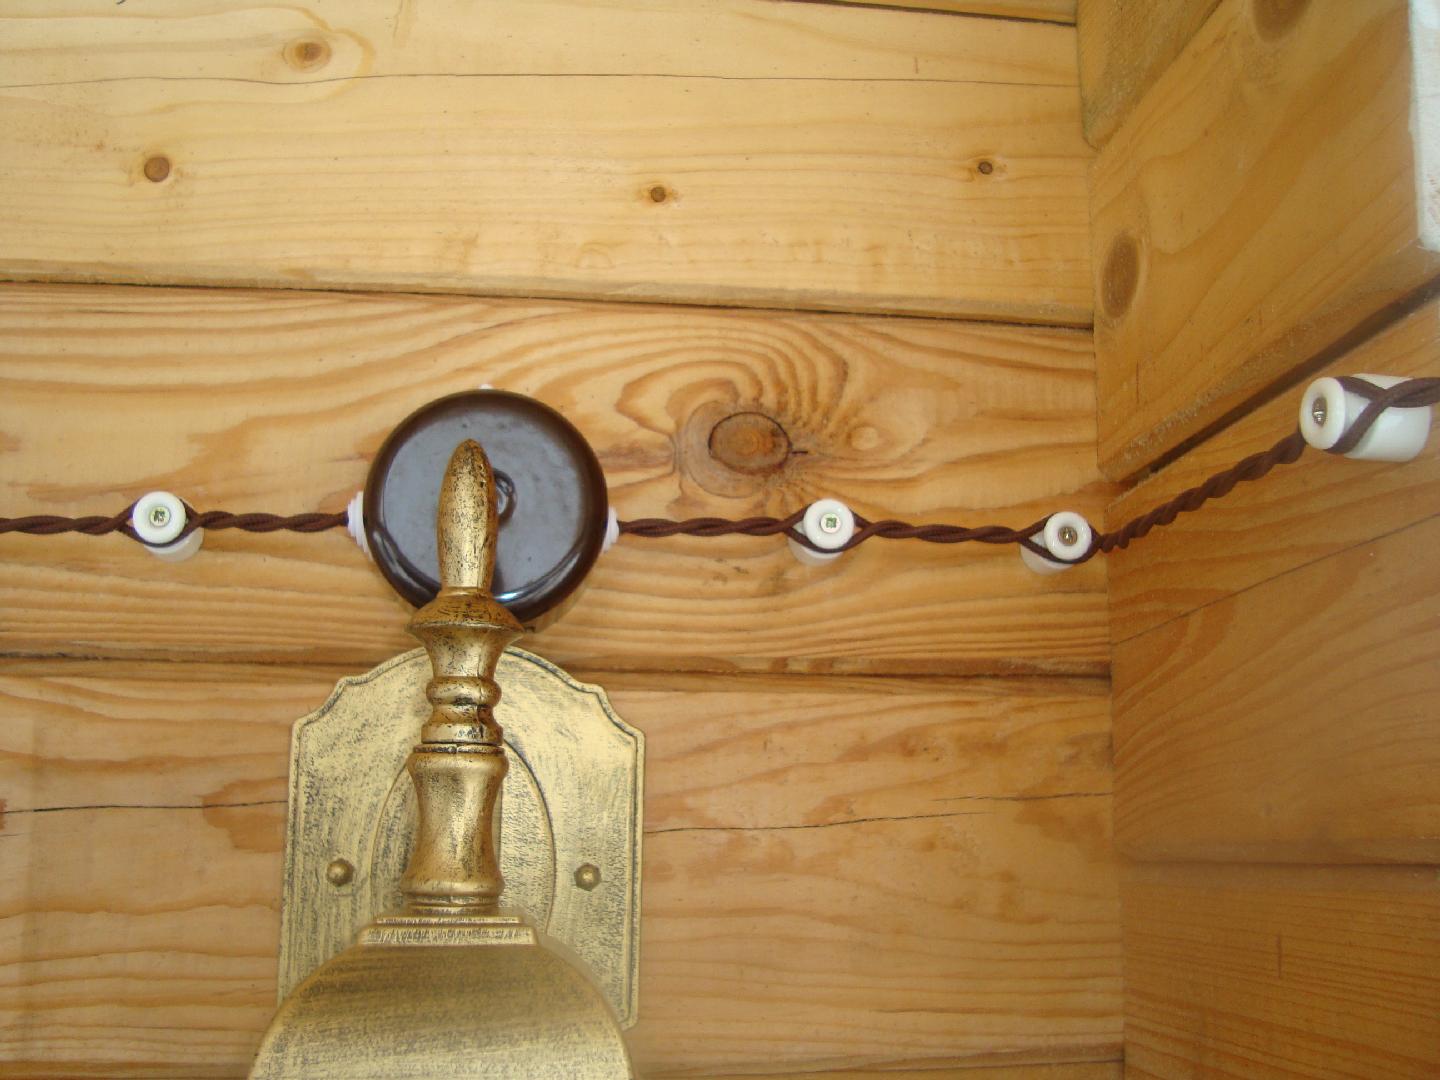
Lead wire to the switch
Features and differences in the installation of semi-antique electrical wiring in wooden houses.
Main differences:
Installation of semi-antique electrical wiring in a wooden house, in contrast to hidden wiring in a foam block house: at what stage it is mounted. If in the standard version the installation is carried out before finishing, then in our case it is necessary to do it at the very end. Retro wiring itself is an element of fine finishing and therefore should be done, almost the last.


Also an important point that I have already mentioned is that with such method of open wiring is better don't rush at all. If, after the initial shrinkage of the log house, you insulated it with caulking, then you should postpone the electrical installation until next year until the log house shrinks again.
After installing semi-antique electrical wiring in a wooden log house, you should also not carry out caulking. The log house rises strongly during such work, which will lead to the wire being pulled out or even pulled out of the mechanisms and junction boxes.
Installation features:
Another feature is that during the installation process, it is necessary to start mounting the wire after it is connected in the mechanism (socket or switch), and only then the wire can be mounted on insulators. During the initial laying of the wire and its further connection to the mechanisms, it will be more difficult to calculate its required length and lay it with good tension.
When laying a twisted retro wire, it is necessary to tighten it with nylon ties on the extreme insulators. Thus, it will be fixed and this will allow you to create a good stretch without sagging.
 Fixing the wire on the extreme insulators
In order to make the tension of the wire easier and stronger, you need to put it on the extreme insulator, and then put it on, passing through two or three insulators, making small sags. When the entire line of wire is laid in this way, we begin to put it on insulators that remain in the center. In this case, it will pull up well and will not sag anywhere.
Since the retro wire is stranded, it is advisable to crimp the ends into NShVI lugs. If this is not done, then perhaps over time the contact will weaken and burn out.
 Crimping a stranded conductor with a NShVI tip
For switching in junction boxes, it is best to use clamping WAGO compact terminals 221 series or use copper sleeves with insulation.
Safety
According to the instructions, a step-by-step wiring plan should take into account the safety of its operation and maintainability.
When choosing the type of wires and the conditions for their installation, you need to take care of the following:
- decorative conductors must be double insulated, reliably protecting people from electric shock;
- when conducting them through walls and ceilings, it is imperative to use pieces of corrugated or metal pipes;
- the height must be sufficient so that children do not reach the wires;
- at this level, the location of equipment and objects that pose a danger to electrical wiring is undesirable;
- near it, it is unacceptable to carry out any work that is dangerous in terms of damage to the wires.
The provisions of the PUE also stipulate the operating conditions of electrical wiring inside a wooden house, which mainly concerns elevated temperatures and humidity. When laying wires in the bathroom, it is advisable to place the wires in a cable duct or corrugated pipe (this should be done even to the detriment of decorativeness).
Read also: Choosing a cable channel according to the cable section
The arrangement and operation of decorative wiring in a private house is possible only if safety requirements (TB) are observed. Only when this condition is met, it is possible to realize all its advantages and advantages.
Open retro wiring was forgotten for almost a hundred years. In the 20s of the last century, it was extremely popular, but new materials appeared, and they began to forget about the open method. In recent years, the fashion for retro wiring has returned. It looks especially stylish in a wooden house: the laying of wires in cable channels is too noticeable, even if they imitate wood. Braided cables on the walls of the house, mounted in an open way, make the rooms wooden houses much more comfortable and unique.
Wiring Retro Wiring
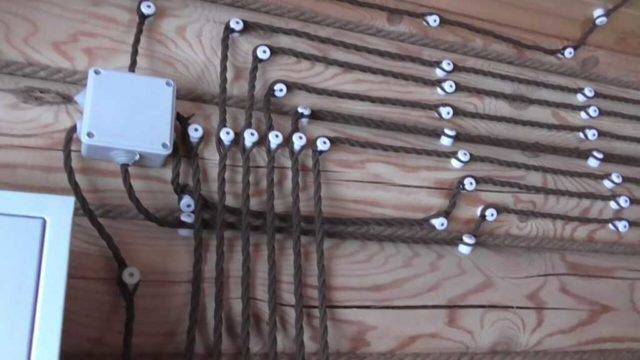
Installation begins with the installation of sockets and switches, cables are connected to them, which cling to the junction box at the other end.After it, the installation sites of insulators are marked along the cable laying route. The first insulator is placed no further than 5 cm from the junction box. Further, the distance between insulators on adjacent lines should be the same and not more than 40 cm.
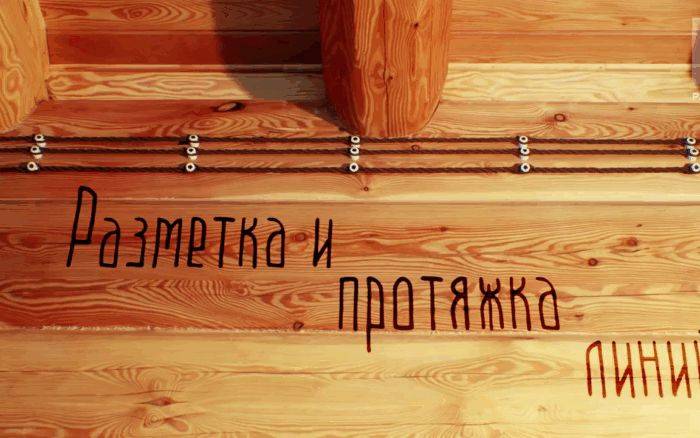 When laying the cable, it is necessary to monitor the implementation of right angles and the parallelism of adjacent lines
Through the walls, the cable is passed through metal tubes with a diameter of 20 mm and a length equal to the wall thickness. In junction boxes, the wires are interconnected either by welding, or by crimping, or by terminal blocks. Welding is the most reliable method, but it can only be performed by a certified welder. Crimping requires skillful hands and special pliers. It is easiest to assemble the installation on the terminal blocks, but the reliability is much lower.
The switchboard is assembled according to the functional principle. For a group of lighting fixtures, ten-ampere circuit breakers are installed; for a socket group, sixteen-ampere differential circuit breakers are used.
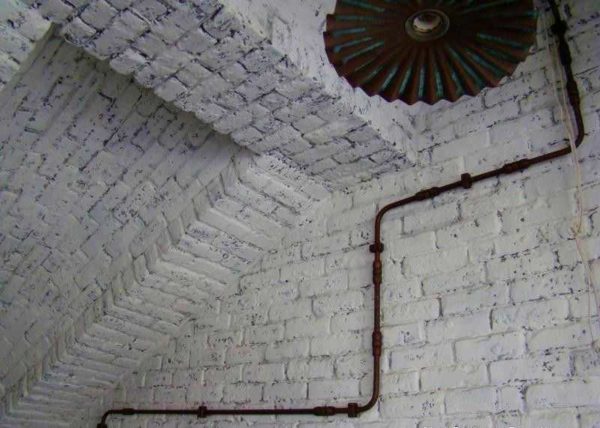
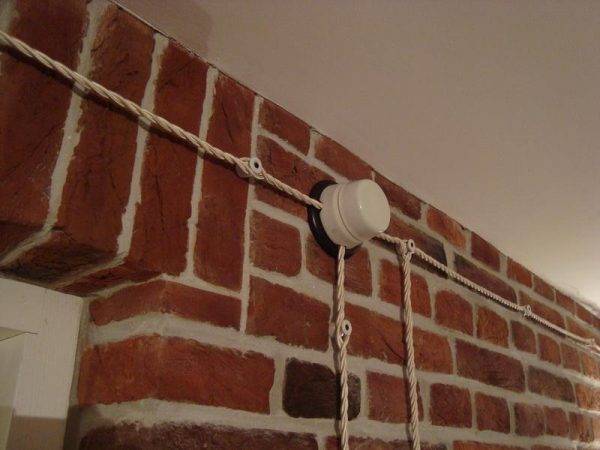
Retro wiring on stone walls
The most significant difference from working in a wooden house is that all installations must be carried out on a hard surface. It is easy to hammer a nail into a tree and screw a screw. In the case of a stone (concrete or brick) wall, a more time-consuming technology has to be applied.
 All screws are screwed into wooden or plastic dowels
And for each dowel, you need to drill a nest in the wall, with a diameter slightly smaller than the diameter of the dowel. The nests are drilled with an electric drill with a concrete drill bit. It is better if this drill is equipped with an impact mechanism.Then a dowel is driven into this hole, and a self-tapping screw is screwed into it. This operation must be done to install each insulator, and two screws are required for the fittings.
How to install retro wiring in a house with stone walls, see this video.
 Watch this video on YouTube
Retro-style wiring - components with a photo in the interior
Retro wiring, especially in a wooden house, requires a more careful approach to fire and electrical safety
When buying cables and accessories, it is necessary to pay attention not only to the design and external data, but also to the quality, manufacturability and reliability of execution. It is best to purchase brand name products.
The leading products of Italian companies:
- Bironi;
retro wiring Bironi - Fontini;
retro wiring Fontini - Villaris;
retro wiring Villaris - Aldo Bernardi;
retro wiring Aldo Bernardi - Gl Gambarelli.
retro wiring Gl Gambarelli
retro wiring Salvador
It is advisable to purchase the necessary materials from one manufacturer. For example, Lindas offers ready-made matched kits:
Lindas
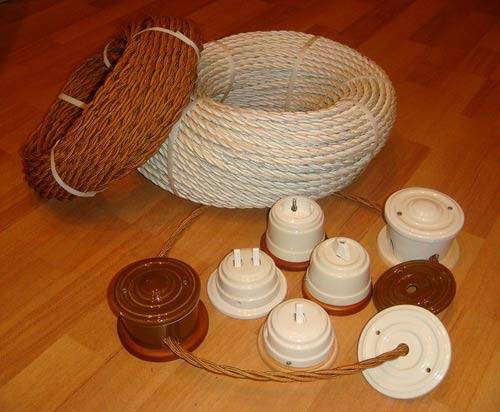
Twisted retro wire
The cable for retro wiring is available in the form of stranded copper wires with a cross section of 1.5 and 2.5 mm². Other types of sections are very rare. The wires are polymer insulated from the following materials:


- PVC - elastic, but with low strength, is used only stationary;
- elastomer - during operation it can stretch, therefore it requires more frequent fastenings;
- polyurethane - durable, has mediocre elasticity, requires bending along a large radius.
External decorative insulation (braid) is made of technical cotton or silk.Brand manufacturers impregnate the braid with flame retardant compounds or fill it with varnish. A wide range of colors and patterns on the surface of the wiring is very diverse, which allows you to choose the right option for any design solution.
An example of Bironi retro wiring cable products
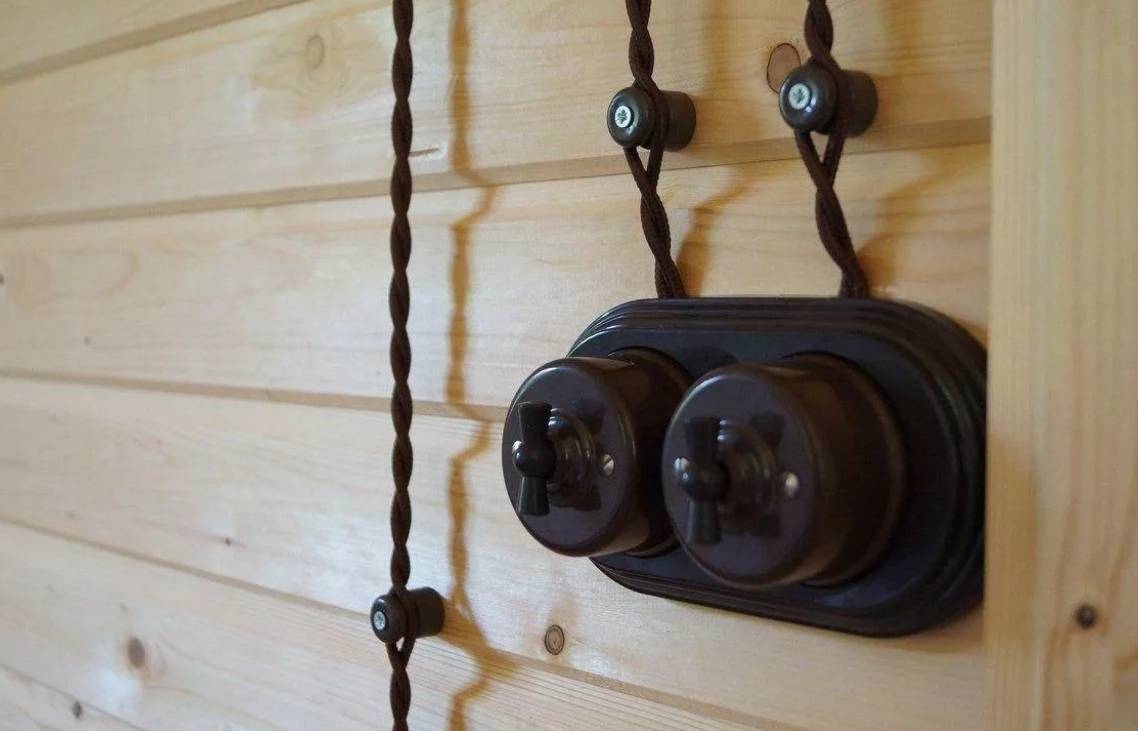
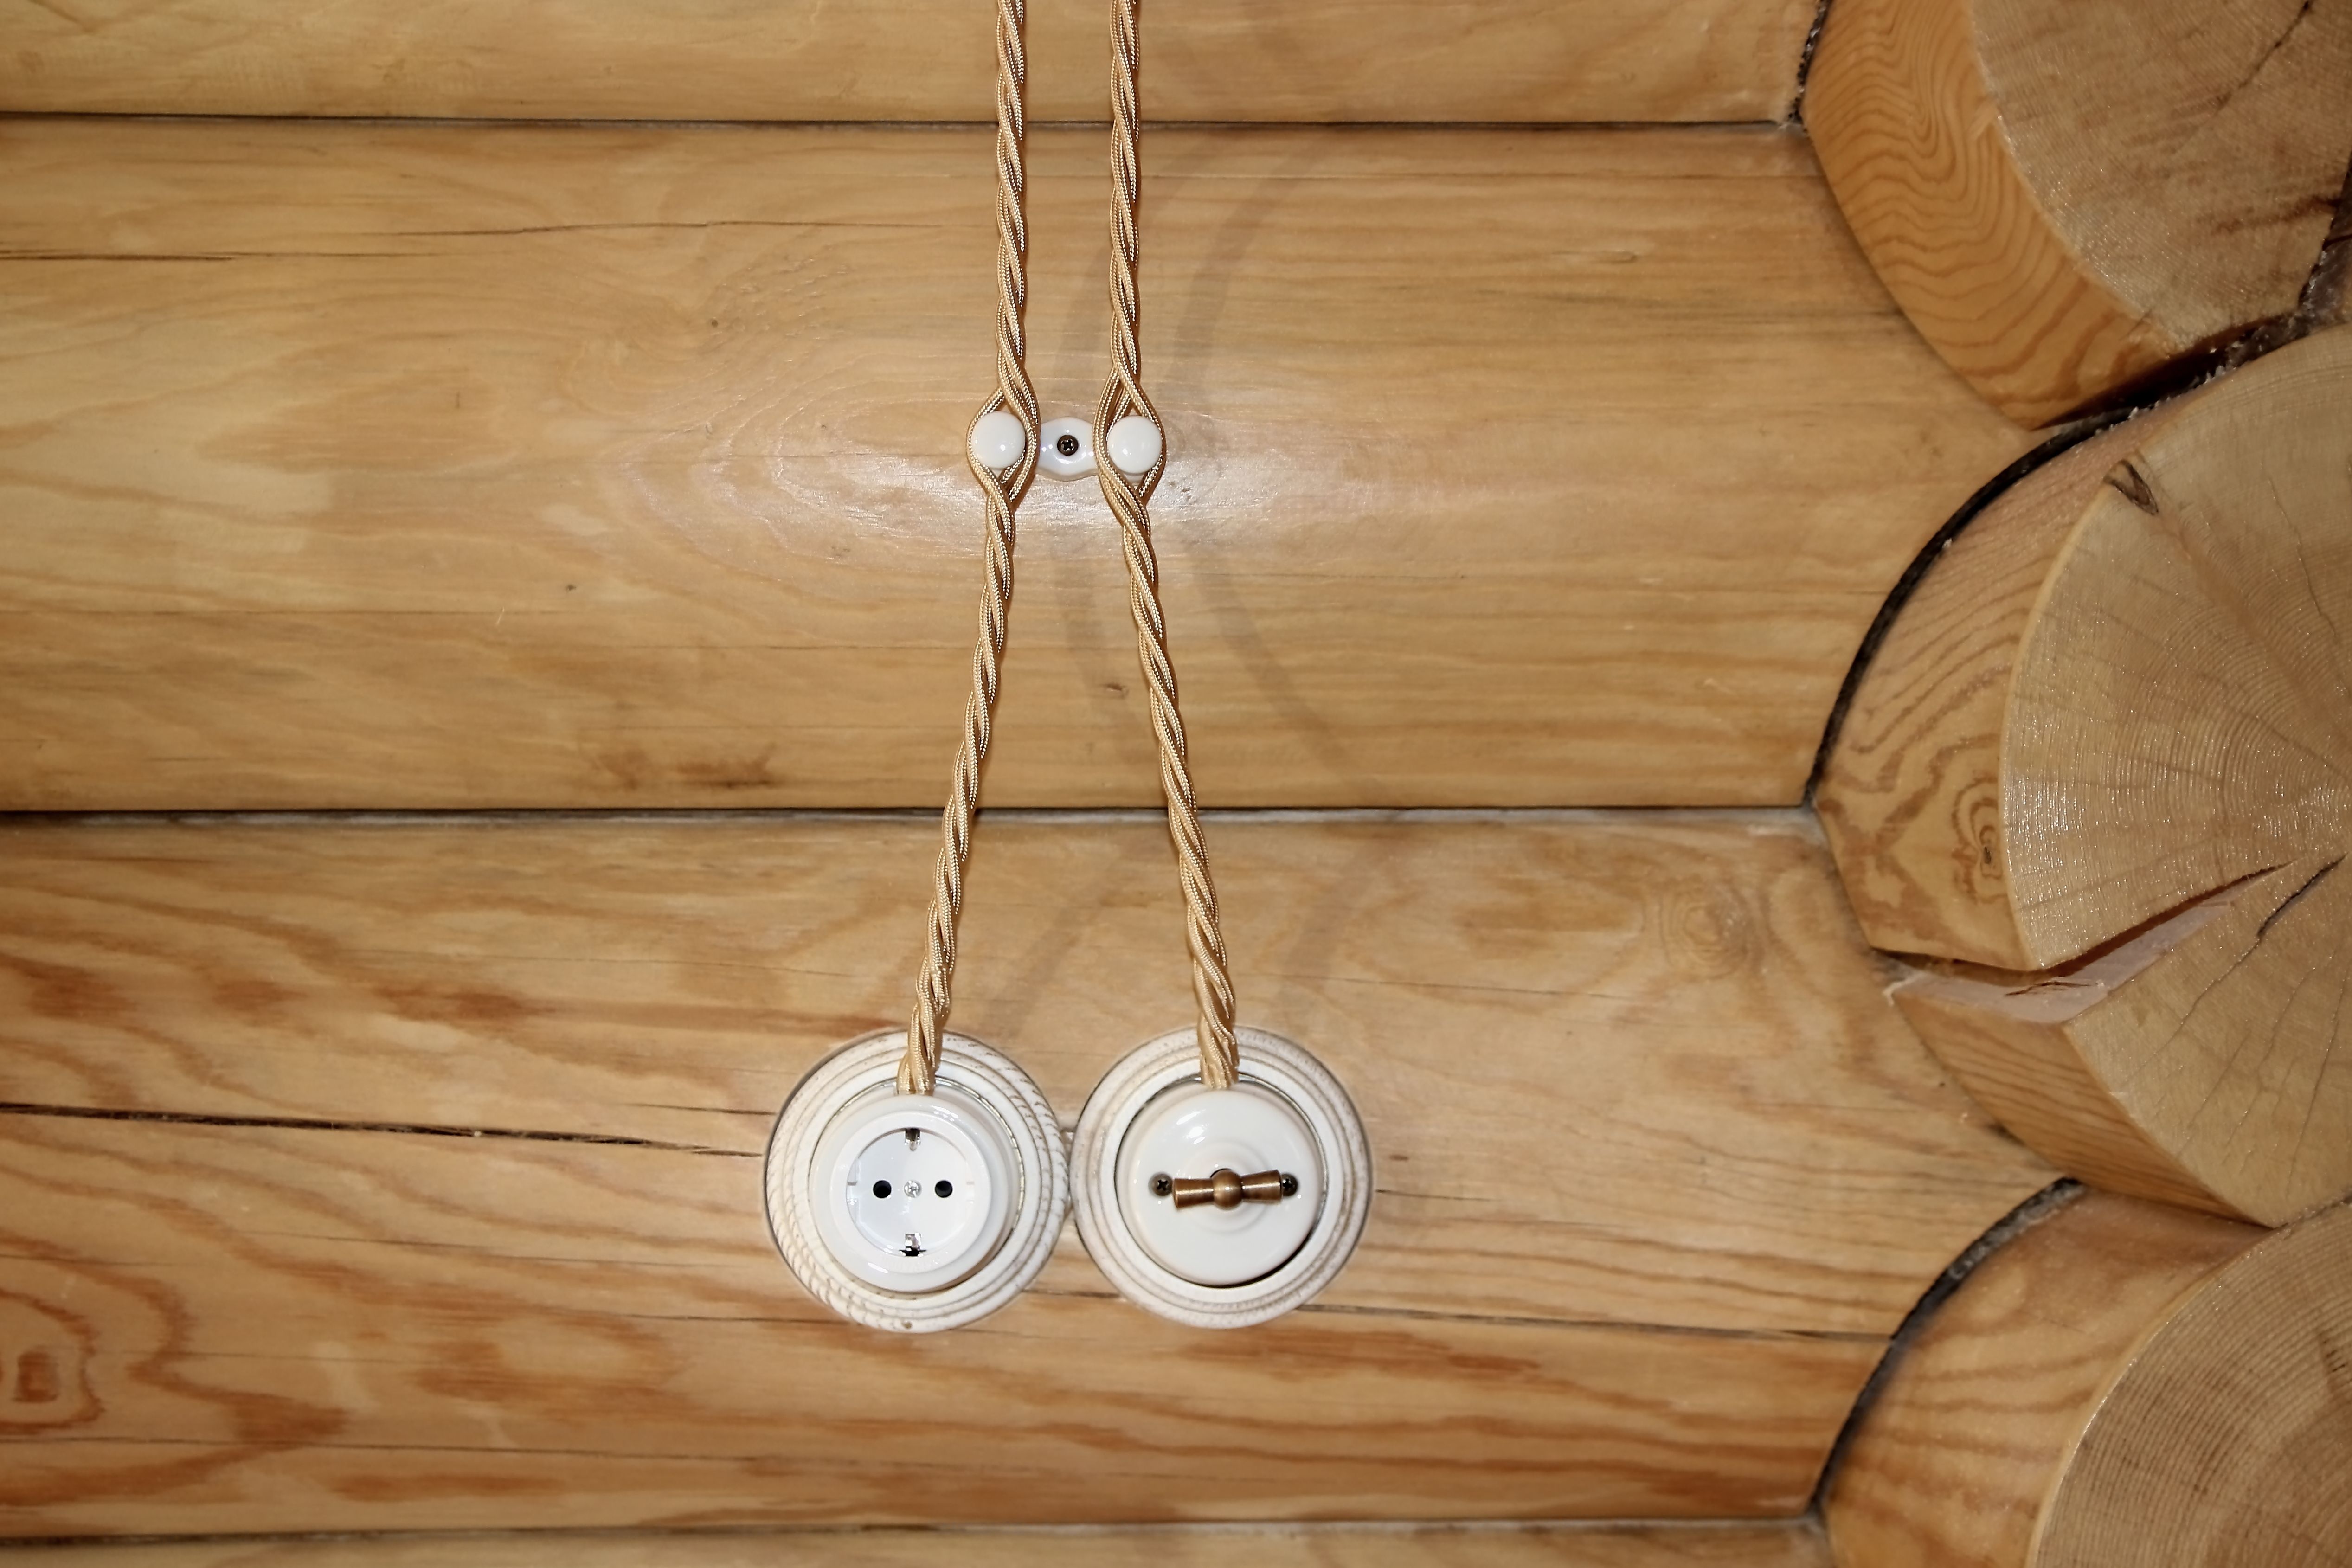
Retro sockets and switches for exposed wiring
Sockets - overhead, often have special installation frames (for 1-3 places) made of wood, plastic "under the metal" or ceramics. For devices that are frequently used, it is best to use ceramic, as they prevent heat.
Switches have several options for mechanisms:
- tumbler - more reliable and familiar to use;
- rotary - it can be one, two and three-pin, due to which it can switch several circuits.

As a rule, sockets, switches and junction boxes are selected from the same collection
Related article:
Terminal blocks and distribution (soldering) boxes
Junction boxes are used to switch wires and significantly reduce their number. Otherwise, you would have to run a wire from the terminal block to each electrical appliance or outlet. The overall dimensions of the junction boxes vary:
- diameter 70-90 mm;
- height 35-55 mm.
Junction box from a technical device can turn into a decorative element
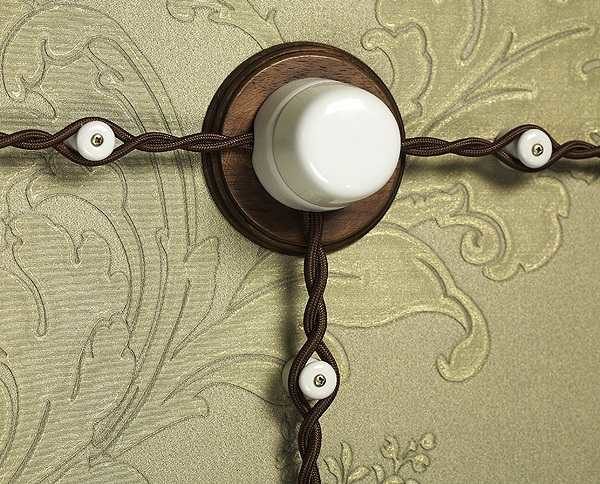
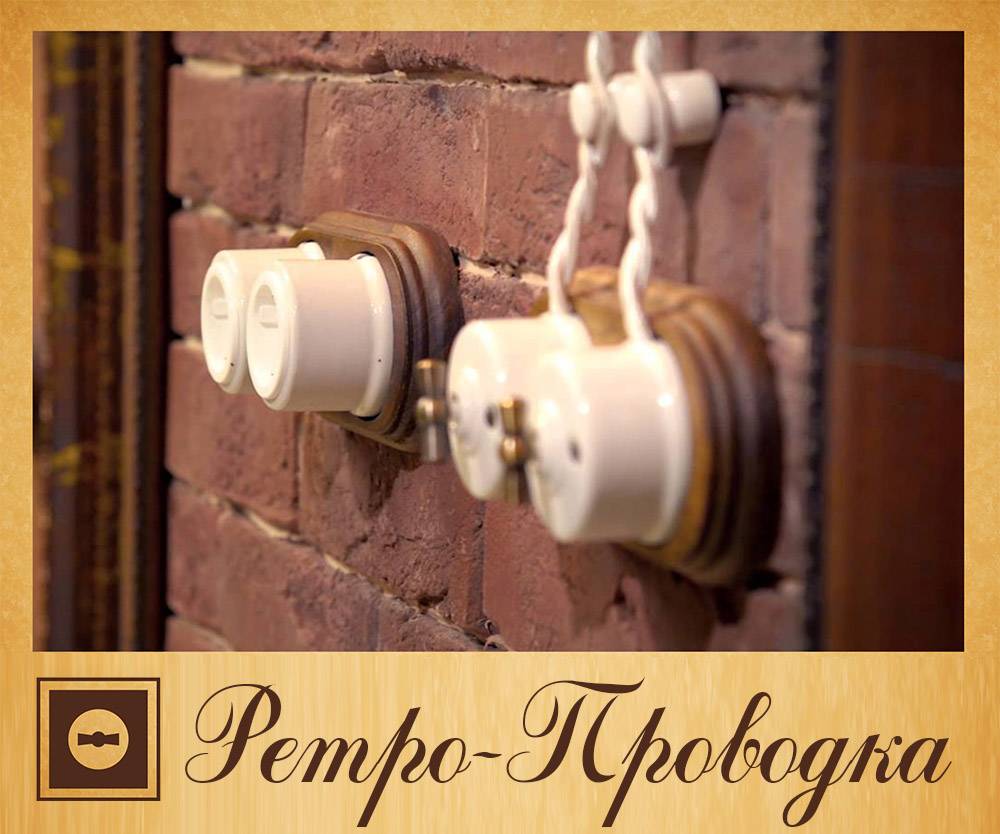
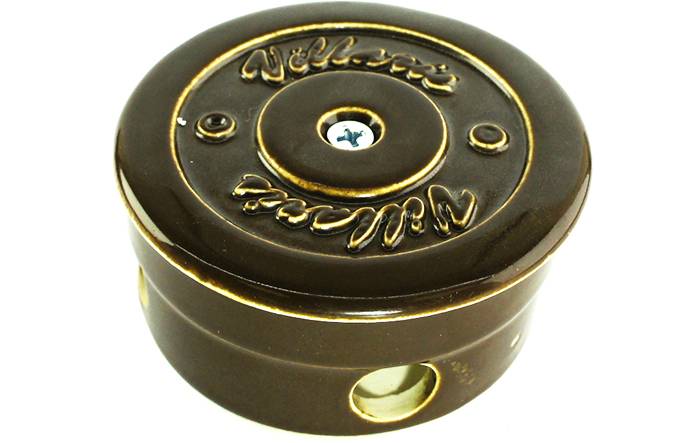
Cartridges, passages and rollers (insulators) for retro wiring
External retro wiring in a wooden house is fixed on the walls by means of special insulators. They look like small embossed cylinders with a base diameter of 18-22 mm and a height of 18-24 mm. The upper part - the “hat” can be narrow for mounting a two-core cable and wide for a three-core cable.Production material - plastic or porcelain. fastening to wall through a hole in the center with ordinary or decorative screws.
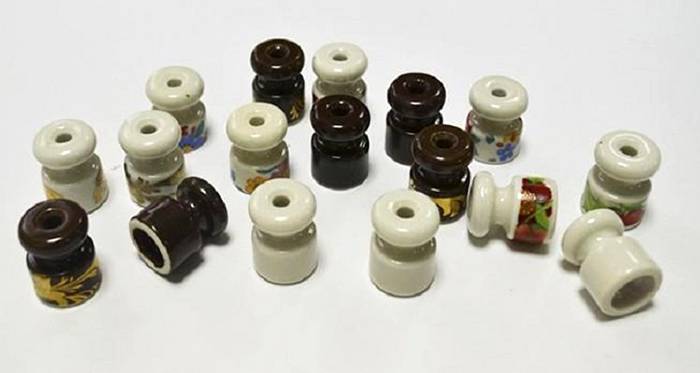
The rollers are produced in various colors, often complete with other elements of electrical accessories.
Passages refer to decorative and protective electrical elements. They are a decorative sleeve with a collar covering the hole through which the cable is led out of the wall. Production material - porcelain.
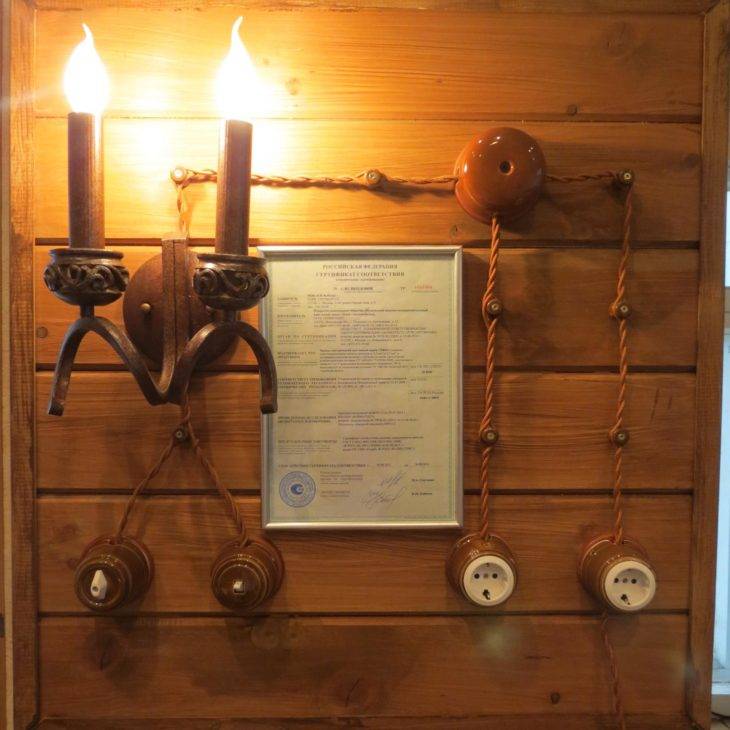
Vintage cartridges are made from brass, aluminum alloys, copper, carbolite or polymeric materials painted "under the metal". As a rule, their design provides for a switch, as well as technological holes, threads and washers for attaching lampshades, etc.
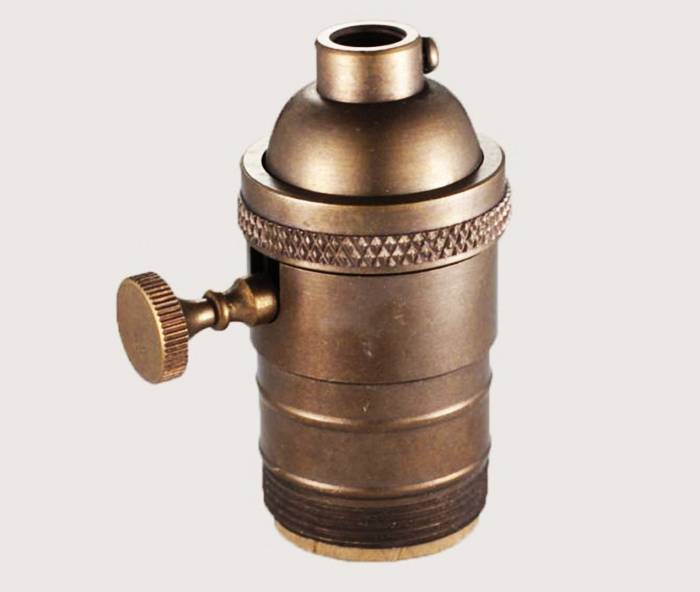
Vintage brass chuck with swivel
Lighting fixtures in vintage style
Professional designers, when developing a retro interior, usually create author's lighting fixtures. You can try to create them yourself by combining vintage cartridges and unusual decorative light bulbs with a base. An electric cable fixed on several rollers is used as suspensions. It is much easier, but more expensive, to purchase ready-made retro lighting fixtures, both ceiling lamps and chandeliers, and wall sconces.
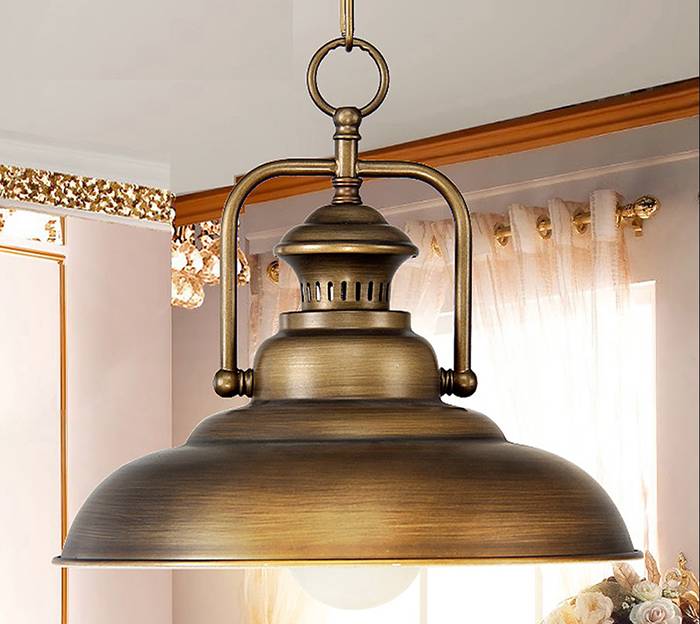
Homemade and factory-made lamps and chandeliers made in vintage style
Savings on mixed type installation
When laying industrial wiring lines, it is possible to use a series connection scheme for loads (sockets and illuminators) or their parallel connection. But for domestic conditions more convenient and economical would be a mixed circuit, in which some of the lines are included in parallel groups, and then all of them are connected in a serial chain.
Using a combined or mixed method of connecting individual lines saves on the total length of wires and provides convenience for connecting sockets and switches. In addition, the wiring itself takes on a neat and austere look.


