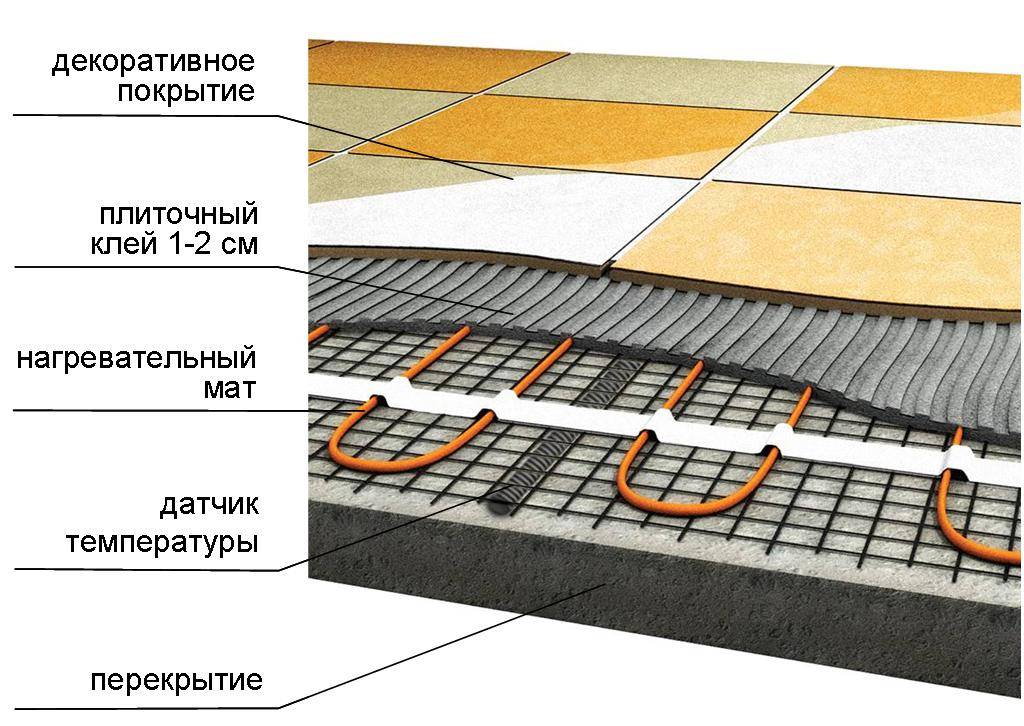
- Concrete installation system for underfloor heating
- Choosing the optimal step
- Video - Warm floor "Valtek". Mounting instruction
- The device of the base under a heat-insulated floor.
- Warming and waterproofing.
- Mounting
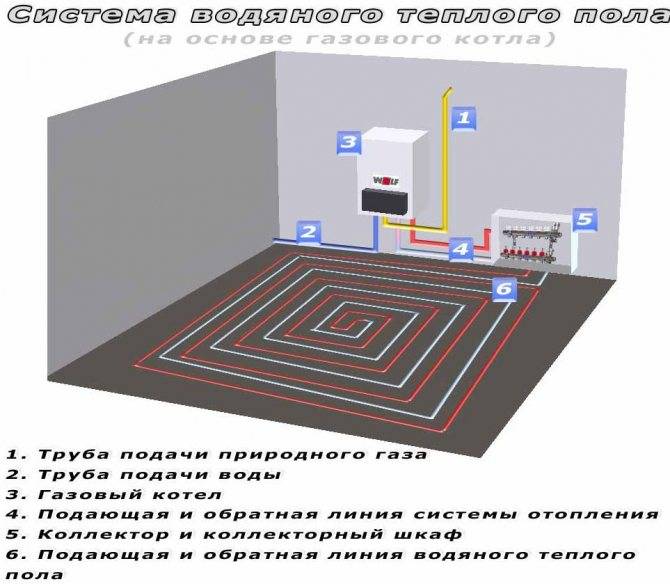
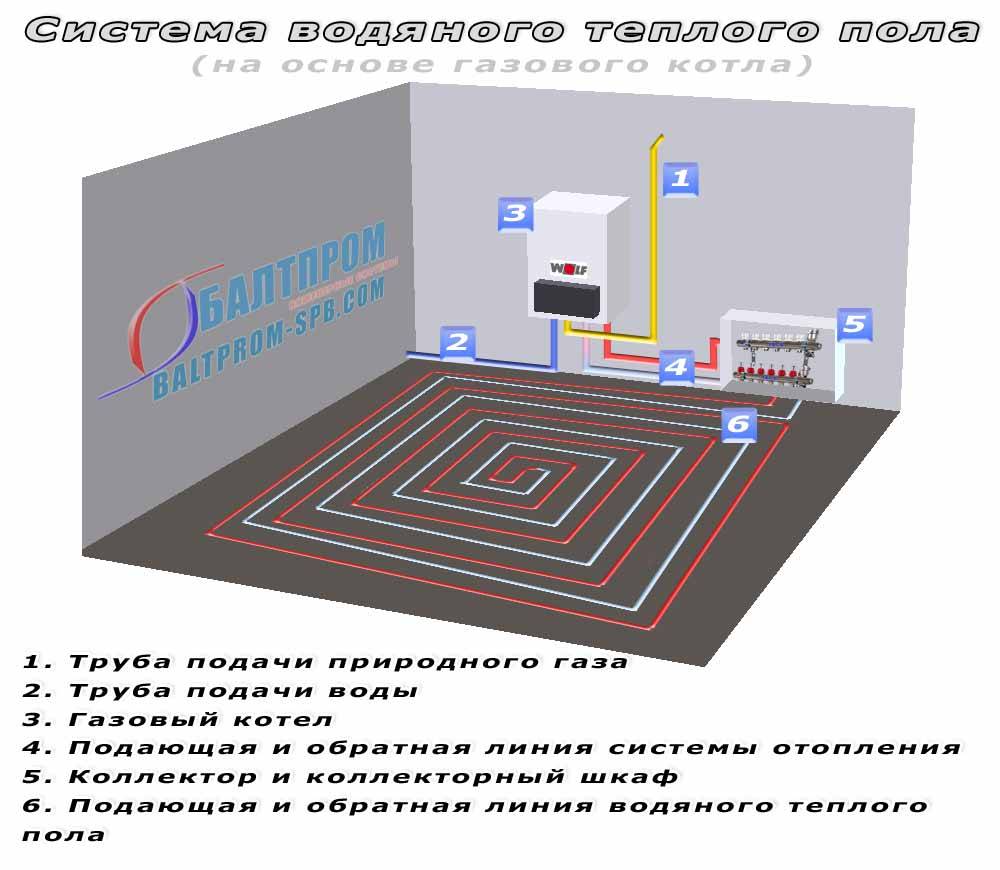
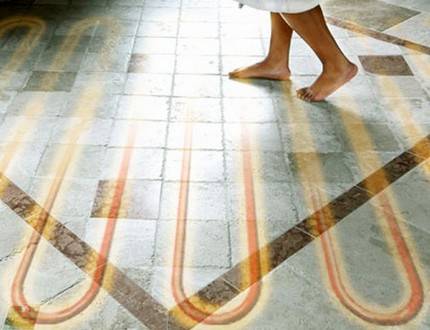
- Laying a water heated floor
- Installation of a water heated floor with his own hands
- Advantages and disadvantages of water floors
- Types of warm floors
- The main advantages of underfloor heating:
- Warm floors are divided into 2 types:
- Step 4. Laying the pipes of the heating system
- Option # 1 - water floor heating
- Features of the technology of arrangement
- Advantages and disadvantages of this system
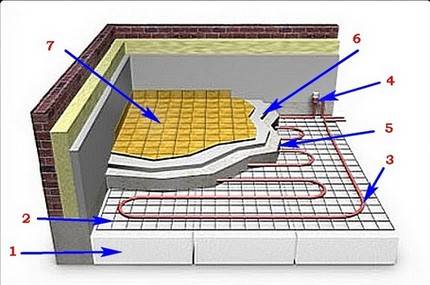
Concrete installation system for underfloor heating
There are some features of the installation of warm water floors that need to be studied before proceeding with the process itself.
It is worth remembering:
- Re-equipment of the heating of your home must begin with the preparation of the floor. The old flooring is removed and if there is an earthen floor underneath, then a concrete screed must be poured. If there is an old screed, then it is advisable to check the level differences - a difference of up to five millimeters is allowed, otherwise air pockets may form. If an excess of the permissible error is detected, the surface must be leveled.
- This is followed by floor insulation using dense polystyrene foam or foam plastic with a thickness of at least thirty millimeters - the colder the insulated floor, the thicker the thermal insulation layer is required. A damper tape is laid along the perimeter of the wall, which compensates for thermal deformations of the screed and prevents cracking and destruction of concrete. On the insulation, for the purpose of waterproofing, it is imperative to lay a plastic film.
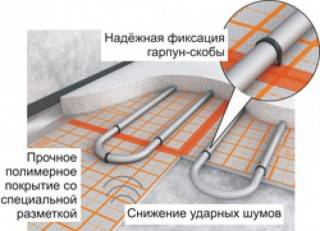
- For laying and fastening pipes, there are special mats with clamps that allow you to position the pipeline neatly, with a given step and without the use of additional fasteners.

But this option requires significant investment, so it is much more economical to use a reinforcing mesh, which in addition will strengthen the structure. The pipe is laid on the grid in the chosen way and attached with plastic disposable clamps. A corrugated tube is used to protect the expansion joints.
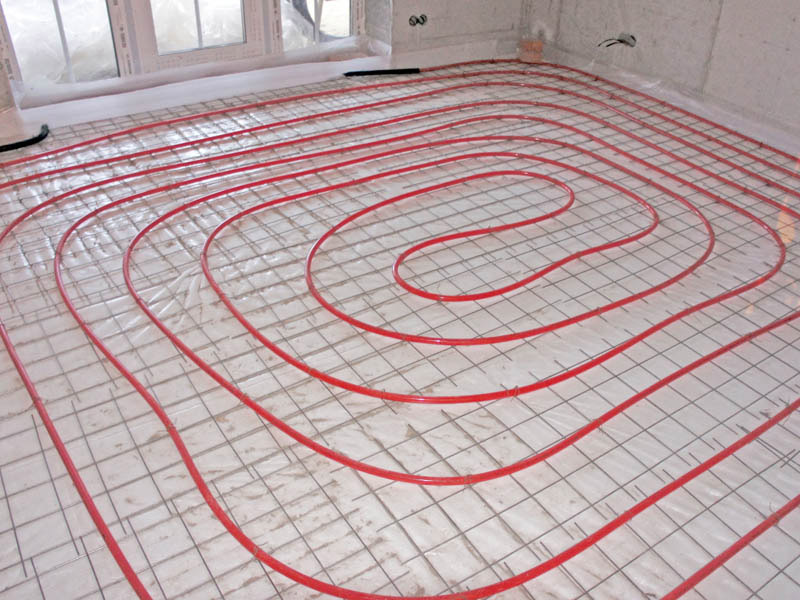
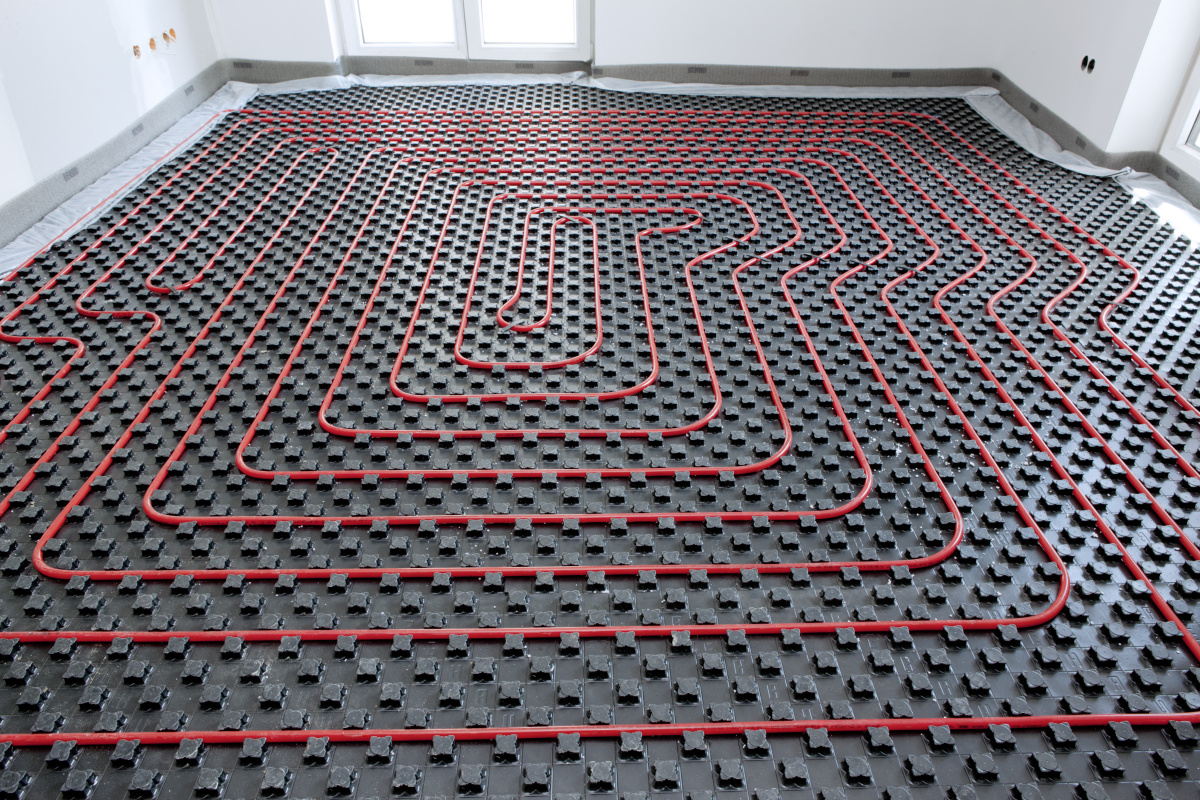
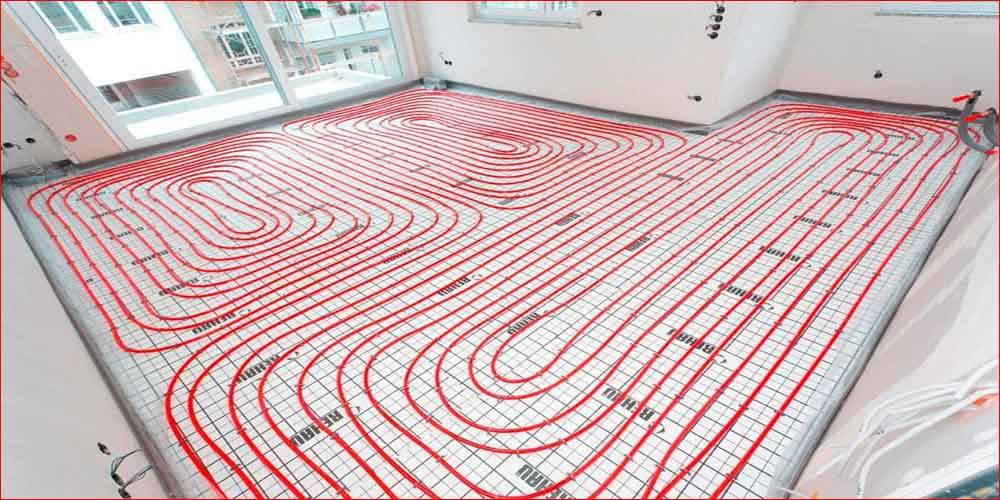
- In each circuit, a single piece of pipe is used, since the joining of sections inside the circuit is strictly prohibited. You can arrange the coolant with a snake or a double snake, a regular spiral or a spiral with a center shift, the choice directly depends on the temperature characteristics that need to be achieved. The distance between adjacent tubes is from seventy to three hundred millimeters. Closer to the outer walls, it is recommended to reduce the step, because the temperature is much lower along the outer walls. It should be remembered that the radius of the loop is not allowed to be less than five pipe diameters, otherwise the pipe wall may crack at the bend.

- An area of one square meter requires about five meters of pipe with an average laying step of twenty centimeters.After the heating system is finally installed, it is subject to mandatory pressure testing under operating pressure during the day to identify possible damage and leaks.
Please note: pipes can be laid with a “snail” or “snake”, or you can choose a combined option for enhanced heating. The “snake” scheme allows you to vary the heating temperature of individual zones in the room, the “snail” ensures uniform heating of the surface over the entire laying area
- Only after making sure of the integrity and serviceability of the pipeline, you can start pouring the screed with sand concrete. The thickness of the screed varies from three to five centimeters, depending on which flooring is planned to be used for finishing. For ceramic tiles, a five-centimeter screed is quite appropriate; for laminate or linoleum, it is advisable to reduce the thickness to a minimum, reinforcing the structure with a reinforcing mesh over the pipes and not using a heat-insulating substrate. During pouring, the pressure in the water supply system is not relieved so that when the concrete hardens, the pipe is in a state of maximum expansion . It is allowed to perform finishing work no earlier than twenty-eight days later - after such a time the screed will reach maximum strength.
Choosing the optimal step
After selecting the material and method of placing pipes, you need to determine the distance between adjacent turns of the circuit. It does not depend on the type of placement of coolants, but is directly proportional to the diameter of the pipes. For large sections, too small a pitch is unacceptable, just like for pipes with a small diameter, a large one. The consequences may be overheating or thermal voids, which will no longer characterize the warm floor as a single heating system.
Video - Warm floor "Valtek". Mounting instruction
A correctly selected step affects the thermal load of the circuit, the uniformity of heating of the entire floor surface and the correct operation of the entire system.
- Depending on the diameter of the pipe, the pitch can be from 50 mm to 450 mm. But the preferred values \u200b\u200bare 150, 200, 250 and 300 mm.
- The spacing of heat carriers depends on the type and purpose of the room, as well as on the numerical indicator of the calculated heat load. The optimal step for a heating load of 48-50 W/m² is 300 mm.
- With a system load of 80 W / m² and more, the step value is 150 mm. This indicator is optimal for bathrooms and toilets, where the temperature regime of the floor, according to stringent requirements, must be constant.
- When installing a warm floor in rooms with a large area and high ceilings, the heat carrier laying step is taken equal to 200 or 250 mm.
Installation project warm water floor
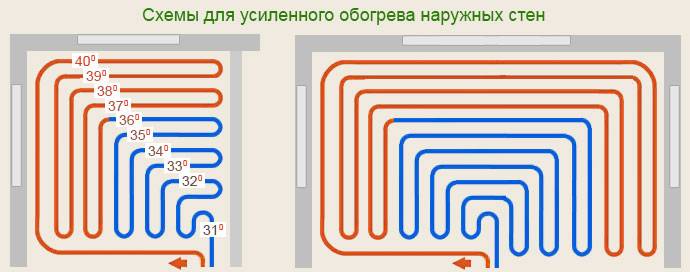
In addition to a constant pitch, builders often resort to the technique of varying the placement of pipes on the floor. It consists in more frequent placement of coolants in a certain area. Most often, this technique is used along the line of external walls, windows and entrance doors - in these areas the maximum heat loss is noted. The value of the accelerated step is determined as 60-65% of the normal value, the optimal indicator is 150 or 200 mm with an outer diameter of the pipe of 20-22 mm. The number of rows is already determined during laying, and the calculated safety factor is 1.5.
Schemes for enhanced heating of external walls
Variable and combined laying pitch is practiced in external and edge rooms due to the urgent need for additional heating and large heat losses, in all internal rooms the usual method of placing heat carriers is used.
The process of laying underfloor heating pipes is carried out in strict accordance with the project
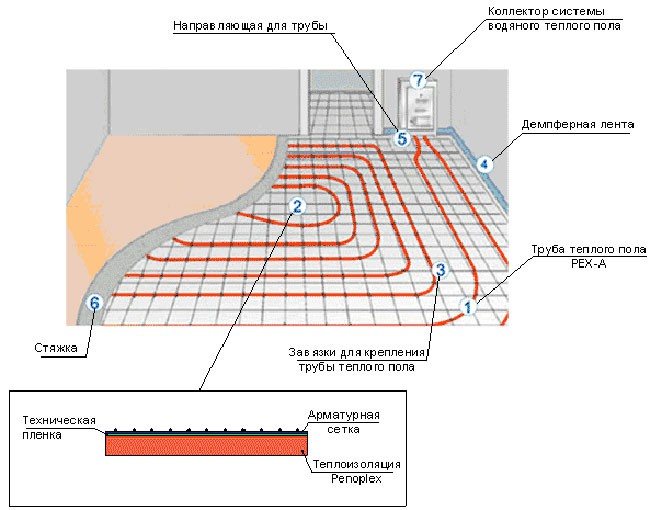
The device of the base under a heat-insulated floor.
Underfloor heating must be installed on a solid foundation. For example, on a concrete slab. Then the thickness of the “general” floor layer will not exceed 8 cm. When laying the floor directly on the ground, it is required to level it as much as possible and insulate it as best as possible. The thickness of the insulation will depend on the weather conditions of the area and the specific location. In the event that the warm floor is laid above the basement, or on floors above the first, the thickness of the insulation will be the smallest. About 3 cm.


Warming and waterproofing.
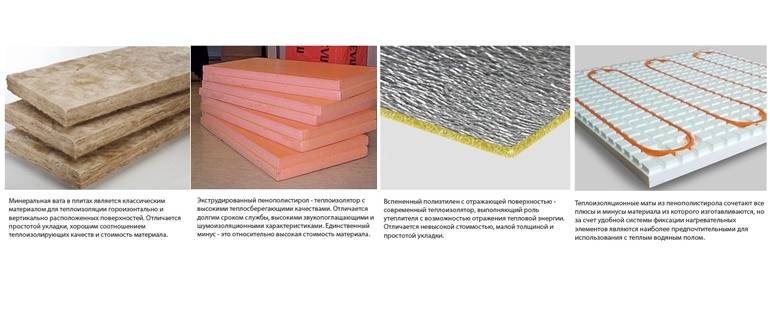
Instead of a dense plastic film, roofing material can be used. Pieces are cut from a roll of film or roofing material along the length of the room and laid with an overlap on each other (an overlap of about 20 cm.) Also, the waterproofing must be wrapped on the walls.
A heater is placed on top of the laid out waterproofing, which serves to retain heat in the room. Of the many options that modern manufacturers can offer, professionals advise choosing from two options:
- Extruded polystyrene foam. Has all the necessary benefits. It has low thermal conductivity, high moisture resistance. It is also very wear resistant.
- Expanded polystyrene in the form of profile mats.The main feature of this type of insulation is the surface with protrusions. This makes pipe laying easier. The pitch of the protrusions in this insulation is 5 cm. The main disadvantage is the increased cost compared to EPS.
When choosing the thickness of the insulation layer, several important conditions should be taken into account.
- When laying insulation directly on the ground, its thickness must be at least 10 cm. You can also consider the option of two-level installation. Two layers of insulation 5 cm thick.
- When laying out the insulation in the room under which the basement is located, a layer of 5 cm.
- When laying on all subsequent floors, its thickness is possible up to 3 cm.
To fix the insulation, you will need dowels-umbrellas, or dish-shaped dowels. For fixing pipes, harpoon brackets are needed.
The procedure for laying out the insulation:
- Level the surface where the insulation will lie. This is best done with sand or a rough screed.
- Laying pieces of waterproofing. The seams must be taped.
- Directly laying out insulation boards butt-to-butt. (marked side should be on top)
- The seams between the plates must also be glued with adhesive tape.
- Fasten the insulation with dowels.
If you are laying insulation in two layers, you should follow the principle of brickwork. The seams of the top and bottom layers should not match.
Mounting
Laying a water heated floor
The base must be located strictly horizontally. Height differences from 1 cm can lead to the formation of air pockets that reduce the efficiency of the system. If necessary, a concrete screed is poured. Layers of waterproofing, sound insulation, then thermal insulation are laid on the base.It can be a metallized lavsan film, cork or mineral wool mats, plates made of polypropylene or other polymers. The most effective, for example, are cork mats supplemented with a layer of ray-reflecting material, but such thermal insulation will also be the most expensive. Polyethylene film or bituminous mastic can also be used as waterproofing. The closer the room is to the ground, the more insulators are required. So that the floor expanding when heated does not put pressure on the walls, a gap is provided between them. To do this, before installation, the joints of the walls with the ceiling are covered with a special tape up to 5 mm thick with a waterproof film. The seams are sealed with mastic, the overlaps of the polyethylene film are carefully glued with adhesive tape.
Installation of a water heated floor with his own hands
After you have purchased the materials, you can proceed with the installation.
Due to the fact that the floors can be not only concrete, but also wooden, we will consider both options.
We divided the installation of water heated floors with our own hands into 6 stages:
2.1. Base cleaning
2.1.1. Concrete floor
Remove all debris and knock down individual concrete growths, if any. Don't worry if the subfloor is uneven, it won't affect the quality of the installation.
2.1.2. Wooden floor
Just clean the surface of large debris.
2.2. Base insulation
2.2.1. Concrete
If the rough screed is not insulated, insulation is required. Most often they are insulated with extruded polystyrene foam (Penoplex) or mats. Penoplex plates or mats are simply nailed to the base with mushroom dowels, as shown in the video:
Video of installing insulation to a concrete base
2.2.2. Wooden
The wooden base does not need insulation, but it will not be superfluous to cover it with polyethylene foam (Penofol) with a reflective surface.
2.3. Mounting the damper tape
The tape is attached to the walls, therefore, we will divide all the walls into 2 types according to the installation method.
2.3.1. Concrete or brick wall


Video of mounting a damper tape to a concrete or brick wall
Here you should fasten the tape with dowel-mushrooms. Do not rely on self-adhesive tape - it will fall off the next day.
2.3.2. Wooden, plasterboard, wall with plaster
Video of mounting a damper tape to a wooden, plasterboard, plastered wall
In this case, the tape is fastened with a conventional mounting stapler, it is simple and fast.
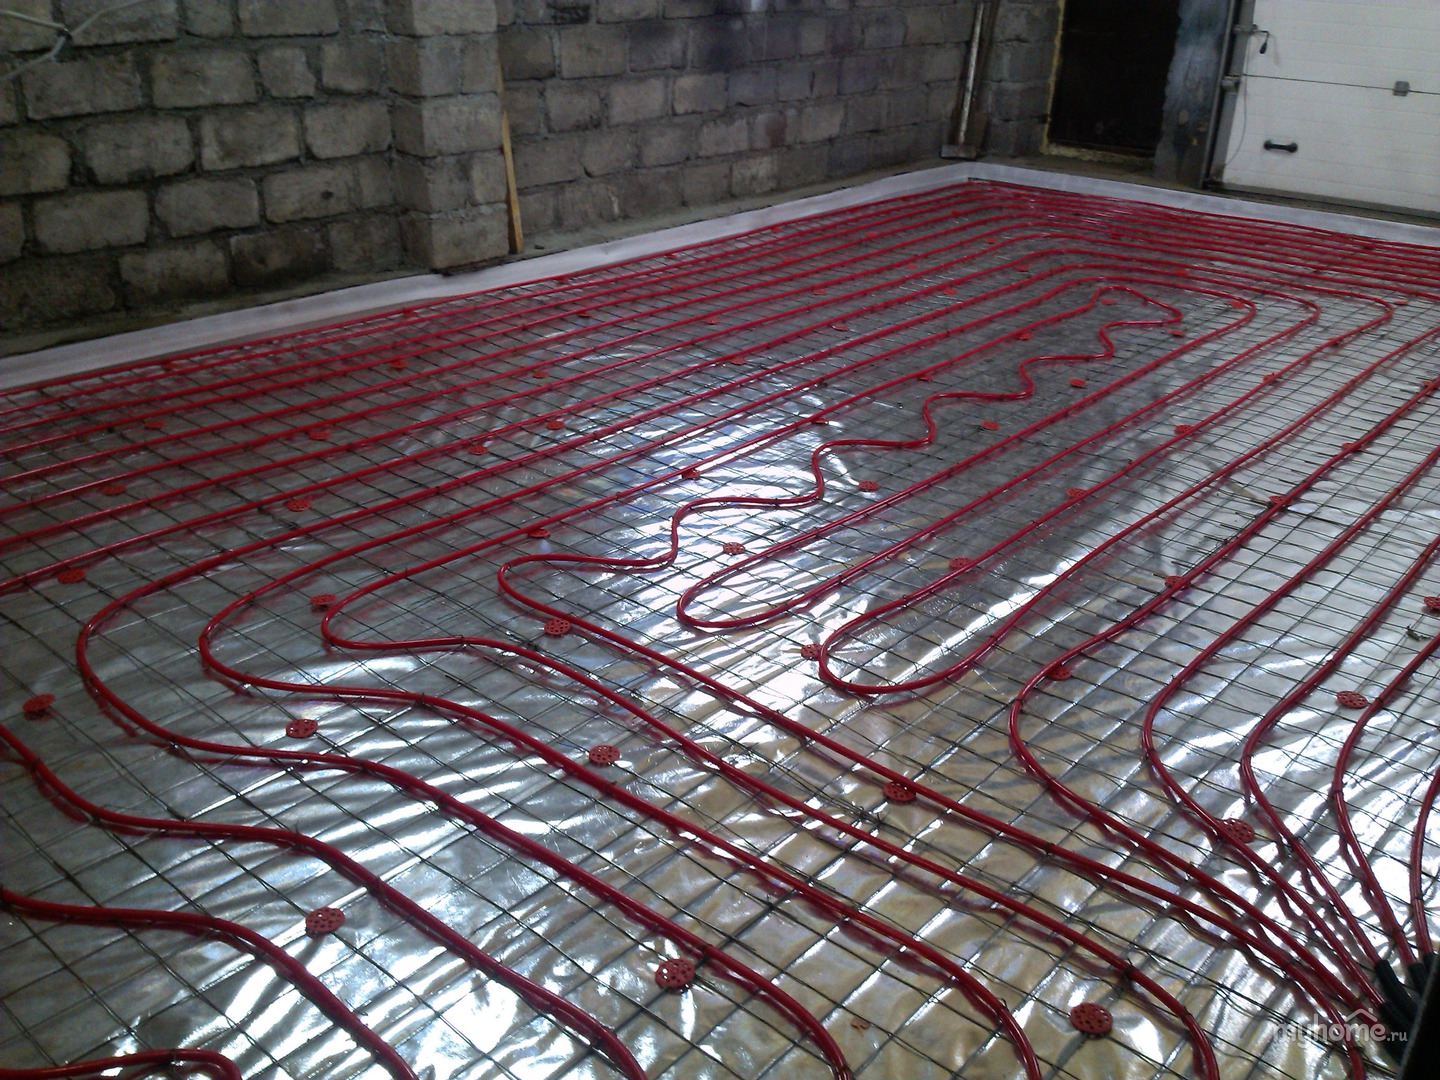
2.4. Reinforcing mesh
If your floor screed is less than 3 cm or due to the relief of the base there are local places where the screed will be less than 3 cm, you will need a reinforcing mesh.
The grid can be laid under the pipe and on the pipe. But if you put the mesh on the pipe, then it will be very inconvenient for you to walk on it during the installation of the concrete screed, the mesh under your feet will bend and stick out of the screed, in order to avoid this, you need to put several boards and walk only on them.
Reinforcing mesh installation video
2.5. Pipe fittings
Pipe fasteners are selected based on the type of insulation, the presence of a fixed reinforcing mesh under the pipe and the type of base.
This has already been discussed in paragraph
Fasteners for pipe
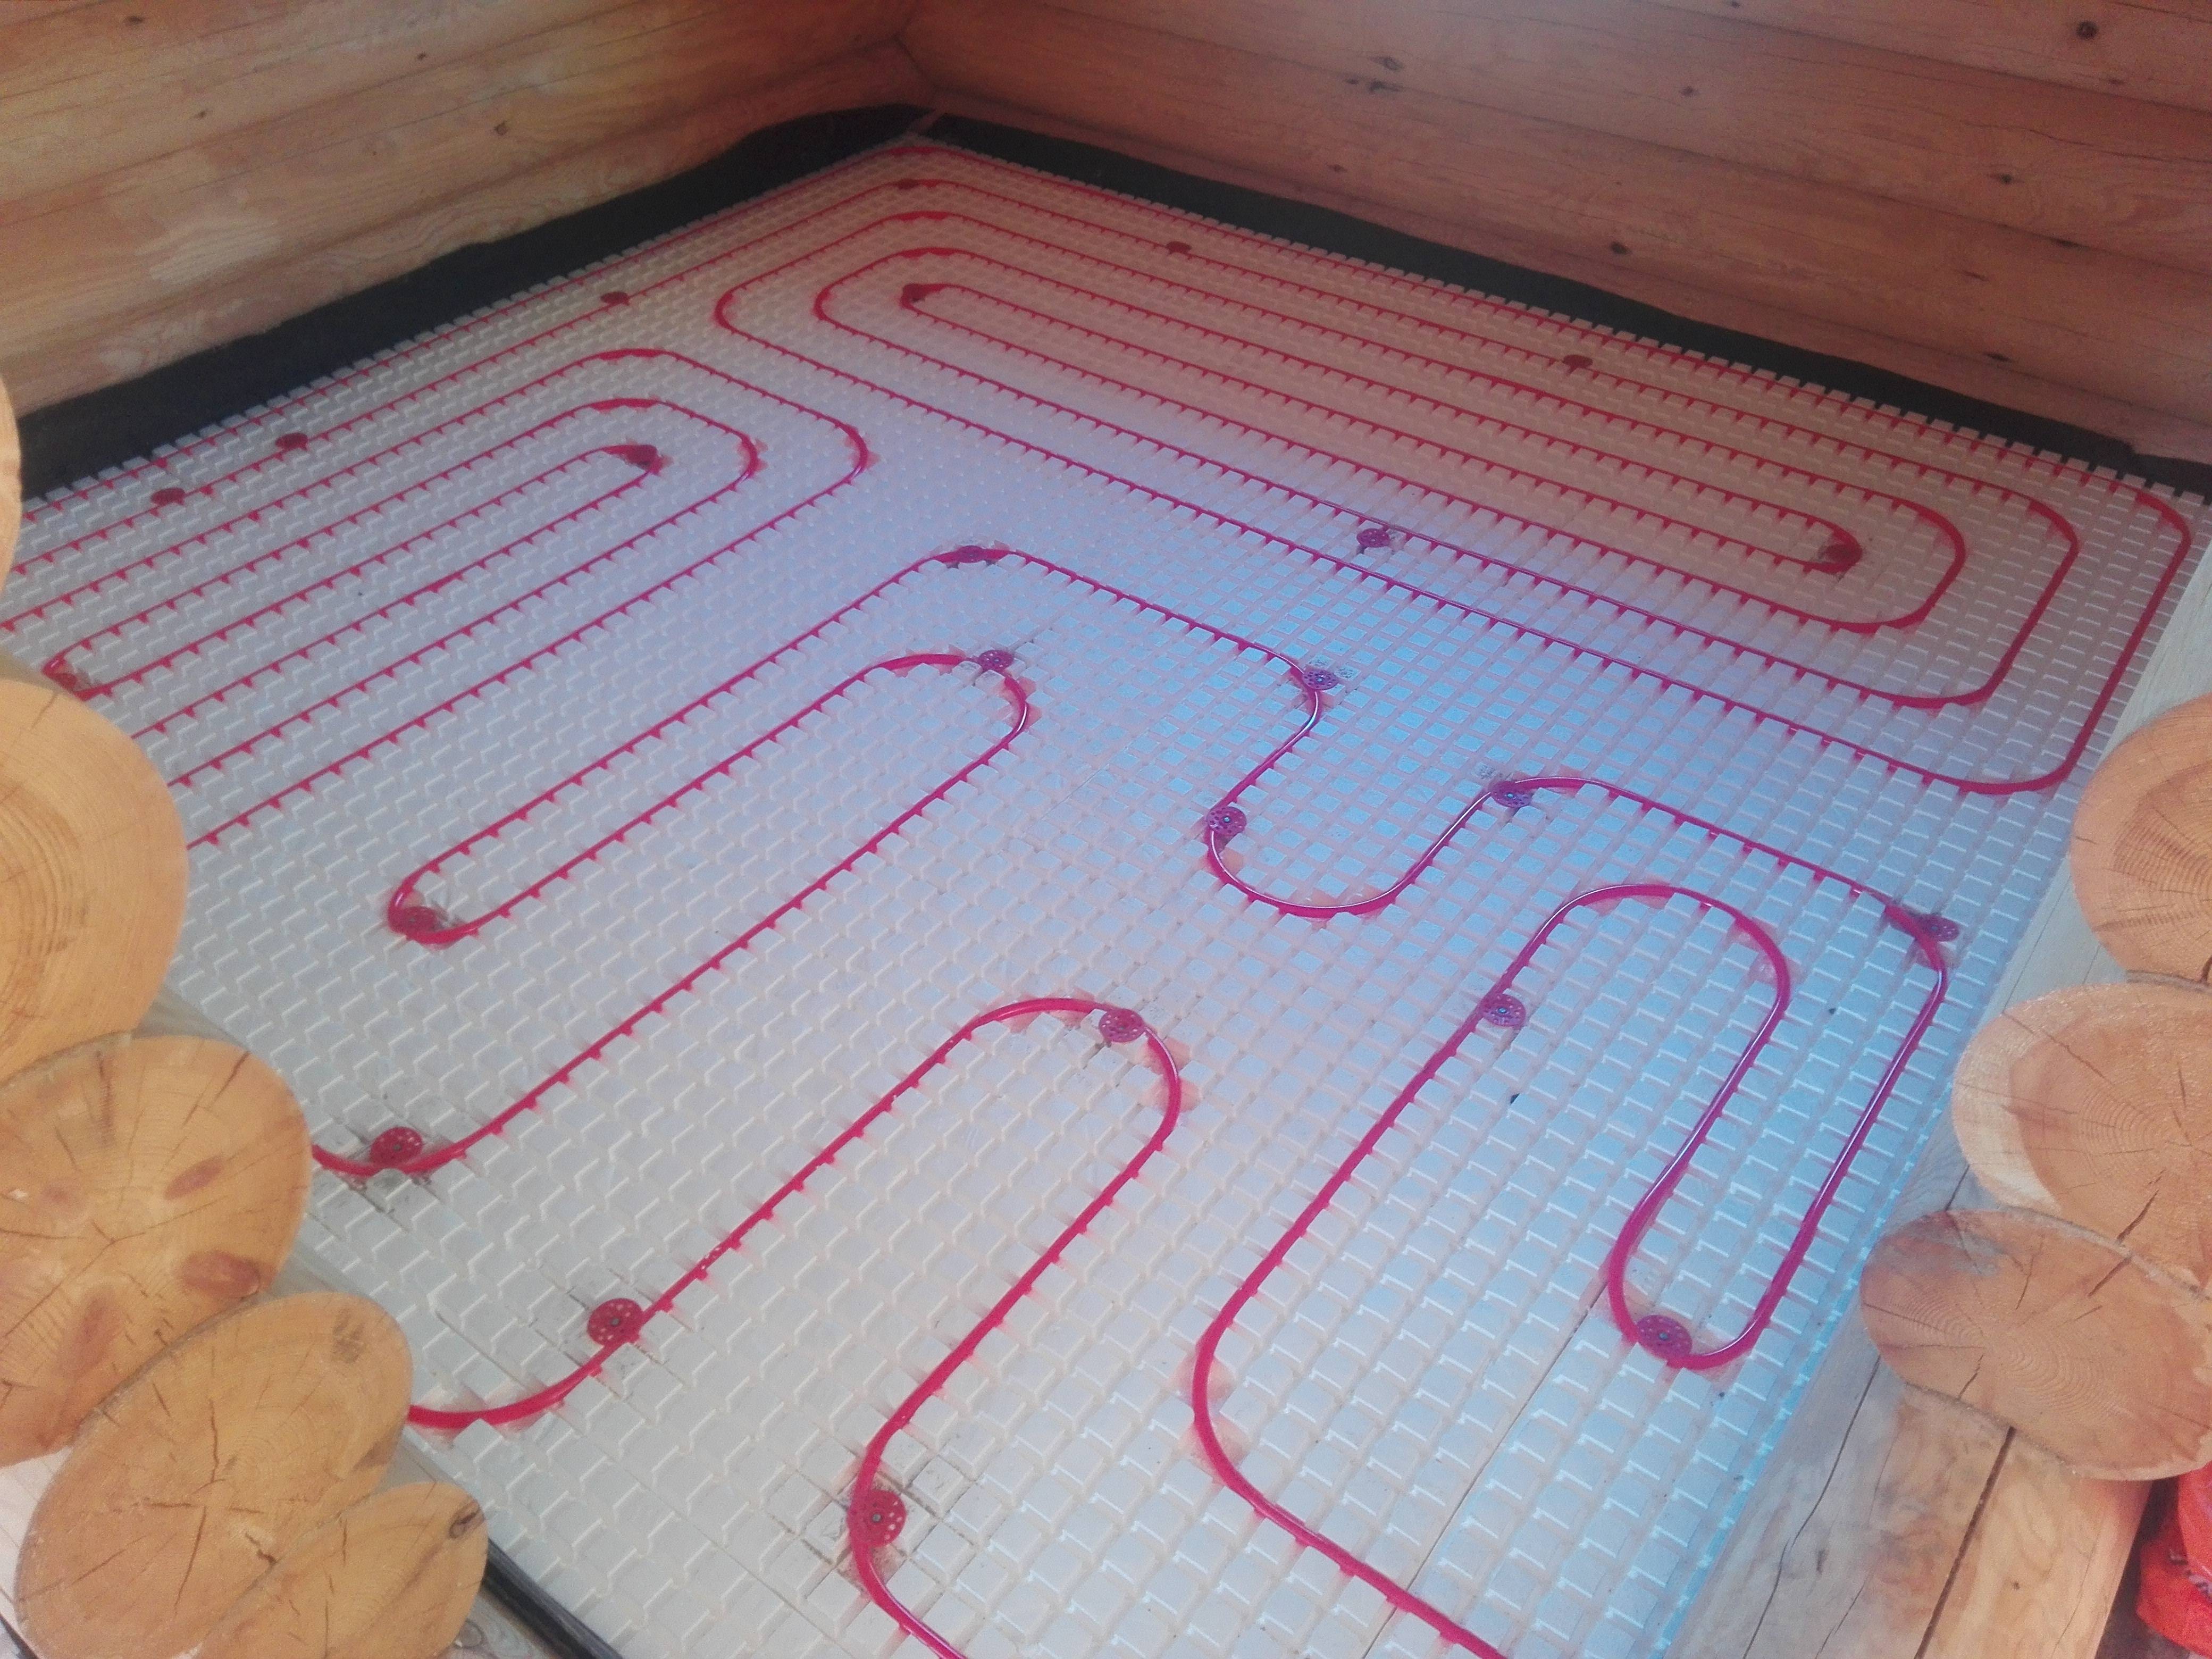
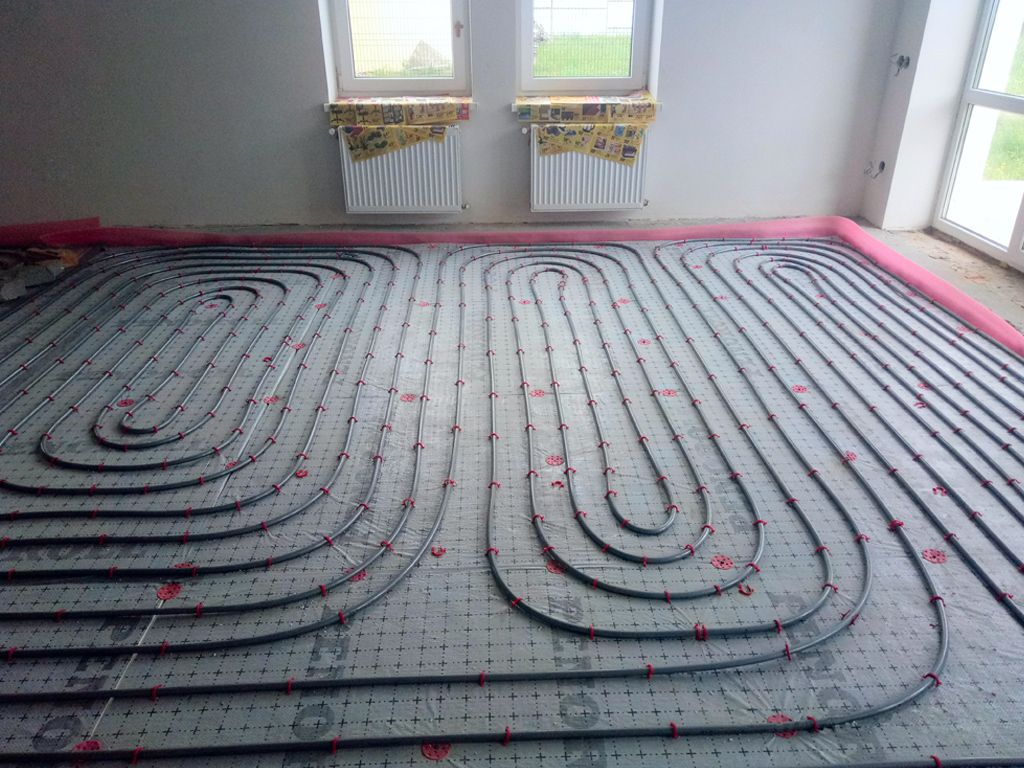
2.6. Pipe laying
Before starting installation, it is necessary to determine the method of laying the pipe and the place where the collector will be placed. There are 3 options:
- double helix (Fig. 1);
- snake (Fig. 2);
- double snake (Fig. 3).
Underfloor heating pipe laying schemes
The most effective option is a double helix (Fig. 1), in this option the heat is distributed as evenly as possible.
By this point, you should have already decided on the pipe laying step. And in order to make installation more convenient, we recommend making a pattern equal to your laying step from any material at hand (a piece of pipe or insulation, for example).
We recommend starting installation from the circuits farthest from the collector!
Video of laying the water circuit pipe
2.7. Manifold installation
The collector is usually mounted in a special cabinet and on the wall.
2.7.1. Manifold Assembly
First you need to assemble the collector and fix it in place.
Video instruction for assembling the manifold
2.7.2. Collector piping
After assembling the collector assembly and mounting it in the place where you need it, we proceed to the “strapping” (connection of loops water heated floor to the manifold nozzles through the fittings) of the manifold.
Video on tying the collector of the water floor
2.7.3. System pressure test


After we have already assembled the entire main system of a water-heated floor, it must be “pressurized” (fill the contours of the warm floor with coolant or compressed air). This is done to check the tightness.
It is recommended to leave the pressurized system at a pressure of 3-6 bar for 1-2 days in order to detect possible leaks.
Video instruction for filling a water-heated floor with a coolant
After pressure testing and checking the system, you can proceed to the installation of a cement-sand screed.
Advantages and disadvantages of water floors
For residents of the house, it is optimal if the heating of the room is carried out evenly and the heating source is located below. When heating a room with radiators, air is converted from the floor surface to air, while warm air moves up, and cold air goes down. Water floors allow you to get a slightly higher temperature in the leg area and a slightly lower temperature in the head area, which is more comfortable for residents.
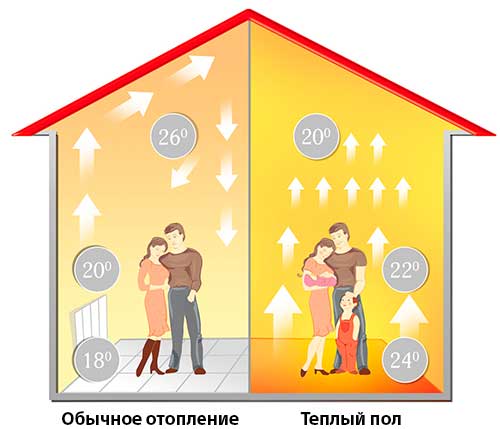
The scheme of heating the room with radiators and underfloor heating
The main advantages of a water floor:
- heating is carried out by radiation, and not by a conversion method;
- since there is no air conversion, there is no circulation of dust flows;
- no need for radiators, which are not always aesthetically pleasing;
- if radiators are still available, they are compatible with a water floor;
- there are no conditions for the occurrence of damp corners in the room, as well as the development of fungus;
- optimal humidity is maintained in the room;
- water floors are easier to keep clean than radiators;
- there is no danger of burns;
- the ability of the system to self-regulate (when cold air enters from outside, the water floor increases heat transfer, and vice versa, if the temperature in the room rises under the influence of, say, sunlight, heat transfer decreases);
- in comparison with heating with radiators, water floors are 25-30% more economical;
- the life of the water floor is limited only by the life of the pipes used in the system.
In addition to the advantages, water floors also have disadvantages:
- water floors are rarely allowed for use in apartment buildings due to insufficient strength of the floors, as well as due to dependence on the central heating system (increased load and the need for more powerful pumps);
- water floors significantly reduce the height of the room, since for the arrangement of the system it is necessary to increase the level of the floor (at least 10 centimeters).
Types of warm floors
Before you make a warm floor with your own hands, you need to figure out what types of heating systems are and which ones are more suitable for a particular home.
The main advantages of underfloor heating:
- uniform heating of the room;
- comfort;
- complete autonomy.
The heat generated by these floors is effectively used for space heating. How to choose underfloor heating for your home? There are different types of underfloor heating, so you can only determine which one is better by knowing all their pros and cons. Some of them are heated with hot water (water), while others are heated with electricity (electric). The latter are divided into 3 types:
- rod;
- cable type;
- film.
All floors have their own advantages and disadvantages. So the advantages of water heated floors include:
- lack of air conversion, creating a more comfortable atmosphere in the house;
- relatively low heater temperature;
- lack of damp corners, which prevents the formation of fungus;
- normal humidity in the room;
- ease of cleaning;
- self-regulation of heat transfer when the temperature changes;
- efficiency, allowing to reduce heating costs by 20-30%;
- lack of heating radiators;
- long service life (up to 50 years).
The disadvantages of water floors can only be attributed to the fact that they cannot be used in an apartment building from a central heating system and permission from the housing and communal services services is required for their installation in such buildings.
The advantages of an electric underfloor heating include the same properties as a water floor, but besides this, they still have the possibility of repairing local faults and installation without special equipment and permits.
Warm floor do it yourself
Many people think about whether laminate flooring is suitable for underfloor heating? What materials are used for floor coverings? The disadvantages of such heating systems include:
- Restriction in choosing the type of flooring. This means that its heat transfer coefficient should not exceed 0.15 W/m2K. For a decorative coating of such a floor, tiles, self-leveling floors, granite, marble, linoleum, laminate, carpet, which have a permissive marking, are suitable. Thus, a warm floor under a carpet or under a carpet can be mounted only in compliance with the above requirements.
- The need to raise the floor by 6–10 cm.
- The inertia of heating for 3-5 hours.
- The use of furniture made of natural wood, since products made of MDF, chipboard, plastic, with constant heating, can release substances harmful to humans.
- Quite high financial costs for electricity when installing electric floors.
Taking into account all the above advantages and disadvantages of underfloor heating, it is preferable to install them in small rooms: in the bathroom, corridor, toilet, kitchen, bedroom, on an insulated balcony. Most often, masters lay a warm floor under the tile. This is due to the good heat-conducting characteristics of ceramics. Water floors are more suitable for round-the-clock space heating.
Warm floors are divided into 2 types:
- Comfortable, slightly warming screed, guaranteeing a pleasant feeling when walking.Along with them, other heating systems are also used.
- Heating, when, in addition to creating comfortable conditions, they are full-fledged heating.
For apartments in multi-storey buildings, it is better to use electric underfloor heating, and in private houses - water. A warm water floor rarely gives a specific power of more than 100 W / m2, so this heating should be used in well-insulated buildings.
It is better to entrust the calculation of a water heated floor or an electrical system to specialists, since not everyone will be able to calculate all the necessary indicators in accordance with sanitary standards. Calculate how much a warm floor costs, everyone can independently, using an online calculator.
Step 4. Laying the pipes of the heating system
We strongly recommend that you draw several variants of schemes before laying. It takes very little time and avoids annoying mistakes. In addition, during the drawing up of schemes, it is possible to choose the optimal location of the contours, taking into account their length and geometry.
Pipes for underfloor heating
Practical advice. There are correct recommendations not to lay pipes under furniture installation sites, it will overheat and quickly lose its attractiveness. We advise you to act very thoughtfully. Who can guarantee that in these places the furniture will stand all the time, that you will not want to rearrange it or completely redevelop the premises?


The length of each circuit must take into account the power of the water pump, the data are indicated in the operating instructions, carefully study it before starting installation.
Table for determining pump performance depending on the heated area
Otherwise, situations are possible when the floor temperature in different areas of the room will differ significantly, and it will become difficult to achieve comfortable room heating values.
Pipes can be fixed in two ways:
-
special brackets immediately on the reflective film, to facilitate the process, a grid is applied to it. The system is fixed with special brackets. The method is not bad, the work is done quickly and efficiently;
-
to the metal reinforcing mesh. It lies on a heat-reflecting film, the pipes are fixed with plastic clamps. We believe that this method has no advantages over the first one. But it has disadvantages: an additional increase in the cost of installation and the risk of mechanical damage to pipes. As a reinforcing element in this position, the mesh does not play any role. According to building regulations, it must be filled with concrete on all sides to a thickness of at least five centimeters, only in this position the mesh works in a bundle and increases the physical strength of the screed.
Never buy low-quality fittings and valves made of weak alloys. The fact is that they eventually crack under the influence of material fatigue phenomena. As a rule, leaks form at the junction of the nut and fitting. Visually, the crack is not visible, it seems that the reason is a poorly tightened gasket. Attempts to tighten the nut always end sadly - the threaded part of the fitting breaks off and remains in the nut. It is very difficult to take it out of there, most often you have to change a pair. The ideal material for making fittings is stainless steel, bronze is also suitable. All other non-ferrous alloys are not worth buying
No need to save on fittings, their importance in the heating system can not be overestimated
How to choose fittings
One more nuance. Use only rubber gaskets to seal connections, do not use paronite, it must be tightened strongly, not all fittings will withstand such efforts. And the last. Elements working in pairs must be of the same metal. This is necessary in order to exclude the appearance of critical stresses due to the difference in thermal expansions.
Connecting pipes with press fittings
The sequence of connecting metal-plastic pipes with compression press fittings
Option # 1 - water floor heating
Features of the technology of arrangement
The pipes themselves can be connected to a separate boiler or centralized heating. This type of heating is applicable both as the main source of heat and additional.
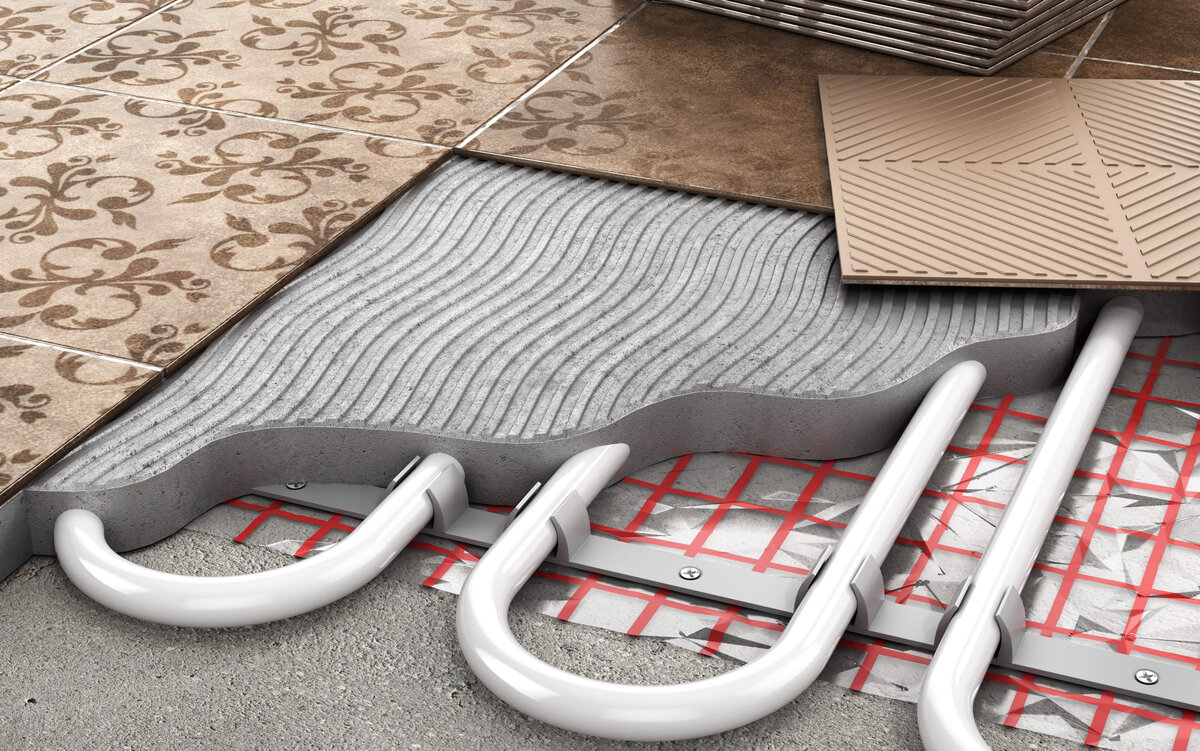
 System diagram, where: 1 - thermal insulation layer, 2 - reinforcing layer, 3 - pipe contours, 4 - devices for input and temperature control, 5 - concrete screed, 6 - self-leveling screed (performed if necessary), 7 - finishing coating
The water floor installation technology includes a number of steps:
- Laying foil insulation on the prepared base base;
- Laying reinforcing mesh for fixing water pipes;
- Installation of a system of metal-plastic pipes;
- Pouring sand-cement screed;
- Laying tiles with adhesive.
The thermal insulation layer is designed to minimize the consumption of thermal energy for heating the base base. Foil insulation, reflecting heat, will redirect the flow upward to heat the room.
Compliance with this condition is especially important when designing a warm floor in rooms located on the first floors, under which unheated basements are located.
Advantages and disadvantages of this system
A properly executed concrete screed, hiding the contours of water pipes underneath, performs two functions:
- It acts as a reliable basis for laying a hard coating such as porcelain stoneware or slab.
- Acts as a powerful accumulator of thermal energy.
Heating up from the metal-plastic pipes laid in it, the concrete screed evenly distributes heat, transferring it to ceramic tiles.
 Underfloor heating, functioning at the expense of water circulating through pipes, can rightfully be considered an economically viable option.
A significant disadvantage of this type of floor is its thickness. Only a cement screed "eats" 30-60 mm of height. In the conditions of standard apartments, which are not characterized by high ceilings, the “stolen” centimeters will be immediately noticeable.


In addition, the screed is poured for more than a dozen years. And it is not possible to provide access for visual inspection and prevention of the heating system. In the event of a leak and repair, it will be necessary to dismantle not only the tile coating, but also the concrete screed.
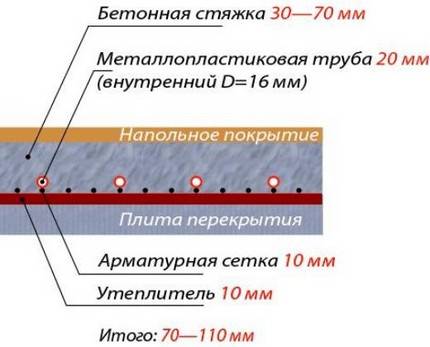 The total thickness of the “layer cake” when arranging a water-type warm floor is significant and is at least 70-100 mm
Experts do not recommend installing it in high-rise buildings of Soviet buildings, since those used in those days interfloor ceilings are not provided for increased loads, which will be created by a massive heat-storing screed.
When planning to connect a water floor to a centralized heating system, be prepared that not many companies give permission to take heat from heating risers, as this may upset its balance. And when connecting the system, in addition to the main costs, it will be necessary to install expensive adjustment equipment.
This is because the water temperature in heating radiators and floor circuits heating is significantly different.
But for owners of private houses, a water heated floor is an ideal solution. After all, they are not bound by spatial restrictions and no approval procedures are required to install the system. It is enough, adhering to the manufacturer's recommendations, to install the equipment. And in the future, maintain the pressure in the system and circulation in the circuit, as well as control the temperature and quality of the coolant.
You can calculate the parameters of a water heated floor using our online calculator:
| Supply temperature, oC. | |
| Return temperature, oC. | |
| Pipe pitch, m | 0.050.10.150.20.250.30.35 |
| Pipe | Pex-Al-Pex 16×2 (Metal-plastic) Pex-Al-Pex 16×2.25 (Metal-plastic) Pex-Al-Pex 20×2 (Metal-plastic) Pex-Al-Pex 20×2.25 (Metal-plastic) Pex 14×2 (Stitched polyethylene)Pex 16×2 (XLPE)Pex 16×2.2 (XLPE)Pex 18×2 (XLPE)Pex 18×2.5 (XLPE)Pex 20×2 (XLPE)PP-R 20×3.4 (Polypropylene) )PP-R 25×4.2 (Polypropylene)Cu 10×1 (Copper)Cu 12×1 (Copper)Cu 15×1 (Copper)Cu 18×1 (Copper)Cu 22×1 (Copper) |
| Flooring | TilesLaminate on a substrateParquet on plywoodCarpet |
| Screed thickness above the pipe, m | |
| Specific thermal power, W/m2 | |
| Floor surface temperature (average), oC | |
| Specific heat carrier consumption, (l/h)/m2 |
In this video you can see typical mistakes when installing a water-heated floor system:


