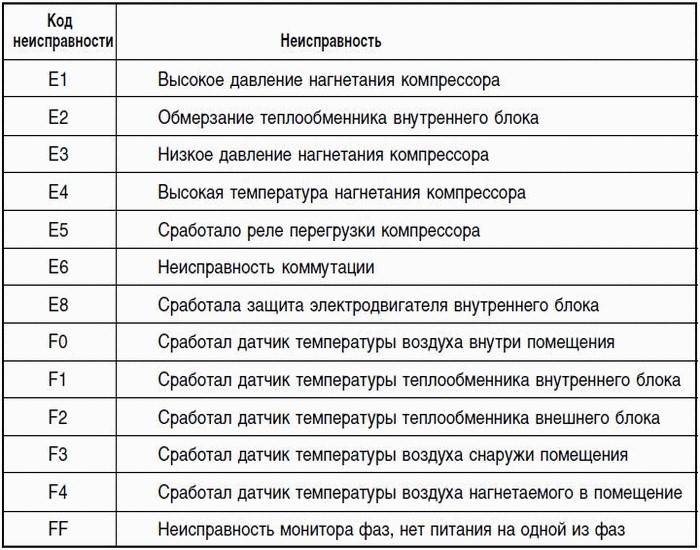
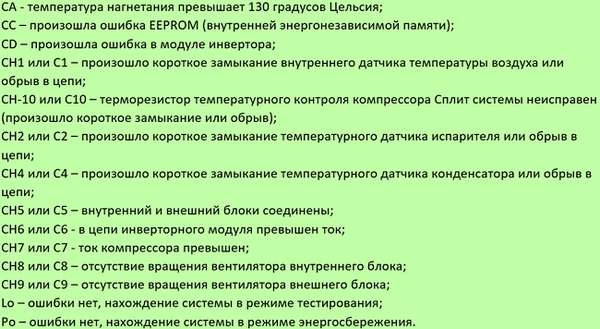
- Other errors and their interpretation
- Description of Error 43
- Kitfort Robot Vacuum Cleaner Errors
- Troubleshooting common breakdowns
- Causes and procedure for eliminating problems with filling and draining water
- Water heating problems
- Universal repair recommendations
- LED indication on outdoor device
- Samsung Robot Vacuum Cleaner Error Codes
- Fan
- Indoor unit errors
- How to Fix CRC Error - Alternative Options
- Errors on the air conditioner heat indicator (H)
- Flame and ignition control (faults 5**)
Other errors and their interpretation
In total, there are 19 trouble codes in the arsenal of Ariston machines, of which we have considered the most common ones.
But let's briefly talk about other possible failures in the operation of equipment:
- F03 - failure of the temperature sensor. It is necessary to check the resistance of the sensor itself (normally about 20 ohms), as well as the circuit to the controller. If necessary, replace damaged parts.
- F06 - indicates a malfunction in the hatch blocking device circuit for Ariston cars on the Arcadia platform (Low-End and Aqualtis series), as well as problems with control buttons for Dialogic models. In the first case, you should see if some thing from the boot prevents you from slamming the door until it clicks. In the second, the problem may be with sticking buttons or damaged contacts.
- F10 - no signal from the water level sensor. The device can generate such an error if the drain is not properly connected to the sewer, there is insufficient water pressure, or an open circuit from the sensor to the board.
- F12 - lack of communication between the controller and the display module. If the reboot does not help, you need to check the control board, the display unit and their connection.
- F13 - an open in the circuit or a breakdown of the drying temperature sensor will require the replacement of a part or worn contacts.
- F14 or F15 - malfunction of the drying heater or an open in the heater circuit.
- F16 - a signal for machines with vertical loading about a breakdown of the drum lock sensor. Most often it happens due to banal inattention - for example, doors that are not closed until they click. In other cases, the reason may be in weak contacts in the section of the circuit to the board or the failure of the sensor itself.
- F17 or door - “speaks” of insufficiently tight closing of the hatch. Perhaps the problem lies in a foreign object that has penetrated, weak hinge fasteners, or a dirty lock for the “tongue” of the door. If external culprits are not identified, most likely the device that blocks the door during the operation of the machine is faulty, which should be replaced.
And in any of the options, the rule applies: in addition to the specific part that the device “points to”, the breakdown may lie in a faulty board, damaged contacts or non-working wiring.
Description of Error 43
If you see hardware in Device Manager that is marked with a yellow exclamation mark, and in its properties there is a description "Windows has stopped this device because it reported a problem (Code 43)", first of all, do not worry! This is a typical error that is caused by a hardware failure or a bug in the device driver.
The error “Windows has stopped this device” or “Code 43” most often occurs in a number of peripheral devices such as Bluetooth or Wi-Fi models, USB hard drives, and the variant with the appearance of this error in the operation of the video card is not excluded.
Kitfort Robot Vacuum Cleaner Errors
| The code | Description of the fault | Recommendation |
| E01 | Left wheel failure | It is required to check whether the wheel is able to rotate freely, if necessary, clean the part |
| E02 | Right wheel failure | |
| E03 | Not applicable | — |
| E04 | The device is lifted from the floor, or one of the wheels hangs down / falls through | You need to install the Kitfort robot vacuum cleaner on a flat floor |
| E05 | Damage to lower sensors | Wipe the sensor windows with a dry cloth |
| E06 | Breakage of sensors in the protective bumper | Wipe the side surface of the protective bumper |
| E07 | Left side brush failure | It is necessary to remove the brush and clean the accumulated debris |
| E08 | Right side brush failure | |
| E09 | Robot vacuum stuck | Place the device on a level surface |
| E10 | Charging a powered off robot | It is necessary to turn on the robot by pressing the switch on the side |
| E12 | Not applicable | — |
| Dust bin icon blinking | Waste container full | Clean the container of debris and the opening of the suction module |
Troubleshooting common breakdowns
According to the statistics of service centers, almost half of all violations in the operation of dishwashers are due to the lack of filling and draining of liquid due to violations of the rules for operating the PMM.
Sometimes error codes appear for no reason due to computer malfunctions or power surges. Follow these simple steps to fix them:
- disconnect the dishwasher from the mains by removing the plug from the socket;
- wait 20 minutes;
- connect to the network and turn on the PMM again.
Quite often, the breakdown code combinations disappear after that, and the machine continues to work without failures.
 The code combination of the i10 malfunction in the Electrolux dishwasher
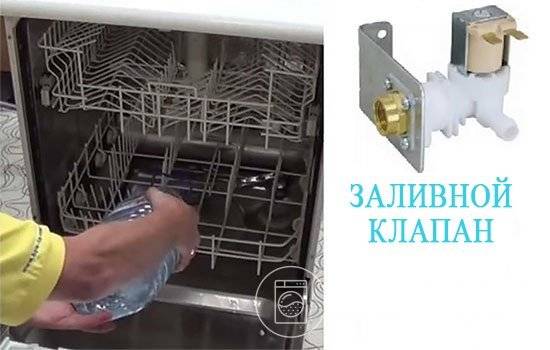
Causes and procedure for eliminating problems with filling and draining water
Liquid may not enter the PMM for the following reasons:
- no water in the plumbing;
- the valve located in front of the inlet hose is closed;
- there is a blockage in the intake strainer;
- inlet hose kinked;
- intake solenoid valve defective.
All of the above defects (error i10), except for the breakdown of the intake valve, are eliminated on their own. If you do not have a multimeter, it is better to entrust the diagnosis and replacement of the valve to the master. Another code combination associated with a slow water intake is iF0. You can find more information about repairs in the event of a lack of water supply here.
 If the machine works after filling with water manually, then the reason for its stop is that the liquid does not flow
- coarse and fine filters are clogged with food residues and fat;
- the drain pump does not work;
- the pressure switch has failed;
- Is there a kink in the drain hose?
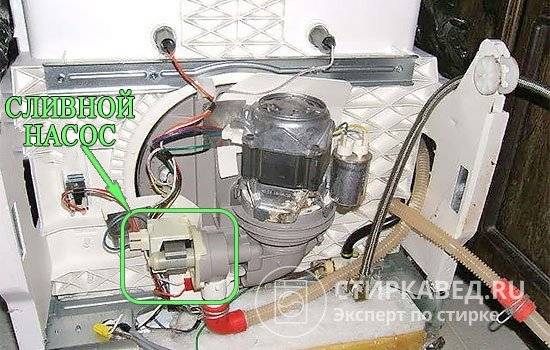 Food debris or glass fragments can get into the impeller of the drain pump, jamming its rotation
For more information about the reasons for the lack of drainage and their elimination, read this article.
Why the i30 error code appears in the PMM Electrolux, Zanussi and how the Aquastop system works, see the following video:


Water heating problems
The code combination i60 reports the absence of heating. The reasons for its appearance are listed in the table above. It is better to entrust wiring diagnostics and computer checks to a qualified craftsman. You can replace the heating element and the thermistor on your own if you disassemble the PMM case (if you have a multimeter for testing the heating element and temperature sensor). In the event of an open circuit in the electric heater, it must be replaced. The failure of the thermistor is reported by error code i70.
Signature7: Flowing heating element of the Electrolux dishwasher
Knowing the decoding of code combinations, most malfunctions in the operation of the PMM can be eliminated with your own hands if you have the appropriate tool and skills in handling it.
Universal repair recommendations
Before starting work, disconnect the air conditioner from the mains.
Carefully read the instructions that came with the device. This will save time searching for unscrewing fasteners and plastic latches that hold the external elements of the climate control housing.
 When repairing the air conditioner at home, use a tool with electrical insulation. Be careful and careful, do not touch rotating and live parts
Film the sequence of parsing the inside of the block on a smartphone. This will help to properly assemble the unit and ensure that all parts are in place. Do not make any changes to the operation of the instrument. For replacement, use only original parts or equivalents approved by the manufacturer.
Don't rush repairs.Allocate at least 1-2 free hours to this activity. Check if the necessary tools are available.
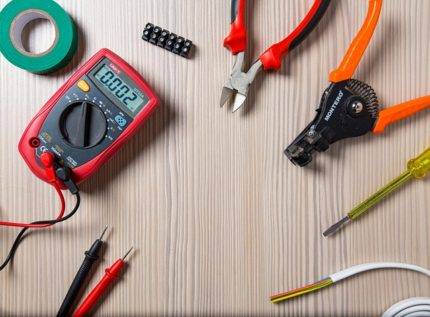
You will definitely need:
- slotted (flat) and Phillips screwdrivers of small and medium sizes;
- wire cutters;
- pliers;
- multimeter;
- jumper wire.
Depending on the model, spanners and hex keys may be required. If most of the tools are not available, think carefully about whether it is worth starting a repair.
LED indication on outdoor device
The outdoor unit is equipped with its own error indication, which is designed to simplify the task of diagnosis and repair. Indication is made by means of the board consisting of yellow, green and red light-emitting diodes. Each diode has three states: off, on and flashing. Various glow combinations indicate certain errors.
Use the data in this table if you need to determine the error code from the indicators on the outdoor unit
Most of these errors correspond to the codes on the 88 display and duplicate its readings. However, there are codes that are only displayed on the LED board.
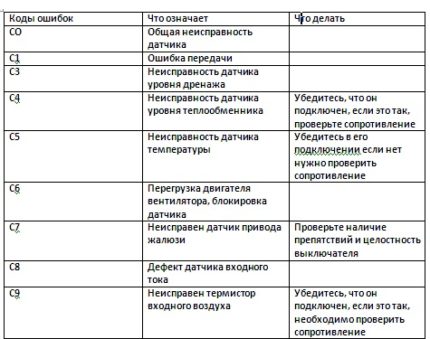
Samsung Robot Vacuum Cleaner Error Codes
| The code | Possible reasons | Solution |
| C00 | Robot stuck | It is necessary to turn off the device by pressing the button at the bottom of it, move it to another zone and then turn it on again |
| C01 | Foreign object stuck in the brush | It is necessary to turn off the device by pressing the button at the bottom of it, remove the dust box, remove foreign objects from the brush, and then turn on the robot |
| C02 | There is a foreign object in the left wheel | Turn off the vacuum cleaner by pressing the button at the bottom of it, remove the foreign object from the wheel and turn on the machine again |
| C03 | There is a foreign object in the right wheel | |
| C05 | Breakage of the protective bumper sensor | You should turn off the robot vacuum cleaner by pressing the button in its lower part, remove the obstacle in front of the product, or move it to another part of the room, then turn it on |
| C06 | Foreign material has entered the sensor window | Turn off the device with the button located on its lower side, wipe the windows of the front and rear sensors with a soft, dry cloth, and turn it on again. |
| C07 | There is foreign material in the window of the break sensor | |
| C08 | Dust collector not installed | Install the dust collector in the vacuum cleaner |
| C09 | There is a foreign object in the side brush in the "Along the walls" mode | It is necessary to turn off the device by pressing the button at the bottom of it, remove excess objects from the side brush, turn on the robot vacuum cleaner |
| Nobatt | Disconnected wire/faulty battery | Turn off the device with the button located on the bottom of it, then start it again. If the problem persists, contact Samsung Service |
Fan
Some errors are reported by indicators on the electronic display of the device. Most often, with such breakdowns, the system turns on for a few seconds, and then immediately turns off.
There are the following main reasons for what is happening:
- Motor capacitor failure.
- Breakdowns in the motor.
- Broken fan blades.
In any situation, the problem is easily solved by replacing the failed part.
The impeller changes in the following sequence:
- Removing the front protective grille.
- Unscrew the nut on which the fan is mounted.
- The motor pulley is released from the impeller.
- Using a new impeller on a pulley.
- The reverse procedure is used when collecting parts.
When replacing a fan motor, it also requires a few simple steps:
- De-energizing the system, removing the front protective grille.
- Unscrewing and removing the nut securing the entire fan.
- Disconnect all electrical connections.
- Unscrewing the motor itself, completely disconnecting.
- Putting on a new part.
- Gathering and fixing parts, using the reverse order.
A certain procedure is preserved when replacing the starting capacitor:
- System de-energization.
- Disassembly of the outdoor unit.
- Unscrewing the fixing bracket.
- Disconnect all wires.
- Replaced with a new start capacitor.
- In the reverse order, the parts are assembled, fixed.
The fan repair procedure will require about an hour of free time. The urgency and volume of repairs, the characteristics of the fan itself determine the total cost of the work.
Indoor unit errors
Error codes for Fujitsu air conditioners displayed on the display of the indoor unit
| Fujitsu air conditioner error code | Decoding the Fujitsu Air Conditioner Error Code |
| 00 | No communication between remote control and outdoor unit |
| 01 | No communication between indoor unit and outdoor unit |
| 02 | The operation of the temperature sensor inside the room is disrupted |
| 03 | Short circuit of the temperature sensor inside the room |
| 04 | The function of the temperature sensor of the external heat exchanger is disturbed |
| 05 | Short circuit on the temperature sensor of the internal heat exchanger |
| 06 | Temperature sensor failure on the heat exchanger |
| 08 | Power supply interrupted |
| 0A | Outside temperature sensor failure |
Those who themselves could not figure out the Fujitsu air conditioner error codes should contact a service center.
How to Fix CRC Error - Alternative Options
In addition to problems with the hard drive, a CRC error can also occur for other reasons. Therefore, to fix the CRC error, do the following:
- Download the torrent file from another source. If you downloaded any file from torrents and got a CRC error, then start the torrent client, delete the download with the error, and then the incorrectly downloaded files themselves on your hard drive. Try to look for an alternative download of the same program on a torrent tracker, perhaps the problematic download was created not quite correctly, or the files in it were damaged. In some situations, it will not be superfluous to reinstall the torrent client, the cause of the CRC error may be in it;
- If you received this error when trying to read data from a CD (DVD) disk, then, first, you need to gently wipe the surface of the disk with a soft cloth in order to remove dust or dirt on its surface, and then try to read its contents using the already mentioned BadCopyPro program ;
If this error occurred during the installation of a game, it will be easier to download its image again (or the program files themselves) from another source using proven Download Master level programs, this may help get rid of the CRC error.
Errors on the air conditioner heat indicator (H)
The most common trouble is the H1 code. She's also the easiest to fix.

The air conditioner stopped supplying heat because it turned on the defrost mode of the external unit. The control sensor of the heat exchanger of the outdoor unit worked and the automation turned off the heat injection. It is fed to the outdoor unit, defrosting it. Unfreeze - everything will work. If not, then you need to check the health of the sensor and the heat exchanger.
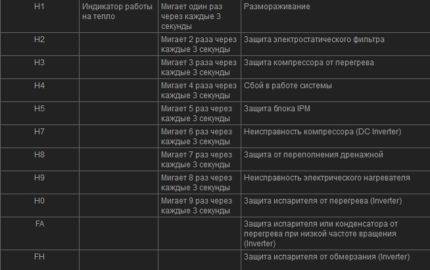 Errors on the heat indicator can indicate a malfunction of the air conditioner circuit, as well as other problems of the outdoor unit from the control board to a clogged drainage system
Error H2 means that the electrostatic filter is at risk, the one that collects dust and other particles circulating in the air. This filter can be cleaned. Or replace with a new one. According to reviews, Gree air conditioner filters are one of the weakest points. So it would be better to learn how to clean them in advance.
To do this, simply remove the filter from the air conditioner, rinse in a detergent solution, rinse well under running water and dry thoroughly. And then put it back in.
An air conditioner with a dirty filter runs louder, and noticeable sparking is also possible. So you can take action without waiting for the H2 error.
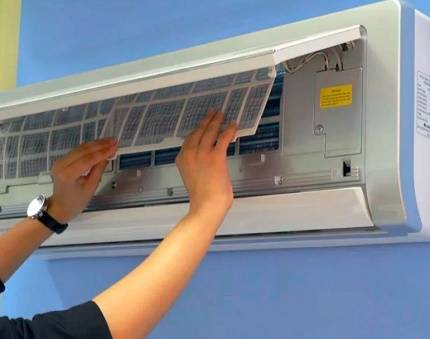
The electrostatic filter must be cleaned regularly. You can simply wash it under running water. This will help you avoid big problems.
Error H3 protects the compressor from overheating. Overheating, as well as compressor overload, can occur due to leakage of oil, freon or freon and oil. First of all, you need to check the roller connections. Or maybe due to a malfunctioning fan or condenser.
If there are no traces of oil on the connections, the fan is working normally, and the external unit itself is clean, then it is necessary to calibrate the circuit using the same pressure valve, thermostatic valve and pressure gauge.
Error H4 means a malfunction. If the air conditioner does not work after restarting, the problem is either in the control board or in improper installation.
Code H5 means the outdoor unit's IPM board is defective. If the board fails, it must be replaced.
The letter H7 means that the compressor fault is indicated by the energy saving inverter (DC Inverter). It is he who is responsible for turning on and off compressors in inverter split systems. Constant switching on and off sooner or later will affect the operation of the compressor. Error H7 rarely happens for reasons that you can fix yourself.
Error H8 means that the automation considers the drainage system to be overflowing with condensate. We need to check the external drainage system. If it is clogged, clean it.
The condensate drainage system is one of the simplest and most understandable air conditioning systems. You can clean it yourself
H9 - a problem in the electric heater. First you need to check if it works. If it does not work, then the reason is probably an open circuit. Or the heater is burned out.
Problems H0 and FH unequivocally mean the operation of the temperature sensor on the evaporator (H0) or on the evaporator and condenser when low speed. It is necessary to check the refrigeration circuit and the refrigerant level in the circuit as with errors E7 and E8. The reasons are exactly the same, only the inverter sensors pointed to them.

A circuit with a thermostatic expansion valve is one of the basic systems that ensure the operation of an air conditioner. The performance and long-term service of climate equipment depend on its action.
An error under the letter FH means that the evaporator may freeze. A good air conditioner can solve the problem on its own. If necessary, it must be cleaned. Also, the evaporator may freeze due to freon leakage or failure of the valve and circuit valve settings.
Flame and ignition control (faults 5**)
Problems can arise in both open and closed combustion chambers. Although it must be admitted that there are few types of malfunctions compared to other components of the gas boiler.
Error #501. No flame on ignition.
This situation can happen for many reasons:
- No gas. You need to check the supply valve.It must be open.
- The system will not turn on if the voltage between the neutral and the ground conductor is more than 10 V. It is necessary to eliminate the current leakage.
- The ionization electrode is out of order. Before changing it, you need to check the quality of the connection with the motherboard.
- The power of smooth ignition has gone astray. It is necessary to adjust this parameter according to the instructions for a particular model.
- Malfunction of the main control board.
Error No. 502. Flame registration before gas valve activation. It often occurs in the absence of a ground loop. If it is made according to the standard, then you need to perform the same steps as for error No. 309.

If there was no grounding in the house, then it will have to be done for a gas boiler. And according to all the rules, otherwise the protective mechanisms will block the start of heating
Error No. 504. Flame separation on the burner if it occurs at least 10 times during one cycle. It is necessary to check the gas pressure, the removal of combustion products and the gas valve.


