- Preparation for work
- Installation of metal-plastic pipes
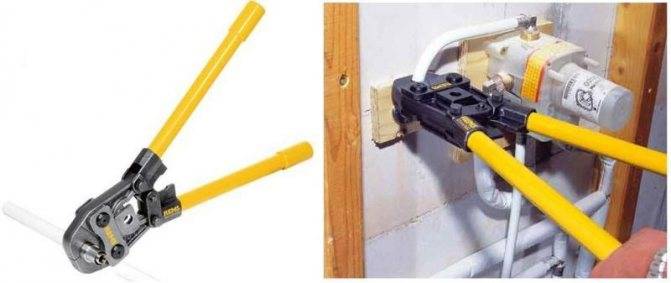
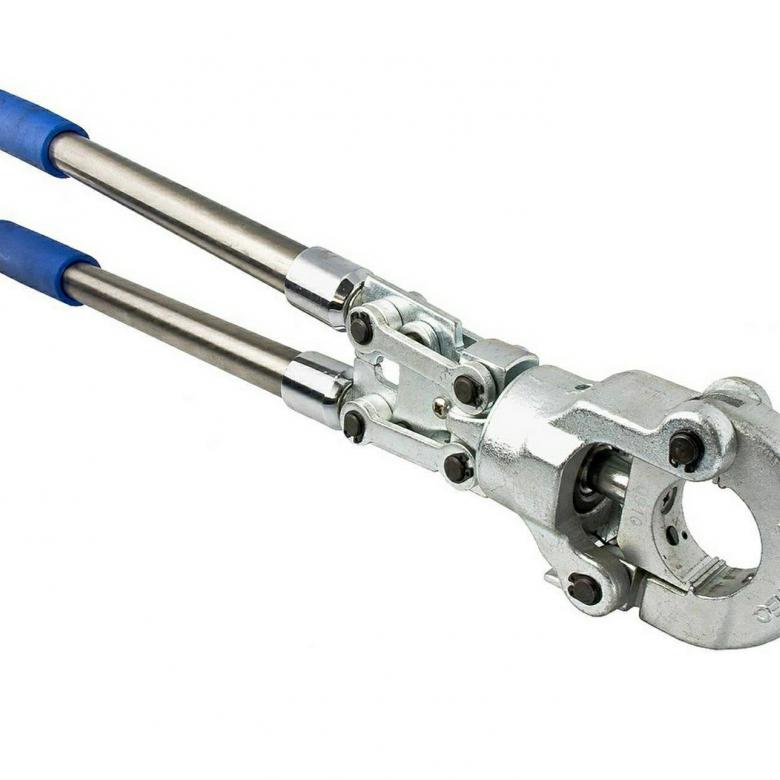
- Tools
- Compression connection
- Press connection
- Push fit connection
- Wall mount
- Fitting classification
- Preparatory work before pressing
- Instructions for use
- Crimping process
- What is flushing and pressing
- Do-it-yourself installation of metal-plastic pipes
- Tests in apartment buildings
Preparation for work
All measuring equipment must be pre-verified by a licensed testing laboratory. The hydraulic power pack is connected to the pressure line via a test pressure manifold. The collector has a drain valve and a pressure gauge. Pressure gauges are installed at the end and beginning of the pressure line.
Before pressure testing of pipes, all valves and gates must be closed.
Preparation for pressure testing of the pipeline includes the following steps:
- Filling the circuit with working fluid;
- Filling the line until a pressure equal to the test pressure is created there;
- Connecting test instruments and equipment to the desired section of the highway.
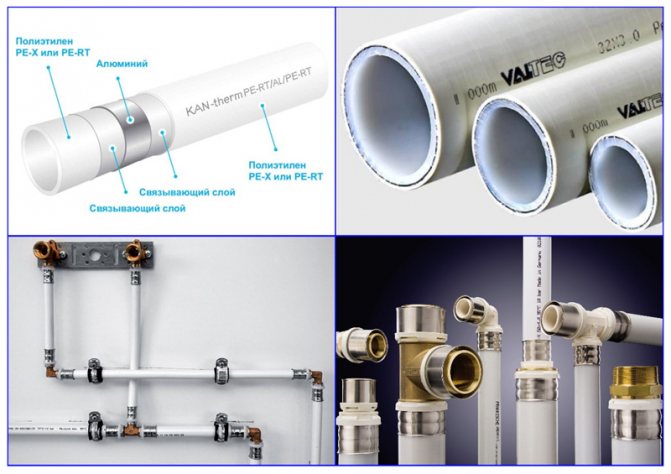
Installation of metal-plastic pipes
Installation of a pipeline made of metal-plastic includes several stages:
- Preparation of materials, tools.
- Installation of connections.
- Testing of the finished pipeline.
Material preparation for all types of joints is the same.Pipes must be cut according to the project. When measuring, take into account the length overlap for the fitting.
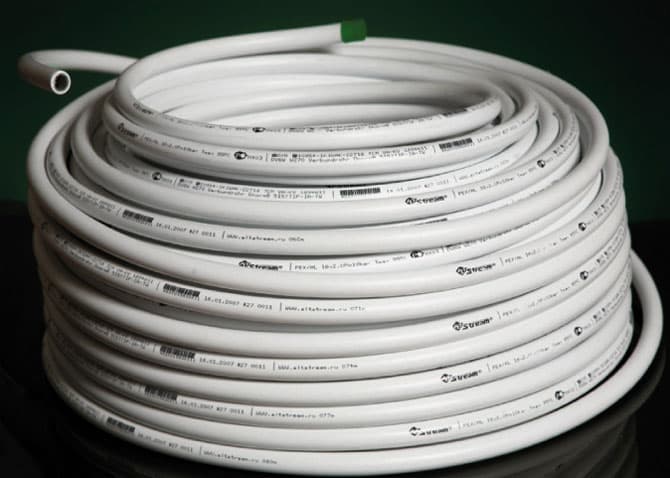
Since metal-plastic is sold in coils, the material must be straightened before installation by rolling the pipe on a flat surface. First, the pipe should be wrapped in several layers of rags.
Tools
A set of tools for the installation of metal-plastic communications depends on which fittings are used to connect parts of the pipeline.
To assemble a pipeline from metal-polymer pipes, you must have:
- pipe cutter or hacksaw for cutting material;
- calibrator - to expand the pipe and give the circle ideal proportions;
- chamfer - for chamfering;
- sandpaper to deburr the edges of the pipe;
- adjustable (or wrenches) wrenches;
- press tongs for some types of connections;
- building hair dryer or bending device, such as sand.
It is preferable to cut with scissors, but you can also use a hacksaw or a sharp knife.
When the edges are prepared for connection, the pipe is inserted into the fitting. There are several types of connecting metal-plastic pipes to each other or with a transition to another material:
- compression fittings;
- press connection;
- push fit.
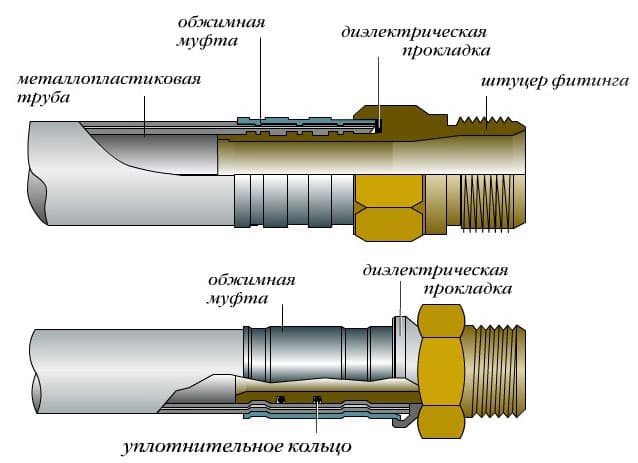
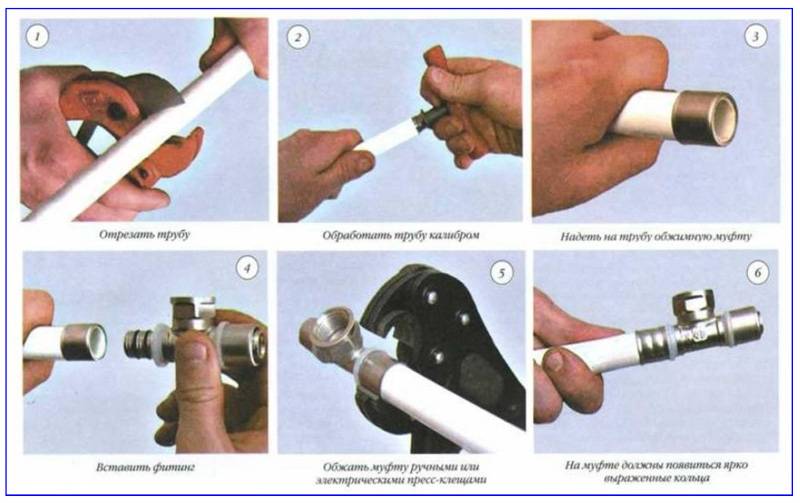
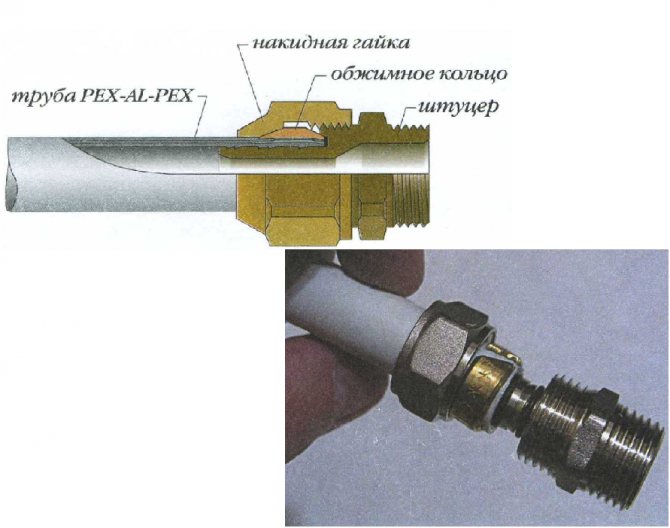
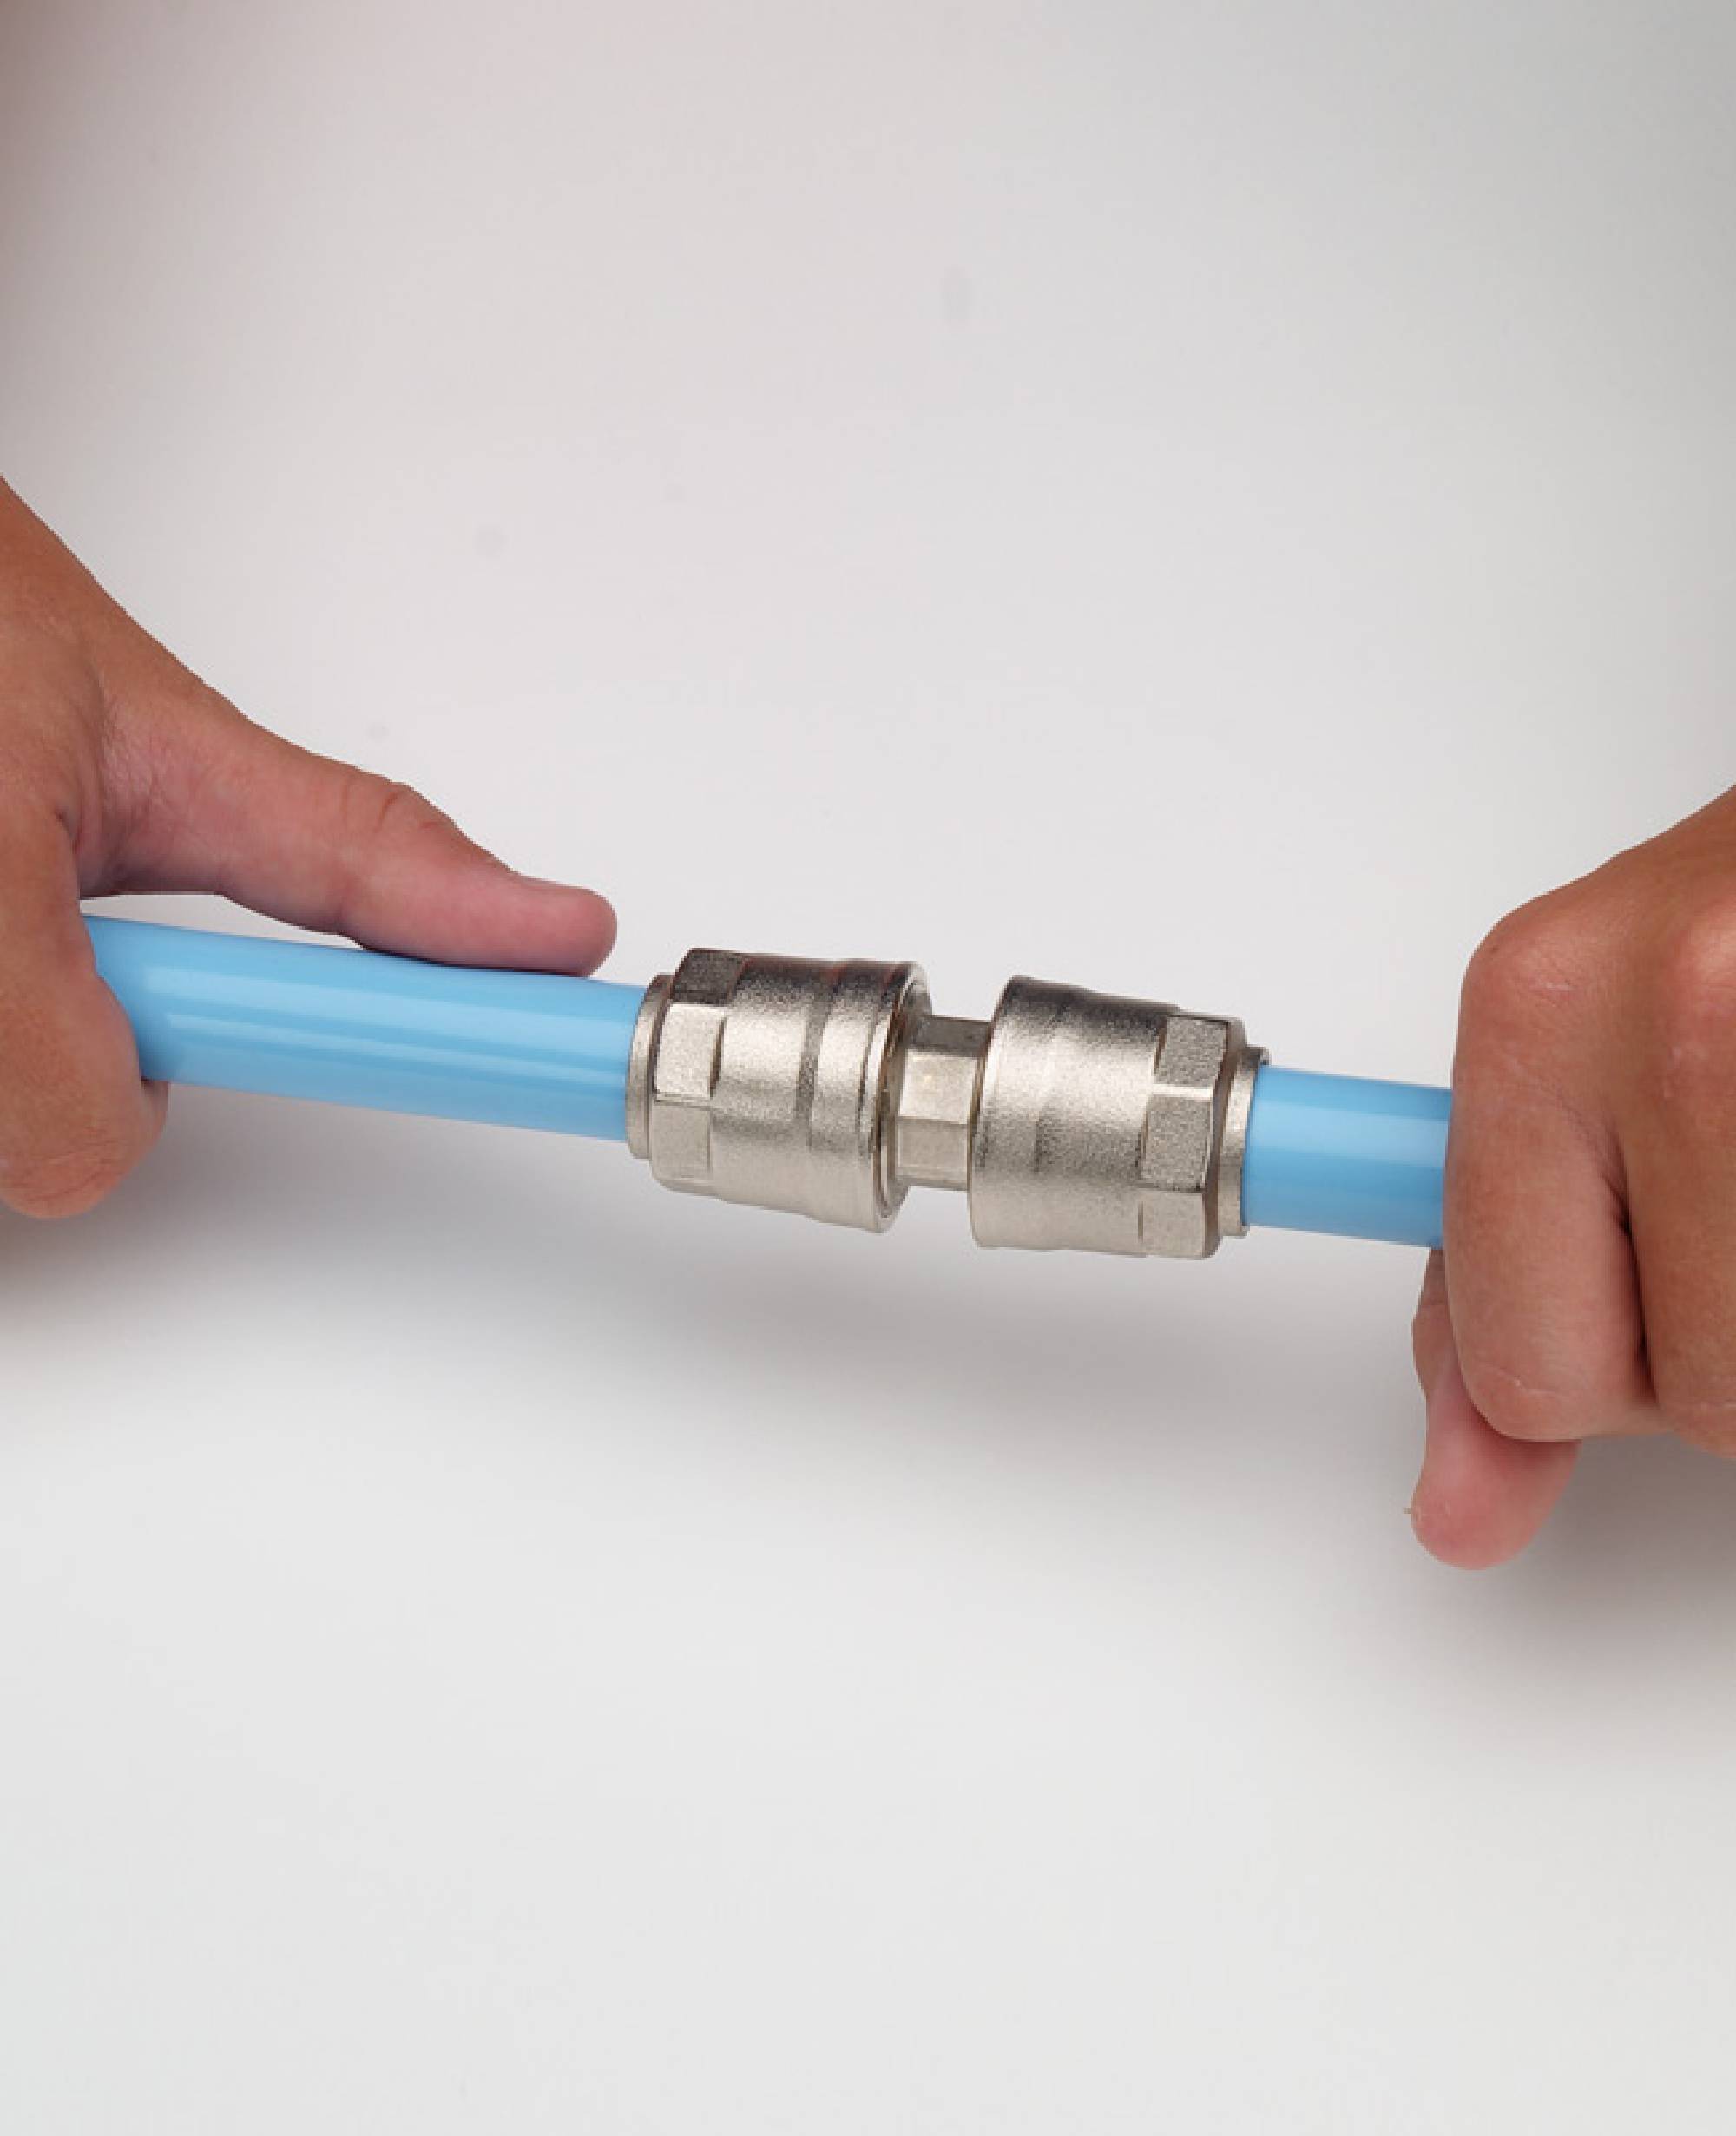
Compression connection
The connection of metal-plastic pipes using compression fittings is common and affordable for self-assembly. Such nodes can be disassembled and reassembled. You will need 2 wrenches for installation.
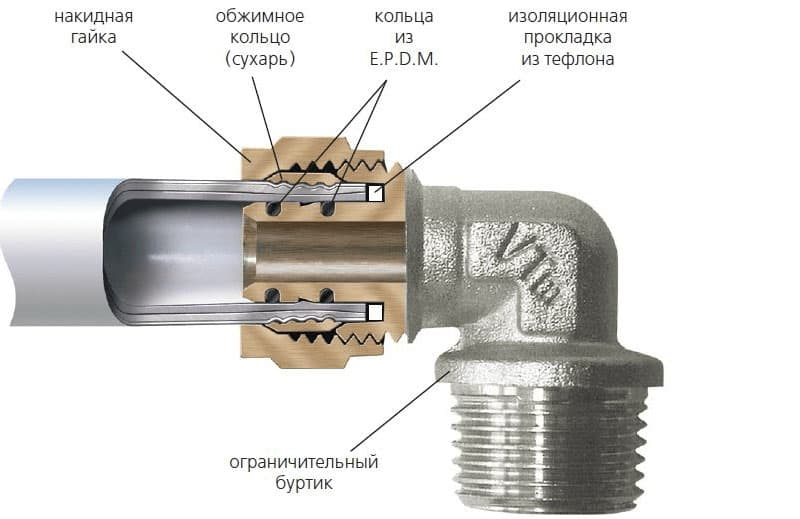
Installation algorithm:
- The fitting is untwisted and disassembled. A union nut and a ferrule are put on the end of the pipe.
- The inside of the pipe and the end of the fitting with a rubber gasket are lubricated with thick soapy foam to facilitate the alignment process. For the same purpose, the inner diameter is pre-flared with a calibrator. Such measures will prevent the displacement of the rubber gaskets.
- The fitting is inserted into the junction, the ring is displaced and the nut is tightened. The twisting process is carried out using two keys.
The resulting connection requires periodic control and tightening of the nut in case of leakage.
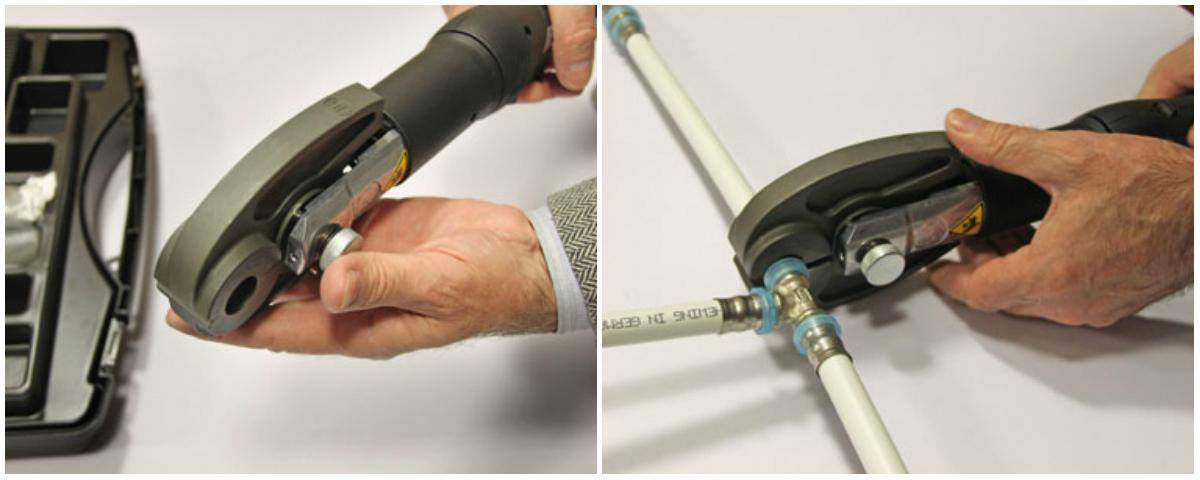
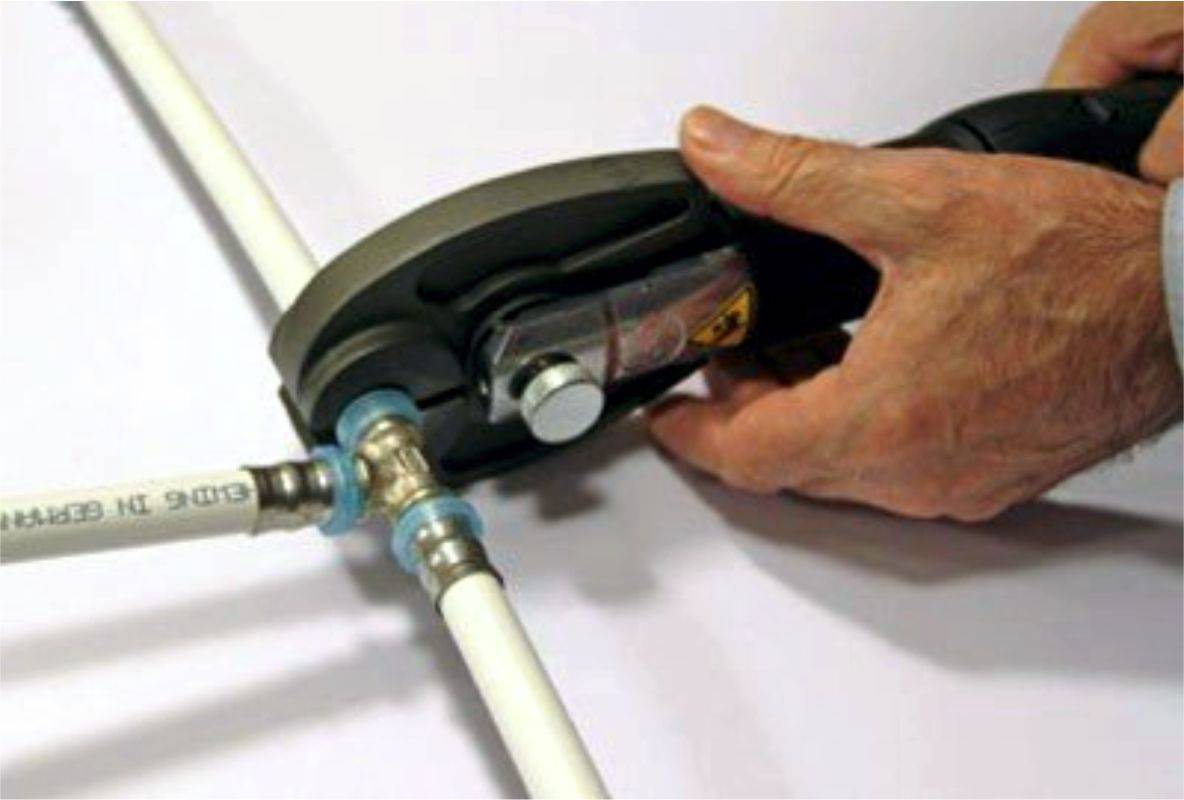
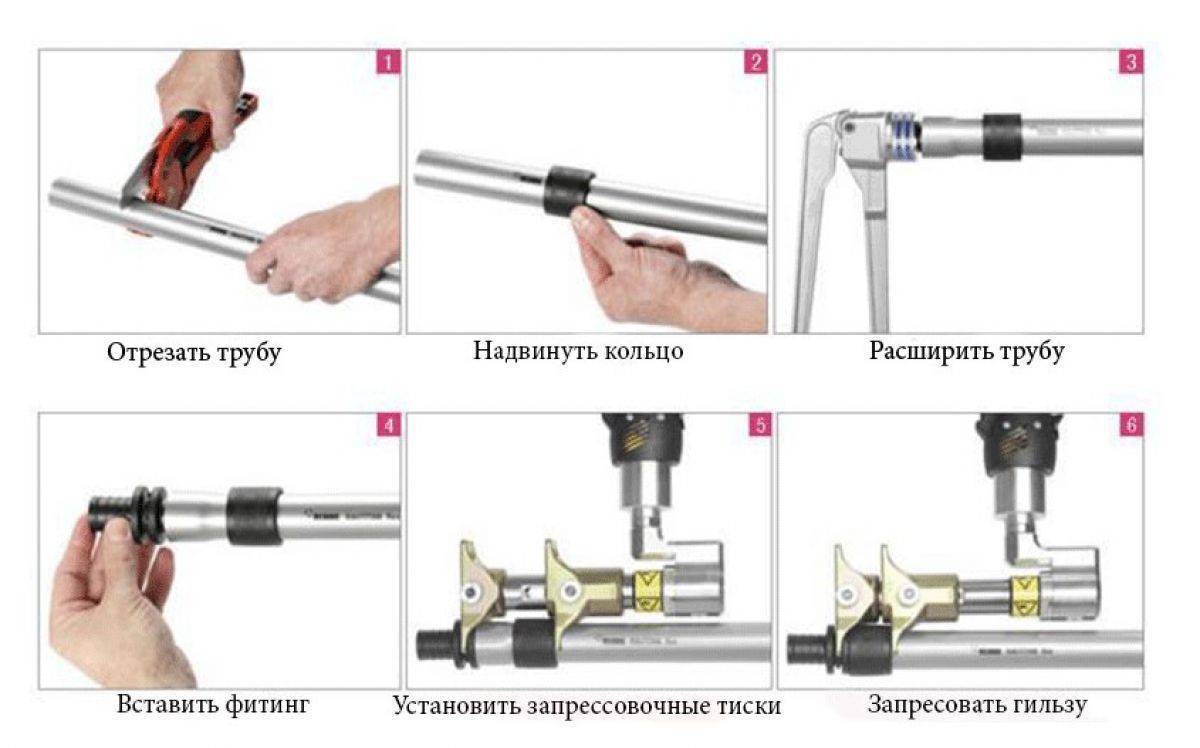
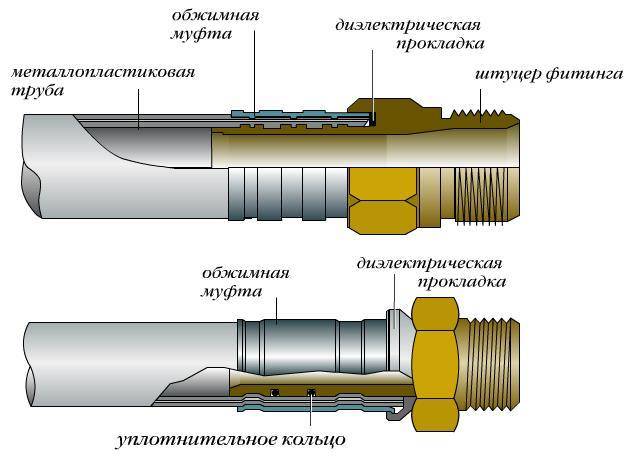
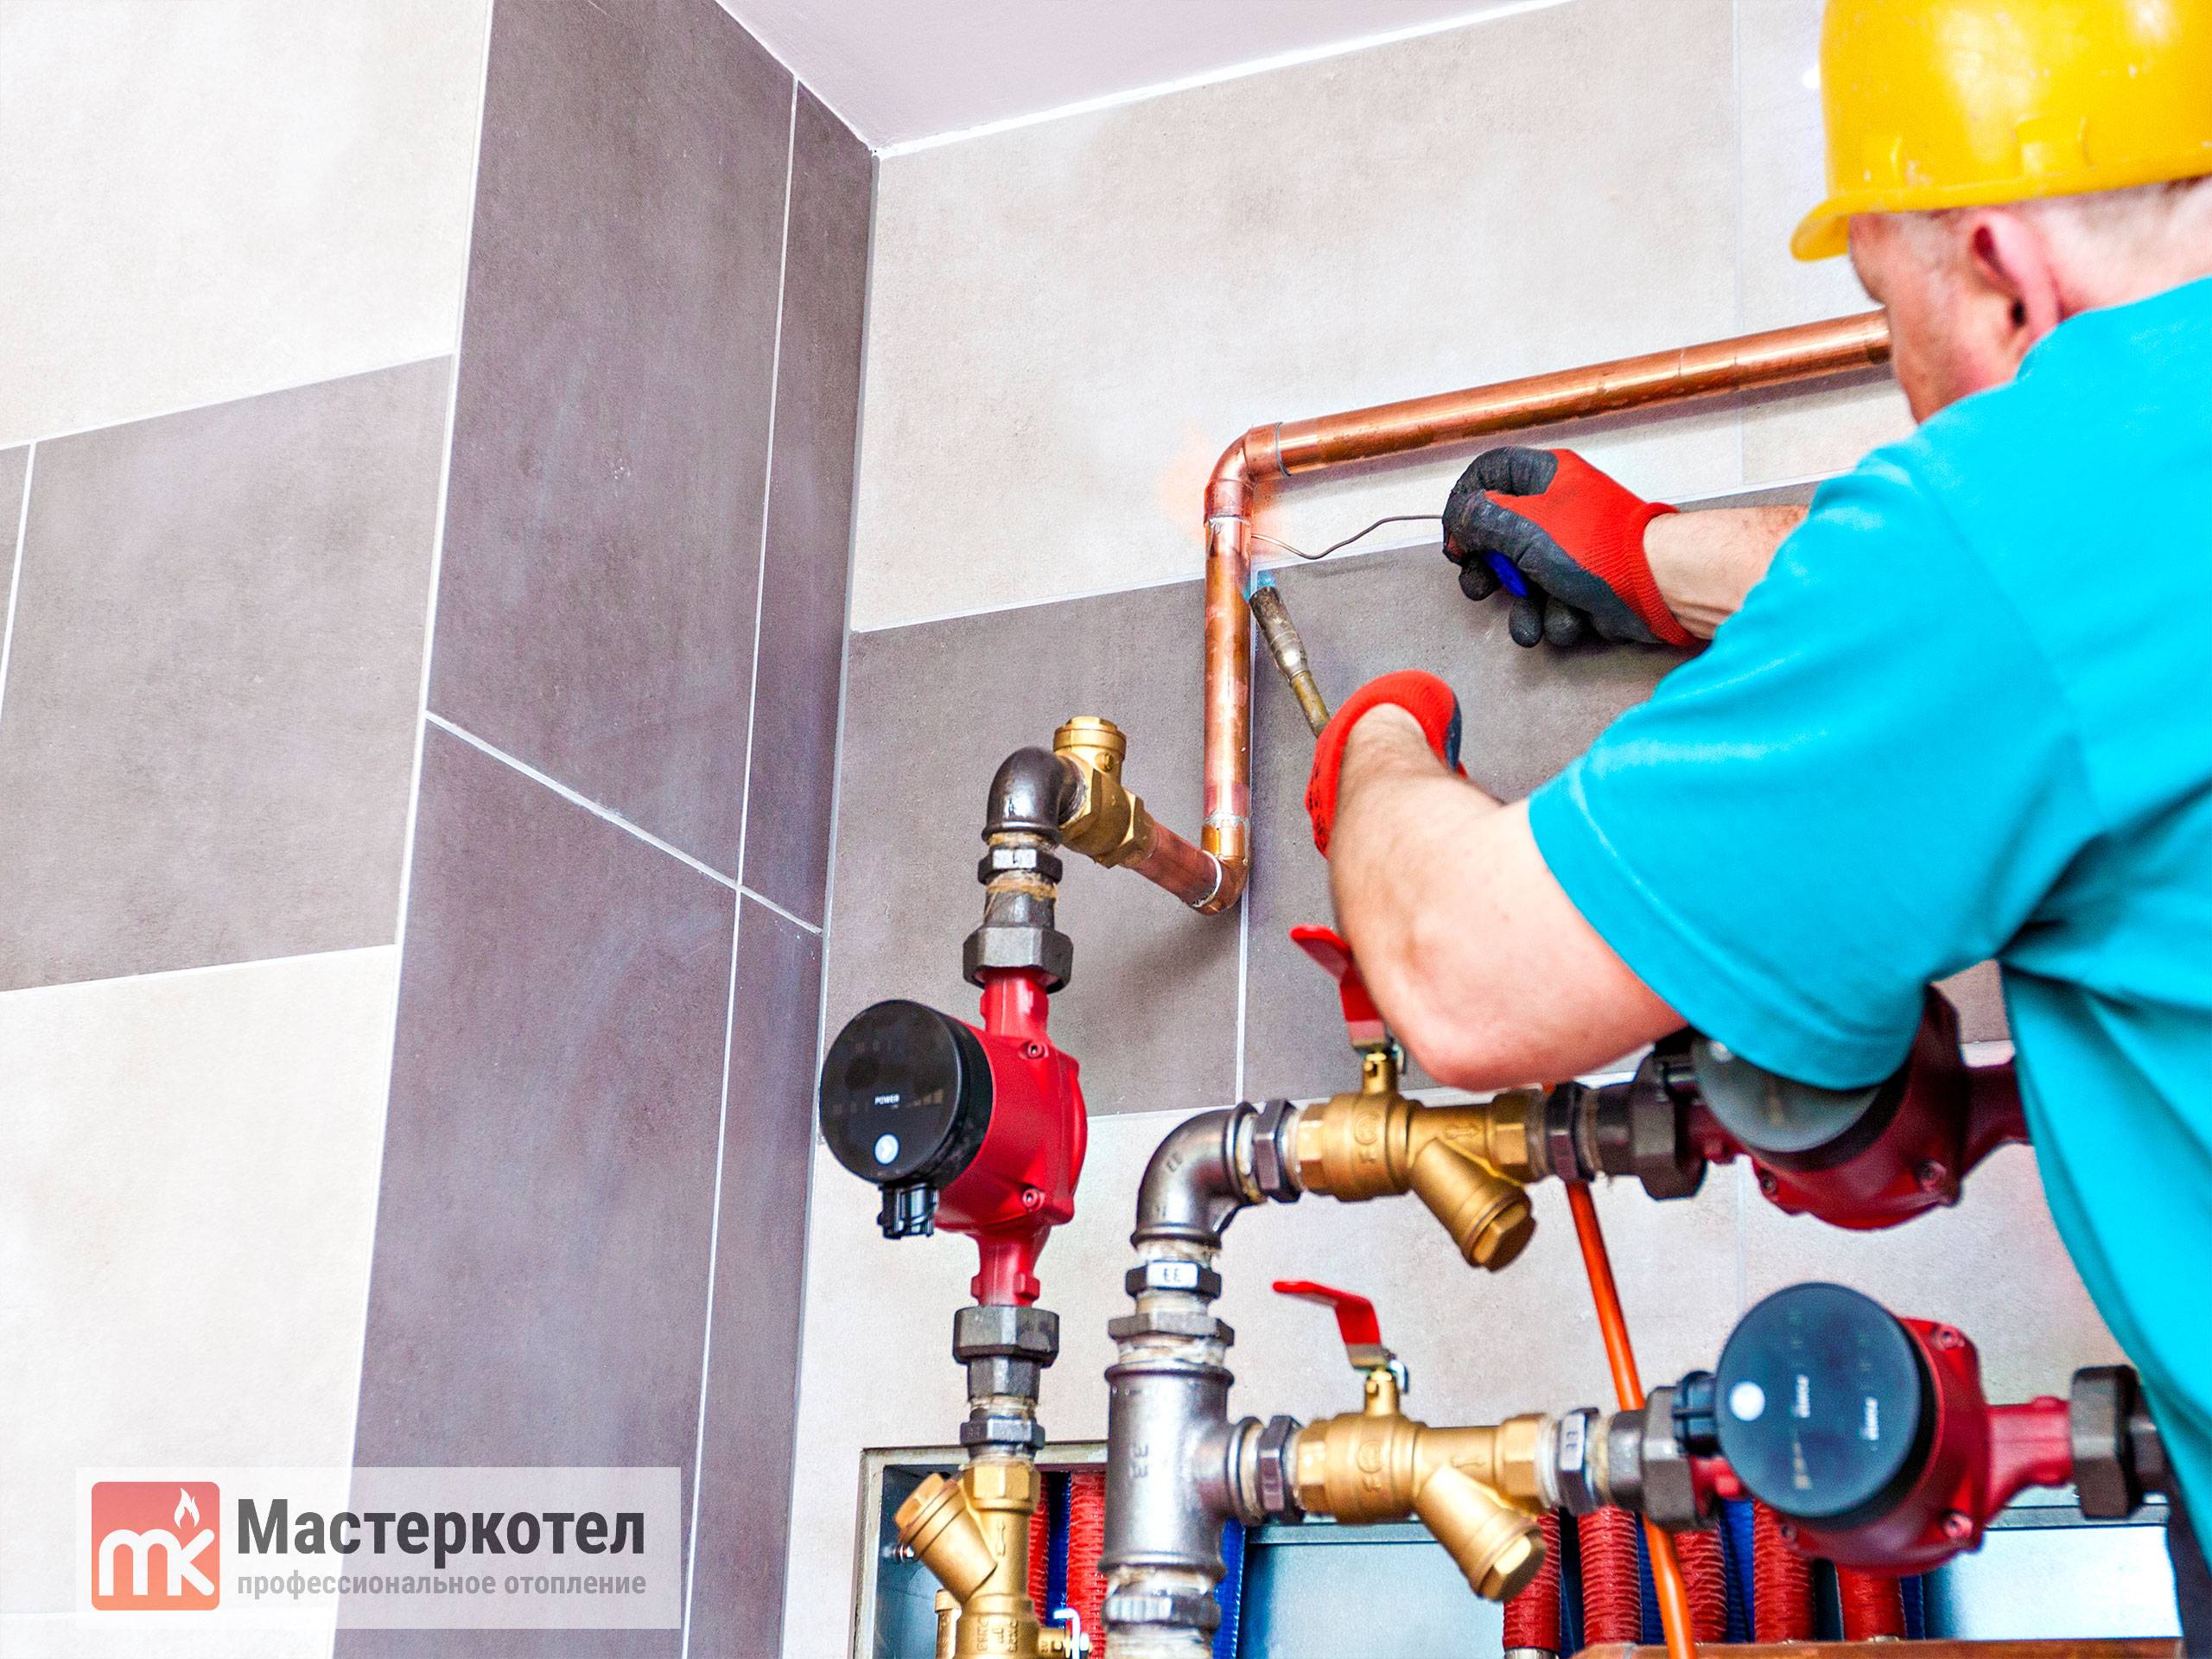
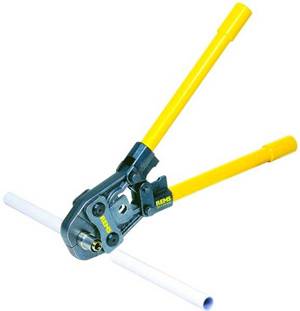
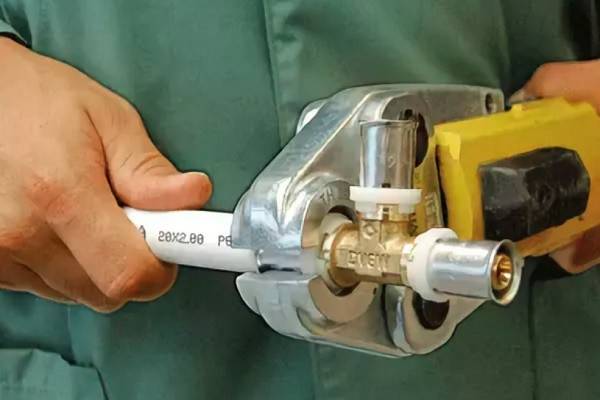
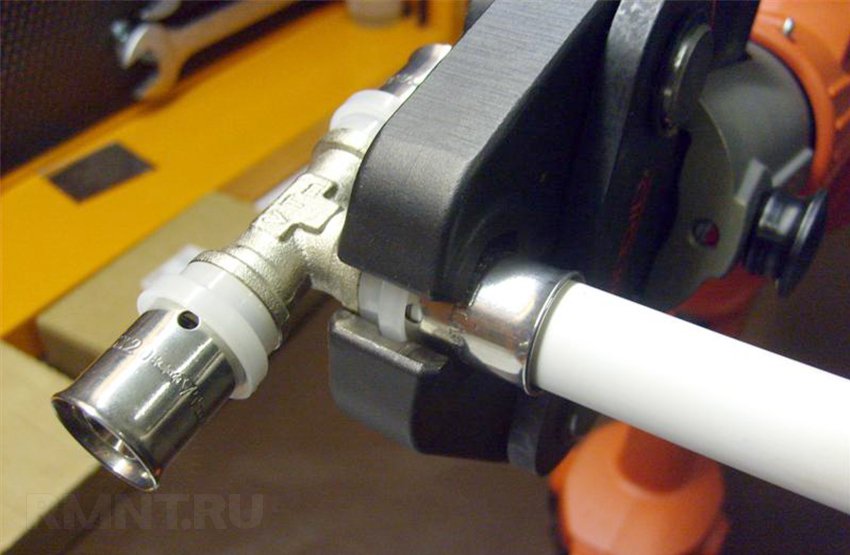
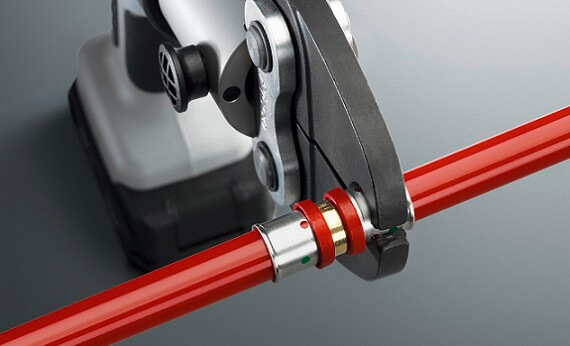
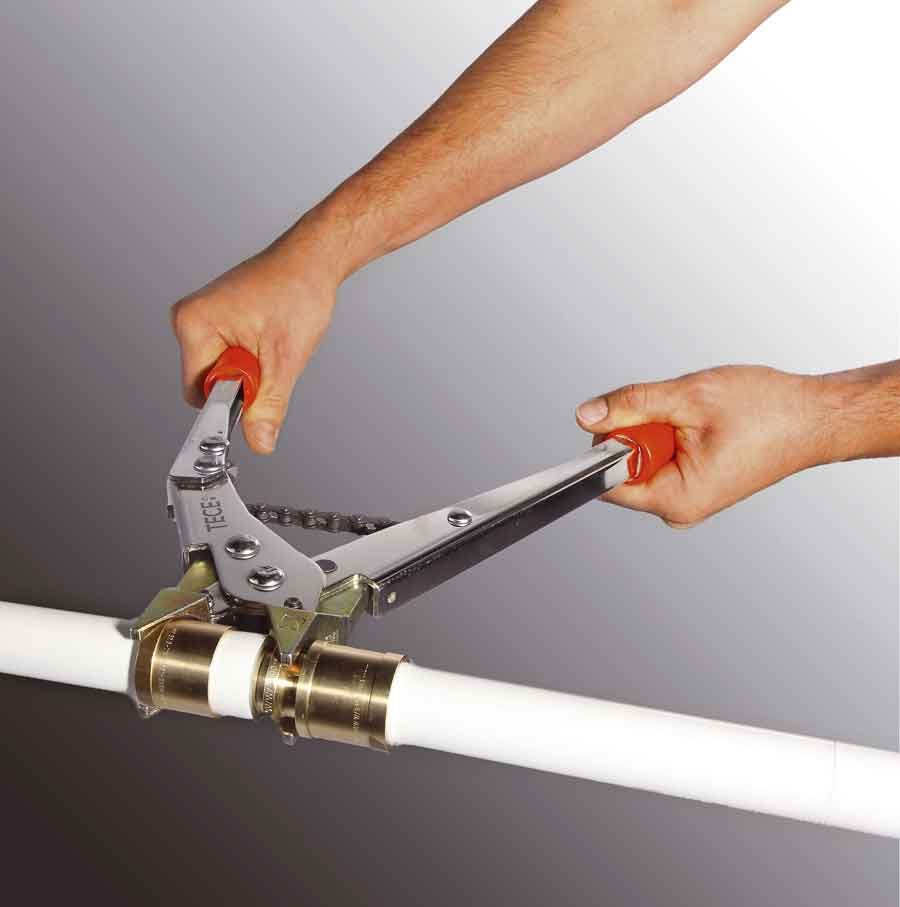
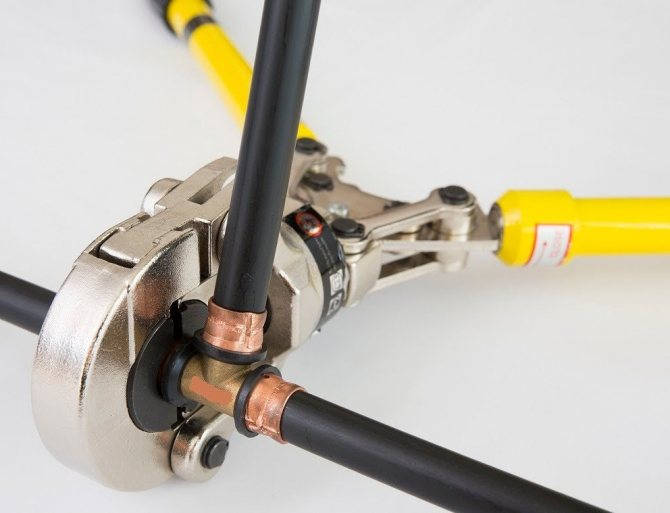
Press connection
The crimp connection is mounted using press fittings and a press tool (manual or electric).
Mounting scheme:
- Preparation: the cut is processed and cleaned. The press fitting is disassembled and checked for integrity and the presence of gaskets, then reassembled ..
- The edge for the connection is put on the fitting to the control window.
- The sleeve is pressed with press tongs, the tool handles are reduced to the stop.
- Repeat operations on the opposite end of the connecting fitting.
The resulting connection can serve up to 50 years, but is non-separable.


Push fit connection
Push fittings are the most expensive elements for connecting plastic pipes. However, their use does not require any tools and skills, it is reliable and durable.
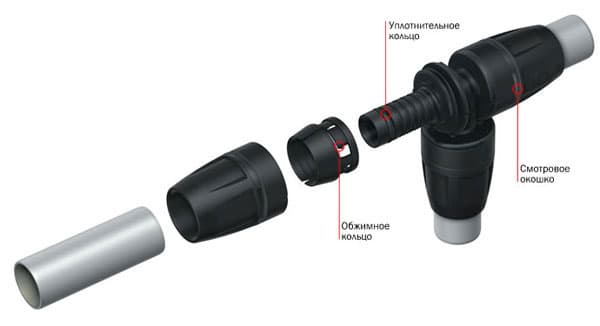
The prepared pipe is inserted into the push-fit up to the control hole. Next, the entire structure is assembled. A trial flow is started, under the action of which the connection is fixed by an internal wedge.
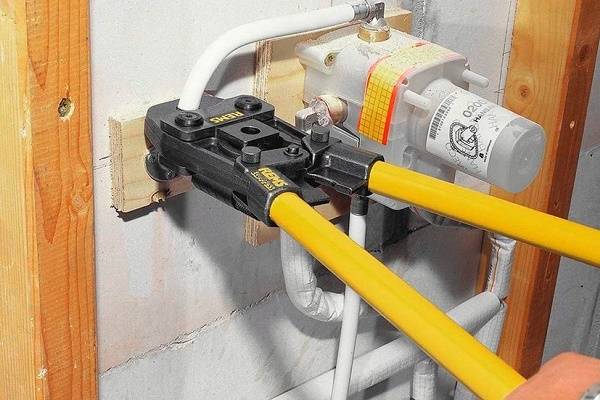
Wall mount
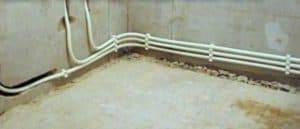
The weak point of metal-plastic products is the low resistance to mechanical damage due to the fact that the aluminum layer is thin.
With a large bending radius or constant pressures, the pipe is deformed.In this case, it is recommended to fix the pipeline on a solid base - a wall, ceiling or under a plinth. To do this, the fixing element is fixed to the wall:
- clips;
- supports;
- pendants.
The process of fastening and fixing occurs in a simple way:
- the support is attached to the wall, fixed in a fixed position;
- the pipe is inserted into the clip with an expanding mechanism. If the clip is deaf, then a pipe is initially inserted, and then the whole structure is attached to the wall.
Fitting classification
Variety of compression fittings.
- corners and bends (used when connecting turns from 45 degrees);
- crosses (help to branch on two sides);
- tees (used for one-way branch);
- plugs (used for fastening at the end of the pipe);
- couplings (with the help of them pipes of the same diameter and direction are connected);
- fittings (if necessary, connection with a hose).
Fittings that are used to connect pipes of the same diameter are called straight fittings, and those intended for fastening pipes of different diameters are called transitional.
There is a wide range of cast iron, steel, brass or copper fittings on the construction market.
As for cast iron, they are distinguished by such qualities as strength and durability. Cast iron fittings have a significant advantage over other connecting products, such as steel couplings. Another positive qualities of cast iron elements include high resistance to negative environmental influences and versatility.
Steel fittings are indispensable in modern industry today. More recently, obstacles in the path of the pipeline could be bypassed by bending the pipe.Today there is no need
The pipeline using steel products is easy to assemble and disassemble, which is also important
Preparatory work before pressing
The actions that must be performed before starting the control pressure testing of the gas pipe are carried out in accordance with the labor protection instructions developed according to the standard safety regulations for performing gas hazardous work.
Preparation includes:
Gas pipeline scheme
- reconciliation of the actual underground laying of communications with the routing indicated on the diagrams in the project documentation;
- places are selected for connecting the necessary plugs, instrumentation and regulators;
- the point of connection of the compressor unit is determined.
All engineers and workers involved in this event are required to be re-instructed in labor protection and familiarized with the procedure for performing work.
Instructions for use
Regardless of the type of installation and equipment you choose, there is a general procedure for preparatory work. These rules will facilitate the arrangement of the pipeline and are desirable for execution:
- you need to draw up a pipe layout plan, this will help calculate the amount of material and couplings;
- places of work must be carefully cleaned to prevent dust and dirt from entering the connection points in order to avoid leaks in the future;
- if you need to connect to an existing system, you need to check its integrity and prepare the insertion point;
- pipes should be cut so that the cut is exactly 90 degrees to the longitudinal axis of the pipe, this is necessary to ensure reliability and tightness;
- guided by the diagram, lay out all pipes and couplings to check the cutting and the number of all the necessary connection elements.
As mentioned above, there are three main options for connecting cross-linked polyethylene. The selection of equipment and tools depends on the choice of method. For all methods, you will need nozzles for the diameter of the pipes and a pruner.


The first method is the easiest to perform. In addition to pipes and pruners, only compression couplings and a pair of wrenches will be required. These tools are needed to tighten the nuts after being pushed into place.
It is important to remember: you need to control the process of tightening the nuts so as not to damage the thread. Screw tight, but don't overtighten.
The second method is pressing. You will need a calibrator, scissors, an expander and a press.
There will be no difficulties with scissors, their purpose is simple - to cut the pipe into the sizes we need. We process its edges with a calibrator, chamfering from the inside. This tool is necessary to give the pipe a rounded shape after cutting.
Then we take the expander (expander) of the manual type, which is very easy to use. We deepen the working edges of the device inside the pipe and expand it to the desired size. This should not be done at one time, as the material can be damaged. We do this gradually, turning the expander in a circle. The advantages of this device are the price and ease of use. This is an amateur instrument.
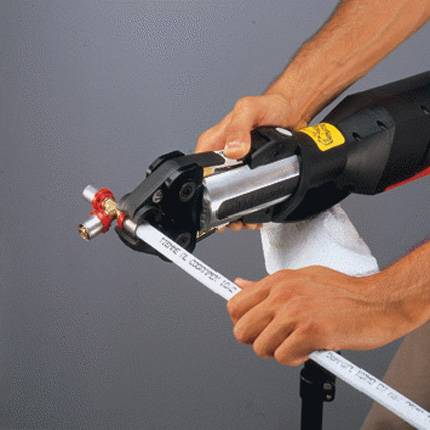
The electrically powered expander is equipped with a rechargeable battery, designed to speed up the work of the installer. It significantly saves the effort of the worker and time for the installation of systems.Naturally, this device is many times more expensive, but if you need to work a lot, it will perfectly fit and justify the costs. There are hydraulic expanders. After we prepare the pipe, you need to install a fitting in it. To do this, we need a press vise. They are also hydraulic and mechanical. Before use, they must be removed from the storage case and assembled in the working position.
After assembling the tool and installing the coupling into the pipe, the connection is installed with a press. That is, the fitting enters its place, and pressure is applied from above with a mounting sleeve. Manual presses are recommended for small pipe diameters and low demand.
Hydraulic presses require virtually no effort during crimping. The fittings and sleeve are simply installed in the groove on the device, then they easily and smoothly fall into place. This tool can be used even in places that are inconvenient for installation, it has a swivel head. And the last option for connecting cross-linked polyethylene is welded. As mentioned earlier, it is the most expensive and rarely used, but the most reliable. For it, in addition to the scissors already familiar to us, expanders, special couplings will also be needed. Electrofusion fittings have special conductors for heating.
After preparing the equipment and components, we proceed to welding. To do this, we install an electric-welded coupling at the end of the pipe. It has special terminals to which we connect the welding machine. We turn it on, at this time all the elements are heated to the melting point of polyethylene, about 170 degrees Celsius. The coupling material fills all the voids, and welding occurs.
If the device is not equipped with a timer and a device that can read information from the fittings, you need to monitor the instrument readings in order to turn everything off in time. We turn off the equipment, or it turns off on its own, we wait until the unit cools down. Pipes are often supplied in reels and may lose their shape during storage. For this, you need a hair dryer. With its help, it is possible to eliminate this drawback by simply heating the deformed segment with warm air.
In the next video, you will find an overview of tools for installing XLPE heating and plumbing systems.
Crimping process
Pressure testing of heating systems of a private house begins with disconnecting the heating boiler, automatic air vents and expansion tank from the system. If shut-off valves lead to this equipment, you can close them, but if the valves turn out to be faulty, the expansion tank will definitely fail, and the boiler, depending on the pressure that you apply to it. Therefore, it is better to remove the expansion tank, especially since this is not difficult to do, but in the case of the boiler, you will have to rely on the serviceability of the taps. If there are thermostats on the radiators, it is also advisable to remove them - they are not designed for high pressure.


Sometimes not all heating is tested, but only some part. If possible, it is cut off with the help of shut-off valves or temporary jumpers are installed - drives.
Next, the process is:
- If the system was in operation, the coolant is drained.
- A pressurizer is connected to the system. A hose extends from it, ending with a union nut. This hose is connected to the system in any suitable place, even in place of the removed expansion tank or instead of a drain cock.
-
Water is poured into the capacity of the pressure test pump, and pumped into the system with the help of a pump.
- Remove all air from the system before pressurizing. To do this, you can pump the system a little with the drain valve open or lower it through the air vents on the radiators (Mayevsky taps).
- The system is brought to operating pressure, maintained for at least 10 minutes. During this time, all the remaining air descends.
- The pressure rises to the test pressure, a certain period of time is maintained (regulated by the regulations of the Ministry of Energy). During the test, all devices and connections are checked. They are inspected for leaks. Moreover, even a slightly damp connection is considered a leak (fogging also needs to be eliminated).
- During crimping, the pressure level is controlled. If, during the test, its fall does not exceed the norm (registered in SNiP), the system is considered serviceable. If the pressure drops even slightly below normal, you need to look for a leak, fix it, then start the pressure test again.
As already mentioned, the test pressure depends on the type of equipment and system being tested (heating or hot water). The recommendations of the Ministry of Energy set forth in the "Rules for the technical operation of thermal power plants" (clause 9.2.13) are summarized in a table for ease of use.
| Type of equipment tested | Test pressure | Test duration | Permissible pressure drop |
|---|---|---|---|
| Elevator units, water heaters | 1 MPa(10 kgf/cm2) | 5 minutes | 0.02 MPa (0.2 kgf/cm2) |
| Systems with cast iron radiators | 0.6 MPa (6 kgf/cm2) | 5 minutes | 0.02 MPa (0.2 kgf/cm2) |
| Systems with panel and convector radiators | 1 MPa (10 kgf/cm2) | 15 minutes | 0.01 MPa (0.1 kgf/cm2) |
| Hot water supply systems from metal pipes | working pressure + 0.5 MPa (5 kgf/cm2), but not more than 1 MPa (10 kgf/cm2) | 10 minutes | 0.05 MPa (0.5 kgf/cm2) |
| Hot water systems from plastic pipes | working pressure + 0.5 MPa (5 kgf/cm2), but not more than 1 MPa (10 kgf/cm2) | 30 minutes | 0.06 MPa (0.6 kgf/cm2), with a further check within 2 hours and a maximum drop of 0.02 MPa (0.2 kgf/cm2) |
Please note that for testing heating and plumbing from plastic pipes, the holding time of the test pressure is 30 minutes. If during this time no deviations are found, the system is considered to have successfully passed the pressure test.
But the test continues for another 2 hours. And during this time, the pressure drop in the system should not exceed the norm - 0.02 MPa (0.2 kgf / cm2).

Correspondence table for different pressure units
On the other hand, SNIP 3.05.01-85 (clause 4.6) has other recommendations:
- Tests of heating and water supply systems should be carried out with a pressure of 1.5 from the working one, but not lower than 0.2 MPa (2 kgf / cm2).
- The system is considered serviceable if after 5 minutes the pressure drop does not exceed 0.02 MPa (0.2 kgf/cm).
Which rules to use is an interesting question. While both documents are in force and there is no certainty, so both are eligible. It is necessary to approach each case individually, taking into account the maximum pressure for which its elements are designed. So the working pressure of cast-iron radiators is no more than 6 atm, respectively, the test pressure will be 9-10 atm. Approximately also it is necessary to be determined with all other components.
What is flushing and pressing
Flushing and pressure testing of heating systems is carried out in cases where the layer of deposits in the pipes becomes too large for them to continue to function. As a preventive measure, such events are rarely carried out, since this pleasure is quite laborious and expensive. For hydropneumatic flushing, acid solutions are used, which remove plaque from the pipeline walls to the outside. Metal particles cling to the inner walls of the pipes, thereby reducing their diameter. It leads to:
- increase in pressure;
- increase in the speed of the coolant;
- decrease in efficiency;
- increase in costs.
What is pressure testing of a heating system - this is an ordinary test, according to the results of which one can say whether it is safe to use such equipment or not, and also whether it can withstand the necessary loads. After all, no one wants to become a victim of circuit depressurization and be a patient in the burn department. Pressure testing of the heating system is carried out in accordance with SNiPs. It is a mandatory procedure. After it, a document is issued confirming the technical serviceability of the circuit. Here are the main cases when pressure testing of the heating system is carried out:
- when assembling a new circuit and putting it into operation;
- after the repair work;
- preventive checks;
- after cleaning pipes with acid solutions.
Pressure testing of the heating system is carried out in accordance with SNiP No. 41-01-2003 and No. 3.05.01-85, as well as the rules for the technical operation of thermal power plants.
From these rules, it is known that such an action as pressure testing of a heating system is carried out either with air or liquid. The second method is called hydraulic, and the first is called manometric, it is also pneumatic, it is bubble.The rules for pressure testing the heating system state that water tests can only be carried out if the temperature in the room is above five degrees. Otherwise, there is a risk that the water in the pipes will freeze. Pressurization of the heating system with air removes this problem, it is carried out in the cold season. In practice, hydraulic pressure testing of the heating system is used more often, as everyone is trying to complete the necessary planned work before the heating season. In winter, only the elimination of accidents, if any, is performed.
It is possible to start pressure testing of the heating system only when the boiler and expansion tank are cut off from the circuit, otherwise they will fail. How is the heating system pressure tested?
- all liquid is drained from the circuit;
- then cold water is poured into it;
- as it fills, excess air descends from the circuit;
- after water has accumulated, a pressure supercharger is supplied to the circuit;
- how the heating system is pressurized - the amount of atmospheres gradually increases. In this case, the maximum test pressure should not be higher than the tensile strength of the various elements of the circuit;
- high pressure is left for a while and all connections are inspected. It is necessary to look not only at the threaded connections, but also at the places where the parts of the circuit are soldered.
Pressurizing the heating system with air is even easier. Just drain all the coolant, close all outlets in the circuit and bring air into it. But in this way, it is more difficult to determine the malfunction. For example, if there is liquid in the pipes, then at high pressure it will seep through a possible gap. It is easy to identify visually.But if there is no liquid in the tubes, accordingly, there is nothing to go out except air. In this case, a whistle may be heard.
And if it is inaudible, while the pressure gauge needle indicates a leak, then all connections are smeared with soapy water. To make it easier, you can check not the entire system, but by dividing it into segments. In this case, it is easier to carry out pressure testing of heating pipes and determine possible places of depressurization.
Do-it-yourself installation of metal-plastic pipes
Pipe cutting is carried out with metal shears or a special hacksaw. Cutters are used for cutting small and medium diameter metal-plastic, and are widely used in professional installation. Scissors are a simpler household appliance, they can also be bought in the budget price category, the main thing is that there is a comfortable and balanced handle, and the blades themselves are sharp, made of high-quality metal. The cutters are equipped with an internal calibrator, which allows not only cutting metal-plastic, but also restoring the deformed shape of the edges.


In addition to special tools, when installing a system of metal-plastic pipes, the use of more versatile devices is required: a measuring tape, keys of the right size, a beveler, grinding emery, an expander, provided that press fitting connections are used.
The plumbing system made of plastic and metal is not only durable and practical, but also easy to install. The process is available for execution even by a person who does not have the necessary knowledge.Having a set of the simplest tools, you can do basic installation work efficiently and with decent cost savings if you follow simple installation rules.
Plastic in combination with metal is a good tandem, but it is also “afraid” of aggressive mechanical and ultraviolet effects, this must be taken into account when laying them open.
If it is intended to install a closed type, then it is necessary to provide for the presence of hatches for access to compression type fittings.
The heating system can also consist of MP pipes, but in this case it is worth paying special attention to checking the integrity of all elements and observing the condition of the most durable connection of all elements. Do not use sharp objects when unpacking new elements of the system, even a micro-scratch can seriously damage the entire system.
Metal supports and hangers used for pipe installation must be equipped with soft gaskets, this will help to avoid mechanical damage to the plastic surface.
As a wardrobe begins with a hanger, so the installation of metal-plastic pipes begins with the selection and fastening of ball valves
This element is extremely important for the entire system, you should not save on it and buy Chinese budget counterparts
A high-quality faucet must withstand up to 60 atmospheres and high temperatures
As a wardrobe begins with a hanger, so the installation of metal-plastic pipes begins with the selection and fastening of ball valves
This element is extremely important for the entire system, you should not save on it and buy Chinese budget counterparts. A high-quality faucet must withstand up to 60 atmospheres and high temperatures.In the event of a leak, it is the faucet that is able to stop the flow of water in the shortest possible time.
If at the right time the tap does not cope with its direct task, the plumbing system is in danger of serious damage.
In the event of a leak, it is the faucet that is able to stop the flow of water in the shortest possible time. If at the right time the tap does not cope with its direct task, the plumbing system is in danger of serious damage.
As a wardrobe begins with a hanger, so the installation of metal-plastic pipes begins with the selection and fastening of ball valves
This element is extremely important for the entire system, you should not save on it and buy Chinese budget counterparts. A high-quality faucet must withstand up to 60 atmospheres and high temperatures. In the event of a leak, it is the faucet that is able to stop the flow of water in the shortest possible time.
If at the right time the tap does not cope with its direct task, the plumbing system is in danger of serious damage.
In the event of a leak, it is the faucet that is able to stop the flow of water in the shortest possible time. If at the right time the tap does not cope with its direct task, the plumbing system is in danger of serious damage.
If the entire system is installed from scratch, then it will include the installation of cleaning filters, meters, a pressure reducer, a manifold for piping throughout the area. Pipes are recommended to be mounted together with filters, this will prevent technical debris from entering the system.


Read also:
Tests in apartment buildings
In apartment buildings, pressure testing of the heating system with air can also be carried out. We will now consider the necessary conditions for the work. In the event that you find water leaks, they must be repaired.But often, without high pressure in the system, it is quite difficult to find thin cracks in the seams. In apartment buildings, it is necessary to carry out pressure testing of both individual apartments and all highways.
You need to prepare:
- Inspect all locking fittings. If the valves are made of cast iron, be sure to replace the glands with them. Replace gaskets on flange connections. All bolts that have lost their original appearance must also be replaced. Be sure to install new pressure gauges, it is recommended to send the old ones for verification in order to decide whether they can be further used for measurements.
- Visually inspect all pipes, fittings to identify even minor defects, damage. If you find problem areas, you need to quickly repair them.
- Check the condition of the thermal insulation material on the highways laid in the basement and between floors.
After preparation, you can begin to carry out directly crimping work:
- Fill the entire circuit with water with low hardness (so that scale does not appear). It is better to pump it into the system, of course, with an electric pump. Pressure - 6-10 bar. In a container with liquid, you need to lower the hoses - drain and supply. Next, connect the pump to the heating network and turn on the pressure tester. The pressure must be set in advance.
- You detect half an hour - during this period the pressure should remain almost at the same level. In the event that the pressure does not drop, the test can be considered completed. You can fill the system with working fluid and begin active operation.
- If the pressure drops, then there are defects in the heating system.The procedure for pressure testing the heating system with air is about the same, but you will have to use a soap solution - without it it is difficult to find a leak. As soon as you find defects, you can begin to empty the system and repair. Then re-diagnose the entire heating.
The input unit is carried out similarly - the pressure should be about 10 bar.


