Installation rules - how to install a head
Since the design of the product is simple, the process of how to install a cap for a well should not cause significant difficulties. But still, there are certain recommendations of specialists that should be followed during installation.
The installation of the head is carried out in a certain sequence:
- First of all, prepare the upper part of the pipe.
- The flange is placed on it so that its side is located downwards.
- Install the sealing ring.
- Fasten the cable for the pump.
- Pass the electrical cable into the appropriate input.
- Connect a hose or a piece of water supply pipe to the fitting, the opposite end of which is attached to the pump.
- The unit is lowered into the source.
- The lid will close under the influence of the submersible pump.
- Between themselves, the head and the flange are connected with bolts, which must be tightened evenly.
When preparing the edge of the casing pipe, it must first be cut strictly horizontally. This allows you to install the head in a plane perpendicular to the column. When the pipe is cut correctly and at the required height, its edge is carefully polished, for which you can use a grinder, which comes with a set of nozzle circles.
Before installing the head on the well, the casing pipe made of metal should be additionally painted with a special coloring compound. In some cases, the o-ring is difficult to put on the pipe and not easy to move down. To solve this problem, you can use a lubricant, for example, special oil or car scrap.
First you need to put on the flange and the sealing ring, and only then lower the unit into the source. Otherwise, when installing the head, the equipment will have to be removed and then lowered again.
This option cannot be called the best, since the risk of damage to the column and pump increases, and the procedure is quite laborious. To fix the cable on the unit and the head, special carabiners are used. The length of the cable must correspond to the depth to which the pump is to be immersed. The unit should not be lowered into the source until all other elements have been placed in the appropriate cover slots.
A special clamp is located on the hole for laying the electrical cable. It needs to be slightly loosened so that the cable slides over the head unhindered. When suddenly the wire is pinched or positioned so that it is subjected to a load partially equal to the weight of the pump, it is likely that it will fail.
Before attaching to the head of a hose or water supply pipe, its lower end is connected to a submersible pump. As the unit lowers, you need to gradually release the cable. After the equipment reaches a specific depth, the cover is closed, and due to the weight of the pumping equipment it is pressed against the flange.
At the same time, the seal is in a special groove and fits snugly against the casing, thereby providing the required degree of sealing of the structure. If all requirements regarding how to correctly install the tip on the well are met, the o-ring will be evenly pressed by the flange to the cover, while the connecting holes will be located opposite.
If this does not happen, the cause of the mismatch should be found. You may only need to slightly adjust the location of the device. The connecting bolts must be tightened evenly, without tilting the cover to either side, without applying maximum force.
In case of too tight contact between the cover and the flange, damage to the ring made of rubber may occur, which will certainly lead to insufficient sealing of the structure. At the same time, an excessively weak connection is unacceptable. If the bolts are loosely tightened, the device can be easily removed from the pipe and then there is no point in mounting it.
When the cover is in place and fixed, you can almost always see a slight slack in the electrical cable. The length of the wire must be chosen so that it is not taut and at the same time does not sag.
Next, a water pipe is connected to the fitting. Then turn on the pump to check the correct installation of the head and its condition under working load conditions.
Device installation rules
Since the design of the head as a whole is very simple, then its installation should not cause any special problems. And yet there are certain rules that must be observed during installation work.
When installing a head on a well, the following procedure is usually followed:
- Prepare the edge of the casing pipe.
- The flange is put on the pipe so that its side is pointing down.
- Install the sealing ring.
- Attach the pump cable.
- An electrical cable is passed into the corresponding entrance.
- A hose or part of a water supply pipe is attached to the fitting, the second end of which is attached to the pump.
- The pump is lowered into the well.
- The cover is closed by the weight of the submersible pump.
- The flange and cover are connected with bolts, which are evenly tightened.
The preparation of the edge of the casing pipe begins with the fact that its edge is cut strictly horizontally. This will place the tip in a plane that is perpendicular to the casing.
After the pipe is correctly cut at the correct height, its edge should be carefully polished. To perform these operations, an ordinary “grinder” with a set of appropriate nozzle circles is quite suitable.
Before installing the head, it is recommended to additionally protect the metal casing pipe with a special paint for metal. The sealing ring is sometimes difficult to put on the casing, and moving it down is also not always easy.
To solve the problem, it is recommended to use a suitable lubricant, such as autol or special oil.
The rubber o-ring must fit snugly against the casing. To facilitate its installation, lubricants are used, for example, autol
In a hurry to get water from a finished well, some site owners immediately lower the pump into it, postponing the installation of the head “for later”. This is the wrong course of action. First put on the flange and o-ring, and then you can lower the pump into the well. Otherwise, to mount the head, it will have to be taken out and lowered again.


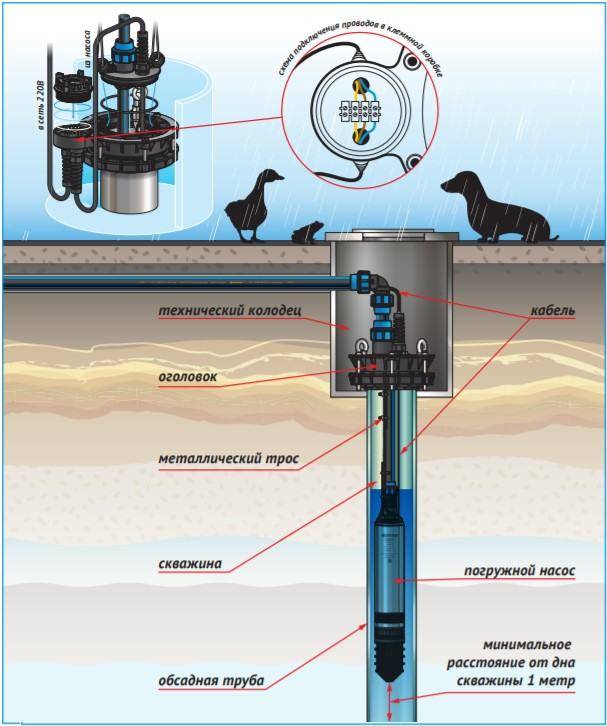
This diagram details all the steps that must be performed when installing one of the borehole tip models (+)
This is not the best option, since the risk of damage to the column and equipment increases, and the procedure itself is quite laborious. To fix the cable on the pump and the head, special carabiners are used.
The length of the rope must correspond to the depth of the equipment. The pump should not be lowered into the well until all other elements have been placed in the appropriate slots in the head cover.
There is a special clip on the hole for the electric cable. It must be slightly loosened so that the cable can slide freely. If the wire is pinched, or positioned so that it bears part of the weight of the equipment, it may break.
Before attaching a water supply pipe or hose to the head, its lower end is connected to a submersible pump.
When lowering the pump into the well, you should gradually release the cable. When the equipment is at the selected depth, the cover is closed and the weight of the pump presses it against the flange. In this case, the sealant enters a special groove and is tightly pressed against the casing pipe, which ensures reliable sealing of the structure.
If the head is installed correctly, the sealing ring will be evenly pressed by the flange against the cover, and the connecting holes will be located opposite. If this does not happen, then you need to look for the cause, perhaps you should just slightly change the position of the cover.
The connecting bolts should be tightened evenly so that the cover does not skew to one side. Don't try to do your best.
Excessively tight connection of the cover with the flange can cause damage to the rubber ring, which leads to a violation of the tightness of the structure. But too weak connection is unacceptable. If the bolts are not tight enough, the head can simply be removed from the pipe, in which case their installation becomes meaningless.
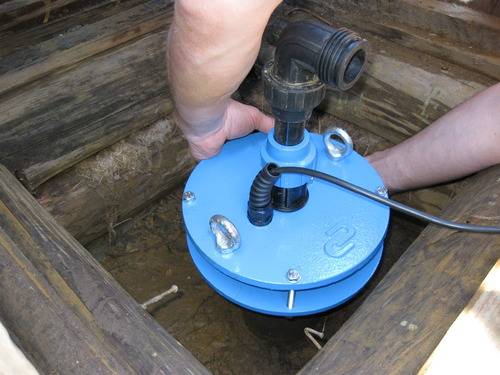
If a cable with a heavy pump is attached to the head cover, it is better to install the head with two people to carefully lower the pump into the well and put the cover in place
After the cover is installed and fixed, there is almost always some sagging of the electrical cable. The wire should be selected in such a way that it does not sag, but is not in a taut state.
Now you can connect the water pipe to the fitting. The pump is then usually turned on to check if the tip is installed correctly and is operating under load.
Self-assembly of heads
General scheme for the correct installation of the head in the caisson
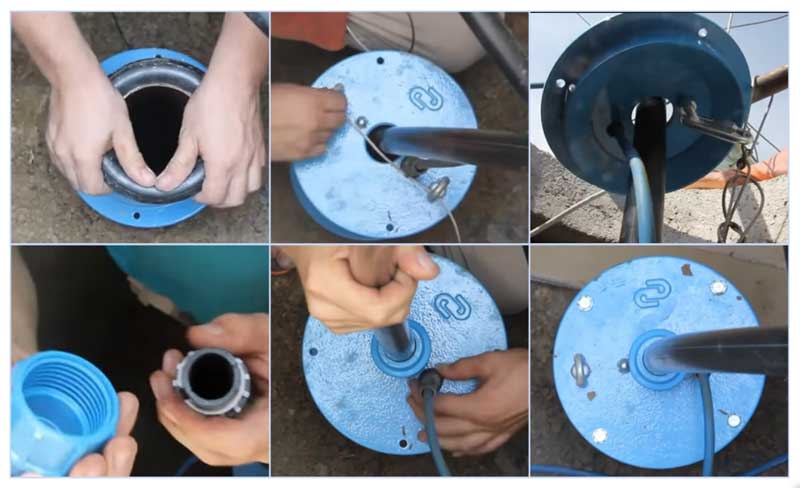
Installation of the head on the well involves the implementation of all work in a certain sequence. The instruction in the table will allow you to understand the main points and not to miss important operations:
| Illustration | Installation phase |
| Installation start. We put a flange on the cut edge of the casing pipe. We seal the connection with a rubber ring, with force pulling it onto the casing. | |
| Lid preparation. We pass the water supply hose and the power cable through the holes in the lid. The cable with a suspended pump is first passed through the rings on the cover, and then, when the length is fully measured, we fix it on the carabiner. | |
| Hose fixation. We install a cover on the neck of the casing pipe, after which we put a fitting on the hose. We drive the fitting to the hole in the cover and fix it, firmly pressing the gasket. | |
| Fixing the power cable. We put a sealing element on the power cable, which we insert into the opening of the cover. | |
| Cover fastening. Insert the bolts into the mounting holes. Tighten them evenly, sealing the knot. |


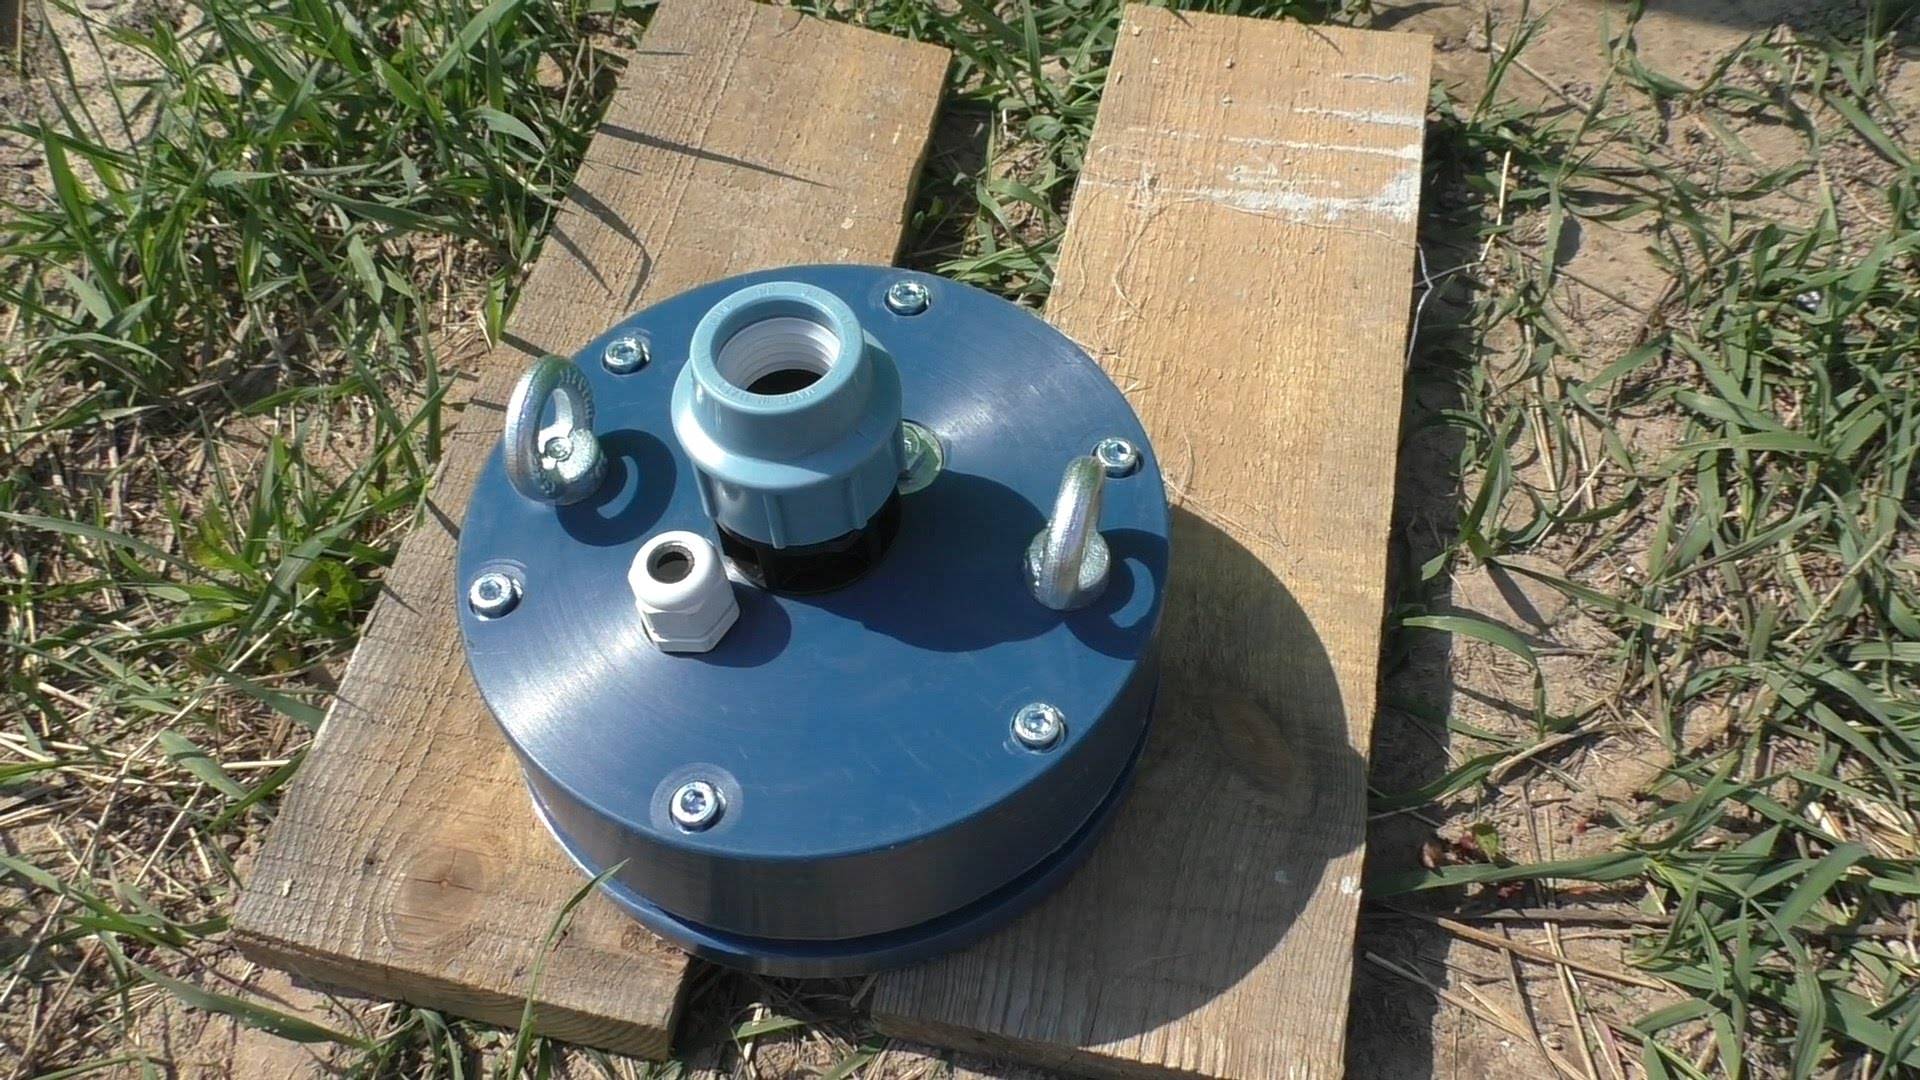

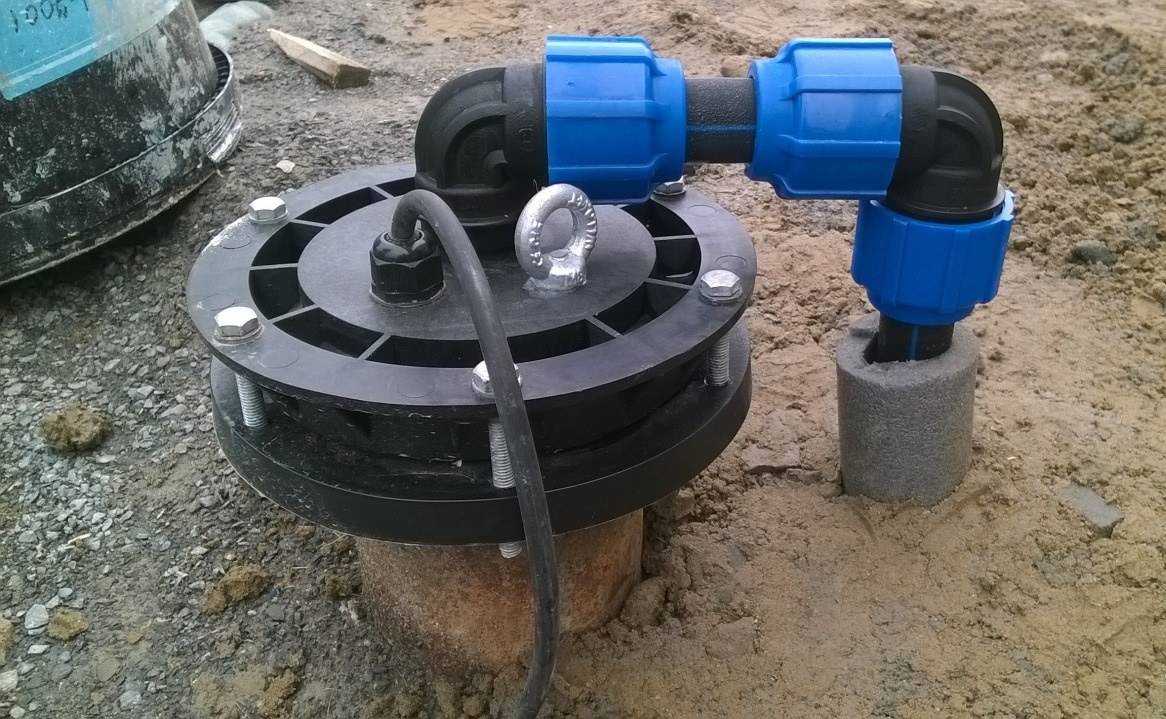
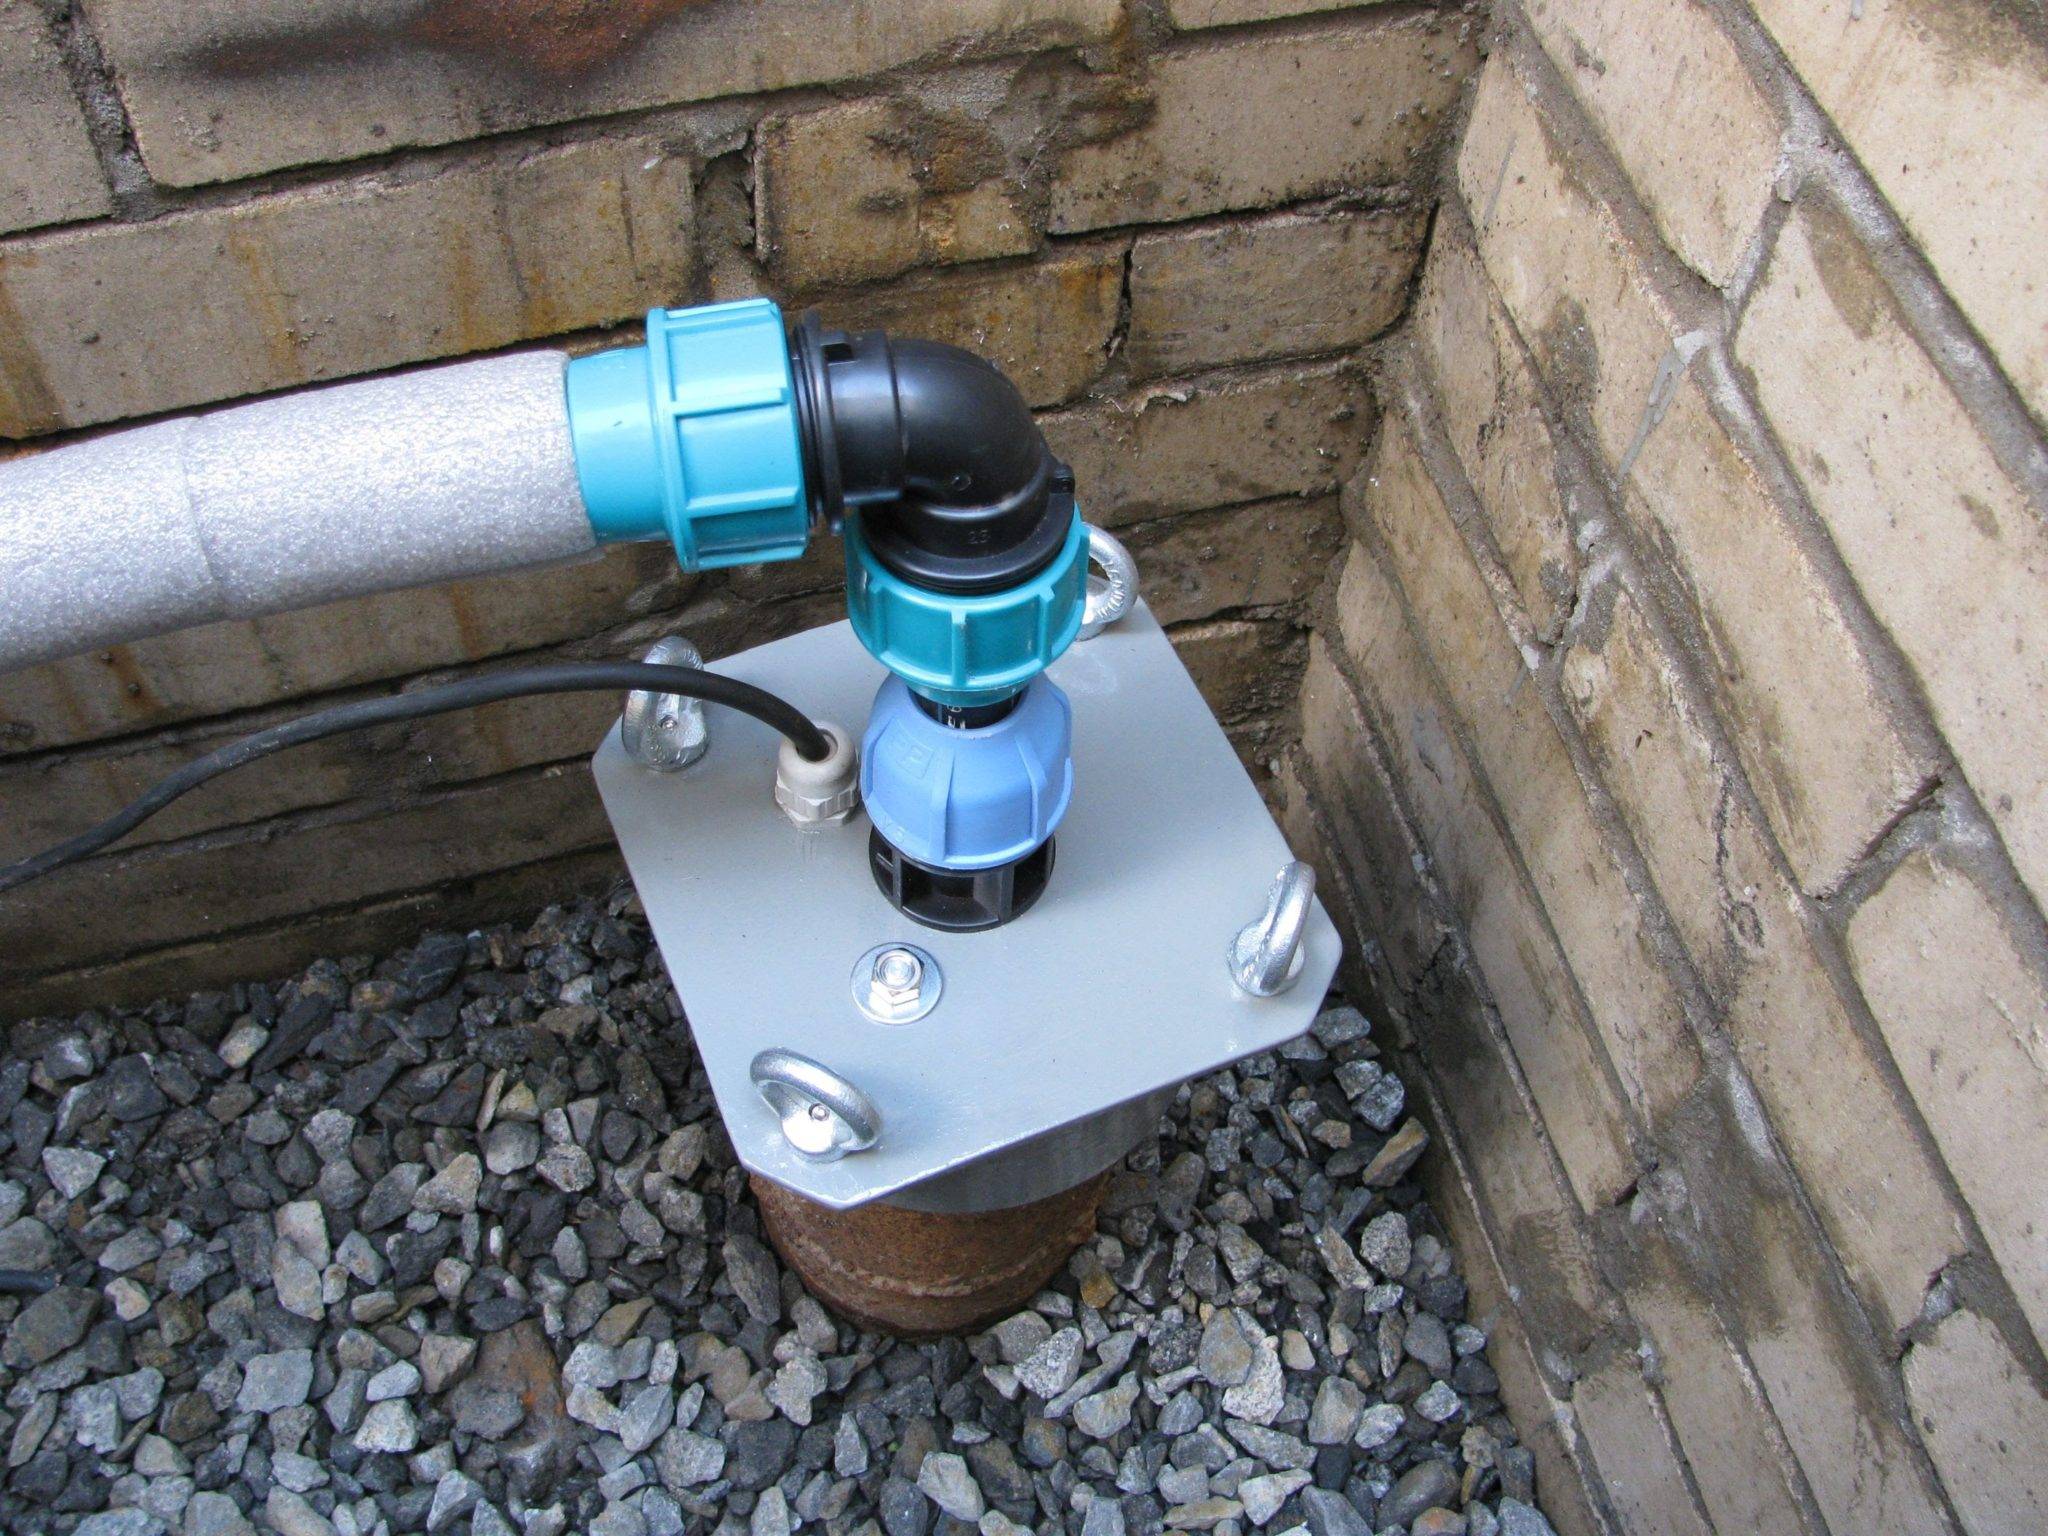
Mounted structure inside the caisson
1
Purpose of the device
In simple terms, the head is a cover for the well. With the help of it, they protect the upper part of the casing from the influence of various negative factors from the outside.
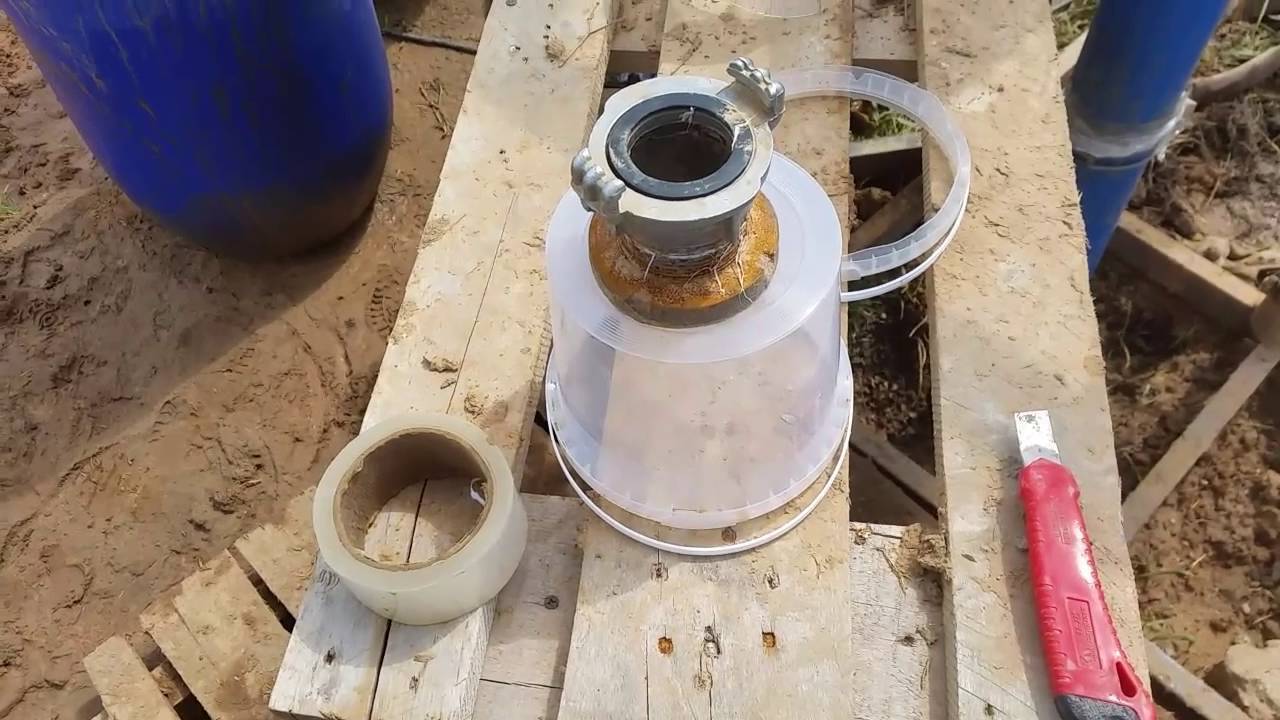
Of course, you can not buy a cap, replacing it with a container that covers the well from above. It also happens that the pipe is wrapped with plastic wrap. But these devices are still not enough for long-term service, since they will not protect the device from various insects or in the event of a spring flood. Another head will be needed for ease of installation of the pump, cable and other devices. Therefore, the need for this mechanism should not be underestimated.
Installation advantages:
prevention of water pollution; tightness of the upper part of the well (protection from the flood of unnecessary liquid); fixing the water supply or submersible pump; exclusion of various small things from entering the mine; prevention of theft of well equipment or pump.
For these reasons, it is worth installing a headband. Moreover, the use of the entire structure will be much easier with the presence of this useful device.
Recommended
How to clean a well in a country house on your own - the most popular and effective technologies How to clean a well in a country house on your own - the most popular and effective technologies
1.1
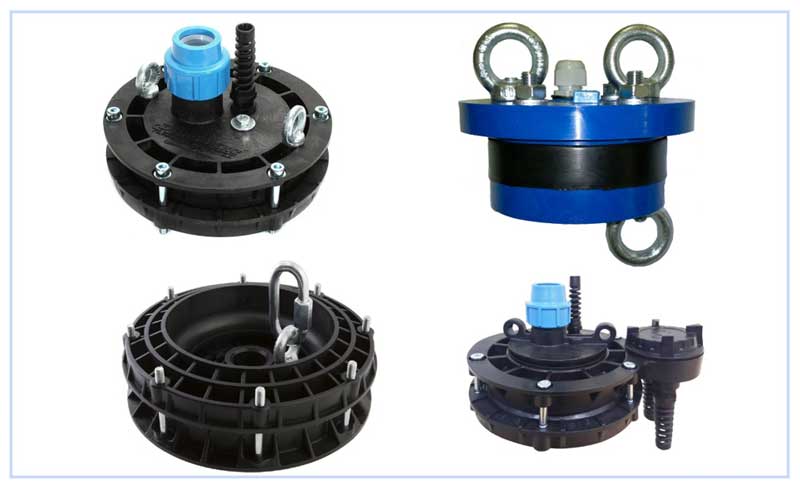
Varieties
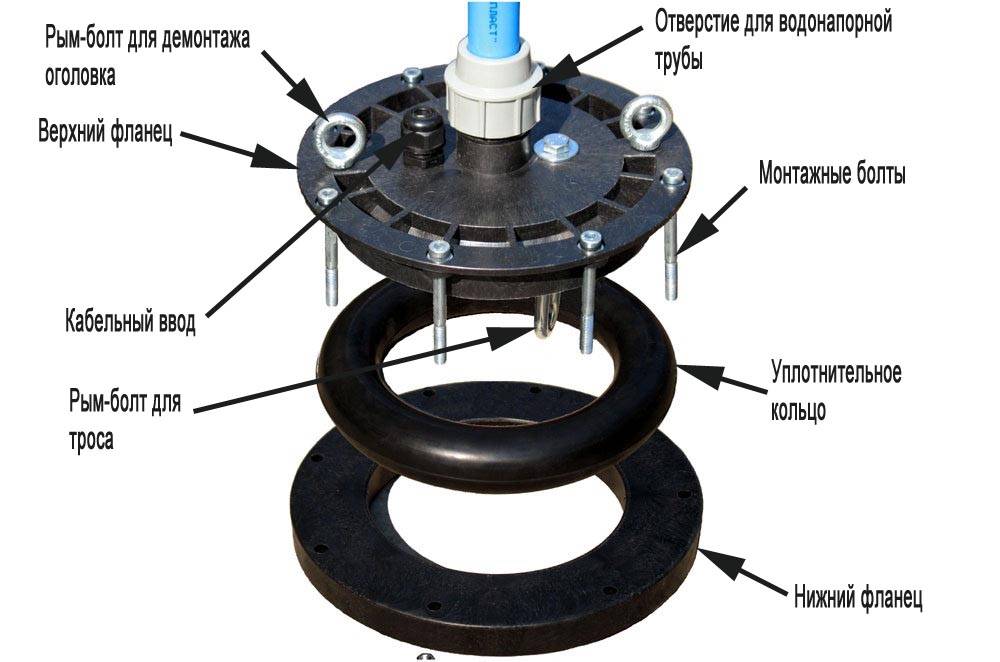
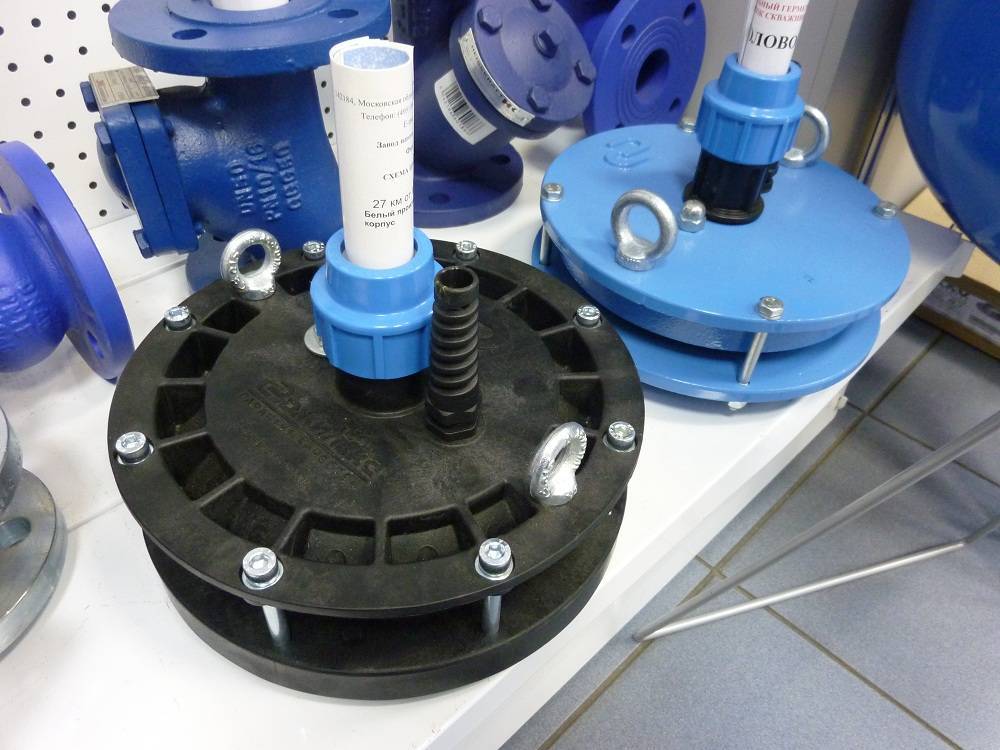
At the moment, there are several types of caps for the well. But still, the initial equipment is the same and consists of:
flange; cover; specialized rubber sealing ring.
The device is also supplemented with:
fixing bolts; cable entry for the electric drive; a set of carbines; eye bolts; fitting for a pipe.
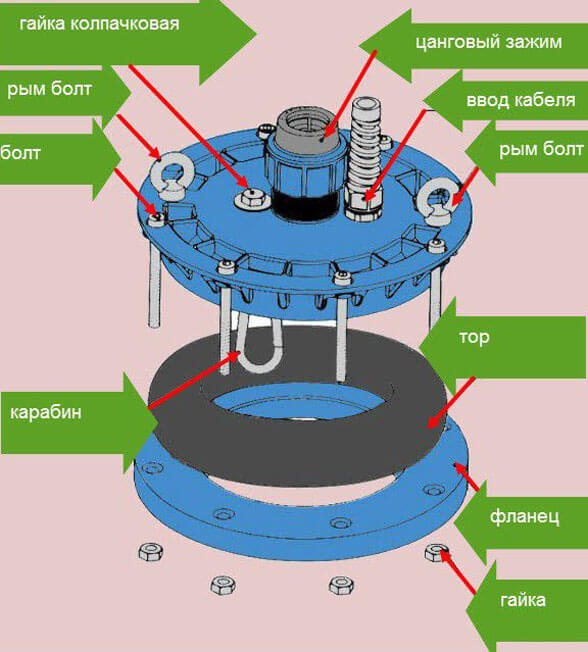
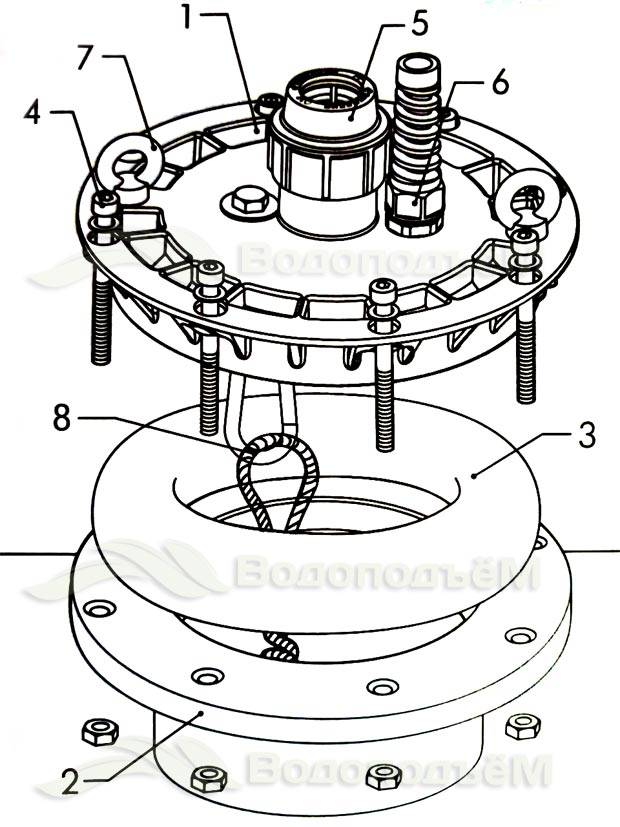
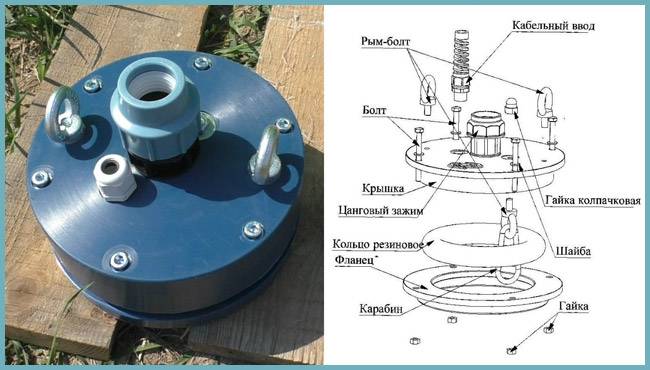
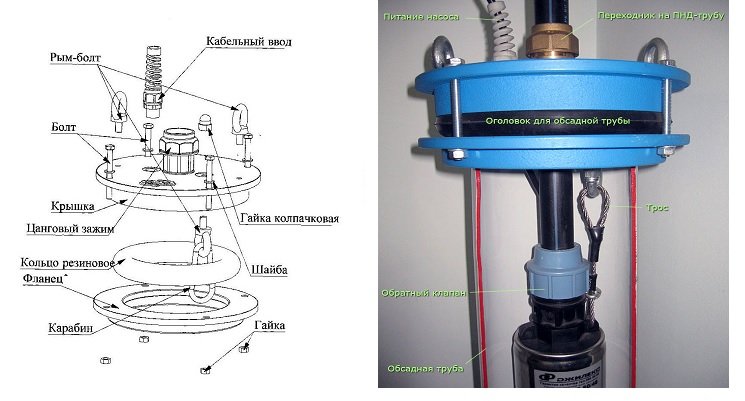
The structure of the head can be seen in the presented drawing:
Some details are worth mentioning in more detail.
The eyebolt differs from the usual upper part. It is made in the form of a ring. Such devices are convenient for hanging equipment or securing cables. On the head, they are needed so that the lid rises freely. This will make it easier to install the pump.
The cable gland has a specialized spring that provides proper fastening and creates tightness. It protects the electrical cable from mechanical damage.
According to the materials, the head is divided into metal (steel, cast iron) and plastic.Their main difference is the weight of the finished equipment, which can be placed on the product without damaging it. Load limit for metal - 500 kg, plastic - 200 kg. Therefore, it is worth considering the depth of the well and the total mass of the device that will be fixed on the product. Its diameter is also important, since the casing pipes are installed with the expectation that a pump will be placed in them. And it is quite large.


Device
Not all pipes on the building materials market are suitable for creating an autonomous water supply system. Therefore, when choosing them, first of all, you need to look at the markings. Water pipes have approximately the following designations - PPR-All-PN20, where
- "PPR" is an abbreviation, an abbreviated name for the material of the product, in the example it is polypropylene.
- "All" - an inner aluminum layer that protects the pipe structure from deformation.
- "PN20" is the wall thickness, it determines the maximum working pressure of the system, measured in MPa.
The choice of pipe diameter is based not so much on the diameter of the threaded inlet on the pump and the automated pressure control system, but on the expected volume of water consumption. For small private houses and cottages, pipes 25 mm in diameter are used as standard.
When selecting a pump, the following points should be considered:
If water from a well is used, a vibration unit cannot be used, it will damage the casing and filter element. Only a centrifugal pump is suitable.
The quality of the water from the well must meet the requirements of the pump.With a well “on the sand”, grains of sand will come across in the water, which will quickly lead to a breakdown of the unit
In this case, it is important to choose the right filter.
Dry run automatic. When choosing a pump, if the choice fell on a model without built-in protection against "dry running", you must additionally purchase automation for the appropriate purpose
Otherwise, in the absence of water that performs a cooling function for the motor, the pump will overheat and become unusable.
The next step is drilling a well. Due to the complexity and high labor intensity, this stage is best performed with the help of a specialized team with the necessary drilling equipment. Depending on the depth of water and the specifics of the soil, various types of drilling are used:
- auger;
- rotary;
- core.
The well is drilled until the aquifer is reached. Further, the process continues until a water-resistant rock is found. After that, a casing pipe with a filter at the end is inserted into the opening. It should be made of stainless steel and have a small cell. The cavity between the pipe and the bottom of the well is filled with fine gravel. The next step is to flush the well. Most often, this procedure is performed using a hand pump or submersible, lowered into the casing. Without this, the action of clean water can not be expected.
The caisson serves as protection for both the well and the equipment lowered into it. The life of the water supply system, as well as the convenience in servicing units immersed in the well, directly depend on its presence.
The caisson, depending on the material used, may be as follows:
- metal;
- cast from concrete;
- lined with concrete rings with a diameter of at least 1 meter;
- finished plastic.
The cast caisson has the most optimal qualities, the creation of which can take into account all the existing specifics of the well. Plastic caisson has low strength and needs to be reinforced. The metal look is subject to corrosion processes. Concrete rings are not very spacious and maintenance or repair work in such a caisson is very difficult. The depth of this structure is determined by the level of soil freezing in winter and the type of pumping equipment used.
For clarity, consider an example. If the depth of soil freezing is 1.2 meters, then the depth of the pipelines leading to the house is approximately 1.5 meters. Given that the location of the well head relative to the bottom of the caisson is from 20 to 30 cm, it is necessary to pour concrete about 100 mm thick with about 200 mm crushed stone. Thus, we can calculate the depth of the pit for the caisson: 1.5 + 0.3 + 0.3 = 2.1 meters. If a pumping station or automation is used, the caisson cannot be less than 2.4 meters deep. When arranging it, it is worth remembering that the upper part of the caisson should rise above ground level by at least 0.3 meters. In addition, a natural ventilation system is needed to prevent the accumulation of condensate in summer and frost in winter.
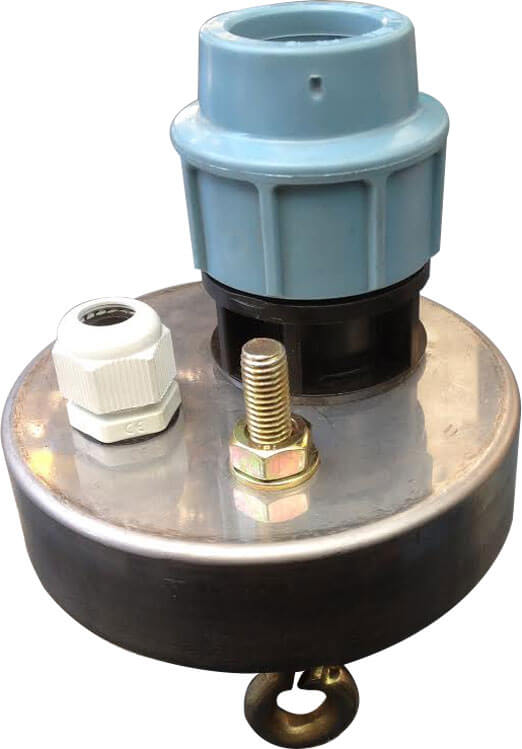
How to make your own headband
Sometimes there are situations when, for some reason, the dimensions of the casing string have a non-standard outer diameter (180 mm), and it is impossible to find a suitable or remake a standard tip with the highest size of 160 mm.In this case, the only way out is to make a home-made metal structure using electric arc or gas welding, and this will also require a household power tool (grinder, drill). The work performed consists of the following stages:
- In a hardware or hardware store, they find a sealing ring made of paronite or rubber on the outer diameter of the casing pipe, the ring must be put on the pipe with some effort.
- From sheet steel with a thickness of at least 5 mm. grinder or jigsaw cut the top cover in the form of a steel circle 80 - 100 mm larger than the outer diameter of the pipe.
- From the same steel, a flange ring is cut with the outer diameter of the cover and the inner size of the casing.
- They combine both parts (it is better to use a clamp) and drill holes in them for mounting bolts - for uniform pressing, you need to make 6 or 8 equidistant holes around the entire perimeter.
- With special crowns for metal, two holes are made in the lid - under 32 mm. a threaded pipe for connecting a water main and a smaller diameter for a fitting in which a pressure seal will be placed, insulating the electric cable of the pump from the metal cover.
- If desired, two diametrically spaced holes are made in the lid with a metal drill, into which eyebolts are then screwed.
- Using a welding machine or a gas burner, they are welded into a 32 mm threaded cover. a fitting for connecting a water line and a fitting for placing an electric cable, a ring for hanging a carabiner is welded on the bottom of the cover.
You can easily do without a welding machine by screwing all the fittings and the carabiner ring to the cover with cap nuts, if you first equip the parts to be connected with threads for fasteners.
A homemade head is placed on the pipe surface in the above way, the bolts are screwed in gradually until the compressed rubber ring fixes both parts on the pipe.
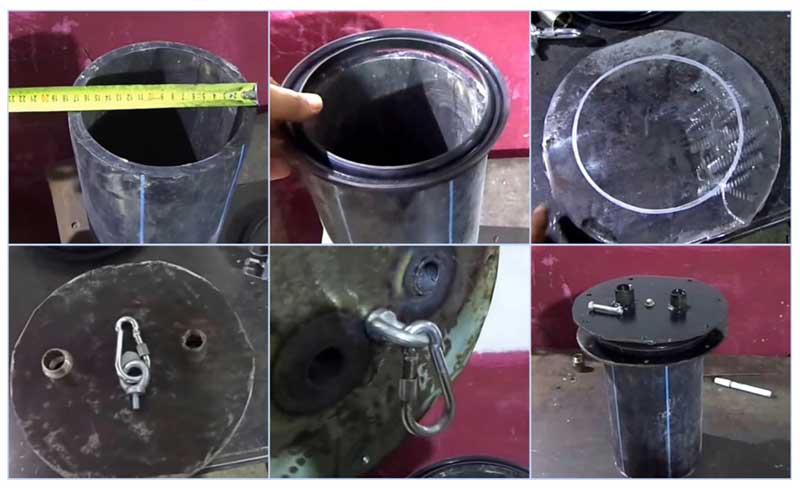
Rice. 11 The main stages of work in the manufacture of a do-it-yourself head
The cap is an important element in the arrangement of a water intake deep source, ensuring the reliability of the placement of pumping equipment, the ease of connecting and removing the electric pump from the well during repair and maintenance work.
The average cost of factory models is about 40 USD, this amount can be saved by making the top cover and flange from sheet steel with your own hands, the main difficulty in this is finding a rubber o-ring of a suitable size.


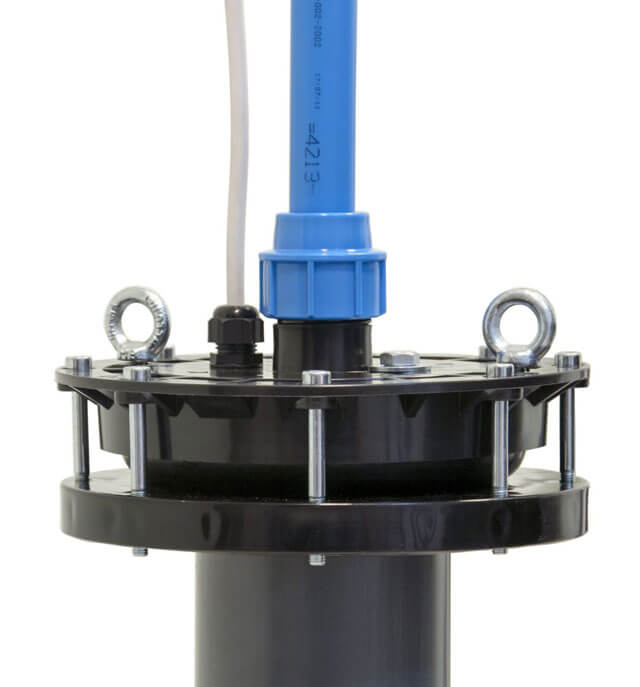
The main element of the design of the upper part of the well
Why is this detail needed?
With a deep occurrence of the aquifer, the well becomes the main source for autonomous water supply. And in order for this source to provide a stable supply of water (and even of the right quality), it should be properly equipped.
This is what an unformed pipe looks like: anything can get into it
One of the most important parts that affect the performance of the entire system is the head for the well. This is a strong sealed cover, which is fixed on the upper cut of the casing pipe.
Well heads perform a number of functions:
- Source sealing. Installation of the head allows you to block the wellhead, protecting the aquifer from both pollution and moisture ingress. This is especially true during the autumn rains and spring snowmelt.
- Formation of an optimal microclimate. Hermetically blocking the pipe, we reduce heat loss in the cold season. Thanks to this, even sections of the cable, hose and cable close to the surface do not freeze, which significantly increases their reliability and service life.
The protective design ensures the operability of the entire system, isolating the aquifer from the external environment
- Improving the efficiency of the pump. Wellhead sealing creates tension inside the casing pipe, due to which water is literally “sucked” from the horizon. For wells with a small debit in dry seasons, this becomes literally a salvation!
- Improving the reliability of fixing equipment. By installing the head on the well, we get the opportunity to fix the pump on a cable attached to the eyebolt in the cover of the device. Such a mount will be much more durable than fixing the pump with improvised means.
Thanks to the fastening with several bolts, the pump is reliably protected from theft
- Theft protection. Fixing the head on the neck of the pipe is carried out with the help of bolts, which are not so easy to unscrew even with a special tool. Yes, when dismantling the head, you will have to tinker, especially with old fasteners - but on the other hand, an attacker is almost guaranteed not to be able to get to the well pump.
This method of sealing the pipe, as in the photo, is cheaper, but its effectiveness is doubtful
In general, the installation of a well head is a completely justified decision.Of course, it is possible to seal the upper edge of the casing pipe at a lower cost (for example, by wrapping it with polyethylene). But such an approach will not provide us with the necessary protection against the ingress of ground and surface water, not to mention other factors.
Types and design of heads
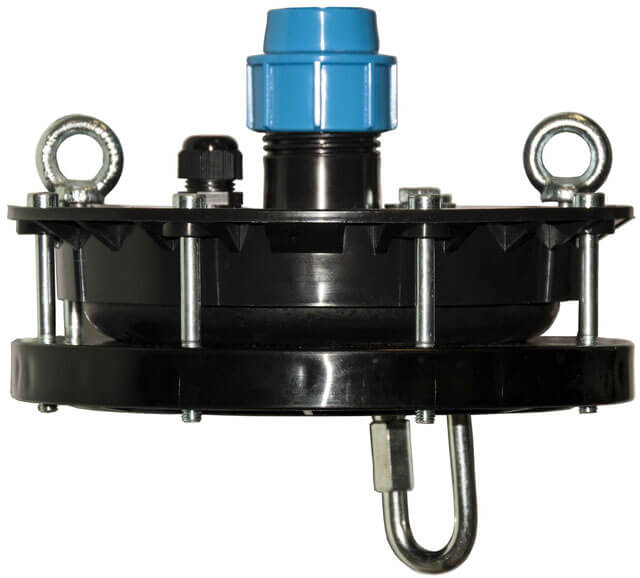
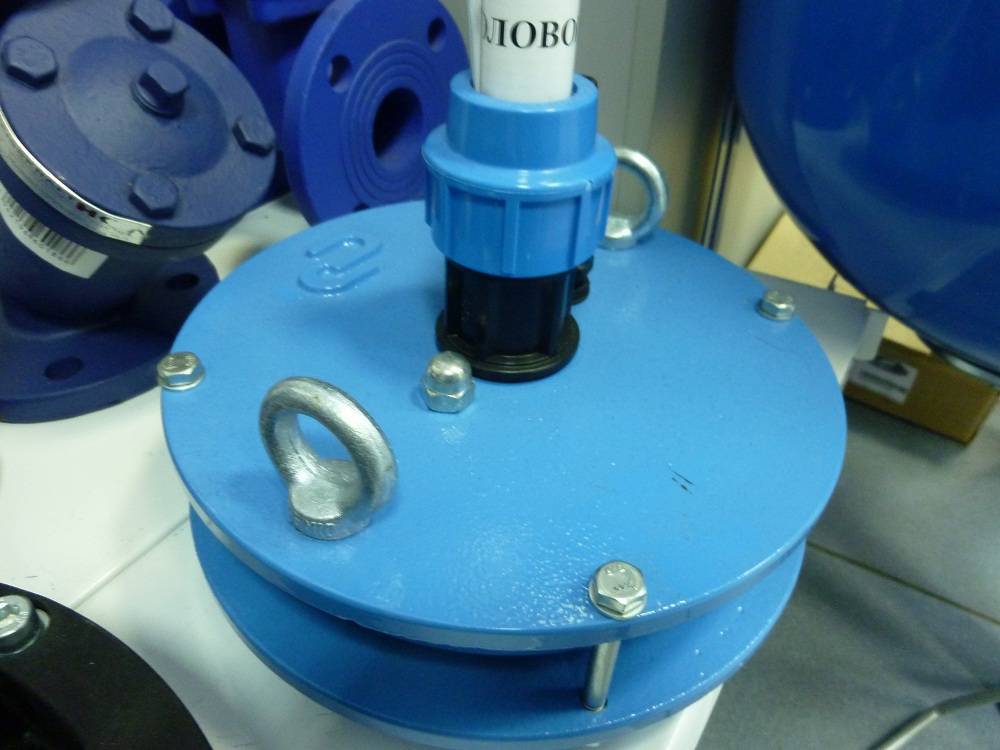
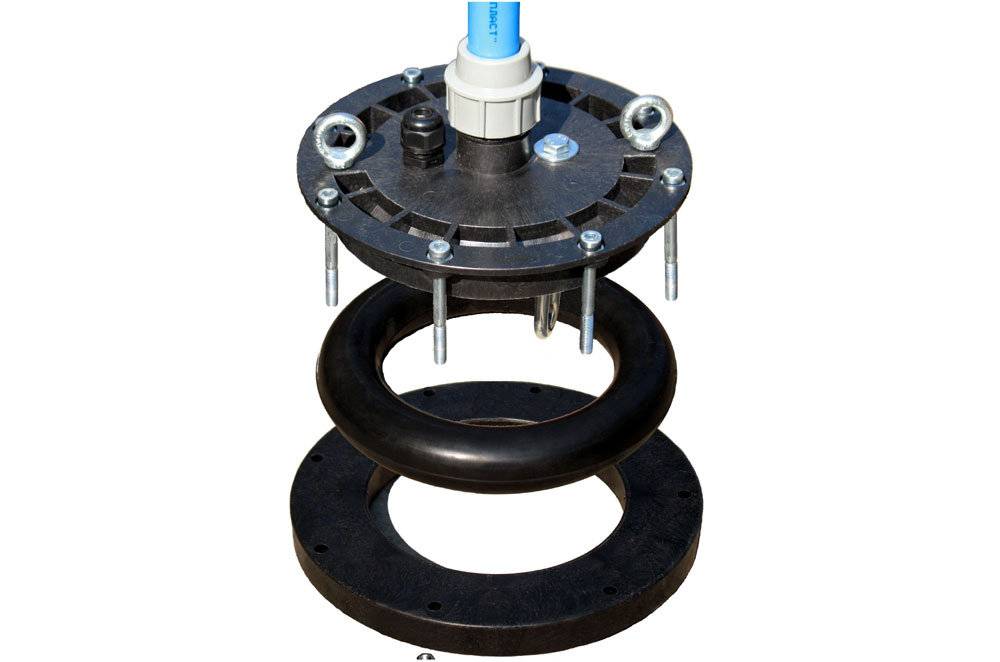
Plastic models (pictured) suitable for most domestic wells
Installation of the head begins with the selection of a suitable model. Today, products are produced for the most common casing diameters, while they can be made from such materials:
| Material | Advantages | Flaws |
| Plastic |
|
|
| Steel |
|
|
| Cast iron |
|
|
Steel models combine low weight with a sufficient margin of safety
If you need maximum strength, choose a cast iron model
By and large, you can choose any borehole head - subject to the manufacturing technology, the role of the material will be secondary.
Scheme of the design of a typical head
The design of the head for the well is also not too complicated.
When choosing a model, you should pay attention to the following elements:
- Flange - an annular part that is put on the top of the casing and is used to fix the cover. The most common diameters are from 60 to 160 mm.
During installation, we pass the pump on a cable with a hose through a flange with a sealing ring
- Sealing ring. It is located between the cover and the flange, used to seal the connection.
The seal provides sealing of the joint between the flange and the cover
- Lid. The upper part of the structure, during installation, is pressed against the flange through an elastic seal. The openings in the cover are designed to allow the passage of the power cable and water supply pipe/hose. In the lower part there is a bolted carabiner - a pump is suspended on a cable from it.
Cover with fixing ring on the bottom surface
- Mounting bolts (4 or more) - connect the cover to the flange, provide the necessary clamping force.
Preparation of related installation materials
The cable has the following requirements:
- reliability and strength, expressed by the ability to withstand loads that are 5 times the weight of the suspended equipment;
- resistance to the damaging effects of dampness, since certain parts of the product are under water.
It is allowed to use improvised materials to damp vibrations. A piece of medical tourniquet or elastic hose will do. Hanging the mechanism on a metal cable or wire is not worth it because of the likelihood of damage to the mount.


The next element that allows you to properly install a deep-well pump into a well is a cable for supplying equipment with power. It is better to take a wire with a small margin in length.
Water is supplied from an autonomous source to consumption points in the house through a water main. The best option is polymer pipes with a cross section of 32 mm or more. With a smaller diameter, it is impossible to provide sufficient pressure.
It is allowed to use a metal pipeline when installing a borehole pump. At the same time, threaded connections must be sealed with FUM tape, flax fiber or a special Tangit tool. To further strengthen the linen winding, a silicone-based sealant is used.
In addition, before installing the pump on the well, you need to prepare the following materials:
- manometer;
- attachment point made of durable steel;
- fittings for fixing the electric cable on the pipe line (clamps can be used);
- check valve;
- shut-off valve that shuts off the water supply, etc.
A nipple adapter is installed on the outlet pipe of the pump. In the absence of a pumping unit in the factory, this device is purchased separately.
During the initial pumping of the well, a large volume of heavily contaminated fluid is removed from it. For the procedure, it is recommended to use powerful models that can pump dirty water. After that, you can proceed with the installation of a standard borehole pump for further operation.


