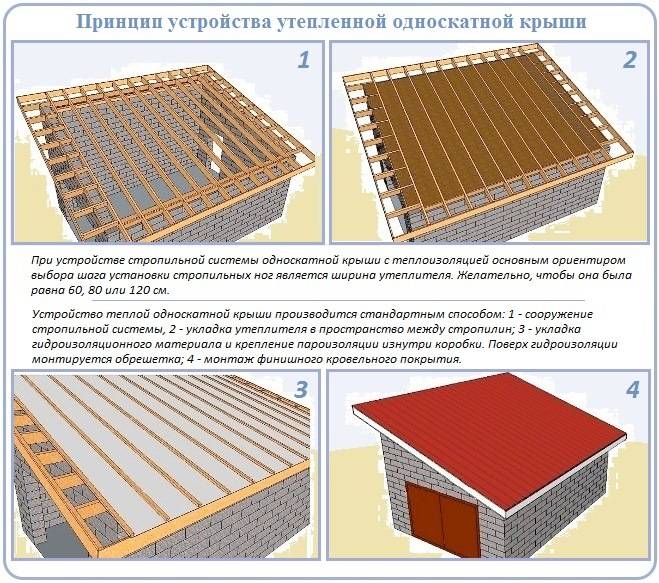
- Photo report from the construction site: shed roof on a house made of aerated concrete
- We also recommend to see:
- How to make a shed roof - step by step instructions
- Project and calculations
- Shed roof Mauerlat and gables
- Shed roof truss system
- Shed roof sheathing
- Installation of vapor barrier and roofing material
- The main advantages and disadvantages of the design
- About strength
- Mounting sequence
- What is the result
- Construction technology
- Let's start installation
- Do-it-yourself shed roof: a detailed analysis of popular construction options
- Shed roof construction
- An important point in the project of the house: the slope of the pitched roof
- The choice of pitched roof slope depending on the layout of the house
- Roof slope restrictions depending on the materials used
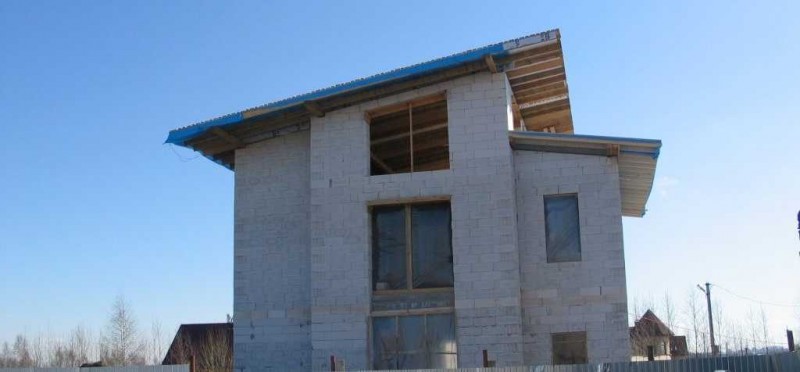
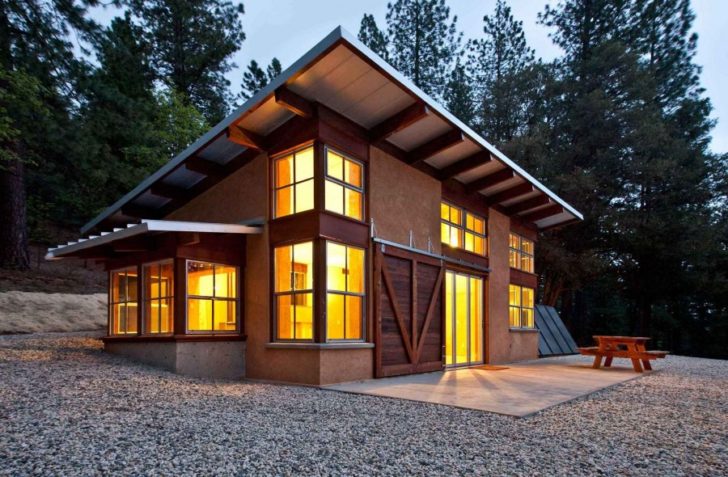
Photo report from the construction site: shed roof on a house made of aerated concrete
A house was built in St. Petersburg. There was no project, there was a general idea, which is presented in the photo. The house is made of aerated concrete, the finishing is plaster, the roof is folded, chosen based on low cost, reliability, ease of installation.
The idea of a house under a shed roof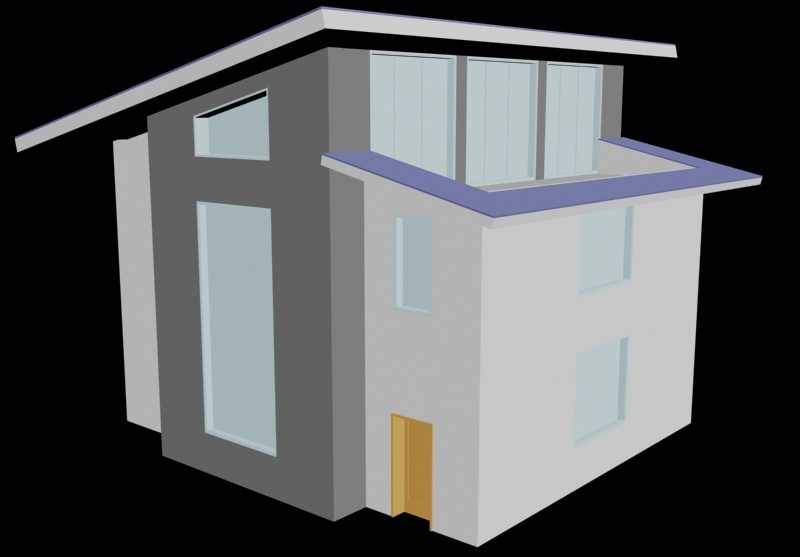
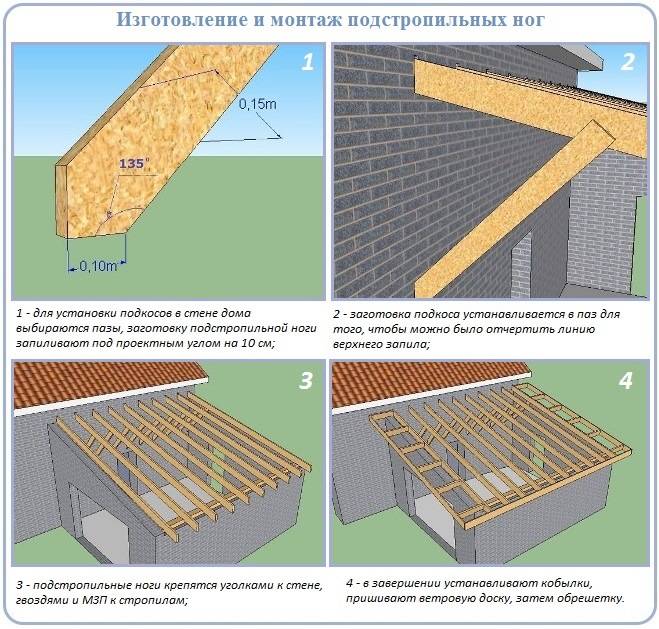
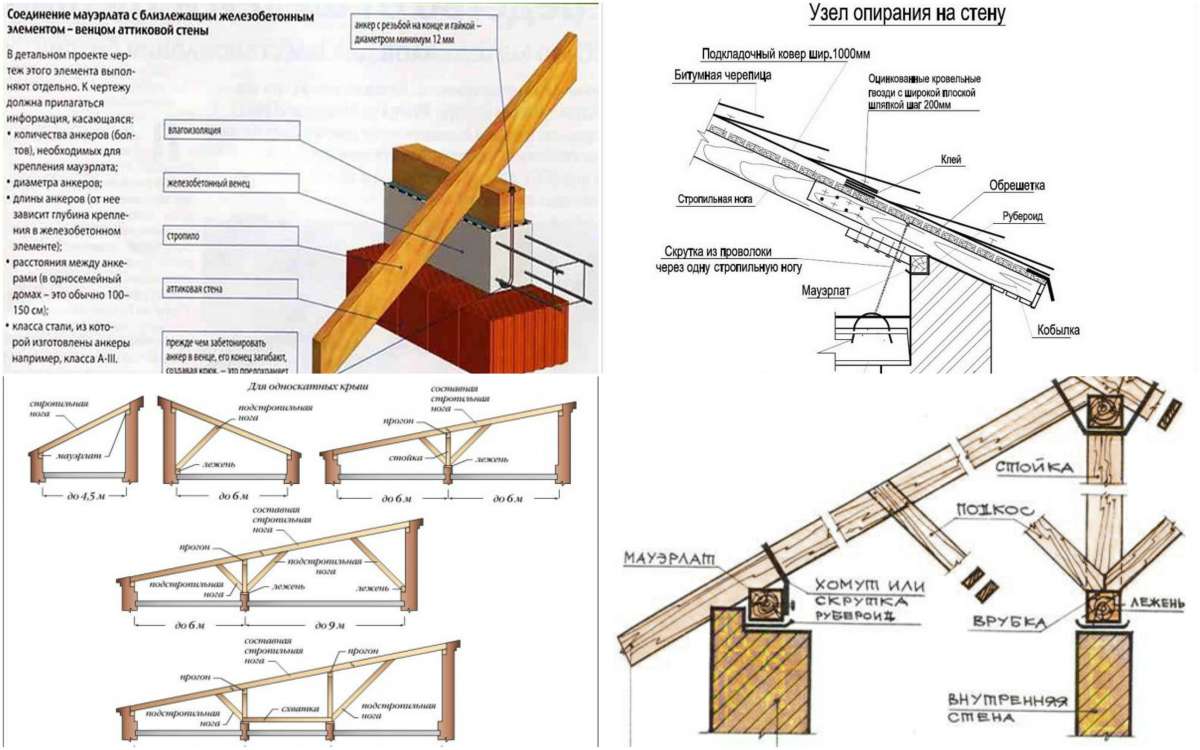
After the walls were driven out, an armored belt was poured into them, in which studs (Ø 10 mm) were installed every meter.When the concrete in the armored belt reached the required depravity, a layer of waterproofing (Gidroizol, cut lengthwise into strips of the required width) was laid on the bituminous mastic. A Mauerlat is laid on top of the waterproofing - a beam of 150-150 mm. All lumber used for roofing is dry, treated with protective impregnations, flame retardants.
The beginning of the installation of a shed roof - laying the Mauerlat
It is first put in place (it lies on studs, held by assistants), they pass along, knocking with a hammer on the places where the studs are. The places where the studs stick out are imprinted in the beam. Now drill holes and just put it on the studs.
Since the span is large, supports made of timber (150-150 mm) were installed, on which a run was laid that will support the rafter legs.
Installation of racks and run
The width of the roof is 12 meters. This is taking into account the removal of 1.2 meters from the front side. Therefore, the Mauerlat bars and the run “stick out” beyond the walls for just such a distance.
To ensure the removal of the roof, the Mauerlat and the run stick out to the limits of the wall
At first there were doubts about such a large offset - the rightmost beam hangs 2.2 meters. If this offset is reduced, it will be bad for the walls, and the appearance will deteriorate. Therefore, it was decided to leave everything as it is.
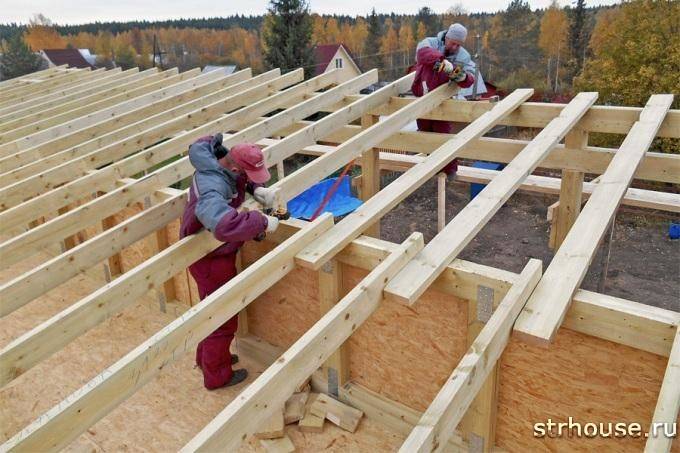
Laying rafters
The rafters are laid from two spliced boards 200 * 50 mm, with a step of 580 mm. Boards are knocked down with nails, in a checkerboard pattern (top-bottom), with a step of 200-250 mm. Nail heads on the right, then on the left, in pairs Two on the top / bottom on the right, two on the top / bottom on the left, etc.). We spread the splicing points of the boards by less than 60 cm. The resulting beam is much more reliable than a similar solid beam.
Rafters laid Method of fastening rafters
Further, the shed roof pie for this case is as follows (from the side of the attic - to the street): vapor barrier, stone wool 200 mm, ventilation gap (batten, counter-batten), moisture insulation, roofing material. In this case, it is a dark gray pural.
An example of a roofing pie for a shed roof (it is actually standard)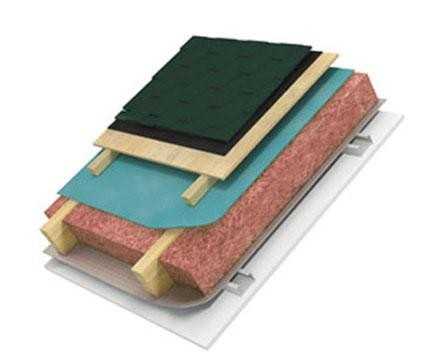
We will carry out insulation from the inside later, but for now, we are laying a hydro-wind-protective membrane "Tyvek Solid" (vapor-permeable) on top of the rafters.
Laying a waterproofing windproof vapor-permeable membrane
The membrane is laid from the bottom up, fastened with staples from a stapler. That canvas, which is rolled out higher, goes on already laid by 15-20 cm. The joint is glued with a double-sided tape (bought together with the membrane). Then, strips are stuffed over the membrane, on them - a crate for a folded roof.
Lathing from a board 25 * 150 mm
First, a crate was made from a board 25 * 150 mm in increments of 150 mm. After laying, walking along the roof, it was decided to strengthen the crate. To do this, between the already laid boards we fill the boards with a width of 100 mm. Now there is a gap of 25 mm between the boards.
Shed roof sheathing as a result
Further, on the lower pediment, hooks were stuffed for installation of a drainage system. They are filled unevenly, because due to the large length of the pediment, it was decided to make two receiving funnels at a distance of 2.8 meters from the edge. To ensure flow in two directions, such a relief was made.
Stuffed hooks for the drainage system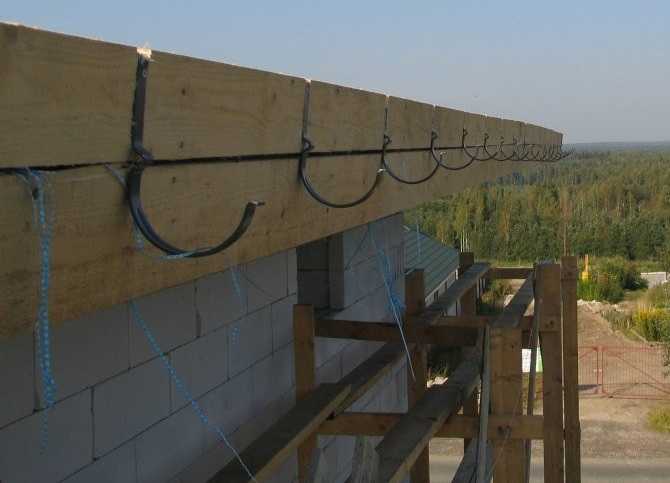
Next, you need to bring in pieces of metal (paintings) 12 meters long. They are not heavy, but you can’t bend them, because the “sled” disappears. For lifting, a temporary "bridge" was built connecting the ground and the roof. Sheets were lifted along it.
Lifting sheets on the bridge
Next comes roofing work, which differs depending on the type of roofing material. In this case, it was necessary to solve the problem of thermal expansion of the material - galvanized steel (pural) significantly changes its dimensions when heated / cooled. To ensure freedom of expansion, it was decided to fasten the material to the crate behind the seam with movable clamps with a freedom of movement of 15-20 mm.


Installation of clamps for seam roofing Pural seam roofing
After laying the roofing material, the filing of the overhangs remains, and they are no different.
The roof needs to be brought “to mind” - to hem the overhangs, but, basically, it is already ready
Well, in the photo below is what happened after finishing. Very modern, stylish and unusual.
Shed roof house - almost finished
We also recommend to see:
-
Do-it-yourself country toilet step by step - tips, tricks, options
A toilet in the country is an integral part of comfort, a full existence. When purchasing an absolutely clean piece of land, the first thing we install is this structure. It's not only…
-
Peppers, planting seedlings in a greenhouse - a step by step guide
Pepper, planting seedlings in the greenhouse should be carried out at a time when it can be protected from recurrent short-term frosts. This is a very important point. Any pepper...
-
How to grow oyster mushrooms at home - step by step instructions
It will be about how to grow oyster mushrooms at home, about all stages of this process and about tasty, healthy, unpretentious mushrooms. After all, we all enjoy eating...
-
Do-it-yourself polycarbonate gazebo - photo of buildings
A cozy gazebo in the country is not only a place to relax, have picnics with friends. Such a necessary country building can serve as a dining room, summer kitchen, ...
-
Grounding in a private house with your own hands - how to do it
Do-it-yourself grounding in a private house will help not only avoid danger, but also save your budget. After all, electric current can cause irreparable damage to health, ...
-
How to make a lawn in the country with your own hands - choosing a place, sowing, care
How to make a lawn in the country with your own hands, what kind of seeds to choose, you will learn from the information below. It does not require special agronomic knowledge or complex sowing equipment. If a…
-
Blind area around the house with your own hands, how to do it right
Why do you need a blind area around the house? Can you make it with your own hands? The blind area, first of all, plays the role of a kind of protection along with a decorative function. It is installed…
-
DIY compost pit: manufacturing options, photos, ideas
Let's talk about how to build a compost pit on your site with your own hands without much hassle and problems. Manufacturing options are varied. In the photo below you can see…
-
Fried eggplant breaded with cheese - step by step recipe with photo
I will introduce you to a very simple recipe. Cooking delicious fried eggplant is not only easy, but also fast. I have given this recipe to many of my friends...
To share with friends:
How to make a shed roof - step by step instructions
So, below is a step-by-step instruction for installing a pitched roof with your own hands.Following all the points will allow you to achieve the desired result without resorting to the help of expensive specialists.
Project and calculations
It is best to do all the calculations on paper or computer. This may be a preliminary estimate, and a plan-drawing, and a whole project for the future roof. It is worth adding 5% to the estimate for materials, as they tend to end at the most inopportune moment.

If the building is not architecturally related to another building, it is worth knowing its leeward side. In areas where there is a large amount of precipitation, a roof with a large slope is installed. In this case, the high part of the gable should be placed on the less ventilated side. This will reduce the windage and reduce the likelihood of the roof being blown off by gusts of wind.
Shed roof Mauerlat and gables
When all the clarifications are made, the gables begin to be erected. The first thing that is needed in this case is the laying of the Mauerlat. Mauerlat is a bar 100 * 150 mm, which acts as a support for the rafters and fits on the armored belt of the structure. If the rough roof has an even base, the pediments are erected independently. This can be done using the same beam, placing it vertically every 50 centimeters as supports for the gables. From the underside, the timber is tied to the rough roof with a board so that a triangle is formed.

Shed roof truss system
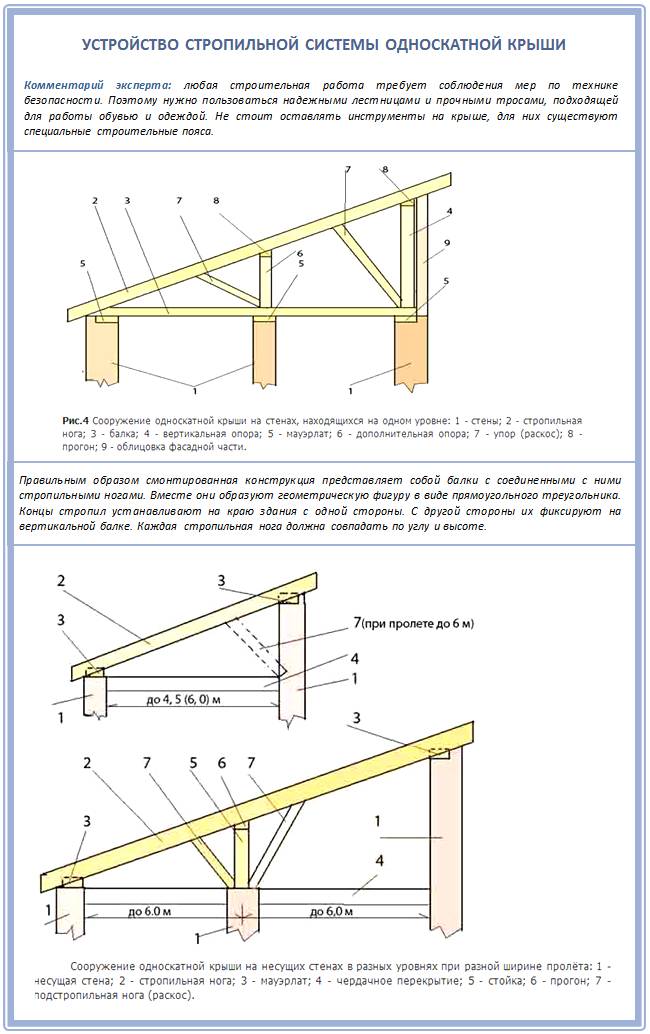
Rafters are laid on the resulting gables. For their installation, a board with a dimension of 50 * 150 mm or higher is suitable. If necessary, additional racks with sun loungers are placed to the rafters and a harness is made from rafter legs. The photo below shows an example of attaching rafters to the roof Mauerlat.
The rafter system of a shed roof can be hanging when the rafter legs do not rest on additional supports, but transfer their weight to the load-bearing walls of the building. The maximum distance between the walls during this installation should be no more than 5 meters. If the distance is greater, then use special struts or racks that prevent the deflection of the rafters. In this case, the rafter system will be called layered.


The pitch of the rafters of a shed roof is calculated based on the selected material of the rafters. The following are general guidelines for choosing a distance:
- Bar - the step is from 1.5 to 2 meters;
- Single board - from 0.6 to 1.3 m;
- Paired board - from 1 to 1.75 m.
This parameter can also be influenced by the dimensions of the insulation, which fits between the rafters. For insulation, as a rule, a slight tightness is provided so that after its installation there are no gaps left. This will eliminate the need to place a second layer of insulation, save money to eliminate heat loss.
The larger the step between the rafter legs, the tighter the crate will have to be mounted. This will add strength to the structure, but increase its cost. The pediment of a shed roof is erected if the height of the walls is insufficient to close all open sections of the roof. At the same time, the same insulation is carried out as the main roof, in order to remove all cold bridges.
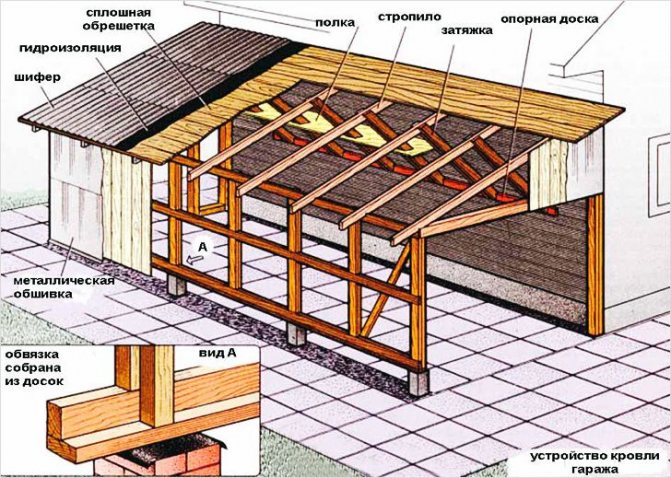
Shed roof sheathing
After installing the rafters, proceed to fixing the roof lathing. Even an "inch" board is suitable for her. It is laid across the rafters and acts as a fixing lag for roofing material.
Installation of vapor barrier and roofing material
Vapor barrier is laid on the crate
It is important to lay the film in such a way that the accumulated condensate can roll off freely without getting inside the room. For this, sagging of the vapor barrier film is provided.
The roofing material is installed last. The technology of its laying may be different depending on the type of material.
Summing up, it is worth saying that recently single-pitched roofs are increasingly finding their adherents all over the world, as they allow the implementation of intricate architectural structures that are in no way inferior to other types of roofs. Finally, we suggest watching a video that clearly shows the self-construction of a shed roof over an extension to the house.
The main advantages and disadvantages of the design
The advantages of this design include the following:
- Saving money on the purchase of building materials.
- Simplicity of design and, therefore, installation.
- Light weight, compared with the gable option - less load falls on the walls.
- High resistance to wind and load from accumulated snow on the roof.
- The structure can be erected in a different angular range - from 5 to 45º.
- A shed roof, made at a slight angle, allows you to install a hot water tank or solar panels on it, as well as arrange a place to relax.
- Such a structure can be covered with any of the existing roofing materials, of course, taking into account the conditions of its operation and the angle of inclination.
Snow guard
Naturally, like any design, a shed roof has its drawbacks, which you also need to know when choosing this option:
- A roof with one slope requires more serious insulation than a gable, since there is not such a large space under it that creates an air gap. Without the arrangement of reliable thermal insulation in the summer months, the attic space will become very hot, and in the winter months it will cool down, in both cases transferring the temperature to the house. However, if you correctly calculate and carry out the installation of all elements, then this drawback can be avoided.
- If the overlap is done immediately under the roof, arranged at a small angle, then the house loses not only the upper air gap, but also the attic, which means that it is possible to arrange an additional room - this can be considered the second design flaw. But, if the attic space is planned a little differently, then this drawback can be dealt with.
One of the disadvantages of a shed roof is the accumulation of snow masses on it.
Another disadvantage of a shed roof applies only to a structure with a slight slope of 5-10º - this is a poor descent of snow masses from it. So, with a large accumulation of snow, the roof will have to be cleaned manually or a heated roof system should be made using a heating cable.
The installation of roof heating will help to solve this problem.
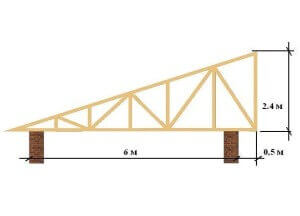
About strength
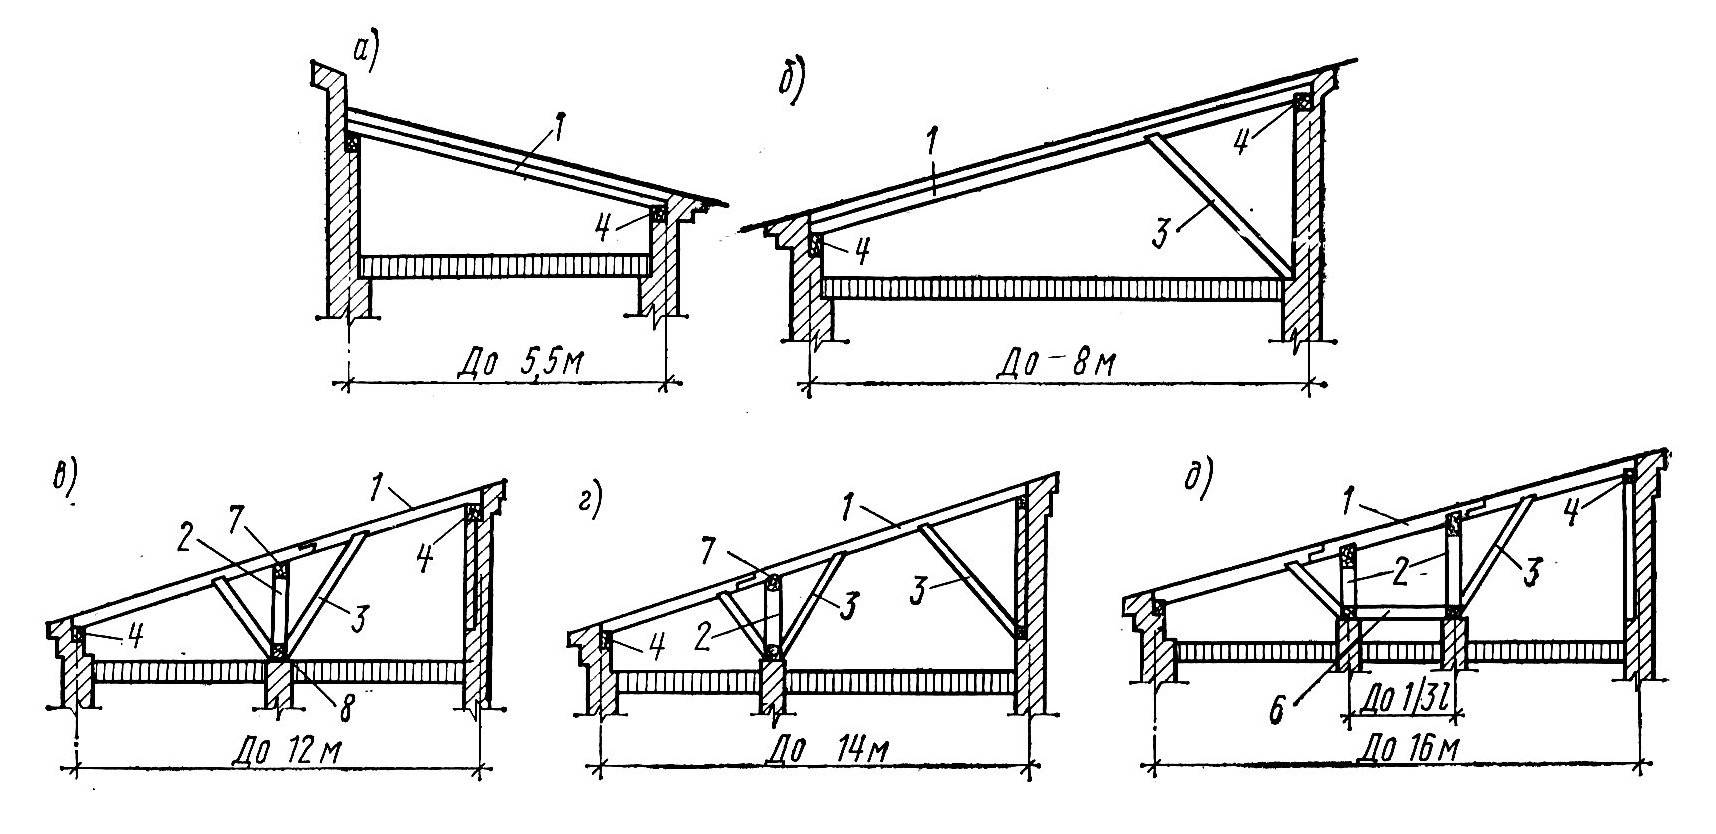
For a shed roof, the concept is important - the length of the slope. After all, on a rectangular building, the rafters themselves can be placed along or across the building
Therefore, when choosing a direction, it is necessary to take into account the possibility of installing intermediate supports. The generally accepted practice is to limit free spans without support to a length of 4.5 m. After all, even without collapsing, the rafter can simply bend.

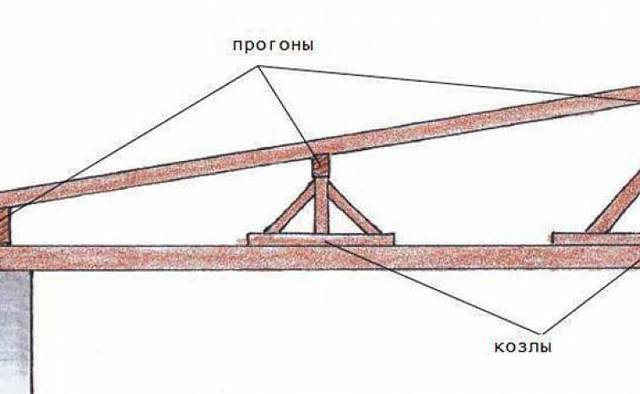
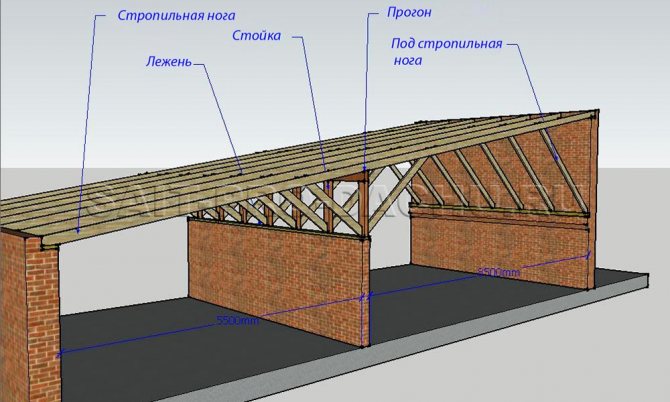
Scheme of assembly of the truss system of a shed roof
In addition to the loss of the attractiveness of the external appearance, this can lead to more serious problems: deformation, rupture of the roofing material and, as a result, a leak that is difficult to fix. Therefore, when the length of the rafter exceeds the norm, measures are taken to strengthen the structure:
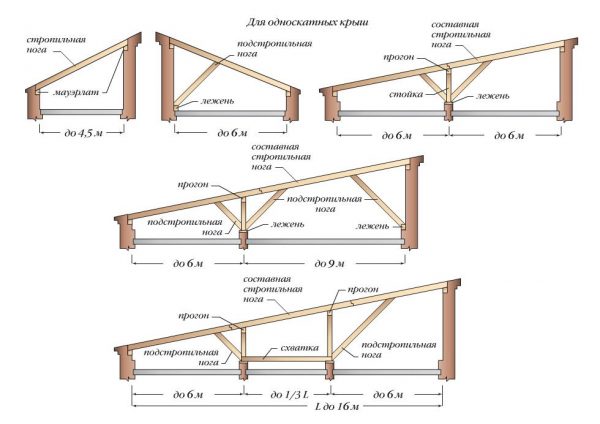
- The distance between opposite walls is 4.5-6 m. It requires the installation of struts supported on one or both walls. A run device is not excluded - it will reduce the number of struts. At the same time, it will be possible to link them with the zoning of the future space.
- A distance of up to 12 m requires the mandatory installation of a run, which is supported by vertical racks from a reliable bed, ceiling, columns or a main wall inside the house. It is also recommended to install struts from racks or walls. The conditions are dictated by the standard lumber length of 6 m - with such a span, the rafters will in any case be composite. Even if structurally it is possible to make strong stops, for safety reasons a reliable intermediate support is necessary.

For reliability, additional supports are provided in the rafter system.
A further increase in the length of the rafters requires even more serious measures to strengthen the entire truss system. Although there is nothing complicated about this - you can install as many runs as you like on reliable racks, leaning on the beds and embroidering with braces. Let's figure out step by step how the rafters for a shed roof are mounted.
In the video, an example of assembling a shed ventilated roof for a frame house:


Mounting sequence
To ensure a margin of safety, all structural features of the building are used.The possibility of leaning on any of the load-bearing walls with a vertical stand or strut is considered in advance. Their number and location can be adjusted and linked to the future design, but without fanaticism - the strength should not suffer. Installation usually does not cause difficulties:
For safety, floor beams are immediately mounted, and temporary flooring is arranged on them.

Installation of floor beams on the house
- Mauerlat is attached to both walls. Or, the frames necessary for the slope of the roof are arranged.
- The extreme rafters and all related elements are installed: racks, struts, if necessary, lying down - a “power frame” is created.

Assembling the skeleton of a shed roof for a private house
If the construction is frame and large gables are open, it is necessary to close them at least temporarily - take measures to reduce the windage of the roof.

To exclude windage, the gables are temporarily closed
Further, intermediate rafters are laid along the prepared frame and additionally unfastened as needed. This is the time for the final decision on the method of insulation - the pitch of the rafters can be adjusted for a specific insulation.

Installation of intermediate rafters
Next, a roofing membrane, a counter-lattice and a supporting lathing of a shed roof are mounted for a specific roofing material.
Particular attention should be paid to the arrangement of the ventilation gap - the slope of a pitched roof is often small. Therefore, the gap should be sufficient for effective ventilation - it is useful to slightly increase it
Completing the roof installation. And the device of hemming, drains can be combined with the exterior trim of the gables, so as not to arrange flooring twice in one place.
Examples of houses with pitched roofs in the video:
What is the result
In such a simple, but effective and simple way, you can build the roof of any house, regardless of the material of its walls and design features.

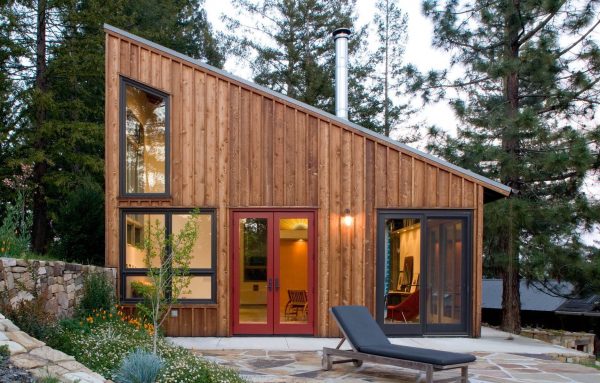
A house with a shed roof is cheaper, but looks modern
However, a shed roof in a frame house, where budget savings are “by default”, is one of the rational solutions. And at no extra cost, functionality is immediately laid in the project, and bringing everything to its logical end is already a matter of time.
Construction technology
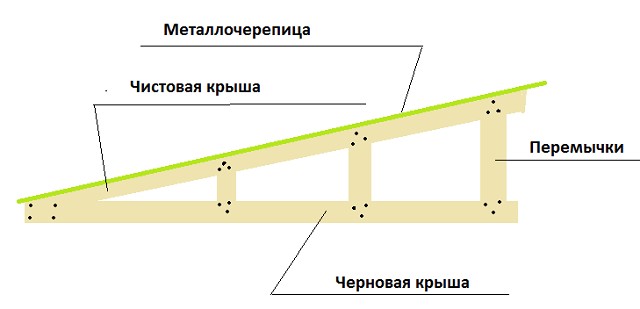
Most often, inclined rafters are used for frame houses. The technology of erecting such a shed roof is to create walls of different heights. As a result, the rafters are supported and fixed with their lower end on the floor beams. A high wall or rack is a support for the truss system in its upper part. It is also desirable to install additional slopes or racks that will make the structure more rigid and durable. This shed roof technology is used not only for frame houses, but also for brick and block houses, which is demonstrated by many projects.
Roof device for a one-story house
As we know, during the construction of frame houses, great importance is attached to ventilation. The roof can also be ventilated or non-ventilated. A non-ventilated roof usually has a slight slope and must be carefully waterproofed and insulated. The ventilated roof has a gap between the roof and the ceiling, as a result of which the service life of the material is extended by removing water vapor from the insulation.
Do not forget that the choice of roofing material depends on the angle of inclination you choose.Recently popular material such as soft tiles, involves an angle of inclination of up to 10 degrees. Decking is recommended to be used at an angle of 10 to 20 degrees. Decking is chosen with a longitudinal profile and a wave height of 3 cm. If the angle of inclination is from 20 degrees, ondulin or slate is used. Metal tiles can be laid if the roof angle is 25 degrees or more.
The shed roof device begins with the installation of a Mauerlat and floor beams. The second stage is the installation of the truss system. All elements of the truss system are made from a dry board 5 mm (thickness). They must be carefully treated with fire protection - it is possible in several layers.
All rafters must be rigidly fixed to the lower and upper edges of the roof. In the walls (upper trim), nests are prepared in advance, where the floor beams will be laid. They are waterproofed. On the floor beams or on the Mauerlat, the lower part of the rafter legs is fixed. Stronger fixation is performed using metal pads. Intermediate struts and struts are used to make the structure even more rigid. Struts and racks are installed on the floor beams. For fixing, staples or metal corners are also used.
To make an even structure, start the installation from the extreme rafter legs. A rope is pulled between them and, guided by it, the rest of the rafters are laid. The step is equal to the distance between the floor beams.


Let's start installation
For the independent construction of the roof, it is necessary to prepare all the necessary building materials and tools.All wooden elements that will be used during the installation process must meet quality standards, have a moisture content not higher than 22%.
Additionally, wood materials are best treated with special antiseptic agents. Do not forget about fasteners: crossbars, struts, spacers, which will definitely be needed during the installation of a shed roof.
Step 1. Installation of the truss system. It completely depends on the dimensions of the planned structure, and on the building materials used to build the walls of the building. The rafters are installed on the Mauerlat. If the dimensions of the structure under construction are small, and the span is not more than 4.5 meters, then the installation of the truss system will be simple, it will include a Mauerlat beam and the rafter support itself.
In cases where the dimensions of the building are sufficiently overall, then in addition to the above, it will be necessary to install additional rafter legs.
Step 2. After installing the rafters, boards are gradually laid on them, and a vapor barrier film is placed on top of the boards. Strips of vapor barrier material must be overlapped and connected with construction tape.
Step 3. Laying insulation. The thickness of this layer should be more than 20 cm, make sure that there are no gaps when laying the insulation.
Step 4 Installation of the waterproofing layer. It should be located at a short distance from the insulation; for this, wooden bars are placed between the layers. The waterproofing material is attached using a special construction stapler.
Step 5. Lathing.On top of the resulting "roofing cake" with the help of slats or wooden bars, a crate is erected.
Step 6 Covering the roof with roofing material.
We hope that we were able to answer the question that concerns you: “How to make a pitched roof with your own hands?”. The main thing in this business is a carefully calculated roof project, the right angle of inclination, and high-quality materials. Prepare carefully for the construction process and you will succeed!
Do-it-yourself shed roof: a detailed analysis of popular construction options
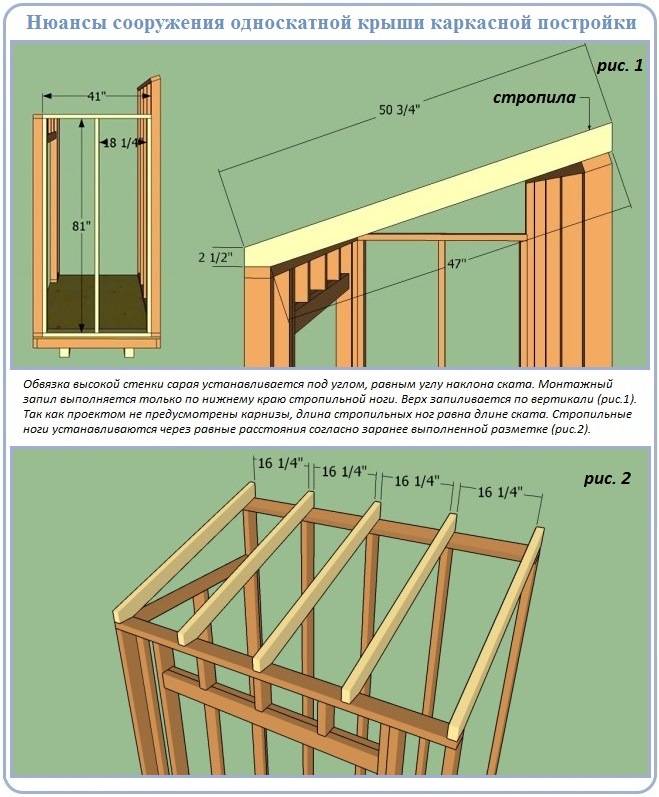
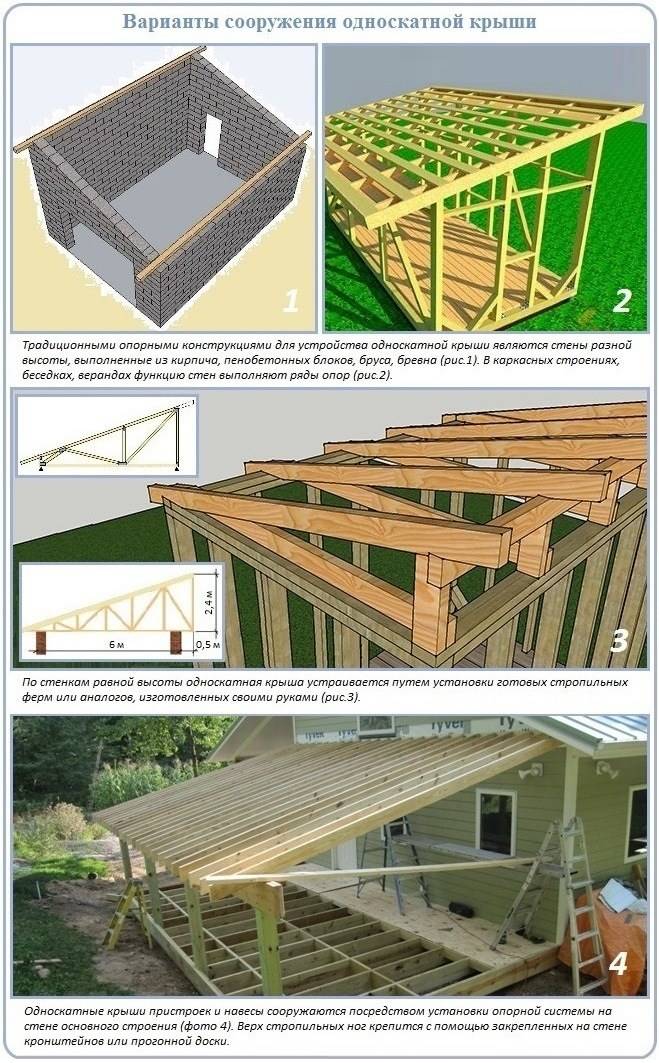
Roofs with one slope are rarely erected over low-rise residential buildings. True, their unpretentious shape and simplicity of lines are very attractive for adherents of high-tech style. However, while newfangled phenomena are not too firmly rooted in the domestic landscape, shed roofing structures are erected over garages, compact cottages, verandas, change houses.
The desire to build such a simple object on their own often visits skilled owners. For an optimal result, home craftsmen need to know how a shed roof is built with their own hands, what should be foreseen and what stages of work are to be carried out.
Shed roof construction
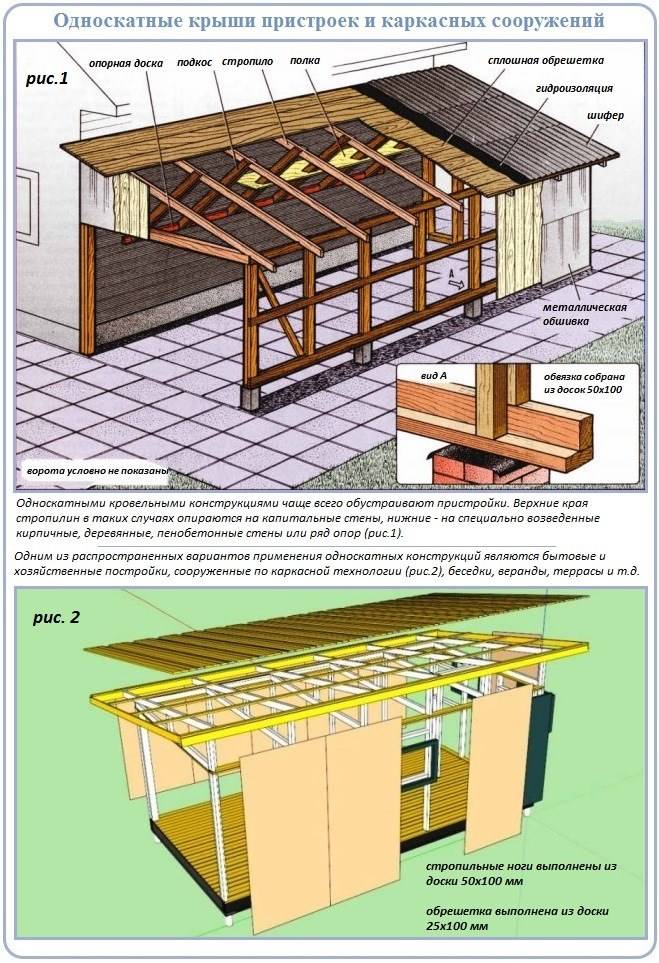
A shed roof usually consists of a truss system, lathing, insulation, roofing and external cladding of gables and walls. Depending on the type of building, the shed roof truss system can be of three types:
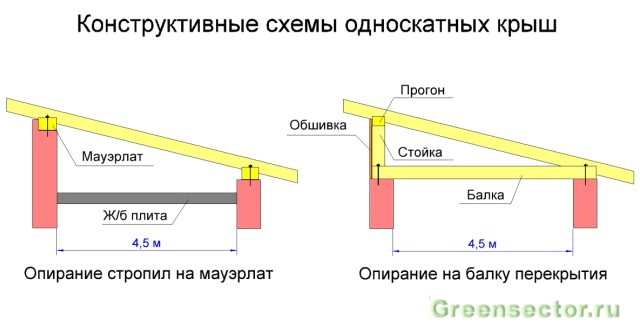
- Sliding, used mainly in log houses. This design eliminates deformation during log house shrinkage, which reaches 15% for new houses. The sliding truss system is rigidly fixed to the Mauerlat of the upper wall.On the lower wall, the rafters rest on special devices, on which they slide when the log house shrinks.
- Laminated rafters are usually used in brick or block houses that do not give much shrinkage. They rest with their lower end on the floor beams, and in the upper part they are supported by a high wall or rack, which also abuts against the floor beam. Additional rigidity of the structure of the rafters is given by struts or additional racks.

In addition, shed roofs can be divided into ventilated and non-ventilated. Non-ventilated roofs usually have an angle of no more than 5 degrees and require high-quality insulation, hydro and vapor barrier. Ventilated roofs can have any angle of inclination, their feature is the presence of free space between the roof and the ceiling and ventilation holes on both sides of the roof or on the gables. The air gap allows you to improve the conditions for the removal of water vapor from the insulation, to extend the life of the structure.


The angle of inclination of a shed roof is directly related to the roofing used. For soft roofing or rolled materials, a slope angle of up to 10 degrees is used, with a slope angle of 10 to 20 degrees, corrugated board with a longitudinal profile and a wave height of 30 mm or more is usually used, slate and ondulin can be laid with a roof slope of 20 degrees, and metal tiles - from 25 degrees. When calculating the roof, it is necessary to take into account this dependence and make a choice in accordance with the purpose of the roof and the selected coating.
An important point in the project of the house: the slope of the pitched roof
Building codes do not prescribe the permissible angle of inclination of a shed roof, but impose restrictions on the slope of a flat roof: from 2 to 12 (SNiP II-26-76, SP 17.13330.2011), which is dictated by the design features of a flat roof and its laying technologies.
In practice, shed roofs on outbuildings are erected with a slope starting from 3, and on residential buildings - from 10. There are no formal restrictions. The maximum angle of inclination is also not standardized.
The choice of pitched roof slope depending on the layout of the house
The angle of inclination is chosen based on the architectural and planning features:
• In the project of a house without attic space, a shed roof is usually made with a slope of 10-30.
• In houses with an attic, the usable area depends on the angle of inclination: the higher the slope, the smaller the attic.
The useful area of the attic depends on the angle of inclination
• In multi-level houses (as happens when buildings are built on a mountainside), the slope of a shed roof can match the topology of the area.
• In houses with variable number of storeys, the angle of slope of the roof is 20-35.
• Sometimes the slope is chosen based on aesthetic considerations, and the layout of the partitions of a house with a pitched roof is adjusted to the specified parameters.
Choose the angle of inclination for aesthetic reasons
Roof slope restrictions depending on the materials used
For some roofing materials, there are restrictions on the angles of slope, dictated by the technology of installation or their wind resistance.
• Bituminous rolled roofs are not allowed to be laid on a roof with a slope of more than 25 - this is due to the fluidity of hot bituminous mastic. To simplify installation, a slope of up to 15 is recommended.
• Slate (asbestos-cement) sheets, on the contrary, require laying with a significant roof slope, at least 25 for a reinforced profile, at least 35 for a regular profile. Moreover, the higher the slope, the greater the overlap of the upper row on the lower one.
• Euroslate (ondulin) allows laying with a slope of 6 to 10 along a continuous crate, at 10-15 the crate should be mounted in increments of 45 cm, more than 15 - 60 cm.
• Metal tiles can be used on shed roofs with a slope of at least 10, but at 10-20 it is necessary to seal the joints of the sheets. For roofs with a slope of more than 20, additional sealing of the joints is not required.
• Decking - a reliable covering for roofs with a small slope. At 10 or more, an increased overlap and sealing of the joints with a special tape is required.
• Seam roofing is successfully used for slopes from 8 without additional sealing of joints.
• Bituminous tiles with a slope of 11-18 are laid on a solid base, more than 18 - they are attached to the rafters along the contour.
• Ceramic tiles with a slope of 10-21 are placed on a waterproofing layer, 22 or more - without waterproofing. Rarely used for pitched roofs.


Great, wonderful, many interesting solutions for the use of conventional shed roof devices. I especially liked the project of a house with an attic under a shed surface. The only pity is the missing place behind the attic, it is difficult to use such places with great benefit.