- If the same problem, but in a ball mixer, then you need to do this:
- What to do if the faucet is leaking
- Tools and materials
- Peculiarities
- Contactless
- Specifications
- Installation algorithm
- thermostatic faucet
- How to repair a single-lever ball mixer
- Blockage removal
- Replacing rubber seals
- Switch Troubleshooting
- Switch Spring Replacement
- How to disassemble the lever device?
- Disassembly of the disk product
- Disassembly of the ball mixer
- Step-by-step instructions for disassembling the crane
- wrench prices
- Typical malfunctions and methods for their elimination
- Faucet mixer repair
- Single Lever Faucet Repair
- Installation height of the shower faucet and correct installation of the shower tap
- Faucet disassembly tool
- Single lever mechanisms
- Faucet assembly
- Cartridges for single lever mixers
- How to replace a cartridge in a kitchen or bathroom faucet
- Conclusion
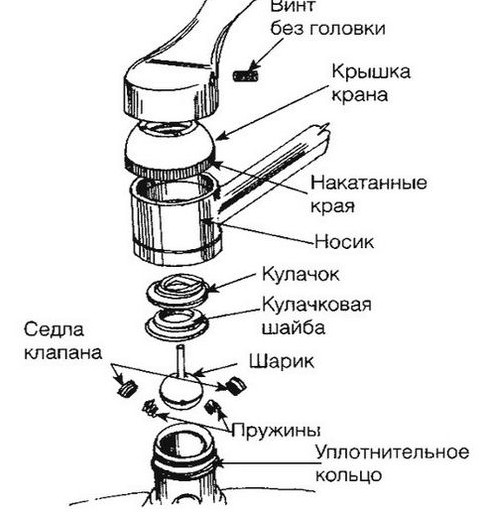
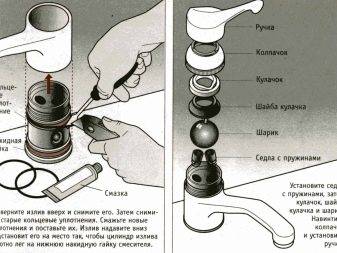
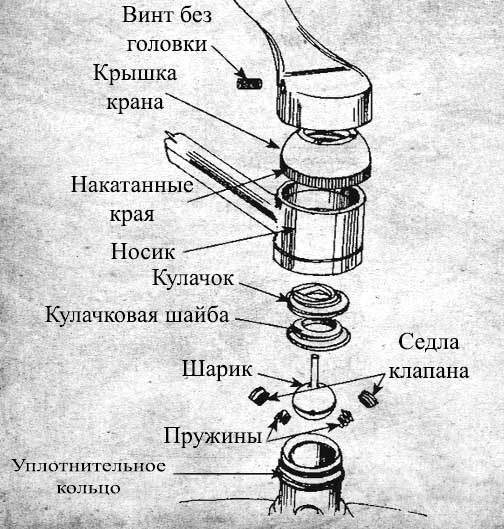
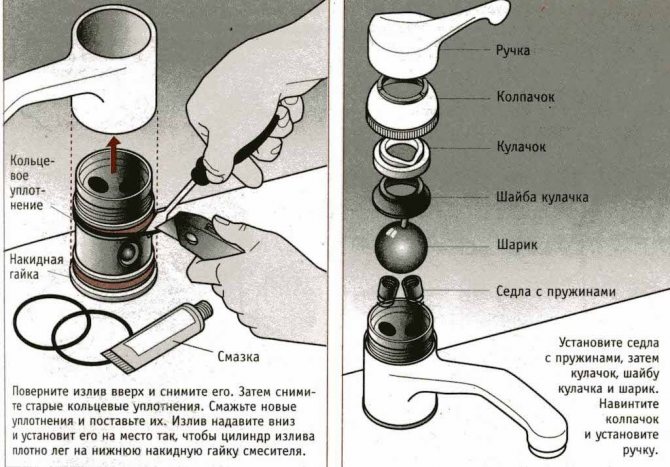
If the same problem, but in a ball mixer, then you need to do this:
- Remove mixer handle. It's not much different from a cartridge faucet.
- After removing it, we take out the cam with the washer. It can be immediately cleaned of any rubbish. It won't be redundant.
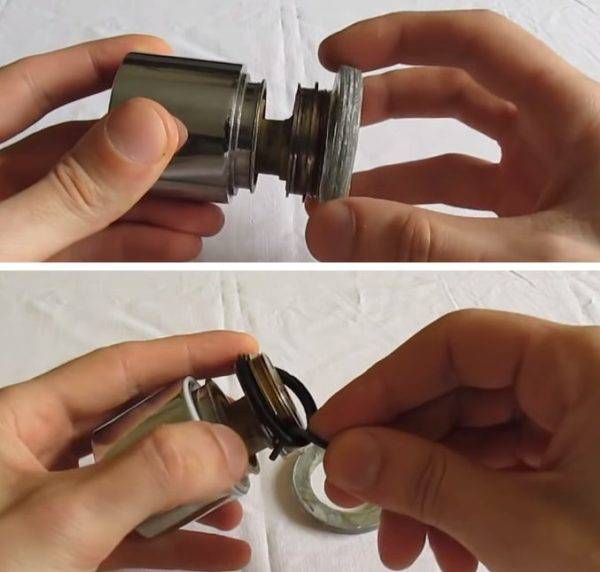
- Then we take out the ball itself, and carefully examine it.First, consider the top washer, it should just be cleaned. If the ball itself looks worn out, then only a replacement will help. If the springs do not press the seats against the valves well, then it is worth replacing both. It's not very difficult. Pry them up with a screwdriver and pull them out.
- Well, in general, that's all. Also, the problem may be in limescale, or in the wear of mechanical components.
- Weak pressure? Gaskets on the liner may be pinched, poor patency of pipes or hoses. It is also worth mentioning the aerator, this is such a mesh at the end of the tap. If something is not very good with the flow of water, then it is worth removing this mesh and cleaning it, this is done very simply, you can use a needle, or you can use a strong pressure of water. If anything, then it can be changed, their price is small, so you can afford to replace them sometimes. However, if a similar situation occurs frequently, then this makes one think that it makes sense to install at least mechanical filters. This will greatly extend the operation of the device and the life of the sink.
As a result, repairing a faucet in the kitchen with your own hands is not such a difficult task. In principle, in order to sort through the entire sink, it will take you one day. But there is no need to rush. Everything must be done as carefully and carefully as possible. But the easy and understandable device of this mixer corresponds to the ease of its repair.
What to do if the faucet is leaking
At first, a simple increase in tightness will suffice. All connections are tightened as tightly as possible. With less luck, the crane will need to be partially or completely disassembled. To do this, use a wrench and adjustable wrench, flat and Phillips screwdrivers.
To prevent the faucet from leaking, it is necessary to replace the gaskets of the stuffing box and the gaskets of the shower hose. A leak between the spout and the stuffing box nut is a frequent occurrence and does not attract much attention, but if the volumes of useless water are large, then the liner will need to be replaced. Then a new part is made from the sealing tape. The old liner is removed and a new one is wound tightly.

Before replacing the shower hose gasket, the latter is unscrewed with an adjustable wrench. Recently, new silicone gaskets have been replaced with old gaskets. They have shown themselves to be more resistant to wear than rubber.
Tools and materials
To disassemble a single-lever mixer, no specific tools are needed. The necessary minimum is in almost every home.
List of tools:
- spanners;
- pipe wrench;
- hexagons;
- screwdrivers;
- a hammer;
- torch.
Running parts for a lever mixer are available in every decent hardware store.
List of materials:
- cartridge;
- mixer lever;
- aerator;
- supply hoses or o-rings for them;
- spout;
- switch and shower hose.
All other parts of the mixer rarely require replacement. The case may eventually crack or lose its chrome plating in places, but replacing it is equivalent to installing a new device. Removing the cartridge and supply hoses requires shutting off the water to the faucet. The lever, spout and aerator can be unscrewed without it.
Peculiarities
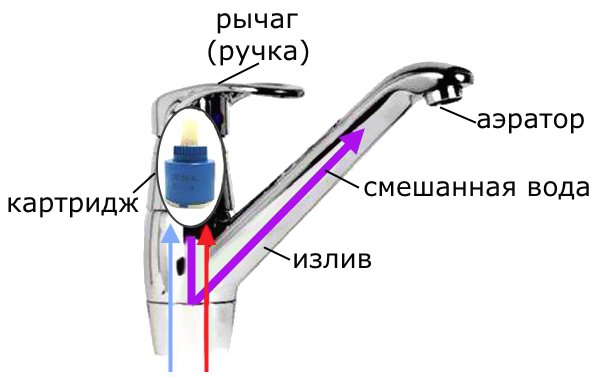
The breakdown of the unit mainly happens for two reasons. Firstly, the wrong use of the mixer, and secondly, the service life of some parts has expired. Initially, it is necessary to carefully understand the principle of operation, features, as well as varieties of mixing taps.This will help to more accurately determine the causes of the breakdown of the plumbing device. The mixer is an indispensable device in all apartments and private houses with connected water supply. It helps to mix cold and hot water in order to eventually get the right temperature. To regulate the water pressure when turned on is another function of the mixer.
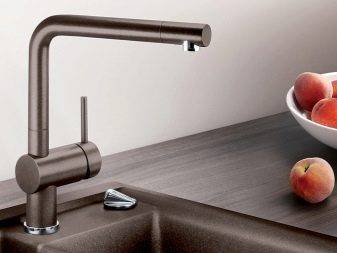
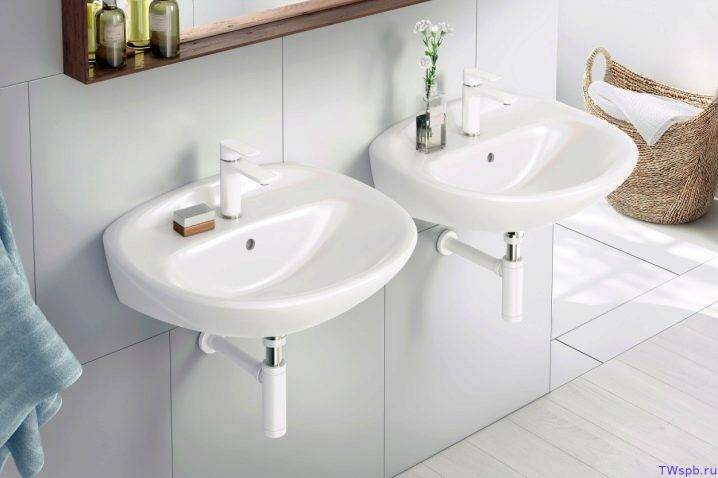
These plumbing fixtures are designed for installation in the kitchen and bathroom. In some apartments, outdated options are still used today - two-valve mixers. But every tenth plumbing buyer prefers single-lever mixing taps, which are distinguished by their convenience and ergonomics. For a bath, it is advisable to install a single-lever plumbing fixture with a high swivel spout, the water from which flows directly into the bath or shower head. In the version with two spouts, the flows are distributed as follows: one enters the bath, and the other goes through the watering can. Such a device, in addition to the lever, is additionally supplied with a switch.
Contactless
Constructions of this type do not imply the presence of a control handle, and are externally equipped with only the spout itself. Their distinctive feature is that water is supplied automatically when any object is brought under the tap. Such automation is ensured by the presence of a special system that analyzes all actions.
The advantages of contactless mechanisms include the following characteristics:
- The operation of the system is fully automated, which does not require constant switching on and off of the flow. This allows you to significantly reduce water consumption, since it will be used only at the right time.
- Lack of a handle. A person does not need to spend time turning on and configuring the system, which also saves time.
- Practicality. One of the advantages is that the water flow has a standard temperature. This allows you to set one value on a special sensor and forget about the setting, as is the case with lever mixers.
Specifications
Touchless faucets include several standard elements:
- Housing and spout.
- Stop valve.
- Filters and connecting hose.
- An electronic system that performs control. This part of the mechanism is one of the most important, as it allows you to configure all the main flow parameters.
Some models of such mixers are designed with a swivel spout, but this already depends on design decisions. Setting the temperature and flow rate is carried out using a special touch panel. More modern modifications can change such indicators automatically depending on the location of the hands.
Installation algorithm
The installation process of mixers of this type can be divided into several successive steps:
- Initially, supply hoses of a certain length must be connected to the tap. In this case, the location of the sink and the source of water supply must be taken into account.
- After that, the mixer is installed in a special hole on the kitchen attribute. In this case, the surface between the sink and the tap is sealed with a rubber ring.
- The mixer is fixed using a special bracket, which is screwed with nuts. They must be tightened carefully so as not to damage the structure.
- The installation is completed by connecting the hoses to water sources and checking the system's performance.
When buying a kitchen faucet, you should give preference to high-quality modifications of well-known manufacturers. This will allow you to get a reliable product that will last several times longer than a cheap analogue.
a photo
thermostatic faucet
But the most modern faucet scheme for the washbasin and shower cabin of the bathroom is represented by a device where mixing is carried out by means of a thermostat. Such a crane has a number of advantages:
- To mix the water, you do not need to use the switch knobs - this allows you to successfully use this design in public places;
- During installation, you can set the settings for the temperature regime, and they will not change even after continuous use of the sink;
- Unlike a single-handed and double-lever rotary switch, the mixing process is fully automated and controlled by a thermostat. Due to this, there is absolutely no possibility of causing a burn if the temperature is set incorrectly. This push-button faucet can be used even by the smallest children.
Despite the apparent complexity of the work, the thermostatic mixer has a fairly simple device, as evidenced by the drawings. The mixing element is connected to a special temperature-sensitive plate and connected to a control valve. The plate or cartridge is made of metal and reacts to the slightest temperature changes during operation.
In addition, this steamer model is equipped with a special thermometer, which, during installation, allows you to set the standard temperature and the one after which the hot water flow is automatically blocked.Famous brands: Hansgrohe, Kaiser.


Various mounting options are possible - on the wall, in place of the old faucet or in other places in the bathroom and kitchen.
How to repair a single-lever ball mixer
The order of actions to be performed depends on the malfunction that has occurred. We offer you to figure out how to fix the mixer, depending on what problem arose during the repair work.
Repairs can be done by yourself
Blockage removal
The presence of such a problem is indicated by a weak pressure of water. To clear the blockage:
- disassemble the single-lever mixer by removing the nut from the spout;
- remove and thoroughly rinse the mesh, removing all collected abrasive substances;
- reinstall all structural elements.
Remove all accumulated dirt from the mesh
Replacing rubber seals
With insufficient tightness of the elements, the single-lever faucet begins to leak. In such a situation, it's time to replace the rubber seals with new ones. You can do this in the following way:
Switch Troubleshooting
If you experience difficulties when switching the operating mode of a single-lever faucet, you can fix the problem as follows:
When choosing a lubricant, you should pay attention to the universal compositions offered by many manufacturers and having positive reviews:
Seals must be the correct size
Switch Spring Replacement
If you have difficulty returning the switch to its original position, the spring may need to be replaced. As a repair part, it is worth choosing a smaller diameter spring with a protective coating. Repair is carried out as follows:
- we disassemble the crane;
- remove the stem with the wound spring and remove it;
- using pliers, wind a new spring onto the stem;
- assemble and install the switch.
The failure of the switch to return to the starting position can be corrected
How to disassemble the lever device?
To repair models with one locking mechanism, it is necessary, first of all, to disassemble the structure in order to get the damaged element. It is replaced with a similar new part. Repairing a lever mixer is quite easy, but you need to act very carefully.
Disassembly of the disk product
To dismantle the accessory, you will need a set of the following tools - a screwdriver and a hex key.
The following algorithm of actions is applied:
- First of all, it is necessary to block the pipes with hot / cold water.
- You should get rid of the plug, which is removed with a screwdriver.
- A hex key unscrews the screw part that connects the lever to the stem, where the water is regulated.
- Having done this, you can manually remove the crane lever. After that, it is necessary to unscrew the ceramic nut, as well as the clamping nut that secures the top plate.
This opens access to the mixer disc. You can get it, and insert a new cartridge into the resulting space, while you need to monitor the correct position of the holes on this part.
After that, all operations are carried out in the reverse order. After assembling the tap and completing the manipulations, you can turn on the water to check the correct assembly.
Going to the store for a new cartridge, it is advisable to grab a failed drive. Models may differ in the diameter of the holes available and the latches that are located on the bottom edge of the products.It is better to give preference to cartridges with a silicone gasket, as they resist water better.
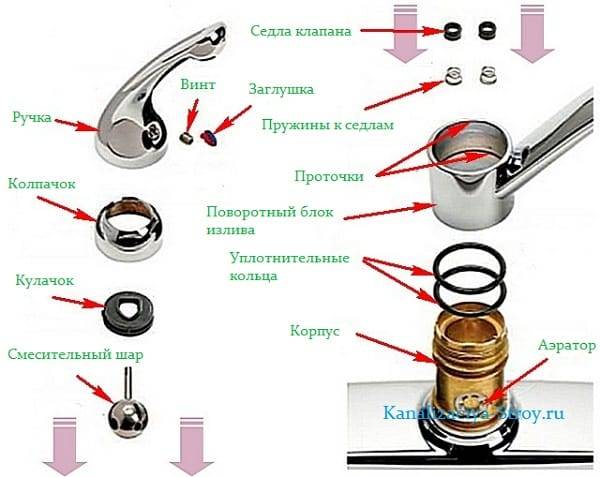
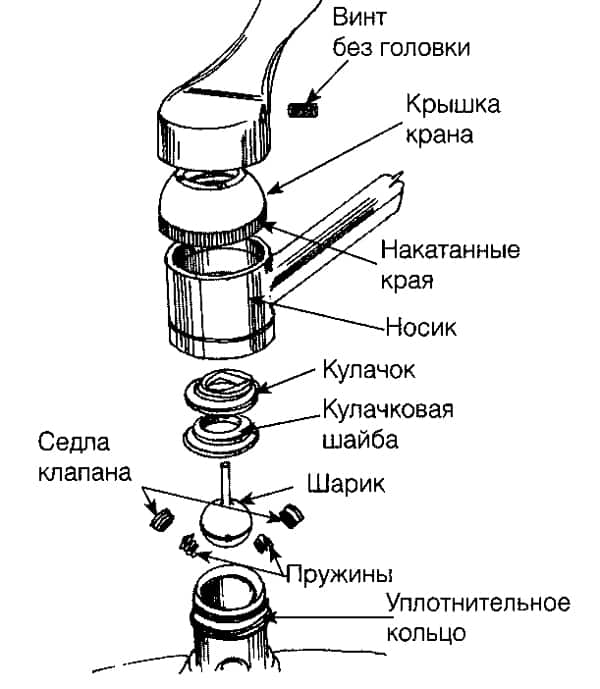
Disassembly of the ball mixer
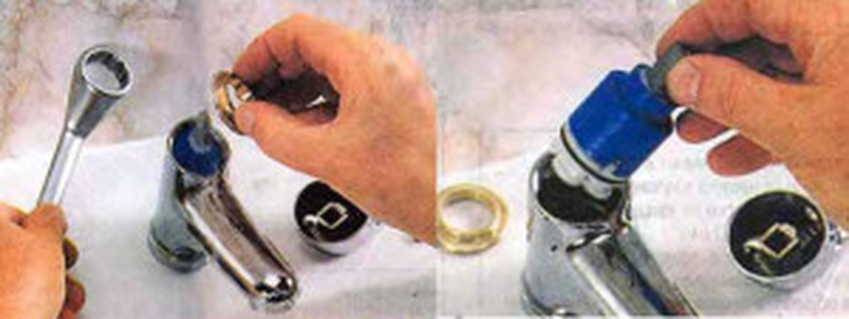
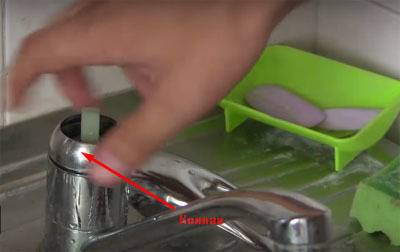
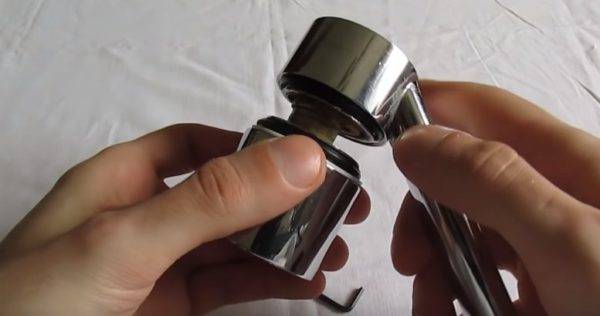
A similar process is performed in the same way as described above, but there are some nuances. First of all, you also need to turn off the water. After that, using a screwdriver, the decorative cap is removed, the fixing screw is unscrewed and the nut is removed, which holds the crane mechanism in the correct position.
It should be borne in mind that in case of a serious breakdown of the ball accessory, you will have to change the entire mixer. Repair of the ball device is possible only if the problems are caused by a worn out rubber gasket or clogging of the tap with abrasive materials.
In some mixer models, the handle fits snugly enough in the control rod. To release the part, it is recommended to gently pry it with the end of a screwdriver
Constantly dripping water from the faucet usually indicates problems with the gasket.
To resolve the issue, you need to take the following steps:
As described above, the screw is unscrewed, the lever is removed.
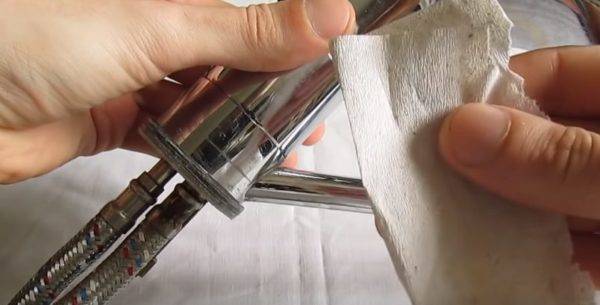
The connection is removed from the thread, after which the screw is unscrewed with a screwdriver
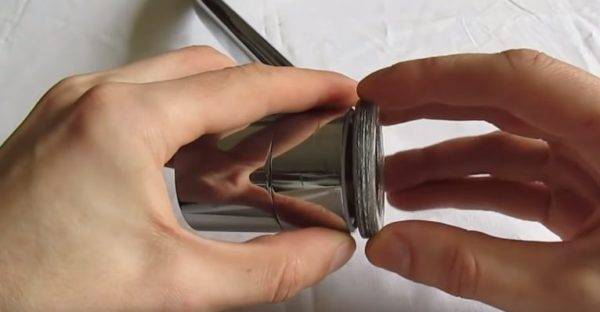
If plaque is found on it, it must be carefully removed with a soft cloth.
The ball is removed from the structure, after which the worn gaskets are carefully removed, which are replaced with new parts.
At the end of the process, the ball is put back in place, and the seals are attached with a plastic nut.
The lever is placed again, and then the screw is screwed to fix this part. After performing these operations, the crane is checked
After performing these operations, the crane is checked.
Problems with clogging of the ball mixer are indicated by a thin stream of water even at the maximum pressure of the tap.
In this case, you need to follow the following instructions:
- unscrew the nut from the spout of the mixer;
- pull out the mesh and rinse it thoroughly with water;
- insert the part back, then re-tighten the nut.
If the manipulations described above did not help solve the problem, it is necessary to replace the device and install a new faucet in the kitchen or bathroom.
Special care must be taken when loosening and tightening the fixing nuts. Excessive force can easily damage the elements
Step-by-step instructions for disassembling the crane
As always, before starting work, you need to check the availability of tools and fixtures, otherwise you will have to interrupt the disassembly due to the lack of something. Prepare:
- a set of open-end wrenches or an adjustable wrench;
- a screwdriver for an asterisk and an ordinary one;
- hex key;
- mounting knife.
Need to stock up on tools
wrench prices
Adjustable wrench
Step 1. To facilitate the work, remove the faucet from the sink. It can be fixed with two studs and a special metal washer or large nut. Mounting method depends on device type and manufacturer.


First you need to remove the mixer
Step 2 Unscrew the studs, for this they have a slot for an ordinary screwdriver.
Unscrew both pins
Step 3. Remove the round rubber seal. It prevents water from entering from the top surface of the sink down.Such leaks occur only as a result of gross errors during the installation of the mixer; during operation, the gasket does not wear out and does not lose its original properties.
Remove the rubber pad
Step 4. Gently twist two flexible hoses, one for hot and one for cold water. There is not enough space under the sink, in connection with this, the hoses have a reduced diameter compared to ordinary ones. In addition, they have a small nut, if for standard ones you need an 11 mm open-end wrench, then here the nut size is only 8 mm. Keep this in mind when preparing the single lever mixer disassembly tool.
Unscrew water supply hoses
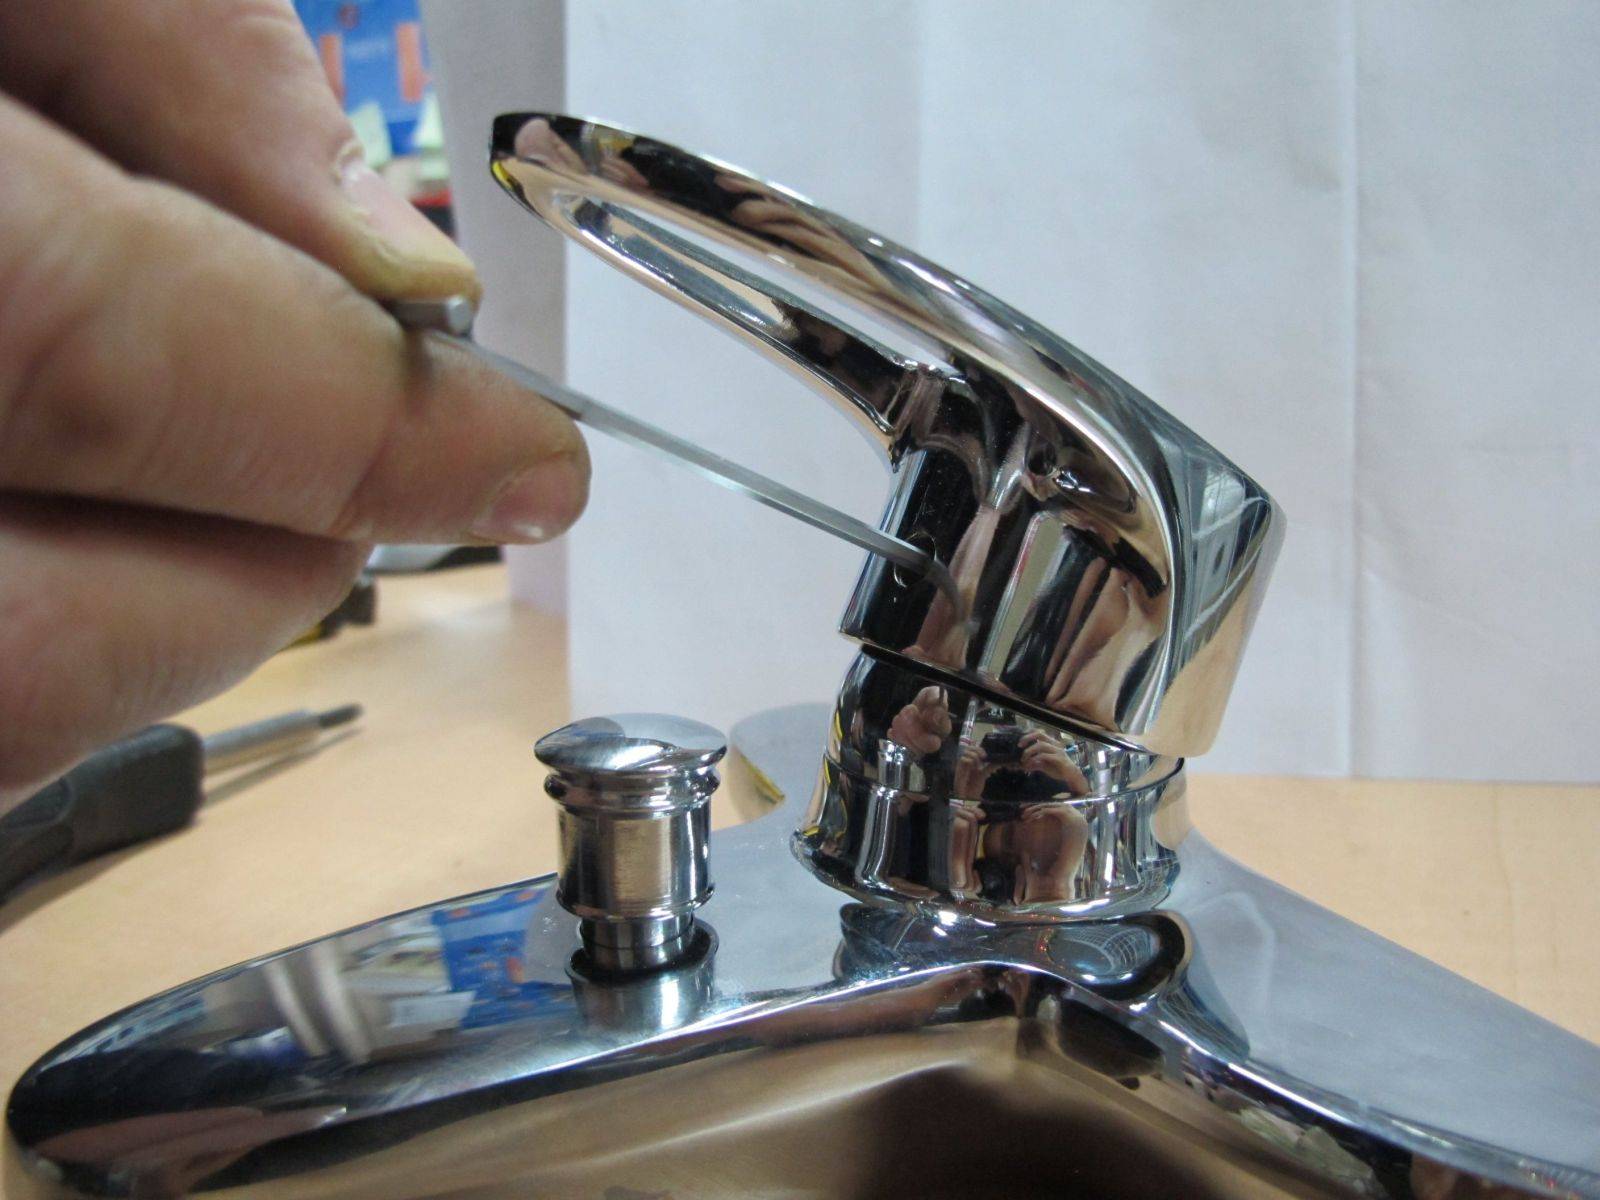
Step 5. Using a small screwdriver or other sharp object, pry off the cap of the pivot arm fixing screw. There are red and blue marks on it, remember their position. During assembly and connection of the faucet, do not confuse the cold and hot water hoses, otherwise the faucet will work the other way around. This is not critical, but it causes certain inconveniences in the initial periods of use, you will have to get used to the opposite algorithm for regulating water parameters.
The screw cap must be pry off with a screwdriver.
Step 6. Unscrew the lever fixing screw with a hex wrench.
Release the hardware half a turn and constantly try to remove the lever. It is fixed to the rod in a small recess; for complete disengagement, more than 1.5–2.0 turns of the screw are not required.
Unscrew the screw and carefully remove the lever
Step 7. Unscrew the top cover on the faucet body, it is held on the external thread of the clamping nut. Remove the clamping nut that secures the cartridge in the housing. To do this, you need to use a wrench.
To remove the clamping nut, you will need an open end wrench.
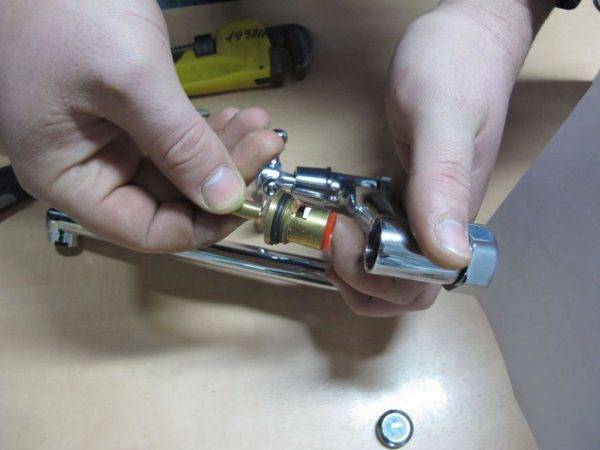
Step 8 Remove the cartridge from the faucet.
Remove the cartridge from the faucet
The mechanism is disassembled, now it is necessary to inspect it to determine the cause of the problem. Unless, of course, you disassembled the device just to find out its internal structure.
Ball mixer disassembly
This is interesting: Iddis mixers - characteristics and types
Typical malfunctions and methods for their elimination
According to the principle of operation, all mixers are divided into the following types:
valve devices. The basis of the mixer are two taps designed to supply cold and hot water. Such devices are considered the most common and most reliable;
The most popular type of faucets with two valves
single-lever. At the heart of the device is a rotary lever, which regulates both the amount of cold or hot water supply and the total pressure of the liquid. Single-lever mixers are more whimsical to water quality, therefore, when choosing such a device, it is recommended to install additional filters;


Device with one control lever
sensory. Relatively new type of mixer. The device is turned on thanks to the installed photocell, which reacts to the presentation of hands.
Automatic plumbing device with sensor
Touch-type faucets cannot be repaired at home.
Faucet mixer repair
The most frequent breakdowns of the faucet mixer in the bathroom are:
- Faucet leak. The causes of the malfunction may be the natural wear of the gasket or damage to the crane box. Repair of a ball valve is carried out according to the following scheme:
- shut off the water supply to the plumbing device;
- remove the decorative cap (plug) from the leaking faucet, which is most often simply inserted into the groove;
- unscrew the screw located under the plug;
- unscrew the crane box (use an adjustable wrench or wrench of the appropriate size);
- replace the gasket or crane box (in the presence of visible damage to this device);
- reassemble in reverse order.
Repair sequence
- Shower diverter leak. The reasons are also natural wear and tear or poor quality water. Repair of this malfunction is carried out in the following order:
- the water supply to the mixer is blocked;
- the decorative cap and switch are removed;
- with the help of an adjustable (wrench) wrench, the shower nut is unscrewed;
- the gasket is replaced and reassembled in reverse order.
Shower diverter gasket replacement technology
- Leakage at the connection point of the shower hose, shower head or gander. Repairs should be made in the following order:
- the nut fixing the hose is unscrewed (a shower head or a gander, respectively);
- the gasket is replaced and the mixer assembly is assembled.
In some models of mixers, in addition to replacing the gasket, additional sealing of the thread with FUM tape or other similar materials is required.
Fixing a leak at a shower hose connection
Single Lever Faucet Repair
Typical breakdowns of a single-lever mixer are eliminated in the following ways:
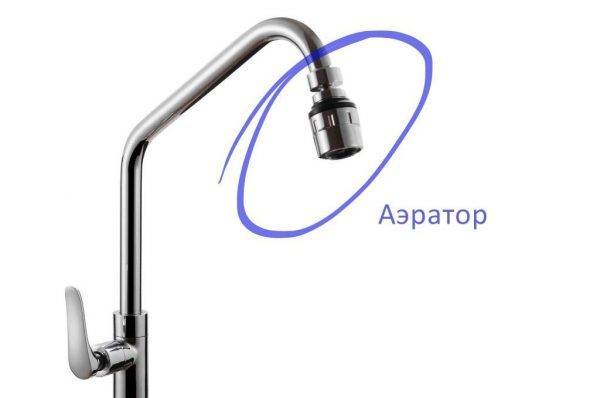
- Reducing the pressure of the crane jet. The cause of the malfunction is a clogged aerator. To clean the aerator, you must:
- remove the device, which, as a rule, is fastened with a threaded method;
- rinse the strainer under the pressure of water or air;
- install the aerator in its original place.
Faucet aerator cleaning
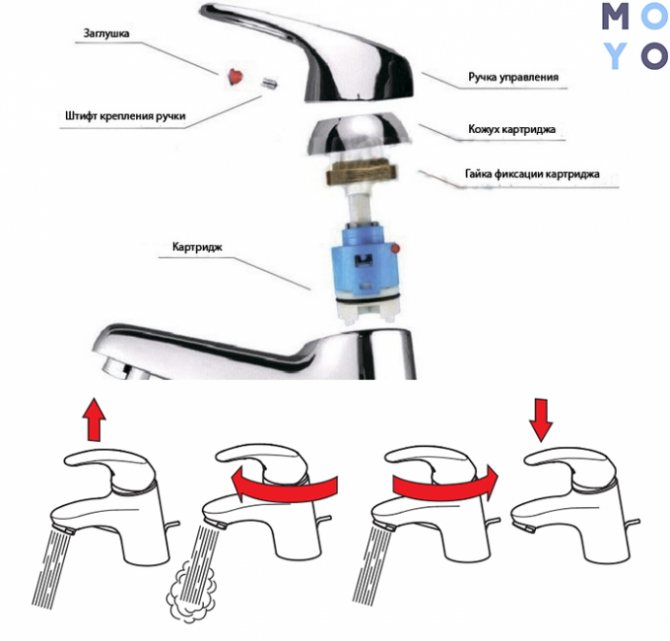
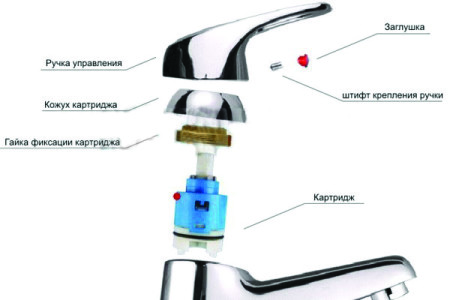
- Control lever leak. The cause of the malfunction is a problem in the operation of the cartridge - a special device in which hot and cold water is mixed. You won’t be able to repair the cartridge yourself, but you can replace the device yourself to fix the leak. The work is done in the following order:
- the decorative cap is removed from the switch housing;
- the screw fixing the lever is loosened;
- the lever body and the decorative element located under it are removed;
- using an adjustable (wrench) wrench, the cartridge is removed;
- a new device is installed and assembled in the reverse order.
It is recommended to select a new cartridge based on the device that has become unusable, that is, after removing the old cartridge.
Scheme for disassembling a single-lever faucet to replace the cartridge
- Leaks at the points of connection of the shower hose, shower head and faucet goose are eliminated according to the scheme of valve faucets.
Ways to eliminate breakdowns of a single-lever mixer are presented in the video.
If you can’t cope with the malfunction of the mixer on your own, then you will need the help of a professional plumber.
Installation height of the shower faucet and correct installation of the shower tap
An important parameter when installing a faucet with a shower is the height of its installation. In this situation, the installation height of the mixer itself and the height of the showerhead are important. Usually the mixer is mounted at a height of 0.9-1.4 m from the floor or from the bottom of the bathroom. and the height of the watering can is selected individually and depends on the height of the person.
At first, faucets were used for stationary showers, where water is supplied to the watering can through a fixed pipe. Later they began to use a flexible hose for supply. Showering just got easier. A bracket was used for fixing, and today a more convenient design is used in the form of a rod and a movable latch, and each family member can adjust the height of the watering can to suit their height.
Most often, the installation of faucets in a bathroom with a shower occurs on the wall, although installation is also used on the side of the bathroom and on the floor. The latter is possible for large bathrooms. In small apartments it is not always possible to find a place for outdoor installation. Here, built-in faucets are more common, which are removed or folded at the moment when they are not in use, which saves some space.
Shower cabins for bathrooms are becoming more and more popular. In small apartments, they are often installed instead of bathtubs, which also allows you to put a washing machine. In more spacious apartments, such booths become an additional bathroom equipment. Their faucet has a rather complex design and is installed during the assembly of shower stalls at the factory. The task of a plumber or home master is to supply hot and cold water and connect the drain to the sewer.
Faucet disassembly tool
A kitchen faucet fails more often than a bathroom faucet, as it provides water to residents many times a day. Special construction tools will be required to repair the structure.
There is no particular uniqueness in the devices, but their presence is important when disassembling the mixer
Before repair you need to prepare:
- a hammer;
- knife;
- adjustable wrench to remove the nuts;
- hex wrench to remove the handle;
- Phillips, flat screwdrivers;
- socket wrench to remove and reattach the bolts.
- You will need lubrication, dry rags. When a faucet leaks, you need to purchase a cartridge, ring-shaped gaskets, and a faucet box in advance. When repairing the mixer, it may be necessary to replace the supply hoses. you need to purchase parts with a braid, a union nut with fittings. Priority is given to non-ferrous metal products: copper, brass.
If some elements do not unscrew, use special tools. For example, WD-40. The liquid dissolves rust, plaque. after a few minutes after application, you can try to unscrew it again.


In advanced cases, a drill helps out. With it, a screw is drilled that holds the handle. The drill should be smaller in diameter than the bolt head.
Plumbers have special tools in their arsenal. a special key for unscrewing the aerators, keys with rubber gaskets for them to prevent damage to the outer body of the mixer, a universal key for dismantling the ball valve, and so on. At home, you can carry out repair work without a master's tool.
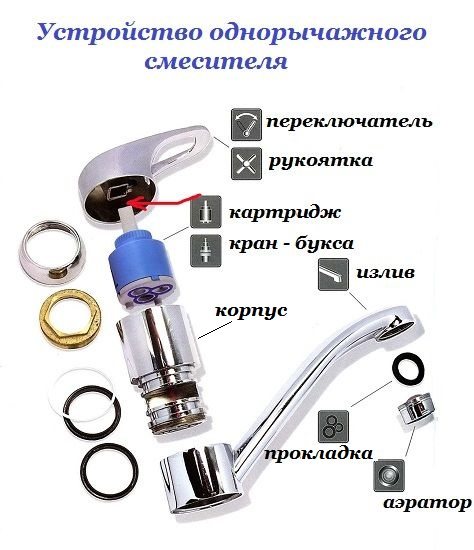
Single lever mechanisms
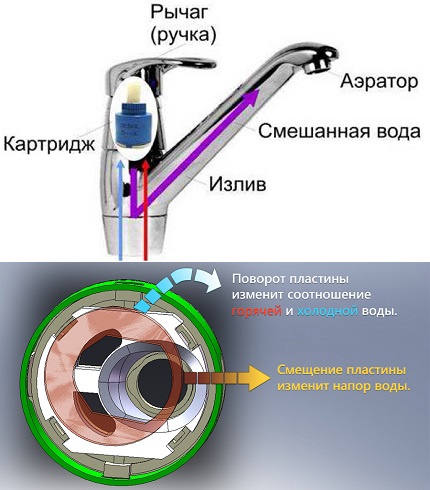
These types of mixing devices are made with one control handle. They work on the principle of a ball valve. If you turn the lever of the mechanism to the left or right, you can adjust the temperature of the water flow, and when it is fed down or up, the pressure of the liquid. Similar devices are placed on kitchen sinks, in bathrooms, in showers. They are very easy to use and really convenient.
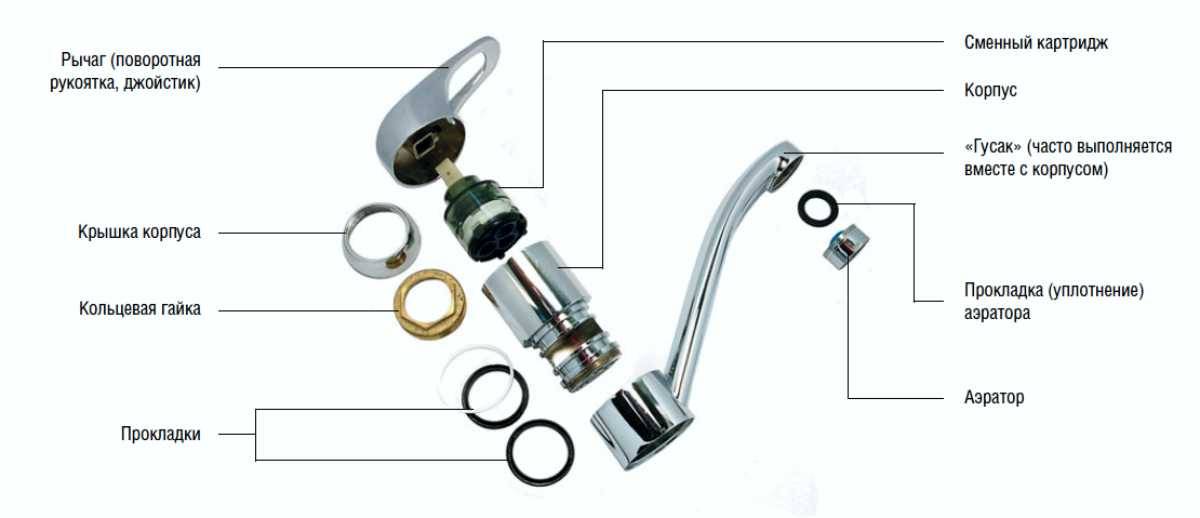
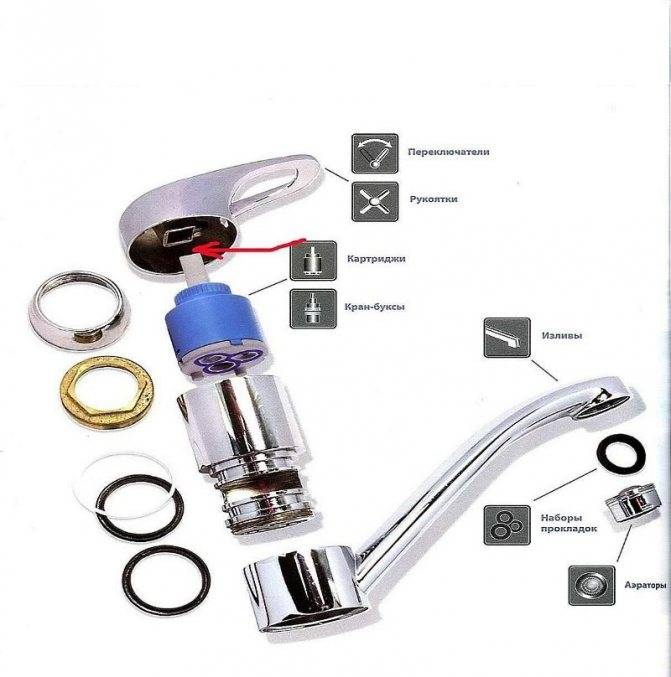
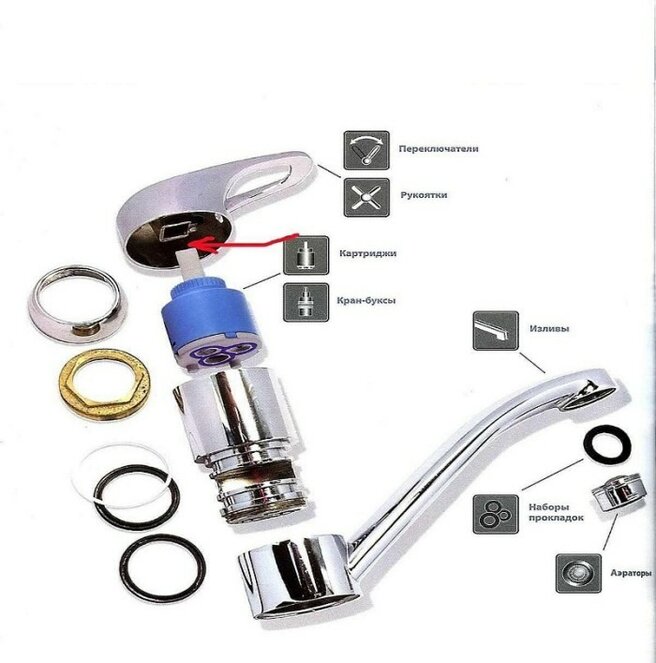
Faucet device - revealing the secrets of design Single-lever mixer
Most of the elements of a single-lever water tap are assembled into a cartridge (it is called a ball), which is structurally non-separable. This makes it difficult to repair the mixer. However, this is not required very often. The biggest problem with a ball valve is the failure of its gaskets. And it’s not at all difficult to change them. Also, mixers with ball cartridges can become clogged with small debris. A similar problem is often observed when the mechanisms in question are mounted on kitchen sinks. There is only one way out of this situation - removing the old and installing a new cartridge. This procedure is easy to perform on your own. The scheme of work will be as follows:
- Shut off the water supply.
- Remove the mixer, and then the lever (you need to unscrew the fixing screw).
- Take the old cartridge out of the faucet and put the new one in its place.
- Assemble the mixer. And you're using a refurbished device.
The main difference between a mechanism with one handle and a two-lever device is that water is supplied to a mixer with one lever at one point. This simplifies the process of its installation on sinks and bathrooms. Recently, new types of single-lever mixers have gained popularity. Instead of a ball valve, ceramic plates are installed in them. They blend very well with each other. Due to this, there is no leakage in mixers with ceramic cartridges. So, you will never hear the annoying noise of dripping water from the tap. Note that ceramic devices are rarely repaired. And most importantly - they do not need any special operating conditions.
Faucet assembly
Do not forget that a hand-made nut does not have the same strength, it is necessary to assemble individual elements with extreme caution. Step 1
Unscrew the nut, check its progress. put on new rubber seals
Step 1. Unscrew the nut, check its progress. Put on new rubber seals.
Remove the nut and install new o-rings
Step 2 Carefully put the spout on the faucet, before that, do not forget to put the bottom nylon gasket in place. It performs the function of a bearing when turning the spout. To facilitate the process, it is recommended to use technical petroleum jelly or ordinary soapy water. Moisten the surfaces, the composition will greatly reduce the friction forces and facilitate the assembly process.
Screw the top of the faucet
Step 3. Put on the top gasket and tighten the self-made nut from the discs. Tighten it with a little force. Remember that the task of the nut is not to compress the nylon gaskets or rubber seals, but only to hold all the parts of the crane together and prevent them from wobbling.
Tighten a homemade nut
And one moment. The pressing force with the nut will increase after the final installation of the faucet on the sink and fixing the device with studs with a washer.
The valve is assembled, it is advisable to check the tightness. To do this, temporarily connect the hoses to water sources and turn on the mixer. Leaks will appear in a few seconds. If everything is normal, then you can install the device in its place. Disassembly, repair and assembly takes no more than two hours, which is much faster and cheaper than going shopping in search of a new lever mixer.
Connect the hoses to the mixer and check for leaks
Cartridges for single lever mixers
It is not always possible to replace the seals to eliminate the malfunctions that have occurred. In this situation, it may be necessary to replace the single-lever faucet cartridge. You can carry out repairs yourself. The main thing is to get a suitable repair part.


Replace faucet cartridge
How to replace a cartridge in a kitchen or bathroom faucet
Let's take a closer look at how to replace a cartridge in a kitchen faucet so you can do it yourself. The work is carried out in the following sequence:
To keep the new cartridge as long as possible, you should pay attention to products with good reviews.
Conclusion
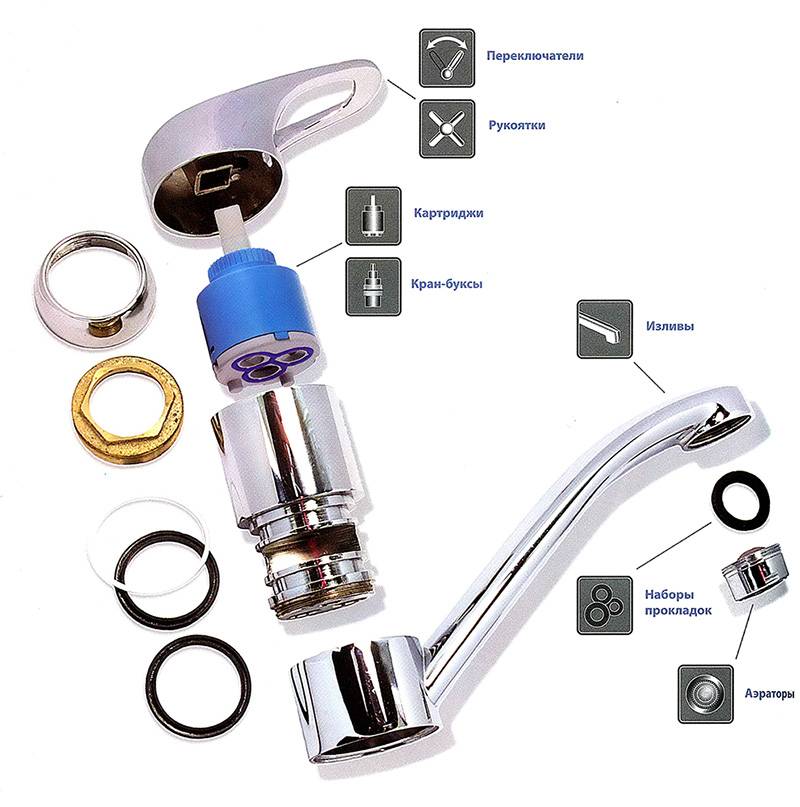
Mixers are single- and double-lever, contactless and thermostatic. Install them on bathrooms, washbasins, walls in showers. Designs differ primarily in the way they work and purpose. Shower diverter units alone have up to a hundred configuration options. Cartridges in faucets are disc and ball, up to two. Recently, with the word mixer, a single-lever design with one valve and an upper handle placement comes to mind. These devices filled the toilets in public places and the bathrooms of modern-style apartments. For the house, they buy either technological options, or those that are not difficult to repair manually. The mixer, in principle, is not a complex structure. To disassemble and replace parts, an intuitive understanding of the mechanism and a small set of tools in the form of adjustable wrenches, screwdrivers and pliers are enough.


