- Procedure for crimping with pliers
- Cable preparation
- Removing insulation
- Preparation of cores for loading into connections
- Crimp pad
- Crimp quality test
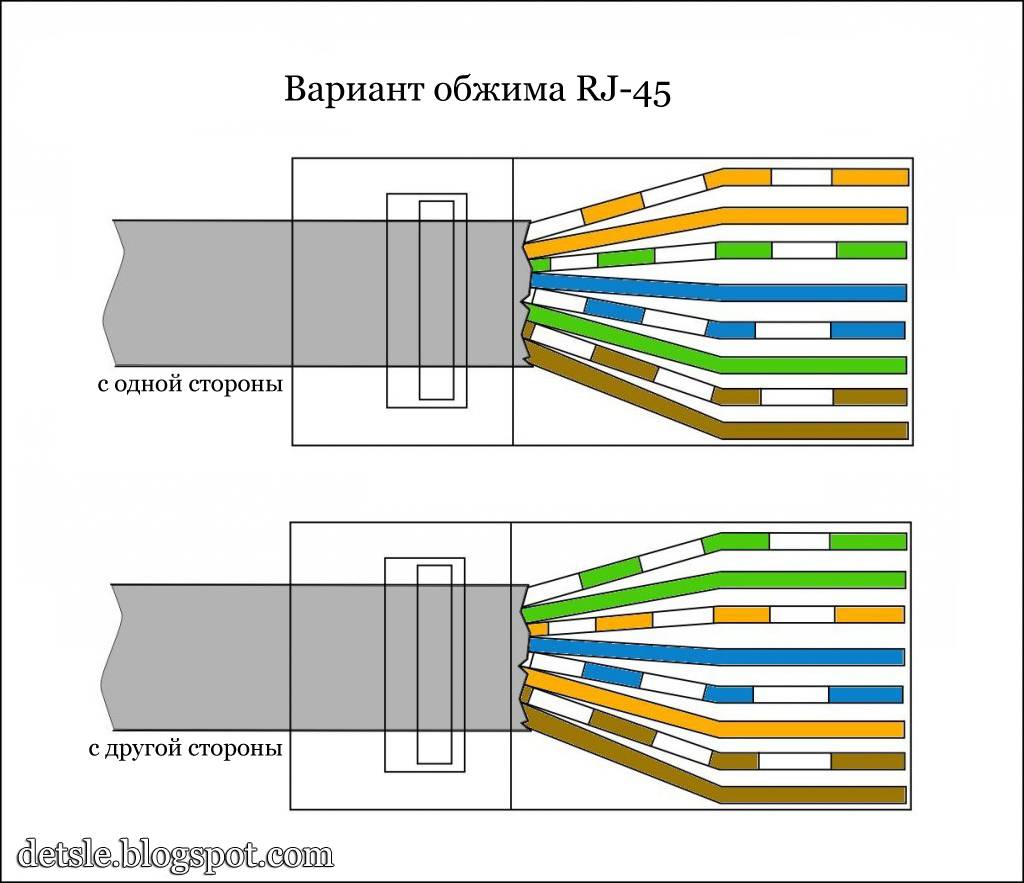
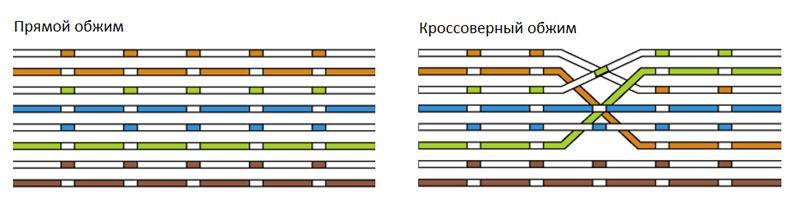
- Possible schemes
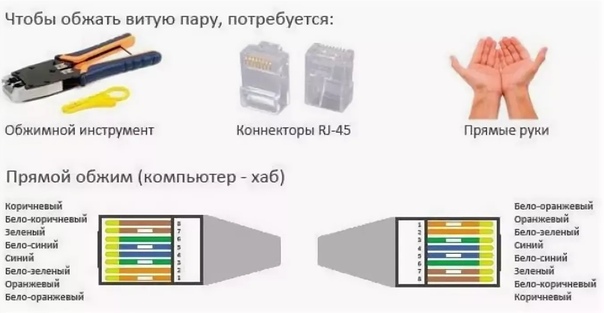
- Direct connection
- Cross connection
- Crimping cable with direct connection
- Crimp without tools
- Wire selection and standards
- What is an internet cable
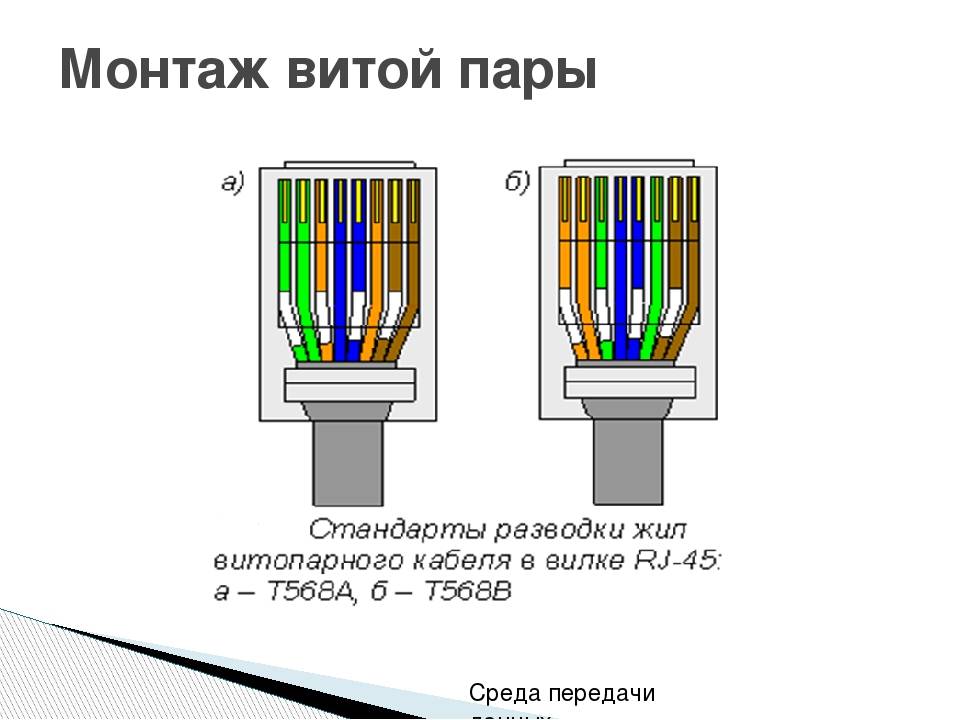
- Standard crimp patterns
- Option #1 - straight 8-wire cable
- Option #2 - 8-wire crossover
- Option #3 - straight 4-wire cable
- Option #4 - 4-wire crossover
- Types of cables for Internet connection
- telephone cable
- Coaxial cable
- Optical fiber (fiber optic)
- Twisted Pair (UTP)
- Making a patch cord
- Crimping technology
- straight type
- cross type
Procedure for crimping with pliers
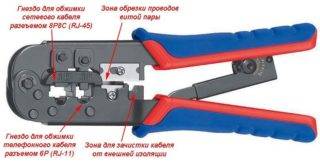 Crimping tool (crimper)
To crimp twisted pairs you will need this tool:
- crimper (pliers for crimping lugs of wires rj 45);
- stripper (cutter for stripping insulation);
- stationery knife.
If such a tool is not available at home, it is better to seek help from specialists.
Cable preparation
First you need to select a cable according to the required number of cores and cut off a segment of the required length from it. For a home network, you need to take a four-wire wire with copper conductors. Unused conductors are simply not used.For high-speed data transmission, an eight-core cable must be connected.
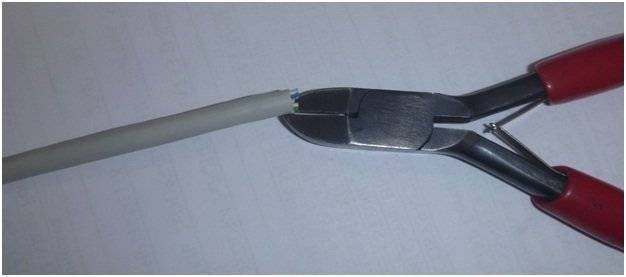
Removing insulation
It is necessary to remove the insulating layer from the ends of the cable section. It is enough to step back 3-3.5 cm from the edge and, using a stripper, make an incision on the insulation with a light circular motion. The cut must be done carefully, without strong pressure, otherwise the sheath of the cores will be damaged. This will result in a drop in data transfer speed. The braid is cut not to the full depth, but to half. Then it is bent and it bursts along the cut line.
Preparation of cores for loading into connections
 Preparing the Cable for Loading into the Connector
The conductors twisted into pairs that have opened after the removal of the insulation must be untwisted and straightened
Copper conductors are quite soft, so this operation must be performed carefully so as not to break off their sheath.
Further, all conductors are aligned relative to each other, after which they are cut perpendicularly evenly, stepping back from the edge of 3-4 mm. This procedure is best done with scissors. The result should be a straight end row of 4/8 strands in a braid.
Next, a plastic connector of the 8P format (8 contacts) will be used, with the help of which crimping will be carried out - contact fasteners of copper conductors.
Crimp pad
 Installing and fixing the connector
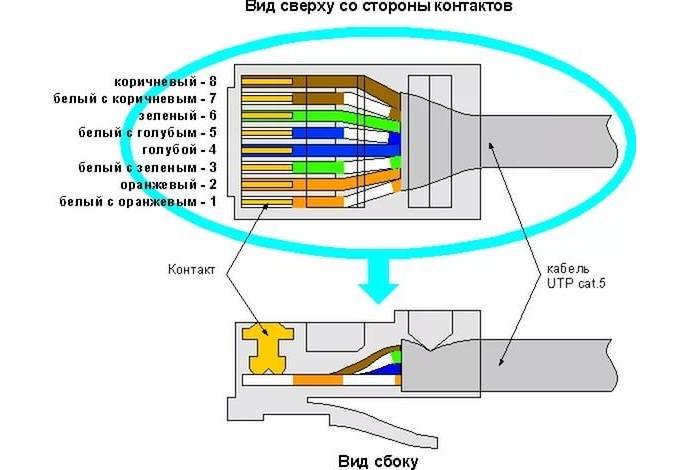
The back of the 8P connector is an entry gateway for the entry of copper conductors. This lock has 8 cells of a rectangular shape, into which cores of the appropriate color are loaded.
The copper conductors of the network cable are loaded into the connector gateway without removing the insulating layer. The conductors just need to be brought into the channels until they stop.
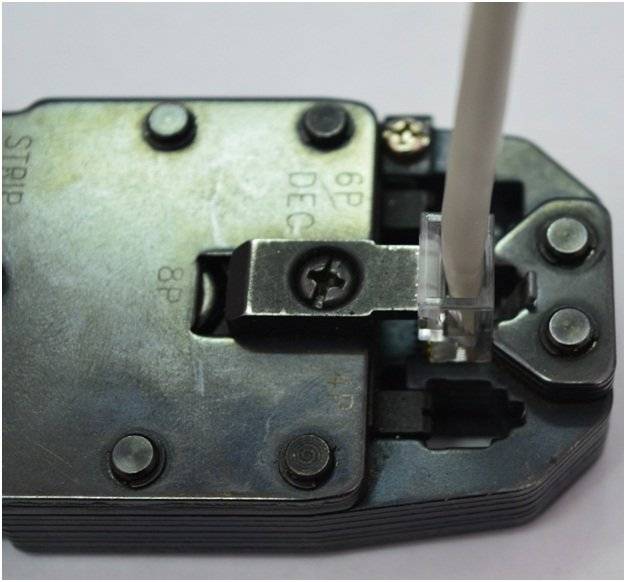
Next, you need to crimp the conductors using a crimper for 8P8C connectors.The block of ticks must be placed on the plastic connector, and then squeeze the handles of the tool until a characteristic click.
Crimp quality test
After the crimping process, the crimper is removed, and the connection itself is subjected to a strength test by physically pulling the cable out of the connector. A similar test is carried out on the other end of the network cable. If everything is done in accordance with the technology, the crimp will not allow the cable to break out of the pressed cells. After that, the crimping can be considered complete.
Possible schemes
There are 2 main schemes used for crimping internet wires. To select the appropriate option, you need to figure out which devices the cable will connect.
Direct connection
This type is required to connect the following instruments and devices:
- Personal computer - router.
- PC - communicator;
- Router - communicator;
- Router - SMART TV.
The main difference between the direct pinout is the same arrangement of wires of the two devices when connected to the connector of each. With a direct connection, the conductors are arranged in the following order:
- White-orange.
- Orange.
- White-green.
- Blue.
- White blue.
- Green.
- White-brown.
- Brown.
You can not swap colors at different ends, otherwise there will be no signal. Sometimes you can use not 8, but 4 wires. So, for data transfer at a speed of up to 100 megabits, only 1,2,3 and 6 numbers are involved. Therefore, to save money, you can buy "cables with two twisted pairs" if you plan to connect low-speed devices. The same RJ 45 connectors are used for connection.
Cross connection
This type is used to connect two devices with the same working principle: PC-PC, router-router.The difference from the first type of connection is that the same wires are used in the first connector as in a direct connection. In the cross, two pairs change places: orange - orange-white, green - white-green. The rest of the positions do not change.
Such a complicated scheme is used less and less. The fact is that most new devices are equipped with an Auto MDI-X interface, which automatically recognizes the type of connection and adjusts the optimal mode of operation. This means that it will be enough for you to connect the wire in a straight line.
Crimping cable with direct connection
How to connect a printer to a computer on Windows 10 and Mac OS
So, let's take a closer look at how to compress an Internet cable correctly.
First you need to clean the wires from their external protection.
In almost all wires in which the wires are in the form of a twisted pair. There is also a special thread with which you can easily get rid of the first layer.


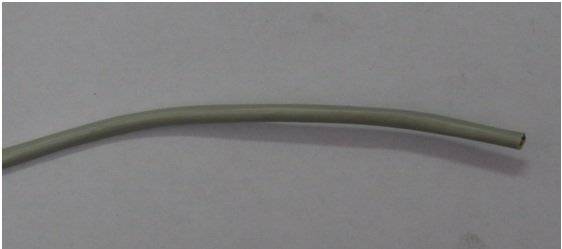
Twisted Pair Image
Next, you need to unwind and straighten the small wires.
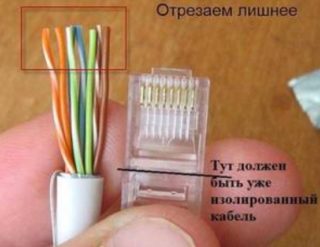
Measure the required length for cutting (attach an adapter), taking into account that a small part of the external protection should go into the connector by a few millimeters.
Cut off the excess, measuring the desired length
Inside the connector are divisions, separate for each dart.
They should carefully arrange the wiring.
You need to insert it so that the outer shell also goes under the adapter clamp.
How to properly fix the wire
Using a screwdriver, you need to fix the connector where it comes into contact with the insulated part of the wire.
It is very important to keep track of the wiring, they must be in their place each.The next step is to fix them in the contacts of the adapter. The next step is to fix them in the contacts of the adapter
The next step is to fix them in the contacts of the adapter.
For this action, you will need a crimper.
With its use, the work will be done once and with high quality.
You can also crimp the cable without crimping, helping yourself with a screwdriver.
1Insert so that the outer shell also goes under the clamp of the adapter.
2 Conveniently place it on a table or other convenient place that will ensure that the object is firmly in contact with a smooth surface.
In this case, the clamp must be in a free position so as not to crush it during processing.
3 The force of pressure must be such that each wire correctly sits in its place and cuts through the insulation.
4Use a flat-sided screwdriver and gently press down on the connector until you can see any gaps or protrusions.
It is important to properly position the wires in the adapter
At the end of processing, it is required to check the performance of the product using a special device.
The tester must be configured before testing as follows: put the switch to diagnose resistance or set the sound signal to sound when the resistance changes.
You need to test for each wire separately.
If there are difficulties somewhere, and there is no indicator reaction, you need to tighten the idle wire and check again.
Next, you need to put the protection in place between the cord and the creeper.
Of course, you can save money and not buy such a tip.
But the savings will be minimal, and if the wire is damaged, you will need to do the work done again, or even buy other components if something becomes unusable.
Protects the wire from bending
This job is done.
The important thing is that the better the adapter is made and the cord is crimped, the better the Internet connection with your PC will be. If the Internet supply is intermittent, you should check the connector again
After all, in this case, over time, it can generally fail.
If the Internet connection is intermittent, you should check the connector again. After all, in this case, over time, it can generally fail.


Crimp without tools
You can crimp an 8-core twisted pair cable without special tools, but only with the help of the following items available in any home:
- using a conventional screwdriver, the RJ 45 connector is crimped;
- with a knife, you can strip the twisted pair by several centimeters;
- wire cutters. You can use pliers or scissors.
The procedure is performed in two ways:
- direct twisted-pair crimping involves methods T568A and T568B, when twisted-pair crimping is performed similarly from both ends of the cable;
- you can also crimp the wire in a cross pattern; it is used to connect two computers without a router.
The crimping sequence is as follows:
- strip the cable with a knife;
- straighten the wires and insert them according to the selected colors so that they do not intertwine;
- cut the wires with wire cutters and leave about 1 cm;
- check the correct layout according to the diagram and insert them into the connector, which must be held with the latch away from you;
- insert the wires all the way so that they rest against the front wall of the connector;
- using a screwdriver, crimp, that is, press the contacts in turn with force. The contacts should be slightly pressed into the connector body;
- latch the cord retainer by pushing it in and pressing the outer insulation;
- perform similar steps on the other side, after which the cable crimping procedure is considered completed.
So, crimping a cable for the Internet for 8 or 4 cores can be done independently at home. The main task is to correctly connect the wires depending on the cable category, after which crimping is performed using a screwdriver or special pliers.
Watch this video on YouTube
Read more:
How to connect an RJ-45 Internet network socket - pinout diagram
USB cable pinout by color
Press pliers for crimping wire lugs
Ways to connect the SIP wire with different cables
How to connect and set up the Internet on the TV?
Wire selection and standards
In the last section, I mentioned the categories of twisted pair, here we will consider this point in a little more detail. After all, the anatomy and the speed of transmission on the cord also depend on the category.
I recommended you to take category 5, but 6th (CAT5, CAT6) is also suitable. All options are shown in the following table:
It will be important here to choose a cable for the desired speed. And it also depends on the number of wires inside
It usually goes like this:
- 2 pairs (4 wires) - up to 100 Mbps
- 4 pairs (8 wires) - from 100 Mbps
Usually, the ISP's technology limits you to 100 Mbps for the internet. But soon this threshold will be passed. Why am I - usually there will be exactly 2 pairs on the Internet cable, but on home ones (from the router to the computer) there are already 4 pairs.
4 pairs or 8 wires
What is an internet cable
An Internet cable is a wire with which anyone can access the Internet. It stretches from the switchboard, and there - from the provider's center, which provides network access services. At the moment, the following types of cables are commonly used:
- twisted pair;
- fiber optic wire;
- coaxial wire.
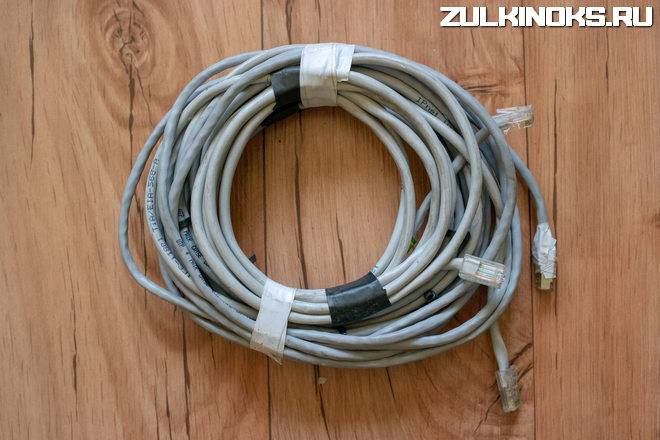
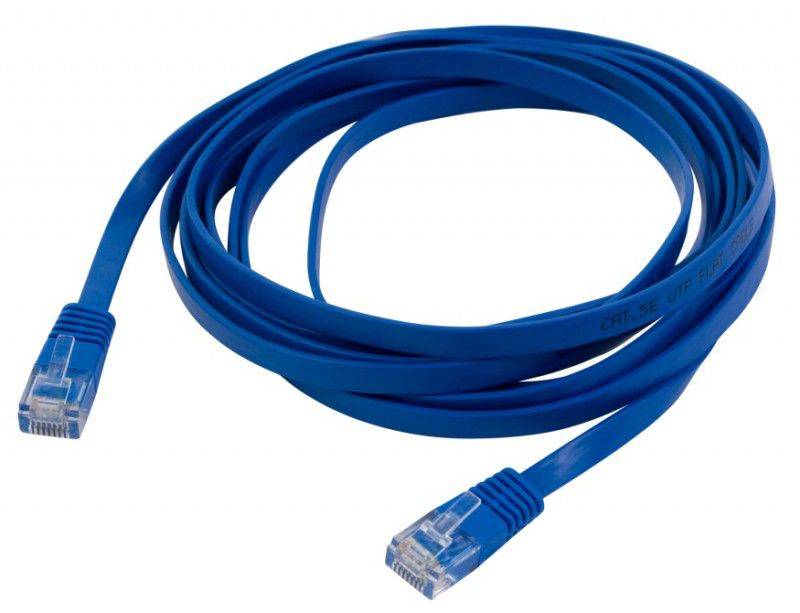 The patch cord is needed in order to connect to the local network
In addition, the cables differ in the way they are shielded, the type of conductors, and so on. The most popular among them is twisted pair, which is usually laid in almost any connection. It also crimps quite easily on its own. The cord itself consists of several pairs of wires twisted together. This is done in order to reduce the influence of the electromagnetic field on data transmission. For category UTP5 and more, we use the interlacing method with different pitches for better signal quality.
Twisted pair is used to create local area networks LAN (Local area network) of two or more computers, as well as for laying inside stations, on the street and even underground. The wire looks like a regular gray or white cord with a marking describing the number of cores and the type of shielding. Inside the insulation are intertwined pairs of veins, which are also isolated from each other. Depending on the type of cable, the veins have a certain color. They are usually dyed white, brown, green, blue, and their "striped" combinations with white.
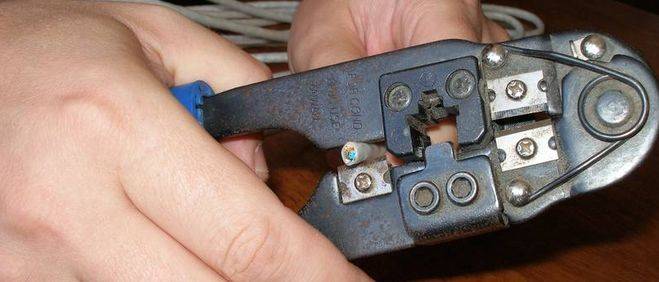 Specialized tools can perform not only crimping, but also wire stripping
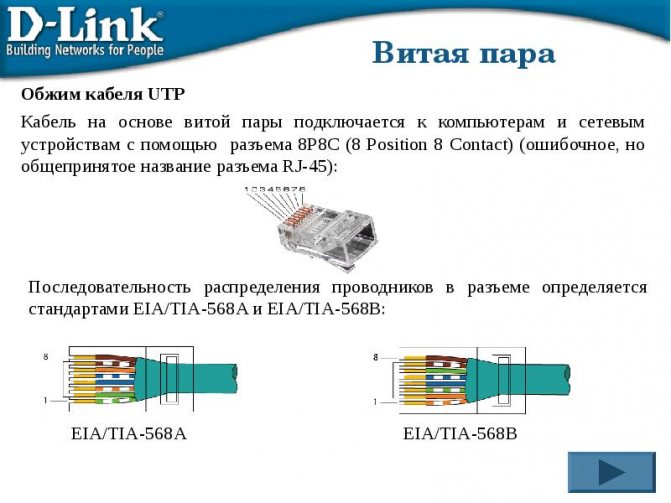
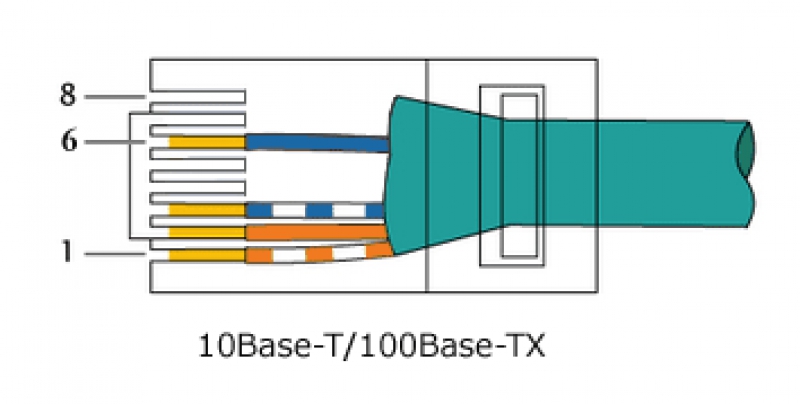
Connecting the cord to the network equipment (network card) of a personal computer or laptop uses the 8P8C type connector located in the computer. An Internet connector of the RJ 45 standard, put on a wire, is connected to it. Often people confuse the name of the standard with connectors for Internet cable connectors. The 8P8C type connector is used, as already mentioned, to create local networks using 10BASE-T, 100BASE-TX, 1000BASE-T and IEEE 802.3bz technology using a four-pair twisted pair cable.
Important! The standards for this communication were developed back in the last century - in 1975, and immediately became widespread for connecting subscribers, first in telephone networks, and then to the global network. Schematic representation of the connector
 Schematic representation of the connector
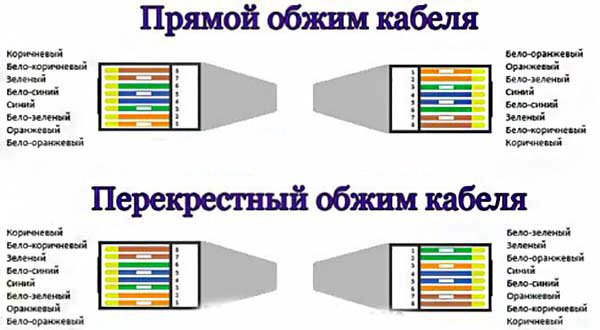
Standard crimp patterns
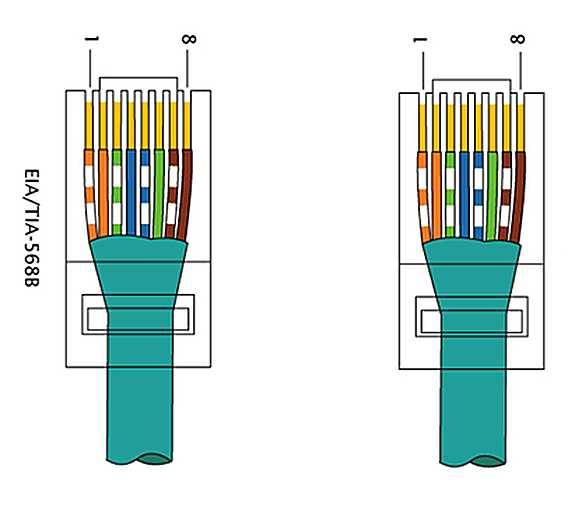
The pinout of a twisted pair and the installation of connectors falls under the regulations of the international standard EIA / TIA-568, which describes the procedure and rules for switching intra-apartment networks. The choice of crimping scheme depends on the purpose of the cable and the characteristics of the network - for example, on bandwidth.

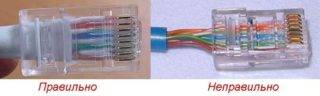
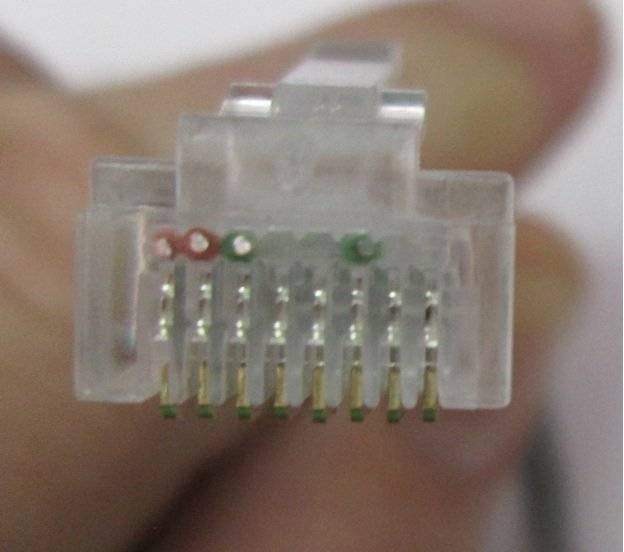
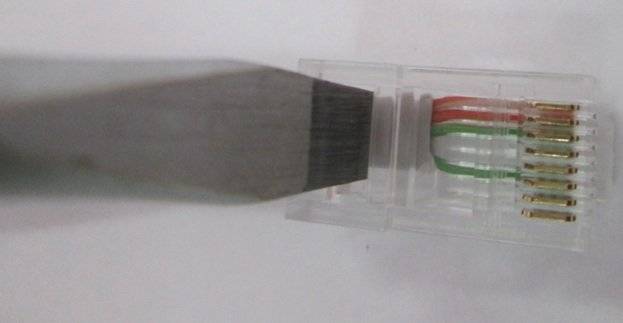
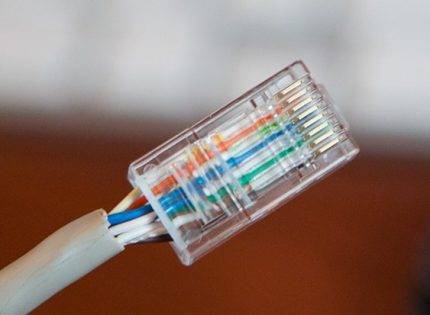 Thanks to the transparent body of the connector, you can see that the cores are arranged in a certain order, and not at random. If you mix up a pair of conductors, switching will be broken
Both types of cables - 4 or 8 cores - can be crimped in a straight or cross way, as well as using type A or B.
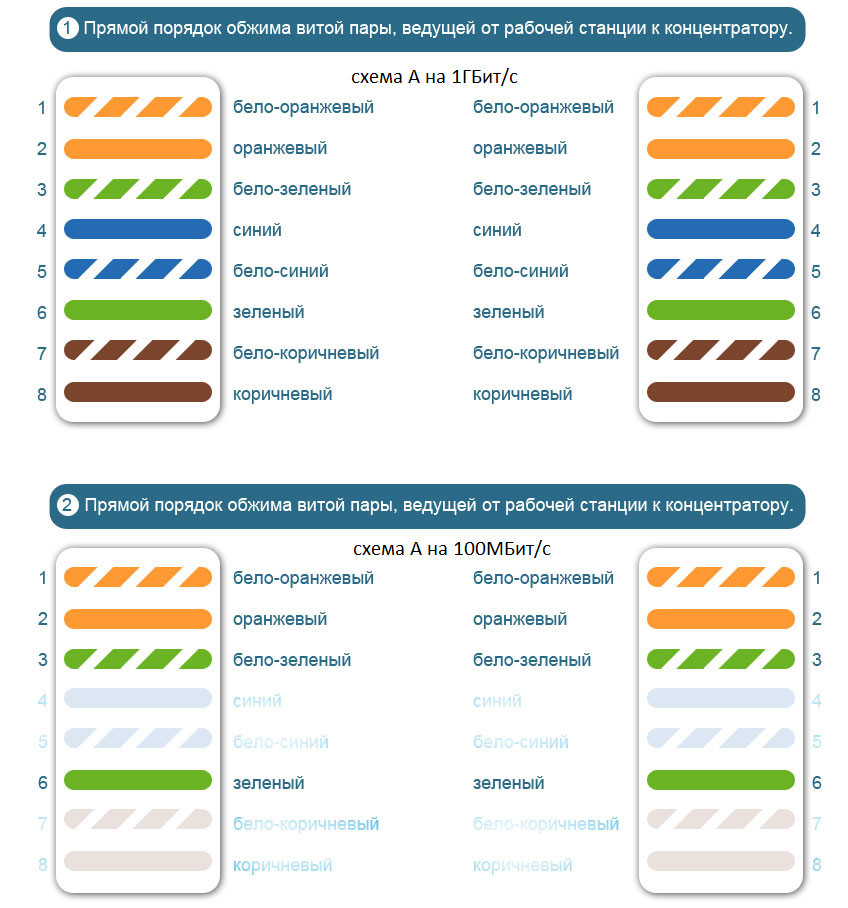
Option #1 - straight 8-wire cable
The direct crimping method is used when two devices need to be connected:
- on the one hand - PC, printer, copier, TV;
- on the other hand - a router, a switch.
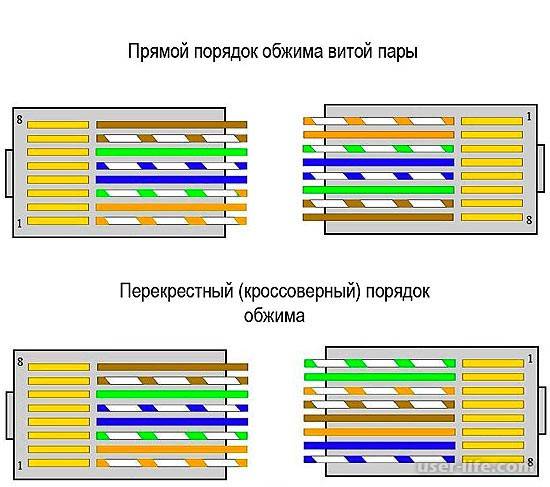
A feature of the method is the same crimping of both ends of the wire, for the same reason the method is called direct.
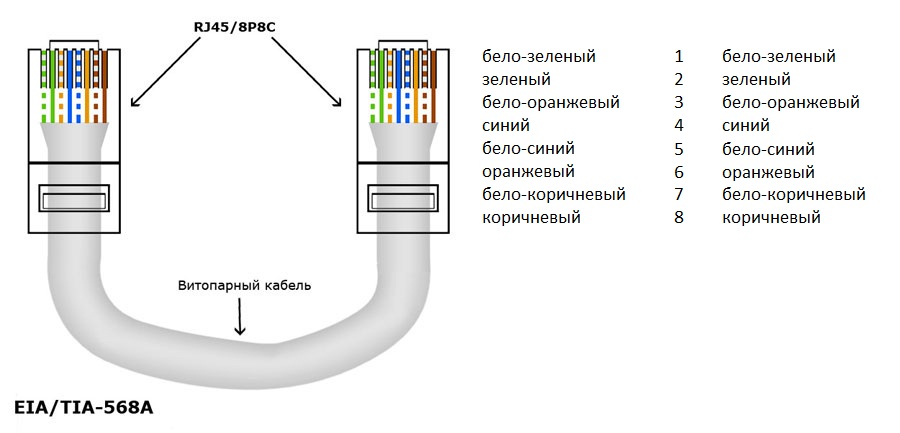
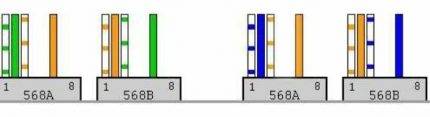
There are two interchangeable types - A and B. For Russia, the use of type B is typical.
Pinout diagram for an 8-wire cable for direct connection of a computer to a switching device (HAB, SWITCH). In the first position - an orange-white vein
In the USA and Europe, on the other hand, type A crimping is more common.
 Type A differs from type B in the arrangement of conductors located in positions 1,2,3 and 6, that is, white-green /green swap with white-orange/orange
You can crimp in both ways, the quality of data transfer will not suffer from this. The main thing is to observe the sequence of lived.
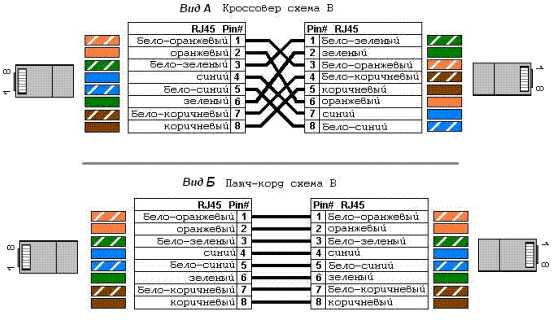
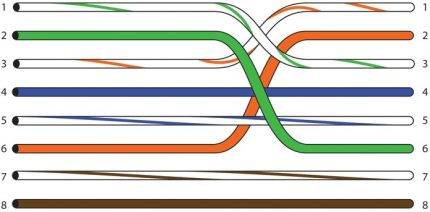
Option #2 - 8-wire crossover
Cross crimping is used less frequently than direct crimping. It is necessary if you need to connect two desktop computers, two laptops or two switching devices - a hub.
The crossover is used less and less, as modern equipment can automatically determine the type of cable and, if necessary, change the signal. The new technology is called auto-MDIX. However, some home devices have been working properly for years, it makes no sense to change them, so cross crimping can also come in handy.
Cross crimping retains the ability to use types A and B.
Crossover circuit designed for equipment of high-speed networks (up to 10 gbit / s), made according to type B. All 8 conductors are involved, the signal passes in both directions
To use type A, you need to change all the same 4 positions: 1, 2, 3 and 6 - white-green / green conductors with white-orange / orange.
For a network with a lower data transfer rate of 10-100 mbit / s - other rules:
 Type B circuit.Two pairs of twists - white-blue / blue and white-brown / brown - are connected directly, without crossing
The scheme of standard A completely repeats B, but in a mirror image.
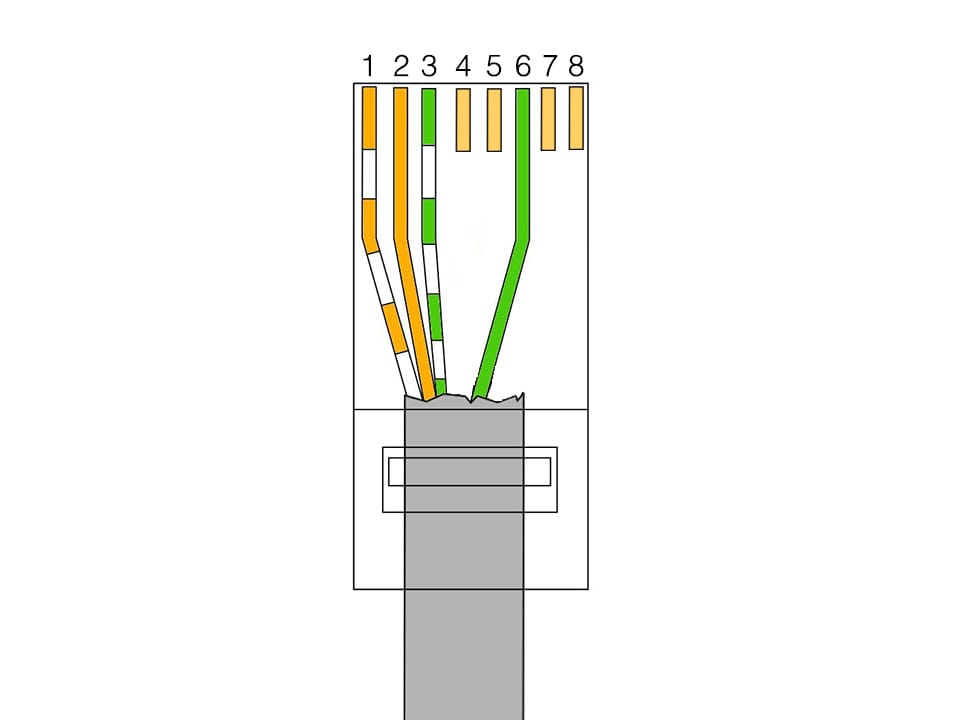
Option #3 - straight 4-wire cable
If an 8-wire cable is required for high-speed information transmission (for example, Ethernet 100BASE-TX or 1000BASE-T), then a 4-wire cable is sufficient for "slow" networks (10-100BASE-T).
 Scheme of crimping the power cord for 4 cores. Out of habit, two pairs of conductors are used - white-orange / orange and white-green / green, but sometimes two other pairs are also used.
If the cable fails due to a short circuit or break, you can use free ones instead of the used conductors. To do this, cut off the connectors and crimp two pairs of other cores.
Option #4 - 4-wire crossover
For cross crimping, 2 pairs are also used, and you can choose twists of any color. By tradition, green and orange conductors are often chosen.
The 4-wire cable crossover crimping scheme is used extremely rarely, mainly in home networks, if you need to connect two old computers together. The choice of wire color does not affect the quality of data transmission.
Types of cables for Internet connection
Depending on the type of provider, the cable can be routed to the subscriber in several ways. If the connection is made according to the Wi-MAX, LTE or 3G standard, there may not be a cable at all.
telephone cable
Used when connecting to the Internet using aDSL technology. The wire is used two- and four-core, when using four cores, you can increase the length of the cable route and reduce interference. In some cases, a wired telephone is connected along the same line.To connect, a special cable modem or modem router is used.
Coaxial cable
Providers use this type of cable to connect subscribers to the cable television network. Due to its wide bandwidth, a coaxial cable transmits both data and analog TV signals without mutual interference. As in the case of a telephone line, a special modem is used to connect.
Optical fiber (fiber optic)
An optical fiber cable is used to connect either multi-storey buildings with subscriber routers installed in the entrances, or houses in the private sector, since this type of cable transmits a signal over long distances without reducing the signal level and interference. The converter, or interface converter, allows you to connect a router-router to such a cable using a patch cord from a conventional twisted pair (UTP).
Twisted Pair (UTP)
This is the most common and inexpensive type of connection. Such cables bring the Internet to an apartment or house, and also connect client devices (computers, TV set-top boxes, printers) to the router. Cables are four- and eight-core. Four cores transmit data at speeds up to 100 Mbps, and the eight-core version allows you to increase the speed ten times.


Without additional amplifying equipment, the length of cable routes will be small (up to 100 meters). Nevertheless, twisted-pair connection is a popular type of connection due to the cheapness of wire and connectors, as well as the ability to cut the cable with or without a penny tool. Whatever wire enters the house, the good old twisted pair cable will still go after the interface converter or cable modem.
Making a patch cord
Step 1. Purchase and prepare a twisted pair piece of the length you need.
 We prepare a piece of twisted pair of the desired length
Step 2. Remove a small part of the outer braid, about two to three centimeters. Try not to touch the inner braid (braid of a separate core). If you use a crimper as a tool, use the appropriate knife slot.
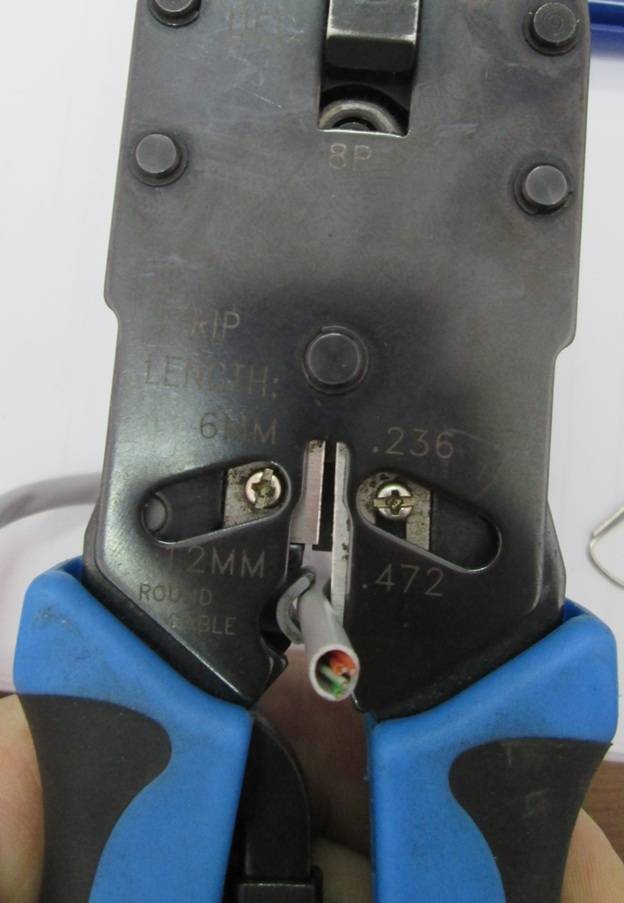 We remove a small part of the outer braid
Don't forget about the tearing thread, when working without a special tool - this is the best way to remove the braid without risking the cable.
 Breaking thread
Sometimes, when purchasing a category 5 cable, there may be no breaking thread inside; in this situation, use side cutters, wire cutters, or an ordinary knife.
 We use side cutters
Step 3. Place the conductors in the desired pins of the plug. Remember that for networking it is worth using switching equipment with normal / uplink technology (currently - any switch or computer network adapter for a 100 Mb / s network), in which case you will only need a direct cabling (same conductors in the same contacts ).
When using old equipment, you will have to do crossover (crossover, cross-link) wiring (one end of the patch cord is crimped in straight wiring, the other in crossover), as shown in the figure below.
Cross wiring
 Make sure the conductors hit the correct pins
Step 4. Cut off the ends of the strands so that they are the same length, after which, insert them into the sleeve 8p8c to the extreme position (the strands should rest against the edge of the connector).
 We insert the core sleeve 8p8c to the extreme position
Step 5Using a special pincer connector, “bite through” the copper conductors with the contacts of the sleeve.
 We fix the copper conductors of the contact sleeves
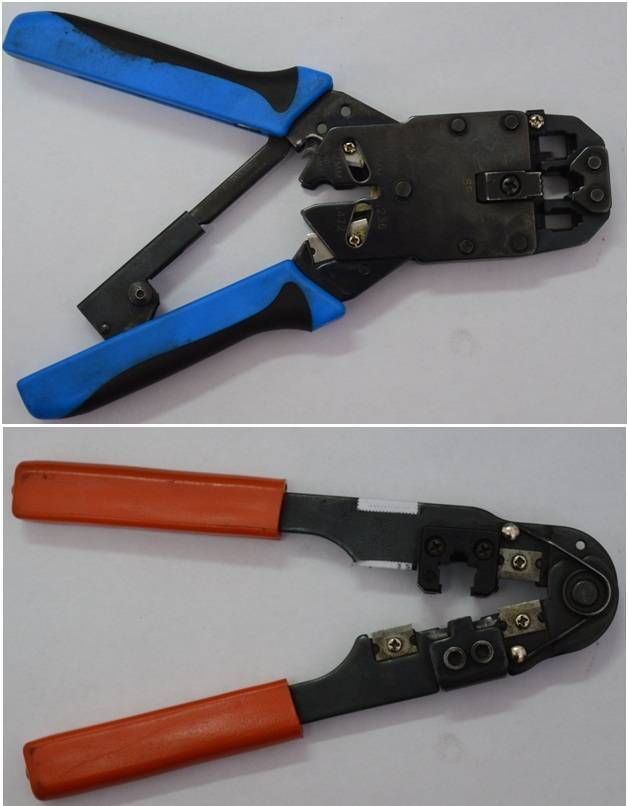 Types of crimping pliers
You can do without the use of crimping pliers - a thin flat screwdriver, or a knife. It is necessary to press the pins of the plug with the tip until they bite through the copper conductors.
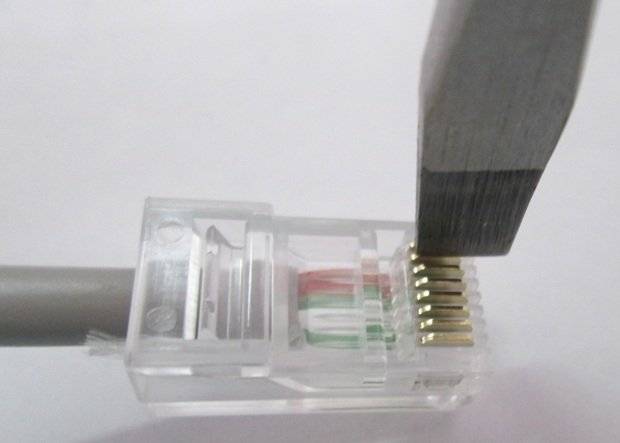 You can crimp the wires with a thin flat screwdriver.
After securing the conductors, press down on the braid retainer.
 After fixing the conductors, it is necessary to press on the braid lock
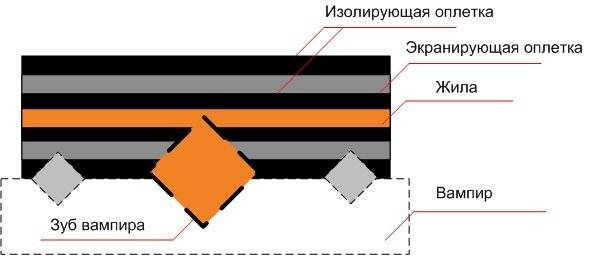 Method - "vampire tooth"
Step 6. After completing the work, do not forget to check the quality of the created patch cord. The easiest way to use a switch is to plug the crimped connectors into the sockets of the device, and make sure that the LEDs indicate the fact of a physical connection.
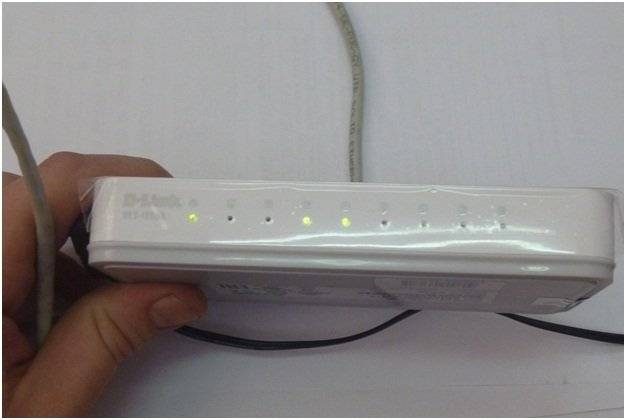 Upon completion of the work, it is necessary to check the quality of the created patch cord
Crimping technology
Here is a step-by-step procedure for crimping an 8-wire cable:
- remove the insulation and strip the wire 3 cm;
- disconnect the wires so that they are located separately from each other;
- insert the wires into the connector;
- when inserting wires into the connector, be guided by the contact group. Standard crimping methods involve the arrangement of colors according to the scheme:
- white-orange;
- Orange;
- white-green;
- blue;
- white-blue;
- green;
- white-brown;
- brown;
- after inserting all the wires according to the diagram, it is necessary to check that they are inserted all the way. Further, with the correct connection, the Internet cable is crimped;
- a cable with a bare 3-centimeter end is cut, so that it is securely fixed in a stationary state;
- then the wires are inserted into the connector, and the whole thing is placed in the pliers.The design provides for the only correct position of the connector, so you will immediately understand the position for installation. Press to insert until it stops, after which the process is considered complete.
straight type
The direct crimp type is used to connect the network card port to network equipment (switch or hub):
according to the EIA / TIA-568A standard: computer - switch, computer - hub;

according to the EIA / TIA-568B standard, it is the most popular and assumes the scheme: Computer - switch, computer - hub.

cross type
The cross crimp type assumes that two network cards are connected directly to each other according to the color scheme shown. Suitable for creating 100/1000 Mbps speed, EIA/TIA-568B and EIA/TIA-568A standards are used.


Computer - computer, switch - switch, hub - hub.

It should be noted that when crimping a twisted pair, it is necessary to observe the minimum bending radius (8 external cable diameters). With a strong bend, external interference and interference to the signal may increase, and the sheath or screen of the cable may also be destroyed.


