- What is a borehole caisson and why is it needed?
- Mine drilling and excavation
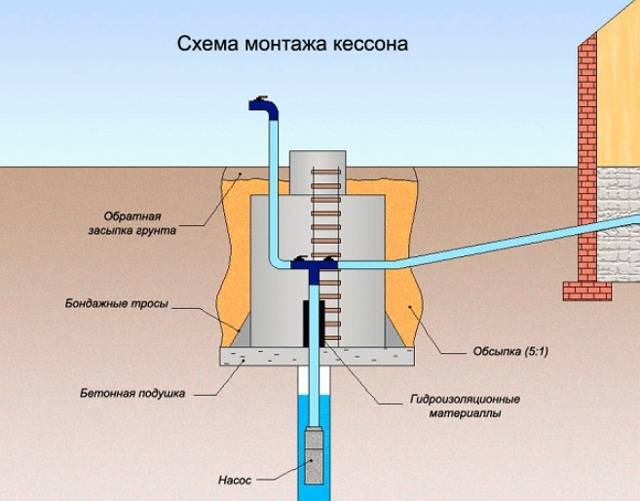
- How to install a caisson for a well?
- Important points when arranging
- Nuance # 1 - the choice of a well drilling method
- Nuance # 2 - the secrets of drilling a well
- Nuance # 3 - the optimal material for the caisson
- How to bring water into the house from a well
- The device and principle of operation of the adapter
- How to choose and install a well pump
- All about installation and connection
- Installation of a caisson from concrete rings
- Installation of a metal caisson
- Installation of a plastic caisson
- Plastic caisson for wells RODLEX KS 2.0
- Prices for plastic caissons
- Step by step installation instructions
- Prices for water pipes
- The subtleties of the autonomous water supply device
- Location selection
- What to consider when developing a scheme, existing options
- Standard scheme
- tower scheme
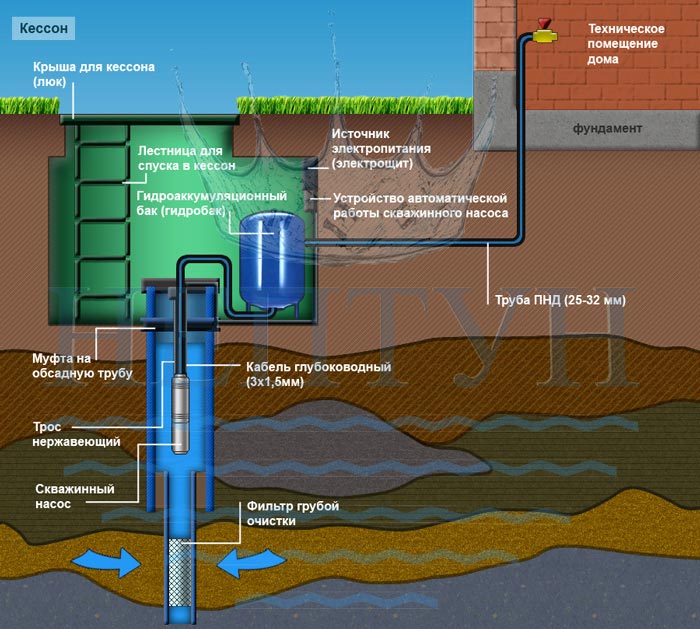
What is a borehole caisson and why is it needed?
A caisson is a container that is reliably protected from water penetration. Initially, they were used exclusively for underwater work, later other areas of application were found for them.
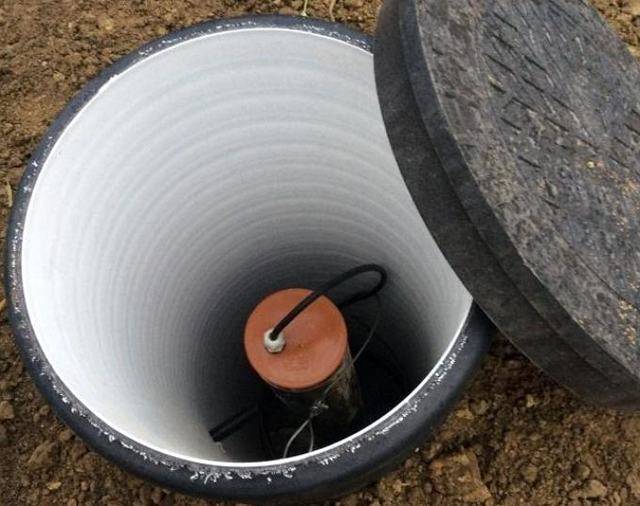
In particular, hermetic chambers began to be installed on the head of the well. The standard caisson has a very simple design. This is a container that closes with a hatch on top.
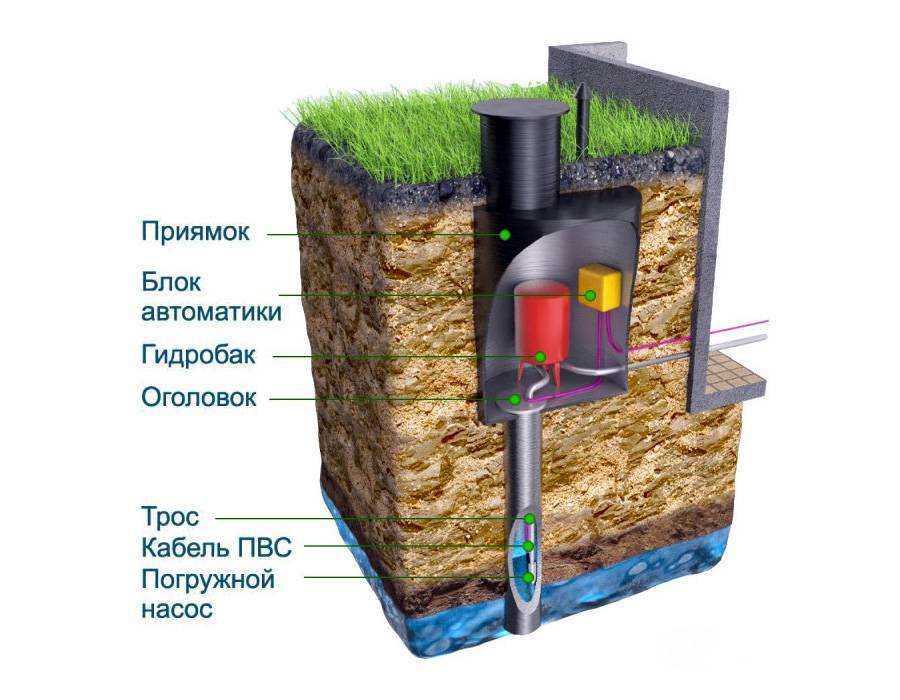
A caisson for a well is a sealed container that protects the head from the effects of low temperatures and the penetration of groundwater.
Through it, a person descends into the chamber to carry out maintenance and repair work. In the bottom part of the device there is a casing pipe entry, in the side walls there are entrances for cable and water pipes.
The lid, and in some cases the walls of the caisson, are insulated. Most often, foam or foamed polymer is used for this purpose. The chamber of classical design is made in the form of a cylinder with a height of about 2 m and a diameter of at least 1 m.
These dimensions were not chosen by chance. The height of the container is due to the need to protect the equipment installed inside it from the effects of low temperatures. The tie-in section of the water supply and the head of the well should be placed below the freezing level of the soil.
Most often, this is a depth of the order of 1-2 m. It is this value that determines the depth of the chamber bottom and, accordingly, its height.
The diameter of the container was also not chosen by chance. It should be sufficient to install the necessary equipment and place inside a person who will go down to carry out maintenance or repair of the well.
When choosing a caisson, you need to understand that too small a design will be inconvenient to use, and too large will be unnecessarily expensive. After all, sealed chambers are quite expensive equipment.
The size of the caisson must exactly match the amount of equipment that will be placed in it. In addition, a person who descended to service the instruments should be freely placed in it.
A sealed container buried in the ground performs two main functions:
- Protection of equipment from low temperatures. In winter, the water supplied from the well is exposed to negative temperatures. In such conditions, it can freeze and spoil, or even break the pipeline.
- Ground water protection. The caisson prevents soil water from entering the well head, which prolongs the life of the equipment.
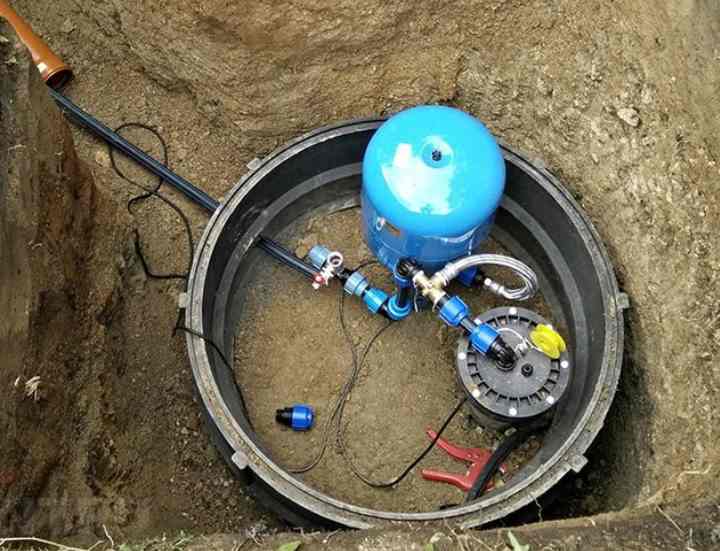
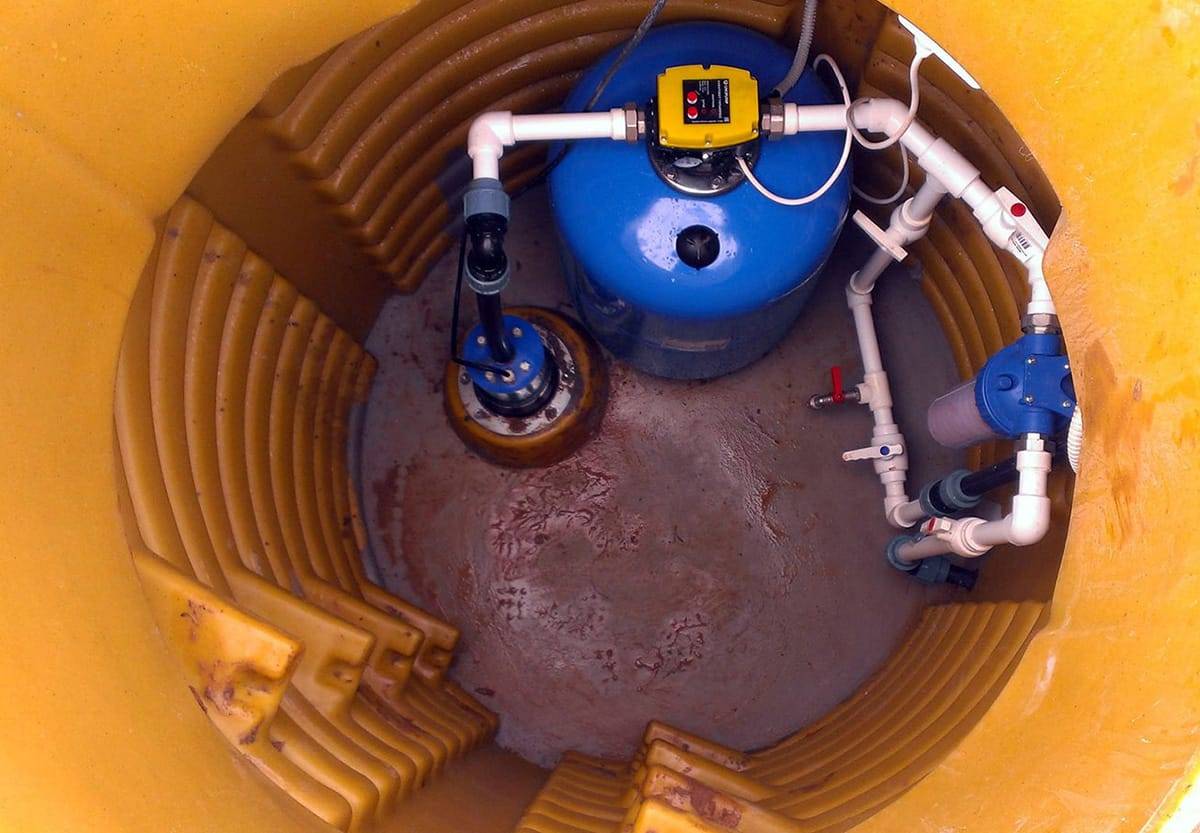
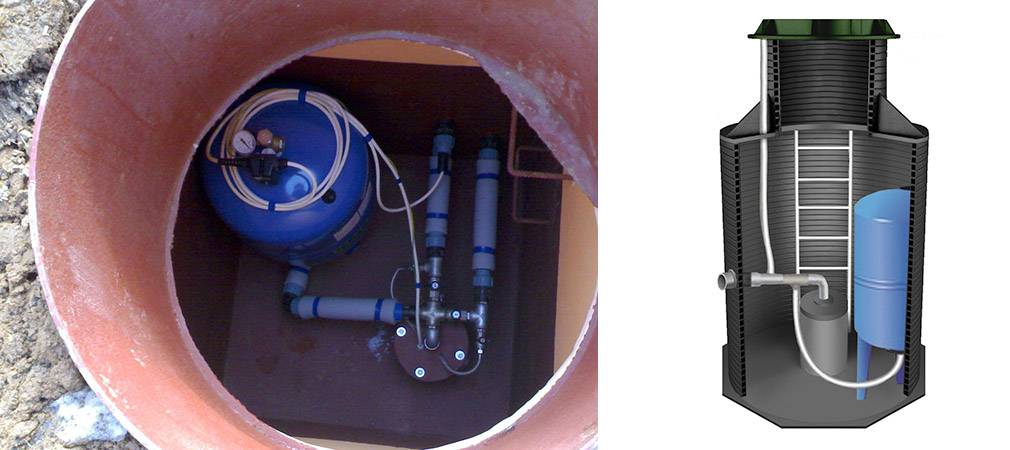
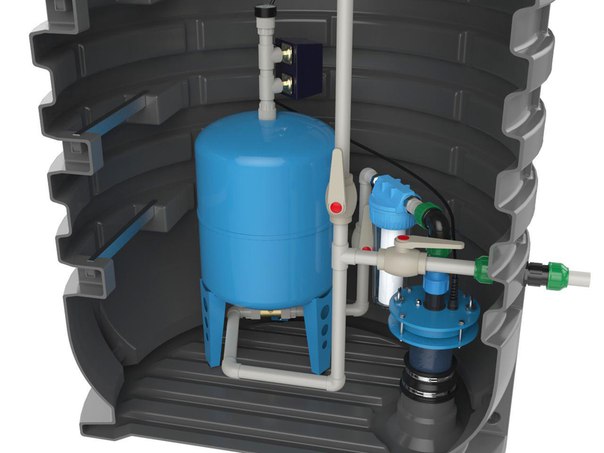
In addition, the caisson is a convenient place to place all the equipment necessary for the operation of the well.
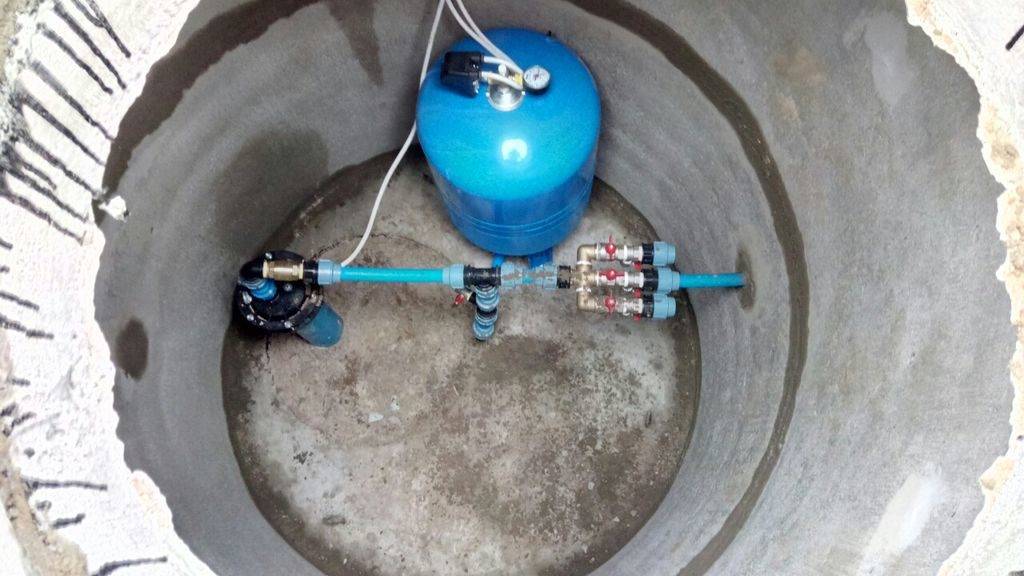
A pumping station, various water purification systems, a borehole adapter, shut-off valves with an electric or pneumatic drive, pipelines and automation that controls an autonomous water supply are usually installed here.
A moisture-proof chamber reliably protects all this equipment from unauthorized access, from damage by rodents and insects.
Chambers made of materials with high heat transfer have to be additionally insulated. For these purposes, only non-hygroscopic types of heaters are suitable.
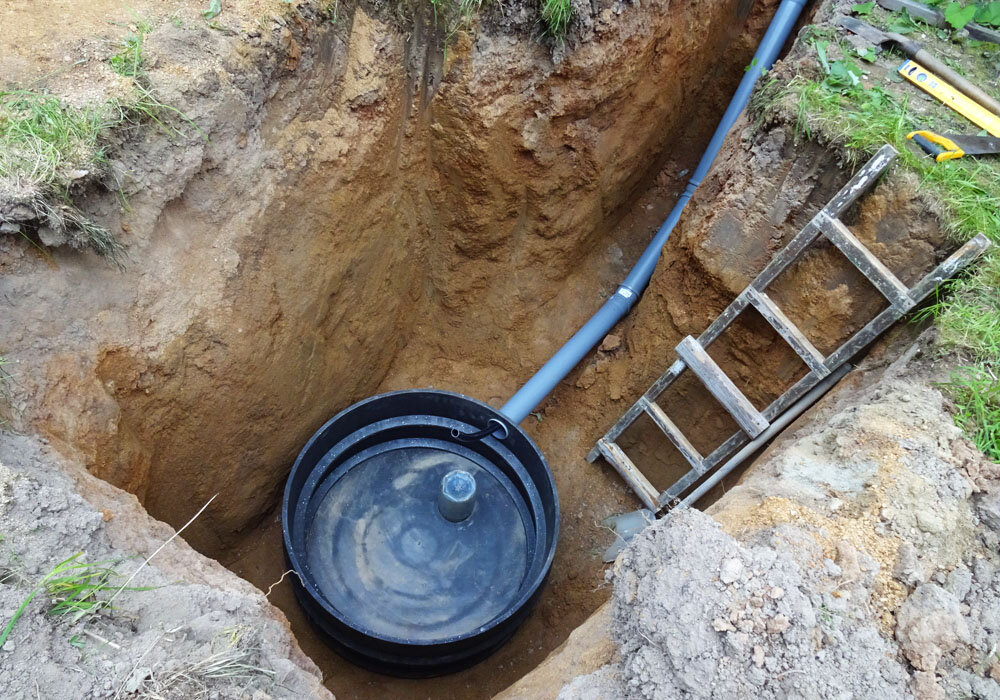
Mine drilling and excavation
The process of building a water structure with your own hands begins with drilling a mine. If it is intended to use a caisson installation, it will need to allocate up to 5 sq. m plot. The summer cottage should be prepared for earthworks - cleared of debris, weeds and garden plants.

Well drilling is carried out with various devices: a hand drill, a rope-impact installation, equipment equipped with an electric motor and a tripod.
The determination of the appropriate diameter and depth of the well is carried out taking into account the type of soil on the site, the characteristics of the aquifer and the pumping equipment used to operate the facility.
How to install a caisson for a well?
Proper installation of a caisson on a well is a relatively complex and extremely responsible process. If during installation the waterproofing of the vessel is violated, then during the operation of the well, serious problems may arise, the elimination of which will require another cash outlay.
The technology for arranging a water supply source consists of a sequential series of critical steps:
- Place. It is necessary to start preparing for the process of installing the caisson by choosing a place for the well.
- Well. The first stage is direct drilling of the well.
- Caisson. The second step is to start the installation process of the caisson.
- Warming. The third stage is that they fill the pit with earth to the very cover, then the hatch is insulated.
- Installation of equipment. Stage four - after completion of work, they begin to install equipment that should ensure uninterrupted and efficient water supply to the house and to the site.
Step-by-step installation of a caisson for a well also consists of several step-by-step operations:
- The pit for the caisson is chosen at least 30 cm larger than the caisson itself. This will help and more accurately install it, adjusting the coincidence of the well pipe and the sleeve for its passage. In addition, this will insulate or strengthen the walls of the plastic structure.
- In the bottom of the caisson with some shift from its center, make a hole for the subsequent installation of the sleeve under the casing string. The diameter of the sleeve must exceed the corresponding parameter of the pipe, measured along the outer contour, by 10-15 millimeters.
- Weld branch pipes for water pipes and cables into the side walls of the caisson.
- Dig a pit so that the neck after installation is completed rises above the ground by no more than 20 cm.
- The bottom of the pit is covered with a sand cushion 20-30 cm thick. The sand filling is poured with water for compaction. A concrete slab with steel mesh reinforcement is cast over the pillow. You can place anchor bolts on it in advance to secure the caisson. However, you can be wrong here. Therefore, it is better to first install the camera in place, and then drill holes for fasteners in the plate.
- Cut the casing at ground level. The casing pipe of the well is cut off taking into account the future height of the chamber floor.
- Lay supports in the form of bars on the foundation pit. Place a caisson on them.
- Dock the casing pipe with the caisson sleeve, adjust the structure horizontally, and then weld hermetically.
- Remove the bars from under the tank.
- Insert pipes and cables into the corresponding nipples.
The water that immediately fills the well will be dirty, so it must be pumped out. It is better to do this with a cheap temporary pump, and not with equipment for permanent use.


It should be noted that the installation of a caisson is not appropriate in all cases. Sometimes, in the immediate vicinity of the location of the well, there is already a structure that is suitable for placing equipment for the water supply system. Then it is more rational to use this space for its intended purpose, and not to equip the well with a caisson.
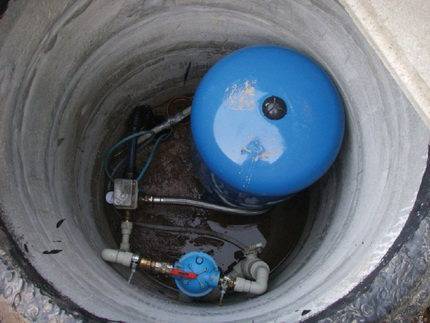
Water-lifting equipment can be placed on the ground floor of the house or in the basement, but there is no such possibility, then the accumulator, electrical equipment, automatic pump control systems and coarse filters are placed in the caisson.
Important points when arranging
Given some technical nuances, you can significantly save on the arrangement of a well equipped with a caisson.
If you place the well closer to the house, then:
- the volume of earthworks will decrease;
- less pipes required;
- you will need a pump of small power, sufficient only to raise water to the surface.
You can also save money when choosing a drilling method. To make a well for personal use, you can do the work using a hand drill. Sometimes they use an electric tool, percussion devices.
Nuance # 1 - the choice of a well drilling method
When choosing a specific tool, you need to proceed from the characteristics of the soil. When drilling a well on your own by hand, you will have to make considerable efforts, but under favorable conditions you can get to an aquifer lying at a depth of up to 15 m.
It is recommended to make no more than five turns of the drill in one penetration, otherwise it will be difficult to remove it.
A hand-made drill gives the best result. The reason is that it is made for specific conditions, so it is more convenient for them to work.
A well of shallow depth can also be drilled with an auger. Its rotation is carried out both manually and with the help of mechanisms.
In any case, a tripod-shaped tower is built above the future well to facilitate the lifting of the tool. When choosing the second method, you will also need an electric motor that is suitable in power.
For cutting a well, the shock-rope method is also used. The working tool here is a pipe, the edges of which are sharply sharpened (a driving glass with a strong edge along the lower edge).
Due to its considerable weight, it crashes into the ground with great effort, then it is removed using a rope system and freed from the ground.
With the shock-rope method of drilling, a tripod up to two meters high is used. At its highest point there is a block with a rope thrown over it. A percussion instrument is attached to it
The casing string (pipe) is taken with a slightly larger diameter than that of a pipe segment called a glass. It should be placed strictly observing verticality.
This is important for any drilling method. If this nuance is neglected, the soils can collapse. Experts advise using PVC pipes with a cross section of 12.5 cm
The first pipe is lowered after passing one meter. Further, the length of the casing string is added as it deepens. Connect the segments using threads on the ends of the pipes
Experts advise using PVC pipes with a cross section of 12.5 cm. The first pipe is lowered after passing one meter. Further, the length of the casing string is added as it deepens. Connect the segments using threads on the ends of the pipes.
Nuance # 2 - the secrets of drilling a well
You can drill a well in any season, but the complexity of the work will be different. The worst option is spring. During this period, groundwater is at its highest level. Under such conditions, it is difficult to determine the location of the main aquifer.
The device of a well in the summer is considered the best option, because. the water level stabilizes and its location is easy to determine.
In autumn, the best month for this work is September. At this time, the rainy season usually does not yet begin, it is possible to determine the aquifer without difficulty.
Precipitation in winter does not affect the state of groundwater.Manual drilling in winter is contraindicated, because. soils are heavily frozen
In winter, you can drill a well as long as the temperature does not drop below -20°. Due to the freezing of the soil, the walls of the well are insured against collapses. Groundwater is at a minimum level.
Nuance # 3 - the optimal material for the caisson
There are several types of caissons:
- from reinforced concrete rings;
- metal;
- plastic;
- brick.
Reinforced concrete rings and bricks. This type of caisson practically does not provide tightness for a long time. This threatens the equipment with flooding and subsequent loss of performance.


Metal. If all the requirements were met in the manufacture of metal caissons, they will have good tightness.
Earth in relation to metal is an aggressive environment, therefore, the enclosing structures of such chambers are subject to oxidation, as a result of which depressurization may occur.
Plastic. Caissons made of polymeric materials are comfortable, light in weight, easy to install and operate. The probability of depressurization is rather small, because the material is not subject to corrosion. Plastic caissons serve much longer than metal ones.
How to bring water into the house from a well
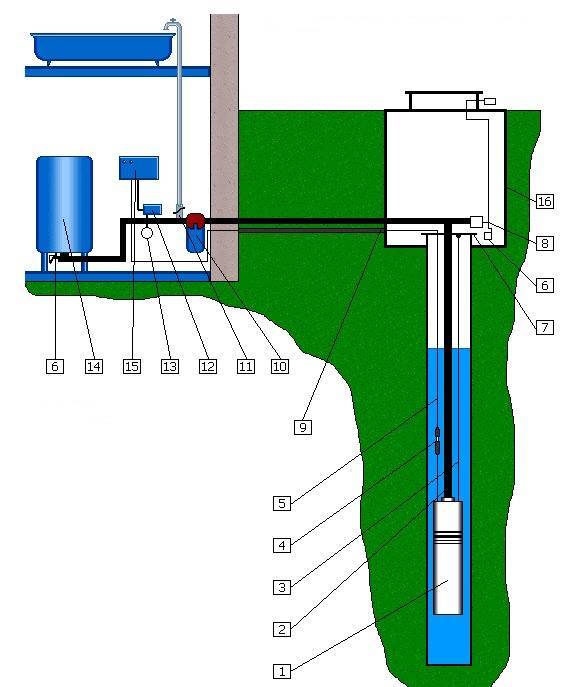
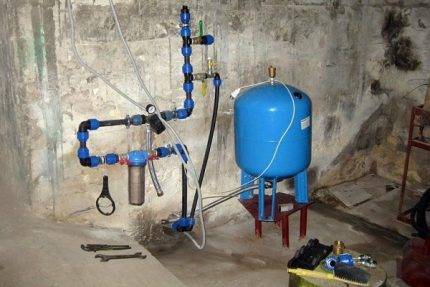
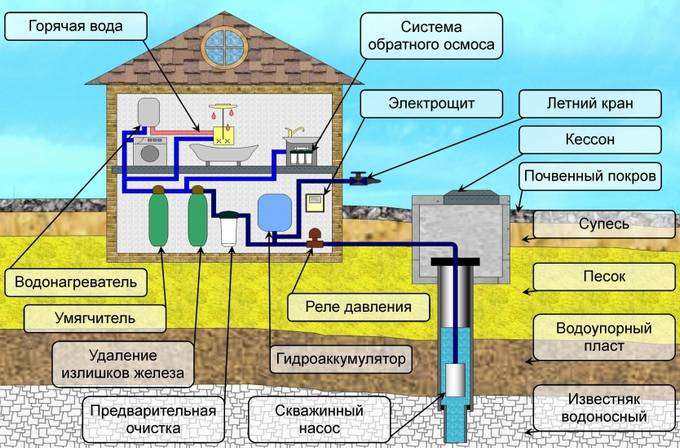
A full-fledged and equipped according to all the rules plumbing to a private house is:
- Own well and surface (or deep) pump in it. In rare cases, they use a pumping station - the equipment is too expensive to serve a small family;
- Filter system: coarse filter in front of the pump, and fine filter at the end of the water pipe;
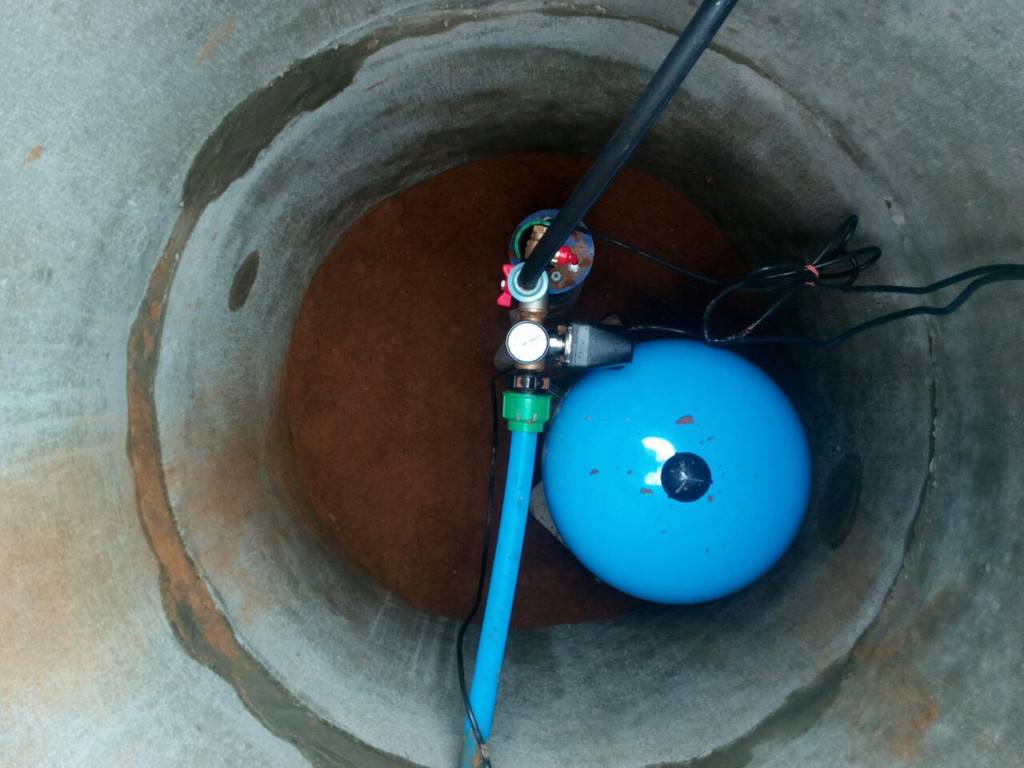
- A hydraulic accumulator is a storage tank that provides the necessary pressure in the drinking water supply system of the house;
- Water is supplied to the heating boiler and to the hot water boiler.
Surface pumps are too low-powered, and are able to lift water from a depth of ≤ 9 meters, so let's consider how to conduct water from a well to a house with a deep pump - such units also work at a depth of up to 200 meters.
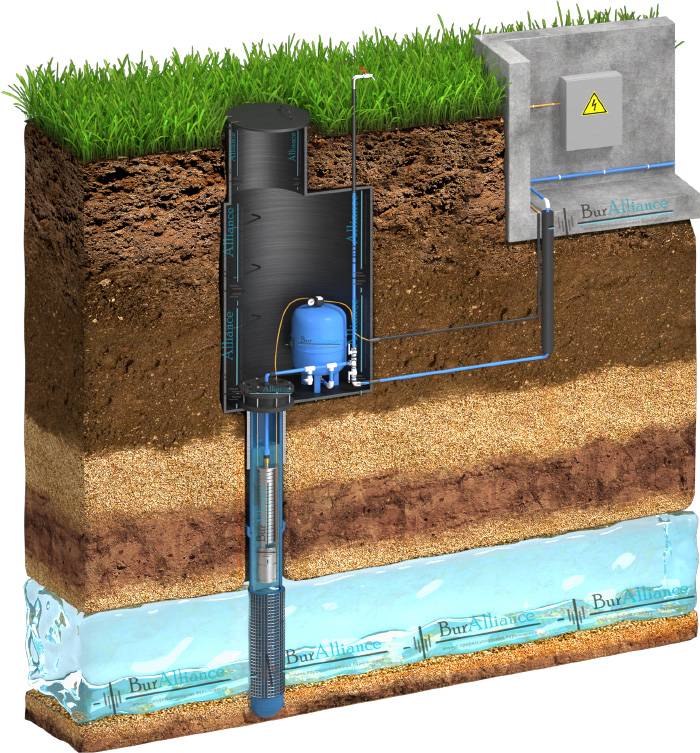
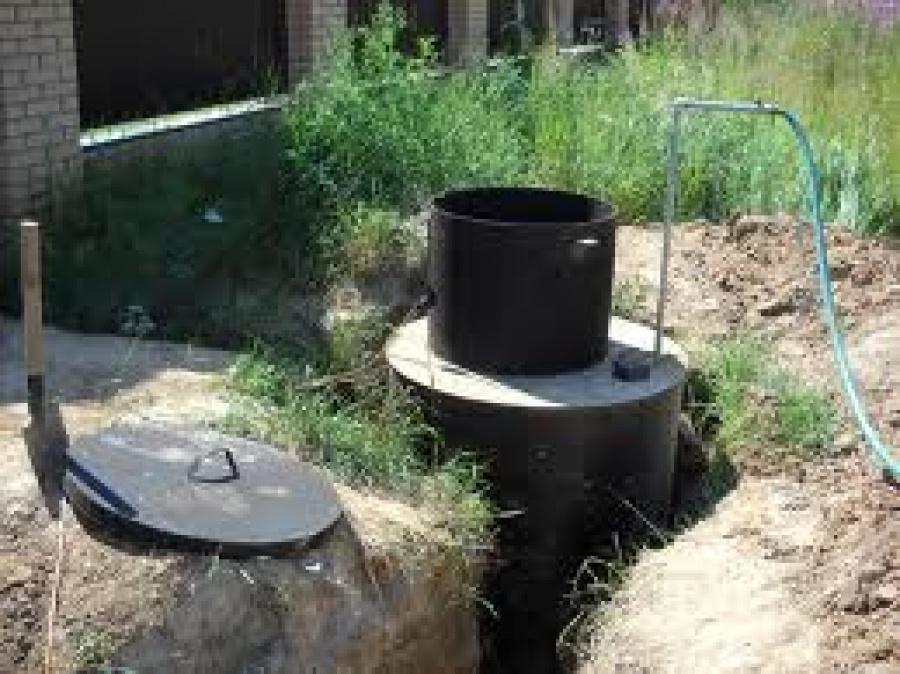
The arrangement of the water supply system begins with the construction of a special recess - a caisson, which is designed to protect the well from melt water, and also serves as a heater. From this recess in winter it is convenient to inspect the well during the maintenance and repair of pumping or filtration equipment.
The walls of the caisson are laid out with bricks, but the best option is to lower a pair of reinforced concrete or thick-walled polymer rings into the pit. The bottom of the pit is covered with a sand cushion, crushed stone is poured on top, the layers are rammed. The bottom of the caisson should be located below the freezing point of the soil in the region, and from this level do-it-yourself pipe-laying into the house from the well begins.
The width of the caisson is no more than 1.5 x 1.5 meters, the walls are insulated with polystyrene foam (polystyrene foam) and plaster, which is applied to the PPU sheets. A layer of waterproofing is applied over the plaster layer - bitumen, tar or mastic. The hole is closed with a lid.
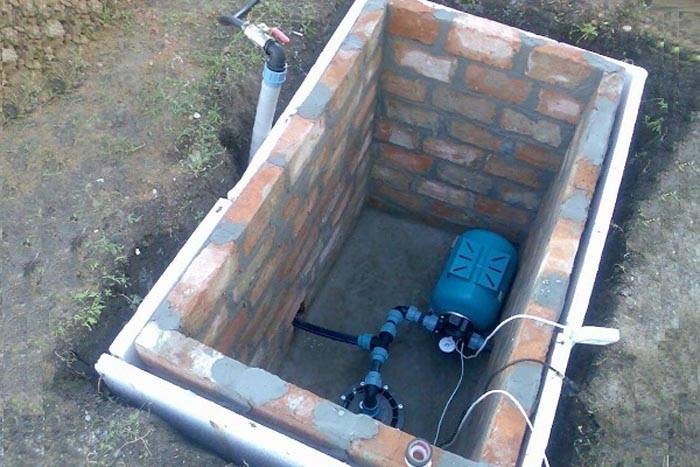
If the water from the well will be raised by a surface pump, it is installed right there, in the caisson. When the submersible pump is operating, it is lowered into the well, and from the caisson it is already possible to draw water from the well into the house by connecting the hose from the pump to the underground pipeline.
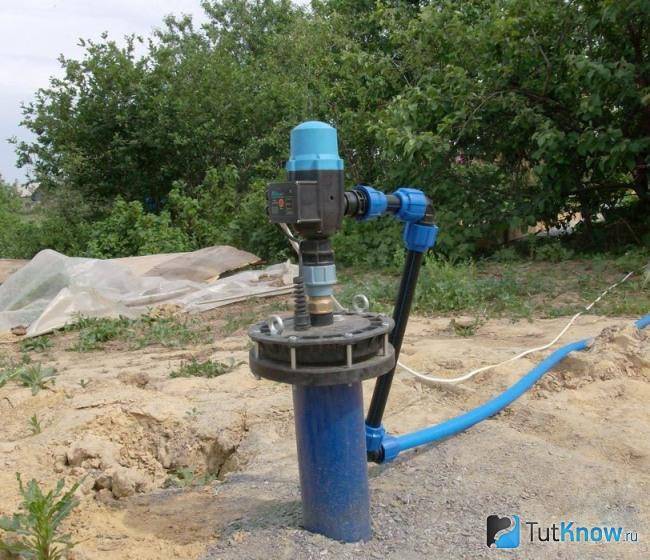
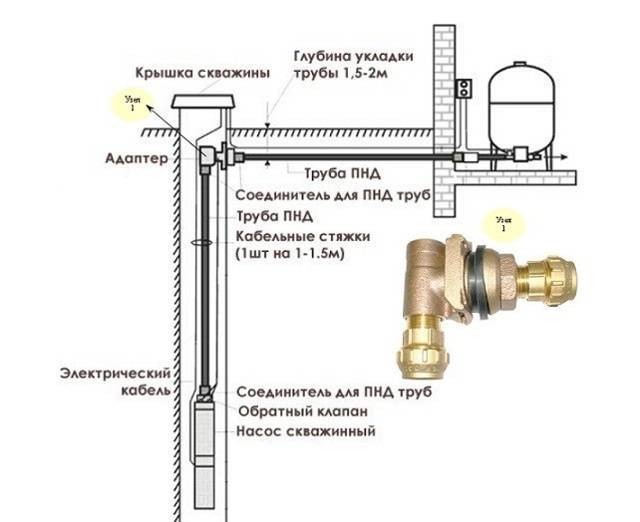
The device and principle of operation of the adapter
The second inexpensive way to equip a well involves the use of a special device - an adapter.In this case, the output of water pipes is carried out through the casing pipe.
This method of arrangement is also excellent for irregular use of the well, which involves the “freezing” of the structure for several months, and for continuous year-round water intake.
The adapter is installed on all types of casing pipes made of polymer or steel alloy. The pipes must have sufficient strength, since they are designed to withstand the weight of the submersible pump and the communications connected to it.
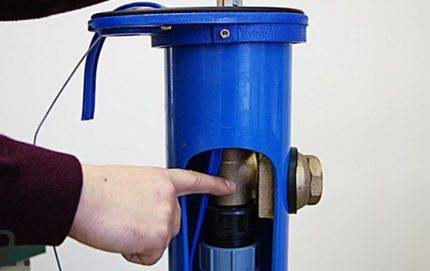
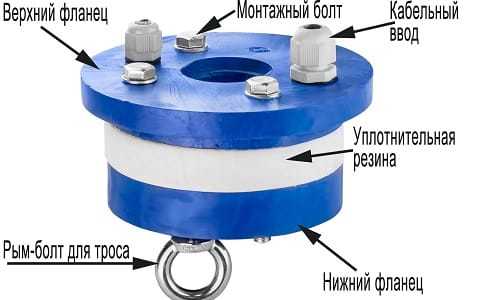
The adapter is a device consisting of two body parts fastened together with a quick-release threadless connection. The main task that is solved by installing this device is to protect the external branch of the water supply system from freezing. Thanks to its use, the pipeline from the well can be laid below the horizon seasonal freezing of soils.

The main elements of the adapter are:
- Permanently fixed element. It is a threaded pipe. It is fixed on the casing below the freezing level through a specially made hole. Forms a sealed unit for the outlet of the pipeline that brings water to the house.
- Reciprocal removable element. Outwardly, it resembles a tee with one blank wall. On one side, it is mounted on the intake pipe leading to the deep pump. The second is connected to the stationary element of the adapter. It is equipped with a connecting technical thread necessary for hermetic joining of both parts of the adapter.
In the process of pumping out of the well, water first rises up the column, then moves to the adapter, through which it is redirected and enters the pipeline leading to the house.With a partial separation of the elements, the water simply begins to drain into the well.
Borehole adapters are made of bronze, brass, stainless steel. A wide range of products on the market are made of combined metal alloys.
How to choose and install a well pump
After installation in the country, you need to choose a model of a submersible pump. To begin with, its performance and maximum head are calculated. This takes into account criteria such as:
- Well depth.
- What is the length of the plumbing.
- How many floors in the house.
- The number of draw points.
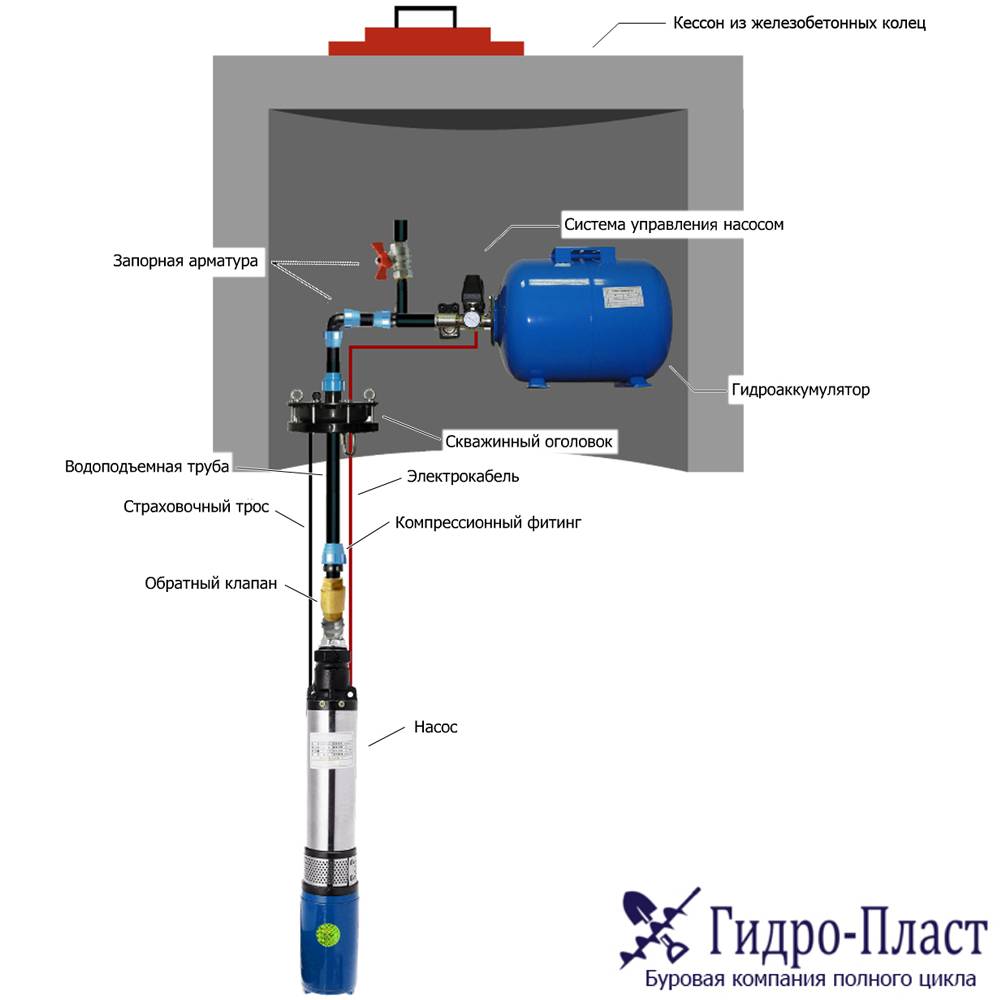
During installation, the pump is lowered into the well to a mark below the static water level. Simultaneously with the pump, the following are lowered:
- A plastic pipe, through which water will flow upward.
- Corrosion-proof cable, for pump lowering insurance.
- Cable, to control the operation of the motor pump.
- The cable is fixed on the head of the well.
All about installation and connection
In order for the caisson chamber to perform its protective functions well, and also to serve as long as possible, a number of rules must be observed during its installation. Before starting work, you should carefully consider the layout of the external pipeline.
It is necessary to take into account the ways of laying other underground communications, the depth of groundwater and the level of soil freezing in winter. Installation features also depend on the design of the caisson and the material from which it is made.
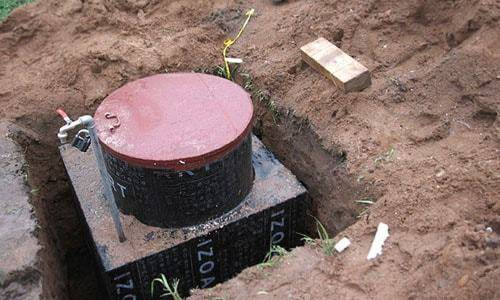


Installation of a caisson from concrete rings
Rings are mounted in two ways:
- Laying the required number of rings on the surface of the earth, around the head of the well. Their number is selected depending on the design depth of the caisson for the well.The rings are stacked on top of each other, and covered with a concrete cover on top. Next, the soil is sampled from inside the future caisson chamber, as a result of which the rings deepen under their own weight. When they descend to the desired depth, the casing pipe is cut so that it protrudes 0.5-1 m above the bottom of the resulting chamber. The bottom of the caisson is concreted or covered with coarse gravel, and the top cover and walls are insulated.
- The second option provides a different installation process. Initially, a pit of the required depth and diameter is dug around the well. The protruding part of the casing is cut to the desired level so that it protrudes slightly above the bottom of the chamber. And only after that is the laying of reinforced concrete rings at the bottom of the pit. Docking seams are carefully sealed with cement mortar and smeared with moisture-proof mastic. With the last step, the chamber is insulated, and the outer sinuses are covered with soil.
The difficulty in installing concrete rings can only be the need to use a crane. Renting construction equipment increases the cost of work, and it will not always be able to freely travel to the site of the well on the plot.
Installation of a metal caisson
Metal structures are also very heavy, so for their installation you will have to use a crane or winch. Initially, a pit of the required depth and dimensions is dug. Its bottom is leveled, and a base is laid on it in the form of a concrete pour, or a sand and gravel cushion.
Before starting the installation, the metal caisson is carefully treated from the outside with waterproofing compounds to prevent corrosion.After installation in place, it is recommended to insulate its walls and cover in order to avoid excessive heat loss.
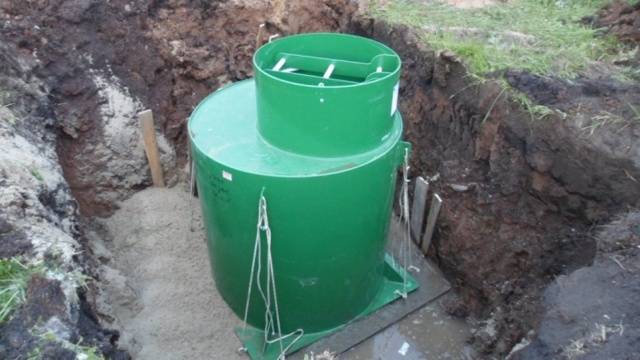
Installation of a plastic caisson
The installation process of ready-made polymer caissons is in general similar to the installation of metal chambers. The procedure here is the same, with the exception of the need for waterproofing. Another feature of plastic caisson chambers is the possibility of squeezing them out of the ground when the soil is heaving.
Therefore, to increase the mass, their bottom is poured with concrete, or covered with a sand and gravel cushion. To fix a lightweight structure into the ground, “anchors” are also used in the form of reinforcement hammered into the ground.
Polymer-sand modifications have a prefabricated structure consisting of several elements. They are attached to each other with thorn-groove joints. Installing them on top of each other is exactly the same as when installing concrete rings. After the installation work is completed, an external pipeline is connected to the installed caisson, the upper edge of the casing pipe is cut to the desired level, and a head is placed on it.
Plastic caisson for wells RODLEX KS 2.0
The new generation model developed by the company was named RODLEX KS2. The use of the most modern technologies in the production increases the functionality and ease of use of this caisson.
RODLEX KS2
Prices for plastic caissons
Plastic caisson
The ease of use of this model of the caisson is increased by the use of the following new elements in the design:
- located in the lower part of the loading skirt, which eliminates the need for time-consuming construction of a concrete slab under the base for cable fastening;
- increasing the strength of the structure with the help of additional stiffeners located at the bottom;
- refinement of the landing site for the use of casing pipes of all standard sizes with a cross section from 12.4 to 15.9 cm.
Tanks are made of special food-grade polyethylene LLDPE. In a material that is environmentally friendly, not only do corrosion processes not develop, but it is not even subject to decay, which leads to a long service life of products made from it, often exceeding half a century.
Step by step installation instructions
With self-assembly of the caisson "Rolex", the following sequence of actions is performed:
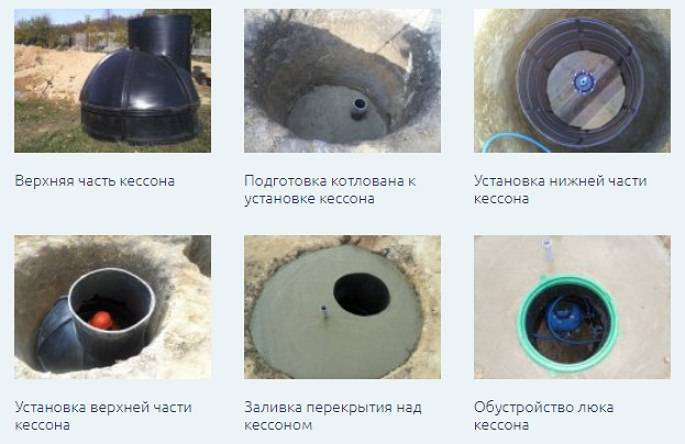
Step 1. Earthwork
The initial stage is characterized by significant labor costs when working manually. Under the capacity to be installed, it is necessary to dig a pit and a trench for laying a pipeline water supply system. The pit should exceed the dimensions of the caisson by 300 mm to adjust the position of the body when inserting the casing into the sleeve. If necessary, a heater is laid in the gap.
Pit and trench for laying communications
Step 2. Arrangement of the base
Since the design provides for a special loading skirt, there is no need for an expensive construction of a concrete slab for anchoring the product using cables. To make a base for installing a container, it is enough to pour a 200 mm layer of sifted sand onto the bottom of the pit. To compact the backfill, the sand cushion is abundantly wetted with water.
Foundation arrangement
Step 3. Laying and insulation of the water supply network
At this stage, pipes are laid in the trench dug from the well to the residential building, through which water will be supplied. To prevent freezing of the liquid at negative ambient temperatures, the pipeline network is carefully insulated.
Laying of water pipes
Prices for water pipes
Water pipes
Step 4. Connecting the casing
The casing pipe is carefully inserted into the bottom of the caisson, while making sure that the tank body takes a strictly vertical position. To prevent moisture seepage, the connection is carefully sealed with an adhesive that fixes PVC products.


Installation of the lower part of the structure
Step 4. Connecting the water supply network and power cable
Pipes for supplying water from an underground source are inserted into the tank body through the holes provided for this purpose to the point of connection to the house water distribution. An electric cable is being laid to supply the pumping station and other equipment that ensures the functioning of the autonomous water supply system.
Connecting the water supply network and power cable
Step 5 Backfill
Backfilling of the installed caisson with sifted sand is carried out sequentially in layers of 300 mm thick.
Pit filled with sand
At the final stage, the site is concreted around the neck of the caisson. After complete curing of the solution, the neck is closed with a hatch.
manhole container
For security reasons and to prevent acts of vandalism, eyelets should be attached to the cover and a reliable lock should be hung, especially in seasonal residences, such as summer cottages.
The subtleties of the autonomous water supply device
The process of arranging the water supply system of a private house from a well can be divided into stages. Let's get acquainted with each of them in more detail.
Location selection
When installing a water supply system, it is necessary to choose the right place for the well. Previously, they were drilled near the kitchen or at home, and even arranged in the basement.
Such placement methods are good, but they have one significant drawback - the user will not be able to flush the well after it is filled. If the well fails, a new one will have to be drilled, sometimes this is not possible.
It is best to choose a place for the well in close proximity to the house, but certain sanitary standards must be taken into account. The water intake point is placed no closer than 20 meters from the septic tank or sewage pit.
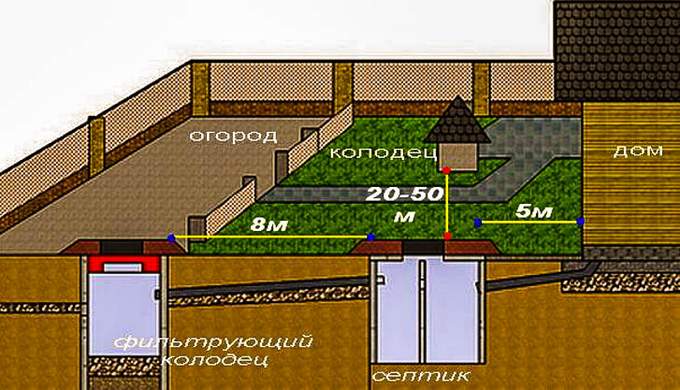
This requirement is true for sandy loam and loamy soils. On sandy soils, the distance is increased to 50 meters
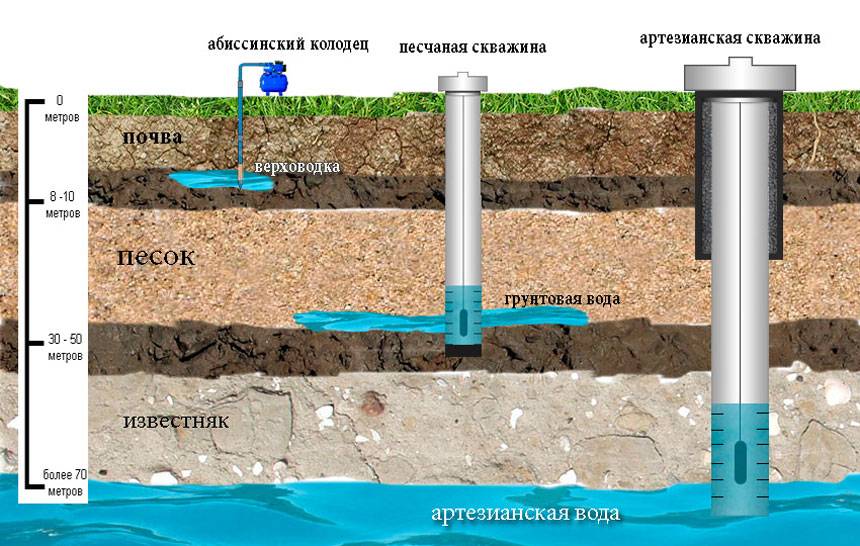
Shallow wells, as well as the Abyssinian well, are located no closer than 5 meters to the foundation of the building.
During the pumping of water from loose soil, rock will be washed out. With the close proximity of the well to a residential building, after a while this will lead to subsidence and deformation of the base.
What to consider when developing a scheme, existing options
The construction of a water well in a private house begins with the development of a scheme.
Preliminary design allows you to divide the process into stages, to study all the nuances that may arise during the installation work. To improve the quality of water supplied to the consumer, it is necessary to install special filters.
When developing a scheme yourself, you must consider:
- the depth of the aquifer;
- soil composition;
- overall dimensions of the equipment for selecting the parameters of the caisson;
- liquid source characteristics;
- need for water;
- operating conditions.
Deep artesian wells are designed for 50 years. Water from such sources does not contain harmful impurities that could lead to premature failure of the pump and other equipment.
Video review of equipment for arranging water supply from a well:


The scheme is selected taking into account the daily fluid intake. During peak periods, users should be able to get water without problems. Next, we will get acquainted with the most common schemes.
Standard scheme
The classic option involves the use of a pumping station. In this case, the water supply of a country house depends on electricity.
With a significant need for liquid, such equipment wears out quickly, so the unit must be of high quality and powerful. In addition, you will have to allocate additional space for installing the device.
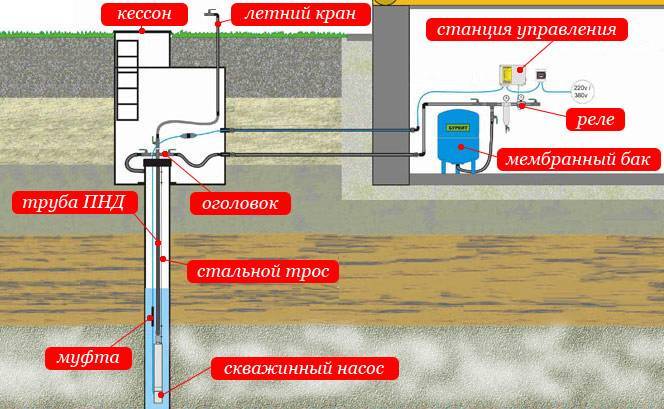
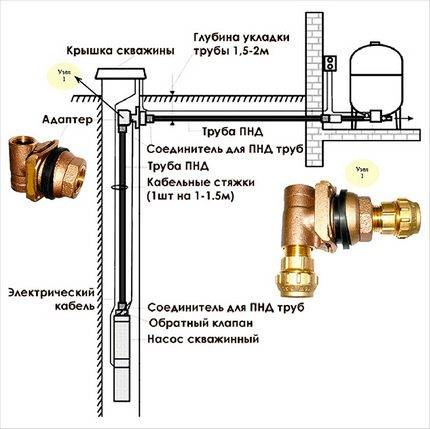
The classic water supply scheme from a well consists of the following elements:
- source of water supply;
- pumping station or deep unit of centrifugal type;
- metal or plastic caisson;
- non-return valve (the device prevents the backflow of liquid during the shutdown of the pump);
- filters for water purification;
- hydraulic accumulator;
- control system.
tower scheme
In this case, a deep pump is used, which pumps water into a special container in the attic. This allows you to meet the demand for liquid during peak hours, as well as during power outages.
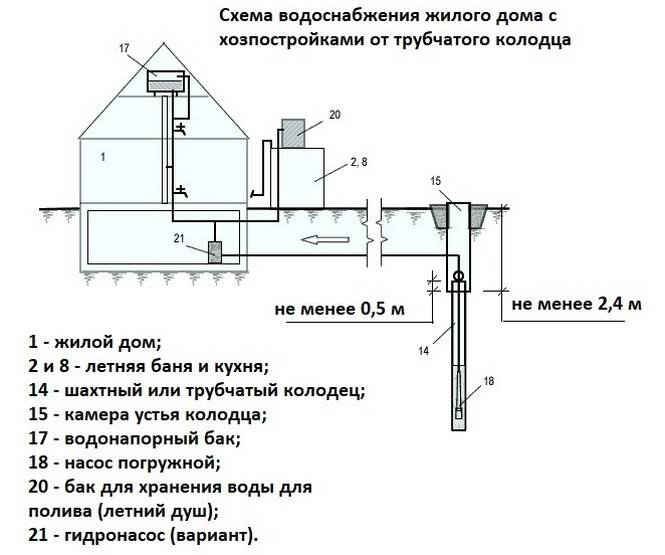
With such a connection of water, it flows to consumers by gravity. A float is installed in the storage tank, which is responsible for the operation of the pump.
The switch operates according to the following principle:
- the unit turns off after filling the tank;
- as needed, residents consume water, which leads to a decrease in its level;
- when the float drops to a certain level, the pump turns on.
Such a scheme is considered the simplest and most reliable, the risk of water hammer is minimal.
There are some disadvantages here - the need for a certain usable space for installing the tank, unstable pressure in the system, additional loads on the supporting structures. In addition, the storage tank must be insulated.
Useful video, a diagram on paper of a water pipe from a well:


