
- Ensuring the tightness of the casing
- Methods for self-drilling
- Shock rope
- Auger
- Rotary
- Puncture
- Well adapter
- Manual drilling: advantages and disadvantages
- How to choose and install a well pump
- Ensuring the tightness of the casing
- Where to drill?
- How to equip a water well with your own hands: pump installation
- Above-ground structure of the pavilion type
- Well drilling step by step instructions
- Ensuring the tightness of the casing
- Well construction without a caisson
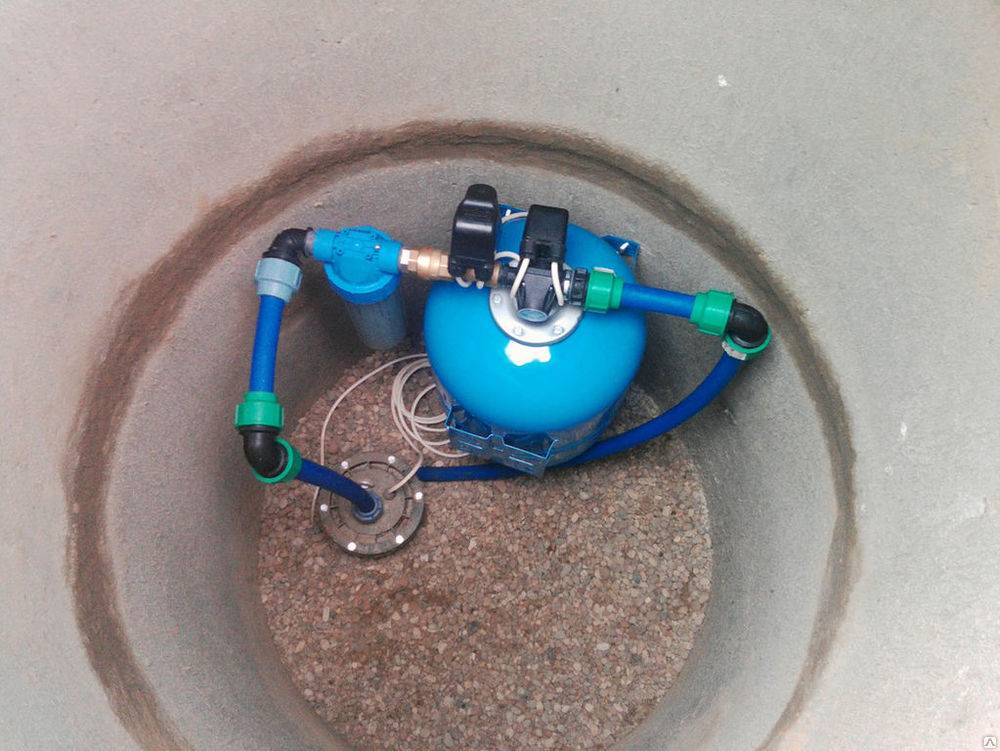
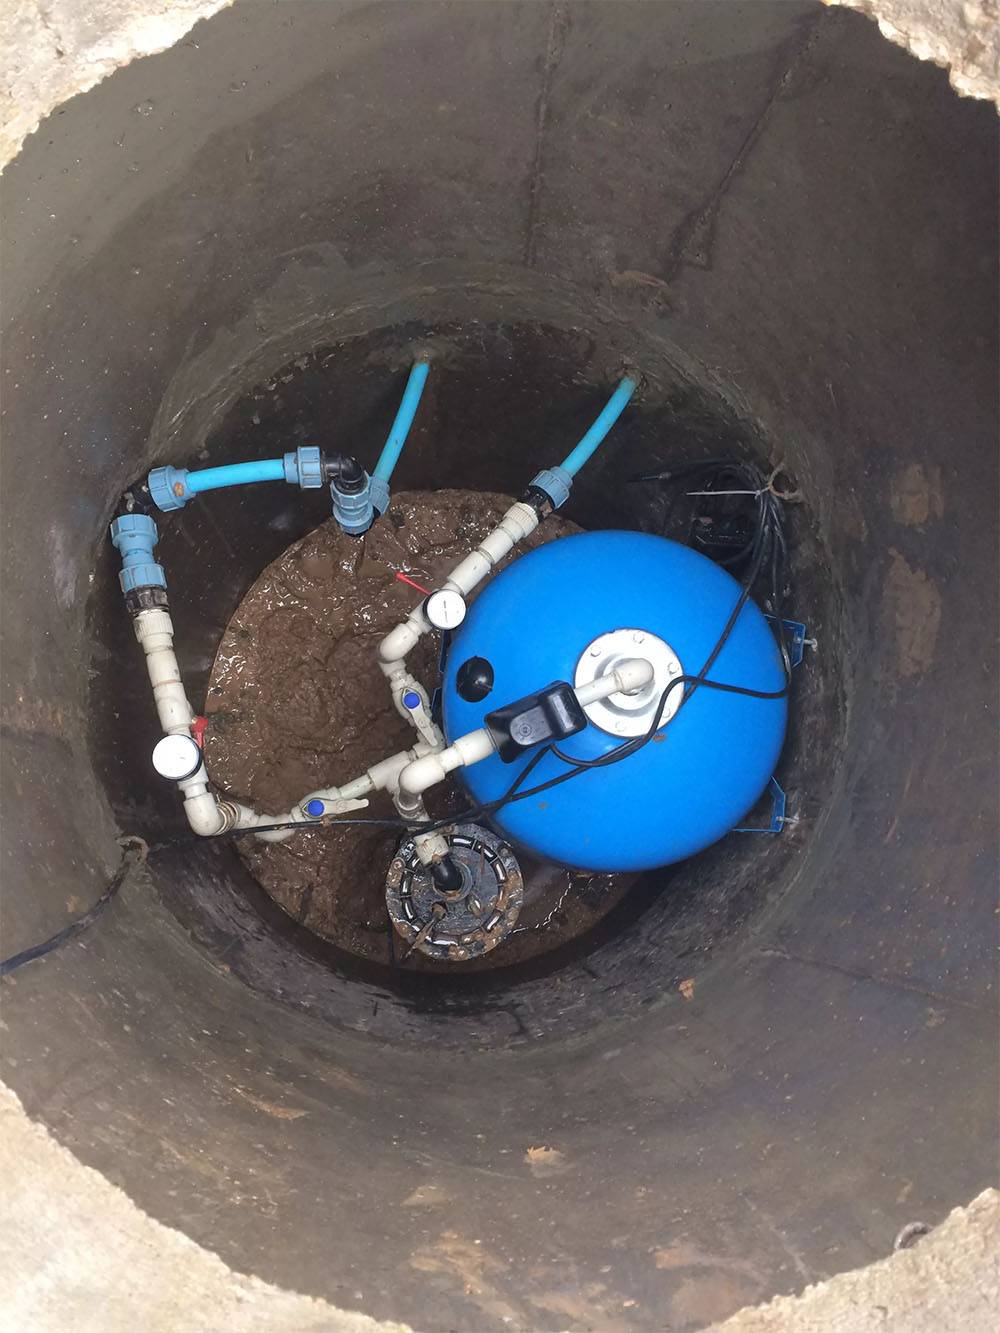
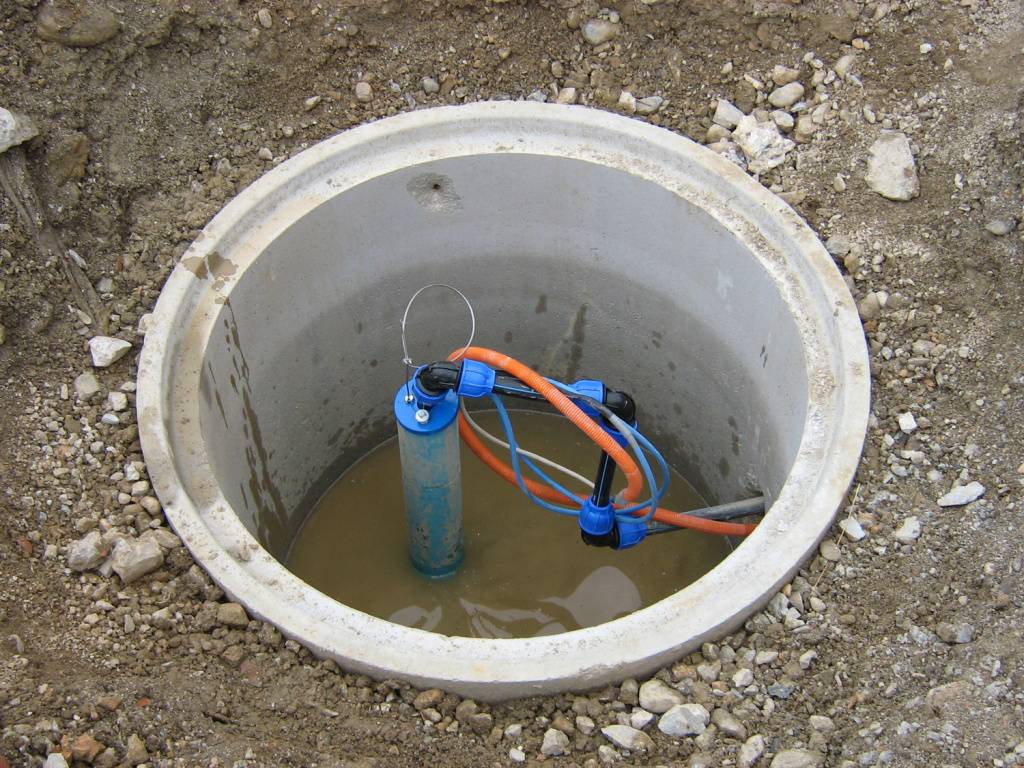
Ensuring the tightness of the casing
The casing pipe must be protected from the penetration of dust and melt water, which are sources of microorganisms. For sealing, a special device is used - a head made of cast iron or plastic, capable of withstanding a load of 200 kg. The device consists of:
- flange;
- covers;
- carbine;
- cuffs;
- fasteners.
The head is selected according to the diameter of the casing pipe and, after being put on it, is fixed with a flange. The inlet cover has openings for the input of the power cable and water pipe. All joints with pipes and cables are securely sealed with rubber seals. A gasket is installed under the cover before fixing with bolts.
Methods for self-drilling
To drill a well for water in a country house, a personal plot, a rural courtyard, it must be taken into account that there are three ranges of depths at which aquifers occur:
- Abyssinian well. Before the water will have to drill from one and a half to 10 meters.
- On the sand. To make a well of this type, you need to pierce the soil to a mark in the range from 12 to 50 m.
- Artesian source. 100-350 meters. The deepest well, but with the purest drinking water.
In this case, each time a separate type of drilling rig is used. The determining factor is the chosen method of drilling operations.
Shock rope
With such drilling of wells for water, the technology of the process involves raising the pipe with three cutters to a height. After that, being weighted with a load, it descends, and crushes the rock under its own weight. Another device necessary for extracting crushed soil is a bailer. All of the above can be bought or made with your own hands.
But before you drill a well with your own hands, you will have to use a garden or fishing drill to make the primary recess. You will also need a metal profile tripod, a cable and a system of blocks. The drummer can be lifted with a manual or automated winch. The use of an electric motor will speed up the process.
Auger
This technology of drilling wells under water involves the use of a drill, which is a rod with a helical blade. A pipe with a diameter of 10 cm is used as the first element. A blade is welded onto it, the outer edges of which form a diameter of 20 cm. To make one turn, a sheet metal circle is used.
A cut is made from the center along the radius, and a hole equal to the diameter of the pipe is cut along the axis. The design is “divorced” so that a screw is formed that needs to be welded. To drill a well in the country with your own hands using an auger, you need a device that will serve as a drive.
It could be a metal handle. The main thing is that it can be disconnected. As the drill deepens into the ground, it is increased by adding another section. The fastening is welded, reliable, so that the elements do not come apart during the work. After the procedure is completed, the entire structure is removed, and casing pipes are lowered into the shaft.
Rotary
Such drilling of a well in the country is not the cheapest option, but the most effective. The essence of the method is the combination of two technologies (shock and screw). The main element that receives the load is the crown, which is fixed on the pipe. As it sinks into the ground, sections are added.
Before you make a well, you need to take care of the water supply inside the drill. This will soften the ground, which will extend the life of the crown. This method will speed up the drilling process. You will also need a special installation that will rotate, raise and lower the drill with a crown.


Puncture
This is a separate technology that allows you to penetrate the ground horizontally. This is necessary for laying pipelines, cables and other communication systems under roads, buildings, in places where it is impossible to dig a trench. At its core, this is an auger method, but it is used for drilling horizontally.
The pit is dug, the installation is installed, the drilling process begins with periodic sampling of rock from the pit.If water in the country can be obtained from a well separated by an obstacle, a puncture is made, a horizontal casing pipe is laid, and a pipeline is pulled. Everything can be done with your own hands.
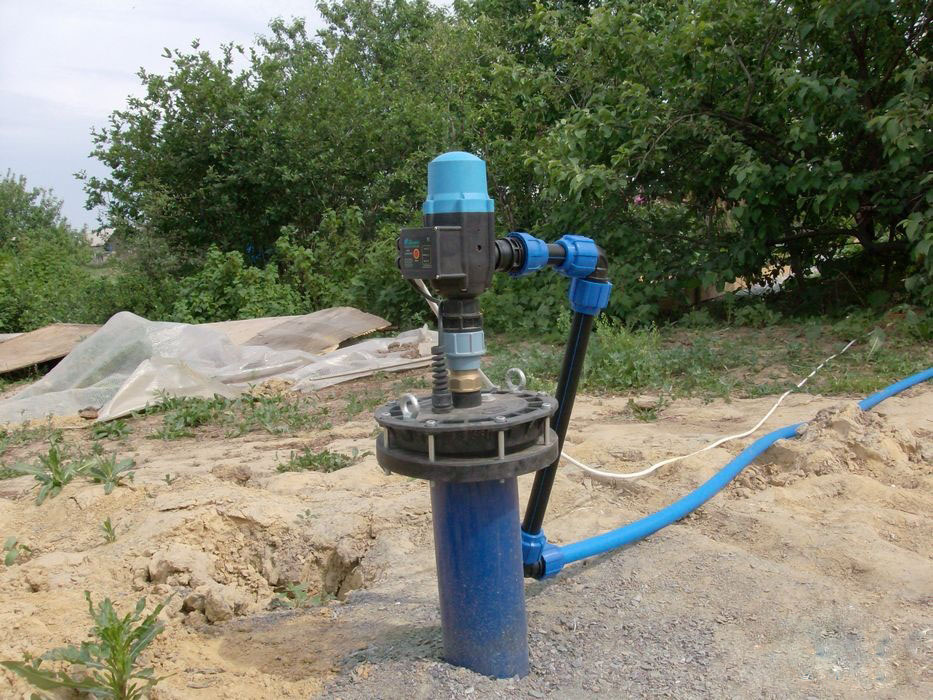
Well adapter
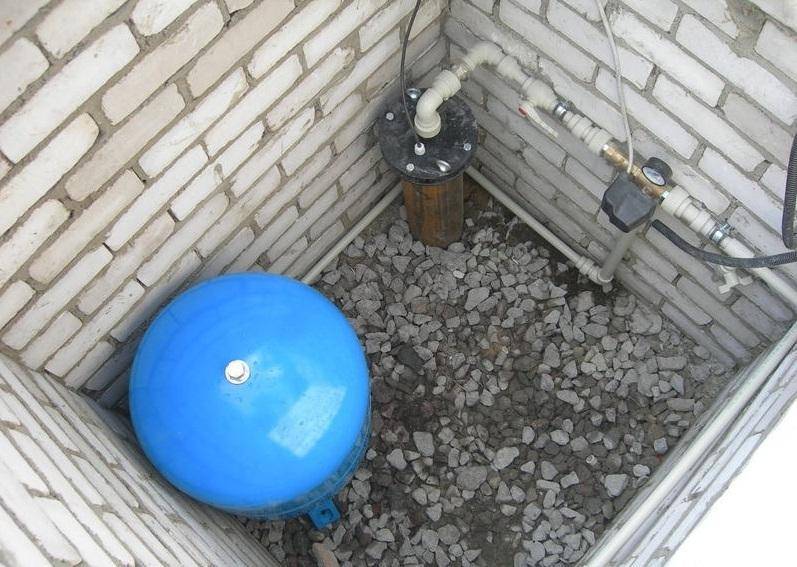
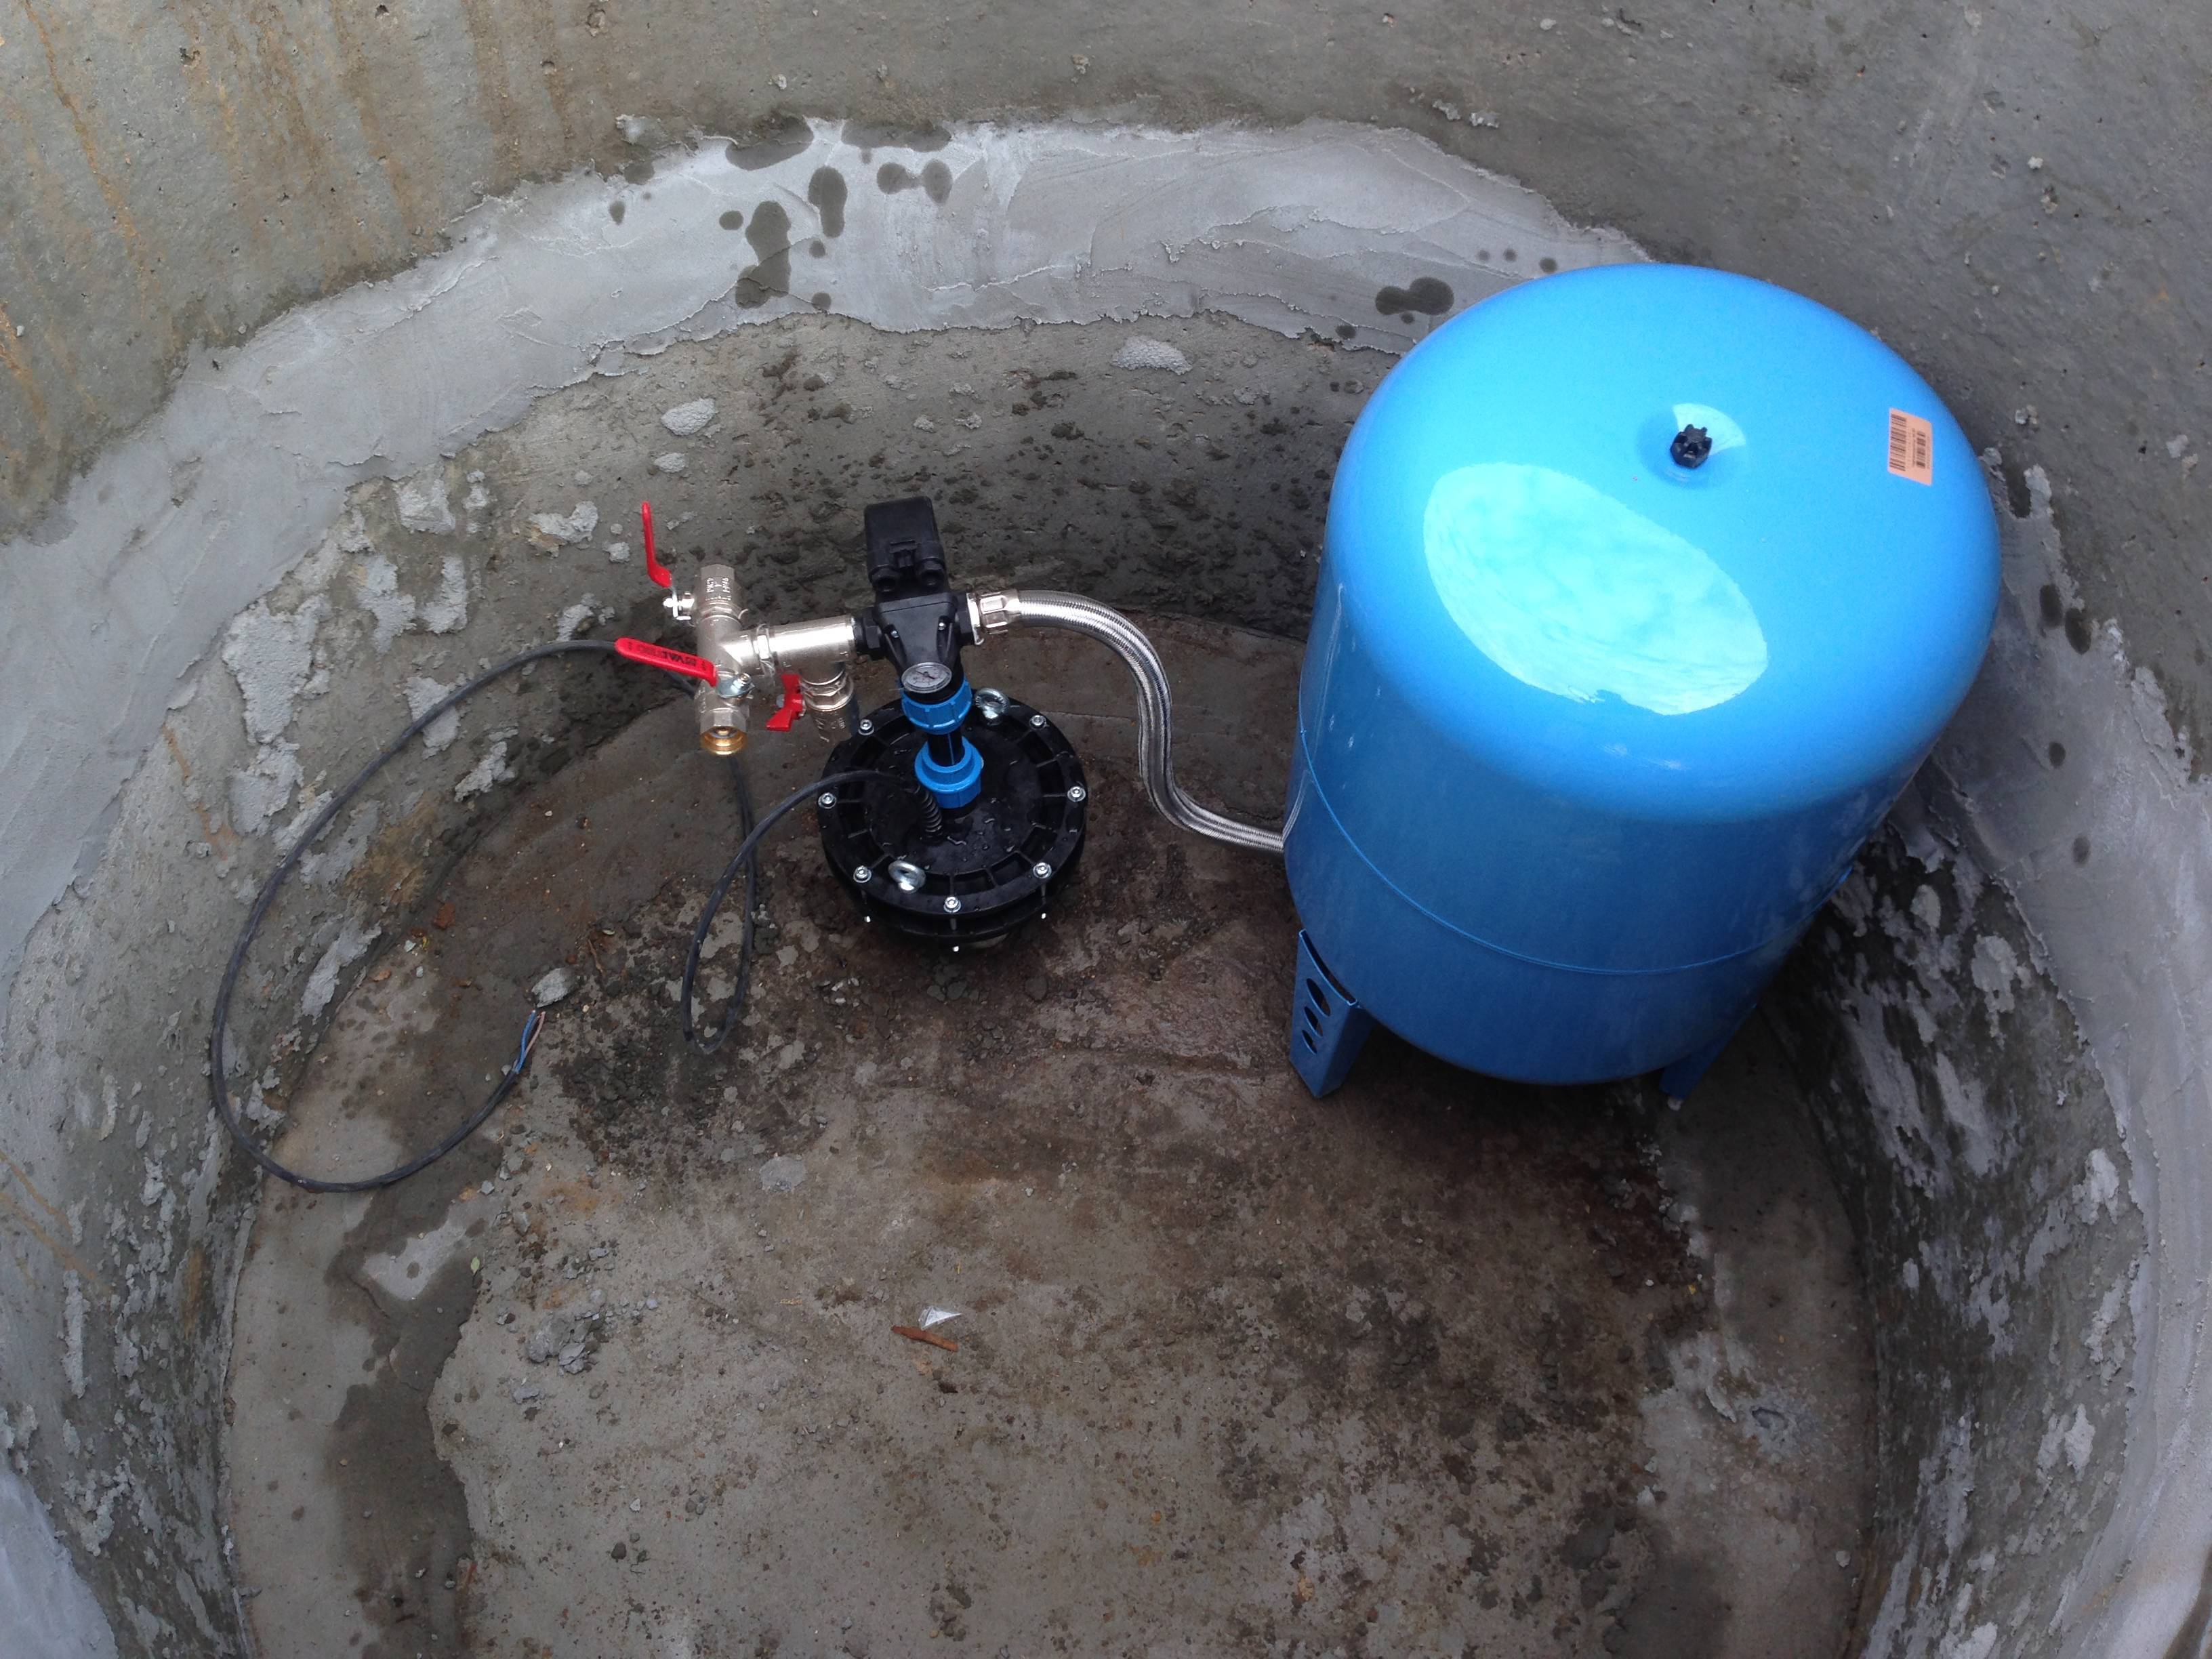
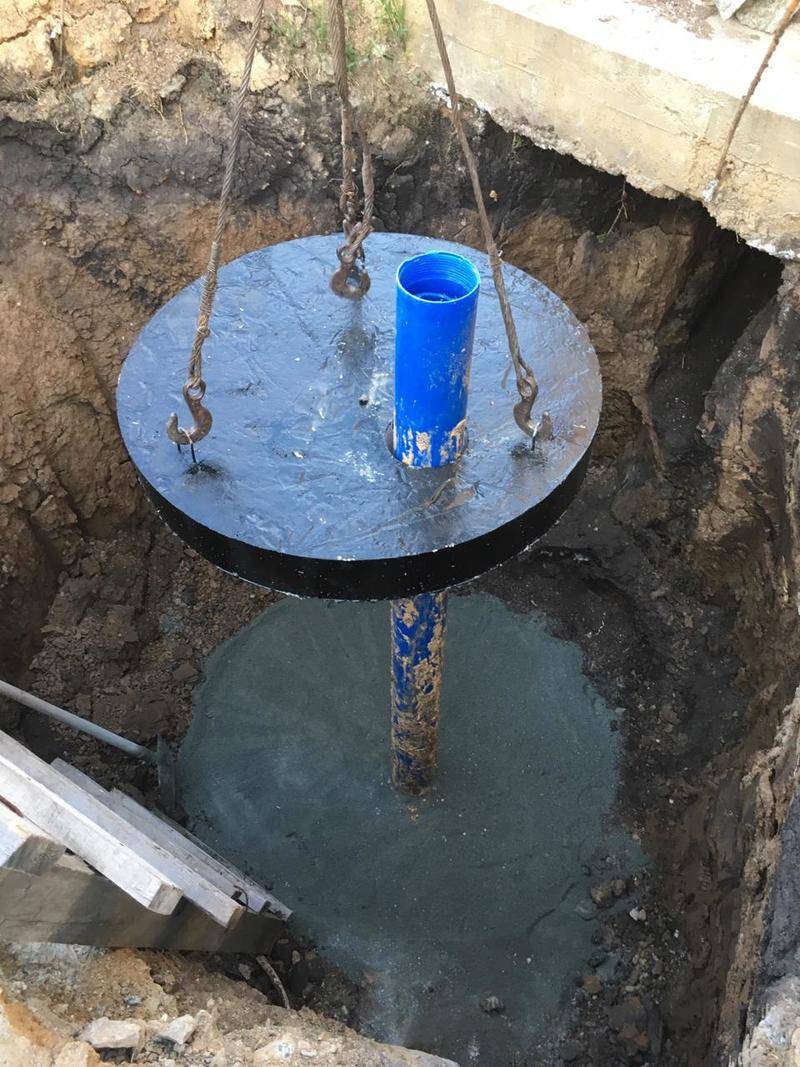
The best way to improve a well is to use a pavilion or caisson. It is these structures that can most reliably protect the source of water supply. The disadvantage of these solutions is their high cost. If the task is to equip a well on the site of a solid cottage, such expenses are quite understandable. Another thing is when a well provides for the needs of a small rural house or cottage. As a rule, the owners of such buildings cannot boast of huge funds.
A budget option for a well device at a site is a well adapter. It makes it possible to switch the supply pipe directly with the well casing. This eliminates the use of a caisson. There is also an inconvenience: in the event of a need for repair, the adapter needs to be dug up (it is placed in a trench during installation). As practice shows, this reliable element rarely fails.
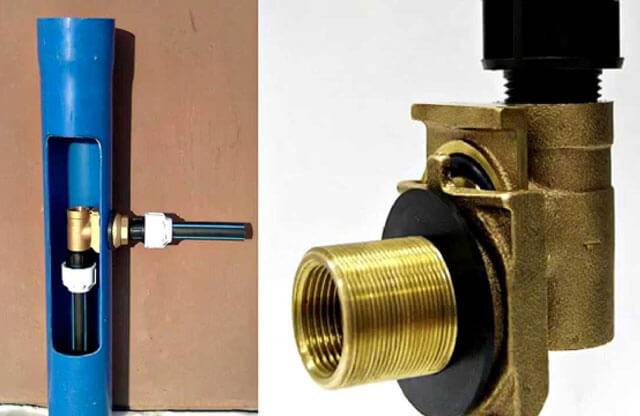
The downhole adapter consists of two main blocks:
- Outer. It is located on the outer side of the casing pipe. Its purpose is to provide switching with a water supply system that supplies liquid to the house.
- Interior. Serves to connect the pipe from the pump.
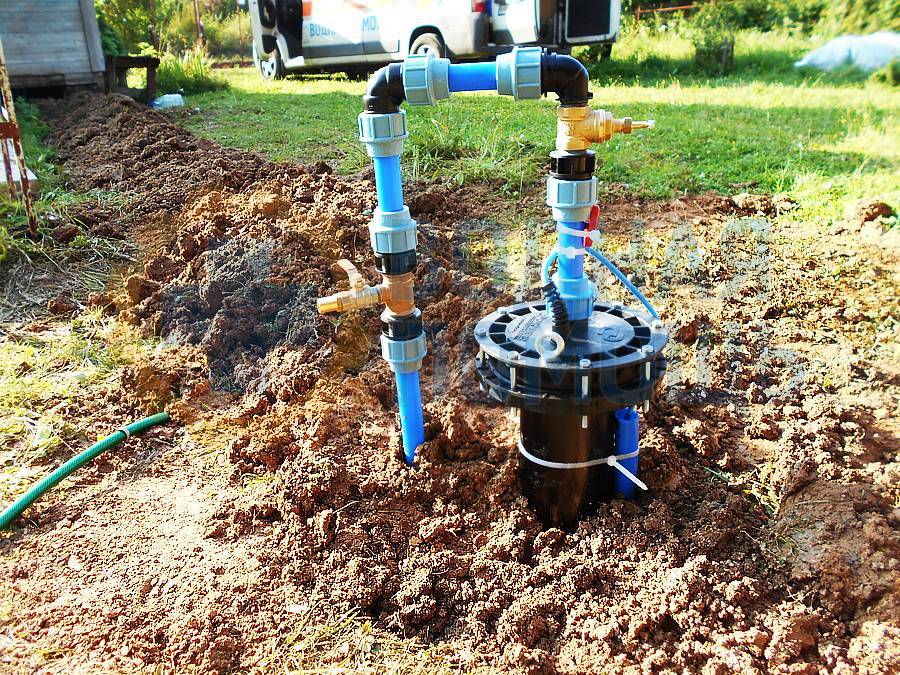
The outer and inner blocks have a radius configuration that follows the shape of the trunk. To switch the elements together, a paired hermetic seal is used.To equip a well with your own hands, you need to install the adapter below the depth of soil freezing.
During installation, the following steps must be clearly followed:
- The casing pipe must be removed so that its end is at a small height above ground level.
- To protect the casing from contamination, the upper edge is formed by a cover with a hole for the electric cable supplying the submersible pump.
- In winter, in case of a significant drop in temperature, there is a real threat of cold penetration into the well: it begins to move along the casing pipe. In regions with severe winters (where frost reaches -20 degrees), additional well insulation is practiced. To do this, it is covered with spruce branches, hay, straw and other natural materials for the winter.
This option, how to equip a well with your own hands, surpasses the use of a caisson with its cheapness. The weaknesses of using the adapter include the complexity of maintenance, the risk of mechanical damage to the electrical wiring and the not very reliable fastening of the pump. In this case, instead of the traditional cable, direct fixation on the water pipe is used. The equipment used can only be placed inside the house. Before you equip a well with your own hands using an adapter, you need to get a special key with a long nozzle. To implement the process, a certain technical experience and accuracy will be required.
Manual drilling: advantages and disadvantages
Nothing is perfect, so manual drilling of a water supply system has its pros and cons. It is worth familiarizing yourself with them in more detail, so that later there are no additional questions during work.
- With manual work, everything is cheap, drilling is simple.
- Clear scheme and design, filters are easy to change.
- No special equipment is required to enter the site.
- Even if there is no electricity in the country house, it is possible to equip the well in such a way as to use a conventional hand pump and be glad that there is water supply.
- The depth of the water supply is small, so the well is pumped very quickly.
- You don't have to buy expensive tools. If something is missing, you can always rent and protect yourself from additional costs.
- There is a clear shortage of specialists: it is difficult to find a person who can help make plumbing and supply water. Drilling will have to be carried out independently.
- Limited depth: plumbing must be done very carefully.
- Systematic timely cleaning - otherwise you just have to use water that is hazardous to health.
How to choose and install a well pump
After installing the well equipment in the country, you need to choose a model of a submersible pump. To begin with, its performance and maximum pressure are calculated. This takes into account such criteria as:
- Well depth.
- What is the length of the plumbing.
- How many floors in the house.
- The number of draw points.
During installation, the pump is lowered into the well to a mark below the static water level. Simultaneously with the pump, the following are lowered:
- A plastic pipe, through which water will flow upward.
- Corrosion-proof cable, for pump lowering insurance.
- Cable, to control the operation of the motor pump.
- The cable is fixed on the head of the well.


Ensuring the tightness of the casing
The casing pipe must be protected from the penetration of dust and melt water, which are sources of microorganisms. For sealing, a special device is used - a head made of cast iron or plastic, capable of withstanding a load of 200 kg. The device consists of:
The head is selected according to the diameter of the casing pipe and, after being put on it, is fixed with a flange. The inlet cover has openings for the input of the power cable and water pipe. All joints with pipes and cables are securely sealed with rubber seals. A gasket is installed under the cover before fixing with bolts.
Where to drill?
The general scheme of the formation of aquifers in nature is shown in fig. The verkhovodka feeds mainly on precipitation, lies within the range of approximately 0-10 m. Riding waters can be drinkable without deep processing (boiling, filtration through shungite) only in some cases and subject to regular testing of samples in the sanitary supervision bodies. Then, and for technical purposes, the top water is taken by the well; the flow rate of the well in such conditions will be small and very unstable.

Formation and types of aquifers
Independently, a well for water is drilled into interstratal waters; highlighted in red in Fig. An artesian well that provides water of the best quality for a very long time cannot be drilled on its own, even if a detailed geological map of the area is available: the depth, as a rule, is more than 50 m, and only in exceptional cases the reservoir rises to 30 m.In addition, the independent development and extraction of artesian waters is categorically, up to criminal liability, prohibited - this is a valuable natural resource.
Most often, it is possible to drill a well on their own into a non-pressure reservoir - sand soaked with water on a clay litter. Such wells are called sand wells, although a non-pressure aquifer can be gravelly, pebbly, etc. Non-pressure waters occur approximately 5-20 m from the surface. The water from them is most often drinking, but only according to the results of the check and after the buildup of the well, see below. The debit is small, 2 cu. m / day is considered excellent, and varies somewhat throughout the year. Sand filtering is mandatory, which complicates the design and operation of the well, see below. The lack of pressure tightens the requirements for the pump and the entire plumbing.
Pressure beds are already deeper, in the range of about 7-50 m. The aquifer in this case is dense water-resistant fractured rocks - loam, limestone - or loose, gravel-pebble deposits. The best quality water is obtained from limestones, and such wells last longer. Therefore, water supply wells from pressure layers are called limestone wells. Own pressure in the reservoir can raise water almost to the surface, which greatly simplifies the arrangement of the well and the entire water supply system. The debit is large, up to 5 cubic meters. m / day, and stable. A sand filter is usually not needed. As a rule, the first water sample is analyzed with a bang.
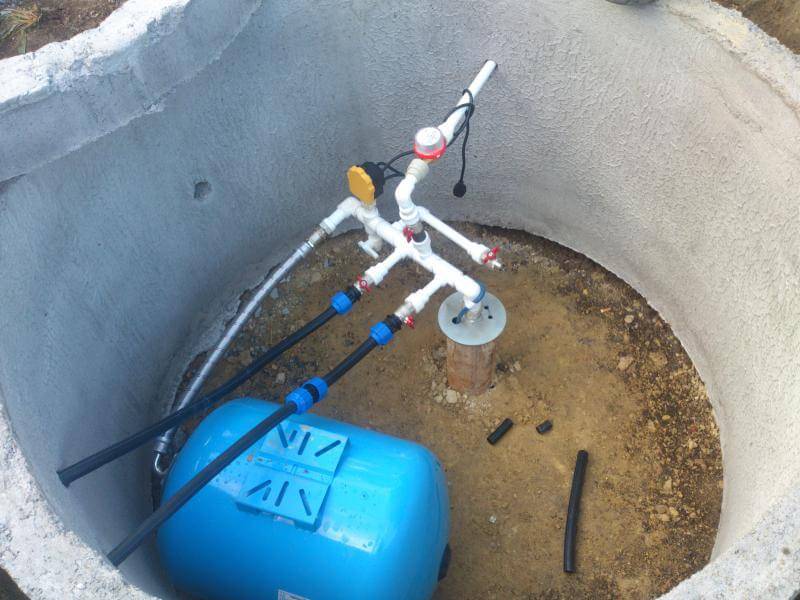
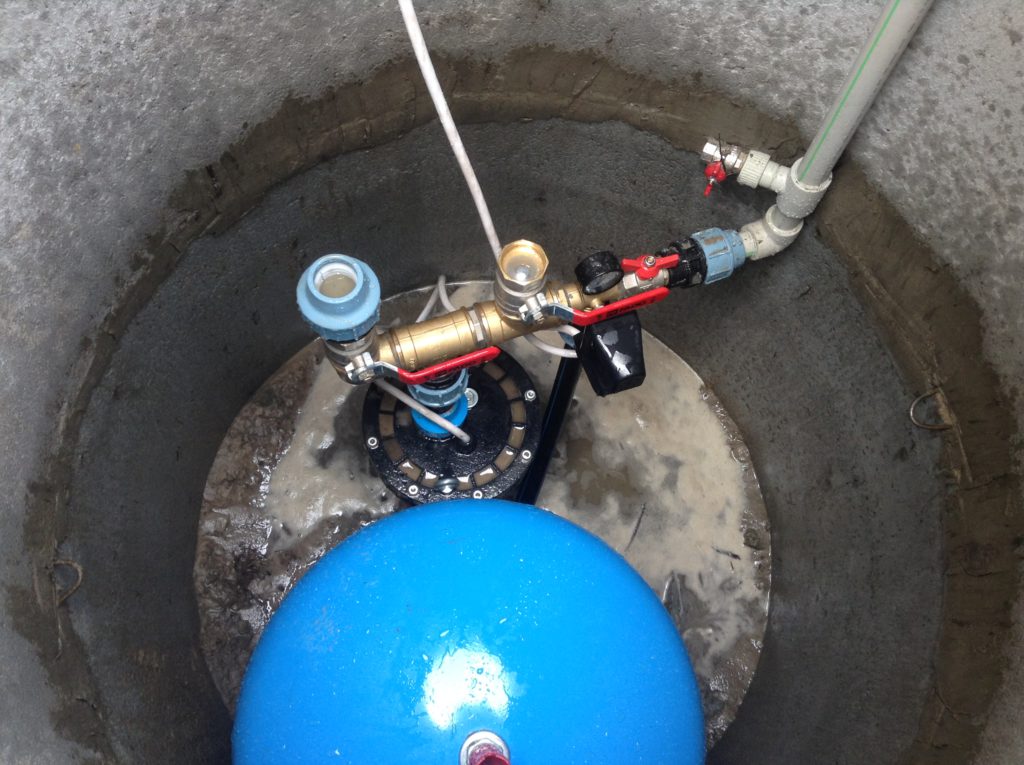
How to equip a water well with your own hands: pump installation
To equip the well, it is mandatory to mount a pump. The best option for a well would be a submersible type pump.This choice is due to the volume of water consumption and the depth of the tank.
The installation process involves lowering the pump on a cable to a depth. They also lower the cable that feeds the engine, and the pipe that will supply water. All elements should be tied. The functions of the cable are fixing the pump and coupling with the head.
The nuances of installing the pump:
- The first water from the well will be quite dirty, so pumping should be carried out. But at the same time, another pump is used, which is not intended for the constant operation of the well.
- The pump must be lowered directly into the water. In this case, the distance from the bottom to the equipment should be 3 m.
- The cable for fastening should be purchased from stainless steel.
After installing the pump, it is necessary to ennoble the well. To do this, make a headband. However, it performs other functions as well.
Above-ground structure of the pavilion type
This is the easiest way to improve the well. For these purposes, a compact design is used, which is placed above the hydraulic structure. Some deepening of such a pavilion is allowed. In this case, it will resemble an autonomous cellar, sprinkled with earth on all sides.


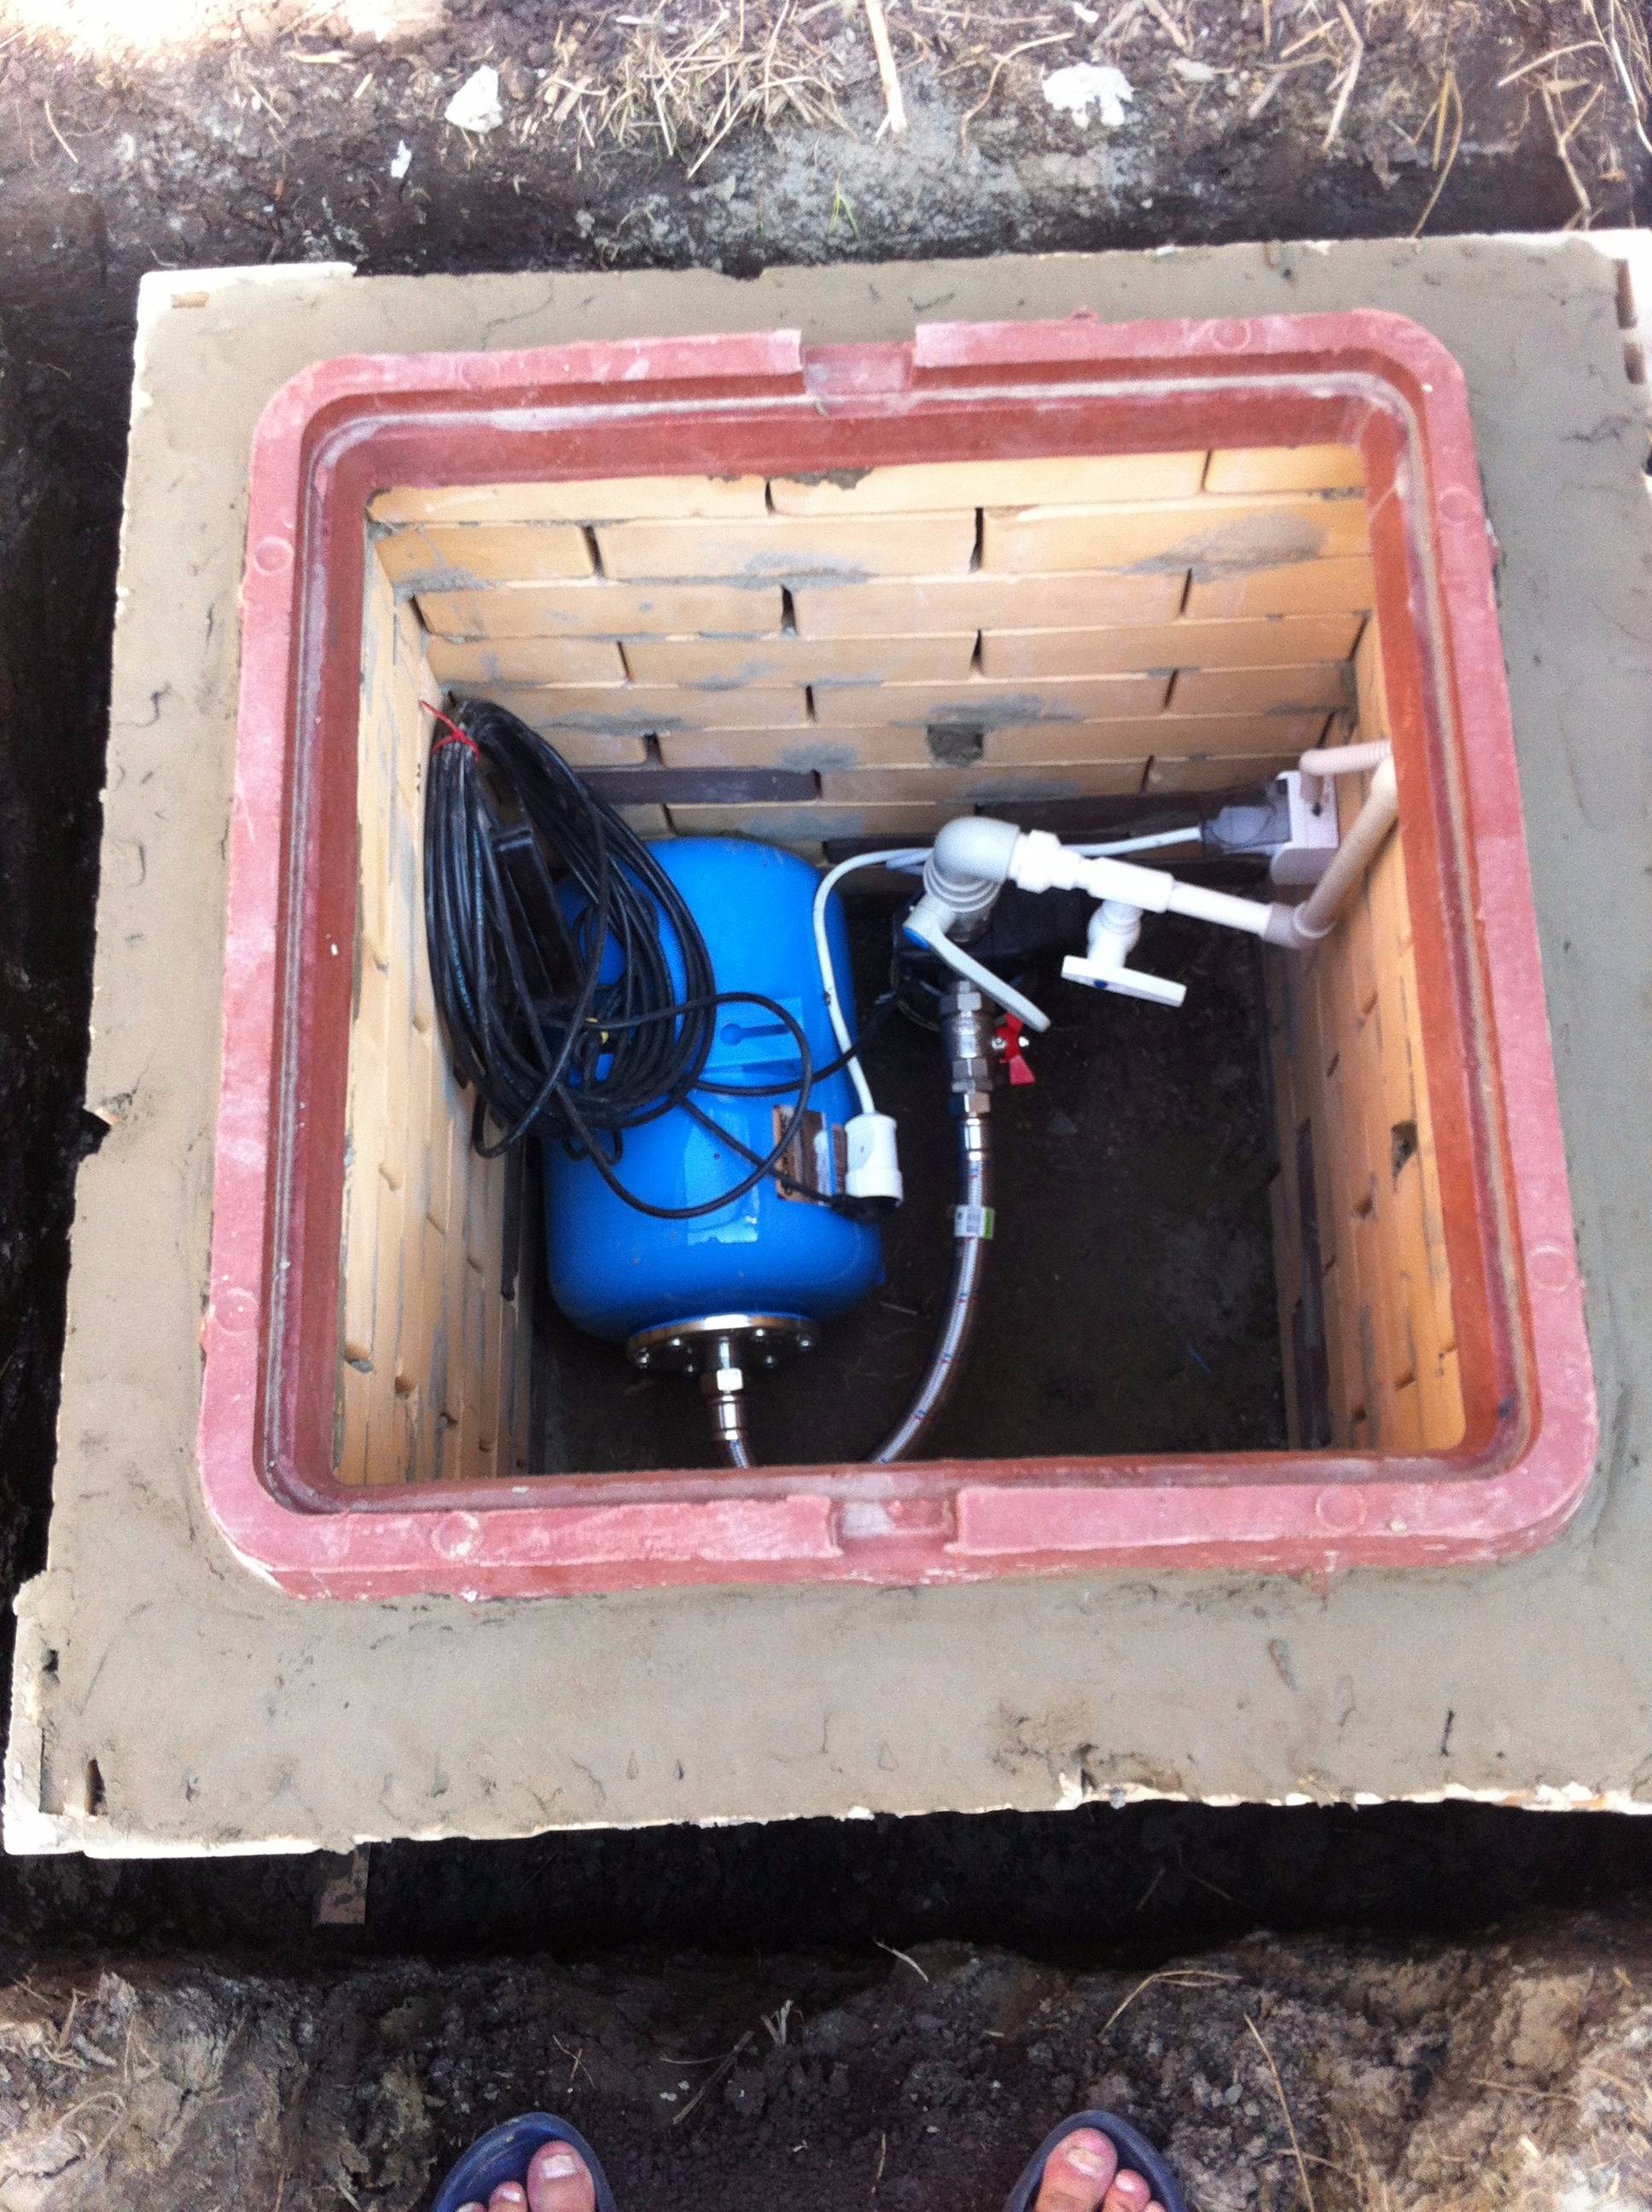
To do this, before installing the structure, a small trench is dug. Industrial wells are most often equipped in this way. In the private sector, pavilions are rarely used, because. its presence hides the useful area and violates the aesthetics of the site. To insulate such a structure, you have to make a lot of effort.
Well drilling step by step instructions
The classic scheme of manual drilling of a well.
Prepare a pit or hole. The hole should have dimensions of 150x150 cm.Reinforce the walls of the recess with boards or pieces of plywood so that they do not crumble. If you wish, you can take an ordinary drill and use it to dig a trunk 1 m deep and about 15-20 cm in diameter. This will help to more securely fix the pipe in a vertical state.
Place a wooden or metal tripod over the recess. Where its supports connect, secure the winch. In most cases, towers made of logs are used. A drill column with rods 1.5 m long is suspended on a tripod. Fasten the rods with a thread of 1 pipe and fix with a clamp. With this design, you can lower and raise equipment.
Choose a pump for the boom in advance. So you can most accurately determine the diameter of the future source, as well as the core pipe. The system is organized in such a way that the pump can easily pass into the pipe. So the pipe must exceed the pump in diameter by at least 0.5 cm.
Do-it-yourself well drilling scheme.
Drilling will be carried out by alternately lowering and raising the working equipment. The bar rotates, they hit it with a chisel from above. It is more convenient if you have an assistant. So you can turn with a gas wrench, and an assistant hit the bar from above, breaking through the rock. The winch makes the job easier and faster. It makes lifting and lowering equipment much easier. On the bar you need to make a marking by which you can determine the need to clean the drill. Do this every 50 cm.
Depending on what type of soil will be drilled, you will need to use different drills, namely:
- Clay soils are processed with a spiral drill.
- Hard rocks are loosened with a drill-chisel.
- Sandy soil is drilled with a spoon drill.
A bailer is designed to raise the earth to the surface.
For drilling a well in sandy soil, a drill-spoon is best suited. During the drilling process, it will be necessary to add water. If the soil is hard, you will need a chisel. Such drills can be flat and cross. The main task of such devices is to help loosen hard rocks. To overcome the floating sands, a shock method is used.
Drill drawing.
Clay soils are best overcome with a drill-spoon, a coil and a bailer. The design of the coils is similar to a spiral. The pitch of the helix corresponds to the diameter of the drill. The lower base of the drill has a size of 4.5-8.5 cm. The blade, as a rule, is 26-29 cm. For the passage of pebble layers, a chisel and a bailer are alternately used. In some situations, to significantly simplify drilling operations, water is poured into the well.
It will become much easier to work, but you can’t stop until a waterproof layer is found.
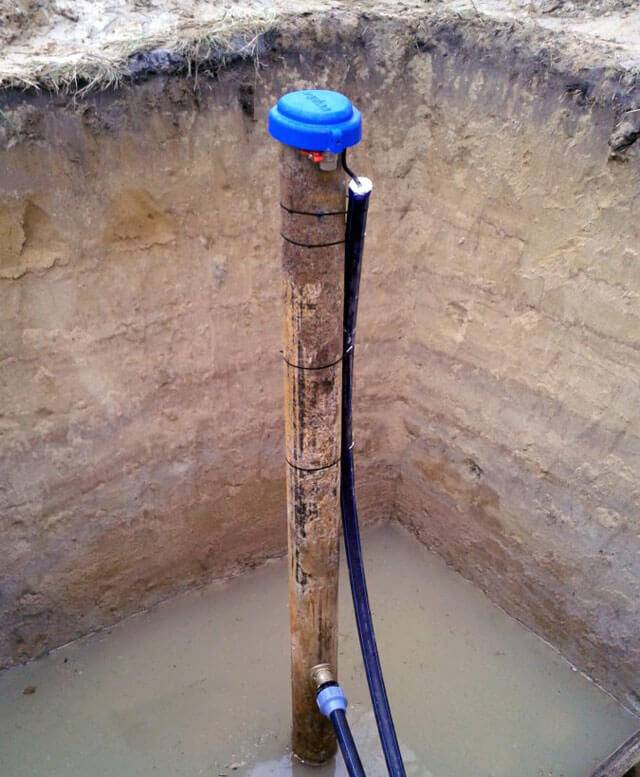
Ensuring the tightness of the casing
Neither dust, nor condensate formed in the caisson, nor, moreover, rain and melt water should get into the well casing that supplies the house with drinking water.
If this happens, harmful microorganisms from the surface can get into a clean underground source and it will be difficult and expensive to “treat” it.
To seal the well, fasten the submersible pump and pass communications, use the factory head: it is relatively inexpensive and makes installation of equipment very easy
To protect the well, a cap is used - a special steel cover equipped with technological holes for passing communications and a reliable hook for hanging the pump.
The head is selected according to the diameter of the casing, it has a rubber crimp cuff that seals the casing. The water pipe and electric cable are also introduced through hermetic seals.


We do not recommend cutting the casing pipe close to the floor of the caisson. It is better to leave a section 25-40 cm high above the concrete surface. Firstly, it will be more convenient to mount a pump with a head. Secondly, with a slight flooding of the caisson, water will not enter the wellbore.
Image gallery
Photo from
Step 1: The pit around the well needs to be equipped: strengthen the walls if necessary, concrete or lay the bottom with stone
Step 2: We cut the casing pipe to a height convenient for installing the head and operating
Step 3: Install the lower head piece onto the cut casing
Step 4: Flush with the edge of the cut pipe, install an elastic sealing ring
Step 5: We connect the electrical cable, fasten it to the water supply pipe 20 - 30 cm from the pump nozzle and above every 1.2 - 1.5 m
Step 6: Pull the water supply pipe through the hole in the head cover, pull the cable through the hole with the seal
Step 7: We install the head cover, together with the cable and pipe pulled through it, onto the casing and fix it
Step 8: Check the system performance and connections. If everything is in order, we cut the water supply pipe to connect the external branch of the water supply
Arrangement of a pit around the well
Casing cutting
Installing the bottom part of the head
Installing the sealing ring of the head
Connecting the cable to the pump
Head cover installation
Borehole head in complete assembly
Preparation for connection to the water supply
Well construction without a caisson

- A hole is made in the casing string for the adapter below the ground freezing mark.
- The device is installed in parts. First, one part of it is placed from the inside so that the threaded pipe can be seen in the hole made in the column. A plastic water pipe is inserted into it.
- Connection to the water pipe of the second part of the adapter. Then you need to connect a deep pump to the device and lower the entire structure into the well.
- Docking of two parts of the adapter. It occurs already at a depth - their normal connection will be accompanied by a characteristic click of the lock.
- Conclusion of electrical wiring and safety cable. They were previously fixed on the pump, and after installing the adapter, they are brought out to the head.


