- Important nuances
- Do-it-yourself concrete caisson for a well
- Video - How to make a concrete caisson with your own hands
- Step-by-step instructions for arranging a monolithic concrete caisson
- About the device and functions of the adapter for the well
- Advantages and disadvantages of using the device
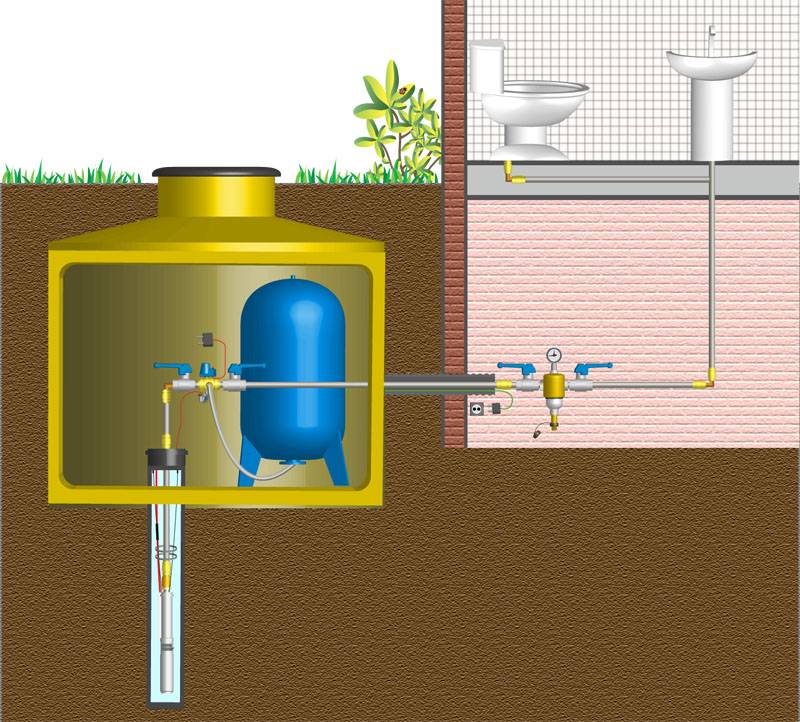
- Correct installation of the accumulator in the caisson
- How to make a caisson yourself
- Monolithic concrete structure
- Caisson from concrete rings
- Budget camera made of bricks
- Sealed metal container
- Organization of a well without a caisson
- Construction and arrangement of concrete structures
- Required materials and tools
- Preparatory work
- Instructions for the progress of work
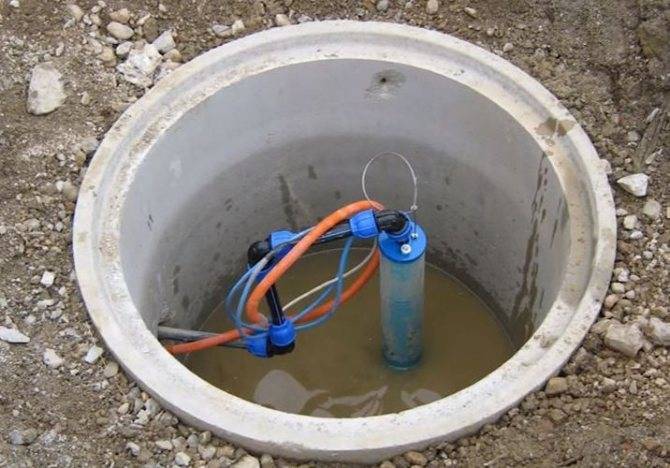
- Choosing a plastic caisson for a well
- The device and principle of operation of the adapter
Important nuances
If the land on the site is fertile, and in case of destruction the surface layer will have to be restored, it is preferable to use cluster drilling. Pad drilling reduces backfilling and reduces the cost of resource extraction. Any work on the site can be started only after studying the level of groundwater. If this level is high, it is better to place the protective room on the surface, rather than deepen it underground.
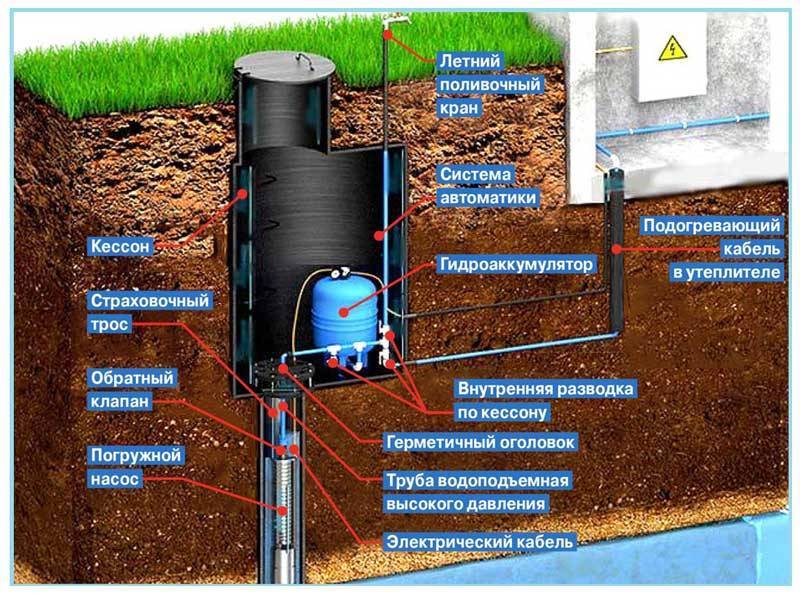
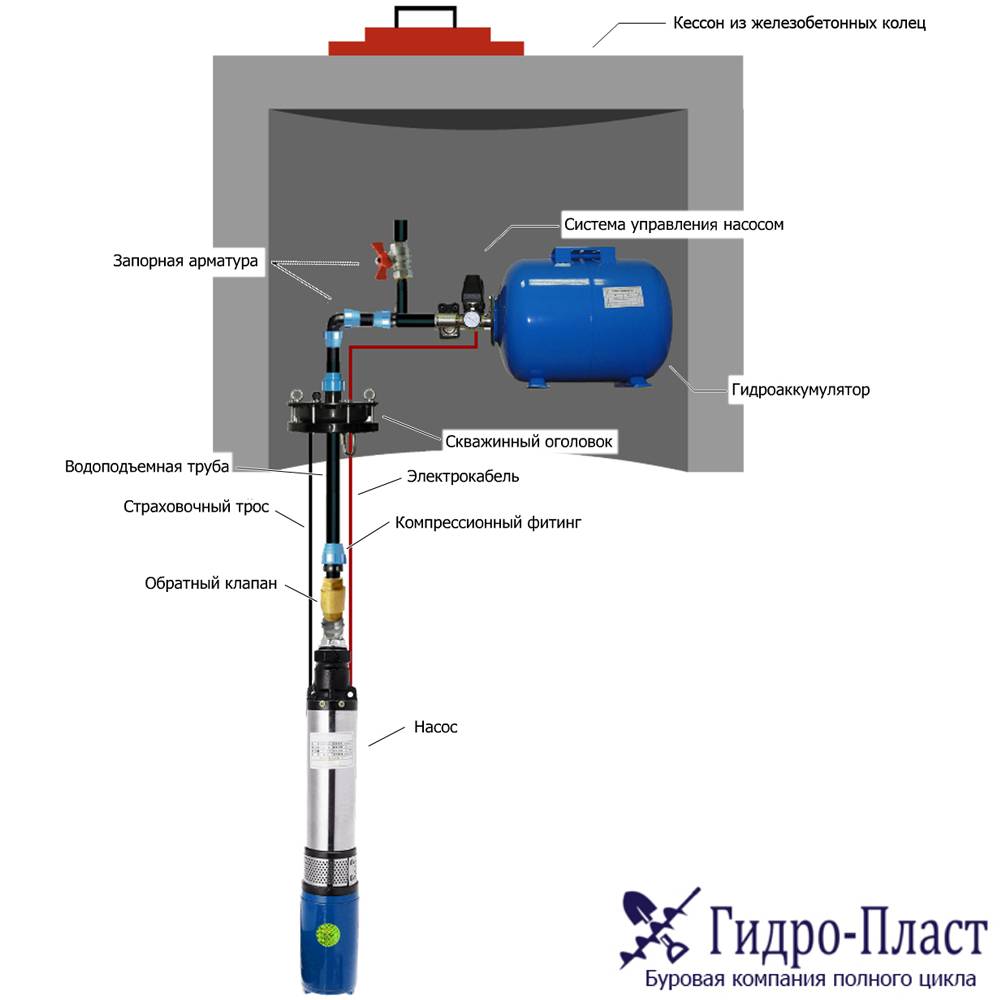
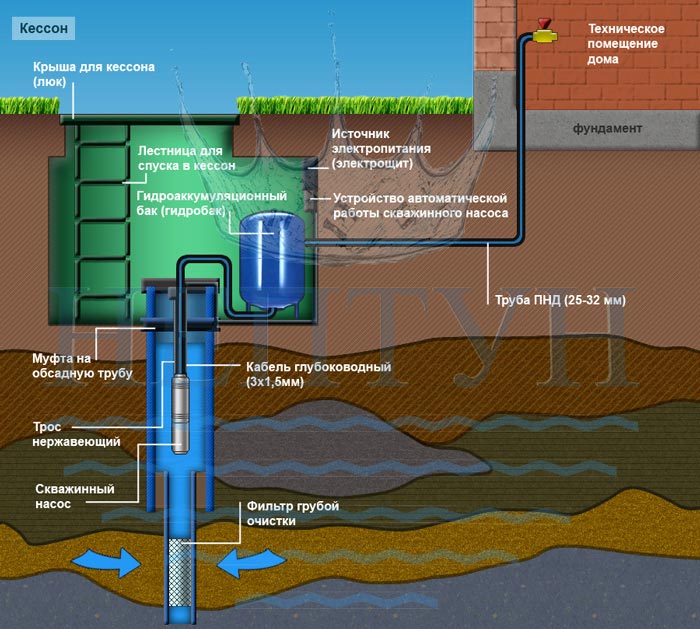
It is extremely important to choose and fix the pump correctly. The role of equipment is extremely important for an autonomous water supply system
For wells, it is customary to choose submersible pumps, as they have better performance. But when choosing, it is important not to overdo it, since the size of the hydraulic structure itself will be an important parameter. The length of the drains is also taken into account. For example, with a water intake structure height of 33 meters, the pressure in the system should be from 1.4 to 3 atmospheres.
For constant support and the possibility of changing the working pressure, a hydraulic accumulator is needed. The tank will provide storage of the minimum water reserve. Modern equipment of this type is a single design, the main distinguishing feature of which is capacity. For example, for summer cottages, a capacity of up to 55 liters is sufficient, and for hotels and boarding houses, devices from 100 to 950 liters are selected.
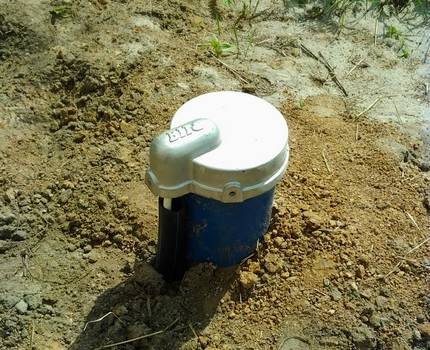
An important protective device of the well is the head. Usually the device is equipped with holes for installing water pipes, as well as power cables.
The cap protects the structure from biological and other contamination.
The design of the head includes such parts as:
- carabiner, flange;
- rubber rings;
- fasteners;
- covers.
If the well is equipped with a cap, then the column is cut off during installation. The cut is cleaned and treated with anti-corrosion agents.
- The supply cable of the pump is inserted through the inlet cover of the water pipe.
- The pump is connected to the pipe, and the hanging end of the cable is fixed with a carabiner.
- The flange is fixed to the column, and a sealing ring is installed on top.
- Next, the pump is immersed to the bottom of the well, and the head cover is fixed with bolts.
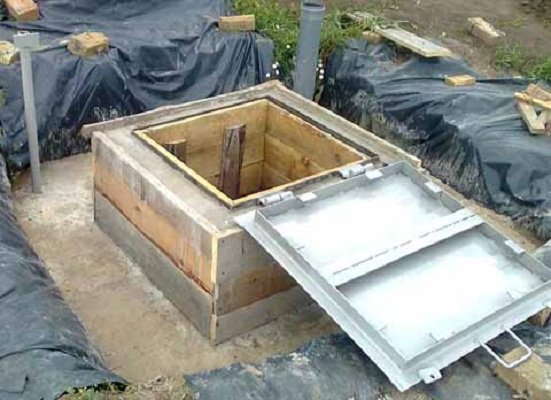
Do-it-yourself concrete caisson for a well
If there is no possibility or desire to hire lifting equipment, then a monolithic concrete box can be made to protect the well and equipment. But you need to take into account that you will have to spend time not only on the arrangement, but also on the drying of concrete walls. Such a tank is usually made of rectangular section to simplify the installation of formwork.
Video - How to make a concrete caisson with your own hands
Making a caisson is best done in the spring. This will help to assess the moisture content of the bottom of the pit and choose the type of base of the caisson:
- with dry soil, a draining layer of crushed stone is sufficient;
- a wet bottom indicates that a concrete monolithic base is needed.
Such a study is carried out at the stage of excavation.
Production of a brick caisson floor
Step-by-step instructions for arranging a monolithic concrete caisson
| Step 1. A pit is dug around the head. Its depth is determined not only by the freezing point of the soil, but also by the type of base of the caisson. The drainage layer is generally 25-30 cm, and the monolithic concrete bottom with a sand cushion is 20 cm. To determine the width of the pit, you need to add 10 cm for each wall to the selected internal size, plus a gap to the walls of the pit if the formwork is double . Gaps are also important at high GWL to make drainage sinuses around the caisson. | Dig a pit around the head |
| Step 2 Arrange the bottom. For a low GWL, first a 10-cm layer of compacted sand is covered, and then a 15-cm gravel layer. If the bottom of the pit is wet, a concrete base is poured.To do this, a film is laid on the sand cushion, which also goes on the walls of the pit, and a reinforcing grate is placed down on the wooden bars so that it does not touch the walls. Then the concrete solution is poured with a layer of 10 cm, closing the reinforcement. | Arrange the bottom |
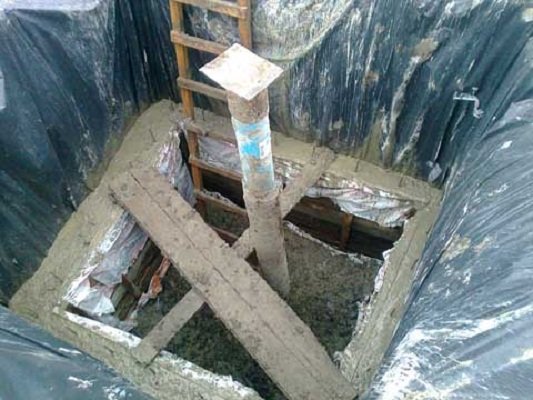
| Step 3. After the bottom has dried, formwork is erected. In non-flowing soils, it can be done with one wall, while the outer part will be made by the side of the pit, covered with a film. In wet and crumbling soils, both formwork walls are boards made of wooden boards, between which a reinforcement mesh is installed. It is imperative at this stage to provide for the exit points of the water supply and the entry of the power cable. | Formwork manufacturing |
| Step 4. The concrete solution is kneaded and fed into the formwork. For uniform distribution of concrete and the convenience of pouring it, a gutter is made from a plastic pipe. Serve concrete in portions, compacting it with a vibrating tool or bayonet. This allows you to remove air and make the concrete dense. | Mixing the concrete solution and pouring it into the formwork |
| Step 5 Dry the concrete walls properly. To do this, they are sprayed with water and covered with a damp cloth for up to 5 days. Such a measure will prevent the formation of cracks from the rapid evaporation of moisture. | Dry concrete walls |
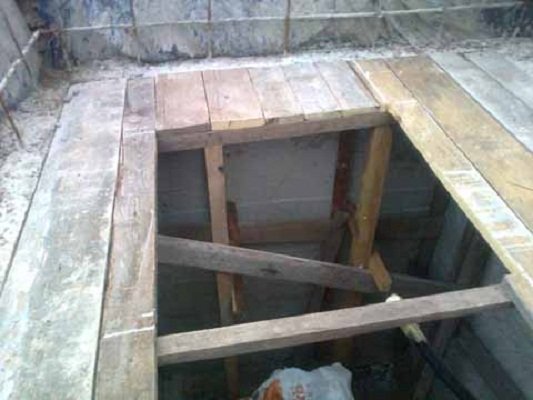
| Step 6. After a week, the formwork is removed and work is stopped for about 4 weeks for the concrete to fully mature. | Remove formwork |
| Step 7 Install a finished concrete slab with a hatch as a floor. It is possible to pour the roof from a concrete solution, having previously built a horizontal formwork. Take into account the place of the hatch and the exit of the ventilation and watering pipes. | Horizontal slab formwork |
| Step 8Waterproofing is applied to the walls of the tank from the inside and outside, for example, bituminous mastic. | Apply bituminous mastic to the walls of the tank |
The reservoir is ready. At the end, equipment and a ladder are installed, all communications are started and connected, replacing the joints of pipes and cables with the walls of the caisson. After that, backfilling is carried out and the area around the tank is ennobled.


About the device and functions of the adapter for the well
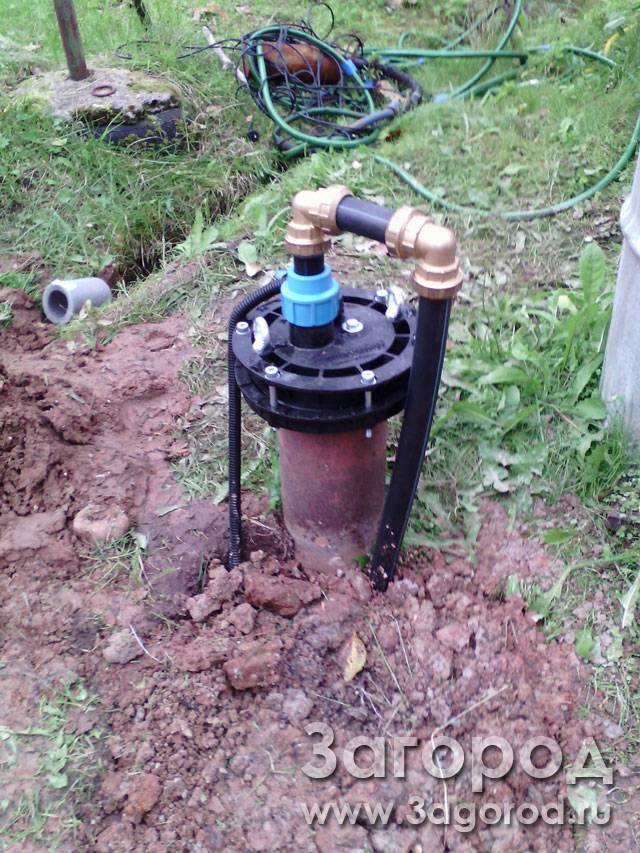
We are talking about a device that connects the water supply that goes to the house with the output of the well. Install the adapter in the casing and, as we just noted, below the freezing level of the soil, so that the well will remain operational regardless of the time of year. The design of the adapter is such that the connection is as tight as possible, but at the same time easy to dismantle / repair.
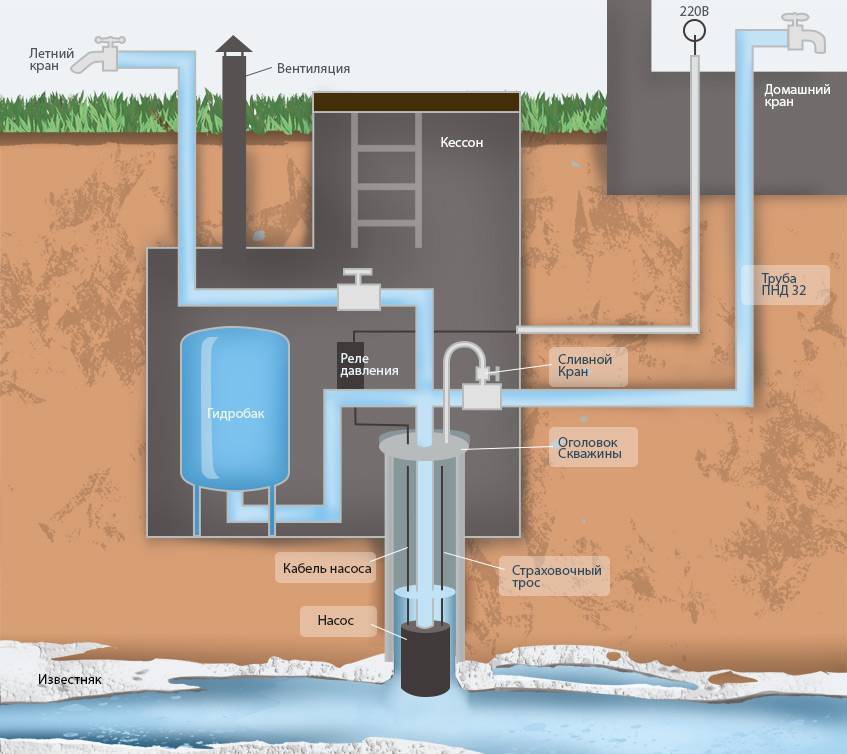
Downhole adapter mounting scheme
The adapter consists of two parts - external and internal. The outer element is a kind of branch pipe installed in a hole made in the casing. At the same time, on the part that is inside, there is a special groove, thanks to which the parts of the device are joined tightly and tightly. Outside there is a thread to connect to the pipeline, additional seals and a union nut that fixes the device in the desired position / location.
Downhole adapter inner and outer parts
As for the second part of the device, it is entirely located in the casing.It is, in fact, a “knee”, slightly modified and modernized, which is connected by leads to the first part of the device (there is a special spike that connects to the groove mentioned above; together it is a dovetail connection sealed with a rubber ring) and a hose connected to the pump.
The principle of operation of the adapter for the well
To facilitate installation, there is a blind thread on top of the inner part. A mounting pipe is twisted there, thanks to which the device is lowered. In the well, it is installed in the groove of the second part, then the mounting pipe is simply unscrewed and removed. It is easy to make such a tool with your own hands.
Here you can see a blind threaded hole for mounting the internal part of the adapter for the well
Table. The main materials from which a downhole adapter can be made.
| Title, photo | Short description |
|---|---|
| "Stainless steel" | Stainless steel devices are durable, weigh a lot and can last about 30-40 years. The price of such adapters corresponds to their quality. |
| Bronze | High quality bronze adapters are very expensive. But at the same time they serve for a long time - about 25 years. |
| DZR alloy | This brass-based material is good because it does not emit any harmful substances, which cannot be said about the next option. |
| Brass | Cheap brass adapters last no more than 8-10 years. During this time, they release zinc / copper oxides into the water, and therefore it is recommended to install an additional filter. |
Downhole adapters from DZR Downhole adapter
Advantages and disadvantages of using the device
A well without a caisson device, equipped with an adapter, has a number of undeniable advantages.
Among the main advantages of this type of arrangement, it is worth highlighting:
- Cost savings. The cost of the device is many times lower than the price of caisson equipment. And the cost of its installation and connection is minimal.
- Ease of installation and maintenance. The installation of the device does not imply complex stages of work using the same welding equipment. Even a master who knows only the basic skills of repair work can perform it.
- Versatility of application. The device is used for tapping water pipes into all types of casing pipes. Due to the fact that the links of the device are tightly adjacent to each other, maximum tightness of the structure is achieved.
The compact dimensions of the adapter allow it to be installed on the walls of the well so that it becomes almost invisible to outsiders. And this is especially true given that theft is not such a rare occurrence.
The adapter allows you to completely hide the point of connection of the hydraulic structure to the water supply under a layer of soil, without leaving the slightest hint of its presence.
True, a source equipped with an adapter also has a number of disadvantages.
These should include:
- The complexity of the repair. To perform repair operations or a routine inspection, you will first have to dig out the connection point of the adapter, which is not always possible.
- Power restrictions. Although manufacturers claim that the device can withstand large pressure drops, when arranging a well using an adapter, you still should not choose pumping units with high performance.
In comparison with the arrangement of the pit, the installation of the adapter loses in that the accumulator, cranes and the automation system will have to be taken out to a separate room.
In addition, if the elements are connected incorrectly during the operation of a hydraulic structure, it is rather problematic to control the backflow into the shaft of groundwater production.
Depressurization of elements can occur even if the connecting elements of the structure are made of unequal metals, which have different aging wear and react differently to temperature and moisture.
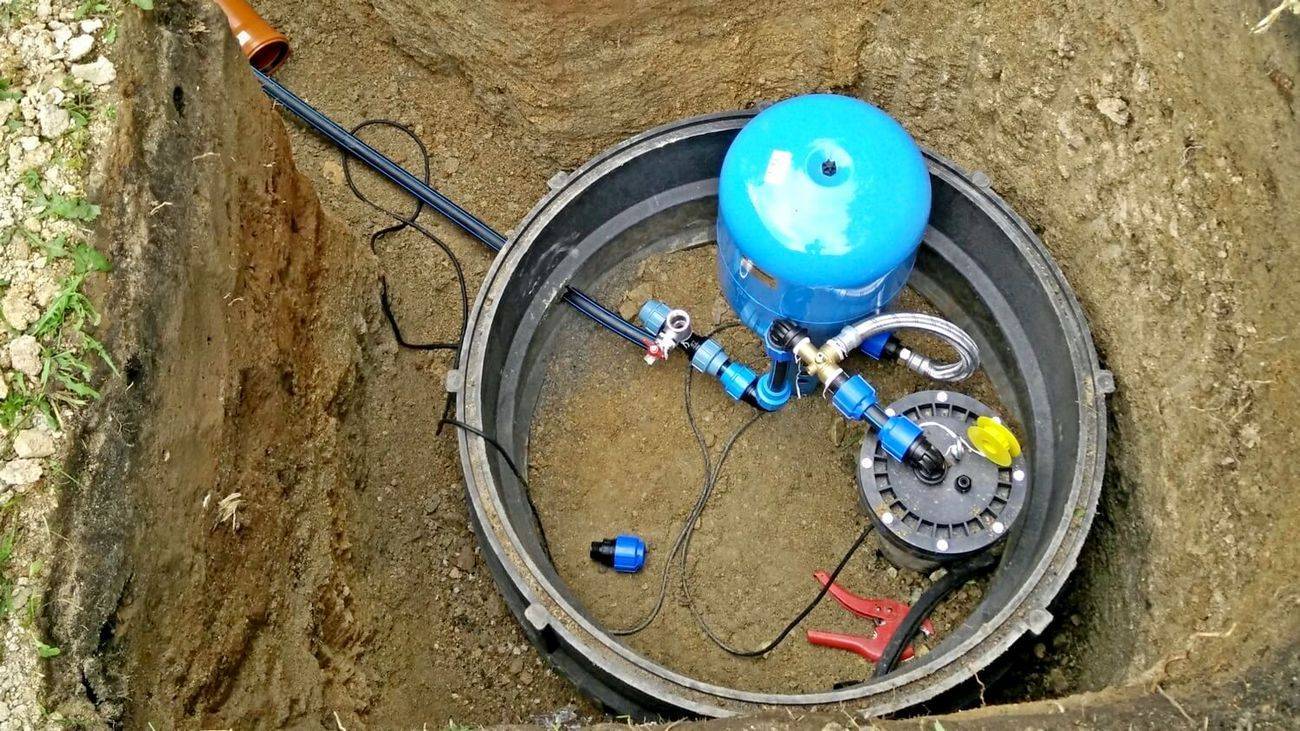
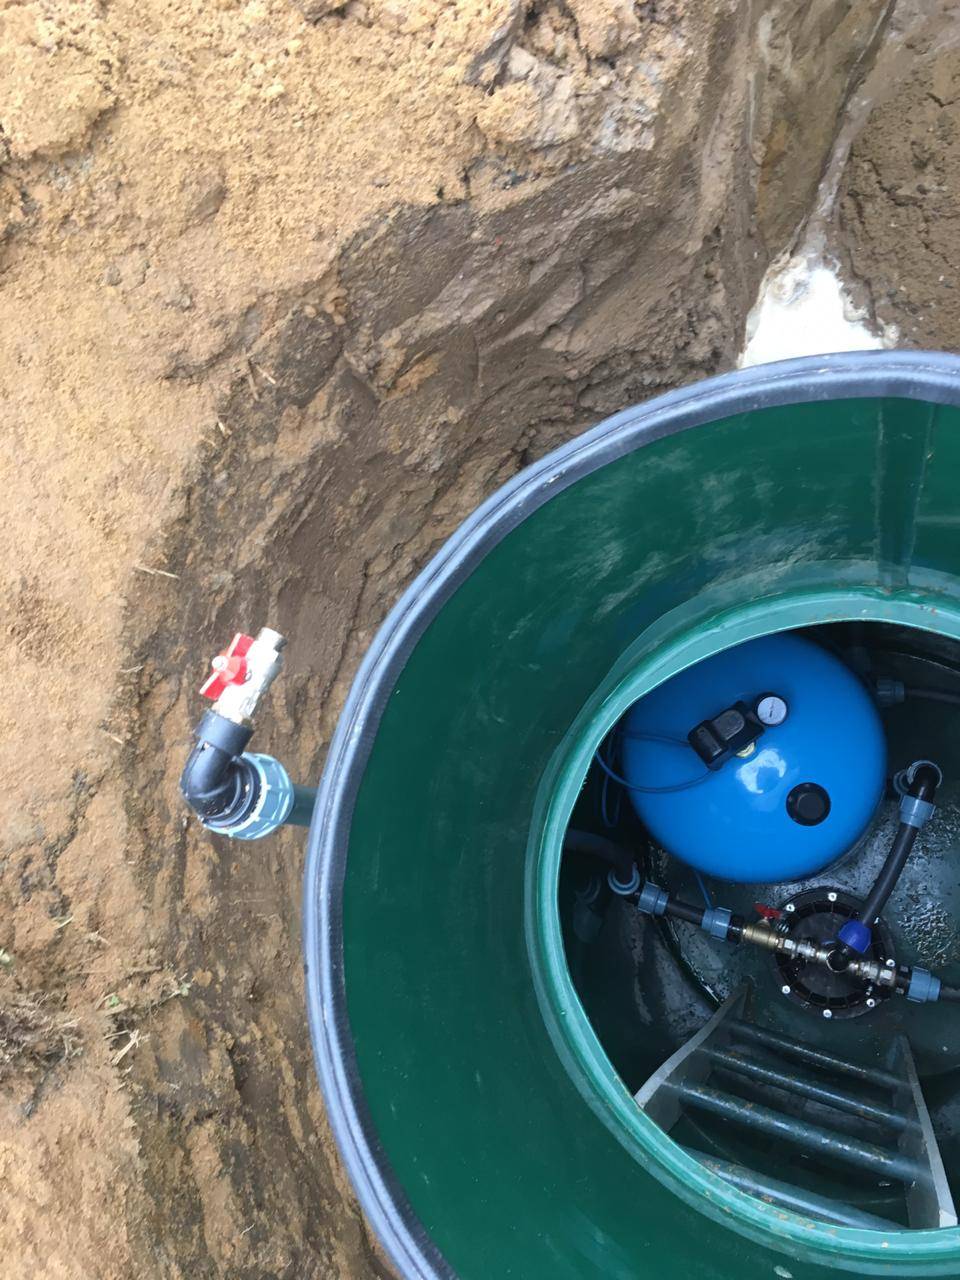
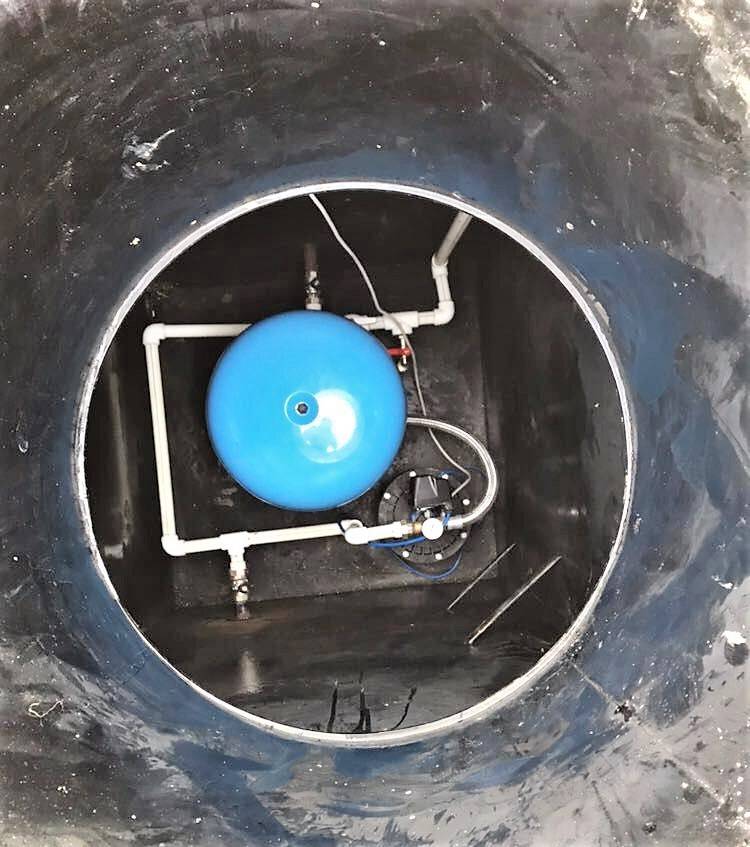
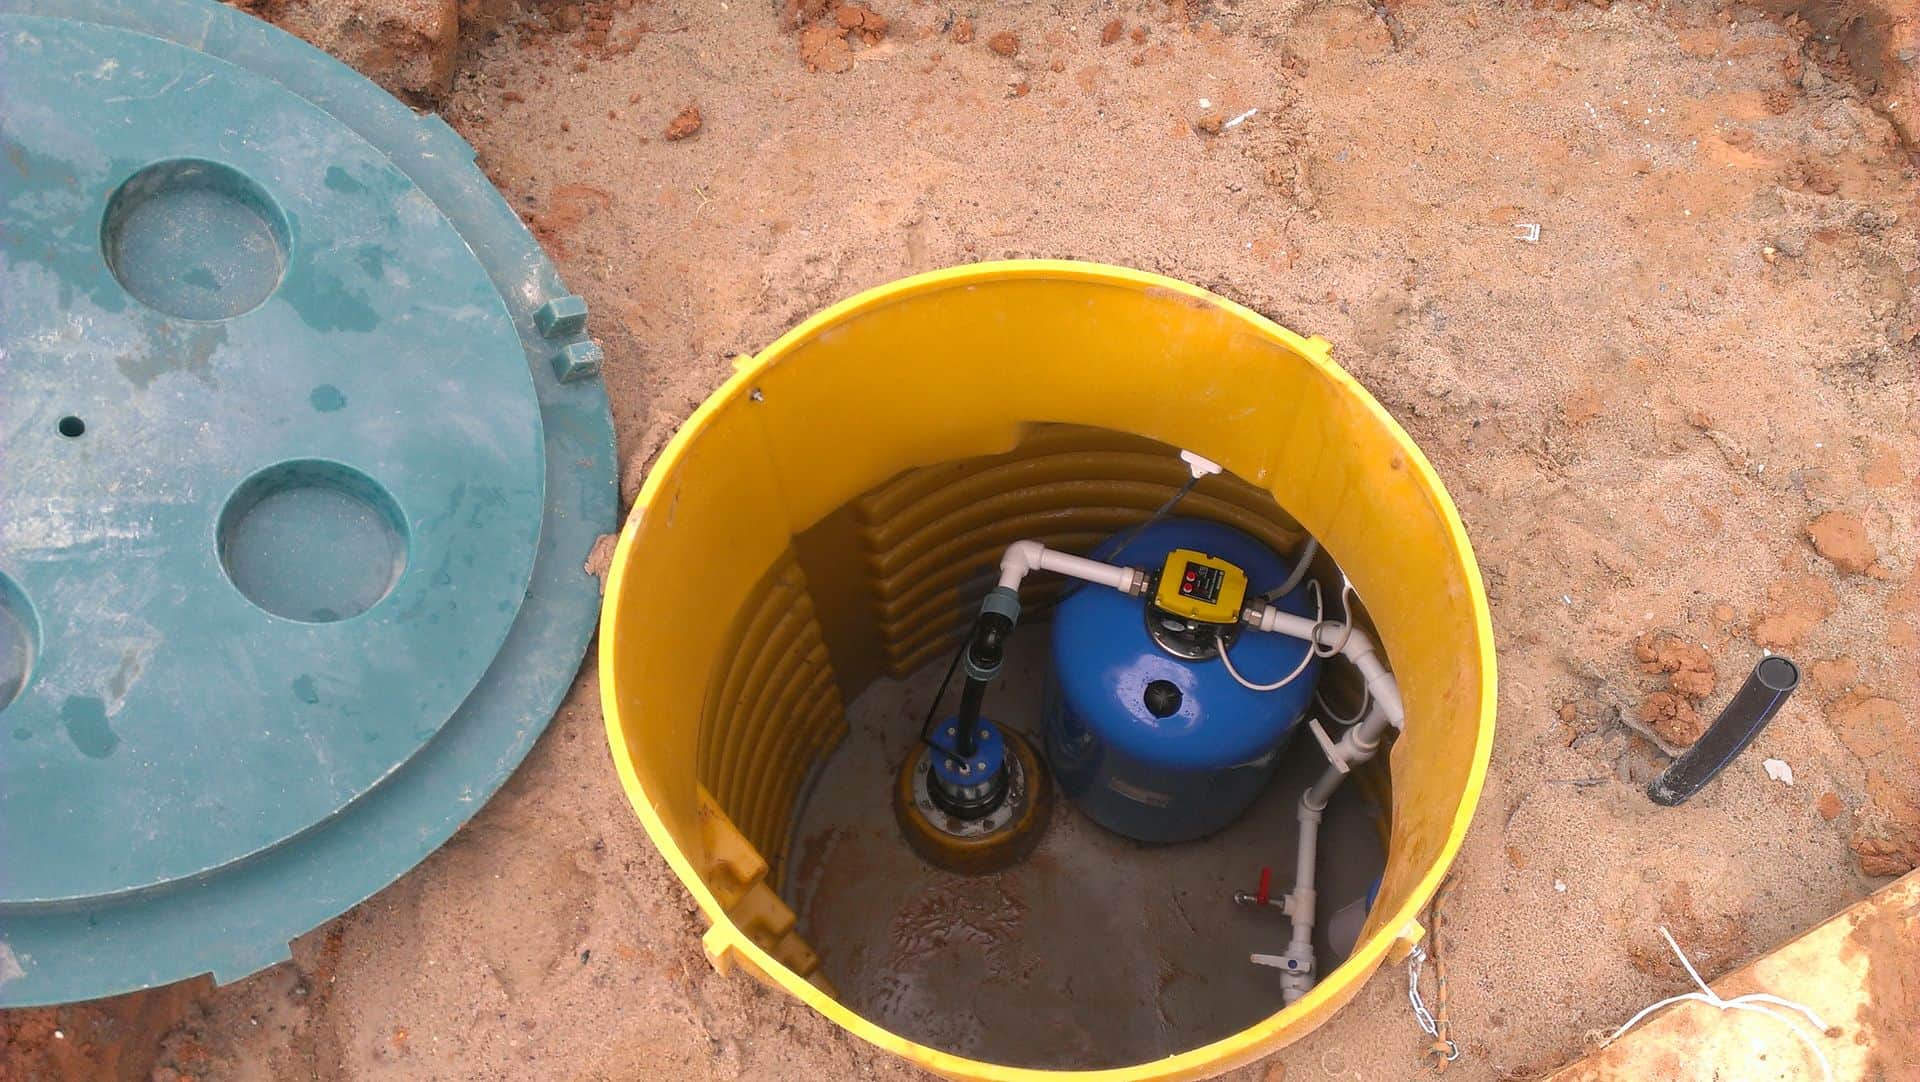
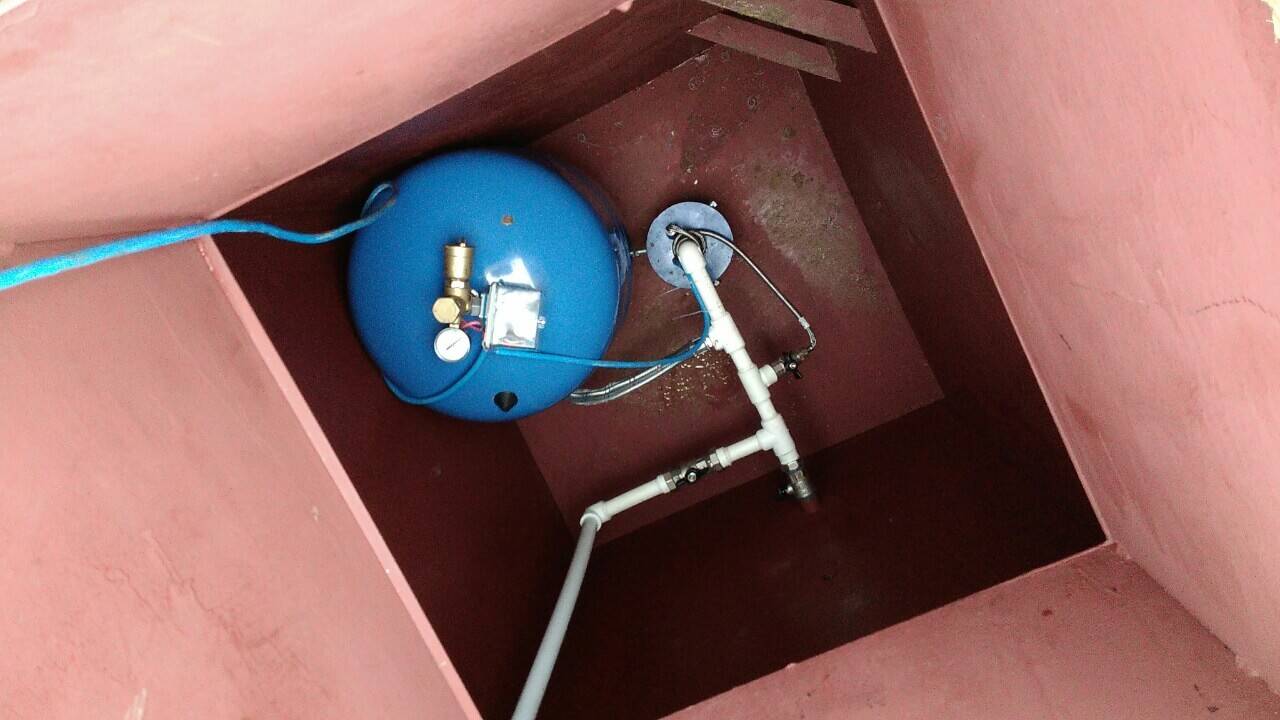
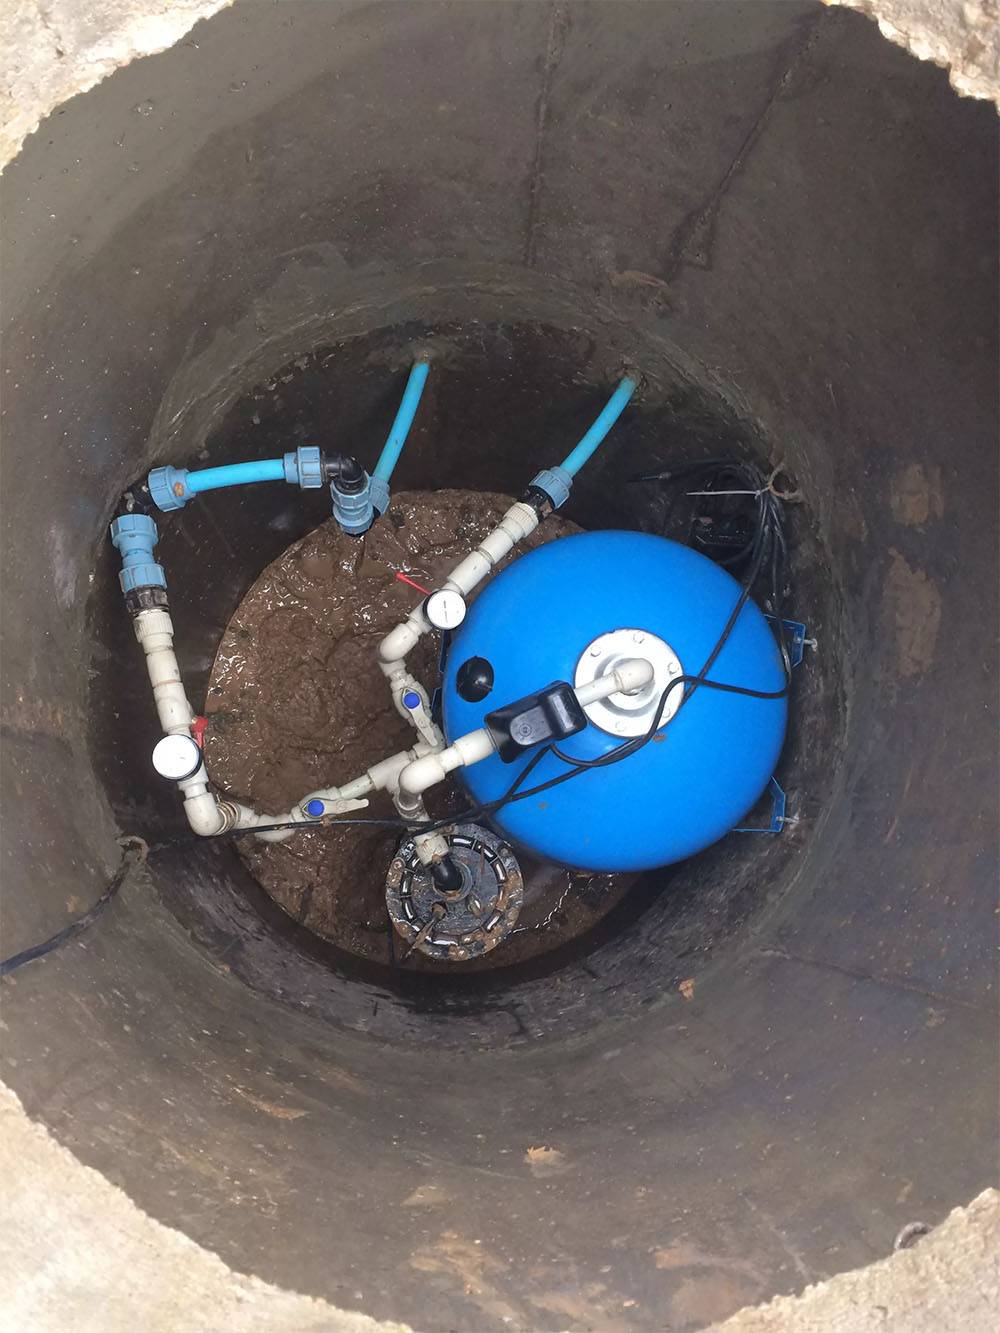
Correct installation of the accumulator in the caisson
To properly equip the accumulator, you must follow some rules. First you need to understand the device itself. It is a storage tank.


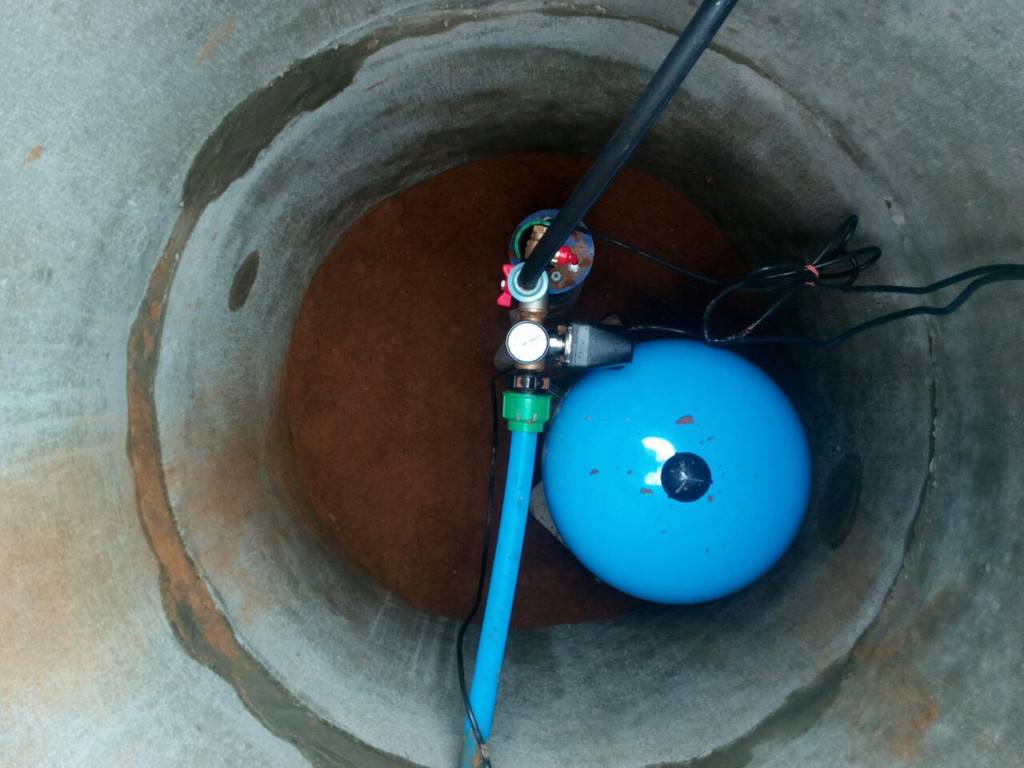


The principle of operation of the hydraulic accumulator:
- The pump pumps water into the tank until it is completely filled;
- From this container, the liquid is delivered outside;
- When there is very little water left in the device, the pump will start working again.
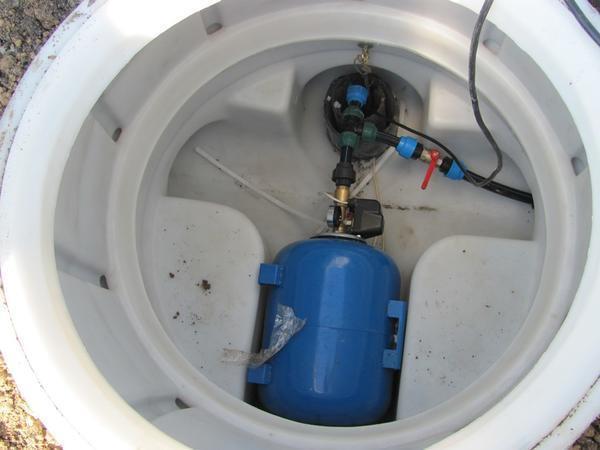
The minimum volume of the accumulator is 10 liters. The right choice largely depends on the needs of the owners in the water.
You can control the water supply system by turning the pump off and on. Also, the tank has protection against possible power surges. It is worth noting the “dry” running sensor, which works when the water level in the well drops.
How to make a caisson yourself
To do it yourself, first you need to decide on the material, system parameters.
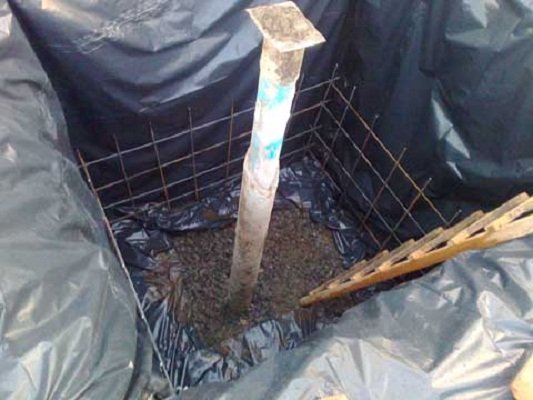
Monolithic concrete structure
A square shape is suitable for the device, it is also much easier to build formwork.
First you need to decide on the size of the pit, which is dug under the structure. The length and width are standardly equal, so they can be calculated as follows: measure the size of the caisson from the inside, add the thickness of 2 walls (10 cm).
It is also necessary to calculate the depth of the pit, which should be 300-400 cm more than the height of the chamber. If everything is calculated, then the drainage layer can be installed at the bottom of the pit.
If further concreting of the base of the structure is not planned, then the following procedure is chosen
But when it is necessary to fill the bottom with concrete, the height must be taken into account. In addition, the pit should be such that the surface of the cover of the structure is flush with the soil. In order to have more space for a person when repairing the system, it is best to place the camera not in the middle in relation to the casing, but on the side
And the equipment will be conveniently placed
In order to have more space for a person when repairing the system, it is best to place the camera not in the middle in relation to the casing, but on the side. And the equipment will be conveniently placed.
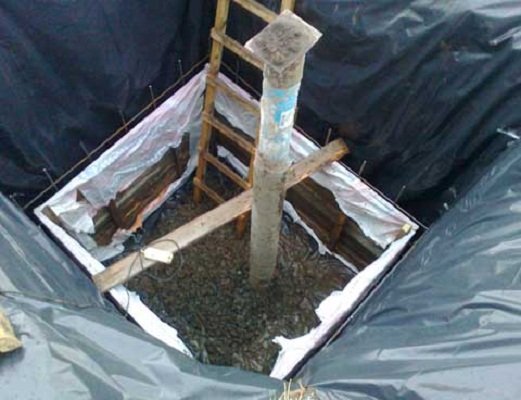
Construction of a monolithic concrete caisson.
The work is carried out as follows:
- Start by digging a hole. At this point, you can immediately dig a trench for water pipes to the house. Then they begin to install drainage, which consists of 2 layers: sand (up to 10 cm high) and crushed stone (up to 15 cm). With such drainage, even if water gets inside the caisson, it will not stay inside, but will quickly go into the soil.
- After you need to equip the formwork. Often the wall of the pit is used as the outer layer of the formwork.The side of the pit must be covered with polyethylene to avoid seepage of water from the concrete into the soil. After you need to make a frame using reinforcement.
- Mix concrete solution. Pour it in small parts, compacting well with an electric vibrator. If there is no device, then you can use a pin, a thin pipe and weld the handles. This device is quickly lowered into the concrete, and then slowly pulled out to get rid of air and water bubbles, thereby making the concrete denser.
- After that, it is necessary to dry the structures, regularly spraying the surface with water so that the concrete does not crack. If it's hot, you can cover it with a damp cloth.
- After a week, the formwork can be removed. And in 4 weeks to install the equipment.
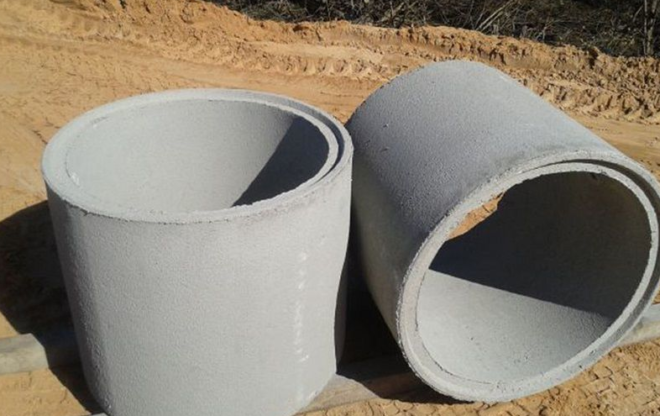
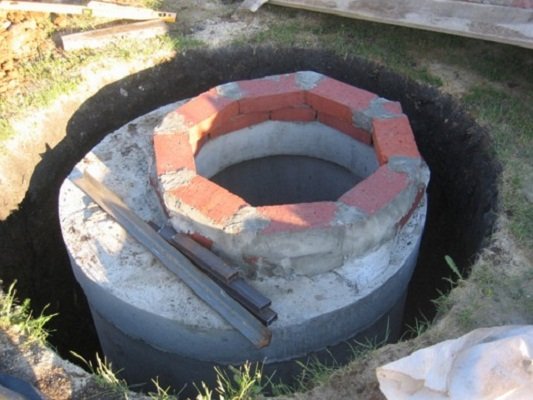
Caisson from concrete rings
The borehole system of concrete rings provides for the following:
- First, the pit is prepared. The calculations are the same as in the previous manufacturing method.
- Fill the bottom with concrete and drill a hole for the pipe.
- They take concrete rings, which are pre-coated with a special waterproofing compound. Let dry.
- After each ring is lowered into the pit, while connecting the joints with a mixture for bonding. The seams are foamy.
- There may be voids around the structure that need to be filled.
From concrete rings, a caisson for a well.
Budget camera made of bricks
Brick caisson device:
- First, a foundation pit is dug out, a strip foundation and a trench are installed at the bottom, which are covered with sand and rammed.
- It is necessary to lay waterproofing on the foundation (for example, roofing material).
- Brick laying starts from the corner, be sure to fill the seams with a special solution.
- After bringing the masonry to the desired height, let it dry, plaster.
Sealed metal container
The process is like this:
- Dig a hole again, suitable for the size and shape of the chamber.
- A hole for the casing pipe is cut out at the bottom.
- Install the cover, clean the seams of slag. The seams must be double-sided to ensure the tightness of the caisson.
- The structure must be treated with a protective layer.
If necessary, the chamber can be insulated, after which the caisson can be lowered into the pit and a column, sleeves, and cable can be installed. The sleeve is welded, everyone falls asleep.


Organization of a well without a caisson
Arrangement of a well without a caisson is possible in the case when the structure is not used all year round, but seasonally - in summer, spring or autumn. Also, the absence of a caisson is justified if there are separate buildings on the site, in which the equipment necessary for the functioning of the hydraulic structure can be installed.
Do-it-yourself well construction without a caisson with a pit is the most practical and affordable option. In this case, the pit provides reliable casing protection wells from the negative impact of the environment.
For the construction of the pit, concrete rings with a locking system are used, formwork is carried out, concrete mixture is poured and brick walls are erected.
Considering questions about how to equip a well in a country house and how to ennoble it before the start of operation, you need to correctly assess your financial and technical capabilities.
The process of arranging a hydraulic structure is complex and time-consuming, it requires practical skills and knowledge. With the right approach and preparation, any owner of the site can implement such a project.
Construction and arrangement of concrete structures
If you want to build a concrete caisson, then you can do it in two ways:
- from monolithic reinforced concrete;
- using reinforced concrete rings with a diameter of 1 or 1.5 m.
In the first case, you can do it only on your own, while the use of concrete rings will require additional labor and the involvement of lifting equipment.
Caisson from precast concrete elements
Just as in the case of a brick caisson, before the start of construction, the need for concreting the floor is determined, depending on the level of groundwater. The size of the caisson is chosen based on whether it will accommodate a hydraulic accumulator and other devices. If the pit is a simple protective structure for the well, then its dimensions should be about 1 × 1 m. If it is necessary to place pumping equipment, the caisson is made with dimensions of at least 1.5 × 1.5 m.
Required materials and tools
For the construction of a concrete pit, you will need the following materials:
- cement grade not lower than M-400;
- crushed stone fraction 20 - 30 mm;
- sifted river sand;
- boards and timber for formwork;
- reinforcing mesh;
- waterproofing;
- Luke;
- a piece of pipe for the manufacture of canisters.
Every home craftsman will have the tool that will be needed for work. You may need to borrow or rent something. The list of the main tool looks like this:
- concrete mixer;
- welding machine;
- Bulgarian;
- perforator;
- shovel and bayonet shovel;
- tamper;
- buckets;
- roulette;
- building level;
- hammer, nails.
The construction of a monolithic concrete pit includes several stages, so you can use our instructions during the work.
Preparatory work
Before proceeding with the construction of a concrete caisson, they determine the place of future construction, free it from debris and make markings. After that, manually or with the involvement of construction equipment, they dig a hole around the well casing. The depth of the pit is made at least 2 m, and when calculating its dimensions, they are guided by the dimensions of the caisson and the thickness of the walls of the structure. By the way, given the formwork width of 15 - 20 cm, the dimensions of the pit should be 30 - 40 cm larger than the pit section.
To prevent soil from shedding from the walls of the pit, they are covered with geotextiles or other dense waterproofing. It will also prevent leakage of lime milk during concreting. If concrete work at the bottom of the caisson is not expected, then the floor is covered with a layer of sand and gravel up to 15 cm thick, after which these materials are tamped with a hand tool.
Instructions for the progress of work
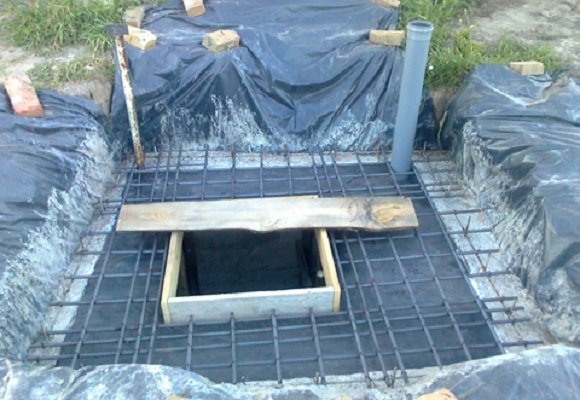
- At a distance of 70 - 80 mm from the side walls of the pit, a reinforcement belt is installed. If the pouring is carried out in one stage, then the reinforcing mesh is mounted to the entire height of the caisson. If it is not possible to immediately pour the structure with concrete, then the reinforcement is installed to a certain level in increments of 30 × 30 cm.
Installation of geotextiles and armored belts on the lower tier of the caisson
Sliding formwork installation
The construction of the next tier is started after the concrete gives a fight

Hole in the wall of the caisson for water pipes
Arrangement of the ceiling lathing
Lathing waterproofing and reinforcement installation
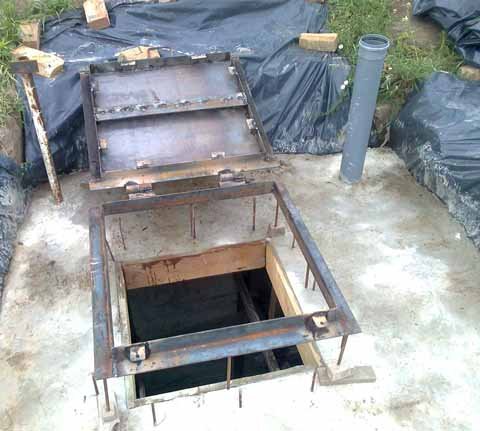
Installation of a metal frame with a hatch
Concrete-filled neck of the caisson
After the insulation of the structure, you can proceed with the installation of equipment and the operation of the structure.
Choosing a plastic caisson for a well
When determining the design of the shelter for the well, the volume of the pressure tank and the area of pumping equipment should be taken into account. These indicators determine at what distance from the walls of the body the hole for the casing should be placed. Based on this, you can calculate: what distance still needs to be added for the convenience of servicing the installed equipment.


The main criteria for choosing a plastic caisson:
- Conditional mark of the depth of soil freezing in the construction region, on the indicators of which the height of the structure depends, since the bottom of the tank should be located below the designated level.
- The temperature regime of the region, the indicators of which affect the presence of insulation in the lid and the upper part of the case.
- The height of the horizon of the underground source. If groundwater is present at the camera installation site, then it is better to choose a shelter with additional stiffeners, anchor loops and a loading skirt.
- The purpose of the caisson and the amount of equipment to be placed.
- Safety, durability, ease of use.
Small containers from 0.7 to 1.0 m are suitable for summer cottages and serve exclusively for installing a pump. Reservoirs with a size of 1.0-2.5 m are designed to accommodate pumping stations, control automation, storage tanks on their area.
The device and principle of operation of the adapter
The second inexpensive way to equip a well involves the use of a special device - an adapter. In this case, the output of water pipes is carried out through the casing pipe.
This method of arrangement is also excellent for irregular use of the well, which involves the “freezing” of the structure for several months, and for continuous year-round water intake.
The adapter is installed on all types of casing pipes made of polymer or steel alloy. The pipes must have sufficient strength, since they are designed to withstand the weight of the submersible pump and the communications connected to it.
The adapter is a device consisting of two body parts fastened together with a quick-release threadless connection. The main task that is solved by installing this device is to protect the external branch of the water supply system from freezing. Thanks to its use, the pipeline from the well can be laid below the horizon of seasonal soil freezing.
The main elements of the adapter are:
- Permanently fixed element. It is a threaded pipe. It is fixed on the casing below the freezing level through a specially made hole. Forms a sealed unit for the outlet of the pipeline that brings water to the house.
- Reciprocal removable element. Outwardly, it resembles a tee with one blank wall. On one side, it is mounted on the intake pipe leading to the deep pump. The second is connected to the stationary element of the adapter. It is equipped with a connecting technical thread necessary for hermetic joining of both parts of the adapter.
In the process of pumping out of the well, water first rises up the column, then moves to the adapter, through which it is redirected and enters the pipeline leading to the house. With a partial separation of the elements, the water simply begins to drain into the well.
Borehole adapters are made of bronze, brass, stainless steel. A wide range of products on the market are made of combined metal alloys.


