- 4 Manufacture of the shaft unit - procedure
- Common problems and solutions
- Types of boilers
- Assembly process
- Air supply device
- Housing (furnace)
- Chimney
- We connect the case and the air supply device
- Heat dissipating disc
- convection hood
- Lid
- legs
- Types of heating boilers
- Electrical
- Gas
- Oil boilers
- Solid fuel
- Cutting parts and installing the boiler
- Making a cauldron from a pipe
- Execution of the electrical model
- 7 Simple CDG options - low cost designs
- Useful tips for making a TT boiler
- Conventional wood burning boiler
- First step
- Third step
- Fourth step
- Fifth step
- sixth step
- seventh step
- eighth step
- Ninth step
- tenth step
- Eleventh step
- How to do it yourself?
- The best solid fuel boilers for long burning
- Zota Carbon
- Candle
- Stropuva S
- How to weld a heating boiler with your own hands
- heat exchanger
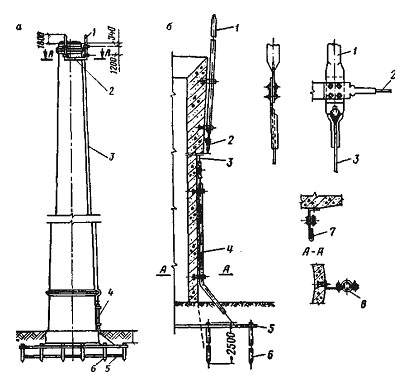
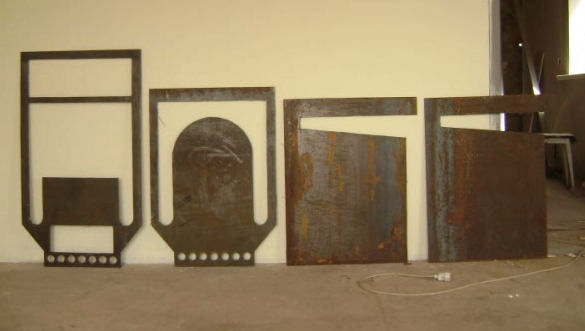
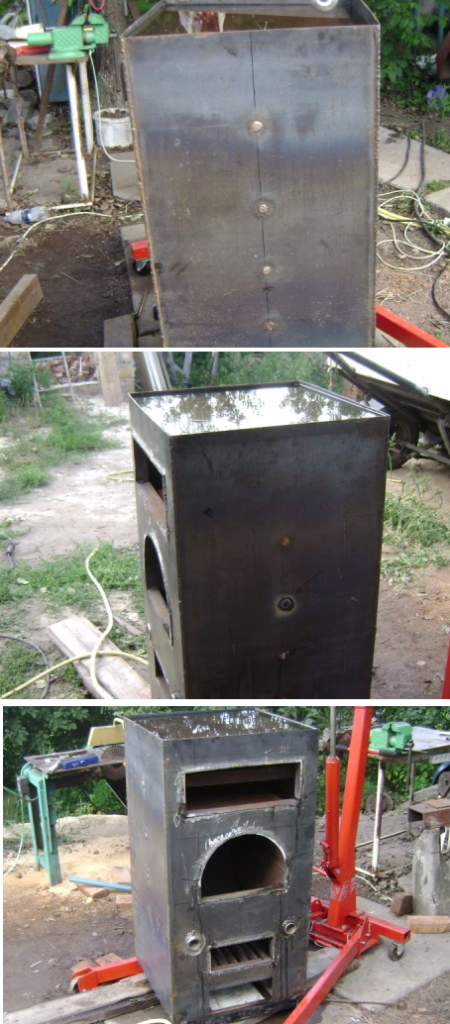
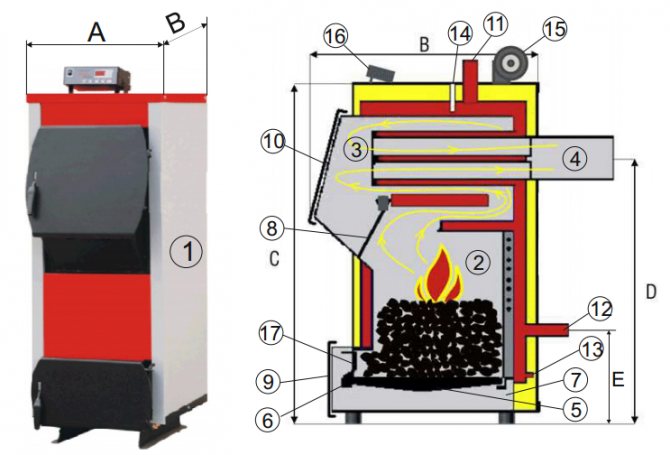
4 Manufacture of the shaft unit - procedure
The first stage of work is the assembly of the KDG case from blanks 4 mm thick. First, side walls, door openings and a vault cover are welded to the bottom of the homemade structure. Corners are mounted inside the resulting firebox. Grates are installed on them. The finished structure is welded through all available seams. It must be sealed.
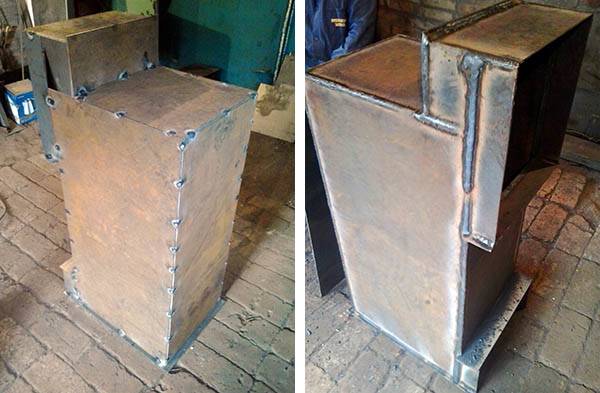
The second stage is the installation of a water circuit (it moves away from the body by 2 cm), assembled from 3 mm blanks, and welding pieces of steel strips to the side walls. The latter are necessary for attaching sheathing sheets to them.
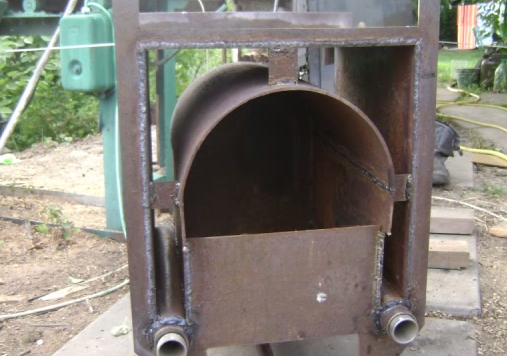
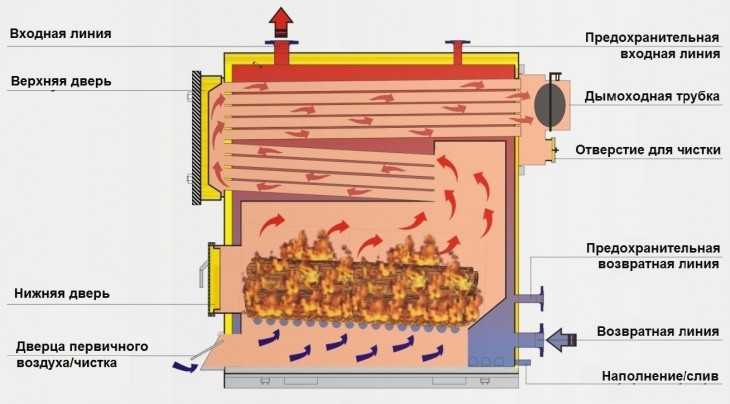
Important! The shirt does not cover the ash chamber. It starts at the level of the grates. The third step is the installation of flame pipes in the boiler tank (in the upper part)
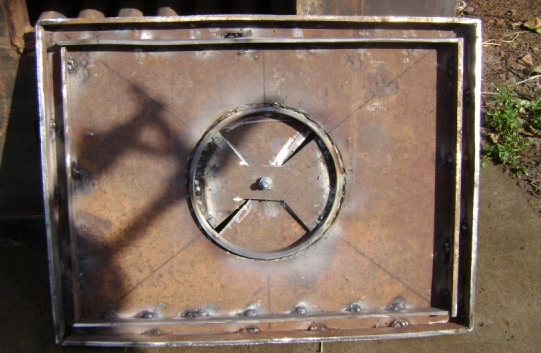
They are mounted in openings that need to be made in the front and rear walls. The ends of tubular products are hermetically welded. Then grates are made from the corners in the form of a lattice and a door. Two rows of a steel strip are attached to the latter from the inside, between which a seal of the porch is placed - an asbestos cord. The grates additionally perform the function of a diffuser of air directed to the ash pan by a fan
The third step is the installation of flame tubes in the boiler tank (in the upper part). They are mounted in openings that need to be made in the front and rear walls. The ends of tubular products are hermetically welded. Then grates are made from the corners in the form of a lattice and a door. Two rows of a steel strip are attached to the latter from the inside, between which a seal of the porch is placed - an asbestos cord. The grates additionally perform the function of a diffuser of air directed to the ash pan by a fan.
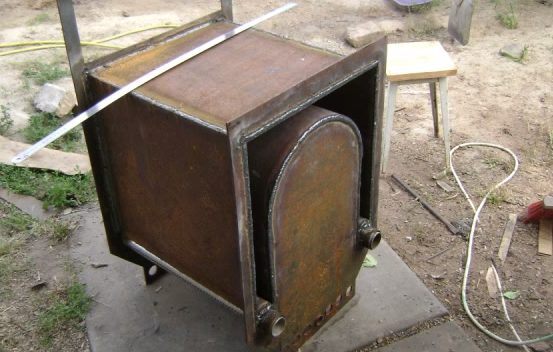
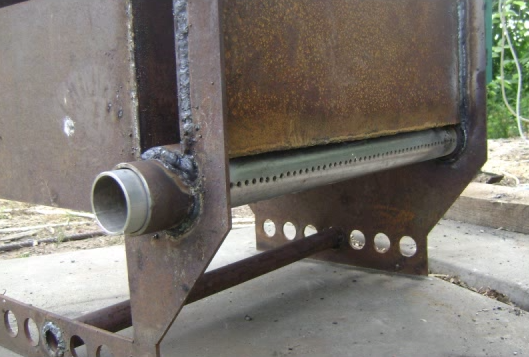
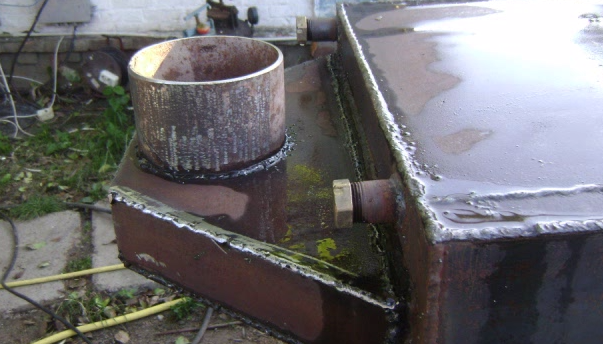
Special devices - fittings - cut into the walls of the tank. They make it possible to connect the return and supply pipelines. An air duct is installed (a flange is immediately mounted on it to fix the fan) and a branch pipe of the smoke duct. The air duct is introduced into the ash compartment from behind (approximately in the middle).
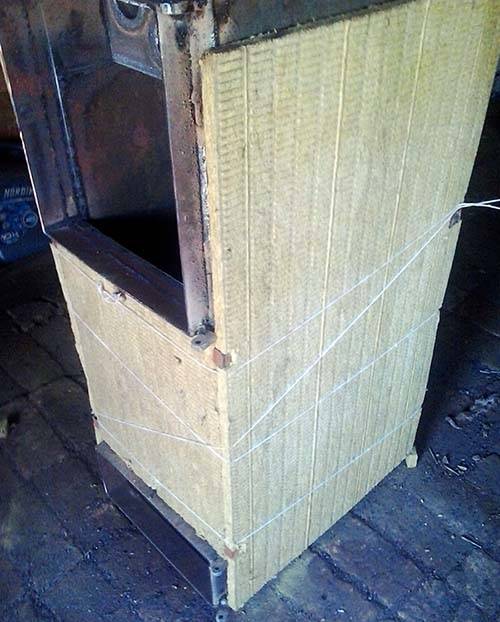
Embedded elements are welded to the body for installing the KDG cladding and door hinges. The home-made unit is finished on top and on all sides with a heater. Its fastening is carried out by a cord. Metal sheets are screwed to the heat insulator with self-tapping screws and doors are installed.
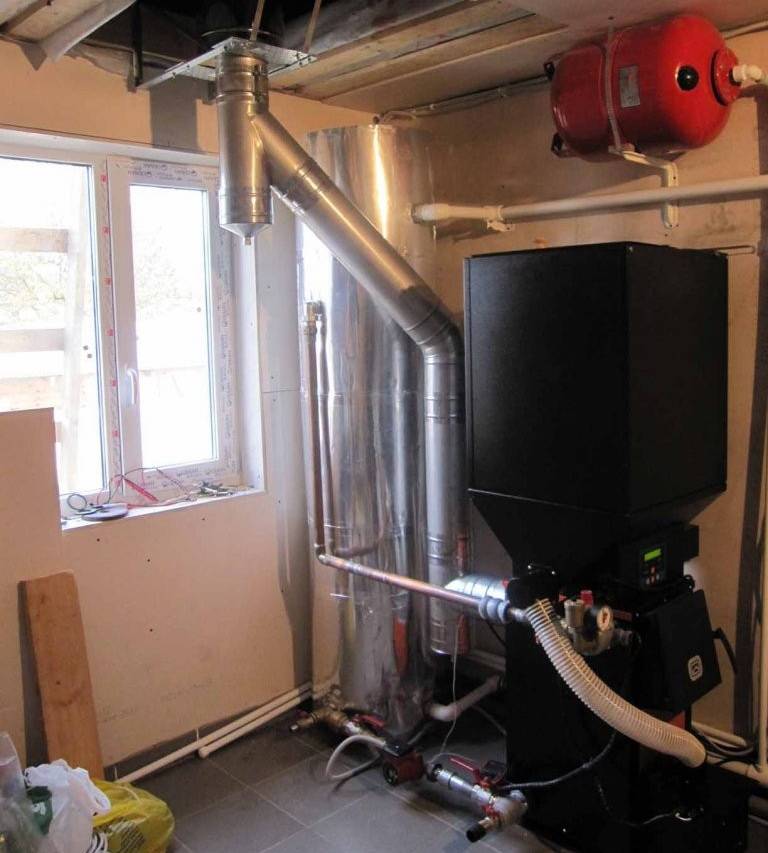
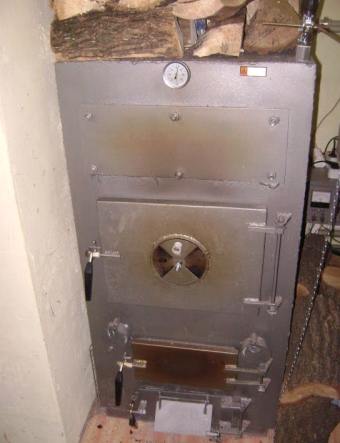
The final work is the connection of the control module on top of the boiler, the installation of a fan on the flange of the air pipe, a temperature sensor under the insulation on the back wall. The continuous burner is ready for use.
Common problems and solutions
Malfunctions in the operation of the boiler often occur due to violations made during:
- choice of chimney;
- welding of "shirt" pipes;
- threaded connection;
- calculation of the slope of the heat exchanger.
If smoke appears after loading the raw materials into the boiler, then the problem lies in the draft. It also prevents the normal combustion of fuel in the boiler.
Attention! Before construction, it is necessary to consult an engineer to calculate the height and diameter of the structure. With the formation of tarry secretions in the boiler, it is recommended: With the formation of tarry secretions in the boiler, it is recommended:
With the formation of tarry secretions in the boiler, it is recommended:
- increase the operating temperature to 75 degrees or more;
- clean the inner walls of the chamber;
- maintain the return water temperature at a level of 55 degrees or more with a 3-way valve.
Damp or low-calorie firewood often interferes with uniform combustion and heating of the room.
Types of boilers
If it is easy to decide on the choice of water heating in the house due to the practical absence of competitors, then choosing a boiler is not so easy. There are several types of such units. Here are the main ones:
- Solid fuel boilers.The most common and sought after. Works on any solid fuel. They have a high efficiency. Reliable and relatively safe. The disadvantages include labor-intensive maintenance of the apparatus and environmental unreliability.
- Gas boilers. Not inferior in popularity to the previous ones, and in some regions far superior to them. Very effective, environmentally friendly, do not require much attention to care. The disadvantages include high fuel consumption and its cost.
- Electric heating boilers. Also very convenient boilers to maintain and operate. The most environmentally friendly, since there is no combustion - no harmful emissions. However, paying for such heating can become an unbearable burden for the family. Electricity consumption is very high, so few people decide to install such a boiler in their home.
In this video, we will consider the heating of the house:
In addition to the main fuel, the design of equipment of this type is strongly influenced by the way the water circulates. It can be of two types:
- Natural. In this case, the heating system is made in such a way that the water filling the system, due to heating in the boiler, circulates independently through pipes and radiators, and when it cools down, it returns to the boiler again.
- Forced. The supply of cooled water to the boiler is carried out using a special pump.
Assembly process
The process of creating a boiler includes several stages. In the manufacture of each element, it is worth considering the special operating conditions of the manufactured product.
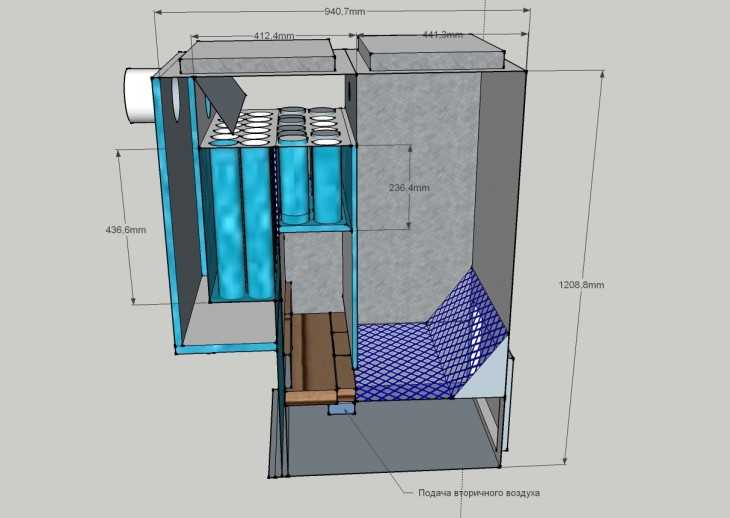
Air supply device
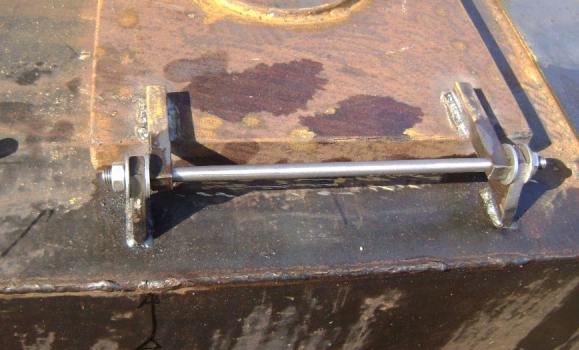
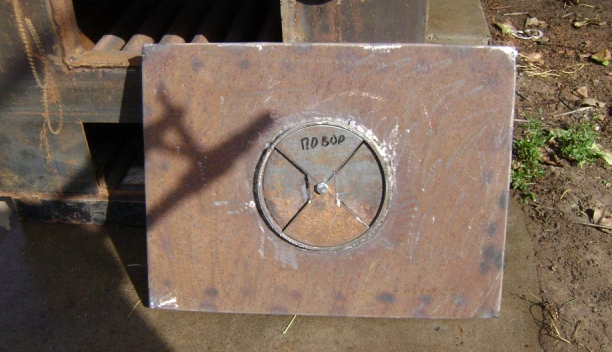
We cut off a segment from a thick-walled pipe with a diameter of 100 mm, the length of which will be equal to the height of the furnace. Weld a bolt to the bottom. From the steel sheet we cut out a circle of the same diameter as the pipe or larger.We drill a hole in the circle, sufficient for the passage of a bolt welded to the pipe. We connect the circle and the air pipe by screwing the nut onto the bolt.
As a result, we will get an air supply pipe, the lower part of which can be closed with a freely moving metal circle. During operation, this will allow you to regulate the intensity of burning firewood and, consequently, the temperature in the room.
Using a grinder and a metal disc, we make vertical cuts in the pipe with a thickness of approximately 10 mm. Through them, air will flow into the combustion chamber.
Housing (furnace)
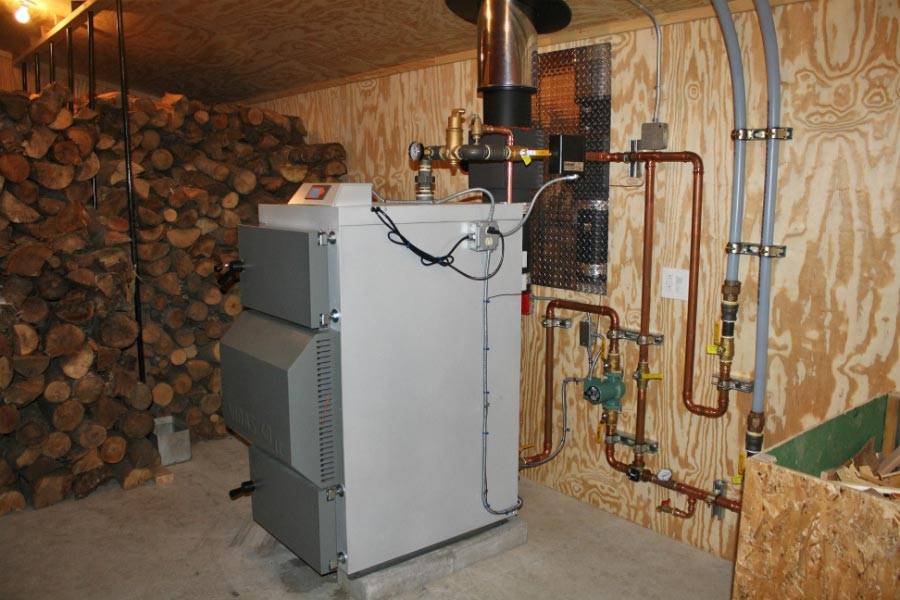
The case requires a cylinder with a sealed bottom with a diameter of 400 mm and a length of 1000 mm. The dimensions may be different, depending on the available free space, but sufficient for laying firewood. You can use a ready-made barrel or weld the bottom to a steel thick-walled cylinder.


Sometimes heating boilers are made from gas cylinders for a longer service life.
Chimney
In the upper part of the body we form a hole for the removal of gases. Its diameter must be at least 100 mm. We weld a pipe to the hole through which exhaust gases will be removed.
The length of the pipe is selected depending on the design considerations.
We connect the case and the air supply device
In the bottom of the case, we cut a hole with a diameter equal to the diameter of the air supply pipe. We insert the pipe into the body so that the blower goes beyond the bottom.
Heat dissipating disc
From a metal sheet with a thickness of 10 mm, we cut out a circle, the size of which is slightly smaller than the diameter of the case. We weld to it a handle made of reinforcement or steel wire.
This will greatly simplify the subsequent operation of the boiler.
convection hood
We make a cylinder from sheet steel or cut off a piece of pipe, the diameter of which is several centimeters larger than the outer diameter of the furnace (body). You can use a pipe with a diameter of 500 mm. We connect together the convection casing and the firebox.
This can be done using metal jumpers welded to the inner surface of the casing and the outer surface of the furnace, if the gap is large enough. With a smaller gap, you can weld the casing to the furnace around the entire perimeter.
Lid
From a steel sheet we cut out a circle of the same diameter as the firebox or a little more. We weld handles to it using electrodes, wire or other improvised means.
Considering that during the operation of the boiler, the handles can become very hot, it is worthwhile to provide special protection from a material with low thermal conductivity.
legs
To ensure long burning, we weld the legs to the bottom. Their height must be sufficient to raise the wood-burning boiler at least 25 cm above the floor. To do this, you can use a different rental (channel, corner).
Congratulations, you have made a wood-burning boiler with your own hands. You can start heating your home. To do this, it is enough to load firewood and set it on fire by opening the lid and the heat-dissipating disk.
Types of heating boilers
First of all, you need to decide which boiler is needed for your home. This will depend on the fuel that will be used for kindling. Hence the classification:
- gas;
- electrical;
- solid fuel;
- liquid fuel.
Electrical
Any of these boilers can be made by hand. The simplest of them is electric.In fact, this is a tank in which the heating element is mounted. From the tank there are still two branch pipes connected to the supply and return circuits. There is no chimney, no combustion chamber, everything is simple.
Electric boilers are good for everyone, but they have two drawbacks. First, electricity is the most expensive fuel. Second: when the voltage drops in the network (and this happens with enviable constancy), the boiler stops working correctly. Its power decreases, the coolant temperature drops.
Gas
The rest of the designs are more complex. And they are almost identical to each other with some differences. As for the gas boiler, you will need permission from the gas service to install it.
Representatives of this organization may not accept such a heating unit for installation. First of all, they will require it to be pressure tested in their laboratory.
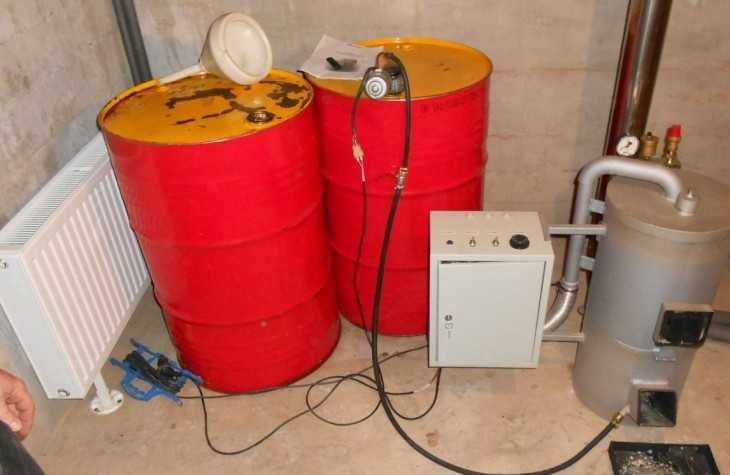
Oil boilers
The operation of this option is associated with great difficulties. First, you will have to build a separate warehouse near the house where the fuel will be stored. Everything in it must comply with fire safety requirements.
Secondly, a pipeline will have to be pulled from the warehouse to the boiler room. It must be insulated. Thirdly, a special burner is installed in this type of boiler, which must be adjusted. This is not so easy to do in terms of setup.
Solid fuel
It is this type of boilers that today is most often made by home craftsmen with their own hands. For small cottages and cottages, this is the best option. Moreover, firewood is by far the cheapest type of fuel.
We will talk about how to make a solid fuel boiler for heating a house below.
Cutting parts and installing the boiler
Before starting the assembly of home-made wood-burning boilers, you will need to complete a drawing, taking into account the features of the heating system for a private house. Products have the form of 2 compartments, located "matryoshka". The outer box is a combustion chamber, the inner box is a reservoir for heating water. The elements do not communicate with each other.
Part preparation is done like this:
- The walls of the unit are cut out of a sheet of metal.
- Partitions for the stove are made of metal with a thickness of 10-12 mm.
- A hole for a chimney with a diameter of 10 cm is made on the top part.
- The sides are welded to the bottom, and then - on the vertical parts, metal strips 3 cm wide under the grate.
- Support strips for partitions are attached to the side parts.
- They are made and installed on the hinges of the door, doors for the firebox and ash pan are cut out.
- Partitions are attached in the form of a labyrinth - they will increase the heating efficiency by creating an air barrier.
- A sleeve 20 cm high under the chimney is welded onto the cover with a hole.
- The cover is welded to the body, the chimney is mounted.
Making a cauldron from a pipe
The boiler on wood or coal is made of a pipe and has a U-shape. On the top there is a fitting, on the bottom there is a return line. The unit is easy to make if you follow the step-by-step recommendations:
- Selection of tools and materials. You will need several metal pipes with a diameter of 1.5-2 inches, as well as a welding inverter, a grinder with a nozzle for cutting metal, a tape measure, a hammer.
- Cutting a metal pipe to size.
- Welding the edges of the lower part in the form of the letter P.
- Burning holes for vertical posts.
- Arrangement of vertical elements from corners or pipes of smaller diameter.
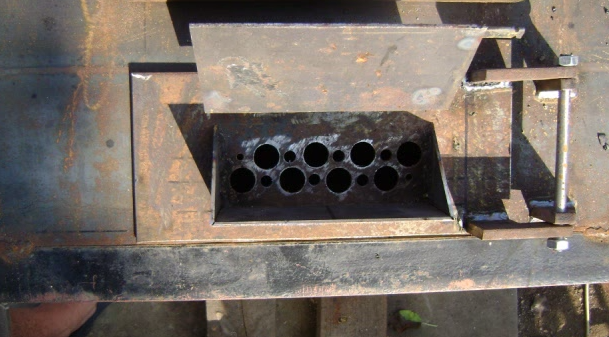
- Production of the upper part from a pipe of the same diameter and holes for vertical parts.
- Welding the fitting on the supply pipe and air blower.
- Execution of the firebox and blower. Rectangular holes 20x10 cm are cut out in the pipe for the firebox and 20x3 cm for the blower.
Execution of the electrical model
A do-it-yourself electric boiler for heating a house is made using the following materials and tools:
- angle grinders or grinders;
- welding inverter machine;
- multimeter;
- sheet steel with a thickness of 2 mm;
- adapters for connecting to the system;
- Heating elements - heaters can be bought or assembled independently;
- steel pipe 159 mm in diameter and 50-60 cm long.
The algorithm for creating an electric type unit consists of the following steps:
- Execution of branch pipes for connecting to a system of pipes. You will need 3 elements 3, 2 and 1.5 inches in diameter.
- Making a container for a tank from a pipe. Markup is made, a hole is cut through it and the seams are processed.
- Welding pipes to holes.
- Cutting out two circles from a pipe of a larger diameter for the heating compartment.
- Welded to the top of a 1.25" diameter spigot.
- Making space for the heater. Two holes are made in the bottom.
- Connecting the boiler with pipes to the system.
- Installation of a low-power heating element with a thermostat on the upper branch pipe.
7 Simple CDG options - low cost designs
If a wood-burning boiler is planned to be installed in a country house in which no one permanently lives, or in a household building, it is recommended to make it from improvised materials. To do this, many people use a piece of iron thick-walled pipe with a section of 30 and a length of 85–90 cm. It plays the role of a body.


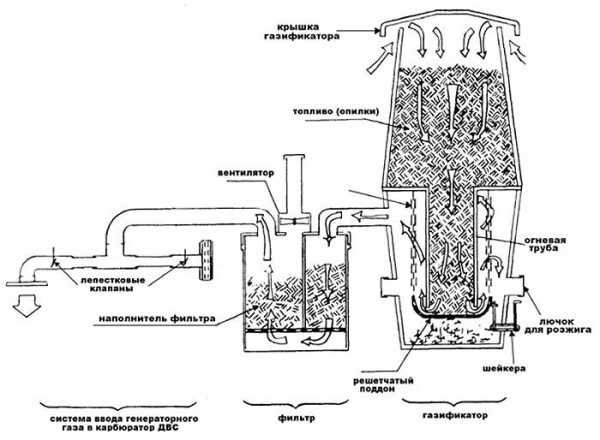
In the upper part of such a boiler, a chimney is mounted to remove carbon monoxide. Its diameter is 10–12 cm. It is welded to the body. A door is made from below, grates are placed.
A small-diameter pipeline is mounted (at a slope) in the housing. It is connected to the heating system, through which hot water will move. The latter is used both directly for space heating and for domestic needs.
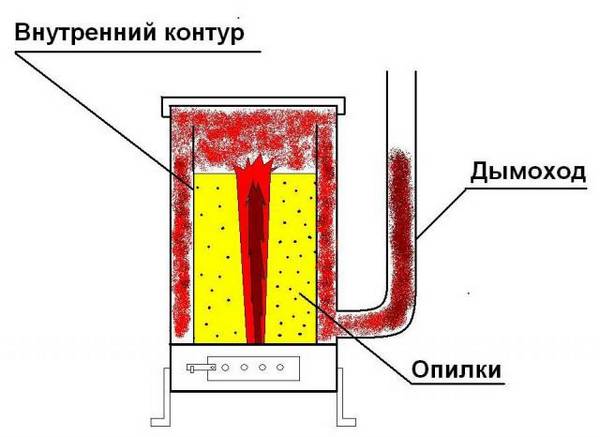
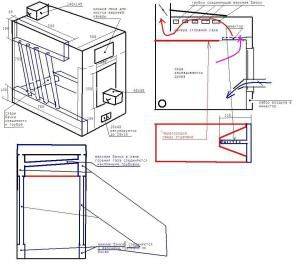
KDG is made from an old barrel (diagram with explanations below). Its upper rim should be cut, to make its high-quality alignment. Inside this container is placed a pre-cut reservoir with smaller dimensions.
The lid is made of refractory and durable metal. It must be completely sealed to the body. To release carbon monoxide, a hole with a cross section of 15 cm is made in the barrel. In addition, a second opening with a diameter of 10 cm is cut through. Air enters the fuel through it.
If desired, such a heating structure can be easily upgraded by equipping it with a load and a fan. Then, on one load of firewood, it can work up to 48-60 hours.
Useful tips for making a TT boiler
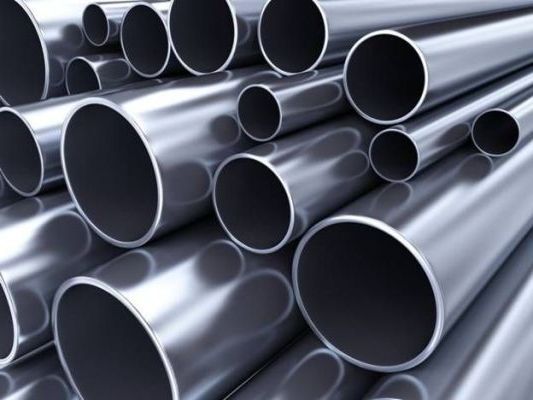
Alloy Steel Pipe for Boiler
You can significantly reduce the cost of building a unit if you take a seamless steel pipe of grade 20.
Before installing the boiler in the place determined for this unit, carry out the first kindling on the street, equipping the boiler with a temporary chimney. So you will be convinced of the reliability of the design and see if the case is assembled correctly.
If you use a gas cylinder as the main chamber, then keep in mind that such a unit will provide you with combustion for 10-12 hours due to the small amount of fuel being put in. So the small volume of the propane tank will decrease after cutting off the lid and ash pan. To increase the volume and ensure a longer burning time, two cylinders must be used. Then the volume of the combustion chamber will definitely be enough to heat a large room, and there will be no need to lay firewood every 4-5 hours.
In order for the ash pan door to close tightly, preventing air from entering, it must be well sealed. To do this, lay an asbestos cord around the perimeter of the door.
If you will make an additional door in the boiler, which allows you to “reload” the fuel without removing the cover, it must also be tightly sealed with an asbestos cord.
For the operation of a TT boiler, the diagram of which we attach below, any solid fuel is suitable:
- hard and brown coal;
- anthracite;
- firewood;
- wood pellets;
- briquettes;
- sawdust;
- shale with peat.
There are no special instructions for the quality of fuel - any will do. But keep in mind that with a high moisture content of the fuel, the boiler will not give a high efficiency.
Conventional wood burning boiler
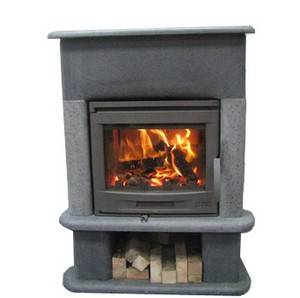
Conventional wood burning boiler
First step
Prepare the material for the manufacture of the boiler. The most convenient option is a two-hundred-liter barrel with thick walls. Instead of a barrel, sheet steel can be used. Also, for the manufacture of the case, a piece of thick-walled metal pipe with a diameter of about 800 mm and a length of about 1 m is perfect.
It is strongly not recommended to make the boiler body from stainless steel. Compared to ordinary steel, stainless material has a much lower thermal conductivity.As a result, more fuel will be consumed for space heating.
Blanks for boiler walls
Third step
Boiler body
Boiler body
Boiler body
Frame
Prepare the supports for the boiler. They can be made from reinforcing bars with a diameter of 1.4 cm. The optimal length of each support is 30 mm.
Fourth step
Prepare the material for the manufacture of the grate. It can be made from a thick (at least 5 cm) metal circle. Make slits in the circle. Through these holes, air will be supplied to the fuel loaded into the boiler. Ash will also escape through these slots.
Fifth step
Prepare another round blank of metal.
Prepare a metal sheet for assembling a box with an internal partition. Additionally, prepare a sheet of metal for making a water tank. You can also purchase a ready-made water tank. At this point, do what feels right for you.


When all the blanks are ready, proceed directly to the assembly of the boiler.
sixth step
Weld several identical pieces of reinforcing bars inside the body. These elements will be the supports. Fix the reinforcement in a horizontal position at three parallel levels.
On the lower level, you will place the bottom of the wood burning boiler. The second level should be placed above the blower door. Place the third level approximately 20-22 cm lower from the upper edge of the heating unit housing.
seventh step
Make a box. You will place it inside the case. Divide the case into two horizontal compartments. In the upper compartment you will load wood for the firebox. Ash will collect in the lower compartment.
Insert the box through a pre-created hole in the side wall of the case and fix it by welding.Such a box is convenient in that you can heat the unit from another room. This solution is especially relevant for baths and other similar premises.
eighth step
Make a blower. There are two options: you can cut a hole and install a door on it. Also, the blower can be made in the form of a drawer, this will eliminate the need to install a door.
With a box it will be much more convenient to clean the boiler from ash.
wood burning boiler
wood burning boiler
Ninth step
Weld the bottom closer to the bottom of the unit body, and the grate above it. Fasten the grate so that its installation level coincides with the location of the internal partition in the box.
wood burning boiler
wood burning boiler
wood burning boiler
tenth step
Cut a hole in the boiler lid for the installation of a flue pipe. Then weld the cover and install the chimney.
Eleventh step
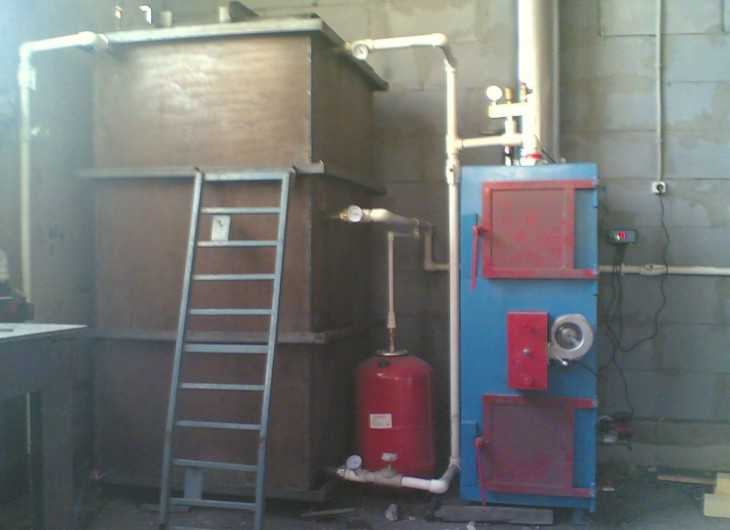
Attach a hot water tank above the boiler. Attach the container to the wall surface, about 25-35 cm above the boiler itself. Place the tank so that the flue pipe passes through it. Its heat will provide heating of the liquid.
wood burning boiler
How to do it yourself?
Drawing of a homemade wood-burning stove

For assembly you will need:
- fasteners;
- luver;
- profile;
- steel 4 mm thick;
- pipes 32, 57 159 mm in diameter;
- temperature sensors, also a drill, electrodes, a welding machine, a grinder, 230 and 125 mm discs;
Instruction:
- First, a drawing is made for the boiler. Dimensions are marked for the chamber inside. The basis for the structure is a concrete screed, brickwork. The combustion chamber is laid out from steel sheets up to 2 mm thick.
- A piece of pipe up to 150 mm in diameter is welded to the tank, holes are drilled in it, oil vapors will burn out in the pipe.
- The heat exchanger is welded to the top of the chamber.
- Inside the chamber, make partitions from a metal sheet, the movement of combustion products will be slowed down, and the furnace will increase its heat transfer.
- Weld the chimney to the top of the chamber, through which the combustion gases will be removed.
- Connect the tank to the pipe.
- Water must not enter the cauldron, otherwise it will foam, and burning oils will splash out through paradise. The chimney must be located strictly vertically, at a height of up to 2 meters.
- Install an air pump in the upper chamber.
It is easy to build a structure:
- Pick up a round barrel, but you can also weld a square or cubic container from metal sheets.
- Select a pipe with a diameter of up to 300 mm, when choosing a length, consider the power of the intended unit.
- Cut out pancakes from the sheet, 3 pieces for the boiler lid and bottom up to 4 mm thick.
- Weld the bottom of the boiler.
- For the combustion chamber, make a hole on the side of the boiler.
- For the blower, make the same hole, but slightly lower.
- Install a grate in the form of a lattice of reinforcement between the combustion chamber window and the blower.
- Attach the grate with a welding machine, lay it on the reinforcing pieces.
- Weld legs (4 pcs.) to the bottom of the structure, as a material, you can take a magpie pipe in diameter.
- Make a press, consisting of a small pancake, from a pipe about 100 mm in diameter, as well as a couple of pieces of a channel.
- Cut a through hole in the circle, weld the pipe to the pancake in the center.
- Distribute evenly and weld the channel on the other side of the pancake.
- Insert the finished press into the cauldron.
- For the heat exchanger, prepare the pipe, install it inside the boiler, after preparing the chamber.
- On the side of the barrel, make a hole for the coil, heat will be supplied through it.
- Take the second pancake, cut a hole for the pipe in the center, about 100 mm. For the boiler, this will serve as a cover, which, as a rule, is welded on top of the body.
- A part of the press pipe can be used as a chimney, but in this case it will require redoing, so it must be quickly disassembled into parts, removed. With a rectangular design, the chimney can stand separately, it is welded on top of the furnace, on the side.
Installation and connection of the boiler:
In order for air circulation to be acceptable, the boiler is installed above the floor level at least 25 - 30 cm.
Steel legs are welded to the bottom of the device, a foundation of refractory material is laid under them.
The boiler is connected to the heating system in stages.
Pipes are welded to the boiler body using special pipes.
A pipe from the chimney cuts into the water tank.
Before connecting the device, it is important to take care of safety precautions, lay bricks up to 1 meter high around the boiler. The masonry will serve as protection against burns if you accidentally touch the hot stove, and the heating will be more efficient.


The best solid fuel boilers for long burning
Zota Carbon
The lineup
This domestic series of solid fuel boilers for long burning is represented by models with a capacity of 15 to 60 kW. The equipment is designed for heating residential and industrial buildings.The boiler is single-circuit and has the following parameters of the coolant: maximum pressure 3 bar; temperature from 65 to 95 ° C. With optimal settings, the efficiency reaches 80%. The boiler is distinguished by its easy loading and the presence of movable grates for ash removal.
Watch product video
Design features
Boilers are completely non-volatile. Management is carried out mechanically. There is protection against overheating of the coolant. The built-in heat exchanger from qualitative steel is installed. The duration of the combustion process is controlled by changing the flow rate of air entering the combustion chamber.
A chimney with a diameter of 180 mm and pipelines of the circulation circuit 2” are connected to the device from the rear wall.
Fuel used. It is recommended to use hard coal fraction 10-50 mm as fuel.
Candle
The lineup
The line of Lithuanian heating equipment Candle includes five long-burning boilers with a capacity of 18 to 50 kW. They are designed for floor installation in residential or industrial premises. The units are designed for autonomous operation as part of a separate heating system. An additional circuit for heating hot water is not provided. The device is designed for a pressure of 1.8 bar and a coolant temperature of 90 ° C.
Watch product video
Design features
The design of the open-type furnace and the automatic adjustment of the air supply provide for a long burning mode. The water "jacket" is built into the boiler body. There is an automatic protection against overheating. Flue gas outlet 160 mm. The diameter of the fittings of the circulation circuit is 2”.
Fuel used. Firewood or peat briquettes can be used as fuel.
Stropuva S
The lineup
The line of Lithuanian-made single-circuit long-burning boilers includes models with a capacity of 8, 15, 20, 30 and 40 kW. The buyer can easily choose a suitable unit for heating a private house or a small business. The most productive of them is able to maintain the optimum temperature in a building up to 300 sq.m. Connection to the electrical network is not required.
During operation, the combustion zone smoothly shifts in the furnace from top to bottom. The efficiency reaches 91.6%. Maintenance consists of periodic replacement of fuel, removal of ash and periodic cleaning of the gas path, including the chimney.
Watch product video
Design features
The elongated shape of the housing saves usable space during installation. The volume fire chamber allows to load up to 80 kg of fuel. Precise regulation of the incoming air extends the burning time of one bookmark up to 31 hours. The coolant is heated up to 70o C and circulates with pressure up to 2 bar. On the back side, fittings are provided for connecting a chimney with a diameter of 200 mm and heating water 1 ¼”.
Fuel used. The boiler is designed to use dry firewood as the main source of energy.
How to weld a heating boiler with your own hands
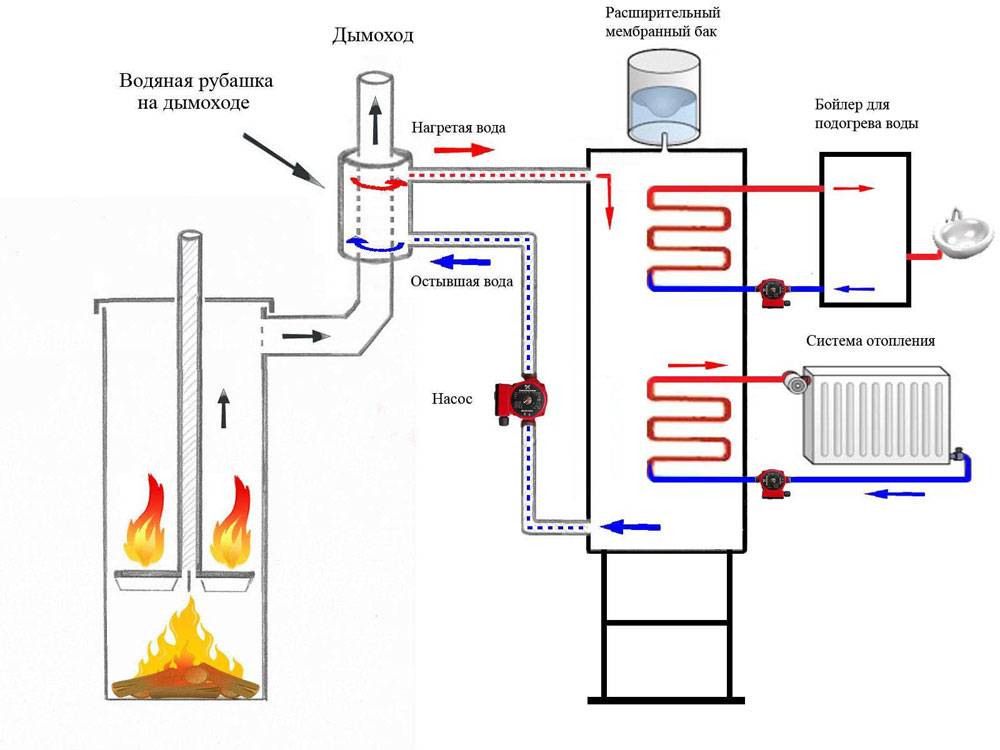
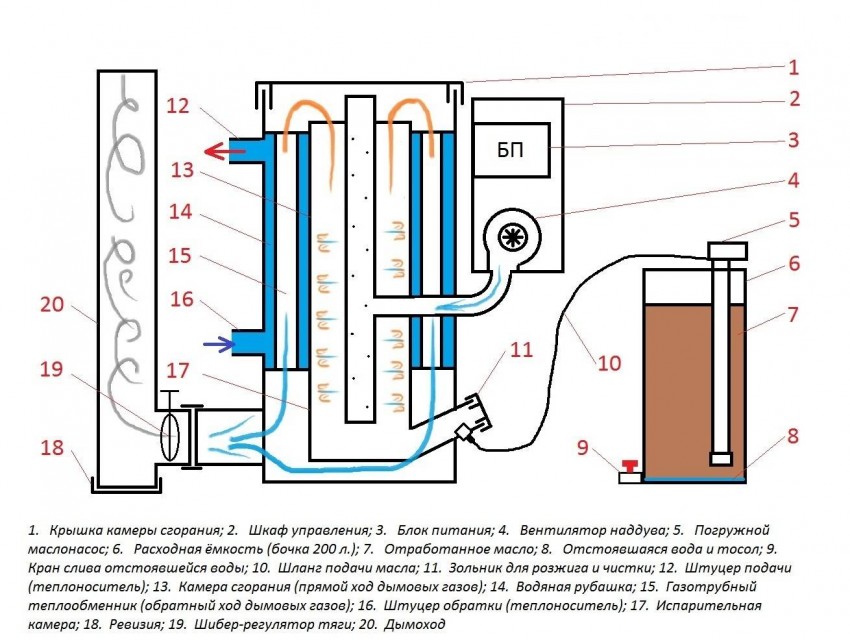
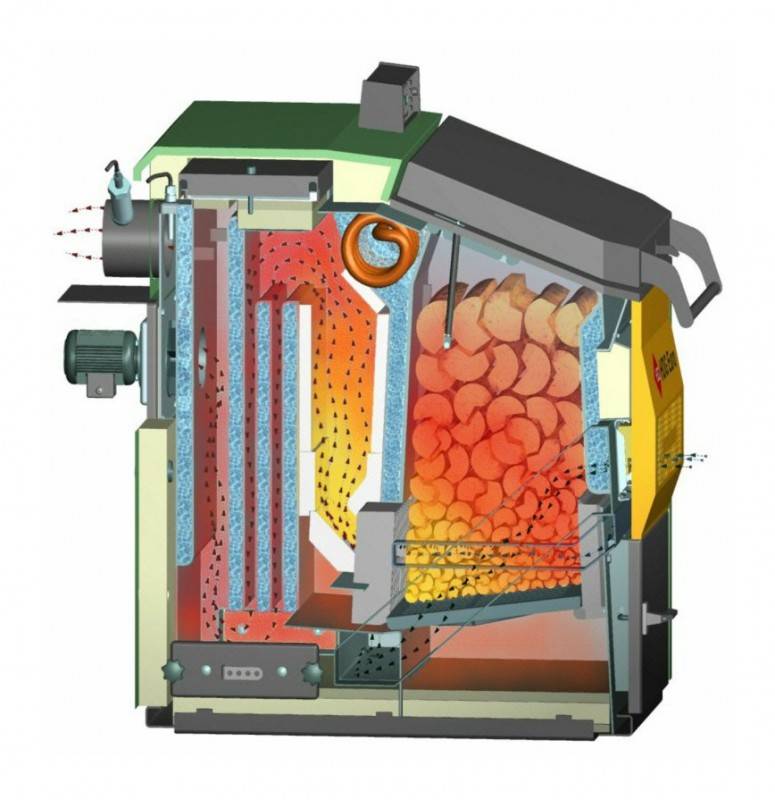
Scheme of manufacturing a long-burning boiler with a heat exchanger
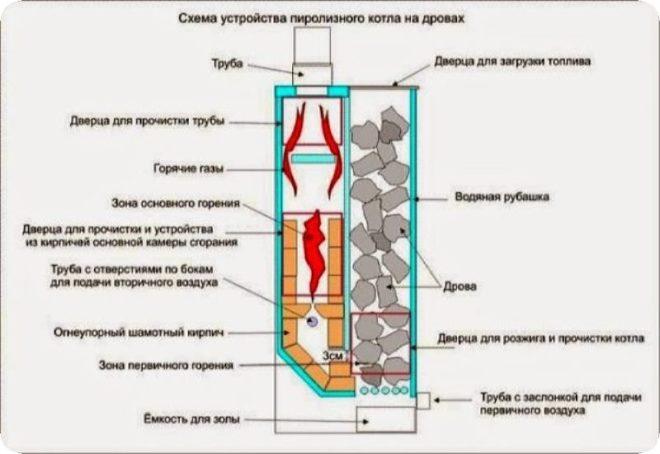
Before you weld the heating boiler yourself, you need to decide on its design. It is preferable that it meet modern requirements for safety and efficiency. Therefore, as an example, a pyrolysis-type boiler made independently will be considered.
How to weld a heating boiler of this type? In addition to the welding machine, this will require the following materials and tools:
- Sheet steel, the grades of which are selected from the data in the table shown above. For the combustion chamber, the thickness of the metal should be 3-4 mm. The case can be made of steel of smaller thickness - 2-2.5 mm;
- Pipes for the manufacture of a heat exchanger. Their optimal diameter is 40 mm. This size will allow you to quickly heat the coolant. Number of registers - from 3 to 6;
- How to weld a heating boiler without a cutting tool? It is best to use a "grinder" with special discs for metal for cutting sheets;
- Doors for the combustion chamber and blower. You also need to purchase cast iron grates. This must be done in advance, since openings and fixing parts of the boiler will be made according to the dimensions of the components;
- Level, tape measure and pencil (marker) for marking;
- Protective equipment - gloves, a welder's mask, transparent work glasses and long-sleeved clothing made of dense material.
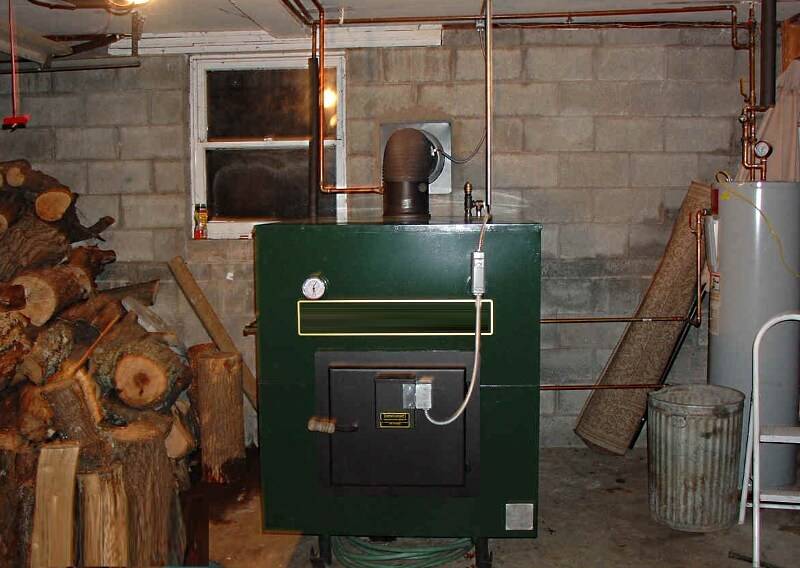
For clarity, you can see how to cook heating in a private house. Video or photographic materials will help in the work, as they clearly show all the stages and features of their implementation. However, this should be done only after drawing up the drawing and preparing all the tools and components. This applies to all stages of the manufacture of components, since it is impossible to weld heating with your own hands, including boilers, registers, combs, without the correct scheme.


It is also important to prepare the place of work before welding the heating in the garage. Most often, the manufacturing process takes place in it.First you need to provide maximum free space by removing unnecessary items
First you need to provide maximum free space by removing unnecessary items.
For safety reasons, flammable liquids - gasoline, oil, etc. - should also be taken out of the garage. And only after that you can get to work - to weld the heating in the garage. Proper welding of a heating boiler consists in the manufacture of two components - the boiler body and the heat exchanger itself.
heat exchanger
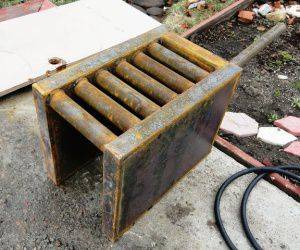
Heat exchanger for heating boiler
This element is made before the heating boiler is welded. Subsequently, it will be installed in a structure that will directly depend on its actual dimensions.
Structurally, it consists of 2 rectangular tanks interconnected by pipelines. The optimal thickness of the material should be 3-3.5 mm. This is due to the high temperatures that will affect the surface. The specifics of its manufacture can be viewed on the video - how to weld heating in a private house.
On steel sheets, the structure is marked according to the drawings. First, the back panel is cut out and a partition is welded to it to remove wood (coal) gases. At this stage, you need to be very careful, as the weld may not always provide proper fastening. Then the side and bottom are welded to the partition and the back wall.
It should be noted that it is rather problematic to weld a heating boiler yourself. Therefore, this work is recommended to be done by two people. In particular, this applies to the stage of installation of the finished heat exchanger.Its nozzles are placed in pre-prepared holes, and the pipes are spot-welded to the inner walls of the boiler.
The question often arises - how to weld the heating inside the garage without forced ventilation. To do this, work must only be carried out with the gates open to ensure a normal supply of fresh air.
The main problem of home-made structures is low work efficiency. To increase the efficiency, it is recommended to make double walls, between which a basalt refractory heat insulator is installed. It is possible to weld such a boiler with your own hands for water heating, but for this you need to provide for additional material consumption. First, double walls are made, which are filled with insulation. Then the further welding technology of the structure is fully consistent with that described above.