- Planning at the design stage
- Why does the previously dry basement floor heat up ↑
- Storm water penetration ↑
- Rising groundwater levels ↑
- Basement circular drainage installation
- Arrangement of internal drainage in the basement
- Do-it-yourself ring drainage
- Main works
- Creation of a drainage system
- Purpose and need for drainage
- What is needed for the installation of a drainage system
- Arrangement of internal drainage in the basement
- How to get rid of groundwater in the basement
- Types of drainage from the basement
- Materials for the drainage device
- Ventilation
- Conclusions and useful video on the topic
Planning at the design stage
Many questions arise before those who are building: from the number of storeys of the house to the need to equip a basement in it. The latter will significantly increase the cost of work, but additional space will never be superfluous either in the country or in the cottage
In addition, basements strengthen the foundation, which is especially important in those regions where there are outbreaks of increased seismic activity. Any construction must begin with a study of the soil
The value will be its composition on the site and the depth of groundwater. Depending on these two indicators, the type of foundation is selected, and, accordingly, the features of the basement:
- Monolithic (tiled);
- Tape.
The second type is suitable for deep-lying waters and soil, which ensures the stability of the building. Monolithic is a solid slab. It is used for more monumental structures in places where the groundwater level rises above the critical level of 2 m, and the soil is loose and consists mainly of sand. Traditionally, construction begins from the basement. First they dig a pit, lay the foundation, arrange a blind area. There are two main basement construction technologies:
- With the preparation of the pit;
- With preliminary filling of tape walls (reinforced concrete).
Why does the previously dry basement floor heat up ↑
If the basement walls do not “leak”, and moisture appears from below, there can be two main reasons for flooding a previously dry basement floor:
Storm water penetration ↑
If the basement is flooded immediately after a heavy downpour or after heavy snow melts, and the water quickly (in a few days) left, storm water penetrates into the basement. It is not worth hoping that this happened once and the trouble will not happen again after another downpour.
It may be possible to fix the problem in a simple way by diverting water away from the walls of the house.
First of all, you should pay attention to the blind area and the storm system that drains the runoff from the roof. If they exist, of course.
There should be no gap between the walls and the blind area. If there is a gap or cracks in the blind area, they should be sealed with building sealant. The wider the blind area, the better. A meter and a half and an outward slope of 2-4% is the best option. Under the drainpipes descending from the roof, it is advisable to place trays that will divert the flow of water to the maximum possible distance from the house, based on the improvement of the site.
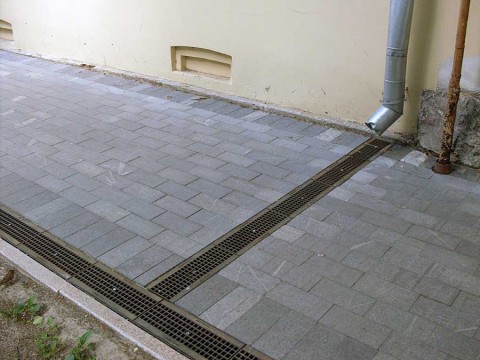
Proper wide blind area, trays that divert storm flow from the walls

Embedded in paving (pictured above) drainage trays with gratings are quite expensive, you can use cheap open concrete trays
But if during the construction of the basement the backfilling of the pit was illiterate, even the correct arrangement of the blind area and the storm system may not give the desired result. Often, during construction in dense clay and loamy soils, a pit dug for the construction of a basement floor is thoughtlessly covered with sand. And the foundation and base of the floor are located on a sand and gravel bed. It turns out that in the middle of waterproof clays there is a permeable sandy lens in which the house is located. If the blind area does not overlap the width of the sand backfill from above, during rain or snowmelt, moisture penetrates the sand in large quantities. And she has nowhere to go, because there is clay around. And if there are “holes” in the waterproofing of the foundation and the basement floor, water penetrates inside. Those who are just building a house should understand that in clay soil, backfilling the pit must be done with the same soil excavated earlier, carefully compacting it. Or immediately arrange the drainage of the basement of the house.
Rising groundwater levels ↑
Groundwater level rise (GWL) can be seasonal or permanent. If the house was purchased or built in the summer, and in the spring the basement was flooded and the water held out for several weeks, there was a seasonal, flood increase in groundwater level. Next spring, if the winter is snowy, the trouble will repeat unless countermeasures are taken. A constant increase in GWL can occur due to changes in the hydrogeological properties of soils, and it is difficult to predict its dynamics.
Improving the waterproofing of the basement of an existing house, especially if water is penetrating from below, is problematic and often impossible or prohibitively expensive. Often the only way to drain a constantly or periodically flooded basement is to drain the basement.
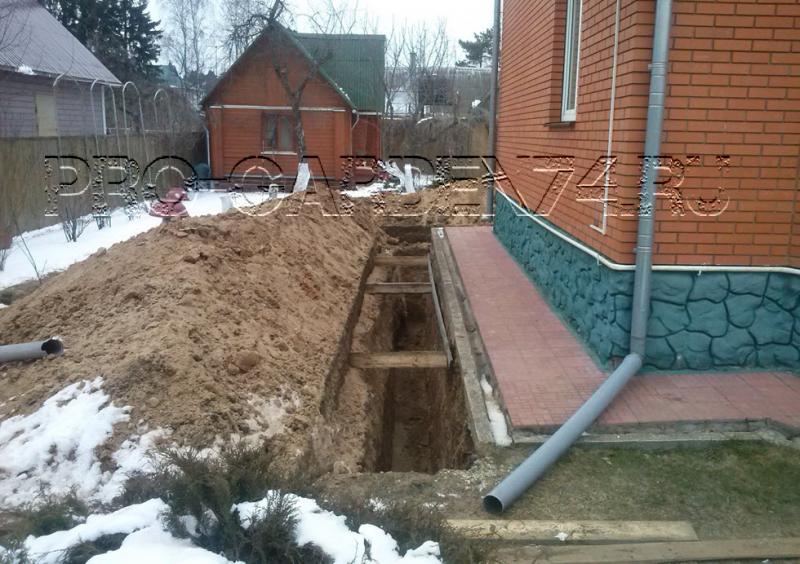
Basement circular drainage installation
 Storm sewer and drainage do not connect to the collector well.
If you decide to build a drainage system yourself, our instructions will help you:
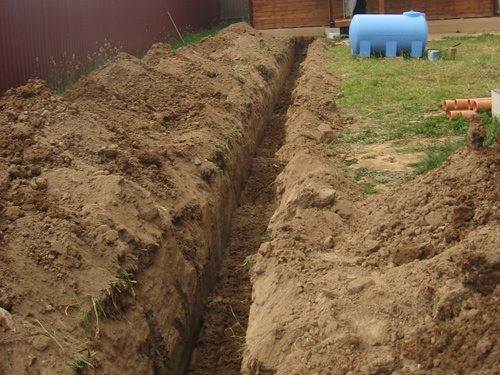
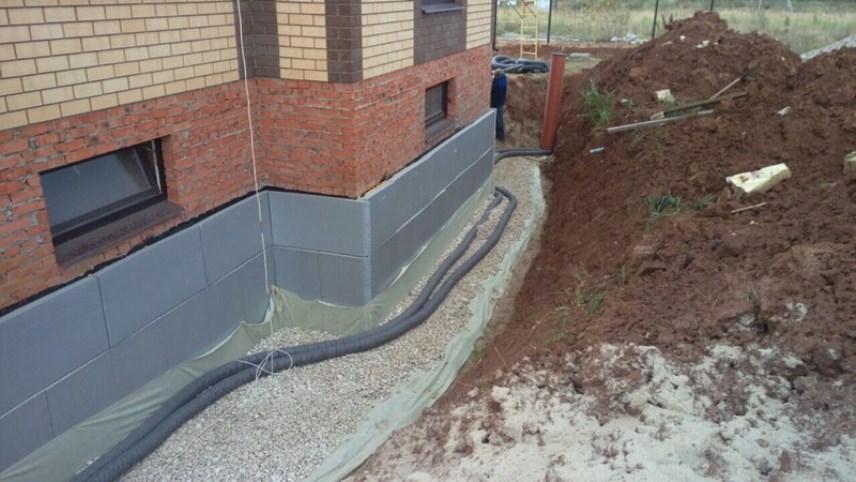
- At a distance of 1 to 3 meters from the perimeter of the house, we dig a trench around the entire foundation. Trench depth - 20 cm below the foot of the foundation slab;
 Digging a trench around the house.
- At the bottom of the trench we pour a layer of sand and gravel 200 mm thick. When backfilling, we make a slope from one of the corners of the trench in both directions, at least 2 cm per meter of length, as a result, the lowest corner should be at or below the foot of the foundation, and the highest - no higher than the floor level in the basement;
 At the bottom we form a backfill with a slope of at least 2%.
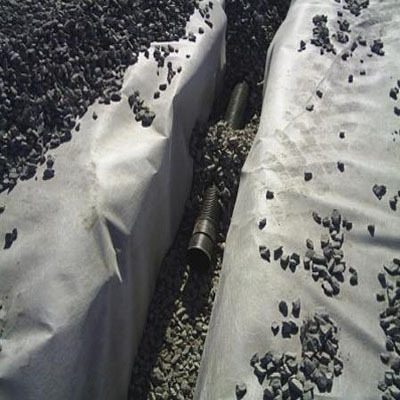
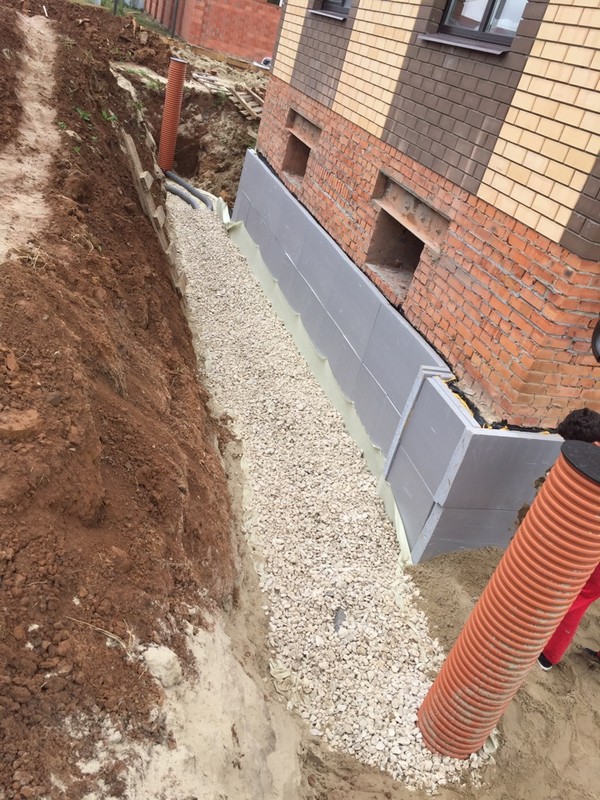
- We lay the trenches with geotextiles so that its edges overlap the walls of the moat. We pour a layer of gravel 200 mm thick on the geotextile;
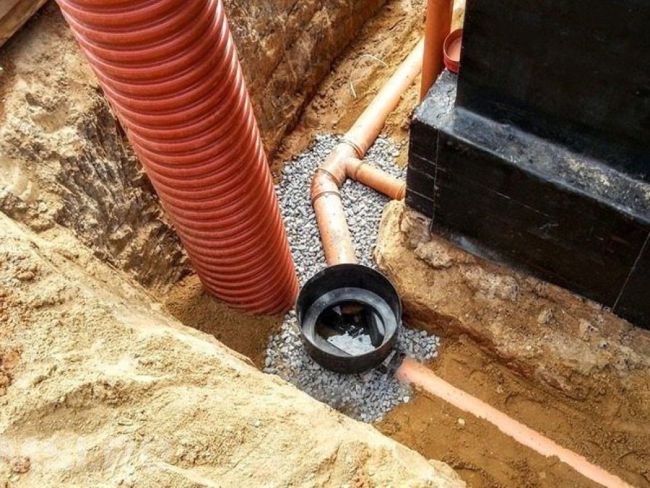
- We lay perforated pipes with a diameter of 100 mm, which we connect using couplings or other shaped elements. We fill the pipes with gravel from above. At each corner we install a viewing well;
 We lay and connect pipes.
- We wrap the pipes in geotextile so that its edges overlap and cover the drainage filter well.
 We wrap the pipes in geotextiles.
-
We connect the lowest manhole with an inclined pipe to a collector well, which is located away from the house;
- We supply the collector well with a pump with a float mechanism, which we connect with a pipe to the sewer system or the place of water discharge;
 We supply the collector well with a pump for pumping out excess water.


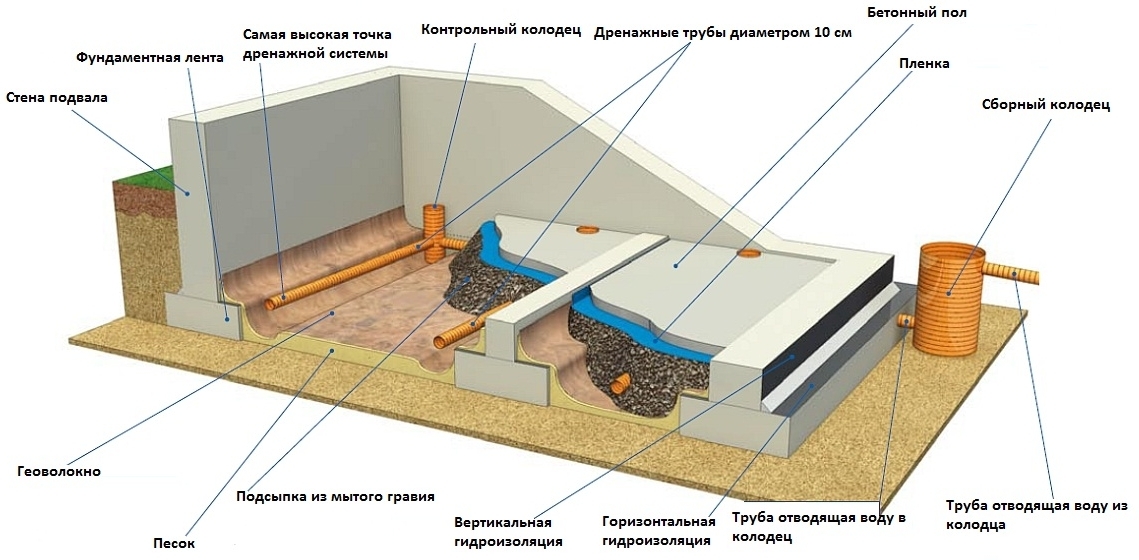

- We fill the trenches with a mixture of soil, sand and sawdust.
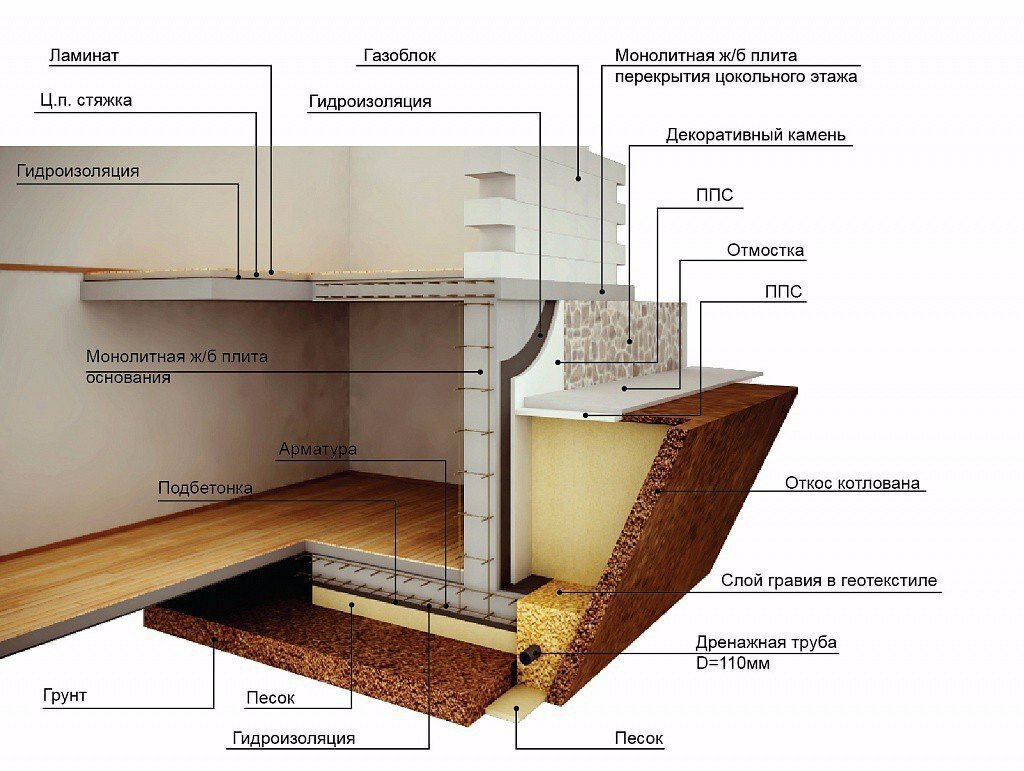
Arrangement of internal drainage in the basement
How to make drainage in the basement of the house? Before starting to carry out work on the arrangement of the internal system for the removal of water entering the basement, it is necessary to thoroughly dry the premises. A waterproofing layer is applied to the inside of the walls of the basement or foundation of the building. It is best to apply a coating or penetrating waterproofing. After that, proceed to the laying of the drainage system inside the basement.
The main stages of work production:
- The basement floor covering is dismantled to the very foundation.
- With the help of an improvised tool (jackhammer), special channels are made around the entire perimeter in a concrete base for future wiring.
- Water pipes and manholes are being installed.
- From above, trenches with pipes are covered with fine gravel.
- Now you need to screed the entire floor area.
- After the screed is ready and dried, roll insulation is applied.
- A floor is made on top of the new insulation.
- In order to bring water out of the underground room, it is necessary to provide for the installation of a small drainage pump for the basement. It is possible to divert the accumulated moisture directly into the pillow under the foundation, but for this a series of soil studies should be carried out with the involvement of specialists.
With a thorough study of the internal drainage system in the building, work on its arrangement can be done completely independently without the help of third parties. Costs will be incurred only for consumables.
Do-it-yourself ring drainage
Such a system can be equipped after the completion of the construction of the building. The recommendations for spacing between structures and drainage remain the same.
A couple of additional important remarks should be made first.
Firstly, regarding the depth of the drainage pipes. The dependence is simple: the pipes are laid half a meter below the foundation of the building.
Scheme of laying pipes of the annular drainage
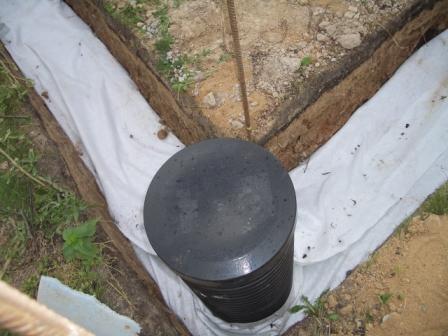
Secondly, regarding the storage well. In the case of a collector system, it is more expedient to use its variety with a blank bottom. The installation procedure differs from the instructions for the filtration well only in the absence of bottom gravel backfill.
Revision wells are installed according to the same principle as storage wells. Only the overall characteristics of the products change (selected depending on the conditions of a particular situation) and the place where the drainage pipes enter.

revision well
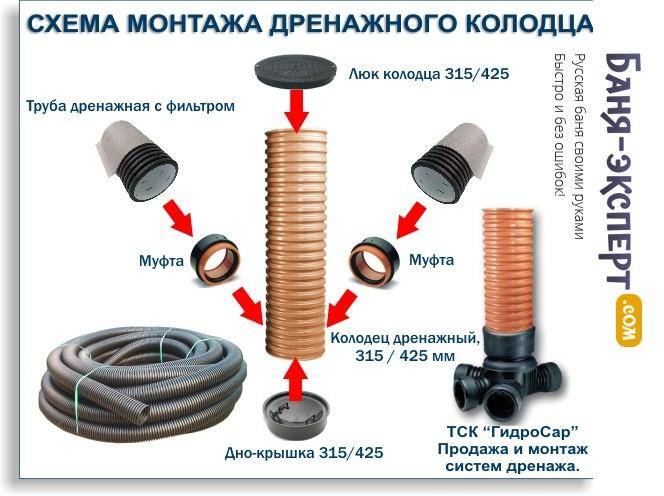
Well installation scheme
Thirdly, regarding the size of the trench. To determine the optimal indicator, add 200-300 mm to the outer diameter of the pipe. The remaining free space will be filled with gravel. The cross section of the trench can be rectangular and trapezoidal - as you prefer. From the bottom of the pits, stones, bricks and other elements that can violate the integrity of the pipes being laid must be removed.
The order of work is presented in the table.
For your own convenience, you can make a markup first. To do this, step back from the walls of the house 3 m (ideally.In the absence of sufficient space, many developers reduce this figure to 1 m, be guided by the situation), drive a metal or wooden peg into the ground, step back from it further to the width of the trench, drive in the second peg, then set similar landmarks opposite, at the opposite corner of the building. Stretch the rope between the pegs.
Table. Do-it-yourself ring drainage
| Stage of work | Description |
|---|---|
| Excavation | Dig trenches around the perimeter of the foundation. Do not forget about the slope of the bottom - keep it within 1-3 cm per meter. As a result, the highest point of the drainage system should be located below the lowest point of the supporting structure. |
| The device of the filter layers | Fill the bottom of the trench with a 10 cm layer of river sand. Tamp carefully with observance of the given slope. Lay a layer of geotextile on top of the sand (if the soil is clean sandy) of such a width that in the future it will be possible to cover the pipes, taking into account the thickness of the crushed stone backfill. On top of the geotextile, pour a 10-centimeter layer of gravel, not forgetting to withstand the specified slope. Lay pipes on rubble. The image shows ordinary orange sewer pipes - here the developer made the holes himself. It is more convenient to use the flexible initially perforated pipes recommended by us, but in the absence of such, you can go the way of the developer from the photo. Maintain a 5-6 cm step between the holes. Recommendations for connecting pipes were given earlier. |
| Continuation of the isolation device | Pour a 15-20 cm layer of gravel over the pipe. Overlap the geotextile.As a result, the pipes will be surrounded on all sides by gravel, separated from the soil and sand by geotextiles. |
In conclusion, it remains to install revision and storage wells, connect pipes to them and backfill the soil.
Well connection
Main works
If you have assessed the situation on your site and realized that you can’t get anywhere without intervention, then before you start draining the foundation with your own hands, you should specify some more rules.
- Firstly, all work must take place in the summer - for obvious reasons.
- Secondly, it should be understood that the process will be time-consuming and long from 2 to 3 months.
- Thirdly, care must be taken to protect the drainage system from moisture ingress if the weather deteriorates. For example, arrange a canopy made of polyethylene or boards.
- Fourth, if you have weak soil, you need to take care of strengthening it with retaining structures in advance.
- Fifth, it would be a good idea to dig out the foundation and inspect its depth and shape.
- Sixth, the land cadastre will need to know the location of underground sources and groundwater.
- Seventh, watch where your foundation accumulates more moisture.
And finally, prepare in advance a diagram of pipes, wells, etc., stock up on everything you need for drainage.


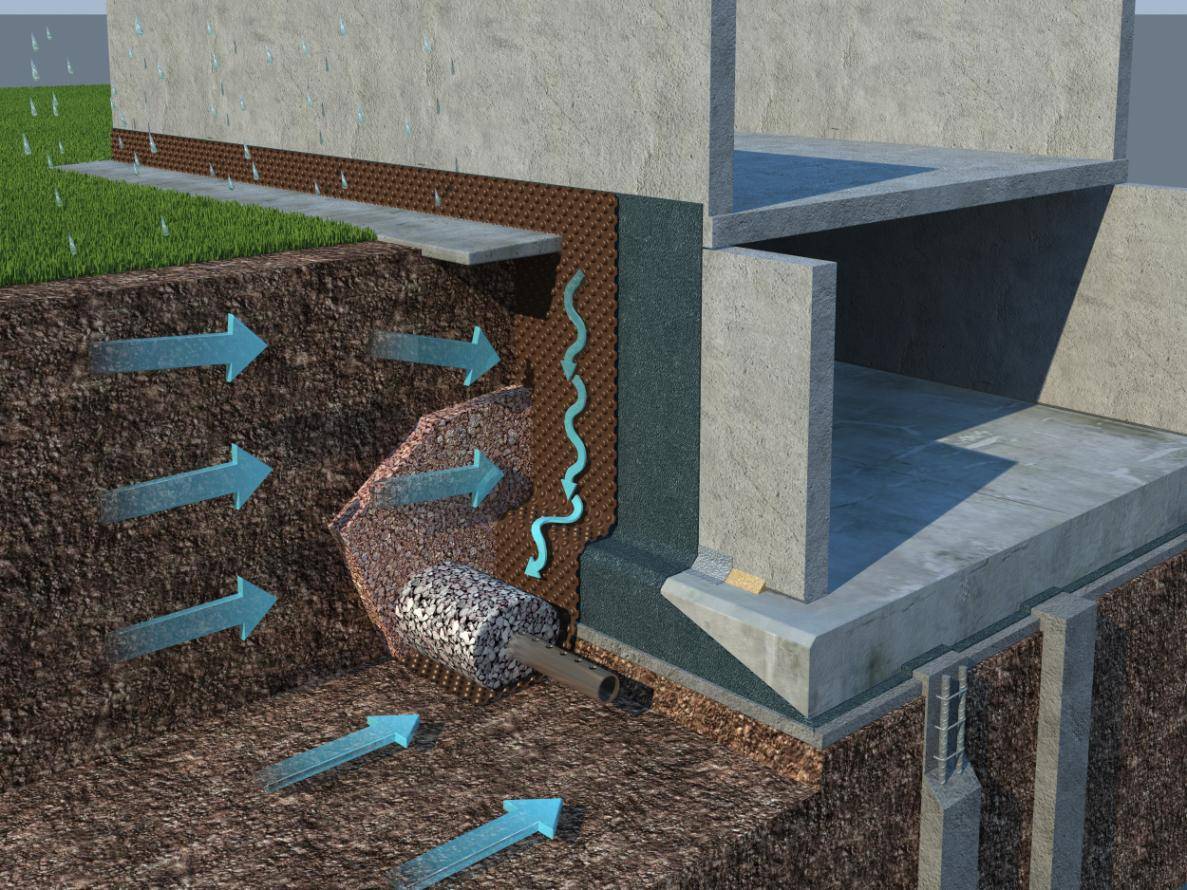
Before you go directly to the wall drainage, you should perform some preparatory work on waterproofing.
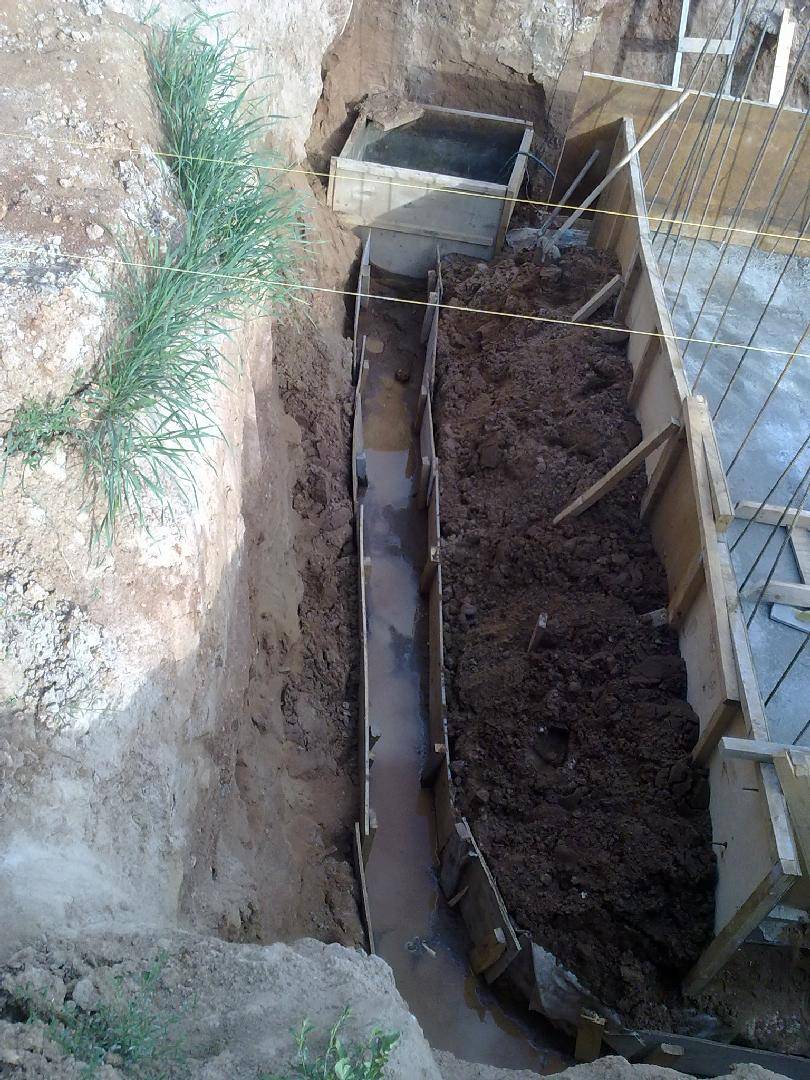
- First, as mentioned earlier, you need to dig out the foundation. In this case, it is necessary to clean the foundation slabs from the earth and old waterproofing.
- Give the foundation time to dry.
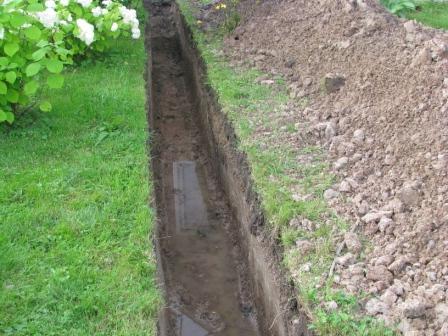
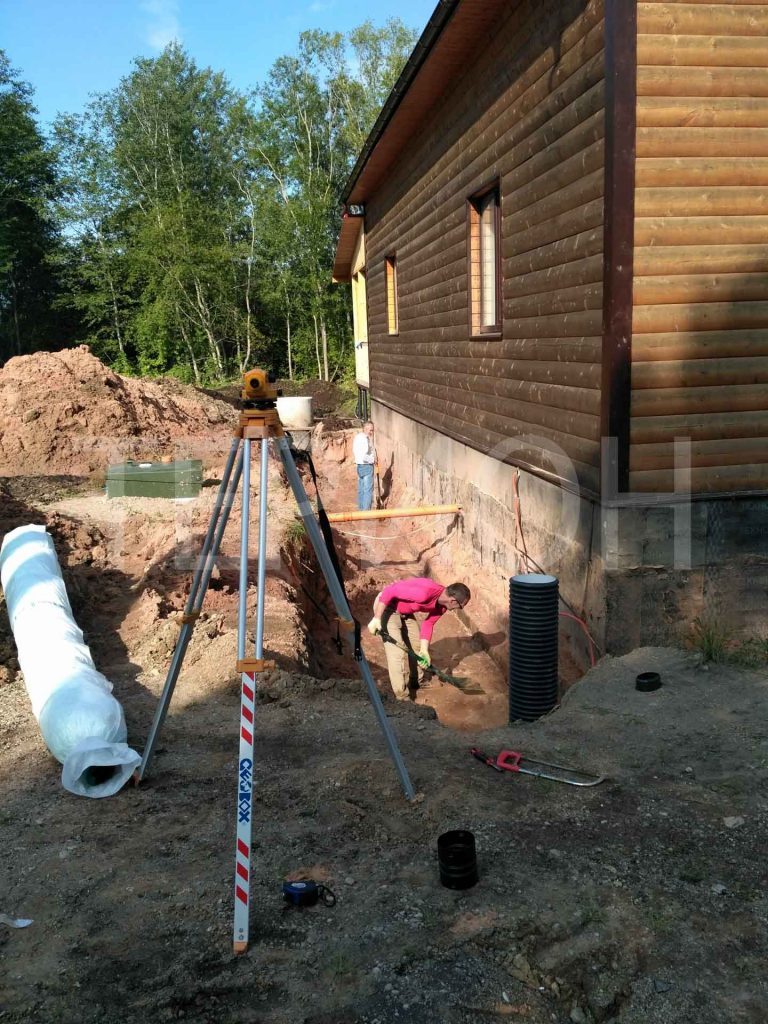
So, let's get started. To begin with, we will dig trenches for laying our system, while retreating 1 meter away from the foundation.Let's estimate the width of the trench - it should be 20 cm larger than the diameter of the pipe.
When laying pipes, do not forget that the drainage must pass half a meter below the supporting structure.
We put wide strips of geotextile fabric on the sand so that its ends protrude beyond the boundaries of the trench. Next, we fall asleep around the foundation of large gravel - it conducts water perfectly.
Only after all this, we lay the pipes, while making sure that they fall with a slope to the lowest point of the system. With the help of fittings, we connect the pipes, just in case, we wrap them with electrical tape and fall asleep 10 cm with gravel. Then we sew the ends of the geotextile with threads.
We install the collector at a distance of at least 5 m from the house. It should be located between the levels of the pipe and groundwater. From the pipes below about a meter. We also cover the pit for the collector with geotextile fabric, and only after that we install the well itself. To eliminate the bevel of the well in the bottom of the tank, you need to drill several holes and secure it firmly. After that, we fall asleep with gravel and then with earth.
By the way, trenches should be filled in such a way that a small mound is formed, because if this is not done, the soil will sag and will have to be poured again.
For example, let's imagine that your water intake tank is above the level of the pipes, then you will have to install a drainage pump among other things. It will forcibly distill the water masses.
We suggest that you familiarize yourself: Do-it-yourself brick oven for a bath
If the depth of the pipes is higher than the freezing depth of the soil, it is necessary to install a heating system using a heating cable. This will keep your drainage system from freezing in the winter.
Thus, if you want to do the drainage of the foundation with your own hands, it is not the easiest, but quite doable task.
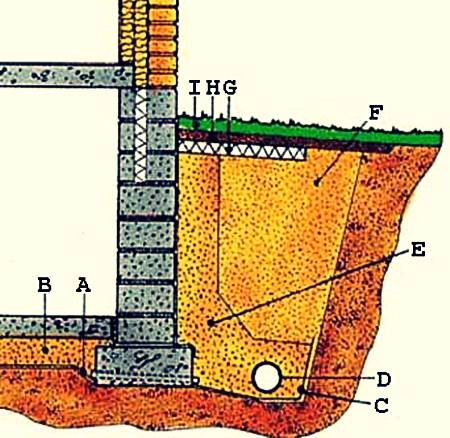
According to the functional purpose and method of installation, there are several main types of drainage around the foundation of the house:
- surface drainage - acts as a storm sewer around the house, is closely connected with the roof drainage system;
- wall drainage of the foundation;
- circular foundation drainage;
- reservoir drainage.
Photo from the site when laying the drainage.
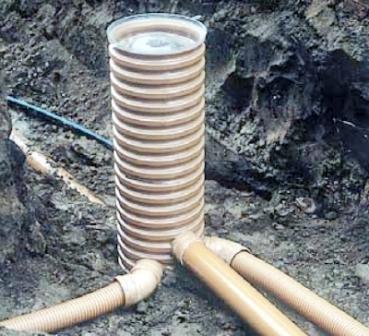
Ring drainage is often used in the construction of private houses in areas with a high level of groundwater. It consists of perforated drainage pipes laid along the perimeter of the foundation of the house, and manholes.
Such a drainage system can be around any foundation - slab, tape, columnar. This system ends with a common drainage well, into which all discharged water is discharged. Water is drained from it by a sewer pipe towards the street or ravine.
difference wall and ring drainage consists in the distance of its device from the foundation surface. For ring drainage, this is an average of three meters, and wall drainage is arranged at a distance of about one meter.
Reservoir drainage is carried out under the entire building area and can be used with slab and strip foundations. It is often used in the construction of baths.
Creation of a drainage system
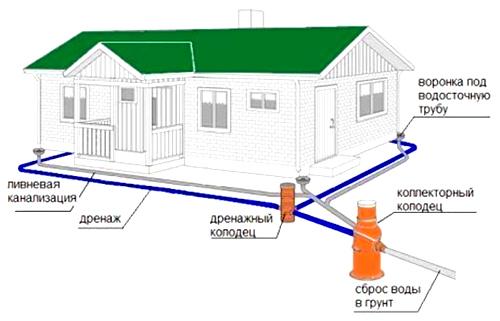
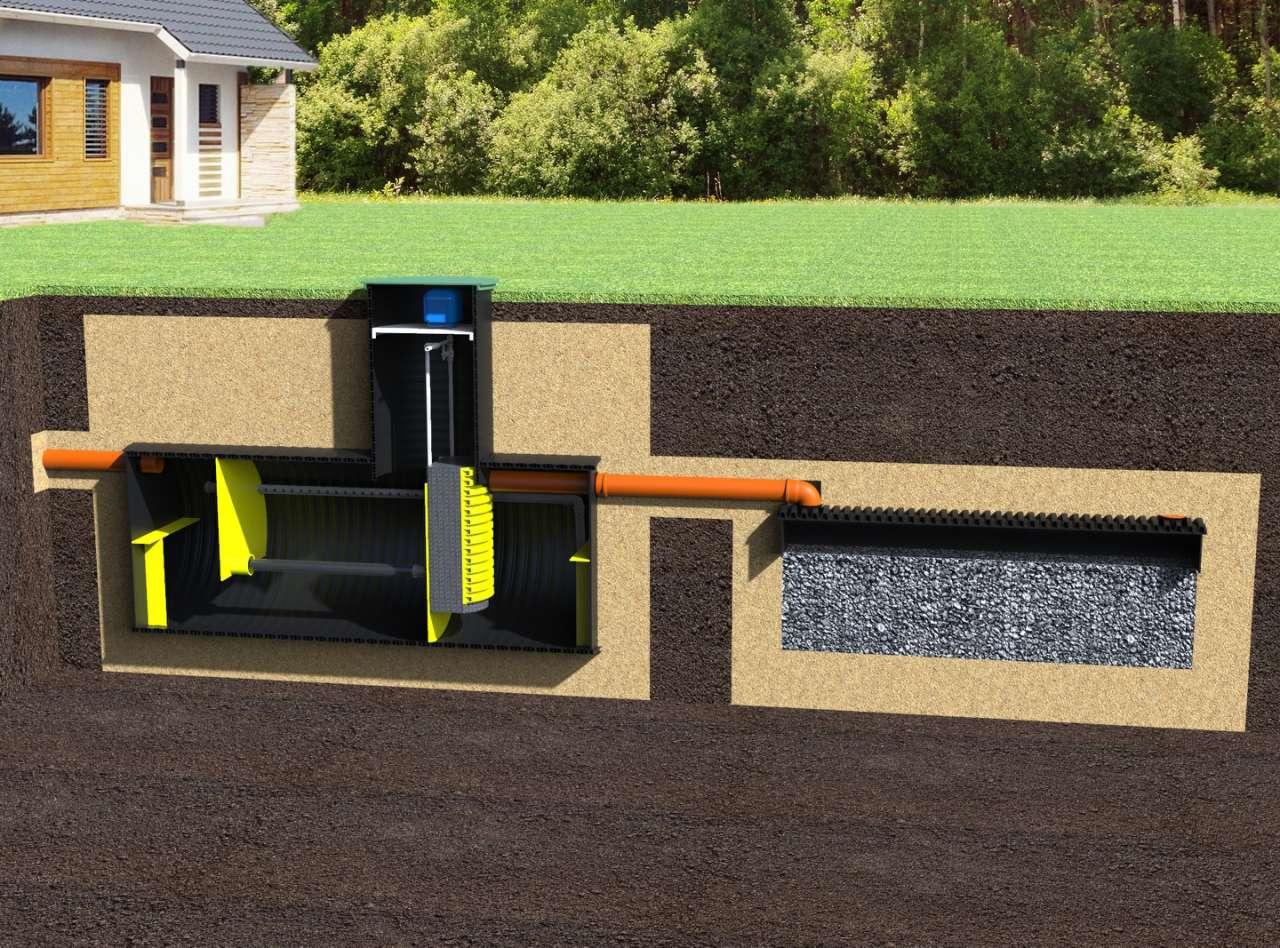
Drainage is a drainage system consisting of trenches, pipes and a well. With the help of it, it is possible to prevent flooding of the basements, as well as drain the land.The drainage system is made at the stage of basement construction. A properly installed system will help to forget about the water in the basement once and for all and protect the foundation from destruction.
How the drainage system works The basis of drainage is a large diameter pipe (at least 100 mm). It has holes all over. Through them, groundwater seeps into the pipe and flows into the collector. In order for the system to work well, the following conditions must be created:
- Dig a sloped trench around the basement below the floor. This will ensure efficient water collection and runoff.
- Be sure to use filter materials (geotextile and crushed stone) that will protect the pipe from flooding.
- Drainage to the central sewer, where a large amount of groundwater will accumulate.
What is necessary:
- drainage pipe wrapped in geotextile;
- fine, washed gravel;
- geotextile fabric;
- river sand.
Mounting
- Make a trench below the floor level around the foundation and a deep well at a distance of 10-15 meters from the building. The trench should have a slope sufficient for water runoff.
- Place a sheet of geotextile into the excavated trench. And then cover with crushed stone (layer thickness 10 cm). Thus, you will create a primary layer that filters groundwater.
- At the next stage, lay the drainage pipe (preferably two-layer in geotextile) on a layer of rubble. Check that the slope is maintained throughout the trench. Using a tee, lay the outlet pipe to the well.
- The laid pipe is completely covered with rubble. Leave 20 cm to the top of the trench. Fold the free edges of the geotextile over the crushed stone bedding. This will completely isolate the drainage from the ground. After that, fill the trench with sand.
As a result, you will get a reliable drainage system. Geotextiles and crushed stone act as a filter, preventing clogging of the perforated pipe. And the sand will ensure the transportation of moisture from the soil surface to the drainage channel.


Conclusion Drainage channels installed around the basement will help eliminate the main cause of flooding - high groundwater levels. The result of the drainage will be a dry basement. Unfortunately, this system has its own significant drawback. It is customary (according to technology) to install drainage channels outside the premises, so not all basements can be equipped this way.
However, in exceptional cases, cellar owners can build drainage channels inside the premises. The installation process is almost the same, with the exception of some points that occur during the floor screed stage. After installing the internal drainage system, the basement will lose 30 cm of height.
Purpose and need for drainage
In modern construction, drainage effectively performs the functions of protecting the basement and basement from flooding. First you need to find out the reasons for the appearance of water near the foundation of the building. These can be nearby groundwater aquifers or atmospheric precipitation coming from the surface of the earth. In any case, double protection is provided - drainage with waterproofing of the entire foundation.
This is interesting: do-it-yourself basement waterproofing technologies at home.
Drainage is needed in a place of high water
If the blind area of the building is broken or there are constant water leaks in the drainage system, the soil is saturated with water and negatively affects the foundation and basement. In this case, drainage is also performed.Another reason for installing the system may be nearby underground structures, such as cellars and a pool.
What is needed for the installation of a drainage system
Tools:
- bayonet and shovel;
- level or hydraulic level (water level) with a length of at least 5 m;
- bucket.
Materials:
- drains (you can use PVC sewer pipes with a cross section of 110 mm and drill holes in them with a diameter of 2-3 mm in increments of 4-5 cm);
- coating waterproofing material based on bitumen or liquid rubber;
- penetrating composition for strengthening concrete ("Penetron" or "Penetron Admix");
- geofabric for drainage;
- gravel or crushed stone of medium fraction;
- sand (coarse-grained quarry, not river);
- drainage sewer well (you can use a wide plastic barrel, after cutting off its bottom).
Arrangement of internal drainage in the basement
How to make drainage in the basement of the house? Before starting to carry out work on the arrangement of the internal system for the removal of water entering the basement, it is necessary to thoroughly dry the premises. A waterproofing layer is applied to the inside of the walls of the basement or foundation of the building. It is best to apply a coating or penetrating waterproofing. After that, proceed to the laying of the drainage system inside the basement.
The main stages of work production:
- The basement floor covering is dismantled to the very foundation.
- With the help of an improvised tool (jackhammer), special channels are made around the entire perimeter in a concrete base for future wiring.
- Water pipes and manholes are being installed.
- From above, trenches with pipes are covered with fine gravel.
- Now you need to screed the entire floor area.
- After the screed is ready and dried, roll insulation is applied.
- A floor is made on top of the new insulation.
- In order to bring water out of the underground room, it is necessary to provide for the installation of a small drainage pump for the basement. It is possible to divert the accumulated moisture directly into the pillow under the foundation, but for this a series of soil studies should be carried out with the involvement of specialists.
With a thorough study of the internal drainage system in the building, work on its arrangement can be done completely independently without the help of third parties. Costs will be incurred only for consumables.
How to get rid of groundwater in the basement
rlotoffski 2-03-2014, 19:00 21 479 Construction
OK
Groundwater problem and possible basement flooding - two complex issues that should be addressed even at the stage of building a country house. Ignoring these points can lead to such undesirable consequences as the destruction of the foundation, its subsidence, flooding of the basement and damage to all its contents, as well as the floors of the first floor. How protective measures should be taken to prevent disaster? If, nevertheless, the problem could not be avoided, what to do? Perhaps the following information will be useful to you.
What causes groundwater to rise?
For example, these may be floods of closely located rivers or a rise in the water level, provoked by heavy rainfall. Can we influence the first factor? We personally, as summer residents, are unlikely. But we can provide for the fastest removal of precipitation.
How to divert ground water?
So that groundwater in the basement of a country house does not create problems, they simply should not be there. To do this, it is worth taking protective measures.What should be attributed to them? Well, firstly, it is a well-timed drainage and, secondly, waterproofing.
Waterproofing is necessary from the moisture contained in the soil in any case, and when groundwater flows significantly below the level of the basement floor, without affecting the underground part of the structure. It is possible to treat all concrete surfaces with special water-repellent compounds, to seal the joints "wall-wall", "wall-floor".
Due to its special properties, a substance injected under pressure with special equipment quickly fills all existing external and internal voids, hardens, thereby reliably blocking access to water. You can forget about flooding basements if, in addition to waterproofing, take care of the drainage system on the site.
Option 1.
With the help of a drill, we will make several wells with a diameter of at least 10-15 cm, and an average length of 3-5 meters.
As a rule, this length is sufficient to provide liquid access to permeable layers through dense clay layers, which trap water, causing it to accumulate.
As a result, water does not accumulate in the upper layers of the soil, for example, during rain or snowmelt, but freely and deeply goes through the waterproof layers of the soil. And very fast too! Such wells are recommended to be made around the entire perimeter of the basement and in its vicinity.


Option 2.
You can also build a drainage system as follows. First of all, it is required to assess the nature of the slope in the summer cottage, which in turn will determine the degree of slope of the pipes. In addition, the larger the diameter of the pipe, the greater the slope.Thus, an independent flow of water is ensured in the direction opposite to the site.
We dig trenches along the perimeter of the house and one or two more in the direction from the house to drain the liquid. They should be about 1.5 meters deep, 0.4 m wide, and the slope at the exit should be below the level of the basement. We cover the bottom with a waterproofing tecton, then with geotextiles (the width of the material should be sufficient to wrap the subsequent elements of the entire system with it).
If the basement is already flooded.
If the organization of waterproofing during construction was not discussed, and the basement was flooded, then it is urgent to drain it, and then think about the drainage system.
A properly laid network of drainage pipes will collect and drain not only groundwater, but also melted, rainwater, constantly protecting the foundation, basements from excessive moisture. Drain the flooded room using a submersible drainage or fecal pump.
There is nothing complicated in their design, as well as operation, which does not prevent the devices from effectively solving their tasks. The choice of model depends entirely on the composition of the liquid in your area, the number and size of foreign particles in it. The drainage pump will perfectly cope with clean or heavily polluted water.
www.kak-sdelat.su
Become the author of the site, publish your own articles, descriptions of homemade products with payment for the text. Read more here.
OK
Types of drainage from the basement
To date, there are several systems for draining excess moisture from buildings and structures that have a basement or basement in their construction. The main ones are:
- ring (trench) drainage of the basement;
- wall-located drainage;
- reservoir drainage.
 The trench drainage system is most often used on sandy and sandy soils. This is due to the fact that excess moisture easily penetrates through the sand. The trench drainage of the basement is a pipe lining located at a distance of about 5-6 meters around the foundation of the building. In this case, the internal part of the system must be isolated from groundwater. Since sandy soils are characterized by high water permeability, the ring system must be mounted below the basement laying level. If it is known (has been revealed through soil hydrological surveys) that the water comes from only one side, a ruptured ring drainage can be laid, thereby saving on materials.
Plinth wall drainage is most often used on heavy clays and loams with low water permeability. Often, the wall-mounted option is mounted as a measure of additional preventive protection of the basement from flooding. The distance of laying this type of drainage from the walls is equal to the thickness of the foundation itself, in depth - from and more than the level of the foundation sole. The wall drainage of the basement is laid with a mixed type of groundwater formation.
Reservoir drainage is in many cases installed in combination with one of the above types. The use of near-wall and reservoir systems is advisable in the formation of groundwater according to a mixed type. The level of laying the system is considered to be a layer of soil located below the base of the foundation. To integrate reservoir drainage with external drainage, a drainage system is laid through the foundation of the building.
Materials for the drainage device
The main materials for the drainage device are PVC pipes of various diameters, laid to a certain depth. Special pipes are produced immediately in a complete set with existing perforations. In order to save money, you can drill holes in ordinary PVC sewer pipes yourself.
As additional materials, crushed stone or brick battle, sand, fittings for installation, rotary revision wells and geotextiles will be required.
When building a house with a basement, much attention should be paid to the issue of drainage from the building. Since the foundation of the building is located below ground level, the basement is constantly exposed to the risk of being flooded with groundwater or melt water.
As a result, the premises become unusable. In addition, solid volumes of moisture in the soil exert great pressure on the walls of the structure, gradually destroying them. The deep drainage of the site, created even at the stage of building a house, will help protect the future premises. But what if the house has already been built, but moisture accumulates in the basement during the snowmelt period or there are puddles after prolonged rains? In this case, the drainage of the basement comes to the rescue, which is carried out in several stages. It can be done both inside and outside the building, depending on what is more convenient for the owner: dismantle the blind area and dig the foundation from the ground, or remove part of the floors inside for drainage work.
Ventilation
Regardless of the needs for which the basement will be used, air exchange must be established during construction.Even if the decoration of the room was done correctly, with the impregnation of the walls with special solutions, if the air circulation is disturbed, the moisture will stagnate. Unfortunately, this is fraught with the occurrence of fungus and mold. The spores of the latter, together with the inhaled air, can enter the lungs, multiply there and provoke a number of chronic diseases, some of which are fatal. Ventilation systems in the basement are classified into two types:
- Artificial;
- Natural.
Kitchen design in the country: ideas and tips
The latter are suitable only for "cold" basements, which no one plans to equip for living quarters. Natural ventilation is a simple pipe system that provides communication between the room and the street. The air in them circulates freely. Artificial or forced ventilation systems force fresh air from the street into the room, and stagnant air is pulled out of it. Modern split systems are able to regulate the level of humidity and temperature within the mode set on the control panel. Such "smart" ventilation will relieve many problems and become a universal "climate control" in the basement of a private house.


Conclusions and useful video on the topic
The video will allow you to deepen your knowledge on arranging basement ventilation and creating holes with diamond cutting, which will help you avoid mistakes that lead to financial losses.
An example of a working ventilation in the basement of a private house:
Although there are several types of hoods, basement ventilation is based on the natural method. Which provides an effective exchange of air masses for a basement area up to 50 m2.
If its dimensions of the basement floor are greater than the specified value, or if the area is divided into several rooms, then the efficiency of natural exhaust will not be enough.
In such situations, modern equipment will be needed to organize a forced ventilation system with the arrangement of ventilation ducts equipped with fans to speed up the process of supplying fresh air instead of the removed one, for each of the rooms on the basement floor.
Do you have personal experience in arranging a basement ventilation system? You can share your own experience or ask questions on the topic of the article in the block below.


