- Maintenance and replacement of cartridges
- Replacing filters and caring for the system ↑
- Structurer
- Reverse osmosis installation - instructions
- Installation of connection tie-in and liquid supply to the filter
- Installation of a clamp for drainage for sewerage
- Installation of a faucet for supplying clean water
- Connecting a reverse osmosis membrane
- Maintenance and replacement of cartridges
- Typical reverse osmosis connection diagram
- Reverse osmosis pump installation instructions
- How is reverse osmosis installed?
- The principle of operation of the system ↑
- Advantages and disadvantages of reverse osmosis
- Installing accessories
- Element #1 - booster pump
- Item #2 - UV Lamp
- Element #3 - mineralizer for water
Maintenance and replacement of cartridges
An operating osmosis treatment plant always contains water. If it stagnates, an unpleasant musty smell appears. It is easy to avoid this: every day you need to update the water, draining at least 0.5 liters from the system.
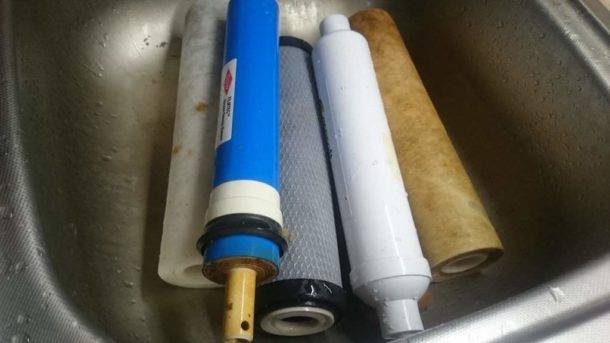
Replacement of cartridges or osmotic membrane is carried out, focusing on the terms specified by the manufacturer, or on the deterioration of the quality of cleaning.
- Prefilters are operated no more than 6 months.
- The carbon post-filter, which completes the water purification, is designed for 1 year of operation.
- The osmotic membrane will last up to 2.5 years.
Replacing cleaning elements is easy:
- Shut off the water supply to the inlet system.
- We open the drinking tap and drain the liquid from the system to the maximum. It is impossible to completely remove water from the device, so rags are laid on the floor so as not to flood the neighbors.
- If the location of the cartridges does not allow removing the filter elements, disconnect the tubes and remove the equipment from under the sink.
We unscrew the lids of the flasks and extract the contents of the filters.
We wash the mesh of the filter from mechanical impurities with a jet of water, we replace the contents of other cartridges
We also thoroughly wash the flasks inside.
We twist the lids of the flasks, paying special attention to the condition of the rubber seal. We assemble the system and test for leaks.
Proper selection, installation and proper maintenance will allow you to operate the reverse osmosis system for a long time without losing the quality of the treated water.
Replacing filters and caring for the system ↑
It is very important in the home water purification system to monitor the contamination of the filters and replace them in time. Depending on the amount of water used (the meter will help determine it), mechanical and carbon filters need to be changed every 3-6 months
Depending on the amount of water used (the meter will help determine it), mechanical and carbon filters need to be changed every 3-6 months.
The membrane can last from 1 to 5 years. Its strength is affected by the quality and quantity of water consumed, its temperature, the condition of the filters, etc.
You can determine that you need to replace the membrane using the following signals:
- sediment in the membrane;
- deterioration of water quality;
- pressure drop.
If the cleaning system is not used for several weeks, the membrane must be disinfected.
Place a floor cloth under the flasks and unscrew them. Pull out dirty cartridges, wash the flask and install new ones. The main thing is not to mix up the cartridges in the filters. It is recommended to lubricate the rubber gasket on the flask, and only therefore screw the flask tightly.
Turn on the water supply from the water supply and run the tap for a while to flush the cartridges. Only then can you open the faucet of the storage tank and drink water.
Moreover, none of the existing systems will purify water from chemicals, bacteria, viruses, radionuclides, solid particles, etc. with such high quality. Clean water is a guarantee of the health of the whole family for many years.
Structurer
What is a reverse osmosis filter structurer? This is the part that is responsible for water purification, namely tourmaline ionizers and bioceramic cartridges. Outwardly, it looks like a cylinder, the body of which is made of plastic. Inside is a glass tube containing a filter medium. As a filler, activated carbon, tourmaline, clay, etc. are used. Tourmaline is a type of quartz sand that is highly absorbent. If it is heated, electrostatic discharges appear on the surface, creating an electromagnetic field. This helps to further disinfect the water due to the effect of ionization.
As a result, water becomes healthy, very soft and pleasant to the taste, so if you decide to take reverse osmosis, pay attention to just such cartridges.
The more degrees of purification in the system, the more expensive it is.
Reverse osmosis installation - instructions
The introductory sheet for the device tells you how to do everything right.And in conjunction with this article, you will have all the necessary information for installation, including the installation procedure for reverse osmosis filters and other equally important processes.


The first task is to find a place where the drinking liquid filtration system will stand. For the area under the sink, you will need a container (basin or something similar) and a towel that absorbs moisture well.
Installation of connection tie-in and liquid supply to the filter
To do this, you need to perform a number of actions:
- Turn off the tap for supplying liquid to the house, open the mixer that supplies cold water. This is required to remove the remaining pressure.
- Disconnect the flexible hose, whose task is to supply cold water to the mixer. Make sure that the gasket is new, otherwise it will be impossible for the nut to shrink on the coupling.
- Next, you need to screw on the thread where the hose was connected, a coupling with a tap. At the finish, you should feel how the thread came close to the rubber gasket.
- Connect the mixer hose to the other end of the coupling in the same way.
- Then close the valve through which the liquid flows to the filter, and slowly open the apartment valve.
At this stage, it is important to see if there is a leak. To do this, the air is released by opening a conventional tap.
When you see that the water is no longer bubbles, stop its supply.
Installation of a clamp for drainage for sewerage
A drain clamp is installed on the siphon in order to divert non-potable water to waste. It is recommended to place it above the water seal. This is a special device that prevents the smell of sewage from seeping out of the drain. It is often performed as a curved pipe.
Here you will need a drill and a 7 mm drill bit. The hole is for a propylene tube.When drilling, you need to be especially careful, as you can pierce the siphon through and through. Do not forget that the seal must be glued inside the clamp. It is included in the kit.
Then you need to put a nut on the propylene tube and thread the tube into the front of the siphon. The tube should enter 5 or 10 cm. The main task here is to make the tube bend, and not be close to the siphon wall. So you will ensure the minimum level of audibility of the murmur of water. Bend the tube inside the siphon, attach the other part of the drain clamp, tighten with bolts. Be careful when doing this, there is a risk of bending the siphon.
Installation of a faucet for supplying clean water
Most often, the faucet is installed in the corner of the washing area. But here the main condition is ease of use and free space below. It does not matter if there is no free space on the sink. The crane will look practical and aesthetically pleasing in the countertop. With a drill, you can drill a neat hole in it.
The tap is fixed at the bottom with two nuts, different in size. First, place a rubber gasket, and place the washer on it, which you will find in the kit. First you need to tighten the thin nut, at the end of the process - the second.
Connecting a reverse osmosis membrane
To place the membrane, you need to find a two-piece body on a metal bracket. It lies on a horizontal plane, fixed with plastic brackets. You need to disconnect the hose and fitting and disconnect the body on the right where the cover is. The next step is to unscrew the cover and install the membrane element.
The diaphragm is placed in depth, stem with rubber bands for sealing forward.In order for it to enter correctly into the intended place, you need to very carefully create pressure on it, it is better to do it with your hand.
After installing the membrane, you need to deal with the cartridges of the lower row of pre-cleaning. They need to be put into the cases intended for this, it's easy, they are most often symmetrical. When twisting, you need to make sure that the body is close to the elastic.
It is easy to attach a container where purified water enters to the entire system. It is necessary to place a sealing thread on the thread. And screw on the valve for the tank.
Maintenance and replacement of cartridges
An operating osmosis treatment plant always contains water. If it stagnates, an unpleasant musty smell appears. It is easy to avoid this: every day you need to update the water, draining at least 0.5 liters from the system.
Replacement of cartridges or osmotic membrane is carried out, focusing on the terms specified by the manufacturer, or on the deterioration of the quality of cleaning.
- Prefilters are operated no more than 6 months.
- The carbon post-filter, which completes the water purification, is designed for 1 year of operation.
- The osmotic membrane will last up to 2.5 years.
Replacing cleaning elements is easy:
- Shut off the water supply to the inlet system.
- We open the drinking tap and drain the liquid from the system to the maximum.
We unscrew the lids of the flasks and extract the contents of the filters.
We wash the mesh of the filter from mechanical impurities with a jet of water, we replace the contents of other cartridges
We also thoroughly wash the flasks inside.
We twist the lids of the flasks, paying special attention to the condition of the rubber seal. We assemble the system and test for leaks.
Proper selection, installation and proper maintenance will allow you to operate the reverse osmosis system for a long time without losing the quality of the treated water.
Tap water, centrally supplied to residential premises, is unsuitable for drinking due to the presence of impurities. To separate the mechanical suspension and solutions of foreign substances, the method of settling and subsequent boiling is used. Reverse osmosis installation allows you to speed up the purification procedure and improve the quality of drinking water.
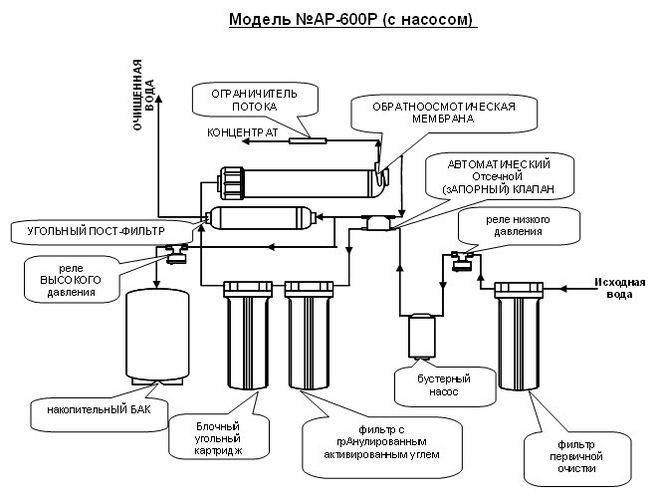
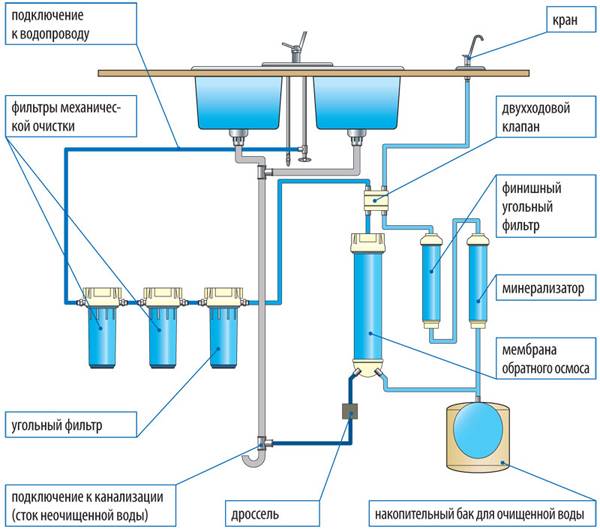
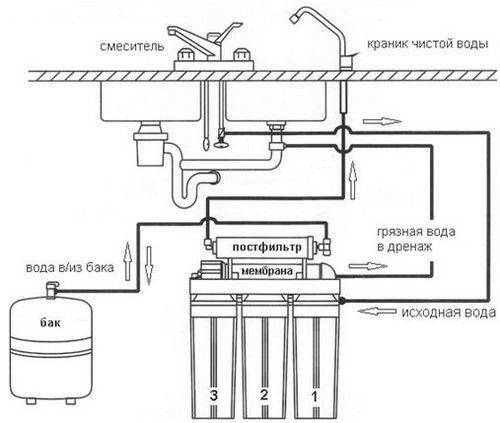
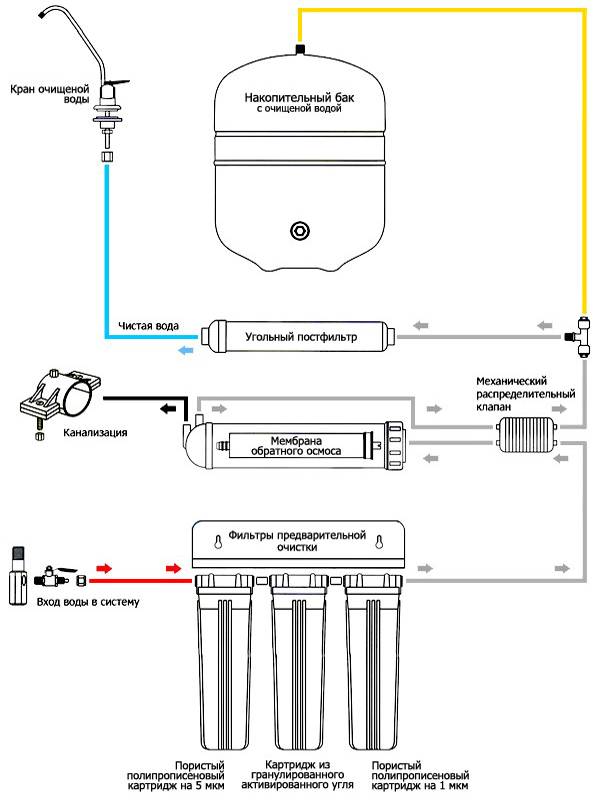
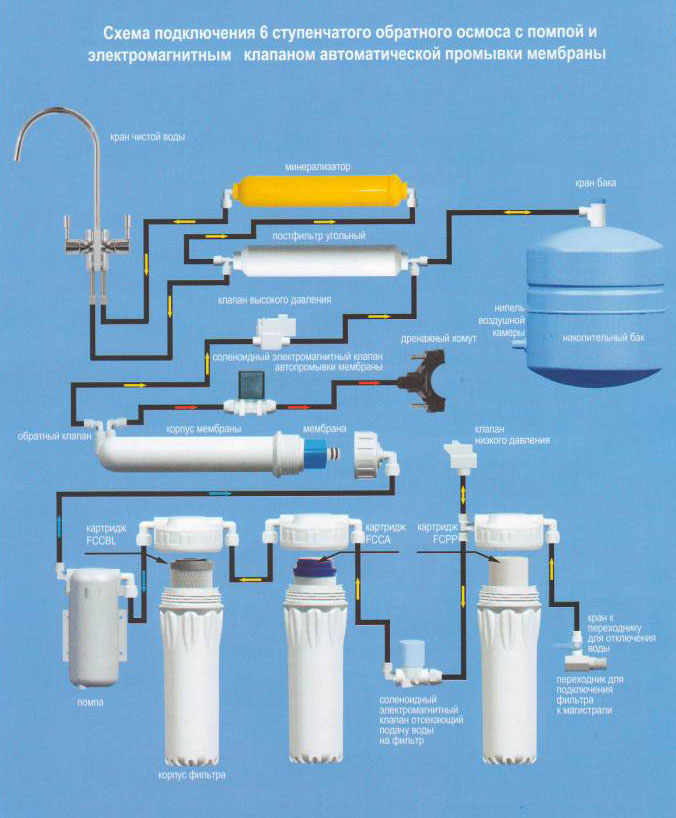
Typical reverse osmosis connection diagram
Before starting installation, it is recommended to study the diagram of the osmotic system and determine the direction of fluid movement. The filter block is connected to a tee embedded in the water main. Then the liquid passes through the coal elements, being cleared of fine suspension.
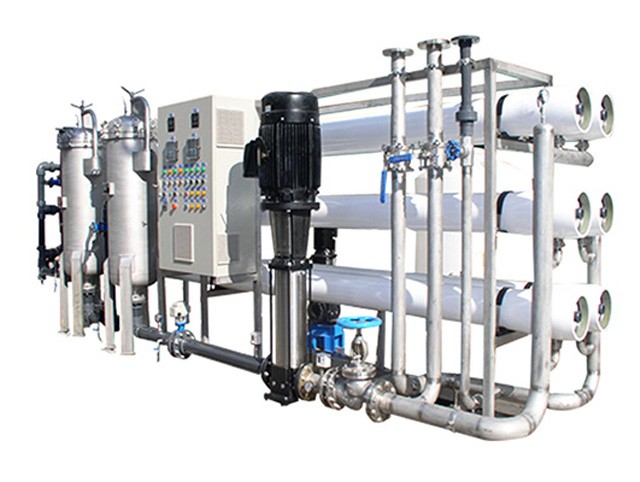
The design of the block includes a pump driven by an electric motor, which provides water supply under pressure to the membrane filter (some blocks are not equipped with pumps).

The filter scheme provides for the installation of 2 hoses, one of which is designed to drain the contaminated solution into the sewer channel.
Purified water is drained through the second tube into a separate tank with a capacity of up to 12 liters. The use of a storage tank is mandatory, since the performance of osmosis for the home does not exceed 7 liters per hour.


Reverse osmosis pump installation instructions
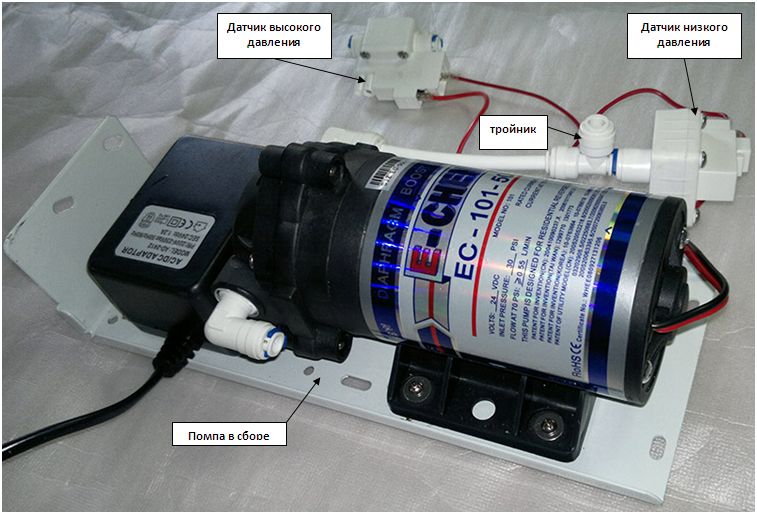
Pressure booster pump on shelf with pressure sensors
For all types and manufacturers of reverse osmosis water filters
Installation and operating instructions
The osmosis pump is designed for use in all standard reverse osmosis water purification filters, with insufficient line pressure (from 1.0 atm to 3.2 atm) with membrane types 50gpd, 75gpd, 100gpd. There are also pump models for 200gpd, 300gpd and 400gpd diaphragms.
The pump for increasing the pressure (pump) is powered by a constant voltage of 24V. Before you start using and installing your osmosis pump, please read this manual completely.
At a pressure in the water supply line of less than 2.9 bar, the proper functioning of the reverse osmosis filter for purifying drinking water stops, close to 3 atm in the main line, the filter discharges more water into the drainage than stated in the passport data. The only way out in this situation is to install a pressure booster pump.
The pressure boosting pump is designed for use in all standard reverse osmosis water purification filters, with insufficient pressure in the line (from 1.0 atm to 3.2 atm) with membrane types 50/75/100 GAL.
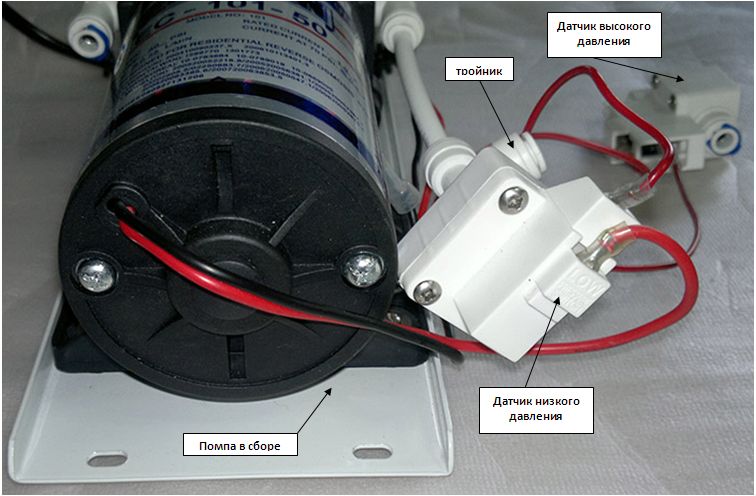
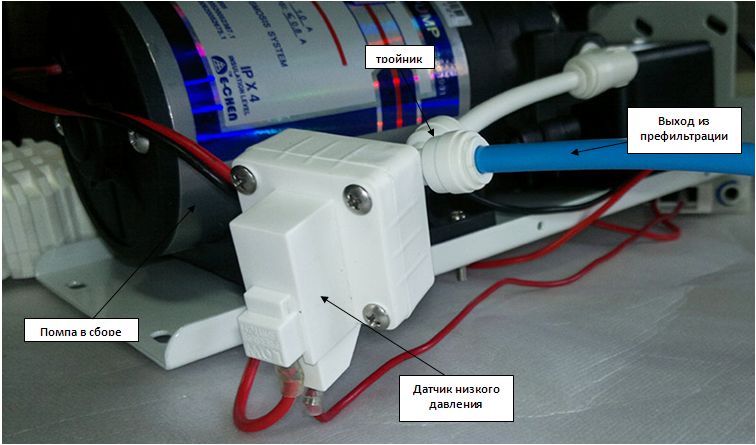
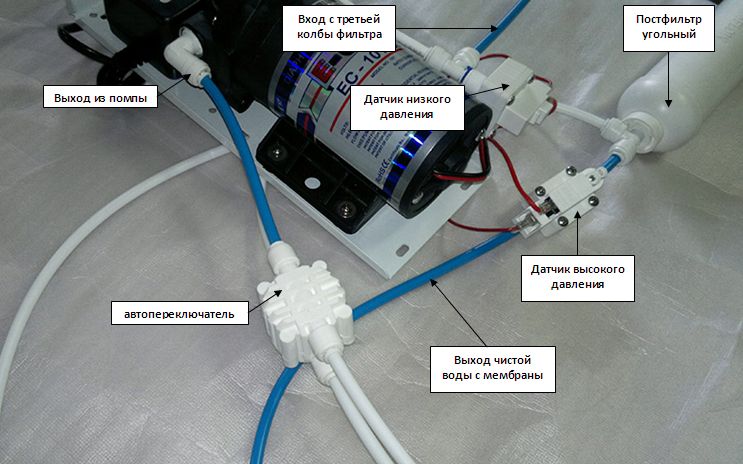
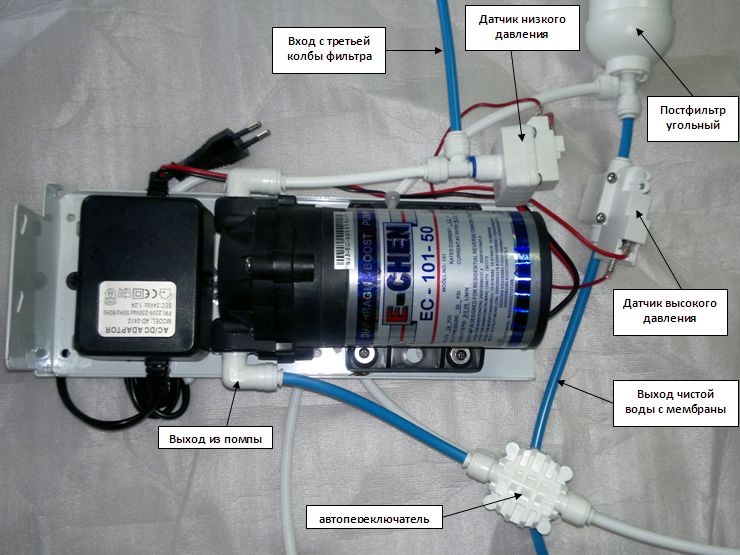
The pump of the reverse osmosis system is basically equipped with two sensors - low and high pressure. The low pressure sensor (labeled LOW on its body) is connected to the pump via a tee. This low pressure sensor LOW turns off the pump assembly when the pressure drops to 0.5 atm at the outlet of the pre-filtration unit (from the last lower flask). This is a kind of pump protection against dry running of the pump, which can occur from a clogged filter pre-treatment or due to a shutdown of water in the line. High pressure switch (labeled HIGH on its body), shuts off the pump when fully filled storage tank of the reverse osmosis filter, and turns on the osmosis pump when the water is flowing.
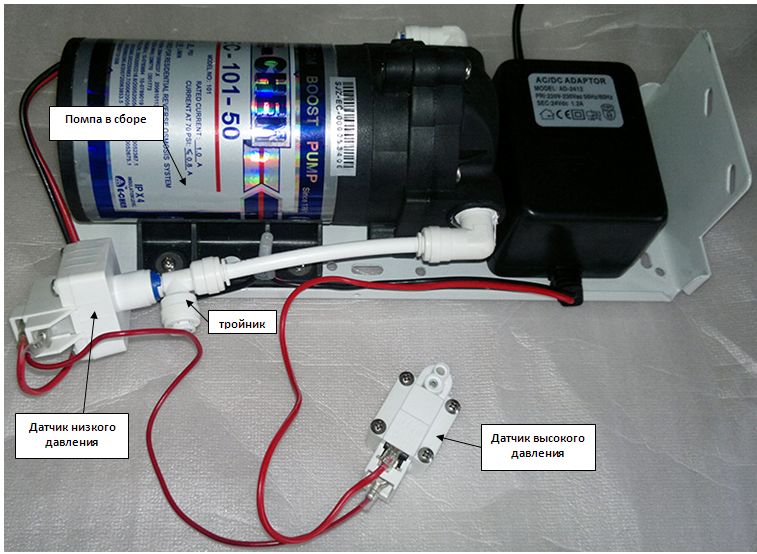
1. Connect to tee exit from the third prefilter flask of your reverse osmosis. The picture shows a blue tube. The tee is connected to a low pressure sensor that will turn off the pump if there is no water in the water supply, this is a kind of protection against dry running of the pump.
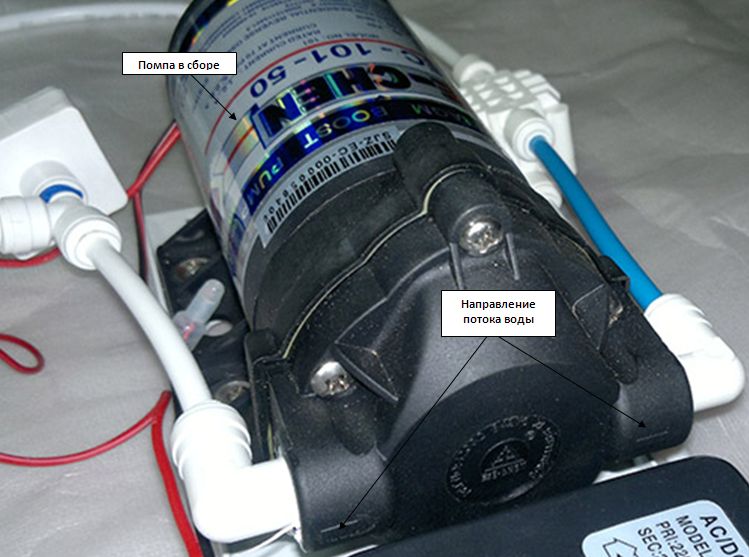
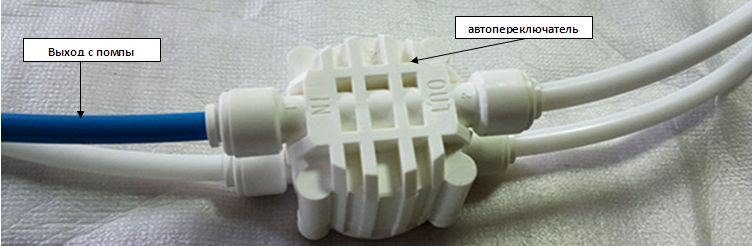
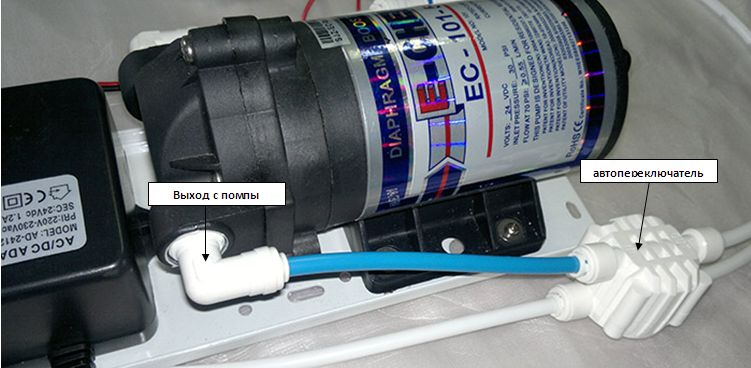
2. Find on the filter auto switch (or a multi-way valve), the output from the pump must be connected to the input of the autoswitch (designation IN on the body), other pipes do not need to be disconnected.
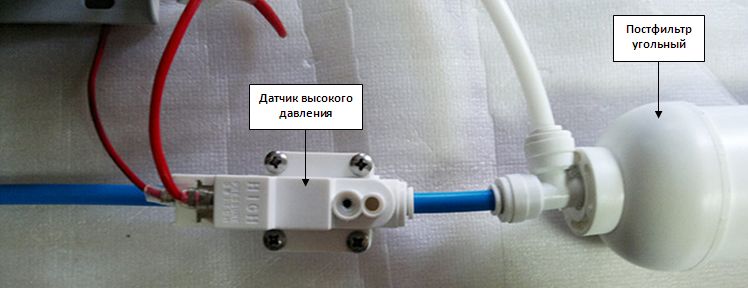
3. Now you need to install the high pressure sensor. To do this, disconnect the tube (blue) that comes from the filter to the carbon post-filter
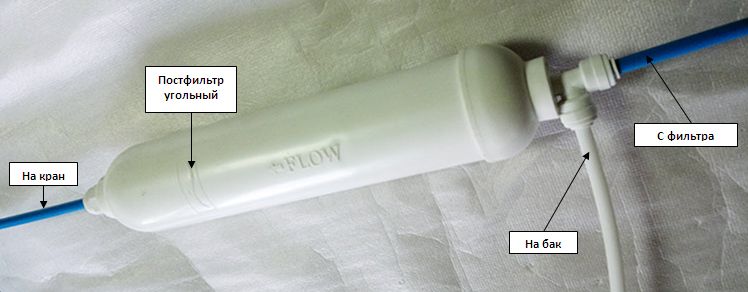
4. Install a high pressure sensor (HIGH) in front of the post-filter tee
Congratulations, your pump is ready to use. Below is the complete installation diagram.
Pump Specifications
Operating water temperature, С
Permissible ambient temperature, С
Operating pressure at the pump inlet, bar
Maximum discharge pressure, bar
Maximum flow, l/min
Thread type for external connection
3/8 (supplied with JG quick couplers)
Pump dimensions, mm
125 x 225 x 305
- Pressure booster pump pre-installed on the bracket with low pressure and high pressure sensors - 1 pc.
- User manual -1pc
How is reverse osmosis installed?
Now let's see how to install reverse osmosis yourself. There is nothing difficult in this. Let's analyze the work on the example of the Geyser-Prestige system.


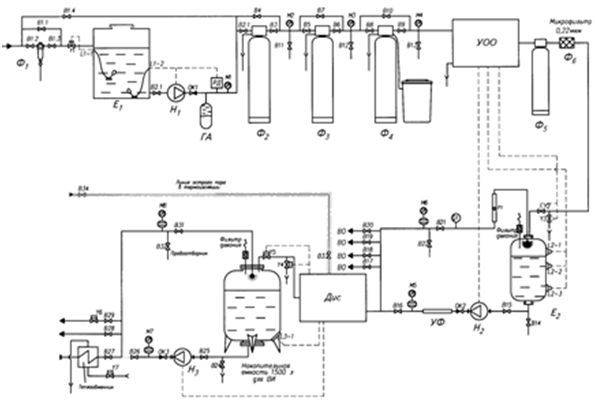

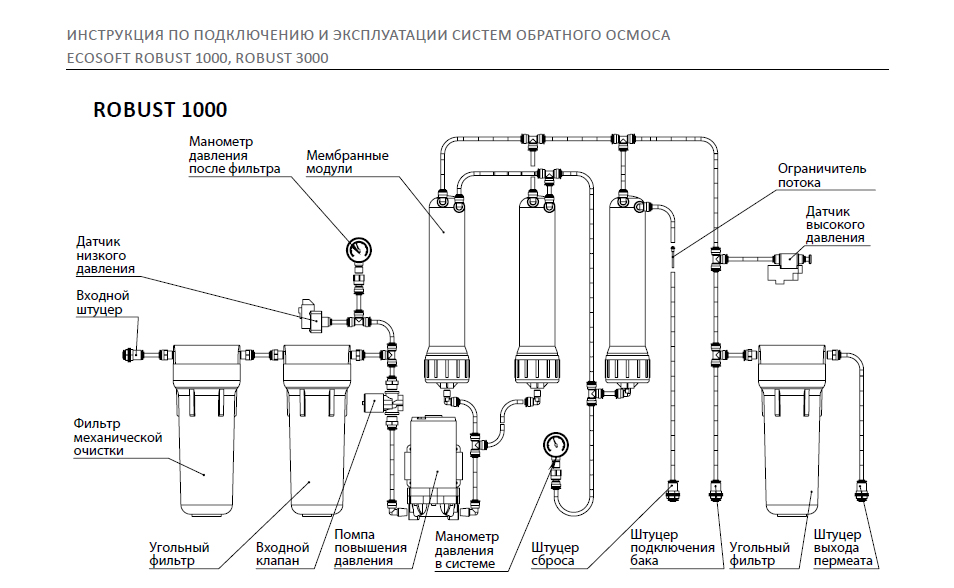


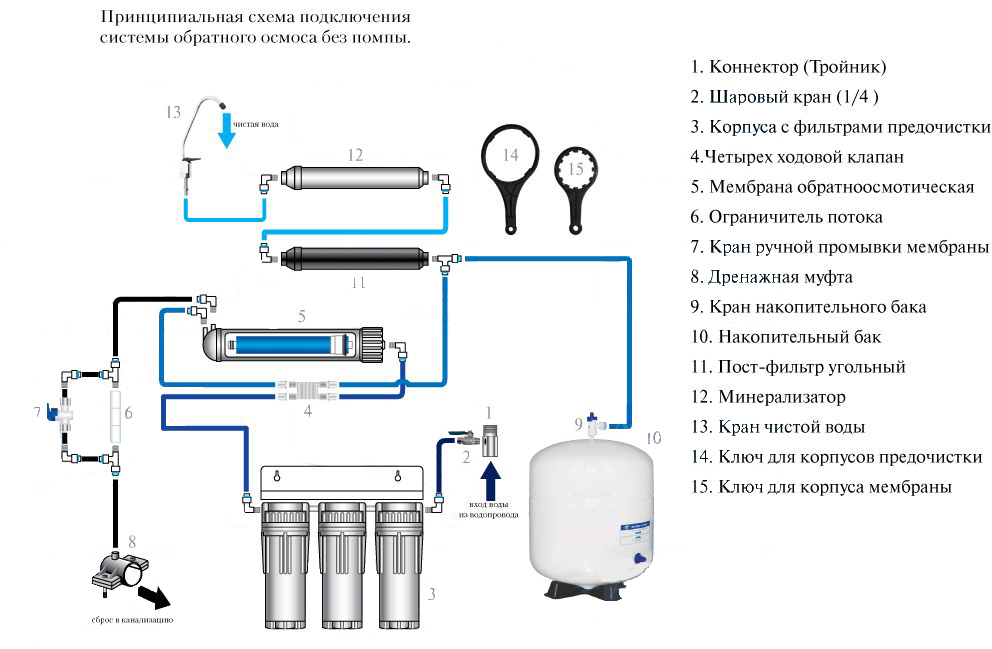
Table 2. Reverse osmosis installation
| Steps, photo | Description |
|---|---|
| Step 1 - Removing the transport plugs | We remove all transport plugs. The first is at the entrance to the pretreatment, the second at the exit from it (see the instructions from the manufacturer). |
| Step 2 - connecting the pre-treatment to the membrane tank | A flexible hose comes out of the membrane tank. We take its free end and connect it to the pretreatment outlet, as shown in the photo. |
| Step 3 - drain plug | Next, remove the drain plug - you just need to pull it towards you. Zetam remove the rest of the plugs from the post-filter and mineralizer |
| Step 4 - Installing the Faucet on the Tank | On the storage tank, to the thread coming out from above, we fasten the tap, which must be securely tightened in the end, so we use a wrench. Do not overdo it so as not to break the plastic parts. |
| Step 5 - connecting the parts of the device with tubes | The blue tube JG is put on the outlet of the tap, and the other end is on the inlet of the post-filter. The green one connects to the inlet to the pre-treatment system, and to the outlet of the adapter tee on the water supply. The red one is for the drain hose. All connections are made by hand - just stick the end of the tube onto the fitting. The second blue tube connects the outlet of the post-carbon filter to a clean water supply faucet. |
| Step 6 - Assemble the adapter tee | Next, you need to embed a tee-adapter into the line. To do this, we carry out its preliminary assembly - the threaded connection is sealed with sanitary flax, which is additionally coated with silicone. You can also use a fum tape, but it is not as reliable as an old proven tool. Then we install a tee in the line - it is most convenient to do this at the cold water outlet, before installing a flexible connection to the mixer.Be sure to seal the joints with gaskets and flax. |
| Step 7 - Connecting the Hose to the Tee | We connect a tube to the tap outlet, which is tightened with a special cap collar - first manually, and then with a key. |
| Step 8 - Installing the Faucet | Next, a 12 mm hole is drilled in the sink, into which a faucet for clean water will be installed. It has one central axis, which is inserted into the hole. Gaskets are placed from below in the correct order, after which the position of the crane is fixed with a nut. See the osmosis instructions for how to install gaskets. |
| Step 9 - Connecting the faucet to the filter | A nut is put on the tube that we have going to the tap, then a piston is inserted into it until it stops. After that, the nut is tightened on the tap - the connection is reliable and will not leak. |
| Step 10 - connecting the drain to the sewer | Then we will need to cut the tube from the drainage hose into the sewer. To do this, we drill a 7 mm hole in the plastic drain pipe. We insert the hose into the special clamp that comes with the kit, and push it inside the pipe. We fix the screw clamps on the clamp. |
In conclusion, we just have to rinse the filter. To do this, we supply water to it, turn off the tap on the tank and open the tap for clean water at the sink. We wait 10 minutes and switch the taps in the reverse order - it is open on the tank, closed on the sink. We wait a couple of hours until the storage tank is full. Then we drain all the water from it and repeat the procedure again. Now the system is completely ready for operation - evaluate the quality of the water!
The principle of operation of the system ↑
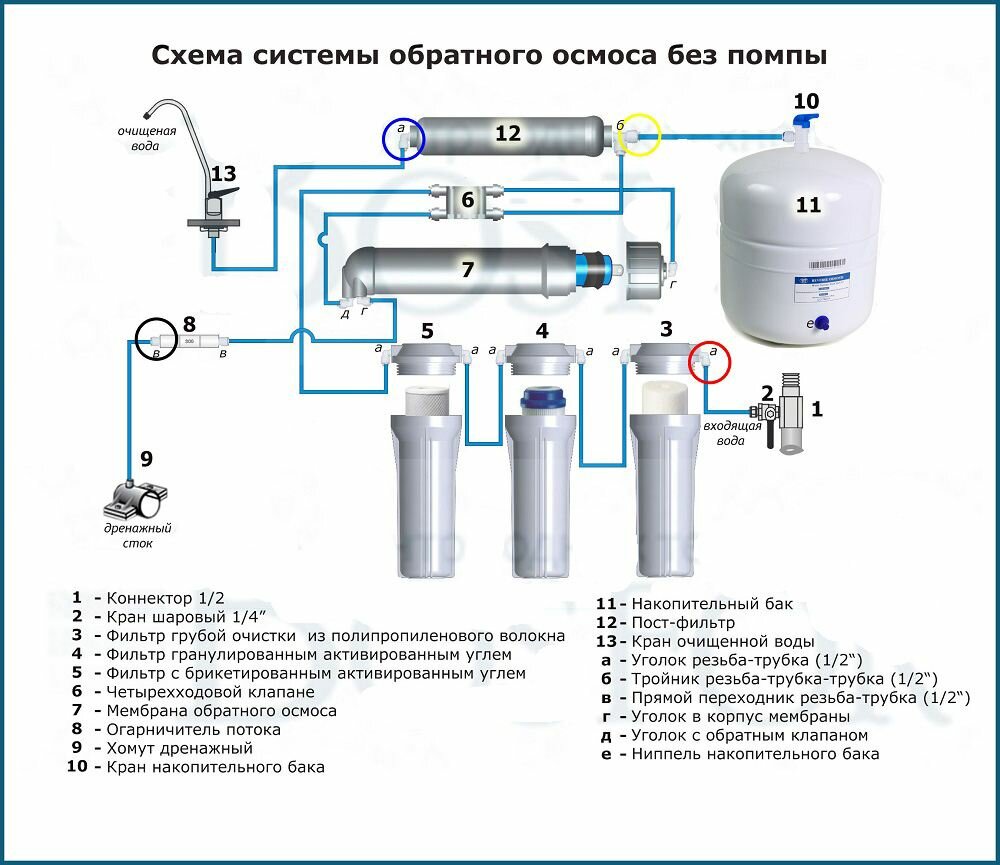
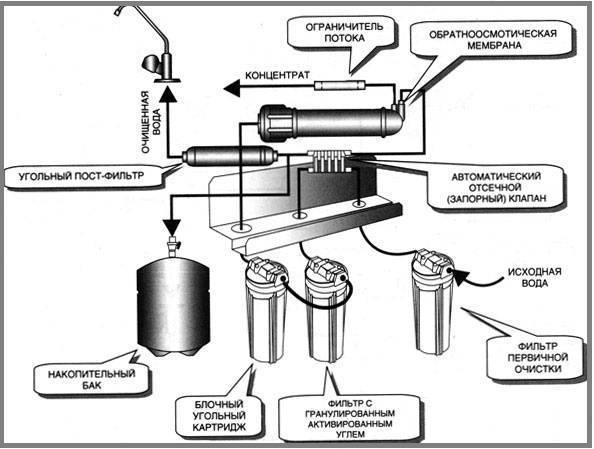
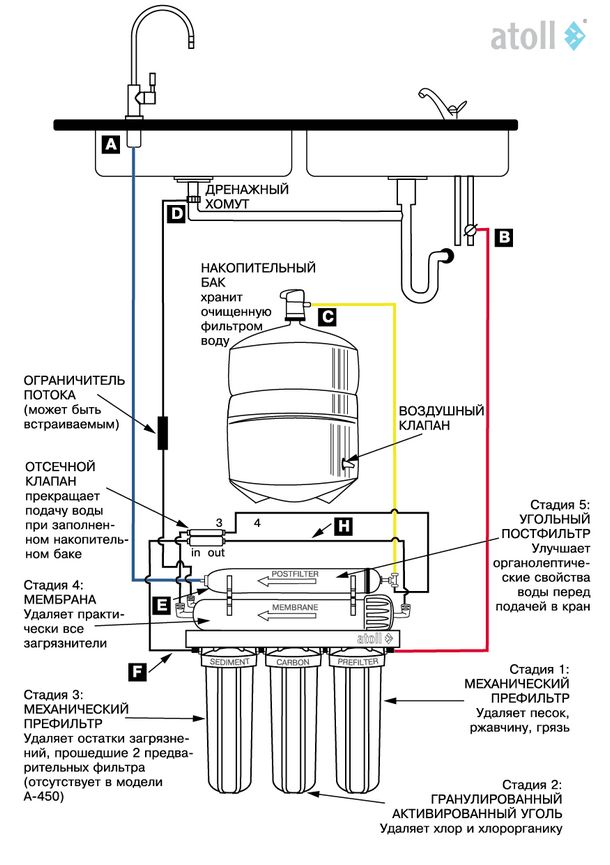
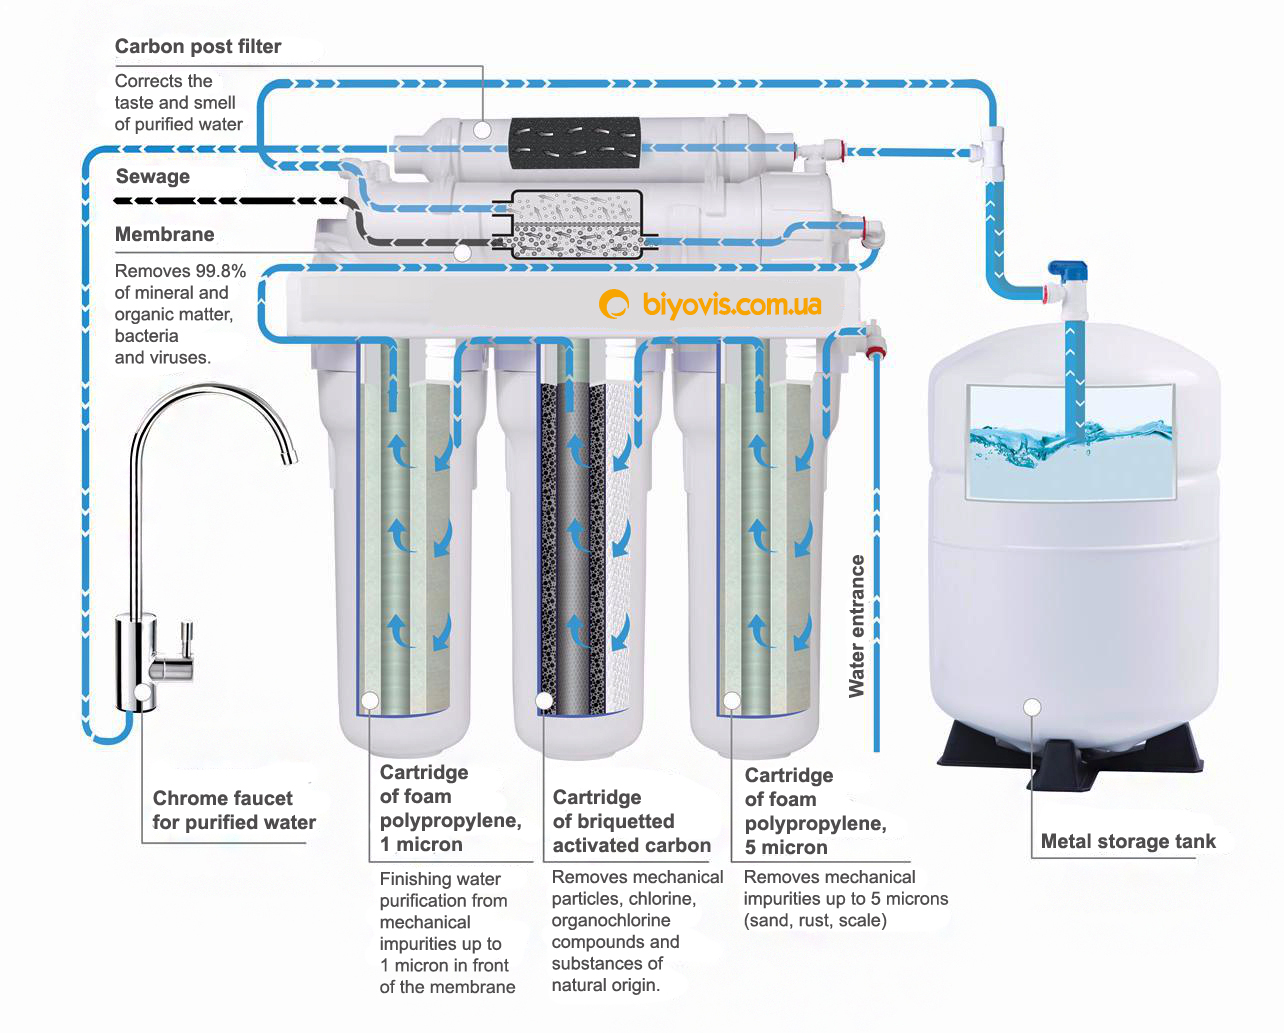
The classic reverse osmosis water purification system at home consists of five stages.
Its principle of operation is the passage of water and oxygen molecules, previously purified from mechanical pollutants, through the biological membrane.
The pores of the membrane are so thin that they retain all the contaminants on themselves, which are then washed away by the flow of water into the sewer.
To avoid getting large dirt on the walls of the membrane and clogging it, the first step in the reverse osmosis system is mechanical water purification.
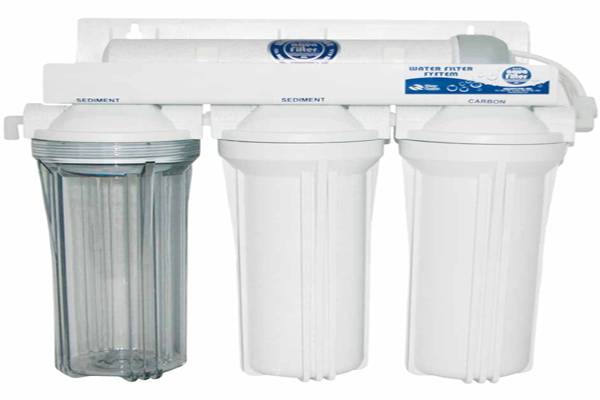
It passes through the filter, which is a set of cartridges designed for pre-cleaning:
- coarse filter - retains large pollutants (rust, sand);
- coal block - purifies water from phenol, oil products, chlorine and heavy metals;
- fine filter - the final mechanical post-treatment of water, removal of impurities smaller than 1 micron.
The fourth stage of cleaning is direct cleaning with a reverse osmosis membrane. Water is filtered through the pores of the membrane, which are so small that they do not allow other impurities and bacteria to pass through.
Air is pumped from one side of it, water is pumped from the other. When the tap is opened, water is pushed out of the tank and passes through the fifth stage of purification - the carbon filter.
After it, the water becomes absolutely clean, with a pleasant taste and smell, and ready for use. Good cleaning takes some time, because reverse osmosis filters have low performance.
Water filtration stages

Five-stage scheme of the reverse osmosis system
You can also install additional cartridges in the system:
- mineralizer. Saturates the water with useful minerals and salts necessary for a person, increases the pH value;
- ionizer. Ionizes water, removes negative ions.This water is better absorbed, regulates the pH level in the body and cleanses it of toxins;
- bioceramic cartridge. Restores the natural structure of water. The use of such water helps to cleanse the body, remove toxins and free radicals;
- softening cartridge. Gives the water a pleasant softness.
In a system with an additional cartridge, a double tap is installed - for plain purified and supplemented water.
Advantages and disadvantages of reverse osmosis
A high degree of purification and guaranteed quality of drinking water is the main advantage of reverse osmosis systems. It is estimated that the content of foreign substances in the water purified in this way is ten times lower than the minimum allowable rate. The design features of the membrane exclude accidental ingress of contaminants into the purified water flow.
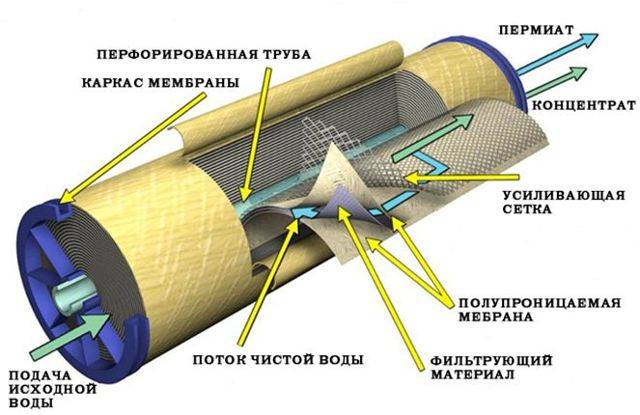
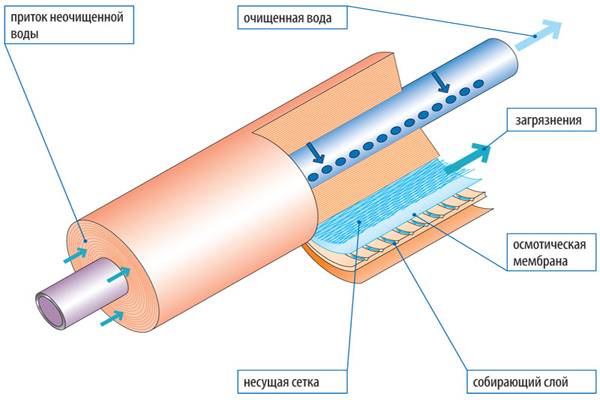
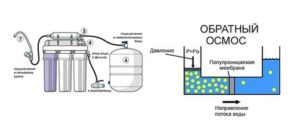
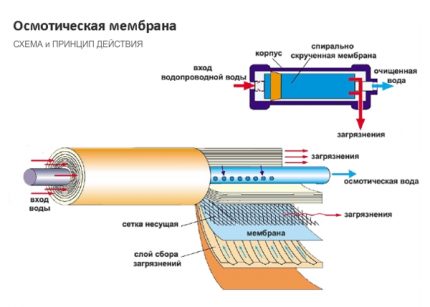 This diagram demonstrates in detail the design and operation of a reverse osmosis membrane, which allows you to get purified water - permeate - and remove the contaminated part - concentrate
Such water can be safely used for drinking and cooking, it can be given to children and pets. For health, reverse osmosis water is much healthier than boiled tap water. Aquarists use such water to supplement the volume of aquariums without settling.
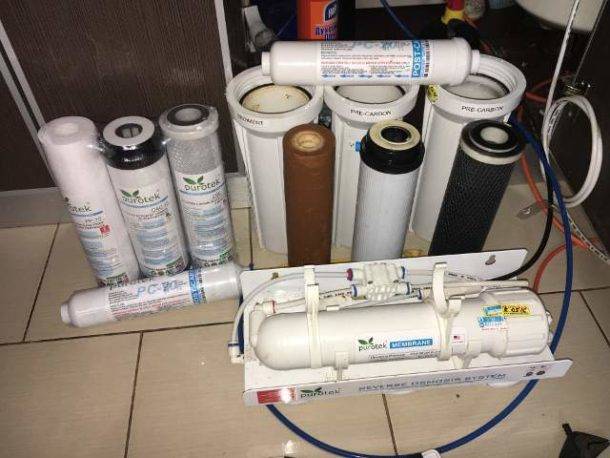
Despite the more complex design compared to conventional household filters, the installation of such systems is carried out without any problems. Everything you need for installation is usually supplied in the kit. Almost all elements or their modifications can be purchased separately.
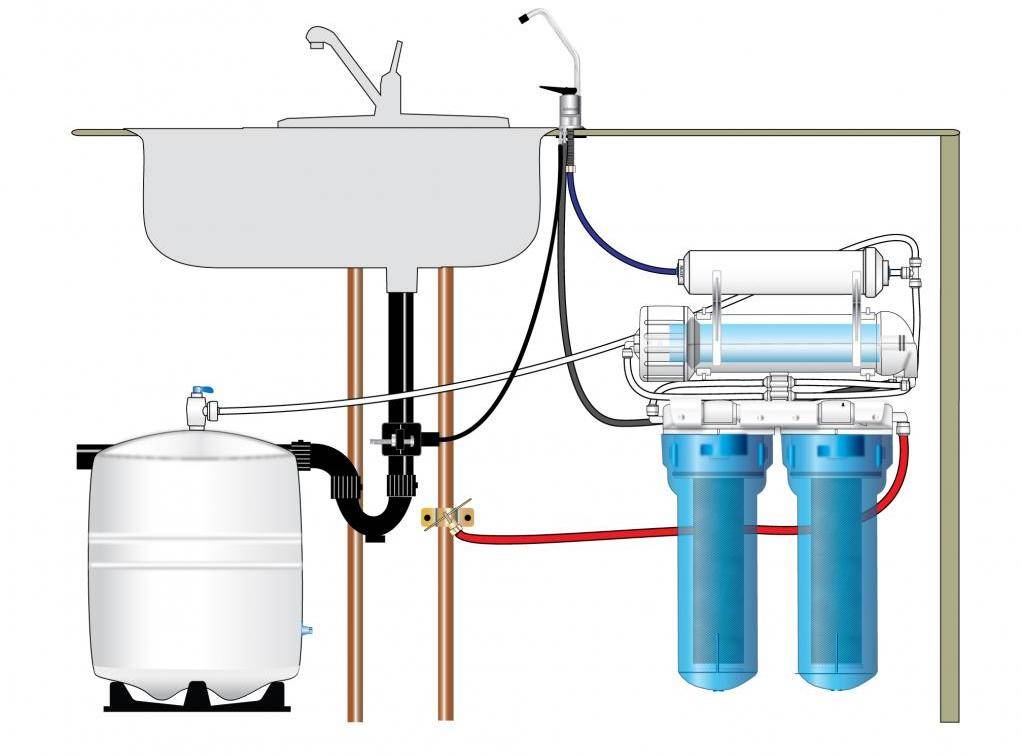
The system does not take up too much space, most often the tank and a set of filters with a membrane are fixed directly under the sink. A compact tap for drinking water, installed on the sink, usually fits perfectly into the interior.


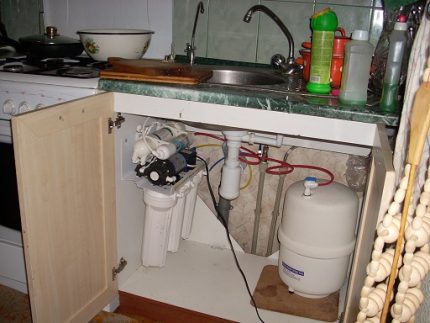
The dimensions of the reverse osmosis system components are small, usually they can be easily installed under the sink. The kit includes a set of narrow hoses for connecting individual elements of the system
The main disadvantage of reverse osmosis systems is the high initial cost of the kit. Further maintenance of the system will also require the cost of replacing filter cartridges, but they cost significantly less.
Every few years you will have to replace the membrane, which can cost about $50. But calculations show that as a result, the cost of clean water will still cost the family less than purchasing drinking water from third-party suppliers.
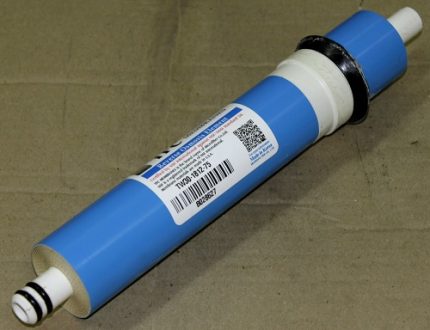
The efficiency of the membrane in a reverse osmosis system gradually decreases and must be replaced every few years. This period varies depending on the operating conditions.
Another feature of the reverse osmosis system, which can hardly be considered a disadvantage, is low productivity. Purified water seeps through the membrane very slowly, the standard membrane capacity is about 150-300 liters per day.
At the same time, more than half of the water that comes from the water supply goes to the sewer, which to some extent affects the amount of utility bills.
But if the volume of the storage tank is chosen correctly, then problems can only arise for a short time only when the system is started immediately after installation or after it has been idle for a long time with an empty storage tank.
Installing accessories
The operation of even such serious equipment as a reverse osmosis filter can be made more efficient by installing additional elements.
Such as for example:
- Pressure regulator and water hammer compensator. The equipment is designed to protect the elements of the water supply system from pressure drops, exceeding the permissible values at the inlet to the filtration system.
- Leak protection system. It is installed in front of the filter and shuts off the water in case of leaks and water ingress. Minimizes risks and limits the amount of damage caused, but does not completely eliminate the possibility of leaks.
- Nitrate prefilter. It is used for effective removal of nitrates, the place of installation is coordinated with specialists.
- Ice maker. It is connected through a tee to a break in the connecting tube leading to a drinking tap.
Before installing the filter, measure the pressure in the line with a pressure gauge. At values greater than 6.6 atm, a reducer is installed, at values less than 2.2 atm, a pump is installed that will create a greater pressure. For devices that are most often used to improve the functionality of reverse osmosis, the following is a more detailed description.
Element #1 - booster pump
The membrane filter, which is the basis of the reverse osmosis system, can only fully function at a certain water pressure.
If the maximum pressure does not exceed 2.8 atm., then for the normal operation of the filter, it is necessary to additionally install a pump.
If you have to buy additional equipment, then it is better to do this from one manufacturer and be guided by the connection diagrams developed by him.
An example of one of the possible schemes.The pump can be placed in the rupture of the supply tube before the first pre-filter, as well as after the second or third
The pump is installed only in tandem with a pressure control sensor, which is responsible for turning it on when the pressure drops and turning it off when it jumps to the maximum.
The sensor is mounted in front of the storage tank, in a tube break. If the quality of tap water is poor, a main coarse filter is installed in front of the pump.
Fix the pressure booster pump to a horizontal or vertical surface using a special bracket and screws
If there is a danger of increasing the water pressure in the system up to 3-4 atm., To prevent leaks, a special pressure relief valve must be installed in front of the pump.
Item #2 - UV Lamp
Sometimes in a reverse osmosis filter favorable conditions are formed for the rapid development of microorganisms as a result of an increase in water temperature or system downtime for a long time.
This leads to the fouling of pre-filters by microorganisms, a decrease in pressure and a deterioration in the performance of the equipment. And then ultraviolet filters are used to disinfect the water.
The device consists of the following parts: a stainless steel case with a UV lamp inside and a power supply that converts the voltage in the network to the values necessary for the operation of the lamp and protects it from power surges.
Water, passing inside the case, is translucent with ultraviolet rays and disinfected.
The UV lamp can be installed after the filter or before it. When mounting the lamp in front of the filtration unit, it is often used in conjunction with a prefilter
The installation location of the ultraviolet lamp may depend on the goals that need to be achieved:
- to eliminate strong biological contamination of tap water, installation is carried out at the inlet to the filter;
- to protect against microorganisms entering the tank from a drinking tap, a lamp is installed in the segment between the tap and the container.
For ease of installation, the lamp has two clips that help to fix it on the filtration unit or on any other surface.
Element #3 - mineralizer for water
Water that has passed through a membrane filter is 90-99% purified and gets rid of any impurities, including mineral elements useful and necessary for the body. This water tastes sour.


Mineralizers compensate for the lack of essential minerals, adjust the PH level. Cartridges-mineralizers of different brands may differ in their composition and resource and enrich water with calcium, zinc, magnesium, and other elements.
The installation of the mineralizer is carried out after the membrane filter and is connected mainly to a double tap. Thus, the user has the opportunity to choose between plain purified and mineralized water.
In some models of reverse osmosis filters, the mineralizer also plays the role of a filter and is installed as the last stage of purification.


