- What is a check valve for?
- Selection Guide
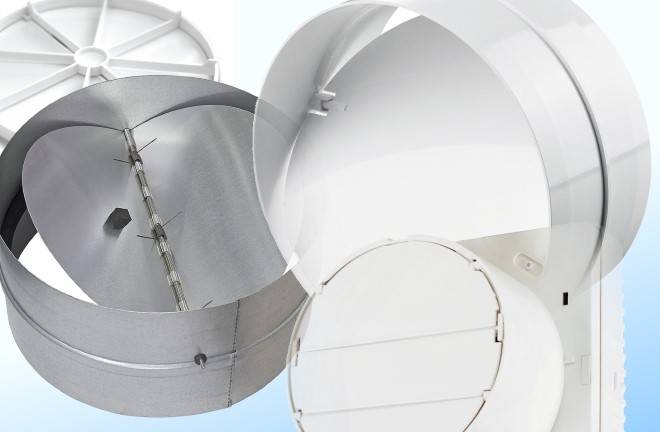
- Rating of high-quality models with gratings
- Grille with valve from Revizzona LLC
- AURAMAX C 5S C
- Reviszona ABS ventilation grille
- How to make and install a check valve yourself
- Tips of the masters
- Check valve - device functions
- Correct installation
- Incorrect use of elements
- Classification
- Double leaf spring
- 5 Additional installation details
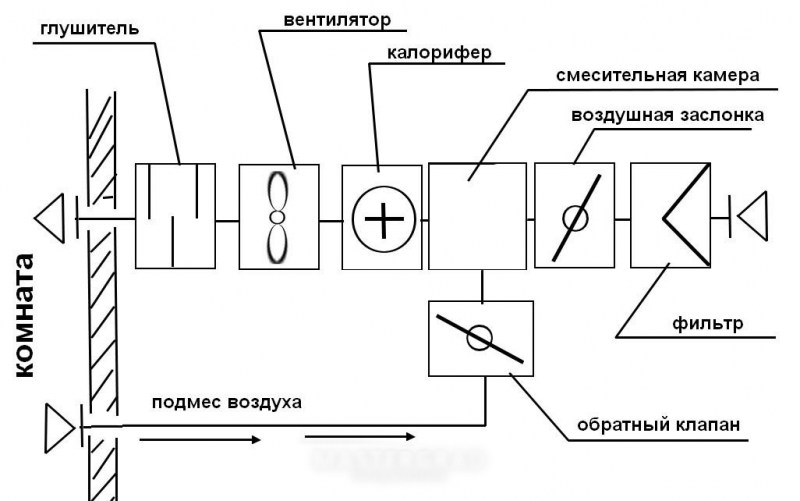
- Forced ventilation
- Forced supply system
What is a check valve for?
The check valve is a design in which the blades of the valve itself, located on the axis, will move in such a way that the air entering the valve will not enter the apartment. The air masses in the check valve move only in one direction, and if it changes sharply, the device closes, which prevents air from entering the room.
The main reasons for installing a check valve are:
- Lack of supply ventilation - it can be broken or clogged, in connection with which the supply air simply does not enter the ventilation.
- Incorrect location of the exhaust pipe, as a result of the ingress of blown air into the ventilation.
- Stove heating is installed in the house, and when the stove is operating, the combustion draft in the pipe increases, which contributes to the reverse flow of air in the ventilation pipe.
- A powerful extractor hood is installed in one of the apartments of a multi-storey building, and during its operation, the course of air flows in other apartments is disturbed.
- The presence of several hoods in one apartment will increase the draft in one of them, which will lead to a violation of the outflow of air.
To check the presence of draft in the ventilation, you can use a candle. Bring a lit candle to the ventilation and open the window. If the air flow is correct, then the candle will die out.
Selection Guide
The return element is selected depending on the ventilation scheme and installation location:
- To connect a kitchen hood, use a gravity-fed popper that matches the shape of the duct. The purpose of this valve is to maintain natural air exchange during the inactivity of the fan.
- A grate with a membrane valve (home-made or factory-made) is placed in the opening of the exhaust shaft if the draft is overturned by gusts of wind. It is better to get rid of odors by another method - to install wall supply valves to resume normal air exchange.
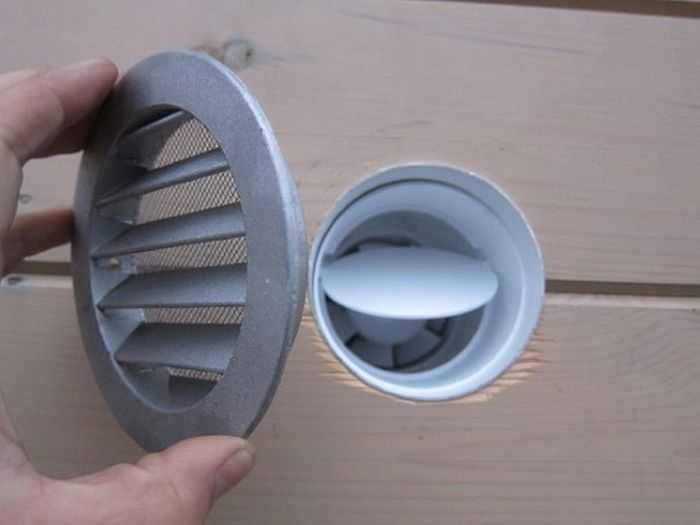
- In private houses, the local exhaust duct is often laid directly through the outer wall. To prevent cold air from blowing into the ventilation duct, install a multi-leaf exhaust grille from the outside.
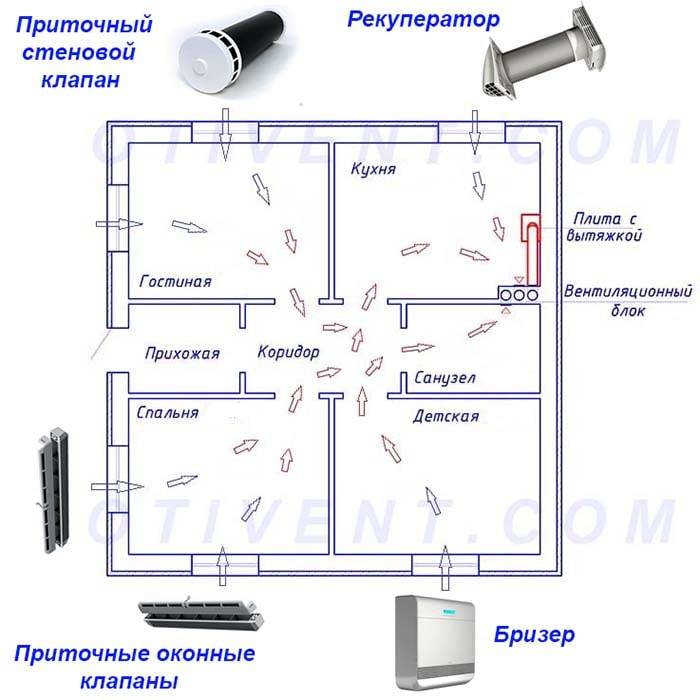
Options for supplying fresh air to rooms using supply equipment
In mechanical ventilation systems with forced air supply, valves are used according to the scheme and specification drawn up by the designer.We do not recommend developing such air exchange on your own - mistakes cannot be avoided, and the price of alterations will be too high.
Rating of high-quality models with gratings
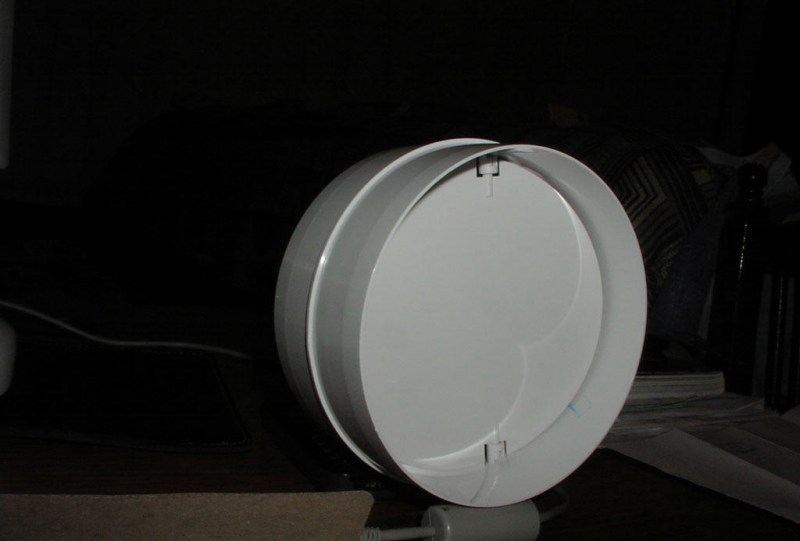
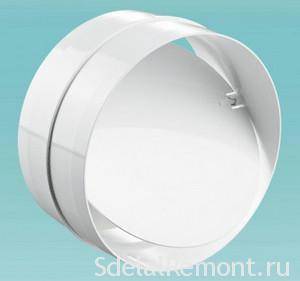
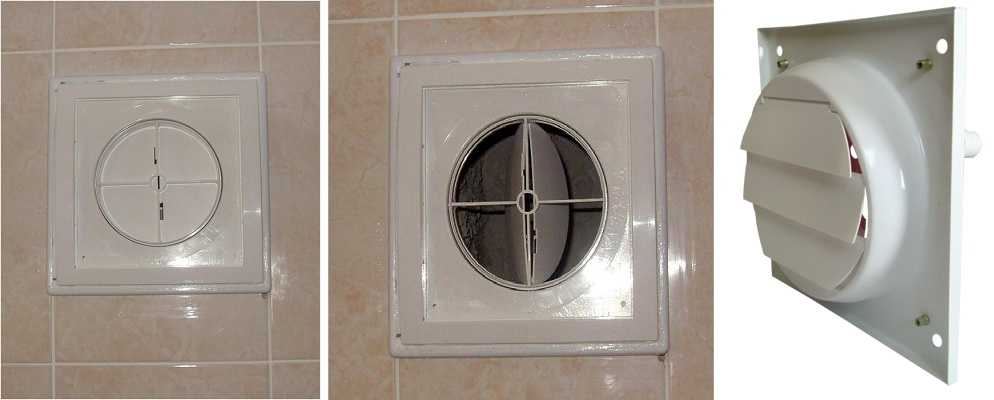
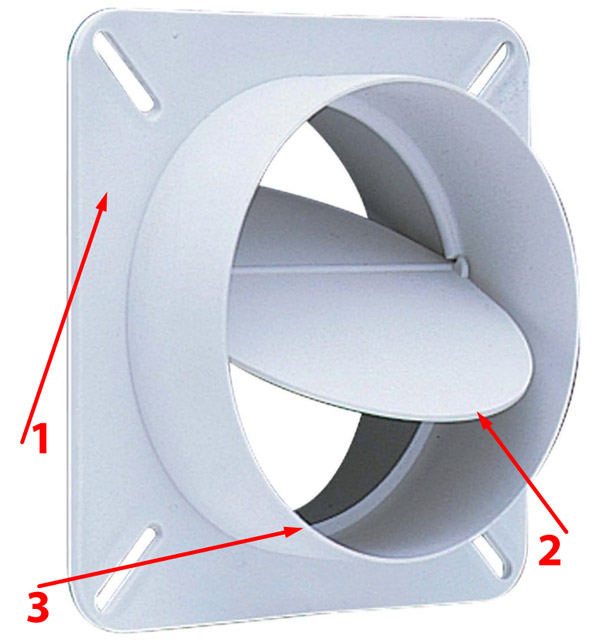
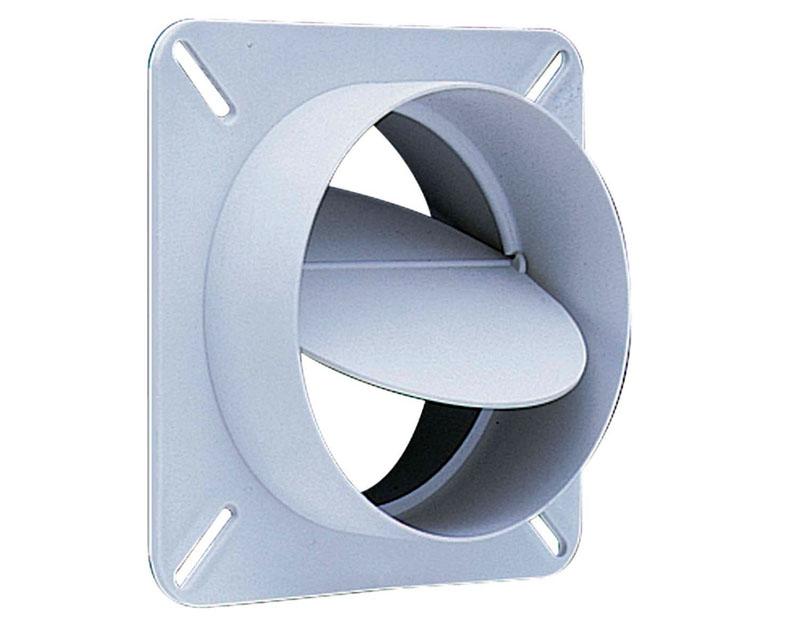
Grille with valve from Revizzona LLC
A classic device that is designed for installation in residential and office premises. Operation is completely silent. The main feature of the design is a snug fit to the walls, which is why it is not necessary to use a sealant.
Grille with valve from Revizzona LLC
Advantages:
- Beautiful appearance;
- Good ventilation;
- Tight fit;
- throughput;
- Easy installation.
Flaws:
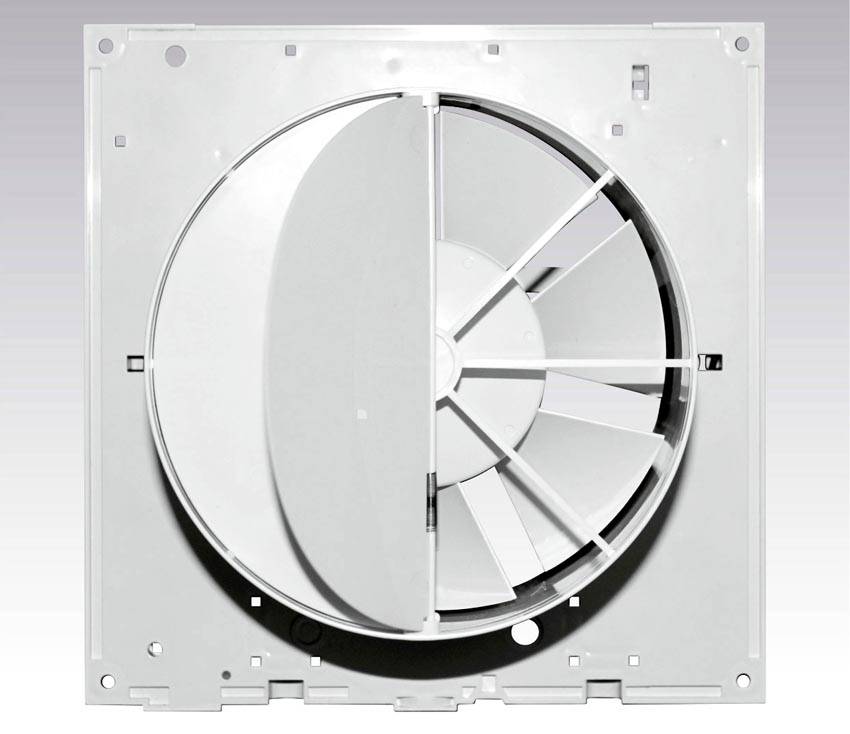
AURAMAX C 5S C
A beautiful modern product designed for installation in residential areas. The design provides for the presence of a fan and a check valve, which increases efficiency at times and eliminates even minor odors. The product is made of plastic. Provides a snug fit against the wall.


The average price is 1,600 rubles.
valve AURAMAX C 5S C
Advantages:
- Fan and check valve;
- Efficiency;
- Durability;
- Tight fit to the wall.
Flaws:
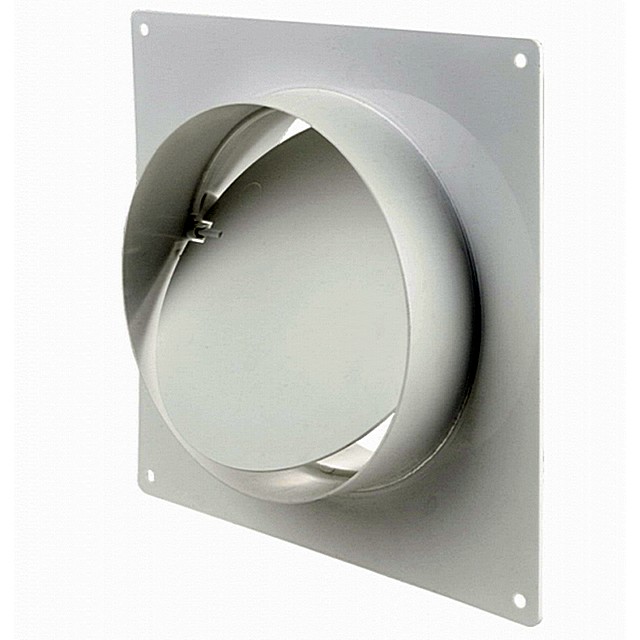
Reviszona ABS ventilation grille
An excellent product that will purify the air and decorate the room. The grate is equipped with a non-return valve, which is triggered by the slightest fluctuation of air. Installation does not take much time and can be carried out by an ordinary person.
Reviszona ABS ventilation grille
Advantages:
- High service life;
- Works fast;
- Removes excess odors;
- Doesn't make noise.
Flaws:
How to make and install a check valve yourself
Step one.The ventilation grill is removed, screwed with self-tapping screws.
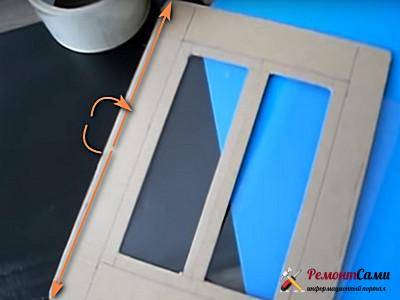
Step two. The basis for the valve is formed by a cardboard frame. It won't be hard to cut it out. Its dimensions must correspond to the size and shape of the ventilation grille, because it will be located behind this grille.
Step three. The cardboard base of the valve is marked. At first, the contour of the vent is outlined on the cardboard (horizontally and vertically, the indents from the edges should be the same). Next, the valve windows are outlined.
From the border you need to retreat to the center of 10 mm and draw 2 rectangles. They will become the windows of the valves. These indents will be required:


firstly, to allow the edges of the membranes to block the flow of reverse thrust when they are pressed against the cardboard;
secondly, so that the membranes, when opened, cannot touch the walls of the vent;
thirdly, for attaching membranes.
Step four. In the center are two rectangular windows. Between them should leave a strip - 15 mm wide. The elastic membranes will converge on it when the valves close.
Step five. The function of the valve is checked. It is attached to the ventilation outlet in the position in which it will remain permanently. For temporary fastening, self-tapping screws are used, inserted into the dowel-plugs, designed to permanently fix the grating.
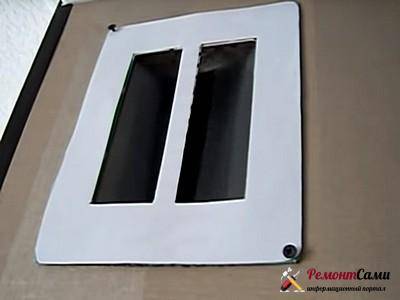
Something can interfere with the free movement of the membranes, then these minor shortcomings are eliminated. The operation of the valve should be checked with the window open to activate air flows and increase traction through the tested vent.
Step six. Only after making sure that the device really works, you can start installing the plastic decorative grille in its original place.
Video: Do-it-yourself check valve for ventilation.Easy and cheap:
Tips of the masters
Wall models are recommended to be laid during the construction of walls, but their installation in finished premises is also possible. Window valves are not advised to be installed by yourself - it is easy to break the tightness of window frames and lose warranty service from the manufacturer. But the main thing is to choose the right type of additional ventilation you need. Poorly selected models can clog the natural ventilation system of the premises, overturn it or create uncomfortable conditions with additional noise from the fan.
In the next video you will find the installation of the ventilation valve.
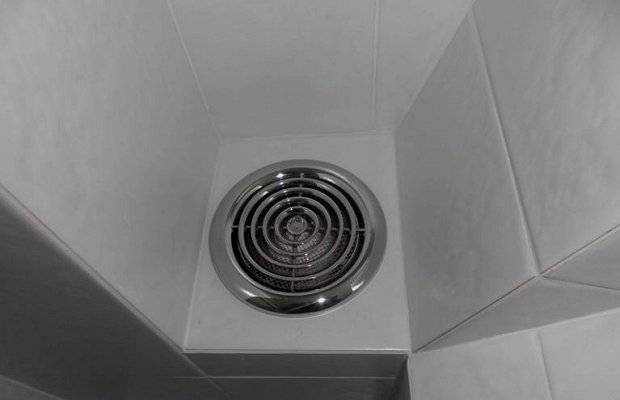
Check valve - device functions
Quite often, the apartment ventilation system begins to function inefficiently. It is easy to notice this by the appearance of unpleasant odors in the home. Such situations arise due to the fact that reverse draft is formed in the ventilation system. This is understood as the phenomenon of the return of part of the air from the ventilation duct to the living quarters.


Backlash can occur for the following reasons:
- Incorrect installation on the roof of the exhaust pipe.
- A small amount of supply air entering the natural ventilation system.
- In one of the apartments of the high-rise building, a powerful forced exhaust was installed, which led to violations in the operation of the general house ventilation system.
Powerful forced draft
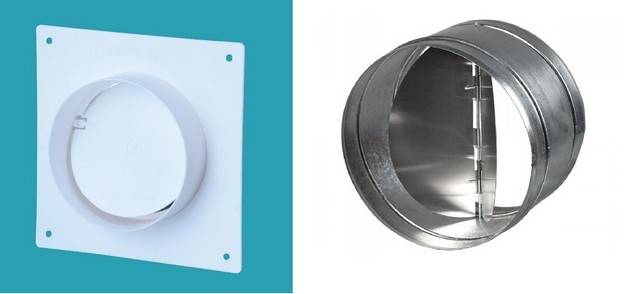
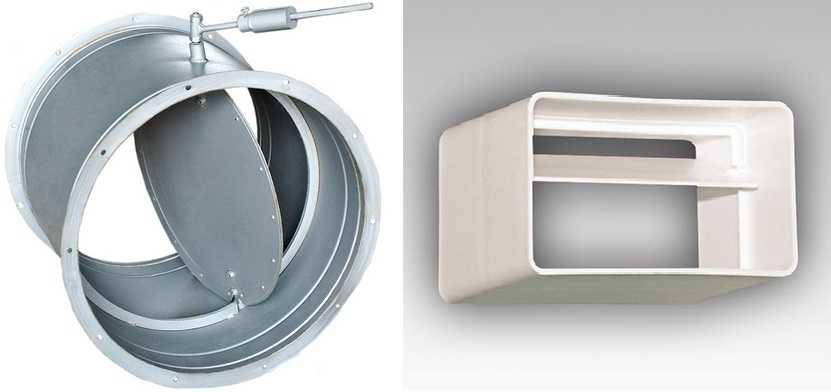
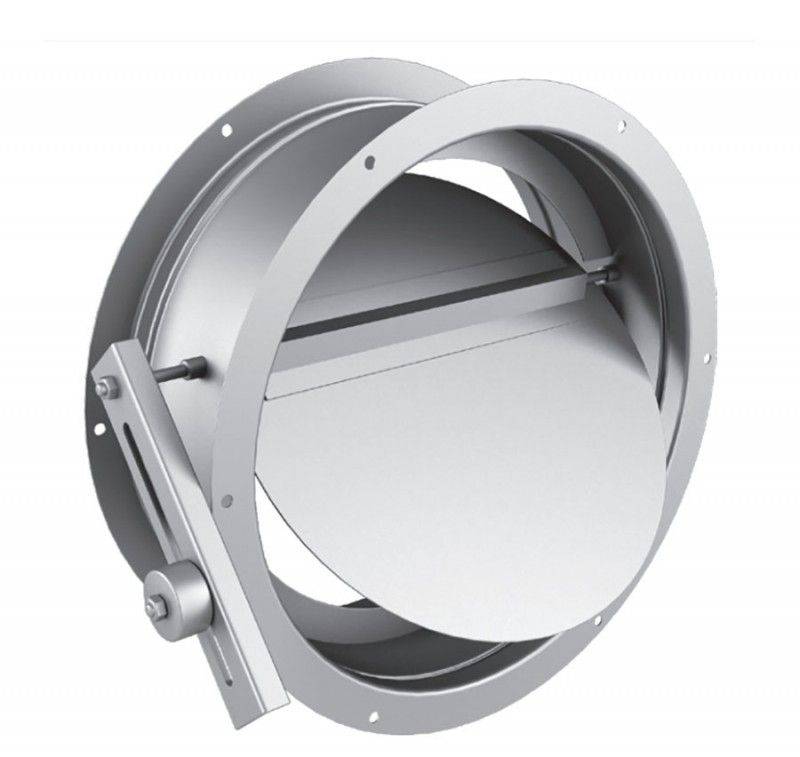
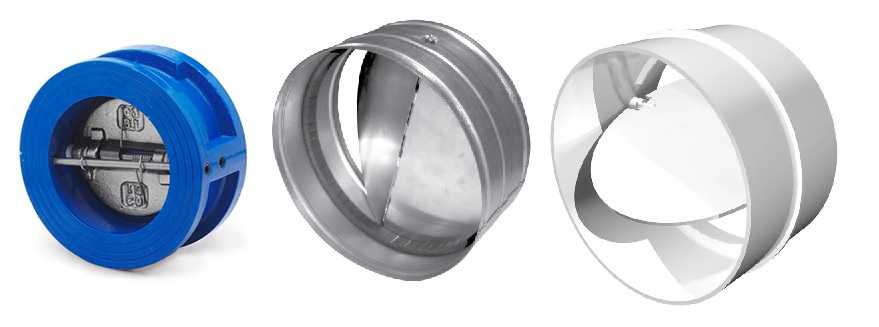
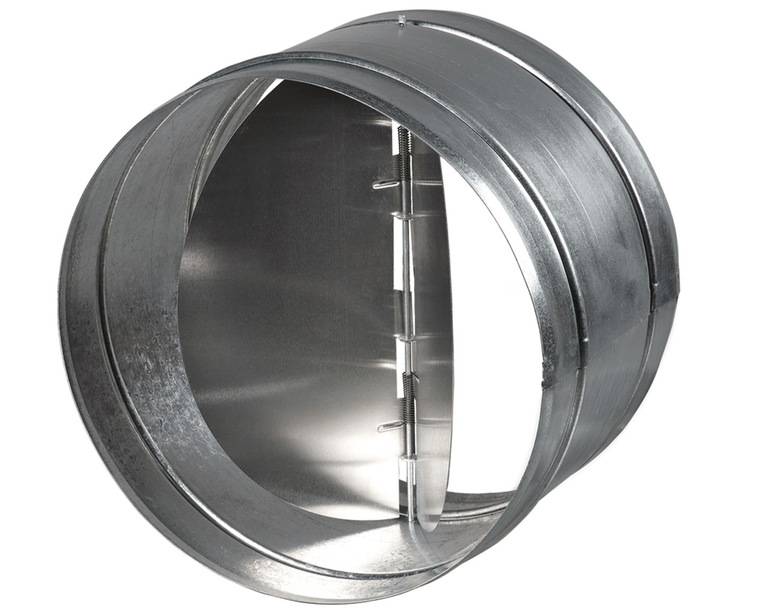
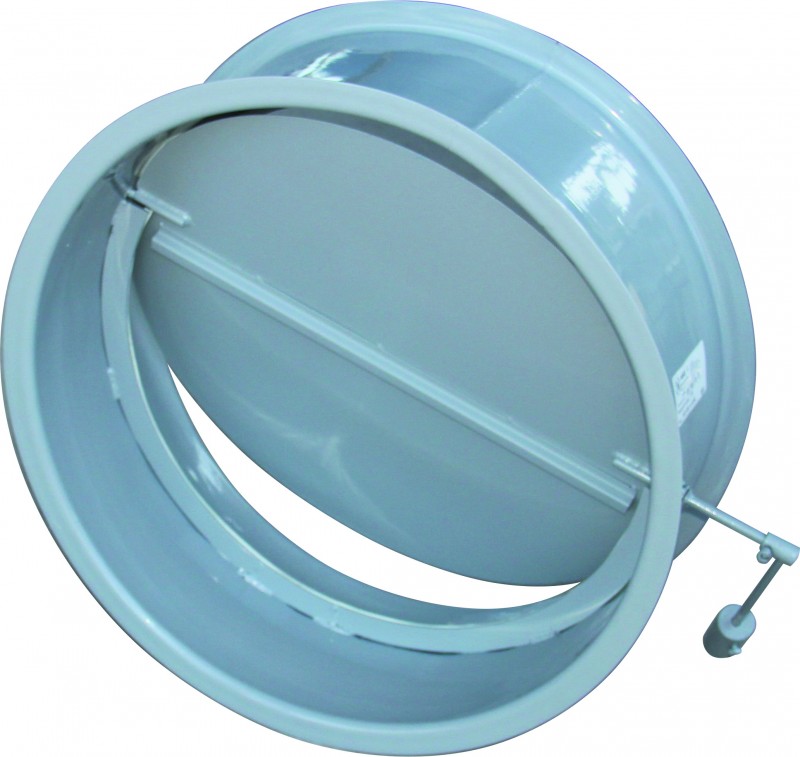
Most often, problems with natural ventilation occur when the check valve fails. This device is set up very simply. Its main structural element is the shutter. It can only open with airflow in one direction. And when the air movement changes its direction, the shutter slams.Due to this, the reverse thrust stops. The shutter for devices operating in natural ventilation systems is made in the form of a flap or a disk. Such devices can have a different size and configuration (rectangular, round) section.
The non-return valve, in addition, can be heated and operate without heating. The first type of devices is installed on ventilation systems equipped with an electric drive. Heated valves eliminate the risk of condensation in the ventilation and the formation of frost on its internal parts during extreme cold. The key parameter of the described devices is their throughput potential. To ensure effective ventilation of a dwelling with a standard area, the value of the latter should be at the level of 4–6 m / s.
Devices for preventing the formation of reverse thrust are made of plastic and metal. Metal devices are considered more durable. But during operation, they make quite loud sounds (claps), condensate often settles on such valves. Among other things, they are prone to rust. For these reasons, many now decide to purchase a plastic check valve. It functions almost silently and is inexpensive. True, its service life is much lower compared to metal products. We add that the devices of interest to us not only prevent back draft, but also prevent dust and small insects from entering the ventilation.
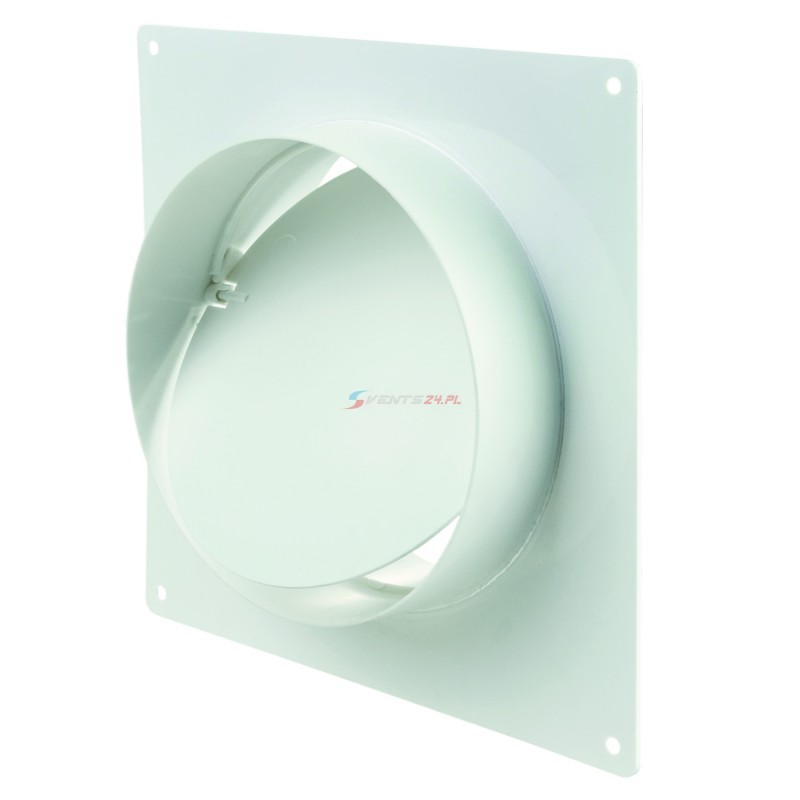
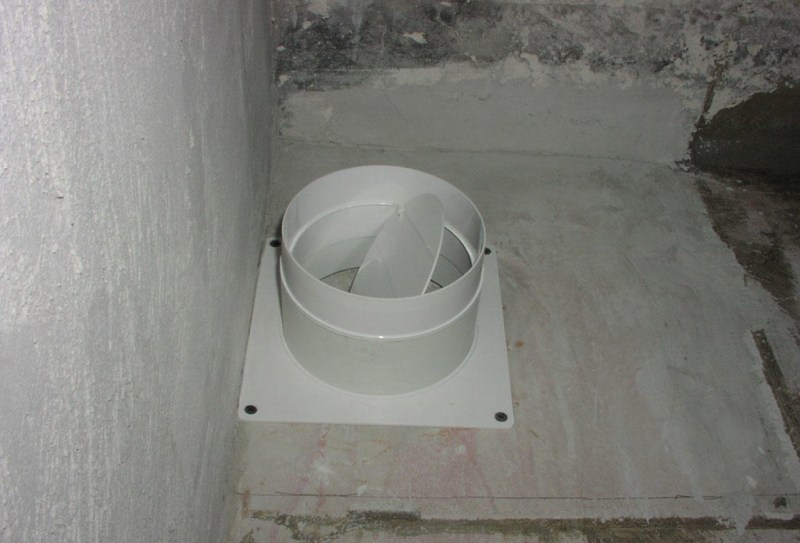
Correct installation
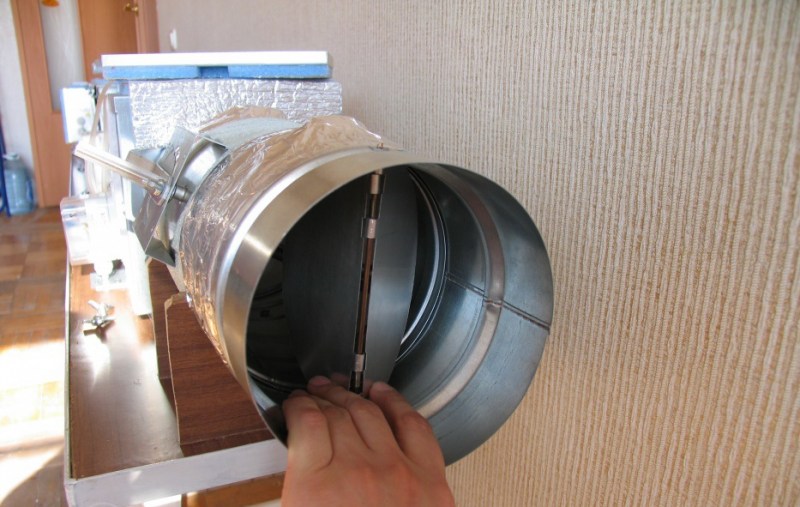
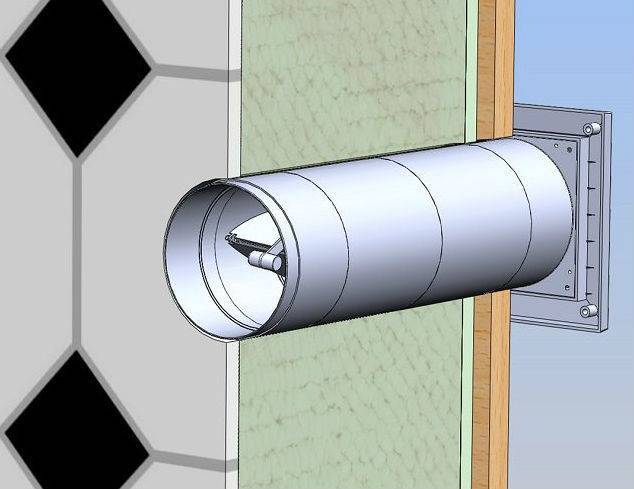
The non-return valve can be installed both at the beginning of the ventilation duct and at the end
To do this, it is necessary to drill holes for fastening, but before that it is important to make the correct markup. To do this, the device housing is installed in the duct pipe
After drilling, the check valve is installed, it is better to use dowels. During this operation, it should be remembered that there should not be any gaps, even if they appear, they must be sealed with a special sealant on any basis. The main thing is that it provides reliable and durable adhesion, and also has antifungal properties.
Incorrect use of elements
A common mistake is to install a ventilation grill with a non-return air valve in the kitchen or in the toilet. Allegedly, it protects against odors from neighboring apartments in a multi-storey building. Why this approach is wrong:
- the reason for the penetration of unpleasant odors is the overturning of the draft in the ventilation shaft;
- the draft overturns due to the lack of inflow, the larger section shaft (in the kitchen) causes the smaller channel (in the bathroom) to work in the opposite direction, the air moves from top to bottom;
- if you install a compensating supply air device in a window or wall, both pipes will begin to draw out the exhaust air, foreign odors will disappear;
- a ventilation grill with reverse petals will protect the apartment from "foreign" air by 90%, but the remaining 5-10% of gases will leak out - the sash does not fit tightly;
- the work of natural ventilation without inflow will not improve.
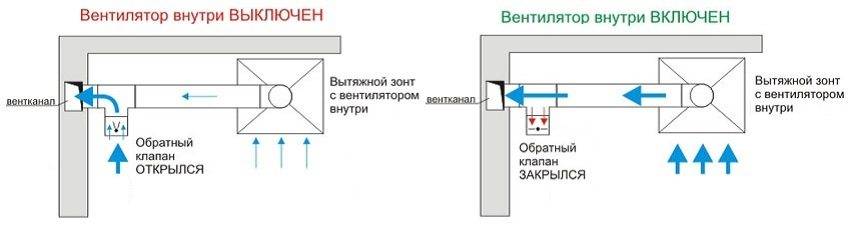
Scheme of action of reverse draft - without inflow, the kitchen shaft draws air from the bathroom channel
Let's give a second example - a scheme for forced ventilation of the kitchen and bathroom, which is found on many Internet resources.Here, 2 fans are involved in a common air duct, two check valves prevent the occurrence of parasitic flows, the third cuts off the outside air. Why diagram on the drawing no good:


- According to the requirements of sanitary standards, the hood from the bathroom (bathroom, toilet) must not be combined into one channel with kitchen ventilation.
- With the fans turned off, toilet odors will seep into the kitchen.
- When running two fans at the same time, it is difficult to predict the behavior of the air flow. Both valves will open, but the bathroom unit will override the kitchen one, as it is installed in a straight section.
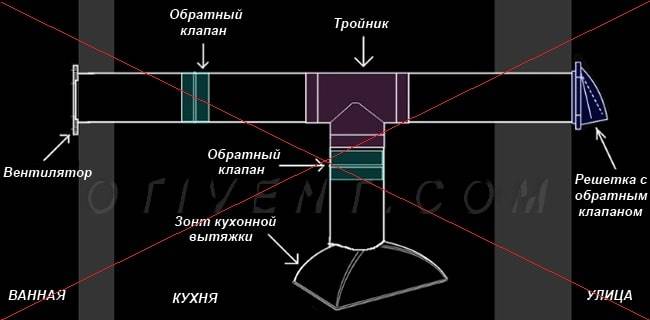
The air from the kitchen and bathroom cannot be reduced to one channel, the scheme is initially incorrect
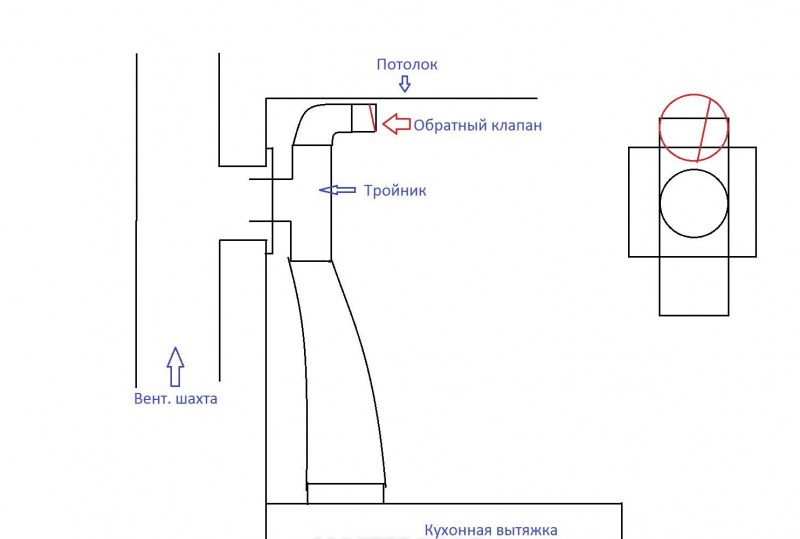
Conclusion: for each room you need a separate air duct, as required by the regulations. Then check valves are installed at the outlets of horizontal pipes, so as not to let the cold in from the street. It is allowed to combine ventilation ducts from the shower and toilet, as shown in the drawing.
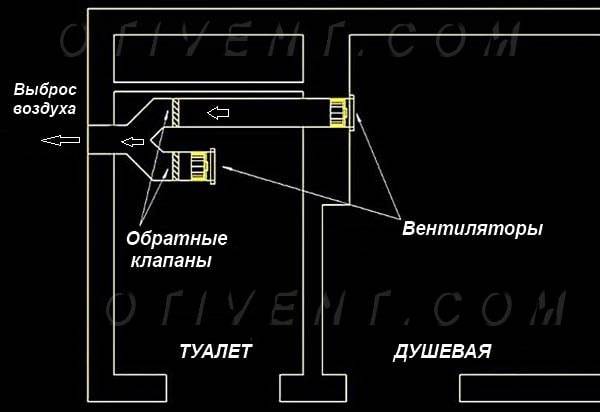
It is allowed to connect channels from the bathroom. And so that during the simultaneous operation of the fans, the air does not flow into the adjacent pipe, we join them at an angle of 45–60 °
Classification
Also, ventilation is called a difficultly regulated process of air exchange in a controlled volume. This includes all kinds of systems. And so common ventilation classification:
- artificial and natural means the way air moves
- supply and exhaust
- local and general exchange divides by service area
- monoblock and typesetting by design
The method of supplying air without coercion, only due to the difference in pressure, temperature and wind speed, is called natural ventilation. This system is constantly used in civil engineering, especially in the construction of typical multi-storey buildings.
Double leaf spring
The valve, which is called the "butterfly", has several shutters. They open if there is significant pressure from a certain side. If it is not, the springs contribute to its slamming.
These moments do not depend on gravity, but unlike the previous version, this design can be fixed at any angle. Normal operation of this model is usually guaranteed when using a hood with forced ventilation.
It is necessary to check exactly those flows that are characteristic of the duct. There are modifications that can be modified so that they take the desired parameter - in accordance with the force of the springs.
5 Additional installation details
If you correctly calculate the ventilation scheme and accurately determine the installation location of the check valve, the exhaust system will work without failure for many years. But with self-assembly, you should know some additional features:
- 1. All valve installation steps begin with determining the speed and air flow in the shaft pipe.
- 2. A valve installed directly in the shaft vent prevents natural air flow. We'll have to think of another place for installation.
- 3. All devices make loud noises when closed. A change in the wind, an increase in traction - all this will create additional noise in the room.
- 4. Some designs initially have built-in valves in their device. If the operation is not correct, the valve must be removed before a suitable one is installed. Two devices in the same design will not work.
- 5. When installing, the possibility of maintenance, replacement of parts, cleaning is considered - all this should be as accessible as possible.
- 6. A protective mesh will become an obstacle for rodents and insects, but it impairs the circulation of air flows, a compromise will have to be found.
- 7. The fastening system is chosen in the form of a clamp or a flange - this is the best way, but there are others.
- 8. If the device is mounted outside the building, the valve is selected with electric heating - this will protect parts from freezing in the winter.
- 9. You should not use "liquid nails", if dismantling is to be done later, it will be extremely difficult to do this.
Forced ventilation
A tube is inserted into this hole, which removes air. The tube is laid on the insulation so that there are no gaps. They can be sealed with construction foam.
Then install the valve so that it does not touch the tube. Next, mark the fasteners.


Drill holes and install dowels in them. Using screws, attach the case to the wall. A cover is put on the outside of the body.
In forced ventilation systems, fans are mounted inside the tube to regulate its operation. For example, in the event of a long absence of the owners, the fan can be set so that it operates at minimum power. It is not recommended to completely turn off ventilation.
If there is no electric heater in the design, the power consumption is low. Air holes are located, directing to a place where the inhabitants of the house spend more time.
To connect the fan, you need to conduct wiring. You can equip the fan with a timer so that it turns on itself at certain intervals.
Forced supply system
Such ventilation can distribute air masses throughout the room, but only if there are air ducts in the room. For such movement of air, plastic or steel outlets are attached to the ventilation devices, the ends of which are closed with a grate.


