- Advantages of an air heater
- Homemade gas heater
- Preparation of materials and components
- Cutting blanks and assembling the structure
- Idea #4 - Oil Appliance
- 6 The simplest fan heater
- Device Requirements
- Advantages of homemade heaters
- How to properly install?
- Homemade gas heater for a garage, home, cottage
- Homemade heat gun
- How to make a heater for a car with your own hands and power it from the cigarette lighter: instructions
- Selection of components
- Spiral
- Cooler
- Manufacturing
- What you need to know about security
- Design and types of fan heaters
- Tips for maintenance and operation
- From stationery pens and resistors
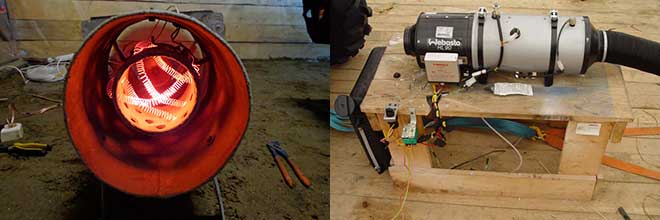
Advantages of an air heater
The advantages of using a heater are the following points:
- improved visibility;
- comfort;
- increase in safety and quality during operation;
- fuel economy.
In addition to saving fuel and lubricants, it is possible to prevent rapid engine wear and reduce money for its repair and maintenance.
Of course, a motorist begins to think about purchasing a pre-heater for a diesel engine in the first place in order to increase ease of use.But only for this, an air heater is quite suitable. But if you also want the service life of engine parts to increase, then you should think about the option under consideration. And manufacturers are ready to offer a wide range of devices.
Homemade gas heater
The main advantage of such a model is that its manufacture requires a minimum of parts that will always be found in the household of any craftsman.
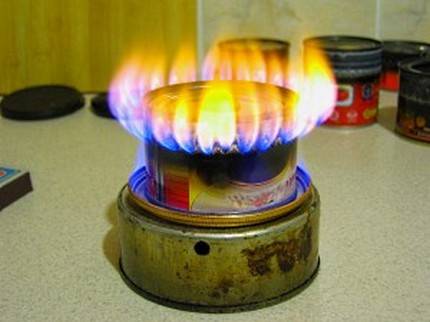
Such an economical source of heating is not too expensive; the cost of its manufacture and maintenance is completely bathed in the process of operation
The only disadvantage of a gas heater is the need to ensure sufficient ventilation.
Preparation of materials and components
To make a gas heater in the garage, you must prepare in advance:
- burner with valve;
- tin sheet;
- metal scissors;
- drill with a thin drill;
- rivets;
- riveter.
For the manufacture of the lattice, a cut of a fine-mesh metal mesh is required. Great, if you have an ordinary wire sieve from a colander on hand, it will act as a protective grill.
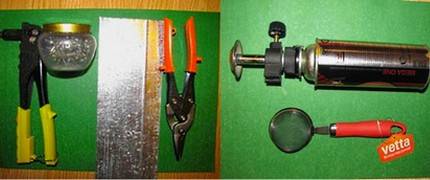
The main element of the device is a gas-filled collet cartridge with a capacity of 450 milliliters, used for refilling lighters.
Collet cylinders are convenient in that when using them, you can not immediately consume all the contents. The presence of shut-off valves allows the device to be used repeatedly.
If desired, a heating structure can be made on the basis of not only disposable cartridges used to refill lighters, but also using a small refilled cylinder.
Cutting blanks and assembling the structure
In the manufacture of the structure, the first step is to fix the heater to the burner.
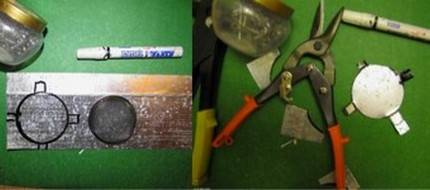
The selected household sieve of the appropriate diameter is applied to the galvanized sheet and circled around the contour with a marker
In the direction of the four sides of the workpiece applied to the galvanized sheet, four rectangular ears are added. One of the ears should be made twice as long as the rest. Workpieces are cut out along the outlined contour, trying to make even, burr-free cuts.
The burner is bolted to the cut tin blank. The ears located on the four sides of the workpiece are bent in the opposite direction and used to fix the strainer.
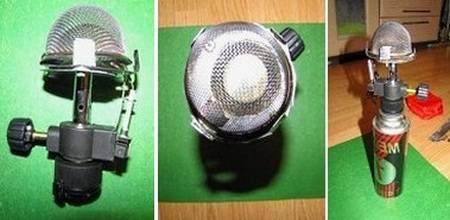
Attached with the help of the lugs of a tin circle, the strainer has a dome shape, thanks to which it will perfectly dissipate heat to the sides
To attach a second protective mesh, take another piece of sheet metal and cut out of it exactly the same size circle. Elongated ears are attached to the workpiece, which are necessary for attaching the mesh.
Stepping back from the edge of the circle half a centimeter, 10 through holes are drilled along the circumference. From a cut of a fine-mesh metal mesh, a strip is cut, the length of which corresponds to the diameter of the cut tin blank.


The ears located on four sides are bent and used to fix the wide side of the fine mesh strip, the second workpiece is fixed on the opposite side
Curved ears of round tin blanks are fixed to opposite sides of the mesh strip using a riveter and rivets. When assembled, you should get a cylinder with mesh walls and tin ends.
The design, which includes two grids, is advantageous in that it has an increased heating surface and is equipped with additional protection.
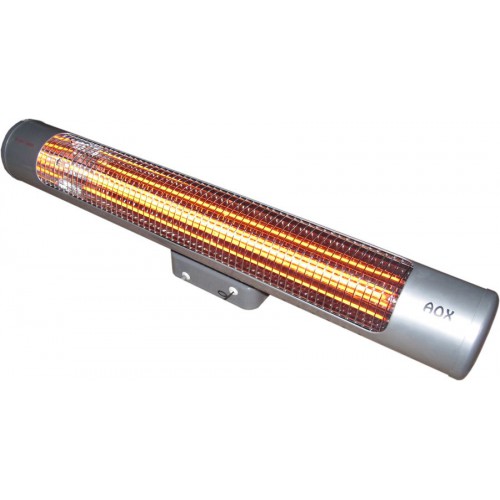
At the final stage, it remains only to turn on the gas water heater and check its performance. The heat produced by this small device will be enough to heat a small room or garage.
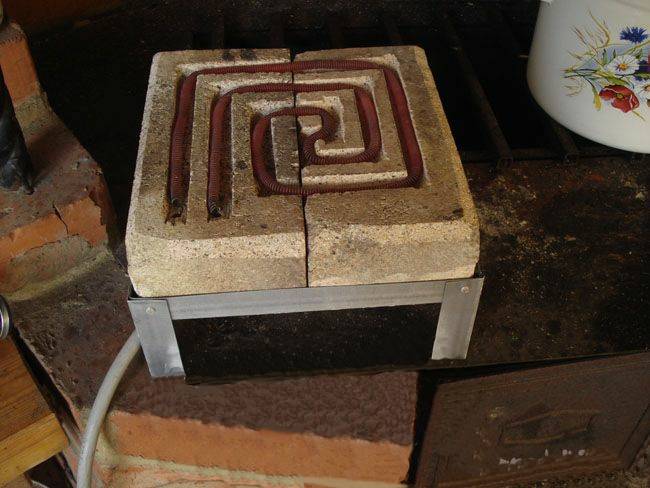
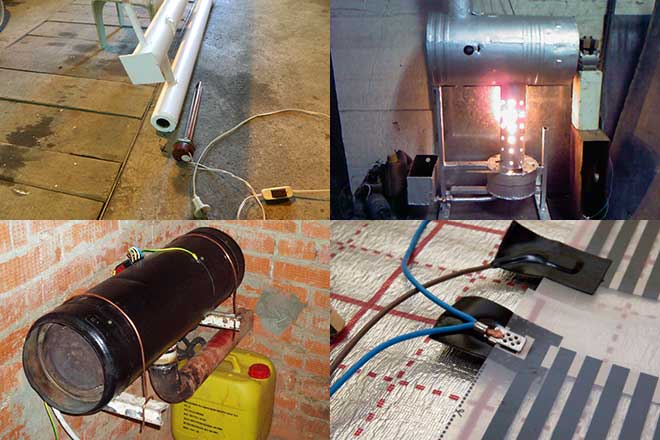
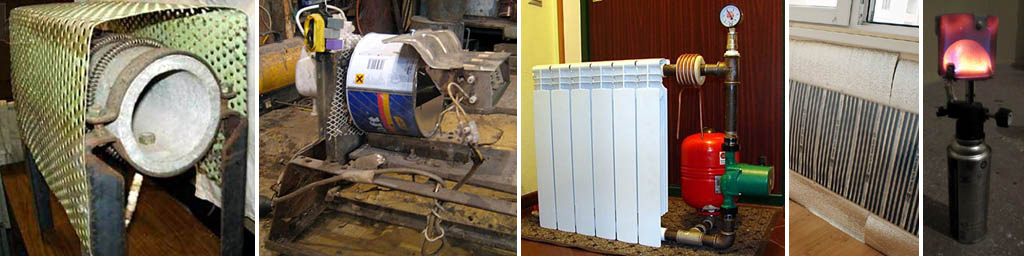
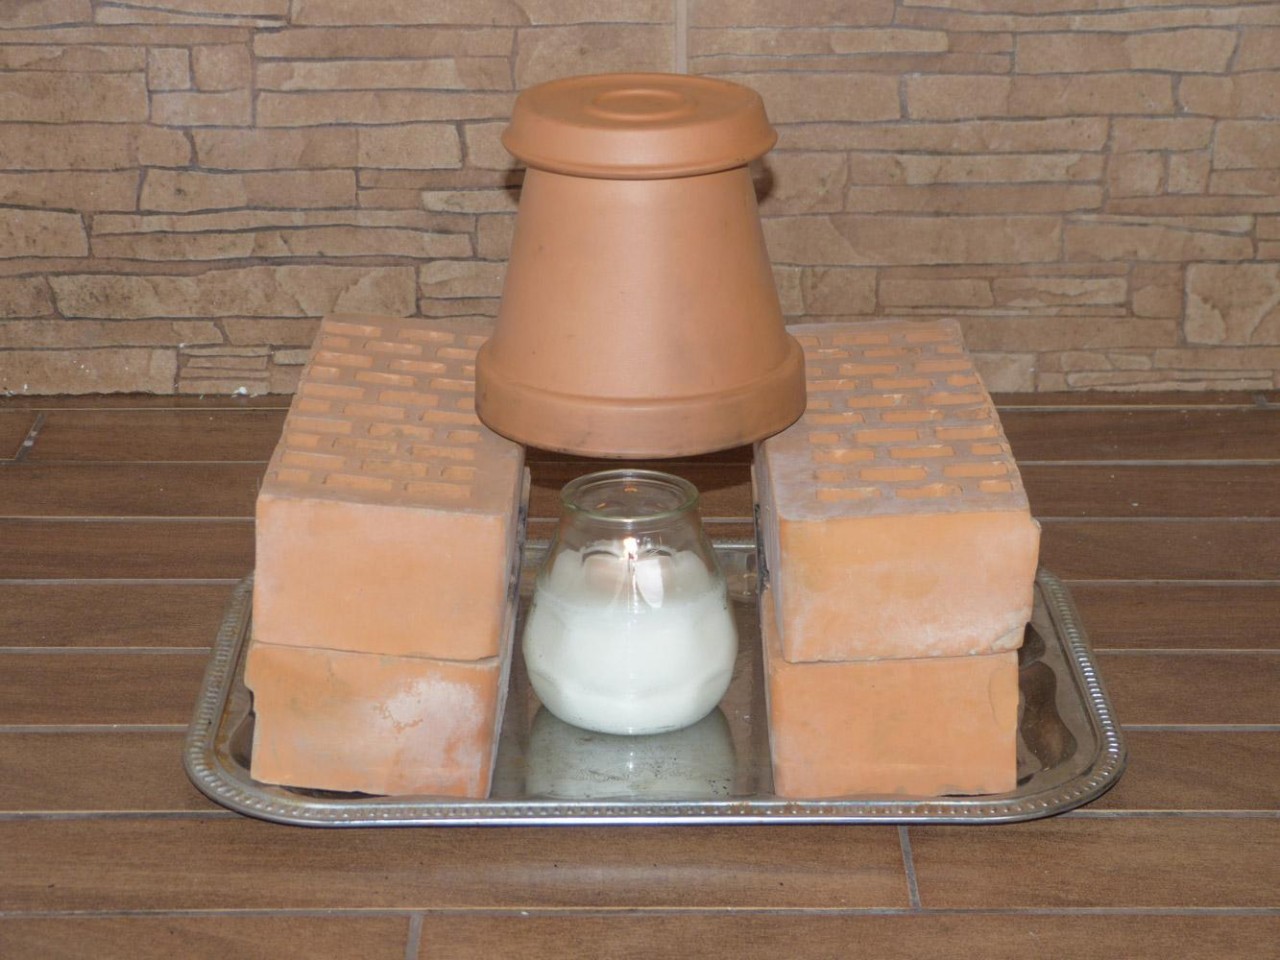
Idea #4 - Oil Appliance
Another model of the device, which is recommended to be assembled for heating a garage or other outbuildings in the country. All you need is an old battery, tubular heater, oil and cork. You will also need a welding machine, welding skills and some free time. The photo below shows one of the options for a homemade oil heater.
A tubular heater is installed at the bottom left, at the top there is a plug for draining / filling oil. A simple design of an electric heater, which will be enough to heat a small room.
The video below clearly shows how to make an oil heater with your own hands:
Overview of an oil cooler made from improvised means
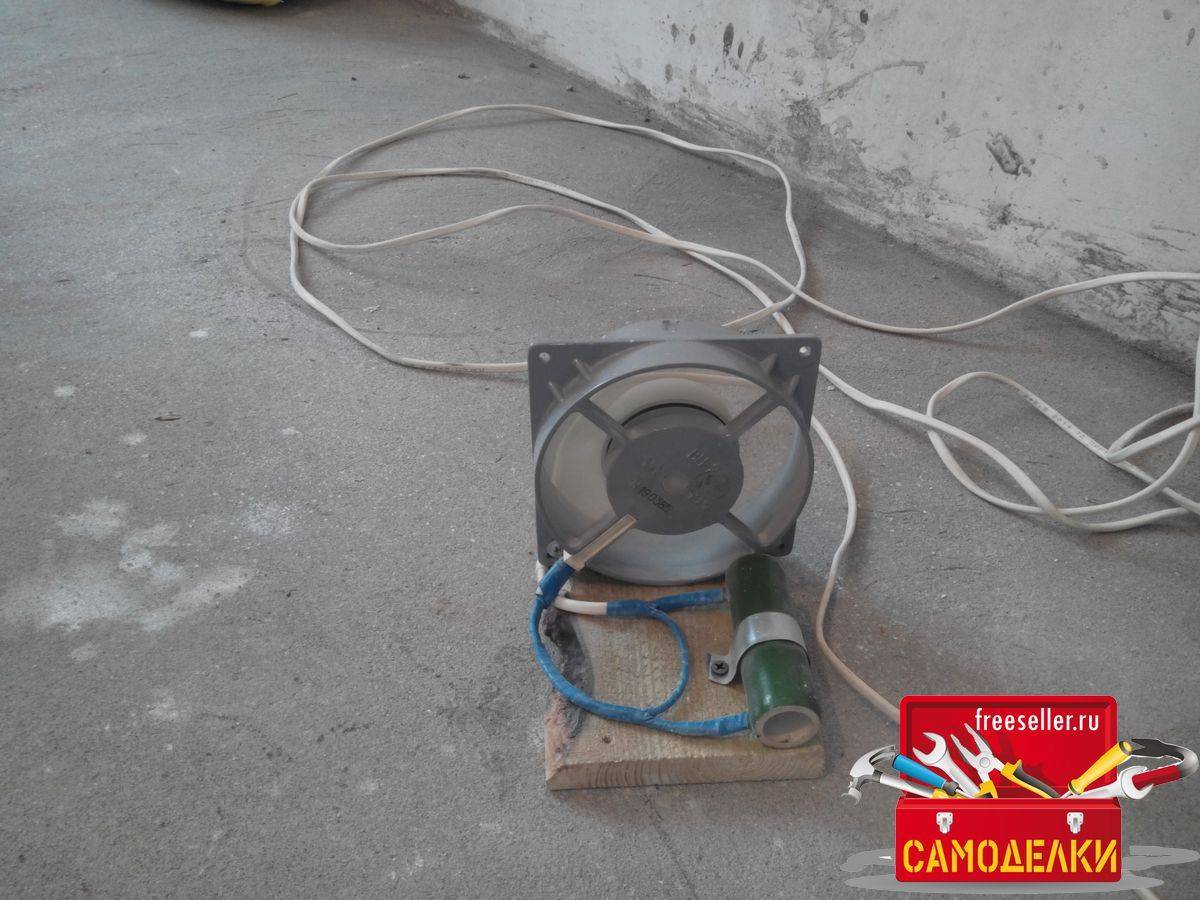
6 The simplest fan heater
There is another option for a homemade unit. The assembly process will take no more than 2-3 hours. The main advantage is ease of manufacture, as well as the availability of parts. The downside is the fact that oxygen is burned during the operation of the device. To build the system you will need:
- a tin can with a diameter of at least 10 cm;
- diode bridge;
- fan;
- soldering iron;
- 12 V transformer;
- nichrome wire with a cross section of 1 mm
2
- drill with a set of thin drills;
- textolite not foiled.
It is necessary to cut out 2 parts from the textolite, the size of which corresponds to the base. In addition, to connect the unit to the network and switch operating modes, you will need a cord and a switch. A structure is cut out of textolite, which looks like a frame. Then, using a drill, 2 holes are made on opposite sides, shifting them relative to each other. The ends of the nichrome wire are placed in them, electrical wires are soldered to the free ends under the frame.
Then the transformer, cooler and diode bridge are closed in a single circuit
It is important not to forget to connect the switch. A diode bridge and a transformer are needed to power the cooler
Then spirals are connected to the structure. The main thing is that during the assembly process they do not come into contact with other parts. The only exception is the textolite frame.


Making a heating element with your own hands is not as difficult as it might seem at first glance. Of course, you can buy an electric radiator or other factory-made designs, but home-made units will help save the family budget significantly.
Device Requirements
A portable device designed to heat a small room is quite functional in its field of application.
Scheme and general view of an electric heater for a garage.
It can be used to heat a garage or to keep a tent warm when camping in the cold season. In addition, the device handmade, suitable for summer residents and gardeners, being a useful acquisition for creating comfortable conditions for growing plants in greenhouses, especially given our climatic conditions with unexpected temperature changes.
Those who want to design a heater with their own hands will not always take up this work, especially when it comes to acquiring expensive materials to create a unit. Therefore, the heater must be advantageous and meet requirements such as good performance, safety in use, especially in camping and garage environments where there are combustible substances, convenience, compactness, and low power consumption. So how to make a heater yourself?
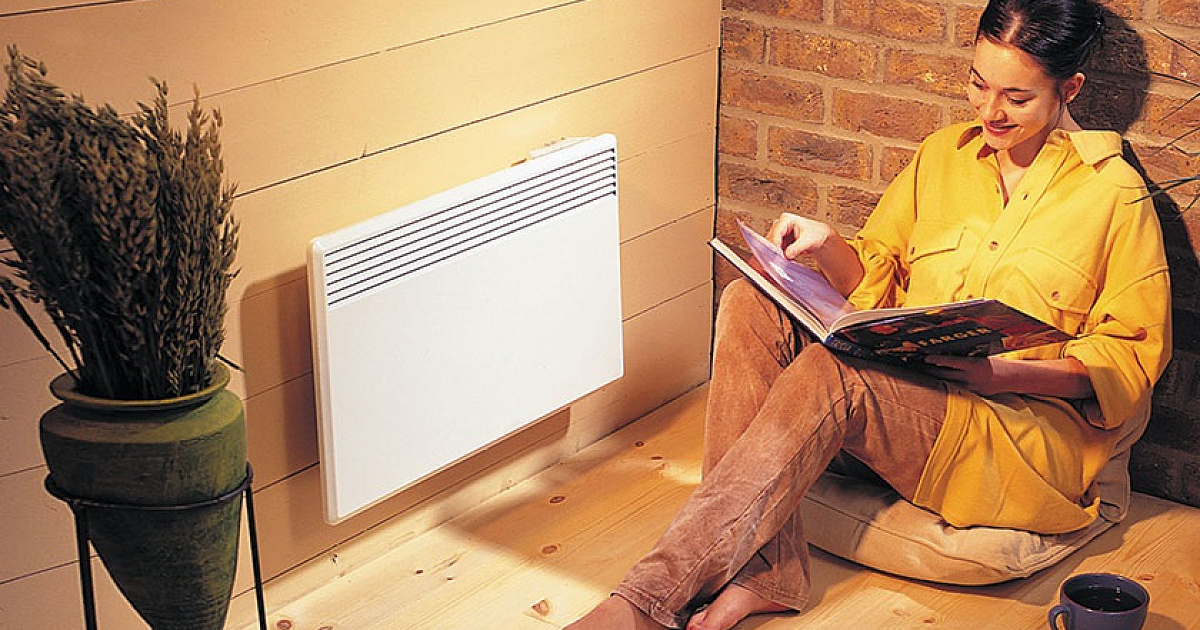
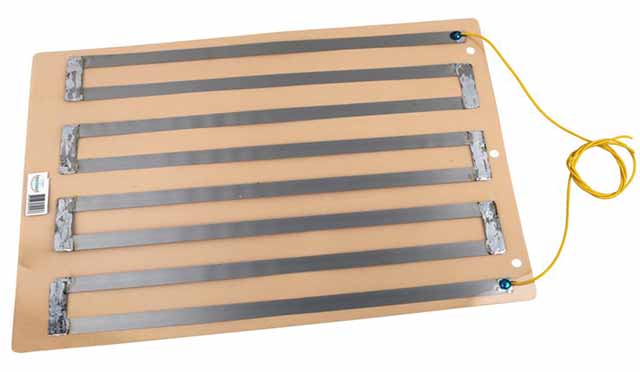
Most homemade devices largely copy the mechanism of factory options. Based on this, self-made heater for garage or tent can be done based on one important detail - thermal film. The heat generated by it will not be directed to heating the air. The generated heat will be directed to the garage items themselves, from which the thermal energy is transferred further to the environment. Thus, a do-it-yourself heater will not work in idle mode, since the generated heat is transferred to nearby objects. Only a small part of the energy is expended in the transfer of heat through the air. Therefore, a home-made heater for the garage will be inexpensive, as it will consume a small amount of energy and give the maximum. What is needed to create a heater?
To make a heater, you will need materials and tools: 2 rectangular glasses, a paraffin candle, foil, sealant, cable, epoxy, a soldering iron.
Materials and components for making a heater with your own hands can be found even at home, so it does not take much time to make a heater for a garage. But in the future, you may need a multimeter to diagnose the device for operability, so you should either purchase it or borrow it from friends, if they have one.
List of required components:
- Two rectangular pieces of glass that should be the same size. The required area for each of them is 20-25 square meters. cm.
- Paraffin candle.
- A piece of aluminum foil.
- Sealant.
- A two-wire power cable with a plug.
- Scissors that will be required to cut the foil.
- Epoxy adhesive.
- Soldering iron.
In addition, it will not be superfluous to stock up on cotton swabs, which can be useful for removing soot, and a cloth for cleaning glass.
Advantages of homemade heaters
Heater for giving do-it-yourself and home-made heating appliances for the home have one indisputable advantage over factory counterparts. The first are made from improvised means, and therefore their cost is low. On the other hand, home-made equipment must be made in strict accordance with the rules for the safe operation of electrical and gas appliances. Today, you can make your own IR heaters, which are considered the most efficient and inexpensive. If you need a device of increased power, then you can make an oil cooler at home. There are schemes for the manufacture of home convectors, portable stoves for tents.
The need for comfortable warmth increases in the off-season and with the onset of cold weather.But not all homeowners have the opportunity to purchase reliable heating equipment factory production, the cost of which is often overpriced. In this case, an alternative option is a home-made heater from available materials, which can easily cope with the task.

How to properly install?
In addition to high-quality assembly, it is necessary to pay attention to the conditions of its operation, which should include:
- Placement - the lower part of the room;
- Dryness of the room;
- The absence of a number of “knocking down” units: radiating heat or cold (electrical equipment, air conditioning, an open door with a draft).

Having figured out how to connect the thermostat with your own hands, you can start using it regularly. The main thing is that the power of the manufactured device is designed for the relay contacts. For example, with a maximum load of 30 Amps, the power should not exceed 6.6 kW.


Homemade gas heater for a garage, home, cottage
When creating a heater with your own hands, you need to follow a few recommendations:
The device should have a simple design without complex elements and parts.
It is necessary to focus special attention on safety, because the devices that block and supply gas are best purchased from the factory, or removed from old cylinders.
When creating a gas heater, its efficiency should also be taken into account.
The heater should not be bulky, and the methods of its activation should not be complicated.
The cost of materials for the heater should be no more than a third of the real price of the factory heater from the store counter, otherwise there is no point in making it, it’s easier to buy ready-made.
To make such homemade gas heater a garage, a house, a summer house with your own hands, you need a minimum of parts and material costs (tin sheet, metal shears, riveter, rivets, a small metal mesh netting, an ordinary household sieve, a 0.5-liter gas canister and a special burner with a valve ).
On this topic:
BACK
FORWARD
1 of 28
The first thing to do is fasten the heater to the burner. You need to take a household sieve, lean it against a galvanized sheet and circle it with a marker. Then, perpendicular and parallel to the circle, draw rectangular ears (one of them should be twice as long). Cut out the pattern with metal scissors. It should be as even as possible.
The second stage of the installation of the heater includes fastening the parts together. To do this, take the burner and fasten it with bolts to the tin circle. Then, with the help of ears that are wrapped in the opposite direction, a strainer is attached. It helps to dissipate heat to the sides. It turned out part of the design of the heater.
The third stage of mounting a homemade heater will be the fastening of a metal mesh. To do this, you need to cut out an identical circle from the tin again. It is also cut with scissors for metal. The ears are bent, and holes are drilled in the plane of the circle (about 10). Then the mesh is taken and attached to the ears of both circles. Attach the bottom first, then the top. Fastening is carried out using a riveter and rivets. As a result of these operations, a mesh cylinder should be obtained.
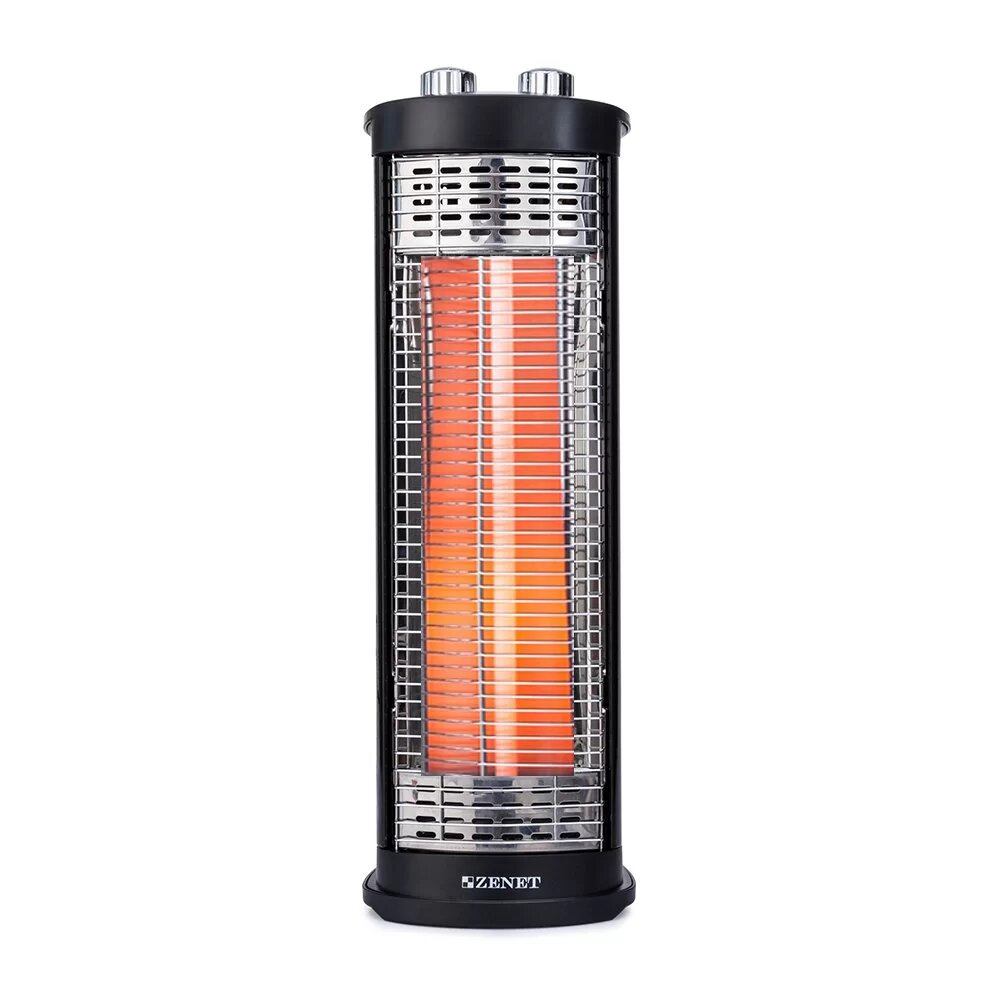
The final stage is the launch of an infrared home-made gas heater.Although it is not large, it gives off enough heat to heat a garage, a room in a house or a small country house.
On this topic:
BACK
FORWARD
1 of 15
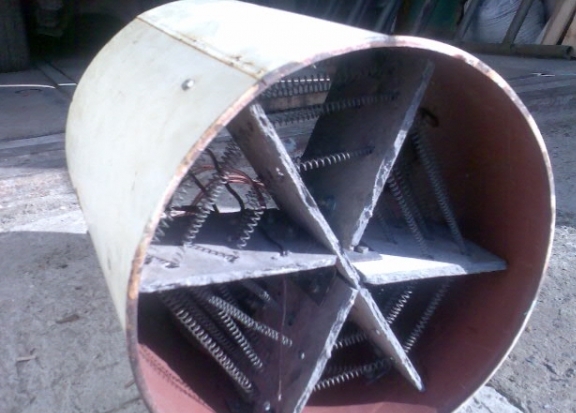
Homemade heat gun
Another option for equipment that you can assemble yourself is an electric heater like a heat gun.
To make a home heat gun you will need:
- metal cylindrical container (bucket, cut cylinder),
- heating element - a spiral from an electric stove,
- metal grill,
- fan,
- conductive wires,
- switch.
The assembly of the heat gun is carried out as follows:
- The grinder cuts off the bottom part of the structure of the prepared cylindrical container. It turns out a through blank.
- The grill is cut to the diameter of the container. The spiral is fixed on the grate so that the stacking diameter is smaller than the diameter of the container.
- On the sides of the container, horizontal rectangular holes are made to insert a lattice with a fixed spiral. Thus, the spiral is indented 3 cm from the edge of the container.
- From the spiral, conductive wires are led out of the container walls through special insulators. Outside, a circuit breaker with additional insulation is fixed on the tank wall.
- On the opposite side of the grille, a fan is installed, which is securely fixed to the walls with self-tapping screws. The device is connected to the machine.
- Holes are made along the edges of the body for mounting supports with fixation on nuts. The finished structure should be as stable as possible.
- Test run of the finished heater. First, the fan turns on, then the coil is energized.


It is not particularly difficult to construct a home electric heater from improvised means, the cost of which is low, so even a novice master can handle this task.
Housing and communal services are in no hurry to start the heating season and it is cold in the apartments, you need to heat the garage or greenhouse, but you never know why there may be a need for a heater. On sale you can find devices for every taste and budget. And yet, many people prefer to assemble a heater with their own hands, while saving substantial funds.
How to make a heater for a car with your own hands and power it from the cigarette lighter: instructions
The principle of operation of fan heaters is based on the formation of a heat flow by blowing a heated body. The air flow is generated by a fan, and a ceramic heating element acts as a heat source. Previously, there were models with tubular electric heaters and nichrome spirals.
Selection of components
You can arrange additional heating of the car interior in winter with your own hands from improvised means. One of the simple schemes includes components available to any inventor:
- An IP65 electrical junction box that serves as an enclosure.
- Nichrome spiral for a household electric oven, acting as a heating element.
- Axial fans in the amount of two pieces.
- Two terminal blocks for fixing spiral segments and tying them with connecting wires.
- Wire with a cross section of at least 2.5 mm2.
- Cigarette lighter socket.
- Button-switch.
Spiral
When choosing a ferronichrome spiral element, it is necessary to be guided by its cross section. It is not recommended to choose products with a diameter of more than 0.6 mm.The optimal diametrical characteristic is 0.6 mm - and you can freely find it on sale, and the connection diagram is simple. We will follow this advice when designing the electrical part.
Cooler
Small-sized fans can handle the heat dissipation function. The specific size depends on the dimensions of the junction box. For example, two coolers 30x30x15 are suitable for a box 88x88x60. Of course, the electric motor must be rated at 12 volts.
Manufacturing
When creating a heater circuit for a car with your own hands powered by a cigarette lighter, it is important to understand that its electrical resistance depends on the length of the nichrome spiral section, which affects the amount of current consumed and, as a result, the amount of heat given off. The greater the length and cross section, the lower the resistance of the conductor and the greater the power of the installation
It is important not to overestimate the scheme here. The standard cigarette lighter power circuit is designed for no more than 15-20 Amperes of load
Based on this, we construct a scheme, taking into account the following aspects:
- The number of spirals is 5.
- The length of the spiral element is 20 cm, the diameter is 0.6 mm.
- Two sections are powered in parallel: one consists of two series-connected spirals, the other consists of three. The first is located closer to the fans.
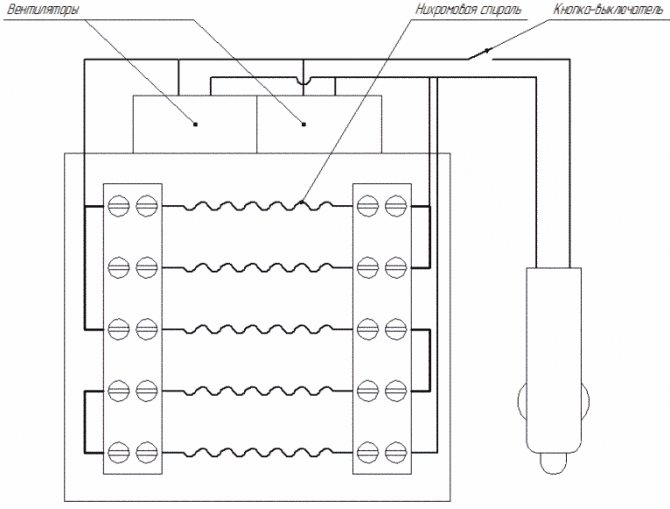
The installation of spiral elements is carried out in the "terminals", the connection between them is also made through the holes of the terminal clamps with wire segments. At one end of the junction box, a cutout is made for fans, which are glued together and glued to the case. On the opposite side, a window is formed through which air will escape from the product.A drawing can be used as a visual aid.
In fact, the power of the device is about 150 watts. Current consumption - 13 A. A more powerful device involves the use of spirals with a diameter of 0.8 or 1.0 mm of similar length. It is impossible to connect such installations to the cigarette lighter socket - the product is connected directly from the battery through a 30A fuse and relay.
What you need to know about security
Do not forget that we are dealing with a source of increased danger - an electric heater, so when assembling and using it, you must follow some rules:
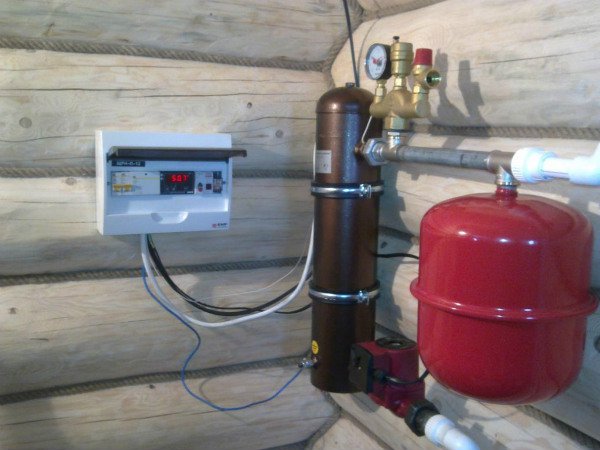
Be sure to use a separate electrical line to connect the induction boiler, and also equip it with a safety group.
- If water circulates naturally in the boiler, then be sure to equip it with a temperature sensor so that the device turns off automatically when overheated.
- Do not plug a homemade water heater into a power outlet; it is better to run a separate line for this with an increased cable cross section.
- All exposed wires must be insulated to protect people from electric shock or burns.
- Never turn on the inductor if the pipe is not filled with water. Otherwise, the pipe will melt, and the device will close, or it may even catch fire.
- The device must be mounted at a height of 80 cm from the floor, but so that about 30 cm remains to the ceiling. Also, you should not install it in a residential area, since the electromagnetic field has a bad effect on people's health.
- Don't forget to ground the inductor.
- Be sure to connect the device through the machine so that in the event of an accident, the latter will turn off the power from the water heater.
- A safety valve must be installed in the pipeline system, which will automatically reduce the pressure in the system.
Design and types of fan heaters
In order to preliminarily estimate the scope of work and select the materials necessary for assembly, it is worth familiarizing yourself with the device of a factory-assembled fan heater. The elements present in the design of all models are:
- Protective case made of plastic or metal.
- Electric motor.
- Impeller with blades.
- Heating element.
- Protective grid.
- Elements of regulation and control.
Depending on the chosen design and purpose of the device, additional components are selected. It is possible to manufacture almost all types of electric heaters with your own hands. For domestic needs, a do-it-yourself mini heat gun is made to warm up and dry the room, a do-it-yourself electric fireplace will allow you to realize your own design ideas and give the room an atmosphere of comfort, and a duct air heater is built into the supply ventilation or air conditioning system.


Tips for maintenance and operation
When using homemade heaters, you need to take into account some operating features and follow simple safety measures:
- A fan heater made from improvised materials must not be left turned on unattended. If such a need nevertheless arises, the device should be equipped with automatic emergency shutdown - buy a thermal relay and install a tipping sensor.
- Do not increase the temperature of the water in the electric battery above 80 ° C, otherwise steam will form and pressure will increase inside, threatening to destroy the cast iron. If the heater generates little heat, add a few sections and install an additional heating element.
- Do not connect the equipment to the mains in twisted wires.
- The line to which the electric heater is connected must be protected by a circuit breaker and RCD.
- The fan heater is undesirable for use in rooms with high humidity.
Like factory heaters, homemade appliances require little or no maintenance. Blow dust out of the convection heater periodically, otherwise it will burn on the coils and give off an unpleasant odor. In the electric battery, once a year, check the condition of the working surface of the heating element and, if necessary, remove scale.
Making a simple electric heater is a good way to save money on buying a factory-made appliance. In terms of heating efficiency, there is no difference between the products - in both cases, the efficiency reaches 99%. The difference in appearance and functionality is offset by the low cost of home-made devices. If desired, the design can be improved by adding useful automation elements: sensors, thermostats and timers.
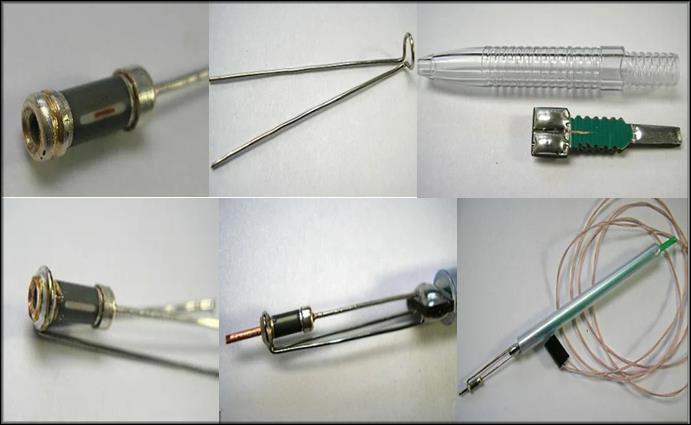
From stationery pens and resistors
The simplest mini soldering iron 5, 24, 12 V at home can be made from pen cases and old smaller resistors.
Details:
- resistor, in this embodiment, it is MLT 0.5–2 W, 10 Ohm;
- handle body;
- double-sided textolite;
- wire (two types are required):
- copper, ∅ 1 mm. It can be wound from old chokes, transformers, taken from conductors for wiring, from power devices for household appliances;
- steel or copper, ∅ 0.8 mm;
- cable for connecting to the network (with a plug, from used appliances).
Steps on how to make a mini soldering iron:
- Strip the paint off the resistor.
- 2 wires stick out of the part: one is cut off, a hole is drilled there for a ∅ 1 mm core. The wire must be isolated from the cup, for which they make a countersink with a thicker drill. At the top of the indicated part, a small cut is made under the wire with a triangular file, the steel wire is bent, a ring is made under it. If the wire is copper, then twist with pliers. The wire described in this paragraph is without insulation.
- From the textolite we cut out (with a jigsaw) a small “T” shape with pads for soldering the contacts of the power cable at one end. You can do without it: just twist the wire with wires, insulate it and attach it to the handle with superglue. The gap between the heater and the handle is about 6 cm to avoid melting the plastic.
- Collect all parts.
- Install the sting. In order not to burn the case, they make a protective layer from a piece of mica, ceramics on the back wall.
- A homemade product is connected (wires are twisted or inserted into a plug) to a power supply unit not higher than 1 A and 15 V.