- Technology for arranging a heating system
- We mark the sections of the future system
- Fixing the heating cable
- Installing junction boxes and sensors
- We mount automation in the shield
- Features of heating gutters at home
- Cable types for gutters
- Installation of the anti-icing system
- Mounting methods
- Heating cable connection
- Mounting Features
- Heating cable for gutters
- Why does ice accumulate
- The nuances of installation work
- Video description
- Briefly about the main
- Installation of a roof heating system
- Video description
- Conclusion
- Wires for heating
Technology for arranging a heating system
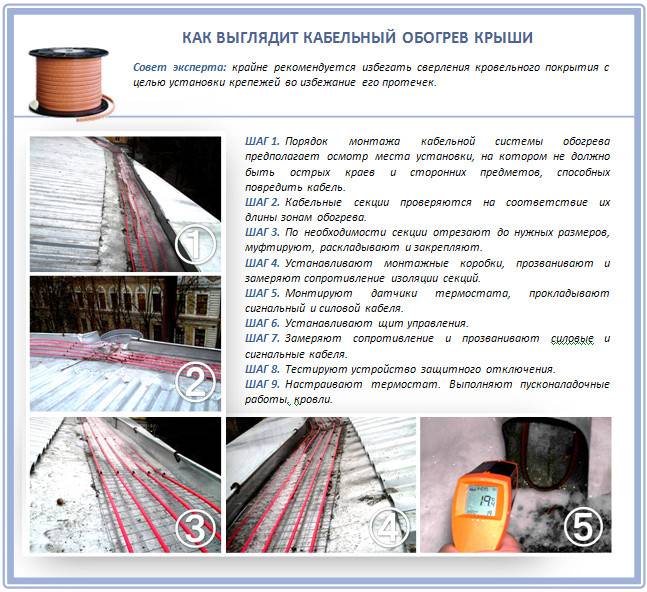
We offer you to study the detailed instructions for installing a roof heating system and gutters with your own hands. We carry out the work in stages.
We mark the sections of the future system
We outline the places where the cable will be laid
It is important to take into account all the turns and their complexity. If the angle of rotation is too steep, it is recommended to cut the cable into parts of the required length and then connect them using sleeves
When marking, we carefully examine the base. There should be no sharp protrusions or corners, otherwise the integrity of the cable will be in jeopardy.
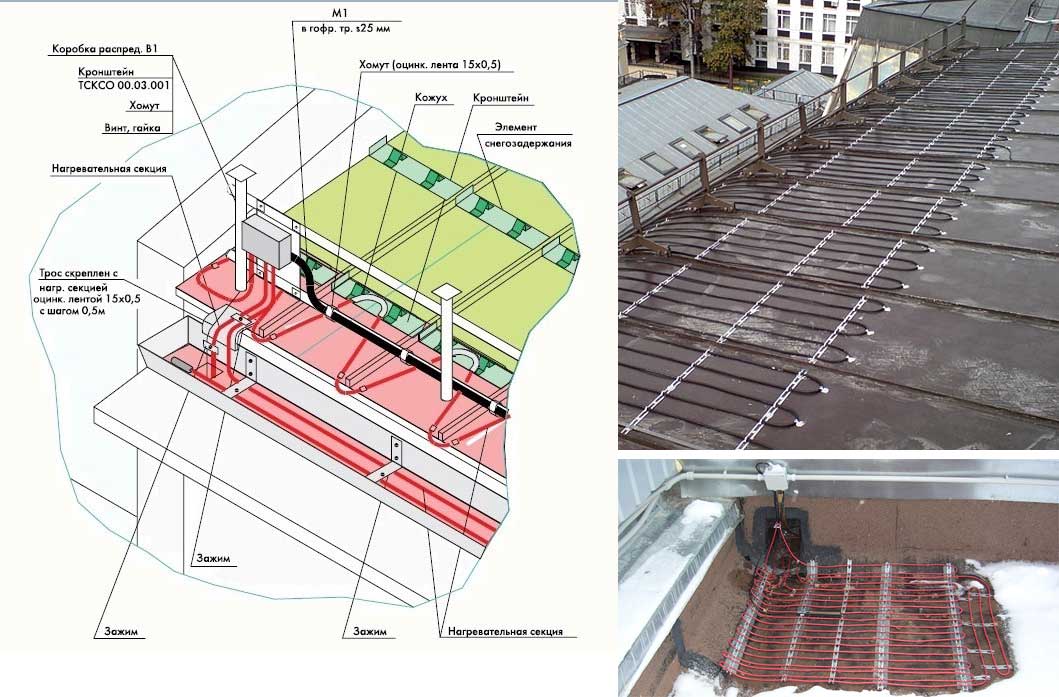
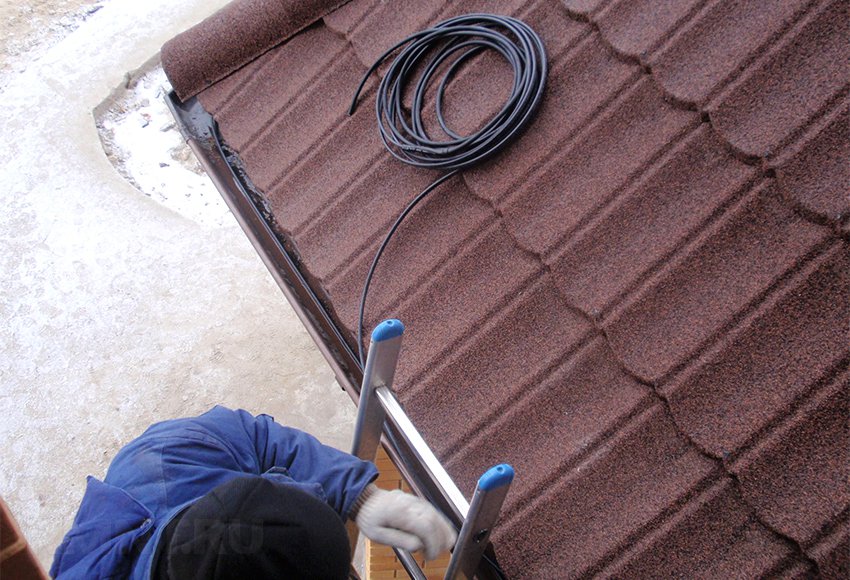
Fixing the heating cable
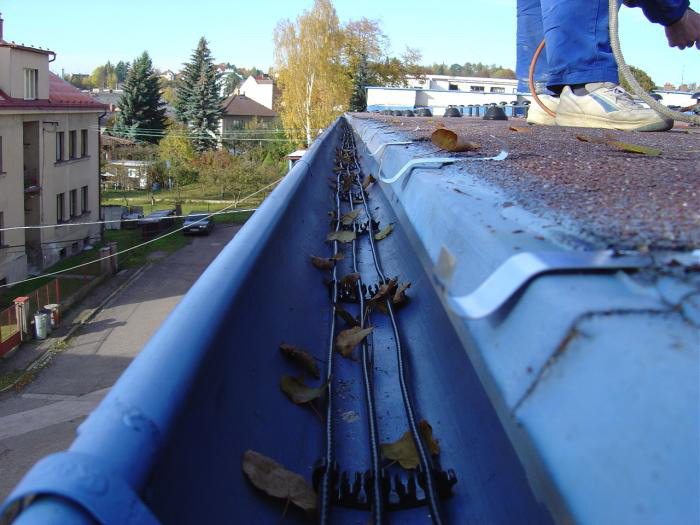
Inside the gutters, the cable is fixed with a special mounting tape. It is attached across the wire. It is desirable to choose the tape as strong as possible.The resistive cable is fastened with tape every 0.25 m, self-adjusting - every 0.5 m. Each strip of tape is additionally fixed with rivets. Their installation sites are treated with sealant.
For cable installation use a special mounting tape. No other fasteners are recommended. Rivets, sealant or polyurethane foam are used to fix the tape
Inside the gutters, the same mounting tape or heat shrink tubing is used to secure the cable. For parts whose length exceeds 6 m, a metal cable is additionally used. A cable is attached to it to remove the load-bearing load from the latter. Inside the funnels, the heating cable is attached to the tape and rivets. On the roof - on a mounting tape glued to a sealant, or on a mounting foam.
An important note from experts. It may seem that the adhesion of the roofing material to the sealant or foam is not enough for a reliable connection.
However, it is absolutely impossible to make holes for rivets on the roofing material. Over time, this will inevitably lead to leaks, and the roof will become unusable.
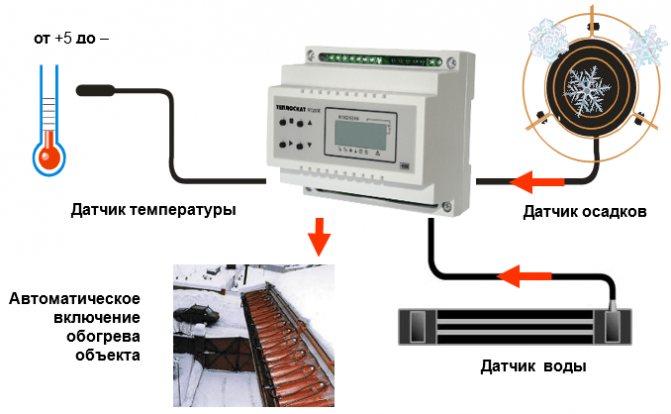
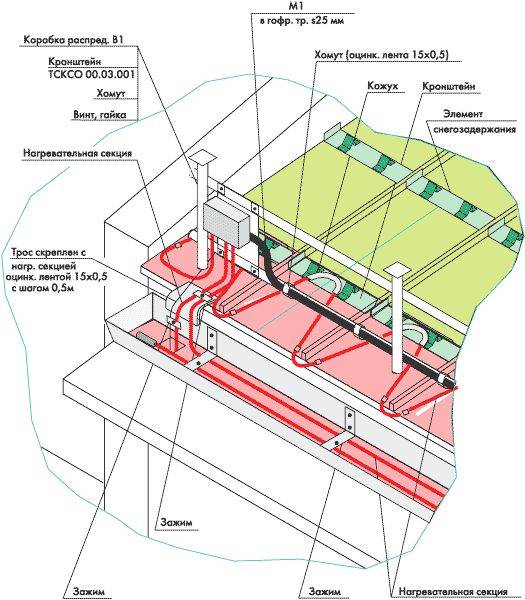
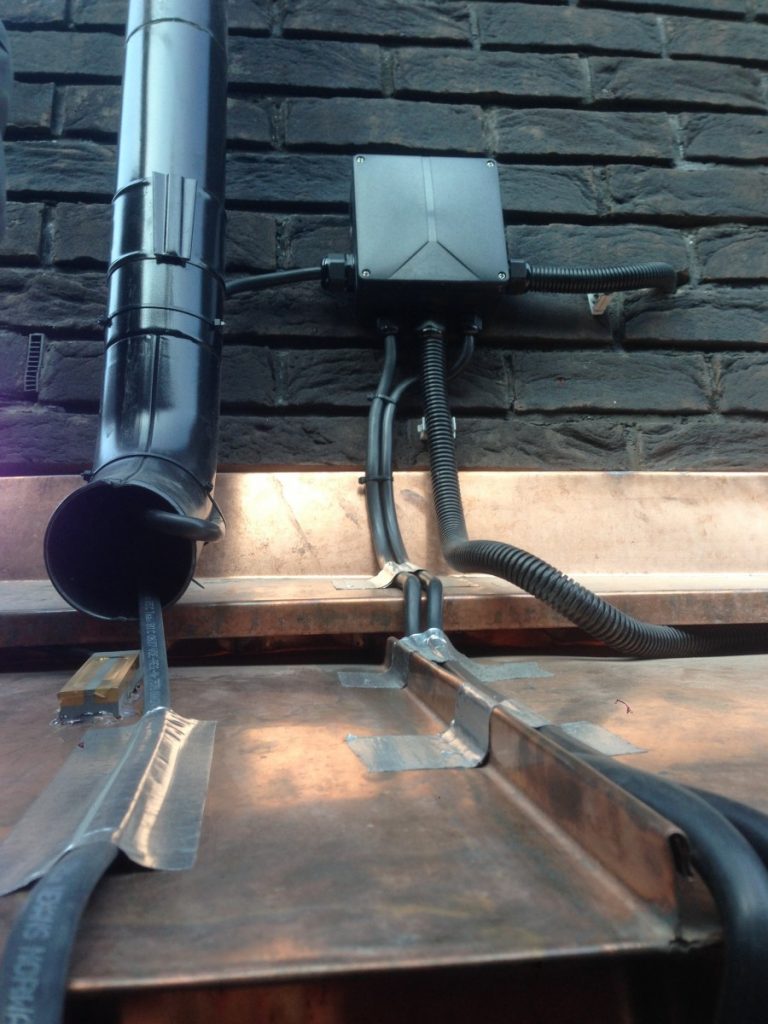
Installing junction boxes and sensors
We select a place for junction boxes and install them. Then we call and accurately measure the insulation resistance of all the resulting sections. We put the thermostat sensors in place, put the power and signal wires. Each sensor is a small device with a wire, the length of the latter can be adjusted. Detectors are placed in strictly defined places.
In some areas of the system, increased heating is required. Here is mounted more cable.These areas include a drain funnel where ice can accumulate.
For example, for a snow sensor, a place is selected on the roof of a house, a water detector - at the bottom of the gutter. All work is carried out according to the manufacturer's instructions. We connect the detectors with the controller. If the building is large, the sensors can be combined into groups, which are subsequently connected in turn to a common controller.
We mount automation in the shield
First, we prepare the place where the automatic control system will be installed. Most often this is a switchboard located inside the building. This is where the controller and protection group are installed. Depending on the type of controller, the nuances of its installation may vary slightly. However, in any case, it will have terminals for connecting detectors, heating cables and for power supply.
The picture shows that the cable is fixed in a "suspended" state. Over time, a violation of the installation will inevitably lead to its breakage and breakdown of the heating system.
We install the protective group, after which we measure the resistance of previously installed cables. Now we need to test the automatic safety shutdown to find out how well it performs its functions.
If everything is in order, we program the thermostat and put the system into operation.
Features of heating gutters at home
The heating of the roof and gutters depends on many factors, which include:
- type of electrical cable;
- type of roof
- climatic conditions of the region.
We will talk about the types of heating cable a little later, now we will determine what main types of roofs exist and how this can affect the installation of an anti-icing system.
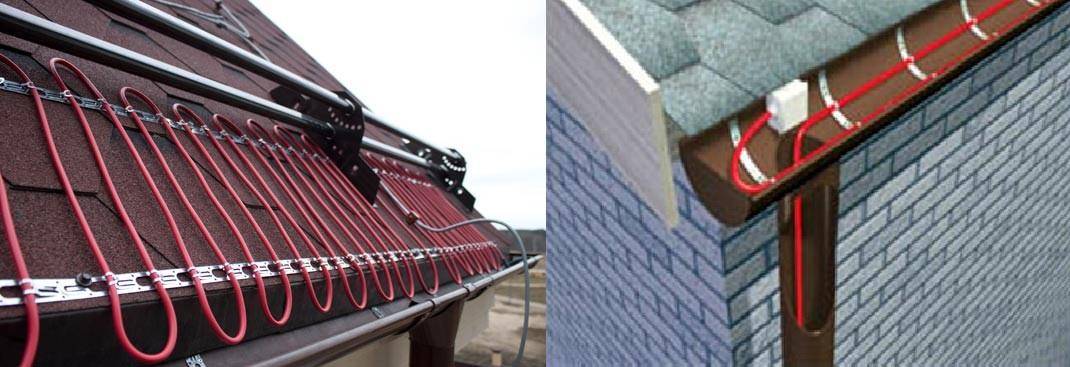
The structure of the cable for heating the drain.
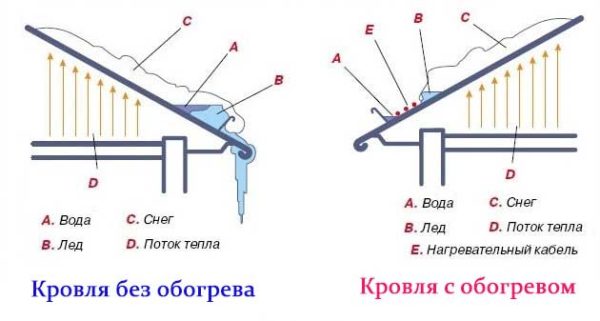
A warm roof is characterized by a lack of insulation, which causes the formation of ice growths. Such roofs melt the snow even at sub-zero temperatures, after which the water flows down to the cold edge and freezes. That is why for this type of roof, additional laying of heating sections along the very edge with loops is necessary. The width of such loops is from thirty to fifty centimeters, the specific power of the system varies from two hundred to two hundred and fifty watts per square meter.


Heating of a cold roof and gutters is somewhat different. These roofs are well insulated and often have a well-ventilated attic space. For such roofs, only heating of drains is installed with a linear power of twenty to thirty watts per meter, while the power should gradually increase to sixty to seventy watts in parallel with an increase in the length of the drain. All cables must be equipped with a special protective device for disconnection.
Also, a feature of heating gutter systems and roofs is the careful planning of the length and location of cables, the possibility of laying the system with your own hands. This takes into account the length of the valley, all parts of the system, the running footage of downpipes, their required number. For one hundred - one hundred and fifty millimeters of the gutter, about thirty - sixty watts of power per linear meter is needed, for a gutter with a width of one hundred and fifty millimeters, the calculated power under standard weather conditions is two hundred watts per square meter.
Cable types for gutters
Various types of cable are used for roof heating, which can be lay with your own hands after the calculation of the system and sections. Two types of cable are used: resistive and self-regulating.
A resistive cable has a lower cost and availability, its principle of operation is as follows: a conductive metal core is heated due to the internal resistance supplied to the electric current. Heating gutters by this method is quite simple, the operation of the system is not complicated and expensive. Among the advantages it should be noted:
- low cost;
- lack of starting currents at startup;
- presence of constant power.
Although the latter characteristic can be a serious drawback, since the need for heat is specific to different areas, some of them can overheat, while others simply do not have enough heat.
Do-it-yourself system installation with resistive cables is simple, the cable can be laid along gutters and pipes or wrapped around them.
A more preferable option is to lay a zonal resistive cable, which has a special nichrome heating filament. At the same time, the linear power of the cable does not depend on the length, it can even be cut if necessary.
Heating drains with a self-regulating electric cable is more reliable, but the price of the system is much higher, and the cable itself has a limited shelf life due to the gradual aging of a special heating self-regulating matrix. The advantage of such a system for heating gutters is that the cable being laid can change its resistance, that is, the heat generated corresponds to exactly the level that is needed at the moment.
It is believed that laying self-regulating systems is more economical to use, simple and reliable. Therefore, you can look at the cost of such systems from different manufacturers and choose the option that best suits your budget.
Share this helpful article:
Installation of the anti-icing system
So, we can conclude that a self-regulating heating cable for a roof is the best option, but expensive. As for the installation methods, all the varieties presented here do not differ from each other.
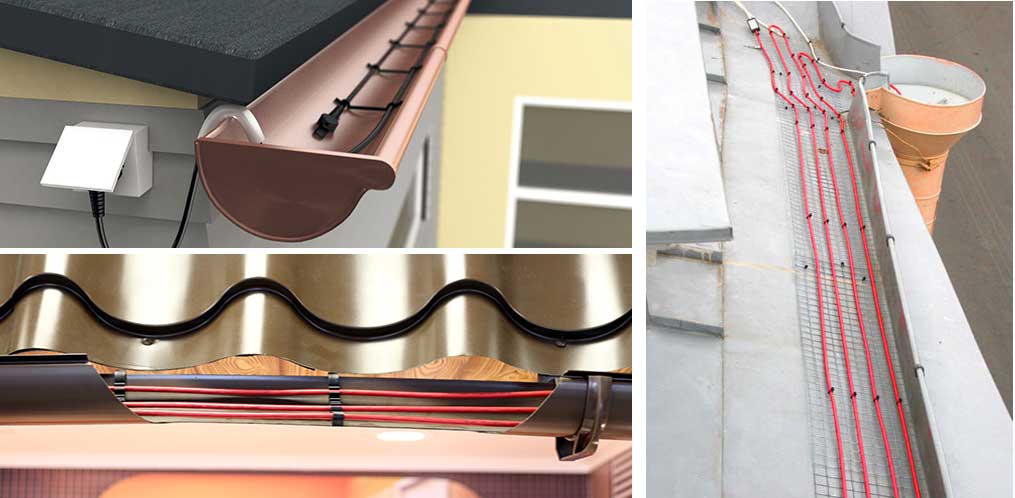
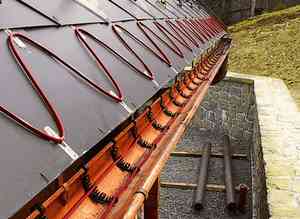
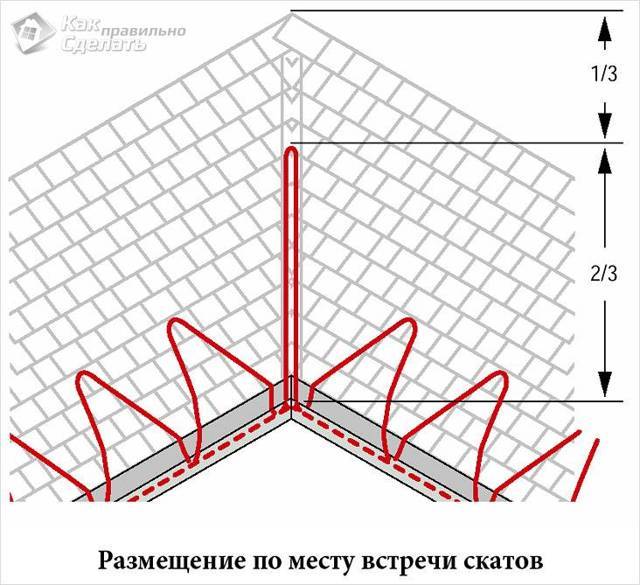
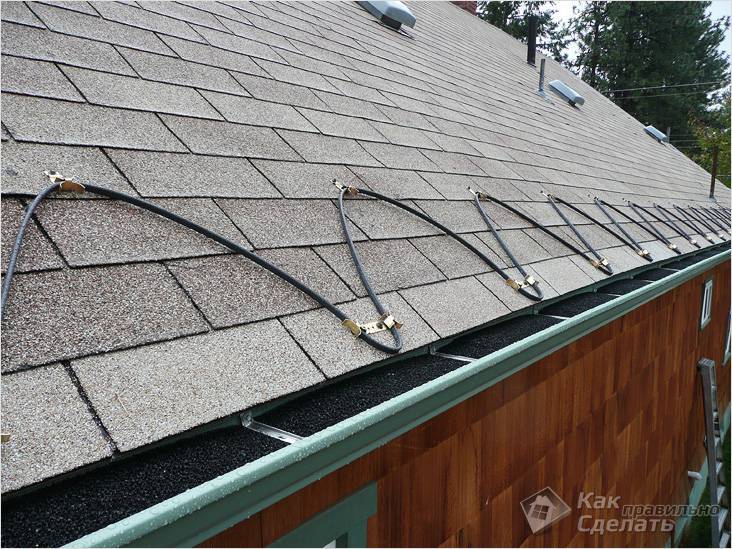
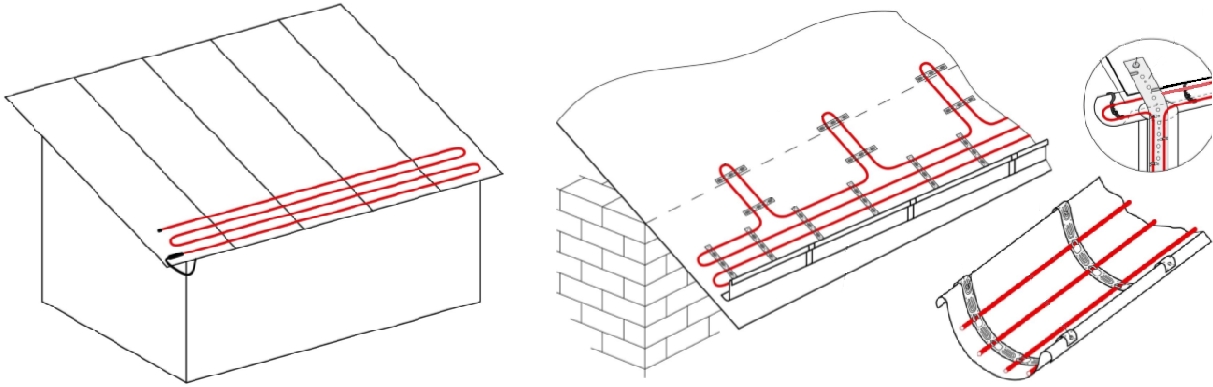
At the edge of the overhang, laying is done with a snake, the width of which varies between 60-120 cm. If the roof is covered with metal tiles or corrugated board, then installation is carried out for each lower wave.

Mounting the wire on the edge of the overhang with a snake
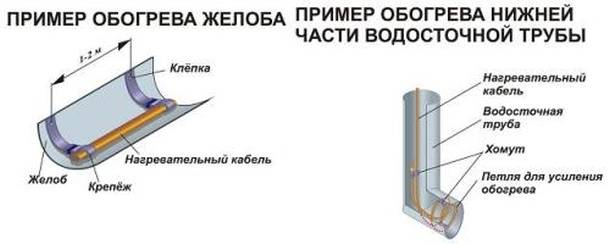
On the valleys, the cable is laid in two parallel sections along the roof element. The distance between them is 30-50 cm.
The same applies to horizontal gutters of the drainage system and vertical pipe risers.
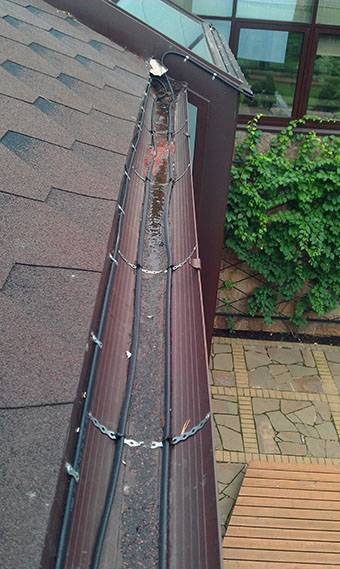
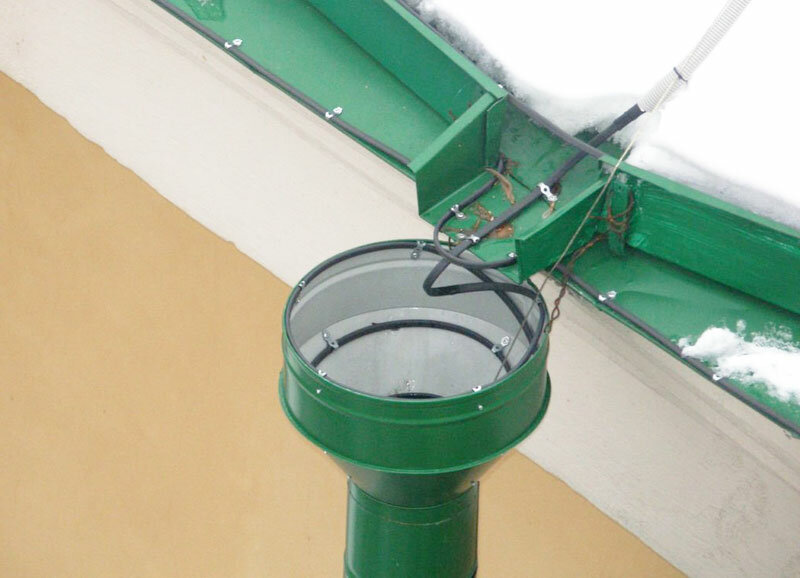
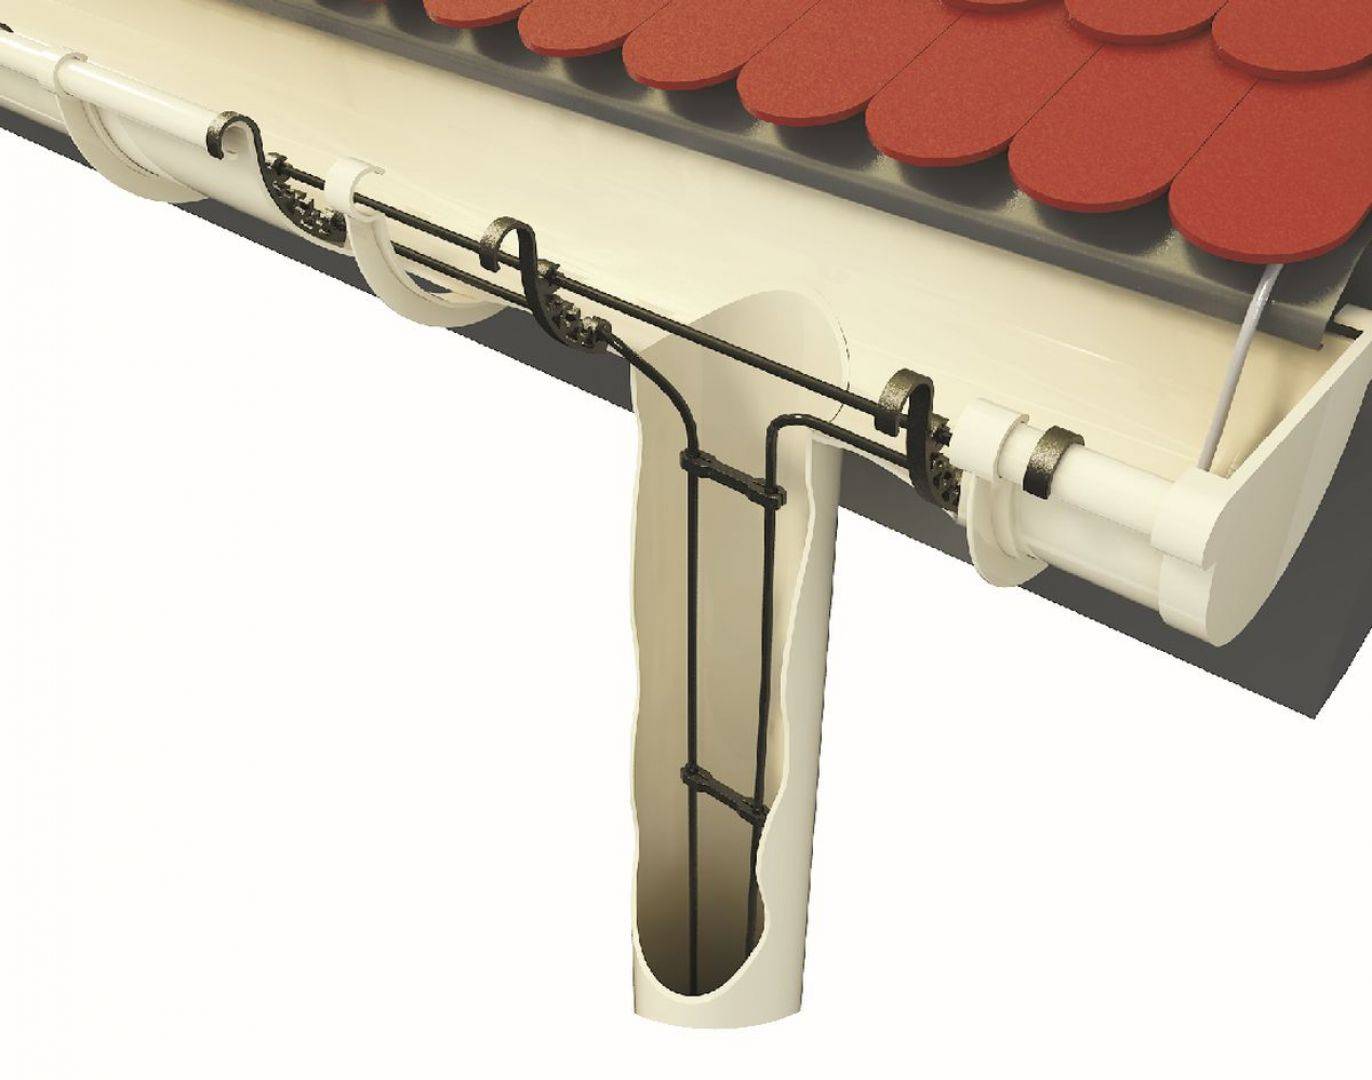
Installation inside the gutter of the gutter system
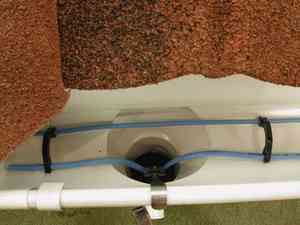
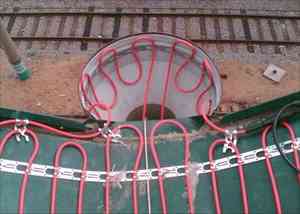
It is necessary to pay attention to how the cable should be laid in the receiving funnel - this is an element between the gutter and the pipe, as well as in the drain pipe located at the very bottom of the pipe riser. These two elements are most exposed to the load from the melt water.
Therefore, inside them, the heating cable is laid in rings or in the form of a falling drop.
Mounting methods
You can attach the heating cable to the roof with various devices. Most often, LST-S clips are used for this. These are various types of spring-loaded hooks through which a heating wire is passed. The clips themselves are attached to the roofing material with self-tapping screws or adhesives.The main task of the foreman is to make as few holes as possible in the roofing material. Therefore, it is recommended to treat the places where self-tapping screws are inserted into the roof with a sealant, preferably silicone.


The photo below shows one of the varieties of such clips. Fasteners are attached to the metal surface of the eaves with glue. And inside the gutters, plastic clips are used, which are attached to the edge of the tray at one end.
Fastening the heating wire to the roof of the house with clips LST-S
The heating conductor is not fixed inside the vertical pipes of the drainage system. It is fixed in the funnel and at the lower end of the pipe or inside the drain. The cable hangs freely inside the riser.
As for the method of attaching the heating element to the plane of the valley, there are two options:
On a stretched steel string, you can use wire of different diameters. To do this, the latter is fixed on both sides: at the beginning and at the end of the valley, and is well stretched.
Special fasteners that are attached to the valley with an adhesive.
The main requirement for this roof element is not to violate the integrity and tightness of the surface. Because a lot of water flows down the valley. And the holes in it - a high probability of leakage.
Heating cable connection
This operation must be carried out carefully.
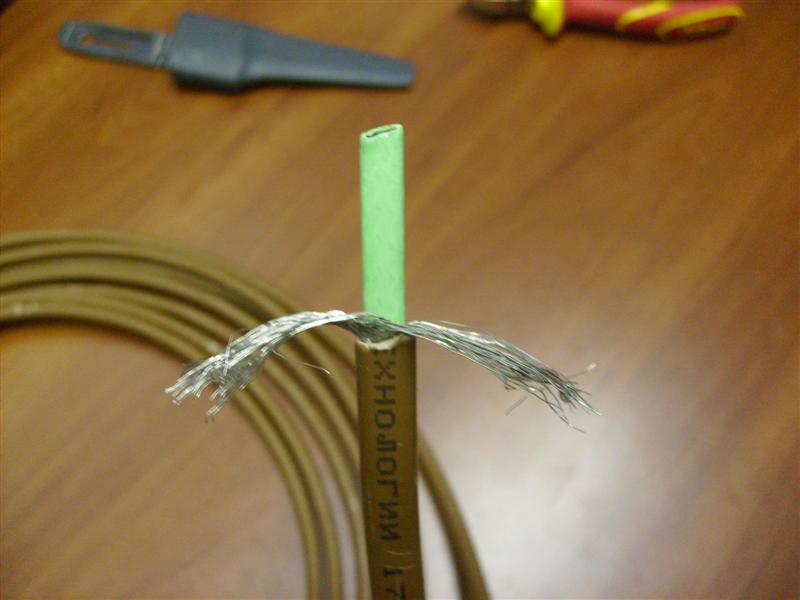
Remove plastic insulation.
The shielding braid is cut along, folding it into a bundle.
Cut off the bottom insulation layer.
The matrix is cut to a length of 3 cm.
The cores of the supply cable are also cleaned of insulation.
The conductors are connected in pairs using a thermotube. This is a plastic tube into which a core of a heating conductor is inserted on one side.It is pulled out from the opposite side of the tube and connected to the core of the supply wire. The connection is made by soldering. Then the thermotube is stretched over the joint and heated with a hair dryer. It expands, becomes soft, and after cooling it decreases in size, compressing the strands together. The thermotube performs the functions of insulation.
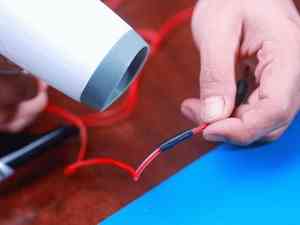
Using a heat pipe and a hair dryer to connect two wires
Thus, two wires are connected. And then two of them are immediately clamped with a sleeve, which will protect the connection from mechanical stress.
The supply wire is connected to a 220 volt alternating current network. An RCD is installed between the connection point and the wire. This device will protect the entire system from stray currents that appear if the insulation of one of the elements of the anti-icing system has been broken. That is, even when a person touches the wires, the current will not strike.
Please note that anti-icing is a grounded system. Therefore, the braided shielding braid is connected to the ground conductor of the supply wire in the same way as the wiring.
In this case, two cores (zero and phase) are connected by one sleeve, the ground loop is another.
When it comes to connecting to the network, the anti-icing system does not require complexities. It consumes little electricity, so a regular outlet will be enough. Although other options are not prohibited. For example, to the switchboard through the machine.


Mounting Features
Installation of a heating system for roof communications should be carried out taking into account the following rules and in the following sequence:
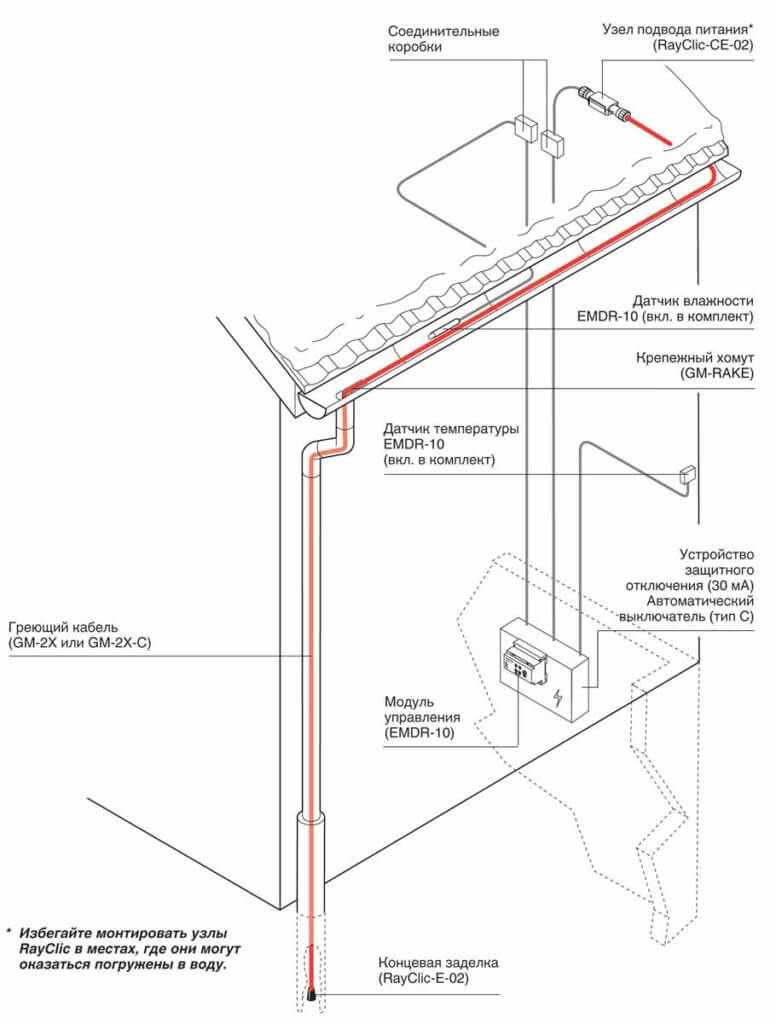
- It is necessary to take care of the presence of a temperature change controller, a power supply with a temperature sensor, a precipitation control sensor;
- A wire of the required length is being prepared, according to measurements and diagrams. Ideally, install the cable before installing the top layer of the roof and fine finishing;
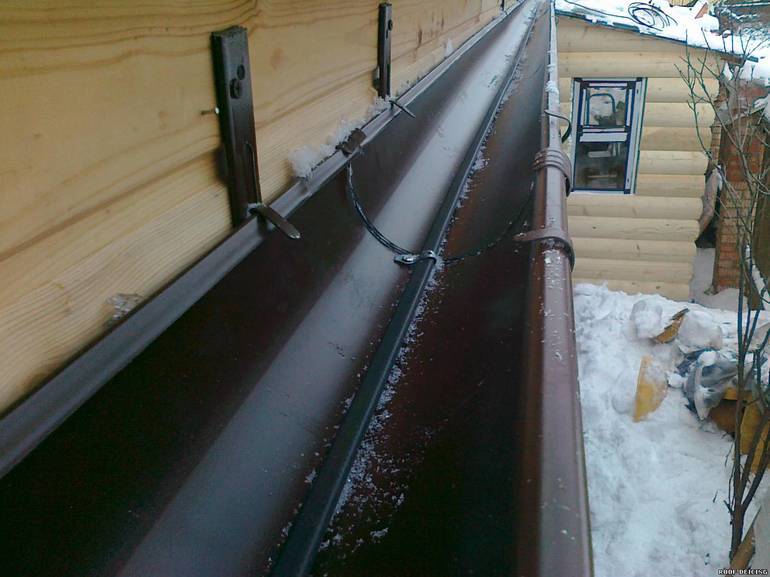
- The cable is tied into bundles with the help of special clamps, after which it is laid in trays and pipes. The cable on the edge of the roof is mounted in a zigzag, fastened with special clamps;
- In the gutters and pipes, the heating cable is fixed with a mounting tape, in strips across. If a heated drain or sewer pipe is longer than 6 m, the wire is first attached to a metal cable in a sheath, and then the entire structure is lowered into the pipe;
- To heat downpipes, 2 pieces of the required power are laid simultaneously. Mounting is carried out from above and below.
- The place of attachment of the wire must be inspected for the presence of sharp edges and excess objects;
- Thermostat sensors are fixed;
- The control panel is installed;
- Start-up work is being carried out.
Heating cable for gutters
Heating cables of various types of adjustment are divided into two types such as:
- Resistive cables.
- Self-regulating cables.
Advantages of a resistive cable:
- high-quality heat transfer;
- economy. The price of this cable is significantly lower than the previous version;
- the need for a low starting field.
Flaws:
- high power consumption;
- in places of plexus, the cable may overheat;
- short service life.
As a rule, resistive cables are used to heat the roof of a large area. However, with financial capabilities, this system can be installed in a small room.

Self-regulating cable has the ability to control temperature changes depending on weather conditions. Thanks to this function, the owners of the premises do not have to adjust the mechanism after each change in temperature.

- Economical electricity consumption.
- Overheating resistance.
- Easy and convenient installation.
- Long service life.
- Practicality. The cable is suitable for any type of roof with almost any slope and roofing materials.

Nowadays, cables of the following types are produced: armored cables of a two-core or two-core section, armored cables of a two-core section and self-regulating cables. These materials differ in price, strength, resistance to mechanical stress, fire safety, and so on. Check with the consultants in the store who are obliged to provide you with this information about all the shortcomings and advantages of this material.
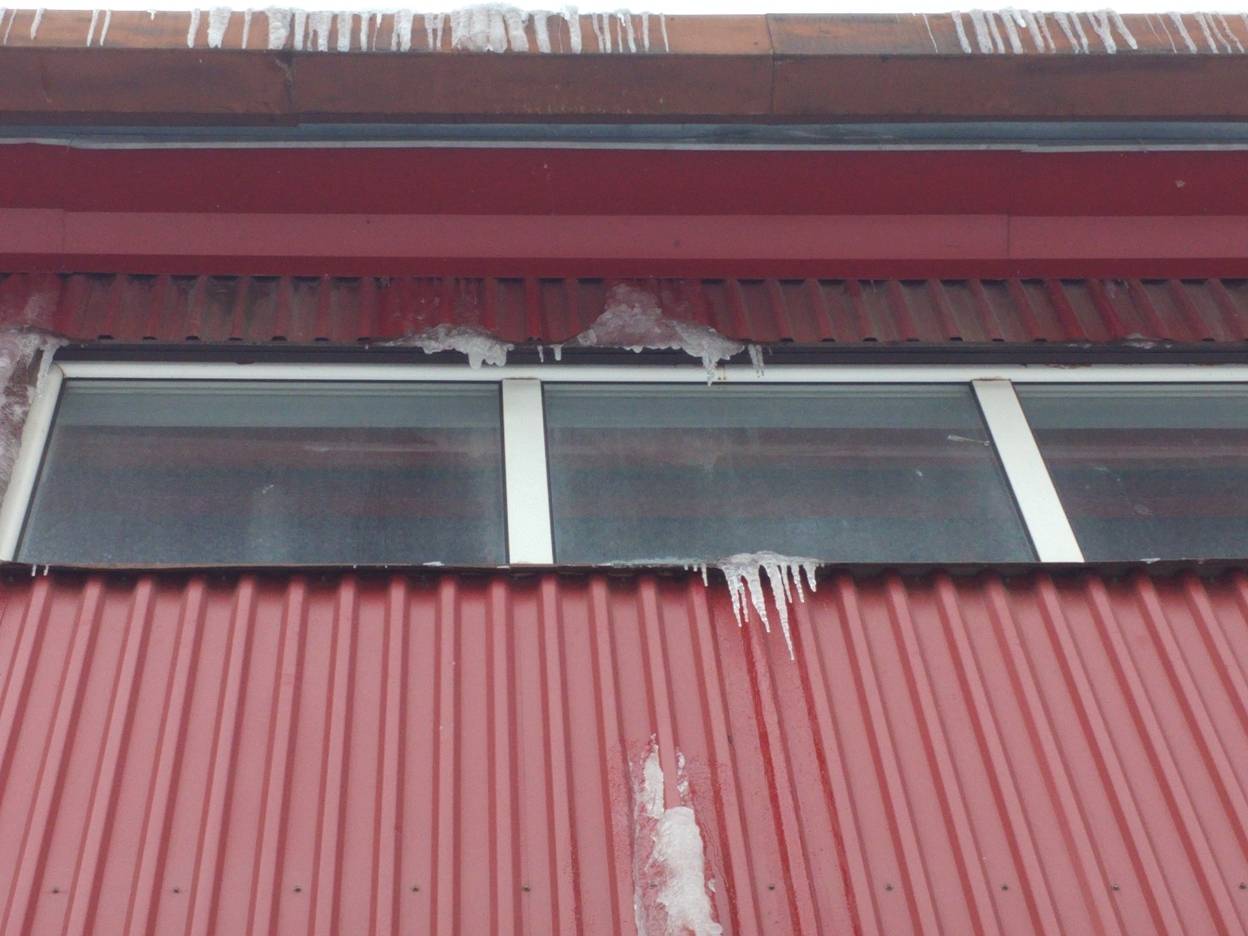
Why does ice accumulate
The causes of ice formation relate to external and internal factors:
- Frequent temperature changes. This leads to the fact that the layer of snow that was already lying could melt, after the temperature dropped, it froze and was covered by the next one.
- Failure to comply with the angle of the roof slope. It should be calculated in accordance with the climatic features of a particular area.
- Uncleaned drain channels. In autumn, the gutters could be covered with leaves. It clogs the holes, which prevents the outflow of water.
- Insufficient insulation of the attic space.
- The presence of an attic.When using the attic as a living space, steam is released, in addition, this leads to an increase in the temperature of the flooring. This causes the snow to melt and the water to freeze in the cold.
- Irregular roof cleaning.
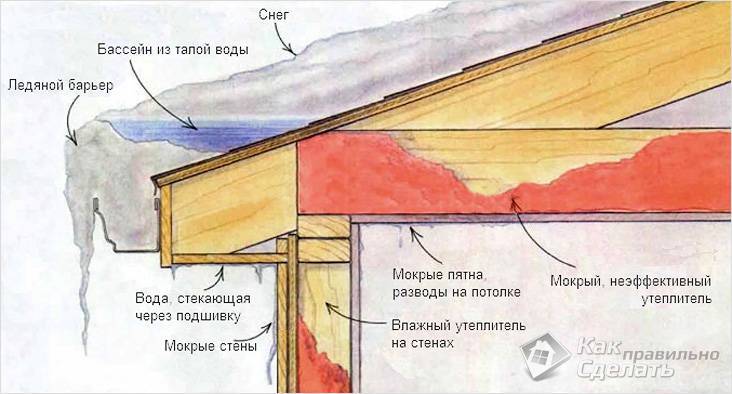 What threatens the icing of drains
The gutter heating system is usually installed in conjunction with the heating of some sections of the roof. This type of device has the following tasks:
- Removal of icicles and frozen influxes on the roof.
- Prevention of roof deck rot due to moisture accumulation.
- Release of holes from congestion for the passage of fluid.
- Prevention of sudden changes in temperature, which can damage some materials.
- Reducing the weight of the overlying sediment layer to reduce the load.
- Extending the life of the flooring and the entire truss system.
- Roof cleaning automation.
 Mounted usually together with roof heating
The nuances of installation work
When the wire is securely fastened inside or out, it is important to take care to insulate the end of the conductor. Experts recommend using heat shrink tubing
This product will perfectly protect the cores from moisture, which will reduce the risk of short circuits and repair work. We must not forget that it is required to connect the heating part with the "cold" one.
Wire connection
Tips and advice from experienced craftsmen:
- If you use two methods of laying the wire inside and outside the pipe at once, you can increase the rate of water heating by several times, but this will require additional installation costs.
- Heating water pipes with a self-regulating heating cable will allow you to ignore warm sections and direct current to cold places. It is allowed to cut, so there will be no problems in installation even in hard-to-reach places.The length of the cable does not affect heat dissipation.
- Resistive wire is half the price, but its service life is much lower. If a conventional two-core cable was installed, but it is worth preparing for the fact that after 5-6 years it will have to be replaced.
- The braid on the wire serves to ground it. You can skip this stage of work, but it is better to familiarize yourself with the methods of grounding.
Video description
How to make a water pipe grounding is shown in the video:


Most often, a linear cable laying method is chosen for self-assembly.
The level of heat transfer directly depends on which pipes are installed in the room
For plastic pipes, this indicator will not be high, which means that when installing a heating cable for plumbing, it will be necessary to wrap the pipes with aluminum foil.
Before attaching the cable to the outside of the metal pipe, it is important to make sure that there is no rust. If it is, cleaning and treatment with a special antiseptic is required.
If this is neglected, then in the future there is a risk of damage to the insulation.
If fastening is carried out from the outside, then the distance between the insulating bundles should not be more than 30 cm. If you take a wider step, then after a while the fasteners will disperse.
In practice, some craftsmen stretch two wires at once to increase the heating rate. It is important that there is a small distance between the cables.
For fastening to plastic, it is better to use special clamps.
Fastening with clamps and thermal insulation in the section
- If it is decided to twist the wire in a spiral, then initially the pipe is wrapped with metallized tape.
- To fix the insulation, it is better to use special ties. They can be purchased at any hardware store.
- It is necessary to completely isolate the temperature sensor from the electrical cable in order to eliminate the risk of short circuit and fire. This requires not only maintaining the distance between these devices, but also making the insulating gasket a special material.
- Heating pipelines with a heating cable using a thermostat will provide constant temperature support. This device is best mounted next to the electrical panel or directly in it. It will not be superfluous to install an RCD.
wire with thermostat
Briefly about the main
First of all, it is important to choose the right cable for heating pipelines.
There are self-regulating and resistive types of cable that are used for plumbing
When choosing a cable, pay attention to the number of cores, type of section, heat resistance, length, presence of braid and other characteristics.
For plumbing, a two-core or zone wire is usually used.
Of the ways to install the wire, it is better to give preference to the outer one. Fasten the cable inside the pipe only if it is not possible to mount it from the outside. In general, internal and external installation technologies practically do not differ from each other, but the second method minimizes the risk of blockages, and also increases the life of the wiring.
Installation of a roof heating system
First you need to figure out which area of \u200b\u200bthe roof requires heating. As already mentioned, these are valleys, overhangs and places of accumulation of a large amount of snow and ice, as well as drains
It is worth noting that the benefits of partial heating in areas that need it are much lower than from heating the roof in all problem areas. After you have decided on the area to be heated, you need to calculate the required amount of materials and purchase them
So, after all the materials are selected and purchased, you can proceed with the installation. Below you will find information on how to correctly install the entire system.
It is recommended to entrust such a procedure to professionals with experience in organizing roof heating.
Experienced hands will not make mistakes when installing a roof heating cable system
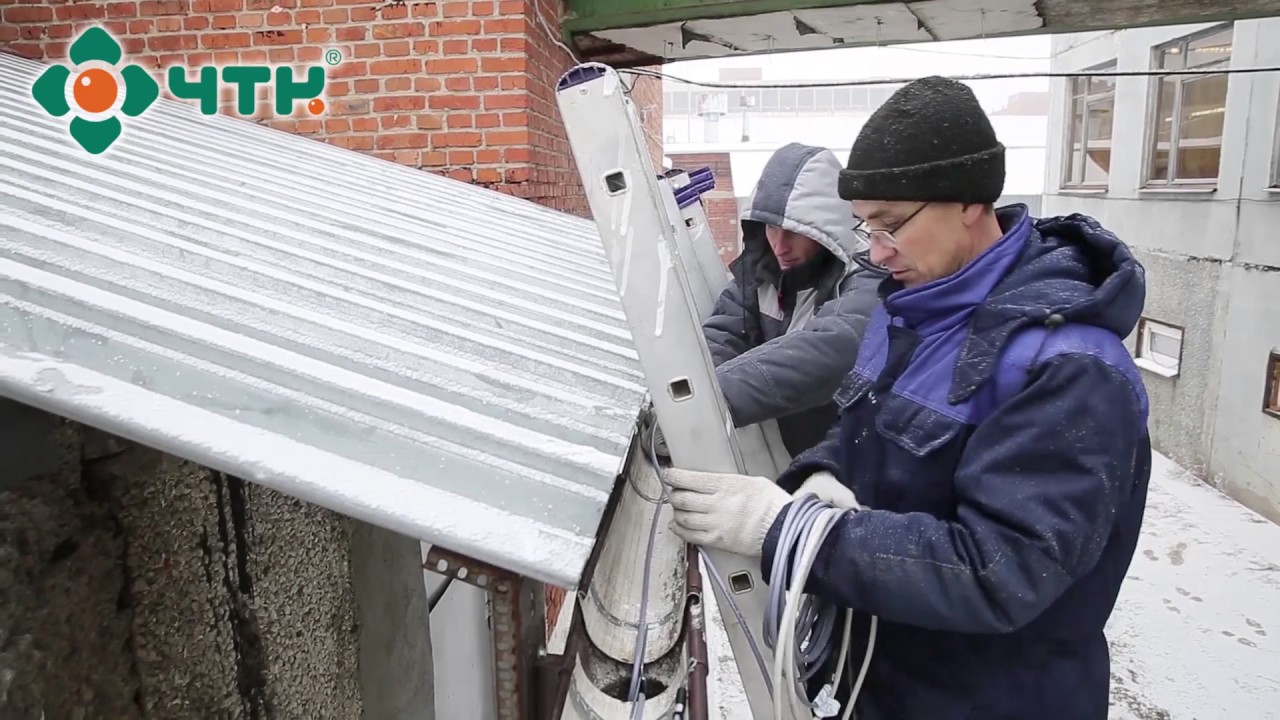
The first step is to completely clean the entire surface of the roof, as well as gutters from debris or leaves. Next, a mounting tape is installed in the required places. The next step is to install the junction box. It is worth bringing to it and fixing the “cold” end of the cable, previously threaded into the corrugated tube. After completing this procedure, the cable should be laid out inside the gutters, fixing it with the antennae of the fastening tape. Now you need to fix the wire inside the drainpipe. To do this, the cable is attached to the chain, for example, with plastic ties, and this entire system is threaded into the pipe. After that, it is worth fixing the upper segment. The bottom edge can be fixed using metal ties. Next, you need to lay out the loops on the surface of the roof and secure them using the antennae of the tape for this. If the roof slopes are too steep, then it would be better to add plastic ties. Now you can install the weather sensors. They should be located on the north side of the building next to the junction box.The next step is to check the entire wiring system. The quality of the system can be determined by measuring the resistance in the circuit and comparing the readings obtained with the data indicated in the product data sheet. It remains only to fix the control panel inside the room. After installation is complete, the temperature of the system must be measured to compare it with the data you entered.
The structure of the heating system on the roof
Video description
You can familiarize yourself with the procedure for installing roof heating, gutters and gutters by watching the video:


If the test showed the correct result, then the installation of the anti-icing system was carried out correctly. In this case, you get good reliable heating of the roof and gutters. Such a system will increase the life of the roof, as well as eliminate the inconvenience associated with the fall of icicles and snow from overhangs.
Conclusion
Good choice and quality installation of anti-icing system roofing will avoid the problem of clogging the drain channels and the destruction of the entire drainage system when snow melts from the roof. But it is better to entrust the design and installation of roof heating to professionals, because otherwise you can get a system that consumes too much electricity or does not cope with its duties.
Wires for heating
Most often, the heating of roof gutters is performed by a special self-regulating cable. But there are other types of such communications for heating gutters and funnels, consider each of them:
-
Resistive wire with constant resistance. It is considered the most affordable option for arranging roof heating. Consists of a two-wire wire and a braid.Due to the constant resistance, it is quite reliable, provides a constant high temperature;
-
Power wire. This is a good option for heating an internal drain, or if there are no funds for organizing special heating. Such a cable generates involuntary heating due to the increase in temperature during normal operation. It is suitable for areas with a small temperature difference;
-
Self-regulating is considered the most popular. It is suitable even for flat roof heating. It is a matrix that reacts to changes in the temperature of the drain. If the degree drops sharply, then the matrix begins to actively heat up its contacts and a general heating of the roof area is performed. Very convenient is the fact that the temperature of the heating element is similarly lowered. A special scheme is used to control the system.
You can equip your drain with heating wires that are laid directly in the outlets or funnels, or install a combined type of sewage heating. With this type of heating of gutters, a power cable is used for external gutters, and a matrix is \u200b\u200bused for funnels or internal communications.
Naturally, such heated systems operate at the expense of electric current. You should know that in high frosts quite serious energy costs are possible. For example, approximately 18–30 W are required to provide heating for one linear meter of gutters, depending on the type of wire selected.
It is advisable to immediately discuss with a specialist the maximum temperature for heating the insulation of a self-regulating and power wire.If there are no problems when heating a metal drain, then some plastic drainage systems do not tolerate heat well.
Video: roof and gutters heating


