- What is an anti-icing system
- How to choose the right heating system
- Preparing for installation
- Mounting process
- Typical errors during system installation
- Selection of control and protection equipment
- Installation of a roof heating system
- Video description
- Conclusion
- Installation of the anti-icing system: step by step instructions
- Required materials and tools
- System installation
- Pro Tips
- Roof heating
- Technology for arranging a heating system
- Means for heating the drain and roof overhang
- Which heating cable to choose
- The composition of the heating system of the drain and roof
- Heating cables as an anti-icing system
- General conclusions
- The need for underfloor heating
What is an anti-icing system
The anti-icing system is a cable device for heating the roof and gutters. The snowmelt system is powered by electric cables. Actual such devices during a period of high temperature fluctuations, when the likelihood of icing increases.
It is ice on the roof and gutters that cause material deformations.
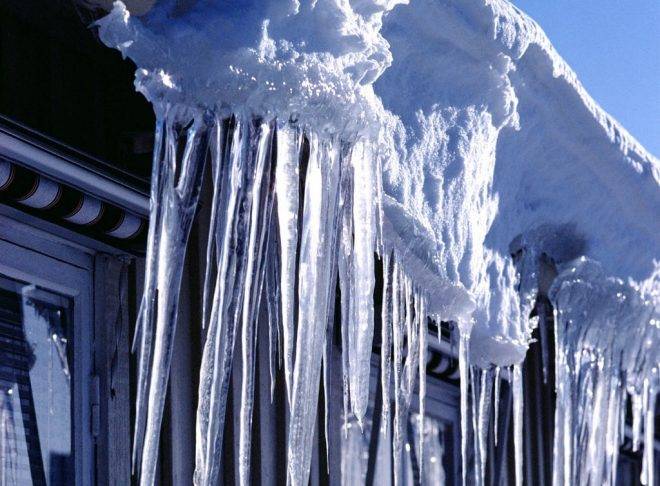
The anti-icing system is also an important safety detail. After all, during the operation of electric heating, icicles are not formed.
With proper design and installation of electric heating, the ice melts in time, and the water is drained away. This protects the roof from cracks and deformations. And the inhabitants of houses and vehicles are not threatened by overhanging icicles.
Roof heating options:
- In the presence of minor heat losses, it is enough to carry out a general check of the condition of the roof and mount the cables in the grooves and gutters;
- In the case of a warm roof, the installation of cables takes place on valleys, drips, attics, overhangs;
- When the roof is iced, it is unprofitable to install an icing system, it is better to replace the covering material.
At the same time, the choice of a snowmelt system includes a number of requirements for electrical cables. Consider their power, reliability, stability
It is also important to have all quality certificates and licenses.
How to choose the right heating system
Such systems differ primarily in the type of heating element. There are options with the use of cable or film heaters. The second method has much in common with the "warm floor" system.
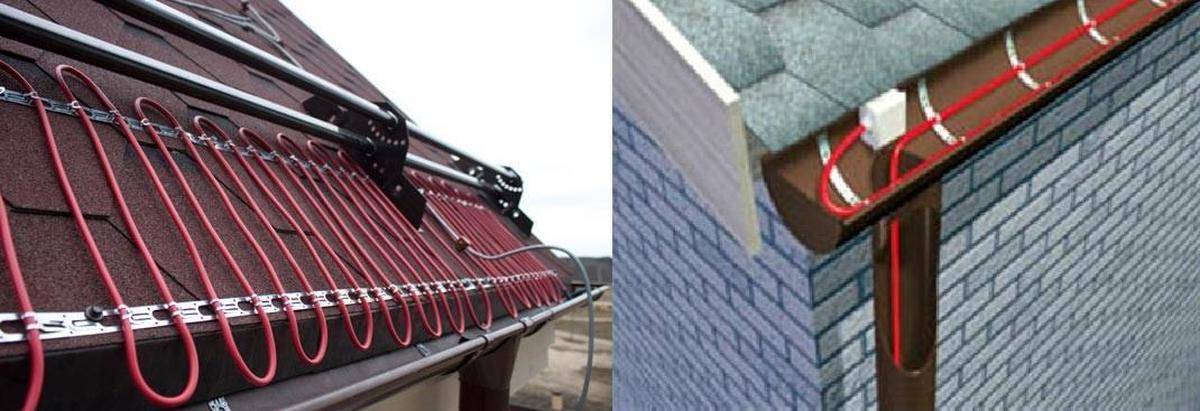
An important difference is that the film must be located inside the roofing pie, because it is not designed for serious loads and is poorly adapted to mechanical damage. But the cable, on the contrary, can be on the surface of the roofing material
But the wire can fit inside. This is usually used when installing a heating system for flat roofs, and also during the construction of high-rise buildings. For heating gutters and pipes only cable is used.

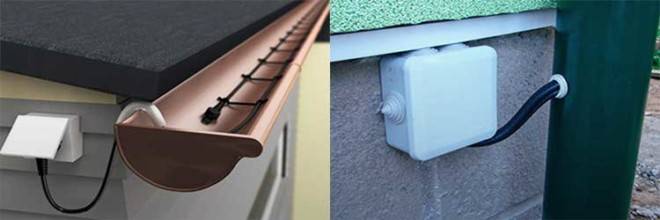
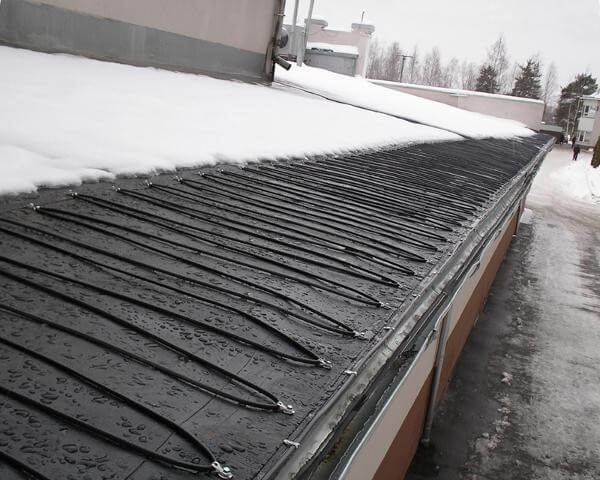
The cable is used for external heating of the roof
Characteristics of different types of heating elements:
Self-regulating wire
This is a matrix with polymer insulation and two strands of wires inside. It also includes a metal braid and an additional layer of insulating material. If it gets warmer outside, then the number of conductive paths inside the matrix decreases and, as a result, the temperature of the heater decreases. There are many advantages to this type of heater. Firstly, cable installation is quick and does not require much experience. Secondly, the matrix itself is resistant to overlaps and spot heating, thanks to the temperature self-regulation system. Thirdly, such a cable can be used in combination with absolutely any roofing materials. An important plus is that the system selects the optimal temperature and thereby prevents the consumption of excess electricity. It is possible to install such heaters without the use of weather sensors, and also with the help of a self-regulating cable it is possible to heat gutters.

Self-adjusting wire most easily mounted on the roof
resistive wire
Heating occurs due to the resistance of the conductor. Such a cable can be two-core and single-core. The insulation is made from a layer of polymer, and on higher quality models a nichrome core is used.
When installing such a cable, you need to pay attention to the fact that both the beginning and the end of each wire must necessarily converge at one point. There is one rather serious disadvantage of such a heating system: in the event of a point damage, the entire anti-icing complex fails.
Installation is inconvenient, because the resistive cable cannot be cut. This method is suitable for heating large areas of the roof.


The resistive system is more complex, it is better to entrust it to an experienced master
Film heater
Represents a flexible film, with veins from a carbonic conductor. It heats such material with the entire surface, since conductive strips are often located over the entire area of the heater. It is very convenient to transport and store, because such a film is sold in small rolls. This material is attached only under the roofing, so it can only be used in the case of roof reconstruction or during the construction process. Installation of such a heater should be entrusted to specialists. In the event of local damage, the heating system does not fail, but loses efficiency. During the repair process, it is always possible to replace the damaged section of the film heater. I would like to note that the film is very safe, it does not self-ignite. Uniform heating of the surface gives good energy savings.

Film heater mounted on the inside of the roof
When choosing materials, you should pay attention to their cost. The most expensive is to use a film heater
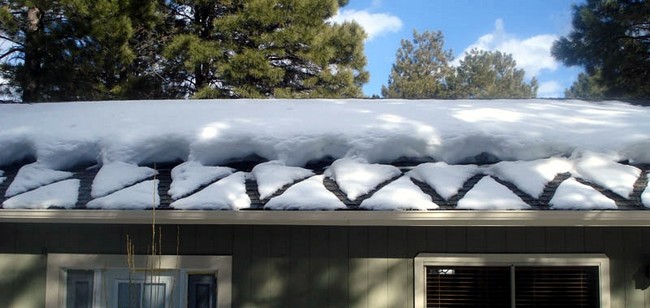
Self-regulating cable costs a little less, and the most budget option is resistive wire. But I would like to note that roof heating using a self-regulating cable is more economical and will provide good benefits in the future. Also note that the installation of an anti-icing system on the roof surface is possible only if there are snow retainers. Otherwise, the entire network will simply be torn down during heavy snowfall. Various improvements and options make the whole complex more expensive, but the choice is always yours.Remember that you should order a heating system for the roof, based on the characteristics of your particular roof.

The heating system is selected based on the type and characteristics of the roof
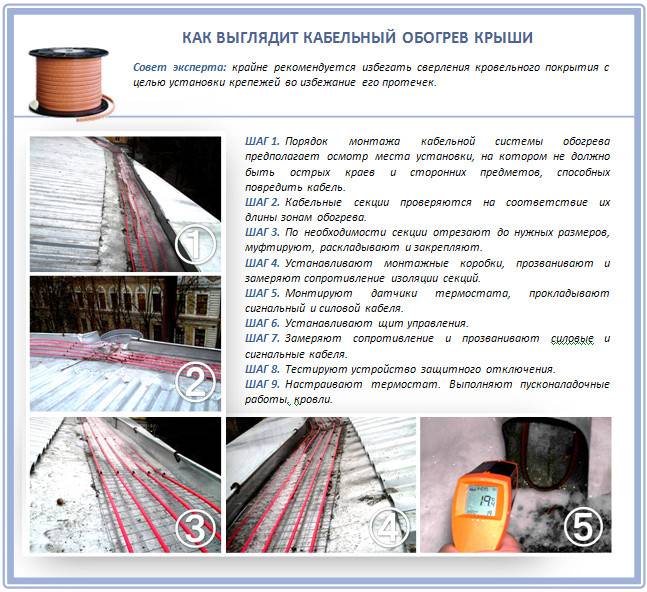
Preparing for installation
The beginning of work provides for the marking of areas for laying the cable, taking into account all available turns and planes. The heaters are cut into segments of the required length for further connection using couplings.
Working surfaces are cleaned of dirt, all irregularities and sharp objects that can damage the cable are eliminated.
Mounting process
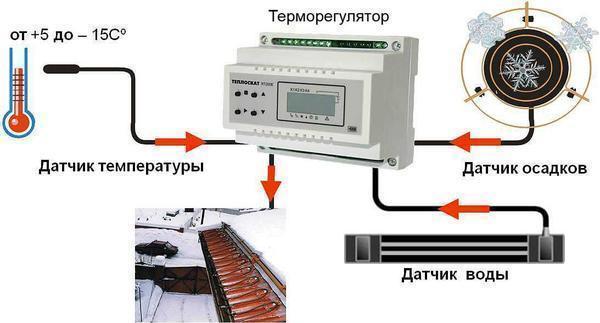
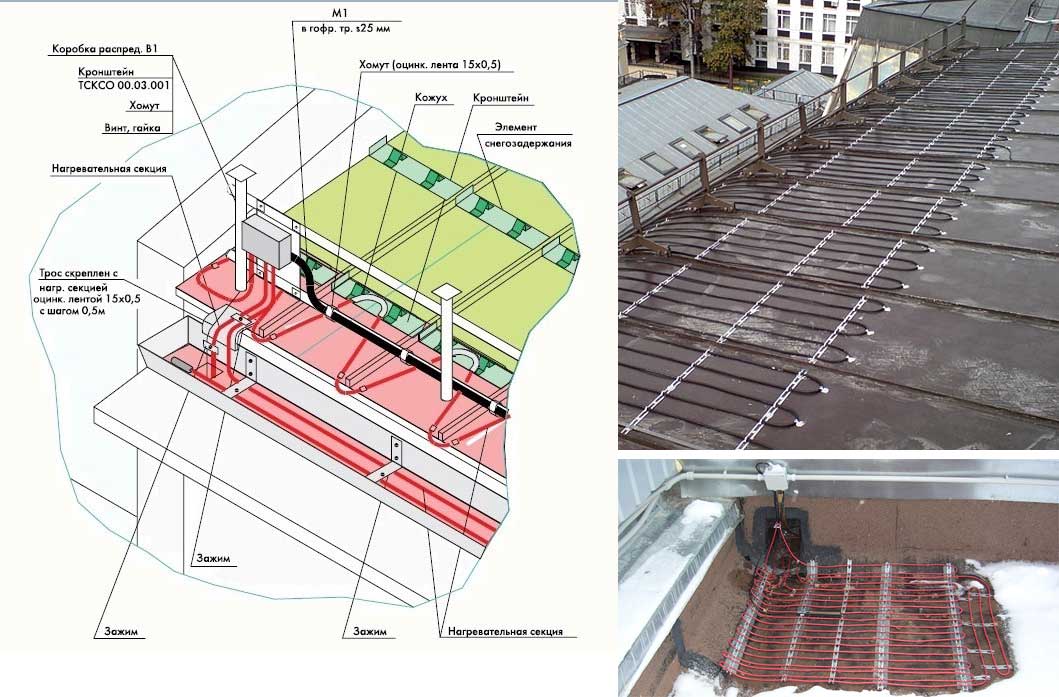
Assembly of the anti-icing system begins with the installation of the controller in a protective box. Next, the installation of the main structural elements is carried out in the following order:
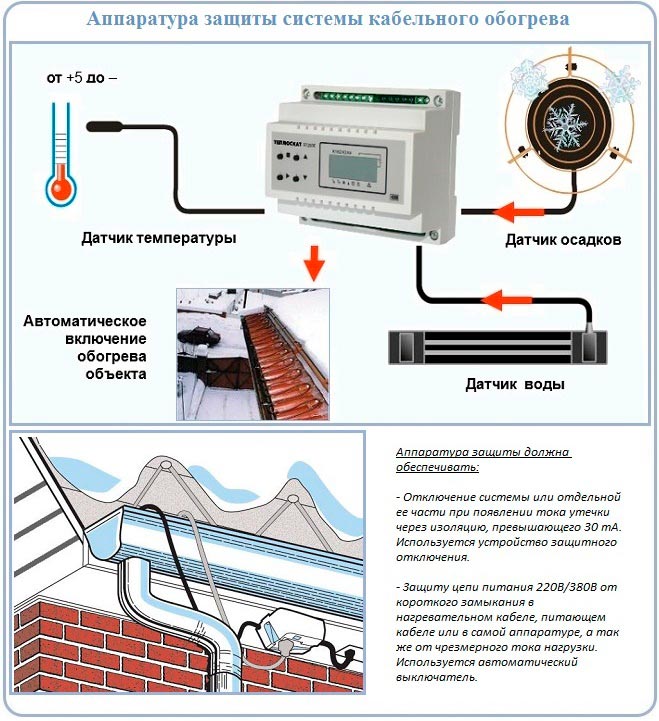
Installation of signal sensors. Temperature sensors are fixed in places protected from sunlight, heating and climate control devices. Precipitation sensors are installed on the roof, and humidity sensors are installed in areas affected by melt water.
Laying signal and power cables with fixation with nylon ties and plastic clamps. Additional measurement of resistance of thermal protection of cables.
Laying heating cables with fixation on brackets, clamps, overlays, mounting tape
It is important to prevent air sagging of the wires.
Connecting cables to junction boxes and measuring resistance to eliminate possible breakdown of thermal protection. Permissible value - 10 MΩ / m
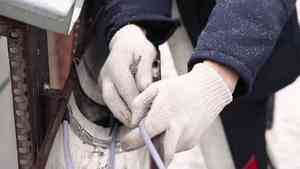
In drains, the heating cable for the roof should be fixed with metal cables. Carrying out additional measures: winding insulation on clamps and plugging all cables.
Connection of cables (heating, signal and power) to a single system and connection to the control unit according to the switching diagram. Grounding of heating elements and distribution unit.
Starting the finished system for 60 minutes and control current measurement at each heating section. If during the control period significant deviations of the obtained values from the norm are revealed, the system is diagnosed and troubleshooting is carried out.
Typical errors during system installation
Often, home craftsmen who install a heating system for the first time make the most common mistakes:
- Incorrect calculations of system elements for a specific type of roof structure. In such cases, the presence of cold and warm sections of the roof, the characteristics of the catchment areas and the number of available turns are rarely taken into account.
- Violation of the technology for laying an electric heater: high mobility and sagging of the cable, damage to the roof due to the presence of through holes for fasteners, the use of clamps that are not intended for outdoor use.
- Installing the cable in the drainage system without additional fixation with a metal cable, which can lead to damage or breakage.
- Use of power cables not intended for use on the roof structure. This may cause breakdowns in thermal insulation and electric shock.

Selection of control and protection equipment
The control equipment is designed to automate the working processes of the icing system for gutters and roofs, and the protection equipment is designed to prevent accidents in the electric circuit.
There are two types of control equipment:
- The thermostat is designed to regulate the heating temperature of cables based on signals received from temperature sensors.
- The meteorological station is used to process data received from control sensors for temperature, humidity and precipitation. It has more functionality and features.
Protection equipment consists of functional devices:
- Introductory automatic switch.
- Protective automatic thermostat.
- Starter on a magnetic basis.
- Diffavtomat.
- Protective circuit breaker.
- Emergency signal.
Additionally, the equipment can be equipped with a time relay, current transformer, soft starter and controller.
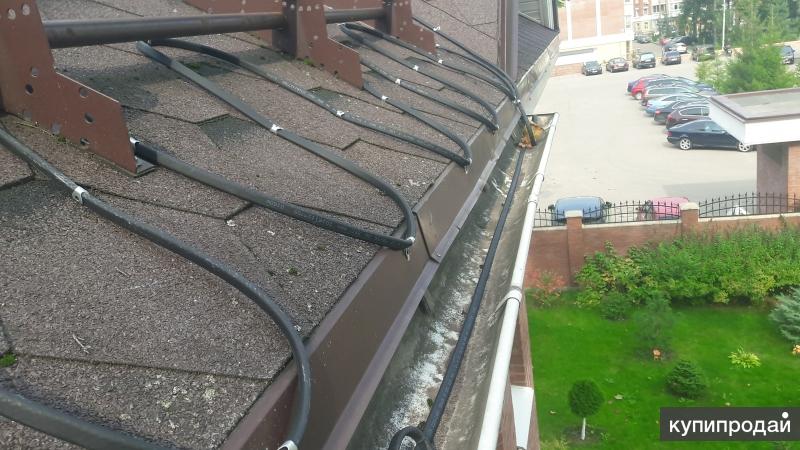
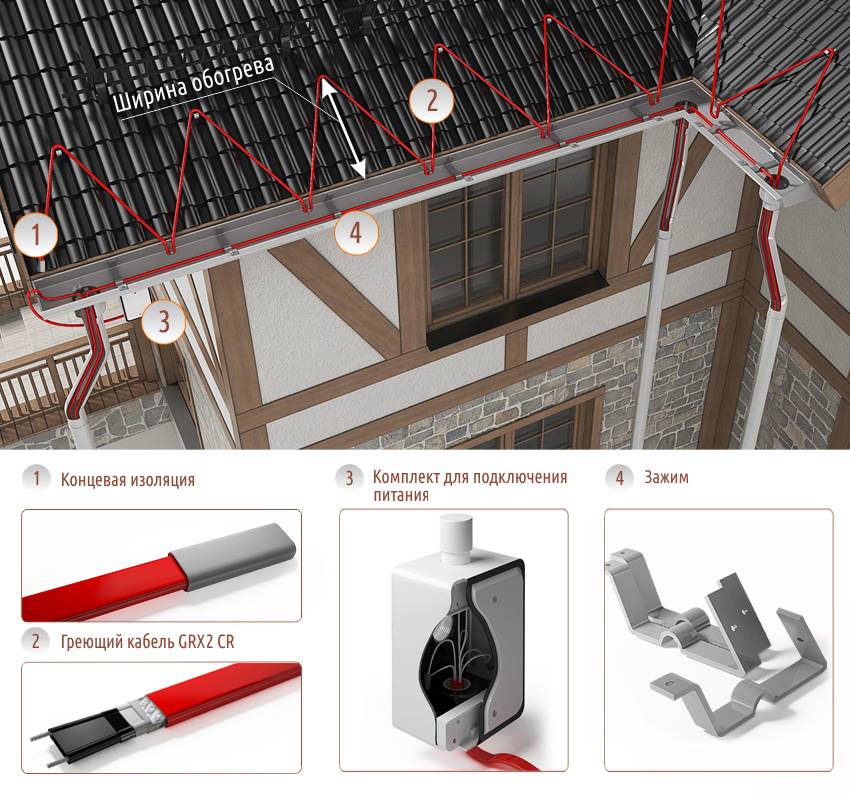
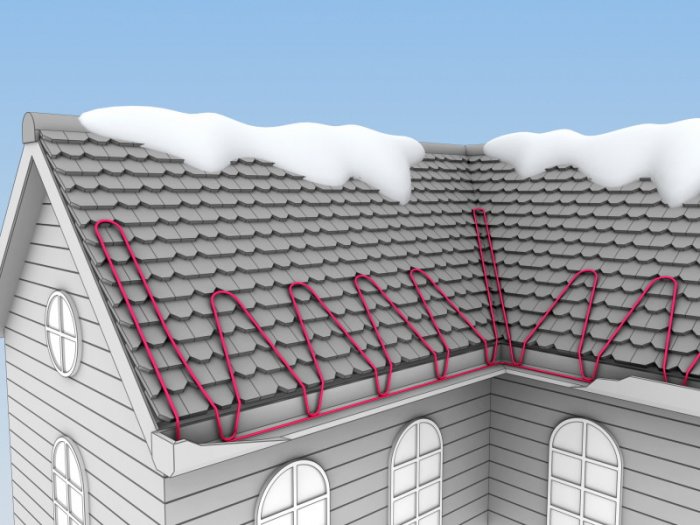
The modern system of electric heating of roofs and drains will provide timely protection against the accumulation of snow cover, ice formation and freezing of the roofing cake. It is quite simple to organize such a system with your own hands, the main thing is to correctly calculate the length of the heating element and determine the zones for its laying.


Installation of a roof heating system
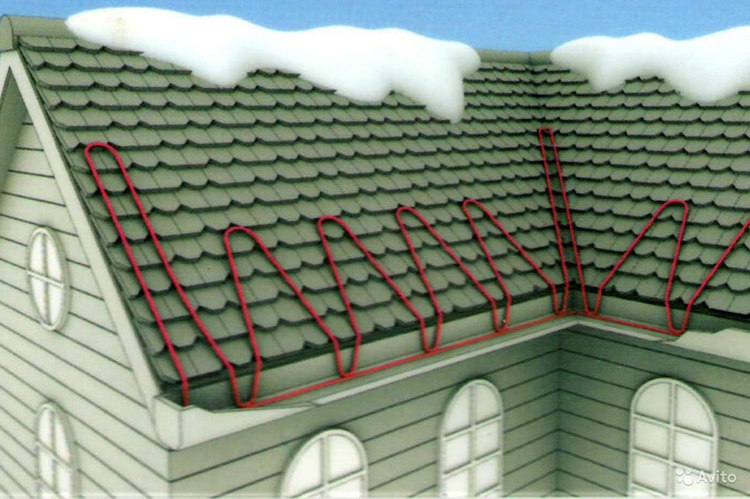
First you need to figure out which area of \u200b\u200bthe roof requires heating. As already mentioned, these are valleys, overhangs and places of accumulation of a large amount of snow and ice, as well as drains
It is worth noting that the benefits of partial heating in areas that need it are much lower than from heating the roof in all problem areas. After you have decided on the area to be heated, you need to calculate the required amount of materials and purchase them
So, after all the materials are selected and purchased, you can proceed with the installation. Below you will find information on how to correctly install the entire system.
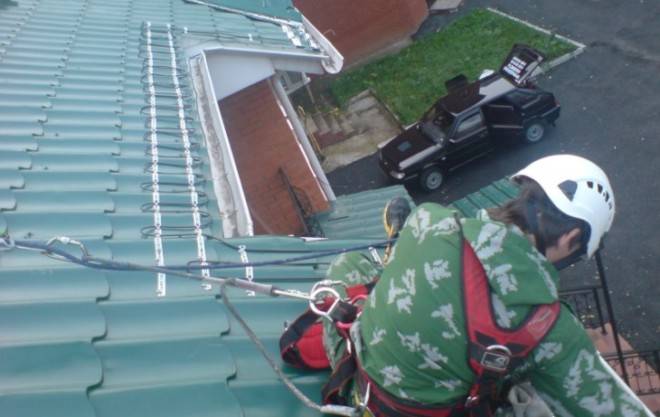
It is recommended to entrust such a procedure to professionals with experience in organizing roof heating.

Experienced hands will not allow installation errors Roof cable heating systems
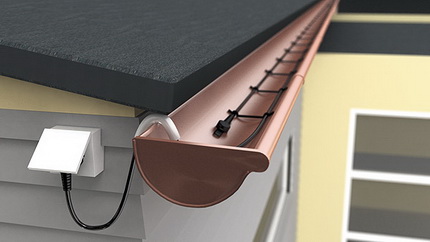
The first step is to completely clean the entire surface of the roof, as well as gutters from debris or leaves. Next, a mounting tape is installed in the required places. The next step is to install the junction box. It is worth bringing to it and fixing the “cold” end of the cable, previously threaded into the corrugated tube. After completing this procedure, the cable should be laid out inside the gutters, fixing it with the antennae of the fastening tape. Now you need to fix the wire inside the drainpipe. To do this, the cable is attached to the chain, for example, with plastic ties, and this entire system is threaded into the pipe. After that, it is worth fixing the upper segment. The bottom edge can be fixed using metal ties. Next, you need to lay out the loops on the surface of the roof and secure them using the antennae of the tape for this. If the roof slopes are too steep, then it would be better to add plastic ties. Now you can install the weather sensors. They should be located on the north side of the building next to the junction box. The next step is to check the entire wiring system. The quality of the system can be determined by measuring the resistance in the circuit and comparing the readings obtained with the data indicated in the product data sheet. It remains only to fix the control panel inside the room. After installation is complete, the temperature of the system must be measured to compare it with the data you entered.

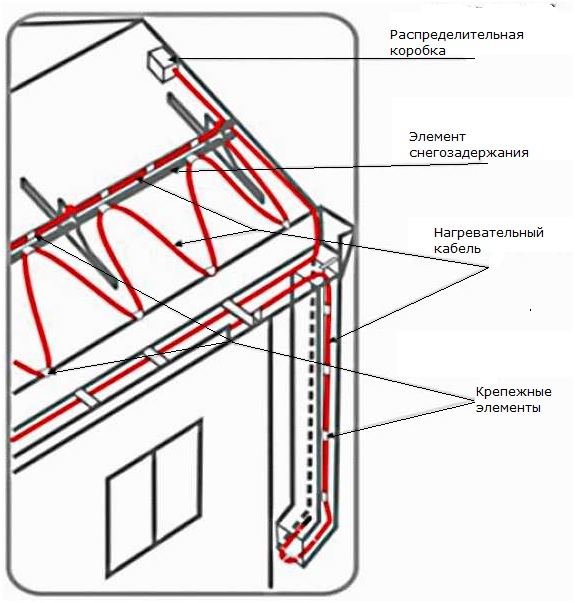
The structure of the heating system on the roof
Video description
You can familiarize yourself with the procedure for installing roof heating, gutters and gutters by watching the video:
If the test showed the correct result, then the installation of the anti-icing system was carried out correctly. In this case, you get good reliable heating of the roof and gutters. Such a system will increase the life of the roof, as well as eliminate the inconvenience associated with the fall of icicles and snow from overhangs.
Conclusion
Literate selection and quality installation of the system anti-icing of the roof will avoid the problem of clogging the drain channels and the destruction of the entire drainage system when snow melts from the roof. But it is better to entrust the design and installation of roof heating to professionals, because otherwise you can get a system that consumes too much electricity or does not cope with its duties.
Installation of the anti-icing system: step by step instructions
First of all, you need to buy all the elements of the heating system and prepare the necessary tools.
Required materials and tools
The roof heating network consists of a control panel and cables. The box must be completed with:
- common circuit breaker;
- thermostat;
- separate circuit breakers for all phases;
- RCD;
- contactor;
- RCD.
- heating cable;
- signal wire for thermostat;
- installation boxes for branching;
- fasteners, as well as for hermetic pairing of wires, electrical tape and couplings;
- pliers, signal screwdriver;
- electric drill, screwdriver.
System installation
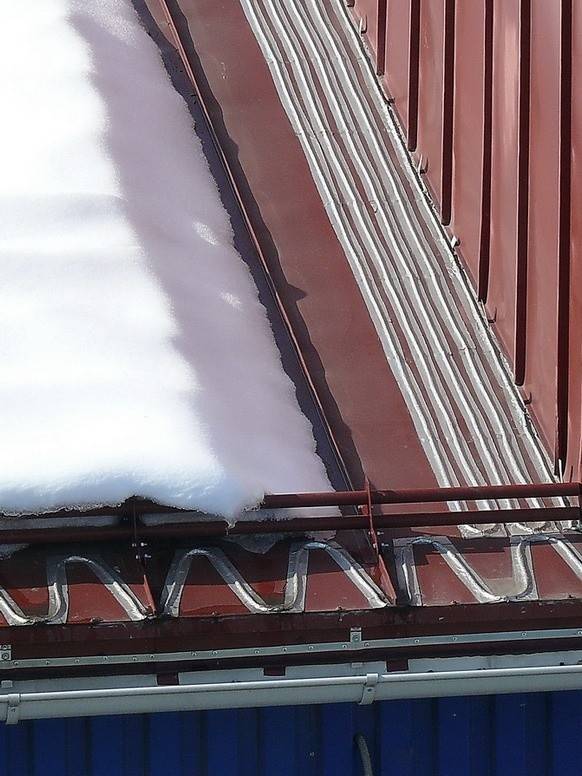
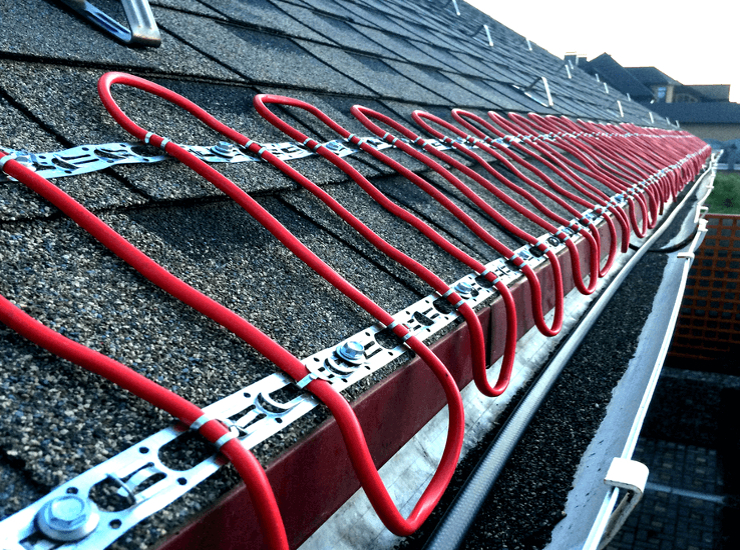
- On the roof overhangs, a resistive cable is placed in one thread. This is done in zigzags so that the wire does not break when the snow cap comes off.The thread is attached to the base with double-sided adhesive tape or sealant.
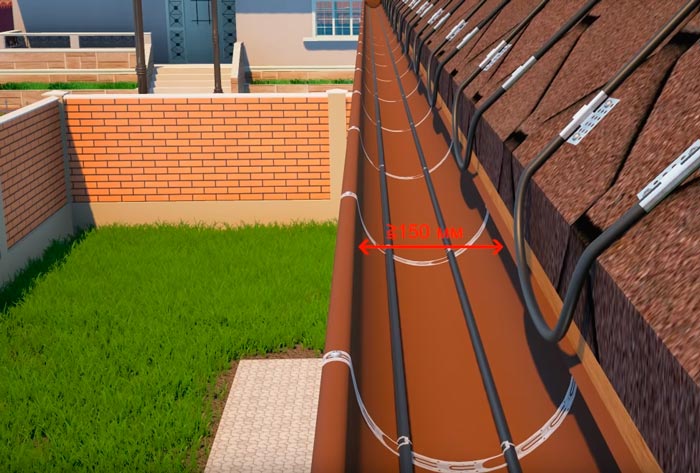
- In the trays, the wire is pulled in 2-3 threads. It is held in place with plastic straps.
- In downpipes, a self-regulating cable is mounted in 1-2 threads. It is attached with mounting tape.
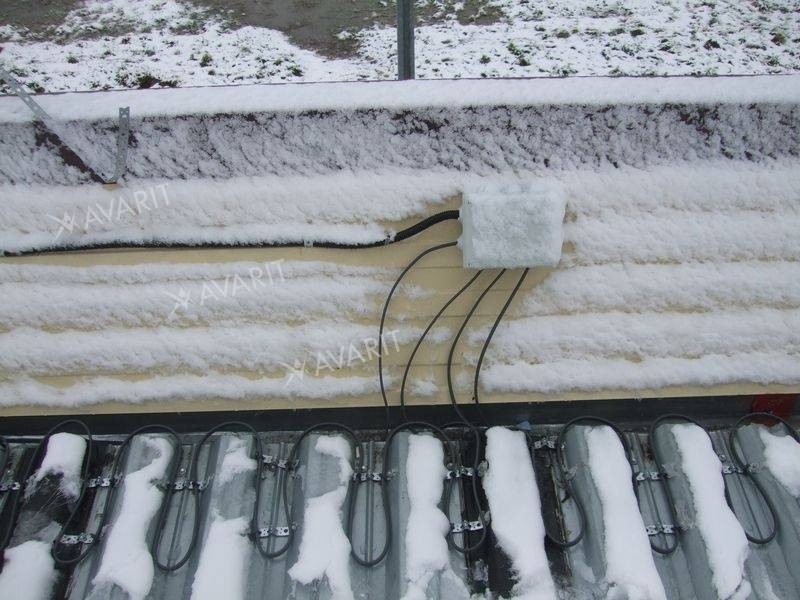
- With the help of mounting boxes through which the cables are mated, the network branches out along the roof.
- In flat roof inlets and at the bottom of pipes, the cable can be fastened with rivets.
- After laying the cable, it is necessary to check whether its length corresponds to the required heating of the roof elements. Then boxes with control switches are installed to heat the roof.
- After the power wire is laid, the signal cable is mounted. It connects to a thermostat.
Pro Tips
- Before installing the system, you need to determine the optimal power of the wire. This is done taking into account its efficient functioning without excessive consumption of electricity. Usually, a power of 25-35 W is sufficient, based on the material of the drainage system and the climatic conditions of the area.
- The heating system can be laid independently, the main thing is to do everything right.
- After installing the heating system, check its performance, check its grounding and adjust the thermostat.
- The heating cable will prevent the roof drain system from freezing and will melt the snow cap on it. You can choose for this self-regulating or resistive wire. It depends on the area of \u200b\u200bthe roof and the climate of your region.
Roof heating
The anti-icing system helps to avoid the accumulation of large snowdrifts on the roof, creating significant weight loads.In addition, thanks to heating, ice and icicles, which are much more dangerous than snow mounds, will not accumulate on the roof surface and on the edges of the roof. It is especially worth thinking about heating the gutter system, designed to drain water and melting snow from the roof surface.
Of course, freshly fallen snow is quite a beautiful phenomenon, but it is dangerous for roofs. When snow first falls, its crystals cannot absorb heat as before. Thus, freshly fallen snow is less prone to melting. But quite quickly in time, dust and dirt settle on top of it, which makes it unstable to the sun. The particles begin to absorb light, thus the snow begins to melt. However, strangely, the snow does not melt from above, but most often from below. A constant coating of dust and dirt fills the gaps between the crystals, making the snow crust thicker. But the most unpleasant thing begins when the temperature passes the zero mark several times during the day: it reaches the plus mark, then drops back to minus again. In winter, some areas of the roof can be heated by the sun, thereby helping to reduce the amount of snow on the surface. However, often the water from melted snow may not reach the ground and freeze on the roof or in the gutter system, which can lead to danger. And of course, it is worth mentioning that ice is much more difficult to melt than snow.
To install a rooftop heating system, certain steps must be followed. Initially, for this it will be necessary to choose the right heating cable, as well as calculate the power with which the system will work.
As you can see, such heating can bring quite a lot of benefits, significantly reducing the weight load not only on the roof structure, but also on the structure of the entire building (walls and foundation).
The heating system on the roof will heat up those parts of the surface on which the heating cable will be installed, because the solar heat is not always enough to heat the entire roof, and in severe frosts the snow becomes even stronger. That's what roof heating is for. Thanks to him, the snow will gradually turn into water, which will smoothly flow down the drainpipes and go into the ground. Thus, the most important task of such heating is the heating of gutters to remove melted snow. This implies that the heating cable should be completely laid where you have drains.
In order for the roof heating system to function properly, quite a few components will be needed. To begin with, you will need a special cable through which heat will pass. The heated cable is one of the most important parts in such a system. You should also purchase special electrical networks that will regulate the flow of water, as well as the heating temperature. Well, and, of course, you will additionally need a special control, thanks to which you can adjust the temperature of the roof heating system. Sometimes you may need special tape, a hair dryer, special fasteners or clips, and glue to secure some materials.


Depending on the task, special couplings may be required. This is a special device that connects all cables into a single system.Thus, there will be no separate wires, each of which will be responsible for certain functions. Mounting perforated tape should be metal. This is the most economical and easiest option. In addition, the metal conducts heat well, thereby increasing the efficiency of roof heating.
At present, roof heating systems are intensively developing, incorporating the best developments and innovations in the energy consumption system.
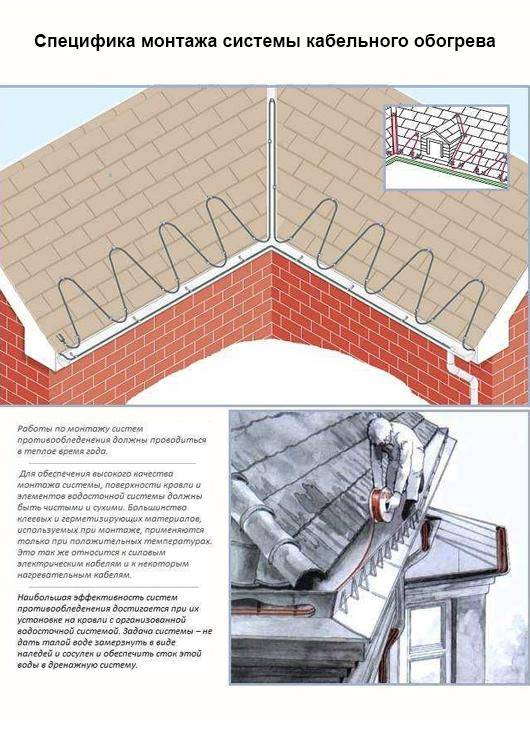
Technology for arranging a heating system
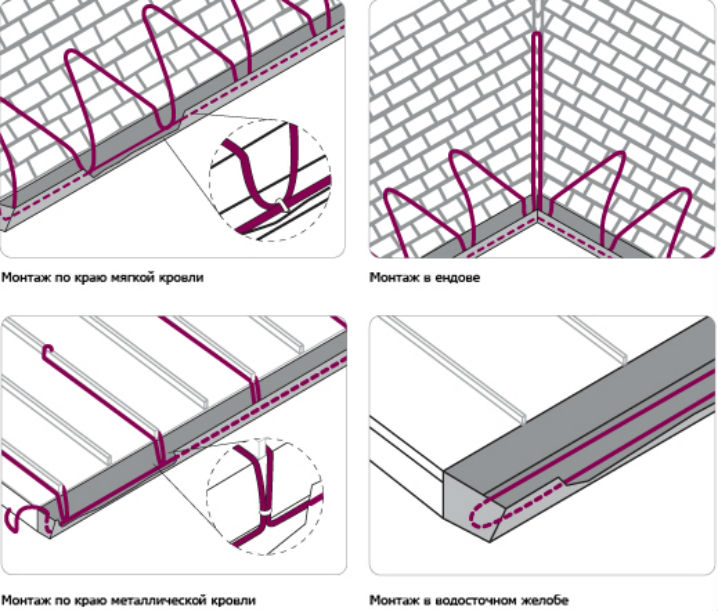
We offer you to study the detailed instructions for installing the roof heating system and do-it-yourself gutters. The process of installing a heating system for gutters includes a number of standard steps:
First, we outline the places where the cable will be laid.
It is important to take into account all the turns and their complexity. If the angle of rotation is too steep, it is recommended to cut the cable into parts of the required length and then connect them using sleeves
When marking, we carefully examine the base. There should be no sharp protrusions or corners, otherwise the integrity of the cable will be in jeopardy.
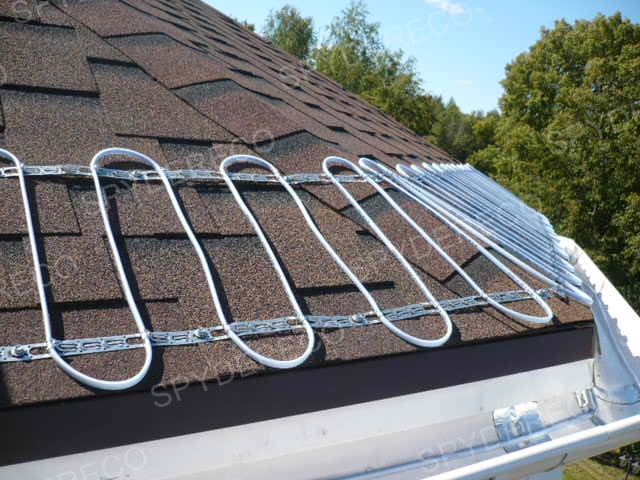
Inside the gutters, the cable is fixed with a special mounting tape. It is attached across the wire. It is desirable to choose the tape as strong as possible.
The resistive cable is fastened with tape every 0.25 m, self-adjusting - every 0.5 m. Each strip of tape is additionally fixed with rivets. Their installation sites are treated with sealant.
For cable installation use a special mounting tape. No other fasteners are recommended. Rivets, sealant or polyurethane foam are used to fix the tape
Inside the gutters, the same mounting tape or heat shrink tubing is used to secure the cable.For parts whose length exceeds 6 m, a metal cable is additionally used. A cable is attached to it to remove the load-bearing load from the latter.
Heating cable inside funnels fastened with tape and rivets. On the roof - on a mounting tape glued to a sealant, or on a mounting foam.
An important note from experts. It may seem that the adhesion of the roofing material to the sealant or foam is not enough for a reliable connection.
However, it is absolutely impossible to make holes for rivets on the roofing material. Over time, this will inevitably lead to leaks, and the roof will become unusable.
We select a place for junction boxes and install them. Then we call and accurately measure the insulation resistance of all the resulting sections. We put the thermostat sensors in place, put the power and signal wires. Each sensor is a small device with a wire, the length of the latter can be adjusted. Detectors are placed in strictly defined places.
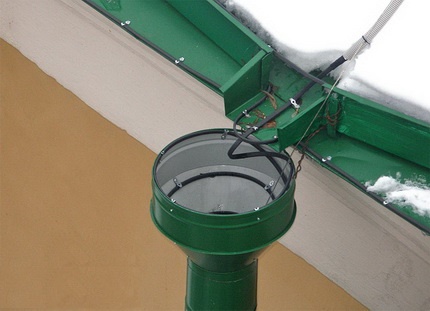
In some areas of the system, increased heating is required. Here is mounted more cable. These areas include a drain funnel where ice can accumulate.
For example, for a snow sensor, a place is selected on the roof of a house, a water detector - at the bottom of the gutter. All work is carried out according to the manufacturer's instructions. We connect the detectors with the controller. If the building is large, the sensors can be combined into groups, which are subsequently connected in turn to a common controller.
Next, we prepare the place where the automatic control system will be installed. Most often this is a switchboard located inside the building. This is where the controller and protection group are installed.
Depending on the type of controller, the nuances of its installation may vary slightly. However, in any case, it will have terminals for connecting detectors, heating cables and for power supply.

The picture shows that the cable is fixed in a “suspended” state. Over time, a violation of the installation will inevitably lead to its breakage and breakdown of the heating system.
We install the protective group, after which we measure the resistance of previously installed cables. Now we need to test the automatic safety shutdown to find out how well it performs its functions.
If everything is in order, we program the thermostat and put the system into operation.
Means for heating the drain and roof overhang
To prevent the formation of frost, various systems for heating gutters and roofs are currently used, but almost every one of them is based on the use of a special heating cable and automation equipment.
Let us consider in more detail what types of heating cable and control equipment exist, which of them will be preferable for selection.
Which heating cable to choose
There are two main types of heating cables for roofs and gutters:
Resistive cable. In practice, it is a conventional cable consisting of a metal core and insulation. The resistive cable has a constant resistance, a constant heating temperature during operation and a constant power. The heating of the cable comes from a closed circuit connected to electricity.


Design (diagram) resistive heating cable
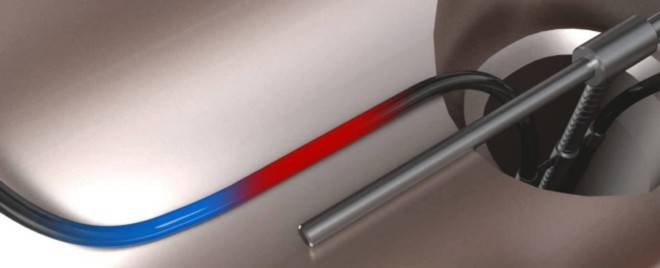
Self-regulating cable for heating gutters and roof overhangs is more technologically advanced.It consists of a heating self-regulating element (matrix) that reacts to the ambient temperature (drainpipe) and changes its resistance and, accordingly, the degree of heating, as well as an insulating sheath, braid and outer sheath.
Each of the types of heating cables is able to provide equally effective heating of the roof and gutters. However, each of them has its own advantages. So, the main advantage of a resistive cable is its much lower price compared to a self-regulating cable. At the same time, the second type is more efficient in terms of electricity consumption and unpretentious to the laying conditions.
When the temperature rises outside, the cable matrix decreases number of conductive pathsowing to what the power and quantity of the consumed electric power falls. The temperature of the self-regulating cable is also reduced. All this avoids the need for a temperature sensor that automatically regulates the operation of the cable.
Advice from a professional: The most effective in terms of cost and quality is considered to be a combined system of heating cables. Usually inexpensive resistance cables are used in the roof part of the system, while the heating of gutters and gutters is provided by self-regulating cables.
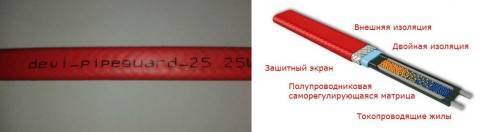
Design (diagram) of Devi self-regulating heating cable
With regard to the calculation of energy consumption and heating cable power selection, then here the norm for products of a resistive type is a cable with a power in the range of 18-22 W per linear meter, for self-regulating - 15-30 W per meter.However, it should be noted that in the case of a drainage system made of polymeric materials, the cable power should not exceed 17 W per linear meter, otherwise there is a risk of damage to the drain due to excessively high heating temperatures.
The composition of the heating system of the drain and roof
In addition to the actual heating cables, heating systems also consist of the following main components:
- fasteners.
- Control panel, usually consisting of:
- input three-phase circuit breaker;
- residual current devices, usually 30mA sensitivity;
- four-pole contactor;
- single-pole circuit breakers for each phase;
- thermostat control circuit breaker;
- signal lamp.
Distribution network components:
- power cables used to power heating cables;
- signal cables connecting thermostat sensors with the control unit;
- mounting boxes;
- couplings ensuring the tightness of connections and terminations of all types of cables.

Heating cable connection diagram
thermostat. Adjustment of the cable heating system can be carried out using two types of devices:
- Actually, the thermostat. This device is designed to turn on the heating system in a given temperature range. Usually the operating range is set within -8..+3 degrees.
- Weather stations. In addition to a certain temperature range, the weather station is able to monitor the presence of precipitation and their melting on the roof. The station includes not only a temperature sensor, but also a humidity sensor, and some weather stations are equipped with both a precipitation sensor and a melting (humidity) sensor.
When using a conventional temperature controller in the cable system, the user will need to independently turn on the system in the presence of precipitation and turn it off in their absence. The weather station, on the other hand, allows you to fully automate the process of the system and even program the time delays for its shutdown. On the other hand, the cost of conventional thermostats is much more profitable.
Heating cables as an anti-icing system
Anti-icing systems based on heating cables are implemented taking into account the design features of the roof. If they are designed correctly, then the formation of frost is completely excluded. Such structures have undeniable advantages.
- The price of the system is relatively low.
- Little energy is consumed.
- The organized drainage system in spring and autumn functions normally.
If the temperature drops below -18 °C, the anti-freeze system does not work, as it is not needed during this period. The reasons are as follows.
Firstly, frost, which is of natural origin, does not form, since water remains all the time in a frozen state on the roof, it is actually not there on the other side of the roof.
Secondly, snowfalls at this temperature are rare.
Thirdly, significant energy capacities will be required to melt the snow and divert water along a very long path. Doing this is impractical.
It should also be taken into account that there are limiting indicators of the possibility of the heating part of the system. Designers provide them based on practical considerations. If they are not taken into account, the equipment will operate inefficiently in the indicated temperature range.If these indicators are significantly exceeded, then there will be an overrun of electrical power, but the system will not work better.
The following indicators must be taken into account.
First indicator. Specific power of heating cables that are installed in the horizontal zones of the roof. The indicator of the total specific power per unit area of the heated surface (such parts are a chute, tray, etc.) should be 180-250 W/sq. m, no less.


Second indicator. Specific power of the cable heating the drain. The minimum indicator is 25-30 W per 1 m of the length of the drain. The longer the drain, the higher this figure. Increases to 60-70 W/m.
General conclusions
Conclusion one. The operation of anti-icing systems is noted during the periods:
- spring;
- autumn;
- the arrival of thaw.
Second conclusion. Must be present in the system:
- temperature sensors;
- special purpose thermostat.
The thermostat controls the operation of the system, provides adjustment of temperature parameters, taking into account certain features:
- number of storeys of the building;
- its location;
- climatic zone.
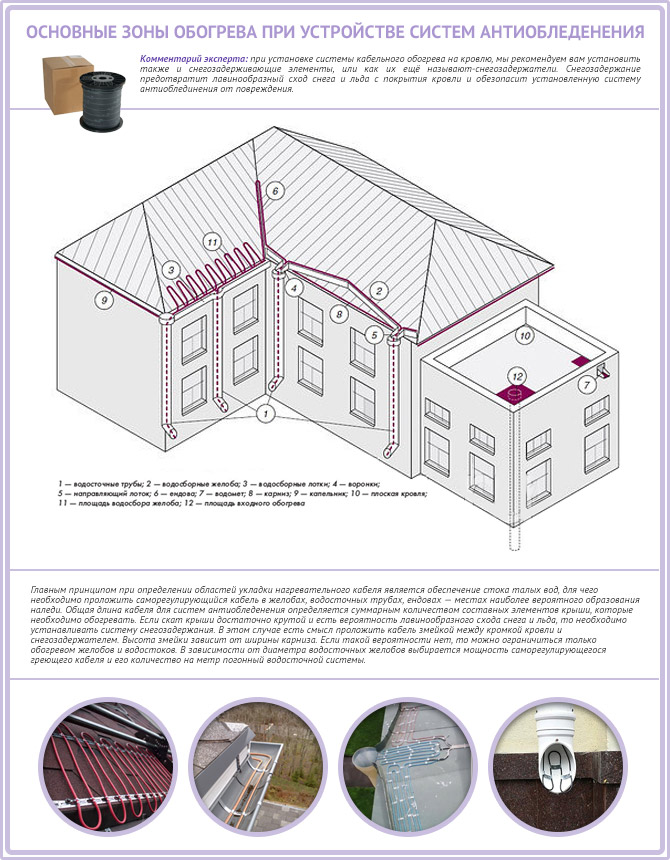
Conclusion the third. Heating cables should be installed along the entire path where the melt water passes. The installation begins with horizontal gutters (trays), and ends at the places where water exits the gutters. If the design provides for entrances to the storm drain, then it is also installed below the freezing depth in the direction of the collectors.
Conclusion four. It is required to adhere to the power standards established for heating cables. In different frequent systems (vertical drains, horizontal trays, gutters) it is different.
The need for underfloor heating
Snow, as you know, not only “circles, flies and melts”, but also creates a lot of problems:
- With its weight, it can damage the roof or gutter system up to the formation of leaks.
- Having overcome the critical mass, a snowdrift can slide off the roof slope and fall down, injuring people or animals near the house.
- Soft and loose snow very easily turns into solid dangerous ice: during the day, under the rays of the sun, melting occurs, and at night the resulting water freezes. Ice not only blocks the drainage system and creates a danger of its collapse with its weight, but also in the form of icicles threatens the lives of passers-by.
Note that snow melting can also be observed in frost if the roof is poorly insulated (“warm roof”). This time, the cause of the melting is the warmth of the interior space of the house. Flowing down to the colder cornice and drain, the melt water freezes, forming ice and icicles.
Such "decorations" turn the roof of the house into a source of danger to others.
The problem of ice and snow on the roof cannot be ignored. But instead of removing them mechanically, you can apply a simpler and more modern solution: fix heaters on the roof and drain. This is the essence of the anti-icing system.


