
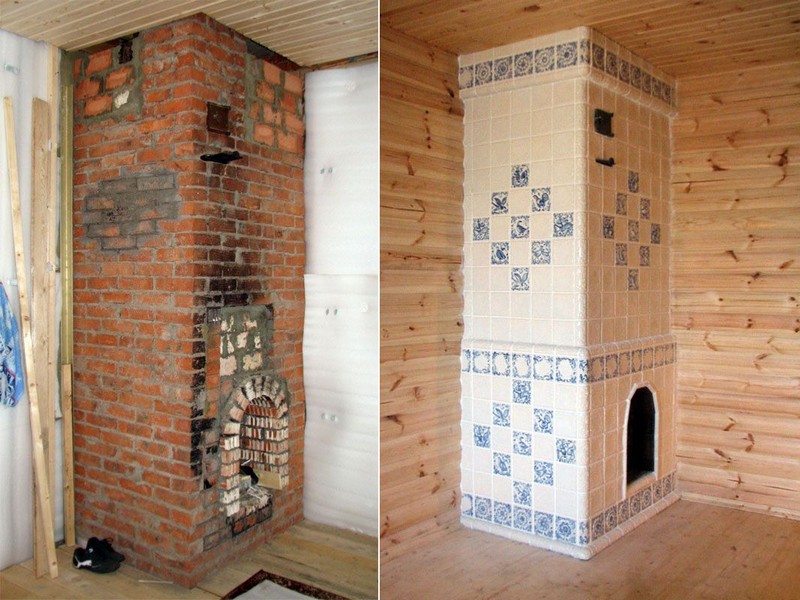
- Features of the lining of the sauna stove
- Combination of materials
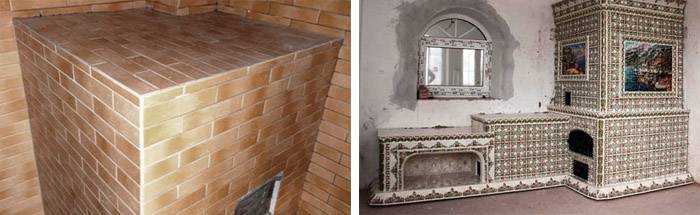
- Types of tiles
- Benefits of ceramic tiling
- Decorative brickwork
- What is useful for tiling a stove wall, and how to do it without high costs?
- Tiles (including ceramic)
- Facing the oven with tiles: the preparatory stage
- Now you can lay the slab
- Additional materials
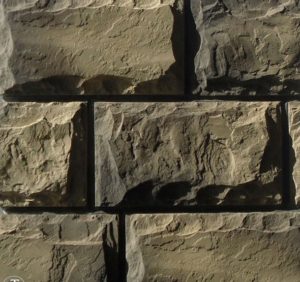
- What is an artificial facing stone?
- Ceramic tile
- Do-it-yourself oven decoration
- Do-it-yourself ceramic tiling
- Plastering
- Coloring
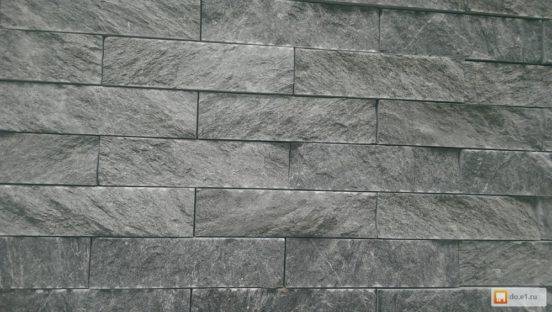
- stone finish
- Furnace finish
- Primers and adhesives
- Oven preparation
- Features of choice
- Briefly about the main
- Grouting tile joints
- Stone
- Facing the stove in the bath with bricks
- Clinker tiles and porcelain tiles
- Tiles - the experience of centuries
- How to choose tiles for lining stoves and fireplaces
Features of the lining of the sauna stove
According to the mode of operation, the sauna stove is very different from the heating and cooking stove, therefore, higher requirements are imposed on the thermal characteristics of its lining (thermal conductivity + heat capacity). A special kind of natural stone is best suited for this purpose - soapstone, also known as steatite or oven stone. Another common everyday name is soapstone.This mineral received it for a smooth-silky surface with a characteristic oily sheen.
Facing with stove stone - the most suitable option for a sauna stove
There is no crystallization water in soapstone, so its structure, unlike many other types of natural stone, does not change when heated. The thermal conductivity is high and the heat capacity is relatively low, so that the efficiency of the furnace and its heat output remain almost constant.
Soapstone cladding is especially recommended if the bath turned out to be not very successful - harsh or with heavy steam.
The density of soapstone is relatively low, so it can be glued in the same way as tiles.
Of the ceramic tiles for a sauna stove, porcelain stoneware is best suited, since it withstands the highest temperatures and is the least porous of all.
Combination of materials
Quite an interesting result can be obtained by combining various finishing materials. This technique allows not only to create a unique appearance, but also save on materials. You will be able to use cheaper finishes for parts of the stove that are subject to less wear.
How and how to finish a home oven is a topical issue for many people. Despite the fact that modern heating is often carried out in cottages now, the stove still tightly occupies its place of honor as a leader. Often she may not look very attractive. Especially if recycled materials were used for its construction. That is why the oven needs additional finishing. After all, in addition to its main function - heating the room, the stove should also decorate the room with everything else.
Types of tiles
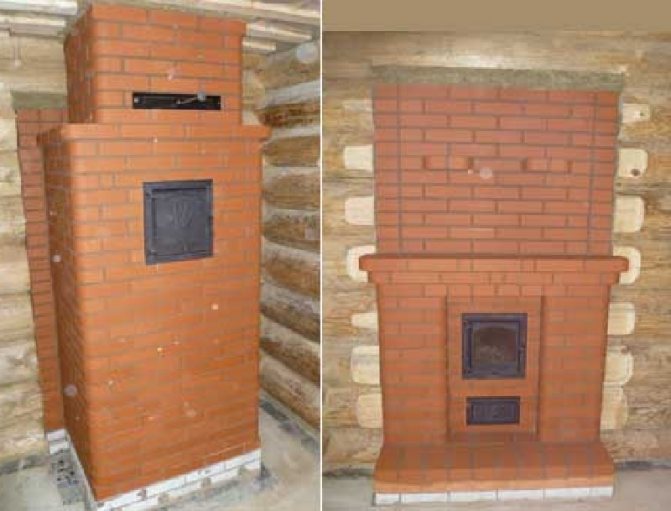
If the brick of the stove or fireplaces is lined with the right tile, then over time, even with prolonged use, it will not lose its attractiveness and brightness, and its color will always have its original appearance.
In addition, there will be no problems with further care for her. The lining of the furnace must be carried out with special tiles designed specifically for these purposes.
The same can be said about the stone, if it is supposed to be lined with artificial stone.
In order for the stove in the house to fit into the overall interior in an original way, it is necessary to make its appearance as aesthetic as possible.
But it should also be taken into account that not every tile can be suitable for work, and therefore the material for stoves and fireplaces should be selected especially carefully.
Several different types of tiles have been developed specifically for facing stoves, including those installed in the bath room.
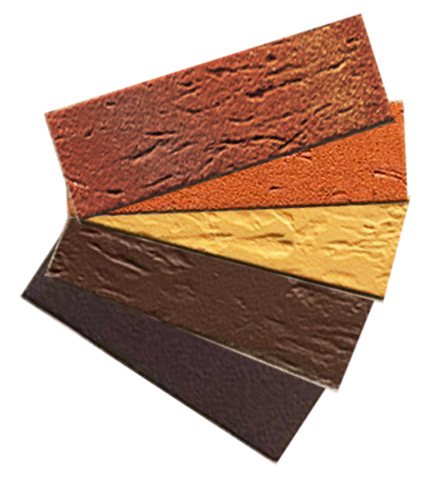
Clinker tiles are well suited for these purposes - this material is made from clay and some impurities.
Also, the lining of the furnace is possible with porcelain stoneware, which has a monolithic structure.
On top of the brickwork of the stove, majolica can be planted on a special glue, which is pressed in a special way and glazed on top.
Terracotta tiles, which do not have glaze on the outside, are also suitable.
It should also be remembered that the tiles used should not be too thin, especially if the stove is installed in a bath.
It is on this indicator that not only the strength of the entire lining depends, but also the characteristics of the thermal conductivity of stoves and fireplaces.
Video:
It is best if the lining of the stove, including metal, is made with square terracotta tiles with a side of up to twelve centimeters.
You should also carefully choose glue and other related building materials for stoves and fireplaces.
Benefits of ceramic tiling
When choosing a material, it is necessary to make sure that it meets the requirements of the operating conditions in the room where the repair is to be carried out.
The advantages of tiles include the following:
- versatility of the material - ceramics can be used in a room for any purpose;
- ceramics environmentally friendly, safe material;
- the cladding is not afraid of temperature changes, therefore it can be used in unheated rooms;
- ceramics is not afraid of high humidity and a direct fall of water, so it is used in pools, baths, showers;
- ceramic tiles form a strong, durable coating on the wall due to high adhesion to the base;
- subject to the technology, the lining can be done independently;
- On sale you can find ceramic tiles of various shapes and sizes. Some collections are represented by original products in the form of rhombuses or polygons. In addition, ceramics are distinguished by a large assortment of colors, patterns and patterns, as well as imitations of the surface of other materials;
- ceramics are durable and fireproof, so it is used for wall cladding in the kitchen. The material does not absorb dirt and odors, it is easy to clean;
- it is a hygienic material, so it is used for wall cladding in medical facilities and laboratories.
Accent wall in the kitchen
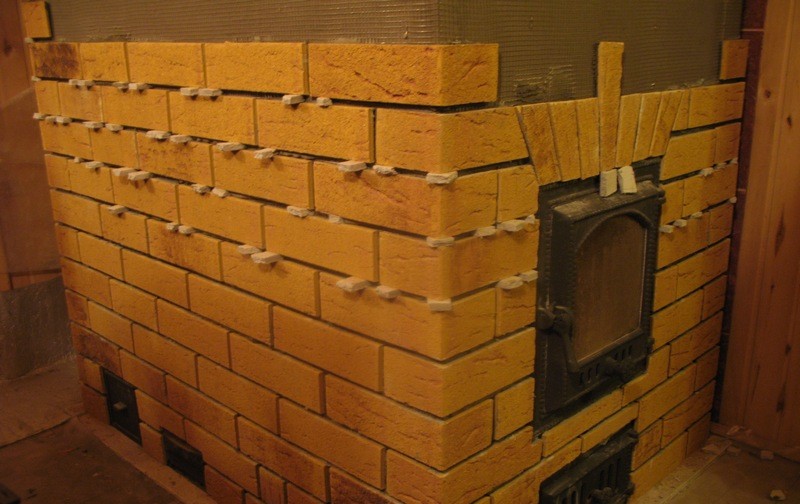
Decorative brickwork
With minimal material costs, competently and accurately performed work can produce an impressive effect. Here, the role of decor is played by the outer surface of the brick and the seam joining them.


A brick oven with neatly made seams also looks good in the interior.
If this method of finishing is chosen, then before starting work, it is necessary to sort out bricks of the same color and texture, which have a flat surface without visible defects, chips and cracks
Special attention should be paid to the corners of the bricks: deviation from the horizon and vertical is unacceptable. When performing masonry, it is necessary to monitor the uniformity and uniformity of the thickness of the seams between the rows of bricks.
Recommendations for the design of the outer surface of the furnaces by the method of decorative masonry:
- It is necessary to select bricks with as smooth a surface as possible. Voids, cracks and cracks are unacceptable, since during operation, over time, the dust accumulating in them when the furnace is heated emits unpleasant odors.
Brickwork is safe, in addition, it is a good heat insulator
- Before laying the corner edges of the brick on the side where the brick will be installed outward, using a grinder or grinder equipped with a grinding wheel, you can chamfer the desired size - this will give a more beautiful look to the wall and corner edges of the furnace.
- When grouting joints between rows of bricks, a mixture of cement and asbestos powder prepared in a certain proportion is used.
- Seams with different color shades look more aesthetically pleasing; for this purpose, brick ground into flour or black clay powder can be added to the solution.
The final operation in this method of finishing the outer walls of the furnace is the jointing, performed using a flat wooden lath and the appropriate tool. And first of all, vertical seams are processed and only after them - horizontal seams.
The metal doors of the firebox and blower can be painted if desired. heat-resistant silicone enamel. This finishing method is often used for sauna stoves, which increases their safety and aesthetic appearance.
What is useful for tiling a stove wall, and how to do it without high costs?
Every day, in economic terms, life is becoming more and more difficult, so not everyone can afford to cover the walls of the heating block with clinker tiles, majolica or tiles. In most cases, a simple layman is inclined to use ordinary ceramic tiles for this task, the installation of which does not require special building skills or (as in the case of tiles) artistic perception, and its price is not as “biting” as the cost of the facing materials listed above. In any case, the costs will be justified, because finishing the furnace with ceramic tiles will allow:
- Ennoble those parts of the house that are connected with the heating device.
- Spend less effort cleaning indoors, as tiles are much easier to clean from dust than plaster.
- Reduce the risk of dangerous gases entering the living rooms from the furnace, which can seep through cracks.
- To make the heat exchange process more rational.
Of course, by hiring professionals to do the work, you can save yourself from unnecessary worries, but in this case it is unlikely that you will be able to avoid big waste, since workers will have to pay almost the same as was paid for building materials. On the other hand, professionalism is not always conscientiousness.Therefore, if you are eager to acquire construction skills, then you can do without the help of specialists. This has certain advantages, since to impose do-it-yourself tile oven sometimes more reliable than getting the same effect and paying twice as much.
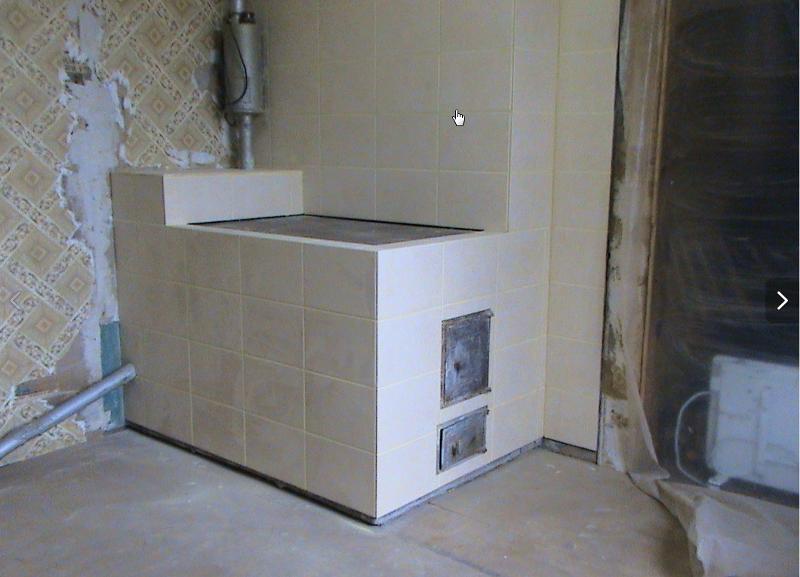
Tiles (including ceramic)
Glazed tile has an attractive appearance, maintaining its surface in the proper form is not difficult. A significant disadvantage of this finish is that during use, during heating and cooling, the geometric parameters of the furnace change. This means that if the tile is installed incorrectly, it will either crack or come off completely. To eliminate such shortcomings, tiles are applied exclusively to plastered surfaces. The furnace must be lined, i.e., the inner surface of the furnace is lined with refractory burnt bricks, which leads to a decrease in the temperature difference along the outer surface of the furnace.
Both ceramic and tile can be used for lining the stove: both types of finishes will be an excellent decor for the stove
Recommendations for finishing the surface of the furnace with tiles:
- To reduce the effect of temperature differences, it is desirable to use smaller tiles.
- On the plastered surface, using self-tapping screws and wide washers, you need to fix a metal mesh with cells of 10x10 mm.
- To fix the boards, use special adhesives designed for use in such conditions. The price of such adhesive compositions is higher than usual, but they have the necessary properties for operation in the required temperature conditions, while possessing sufficient plasticity.
- The grouting of the joints between the boards can be done with the usual mixture with the addition of the selected inorganic dye.
In working with tiles, the main thing is accuracy when laying
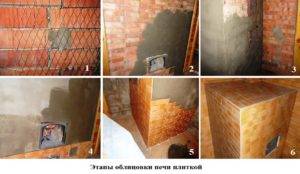
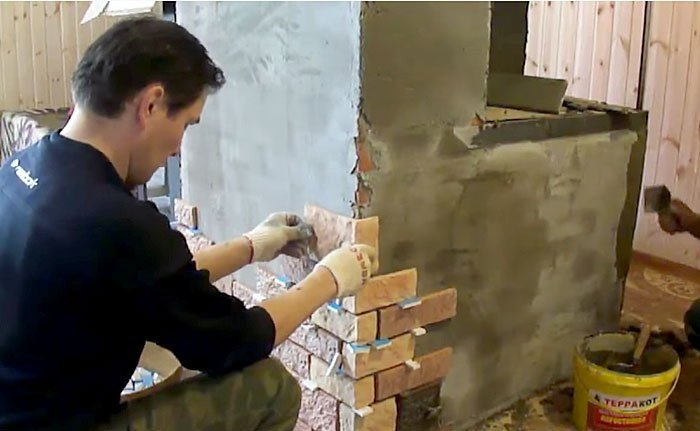
Facing the oven with tiles: the preparatory stage
The first thing to understand is that the stove (like any other structure that has weight) shrinks. In the situation with it, things are even worse than with conventional buildings - here again the effect of temperature comes into force, due to which shrinkage is much more intense. On the one hand, this is good, since such products shrink quickly, and after a month and a half they stabilize, but on the other hand, not so much - it is at this time that the bulk of cracks and other structural violations form. In general, before proceeding with tiling do-it-yourself ovens, the product will have to be exploited a little as it is. Well, then the preparatory work technology looks very standard, and you can imagine it in the form of the following sequence of actions.
In principle, this is the whole preparation, which seems scary only at first glance. In fact, it is made very simply. The most difficult thing in this whole business is to install plaster beacons clearly in the level and plane. Here you have to try - you should understand that the smoother you make the plaster, the easier it will be to lay the tiles.
Facing the furnace with terracotta tiles photo
Now you can lay the slab
The technology for lining furnaces with decorative stone or tiles is approximately the same. It is worth starting from the bottom row from the outer corner of the furnace, which needs to be leveled as much as possible.Tile adhesive is smeared on the surface itself and a little on the inner layer of the slab, everything is checked by the level.

Next, laying is carried out in an upward direction, not forgetting the need for a distance between the tiles. To create it, special crosses of different sizes are sold.

Furnace cladding with decorative stone differs from tiles in that special corner elements are commercially available for stone, which allow you to save the pattern (when laying “in a row”).

After at least two days, you can rub the seams with a special grout. Now there are a lot of color options for sale that will complement the design and help to beat it in an interesting way.


Additional materials
When compiling a cost estimate, you need to take into account that, in addition to the tile itself, you will need:
- heat-resistant primer;
- reinforcing mesh with cells 50x50 mm, for plastering surfaces (stainless or galvanized);
- heat-resistant mixture for plastering furnaces;
- heat-resistant adhesive for laying tiles;
- grout for seams;
- templates (crosses) to maintain the thickness of the seams;
- nails or self-tapping screws for attaching a reinforcing mesh.
You can save a little on plaster and glue if you prepare these solutions yourself. Clay, sand and cement are used to prepare plaster and mortar for tiles. Some craftsmen recommend adding PVA glue to them.
What is an artificial facing stone?
 Facing the stove with artificial stone has gained great popularity. This material is easy to purchase in any building supermarket, it has a lower weight compared to natural lumpy minerals.
For the manufacture of this building material are used:
- Sand
- Natural mineral crumb of fine fraction
- Light artificial fillers
- Various adhesives
- Dyes and pigments
- A special fiber backing that facilitates its installation on the oven.
There are several varieties of artificial facing stone, such as gypsum artificial stone, marble or granite chips, sandstone chips, wood panels for fireplaces, and flexible stove stone made on a special substrate. They can cover even the most curved surfaces.
Ceramic tile
Fired clay tiles have been used by mankind since ancient times, including as an insulator. For the stove, ceramics are used, which have a number of specific qualities:
- heat resistance;
- strength;
- dense structure.
The latter is important because through wide pores the material quickly loses the heat received from the bricks. The strength of the tiles is achieved due to the thickness
For cladding, experts recommend using products with a thickness of at least 8 millimeters. All these requirements are met by terracotta, made of fired clay, not covered with glaze. Terracotta tiles have been used to line brick ovens since ancient Greece.
The strength of the tiles is achieved due to the thickness. For cladding, experts recommend using products with a thickness of at least 8 millimeters. All these requirements are met by terracotta, made of fired clay, not covered with glaze. Terracotta tiles have been used to line brick ovens since ancient Greece.
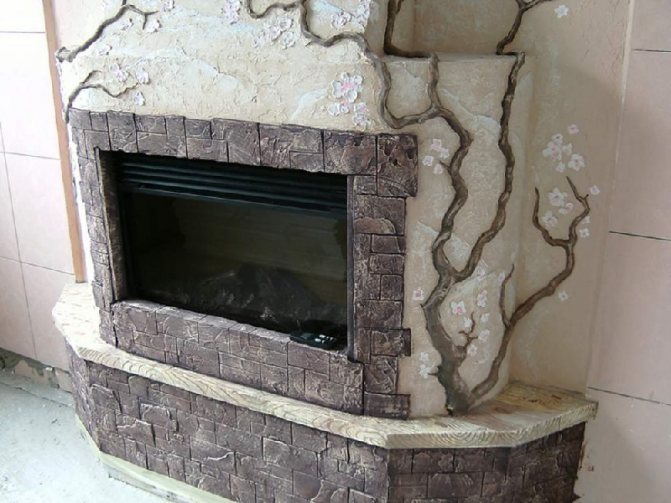
Do-it-yourself oven decoration
There are a number of stages of finishing the furnace:
- Plastering.
- Tiling.
- Painting.
- Stone cladding.
Do-it-yourself ceramic tiling
Having completed the preparatory steps and prepared the necessary inventory, start work:
- Determine the point where the first plate will be fixed. It is recommended to start work from the lower right or left corner. When laying out a tile, correct its placement using a building level or a plumb line. This will avoid distortion or unevenness. The adhesive base is applied with a notched trowel.
- Before fastening the bottom row, fix the L-shaped steel profile or rail to "support" the first row.
- For smooth and beautiful seams, use mounting crosses.
- You can change the position of the tiles using a rubber mallet, which you need to tap on the ceramic surfaces.
- After laying the main part using solid fragments, move on to those areas where you need segments. Use a tile cutter to finish all remaining areas.
- Traces of glue must be wiped off before they dry.
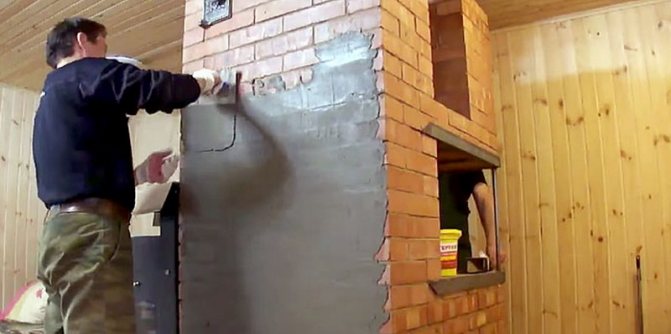
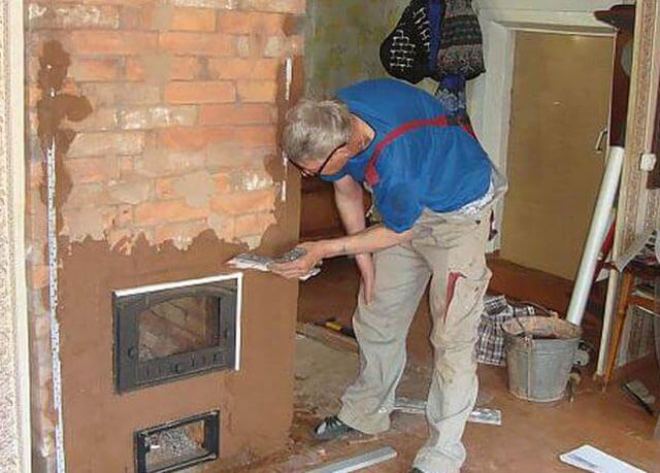
Plastering
To finish the oven with your own hands, you can use plaster. The material allows you to quickly transform the appearance of the structure, is cheap and affordable.
In most cases, craftsmen use dry heat-resistant mixtures, which are applied in a couple of layers and aged for at least 4 hours. The composition for the first layers may be more liquid than for subsequent ones.
Coloring
To paint the oven, you can use different coloring compounds and whitewash. At the same time, both brick and plastered surfaces lend themselves to staining.
For most conditions, lime or chalk whitewash is suitable, and to protect it from rapid shedding, add kitchen salt to the composition.
stone finish
If the stove is made of stone, follow these instructions:
- First, apply a layer of primer to the surface to be treated and proceed with laying out the first lower layer. The process involves the use of special formulations.
- Stone sections are cut with a grinder with a concrete disc.
- Next, you need to embroider the seams with drywall.
Furnace finish
To finish the furnace structure, it is worth taking the materials that were used when finishing the furnace. The main thing is that they are safe, heat-resistant and reliable. When designing a firebox, consider all fire safety rules, as it will be subjected to intense heat.
It is necessary to leave a small void between the facing layer and the firebox in order to ensure stable and uninterrupted air circulation. If you miss this moment, the efficiency of the furnace will be low. To protect the finish from deformation processes, sand or a heat insulator can be placed in the gap between the masonry and the finish.
If drywall products are used, they will increase the fire safety of the structure.

Primers and adhesives
There are two types of glue for lining furnaces:
- one-component;
- two-component (the second component is a primer).
Two-component compositions are used if the laying of tiles is carried out with cutting joints. Masonry without cutting seams is carried out using a one-component adhesive.


In addition, adhesives are:
- heat-resistant;
- heat resistant.
Heat resistance implies the ability to withstand a certain number of TCs with a temperature difference of at least 150 degrees.Heat resistance is the ability to withstand heat up to 500 degrees for a long time. Only heat-resistant compositions should be used for lining furnaces. At a temperature of 300 degrees, typical for the hottest areas of the furnace surface, such adhesives can withstand any number of TCs.
Another characteristic of tile adhesive is the bearing capacity. The heavier the facing material is, the higher it should be.
Most often, the following compositions are used for gluing stoves with tiles:
- Glue K-77 plus primer G-77. Heat-resistant two-component structure, the bearing ability — high. Additionally, manufacturers offer grout. All materials have an affordable cost and can be used for lining absolutely any furnace, but there is a drawback: the full curing time is 20-25 days. It is impossible to heat the stove / fireplace during this period, while the temperature in the room must be maintained at + 20C - + 25C.
- Anserglob BCX is an imported analogue of K-77 / G-77 glue. It costs more, but also gains strength somewhat faster.
- Plitonite-FireplaceRefractoriness. Despite the presence of the word "fireplace" in the name, the scope of this glue is not limited to these devices - it is also great for stoves.
- SkanfixSuper and its domestic counterpart - Plitonit-SuperFireplace. These adhesives are heat-resistant, so they are used only for finishing fireplaces.
- Terracotta. This is the name of the adhesive, designed specifically for the installation of terracotta tiles. In relation to it, it shows the highest bearing capacity, has heat resistance. At the same time, practice has shown that in pairs with other types of tiles, Terracotta glue also shows itself very well.
- Ceresit CM-117/5, Moment Crystal, Weber Vetonit Absolute, Kleos, IVSILTermix. Compositions with low heat resistance are used in the decoration of fireplaces for decorative purposes, which are heated only from time to time.
-
BauGut FFK. Another glue for facing fireplaces. It differs from the previous group in resistance to higher temperatures, which allows it to be used on heating fireplaces, but it is also not designed for a constant firebox. Suitable, for example, for a fireplace in a country house, where the owners come only for the weekend. It has a rather high cost.
You can lay tiles, like tiles, on a clay mortar, in which sand, chisel or sawdust plays the role of a filler. The ratio of clay and filler is:
- for oily clay - 1: 4;
- for normal - 1:3;
- for skinny - 1: 2.5.
The volume ratio of water and clay is approximately 1:4.
A cement-clay mortar has a higher adhesion and strength, for the preparation of which the following components must be mixed:
- clay: 1 part;
- cement: 1 part;
- chalk: 1 part;
- sand: 3 parts.
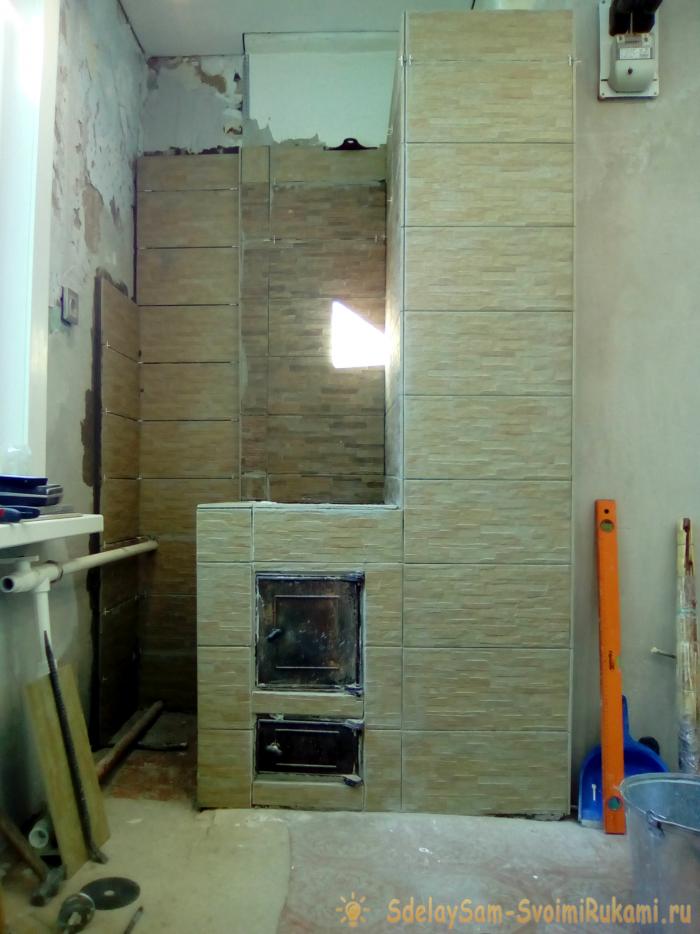
Oven preparation
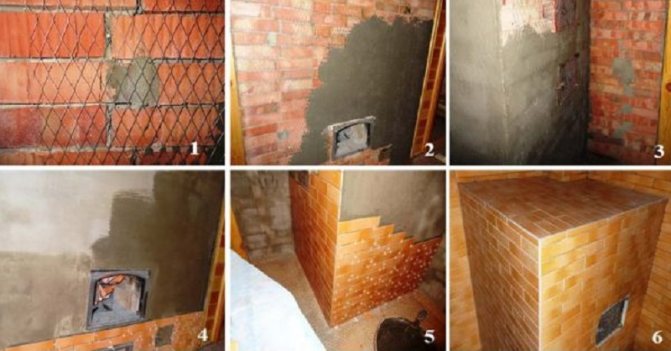
Before starting all work, it is necessary to prepare the coating. Not only the appearance of the cladding, but also its durability will depend on how smooth the surface is. Stages of work:
Dismantling of the old coating. In the event that the furnace is not new, it has already been lined before. First of all, you need to get rid of the old finish.
Cleaning the surface of the furnace walls. First you need to remove the old plaster, paint or any other coating. You can do this with a metal wire brush. Carefully remove any remaining dust and dirt. If it was not possible to completely remove the old material (which often happens with paint), make notches on it for better adhesion of the tile to the surface.
Deepening seams between bricks
Particular attention must be paid to cracks. Deepen and clear them with tools to a depth of about one centimeter
In this case, in addition to the brush, you can also use the grinder. Remaining dust can be removed with a regular foam sponge dipped in water.
Alignment of the walls of the furnace. The surface of the oven has depressions or other irregularities. To maximize the leveling of the surface, a construction metal mesh is used. It also prevents the tiles from peeling off the surface due to the large weight. The mesh is fixed with self-tapping screws.
It is important to screw the screws not into the seams, but into the brick. So the construction will be more durable, and the newly glued tile will not fall off the surface due to the heavy weight.
Furnace wall primer
For priming the wall, you can use various compositions that are offered in specialized stores. After the primer has dried, plaster can be applied, after wetting the surface with water. The coverage layer should be large enough to hide the entire mesh. You can level the layer with a plumb line. After the layer of putty has dried, you can remove the screws, and seal the resulting recesses with a primer. After the priming stage, the oven should be heated a little. So it will be much easier to lay clinker tiles.
Pre-marking. Facing the furnace with clinker requires preliminary marking. Using a regular construction pencil, draw a tile layout on the surface. It should be remembered that whole tiles should be in the center, and cut ones should be closer to the corners.If you purchased a corner tile, you won't have to use cut pieces. You can draw horizontal lines along which tiles will be laid out. Do not forget about the seams between the parts. Preliminary marking allows the master to assemble the drawing on the stove in advance, and not to redo the work later due to incorrect location or displacement of the entire masonry.
Preparation of the adhesive composition. Glue packaging often indicates the right amount of water. Dilute the composition and mix it with a mixer, while removing all the lumps. You do not need to prepare too much glue, because it loses its properties after a while. It is better to cook small portions for about one meter of masonry. So you save the properties of the adhesive and avoid unnecessary material consumption.
Stages of work
Features of choice
A wide variety of materials, on the one hand, allows you to choose a finish that fits perfectly into the interior, on the other hand, it makes even experienced craftsmen get lost. Facing tiles, which will be constantly in contact with a heated surface, must have the following qualities:
- have a thickness of at least 6 mm;
- do not contain harmful components;
- withstand high temperatures without deforming;
- do not absorb moisture;
- not be abraded.
A prerequisite that guarantees aesthetic pleasure from the appearance of the stove is a tile with a beautiful surface. Manufacturers offer it in a wide variety of colors, sizes and shapes. Properly selected tiles will retain the brightness of colors for a long time, will not crack and give the stove a modern look. Usually, tiles with a side size of 10-12 cm are used for cladding.This, of course, makes its laying time-consuming, but it reduces the likelihood of cracking the surface.
Briefly about the main
There are several types of facing tiles: based on clay, natural or artificial stone. The material must be fireproof, heat-resistant, durable, not absorb moisture, conduct heat well and at the same time have an attractive appearance.
On the building materials market, there are models for every taste and budget: pretty terracotta and harsh fireclay tiles, amazing majolica and delicate faience, majestic marble and modest tiles, strict porcelain stoneware and luxurious brooms.
There are two cladding technologies: on glue and on a metal frame. The choice of tiles is made according to technical characteristics, taking into account the marking, design and colors, and cladding technologies according to the expected operating conditions.
Grouting tile joints
Heat resistant mastic
After all the tiles are laid on the stove, it should dry out a little. After waiting a day, you can safely remove pieces of "gypsum" or plastic crosses from the seams. Then all the seams should be carefully cleaned with a spatula and proceed to the final stage of decorating the stove. Let's do the stitching.
To do this, you can use the same dry heat-resistant glue or, as already mentioned at the beginning of the article, ready-to-use K-77 glue or a similar Terracotta heat-resistant mastic. There are two options for filling the seams.
Facing the stove in the bath
You can use a rubber spatula. And you can use a special gun and do the intended job much faster. This is especially true for wide seams.After all, it is easier to squeeze glue or mastic into them, and simply remove the excess with a damp cloth.
This completes the lining of the furnace with ceramic tiles. It remains to wait a few days for the whole structure to dry well in a natural way. The oven in this case is not recommended to heat. For two or three days you should forget about it. And only then, slowly, you need to start heating.
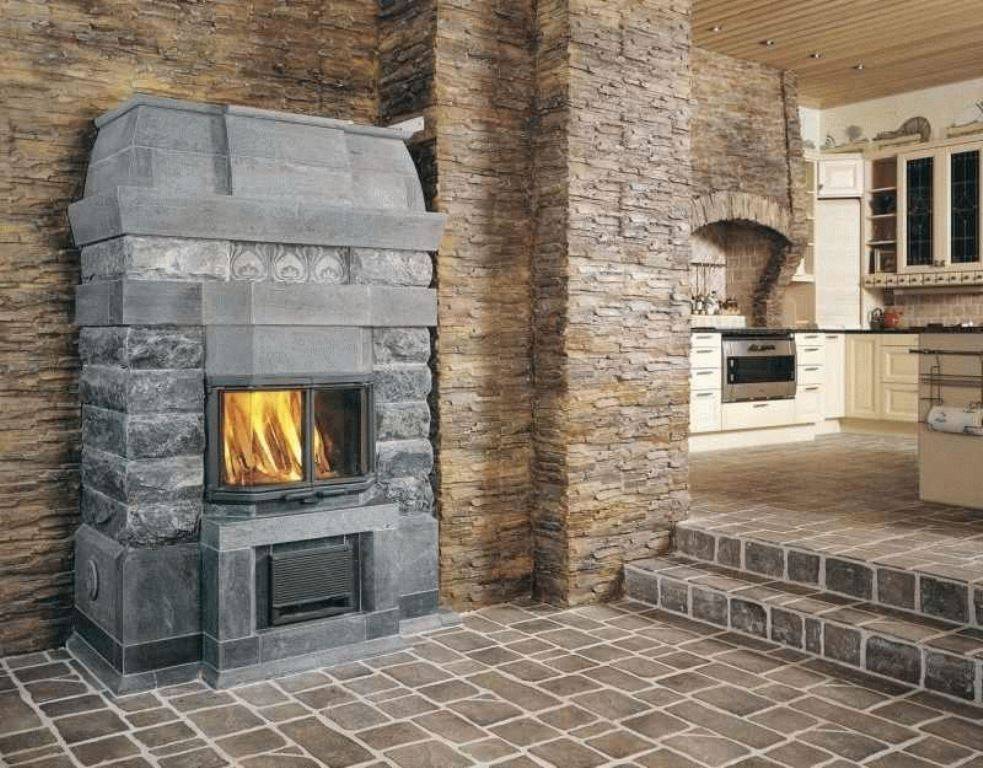
Facing stoves and fireplaces is a rather complicated process that requires certain knowledge, skills and perseverance. But it's worth it, since the decor of the stove with your own hands will delight the eyes of both the owners and guests for a long time. In conclusion, in the video below, some interesting examples of stove lining with decorative stone. For those who are interested, take a look. Good luck and success in your future endeavors!


Quote of wisdom: It is not shameful to be born stupid, it is only shameful to die a fool.
Stone
Most often, this method is used when facing fireplaces, less often - stoves in steam rooms. When choosing a stone as a decor, it must be taken into account that, depending on the breed and type of stone, its thermophysical properties vary over a very wide range. For example, when using attractive and beautiful labradorite as a lining, it will be possible to achieve the desired heat transfer only after a long warm-up of the furnace (i.e., fuel consumption will be significantly increased), since this material has quite high heat capacity. On the other hand, the "stone" oven looks more attractive and cools down longer - because it has a large thermal inertia.
If funds allow and the imagination works well, you can show your creativity in such a decorative finish.
For finishing stoves with natural stone, rocks such as marble, shale, shell rock, sandstone, travertine and tuff are considered the most suitable. Granite, basalt, labradorite and some other materials are undesirable because of their not quite suitable physical properties.
Recommendations for working with stone:
- First, for a better selection of the necessary fragments, it is necessary to decompose the material, then mark the contour of the surface to be trimmed on the floor with chalk, taking into account its dimensions.
- Lay out the outlined area with a stone. In this case, it is necessary to try, if possible, so that the stones adjoin each other as tightly as possible.
Before carrying out work, it is advisable to “try on” individual pieces on the floor, like puzzles
- For the heaviest wire stones, it is necessary to make hooks, the ends of which are inserted into the seams between the individual stones. With a rounded lower part of the stone, two hooks are needed to fix it in order to prevent it from falling out to the side.
- A special glue is applied to the fixed side, after which the stone is laid in accordance with the sketch photo.
- Depending on the adhesive used, it takes time for its complete hardening - from 3 to 20 days.
Facing the stove in the bath with bricks
The brick has an aesthetic appearance and is suitable for both the construction of furnaces and for cladding. For laying on the surface, there is no need to install a reinforcing mesh
It is important to take into account the fact that the material is quite heavy, and exerts a significant load on the foundation. It is this nuance that must be taken into account at the stage of creating a drawing.
Advice.
Facing bricks are used to create a decorative finish for a sauna stove.
Decorative brick for lining the stove in the bath is able to transform the stove beyond recognition, make it a kind of work of art. Such material is not inferior in beauty to marble or granite. In order to line a metal furnace, fine-grained dry sand is poured between its walls and bricks to protect against metal deformation, which inevitably occurs when exposed to high temperatures. In addition, the layer contributes to the transfer of heat inside the steam room.
Clinker tiles and porcelain tiles
Clinker tiles are made from a mixture of fireclay, clay and mineral dyes. The resulting mass is pressed under high pressure, after which it is fired at high temperatures.
The resulting tile is characterized by strength, heat capacity and low porosity. With the help of various additives, it acquires a wide variety of shades. Therefore, clinker tiles have become a very popular material for lining brick ovens, able to fit into any interior.

Scheme of lining the furnace with tiles.
Porcelain stoneware is a composite material that appeared in the 1980s and very quickly gained wide popularity. It was invented in Italy. A mixture of clay, sand, granite and marble with the addition of natural dyes is pressed at high temperature and under very high pressure.
The result is a monolithic material without pores, resistant to impact and excellent heat retention. Porcelain stoneware can be given any color or shade, as well as texture, which makes it very popular in the field of materials for construction and cladding.
Porcelain tiles imitate terracotta, majolica, tiles and natural stone. At the same time, it is much cheaper and more practical.
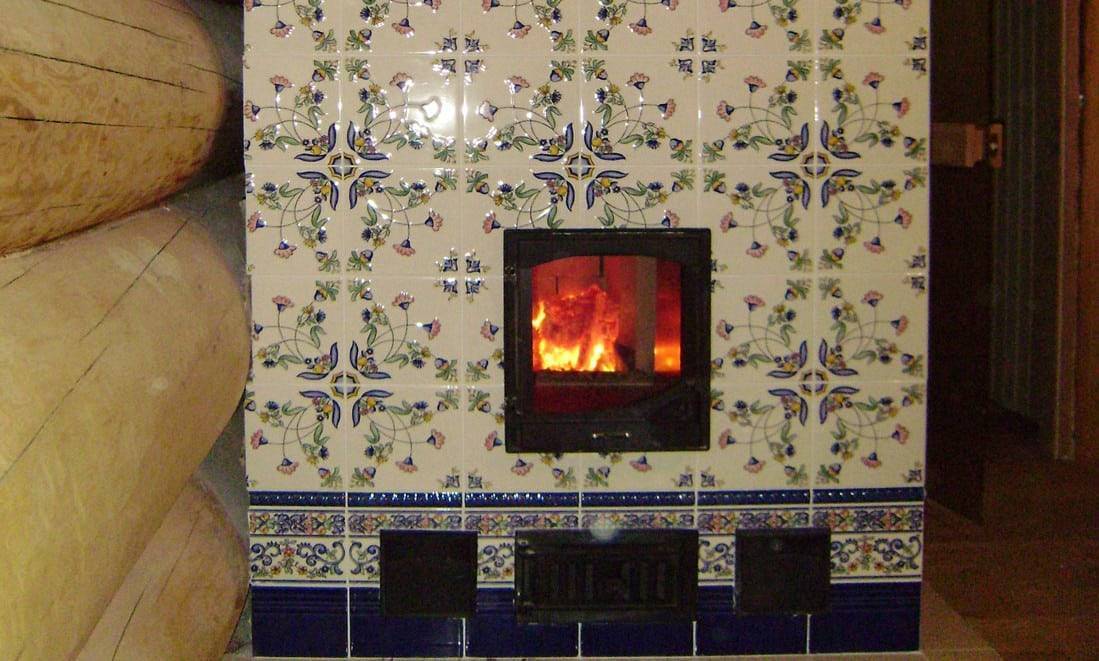
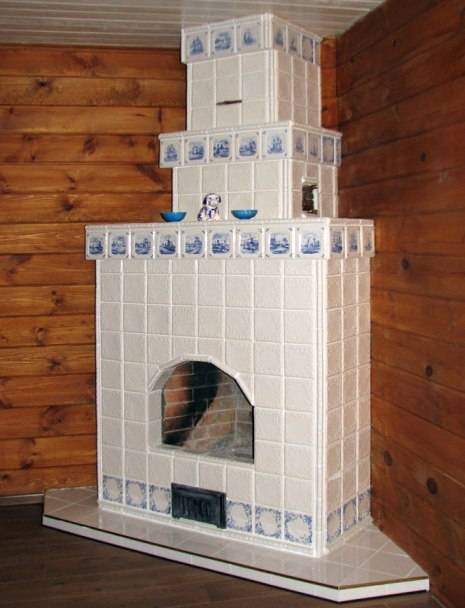
Tiles - the experience of centuries
Furnace craftsmen have been looking for a way to protect the finish from temperature deformations for a long time, until they came up with tiles. In fact, this is an ordinary clay tile, but of a special “volumetric configuration”. On the back side of the tiles there are special protrusions - rumps. They serve to connect the tiles to each other and to connect with the array of masonry.
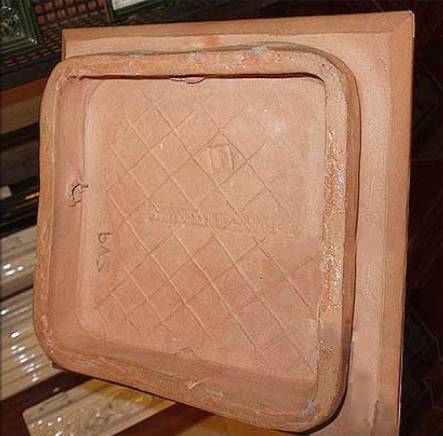 Stove tile (view from the back)
The laying of tiles is carried out simultaneously with the construction of a stove or fireplace, row by row. This results in a strong self-supporting wall. It is connected with the main masonry by wire "antennae" laid in the seams between the bricks.


Tiled tiles are connected to each other with steel clips-hooks. They are connected with the brick wall of the furnace not only by wire, but also by the mortar placed in the ramps and in the space between the tiles.
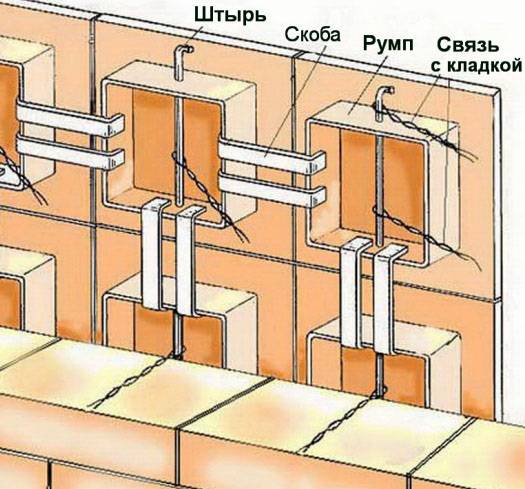
The technology of tiling is different from the usual stove finish. First, they put a row of tiles, fix them together and clog the rumps with clay mortar. Only after that, a brick wall of the furnace is laid close to them.
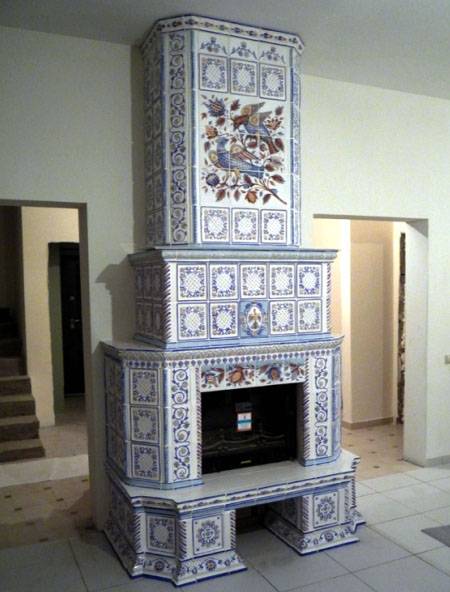
The richness of decor and colors of stove tiles is amazing. Therefore, finishing with this material is often equated with high art.
How to choose tiles for lining stoves and fireplaces
Finishing a fireplace with tiles is not associated with the use of ordinary tiles, therefore, when choosing a facing material, it is important to consider that a quality product must have:
- composition from a mixture of glaze, water and clay processed using a special technology;
- heat-resistant and resistant to mechanical damage structure;
- low coefficient of water absorption (no more than 2-3%).
The combination of color with a pattern and the main range of shades in interior design is a prerequisite for a successful choice of finishing material. If the refractory ceramic tiles are selected taking into account these rules, then the stove or fireplace can be turned into a real interior decoration. The right choice can only be made after a visual assessment of the tiles on the fireplace or stove
Parameters that you need to pay attention to first of all:
- The product and its elements must have the same thickness.
- Tiles of different types can have different thicknesses, the average value of the parameter is 6-8 mm.
- The material must have identical geometric dimensions.
To check the evenness of the tiles, you will need to attach 2 products to each other, first with the front side, and then with the inside. Docking should be smooth without gaps. If irregularities are found on the front side of the product, this will create visible visual defects on the surface of the cladding. If the wrong side of the product is uneven, then the quality of the finish will be low.
It is necessary to buy tiles with a margin of 15-20%, since part of the material is spent on trimming, and the other part is replaced during operation. This will avoid buying different batches of tiles in the future. If there are various chips and cracks on the products, the entire material is very fragile and easily damaged. Cracks on the wrong side will cause the front of the material to burst under the influence of temperature.


