- Frameless installation
- Training
- Bath installation
- Installing a bathtub on a homemade frame and bricks
- What to Look for When Choosing an Acrylic Bathtub
- Siphon assembly
- Which frames are better - manufacturers' recommendations
- Steps for installing a tile bath
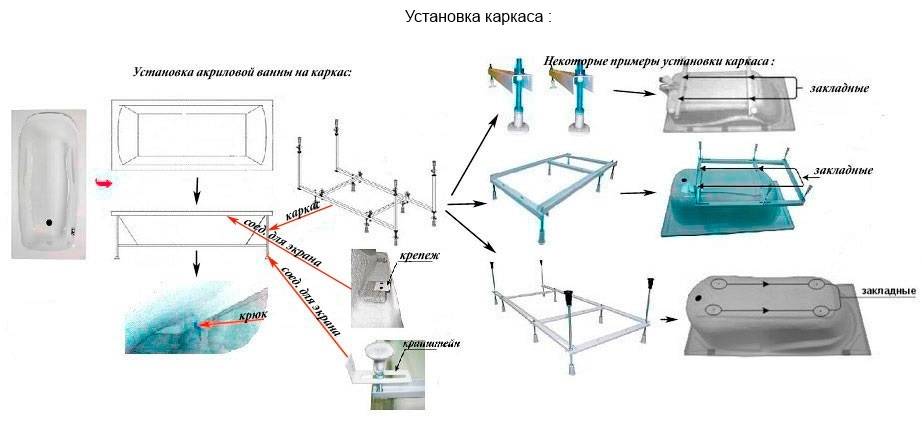
- Installing an acrylic bath on a frame
- We twist the frame
- Fixing the bathtub to the frame
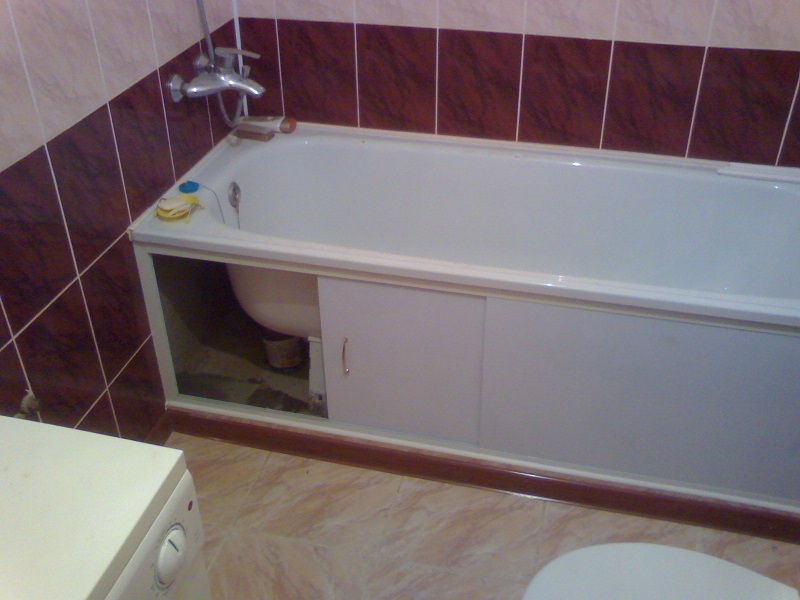
- Screen mounting
- How to choose a frame and not be mistaken
- Advantages of installing a bathtub on a frame
- Installation on bricks
- Pros why consumers choose cast iron
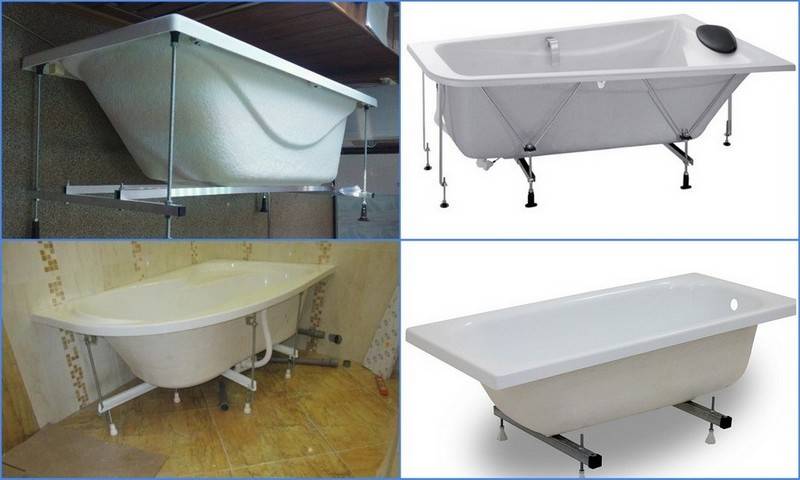
- Installing an acrylic bathtub on support legs
- Acrylic, steel or cast iron: which bath is better?
- Cutting acrylic bathtubs
Frameless installation
Now consider the features of installing a bath without arranging a frame for it. This option is most often used for acrylic baths, but is also suitable for steel products. Consider a step-by-step algorithm of actions.
Training
The preparatory stage is standard for acrylic products:
-
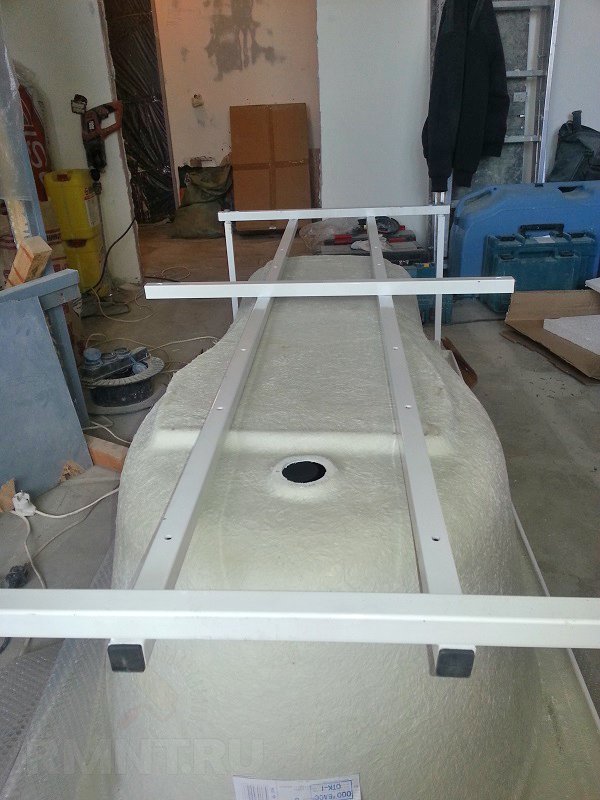
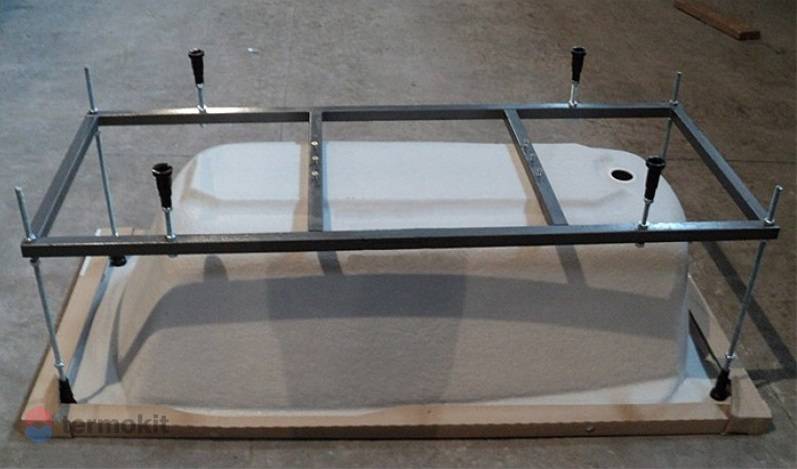
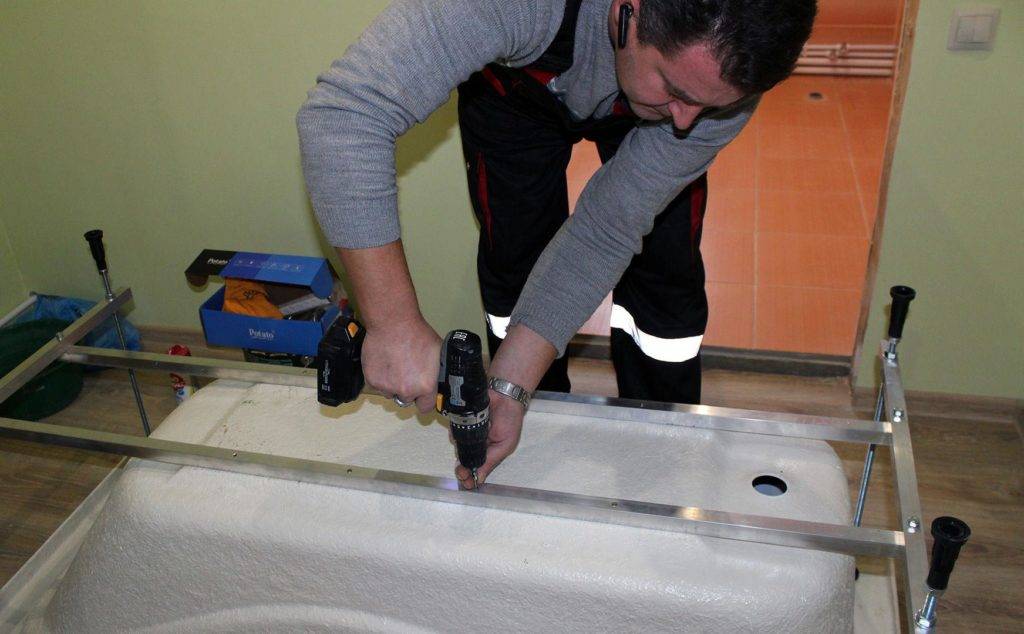
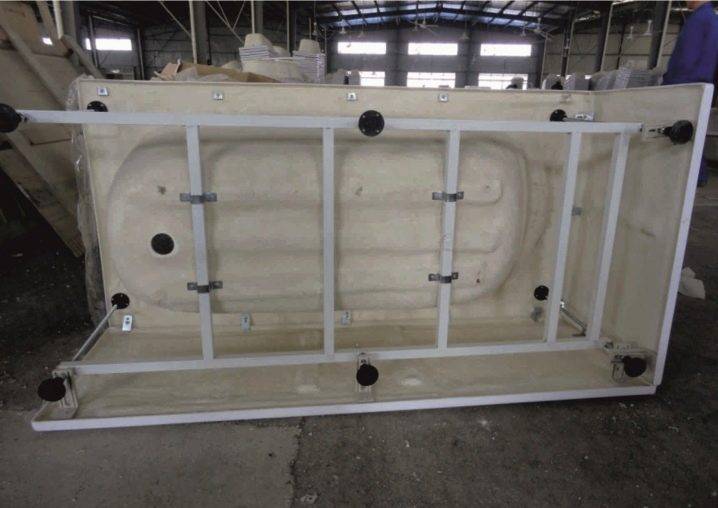
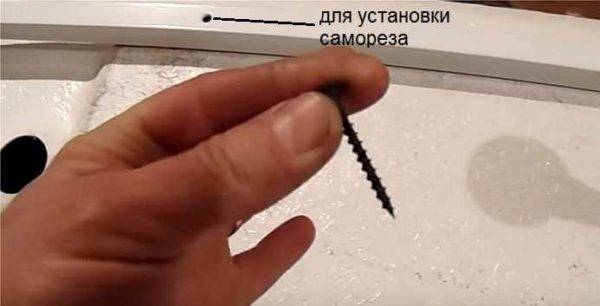
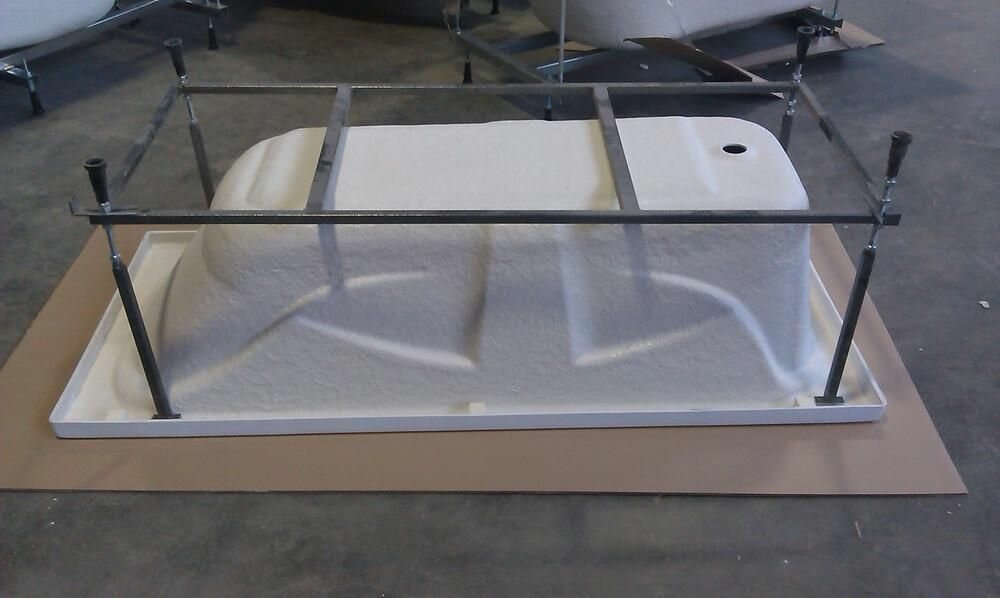
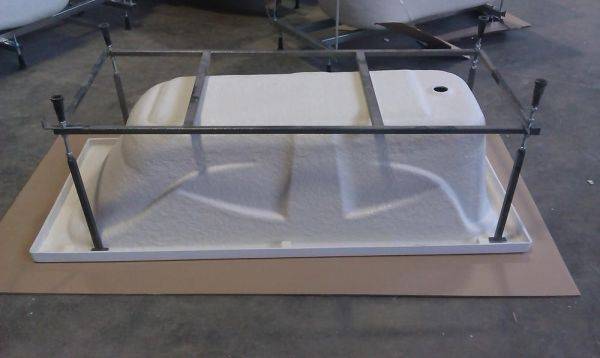
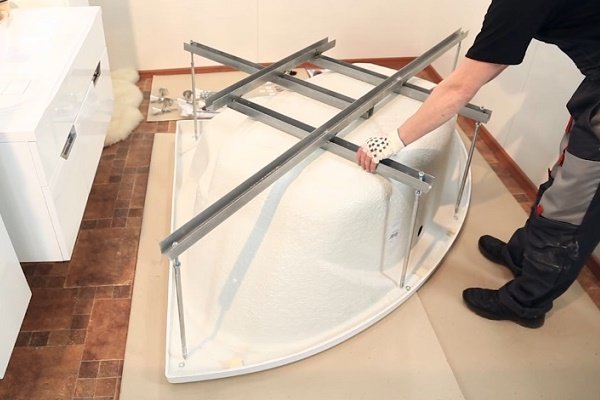
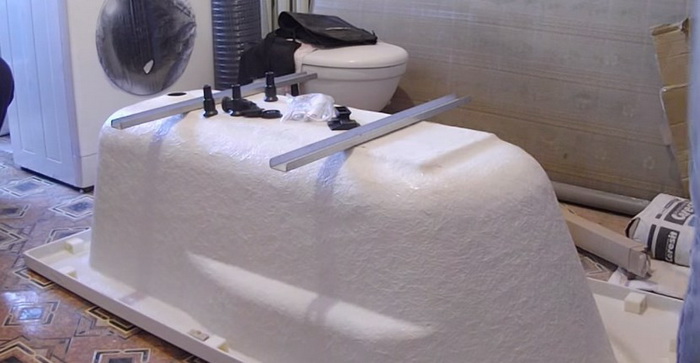
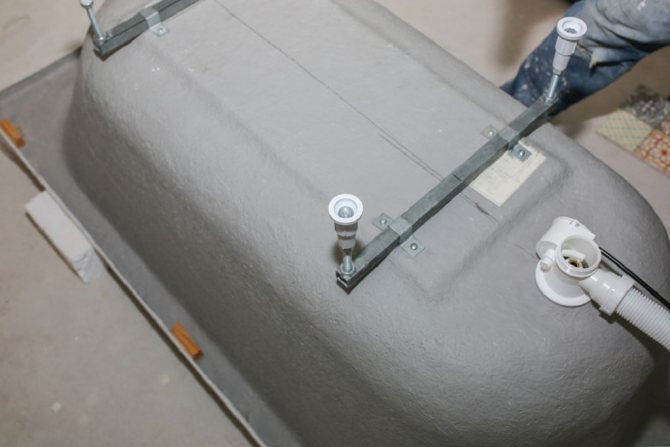
The bath is turned over, the transverse metal beams that come with the kit are screwed to its bottom. Only original (included) self-tapping screws should be used, as longer hardware will pierce the bottom through and through. In order not to scratch the sides, when turning the bath over, some kind of substrate is placed under it, for example, plasterboard strips, wooden blocks, even an ordinary bedspread will do.
-
The legs are assembled and screwed to the beams with nuts.
-
Also at this stage, you can pre-adjust the legs by setting them with a tape measure and a level at the same distance from the floor. This will further facilitate the leveling of the bathtub after placement in the bathroom. The height of the legs is set, first of all, focusing on the height of the outlet of the sewer pipe. To ensure normal drainage, it is necessary that the inlet pipe is located below the siphon outlet.
-
Also at this stage, it is recommended to fix the guide to the side for the subsequent fastening of the screen, since after installing the bath it will be more difficult to do.
-
The final step of the preparatory stage is the assembly and installation of the drain and overflow system.
Bath installation
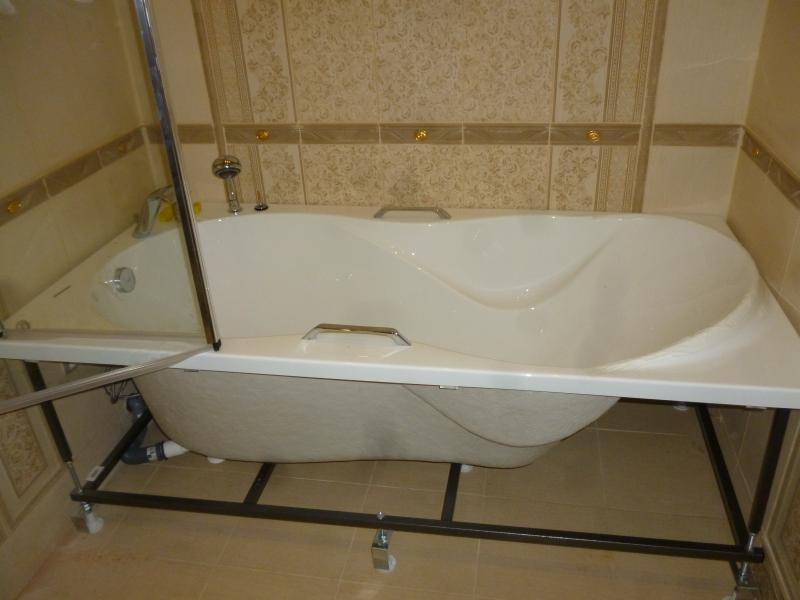
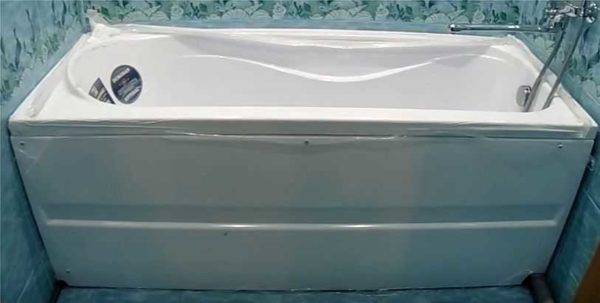
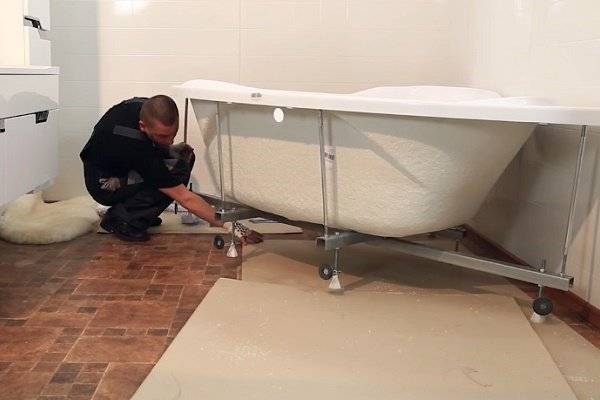
The bath is brought into the bathroom, connected to the sewer and leveled. Then the water flow and the tightness of the drain are checked so that after finishing work it is not necessary to dismantle everything and eliminate leaks. The edge of the bath is recommended to be glued to the wall with a sealant.

Next, you need to weight the bowl: for this, the bathtub is filled with water, you can also put several bags of sand or a dry mix in it.
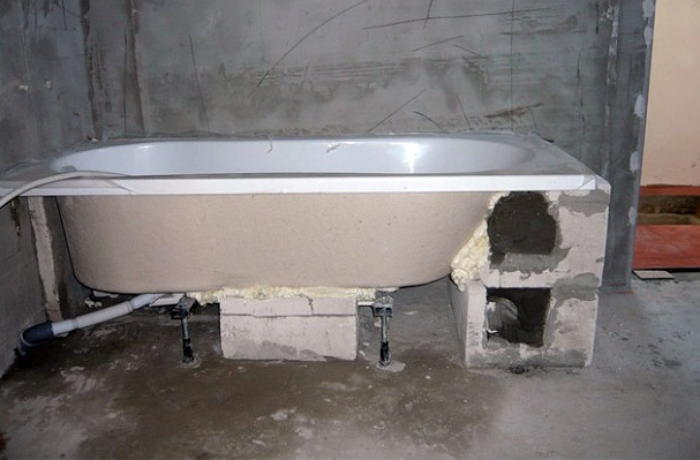
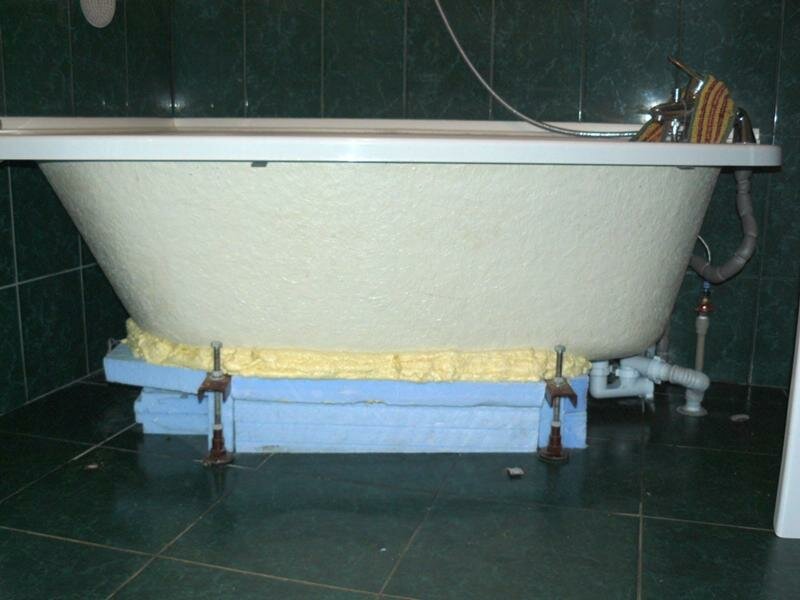
The next step is to lay the support pad under the bottom of the tub. To create it, brick or other suitable building material is used. A gap of 10-20 mm wide is left between the pillow and the body, which is filled with mounting foam.
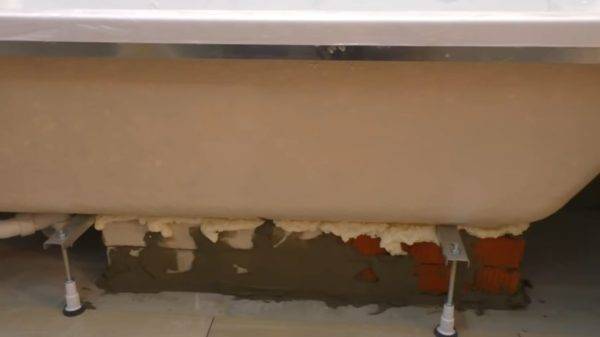
After the glue and foam have hardened, it remains only to equip the frame for the screen, which simultaneously acts as a support for the front side, after which you can proceed to the finishing work.
We examined the main ways to install a bath: frame and frameless technologies.Despite the similar technology, each method has its own characteristics and nuances that must be taken into account when carrying out work.
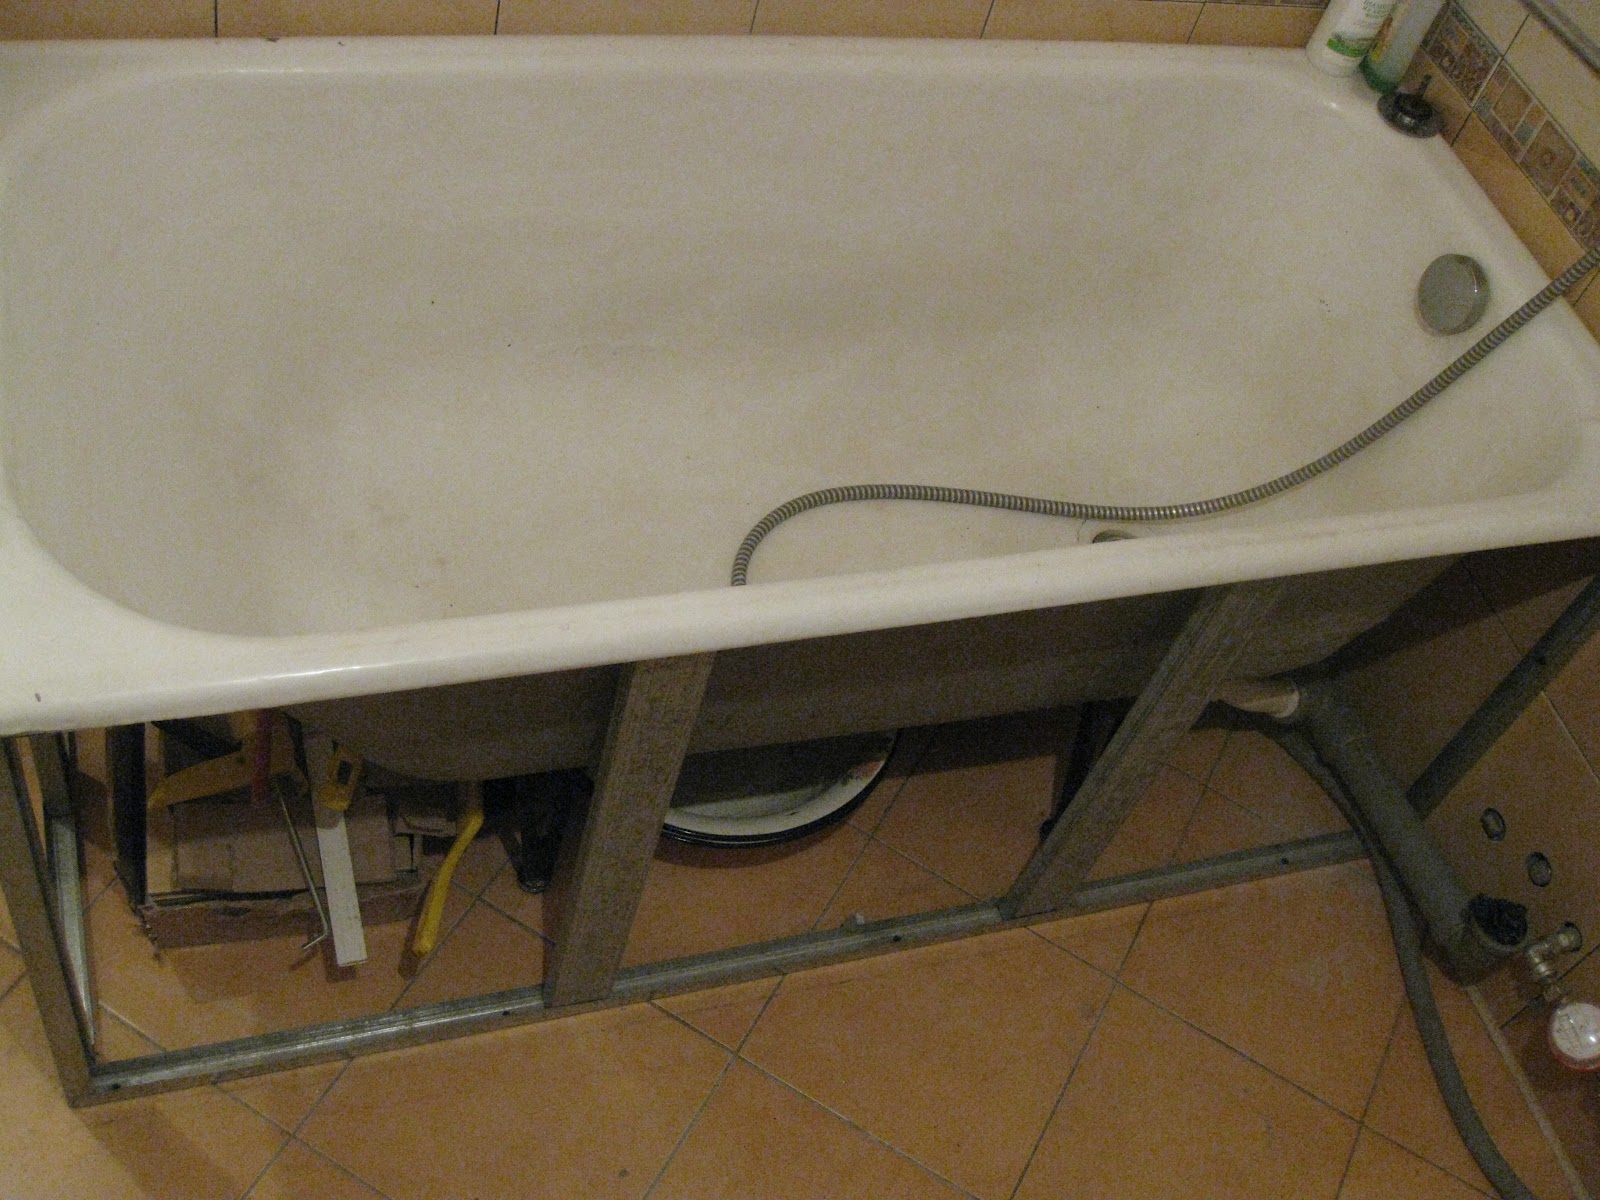
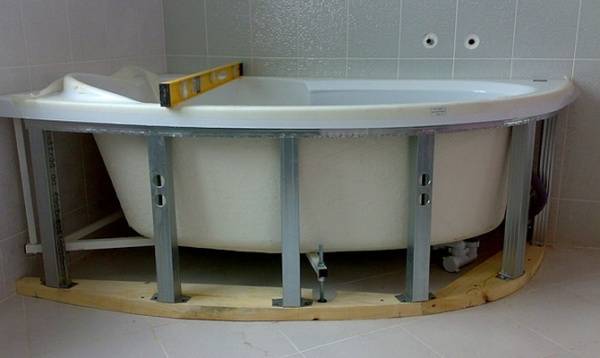
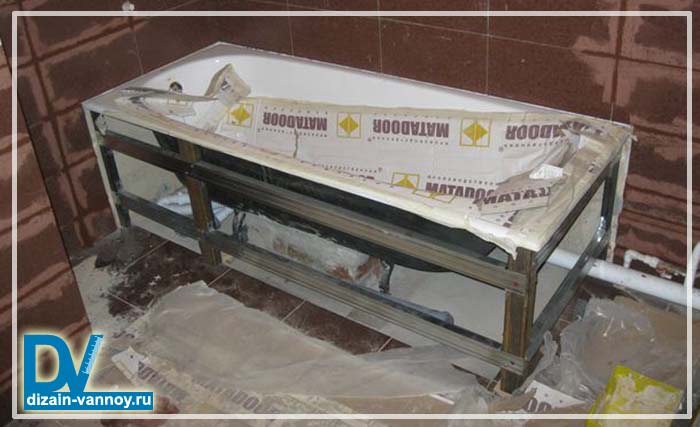
Installing a bathtub on a homemade frame and bricks
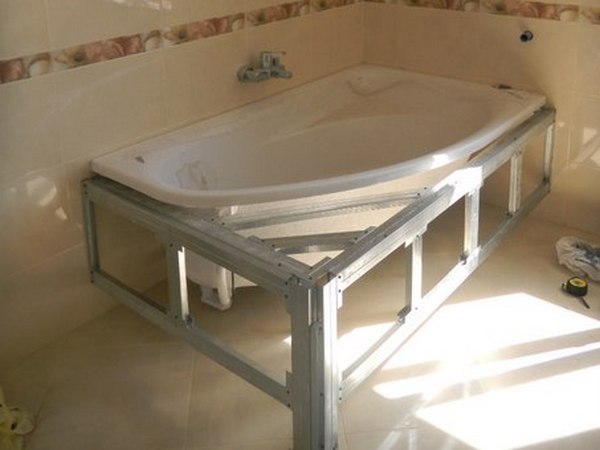
The most famous method of attaching acrylic baths is the combined method, when the installation is carried out on a metal frame made of aluminum profiles, and ordinary bricks are used to prevent the bottom from bending or deforming. In order to build such a structure, you will need:
- bricks that will support the bottom of the font;
- for the manufacture of the supporting structure, a metal or aluminum profile is required;
- in order to fix the brickwork, cement mortar is required;
- to seal the seams, it is recommended to use a sealant;
- self-tapping screws will help to assemble the frame;
- for stirring the cement mortar, use a special container and a trowel.
Worth remembering! When working with sharp and heavy objects, care should be taken, since an accidentally dropped tool can easily make a hole in the bathroom, thereby damaging the product. It is better to take precautions in advance by covering the font with thick paper or thick film
In order to properly install an acrylic bathtub on the wall, it is necessary to note what its future height will be, starting from which we will form the height of the brickwork. We measure from the floor to the indicated line, from the results obtained we subtract the height of the bath itself, and what happened will be the thickness of the brick lining on which the bath will be mounted.
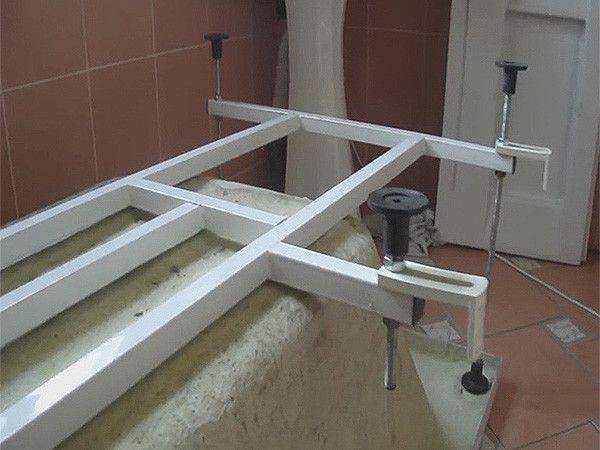
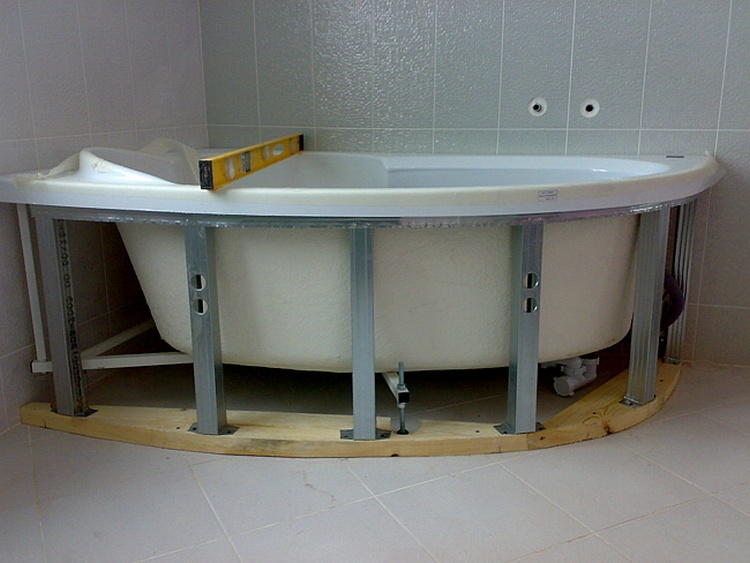
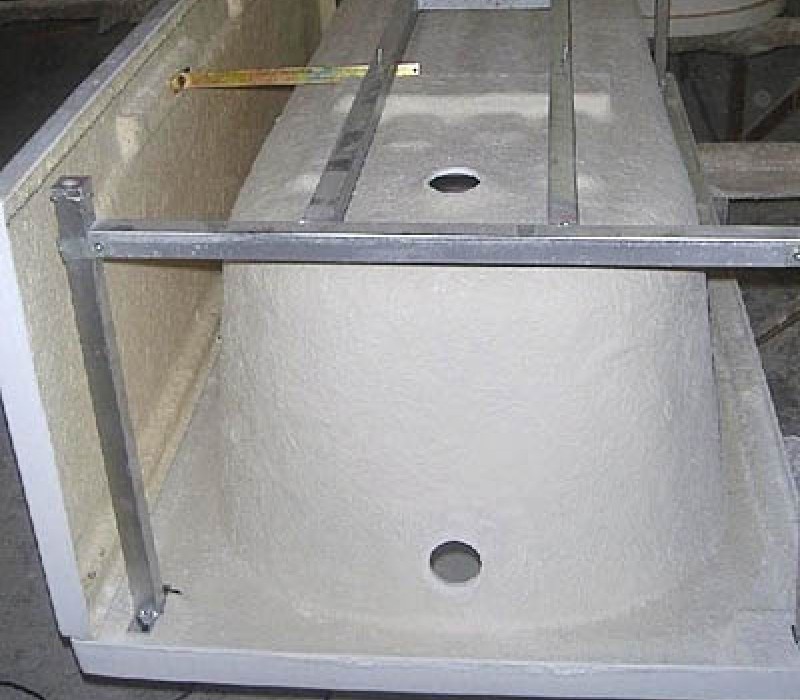
It is recommended to start installing an acrylic bathtub against the wall by mounting a metal profile, which will subsequently serve as a support for the bathtub.Then, along the lower level of the edge of the edge of the bathtub, you need to install a metal profile around the entire perimeter with the help of dowels, where the bathtub will come into contact with the wall. It is on him that the sides of the bath will rest. Next, before installing the acrylic bath, we make a brick pillow along the bottom of the bath of the required height.
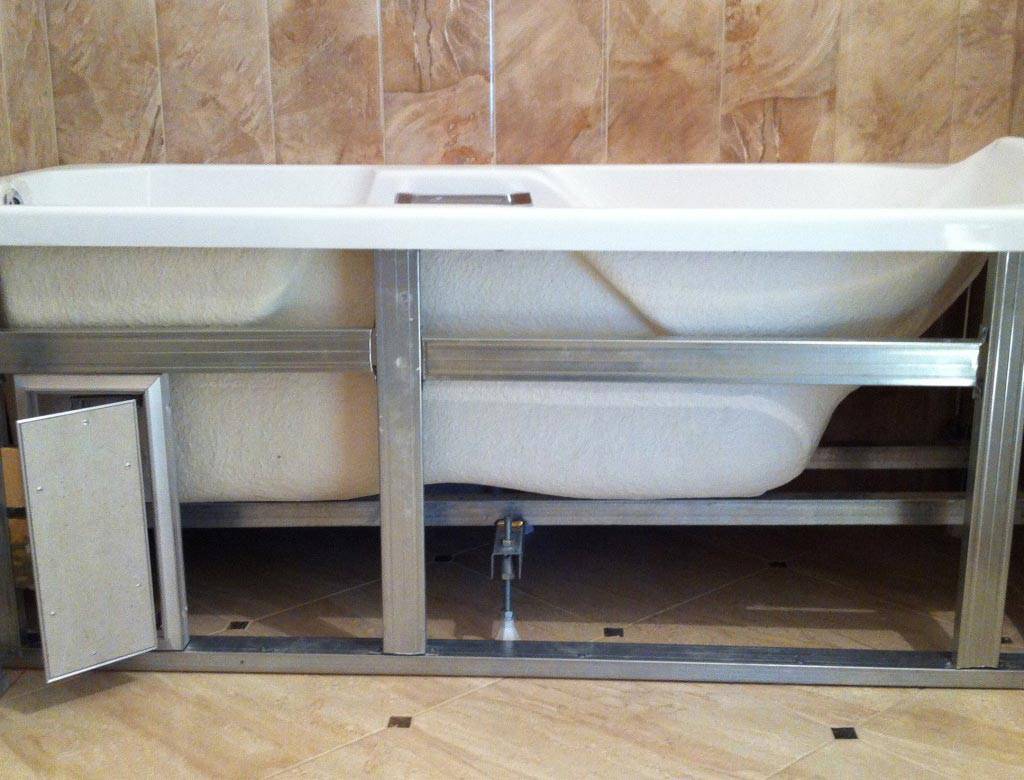
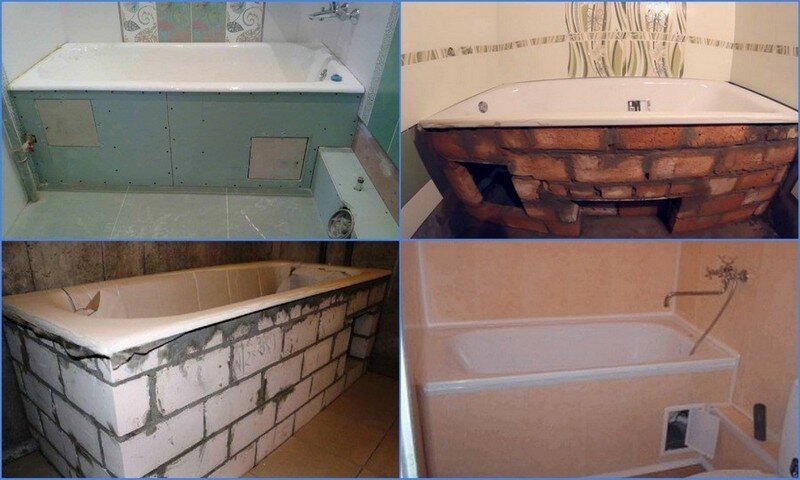
Need to know! Before fixing acrylic bathtubs in this way, everything must be calculated so that during installation it exactly lies with its sides on the previously installed profile, and the bottom slightly touches the brickwork along it. Attachment to the wall in this situation is done with the help of a sealant, which is applied to the profile, and at the same time is a sealant preventing the flow of water.
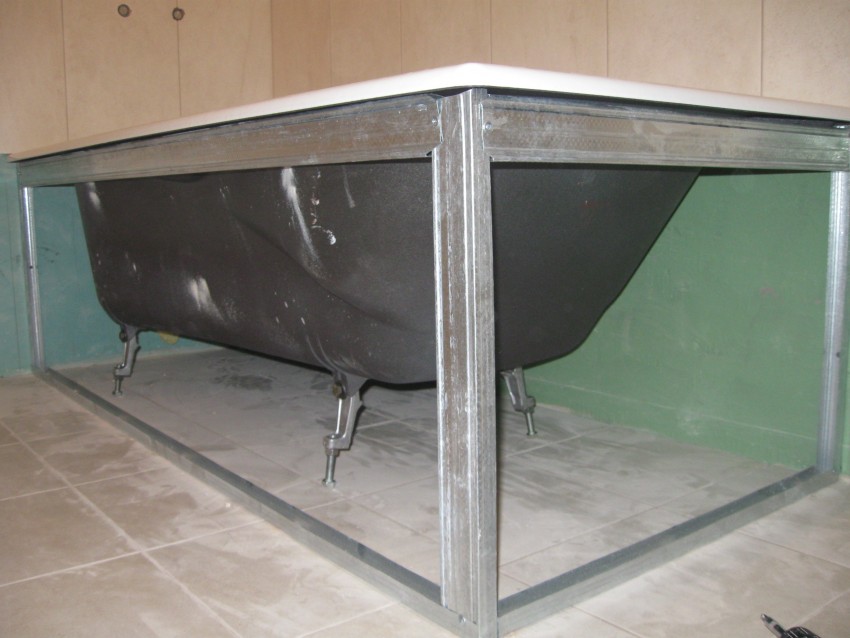
Thus, the manufacture of the frame can be considered complete, but it is possible to create a front protective screen from the same metal profile. This screen will make it possible to hide the inside and be able to provide additional protection for the outer side, as well as make it possible to make a special hatch for the repair and maintenance of the siphon. You have learned how to properly install an acrylic bath on a do-it-yourself frame.
What to Look for When Choosing an Acrylic Bathtub
When choosing a bathtub made of acrylic, first of all, you should talk to a sales consultant who will tell you about the advantages and disadvantages of each model, as well as about its configuration.
The fact is that some manufacturers offer, complete with a bathroom, a complete set of accessories necessary for installation and use:
- siphon to connect the bath to the sewer;
- fastening fittings;
- mounting feet;
- dowels, fastening strips, drills, self-tapping screws.

In addition, carefully inspect the bath you like for visible defects in the acrylic coating. It will not be superfluous to check it by touch. The surface of the bath should be perfectly smooth and even. Any presence of bumps, scratches, chips, roughness, etc. on the bathroom bowl is considered a marriage. Most likely you will not be able to use such a bathroom for a long time.
Do not forget to ask the seller about the thickness of the polymer sheet that covers the inside of the tub. Usually it is 2-4 mm, but sometimes you can find 6 mm.
The choice of color and shape of the bathroom depends entirely on the size and design of the room in which the acrylic product will be installed, as well as on the desire of the buyer.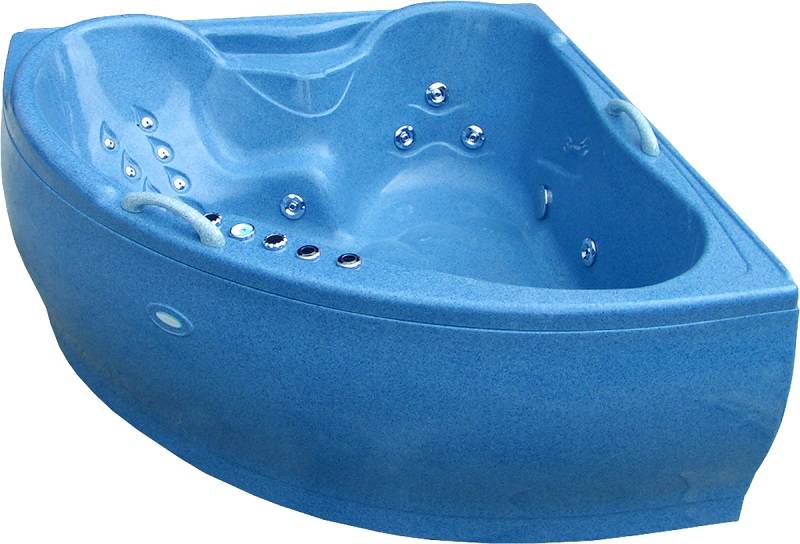
Siphon assembly
Step 1. Check the completeness of the siphon spare parts and their technical condition. Carefully inspect the rubber rings and gaskets, their surfaces should be smooth, without depressions, sags and burrs. If there are signs of material shrinkage on plastic elements during cooling, you are dealing with an unscrupulous manufacturer, never buy such goods. Lay out all the elements on a clean surface and study their purpose. Before doing this, read the instructions and familiarize yourself with the attached assembly diagram.
Siphon kit
Step 2. Start assembling the kit from the largest part - a flask or other siphon hydraulic lock
Pay attention which side to put cone seals, they should go into the nozzle during tightening and increase in diameter, and not be pressed against the end of the tube
Step 3. Attach the overflow tube, put the drain grate in place. Make all connections with your hands, do not clamp the elements too tightly. Before installation of drain and overflow gratings around the holes, remove the protective film. Let the rest of the surface remain protected, the film is completely removed only after completion of all installation work.
Siphon assembly diagram
Now you can install an acrylic bath and connect the drain.
Which frames are better - manufacturers' recommendations
Acrylic bathtubs are very attractive to buyers, but they have a number of features. In the production process of such equipment, an acrylic mold is initially made. It has a very high plasticity and bends even at normal temperatures from the slightest effort applied to it. Therefore, layers of fiberglass are applied to the outer side of the product. Their quantity and quality of application determine the strength of the future bath. In any case, it is difficult to expect special strength from equipment produced in this way.


The frame for an acrylic bathtub is necessary for the safe operation of the structure. Otherwise, the sides of the structure may break, unable to withstand the load.
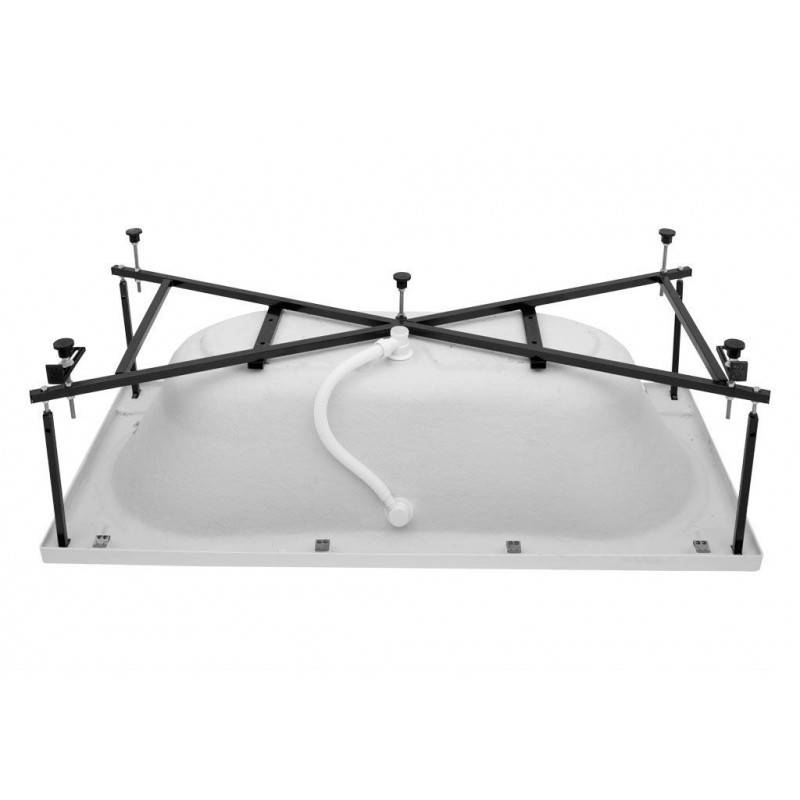
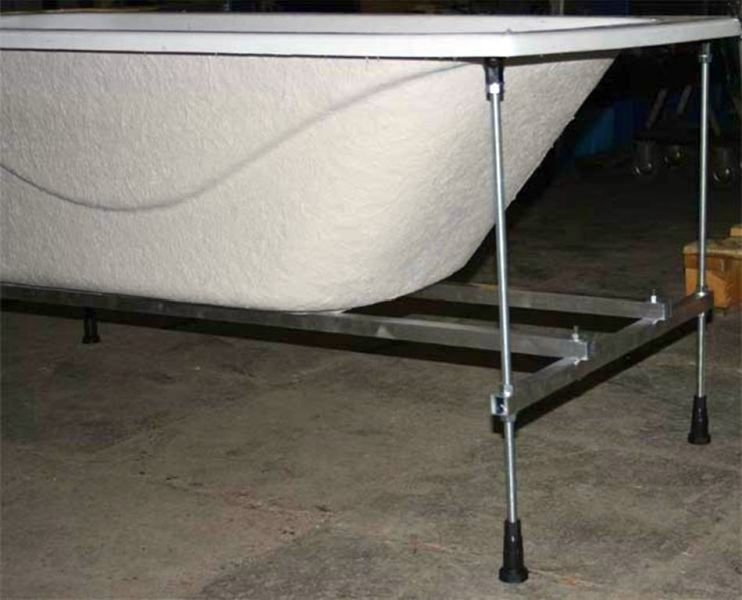
Manufacturers recommend using special frame-frames on which acrylic bathtubs are installed. The design is designed to optimally distribute the load over the bowl and prevent deflection and breakage of the equipment body. Only serial frames are produced, which are designed for certain models of bathtubs. There are no universal options here. The frame is a structure made of profiled steel tube of square section, powder coated with anti-corrosion paint.The frame includes supports for the bowl in each corner of the bathtub, intermediate stiffening ribs, as well as height-adjustable legs.
Thus, it will be impossible to use an acrylic bath without a support frame. Despite the fact that it is made of high-strength fibers, the design is not capable of withstanding serious loads without deforming, which are made up of pressure on its walls of water and the weight of the human body. And do not think that acrylic equipment will have enough legs for installation. In this case, they will be required only in order to level it above the floor level.
When buying, experts recommend paying attention to the frame, which the seller offers to purchase along with the bathroom. The more points for support on the floor such a frame will have, the less durable the acrylic bath itself will be.
The ideal option is support only at the corners of the structure. If an all-welded frame is included with the selected equipment, this is a signal of the low strength of the product. In any case, it will not be possible to do without installing a supporting frame-frame. If desired, you can make it yourself.
Steps for installing a tile bath
All work should be performed in a certain order, a violation of technology can cause further difficulties.
-
Room preparation. Align the walls and floor, repair large cracks. It must be remembered that acrylic bathtubs can only be installed on solid surfaces. This means that the walls should only be plastered, the use of plasterboard plates for their alignment is strictly prohibited.The fact is that side stops take on a large load during the installation of the bath, and they can only be securely fixed on brick or concrete walls. Even foam blocks do not have the required indicators of physical strength.
-
Bring cold and hot water and drain to the place of installation of the bath. Choose the placement of outlets taking into account the design features of the bath. All wiring must be hidden.
-
Measure the number of tiles for the floor, walls and bath screen, if one is planned to be finished with ceramic tiles. Buy glue and grout, check for tools. You will need a mixer and containers for preparing the mortar, flat and comb spatulas, a level, a plumb line, plastic or metal corners for tiles, a cutter, a grinder with a diamond blade and a drill with a set of drills.
-
Lay the tiles on the floor. We recommend that you do not leave an open area under the bathtub, saving a few tiles is not worth the inconvenience that will arise in the future. Wait for the glue to dry, seal the seams and the next day start installing the acrylic bath.
Further, the technology of work largely depends on the type of bath.
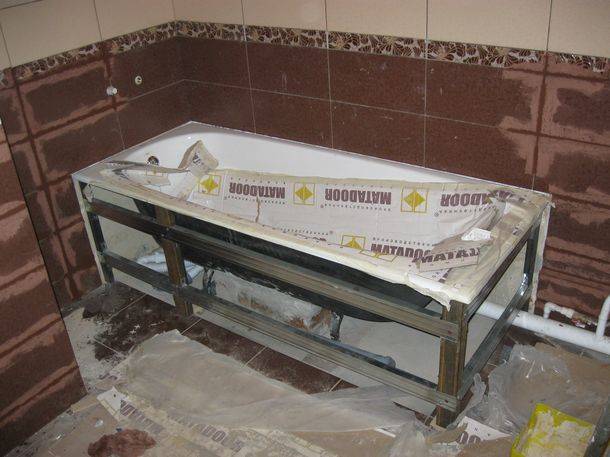
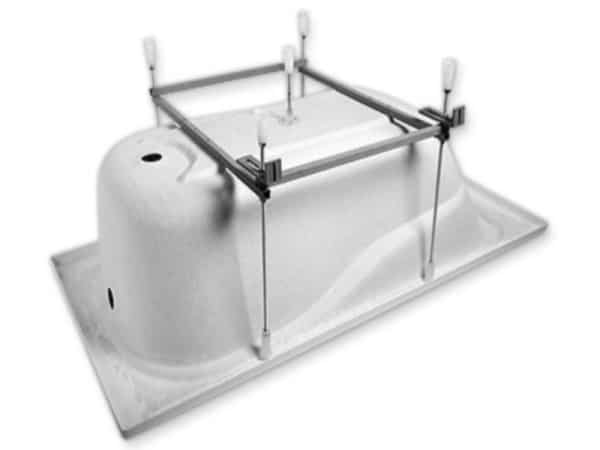
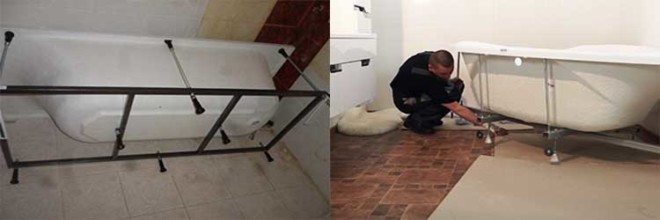
Installing an acrylic bath on a frame
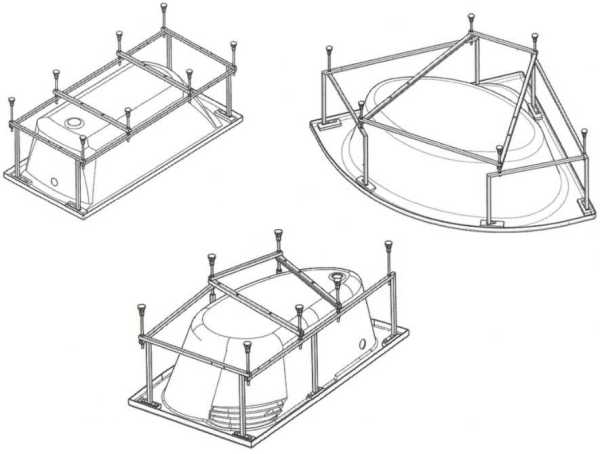
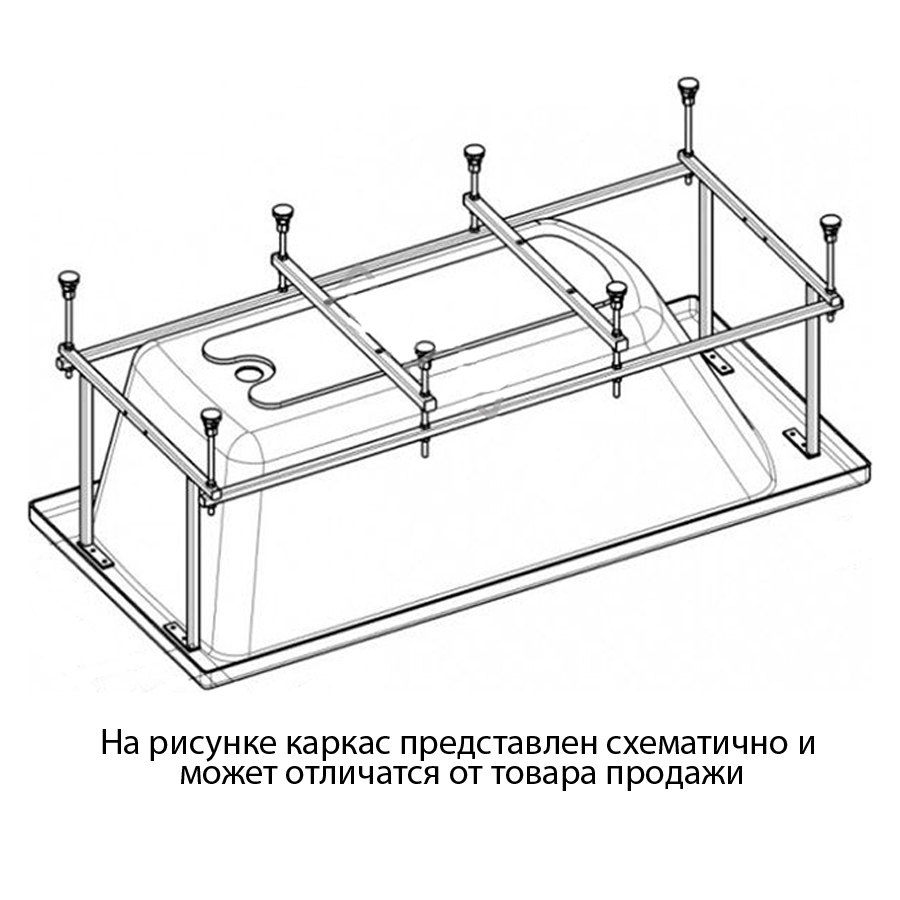
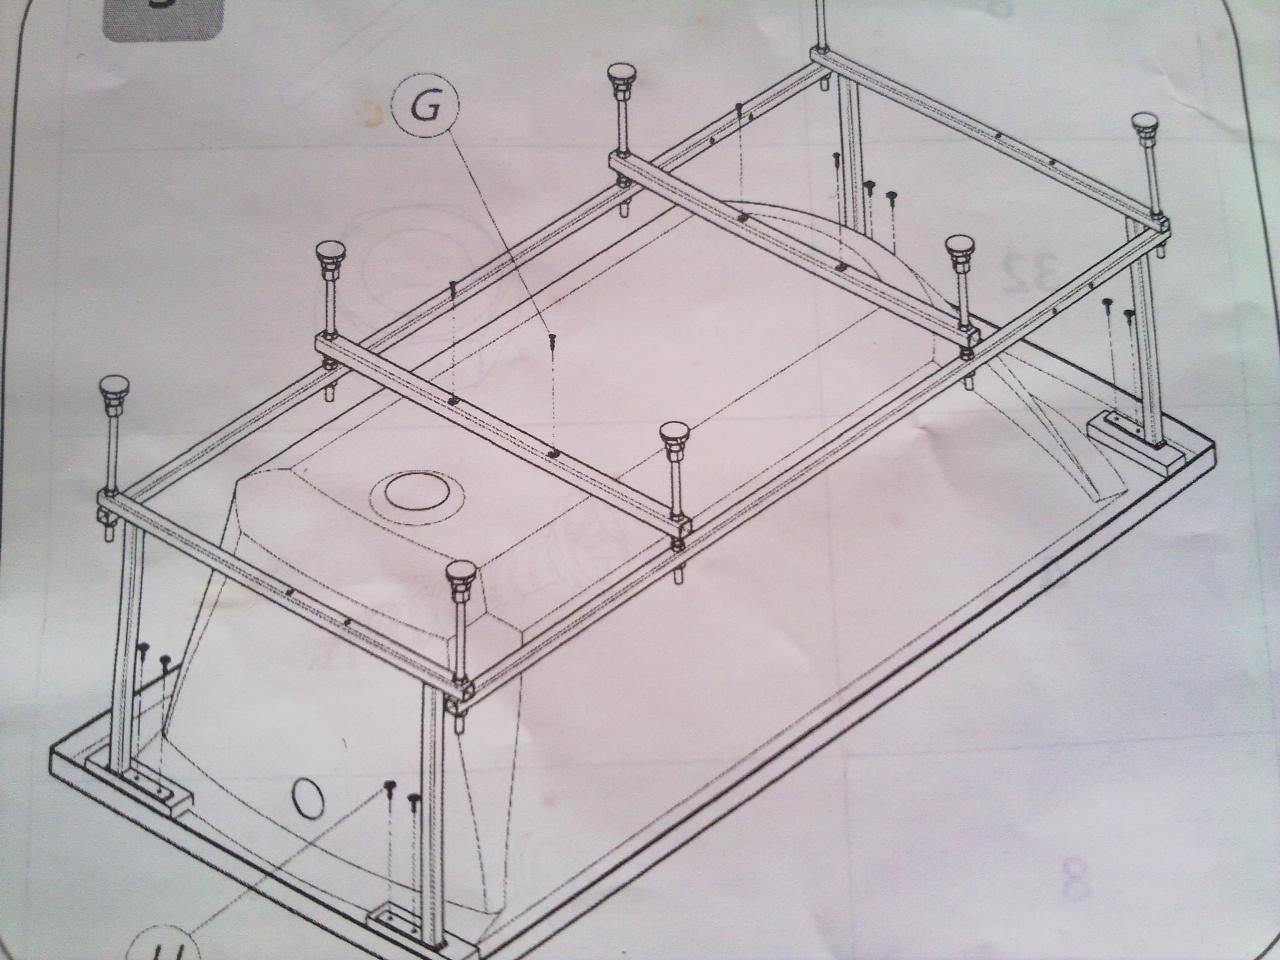
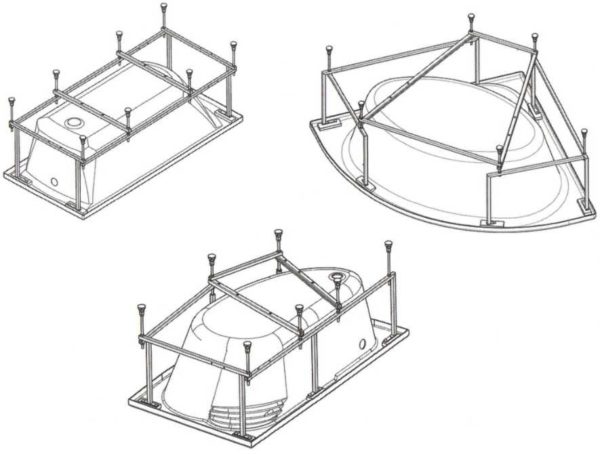
For each bath, the frame is developed differently, therefore the assembly nuances are different for each case. Even for one company, for different models of the same form, the frames are different. They take into account the geometry of the bath, as well as the distribution of loads. Nevertheless, the order of work is general, as are some technical points.
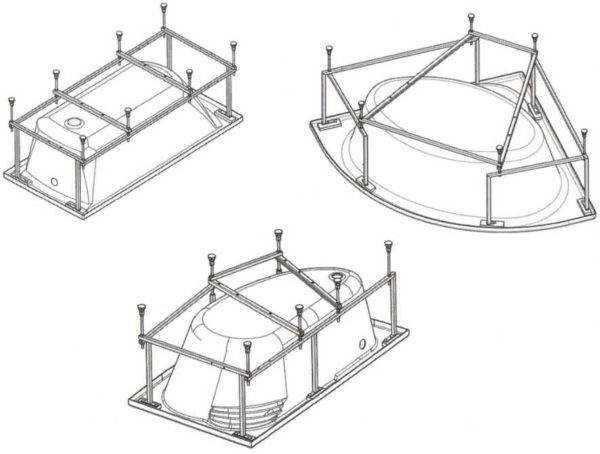
An example of frames for acrylic bathtubs of various shapes
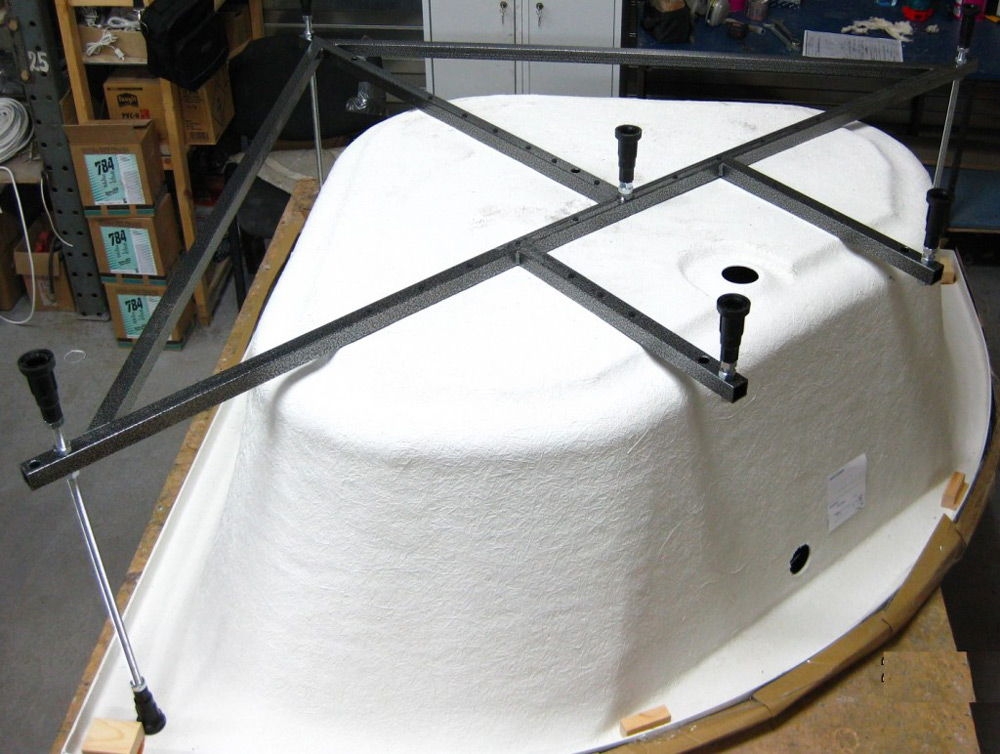
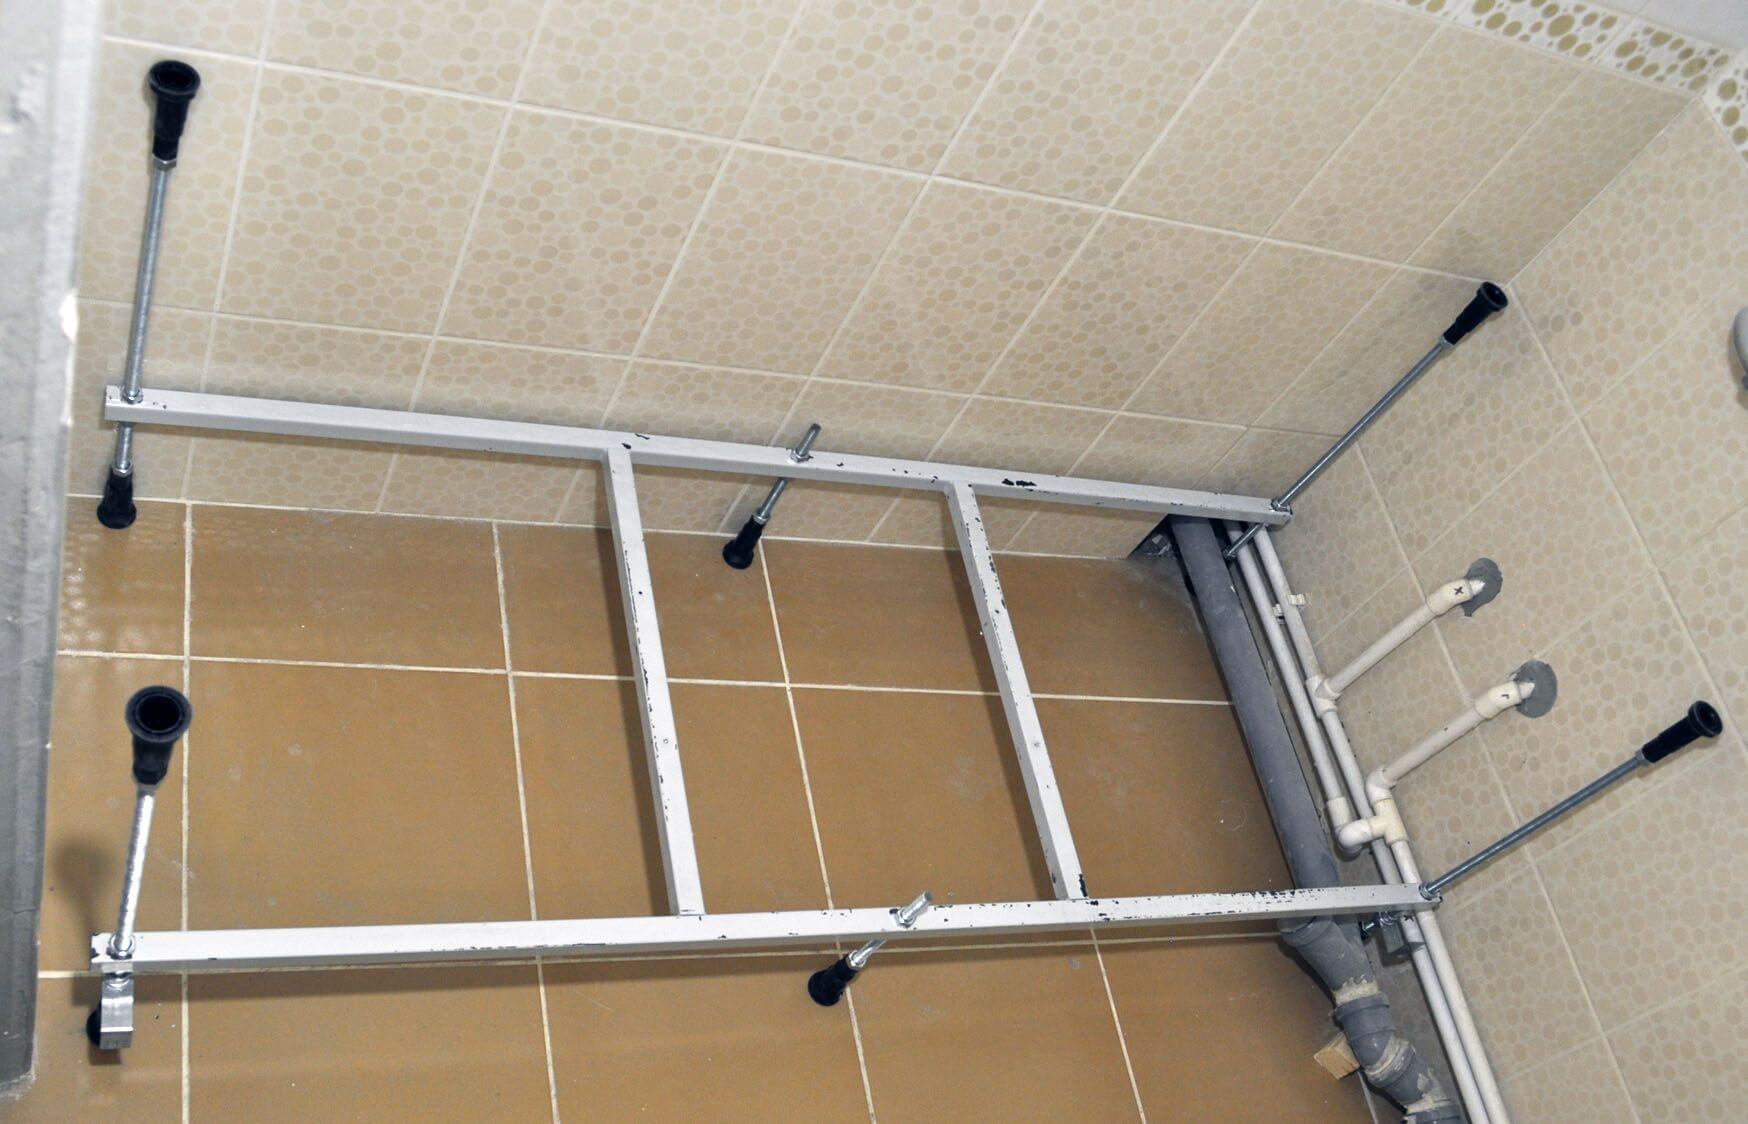
We twist the frame
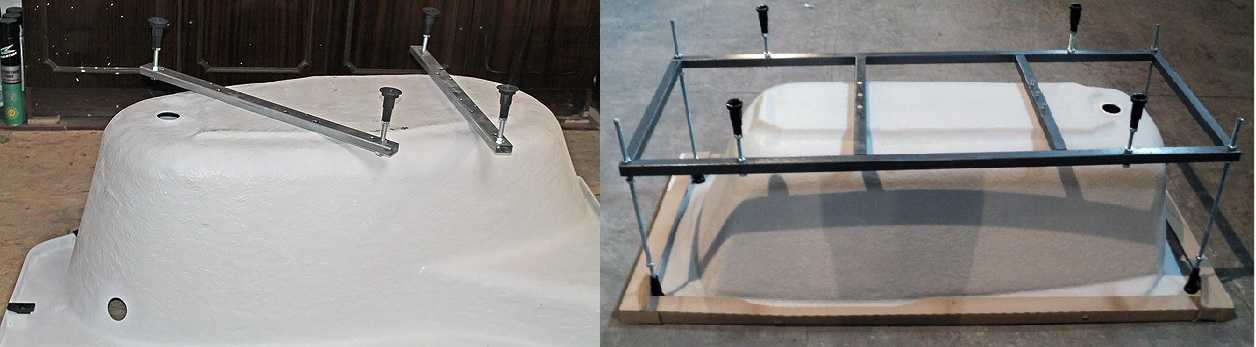
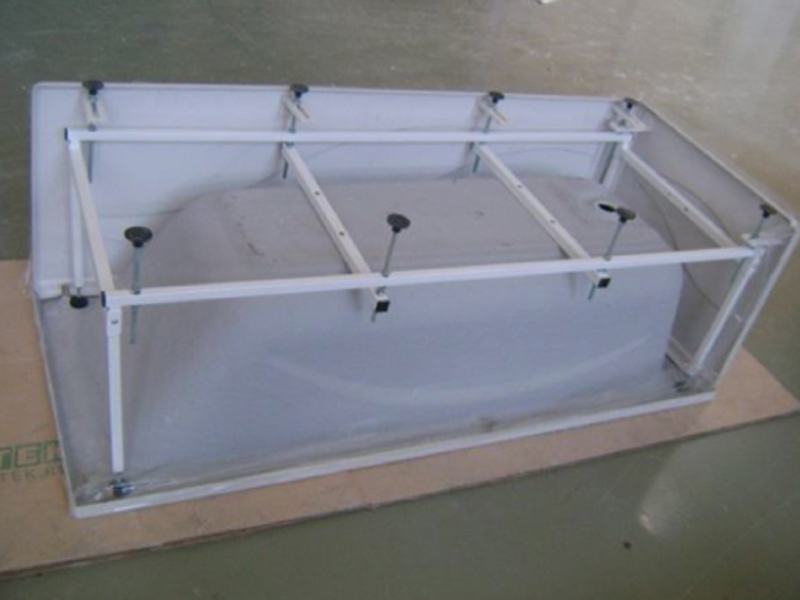
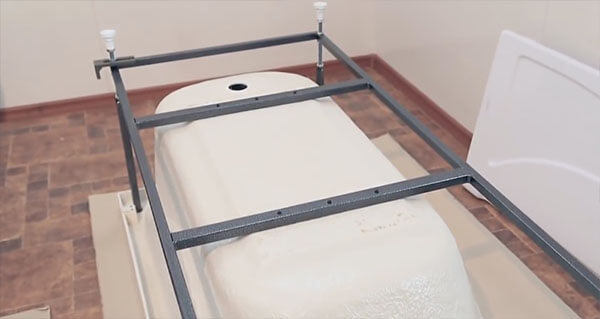
A frame is assembled on which the bottom rests. In some cases, it is welded and does not require assembly. The frame is laid on the bottom of the inverted tub until nothing is fixed.It is exposed exactly, as it must be attached.
-
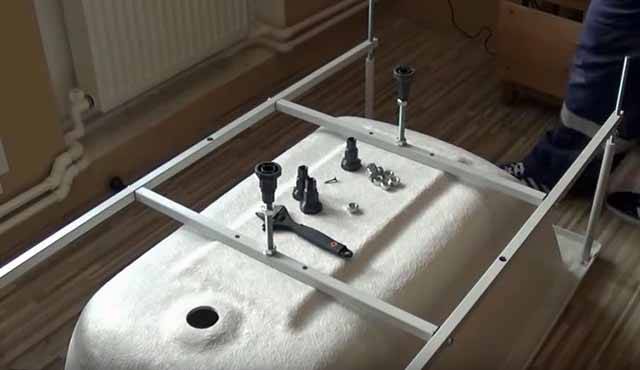
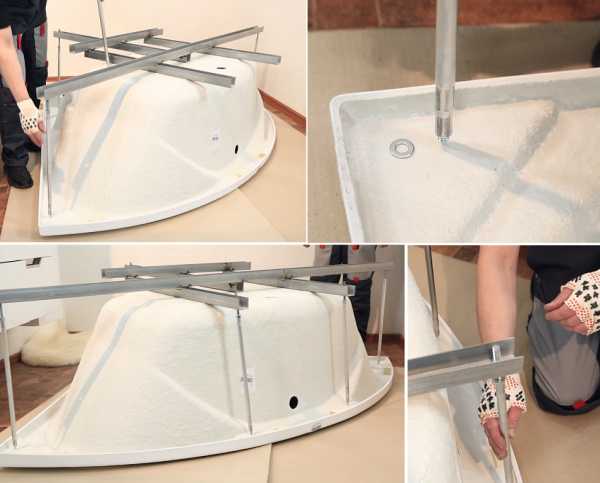
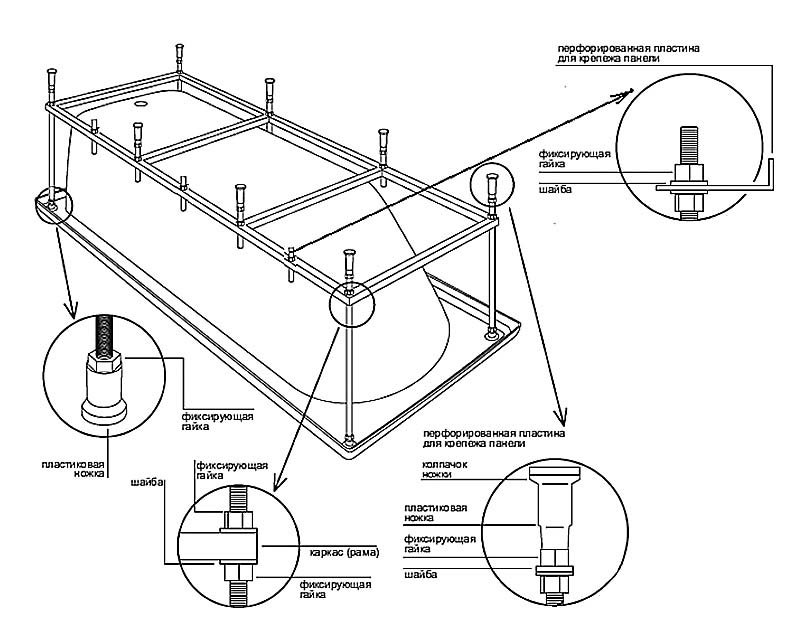
Washers with fasteners are installed on the racks. Racks are either profile pieces (square-section pipes) or metal rods with threads at both ends. They must be attached to the sides of the bath. Firms usually develop fasteners of their own form. The photo shows one of the options.
-
Racks are usually installed at the corners of the bath. In these places there are plates, there may be holes, or they may not be - you have to drill yourself. The number of racks depends on the shape of the bath, but not less than 4-5, and preferably 6-7 pieces. At first, the racks are simply assembled and placed in the places allotted to them (until we fix it).
-
The second side of the racks is connected to the frame supporting the bottom. A threaded nut is mounted in the end of the rack, we screw the screw into it, connecting the frame and the rack.
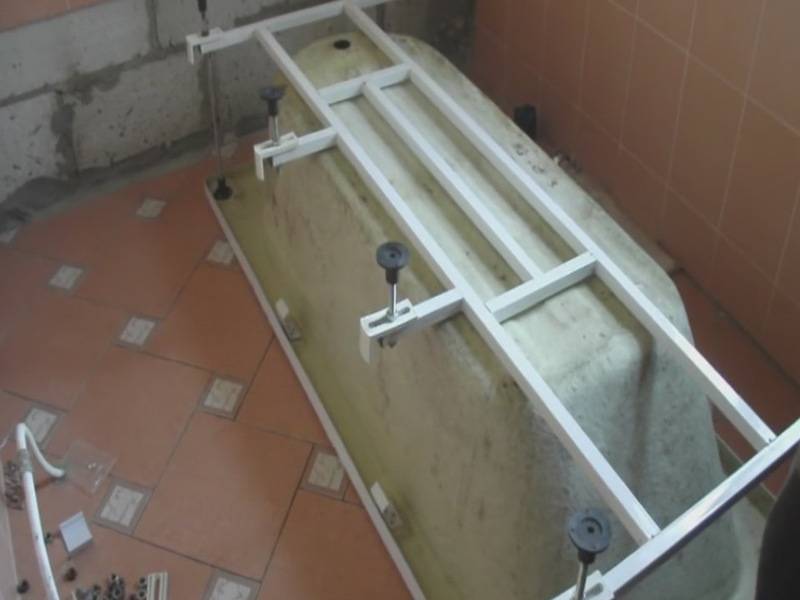
- After installing the racks, with the help of bolts align the position of the frame. It should be located strictly horizontally, and the bottom should lie on it tightly, without gaps.
Fixing the bathtub to the frame
After the frame is level, it is screwed to the reinforced bottom of the acrylic bath. It is necessary to use self-tapping screws of the recommended length, which are included with the frame.
We fix the frame to the bottom
- The next step in installing an acrylic bath is to set up and fix the racks. They have already been adjusted in height, now you need to set them vertically (we control the building level on both sides or check the accuracy of the plumb line). The exposed racks are “sit down” on self-tapping screws. The length of the fasteners is indicated in the instructions for each bath, but usually they are less than those that fixed the bottom.
- Next, install the legs on the frame.
-
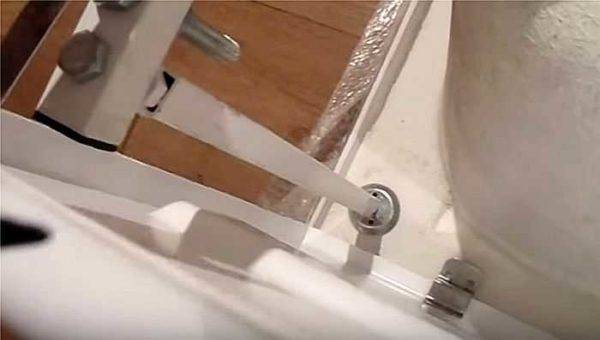
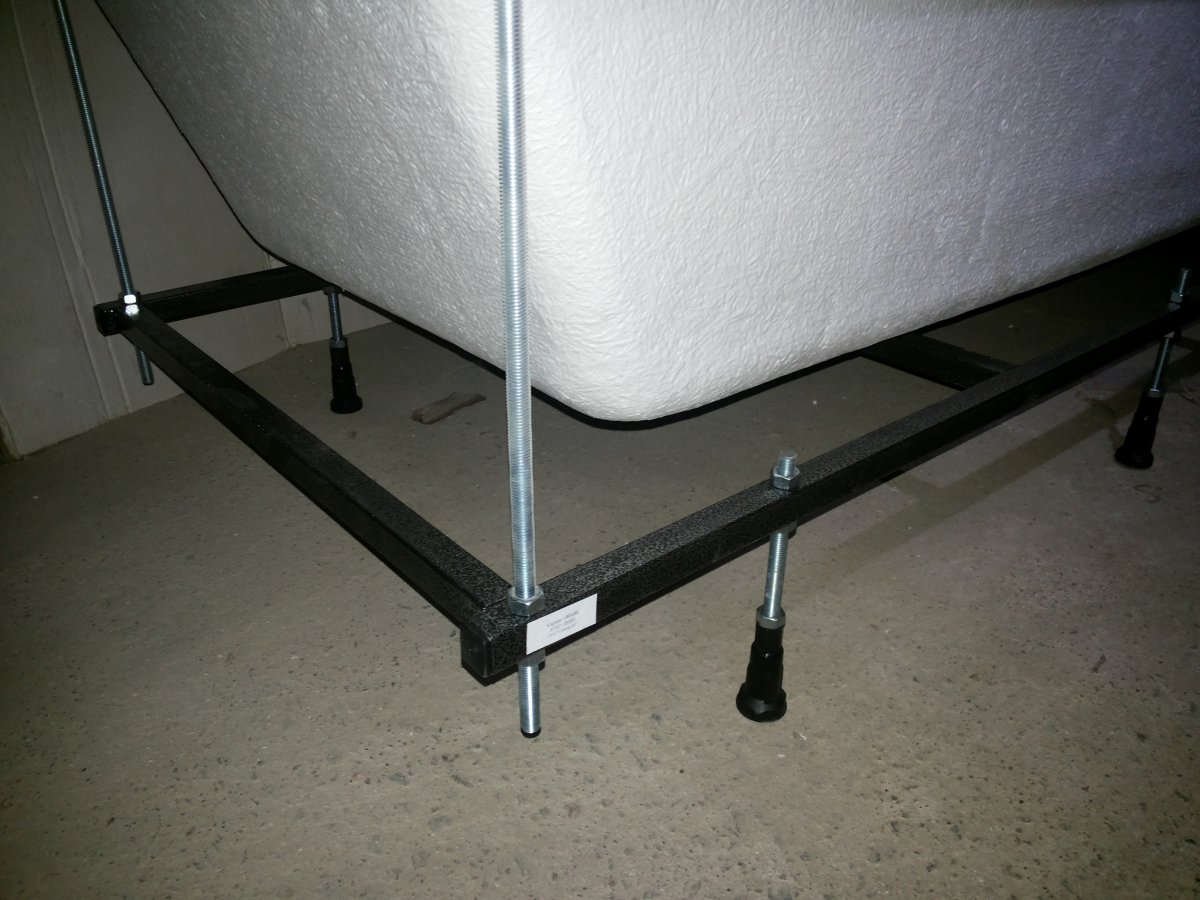
On the side where there is no screen, a nut is screwed onto the leg pin, after which they are inserted into the holes in the frame (hanging on this nut), fixed to the frame with another nut. The result is a height-adjustable design - by tightening the nuts, you can set the bath to the desired position.
-
The assembly of the legs from the side of the screen is different. The nut is screwed on, two large washers are installed, a stop for the screen (L-shaped plate) is inserted between them, the second nut is screwed. We received an emphasis for the screen adjustable in length and height. Then another nut is screwed on - the support nut - and the legs can be placed on the frame.
-
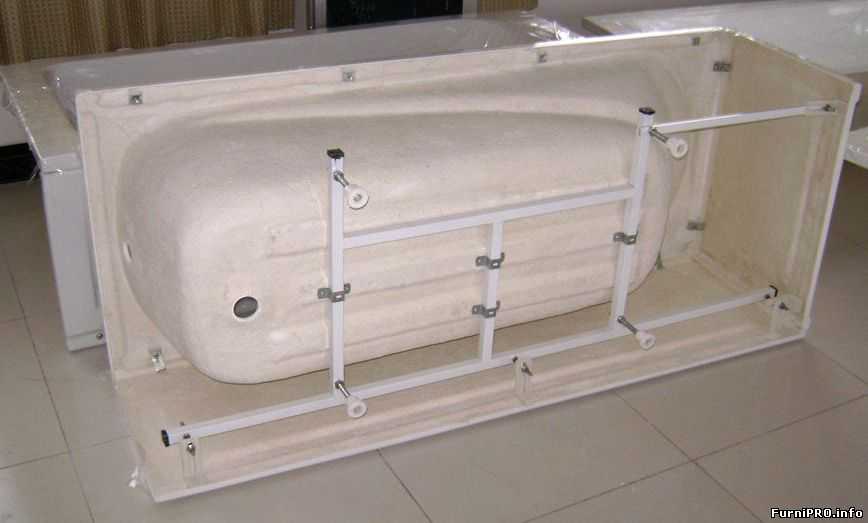
Screen mounting
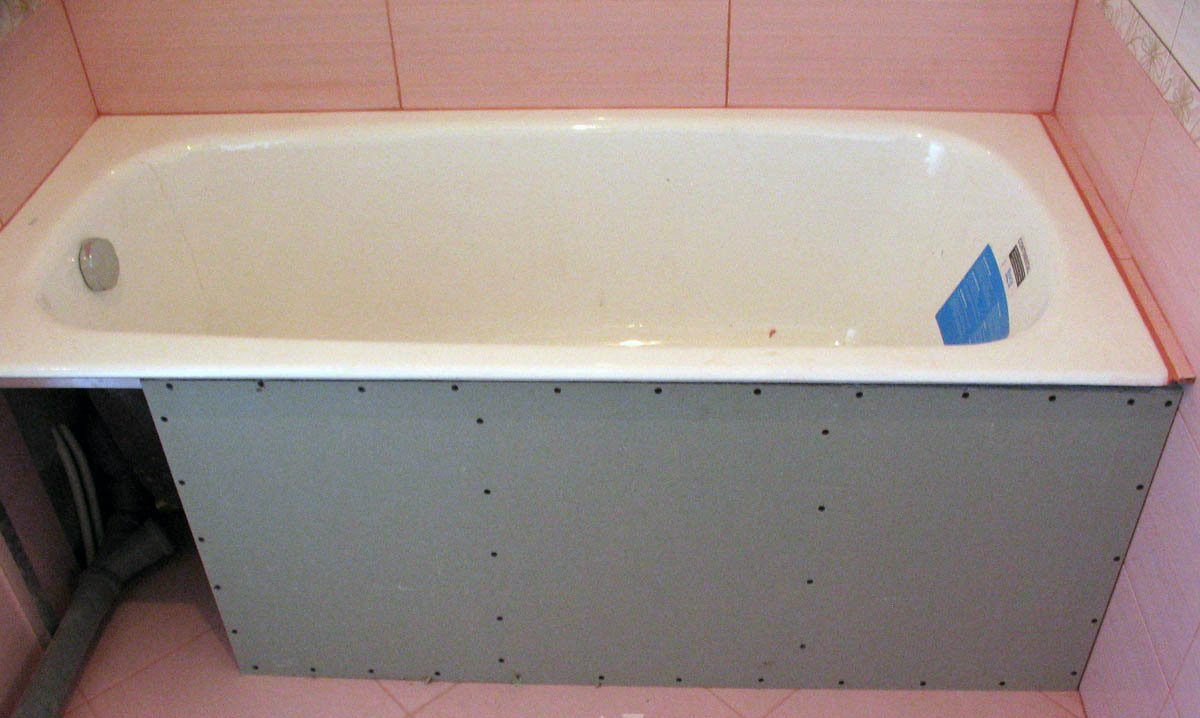
This is not quite the installation of an acrylic bath, but this stage is rarely dispensed with: we install the screen. If you bought this option, the kit comes with plates that will support it. They are placed along the edges and in the middle. After attaching the screen and adjusting the stops on the legs, fix them in the desired position. Then, on the bath and the screen, the places where the plates need to be fixed are marked, then holes are drilled for the fasteners and the screen is fixed.
We put the fasteners for the screen on the side
-
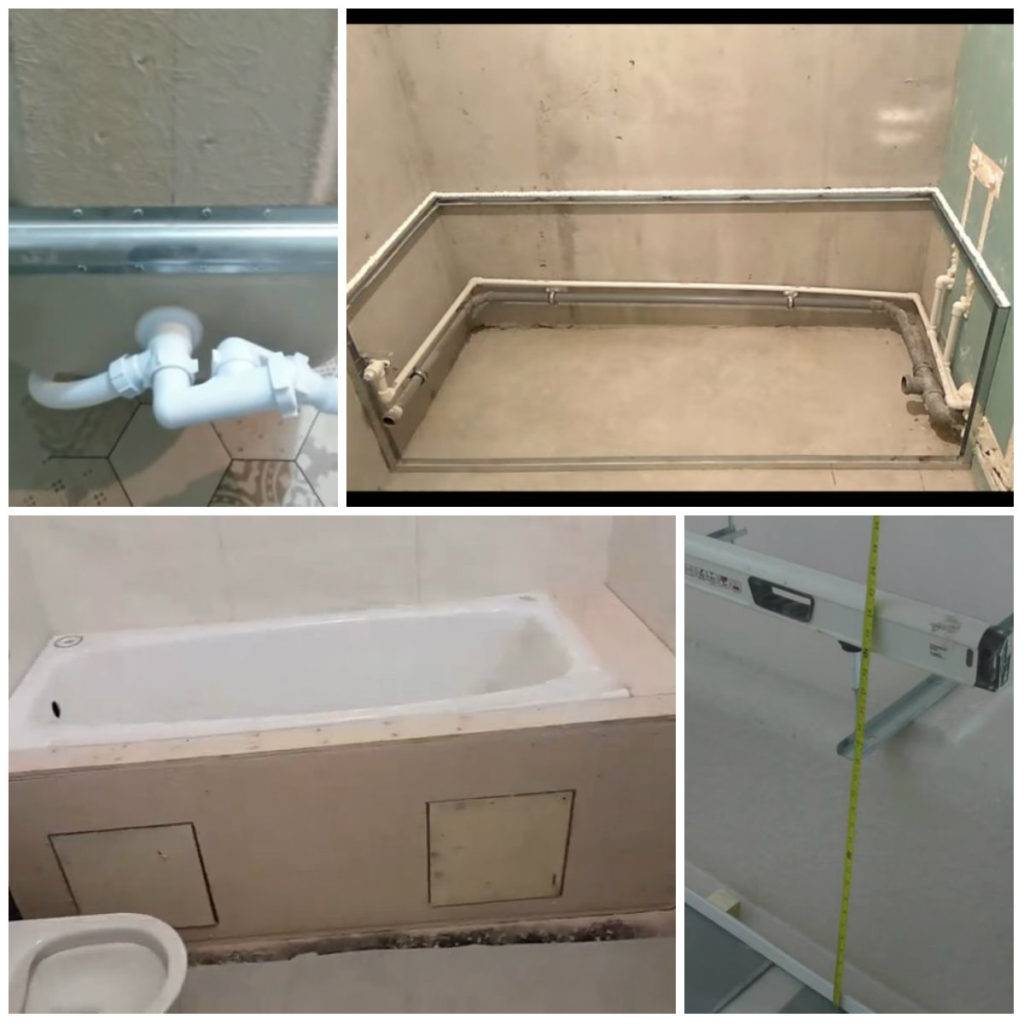
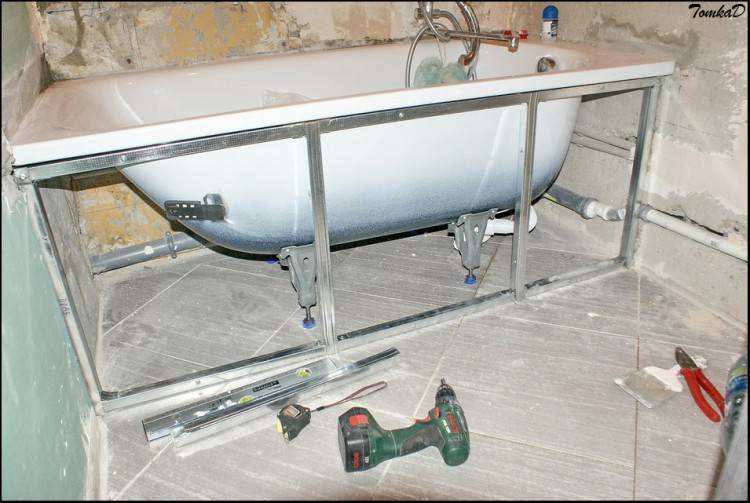
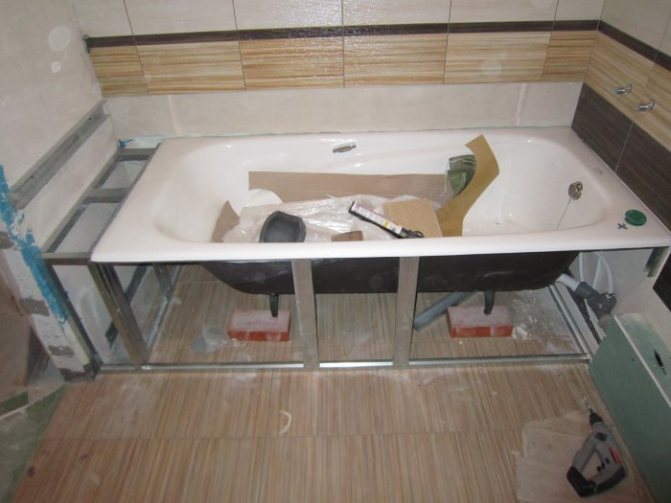
Next, you need to install fasteners for the acrylic bath to the walls. These are curved plates for which the sides cling. We move the bath installed and leveled to the wall, mark where the sides will be, put the plates so that their upper edge is 3-4 mm below the mark. They are fastened to dowels by drilling holes in the walls for them.
- During installation, the bathtub is put on the boards on the screwed plates. Having installed, we check whether it stands exactly, if necessary, adjust the height with the legs. Next, we connect the drain and the last stage - we fasten the screen to the plates installed on the side.At the bottom, it simply rests against the exposed plates. Acrylic bathtub installation completed.
Do-it-yourself installation of an acrylic bathtub is over

Next, it will be necessary to make the junction of the sides of the bathtub with the wall airtight, but more on that below, since this technology will be the same for any installation method.
How to choose a frame and not be mistaken
The frame is an additional structure that redistributes the load and protects the acrylic bath bowl from deformation. In addition, the base serves to install and fix plumbing. Acrylic baths very often have a complex asymmetrical shape. Correctly calculating and choosing the right frame is not so easy. When buying a bathtub in a store, the seller will most likely offer a suitable model from the available ones.
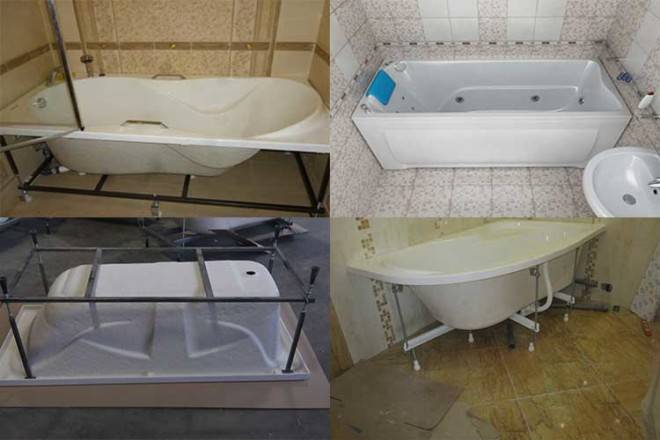
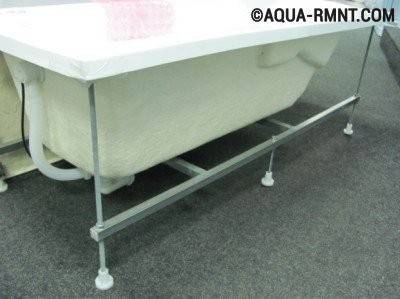
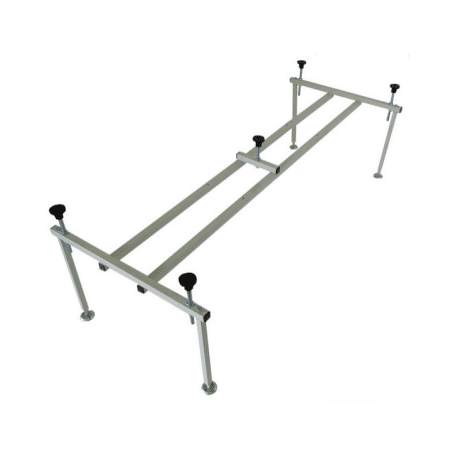
The simplest and most popular type is an ordinary stand with legs. It is made from a metal profile. Most often, pipes of rectangular section or U-shaped profile are used. The stand consists of several separate elements that support the bowl.
The set also includes legs. Their height is adjustable. This allows you to set the bath exactly on the level, even if the floor in the bathroom is uneven. The disadvantage of this type of construction is that the frame takes the load only from the bottom of the bath, and there is no support for the sides of the bowl.
This type is more complex and durable than the previous one. The bottom of the bath rests on a flat metal profile frame. The shape of the stand corresponds to the bottom of the bowl. Rigidity is added by transverse ribs. The design contains additional vertical elements. They support the sides of the bowl at several points.
The stand is often sold unassembled.Connecting all the elements of a metal profile with bolts is not difficult. This type of frame is best used for baths of complex shape and corner bowls.
Spatial all-welded bathtub frame is the most durable construction offered by manufacturers. It is a complex three-dimensional structure that securely holds the bowl. Such a base has several reference points and distributes the load both from the bottom of the bowl and from its sides. Stiffening ribs are located in places of the greatest loads. Thus, the weight is completely distributed on the metal parts of the structure.
When choosing a frame for an acrylic bath, you need to take into account its dimensions, configuration, wall thickness. Of course, a product made of a thick layer of reinforced acrylic of more than 5 mm can withstand a significantly greater load than an inexpensive copy with 1 mm walls. The thinner the bath, the greater the need to reinforce it with additional supporting structures.
If you have purchased a traditional-shaped bath, then there will be no problems. You can buy a universal rectangular frame for a rectangular bath or a pentagonal frame for a corner one. The only thing to consider is the dimensions of the bowl. As a rule, in stores there is a wide selection of simple frames that differ in the country of origin and the thickness of the metal. The choice in this case depends on the financial capabilities and desires of the buyer.
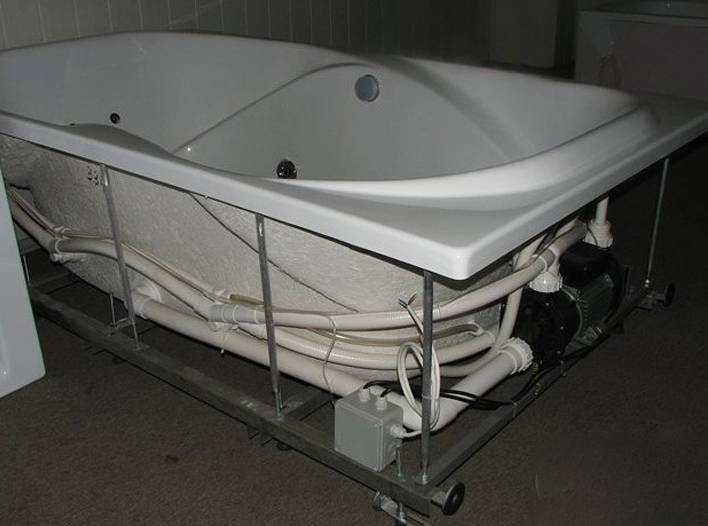
If the acrylic bath has a complex shape, you plan to install a hydromassage and other accessories that weaken the structure and make the bowl heavier, then a universal model will not work. It can be a reinforced frame or a whole metal platform.
In addition to the shape and strength of the structure, you need to pay attention to the material from which it is made. Quality products are made of metal of sufficient thickness. The frame will stand in the bathroom - a room with high humidity, so the manufacturer must take care of corrosion protection
The frame will stand in the bathroom - a room with high humidity, so the manufacturer must take care of corrosion protection.
If you can't find a stand that fits your bathtub model in the store, you'll need to consider alternative installation options.
Advantages of installing a bathtub on a frame
Installing an acrylic bathtub is much more efficient and reliable when compared to other options. All frames are developed individually, for a certain design option, and, therefore, the entire load is distributed evenly, which eliminates the possibility of breakage.
Everything you need to install the frame is included in the package, so there is no need to visit stores and in additional expenses. Installation on the frame does not take much time. During operation, there is no need to pre-prepare the floor, as is the case with laying on a brick base.
No extra dirt. The frame does not create excessive pressure on the floors. If there is a decorative screen, which can be purchased separately, then the entire supporting structure is perfectly hidden from prying eyes.
Thus, installing a bathtub on a frame solves several problems at once: it increases the safety of product operation, speeds up installation time. And imposes the work of cleaning the premises after the completion of work.
Installation on bricks
First of all, you should stock up on the necessary tools and materials for installation. This includes bricks (20 or more), cement and mortar sand, spatula, tile adhesive, brush, trowel, spirit level, ceramic tile and screen. Then you need to choose a convenient place for the location of the bathroom, preferably in the place of the old one, so as not to bother with the conclusions of communications. The next step is to prepare the material. In most cases, bricks are installed across the bathroom, with pillars of 2-3 pieces high.
Here it is important to know the shape of the bottom of the bathroom, because it can be different: oval, rectangular or beveled - the future shape of the masonry depends on it. In order to designate it, half a brick is added to the outer columns (in the event that the bottom has a rounded shape)
The total height of the structure together with the bathtub should not exceed 0.7 m; at a greater distance from the floor, the use of the bowl becomes inconvenient.
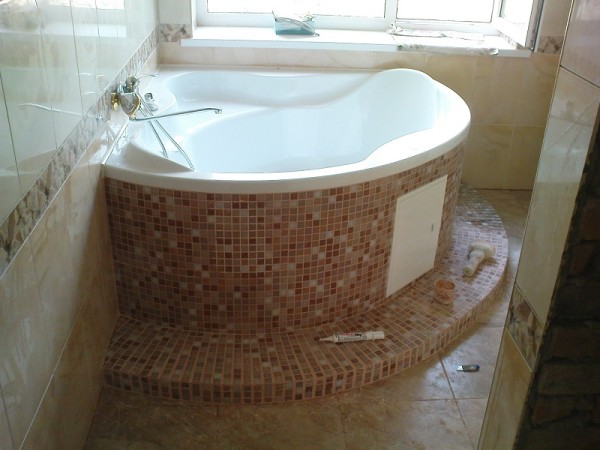
bathtub on brick basis.
Also, the height must be optimal for the normal functioning of the siphon. The number of rows should be calculated depending on the length of the bowl. The optimal distance between the columns is 50 cm.
Having drawn up a rough plan, you need to proceed to the preparation of the solution. The ratio of cement and sand should be 1:4 respectively + water. Then, in the designated places, brickwork is carried out. In order for the mortar to dry well and adhere to the bricks to the desired degree, you need to wait at least a day.
After we install a siphon with overflow on the bathroom. Here you need to put the bowl on its side, and rubber gaskets are installed on the corresponding hole: this is necessary for sufficient sealing of the drain.A prerequisite for the normal operation of the siphon is the placement of its outlet pipe slightly above the sewer pipe with a drain.
Bathtub mounted on brick pillars.
After a day, you can install the tank itself. For the most durable and efficient installation, professionals recommend lubricating its edges with tile adhesive, the places where it will connect to the wall surface and the wall itself too. With this simple action, you will firmly connect the bowl to the wall, as well as create additional waterproofing. After that, use the level to trace the horizontalness of the tank and put the bath on the supports. If the bathtub is metal, do not forget to stick Guerlain (plastic roll material) on the bottom support points on the brick posts. For a cast iron bath, additional processing will be superfluous, since its very weight ensures a snug fit. As mentioned above, for a normal drain, you need a slight advantage on one side.
After the installation is completed, you need to connect the sewer hose to the drain hole using a corrugated plastic pipe. The angle of its inclination should be equal to 45 degrees. To check the quality of installation, you need to fill the bath with water and see how it flows out - if there are no obstacles, then the bath is installed correctly.
Bath Screen will not only help hide the brick supports, but will also be a stylish addition to the interior.
There is another version of this installation method, it is called "embedded installation". It consists in creating a support, which is a wall closed around the perimeter, on top of which a bath is laid.A flat cushion of bricks is installed under the bottom, and sometimes the empty space formed by the masonry is covered with sand, but in this case it becomes difficult to access the drain siphon.
In any case, the installation must be completed with a decorative finish of the external space. A plastic screen or ceramic tile can be used for it. The latter can be called especially successful, especially if the color of the tile is in harmony with the exterior of the bathroom.
Pros why consumers choose cast iron
- The first and, perhaps, the main reason is durability. The mechanical strength of the material used, plus the enamel's chemical resistance to virtually any type of cleaning agent, make this an attractive choice. With care, a cast iron bath will last as long as you want.
- The second reason is that the low thermal conductivity of cast iron and its high heat capacity keep the water poured into the cast iron bath hot for a long time. Thick walls accumulate the heat of hot water and then gradually give it back, allowing the bather to soak up longer.
- The enamel used to cover cast iron is highly durable, smooth, its colors are rich and bright, the enameled surface is shiny and gives the whole structure an elegant look. The absence of pores on the surface of the enamel facilitates cleaning from contaminants.
- Another distinctive feature of cast iron baths is their large mass. Even the most modern lightweight models weigh at least 100 kg. This is not always convenient, but such a large weight also has positive aspects - cast-iron bathtubs are exceptionally stable and usually do not require any additional strengthening measures during installation.In addition, thick walls dampen the sounds of running water without requiring additional soundproofing.
Installing an acrylic bathtub on support legs
This is the fastest and easiest installation method that does not require a set of tools and special skills. The assembly of the bath with legs is easy if you use the instructions that are attached to the product. If, according to the instructions or during installation work, it becomes necessary to drill the font, then this should be done with a wood drill at slow speeds. Mounting on the support legs consists of screwing the legs to the bowl and adjusting them in place.
- Screwing legs. On the lower part of the bath body there are special seats marked with stickers or corresponding symbols. To facilitate self-assembly of an acrylic bathtub, some manufacturers supply products with pre-drilled holes. And if they are not, then you need to make these holes yourself. Then the legs are screwed into these holes, otherwise the load will not be distributed evenly and the bath will quickly fail.
- Support adjustment. Almost all bathtub legs are designed with the ability to adjust the height of the support in order to attach the bowl at the desired slope using a level. First, the bath is installed against the wall, and then the legs are twisted, setting the desired height. After that, proceed to horizontal alignment, when the level is set on the side of the bath in a horizontal position. If necessary, the legs are twisted up or down with a wrench.
When the optimal performance is set, the legs are fixed with nuts in the desired position.Sometimes, for greater reliability, the bathtub is screwed to the wall with special plastic or metal hooks, which are pre-mounted strictly horizontally around the entire perimeter of the bathtub into the wall at the same distance from each other. The hooks are screwed up to the wall cladding.
Acrylic, steel or cast iron: which bath is better?
Many people ask: is the bathtub acrylic, cast iron or steel? Let's compare the advantages and disadvantages of each type. For convenience, they are presented in the form of a table.
| Cast iron | Steel | Acrylic | |
|---|---|---|---|
| pros | 1. Durability. 2. Sustainability. 3. When filling, they are not very noisy. 4. Low thermal conductivity (water slowly cools down). 5. Wash well. | 1. Light weight (30–50 kg). 2. Very durable and beautiful smooth enamel. 3. Ergonomics. 4. Extensive size range. 5. Variety of shapes. 6. Easy to care for. | 1. Light weight (30–40 kg). 2. Warm to the touch. 3. Keep heat well (6 times longer than cast iron). 4. Smooth, shiny surface. 5. Hygiene. 6. Abrasion resistance. 7. Not subject to corrosion. 8. Restored at home. 9. Large size range. 10. Any depth. 11. Designer variety of models. 12. Ideal for equipping with a hydromassage system. 13. Easy to care for. |
| Minuses | 1. Very large weight (130 kg). 2. They warm up for a long time. 3. Enamel can be chipped off. 4. Not subject to restoration. 5. Small selection of shapes and sizes. 6. Over time, the enamel wears off. 7. As a rule, they are not equipped with hydromassage. | 1. Thin-walled are deformed. 2. Very noisy. 3. Need soundproofing. 4. Water cools down quickly. | 1. The surface is easy to scratch. 2. They are afraid of very hot water (100 ° C). 3.Cannot be soaked or washed. 4. It is undesirable to bathe animals. |
After analyzing the given data, it is easier to make a choice. cast iron, acrylic or steel the bowl must fully meet the expectations of the owner.
Cutting acrylic bathtubs
 View of a lined bathtub installed in a strobe
Very often there are situations when, when deciding how best to install an acrylic bathtub, due to inexperience, significant errors in calculations can be made, as a result of which the acrylic font does not fit into the space allotted for it. If at the same time there is no decorative cladding on the walls of the room, then the installation of an acrylic bath in a strobe is used. To do this, a special groove is cut out in one of the walls of the room and one side of the font is inserted into it as shown in the figure above. This option compensates for the shortcomings and plays the role of additional reinforcement.
Is it possible to cut an acrylic bathtub if the decorative cladding has already been installed and there is no possibility or desire to redo it? Theoretically, it is possible, but this event should be approached as responsibly as possible. Before shortening an acrylic bathtub, make sure that this does not compromise its rigidity, since it is the curved edges of the sides that give the product additional resistance to deformation.
If the situation is hopeless, then you can cut off the side of the acrylic bath, but before that you need to take some steps to prevent cracking of the font. To do this, go to any auto shop and buy a plastic bumper repair kit, which consists of fiberglass cloth and epoxy. This fiberglass is used to reinforce the area you are about to cut.For example, if you need to cut off 2 centimeters of the side of the bathroom, then starting from the third centimeter, you need to apply fiberglass, cover it with resin and wait until it dries completely.
 Repair kit for reinforcing the cut point
If this is not done, then at the moment when you want to saw off the acrylic bathtub, there may be tension in this area of \u200b\u200bthe product that will cause cracks to appear. The fiberglass will keep this crack from going any further and stop the cracking.
Before cutting an acrylic bath, think about personal protective equipment, as the acrylic shavings will be hot during the cut and can cause burns if it gets on your hand.
From the material proposed in this article, you already know whether it is possible to cut acrylic bathtubs, what tool to use, and you also learned how an acrylic bathtub is attached to a bathroom in several ways. To consolidate the material, we suggest watching the video below.


