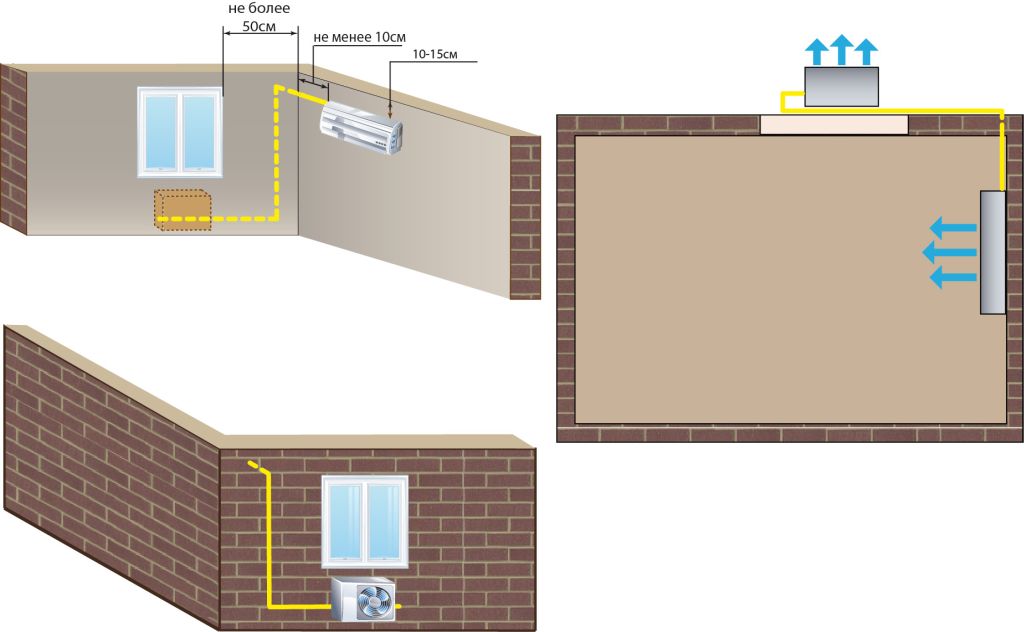
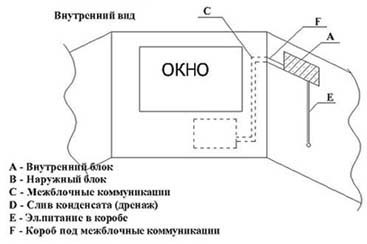
- The location of the external and internal units of the air conditioner relative to each other
- Installation of SPLIT systems
- Basic rules for installing an air conditioner
- Rules for installing the indoor unit
- Proper step-by-step installation of a split system
- Features of installation of cassette and duct air conditioners
- Features of installing air conditioners in residential buildings
- Basic installation rules
- Rules for installing an external element of a climate device
- Rules for the installation of communications
- The principle of operation of the split system
- How to install the air conditioner (briefly)
- Necessary materials and tools
- Fixing copper pipes
- The principle of operation of the split system
The location of the external and internal units of the air conditioner relative to each other
normal distance between blocks
The normal installation of an air conditioner in a room involves a small length of the freon route between the units of the split system. On average, this value is from 5 to 10 meters.
Firstly, it is important in terms of interior aesthetics. The shorter the connecting line, the less it needs to be sewn into decorative boxes that look neat, but do not add beauty to the design.
Secondly, the price for installing an air conditioner is formed taking into account the length of the freon route.Each extra meter adds to the total cost of about 800 rubles. For devices with higher power, a larger diameter of the pipeline will be required, and, consequently, the price will increase.
Installation of SPLIT systems
In the air conditioning industry, one of the most commonly used types are split air conditioners. These systems consist of two separate parts, an outdoor unit and an indoor unit, which are connected to each other with copper piping to form a closed circuit. Currently, most manufacturers offer split air conditioners that can operate in cooling or heating mode. The heating process is carried out by the heat pump by changing the cycle. To ensure the design mode of operation, it is necessary to follow the rules for installing the outdoor unit of the air conditioner and choose the right power.
Assembly of split air conditioners.
Choose the right place to install the indoor and outdoor units. When choosing a location, you need to ensure an even distribution of air in the room and ease of use of the system. Excessive drafts should not be allowed in the area of \u200b\u200bthe permanent presence of people. When installing the indoor unit, consider access to the unit to clean the filters and disinfect the evaporator. After selecting the correct installation location, the indoor unit is assembled first. It is mounted on the frame, marking the center of the position, aligning and securing the structure. Then a hole with a diameter of 65 mm is made in the wall so that it is closed by the indoor unit, through which the installation of pipes, electrical and condensate drainage will be carried out. The hole is made with a slight slope from the outside.It is recommended to install a protective sleeve in the hole, and on the side of the outer wall - a socket that closes it and increases the aesthetics of installation. Drainage of condensate from the indoor unit should always be done naturally, if possible, with a pipe slope of approximately 3%. A solution with a condensate pump should only be considered as a last resort. The pump is a mechanical part that serves to discharge condensate and increase the reliability of the air conditioning system. After installing the condensate drain system, it is necessary to check its permeability by pumping about 2 liters of water through the drain into the drip tray. If the air conditioner operates year-round, a heating cable must be installed in the drain pipe. Before hanging the indoor unit on the rack installed on the wall, it is necessary to connect a cooling unit to it
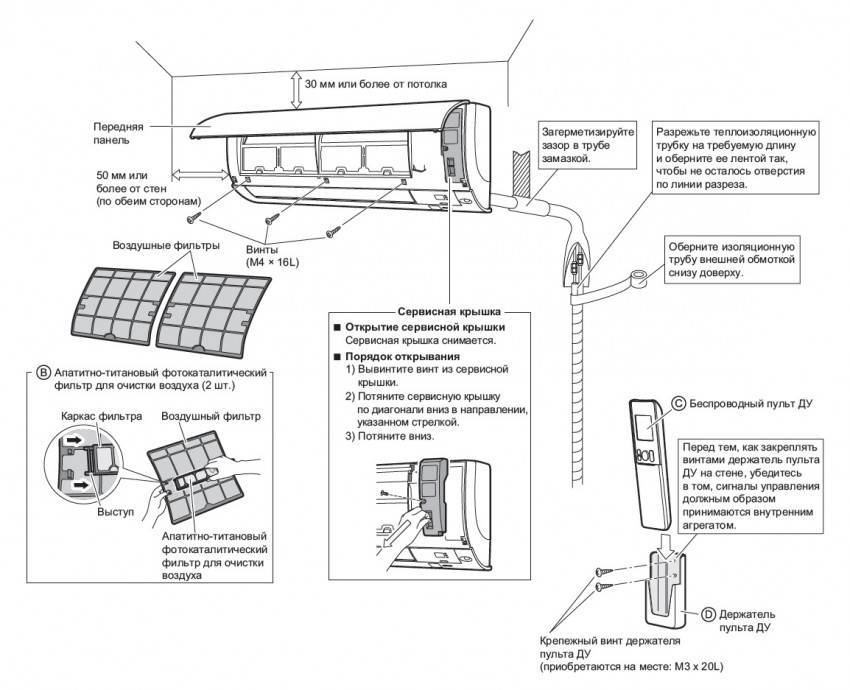
The connection must be made in the form of a screw connection, so special care must be taken to ensure that the refrigeration system is strong and tight. On the outer surface of the socket, when tightening the screw connections, use a paste that prevents the nuts from self-twisting. It is necessary to insulate the piping connections on the indoor unit to prevent moisture condensation on the outer surface of the pipes and streaks on the wall below the indoor unit
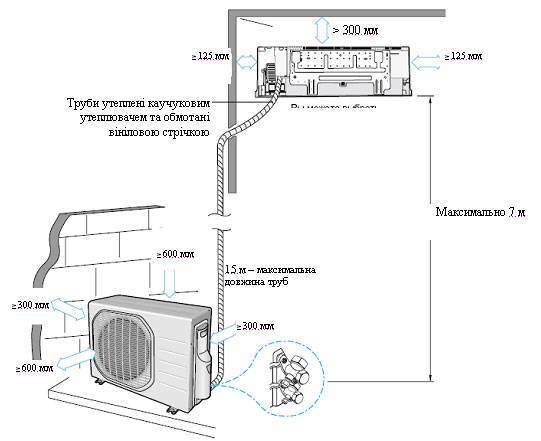
The outdoor unit is installed on an L-type support structure. The device must be installed at a safe distance from the wall to allow free air flow through the condenser, its subsequent maintenance and cleaning.
It is necessary to insulate the piping connections on the indoor unit to prevent moisture condensation on the outer surface of the pipes and streaks on the wall below the indoor unit. The outdoor unit is installed on an L-type support structure. The device must be installed at a safe distance from the wall to allow free air flow through the condenser, its subsequent maintenance and cleaning.
Basic rules for installing an air conditioner
The main tasks of climatic equipment are the supply of cooled / heated, purified air inside an apartment, house, office and other premises. This is especially true with the onset of the warm season (cooling), off-season (heating). The main thing is that the device does its job well. The high-quality, efficient functioning of the climate system largely (up to 80%) depends on professionally organized installation. By following certain rules for installing an air conditioner, it is possible to extend the life of the equipment, enjoying its flawless operation every day.

Rules for installing the indoor unit
The indoor unit is that part of the split system, the design, the functional improvement of which is given great attention. And not in vain, because it is located indoors, one might say, it is the "face" of the climate equipment
The installation of the indoor unit of the air conditioner is subject to many requirements that are designed to organize it in the most qualitative way. We list the basic rules for installing the indoor unit of a split system used by specialists:
- Installation of the device is best done before or after repairs in the room.So you can lay communication paths in the most convenient, less costly way.
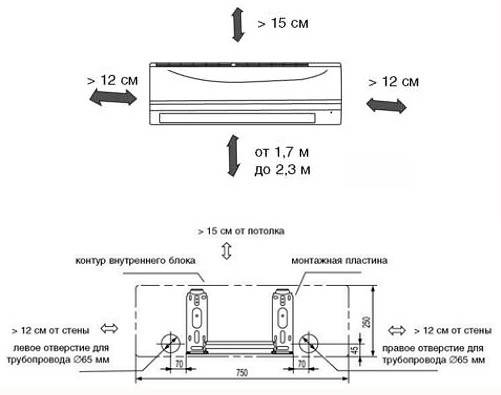
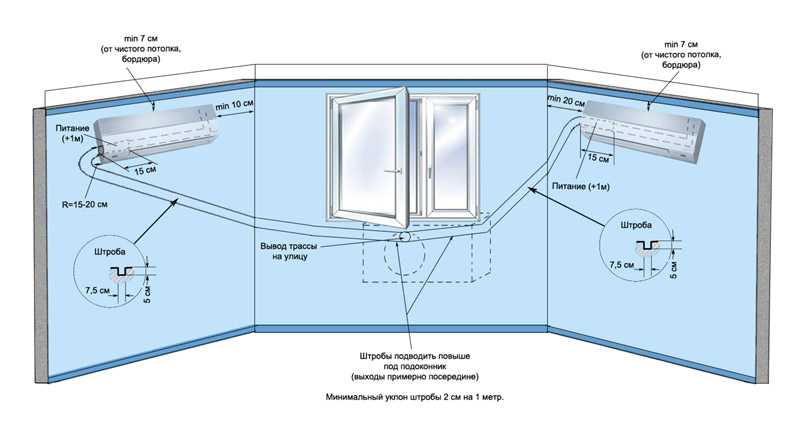
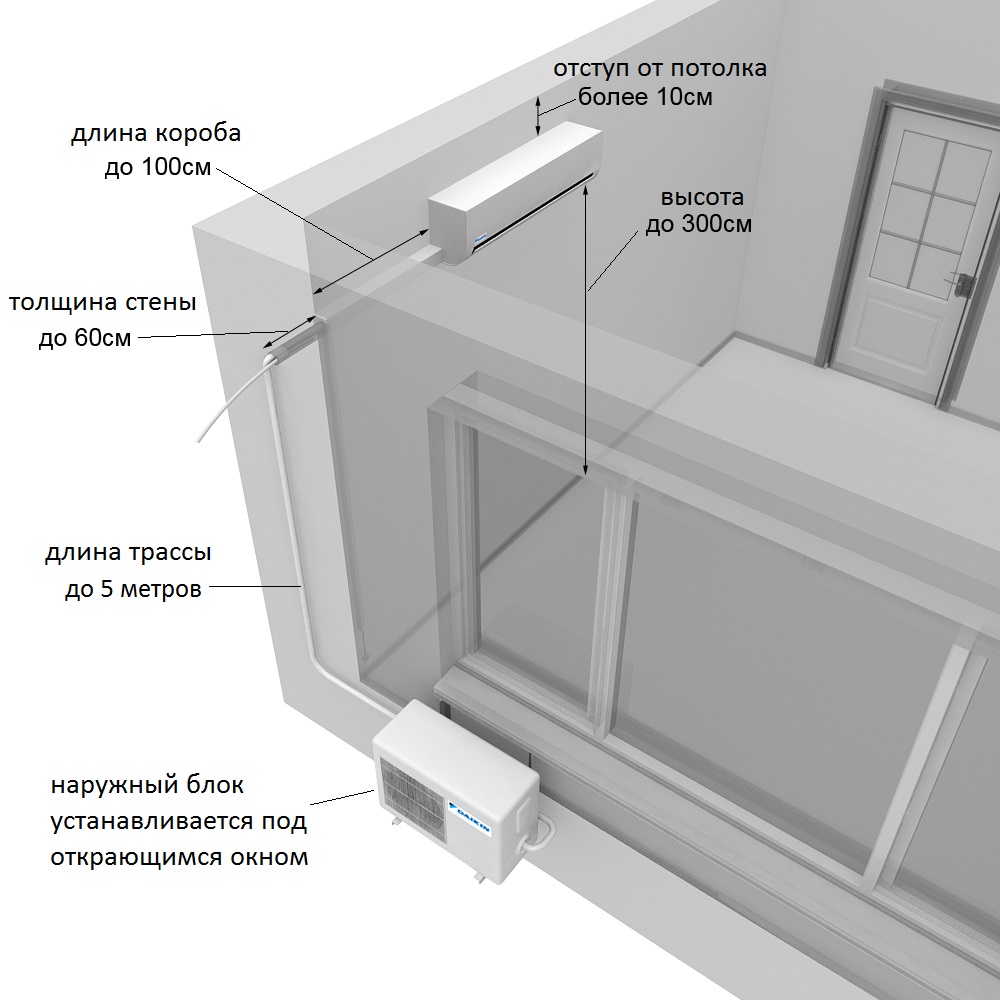
- It is necessary to observe strictly marked distances to the nearest walls, ceilings: at least 10 cm to the ceiling, at least 10 cm to the walls, taking into account the fact that from the device to the communications exit point - at least 50 cm.
- It is impossible to install windows behind curtains, in niches. This will limit the cooled air flow, it will circulate only through the space of the window opening.
- It should not be installed above high chests of drawers, cabinets (minimum - 1m). The airflow will also be limited by the obstruction, and the dust accumulated on the furniture will enter the room.
- Cannot be installed above elements of the heating system. The temperature sensor inside the unit will continuously detect a high temperature, prompting it to continuously operate in cooling mode. This will lead to rapid wear of parts, failure of the climate system.
- Arrange in such a way that the places of rest, work, frequent stay of people are outside the direct cooled air flow.
- The climate device must be located strictly horizontally to avoid accumulation and then overflow of condensate from the drainage tank.
Proper step-by-step installation of a split system
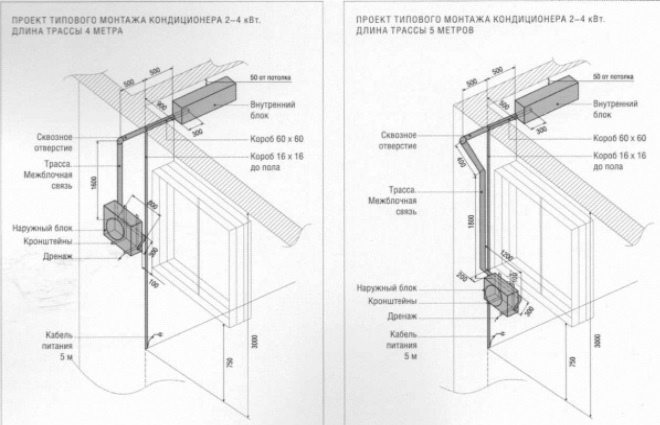
How professional teams carry out the correct installation of the air conditioner, step by step is written below. For example, a size 18 LG wall-mounted split system is taken. It was placed in an office with an area of 35 m², where 7 people are permanently located and 7 computers + 2 printers are installed. The room has 2 large windows that face the sunny side. Installation location - near one of the double-glazed windows opposite the copy machine.


Stages:
- A hole is drilled in the wall with a large puncher to the street. To do this, use a drill with a diameter of 55 mm.
- Next, a 6 * 6 cable channel is laid from the hole to the indoor unit.
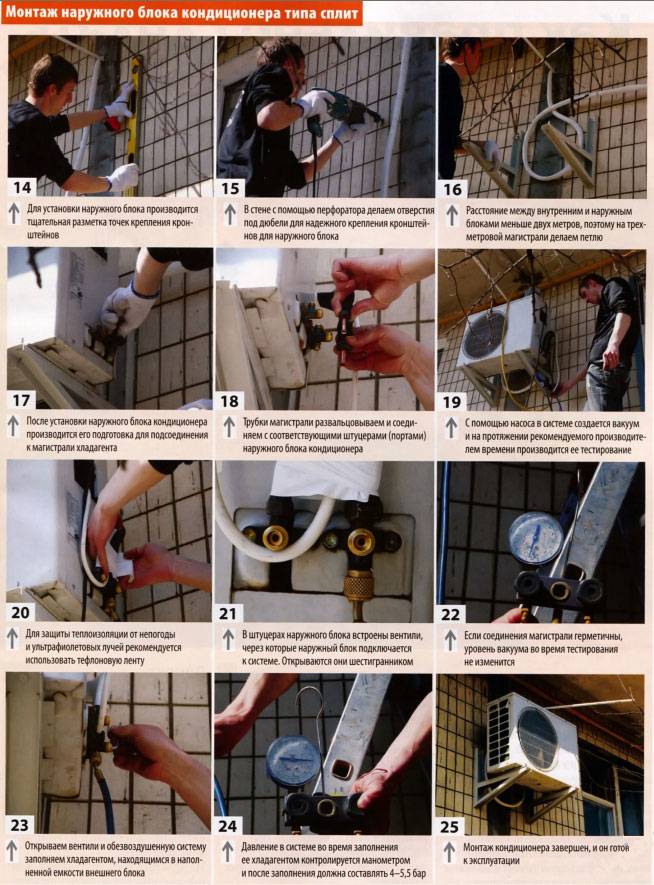
- Mark the holes for the mounting plate from the indoor unit and for the brackets for the outdoor unit.
- Drill the corresponding holes with a small puncher and fix the mounting plate with dowels and self-tapping screws. Brackets are fixed with dowels 12 * 100 mm.
- Mount the outdoor unit of the air conditioner on the brackets and fix it with bolts and nuts. Next, fix the indoor unit to the mounting plate.
- The route and interconnecting cables are being laid. Before that, a heater is put on the copper pipeline. Tubes must be flared. Connect to both blocks.
- Connect electrical connections. The wires are pre-cut, stripped, crimped, only then connected to the terminal blocks.
- Drainage is laid with a pipeline and connected to the indoor unit.
- Connect the power to the unit that is needed for this model. For the aforementioned air conditioner, the power cable from the shield was extended to the outdoor unit.
- Carefully seal the holes for the route in the wall with mounting foam and close the covers on the box.
- The circuit is evacuated for at least 10 minutes. Open the valves and start the working gas.
- After that, they turn on the split system in test mode and check its performance: they measure the pressure and look at the quality of the cooling of the outgoing stream.
This describes the installation of a conventional household split system.If a semi-industrial or industrial air conditioning system is being installed, then additional features arise in the installation of a room module.
Features of installation of cassette and duct air conditioners
For example, the installation of a cassette split system begins with fixing the suspension for the indoor unit to the anchor bolts in the suspended ceiling cell. When fixing the room module, be sure to align it at the specified level from the ceiling, which is usually specified by the manufacturer. Fixation occurs with the help of mounting studs. The drainage of a cassette split system is most often diverted to a special centralized drainage system.
Channel split systems can have an extended network of air ducts that are attached to an adapter and lead to distribution grilles in each room. The installation of the indoor unit is carried out behind the false ceiling of a residential or utility room.
air ducts
Here, first of all, it is important to calculate the required pressure of the outgoing air, since the length of the air ducts and their number will depend on this. Their shape and style may also depend on this.
There are ducts:
- round and straight section;
- straight-line and spiral construction;
- with flanged, flangeless and welded type of connection;
- flexible and semi-flexible.
It is also necessary to insulate and soundproof the air ducts. Insulation is required to prevent condensation. Soundproof for quiet operation. Otherwise, such a split system will make noise.
To control the duct system with a wired remote control, you will need to run a separate wire to the indoor unit in the same way as in the situation with a cassette air conditioner.
In fact, the main differences in different split systems are observed when installing the indoor unit, external modules are mounted and connected to the room everywhere according to the same scheme, as described in the LG wall air conditioner installation plan.
Of course, installing any air conditioner with your own hands is a dangerous undertaking, especially when it comes to semi-industrial or industrial systems.
Features of installing air conditioners in residential buildings
The regulation for the installation of air conditioners in residential buildings is the same as in an apartment building. A distinctive feature - when planning the purchase of a climate device, it is necessary to take into account the availability and capabilities of the ventilation system at home.
For suburban housing, the use of multi-split systems (one outdoor unit + several indoor units) is typical. Often, a central air conditioning system is used for ventilation and air purification. Also, private houses can be equipped with channel air conditioners, which is very convenient to arrange in the space of a large building.
The main condition is that the climatic equipment should not create obstacles for the operation of the main ventilation system. Their work is a harmonious, complementary functioning.
Improper installation of the air conditioner will certainly affect the quality of its work in the future. The consequences can be serious, it is often necessary to replace a faulty climate device with a new one. One of the common problems is the leakage of coolant through leaky pipe joints. Undetected in time, it threatens to damage the compressor, condenser, and other important components.
Also, the consequence of improper installation of the air conditioner on the wall of the apartment is the overflow of condensate from the drainage tank to the outside, into the room (strictly horizontal arrangement is not carried out).
Ignoring the basic rule for installing the outdoor unit of the air conditioner is fraught with its fall down. At best, it will create a lot of noise during operation.
Professional installation of climate control equipment is a prerequisite for its reliable, efficient operation for a long time.


source
Basic installation rules
Household air conditioning systems such as a split system consist of two parts:
- outdoor unit; - indoor unit. Sometimes there are more indoor units: 3 or even 4. This combination is called a multi-split system.
In this case, the external unit performs the function of a condenser, and the internal evaporator. The outdoor and indoor units are interconnected by a line consisting of control wires and tubes through which the refrigerant - usually freon - circulates.
Another detail is the drain tube. It is connected to an external unit and serves to remove condensed moisture. According to the rules, the drainage tube must be connected to the sewerage system.
Split systems can have different designs: colors, shapes and controls - but in terms of layout, they are all almost identical. The principles of installing an air conditioner are practically not affected by the design. But when choosing a place for installing blocks, you must consider:
- the side of the world on which you are going to install the block capacitor; - the material and design of the wall on which it will be attached; - the weight of the block itself; - the possibility of access to it for preventive work; - the ability to protect the condenser from ice and precipitation.
When choosing the power of the air conditioner, it is necessary to take into account the total heat generation in an apartment or house. This is affected by:
- orientation of housing to the cardinal points; - the number of people living; - quantity and power of electrical appliances; - number of batteries heating; - the presence of other ventilation vents.
Rules for installing an external element of a climate device
Strict regulations also determine the installation of air conditioners on the facade of the building. Factors such as:
- Mounting fasteners are installed with a margin of safety, 2-3 times the weight of the device. Mounted with anchor bolts.
- The outer surface of the building must be smooth and durable. Fastening to a dilapidated wall is excluded. The vibration force will loosen the mounts, and the unit may fall.
- When installing air conditioners on the facade, it is necessary to take into account its finish. If it is insulated with foam, or a ventilated facade is designed, you must make sure that the fasteners are mounted to the wall itself, and not to the facade finish.
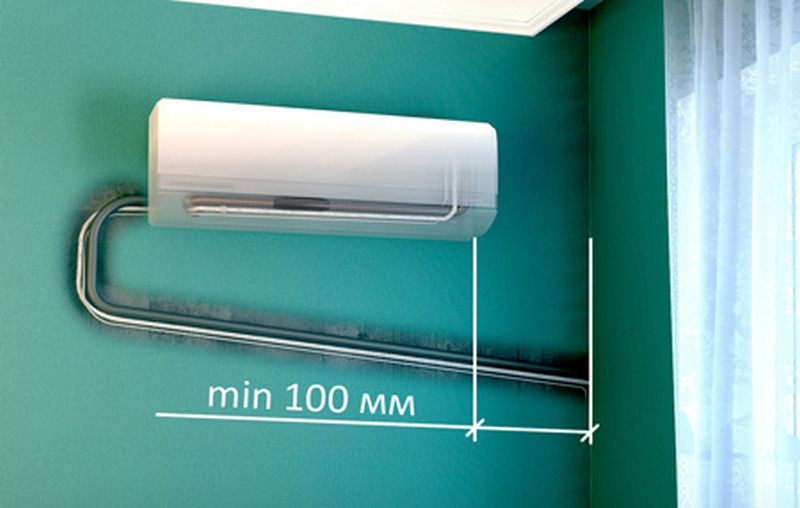
- There must be a distance of at least 10 cm between the wall and the climate device, and at least 10 cm from any object at the top of it. This ensures the natural circulation of the air flow around, allowing it to cool in time.
- Fasteners are carried out taking into account further unhindered access for maintenance.
- It is placed strictly horizontally in all planes in order to organize the correct free movement of freon along the cooling circuit.

From the ground, the location is not lower than 1.8-2 m, preferably in a protective crate.When installing on the upper floors, it makes sense to think about placing the system on the roof of the house. This will avoid calling industrial climbers
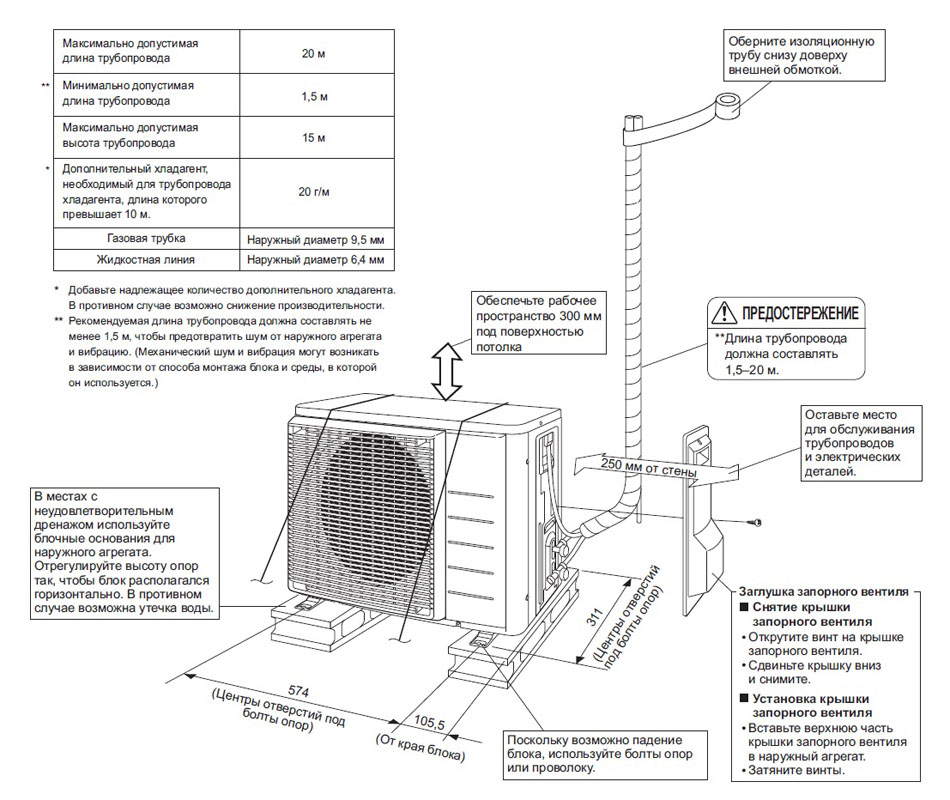
It is important to remember that the maximum distance between the elements of a split system is 15 m. It is recommended to install it on unglazed balconies, loggias, which will significantly protect the climate device from mechanical damage, adverse atmospheric conditions
Installation inside a covered balcony is extremely undesirable due to insufficient air flow convection, which is so necessary for the external element of the split system.
The rules for installing air conditioners on the facades of buildings are general, applicable to all split systems to the same extent.
Rules for the installation of communications
During the installation of the air conditioner, a significant amount of time is allotted for the correct installation of the route for the cooling circuit, which is due to factors:
- The maximum distance between the blocks is 30 m. At a distance of up to 5 m, all the properties of the coolant are preserved. The greater the distance, the greater the losses.
- The connection of copper pipes must be airtight, the freon supply system is insulated as much as possible to avoid gas leakage, which will reduce the performance of the climate system, up to its failure.
- It is best to drill a route in the wall for the cooling circuit. Communications will be hidden, which will preserve the aesthetics of the room. If the repair has already been made, the pipes are closed with a plastic box. At the same time, it is necessary to provide access to the connections for service maintenance.
- The freon pipeline must not be kinked so that the coolant circulates freely.
- For the climate system, it is recommended to run a separate electrical cable with a separate switch in the shield in order to relieve the load on the general power supply, especially if it is already old.
- All connections of electrical wires are securely insulated.
- It is best to lay the drainage tube in a separate strobe.
- It would be correct to lead a pipe to the sewer pipe to drain condensate.
- If this is not possible, the pipe can be brought out near the external element of the climate system, while making sure that the condensate does not subsequently damage the facade of the building, does not fall on passers-by.
- A glass holder is installed inside the opening of the outer wall, through which connecting communications are passed.
- Refrigerant pipes, electric cable, drain pipe must be packed with foam rubber pipe, wrapped with vinyl tape.
- After fastening the outer part of the air conditioner to the facade and connecting the climate system, it is necessary to vacuum (at least 50 minutes) using special equipment. This ensures complete removal of air and liquid from the cooling circuit, eliminating the appearance of corrosion on the inner surface of the pipes.
- Be sure to conduct a test run of the air conditioner at the end of the installation work.
- It is necessary to check the device for the absence of refrigerant leakage, the presence of constant pressure inside the circuit, the timely removal of condensate. The main functions of the climate system are being tested.
The principle of operation of the split system
First, let's find out how a household split system works - it will be easier to understand why installation nuances are important.
As you know, a home air conditioner of a traditional design consists of two blocks: one of them is installed in the room, the second is fixed on the street, on the outside of the wall, in the attic or in any other place..
The process of cooling the air in the room occurs due to the continuous movement of freon and its transition from a gaseous state to a liquid, and then vice versa. When the refrigerant is in the gaseous state, it absorbs heat, and in the liquid phase it releases it.


The condensation process, that is, the transition to a liquid state of aggregation, occurs at high temperature and pressure, and boiling, at which the gas evaporates, is characterized by low values.
The heat transfer process takes place as follows. The compressor draws vapor from the evaporator (zone 1-1), compresses it and sends it to the condenser (zone 2-2). In this case, the refrigerant is compressed to 20-25 atm., and its temperature rises to +90 °C. This is where cooling and condensation takes place.
From the air conditioner (3), the refrigerant, already in a liquid state, returns to the evaporator (4) through the flow regulator under low pressure conditions. The internal air heats the liquid, boils and turns into steam. And so the process is repeated endlessly.
The transition of the refrigerant from one state of aggregation to another occurs both in heat exchangers and in pipes
In order for the process to start and finish on time, a certain length of the pipeline is required - that is why it is important to take into account the length requirements established by the developers of the equipment. With device and principle operation of a typical air conditioner figured it out, and now we turn to the rules and regulations for the installation of its blocks
How to install the air conditioner (briefly)
I. Installation of electrical wiring for the air conditioner.
– choice of location (not lower than 1.8–2 m above the ground); - installation of brackets (using anchor bolts); — installation of the external block on brackets; - drilling a hole in the outer wall for communications, the diameter of the hole is 50–60 cm; - installation of a waterproofing cup and connecting communications in the hole.
- choice of location (distance from the outdoor unit to the indoor unit is 7-20 m. The distance depends on the model of the air conditioner); — installation of brackets; - installation of the indoor unit.
IV. Connection of wires of the air conditioning system:
- installation of the box (external or internal); - connection of copper pipes for refrigerant and electrical wires; - removal of air and moisture from the system - vacuum. Duration from 45 minutes, special equipment is used.
V. Trial inclusion of a split system. As a rule, special software and hardware devices are used.
Necessary materials and tools
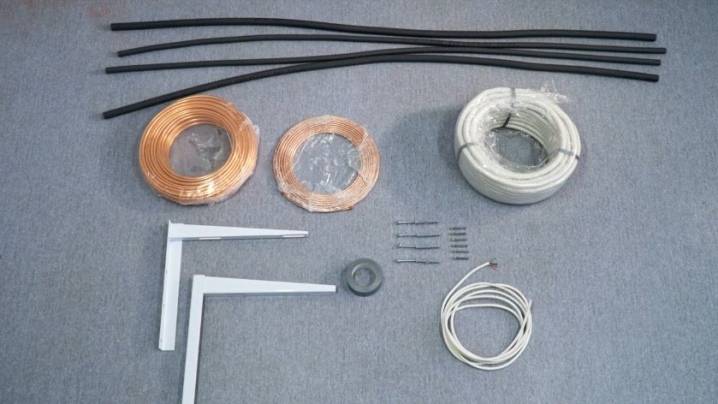
Materials and tools for installation must be prepared in advance. Careful planning will allow you to install the air conditioner quickly and without errors. In order to install a split system with your own hands, you will need the following materials:
- electric wire;
- copper pipes of two sizes;
- plastic tube for drainage pipeline;
- thermal insulation for pipes;
- scotch;
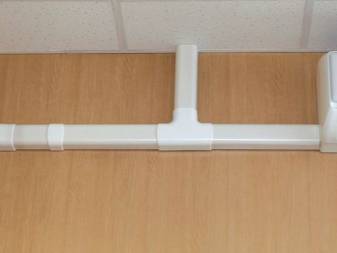
- plastic cable channel;
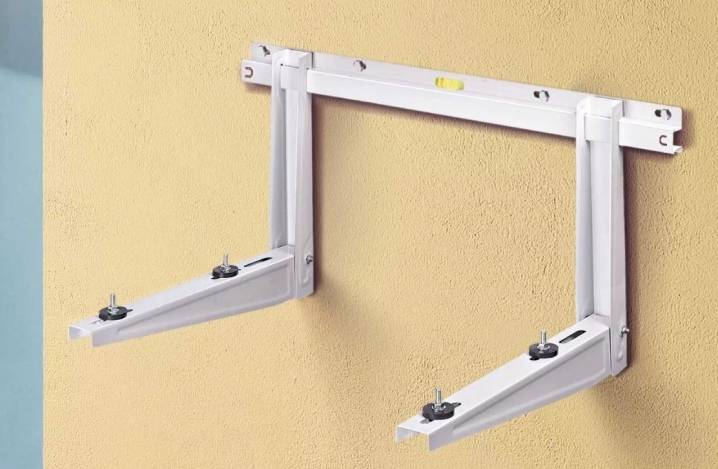
- L-shaped metal brackets;
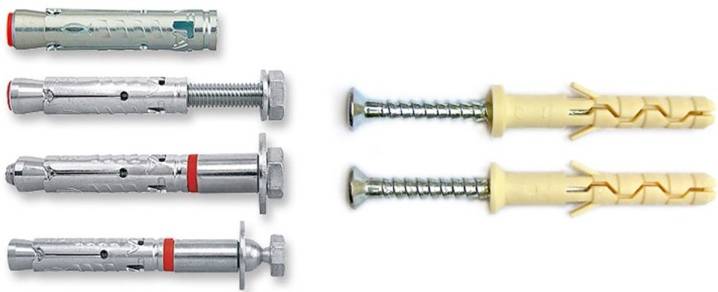
- fasteners (bolts, anchors, dowels).
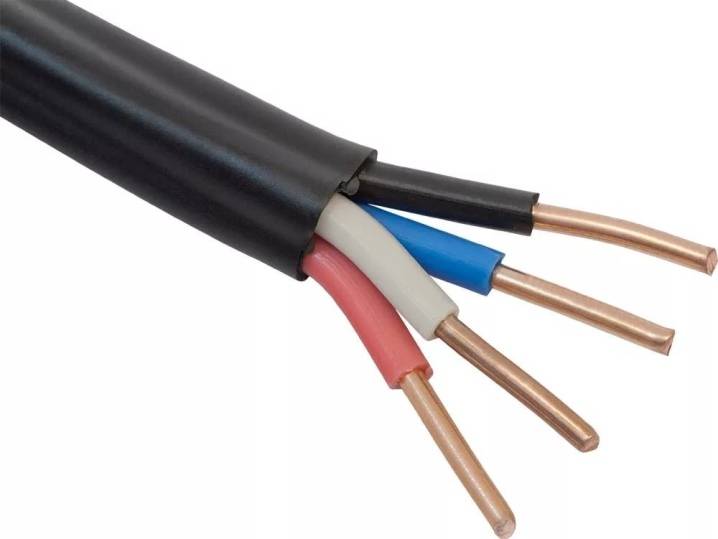
The instructions that came with the split system indicate what electrical wires will be needed. Usually this is a four-core cable with a cross section of 2.5 square meters. mm. You should purchase a non-combustible cable, for example, VVGNG 4x2.5. When purchasing a cable, measure 1-1.5 m more than the planned length of the route.
Copper pipes should be purchased from specialized stores. Pipes for air conditioning systems are made of extra soft copper and have no seams. Some installers believe that products designed for plumbing can be used. This is a misconception: copper in such pipes is porous and brittle, and the surface is rough. This will not allow you to provide a reliable connection with the pipes; freon will quickly evaporate through the smallest cracks.
You will need to purchase tubes of two diameters. For smaller systems, 1/4", 1/2", and 3/4" sizes are standard. The required size is given in the instructions for the split system, and is also indicated on the body of the outdoor unit. Like wire, tubes must be purchased with a margin of 1-1.5 m.

Thermal insulation is sold in the same place as special copper pipes. It is inexpensive, and it can also be taken with some margin. Thermal insulation is sold in standard pieces of 2 m each. Do not forget that it needs 2 times more than the length of the track, + 1 piece.


When laying, the ends of the thermal insulation will be fixed on the copper tubes with a strong adhesive tape. Construction reinforced tape is well suited for this. In extreme cases, you can even get by with electrical tape, but keep in mind that it should not stick out over time. It is also convenient to use plastic mounting ties with a lock for fixing.
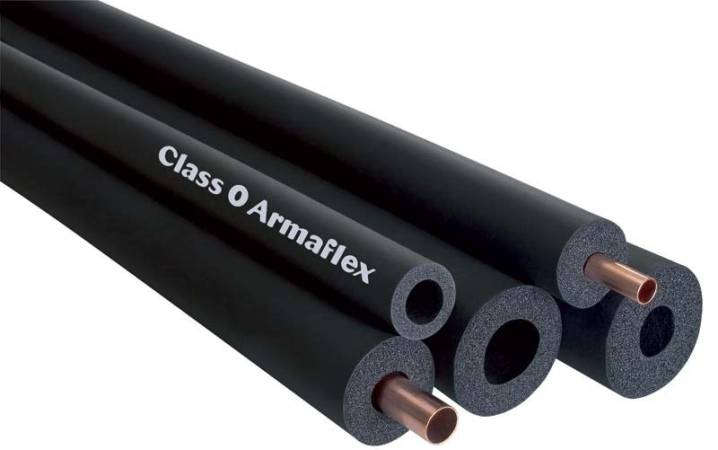
To drain condensate, plastic flexible pipes of a special design are used. In order for them not to be crushed when laying the line, a thin but rigid steel spiral is located inside such pipes.They are sold in the same stores of spare parts and materials for air conditioning systems. Take such a tube with a margin of 1.5-2 m.

So that pipes and wires do not spoil the appearance, it is advisable to lay them in a neat box. As well as possible, standard electrical cable channels with a cover are suitable for this. Such boxes are sold in sections of 2 m. To make the track look neat, do not forget to also purchase high-quality products in addition to them: inside and outside corners. For the installation of split systems, cable channels with a cross section of 80x60 mm are usually well suited.

The brackets on which the external unit of the split system will be installed outside are L-shaped. Air conditioners are quite heavy, besides, they vibrate during operation. Therefore, it is necessary to purchase special brackets for installing air conditioners. Such products have high strength and rigidity. It is good if such brackets are included in the installation kit of your system, because ordinary building corners are not suitable for this purpose.
Anchors and dowels are required to fix the boxes, frames of the indoor unit and brackets of the outdoor unit to the walls. Screws and rubber pads are required to fix the outdoor unit to the mounting brackets. The required number of fasteners should be calculated in advance and provide for a margin of 25-35%.
If you decide to install a split system with your own hands, you probably already have the following tools in your house:
- screwdrivers;
- building level;
- hex keys;
- drill and a set of drills;
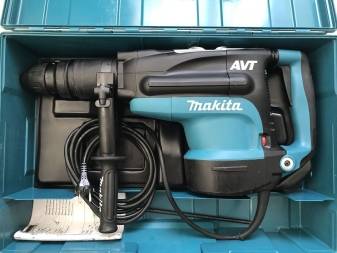
- perforator.
A puncher will be required not only for drilling small diameter holes for dowels and anchors. You will also have to make several holes of large diameter in thick walls.
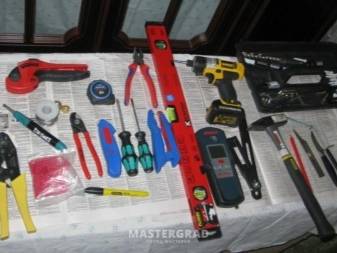
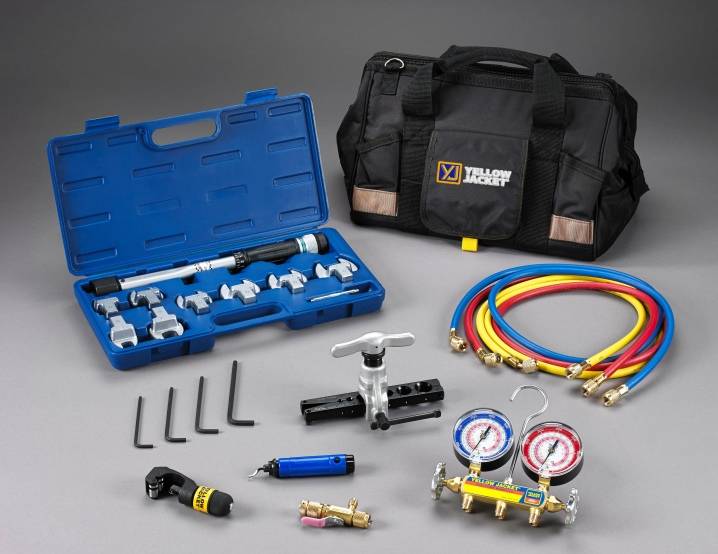
In addition, during the installation of a split system, you will need a special tool:
- pipe cutter with a sharp blade;
- trimmer;
- flaring;
- pipe bender;
- manometric manifold;
- Vacuum pump.
It is too expensive to purchase such specialized equipment for the sake of one installation. But you can rent these unusual devices from a specialized company or from a familiar craftsman.
Fixing copper pipes
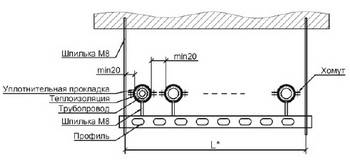
Rice. 1. Scheme of fastening pipelines in one of the projects,
of which fastening the clamp directly to the pipe
not obvious, which has been the subject of controversy
In terms of fastening copper pipelines, the most common mistake is fastening with clamps through insulation, supposedly to reduce the vibration effect on fasteners. Controversial situations in this matter can also be caused by insufficiently detailed drawing of the sketch in the project (Fig. 1).
In fact, two-piece metal plumbing clamps, twisted with screws and having rubber sealing inserts, should be used to fasten the pipes. It is they who will provide the necessary damping of vibrations. Clamps must be attached to the pipe, and not to the insulation, must be of the appropriate size and provide a rigid fastening of the route to the surface (wall, ceiling).
The choice of distances between the fastenings of pipelines from solid copper pipes is generally calculated according to the method presented in Appendix D of the document SP 40-108-2004. This method should be resorted to in case of using non-standard pipelines or in case of disputes. In practice, specific recommendations are more often used.


So, recommendations for the distance between the supports of copper pipelines are given in Table. one.The distance between the fastenings of horizontal pipelines from semi-solid and soft pipes can be taken less by 10 and 20%, respectively. If necessary, more accurate distances between fasteners on horizontal pipelines should be determined by calculation. At least one fastener must be installed on the riser, regardless of the height of the floor.
Table 1 Distance between copper piping supports
| Pipe diameter, mm | Span between supports, m | |
|---|---|---|
| Horizontally | Vertical | |
| 12 | 1,00 | 1,4 |
| 15 | 1,25 | 1,6 |
| 18 | 1,50 | 2,0 |
| 22 | 2,00 | 2,6 |
| 28 | 2,25 | 2,5 |
| 35 | 2,75 | 3,0 |
Note that the data from Table 1 approximately coincide with the graph shown in Fig. 1 p. 3.5.1 SP 40-108-2004. However, we have adapted the data of this standard for the pipelines used in air conditioning systems of relatively small diameter.
The principle of operation of the split system
First, let's find out how a household split system works - it will be easier to understand why installation nuances are important.
As you know, a home air conditioner of a traditional design consists of two blocks: one of them is installed in the room, the second is fixed on the street, on the outside of the wall, in the attic or in any other place..
 A line is laid between the indoor and outdoor module, through which the refrigerant circulates. This is a closed system of copper tubes filled with freon.
The process of cooling the air in the room occurs due to the continuous movement of freon and its transition from a gaseous state to a liquid, and then vice versa. When the refrigerant is in the gaseous state, it absorbs heat, and in the liquid phase it releases it.
The condensation process, that is, the transition to a liquid state of aggregation, occurs at high temperature and pressure, and boiling, at which the gas evaporates, is characterized by low values.
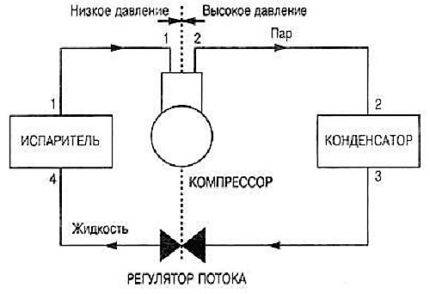 Diagram showing the refrigerant circulation in a closed circuit between two units: the evaporator is located in the wall unit case and the condenser is inside the outdoor unit
The heat transfer process takes place as follows. The compressor draws vapor from the evaporator (zone 1-1), compresses it and sends it to the condenser (zone 2-2). In this case, the refrigerant is compressed to 20-25 atm., and its temperature rises to +90 °C. This is where cooling and condensation takes place.
From the air conditioner (3), the refrigerant, already in a liquid state, returns to the evaporator (4) through the flow regulator under low pressure conditions. The internal air heats the liquid, boils and turns into steam. And so the process is repeated endlessly.
The transition of the refrigerant from one state of aggregation to another occurs both in heat exchangers and in pipes
In order for the process to start and finish on time, a certain length of the pipeline is required - that is why it is important to take into account the length requirements established by the developers of the equipment. We figured out the device and principle of operation of a typical air conditioner, and now we turn to the norms and rules for installing its blocks


