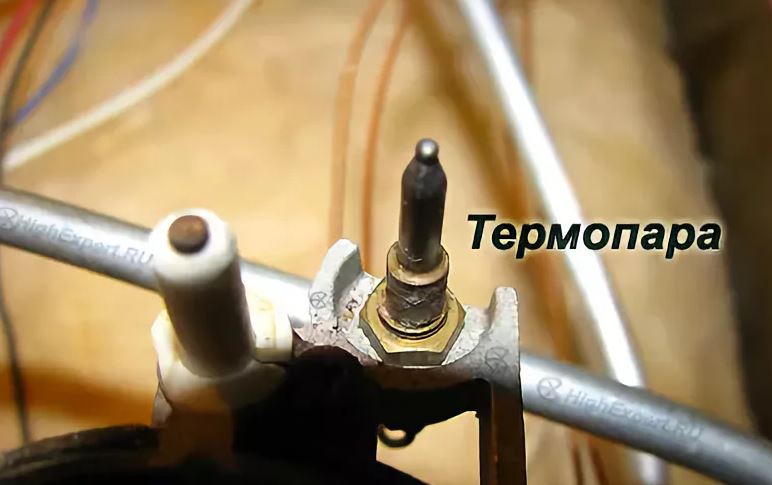
- A crack has appeared on the ceramic spark plug
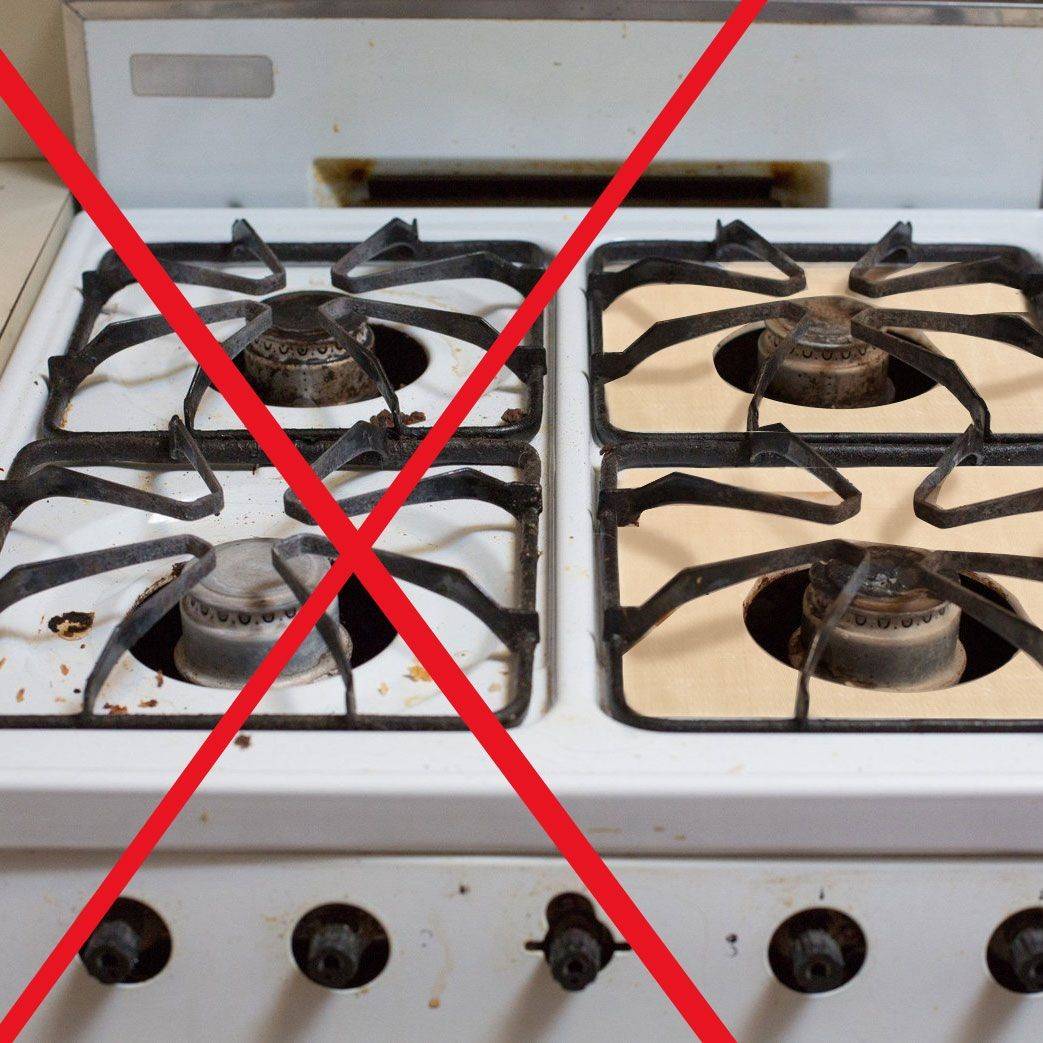
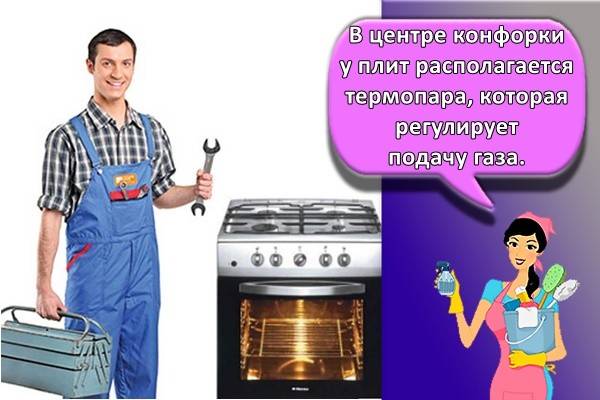
- Preventive maintenance of gas stoves
- How to turn on the oven if it stops working
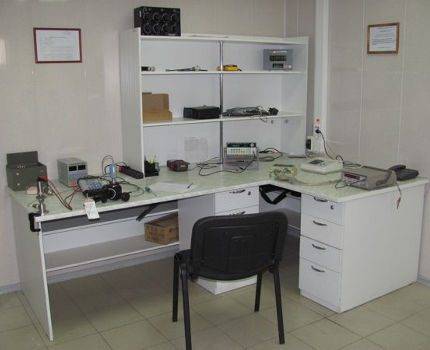
- The cost of the work of specialists
- to
- The process of revision of the tap cork cone coupling
- Tools and materials
- How to understand that the stove poisons gas?
- Problems with burner knobs
- Common breakdowns of electric stoves Darina
- The most popular gas stove malfunctions and how to fix them
- Burner repair
- Oven door repair
- Electric ignition repair
- The oven thermostat does not regulate the flame
- How to disassemble a gas stove?
- Removing the gas stove knobs
- Removing the oven door
A crack has appeared on the ceramic spark plug
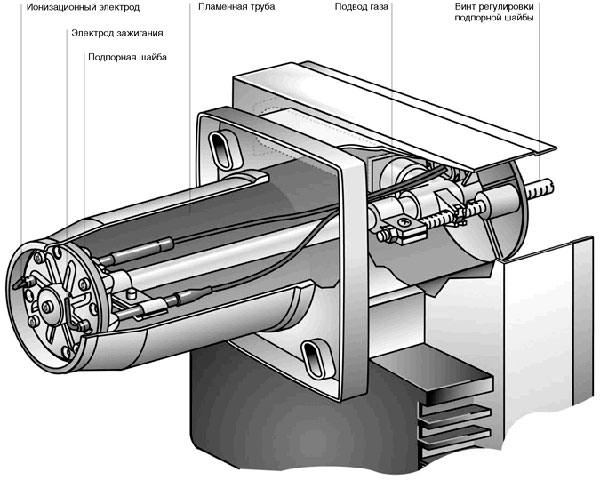
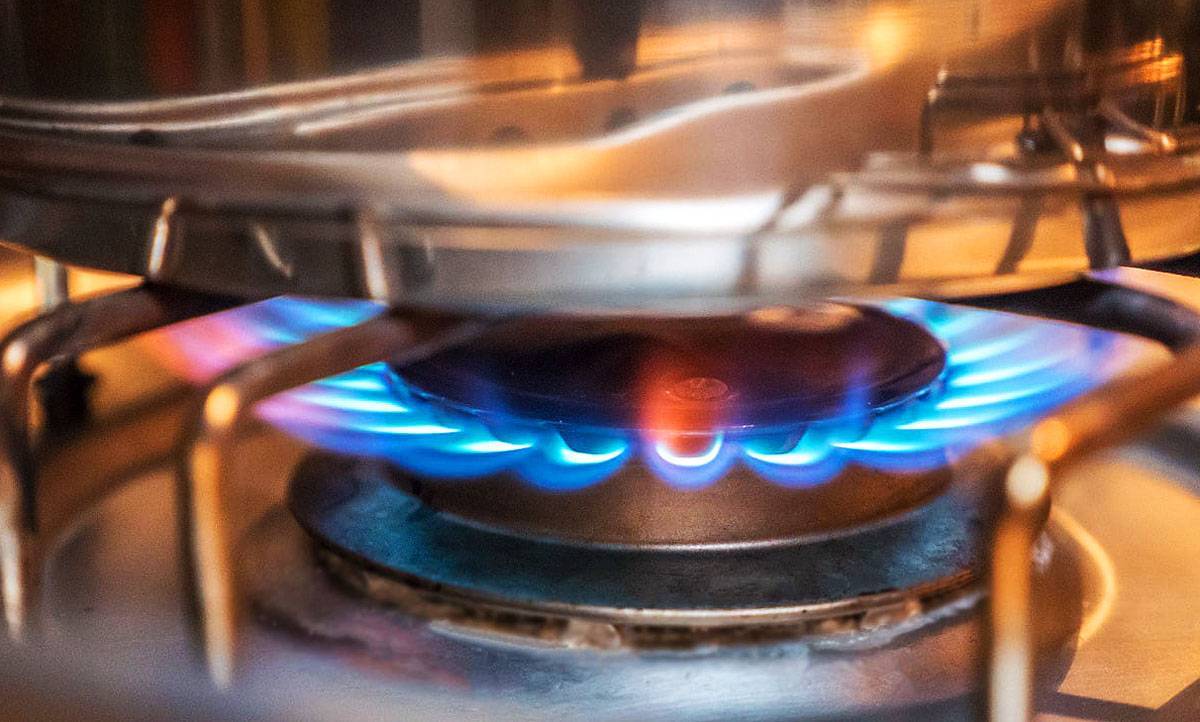
The automatic ignition system is the most unreliable and capricious thing in the entire stove. Breakdowns are not uncommon here, especially against the backdrop of the poor quality of some gas stoves. Normally, the system should work without failures. By the way, I met an excellent “seven-core” ignition in Gorenje and Smeg gas stoves.
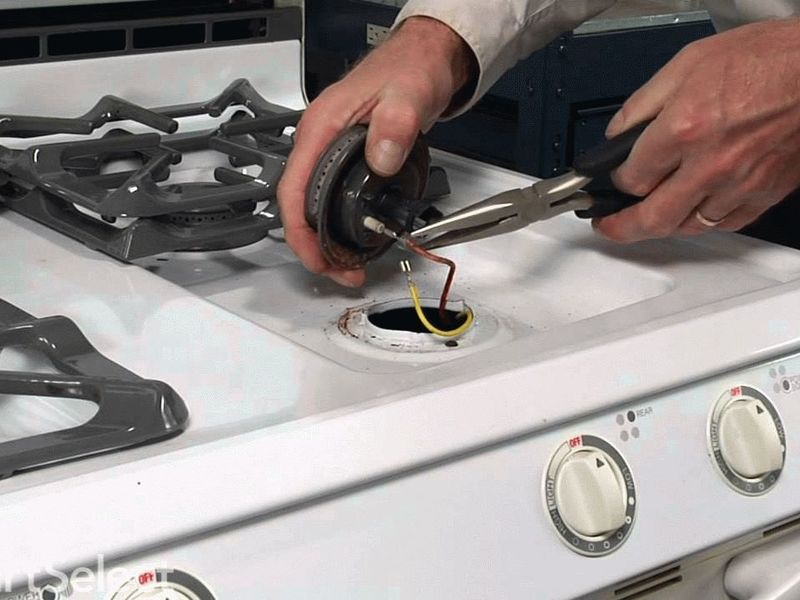
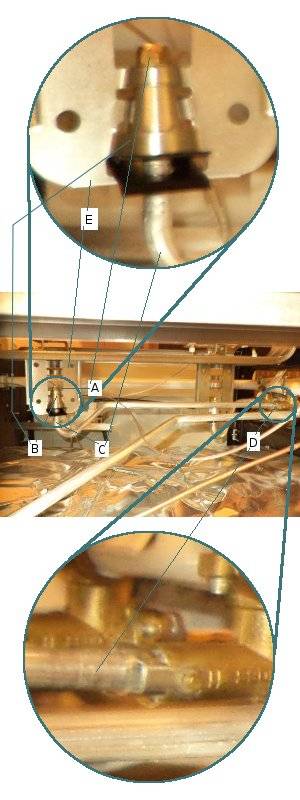
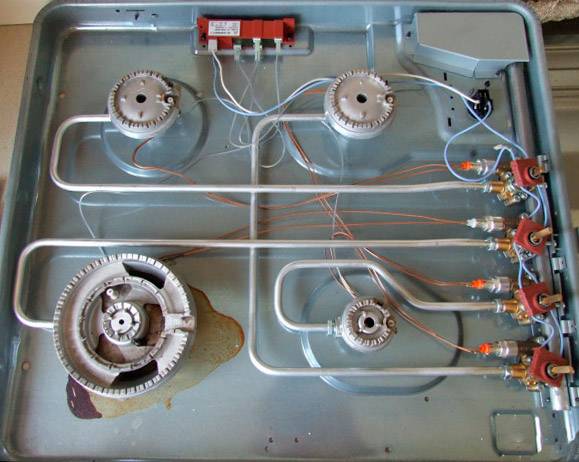
During the diagnosis, the first step is to examine the electrodes. The electrode is a ceramic candle, a rod if you like, in which there is a metal core.You should carefully examine it, make sure that there are no mechanical damages and cracks. The candle itself must be securely fixed next to the burner or inside it.
A sign of a crack is the sparking of some burners. They will need to replace the spark plugs. To access damaged parts, the hob is disassembled. The spent candle is disconnected from the burners (by the way, there are retaining rings here, they cannot be lost) and from the impulse block. Instead of a worn node, a new one is put in, a connection is made.
Advice from the master: never press the ignition button if the burners are removed from the stove. So you get a test.
Preventive maintenance of gas stoves
In the previous part of the article, what are the malfunctions and how to repair a gas stove.
In this part, we will tell you what needs to be done to avoid premature repair of a gas stove with your own hands.
When operating gas stoves, jets, burners, and switch connections become clogged.
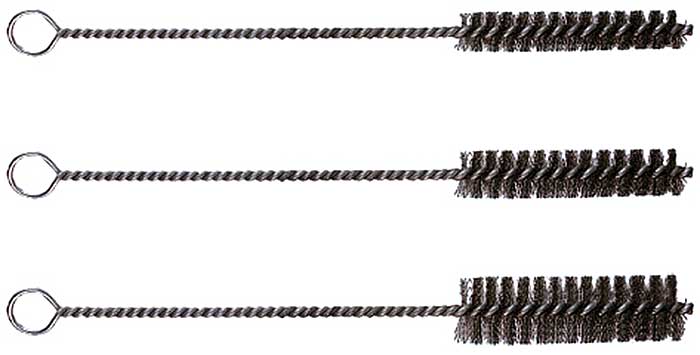
To clean parts, use:
- thin wire or needle;
- metal brushes and brushes.
If you do not inspect the rubbing parts, then they become dirty and rotate tightly.
For maintenance:
- remove the protective panel;
- pull out the studs;
- take out the stems;
- elements are cleaned and checked for mechanical damage.
Friction parts are lubricated with graphite grease.
After checking, the mechanisms are assembled in the reverse order.
How to turn on the oven if it stops working
1.
If automatic ignition is built into the oven and when the button is pressed, the main burner does not ignite, but gas hiss is heard, do not hold the handle for a long time and gas the cabinet. Turn on the oven with matches.Light a match and bring it to the hole, usually located in the center in front.
2.
If after releasing the knob the stove oven goes out: try turning it on without it. Due to poor assembly, the adjusting knob, when pressed, may rest against the panel and not push the valve further, so remove the knob by pulling it towards you, make sure that all the details are in your hands. Do not lose components such as a spring and a ring, they are very difficult to buy. Press and turn the valve stem, when gas comes out, bring a match. For the convenience of removing the handle, you can use ordinary pliers.
— Some tips for finding the causes —
If the oven does not work well or does not bake well, check the rubber door seal. If the rubber gasket is worn, the oven may not reach the desired temperature and you will not get the desired result when baking. Our oven repairmen say that the best way to check the rubber seal is to put your hand over the door, if you feel hot air, then most likely the rubber seal needs to be changed for a positive result.
Another reason that can have a negative impact on the performance of the oven is the contamination of the gas burner with dirt. Remove the bottom pan and see if the fire is evenly distributed throughout the burner. If not, then in places where there is no fire, you should clean and wash the holes. When cleaning, do not use scouring powder, as it contains abrasive particles, use liquid products.
The cost of the work of specialists
Malfunctions occur suddenly and require quick elimination, especially when a gas stove breaks down. However, not all owners of household appliances have the necessary skills.When it is impossible to carry out repairs on your own, you have to call the master to the house. What expenses are expected by the owner:
- replacement or repair of a gas supply valve - from 300 to 1,200 rubles;
- nozzle cleaning - from 400 rubles;
- replacement of the lamp in the oven - from 400 rubles;
- gas adjustment - from 500 to 900 rubles;
- lubrication and cleaning of rods on the feed lever - 900 rubles;
- replacement of rods - 1200 rubles;
- change of thermocouple - 900 rubles;
- replacement of the ignition unit - 900 rubles;
- cleaning of the supply contacts - from 900 to 1,100 rubles;
- change of sealing gum - from 500 rubles;
- replacement or repair of a candle - 800 rubles.
Prices depend on the stove model and the region where household appliances are serviced and repaired.
to
Do-it-yourself electric stove repair. What to do if the burner in the electric stove does not work? Do-it-yourself troubleshooting principles.


Bread machine repair. When the bread machine is working, there is a strange squeak and noise, the smell of burning or the flow of water from the bowl? In this article, you will learn how to fix common bread machine breakdowns and prevent re-damage to the mechanism.
Do-it-yourself home and car air conditioning compressor repair. Air conditioner not working? Got an unpleasant odor? Several ways to diagnose and fix a breakdown of climate equipment
Repair of food processors. Broken food processor? What are the possible causes of its failure and how fix them yourself?
The process of revision of the tap cork cone coupling
Loosen the screw plug with a flat screwdriver.
With a flat screwdriver, turn the tap plug a little, pressing on it. Hold the cork with the finger of the second hand.When it is jammed, you can tap the screwdriver a little with a hammer.
Note. Do not damage the inner surface of the faucet with a screwdriver and do not drop the plug, in order to avoid scratches and nicks!
We take out the cork.
Wipe the faucet body and plug with a rag. Dried grease can be removed with gasoline or alcohol.
Use a screwdriver to remove the remnants of the old grease from the cork.
We place the lubricated cork in the body.
We fill the grease into the cavity where the spring is located.
We place the spring in the groove of the cork.
Lubricate the threaded plug and screw it into the housing for several turns with a screwdriver. The spring should fit into the groove on the plug.
Holding the faucet plug with a handle, unscrew the locknut and nut in turn with the 17th key.

Remove the restrictor.
We press a finger on the cork pin, turning the cork with a handle. When the plug is jammed, you can tap the stud a little with a hammer, after screwing the nut onto it, so as not to damage the thread. You need to hit the nut!
We take out the cork.
Cleaning of the plug and body, followed by lubrication and assembly, is carried out similarly to a coupling valve. We clean the restrictive washer from the old grease.
We apply grease to the valve body at the place where the limiting washer fits.
We screw the nut with a slot to the tap plug.
Clamping the nut, we adjust the degree of tension of the valve. We check by turning the faucet handle. The crane should not turn with effort, but it should not go too easily. We tighten the locknut.
Once again, we check the smoothness of the move.
Tools and materials
Gas fittings are made of bronze or other alloys that do not spark on impact.An additional condition is two orders of magnitude better (based on the ratio of the viscosity of gas and water) tightness. Therefore, you need to buy faucets, hoses, etc. certified, in specialized stores. Visually, they can be distinguished from plumbing by a yellow handle, black, yellow or black braid with a yellow stripe. Remember: the price of unreasonable savings is life.
There are two types of supply hoses: from special rubber in a metal sheath (black) and corrugated metal (bellows) in a plastic sheath (yellow). The latter are twice as expensive, but their estimated service life is twice as long. Rubber is still preferable: it is more difficult to damage it, it will not crack if accidentally bent, and a good branded hose will last at least 20 years.
gas key
The best insulation for threads is linen tow, impregnated with a special Unipack paste for gas, with the joint painted outside after assembly. The FUM tape and Teflon thread, which hold well on the water supply, on gas eventually give an insignificant, but not harmless to health, leak.
From the tool, in addition to screwdrivers, an adjustable wrench, pliers, a gas (pipe) wrench is absolutely necessary, see fig; for the stove - No. 1 (the smallest). If it is planned to replace the shut-off valve on the descent, then key No. 2 is also needed, otherwise, trying to turn off the old valve stuck to the pipe, you can break the descent, and gas from the riser will rush into the apartment.
An indispensable accessory of a modern gas stove is a dielectric insert between the inlet hose and the shut-off valve. Now almost all stoves are supplied with electric ignition; in addition, according to GOST R 50696-94, the oven of any stove must be equipped with a gas control system (see below), which shuts off the gas when the flame goes out.All this (the flame is an excellent conductor of electricity) gives a strong electrical leakage to the gas riser, which is by no means safe, so electrical insulation of the stove from the riser is necessary. In addition, if the stove is equipped with a control microprocessor, then floating electrical potentials without an insulating insert will quickly disable it.
How to understand that the stove poisons gas?
A person does not feel the smell of natural gas. The safety of household stoves is increased by the odorant ethanethiol (ethyl mercaptan). The odorant emits a sharp unpleasant odor. Combustion problems produce carbon monoxide. It is also unpleasant, but does not directly indicate a household gas leak.
When there is a choice, to ventilate the kitchen or keep it closed to hear extraneous odors, it is better to stop at the first option.
 Modern stoves have gas control: the system works due to a fire sensor and an electromagnetic valve that acts on a spring and shuts off the fuel supply
It is worth worrying about leakage when the smell of ethanethiol is held in the air for more than 5 minutes, especially when cooking. Ventilate the polluted room. Natural gas will collect in the corners, so it makes no sense to focus on the fragrance. Waving your hand will do nothing.
You can find out about the status of household appliances in 3 other ways:
- plate manipulation;
- tightness test;
- by sound.
To check the burners turn off the hob. If there is a smell of odorant near the burners or it intensifies, there is a leak in this place. Modern stoves have valves that prevent excess gas from entering the burner and shut off the fuel when the fire goes out.
The accumulated gas will still make itself felt.Methane with impurities will collect under the hob, and the owners will hear it next to the control knobs, control panel joints. In a dangerous situation, emergency personnel will help.
The plate should be moved away from the wall. An increased smell will indicate a leak at the connection point of the unit. If there is no visible damage, then simply replace the gaskets. New hoses and fittings will be needed in case of a serious defect.
The condition of the stove tap is determined by the smell from the open oven. Its strengthening means a violation of the density in the parts, possibly a lack of lubrication.
 Gas workers are required to inspect gas appliances in accordance with the contract and at least once a year: they must be required to fully inspect the stove and supply lines
The leak test provides comprehensive information on leaks. Use a solution of dish detergent or soap. Apply to threaded connections of a gas pipe, hose, pipes under the burners. When the first bubbles appear, it makes sense to turn off the gas and call the gasmen. The master will determine all the problem points himself.
The gas does not come out silently, so quiet conditions can be created. The pressure in the unit poisons everything superfluous outward, and a person will be able to find the approximate place of the leak. The strongest and most dangerous movements of fuel are accompanied by a whistle. In a room with a distinct sound of gas, open the window wide and close the door. At the other end of the home, the owners will be in the greatest safety.
Problems with burner knobs
It happens that no matter how you turn the knob, the burner burns only at minimum power. If you do not take any measures, over time it may stop burning completely. Most likely, the reason is that the nozzle supplying gas is clogged.
Escaped food rarely enters the nozzle, because during cooking it is protected by the upper part of the burner. More often, cleaning products, especially those based on soda, become the cause of clogging.
Cleaning the jet is quite easy: first you need to remove the top of the burners and raise the table, in some cases it may be necessary to replace the jets on the stove. The burner nozzle is a small part, the top of a gas pipe, with a thin hole in the middle.
This hole must be carefully cleaned. This is best done with a toothpick. It is not recommended to use metal objects for cleaning, so as not to damage the hole.


Escaped food rarely enters the nozzle, because during cooking it is protected by the upper part of the burner. More often the cause of blockage is cleaning products, especially those based on soda.
You can read more about how to increase the power of a gas burner in this material.
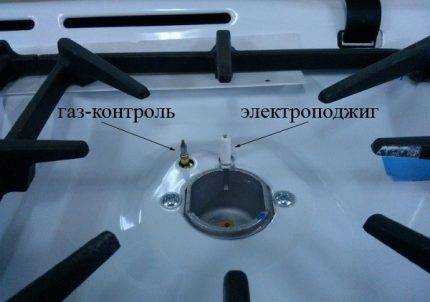
The handles for supplying gas to the burner are one of the most necessary parts; without them, it is impossible to use the stove. Behind the outer flag with a skirt, which you turn, is a gas cock, which can be equipped with a gas control sensor.
We suggest you read: How to clean the kettle from scale with citric acid -
Electric ignition built into the handle is rare for Hephaestus stoves - usually it is carried out with a separate button.
Over time, the handles may stop turning, start to stick or scroll. What to do with it, we will tell further.
Such a problem is not uncommon, if you run it, the handle may completely stop turning.The cause is usually grease that has accumulated between the flag, the skirt and the front panel of the stove.
Hot, it splashes during cooking and easily flows into all the cracks, and then cools down, thickens and turns into a kind of glue.
Gently pry off the skirt and handle with a knife, screwdriver, or other flat object. Don't use too much force - you can damage the enamel or plastic
The skirt usually flies off on its own after removing the handle, but if it does not turn with a flag, it can be secured with a latch. In any case, it can be tucked with a knife. Remember its position so that during assembly the latches close to the panel or to the flag.
Many models have a reinforcing metal plate in the handle, do not lose it. After washing all the parts, as well as the front panel under the handle, assemble everything in place. Don't forget to insert the spring if you have one.
Such a problem with Hephaestus plates is rare, but still happens. The reason is usually that the metal plate fell out of the flag and was lost, which clings to the notch on the stem.
You can cut such a plate from a metal cover for conservation and insert it into a special groove, or buy a new flag. If on your model the handle is completely plastic and its inside is licked, only buying a new one will help.
It happens that even after the flag with the skirt is perfectly washed, the handle still turns tight. The reason is that grease has developed on the gas taps.
It is better to invite a specialist for prevention, because errors in such repairs threaten to leak or clog gas supply pipes
In Hephaestus plates, the stem is fixed in the valve with a flange connection; in order to remove it, it is enough to unscrew 2 bolts on the sides.Wash the stem immediately from grease and dust.
Then the spring and the tap plug are removed - the latter needs to be lubricated. This is a cylindrical part with a through hole and a cut on the side, through which gas is supplied to the burner. You need to lubricate the cork quite a bit, the layer should be invisible, but noticeable to the touch. It is more convenient to collect a little grease on your finger and rub the cork.
After assembling the faucet, do not rush to reinstall the front panel. First, put the flag on the stem without it, open the gas and apply a soapy solution to the tap. If no bubbles appear anywhere, wipe everything dry and reassemble the stove.
Common breakdowns of electric stoves Darina
Foreign smell during operation
We kindly ask you to pay attention to the specificity of the smell. If it resembles food, service the appliance and clean all work surfaces from contamination.
But if the smell resembles burnt rubber or plastic, then immediately disconnect the device from the mains and call a professional craftsman from the PlitRemont Service Center;
The display does not work, the backlight is gone, the keys do not function. Most often in the Darina technique, this is due to the oxidation of contacts. Other causes are determined by the diagnosis;
Burner power not adjustable. They work weakly or at full strength. Maintenance of power regulators or their replacement with new analogues is required. In rare cases, malfunctions are associated with the burners themselves (at low temperatures);
One or more burners are not working. There are defects in the heating element, contacts, wiring. Never attempt self-repair. Turn to professionals;
The oven temperature is incorrect.The main culprit is a malfunctioning temperature sensor. It is not repairable and needs to be replaced. When it breaks, both high and low temperatures can be observed. In addition, the heating element can also become the cause of the last breakdown. In some cases, a short circuit may occur. We recommend that you constantly take care of the working surfaces of the oven or oven to prevent the formation of fatty layers on the heating element.


Next
KitchensGas burner power in kW
The most popular gas stove malfunctions and how to fix them
The market for gas stoves today is quite large, many conscientious manufacturers work on it. But, despite the reliability, quality and functionality, such household appliances still break. Therefore, many home craftsmen repair the Electrolux gas stove with their own hands.
Most often, problems are associated with such phenomena:
- Insufficient burner flame.
- Problems with the oven door.
- Violation of the electrical ignition.
- Poor thermocouple performance.
Now we will describe the most popular problems with gas appliances and how to fix them.
Burner repair
More often than not, problems arise with burners. The flame gradually begins to weaken, then disappears altogether. The main problem is associated with clogging of the dividers or burners. This is due to careless cooking - spilled sauce, boiled broth, lead to the fact that small holes quickly become clogged.
It is not difficult to solve this problem, you need to remove the burner, then disassemble it, clean the divider or nozzle. You can use a thin knitting needle or needle for this.
Oven door repair
Problems with oven doors also occur frequently. After some time after the start of operation, the door begins to jam, it does not close tightly. As a result, the hostess cannot fully operate the oven.
To fix this element, you need to unscrew the screws connecting it to the stove, then shake it slightly in different directions so that it sits back on the hinges.
Electric ignition repair
With this device, you can start a fire without matches or lighters. But in order to use it, you need to provide it with access to the network. It rarely breaks, if it does, then the fault is inaccurate handling or contamination with food particles and dirt.
To replace it, turn off the stove, disassemble the partition under it.
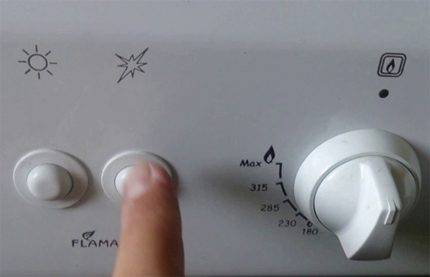
The oven thermostat does not regulate the flame
This effect is often complained about by housewives who do not understand very well how the oven thermostat works. If you have a stove with a thermostat, then when you change the position of the regulator, the flame may not change immediately. The thermostat works like this: first, while the oven is cold, the gas is supplied at full power, no matter how the engine is installed. As it heats up to the desired temperature (it is it that is set on the regulator), the valve gradually closes, the flame decreases.
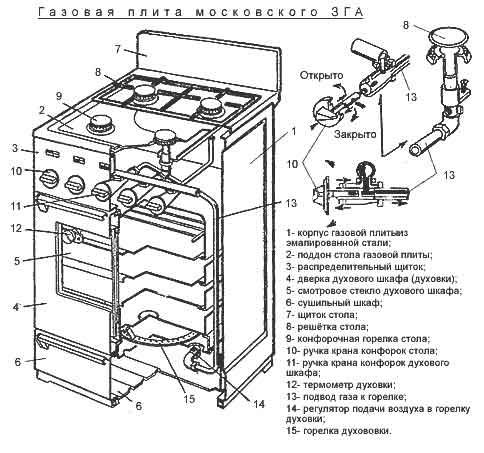
But two other malfunctions can be associated with the thermostat. Firstly, the flame may go out after the oven heats up. Secondly, the flame may burn too hot even though the oven is already hot. Both of these problems are caused by improper adjustment of the low fuel screw on the oven burner (Figure 3. A).
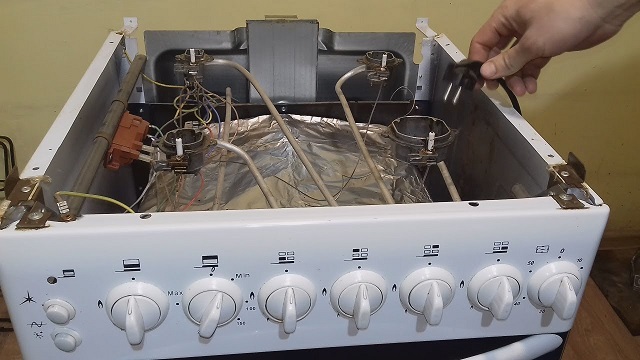
Figure 3. Removed faucet handles and front panel under these faucets.
This screw needs to be turned out a little. Light the oven, close it. Set the adjuster to 140 degrees. Wait 10 minutes. Now, by adjusting the screw, you need to ensure that the flame is small (reeds about 4 mm), but burns steadily, does not go out. This is usually easy to do. But sometimes, even with the low flow screw fully turned, the flame is too large. The fact is that there is a small hole in the screw, which excludes the complete shutdown of the gas supply even with the screw screwed to the end. Why this hole is needed, I have not figured it out. But the fact remains. If the flame cannot be reduced to the desired level, then the screw must be unscrewed completely and replaced with a screw with a smaller hole, or the hole must be sealed with a poxypol (it is completely useless). Then we screw the screw again and adjust the flame.
All of the above applies to the oven with a thermostat. The burner with a tap is regulated similarly to the burners of the table. It is very easy to distinguish a thermostat from a faucet. Temperature values are written on the thermostat scale. On the scale of the crane are just numbers.
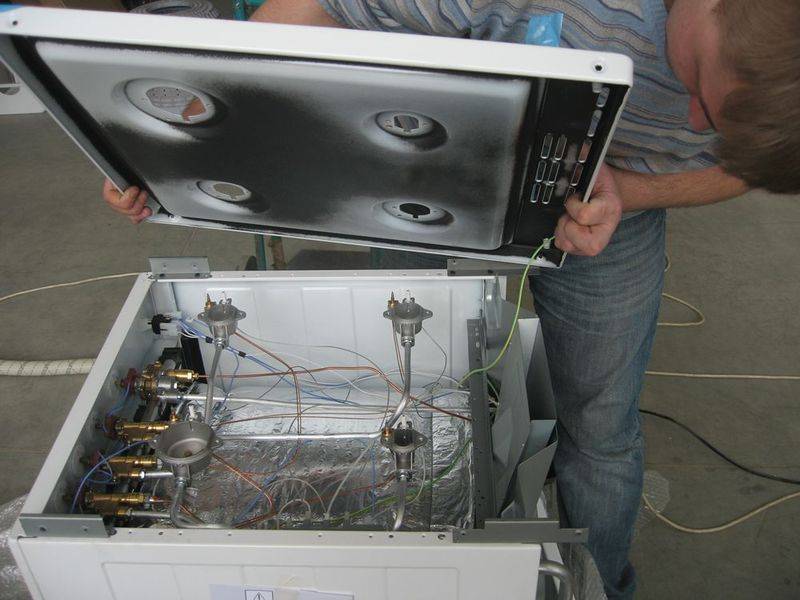
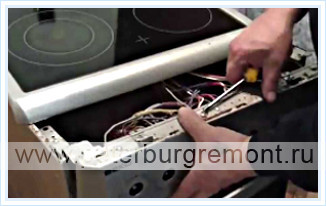
How to disassemble a gas stove?
Repairing Darin's equipment may require certain knowledge and skills, which is why it is so important to know how to properly disassemble a gas stove with your own hands. The first thing to do is to unplug the appliance from the outlet and close the gas shut-off valve
After ensuring your own safety, you can proceed to the next steps, sequentially disassembling each part of the equipment.
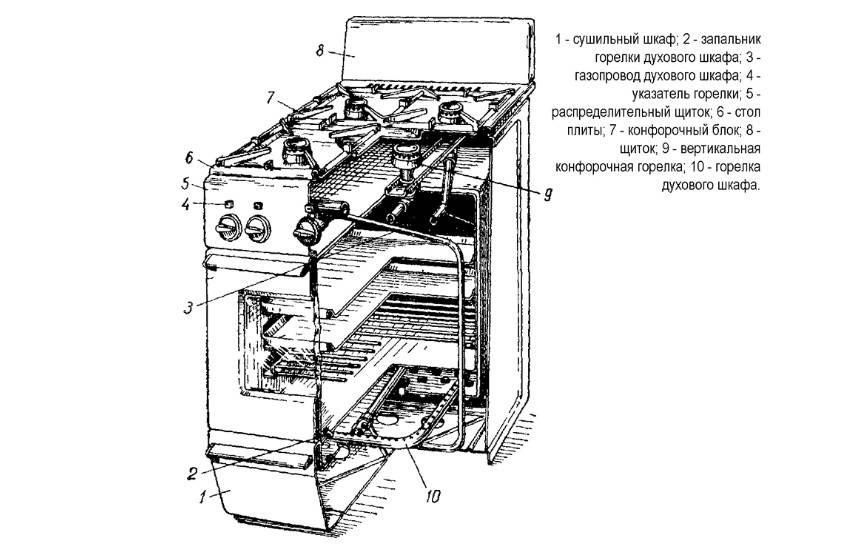
Next, we will tell you how to remove the most important elements of the case in order to provide access to the necessary parts of the device.Since the internal structure of all gas stoves is almost the same, the following steps are suitable for parsing equipment of any model.
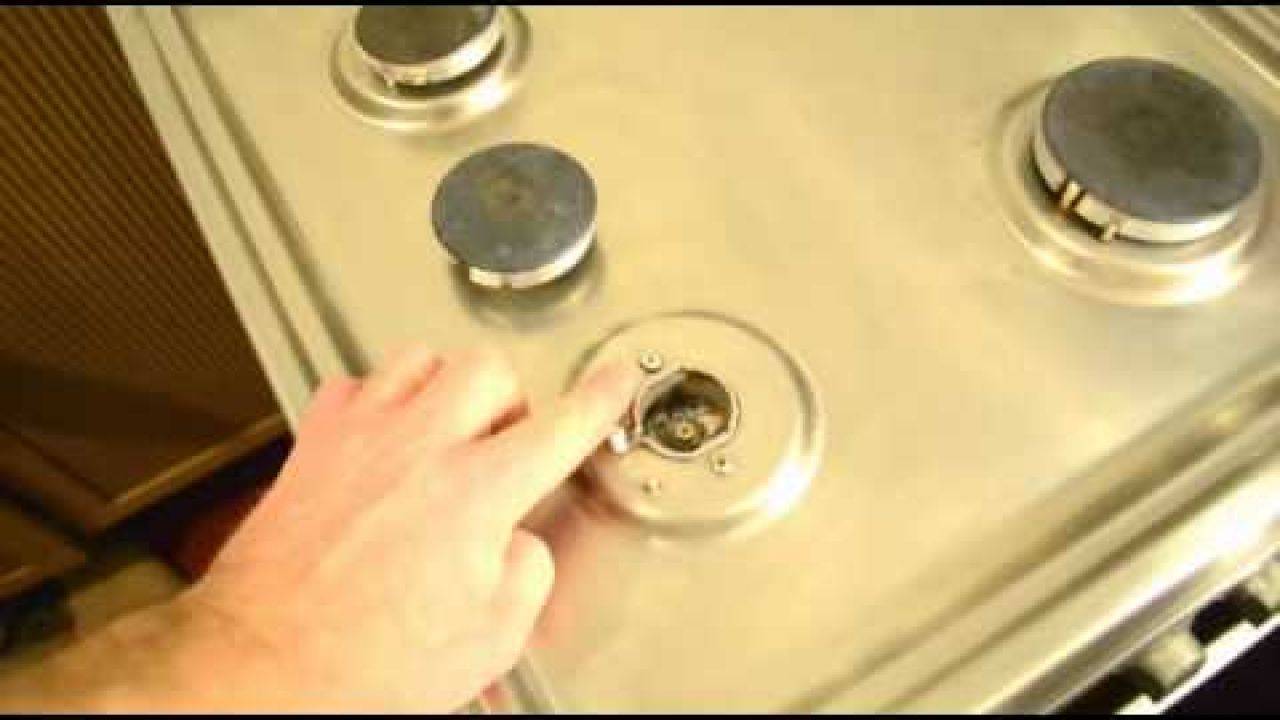
Removing the gas stove knobs
During operation, the handles located on the control panel gradually become dirty, while grease can get not only on the surface of the switches, but also inside their housing, which makes them hard to turn.
The only sure way out is to remove the handles, clean them from accumulated fat and food debris, using a soapy or ammonia solution.
If the regulators are removed, it does not hurt to dip them in the solution for at least 5 minutes, then clean off the remaining dirt with the hard side of a sponge or an old toothbrush. In this case, you need to figure out how to remove the knobs from the gas plates of Darin without damaging the hull of the equipment.


The handles on Darin's gas stove are removed quite easily, while you do not have to pry them with a knife or a screwdriver. First of all, we turn off the gas supply valve, and check that all knobs are turned all the way. Next, with your fingertips, we grab the ring that covers the holes behind the handle, rest the phalanges of the fingers against the surface of the plate, and pull it towards us until the handle completely comes off.
If the dirt is so strong that you cannot remove the handles yourself, you can try to carefully pry them off with a chisel or knife. However, be careful not to scratch the body of the hob. Since the switches are plastic, you shouldn't pull them with all your strength, otherwise you can simply break them.
More details on how to remove the handles from the gas stove and what to do if they are not removed - read on.
Removing the oven door
Often the need to remove the oven door arises due to the bending of the brackets, which is why it is poorly covered.
This situation can occur due to congestion of the structure, for example, if a heavy object is placed on the open door. So, the brackets no longer perform their function of pressing the sash, and as a result, a gap appears between the door and the plate body.
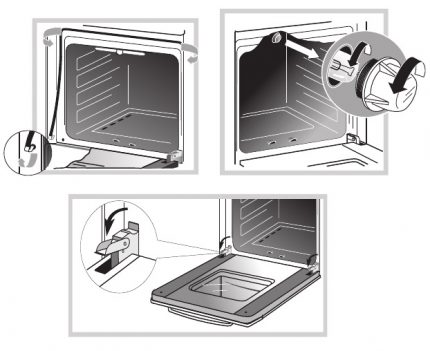
Since the principle of fastening the oven door is the same for all stoves, you should familiarize yourself with the single instructions for removing the door yourself. First of all, you will need to fully open the oven door, and find the door hinge latches that just hold it.
Further, it is important to follow the presented instructions, keeping the sequence of actions:
- we recline the door hinge latches back, and slowly close the door until they rest against the slots on the door;
- we pull the half-closed door towards ourselves, while the distance between the inner wall of the door and the oven should be equal to 10-15 cm, and slowly raise it;
- we remove the hinges from the sockets on the body and remove the door without much effort.
In this case, it is important to take into account the severity of the door, so as not to accidentally drop it after removal. If the door is successfully removed, then the first thing you will need to do is to assess the degree of damage to the brackets, and purchase new parts if necessary.
If the door is successfully removed, then the first thing you will need to do is to assess the degree of damage to the brackets, and purchase new parts if necessary.