- Wiring diagram and do-it-yourself installation
- Installing a heat storage tank
- How to connect a heat accumulator in a harness with solid fuel and gas boilers (video)
- Connecting professional advice
- With liquid mixing
- With hydraulic distribution
- Device and principle of operation
- What is heating wiring
- How the principle of temperature control works
- Adjustment Options
- Main Process
- Chassis suspension
- Electric installation work
- Heat pumps - classification
- Geothermal pump - principles of design and operation
- Using water as a heat source
- Air is the most accessible source of heat
- Types of thermostats for gas boilers
- Thermoregulators with integration with external systems.
Wiring diagram and do-it-yourself installation
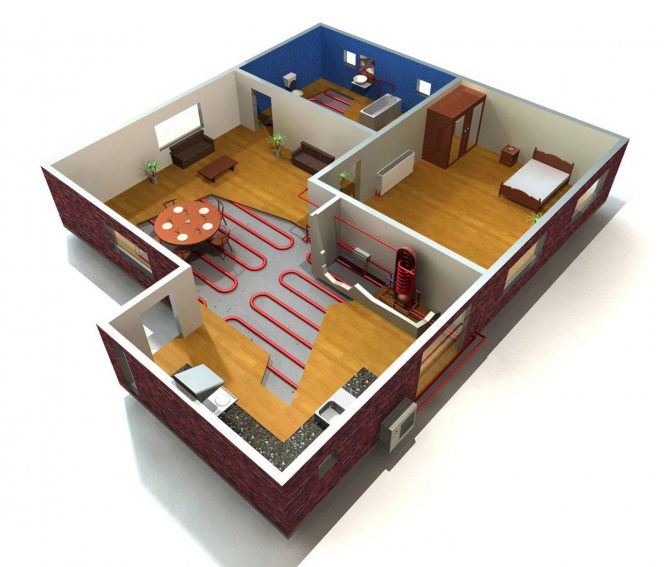
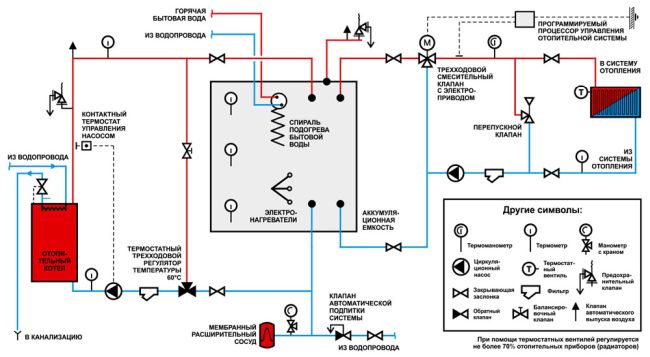
Heat accumulator connection diagram
If you are faced with the installation or reconstruction of the heating system, then it will not be difficult for you to manufacture and install a heat accumulator. Even a beginner can cope with this work if he has the necessary locksmith skills.
The buffer tank connection scheme has the following features:
- the boiler inlet and the return branch of the heating system are connected to the lower nozzles of the device;
- the movement of the coolant in the system, as well as its supply to the heating unit, is provided by a circulation pump installed together with a check valve and a shut-off valve;
- a second pump is connected to the boiler outlet, designed to transport hot liquid to the upper branch pipe of the storage tank;
- the second upper branch pipe of the tank is connected to the pressure line of the heating system. In this case, it is possible to switch on both with a three-way valve and without it.
Note that a similar principle is used for systems with one heating unit. The use of several boilers requires additional installation of locking, balancing and shut-off devices, which greatly complicates the connection scheme and the design of the heat accumulator.
Installing a heat storage tank
Installation of a heat accumulator provides for the installation of control automation, locking devices and centrifugal pumps
Regardless of which heat accumulator is used (purchased or self-made), in the process you will need:
- Ball Valves;
- circulation pumps;
- pipe segments of the required diameter;
- check valves;
- temperature sensors;
- safety valve;
- electrical wiring;
- three-way valves or an electrical control system for the operation of circulation pumps;
- thermal accumulator.
In addition, the usual plumbing and electrical kits will be required, which include the necessary tools and the necessary insulating and sealing materials.
When mounting the buffer tank, the ability of the heated liquid to rise to the top of the tank is taken into account.
First of all, determine the installation location of the device.If possible, the tank is mounted as close as possible to the heating boiler. The heat storage tank is connected in the following order:
- The coolant is drained from the heating system.
- A safety valve is connected to one of the upper terminals of the tank.
- Ball valves are installed on the tank nozzles. You can do without shutoff valves, but in this case, if it is necessary to repair or replace equipment, you will need to drain the coolant.
- A circulation pump is connected to the lower outlet of the tank, through which the cooled liquid will be supplied to the boiler.
- The pressure pipe of the heating unit is connected to the upper outlet of the heat accumulator.
- They mount a temperature sensor and an automation unit that will control the circulation pump depending on the degree of heating of the coolant.
- The supply line of the heating system is connected to the steam outlet located in the upper part of the tank.
- A second circulation pump is mounted on the return pipeline. This unit will be needed to transport the coolant along the heating circuit.
- Install automation to control the operation of the second pump, depending on the air temperature in the premises.
- If the design of the heat accumulator provides for a second circuit, then it is connected to the hot water supply system.
- If necessary, make an electrical connection of the heating element of the buffer tank to the supply voltage.
- Install a residual current device and a ground loop.
The places of all mates must be carefully sealed with tow and a special paste.It is better not to use fum-tape, since it will not allow you to “turn” the connections for the correct installation of circulation pumps and convenient placement of ball valves.
How to connect a heat accumulator in a harness with solid fuel and gas boilers (video)
The heat accumulator optimizes the operation of the heating unit and saves resources. Buffer the container is easy to install with your own hands, for which you can buy a finished product in a distribution network or make a storage tank yourself. In any case, the funds spent pay off in a short time, which makes it possible to advise the installation of heat accumulators both for the purpose of saving energy and for protecting heating units from overheating.
Connecting professional advice
In order to correctly and efficiently implement a private heating system based on any solid fuel boiler, you can connect a heat accumulator in several ways. They are quite common among professional craftsmen, but you can learn this on your own, since there is nothing complicated and supernatural in these schemes.
Advice! Consider the fact that the cost of work directly depends on the basic principle of building a system of constant fuel circulation in the boiler.
Heat accumulator connection diagram
With liquid mixing
The scheme for connecting a heat accumulator to a solid fuel boiler of a common type is extremely clear. Easily and affordably used in the piping of permanent heating systems, which are based on the circulation of a simple gravity type of fuel in the boiler. In this situation, this happens:
- During the heating of the set volume of water in the heat exchanger of the device itself, its circulation begins throughout the system of the installed pipeline, which passes through the boiler valve.
- When the temperature set by the user is reached, the built-in valve actively starts to work and accordingly maintain the pre-set value, gradually mixing only cold water from the boiler itself.
- At this moment, hot water from the installed unit is poured into the tank - this is how the heat accumulator is charged.
- For all the time that can only be determined by the boiler tank, the fuel burns out completely.
- Starts the reverse process, which consists of supplying water to small radiators. Temperature stability is maintained all the time.
- When the direct source of the required heat cannot maintain stable heating of the water in the heat accumulator tank, the installed valve closes promptly and reliably, and the system instantly returns to its original state.
If there is no power supply or the circulation pump fails, the boiler immediately goes into a special buffer mode, which allows the entire system to work only on the check valve.
Connecting a heat accumulator to a solid fuel boiler
The collected water, which has heated up to this point in the boiler itself, then actively enters the installed tank. Then she goes to several heating radiators. This continuous process ensures smooth heating of the water and a gentle drop in high temperatures.


Advice! In order for the heating circuit to function at its best, the heat accumulator must be mounted high enough so that there is no contact with the heating radiators.
With hydraulic distribution
A system of this type is sold for almost every boiler model. Due to them, it is possible to provide for an uninterrupted and stable supply of electricity. In order for the entire thought-out system to work correctly and smoothly, it is worthwhile to correctly and clearly provide for a source of stable and nutritious nutrition.
It is possible to implement this principle: the installed boiler will serve only as a special container, which to the maximum stabilizes the temperature of a sufficiently large volume of water necessary for comfort in the room. This makes sense in the case when it is necessary to immediately supply power to several private heating circuits.
Connecting a heat accumulator to a solid fuel boiler of this type has also found wide application among modern users and developers.
Which heat accumulator connection scheme to choose depends solely on the individual needs of the owner of the house and those living there. Here you need to weigh all the advantages and disadvantages, as well as take into account many factors that can significantly affect the final choice.
Quite a lot depends on the area that will be heated with a solid fuel boiler; used elements and assemblies of the entire installation; the calculated number of contours that will be made in the harness; the presence of a well-thought-out system of hot stable water supply of the entire room.
Properly organizing a wiring diagram is a difficult task that requires increased concentration and the right approach.If there is no confidence in your knowledge, it is better to entrust the process to experienced and qualified specialists.
Device and principle of operation
The comfort of staying indoors largely depends on the heating system used. Control over the temperature of a water-heated floor is carried out using special devices - thermostats.
Many designs of such systems are used, but in most cases they use only a few fundamentally different methods of adjustment.
Watch video - setup process
But, before considering the principle of operation and the design of thermostats, you need to understand the object of regulation.
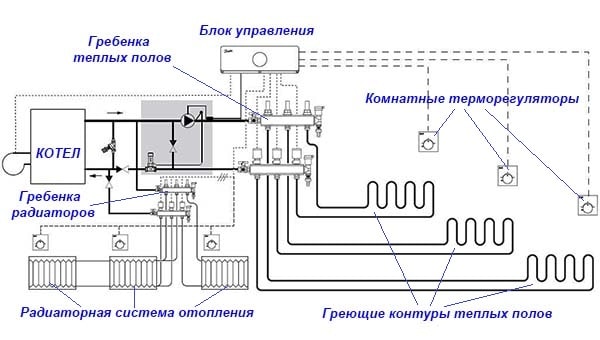
What is heating wiring
Heating a room with a water floor can be carried out in various ways. One of them is the use of the heat of heated water, which acts as a heat carrier. The transmission takes place through pipes. Previously, steel pipes were mainly used in heating, now they have been replaced by modern ones made of plastic materials.
The heating circuit can be located along the walls in the form of radiators, or it can be located under the floor surface, heating it and the air in the room.
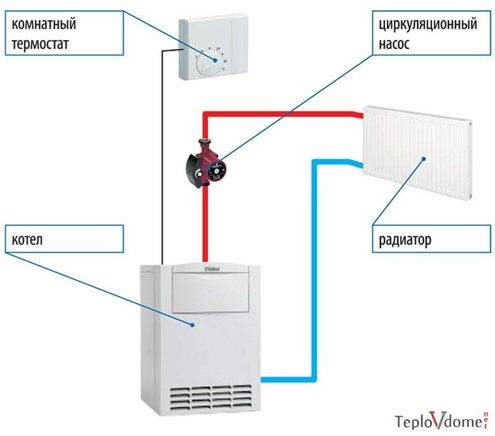
Hot water or antifreeze is heated in the boiler, after which, using a circulation pump, it is fed into the heating circuit of the water floor.
Passing through its pipes, the coolant gives off heat to the closed surrounding space, heating the surface. The cooled liquid is returned to the boiler system. Depending on the temperature of the "return" in the mixing unit, it is heated or cooled by mixing in colder water from the tank.
In circuits with underfloor heating, which are connected by a separate circuit, a thermostat is installed for each of them, since they all have their own thermal regime. And the radiator heating circuits are heated to a temperature almost twice as high as for a warm floor.
How the principle of temperature control works
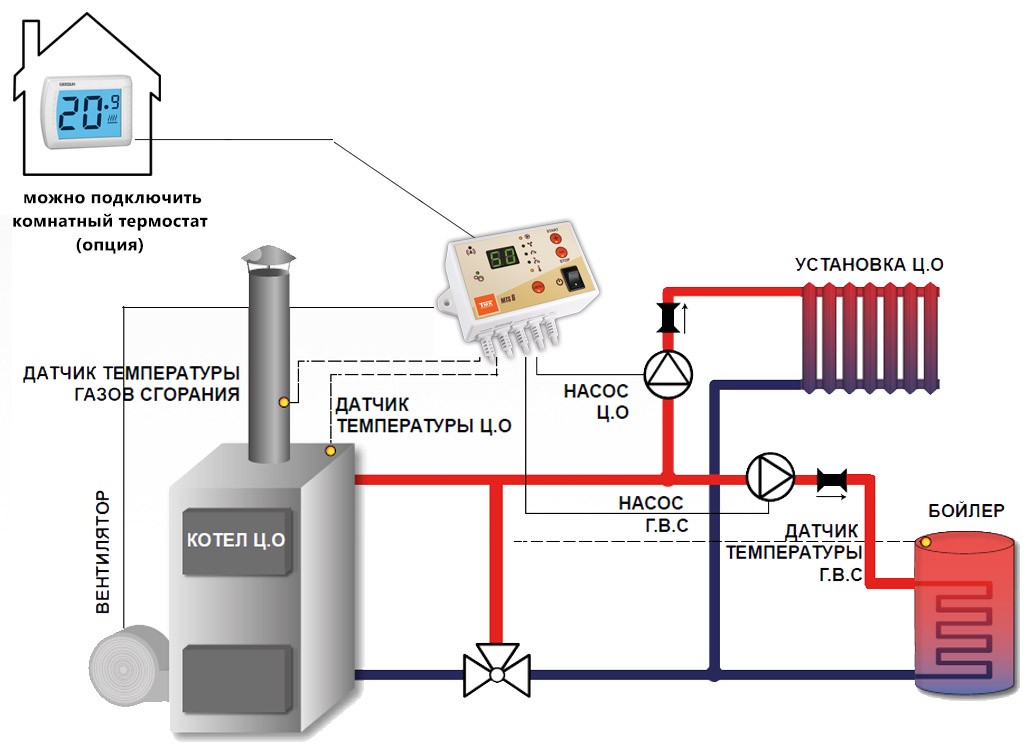
The main elements of heating control are servo drives, temperature sensors and thermostats. This composition of the equipment allows you to adjust the temperature of the water-heated floor steplessly in a continuous automatic mode. It happens like this:


- If a signal about insufficient temperature comes from the temperature sensor, the servomotor opens the valve and more hot water enters the heating circuit.
- When the coolant overheats, the chilled water mixing valve opens, reducing the degree of heating in the circuit.
- However, manual adjustment is also possible by setting the valve to a certain position. But this method requires constant visual control, since the factors on which the heating mode depends change repeatedly during the day. With the relative cheapness of such devices, they are very inconvenient to use, since every change in the conditions in the room requires intervention in the operation of heating.
Adjustment Options
Watch video - adjustment thermal sensor block power
- The degree of heating of the floor covering. In this case, the heating sensor is installed in close proximity to it. Such a floor heating device is best suited for small rooms and low-power heating circuits, which are used only as auxiliary ones, in particular for underfloor heating.
- The air temperature in the room - with this control scheme, sensors are used that are mounted directly in the thermostat housing. The correct operation of such a device can only be achieved if all the requirements for the insulation of a heated building are met. Otherwise, it is difficult to achieve efficient heating operation - significant energy losses are inevitable. A properly built house with an extensive heating system and a thermostat can save up to 30% on resources.
- Combined control systems, in which water floor heating temperature sensors are installed both in the heated room and on the system of the mixing unit. The parameters are adjusted for reasons of the most comfortable temperature in the house. Such equipment with a thermostat is used in large rooms. Both sensors can be used simultaneously or one of them can be used for control.
Main Process
Chassis suspension
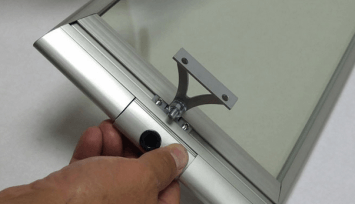
First you need to determine the installation location of the infrared heater in the house (or apartment). As we said above, the case can be placed both on the ceiling and on the walls, depending on the individual preferences of the owners.
First of all, you need to mark the places for installing the fasteners yourself. To do this, use a tape measure, which measure the same distance from the ceiling to the selected area. It is also recommended to use a building level, with which you can evenly set the brackets in a horizontal plane.
After marking, proceed to drilling. If the ceiling (or wall) is made of wood, drill holes with a drill. If you have to deal with concrete, you can not do without a puncher.It is necessary to drive dowels into the created holes and screw in the brackets, after which you can install the infrared heater in its place.
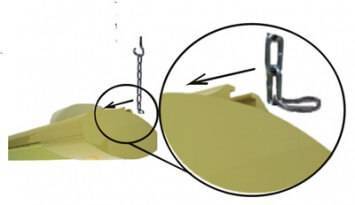
We draw your attention to the fact that the design of the unit is different. Some products have guides fixed in brackets. A simpler option is chains fixed in the ceiling (special holders cling to them)
Also on the market you can see infrared heaters on the leg, which are simply placed on the floor.
A simpler option is chains fixed in the ceiling (special holders cling to them). Also on the market you can see infrared heaters on the leg, which are simply placed on the floor.
Electric installation work
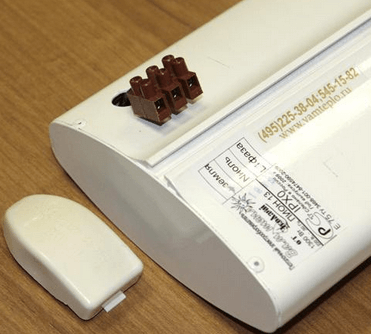
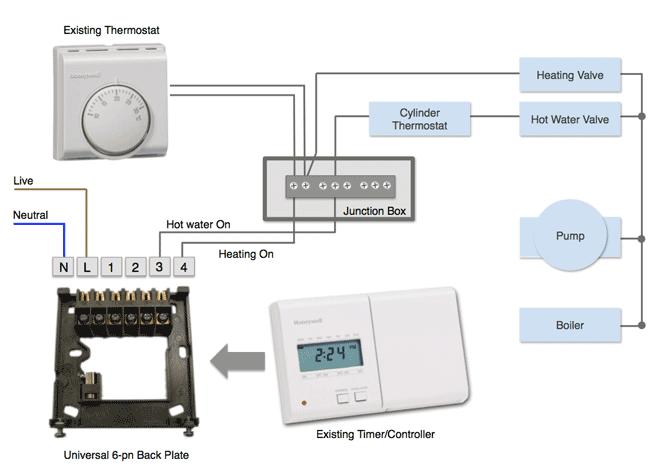
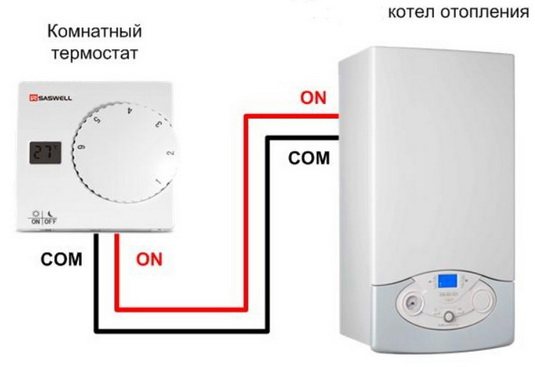
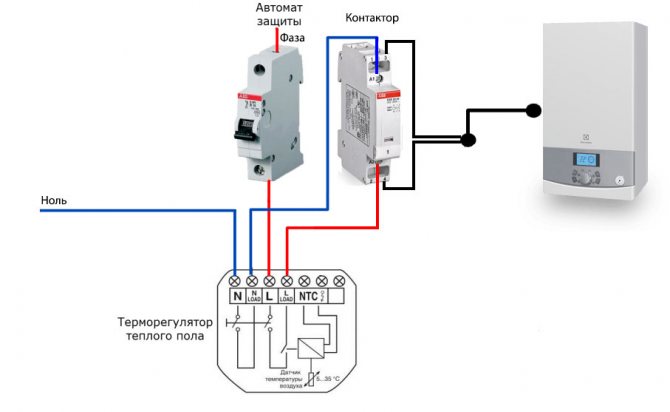
As we said at the beginning, the process infrared heater connection to the network will be carried out using a temperature controller.
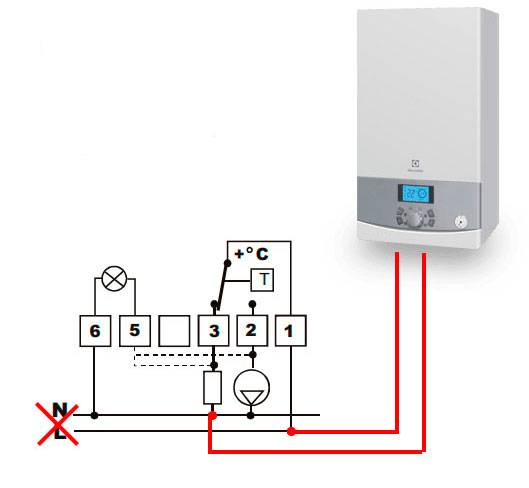
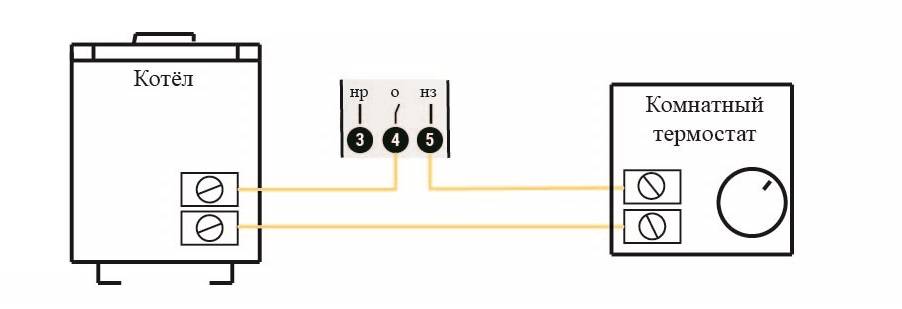
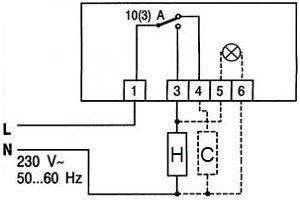
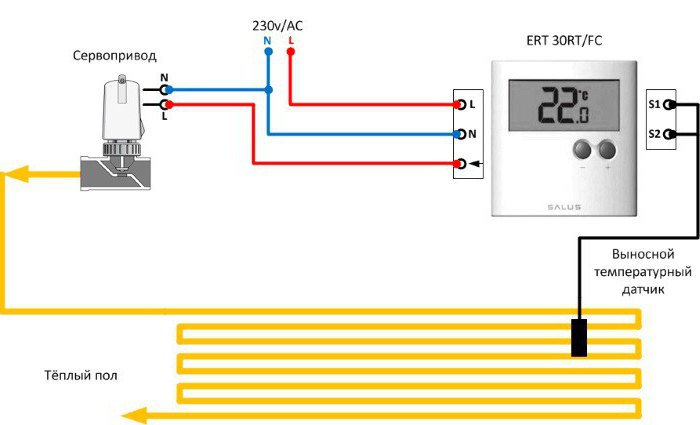
First you need to connect the contacts of the collapsible electrical plug to the terminal blocks of the thermostat, which are installed in the product case. Each "socket" has its own designation: N - zero, L - phase. It should be noted that both zero and phase terminals are at least two each (from the network to the regulator and from the regulator to the heater). Everything is quite simple - you strip the wires, insert them into the seats until they click (or tighten the screws). Be sure to follow the color coding of the wires so that the connection is correct.
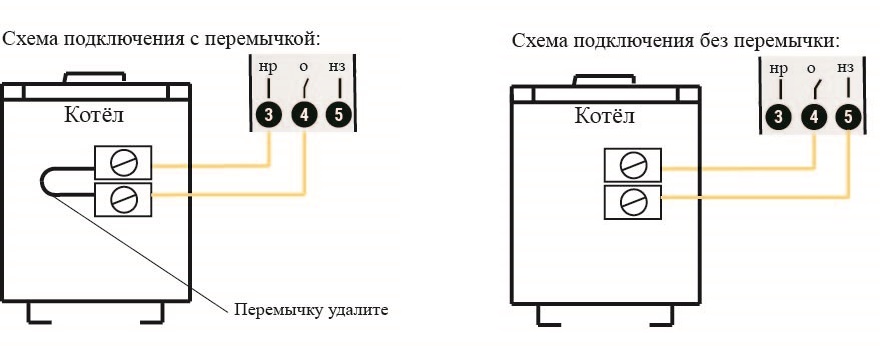
To your attention schemes of the correct connection:
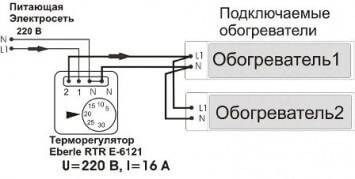
As you can see, connecting an infrared heater through a thermostat is quite simple, the main thing is not to confuse the wires and carefully tighten them in the terminal blocks.
A very important nuance is the correct choice of the location of the regulator. Do not install the product next to a heater, asin this case, warm air entering will adversely affect the measurement accuracy. It is best to place the device in a more remote area, at a height of one and a half meters above the floor.
Also note that you need to install the controller in the coldest room, otherwise the heating problem will not be completely solved. As for the number of infrared devices serviced by one temperature controller, it all depends on the power of the heaters. Usually one 3 kW controller is used for several products, the total power is not more than 2.5 kW (so that there is a margin of at least 15%)
Usually one 3 kW controller is used for several products, the total power is not more than 2.5 kW (so that there is a margin of at least 15%).
You can read more about connecting a thermostat to an IR heater in our separate article, which provides several installation schemes!
So that you can clearly see the whole process of connecting with your own hands, we provide these lessons for viewing:


How to connect a temperature controller
Heat pumps - classification
The operation of a heat pump for heating a house is possible in a wide temperature range - from -30 to +35 degrees Celsius. The most common devices are absorption (they transfer heat through its source) and compression (the circulation of the working fluid occurs due to electricity). The most economical absorption devices, however, they are more expensive and have a complex design.
Classification of pumps by type of heat source:
- Geothermal. They take heat from water or earth.
- Air. They take heat from the air.
- secondary heat.They take the so-called production heat - generated in production, during heating, and other industrial processes.
The heat carrier can be:
- Water from an artificial or natural reservoir, groundwater.
- Priming.
- Air masses.
- Combinations of the above media.
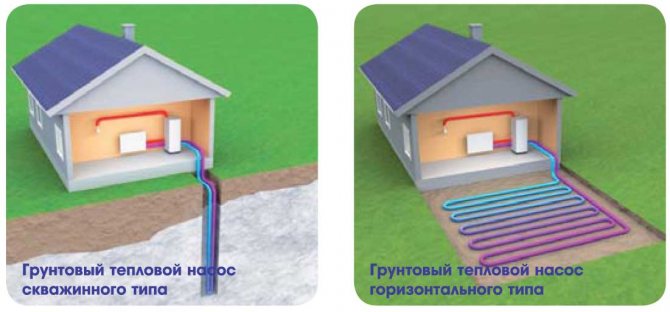
Geothermal pump - principles of design and operation
A geothermal pump for heating a house uses the heat of the soil, which it selects with vertical probes or a horizontal collector. Probes are placed at a depth of up to 70 meters, the probe is located at a small distance from the surface. This type of device is most efficient, since the heat source has a fairly high constant temperature throughout the year. Therefore, it is necessary to spend less energy on heat transportation.
Geothermal heat pump
Such equipment is expensive to install. The high cost of drilling wells. In addition, the area allotted for the collector should be several times larger than the area of the heated house or cottage.
It is important to remember: the land where the collector is located cannot be used for planting vegetables or fruit trees - the roots of the plants will be supercooled
Using water as a heat source
A pond is a source of a large amount of heat. For the pump, you can use non-freezing reservoirs from 3 meters deep or groundwater at a high level. The system can be implemented as follows: the heat exchanger pipe, weighed down with a load at the rate of 5 kg per 1 linear meter, is laid on the bottom of the reservoir. The length of the pipe depends on the footage of the house.For a room of 100 sq.m. the optimal length of the pipe is 300 meters.
In the case of using groundwater, it is necessary to drill two wells located one after the other in the direction of groundwater. A pump is placed in the first well, supplying water to the heat exchanger. Chilled water enters the second well. This is the so-called open heat collection scheme. Its main disadvantage is that the groundwater level is unstable and can change significantly.
Air is the most accessible source of heat
In the case of using air as a heat source, the heat exchanger is a radiator forcedly blown by a fan. If a heat pump works for heating a house using an air-to-water system, the user benefits from:
- Possibility to heat the whole house. Water, acting as a heat carrier, is diluted through heating devices.
- With minimal electricity consumption - the ability to provide residents with hot water. This is possible due to the presence of an additional heat-insulated heat exchanger with storage capacity.
- Pumps of a similar type can be used to heat water in swimming pools.
Scheme of heating a house with an air source heat pump.
If the pump operates on an air-to-air system, no heat carrier is used to heat the space. Heating is produced by the received thermal energy. An example of the implementation of such a scheme is a conventional air conditioner set to heating mode. Today, all devices that use air as a heat source are inverter-based. They convert alternating current to direct current, providing flexible control of the compressor and its operation without stopping. And this increases the resource of the device.
Types of thermostats for gas boilers
Thermostats can be divided into these three main types: mechanical, electronic and electronic wireless.
Wired models cost less, but require cable laying - it is better to install a thermostat on a gas boiler before or during repairs in the house. Wireless models are more expensive, more functional, more convenient.


The choice of a thermostat for connection to a gas heating system is carried out taking into account the following main criteria:
- functionality;
- adjustment accuracy;
- the cost of the thermostat;
- ease of use and installation.
By functionality, they distinguish:
- simple thermostats - help maintain the desired temperature in the house;
- wireless thermostats - have a transmitter unit that is placed in another room for more accurate temperature control;
- programmable - allow you to set a stable temperature regime separately for day and night, program the operation of the heating system by day of the week, which significantly reduces fuel consumption;
- with hydrostat function - help to control the level of humidity in the room, reducing or increasing it according to the settings.
- With an additional floor sensor - the model is used, among other things, to adjust the temperature of the coolant in the "warm floor" system.
- With an additional water heating sensor - the device is used both to regulate the temperature regime of hot water supply and to control the heating system.
Separately, it should be said about programmers - thermostats that are more complex in terms of functionality, which are installed, among other things, to control climate systems in so-called smart homes.
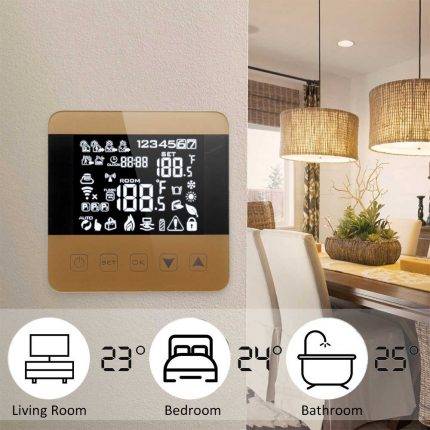 There are models of Wi-Fi thermostats with voice control.Such room regulators support several foreign languages, can be controlled using a smartphone. During a power outage, the function of turning on the memory is activated, which saves the settings of the programmer
Programmers control the operation of not only heating and water heating equipment, but also air conditioners, pumps, and other devices. Some of them help to program an individual temperature regime for each day of the week with the ability to set from 1 to 6 fixed regime points.
Thermoregulators with integration with external systems.
the thermostat can be a conventional device, or it can be integrated into smart home systems or available for remote control from other systems.
There are such ways of external communication with the thermostat:
- WiFi;
- web;
- cloud service;
- MOD Bus;
- Radio channel;
WiFi.
The article “What is a Wi-Fi thermostat” discussed ways to control thermostats via Wi-Fi. The easiest way is to connect directly to the thermostat as an access point.
WEB.
More convenient connection to the Wi-Fi thermostat via a Wi-Fi router.
But such a thermostat is a WEB device and you can connect to it via the Internet.
Cloud service.
In order to access the thermostat without an IP address, a third-party server is used - a cloud service with a mobile application or WEB interface.
Such thermostats were discussed in detail in the article “Overview of thermostat models with WiFi and cloud service”.
MOD bus.
I met discussions about such thermostats. Most likely it makes sense for refrigeration control with a central air conditioner and with a central air conditioning controller.


Probably it can be somehow applied in zone heating systems with a central controller.
Model SML-1000 of execution GB, GD, GC.
Remote.
Thermostat with the possibility of remote control using a remote control, like from a TV.
Perhaps it makes sense when controlling an air conditioner or an infrared heating panel.
| Wireless Remote Room Digital Thermostat | Eco Art Outdoor Infrared Heater , 2400W Outdoor Patio Heater wall mounted heater with Smart thermostat |