- Installation and configuration of a satellite dish for Tricolor and NTV +
- Preparing equipment for setup
- Proper Antenna Installation
- Choosing the best weather
- Selecting a suitable location for equipment
- TV jack installation
- Receiver connection
- Stages of connecting cable and convector
- Setting up a satellite signal
- Antenna adjustment
- What you need to know before installation work
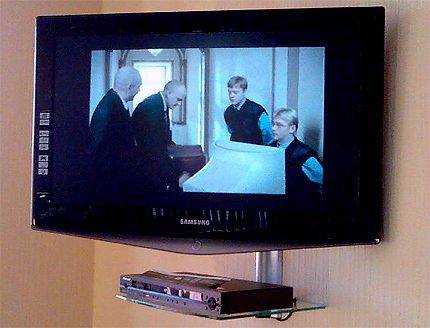
- The purpose of the tuner and its location
- Proper tuner installation
- Interfaces and control elements
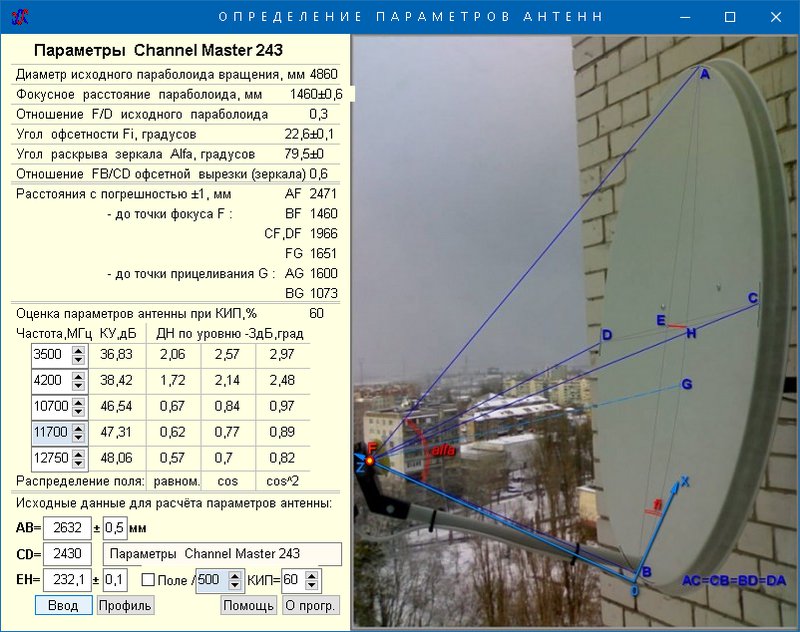
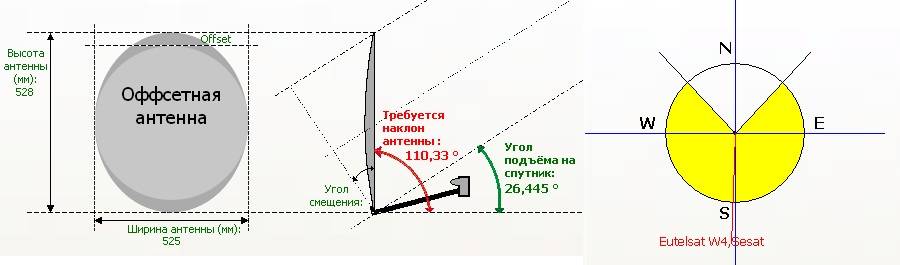
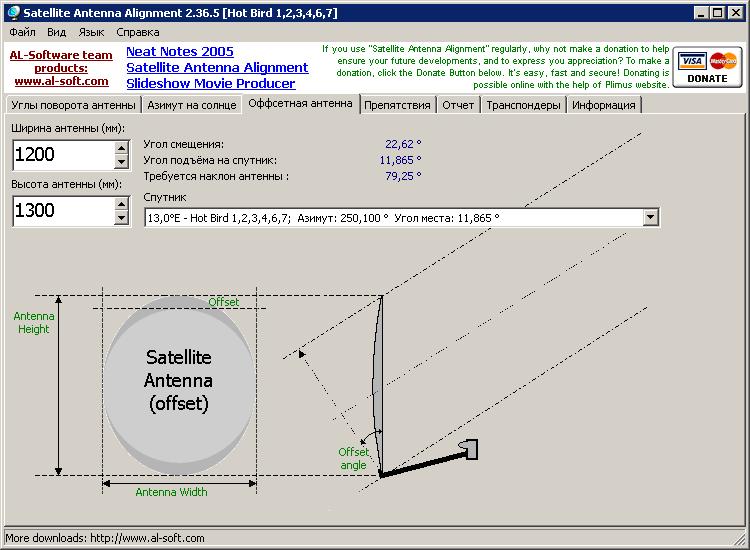
- The parameters that we received for setting up a satellite dish:
Installation and configuration of a satellite dish for Tricolor and NTV +
Since Tricolor and NTV + broadcast from the same satellite, the algorithm for installing, configuring and connecting the antenna to the TV will be the same for them:
- To get started, purchase a satellite dish of sufficient diameter.
- Buy equipment for receiving a signal from a dish:
- receiver and access card (for NTV +), from 5000 rubles.
- if you have a TV with a CL + connector, then you can purchase a special module and a card (for NTV +), from 3000 rubles.
- a digital two-tuner receiver (for Tricolor, from 7800 rubles) or a ready-made kit along with a Tricolor dish with a TV module (8300 rubles) or a receiver that allows you to later connect 2 TVs (17800 rubles).
- you can purchase any receiver on your own, having previously specified its compatibility with the operator's signal on the website or in the technical support service.
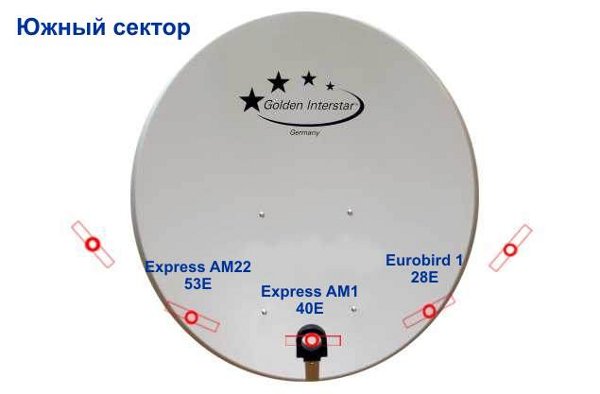
- When all the equipment is ready, you can proceed with the installation. For the European part of Russia, the satellite is located in the south, so the antenna must be installed on the southern part of the building.
- There should be no obstacles on the signal receiving line. Try to mount the plate higher.
- Attach the bracket to the wall with anchor bolts. It should be firmly screwed on and not wobble.
- Assemble the plate according to the instructions for it and fix it on the bracket.
- Install the converter on a special holder and connect the cable to it. It is better to install the converter with the connector down to avoid precipitation.
- Now you need to connect the receiver to the converter and TV. If you are using a module, then insert it into a special connector, and connect the cable from the antenna to the TV.
- Turn on your TV and receiver. Antenna installation is complete. Next, you need to tune it exactly to the satellite and search for channels.

In the case of NTV + and Tricolor, which broadcast from one satellite, no additional equipment is required for setup. After south installation is complete, fine-tune:
-
Go to the "Search for channels" menu on the receiver (or TV if you connected it directly). For Tricolor and NTV+, the satellite name should be Eutelsat 36B or 36C.
- Press the "i" button on the receiver's remote control or similar on the TV remote control (according to the instructions for the model) to see the signal level and signal quality. Or go to the menu "Settings", "System", section "Signal Information".
- On the screen you will see two scales, strength and quality. It is necessary to achieve the highest values, from 70 to 100%. To do this, slowly rotate the antenna, approximately 3-5 mm, fixing each position for 1-2 seconds, so that the receiver has time to respond to the change in position.
- Remember that you can rotate in azimuth (in the horizontal plane) and in angle (in the vertical plane).
- After you get the best signal, turn on the automatic channel search on the receiver. If you purchased your receiver from a satellite TV supplier, then most likely it is already programmed with the desired channels.
- You will need to insert an operator access card, possibly go through the registration and activation procedure and enter a password. Follow your carrier's connection instructions.
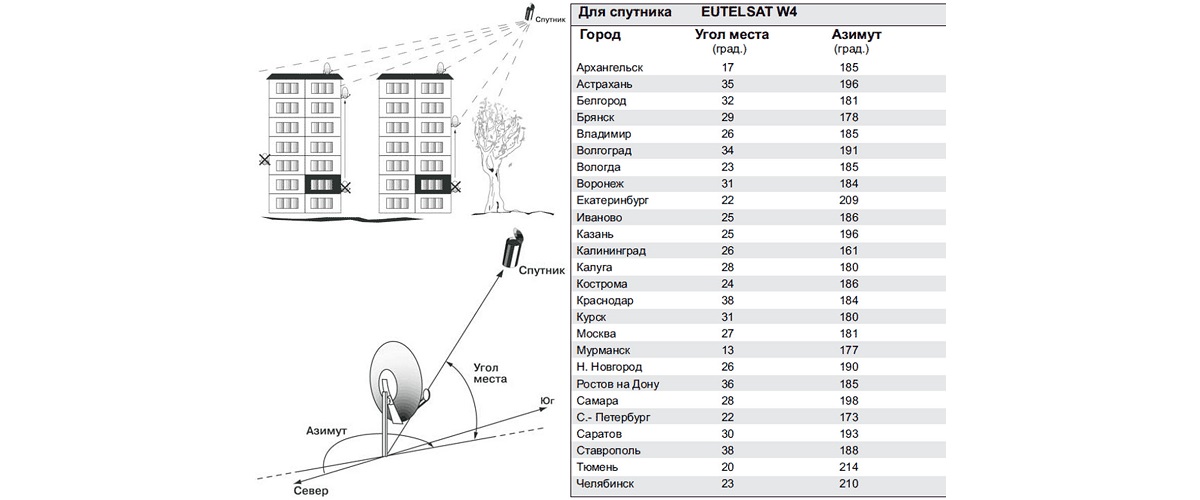
You can also use special tables that show the approximate location of the dish in terms of angle and azimuth for different cities of Russia. Such tables are easy to find for Tricolor, NTV +, and, if desired, for other satellites.
Preparing equipment for setup
What is a satellite "dish" - perhaps there is no need to explain. This element of television technology has already become firmly established in everyday life, and therefore almost everyone is familiar and understandable.
Meanwhile, it is one thing to represent a satellite "dish" in general, and quite another thing - to consider the device technically and technologically.

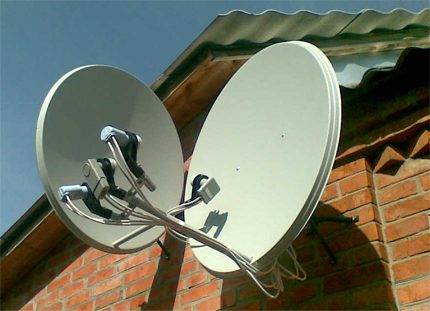
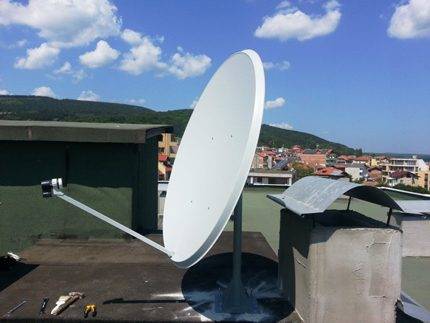
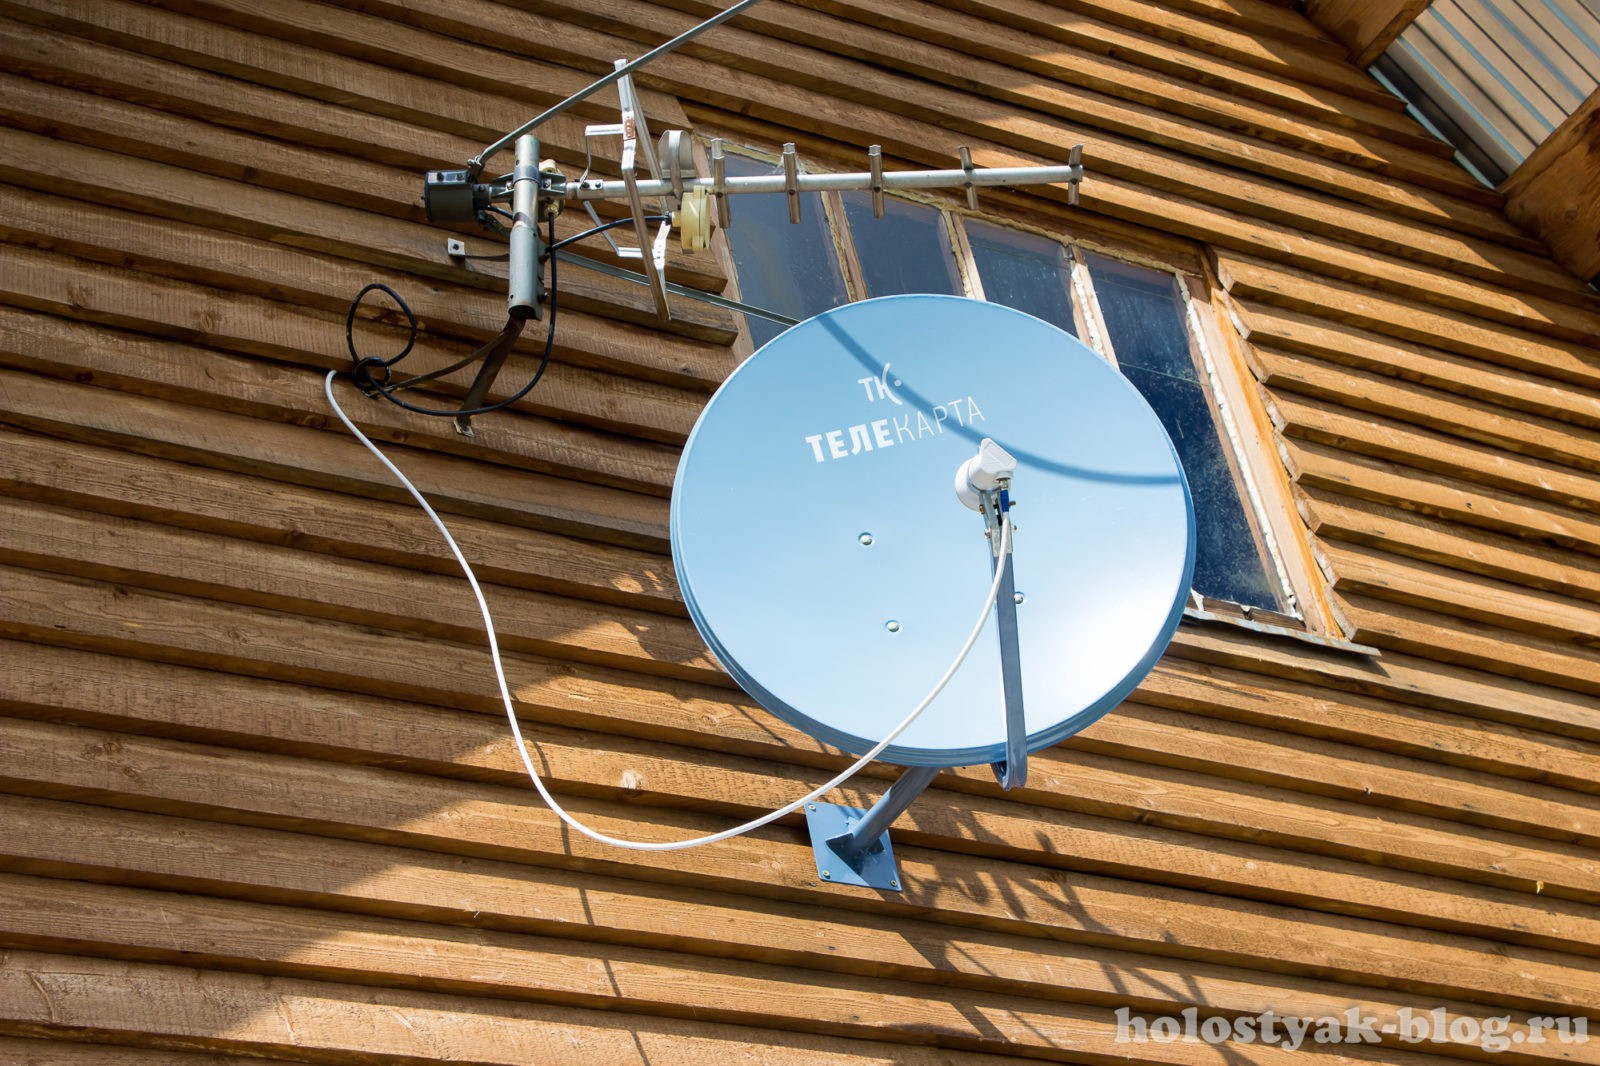
Antenna mirror mounted on the wall of a building, fully equipped to receive a television signal.This has long been a familiar household accessory, increasingly installed independently.
Firstly, satellite dishes of the "dish" type are produced in different diameters. Secondly, to receive a signal from the satellite, the "dish" included in the installation kit must be fine-tuned.
Antennas of different diameters allow you to receive signals of different frequencies (different satellites). And each used satellite is in an individual geostationary orbit.
True, for the domestic sector, the use of antennas with a diameter of no more than 1 m, and often no more than 50-60 cm, seems characteristic (NTV-plus, Tricolor-TV).
Therefore, we will focus on such products in order to show potential owners how to set up a satellite dish with a diameter of 50-60 cm to a satellite.
Proper Antenna Installation
Properly executed installation of the "plate" in many respects favors the tuning procedure. Therefore, all recommendations of the manufacturer should be followed exactly when installing the antenna.
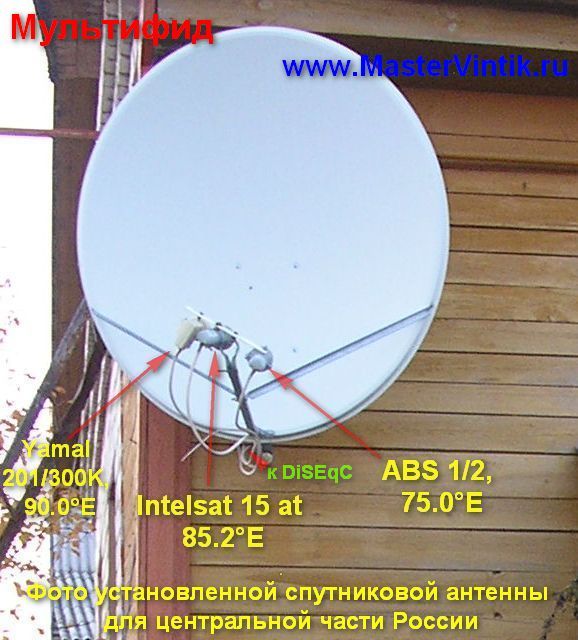
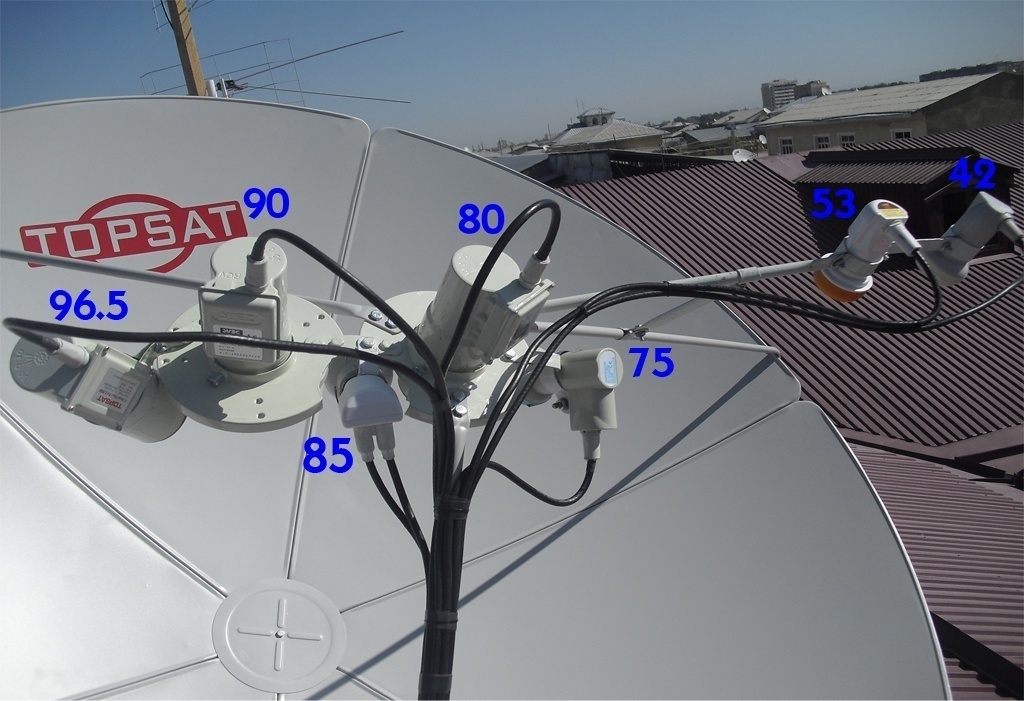
The installation of satellite "dishes" allows for all sorts of variations, but it is necessary to observe all the subtleties of setting for an individual instance. Then interference from one mirror to another is completely eliminated.
So, for the Tricolor installation, the characteristic values of distance and angle are the numbers 100 and 40. In other words, in front of the antenna mirror at a distance of 100 m, the presence of any objects (objects) that hide part of the sky is excluded.
However, the set “net” distance parameter is not the only criterion. In addition, the same "clean" angular view should be provided.


That is why at the marked distance, in height from the horizon line (along the central axis of the antenna) at 40 m, the presence of any foreign objects should also be excluded.
Considering that the satellite "dish" is mounted at a certain angle and at a certain height from the earth's surface, the picture of an ideal installation should be approximately the same as shown in the diagram below.
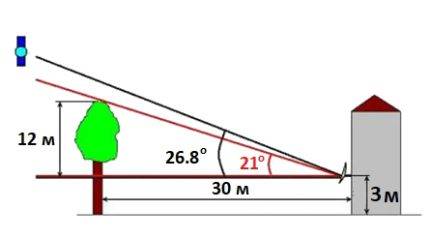 Approximately this looks like, if not ideal, then really the correct installation of the “dish”, which will be tuned to the satellite in order to get a high-quality signal on the TV screen
When installing the equipment, it is necessary to provide protection against a possible fall from the roof or other objects of ice, snow, water.
The surface of the mirror of the mounted satellite dish is directed to the "southern" region of the sky. After the installation is completed, the cable is connected and the receiver is installed, you can proceed directly to fine-tuning to the satellite.
Choosing the best weather
To begin with, you should learn the main rule: it is recommended to set up the "plate" under favorable weather conditions.
Therefore, it is important to ensure that there is no: dense clouds, precipitation or strong winds. Favorable weather for tuning: clear sky or little cloudiness, complete lack of wind or light breeze
This is one of the main requirements if a potential installer expects to quickly set up a system.
Favorable weather for tuning: clear sky or small clouds, complete absence of wind or light breeze. This is one of the main requirements if a potential installer expects to quickly set up a system.
Selecting a suitable location for equipment
First of all, you should choose the optimal location of the satellite dish. What is meant by the term "optimal"? Of course, a completely free area in the direction of the transmitting satellite.
That is, in a given direction, the presence of any objects similar to:
- buildings;
- trees;
- advertising posters, etc.
It is also recommended to ensure the maximum possible proximity of the placement of the rest of the equipment (receiver, TV) to the installation point of the satellite dish. These are not critical requirements, but the fulfillment of these requirements will help to simplify the setup of the equipment.
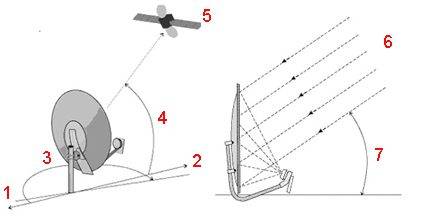
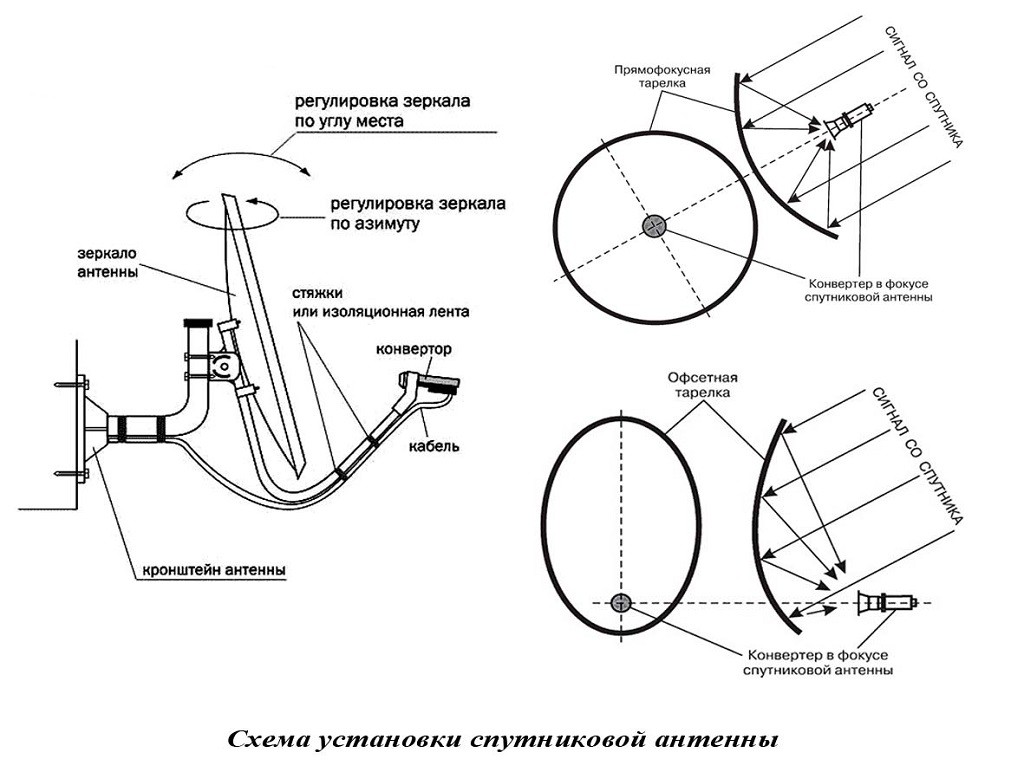
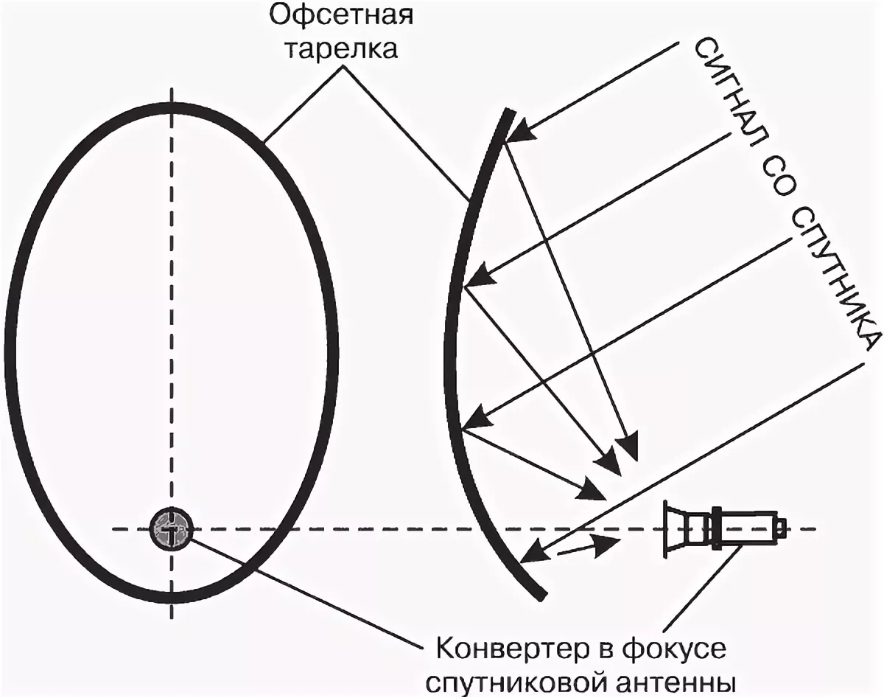
Tuning antenna circuit: 1 - direction "north"; 2 - direction "south"; 3 - azimuthal direction; 4, 7 - angle at the installation site relative to the location of the satellite; 5 - television satellite; 6 - satellite signal
Traditionally, "plates" are placed on the wall of the building next to the window opening, or the installation is done on the side of the wall, which is part of the balcony (loggia) structure.
The instruction prohibits installation directly inside the balcony area, especially the glazed one. Also, the equipment should be installed at points where there is no possible fall of precipitation in the form of snow and ice from the roof.
TV jack installation
The TV connector is connected to the converter in accordance with the diagram:
- Strip the top insulated layer of the cable for a length of 1.5 cm.
- Unroll the shielding braid along the wire.
- Turn the foil over the braided coating.
- Remove the insulating layer of the conductor 1 cm long.
- Mount the cable in the F-connector.
- Leave a protruding center conductor 2 mm long (the excess is cut off).
- Seal the F-connector over the entire length.This is done with a heat-shrinkable tube or 2 layers of electrical tape coated with a silicone-based sealant.
- Fix the cable in the arc space of the converter by applying a layer of electrical tape or ties.
-
Connect the other end of the wire to the receiving equipment.
Mounting the F-connector.
With regard to the antenna wire used, there are two ways to install the receiver to the TV:
- High-frequency antenna cable (HF) - plugs into the antenna socket on the TV and into the RF Out receiver inlet. After switching on, the combination “BOOT” and the channel number appear on the TV screen. When the channel search function is turned on, the notification "No signal" is displayed, which implies the normal functioning of the receiver.
- Low-frequency cable with connector (LF) - similar to HF. When connected, the inscription “BOOT” appears on the TV screen. After that, you need to press the “A / B” button on the console surface of the receiver. As a result, the notification "No signal" should light up. The appearance of other information indicates the incorrect assembly of the equipment.
After the above steps, you can start setting up channels.
Receiver connection
Stages of connecting cable and convector
- Strip the end of the cable. To do this, cut the outer insulating material at a distance of approximately 15 mm from the edge, cut the inner material by 10 mm. Then remove the cut insulation. All this must be done very carefully so as not to damage the shielding braid.
- The shielding braid together with the foil must be bent in the opposite direction from the ends, and screwed to the F-connector until it stops.
- Behind the connector leave the end of the core with a size of 2 mm.
- The cable itself must be fixed on the holder.For this, electrical tape, tape, or nylon clamps are usually used.
- The connector must be made airtight to prevent moisture from entering inside. To do this, you can use sealant, tape or electrical tape.
This completes all the main outdoor work on installing the antenna. When the design is installed, you need to configure it. To do this, you need to connect the cable to the receiver, and then configure the receiver.


Connecting the receiver to the TV can be done in two ways:
- using a high-frequency (HF) antenna cable;
- using a low-frequency (LF) cable with a connector.
The RF must be inserted into the TV socket, which is designed for an antenna and has a corresponding icon. The other end must be inserted into the "RF Out" connector on the receiver. When plugged into an electrical outlet, the word “BOOT” and the digital designation of the channel should appear on the TV screen. When you turn on the channel search, the answer “No signal” should appear. This means that the device is working correctly.
LF connection is made in almost the same way. Only after the inscription “BOOT” appears on the screen, you need to press the “A / V” key on the remote control, and then wait for the inscription “No signal”. If it appears, then everything is working correctly. Any other inscription indicates that the hardware circuit is assembled incorrectly.
Setting up a satellite signal
How to achieve high quality images?
To search for a signal, you need to do several actions in the satellite TV settings.
On the receiver's remote control, select "Menu" => "Installation" => "OK".
Enter four zeros. In the pop-up window, click "OK" again.
Select the "Antenna installation" column and press "OK" again.
Find two scales - "Signal Quality" and "Signal Strength". They show the level of information flow that the system is currently receiving. It must be at least 70%.
If the quality is below 70%, then the reasons for this may be either an incorrect assembly of the circuit, or an incorrectly selected antenna position. If the cable is connected correctly, then it is necessary to change the values of the incoming signal by changing the position of the antenna design itself.
Such actions must be performed very slowly and carefully. First move the antenna by 1-2mm, wait a few seconds so as not to lose the signal
The mirror of the plate should be directed as far as possible upwards. At the same time, it is necessary to carefully monitor that the people doing this work do not inadvertently block the signal with their bodies. It is necessary to move the plate until TV screen does not appear sharp image. When it appears, you can tighten the bolts holding the brackets to the end.
How to set up the Tricolor TV antenna yourself - watch the video:
Antenna adjustment
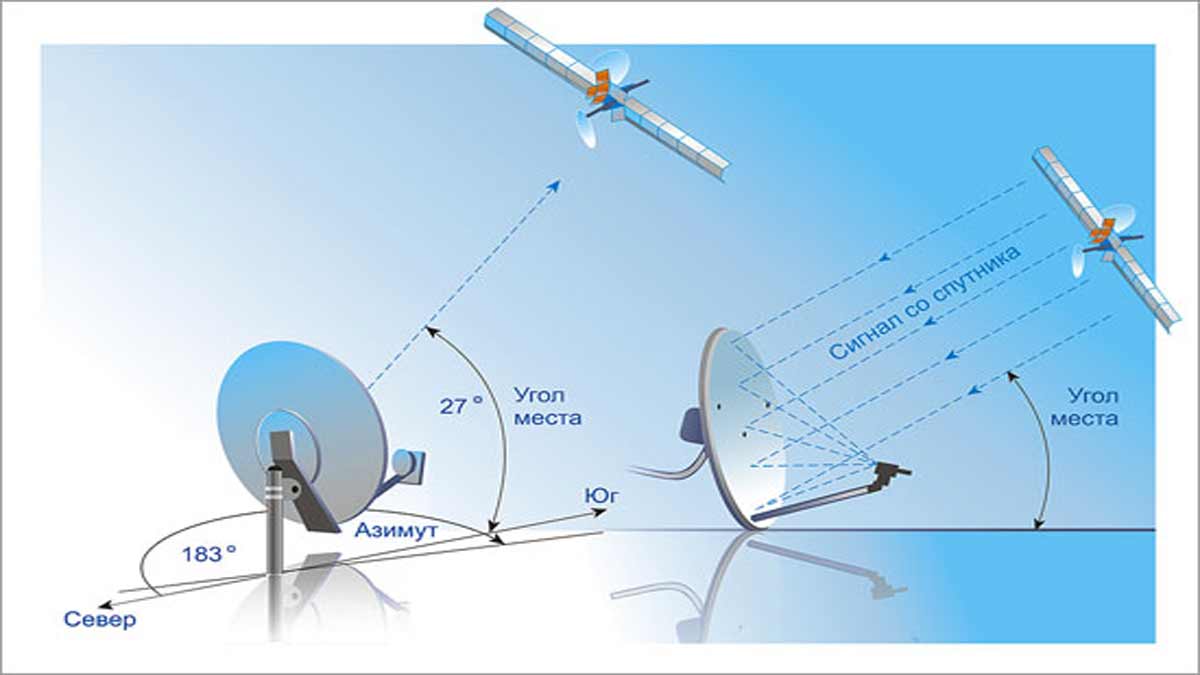
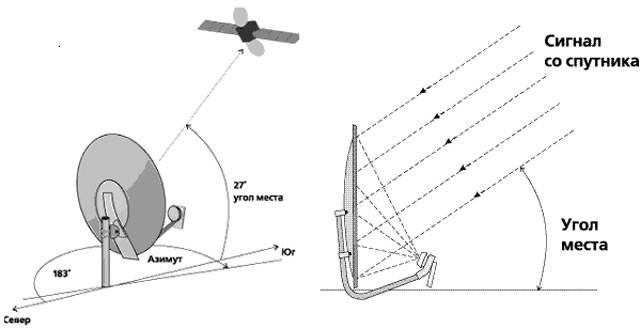
Adjustment should be carried out in good weather (no snowfall, rain, dense clouds). The stage involves the creation of a certain position of the equipment for the clarity of the broadcast. They depend on the elevation angle and the azimuth angle. To calculate the elevation angle, you should draw a horizontal line from the installed dish in the direction of the satellite and measure the angle formed by this line and the signal receiving line (the vertical angle formed by turning the mirror up and down).
Azimuth is the angle of the horizontal plane between the north guide line and the dish-to-satellite guide line (horizontal angle corresponding to left-right rotation of the dish).
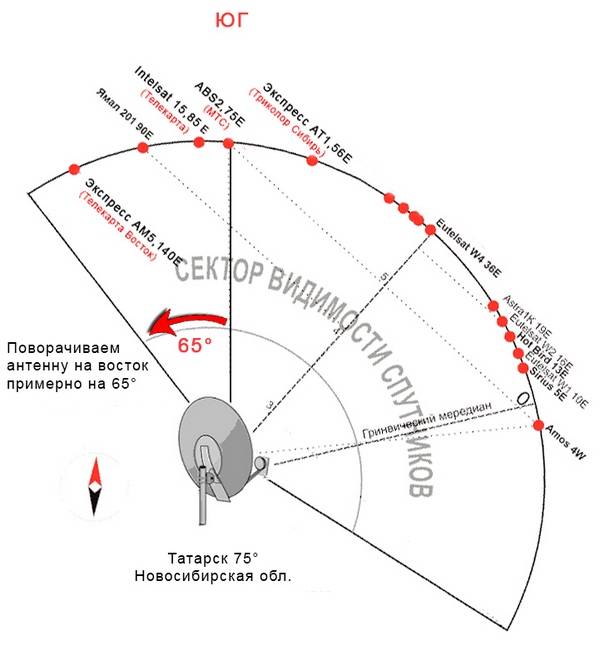
There is a table that shows the angle of elevation and azimuth for different cities. If the plate is not installed in the city, then you need to focus on the nearby city.


Azimuth for different cities.
The azimuth angle is set by the compass. To determine the elevation angle, you can use a protractor and a plumb line. The plumb line is located at the zero point of the protractor and serves as a conditional horizon line. The required size of the angle is plotted on the protractor scale.
Different manufacturers design the antenna at different tilt angles. Supral's products are characterized by an accurate vertical position of the antenna at an angle of 26.5°. When the equipment is located with such an angle in Moscow or Kaliningrad, it is not required to change the elevation angle. For other cities, it will be necessary to tilt the structure forward or backward so that the angle matches the required value.
What you need to know before installation work
First you will need to find out the exact coordinates of the place where you will install the antenna. This can be done either from any geographical directory, or using an Internet search.
Then you will need information regarding the parameters for transmitting data from the selected satellite. The following will be of interest here:
- Satellite position on the horizon;
- The frequency of the transponder (transmitter on the satellite);
- Symbol rate, expressed in Kb / s and meaning the maximum speed of information transfer;
- Signal polarization;
- FEC, in other words, error correction.This parameter is optional for some receiver models, as it can be set automatically.
Information about the transponder is also easiest to find out through search engines, simply by typing in the name of the satellite.
Finally, it will be necessary to calculate the angles of inclination and rotation of the antenna. This can be done in several ways.
- Ask people who are already receiving a signal from the satellite of interest and have made the settings with their own hands.
- Calculate manually. However, this method requires quite serious knowledge and therefore is not always possible.
- Take advantage of special programs.
You can find and download them all also on the network. Regardless of the developer, all of them will require the input of the geographic coordinates of the antenna location, as well as the position or name of the satellite. An additional plus in this case will be that such programs also present the result of calculations in graphical form. And this greatly simplifies the understanding of how exactly the antenna should stand in space in order to gain access to the satellite of interest.
The purpose of the tuner and its location
For users, and there are many of them, who are completely ignorant of radio and television electronics, the word “tuner” is perceived as difficult to fully understand.
However, there is nothing complicated in this word, since, in fact, it hides the usual meaning of the signal receiver.
One of the many design variations of the receiver (tuner) of a television signal from a satellite, traditionally representing the basis of a satellite system along with a "dish" - a satellite dish
In this case, we are talking about a television signal receiver broadcast via satellite.
The signal received by the tuner is converted for consistent processing by the TV. As a result, the user visually perceives on the TV screen the television picture formed by the signal.
Before proceeding with the installation of the tuner, we recommend that you read our other articles, where we described in detail how to properly install a satellite dish with your own hands and set up a “dish” for a satellite.
Proper tuner installation
After purchasing a television receiver, the user will need to configure it. That is, perform a series of sequential steps according to the instructions before the received signal is converted correctly and displayed on the TV screen.
Further, this process will be considered in detail using the example of the tuner of the Tricolor TV system.
Even before starting the settings, the tuner should be installed on a flat, solid surface, preferably next to the TV, but no closer than 10-15 cm from the screen panel or rear wall.
Approximately so it is necessary to place the device near the television receiver. Proper installation of the tuner - when a flat hard surface is used and the technical distances between it and the TV are observed
The receiver module must be installed with unobstructed airflow to the ventilation areas, usually the bottom and top covers or side covers. Violation of the ventilation mode threatens with overheating and malfunctions of the device.


Typically, the scope of delivery is:
- tuner module;
- control panel (RC);
- power adapter module;
- connecting cable type 3RCA.
The locally installed tuner must be connected with the appropriate cables to the TV.This operation must be carried out with the network cable disconnected.
Interfaces and control elements
The case of a standard tuner is rectangular, has a front and rear panel, where the operation controls and system interfaces are located. The former, as a rule, occupy the front panel area. The latter are located in the area of the rear case panel.
Of the control elements, the main ones are the power on / off button, the buttons for changing modes and channels, the information display and the user card slot.
 The interface component of a modern tuner provides the end user with a variety of options for connecting an image output source and sound transmission
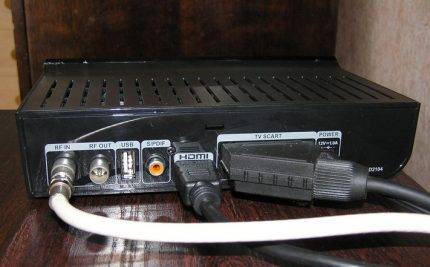
Interfaces are usually located on the rear panel. The number of interfaces of a modern tuner is quite large and can reach more than 10:
- Under the RF cable (RF OUT) connection with TV.
- Under the terrestrial antenna cable (RF IN).
- Connecting to another tuner (LNB OUT).
- Satellite dish cable connection (LNB IN).
- Composite video (VIDEO).
- Under connection with a computer (USB).
- TV connection (SCART).
- TV connection (HDMI).
- Connecting sound through the "tulip" (AUDIO).
In the same place - on the rear panel there is traditionally a socket for the power adapter plug, sometimes mode switches and fuses.
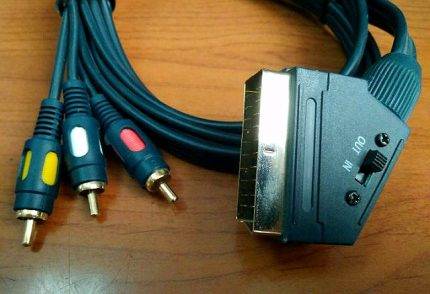 Connecting cable option (SCART/3RSA) that can be used when connecting the output of a satellite TV tuner to the input interface of a standard TV receiver
Connecting the tuner with a cable to a television receiver is usually done using a "SCART" cable (full wiring) through the appropriate connector.
However, other options are not excluded, including the RF OUT signal through the standard antenna input of the TV. But in these options, the quality of the image and sound is reduced.
The parameters that we received for setting up a satellite dish:
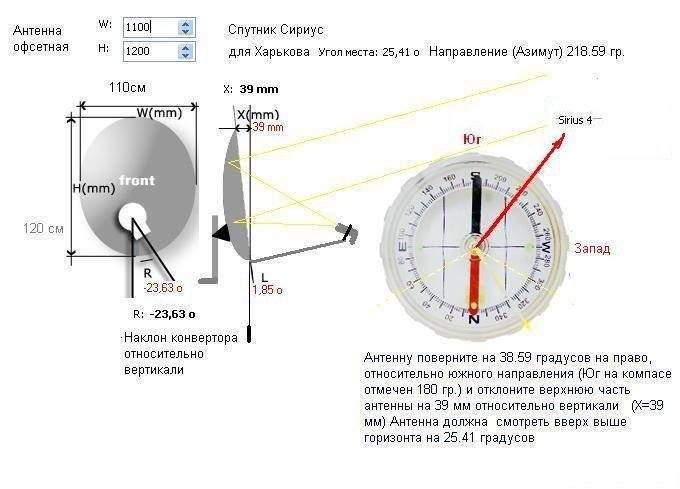
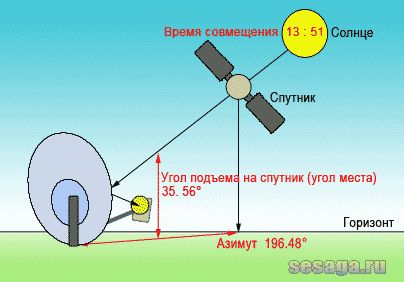
1. Azimuth is the direction to the satellite in the horizontal plane, i.e. where your antenna will point between southeast and southwest. He made us 196.48 degrees, which means that our satellite is located almost in the South.
2. Angle of elevation, or it is also called angle of elevation to the satellite is the angle between the horizon line and the direction to the satellite relative to the point of reception from the Earth. This means that the closer the orbital position of the satellite to the geographic longitude of the place of reception, the greater the elevation angle, the higher the satellite is above the horizon. And this suggests that our plate with its mirror will look up at an angle 35 degrees relative to the horizon. As the orbital position moves away from geographic longitude, i.e. satellites will be lower, the elevation angle will decrease, which means that the dish will gradually turn around and tilt towards the horizon.

3. The time of alignment of the azimuth of the Sun and the satellite - here is the time when the Sun becomes in line with the satellite, i.e. at this point in time, it is our satellite. A very convenient option, since you immediately kill several birds with one stone. Determine the location of the antenna, you can see, if any, obstacles (trees or buildings) that interfere with the passage of the signal, remember the part of the sky of the proposed satellite relative to the horizon. And if obstacles are visible on the path of the alleged signal, it will not be difficult for you to find another place to install the antenna.
What if the weather is cloudy? So, our good old compass will help out. Of course, it does not always show the exact direction on the spot (reinforced concrete structures, electromagnetic fields, magnetization, etc.), all this interferes with it, but you will find an approximate direction to the satellite anyway.
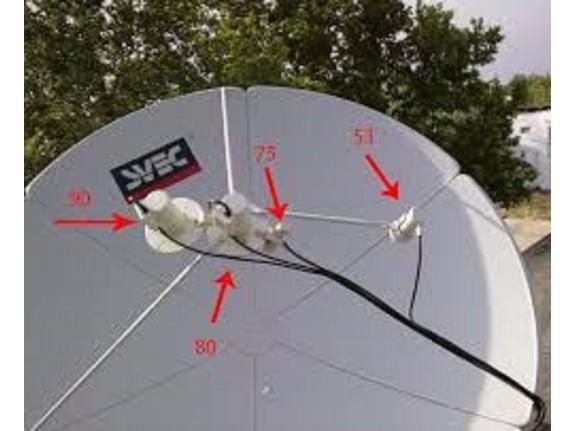
4. The angle of rotation of the converter is a very important parameter that should not be forgotten. Due to the fact that the Geostationary orbit is an arc, and the more west or east the satellite is, it will be tilted towards you, which means you need to align the converter with the satellite. For summit satellites located in the South, the converter will stand almost straight. The divisions provided for these cases are specially applied to the head (irradiator) of the converter. The value between two divisions is usually ten degrees. To rotate the converter correctly, remember you must always look in the foreheadand then there will be no confusion or doubt.
And in general, make it a rule, before installing a plate on a wall mount, turn the converter in the right direction to the value indicated by the program. And already in the process of fine tuning, in search of the best signal, it will be possible to additionally twist the converter by several values clockwise or counterclockwise.


5. Satellite position – this column indicates its position in the Geostationary Orbit. In our case, this is 36E (East).
Well, you figured out what basic parameters are needed to tune to any satellite. In the future, as you gain experience, you will already easily find the location of the main satellites, and it will not be difficult for you to point the antenna at them.


