- We install fittings
- Types of valves
- Separate and combined options
- Materials for the manufacture of devices
- Place of water supply
- Button repair
- Button malfunctions and solutions
- Elimination of sticking
- Elimination of failure
- Button Replacement
- Dual flush
- The main elements of the toilet
- The sequence of operations for installing structural elements
- Comparing the advantages and disadvantages of both options
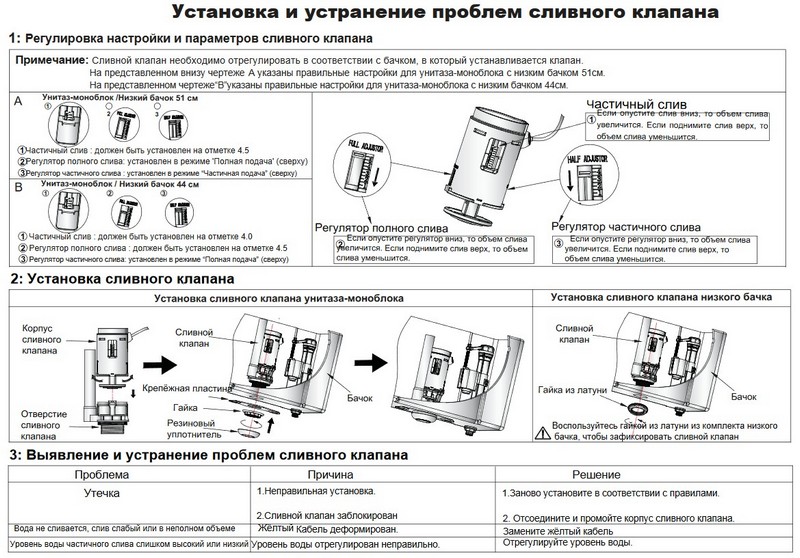
- Drain mechanism failure
- Setting up sanitary cistern toilets
- Push button cistern adjustment
- Two-level drain adjustment
- Adjusting older models
- The button sinks or sticks: what to do?
- Sewer connection
We install fittings
A new cistern mechanism is selected in advance. This takes into account:
- height and volume of the tank;
- the location of the opening for the water supply;
- the location of the hole for the button or lever.
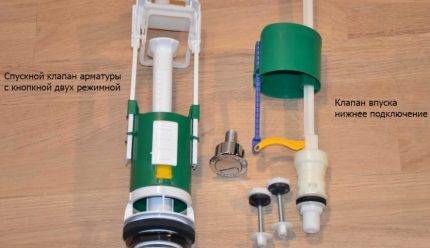
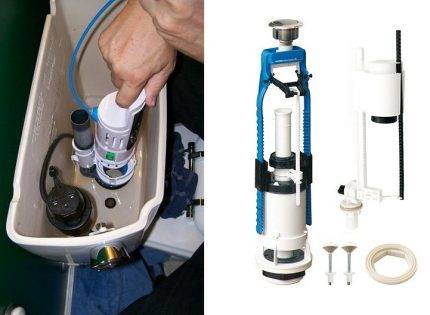
Fitting kit for installation
In a clean tank lying on a flat surface, the body of the drain mechanism is brought in, after unscrewing the lower mounting nut from it and installing an elastic sealing ring on the pipe. A plastic nut is screwed onto the thread of the rack from the outside of the tank. Screw it in with your fingers until it stops, then tighten it slightly with a wrench.Do not overtighten the fasteners - the plastic may burst.
A new o-ring is placed on the shelf of the toilet bowl - it should be located around the drain hole. The surface of the shelf is pre-cleaned of dirt and wiped dry.
New bolts with elastic gaskets are passed into the mounting holes inside the tank, which are responsible for the tightness of the joints. The drain tank is installed in place, not leveled yet. It is necessary to pass the bolts into the mounting holes of the toilet shelf, screw the nuts onto them.
The next step is to align the tank and tighten the nuts with a wrench.
It is important to tighten the fasteners gradually and alternately, then right, then left, in order to avoid skewing the tank
Installing and fixing the tank
Next, mount the side or bottom supply valve of the drain tank, after putting the sealing ring on the pipe. The mechanism is also fixed with a nut located on the outside of the tank. A flexible water supply is connected to the inlet valve, the threaded connection is sealed with fum-tape.
Before connecting the flexible hose, it is advisable to briefly open the water supply in order to remove rust particles and other debris from the pipe that got there during dismantling.
After connecting the flexible piping, turn on the water to check the tightness of all connections. If necessary, fasteners are tightened with a wrench. Then they check the operation of the mechanisms, adjust the fittings so that the system functions properly.
Before installing the cover, check and adjust the mechanisms
At the final stage, the cover is installed and the button is put in place - it is enough to screw the ring around it with your fingers.After the final testing, the tank is completely ready for operation.
Types of valves
The principle of operation of a conventional tank is not complicated: it has a hole through which water enters and a place where water is discharged into the toilet. The first is closed by a special valve, the second - by a damper. When you press the lever or button, the damper rises, and the water, in whole or in part, enters the toilet, and then into the sewer.
After that, the damper returns to its place and closes the drain point. Immediately after this, the drain valve mechanism is activated, which opens the hole for water to enter. The tank is filled to a certain level, after which the inlet is blocked. The supply and shutoff of water are regulated by a special valve.
There are separate and combined design of valves.
Separate and combined options
The separate version has been used for many decades. It is considered cheaper and easier to repair and set up. With this design, the filling valve and the damper are installed separately, they are not connected to each other.


To control the inflow and outflow of water, a float sensor is used, in the role of which even a piece of ordinary foam is sometimes used. In addition to a mechanical damper, an air valve can be used for the drain hole.
A rope or chain can be used as a lever to raise the damper or open the valve. This is a typical option for models made in retro style, when the tank is placed quite high.
In compact toilet models, control is most often carried out using a button that needs to be pressed.For those with special needs, a foot pedal may be installed, but this is a rare option. In recent years, models with a double button have been very popular, which allow you to empty the tank not only completely, but also halfway to save some of the water.
The separate version of the fittings is convenient in that you can repair and adjust individual parts of the system separately.
Combined type fittings are used in high-end plumbing, here the drain and inlet of water are connected into a common system. This option is considered more reliable, convenient and expensive. If this mechanism breaks, the system will need to be completely dismantled for repair. The setup can also be a little tricky.
Materials for the manufacture of devices
Most often, toilet fittings are made of polymeric materials. Usually, the more expensive such a system is, the more reliable it is, but this method does not give clear guarantees. There are fakes of well-known brands, and quite reliable and inexpensive domestic products. An ordinary buyer can only try to find a good seller and hope for good luck.
Fittings made of bronze and brass alloys are considered much more reliable, and it is much more difficult to fake such devices. But the cost of these mechanisms will be much higher than that of plastic products. Metal filling is usually used in high-end plumbing. With proper configuration and installation, such a mechanism functions smoothly for many years.
Place of water supply
An important point is the place where water enters the toilet. It can be carried out from the side or from below.When water is poured from the side hole, it produces a certain amount of noise, which is not always pleasant for others. If the water comes from below, it happens almost silently. The lower water supply to the tank is more typical for new models released abroad.
But traditional cisterns of domestic production usually have a lateral water supply. The advantage of this option is the relatively low cost. The installation is also different. The elements of the lower water supply can be installed in the tank even before its installation. But the side feed is mounted only after the tank is installed on the toilet bowl.
Button repair
The fittings of the tank may become unusable for the following reasons:
- use of low-quality mechanisms. Professional plumbers recommend installing cistern fittings made by companies such as Cersanit, Vidima, Jika;
- natural wear. Any device is designed for a certain number of years of use or number of flush cycles;
- mechanical damage. Careless use may cause damage.
Button malfunctions and solutions
The most common button failures are:
- "sticking" of the button, that is, the flushing of water occurs only after repeatedly pressing the descender;
- failure of the button, that is, the button mechanism descends into the capacity of the drain tank.
Elimination of sticking
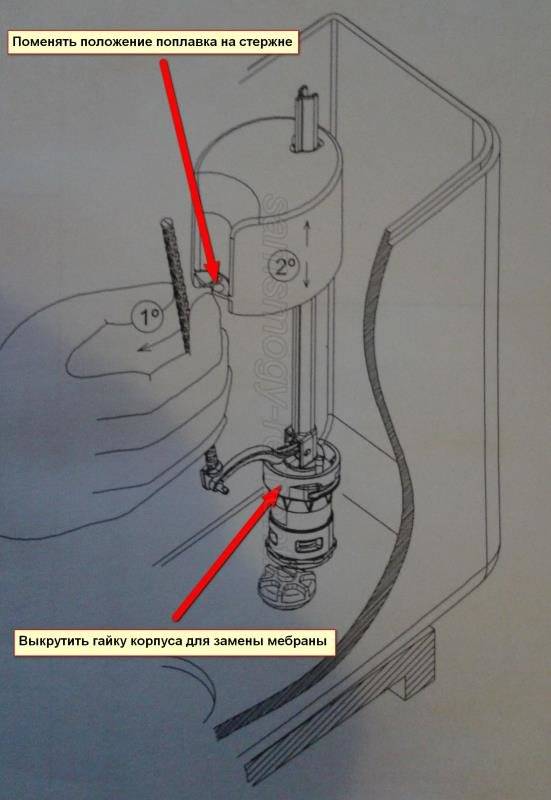
If the water is flushed after repeatedly pressing the button, then the malfunction is related to the rod connecting the drain device and the drain mechanism.
Button and drain valve connection device
To fix the problem, you need:
- block the flow of water into the tank;
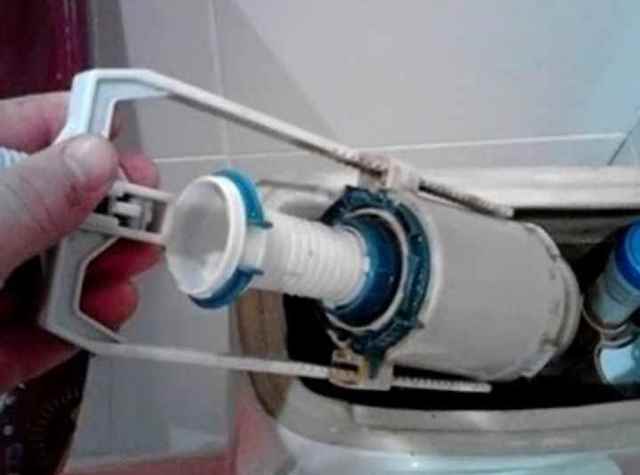
- remove the tank cover. To do this, first of all, the inside of the button is removed, and then the retaining ring located on the button is unscrewed counterclockwise and removed;
Parsing the button and removing the retaining ring
Unscrewing the trigger
- stock is being repaired;
- the system is assembled in reverse order.
The stem is made of plastic. Therefore, repairs most often come down to a complete replacement of the product. For temporary troubleshooting, the stem can be replaced with wire.


Elimination of failure
If the toilet cistern button fails, then the causes of the breakdown may be:
- incorrect setting of the drain device (insufficient button height selected);
- failure of the spring that returns the button to its original position. The problem is solved by replacing the spring.
To set up the drain mechanism, you must:
- turn off the water supply to the container and completely drain the remaining liquid;
- remove the drain mechanism (the entire valve turns to the left until it clicks);
- press the clamps securing the glass;
- increase height;
Elimination of the sinking of the drain button
- install the valve and cover;
- check if the problem is resolved and repeat the procedure if necessary.
How to adjust the drain mechanism is shown in the video.
Button Replacement
If the listed actions do not help to eliminate the malfunction of the tank trigger, then the drain button needs to be replaced. You can work in the following way:
- remove the button, according to the scheme described in detail above;
- disconnect the button from the exhaust valve;
- install a new device.
The new toilet button must fully match the broken device. Otherwise, the drain valve will need to be replaced.
All troubleshooting work on the button must be done very carefully so as not to damage the rest of the fittings. If it is not possible to eliminate the breakdown on your own, then it is more expedient to seek help from specialists.
- How to choose the manufacturer and model of the shower toilet
- How to wash and clean the toilet from limescale
- How to replace the toilet with your own hands
- How to properly install and adjust the toilet with your own hands
- Autonomous sewerage
- Household pumps
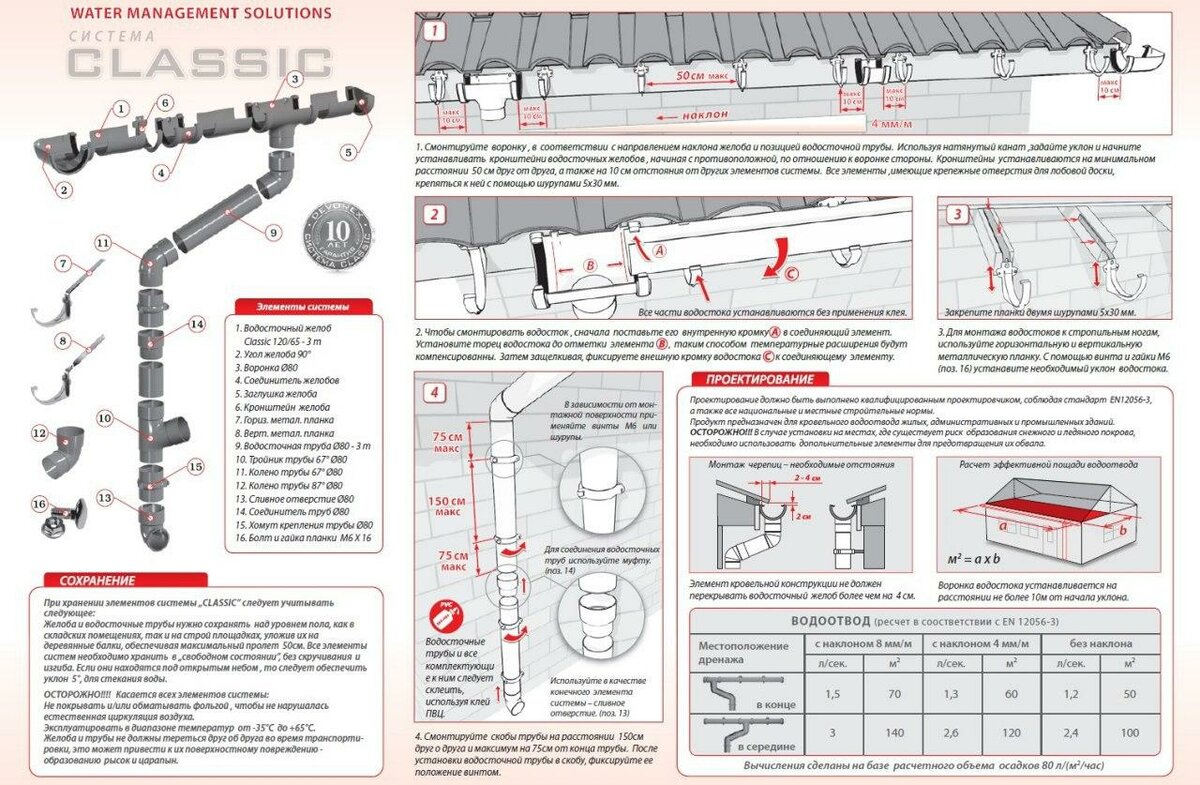
- Gutter system
- Cesspool
- Drainage
- sewer well
- Sewer pipes
- Equipment
- Sewer connection
- The buildings
- cleaning
- Plumbing
- septic tank
- Choosing and installing a hanging bidet with your own hands
- How to choose an electronic bidet
- Choosing and installing a compact bidet
- How to choose a bidet manufacturer
- How to choose, install and connect a floor bidet
- How to install and adjust toilet cistern fittings
- How to connect a dishwasher with your own hands
- How to connect a washing machine with your own hands
- Cleaning sewer pipes: household recipes and equipment
- Heating system made of polyethylene pipes: how to create your own hands
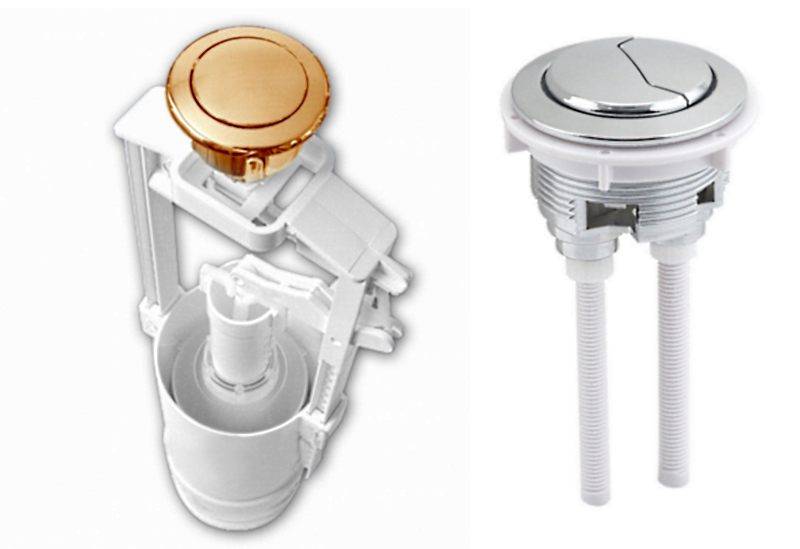
Dual flush
The working volume of the toilet bowl is 4 or 6 liters. In order to save water, flushing mechanisms have been developed with two modes of operation:
- in the standard version, the entire volume of liquid from the tank is drained into the bowl;
- in the "economy" mode - half the volume, i.e. 2 or 3 liters.
Management is implemented in different ways.It can be a two-button system or a one-button system with two pressing options - weak and strong.

Dual flush mechanism
The advantages of a dual-mode drain include more economical water consumption. But we must not forget about the disadvantage - the more complex the mechanism, the more elements it contains, the higher the risk of breakage and the more difficult it is to fix the malfunction.
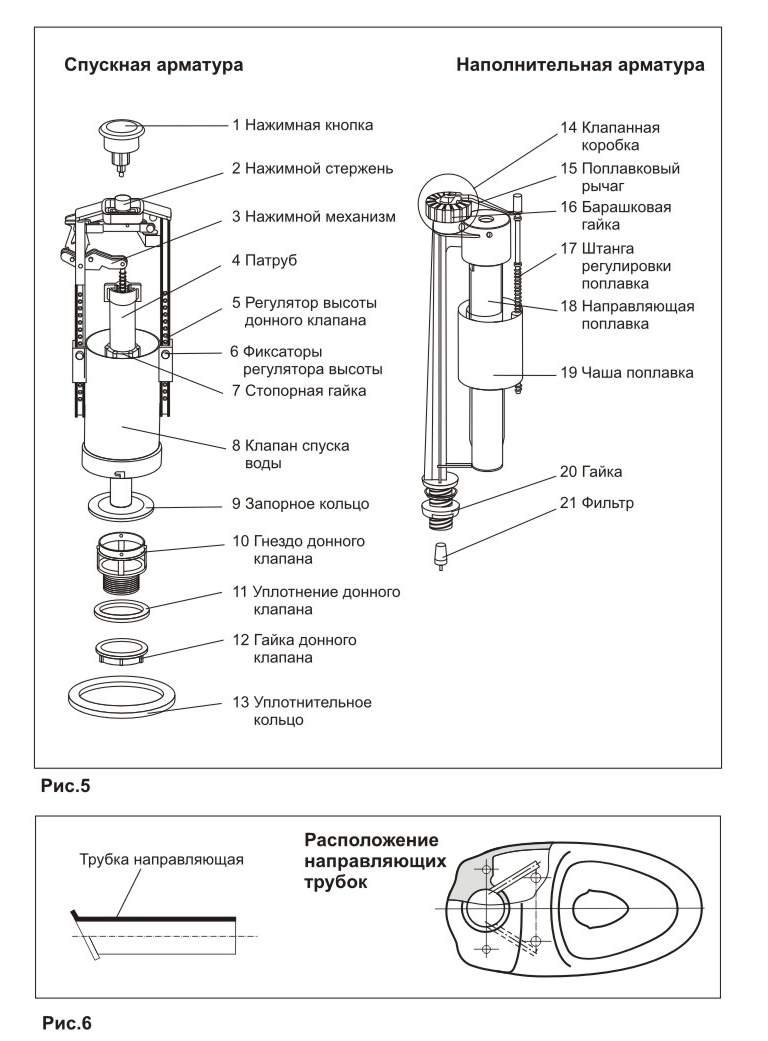
The main elements of the toilet
Regardless of the external solution, the basic components of all models are almost identical, so compact systems with a standardized structure will be considered.
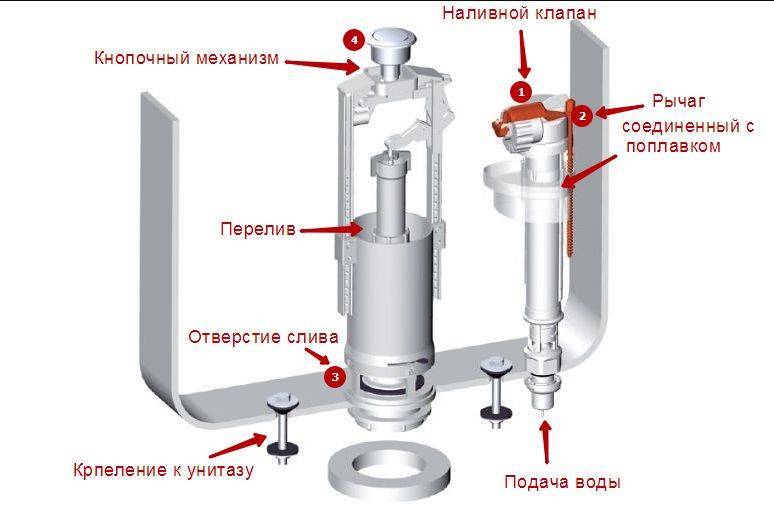
Drain tank from several components:
- stop valves;
- drain hole;
- overflow tube;
- drain mechanism;
- rubber valve cover.
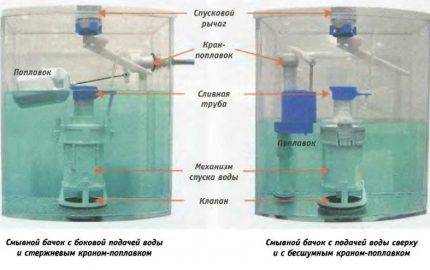
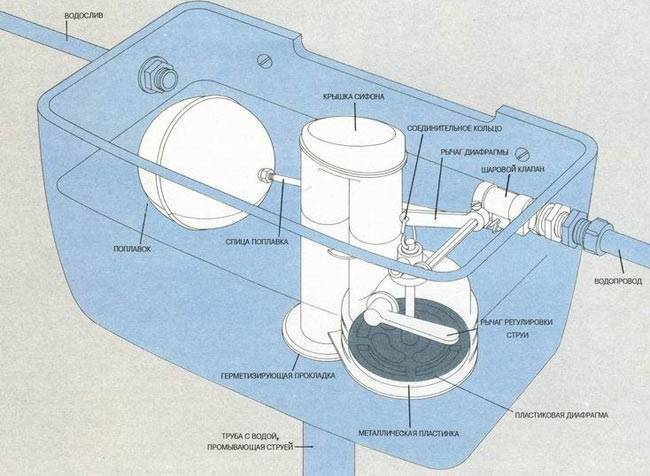
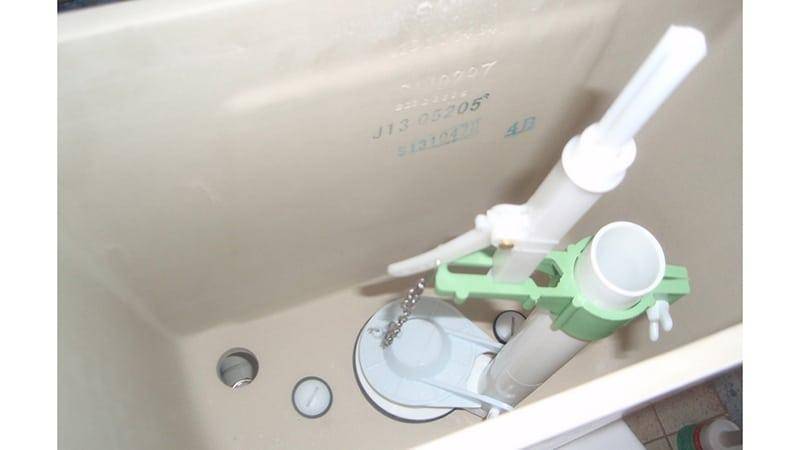
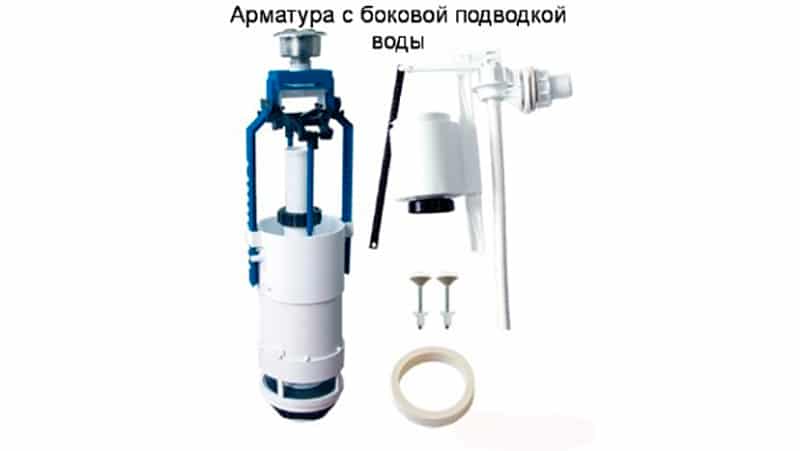 Fittings for a tank with a lateral water supply
When choosing methods for proper installation, it is important to determine type of water supply to the tank (side or bottom). In the first case, the container is equipped with two holes
The liquid during draining is driven by the top button or side lever. The main requirement for shut-off valves is a reliable blocking of the access of the water jet with standard filling, which the shut-off valve of the toilet bowl provides, given that its membrane varieties are in higher demand than piston ones. The float regulates this process. Floating up with water, when the maximum filling is reached, it acts on the lever to which it is attached, and it closes the shut-off valve directly.
The bowl is selected for specific conditions. Basically, two of its modifications are offered, differing in the oblique or direct orientation of the sewer outlet.The ceramic tank is fixed with bolts directly to the horizontal shelf of the bowl, a rubber gasket is provided between them.


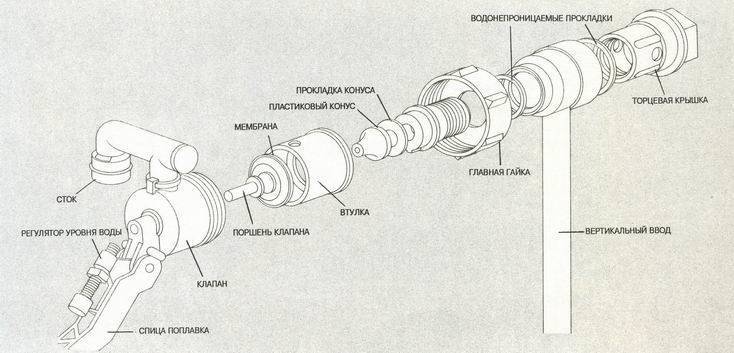


The drain system or drain fitting for the toilet cistern is represented by two basic elements:
- release lever;
- drain siphon, the main purpose of which is to hermetically close the hole after the completion of the process of draining water. Siphons are available in several models, the simplest of them resemble a rubber cylinder.
The sequence of operations for installing structural elements
The toilet bowl is placed in the place allotted to it and joins the sewer system. After that, the stage of installation of such a critical part as fittings for the toilet flush tank begins, which to a large extent ensures the flawless functioning of the equipment.
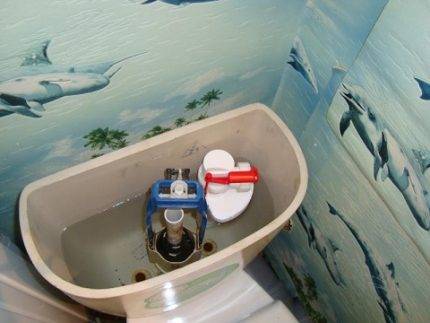
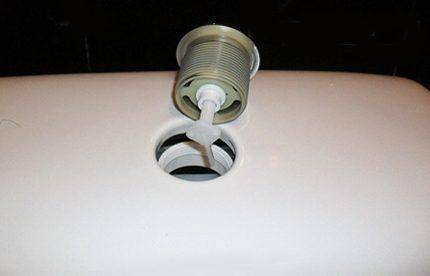
 Tank drain valve
- Install a drain mechanism in the container, tighten the plastic nut, ensuring tightness with a rubber gasket.
- Equip the bolts with washers and gaskets from the kit, insert them evenly along the axis into the holes. On the reverse side, a washer is put on them, then a nut, which is neatly but tightly twisted.
- For better sealing, a sealing rubber ring is put on the nut if it is made of plastic. If the ring has already been used, then the joints should be additionally coated with a sealing compound. For a new ring, these techniques will not have to be applied.
It remains to fix the tank. The algorithm will be identical to the sequence of operations in accordance with the recommendations on how to change the toilet bowl, given by experts. A rubber gasket is attached to the shelf.For a more reliable fixation, it is advisable to look for self-adhesive samples.
The tank is placed, taking into account that the sharp tips of the cone-shaped gaskets with which the mounting bolts are equipped must be directed into the holes. This form has already proven its reliability, protecting against leaks. Bolts are inserted strictly along the axis into the holes. Screwing the nuts completes the installation.
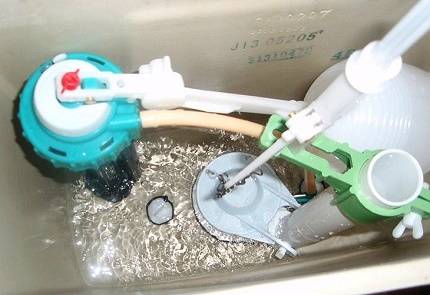
 Installation of fittings in the drain tank
The hose is connected to the pipelines, focusing on cold water systems. Tightness is created using a washer-gasket. When putting on a flexible hose, you do not need to try to independently increase the degree of strength of the future connection and wind auxiliary materials on the thread in the form of threads or tapes. The main thing in this operation is to exclude the skew of the mounted mechanism. This will help to tighten the nuts evenly without stripping the threads and achieve full operational readiness of the drain mechanism.
Carefully replace the lid and screw on the drain button. Then the valves open, and the control filling of the tank and draining is carried out. The absence of protruding condensate on the connections indicates a quality installation.
Comparing the advantages and disadvantages of both options
 One-button drain hydraulic systems are among the most popular. Automatic two-button mechanisms are only gaining momentum in popularity.
The "small drain" hydraulic system is undeservedly underestimated. However, modern types of cisterns are equipped with a special element - an auger, which makes the water fall down intensively and powerfully, which positively affects the cleanliness of the toilet bowl.
If desired, there is a need to purchase economical one-button drain tanks, in which water flow control is carried out using the “aqua-stop” design. Profitability is due to the alternation of pressures: the first pressing contributes to the drain, and the second - stops this process.
Flushing tanks operating in a dual-mode drain save almost twenty cubic meters of water per year, which significantly affects the payment costs. True, it should be borne in mind that modern two-button mechanisms are more expensive than the classic one-button version, but all costs quickly pay off.
Drain mechanism failure
There are no such structures that would serve you for a long time and did not break. Be sure there comes a time when the tank begins to falter in terms of fulfilling its direct duties. Most often, there are only two breakdowns that are typical for drain mechanisms:
- Water does not hold in the tank;
- From time to time, the mechanism becomes unusable.
If you have the second reason, then most likely it will make you go and buy a new mechanism, but you can still try to eliminate the first one on your own.
Water from the tank can pour out for two reasons:
- Does not hold the locking mechanism.
- The overflow is incorrectly adjusted.
When the container is too full of water, it means that you have adjusted the float mechanism incorrectly. The regulation should end with the fact that the water level should not reach the overflow.
If the shut-off valve is the reason for the leakage of water, then the gasket must be checked, if it is worn out, then it must be replaced. Or maybe just accumulated debris under the valve does not allow it to work normally.Thus, it is possible on your own to cope with many problems that arise during the operation of the toilet cistern.
Setting up sanitary cistern toilets
The end of the assembly of plumbing does not mean the end of all work on its installation. Often, the fittings of the toilet cistern will have to be adjusted, after which the functions of filling, overflowing and draining must be performed flawlessly. Also, sometimes it is necessary to adjust the mechanisms during their long-term operation or replacement.


Important! First of all, for all types of equipment, the shut-off valve of the toilet bowl is checked, the tightness of its fit to the seat. Usually on new equipment, if everything is assembled without distortions, then there should be no leaks
Push button cistern adjustment
What should be paid attention to in the process of setting up modern "push-button" plumbing?
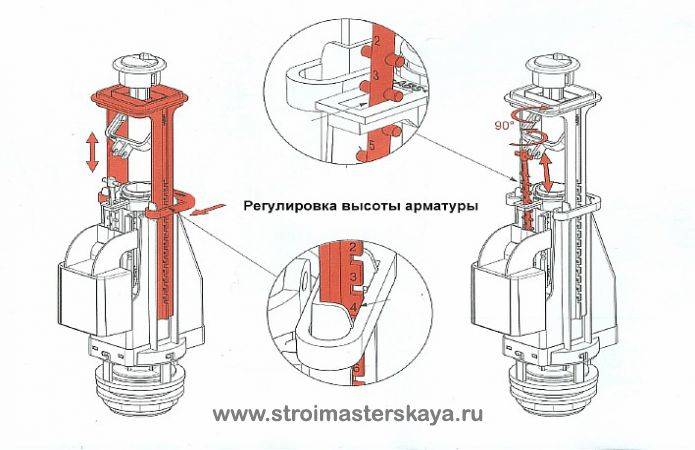
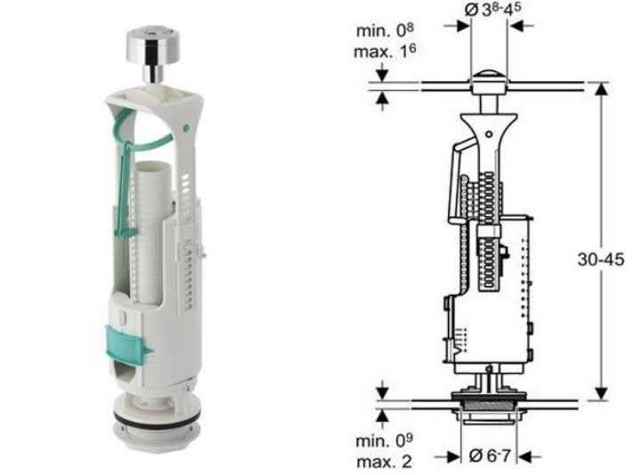
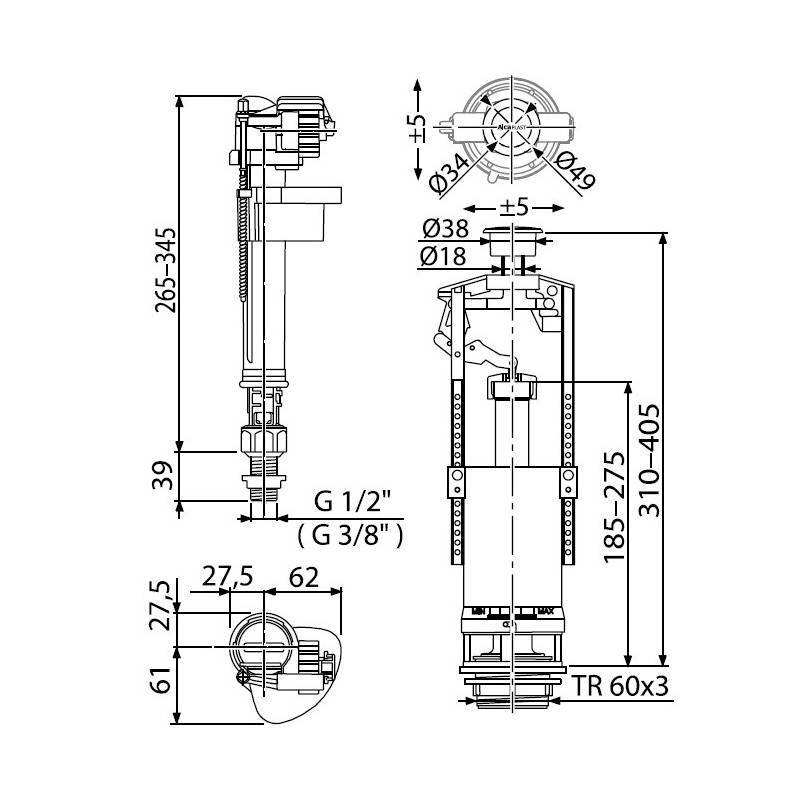
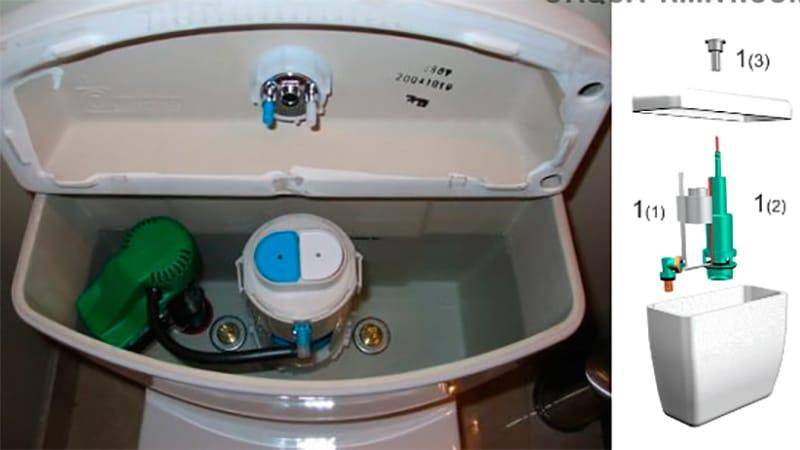
Figure #2
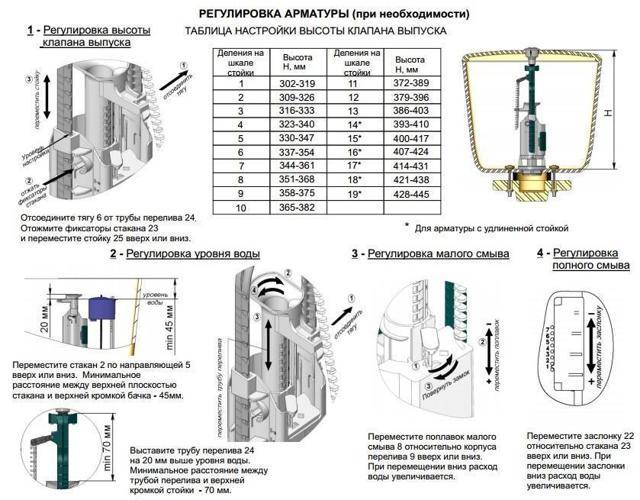
- The flush valve height is set (Figure 2). Its design must correspond to the dimensions of the storage container under the cover, taking into account the button (1). Disconnect the rod (2) from the latch of the overflow tube. Release the rack clamps (3) on both sides. Move the racks (5) in the required direction vertically, guided by the scale printed on them. Fasten the clips and tie rod in the new position.
- The height of fixation of the overflow tube is adjustable. There are two requirements for this parameter: the surface of the water in the toilet bowl must be 15-20 mm below the edge of the overflow, but at the same time, the fully pressed button should not touch the top of the tube. To do this: Set the gap between the edge of the overflow and the top (4) of the rack (5), (Figure 2). To perform this operation, you will have to release the rod (2) and the clamping ring or the clamp on the tube.Lower or raise it to the required height. Fix overflow and traction.
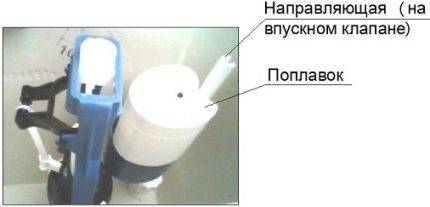
- The functionality of the filling fittings is configured in accordance with the requirements of the previous paragraph regarding the filling volume. In order for the inlet valve to provide the optimum water level in the drain tank, the position of its float must be set. If you need to set an early cutoff of the supply, then the float is lowered lower or fixed higher if the volume of liquid is insufficient. Changing its position is carried out by rearranging the rod similar to the rod on the drain valve.
Two-level drain adjustment
In modern push-button toilet sets, it is not uncommon to have a two-level water discharge. Such models require small and full drain settings.
Adjustment of the two-button drain mechanism.
The discharge of the entire volume of liquid is regulated by a damper, increasing this parameter by moving it down and, decreasing it, by moving it up. Partial discharge of water is set by a small flush float, which, after opening the lock, we move it up or down, respectively increasing or decreasing the flow rate.
You can learn more about adjusting the two-button trigger mechanism from the video:
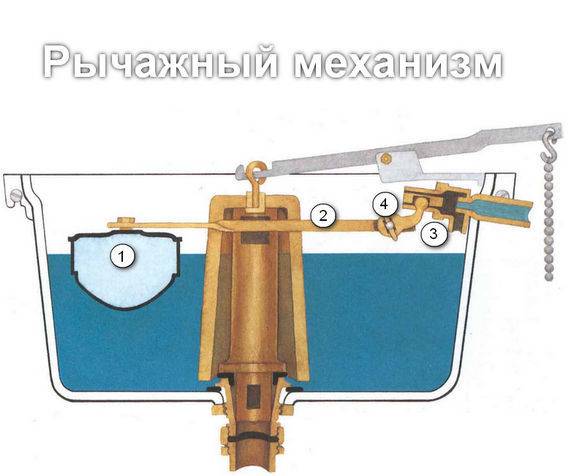
Adjusting older models
In conclusion, it is worth mentioning the adjustment of "classic" systems with a lateral water supply. The old-style toilet cistern device only involves setting the inlet valve.
His work depends on the position of the float, which is lowered or raised.To this end, if the rocker is brass (steel), then it is simply bent into the desired position, and if it is plastic, then the geometry of the lever changes after loosening and then tightening the mounting screw.
Adjustment of the overflow and exhaust valve in such models is not provided, and the problems that arise with them, as a rule, lead to repair work or a complete replacement of the mechanisms.
The button sinks or sticks: what to do?
To the listed malfunctions of the flush tank, you can add another sticking or sticking of the button. This is when you press the button, release it, and it remains in the nest, so that the drain does not stop. You have to press the button mechanism several times to return the button to its original position. The problem is solved by cleaning the buttons themselves from rust and dirt. Monthly use of cleaning products when caring for the sanitary condition of the buttons allows you to get rid of this problem once and for all. Some simply pour a small amount of detergent directly into the button mechanism. Under the influence of special means, all the dirt dissolves, and the buttons do not stick.

The sinking button of the toilet cistern entails a large amount of water, which is unacceptably expensive for the family budget
As you can see, self-repair of a toilet cistern with a button is quite possible. After spending a little time studying the device and the principle of operation of valve mechanisms, you can fix the drain tank without outside help. Of course, if plumbing work does not bring you any pleasure, then you should turn to professional craftsmen who will cope with any malfunction of the tank and toilet bowl in a matter of minutes.It is enough for real masters to take a look at the toilet bowl with one glance to understand the nature of the problem. For troubleshooting, plumbers usually have everything they need always with them.


Vladimir Vladimirovich Golovanov
After graduating in 2008 of the Faculty of Engineering and Construction of St. Petersburg State Polytechnic University, works as an engineer of sanitary equipment. He has patents for inventions in the field of engineering plumbing equipment, which are being introduced into production. Author of a unique advanced training course for plumbers. Invited Russian-speaking teacher of the international university "Ontario College Certificate" with a degree in plumbing equipment engineering.
Sewer connection
The design of toilet bowls is changing, the way they are attached to the floor, the level of walls and floors in the bathrooms is also changing. In this regard, it was more and more difficult to select typical cast-iron pipes in size so as to join them all together. This is how a flexible adapter made of thermoplastic and durable materials was invented. Stretching, it changes size and bends, as it is made of corrugated material. With the help of corrugations, installation and connection to the sewerage system have been greatly simplified.
We suggest you familiarize yourself with How to weave braids at home
From the inside, the corrugation has a pipe that is completely smooth, this prevents it from overgrowing with dirt from the inside and accumulating debris. The disadvantage of these pipes is their fragility - they must be carefully assembled, as the pipe may crack from impact and load. Some products are reinforced to avoid this.
This does not mean that attaching the bellows to the toilet requires a high level of skill, for a person with little experience, it will not be difficult and the motto "build it yourself" is quite applicable to the toilet.
The end of the corrugation has internal membranes designed to ensure the tightness of the connection. This end is attached to a clean toilet pipe, which is coated with silicone sealant to enhance tightness and give additional strength. After that, the wide end of the corrugation is put on the pipe from above, monitoring the uniformity and symmetry of putting on. The sealant must be allowed to dry before the test run of water.
The opposite edge of the corrugation has sealing rings. It is inserted all the way into the pipe that leads to the riser. Previously, the pipe, as far as possible, is cleaned of debris and rust. This end of the corrugation is also lubricated with silicone before fixing.
To check the tightness of the connection, after the sealant dries, a bucket of water is poured into the toilet bowl. If there is no leakage, the corrugation functions well.
Be sure to use sealant in the process. The use of a cuff is an affordable price and an easy job to do. This method is suitable when the toilet is fixed in a hard-to-reach place or it is not clear what distance is laid. When the fastening is done, you need to check for leakage - just pour a bucket of water.