- Basic installation and connection diagrams
- Installation technology
- Choose a place
- Laying pipes
- We connect the unit
- Prestart setting
- Water source
- Well types
- Pump selection
- Well equipment
- Pump station units
- Features of the device of the pumping station
- Do-it-yourself steps for connecting a pumping station to a well
- Installation of a submersible electric pump for installation in a well
- How to install?
- Storage tank system
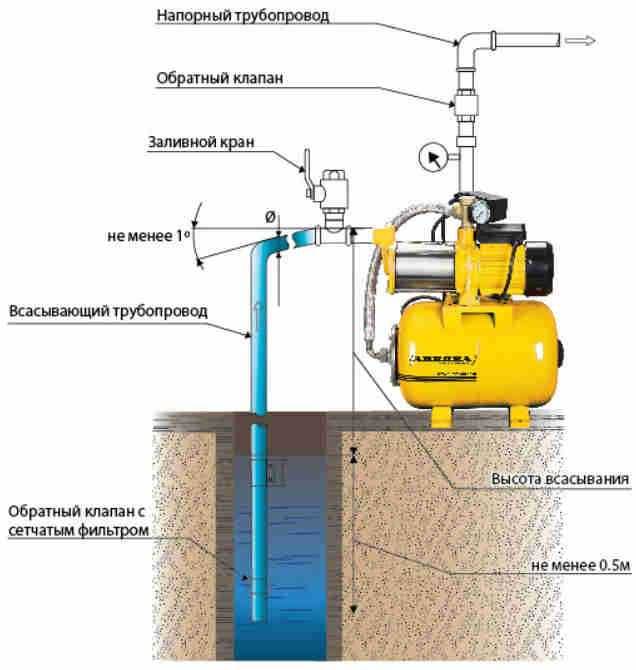
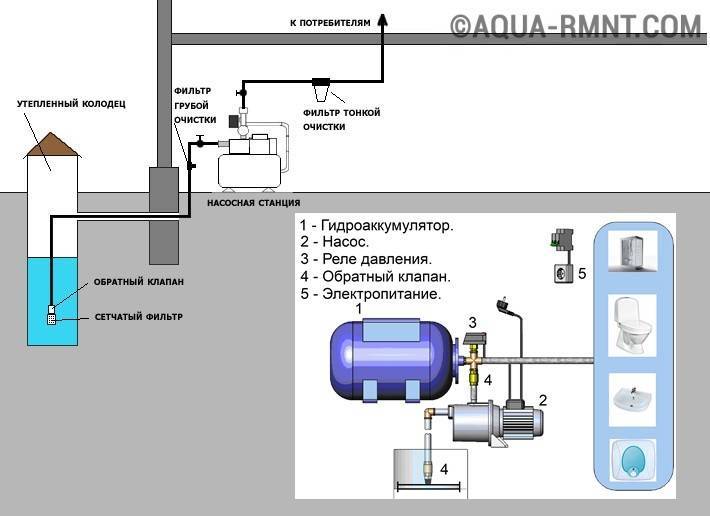
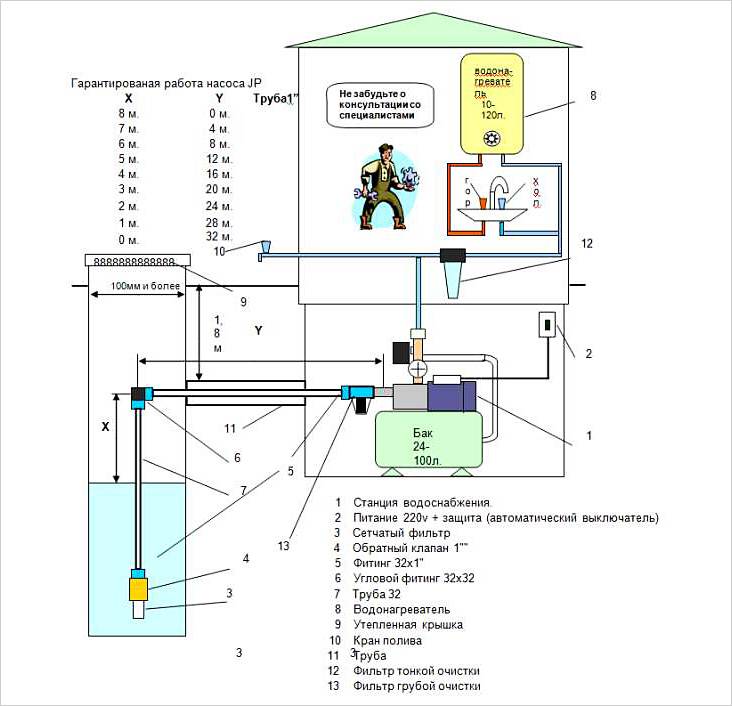
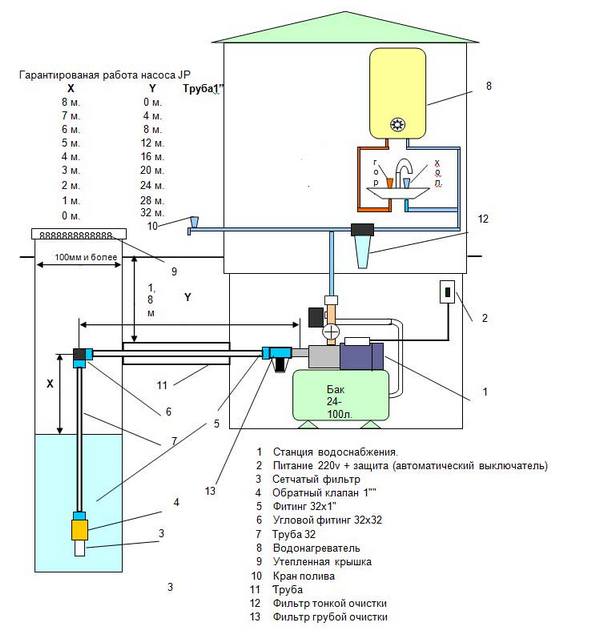
Basic installation and connection diagrams

The most common schemes are:
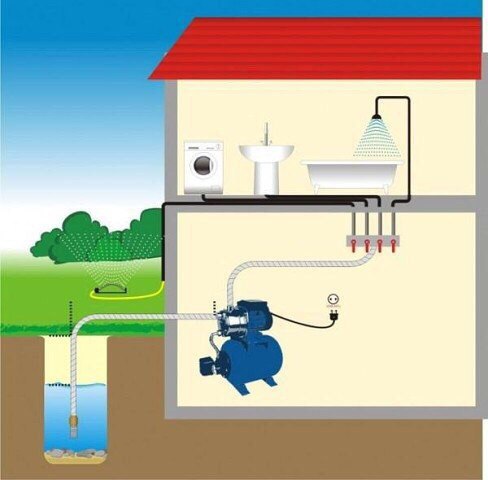
- Scheme of direct connection of the device to the supply pipeline.
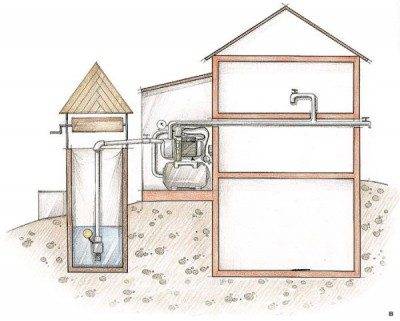
- Scheme with a storage tank.
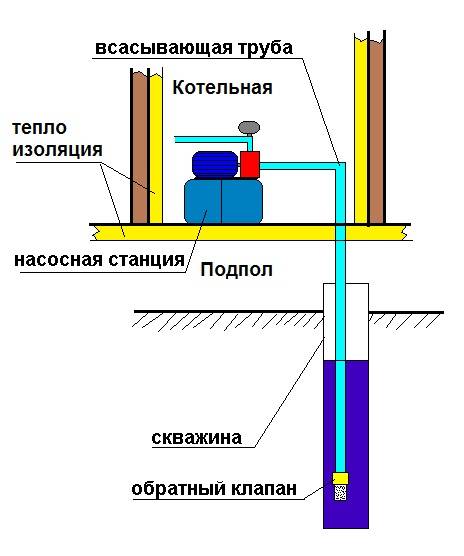
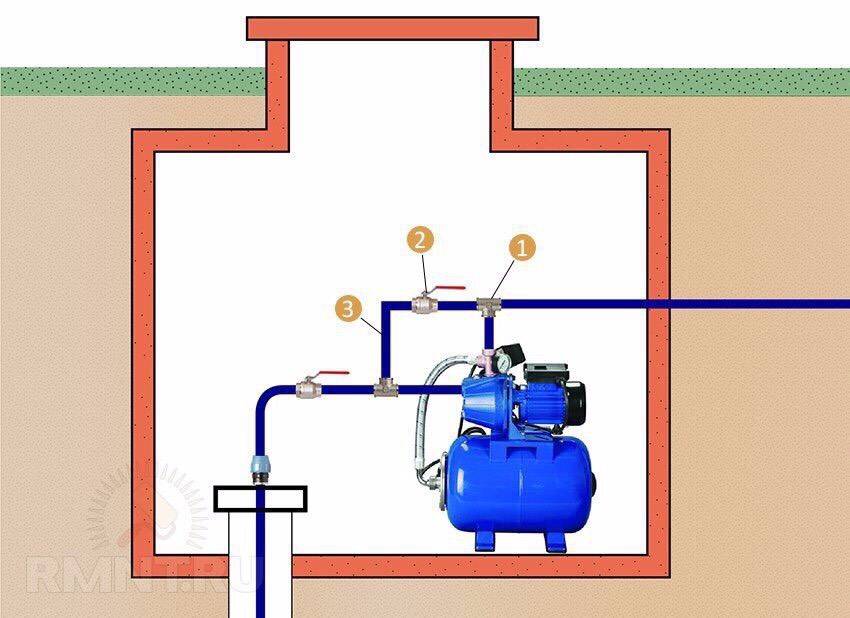
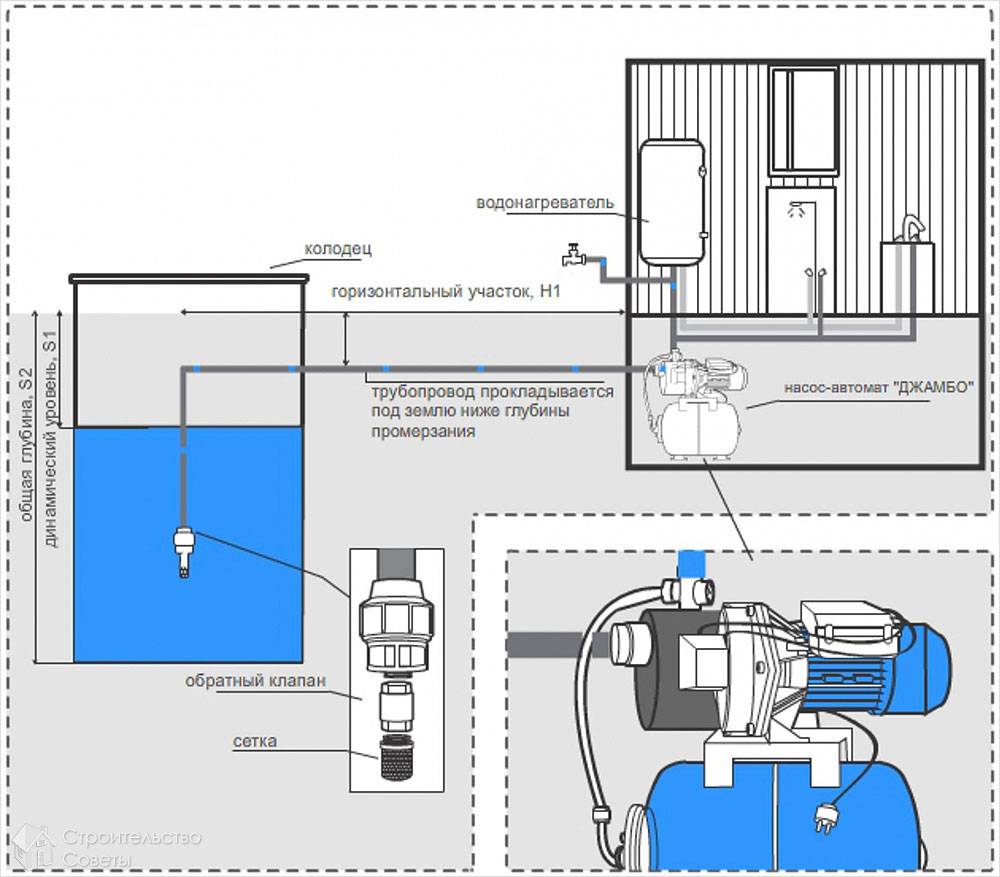
Direct connection involves placing the station between the water intake and the intra-house pipeline. Water is directly sucked from the well and supplied to the consumer. With this installation scheme, the equipment is located in a heated room - in the basement or basement. This is due to the fear of low temperatures. Freezing water inside the device can cause it to fail.

However, in regions with relatively mild winters, it is allowed to place a water station directly at the top of the well. To do this, a well buried in the ground is built above it, which is insulated to prevent freezing of water inside the pipeline.If necessary, an electric heating wire can be used. We will discuss in more detail all aspects of choosing an installation site below.

The scheme for connecting a station with a storage tank looks a little different. Water from the source is not supplied directly to the in-house system, but to a special volumetric storage tank. The pumping station itself is located between the storage tank and the internal pipeline. Water is pumped to the points of water intake by the station pump from the storage tank.
Thus, in such a scheme, two pumps are used:
- Deep well pump that pumps water into the storage tank.
- A pumping station that supplies water from a storage tank to a water supply system.
The advantage of the scheme with a storage tank is the presence of a sufficiently large amount of water in it. The volume of the tank can be several hundred liters, and even cubic meters, and the average volume of the damper tank of the station is 20-50 liters. Also, a similar version of the water supply system is suitable for artesian wells, when one way or another it is necessary to use a deep pump.
Installation technology
Choose a place
Installation in a special shelter
Before starting work on the installation of the pump unit, you must select a suitable location.
Its requirements are as follows:
- First, the system must be located in close proximity to the water source. This will allow us to provide the most efficient water intake without power losses.
- Secondly, the device must be protected from the effects of precipitation. Of course, most pumping stations are produced in sealed enclosures, but they are clearly not designed for continuous operation in rain and snow.
- Thirdly, the installation site must provide access to the system for adjustment and maintenance.
- Also, do not forget that the pump motor makes quite a lot of noise, so you should not mount them in residential premises.
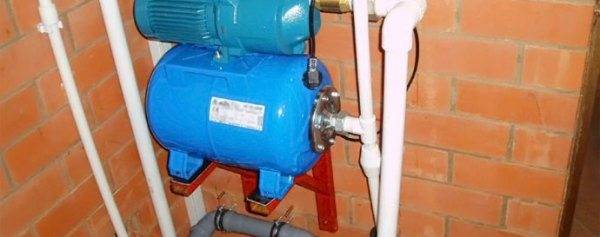
Photo of a hanging mount on a special shelf
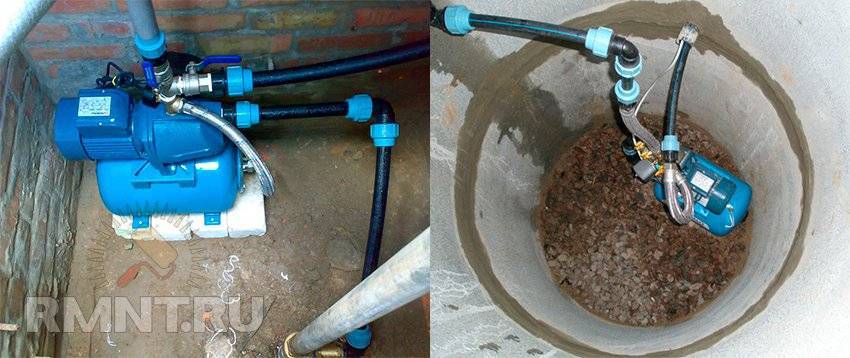
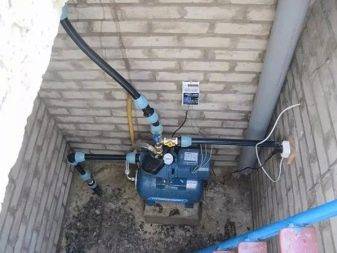
From this point of view, the basement of the house (if the well is located in close proximity to the foundation), a pit or a caisson would be an ideal place for installation. You can also place the control station in the well itself, fixing it on a special shelf under the neck.
Laying pipes
After the installation site is selected, we need to lay a pipe from the house to the water source.
The instructions for doing the work in this case are quite simple:
- We dig a trench with a slope towards the well. The depth of the trench should be slightly greater than the depth of soil freezing - this way we will protect the pipe from the formation of ice plugs.
- We fill the bottom of the trench with a sand cushion up to 20 cm thick.
- We lay the pipe, after wrapping it with heat-insulating materials.
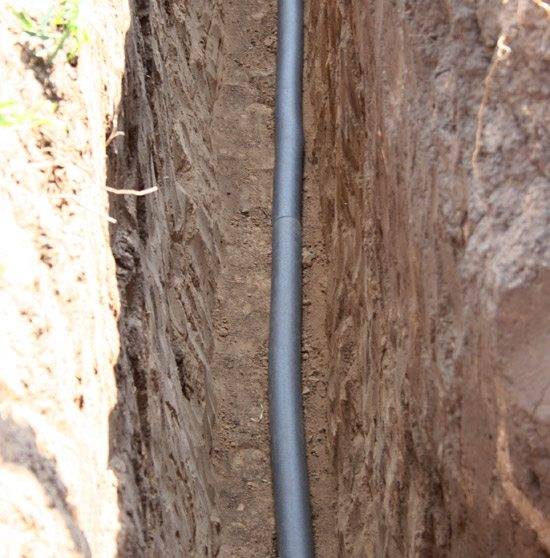
Pipe with insulation in a trench
- We make a hole in the foundation through which we lead the pipe into the basement or underground.
- We connect the pipeline to the internal wiring, carefully insulating all sections in unheated rooms.
- We connect the other end of the pipe to the pumping station through a special fitting with a check valve and a mesh for cleaning from suspended particles. The price of such a part is low, but its use significantly increases the stability of the system.
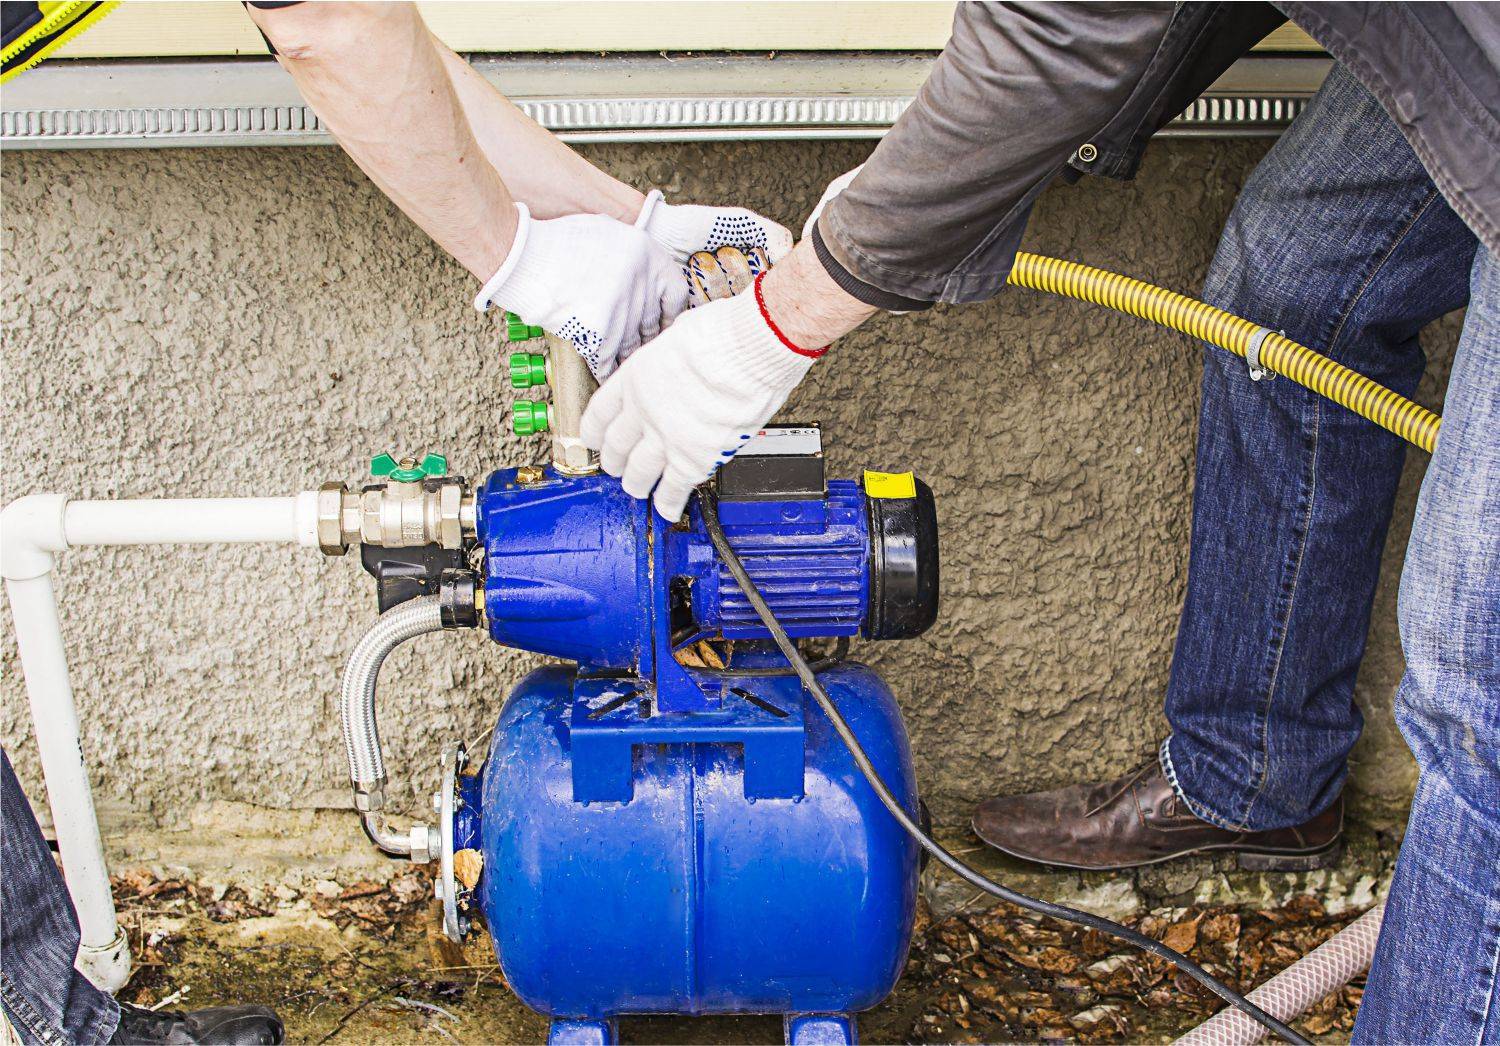
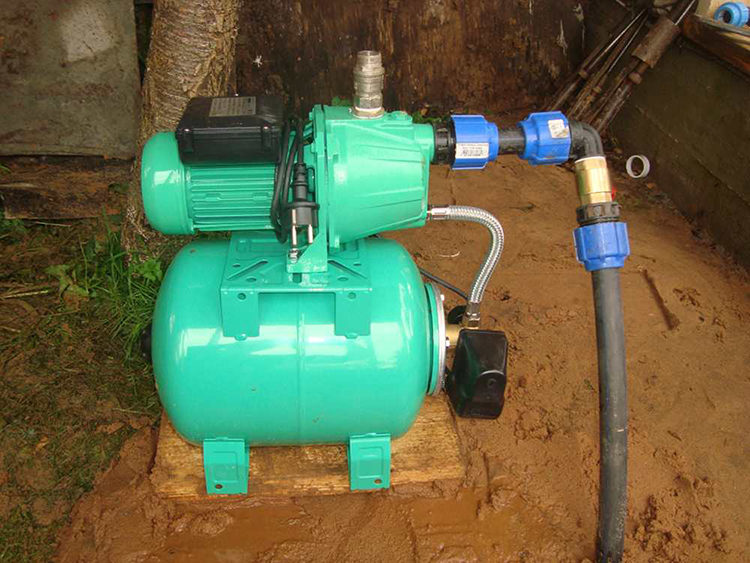
We connect the unit
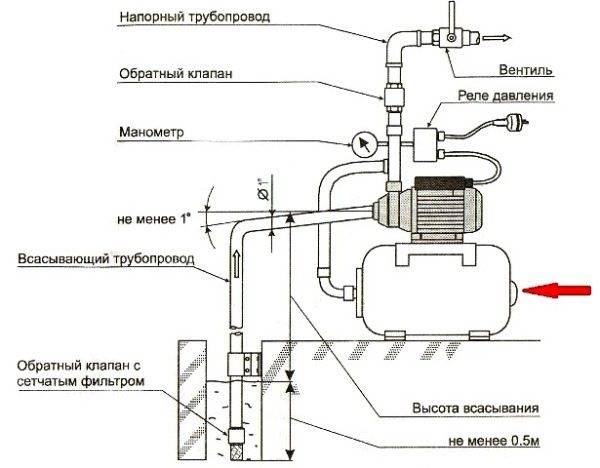
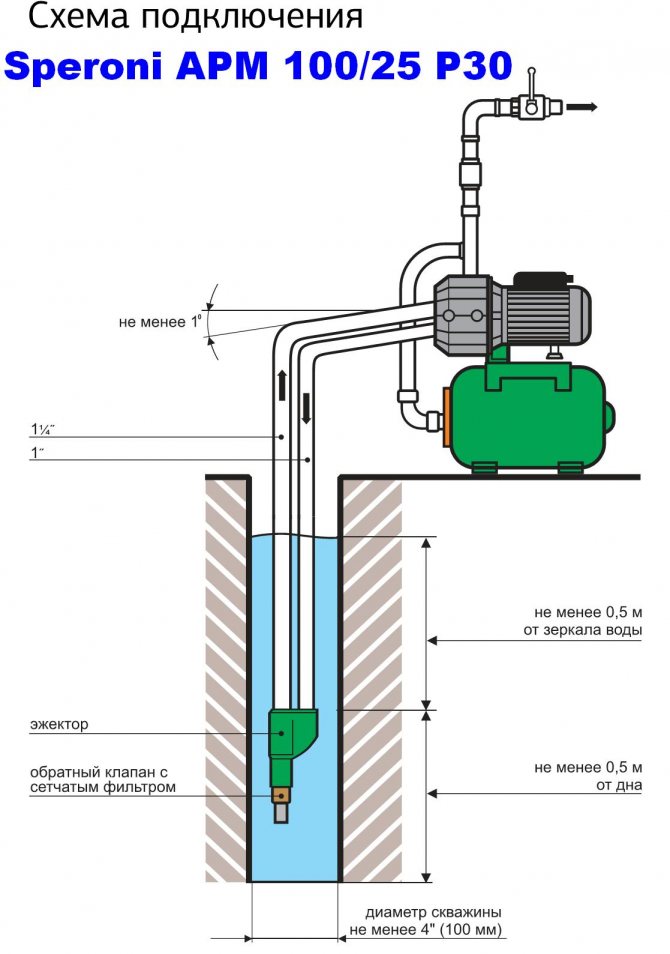
Installation scheme
Next, we need to connect and start the unit itself.
Pump room connection diagram well stations quite simple, and it can be implemented with even minimal skills:
- To begin with, we are preparing the base on which the station itself will be mounted. A small podium made of bricks or cast from monolithic reinforced concrete is best suited for this. The minimum height of such a podium is about 20 cm.
- Directly under the legs of the unit is to put a rubber mat about 10 mm thick. The elastic material will effectively absorb vibrations, reducing equipment wear and noise.
- We install the pump legs on a rubber gasket and fix them with anchor bolts with wide washers.
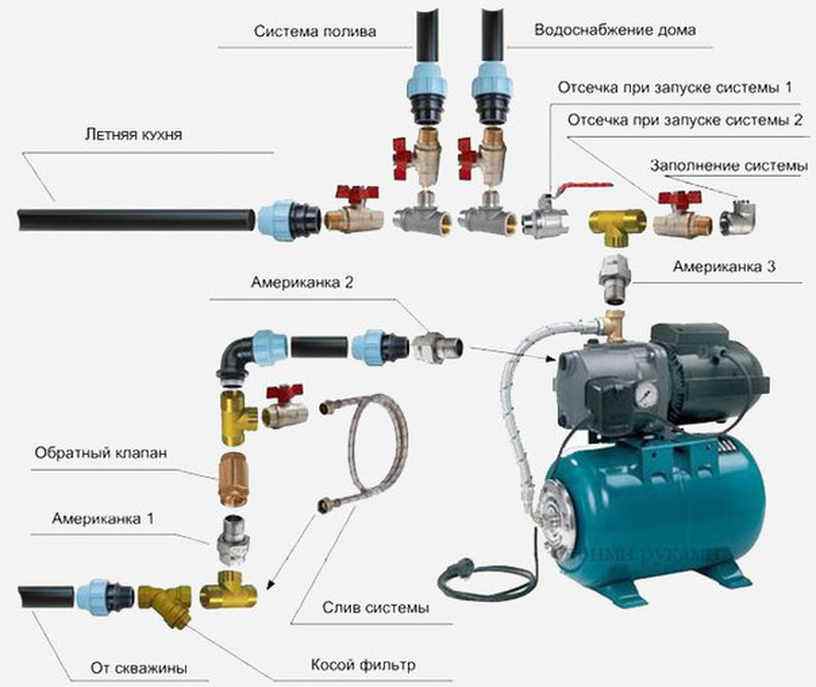
Next, you need to connect the water intake hose.
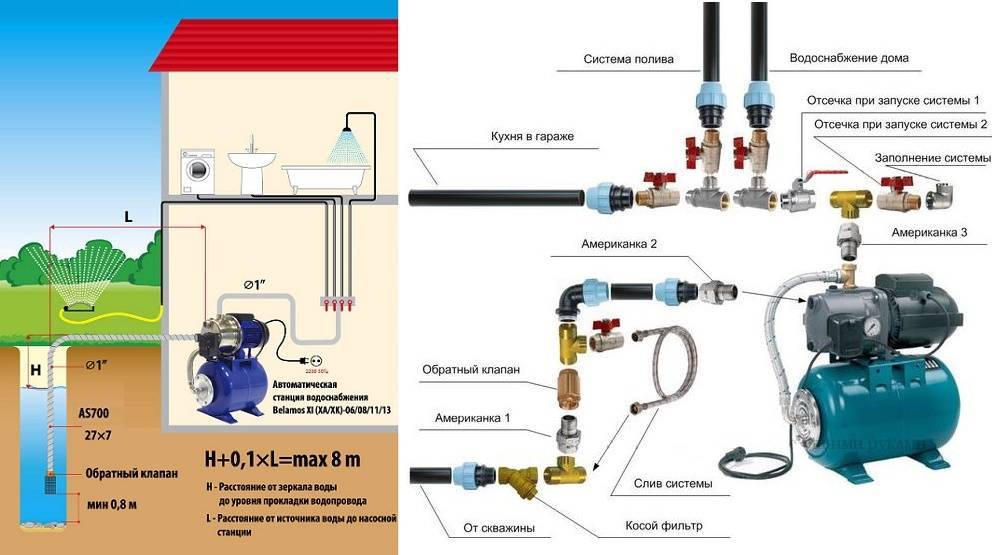
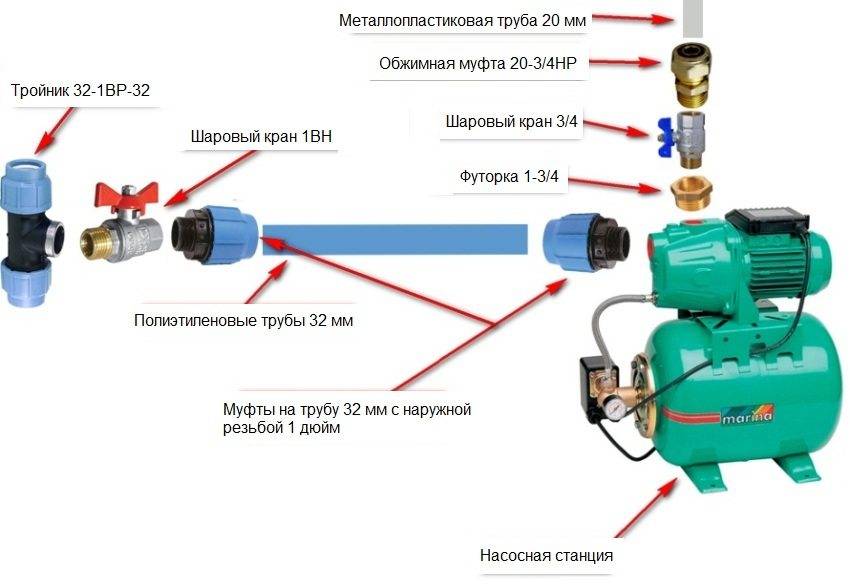
To connect we use:
- Inch coupling with external thread.
- Steel or bronze corner with an external carving.
- A non-return valve of suitable diameter that ensures a uniform flow of water into the system.
- Connection - "American".
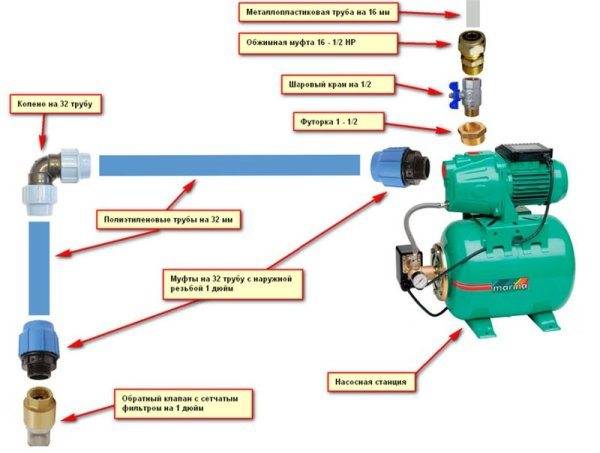
Main parts and installation sequence
We connect all the parts into a single system by connecting the water intake pipe to the pump part. In this case, it is necessary to monitor the tightness of all joints.


Using the same method, we connect the outlet pipe. As noted earlier, a coarse metal mesh filter can be installed here.
We can optimize our system by installing a pre-filter upstream of the pump section. The use of this inexpensive device allows you to extend the life of the pump, since particles of clay and sand that enter the flow section are the main factor in the wear of parts.
Prestart setting
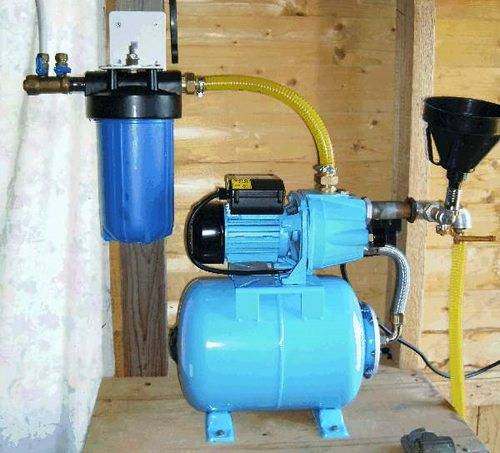
Adjustment water can be poured through the funnel
- To adjust the pressure in the pump, fill in about two liters of water through a special technological hole.
- We carry out a trial run of the unit, fixing the moment of starting and stopping the system. The optimal shutdown indicator is from 2.5 to 3 bar, the pumping part should turn on at 1.8 - 1.5 bar.
- If deviations from these figures are noted, then it is necessary to open the cover on the pressure switch and calibrate it by turning the adjusting screws. As a rule, they are marked, fixing the direction of increase and decrease of the indicator.
After the adjustment is completed, the pump can be connected to operate normally.
Water source
Well types
Any scheme for supplying water to a house from a well is built on the basis of a key component - the water source itself.
To date, all wells, depending on the characteristics of the substrate, are conditionally divided into three groups:
- Sandy - the simplest and cheapest in the arrangement. The disadvantage is a relatively short service life (up to ten years), and fairly rapid siltation. Suitable for garden installation.
- Clayey ones require a little more responsibility when drilling a well, but otherwise they have the same advantages and disadvantages as sandy ones. Should be used regularly, since after about a year without operation, it will be very difficult and expensive to restore a silted well.
- Limestone (artesian) wells are considered to be the best. The scheme for drilling a well for water in limestone involves deepening to a level of 50 to 150 meters. This provides a margin of reliability and durability of the water source, and in addition - improves the quality of natural filtration.
Main varieties
When choosing the type of well, one should not pay all attention to such a parameter as price. The fact is that the arrangement of an autonomous water supply is a very expensive task in itself, and it is better to invest in this project once (by choosing high-quality equipment and inviting professional craftsmen) than to reap the dubious “fruits of savings” in a few years in the form of impressive bills for repairs and source recovery
Pump selection
The next step in building a water supply system is the selection of pumping equipment.
Here the instruction recommends paying attention to such points:
- As a rule, high-performance models are not required for small cottages. Knowing that approximately 0.5-0.6 m3 of water is needed to operate one tap for an hour, a pump is usually installed that can provide an inflow of 2.5-3.5 m3 / h.
- The highest points of water withdrawal should also be taken into account. In some cases, to provide the necessary pressure on the upper floors, the installation of an additional pump is required, since the downhole water-lifting device cannot cope.
Small diameter pump for lifting water from great depths
Almost all models of borehole pumps are characterized by a fairly high level of energy consumption.
Taking into account this fact, it is worth taking care of the power stabilizer in advance. And if the electricity in your village is often cut off, then the generator will not be superfluous
Well equipment
The equipment process itself is usually carried out by the same company that did the drilling.
However, you should also study it - at least in order to ensure quality control of the execution of work operations:
- We lower the selected pump to the design depth and hang it on a cable or a strong cord.
- Through the neck of the well with the head installed (a special sealing part), we bring out the water supply hose and the cable that provides power to the pump.
Head mounted
- Some experts advise connecting the hose to the cable. This is quite convenient, but you need to remember that in no case should the hose be pinched at the connection points!
- Also, a lifting device is mounted near the neck - a manual or electric winch. You can do without it only at very shallow depths, because the deeper, the stronger will be felt not only the weight of the pump itself, but also the weight of the hose with the power cable, and the weight of the cable.
Photo of the main pit
This is the view of the scheme of the well device for water. However, this is not even half the battle: we need to assemble an entire system on this base.


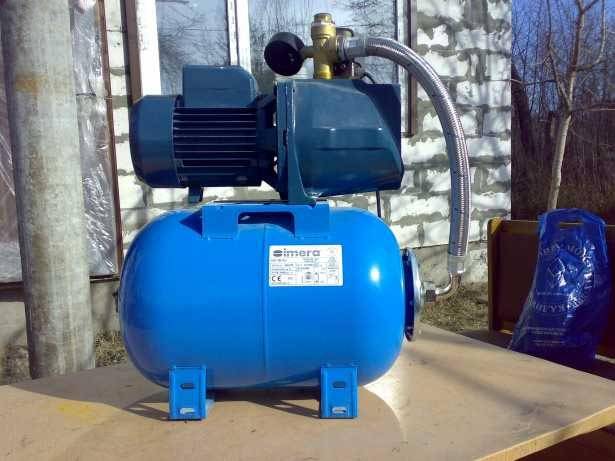
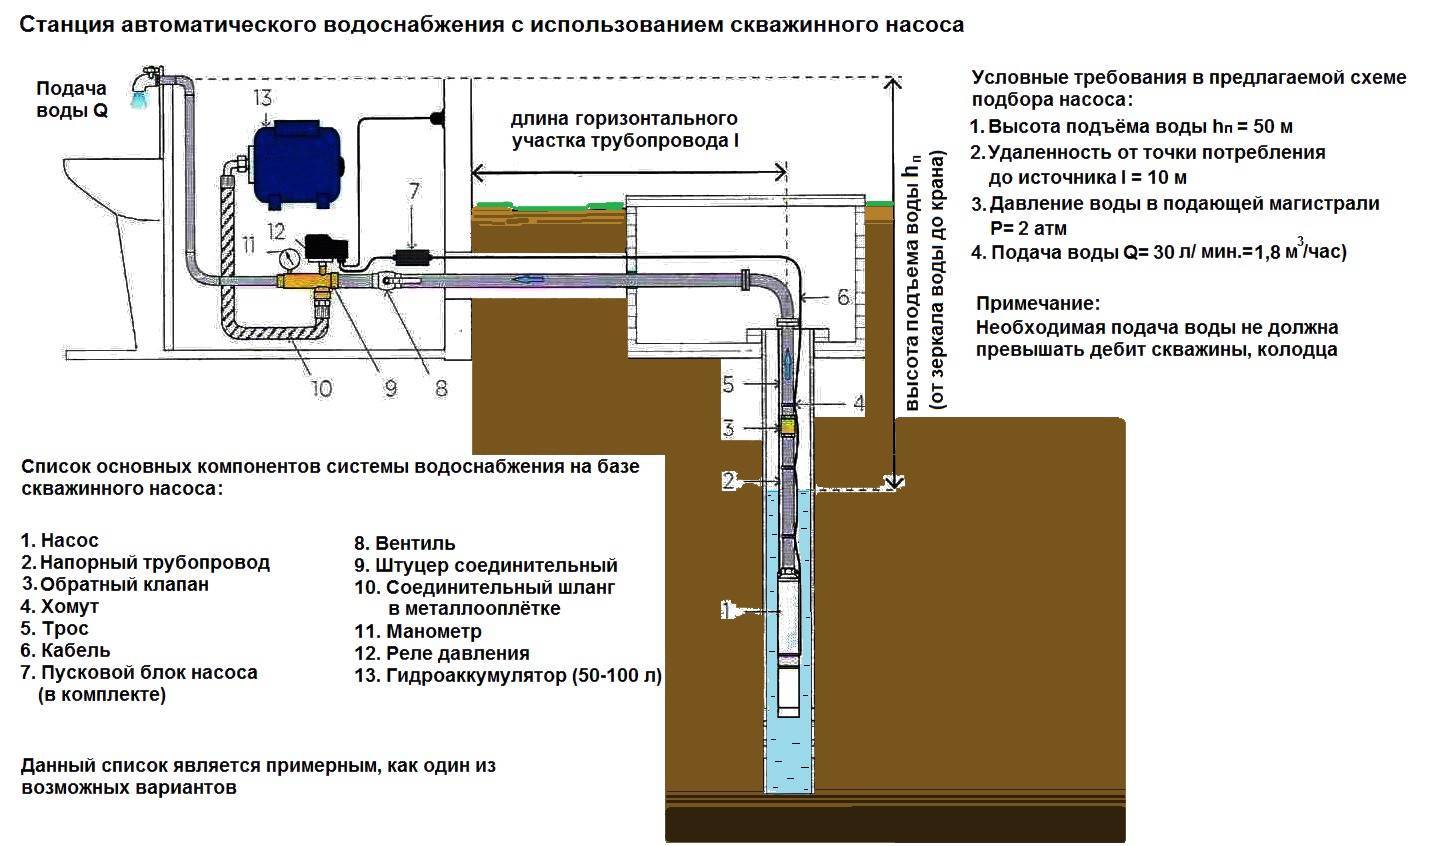
Pump station units
To organize water intake from an individual well source, a pumping station or a submersible well pump is used. The choice and use of each of the devices is determined by the physical parameters of the container.
To organize an automatic mode of water supply, to avoid water hammer in the line when the electric pump is turned on and to ensure control over physical pressure, additional elements are used together with a submersible or surface pump. In a water pumping station, they are assembled on a frame, rigidly interconnected, its main components:
Surface electric pump.A typical electric pump used in a pumping station is an electric motor in a closed housing, on the shaft of which a centrifugal or vortex impeller is located. When rotating, it sucks in water entering through the front inlet and gives it kinetic energy, pushing it out through the side outlet.
Hydraulic accumulator. Includes a metal tank of various sizes, inside which is placed a pear-shaped rubber membrane. When the tank is filled with water by a working electric pump, the membrane pear expands, and after turning on the taps during water intake, the elastic shell contracts, giving water to the system with a certain pressure. The hydraulic tank prevents hydraulic shocks in the pipeline, creates a supply of water, reduces the number of pump on-off cycles, and maintains a high pressure at the outlet of plumbing fixtures.
Pressure switch. The main element that ensures the automatic operation of the electric pump. When water is pumped into the main and the hydraulic tank monitors the pressure, as soon as it reaches the limit value, opens the power line of the electric pump with its shutdown. When using water, the device reacts to a pressure drop in the system - upon reaching the minimum value, it closes the power supply circuit of the pump - it turns on and starts pumping water.
Pressure gauge. The measuring device fixes the pressure parameters in the system, allows you to control and adjust the thresholds for the pressure switch.
Plumbing fittings.Usually, all elements of the pumping station are connected into a single unit using a five-inlet fitting with inlet and outlet pipes, a pressure gauge, a hydraulic accumulator using a flexible connection, and a pressure switch are connected to the remaining 3 fittings.
It is clear that a submersible pumping station, unlike underwater electric pumps, cannot exist in reality, all its units are mounted on a rigid frame and located on the surface of the earth, and the water intake is carried out by a pipeline lowered into a deep source. Some domestic manufacturers produce a hybrid pumping station for submersible vibration pumps, it is a small-volume hydraulic tank, to which a pressure switch and a pressure gauge are screwed.
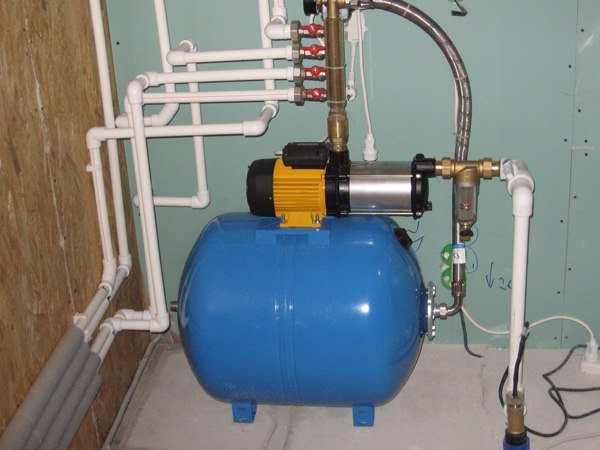
Features of the device of the pumping station
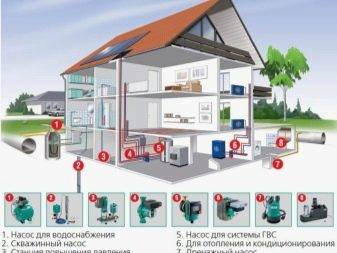
Autonomous water supply based on the pumping station includes a set of devices that provide automatic water supply to the house. To organize a comfortable autonomous water supply, it is necessary to choose a suitable pumping unit, connect it correctly and configure it.
If the installation is done correctly and the requirements for operation are observed, it will last a very long time. The house will always have clean water under pressure, allowing the use of modern appliances: from a conventional shower and washing machine to a dishwasher and a jacuzzi.
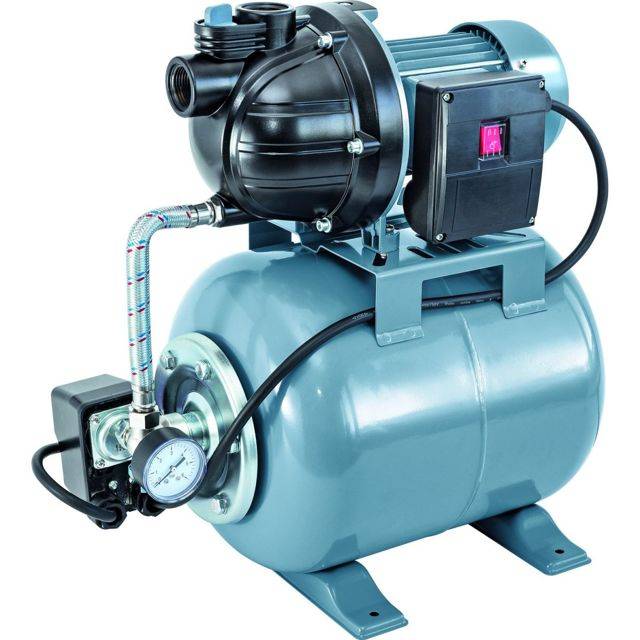
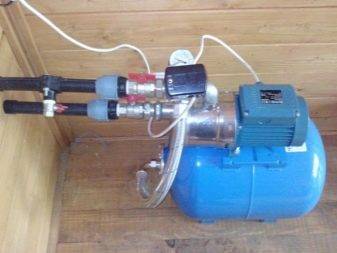
The pumping station consists of three main elements:
- a pump that supplies water;
- hydroaccumulator, where water is stored under pressure;
- control block.
The pump pumps water into a hydraulic accumulator (HA), which is a tank with an internal insert made of an elastic material, often called a membrane or pear because of its shape.
The more water in the accumulator, the stronger the membrane resists, the higher the pressure inside the tank. When the liquid flows from the HA to the water supply, the pressure decreases. The pressure switch detects these changes and then turns the pump on or off.
It works like this:
- Water fills the tank.
- The pressure rises to the upper set limit.
- The pressure switch turns off the pump, the water flow stops.
- When water is turned on, it begins to decrease from the HA.
- There is a decrease in pressure to the lower limit.
- The pressure switch turns on the pump, the tank is filled with water.
If you remove the relay and the accumulator from the circuit, the pump will need to be turned on and off every time the water is opened and closed, i.e. Often. As a result, even a very good pump will break down quickly.
The use of a hydraulic accumulator provides owners with additional bonuses. Water is supplied to the system under a certain constant pressure.


In addition, some (about 20 liters), but the necessary supply of water is stored in the tank if the equipment stops working. Sometimes this volume is enough to stretch until the problem is fixed.
Do-it-yourself steps for connecting a pumping station to a well
Well piping occurs after the pipeline is withdrawn. The head must be installed on the well casing. After, with the help of a long object, it is necessary to find out the depth to which the water intake pipe will go down.
Next, the polyethylene pipe is fixed on the ejector assembly. The length of this pipe is the sum of the depth of the well and the distance from its mouth to the pump. An elbow with a 90ᵒ turn is installed on the wellhead.
Initially, an ejector is assembled - a separate cast iron assembly with 3 outlets for connecting pipes:
- A filter is mounted on the lower part of the ejector, which protects against debris and dirt.
- A plastic socket is mounted on top, to which a 3.2 cm cross section is attached.
- At the end, it is necessary to connect a coupling (usually bronze), which provides a transition to plastic pipes.
All necessary components for the pumping station can be purchased separately
The pipes leading to the ejector must be pushed through the knee. Then lower the ejector to the required depth. After the head is fixed on the casing pipe. The installation scheme of the system is simple, so you can install it in a country house or a private house with your own hands. Connecting elements must be airtight, because excess air intake can lead to system failure and pressure drop in it. Next comes the introduction of pipes to the installation site of the system.
Installation of a submersible electric pump for installation in a well
To install a submersible electric pump in a well, work is performed in the following order:
- Screws into the outlet of the unit a plastic adapter for connecting the pressure pipe. In the absence of a built-in check valve, install your own, mounting it first at the outlet of the electric pump, then screw the fitting to connect HDPE pipes.
- A pipe is attached to the pump and fixed with a plastic cuff, a cable is threaded into the ears of the housing and its ends are connected at the outlet using two special clamps, the free end is screwed to the main cable with electrical tape.
- Connects the power cable, cable and pressure hose together with electrical tape or ties in 1 meter increments, while making sure that the power cord is secured without tension.
- The electric pump is lowered into the well to a predetermined depth. To do this, measure and cut the pressure pipe of the desired length, insert it into the head, to which the cable is tied.
- After diving, you can immediately check the operation of the electric pump without connecting to the pipeline, if the liquid supply corresponds to the passport data, connect the entire water line and then control and regulate the operation of the equipment with automatic devices.
Rice. 8 Preparation of the downhole electric pump for immersion
To connect the borehole pump to the water supply system, devices are used that automate its operation, prevent frequent starting and reduce the load on the line. They can be independently mounted in one module, installed in a residential area or left in a caisson pit with a borehole tip.
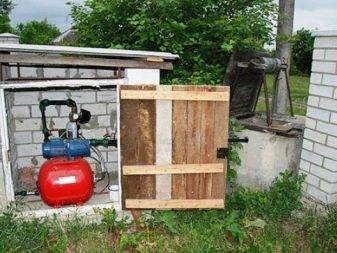
How to install?
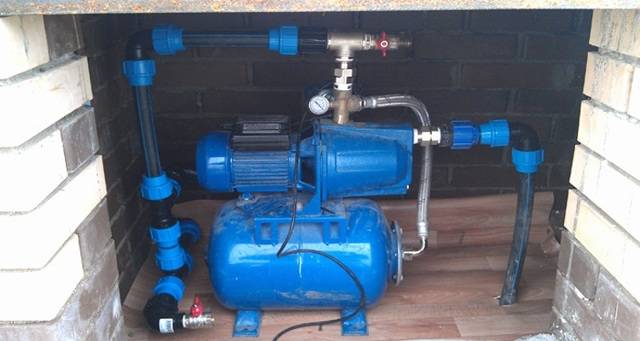
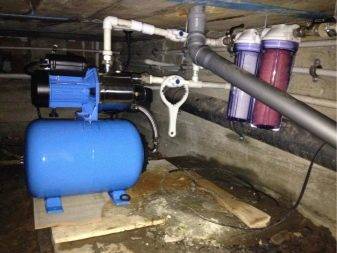
Do-it-yourself installation of a pumping station in a house is often carried out in a heated room. The most ideal option would be a boiler room with good sound insulation. You can, of course, install in the corridor, hallway, pantry or bathroom. Most importantly, away from the bedrooms.
Often, a basement or basement is chosen for the location of the pumping station. However, this is provided that they are heat, sound and waterproofed. It is also possible to carry out installation in a special box, which is located in the underground and has a hatch so that there is access to the equipment.
To install the station in the well, a specially equipped platform is used. It must necessarily be lower than the freezing level. At the same time, it is necessary to insulate the well itself from above. Such a scheme is somewhat difficult to access the station.
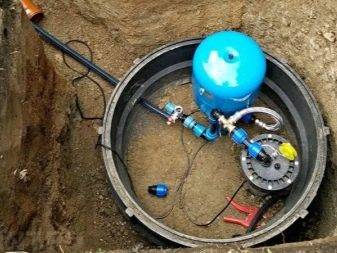
It is also possible to install a station in the caisson of the well.To do this, a room is built around the well, which is buried at a level lower than the freezing of the soil. The caisson must be closed and insulated near the surface of the earth. It is enough to leave a small hatch necessary for maintenance.
It is also possible to install the station in a separate building or an attached room. Of course, such a structure requires not only insulation, but also additional heating.


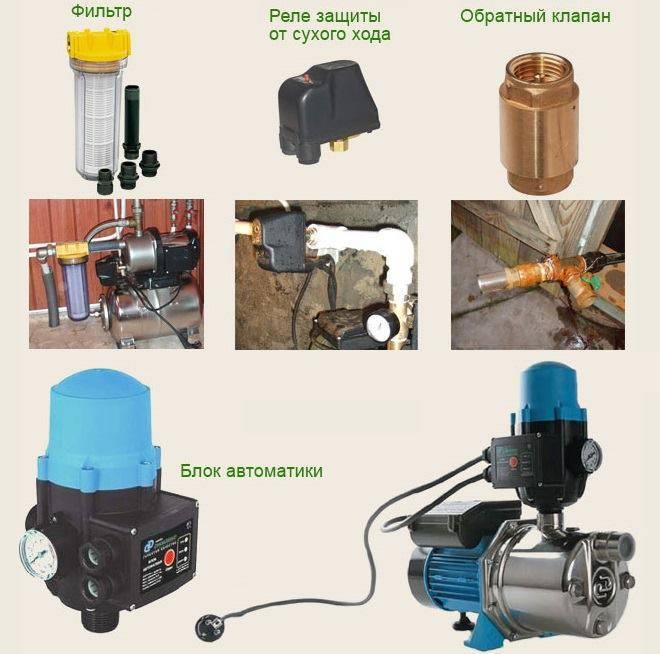
Installing a pumping station on your own can save a lot. Depending on the connection of the pumping station to a particular source of water supply, there are various schemes for their installation. Proper installation largely depends on small details such as a check valve, stuffing box, filters, and so on. Such little things can significantly improve and extend the operation of the pumping station.
Storage tank system
As an alternative to a hydraulic accumulator, you can consider a conventional tank, for example, made of plastic. It can be any suitable container that will provide the family's water needs. Typically, such a storage tank is installed as high as possible to ensure sufficient water pressure in the house's plumbing system.
In this case, it must be borne in mind that the load on the walls and ceilings will increase. For calculations, one should remember not only the weight of the accumulated liquid (the weight of water in a tank of 200 liters will, of course, be 200 kg).
You need to take into account the weight of the tank itself. The total weight is related to the bearing capacity of the house. If in this respect there are doubts, it is better to seek the advice of an experienced engineer.
To automate the operation of a pump with a homemade storage tank, you can use a float sensor.This is a relatively simple device, many craftsmen make it on their own. A float is installed in the tank, with the help of which information about the water level is sent to the automatic switch.
When the amount of water in the tank reaches the minimum level, the pump turns on and runs until the tank is full. The pump then switches off automatically. The storage tank is considered an economical option for water supply at home, since the cost of such a set of devices is lower than that of an industrial pumping station.
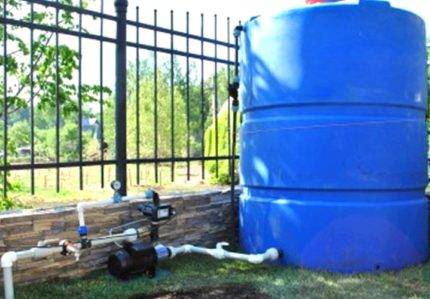
A surface pump in a country house can be used for various purposes, for example, for filling a storage tank with water, for irrigation, etc.


