- Features of the device of the pumping station
- Kinds
- Choosing a pumping station for a summer residence
- Why insulate
- How to assemble?
- Rules for launching and configuring equipment
- First launch of the station
- Automation setting
- Plant commissioning and testing
- Pros and cons of a pumping station
- Location of the pumping station
- Room inside the house
- Basement
- Special well
- Caisson
- What you need to know to choose a pumping station?
- Starting the pumping station
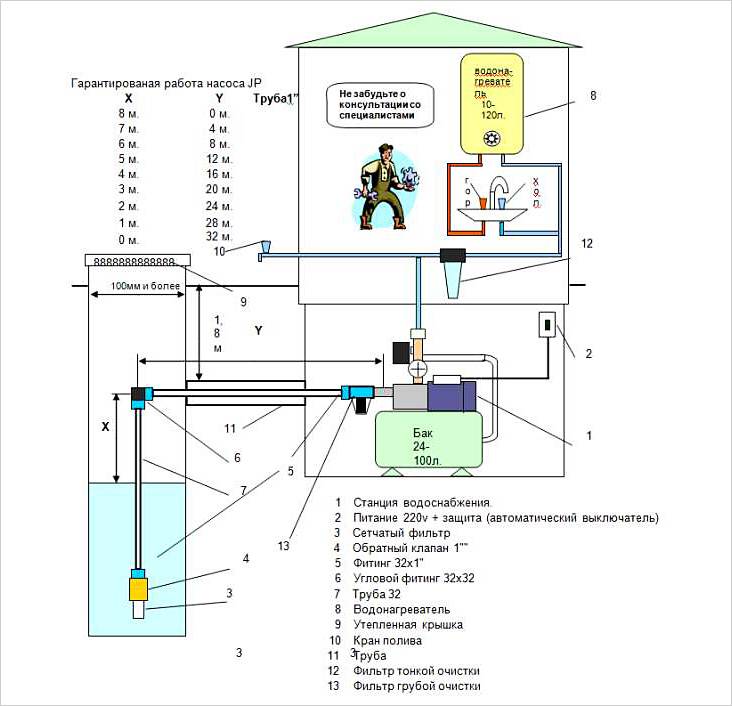
Features of the device of the pumping station
Autonomous water supply based on the pumping station includes a set of devices that provide automatic water supply to the house. To organize a comfortable autonomous water supply, it is necessary to choose a suitable pumping unit, connect it correctly and configure it.
If the installation is done correctly and the requirements for operation are observed, it will last a very long time. The house will always have clean water under pressure, allowing the use of modern appliances: from a conventional shower and washing machine to a dishwasher and a jacuzzi.
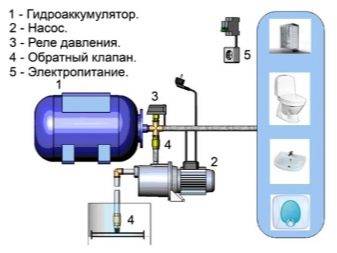
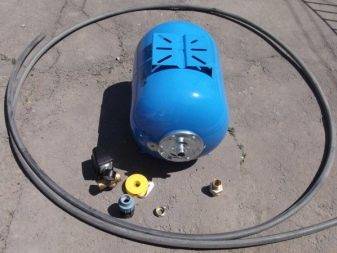
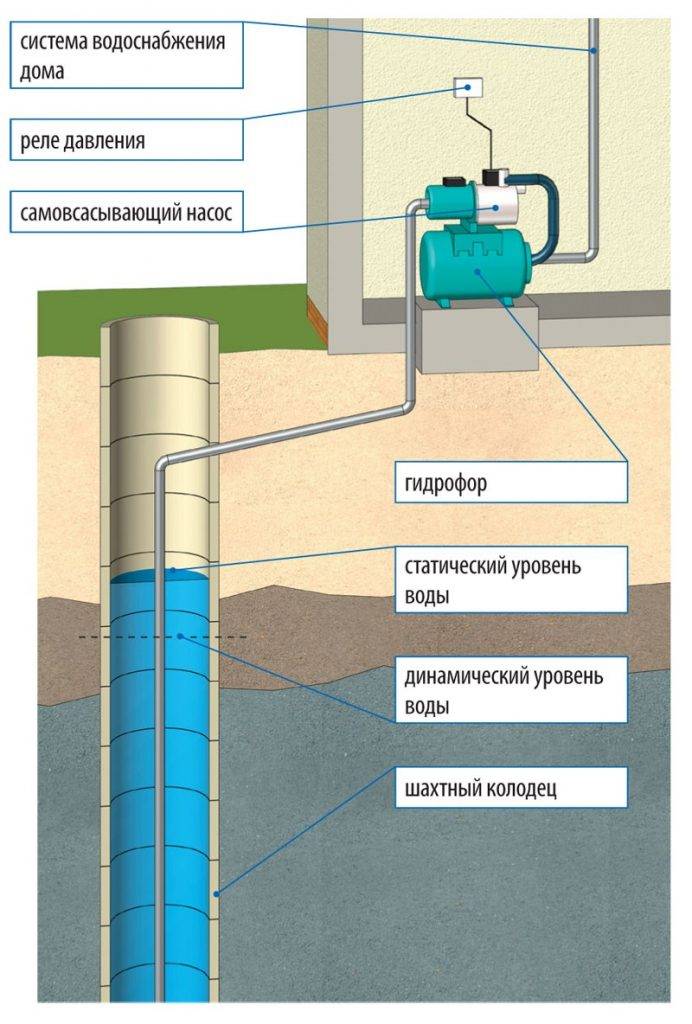
The pumping station consists of three main elements:
- a pump that supplies water;
- hydroaccumulator, where water is stored under pressure;
- control block.
The pump pumps water into a hydraulic accumulator (HA), which is a tank with an internal insert made of an elastic material, often called a membrane or pear because of its shape.
The task of the pumping station is to ensure a constant supply of water to the house at a sufficiently high level of pressure in the water supply system
The more water in the accumulator, the stronger the membrane resists, the higher the pressure inside the tank. When the liquid flows from the HA to the water supply, the pressure decreases. The pressure switch detects these changes and then turns the pump on or off.
It works like this:
- Water fills the tank.
- The pressure rises to the upper set limit.
- The pressure switch turns off the pump, the water flow stops.
- When water is turned on, it begins to decrease from the HA.
- There is a decrease in pressure to the lower limit.
- The pressure switch turns on the pump, the tank is filled with water.
If you remove the relay and the accumulator from the circuit, the pump will need to be turned on and off every time the water is opened and closed, i.e. Often. As a result, even a very good pump will break down quickly.
The use of a hydraulic accumulator provides owners with additional bonuses. Water is supplied to the system under a certain constant pressure.
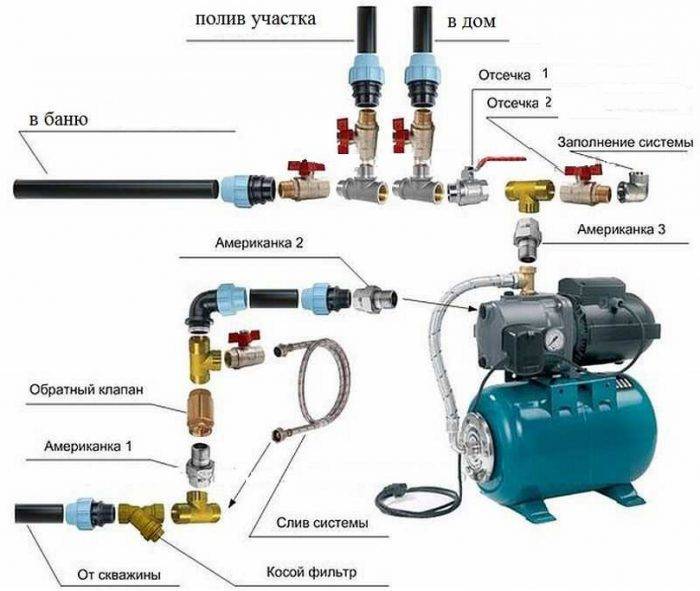
All components and materials necessary for connection should be prepared in advance. They must match the size of the nozzles of the existing equipment, adapters may be needed for successful installation.
Good pressure is needed not only to comfortably take a shower, but also for the operation of an automatic washing machine or dishwasher, hydromassage and other benefits of civilization.
In addition, some (about 20 liters), but the necessary supply of water is stored in the tank if the equipment stops working. Sometimes this volume is enough to stretch until the problem is fixed.
Kinds
To fit the HC, you first need to take into account the capabilities of the well and take the model just below this limit. But if the limit is less than 1.7 cu. m / h, then you will have to forget about the National Assembly: the motor will not provide constant pressure and interruptions in water are inevitable.
Household pumps have a capacity of 1.5 to 9 cubic meters. m / h, is determined by the number of water points (kitchen, toilet, bathroom, washing machine or dishwasher).
Water consumption at the point: 0.35 cubic meters m/h X 5 \u003d 1.75 cu. m/h In this case, you can limit yourself to NS with a capacity of 2 cubic meters. m / h (the stock does not hurt).
The capacity of the tank also depends on the points of consumption.
The average capacity of the tap is 12 liters, therefore, in our case, a tank of 60 liters is suitable. The instructions usually indicate the maximum that this model can provide.
Well data is obtained by using any motor to measure the volume of fluid pumped out. The level of the mirror will be prompted by a nut on a thread lowered into the well.
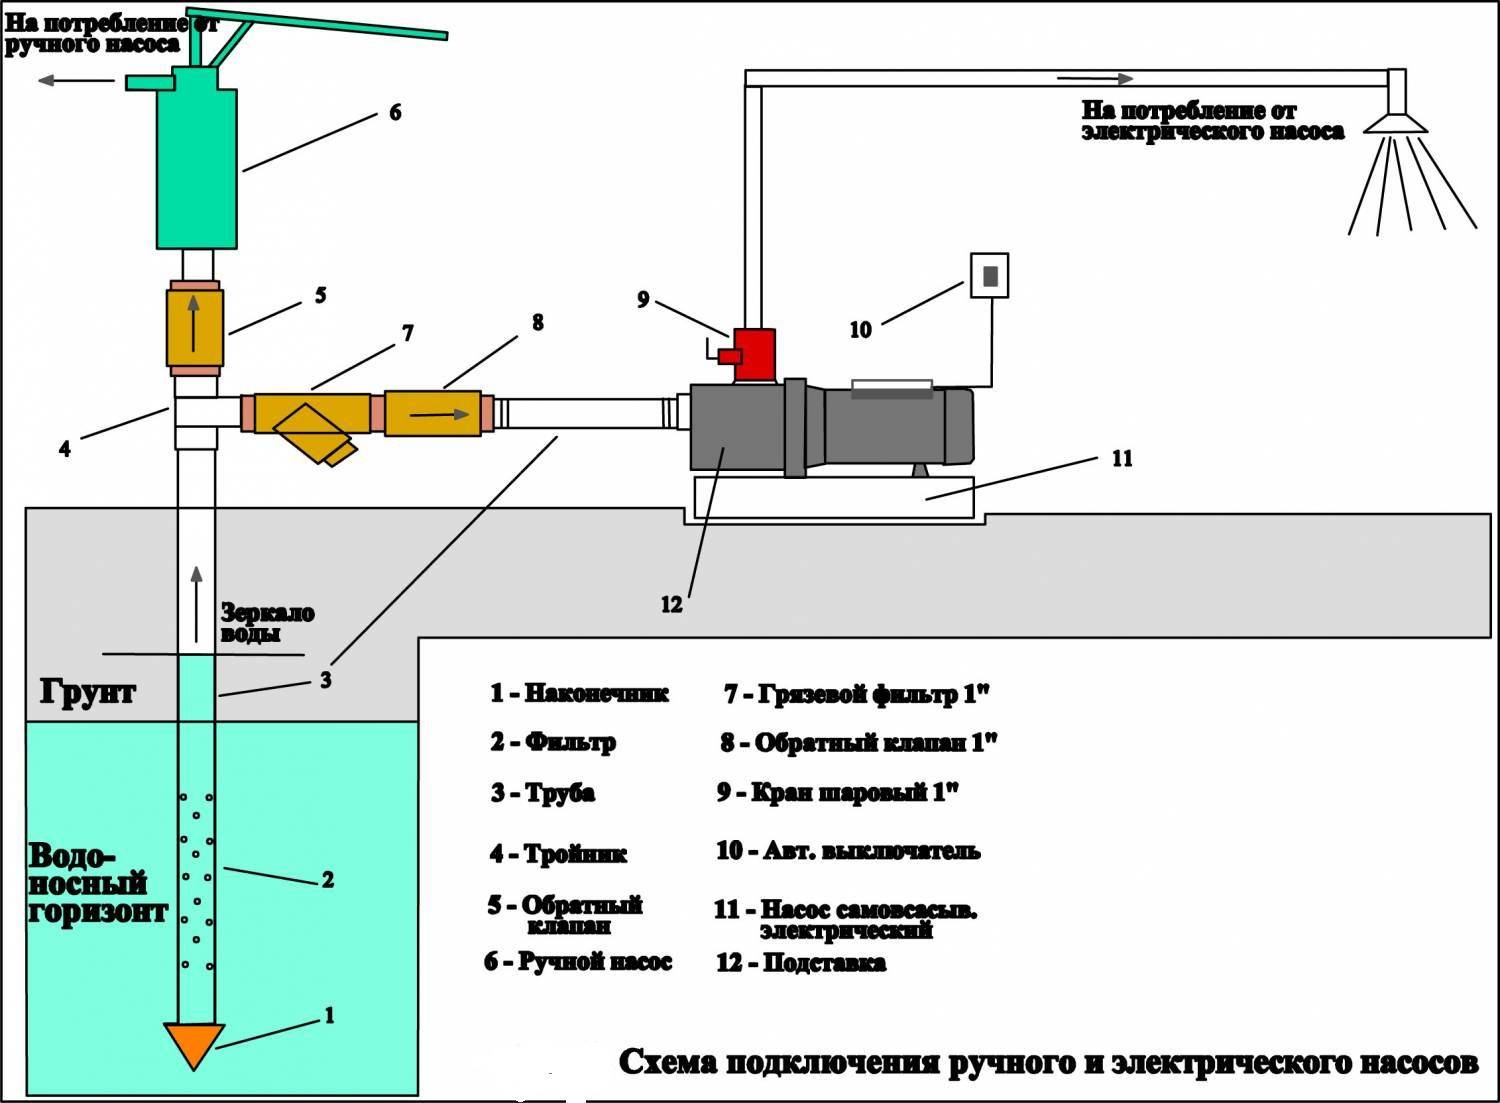
There are three types of pumps on the domestic market:
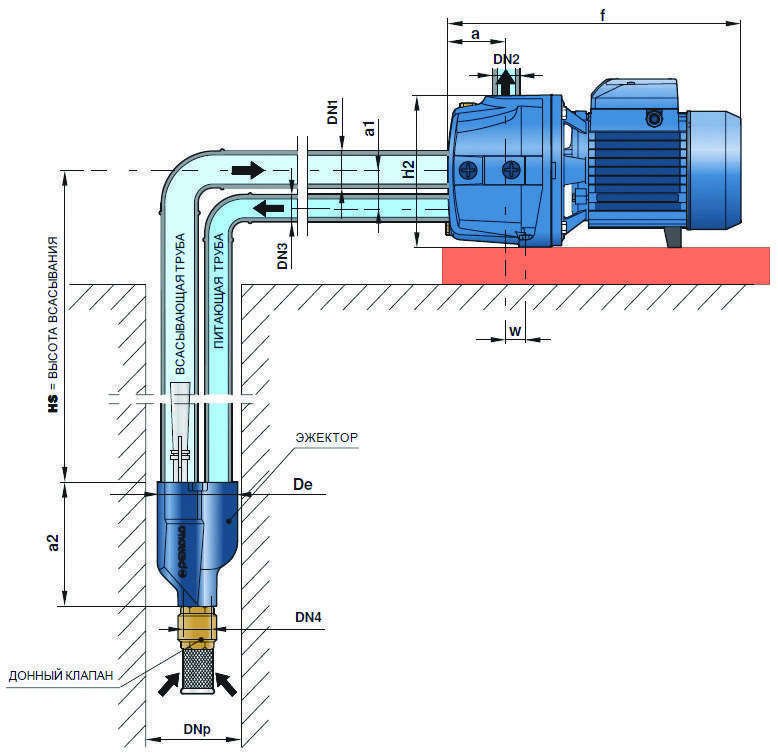
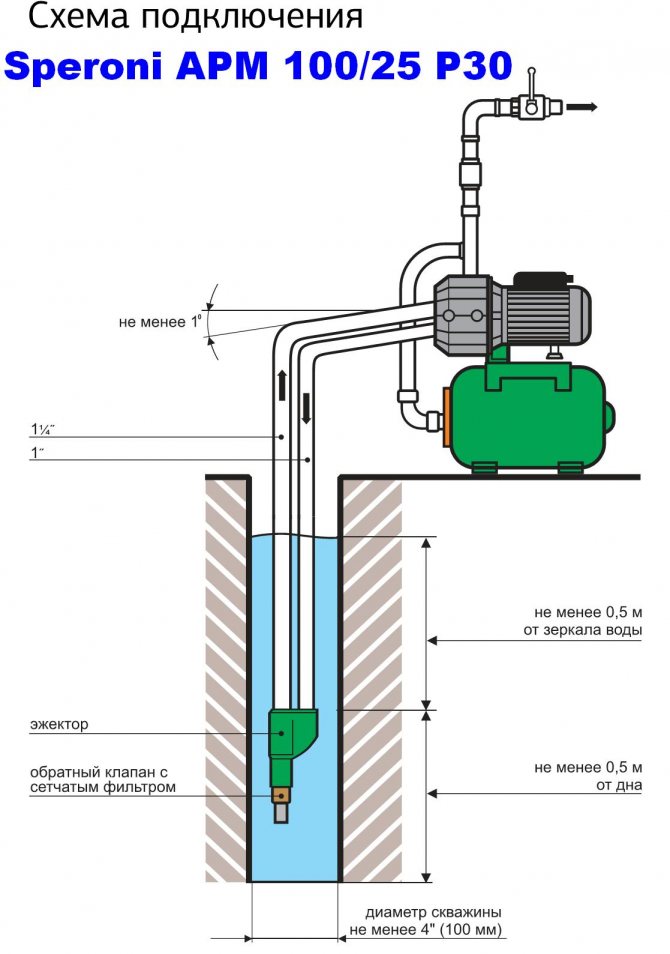
- The station with a centrifugal self-priming pump and a built-in ejector with a water pressure of up to 40 m and a suction depth of up to 9 m is the most popular. But its main advantage is its low susceptibility to air. To start the NS, open the lid and fill it with water to the brim. After pumping air, the motor will give water. Excess air escapes through a faucet or valve.
- Centrifugal self-priming pumps with an external ejector are suitable for wells with a depth of up to 45 m. They are mounted in a boiler room or other utility room. An ejector with two pipes is placed in a well.One supplies water to the ejector for suction, the second for lifting.
This type of HC is very sensitive to air and pollution, but allows it to be used in the house by lowering the ejector into the well at a distance of up to 40 m.
- Submersible pumps operate in areas with groundwater levels up to 10 m. They are lowered to the water level, pumped up and lifted up. The suction height is 8m, and they can push out to a greater height.
So, we determined the amount of water for a comfortable stay. We calculated the capacity of the pumping station and chose the type and location. Left to buy:
- Pump;
- Hydraulic accumulator;
- Pipes for external water supply (preferably polymeric);
- Automatic protection system;
- Faucets;
- Valves;
- gate valves;
- Cranes;
- Flexible hoses;
- Compression and press fittings
If there is no well on the site yet, it can be made by installing reinforcement around the rings, scalding it. This will save you from floaters and shifting rings.
The sooner you plan the water supply at home, the better the result will be. Ideally, the station operates autonomously. Every year we check the air pressure in the accumulator using a pressure gauge - that's all prevention. I really wish you were like that.
Views:
457
Choosing a pumping station for a summer residence
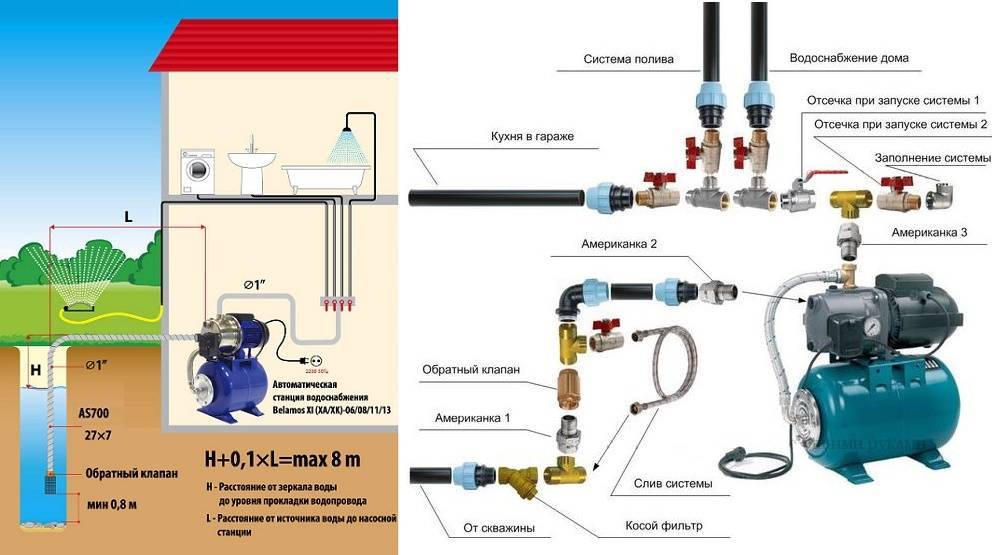
There are different types of pumps: some are suitable for irrigation and have low power, others are used in stations and help supply water to the house, sometimes it is the second and even third floor, so the pressure must be much higher than in the irrigation pump.
Water supply can be carried out as follows:
- The pump is turned on only when necessary, it does not have automation and supplies water immediately after it is turned on. This option is suitable for watering or if you live in the house intermittently and water is rarely needed.
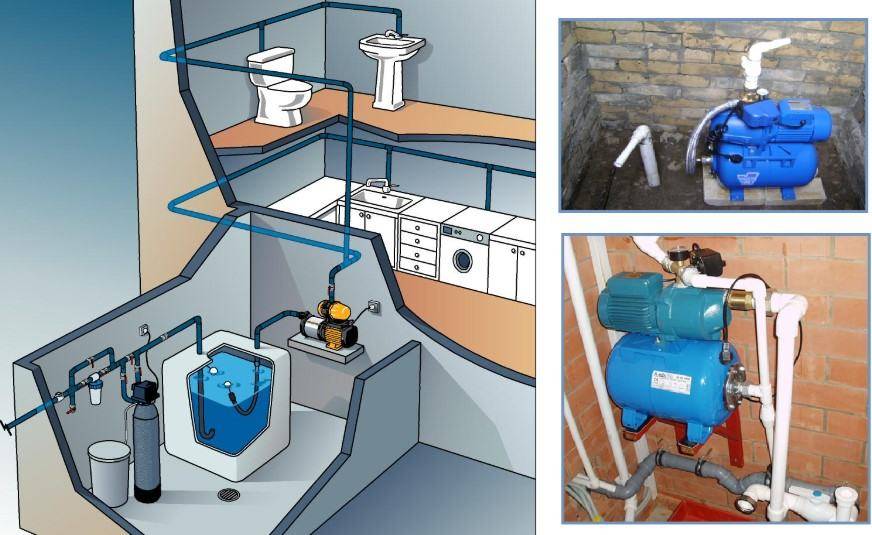
- The pump pumps water into a storage tank located at the top of the house. Thus, there is always a certain margin that reduces the dependence of the owners on the stability of the electricity supply. A non-pressure storage tank can be used, for example, as a summer shower. A switch can be installed on the pump itself. This method will not allow the use of household appliances, such as a washing machine, as it requires good water pressure.
- Using a diaphragm accumulator and a submersible pump. This method is more convenient, but also not without drawbacks.
- Installation of automatic station. Such a pumping station in a well for a summer residence allows the water supply system to operate autonomously, while using a membrane tank, you can create a supply of water that will be dispensed under pressure. In addition, the system does not require constant turning the pump on and off, the automation will do it itself, the main thing is that the equipment is connected to the power supply. In fact, everything will work exactly the same as in a city apartment. It is necessary to open the tap, water flows, close - it does not go; nothing more needs to be done. Such a system is equipped with a special relay that regulates pressure so that it does not click, a membrane tank is used that maintains the necessary pressure inside the system. This helps to reduce the load on the pump, increase its resource, and reduce energy consumption. Automatic ones are the best option, as they are not only more convenient to use, but they also save electricity consumption.
Why insulate
Insulation of water pipes and pumping stations is a topical issue for those people who live in private homes or often come to the country in winter.
The situation described above is actually much more dangerous and serious than it might seem at first glance. It is good if the problem is solved by itself: during the day the temperature will rise a little, and the frozen area will thaw. However, one should not hope for such an outcome - the chances for it are minimal. Alternatively, you can independently identify the part of the pipeline in which the water has frozen and warm it up - however, such a solution is only possible in cases where the pipes and the pumping station are available for inspection.


But the consequences of freezing (besides the fact that there will be no water in your house) will certainly make you think about the insulation of the entire plumbing system of every owner of a private house. As we remember from the school physics course, frozen water tends to expand, and the force of its impact will be enough to damage even a metal pipe - it will simply crack. The same applies to pumping equipment. And in this case, you will have to carry out much more significant repairs to identify and replace it - you see, it’s not a very pleasant and easy task if it’s twenty degrees below zero outside, and the frozen area is on the street.
For this reason, the insulation of water pipes and pumping stations is a topical issue for those people who live in private homes or often come to the country in winter.
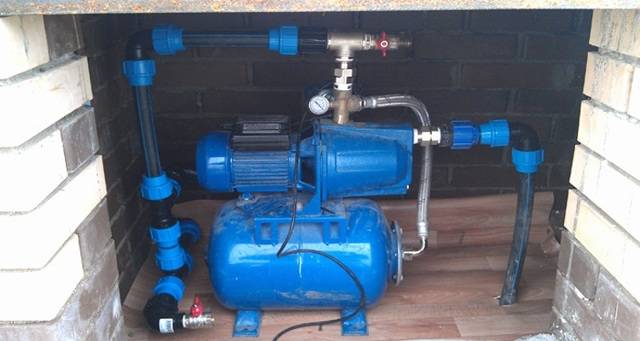
How to assemble?
To assemble the pumping station yourself, you first need to understand what it is and how it works. The level of intensity of water use should also be foreseen in advance.
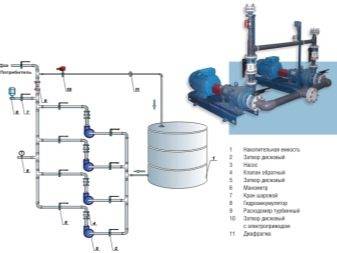
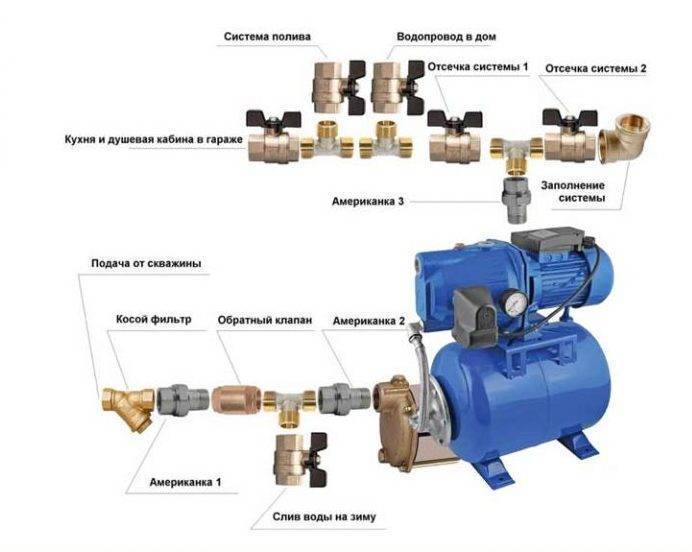
The main functional units of the station:
- a centrifugal type pump that lifts and transports water into the house;
- a hydraulic accumulator that softens water hammer;
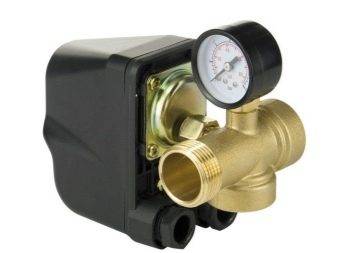
- pressure switch;
- an electric motor connected to a pump and a pressure switch;
- manometer, allows you to determine the pressure;
- water intake system with check valve;
- line that connects the water intake and the pump.
The pressure switch allows you to control its level in the system. For example, when the pressure decreases compared to a certain parameter, the engine starts, and if it rises, it turns off. The pressure can be adjusted using a manometer. The most essential element is the hydraulic accumulator. Sometimes a storage tank is used instead in pumping stations, but this design is outdated due to a large number of shortcomings.
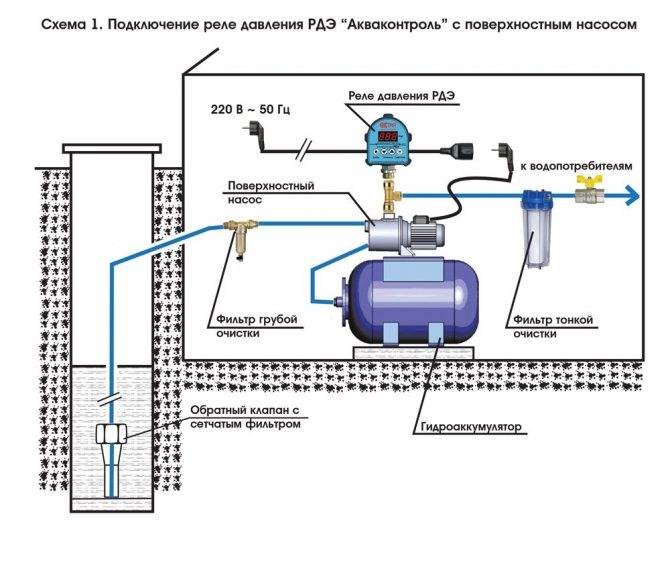
Rules for launching and configuring equipment
Before starting the pumping equipment for the first time, it is first necessary to prepare the accumulator, since the stability of the entire water supply system depends on the correctly selected pressure in it. A high pressure in the tank will provoke frequent turning on and off of the unit, which will not have the best effect on its durability. If there is an underpressure in the air chamber of the tank, this will lead to excessive stretching of the rubber bulb with water, and it will fail.
The hydraulic tank is prepared as follows. Before pumping air into the tank, make sure that the pear inside it is empty. Next, check the pressure in the tank with a car pressure gauge. As a rule, new tanks are filled with air at the factory. Hydraulic tanks up to 25 liters should have a pressure in the range of 1.4-1.7 bar.In containers of 50-100 liters, the air pressure should be in the range from 1.7 to 1.9 bar.
Advice! If the pressure gauge readings are lower than recommended, then you should pump air into the tank using a car pump and adjust it, referring to the pressure gauge readings.
First launch of the station
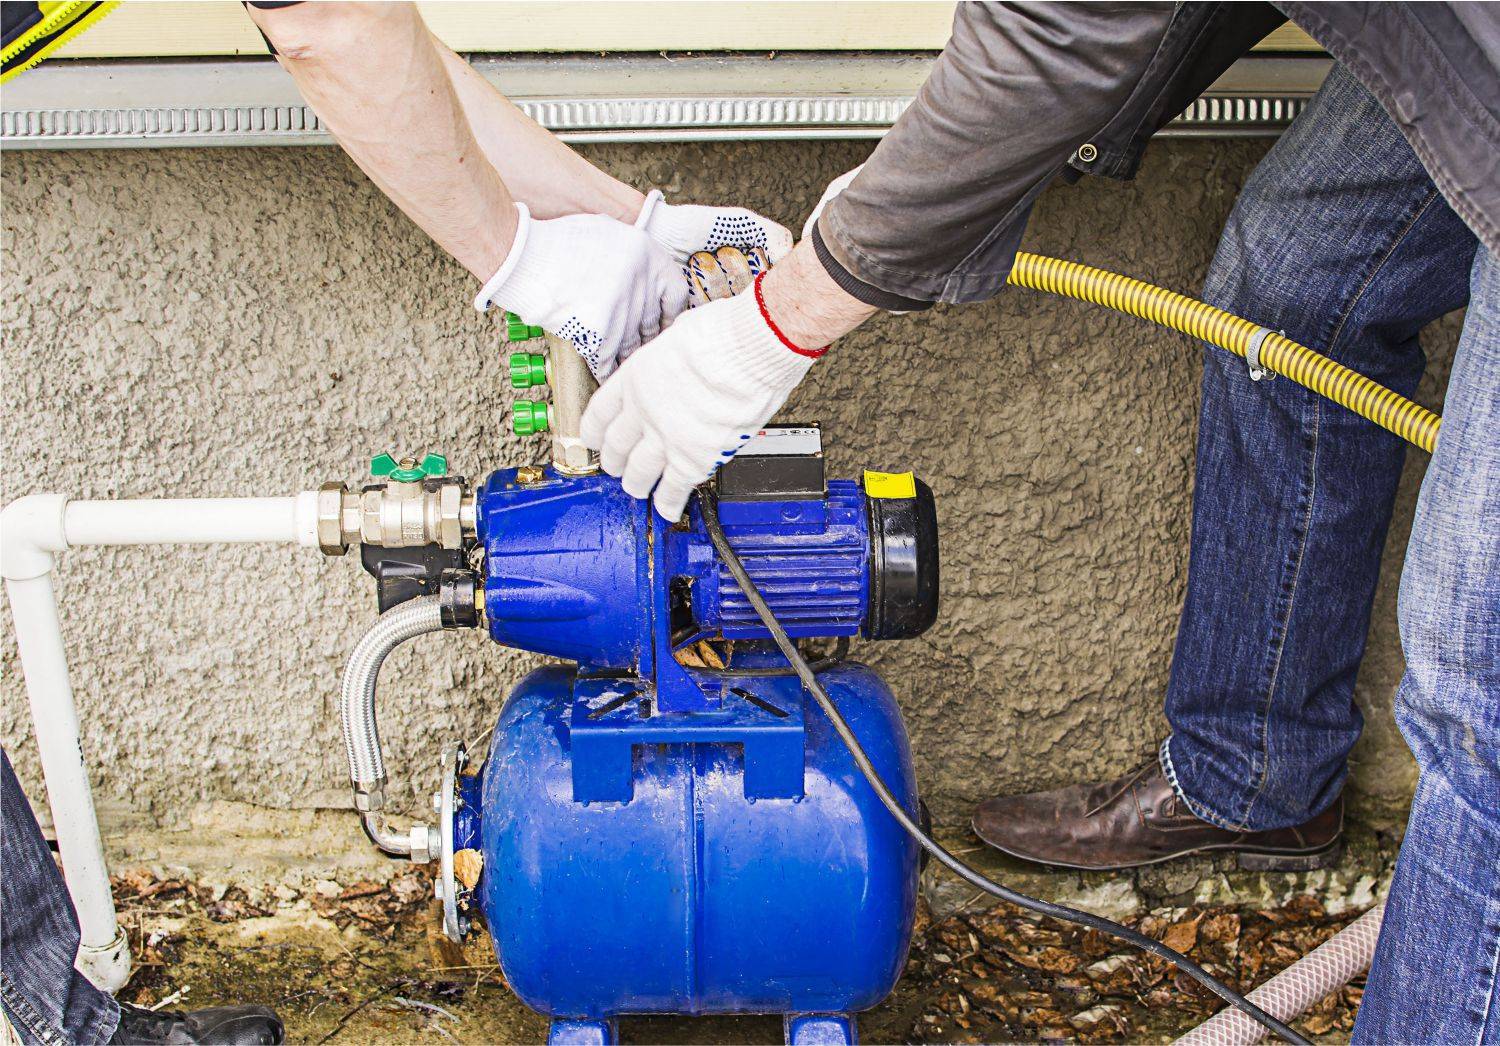
To correctly start the pumping station for the first time, perform the following steps in stages.
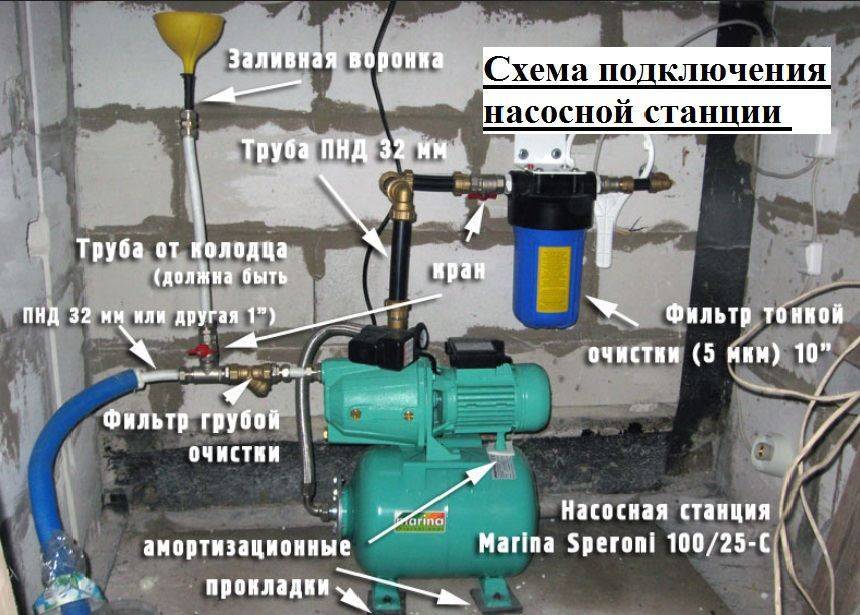
- Unscrew the plug that closes the water hole located on the unit body. On some devices, instead of a cork, there may be a valve. It should be opened.
- Next, fill the suction pipe and pump with water. Stop pouring liquid when it starts to flow out of the fill hole.
- When the suction pipe is full, close the hole with a plug (close the valve)
- Connect the station to the mains and turn it on.
- To remove the remaining air from the equipment, slightly open the tap at the water intake point closest to the pump.
- Let the unit run for 2-3 minutes. During this time, water should flow from the tap. If this does not happen, then turn off the pump and refill the water, and then start the pumping station.
Automation setting
After a successful launch, you need to check and configure the operation of automation. The new pressure switch has factory settings for upper and lower pressure thresholds, upon reaching which it turns on or off the pump. Sometimes it becomes necessary to change these values by setting them to the desired on-off pressure.
Automation adjustment is as follows.
- Turn off the unit and drain the water from the accumulator.
- Remove the cover from the pressure switch.
- Next, you should start the pump to start collecting water in the hydraulic tank.
- When turning off the device, write down the pressure gauge readings - this will be the value of the upper shutdown threshold.
- After that, open the tap at the farthest or highest point of the water intake. As water flows out of it, the pressure in the system will begin to decrease, and the relay will turn on the pump. The readings of the pressure gauge at this moment will mean the lower switching threshold. Record this value and find the difference between the upper and lower threshold.
Normally, the cut-in pressure should be 2.7 bar, and the cut-out pressure should be 1.3 bar. Accordingly, the pressure difference is 1.4 bar. If the resulting figure is 1.4 bar, then nothing needs to be changed. If the pressure is too low, the unit will often turn on, which will provoke premature wear of its components. When overestimated, the pump will work in a more gentle mode, but the difference in pressure will be obvious: it will be unstable.
Advice! To increase the pressure difference, tighten the nut on the small spring. To reduce the difference, the nut is released.
When checking the operation of the relay, pay attention to the pressure with which water flows from the tap. If the pressure is weak, then a pressure adjustment will be required.
In this case, the pressure in the system should be higher. To raise it, turn off the device and slightly tighten the nut that presses the large pressure switch spring. To reduce the pressure, the nut must be loosened.
Plant commissioning and testing
The first start-up after installation or the restoration of the system's performance after a long "dry" period is simple, although it requires certain manipulations.Its purpose is to fill the system with water before the first connection to the network.
This is a simple procedure that does not require special skills. There is a plug on the pump that needs to be removed.
A simple funnel is inserted into the hole, through which the system is filled - it is important to fill in the supply pipe and the pump with a hydraulic accumulator. A little patience is required at this stage - it is important not to leave air bubbles. Pour water up to the neck of the cork, which is then twisted again
Then, with a simple automobile pressure gauge, the air pressure in the accumulator is checked. The system is ready to start
Pour water up to the neck of the cork, which is then twisted again. Then, with a simple automobile pressure gauge, the air pressure in the accumulator is checked. The system is ready to start.


To make it clearer how to test a pumping station, we have prepared 2 galleries for you.
Part 1:
Image gallery
Photo from
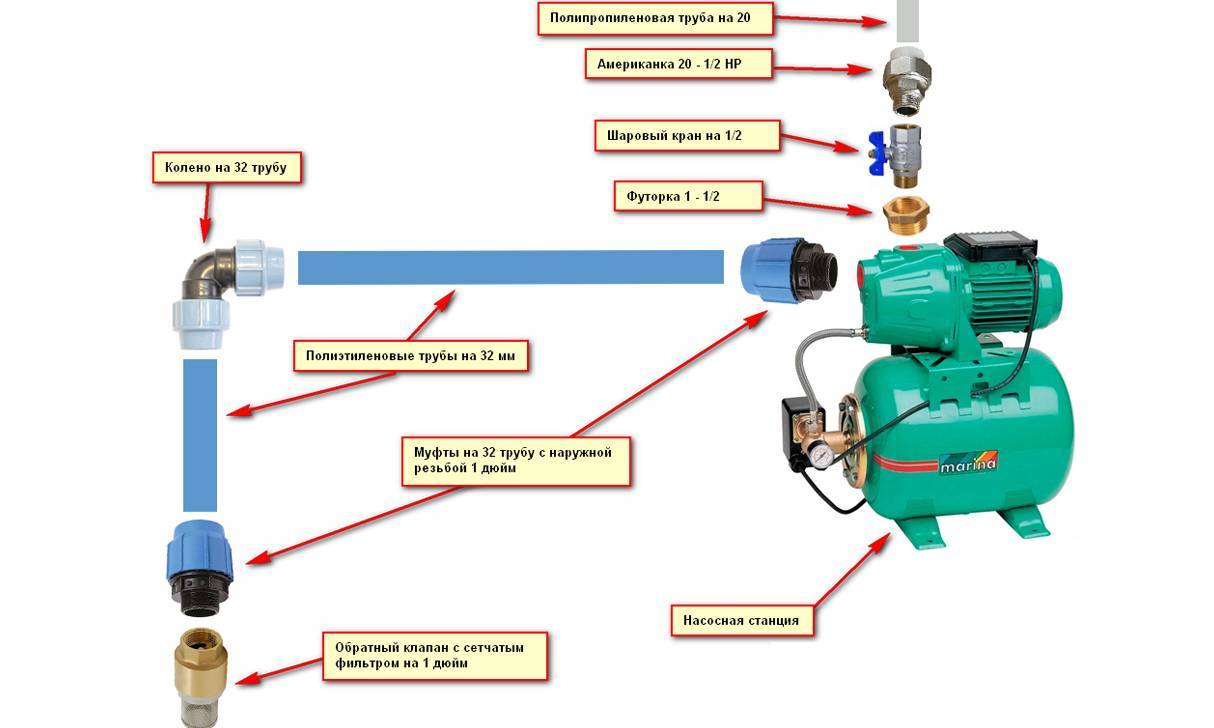
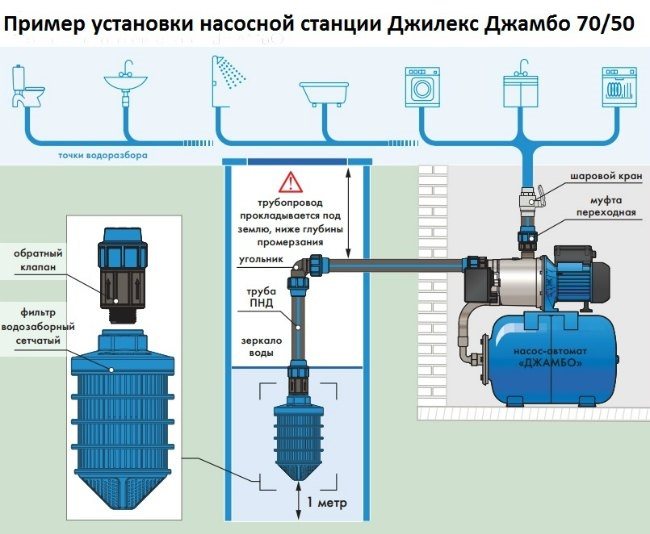
Fittings (elements for connecting water pipes or hoses to the unit) are not included in the kit, so they are purchased separately
We connect a pipe to the upper hole of the accumulator, through which water will go to the points of analysis in the house (shower, toilet, sink)
By means of a fitting, we also connect a hose or pipe for taking water from a well to the side hole
Do not forget to equip the end of the intake pipe with a check valve that ensures stable operation and the required pressure.
Before pouring water into the pipe, we check the tightness of all connections - the tightness of the fittings and the quality of the tightening of the union nuts
To test the quality of the pumping station, we fill the tank with clean water. When installing the pump at the well, we check whether the water level allows the use of the pump
Before starting work, pour 1.5-2 liters of water into the pumping equipment through a special hole
Step 1 - installation of the pumping station at the selected location
Step 2 - Installing the Water Supply Fitting
Step 3 - connecting the system that provides the house with water
Step 4 - connecting the pipe leading to the well
Step 5 - install a check valve at the end of the pipe (hose)
Step 6 - Leak Testing the Complete System
Step 7 - Filling the tank with water (or checking the water level in the well)
Step 8 - a set of water to create the desired pressure
Part 2:
Image gallery
Photo from
For the station to work, it remains to connect the power supply. We find the power cord, unwind it and plug it into a 220 V outlet
Do not forget to press the "Start" button, which is usually located on the side of the case
We turn on the pressure switch to start the pump, and wait for the pressure gauge needle to reach the desired mark
When the pressure in the accumulator reaches the desired level, it will automatically turn off.
To check the correct functioning of the pumping station, we turn on one of the taps, for example, in the bathroom or in the kitchen
We monitor the operation of the pumping station, pay attention to the speed of water supply, pressure force, performance
When the water in the tank (or in the well) runs out, the dry-running protection automatically turns on and the pump stops working.
Step 9 - Lowering the end of the hose into the water
Step 10 - connecting the station to the power supply system
Step 11 - Introduction to the working state by pressing the button
Step 12 - start the pressure switch
Step 13 - the accumulator is gaining the set pressure
Step 14 - opening the tap at the water supply point
Step 15 - Check Station Functionality
Step 16 - Automatic Dry-Run Shutdown
Pros and cons of a pumping station
The pumping station has its advantages and disadvantages. First of all, it is very convenient - all the main mechanisms are arranged in a single unit, and therefore it is easy to purchase, adjust, install, and maintain.


Requires a minimum of additional spending. The system has an innate immunity to water hammer - pressure surges when opening and closing flow taps.
There are only two cons, and both are minor. The installation is noisy. The second relative minus is the impossibility without additional mechanisms for lifting water from depths above 8-10 meters.
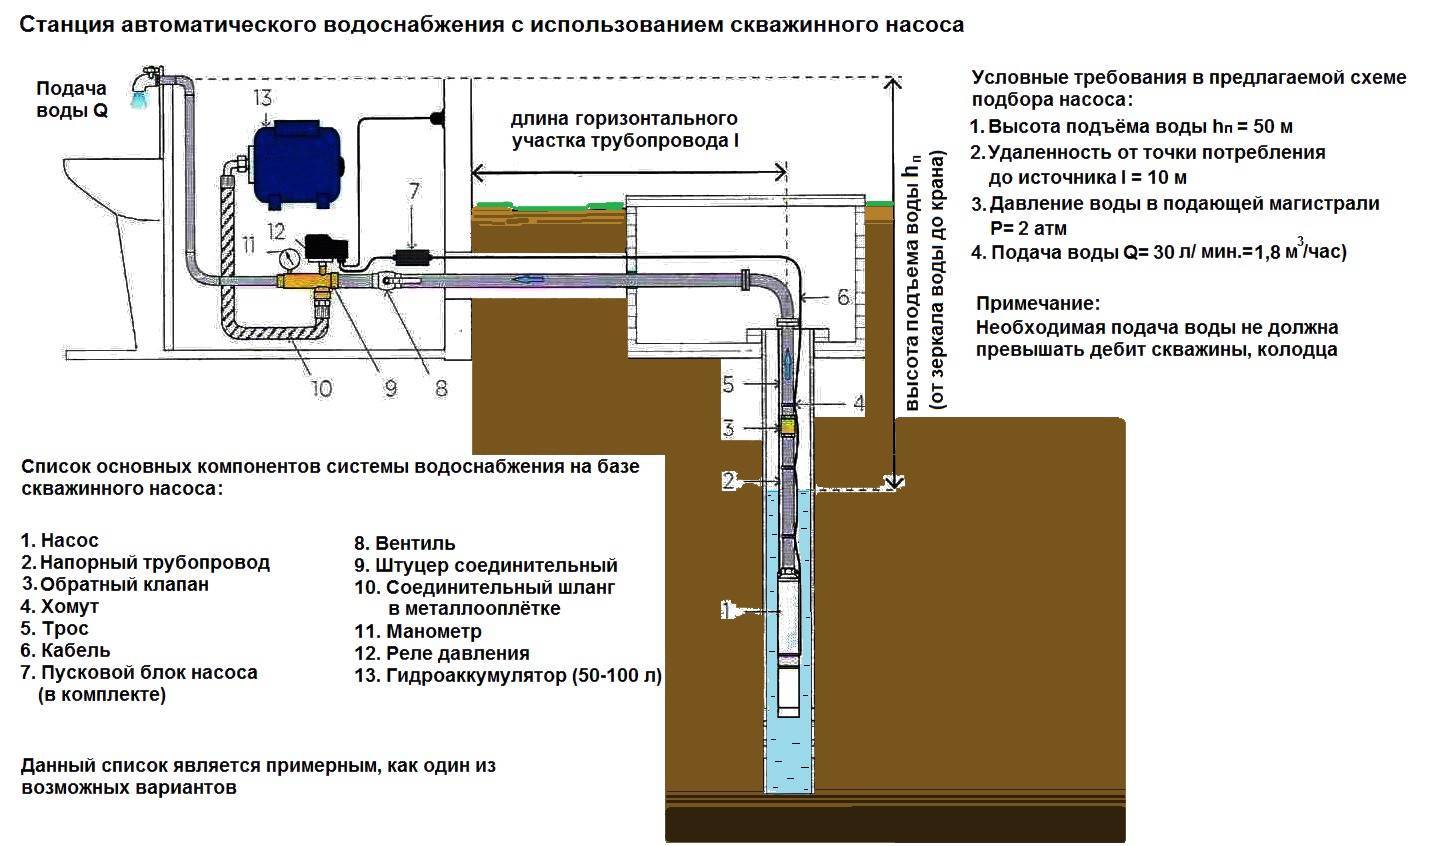
The use of a pumping station for drawing water from a well is advisable if the depth of the water surface in it is not more than 7 - 8 m. The equipment can be located in a nearby box or in a well shaft
Noise is neutralized by the conditions of installation and placement. The lifting depth can be increased by introducing an additional device - an ejector.
They are of two types. Built-in and external, portable. Built-in is more productive, but increases the noise of the whole structure
As already mentioned, this drawback is treated with attention to installation and placement.
The pumping station does not require many additional parts and mechanisms - it’s only better to install a cleaning filter after the station, and not before
Location of the pumping station
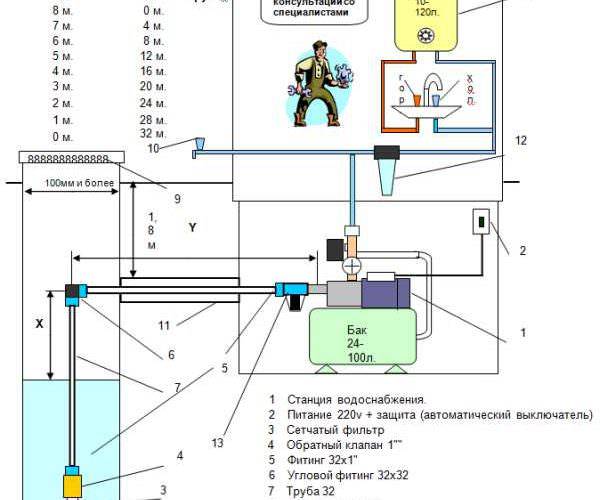
When choosing a place, it is necessary to take into account the technical characteristics of the device and the distance from the installation site to the water level. If it is large enough, the station is placed in a household room or in the basement.
It must be ensured that the following conditions are met:
- it was quite dry and warm;
- it was possible to install soundproofing;
- free access to devices for regular maintenance is provided.
High humidity, as well as freezing of water inside the device, lead to breakdowns.
If the equipment is delivered in the house, you will have to take care of sound insulation. The status and settings of the main nodes must be periodically monitored. Instruments should be placed so that they can easily take readings, adjust relays, etc.
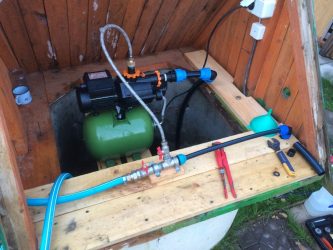
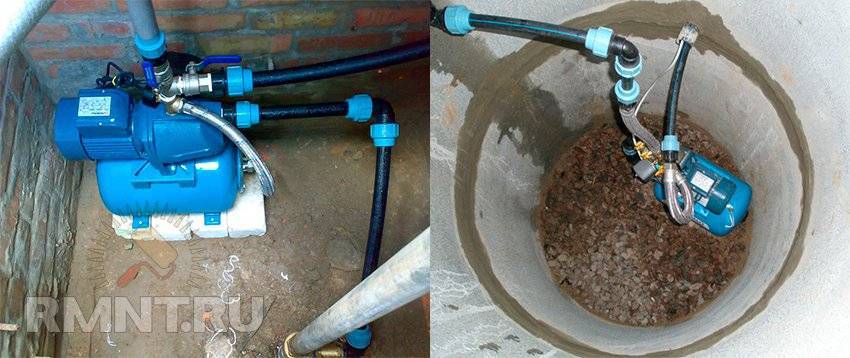
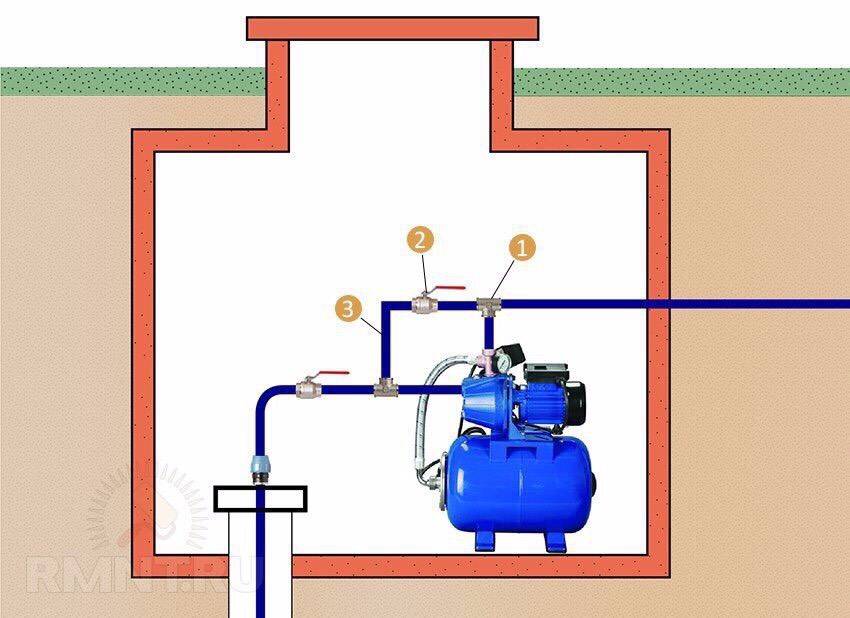
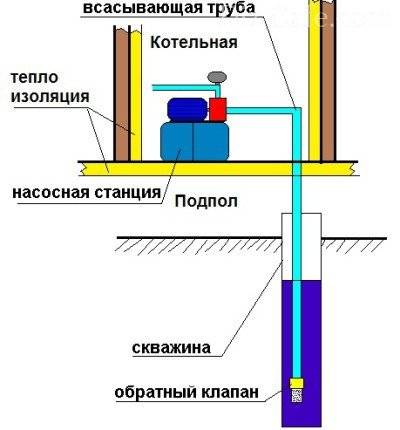
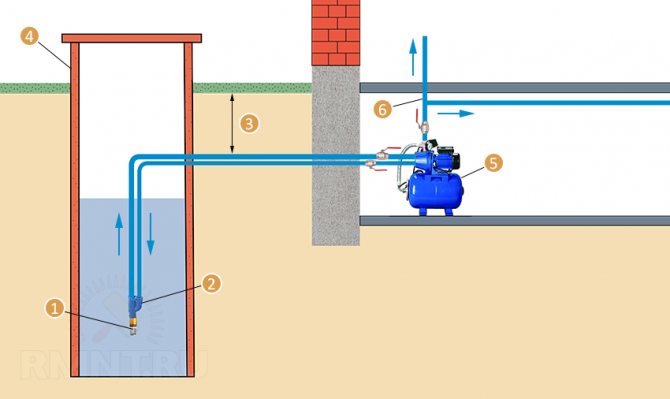
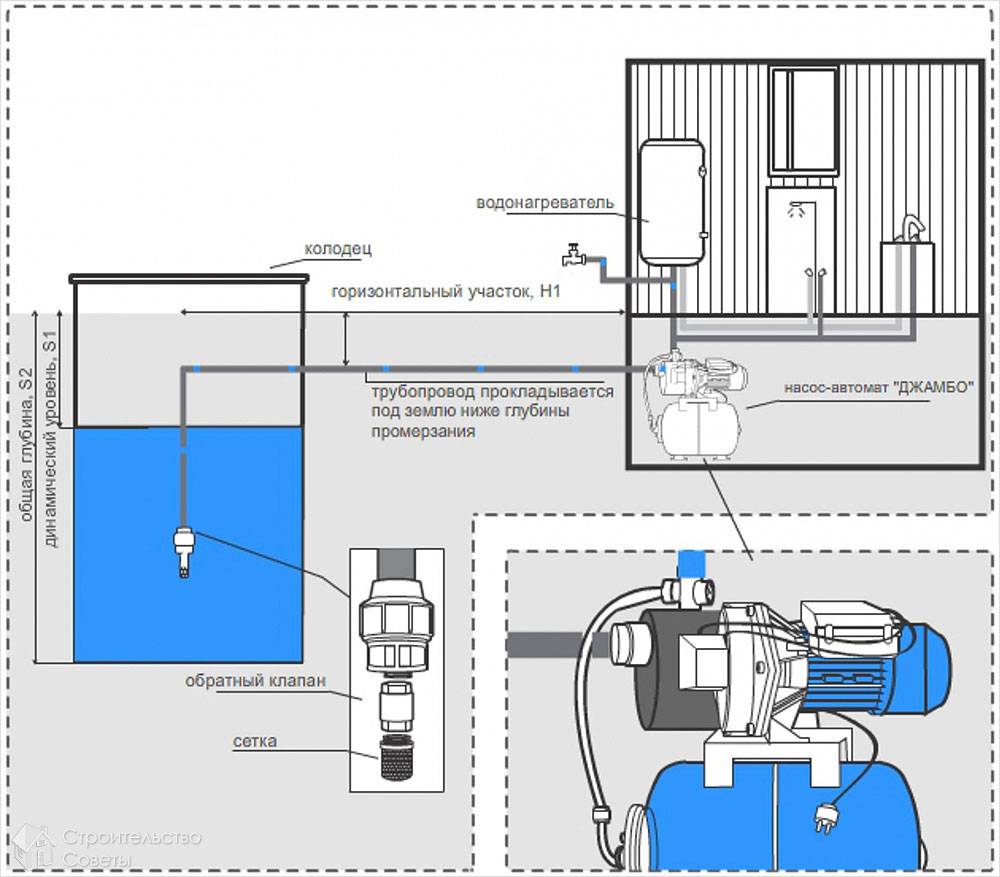
When installing a pumping station at the mouth of a deep well, a caisson is used so that the devices are as close as possible to the water source. A caisson is a container that is quite spacious, in which holes and nodes are provided for easy installation of pumping equipment.
Finished products of this type are sold in specialized stores, you can choose the option that is suitable in size and configuration. They are made of plastic, metal, polymer sand compositions. For self-arrangement of the caisson, the pit is deepened and expanded, the walls are lined with bricks, and a solid cover is mounted on top.
Often, instead of the brickwork of the caisson grids, concrete rings are used, between which the joints are sealed, and then waterproofing work is performed. In the resulting small room, pumping equipment is installed.
Room inside the house
A well-insulated boiler room on the territory of the cottage is an ideal area for installation in case of permanent residence. The main disadvantage is good audibility with poor sound insulation of the room.
If the pumping station is located in a separate room of a country house, then it is best to arrange a well directly under the building
Basement
An underground or basement room can be equipped for the installation of a pumping station, but this should be considered when designing. If there is no heating in the room, and the floors and walls are not insulated, you will have to spend a lot of effort to prepare it.
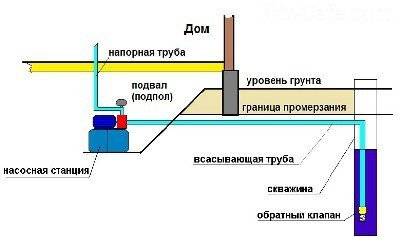
A well-equipped basement is great for installing a pumping station. During the laying of the pipeline in the foundation of the house, a hole should be made for communications
Special well
A possible option that has a couple of pitfalls. The first is the difficulty in maintaining the desired level of pressure in the house, the second is the difficulty in performing repairs.
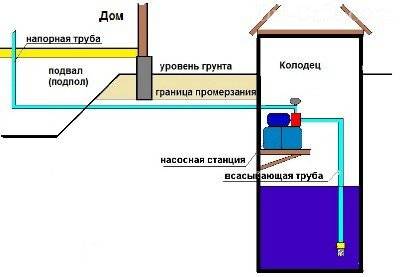
When the pumping station is located in a well, on a specially equipped site, the pressure level should be adjusted, which depends on the power of the equipment and the parameters of the pressure pipe
Caisson
A special platform near the exit of the well is also suitable for installation, the main thing is to correctly calculate the depth of its location. The required temperature will be created by the heat of the earth.


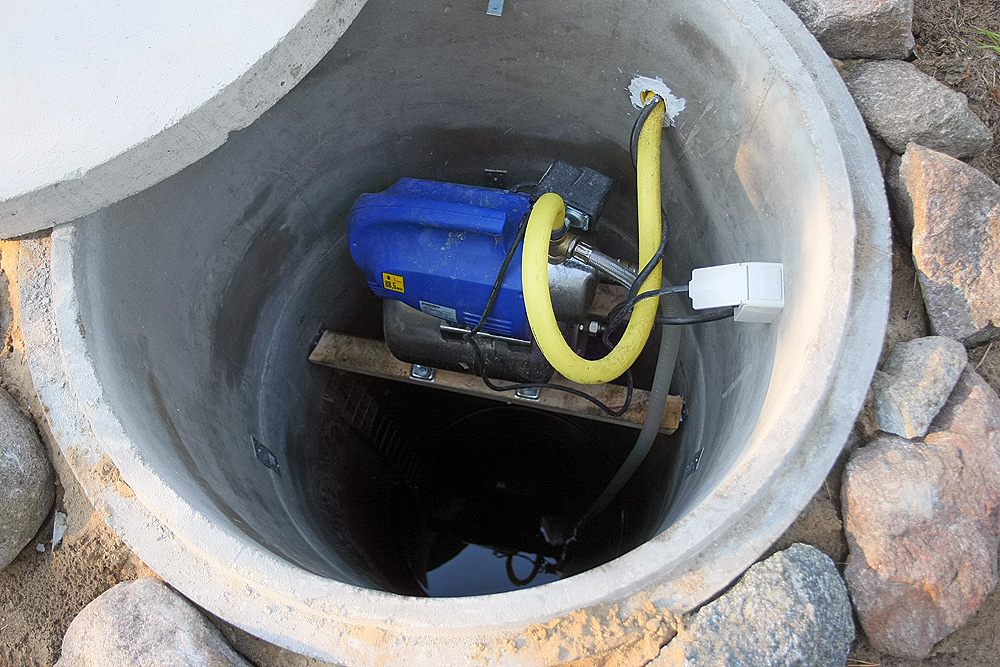

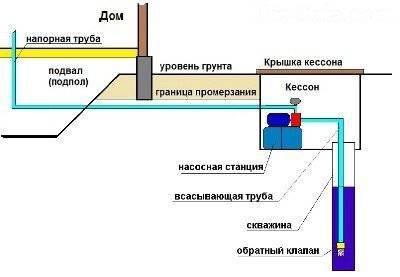
The pumping station, located in the caisson of the well, has two advantages: complete noise insulation and protection against freezing during frost
What you need to know to choose a pumping station?
In order for the selected station to cope well with its functions, the choice must be made taking into account your needs. In this regard, the following criteria can be distinguished, which should first of all be taken into account by the owner:
- Technical characteristics of the pumping station;
- Well features.
Considering the technical characteristics, first of all, the performance of the unit should be highlighted.The best option is a device that can provide water pressure from a well, which can satisfy the needs directly in the house, as well as in the adjacent territories.
Based on practical experience, we can say that for normal living in a country house or a residential building designed for 4 people, it is recommended to choose a device of medium or low power. In the design of such units there is a hydraulic accumulator with a volume of 20 liters. Such a station is capable of supplying water from a well in the amount of 2-4 cubic meters. meters per hour and pressure 45-55 meters. An installation with such characteristics can fully meet the needs of a family of four.
A number of other important indicators should be taken into account in the process of considering various installations:
- productivity;
- the size;
- water level when the pump is off;
- water level when the pump is running;
- filter type;
- pipe width.
This is interesting: Homemade ejector for a pumping station: assembly example
Starting the pumping station
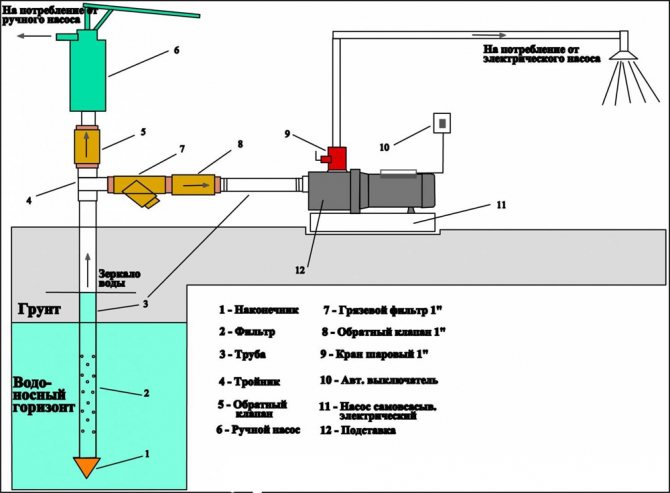
In order to put the pumping station into operation, it is necessary to completely fill it and the supply pipeline with water. For this purpose, there is a special filler hole in the body. Pour water into it until it appears. We twist the plug into place, open the tap at the outlet to consumers and start the station. At first, water goes with air - air plugs come out, which formed during the filling of the pumping station. When the water flows in an even stream without air, your system has entered the operating mode, you can operate it.
If you filled in water, and the station still does not start - the water does not pump or comes in jerks - you need to figure it out. There are several possible reasons:
- there is no non-return valve on the suction pipeline lowered into the source, or it does not work;
- somewhere on the pipe there is a leaky connection through which air is leaking;
- the resistance of the pipeline is too high - you need a pipe of a larger diameter or with smoother walls (in the case of a metal pipe);
- water mirror is too low, not enough power.
To prevent damage to the equipment itself, you can start it by lowering the short supply pipeline into some kind of container (tank of water). If everything works, check the line, suction depth and check valve.


