- water pump
- Instructions on how to make a hand pump
- Design No. 1 - practical overflow pump
- Design No. 2 - a homemade water pump with a spout
- Features of operation of surface pumps
- Design #7 - Wave Energy Pump
- DIY hand pump
- Draining through the handle
- Side drain assembly
- Spiral hydraulic piston
- Design #4 - piston well pump
- Step #1: Assembly liner assembly
- Step #2: Building the Pump Piston
- Step #3 Making a rubber flap valve
- Step #4: Final assembly and installation
- Design #6 - American or Spiral Type
- How to make a mini pump yourself
- Stock Features
- Construction #9 - water pump from compressor
- DIY hand pump
- Draining through the handle
- Side drain assembly
- Spiral hydraulic piston
- Homemade water pump from an oil pump
- Recommended:
water pump
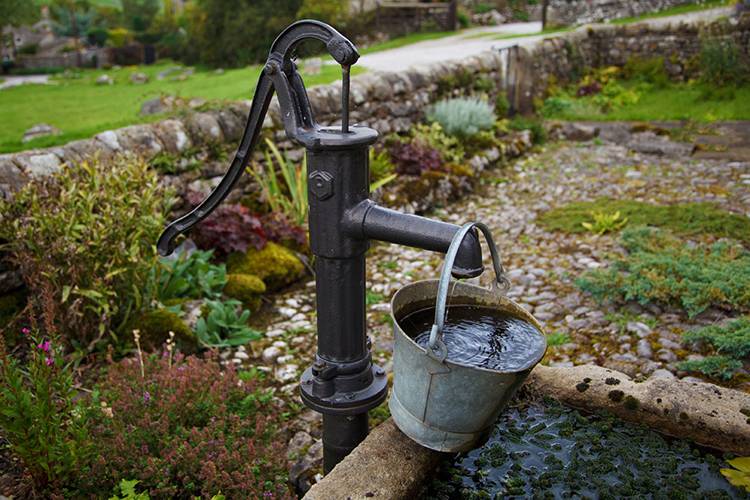
The classic pump scheme, which has been used for several decades in many villages and settlements without running water.


You will need the following accessories:
- PVC pipe 5 cm in diameter with plug and bends.
- Check valves 0.5 2 pieces.
- Pipe PPR 2.4 cm in diameter.
- Rubber gaskets and several pairs of bolts with a 6-8 mm nut.
- Additional details.
We make a pump.

For the structure to work, it is necessary to ensure the reliability and tightness of the structure. The handle is connected to a piston that creates pressure in the working chamber. Under the influence of increased pressure, water passes through two valves and enters the outlet. If you do not ensure the reliability of the case, and the tightness of the gasket, the efforts will be in vain

Instructions on how to make a hand pump
If it is not possible to purchase a ready-made device, you can make a mechanical pump for pumping water with your own hands.
Design No. 1 - practical overflow pump
You can make a device from available improvised materials:
- garden outlet hose;
- PVC pipes of the appropriate diameter;
- upper part of a plastic bottle - 2 units;
Assembly instructions:
- Remove corks from the cut parts of plastic bottles. Remove the rubber seals from the plugs.
- One seal is trimmed so that its diameter becomes smaller than the cork circumference. A small hole with a diameter of 9 mm is made in the center of the lid.
- The prepared seal is inserted into the cap, which is screwed onto the neck of the bottle so that it tightly presses the seal. It turns out a simple petal valve.
- A plastic tube is inserted into the valve, to which the upper part of the second bottle is fixed. A hose is installed on the opposite side.
This design works on the principle of translational movements up and down, after which the water rises through the intake valve through the pipe to the spout. The liquid flows to the consumer by gravity.

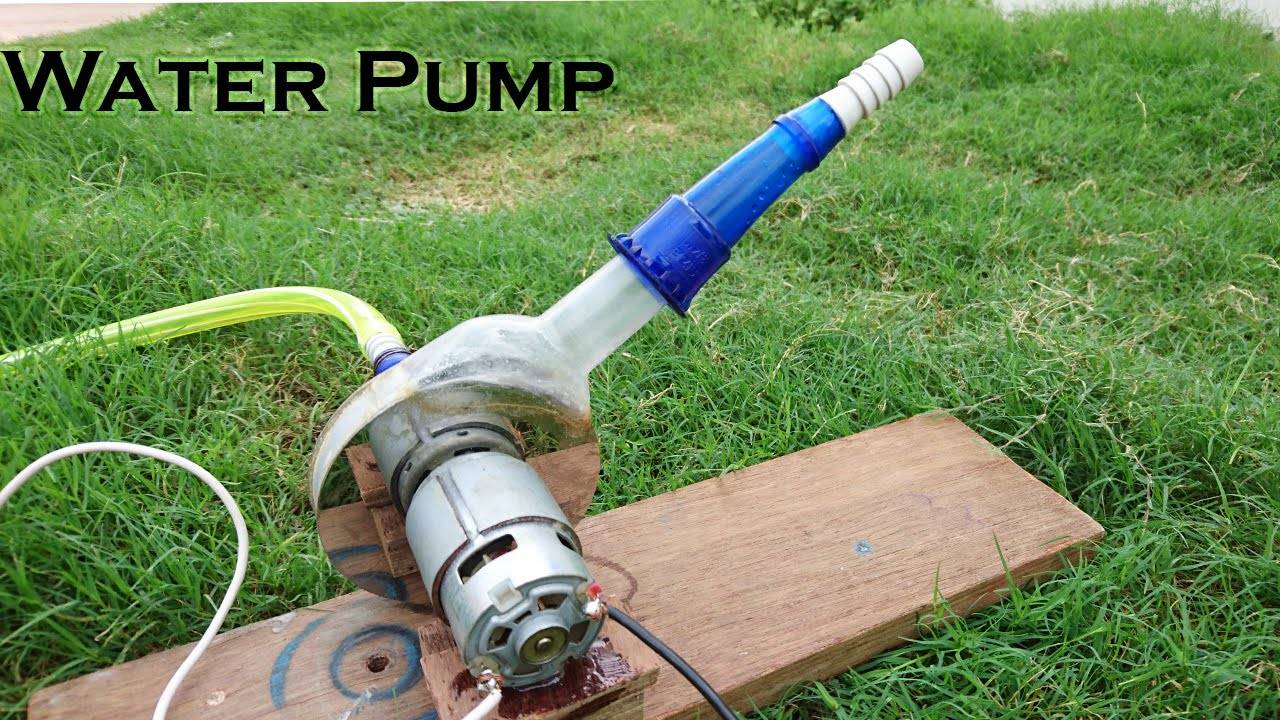
Design No. 2 - a homemade water pump with a spout
The unit is intended for pumping water from a water source - a shallow well, reservoir, reservoir and pond.
To complete the work you will need:
- Sewer pipe with a diameter of 5 cm, length - 65 cm - 1 pc.;
- Branch with a diameter of 2.4 cm - 1 pc.;
- Plug with a diameter of 5 cm - 1 pc.;
- 0.5 inch check valve - 2 pcs.;
- Sewer pipe PPR with a diameter of 2.4 cm - 1 pc.;
- Fixing elements - nuts, bolts, self-tapping screws, washers (diameter 8 mm);
- Connecting clamp - 3 pcs.;
- A piece of rubber - 1 pc.;
- Clip - 3 pcs.;
- Sealant - 2 cylinders (1 for work, the other is empty).
Assembly instructions:
- Manufacture of a sleeve equipped with a valve. For this, a plug with a diameter of 5 cm is used. 10 holes with a diameter of 5 mm each are made along the perimeter of the pipe. 4 round seals with a diameter of 5 cm each are cut out of rubber. The seal is fixed in the center of the plug with bolts.
- The plug is installed in a sewer pipe of identical diameter and fixed with a silicone-based sealant and self-tapping screws. Self-tapping screws are screwed through the base of the sleeve. The check valve is mounted in the PPR pipe.
- The tip of the used sealant bottle is cut off. The balloon itself is slightly heated and inserted into the sleeve. The cylinder is mounted on the check valve on the other side of the arrow. The rest of the balloon is cut off and fixed with a nut.
- Stock preparation. The length of the rod must exceed the length of the finished sleeve by 55 cm. A PPR pipe is used as a rod. The lower part of the stem is slightly warmed up, after which it is mounted on the valve. The arrow on the valve points towards the inside of the stem. The pipe is tightly tightened with a clamp.
- Final assembly. A rod is inserted into the sleeve, a plug is fixed in the upper part, and a branch with a diameter of 2.4 cm is fixed in the lower part. The branch acts as a reliable manual support.A hose is connected to the assembled structure and a test pumping of water is performed.
Modern manual water pumps solve a complex of tasks related to pumping water for various needs. The correct choice of such equipment is determined by the appropriateness of its use and the main technical characteristics.
Features of operation of surface pumps
Surface pumps, as the name implies, are installed on the surface. These are relatively inexpensive and quite reliable devices, although they are not suitable for very deep wells.
You will rarely find a surface pump that can deliver water from a depth of more than 10 meters. And this is only in the presence of an ejector, without it, the performance is even lower.
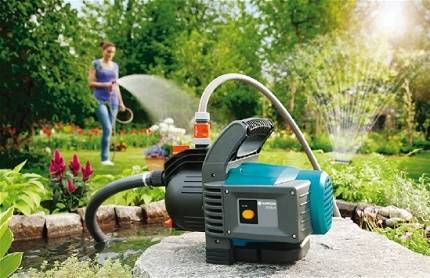
Surface pumping stations have an extensive scope, they pump water from various sources with a depth of no more than 10 m
If the cottage has a well or a well of suitable depth, you can safely choose a surface pump for the site.
You can take a model with a relatively low productivity for irrigation or a more powerful device that will effectively provide water to a private house. The convenience of surface pumps is obvious: first of all, it is free access for adjustment, maintenance and repair.
In addition, the installation of such a pump at first glance looks very simple. The pump must be installed in a suitable place, lower the hose into the water, and then connect the device to the power supply. If the pump is needed only for irrigation, you can purchase and install it without any additional elements.
To optimize the operation of the device, it is recommended to take care of an automated control device.Such systems can turn off the pump when a dangerous situation arises, for example, if water does not enter it.
“Dry running” is not recommended for almost all models of surface pumps. You can also automate the shutdown of the pump if the watering time is over, the required volume is filled, etc.
Design #7 - Wave Energy Pump
As the name implies, these pumps use wave energy. Of course, the waves on the lakes are not so big, but the pump works around the clock and is capable of pumping up to 20 cubic meters per day.


Option 1
Necessary materials:
- float;
- corrugated pipe;
- two valves;
- attachment mast.
The float is a pipe, a log, selected depending on the rigidity of the corrugated pipe, empirically.
Corrugated pipe can be made of plastic or metal. The weight of the log must be selected experimentally
Two valves are mounted in a corrugated pipe, working in the same direction.
When the float moves down, the corrugated pipe is stretched, as a result, water is taken. When the float moves up, the corrugation contracts and pushes the water up. Therefore, the float must be quite heavy and large.
The whole structure is rigidly attached to the mast.
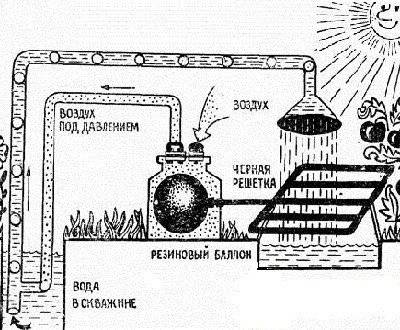
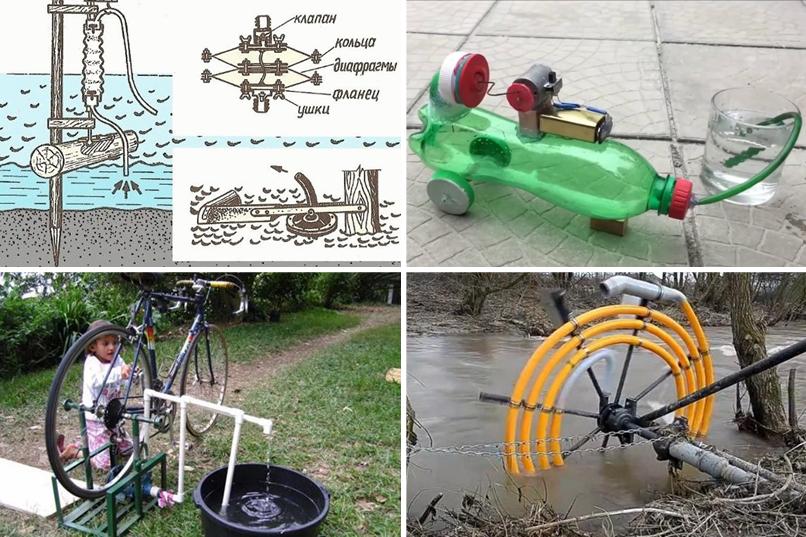
Option 2
This design differs from the first version in that the corrugated pipe is replaced by a brake chamber. This diaphragm-based circuit is very often used in simple do-it-yourself water pumps. Such a pump is quite versatile and can receive energy from wind, water, steam, sun.
The brake chamber should be disassembled and only two holes for the valves should be left.
Instead of homemade valves, you can use ready-made, plumbing ones.The washers must be of sufficient diameter so that the diaphragm does not tear (+)
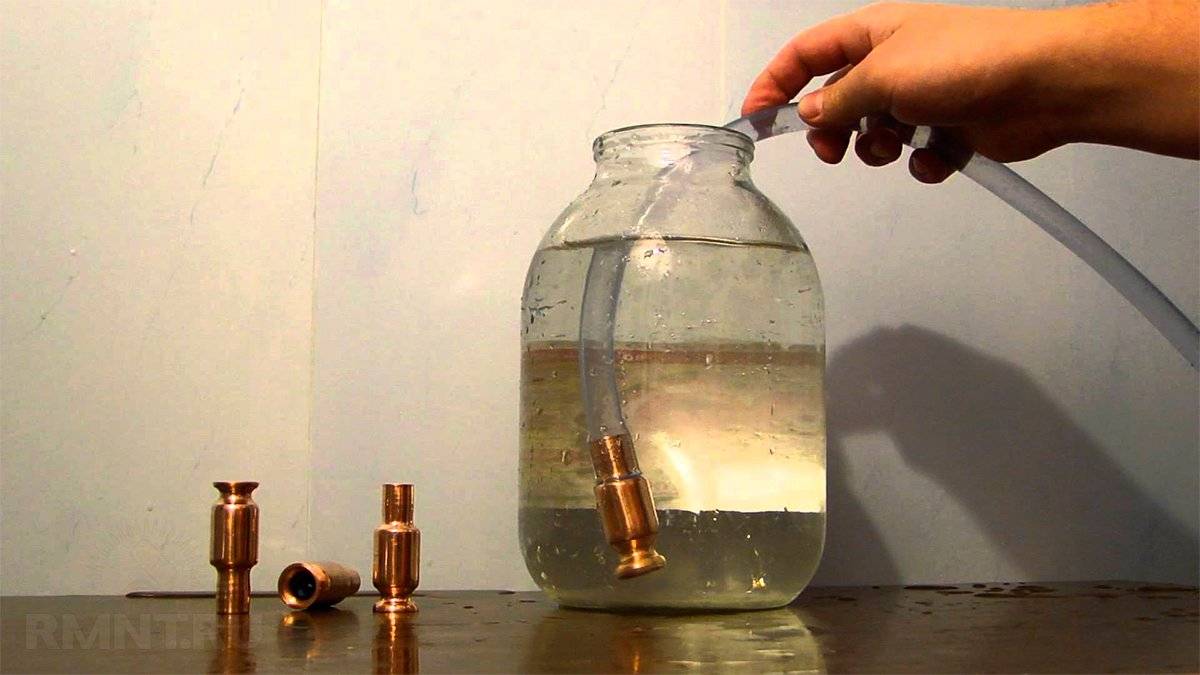
Producing suitable valves is a separate task.
Necessary materials:
- copper or brass tube;
- balls of a slightly larger diameter - 2 pcs.;
- spring;
- copper strip or bar;
- rubber.
For the inlet valve, we cut off the tube and drill it so that the ball fits snugly on the tube. It is necessary to ensure that the ball does not let water through. To prevent the ball from falling out, solder a wire or strip on top.
The design of the exhaust valve differs from the intake valve by the presence of a spring. The spring must be installed between the ball and the copper strip.
We cut out the diaphragm from the rubber according to the size of the brake chamber. To drive the diaphragm, you need to drill a hole in the center and stretch the pin. The valves are inserted from the bottom of the brake chamber. For sealing, you can use epoxy glue.
It is better to find balls for valves that are not metal, so they will not be subject to corrosion.
Option 3
Based on the design of the two previous options, you can think about building a more advanced model.
It is advisable to choose a log that is dry and not resinous, so it will be easier, pay attention to the absence of cracks
This pump requires four stakes (1) to be driven into the bottom of the reservoir. Then make a float from a log. In the log, you need to make gashes so that when swinging on the waves, it does not rotate.
For durability, it is recommended to treat the log with a hot mixture of kerosene and drying oil
You need to do it carefully, process it in a water bath: there should be no open fire
The log limiters (3) and (4) are nailed in such a way that the log does not damage the pump rod (5) during maximum movement.
DIY hand pump
To make a more complex version, you need to prepare the following materials:
- a piece of plastic pipe for sewage with a length of 600 - 700 mm and a diameter of 50 mm, as well as a tee, two plugs and seals of the same diameter;
- a piece of plastic pipe for sewage with a diameter of 24 mm;
- two half-inch check valves;
- bolt M6 or M8, as well as a washer and nut for it;
- technical rubber;
- several clamps.
The pump can be assembled in several variations.
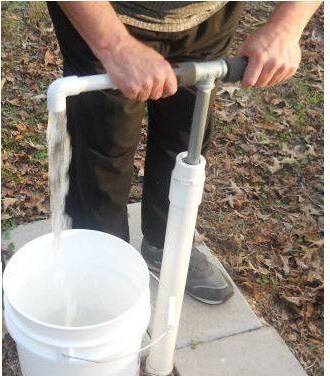
Draining through the handle
This is the simplest version of a homemade piston pump. Its stem, made of a plastic pipe with a diameter of 24 mm, simultaneously plays the role of a drain pipe. The device is manufactured in the following order:


- In the center of the plug with a diameter of 50 mm, a dozen holes with a diameter of 5–6 mm should be drilled.
- From the inside, it is necessary to attach a piece of thin rubber to the plug using a bolt with a nut or a rivet so that it covers the drilled holes. This simple design will play the role of a check valve.
- A plug with an improvised check valve must be fixed with self-tapping screws at the end of a segment of a 50 mm sewer pipe. The connection point should be sealed with a rubber seal. Do not forget that the rubber valve must be inside the sleeve.
- A hole with a diameter of 26 mm must be drilled in the center of the second plug. At the final stage of assembly, this part will need to be fixed on the second end of the sleeve. It will serve as a guide for the stem.
- Now it is necessary to equip the future stem (plastic pipe with a diameter of 24 mm) with a purchased check valve. To do this, it must be screwed onto a short steel pipe, which is then inserted into a heated pipe. After installing the branch pipe with the valve, the pipe must be tightened with a clamp, which is removed only after the plastic has completely cooled.
- The piston will be the upper part of the 340 ml sealant bottle. Having warmed up well, it is placed in a sleeve, as a result of which the future piston will take the necessary shape. Then a large part is cut off from the bottle, and the top is attached to the check valve installed in the stem. To do this, use a union nut or a barrel - a coupling with an external thread.
It remains to assemble the pump. The piston is installed in the sleeve, then the plug with a hole made in the center is put on the rod and screwed (without sealing) to the sleeve. A fitting must be attached to the free end of the rod, on which the hose will be put on.
Side drain assembly
A small improvement will make the operation of the pump more convenient, since the stem will be freed from the hose. The difference from the above design is very small: a tee must be attached to the sleeve from above, it is possible with an oblique outlet.
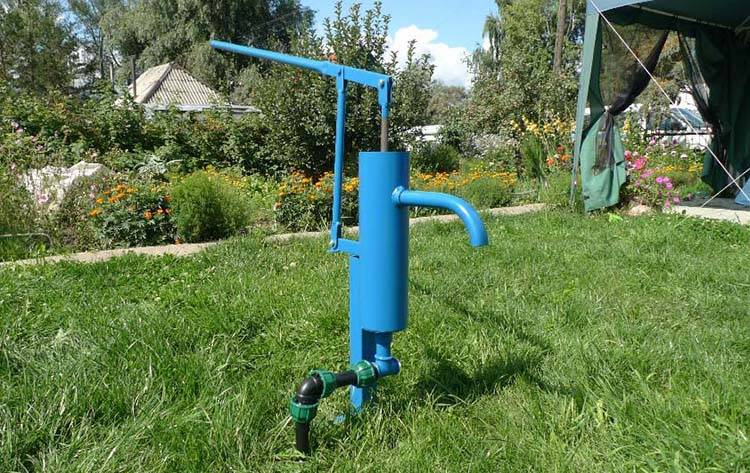
Finished hand pump
In this case, several holes must be made in the stem immediately behind the check valve, but so that the pipe retains sufficient strength. Now the hose must be attached to the outlet of the tee - when the piston is lifted, water will exit through this hole.
Spiral hydraulic piston
This ingenious invention is able to use the power of the stream to supply water through a pipeline that is not very long.
The plant is driven by a partially recessed wheel with blades, rotated by a river or stream. On its lateral surface, a plastic pipe with a diameter of 50 to 75 mm is laid in the form of a spiral. To fix it, it is easiest to use plastic clamps.
A ladle with a diameter of 140 - 160 mm should be attached to the inlet pipe (the outer end of the spiral).
Hand pump in the country
Water will flow from the spiral into the pipeline through a special device - the so-called pipe reducer, which should be removed from a non-working factory-made pump. The gearbox is mounted in the center of the wheel.
This model works as follows: at the moment of rotation of the wheel, the intake pipe passes a certain distance under water, capturing a certain amount of liquid. Then the branch pipe rises vertically and the water in it rushes down under the influence of its own weight and, as the wheel rotates, moves towards the center of the spiral, from where it enters the pipeline.
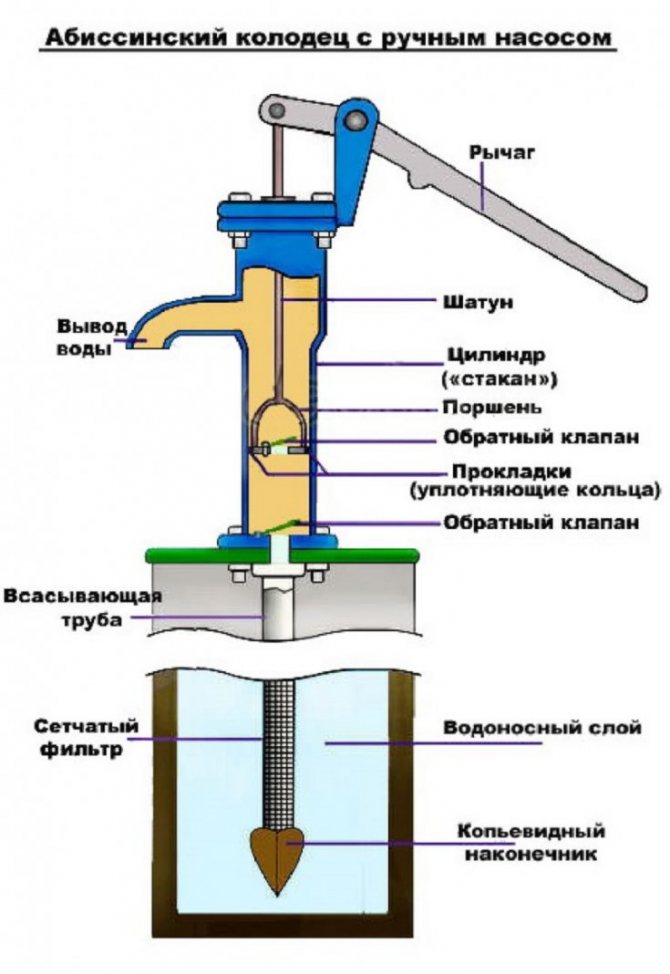
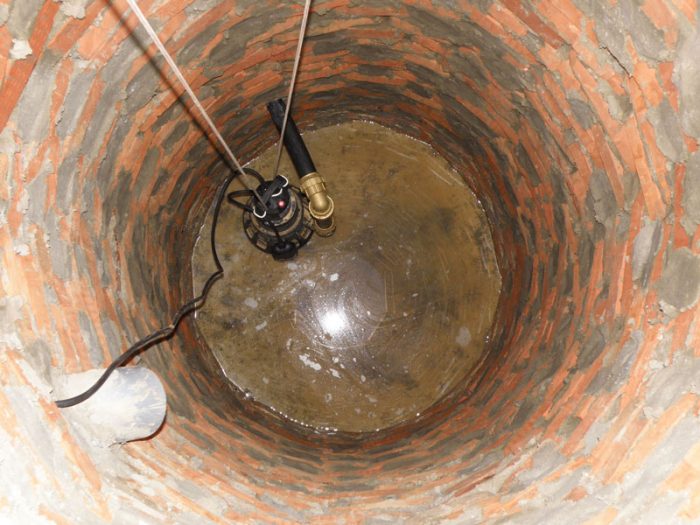
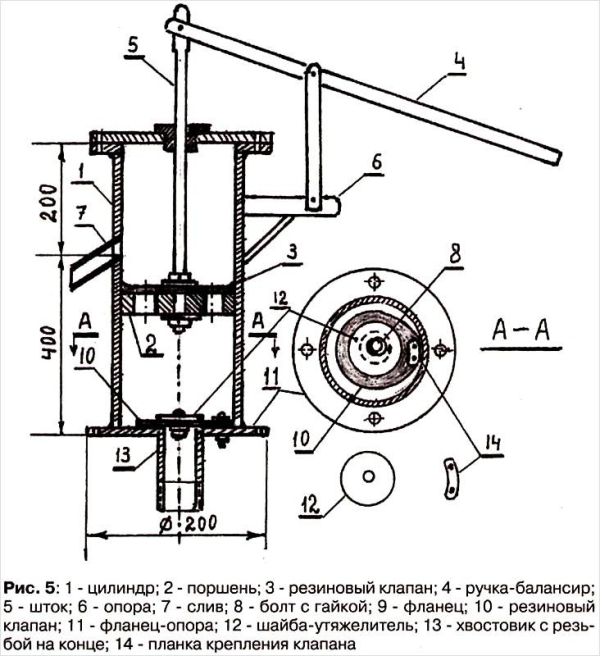
Design #4 - piston well pump
This pump design is suitable for wells no larger than 8 meters. The principle of operation is based on the vacuum created by the piston inside the cylinder.
In such pumps, the top cover is either absent or has a slotted hole, since the stem is rigidly connected to the handle.
Necessary materials:
- metal pipe d.100mm., length 1m.;
- rubber;
- piston;
- two valves.
The performance of the pump directly depends on the tightness of the entire structure.
Step #1: Assembly liner assembly
For the manufacture of the pump sleeve, it is necessary to pay attention to the inner surface, it must be flat and smooth. A good option would be a sleeve from a truck engine
From below, a steel bottom must be welded to the sleeve along the diameter of the wellhead. In the center of the bottom, either a petal valve or a factory valve is installed.
A cover is made for the top of the sleeve, although this part is more aesthetic, you can do without it
It is necessary to pay attention to the fact that the hole for the piston rod is slotted
Step #2: Building the Pump Piston
For the piston, you need to take 2 metal discs. Lay between them not very thick rubber 1 cm, slightly larger in diameter than the discs. Next, we tighten the disks with bolts.
As a result, the rubber disk will be clamped and you should get a sandwich of metal and rubber. The point is to create a rubber rim around the edge of the piston, which will form the necessary piston-sleeve seal.
It remains to install the valve and weld the ear for the stem.
Step #3 Making a rubber flap valve
The reed valve consists of a rubber disk of not very thick thickness. The disc size must be larger than the inlet holes. A hole is drilled in the center of the rubber. Through this hole and the pressure washer, the rubber disc is mounted over the intake ports.


When sucked, the edges of the rubber rise, and water will begin to flow. During the reverse stroke, down pressure is created: the rubber reliably covers the inlets.
Step #4: Final assembly and installation
It is desirable to cut a thread on the head of the well and in the bottom of the pump sleeve. The thread will allow the pump to be easily removed for maintenance and will make the installation airtight.
Install the top cover and attach the handle to the stem. For comfortable work, the end of the handle can be wrapped with electrical tape or rope, laying a coil to coil.
If the pump does not pump water, it is necessary to eliminate all leaks, including those in connection with the well head (+)
The limitation on the depth of the well is due to the theoretical impossibility of creating a rarefaction of more than 1 atmosphere.
If the well is deeper, you will have to modify the pump to a deep one.
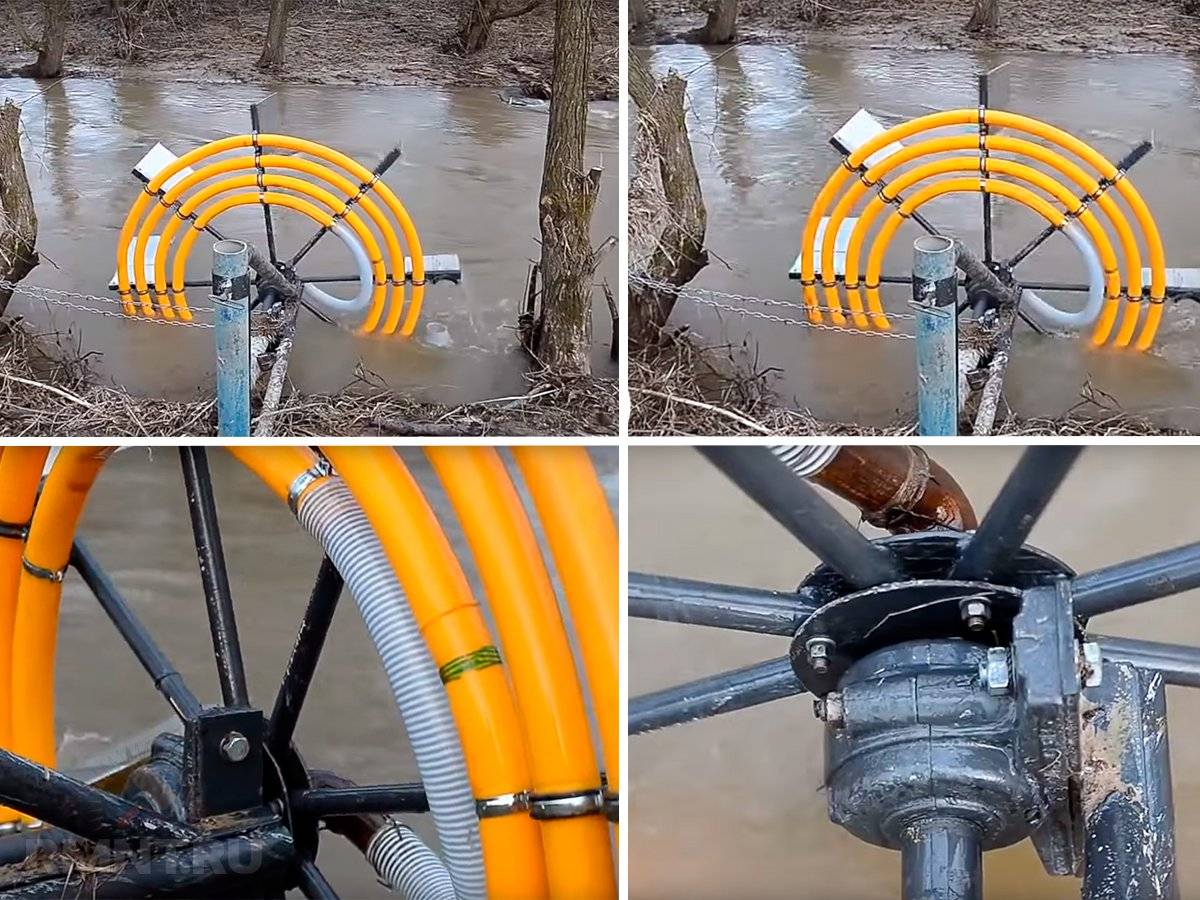
Design #6 - American or Spiral Type
The spiral pump uses the energy of the river flow. For work, the minimum requirements must be met: depth - at least 30 cm, flow speed - at least 1.5 m / s.
Option 1
- flexible hose d.50mm;
- several clamps along the diameter of the hose;
- intake - PVC pipe d. 150mm;
- wheel;
- pipe reducer.
The main difficulty in such a pump is the tubular gearbox. This can be found in decommissioned sewage trucks or obtained from factory equipment.

An impeller is attached to the pump for greater efficiency.
Water is taken in by a water intake and moves in a spiral, creating the necessary pressure in the system. The height of the lift depends on the speed of the current and the depth of the immersion of the intake.
Option 2
- flexible hose d.12mm (5);
- plastic barrel d.50cm, length 90cm (7);
- polystyrene (4);
- impeller (3);
- sleeve coupling (2);
Cut a hole in the bottom of the barrel. Inside the drum it is necessary to lay the hose tightly in a spiral and connect it to the sleeve coupling.
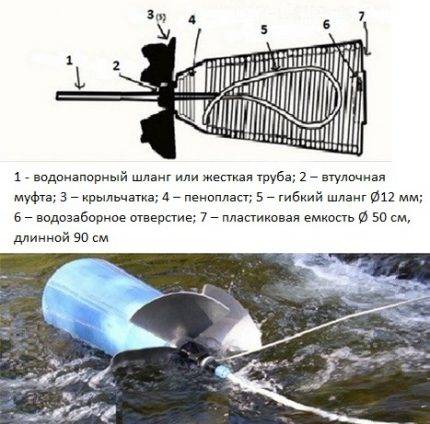
Inside the barrel, the hose is tightly laid, pressed against the walls with a strip. The barrel can be metal with foam floats
To give buoyancy inside the barrel, it is necessary to glue foam floats. Finally, screw on the impeller.
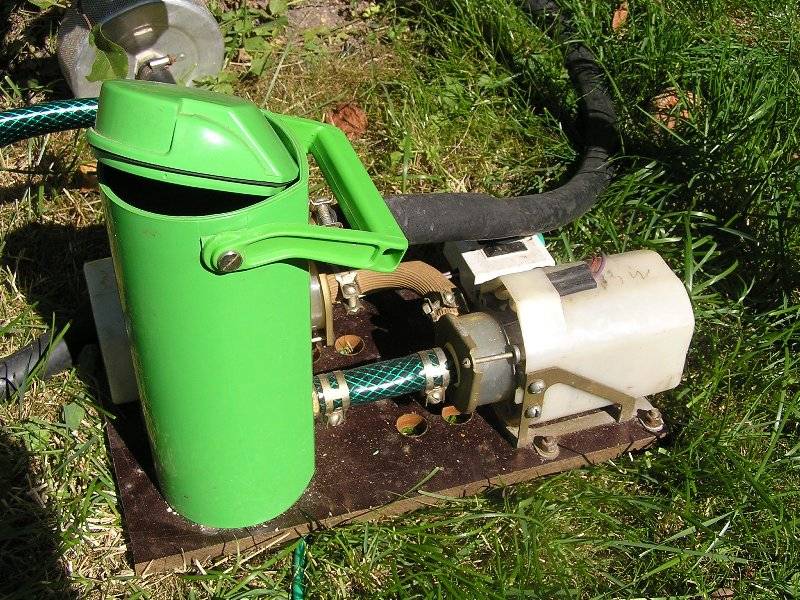
How to make a mini pump yourself
Sometimes craftsmen want to make a mini water pump on their own.One of such devices can be proposed below. For work you will need:
- The motor is electric.
- Ballpoint pen.
- Super glue, better quick dry and waterproof.
- From a deodorant cap.
- A small gear, about the size of a cap.
- Four plastic pieces 10 x 10 mm.
Work instructions:
- All teeth are ground off at the gear, which is then adjusted to the size of the cap.
- Plastic pieces are glued with glue through 90 degrees opposite each other.
- To form the pump housing, the walls of the cap are cut off, leaving them 1.5 centimeters high.
- Holes are drilled on top of the body for fixing the axis of the motor and on the right for fixing the handle body.
- The ballpoint pen is disassembled, leaving only the body, and glued in the cap to the side hole.
- The motor is glued to the upper opening of the housing.
- An impeller is attached to the axis of the motor.
- A plastic panel is cut out, the diameter of which is the same as the cap.
- A hole is drilled in the water intake panel and it is hermetically glued to the body.
What mini-pumps you can make yourself, how they work can be clearly seen in the video in this article.
The idea was born to make a mini fountain myself. The design of the fountain itself is a separate story, and this article will discuss how to make a pump for circulating water with your own hands. This topic is not new and has already been described more than once on the Internet. I'm just showing my implementation of this design. If anyone is too lazy to do it, then such pumps are sold on Aliexpress in the region of 400 rubles (price for February 2016).
So let's get started. A nasal drop bottle was used as the body. Who cares, I will write the dimensions of some parts.So, the inner diameter of the bubble is 26.6 mm, the depth is 20 mm. A hole slightly larger than the diameter of the motor shaft is drilled in it from the back side, and a hole for water outlet (4 mm in diameter) is drilled on the side. A tube is attached to it first with superglue, and then with hot glue, through which water will subsequently rise to the top of the fountain. Its diameter is 5 mm.
We also need a front cover. I drilled a 7mm hole in the center of it. All body is ready.
A hole for the shaft is drilled in the base. The diameter of the base, you know, should be less than the diameter of the body. I have about 25 mm. In fact, it is not needed at all and is used only for strength. The blades themselves can be seen in the photo. Made from the same box and cut to the diameter of the base. I glued everything with superglue.
The motor will drive the impeller. It was taken out, most likely, from some kind of toy. I don’t know its parameters, so I didn’t raise the voltage more than 5 V. The main thing is that the engine should be "smarter".
I tried another with a speed of 2500 rpm, so he raised the column of water very low. Next, you need to collect everything and seal it well.


And now the tests. When powered by 3 V, the current consumption is 0.3 A in load mode (that is, immersed in water), at 5 V - 0.5 A. The height of the water column at 3 V is 45 cm (rounded down). In this mode, he left it in the water for an hour.
The test went well. How long it will last is a good question that only time can answer. When powered by 5 volts, the water rises to a height of 80 cm. All this can be seen on the video.
The summer cottage and the presence of a well on it are a joy for every nature lover.Especially if electricity is supplied to the village and it is possible to pump water for irrigation from a well using a powerful unit.
But what to do in the event that there is no electricity at all or it was temporarily cut down ?! Of course, you can carry water to the beds just with buckets, but it's tiring, and just a long time. Especially if the garden lands have a large area.
We bring to your attention a solution to the dilemma - assembling a water pump with your own hands. And believe me, such a water machine will work, albeit a little slower than an electric pump, but still, quite productively. Consider several options for hand-assembled pumps.
Is it worth thinking that the production of your own pump at home is not profitable and will not lead to anything. We are ready to prove the opposite to you, referring to several advantages of such work:
- Firstly, the summer resident will always have a device at hand to supply water from the well upstairs, even if the electricity is turned off.
- An important point is the saving of the family budget. So, electricity tariffs are growing by leaps and bounds, and a powerful pump in working order winds up a lot of kW. Such cycles of the pump, even for the purpose of watering the beds in a month, can result in a tidy sum for the average family.
Stock Features
If the septic tank or cesspool is not cleaned on time, this can lead to serious problems. As a result, the carrying capacity of the soil may deteriorate, which will lead to the accumulation of a large amount of wastewater in the tank.
To collect runoff from a country house or cottage, a cesspool is built on the site or a septic tank is installed.In any case, it is periodically necessary to pump out silt deposits and solid impurities from this structure. Even when using a modern multi-chamber septic tank, in which bacteria are responsible for the processing of waste, periodic cleaning of sewage waste will be required.
It is good if there is a free access to the sewage treatment plant for a sewage truck. Otherwise, you will have to use a factory-made or home-made fecal pump. At the same time, in any case, the installation of such equipment must be carried out in accordance with all the rules, therefore, when doing work with your own hands, you should familiarize yourself with the nuances and sequence of installation.
If the septic tank or cesspool is not cleaned on time, this can lead to serious problems. As a result, the carrying capacity of the soil may deteriorate, which will lead to the accumulation of a large amount of wastewater in the tank. The accumulated sewage will spill onto the site and cause a deterioration in the sanitary condition of your site.
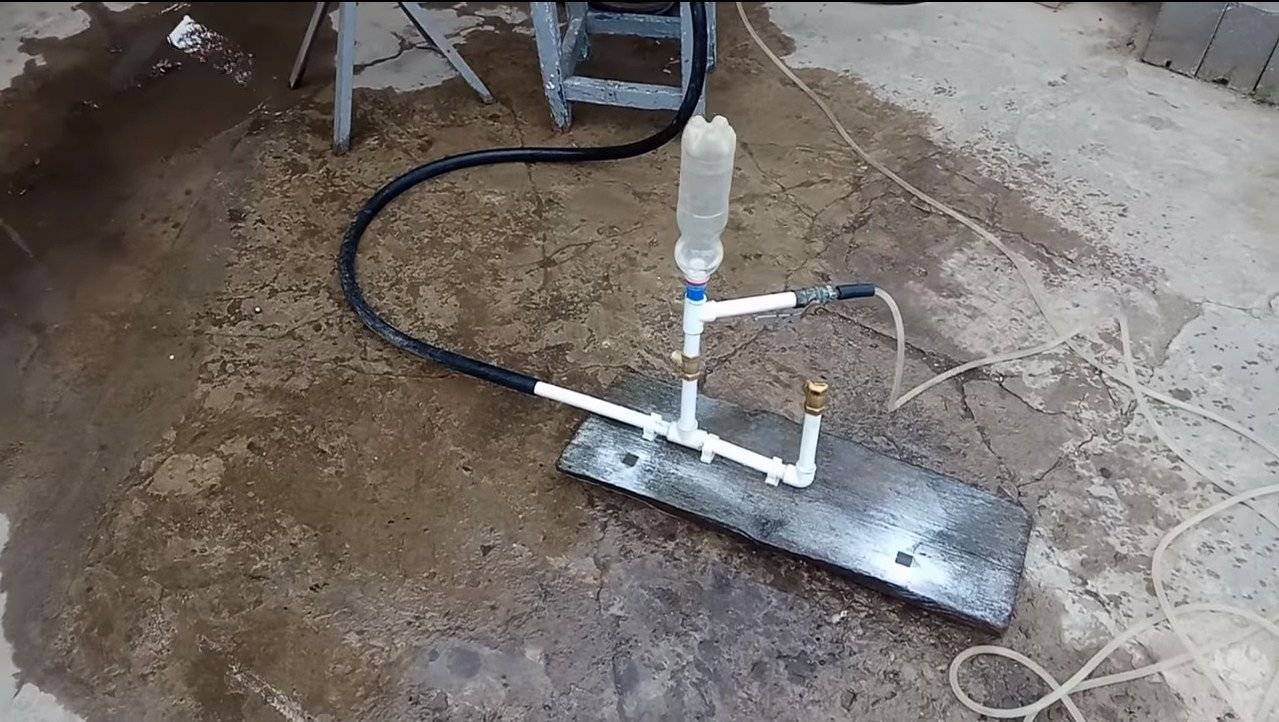
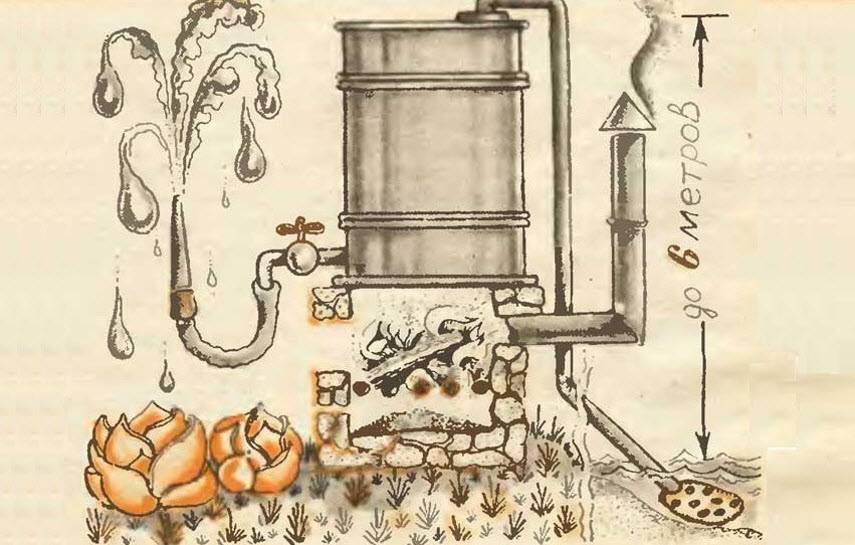
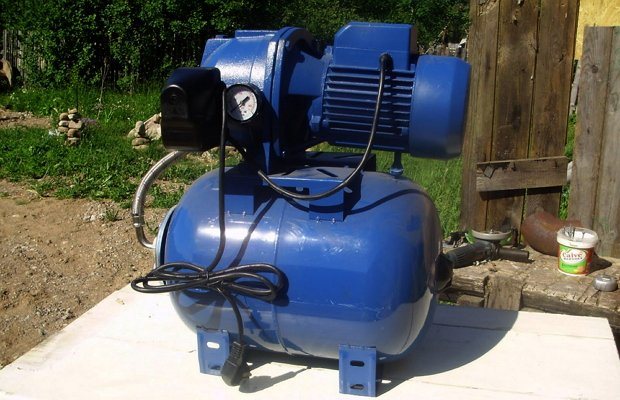
Construction #9 - water pump from compressor
If you have already drilled a well, have an air compressor, do not rush to purchase a water pump. It will be successfully replaced by a structurally simple airlift device.
- spout pipe d.20-30mm;
- air pipe 10-20mm;
The principle of operation of the pump is very simple. A hole must be drilled in the outflow pipe, they must be placed closer to the bottom. The hole should be 2-2.5 times the diameter of the air pipe. It remains to insert the air pipe and apply air pressure.

One of the most efficient and simple pumps, does not clog and is assembled in 5 minutes
The efficiency of such a pump depends on the height of the water level, the depth of the reservoir, the compressor power (capacity). The efficiency is about 70%.
DIY hand pump
The manual pumping system described below can be taken as the basis for creating a stationary water-lifting post in a well or well.
We need:
- PVC sewer pipe 50 mm with several outlets, plug, cuffs-seals - 1m.
- Check valve 1/2″ in the amount of 2 pcs, sewer pipe PPR 24 mm,
- Also rubber, bolts and nuts with 6-8 mm washers, several clamps, fitting clamps and other plumbing parts.
There are several ways to assemble such a pump.
Draining through the handle
This model is the simplest of those that can be assembled at home: the stem is made of a PPR pipe, the water in it rises and pours out from above. The sleeve is made from a pipe with a diameter of 50 mm and a length of 650 mm. The pump turns out to be the simplest of the home ones - water rises along the piston rod, which is made of a PPR pipe and pours out from above.
Draining water through the handle
So:
- We make a sleeve from a pipe with a diameter of 50 mm and a length of 650 mm. The valve should be annular petal: drill 10 holes with a diameter of 6 mm, cut out a round rubber flap in the amount of 3-4 pieces with a diameter of 50 mm.
- We fix the flap in the center of the plug using bolts or rivets (a self-tapping screw will not work). Thus, we get a petal valve. You can not make the valve yourself, but cut it into the factory end cap. In this case, the cost of the pump will increase by 30%.
- We install a plug into the sleeve, using sealant through the heaters, while additionally fixing it with self-tapping screws through the wall of the sleeve base.
- The next element of the pump is the piston. A check valve is installed in the PPR pipe.
- For the manufacture of the piston head, you can use the spent nose of the sealant 340 ml. The pipe is preheated and placed in the sleeve. Thus, the head will acquire the desired shape and size.
- Then it is cut and installed in series on the check valve using a coupling with an external thread, or a union nut is used.
- We insert the piston into the base of the pump and make an upper plug, which may not necessarily be airtight, but the rod must be held evenly.
- We install the squeegee on the free end of the pipe, put a hose on it. A pump of this design is very reliable, but a little inconvenient - the water drain point is in constant motion and is located close to the operator. This type of pump can be slightly modified.
Side drain assembly
Everything is done as follows:
We include a tee-angle of 35 degrees in the sleeve. We make large holes in the rod pipe, while not violating rigidity, as an option, you can use a rod rod.


- The main advantage and advantage of the described pumps is the low price of the structure. A factory valve costs about $4, a pipe about a dollar per 1 meter. And all other parts in total will come out for 2-3 dollars.
- Get a pump that costs less than $10. Repair of such pumps will also cost a penny by replacing a few "other" cheap parts.
Spiral hydraulic piston
Do-it-yourself manual water pump in this design is a little more difficult to make. But it does have more performance.This type of piston is most often used when pumping water from reservoirs over a short distance.
So:
- The device is based on a carousel with blades, resembling a water mill wheel in appearance. The river flow just drives the wheel. And the pump in this case is a spiral from a flexible pipe 50-75 mm, which is fixed to the wheel with clamps.
- A bucket with a diameter of 150 mm is attached to the intake part. Water will enter the pipeline through the main assembly (pipe reducer). You can take it from both the factory pump and the sewer pump.
- The gearbox must be tightly fixed to the base, which is motionless, and located along the axis of the wheel.
The maximum rise of water is equal to the length of the pipe from the fence, which is in the water during operation. This distance is obtained from the point where the pump is immersed in water to the point where it exits. It is this distance that the pump intake bucket travels. - The system of operation of such a pump is simple: when it is immersed in water, a closed system with air sections is formed in the pipeline, water flows through the pipe to the center of the spiral. The only disadvantage of such a water pump is that we are a reservoir as an activator, so its use is not suitable for everyone.
This pump will serve as an excellent watering agent in the season. Its price depends on the material used.
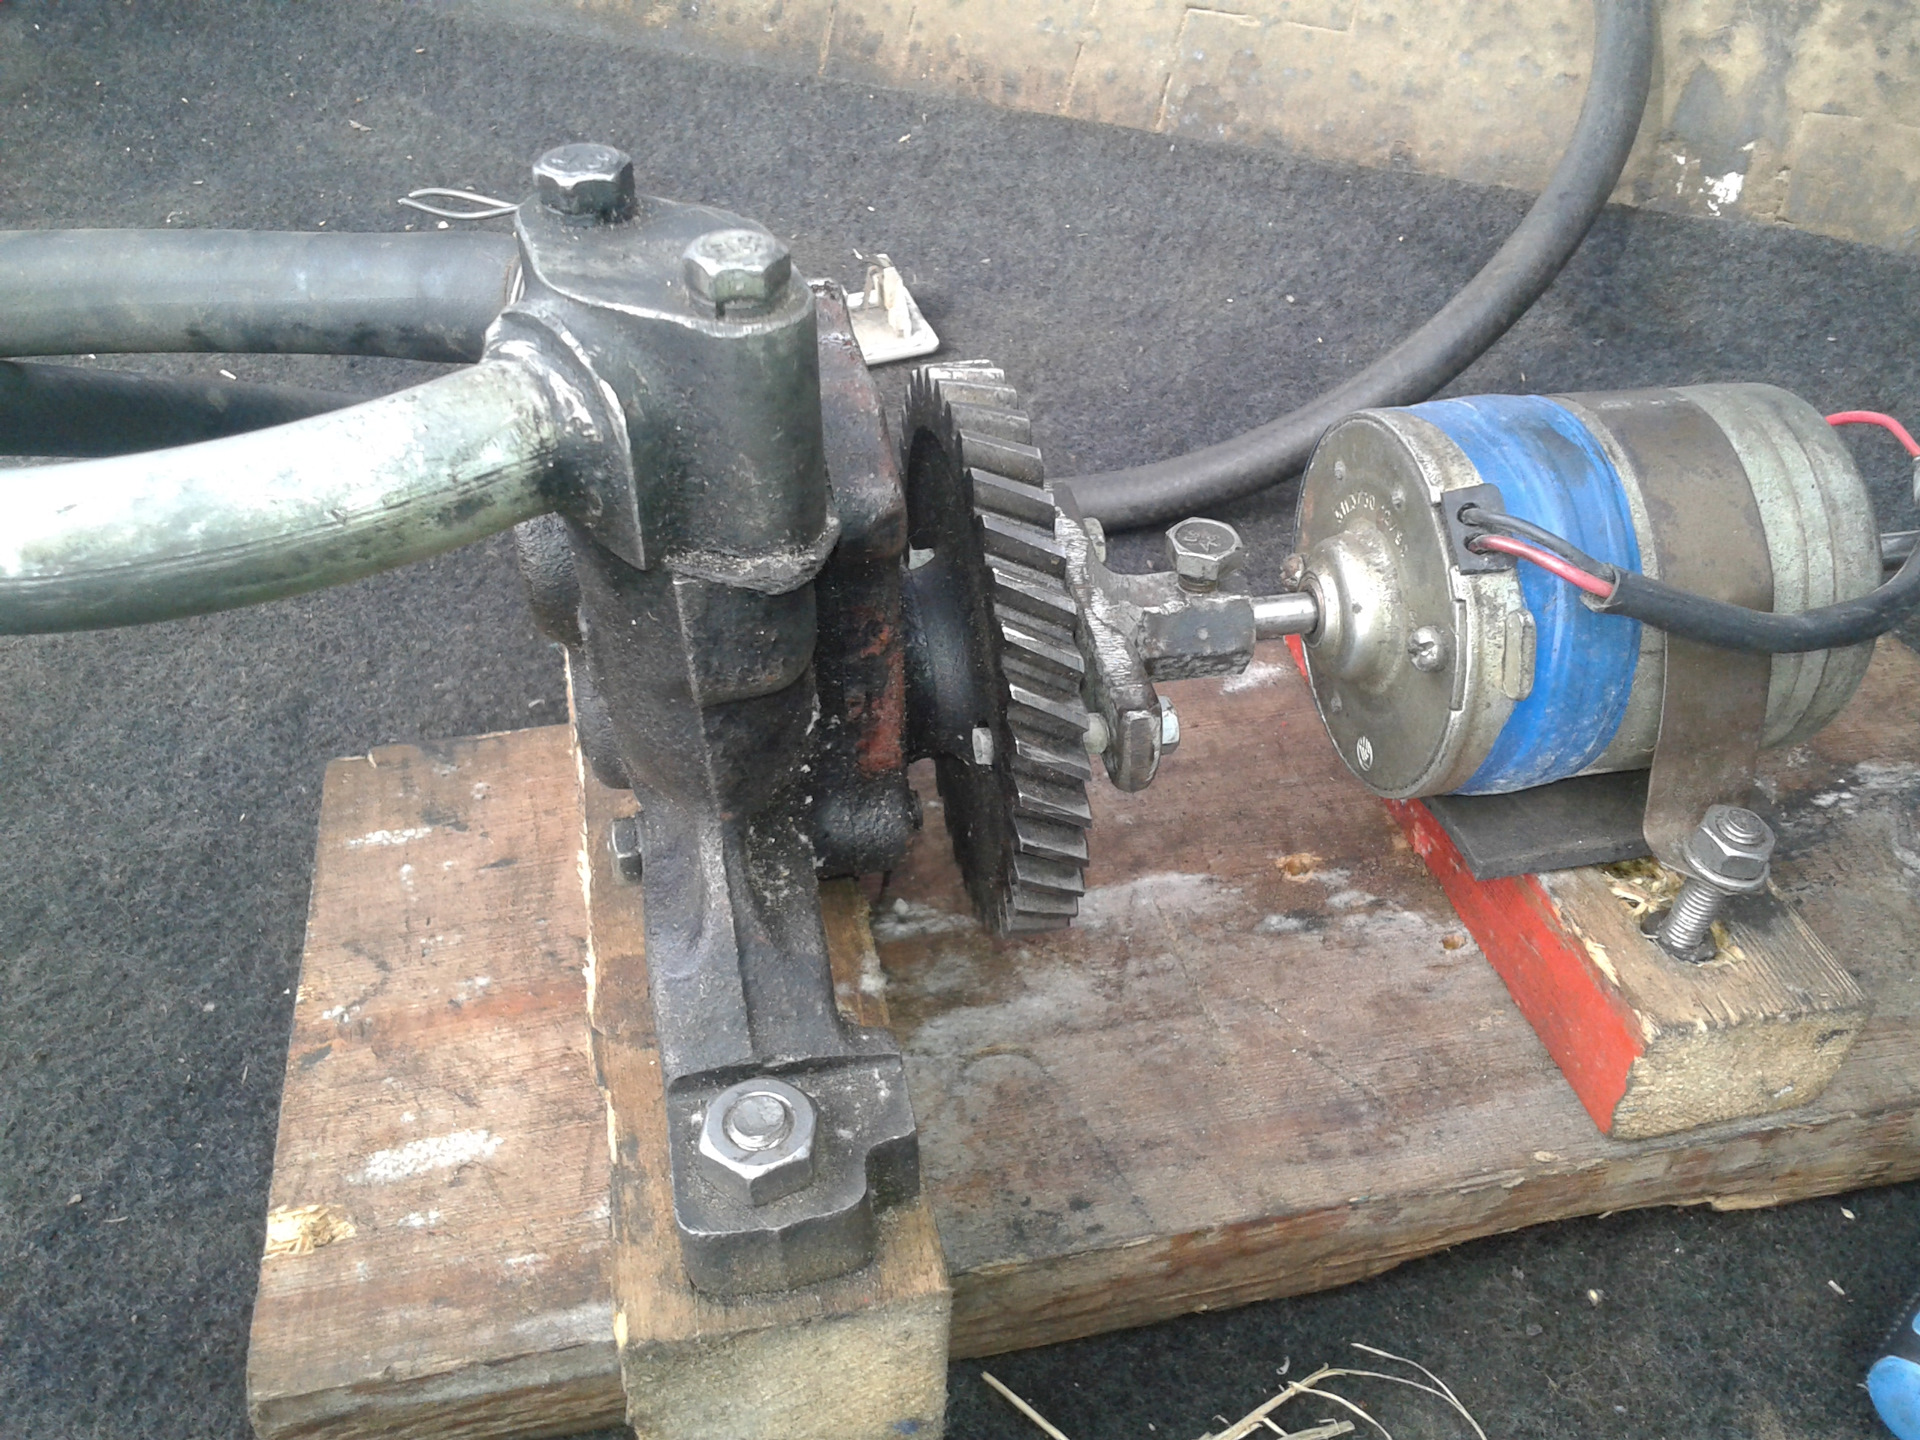
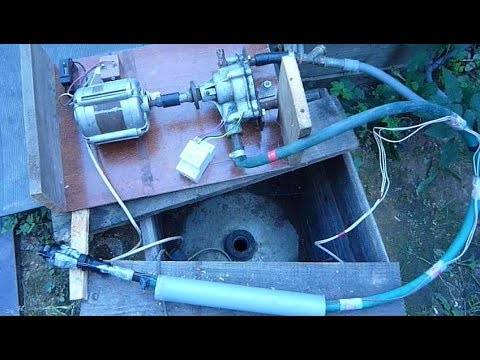
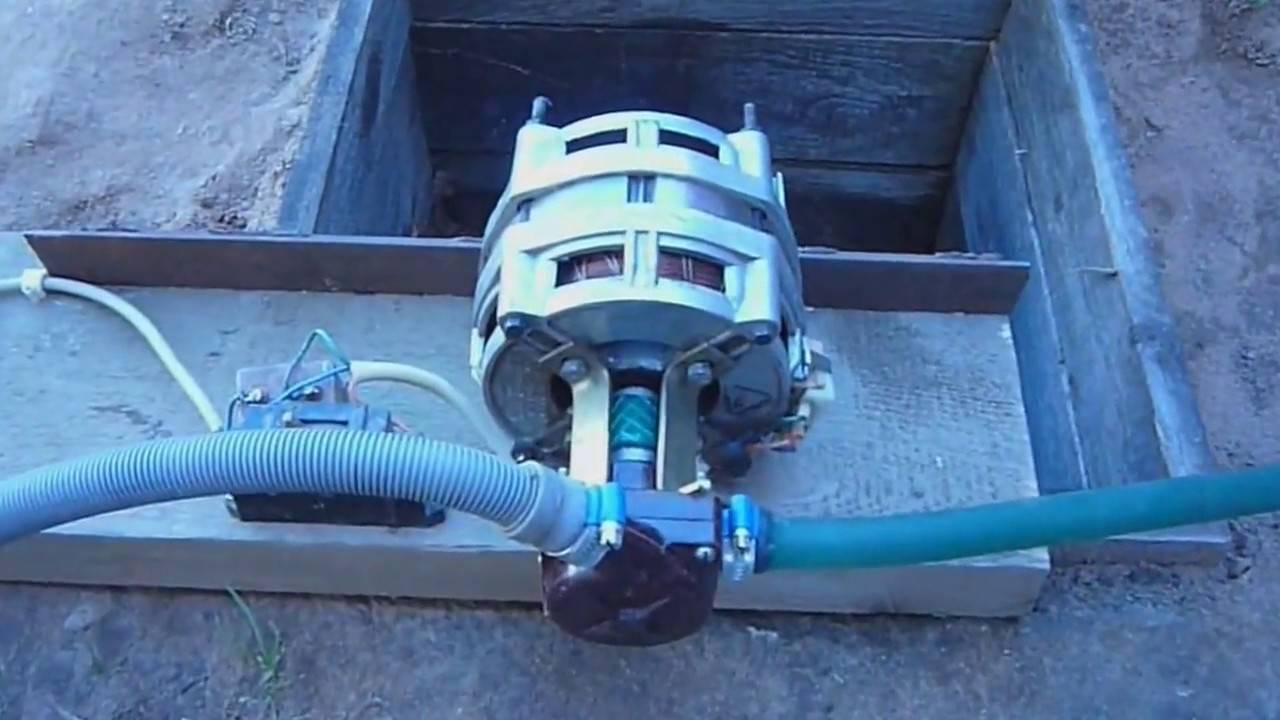
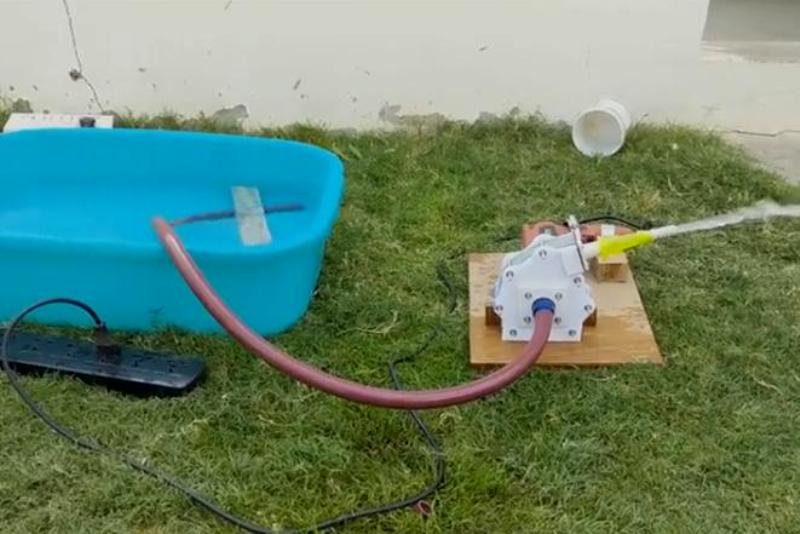
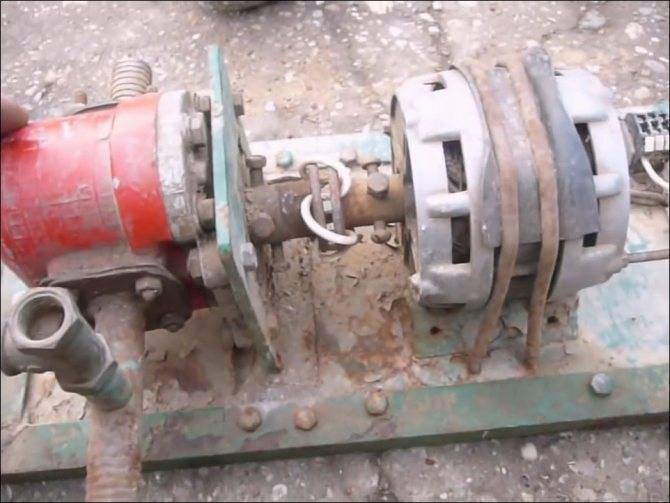
Homemade water pump from an oil pump
When moving from a city to a village, you face the issue of watering the garden and water supply at home. Anyone who has continuously used submersible pumps knows very well how reliable the various "Brooks", "Springs", "Gnomes" are. Most vibration devices do not withstand even one season of active work, often breaking down within a month after purchase.And you want to drink every day, and you also need to water the garden, so it is advisable to have a spare pump in case of an accident. Of course, you can keep a repaired water pump in stock, which previously failed, and he had to look for a replacement. It is also quite realistic to make a water pumping unit with your own hands.
In order to assemble a homemade water pump you will need:
- a small electric motor, with a maximum power of 1.5 kW;
- electrical cable or extension cord;
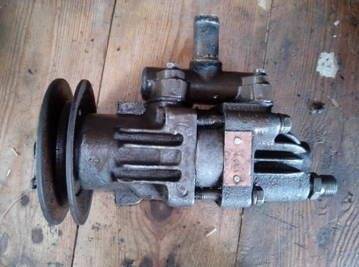
- water pump or oil pump;
- transmission system in the form of a belt and pulleys or pins and coupling halves;
- rubber hoses or pipes.
- steel or wooden heavy base.
Pump Assembly
Gear pumps NSh32U-3 are used for pumping oil in the hydraulic systems of many machines:
- tractors YuMZ, KhTZ, MTZ, DT;
- combines NIVA, Sibiryak, Kedr, Yenisei;
- trucks ZIL, GAZ, FAZ, KrAZ, MoAZ;
- dump trucks KamAZ, BelAZ, MAZ;
- excavators;
- motor graders;
- loaders;
- Agreecultural machines. Agreecultural equipment;
- forklifts.
NSh devices are produced with right and left rotation of the drive shaft, but for installation on a self-made pumping station, this difference does not matter, the main thing is to correctly connect the suction hose to the hole labeled "Inlet" and outlet to the outlet.
Characteristics of the oil pump NSh32U-3:
- Working volume - 32 cm3.
- The nominal outlet pressure is 16 MPa.
- The maximum outlet pressure is 21 MPa.
- Rated speed - 2400 rpm. in min.
- The maximum rotational speed is 3600 rpm. in min.
- The minimum rotational speed is 960 rpm. in min.
- Nominal flow - 71.5 liters per minute.
It can be proposed to use, instead of the NSh device, the power plant of the power steering of the KrAZ truck with similar characteristics.This pump also has a gear device.
For a homemade water pump, an electric motor from an old washing machine with a power of 200-300 watts is useful. The old “assistant” can no longer compete with modern programmable devices, but its electric motor and pump can serve for a long time.
It is very convenient that most electric motors from washing machines can be connected directly to a 220 V network without modifications, because they have starting windings. Do not forget only about the reliable grounding of the metal case of the electric motor itself, it also works near water. Be sure to connect any homemade product to the network only through fuses or a circuit breaker.
The oil pump works great with water! There is no need to fill the intake hose with water, as the pumping gears provide excellent suction from a depth of 4 meters, while the productivity is 2–2.5 cubic meters. in hour. The filler neck on the inlet pipe is completely useless.
After operation, it is recommended to dry the pump so that the gears do not rust. It is enough to drive it without water for 15-20 minutes at idle - this is where drying ends.
Improvements to a homemade pump
Often the power of a homemade pump is insufficient, and it cannot lift water from a well or a deep well. Then you can solve the problem by using one of the ways to increase the pressure on the suction:
- Lower the pump as close to the water as possible.
- Run a recirculation line from the outlet pipe, and increase the suction head with the flow from it.
- Use a compressor to increase the air pressure in a pre-sealed well.
- Connect another weak pump in tandem.
What if the electricity goes out? Then it would not hurt to adapt a gasoline engine from a lawn mower, chainsaw or moped to a homemade pump.
Recommended:


