- Connection kit
- How to solve the choice problem
- Required Tools
- Peculiarities
- Installing a toilet in a new location
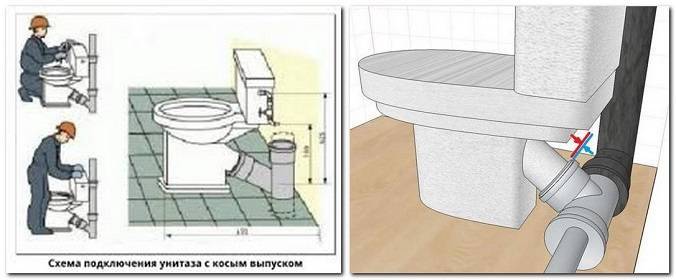
- Toilet bowl with oblique outlet: installation features
- The device of the sanitary unit
- What it is
- Advantages and disadvantages
- Kinds
- Flush control panel
- Connecting a toilet to a sewer pipe
- Connecting a toilet without using corrugations: basic rules
- Toilets with vertical outlet
- Toilet with horizontal outlet
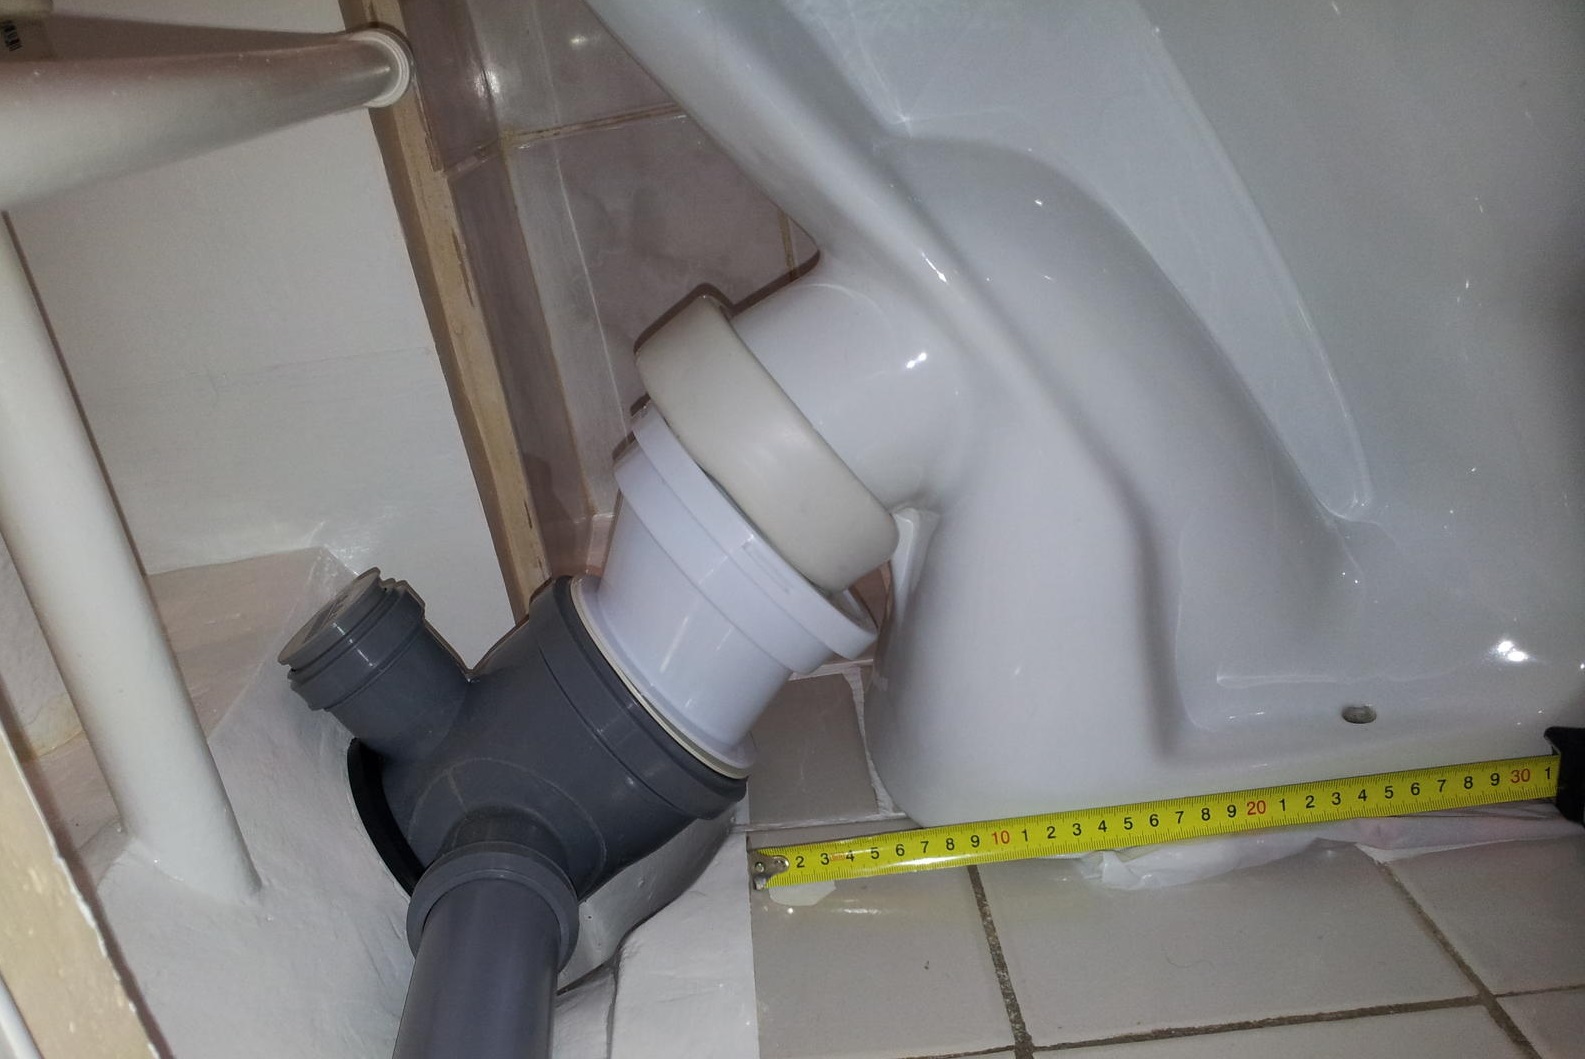
- Installation of a toilet equipped with an oblique outlet
- Step-by-step instructions for carrying out work
- Connecting with a corrugation
- Features of toilet bowls
- Corrugation installation
- We move the toilet
- simple case
- Dismantling
- Installation at a new location
- Difficult case
- How to change the height of the inlet in the riser
Connection kit
To connect the pump to the system at home, additional components are purchased. Complete with
only cuffs go to the pump for input - output and clamps, the rest of the pipes are bought separately. Since at
draining, the pump pressurizes the drain pipe, draining should not be done with a standard sewer
pipe. Up to the area where the drain increases to a minimum of 50 mm, pipes capable of
withstand slight pressure.The best option is a polypropylene water pipe with
soldering joints. Entering the main sewer should not be done at an angle of 90 degrees, you need to do
smoother turns. Smoother turns should also be made in all areas where the pipe will
under pressure from the pump.
How to solve the choice problem
Before buying a corrugated connector, you should clarify the dimensions of the holes with which it will be connected. The probability of errors will be less if the corrugation is bought at the same time as the toilet. The second important indicator is the length of the pipe. There are models of different types and purposes.
For example, for a small combined bathroom, a corrugation with a tap can be a very convenient option, which allows you to connect two objects to one sewer outlet at once. Sometimes it is more convenient to use a special rubber toilet cuff.
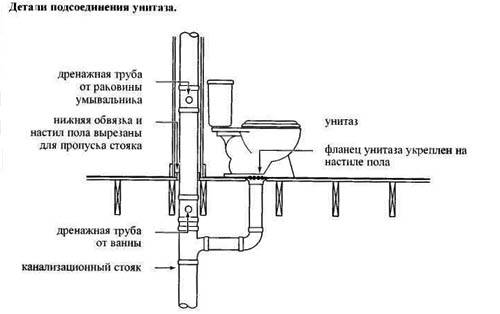
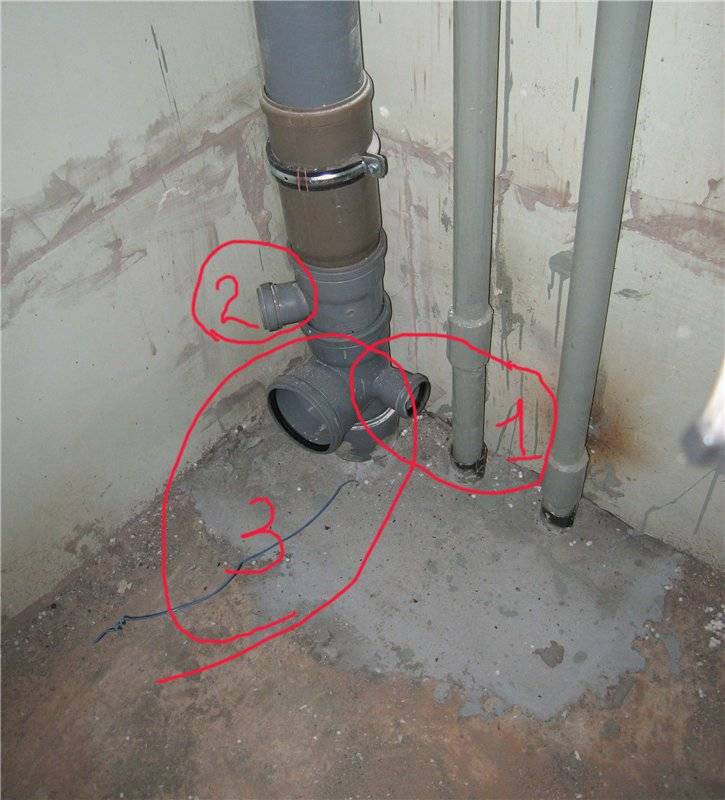
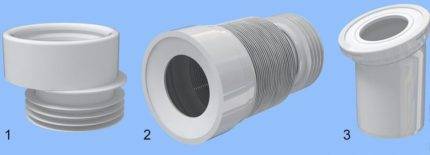 To connect the toilet to the sewer system, you can use not only the corrugation (2), but also a special rubber cuff (1) and a plastic outlet (3)
It makes no sense to buy cheaper corrugations, since the cost of even the most expensive option is low. Let the connector be a little more expensive, but meet the expected level of quality. Imported products are distinguished by good characteristics in terms of strength and durability.
Western manufacturers additionally strengthen their products with reinforcing metal wire. Such models are more rigid, they sag less and better resist mechanical stress.
To install the corrugations, you may also need the following items:
- coupling, straight or eccentric, for connection to the sewer pipe of the toilet bowl, which is located next to it;
- a pipe with a cuff or a plastic outlet designed to install a toilet bowl, the position of which is offset relative to the entrance to the sewer system;
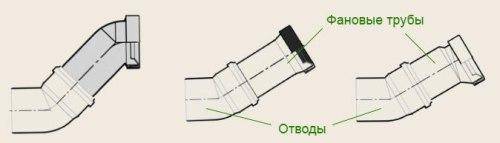
- the corrugation is rigid or soft, allowing you to bypass small obstacles that prevent the direct connection of the toilet bowl to the sewer.
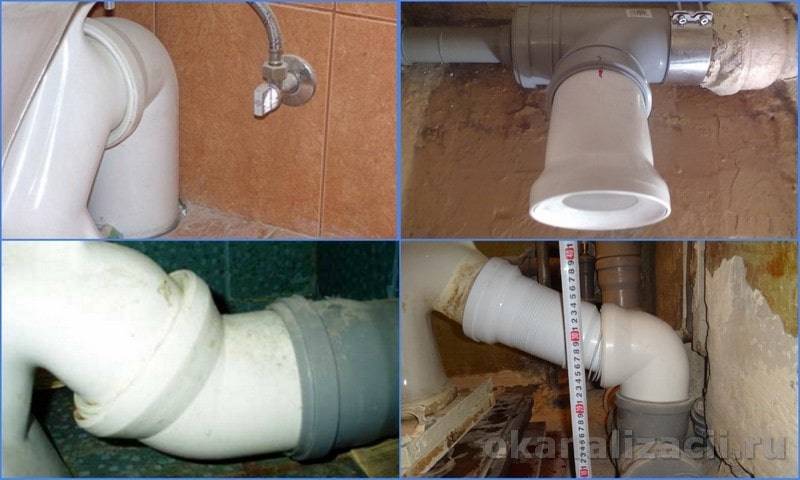
When choosing a suitable corrugation for the toilet, it should be remembered that problems can arise not only when using an element that is too stretched. It is also not recommended to use an excessively short pipe.
Strong compression or sharp bending will soon lead to breakage.
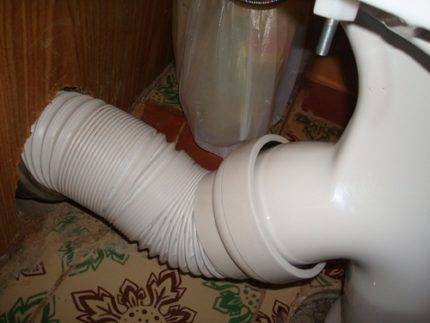 With such a bend of the corrugation installed on the toilet, liquid will probably accumulate below. You need to change the position of the toilet or choose a different connection method
Required Tools
It is often believed that only a plumber can perform such work with high quality. However, this is not entirely true: the installation of a plumbing fixture will be mastered by any homeowner who is familiar with the basics of such operations. To properly install the toilet and connect it to the fan system, you must first assess the need for the necessary materials and tools.
Their choice depends on the type of riser, its condition, the location of the toilet and its model. In addition to the product itself, for installation you will need:
- corrugated pipe;
- plastic corners, adapters and connecting elements;
- cuff-eccentric;
- sealant;
- rubber seals;
- hacksaw for metal;
- tape measure and pencil;
- locksmith tool set.
If it becomes necessary to dismantle the cast-iron pipe, then you will additionally need a puncher and a grinder. But in such cases, it is better to use the services of a professional.
Peculiarities
In an apartment building, the highway has already been installed at the construction stage, so an oblique toilet bowl is not always suitable for it. The only solution is reconstruction. But for many, it’s easier to just pick up plumbing with the right outlet than to do such a difficult job.
Related article: How to save water costs through a conventional faucet?
Outlet pipes are mounted at an angle of 45 or 30 degrees. Due to this, it is not difficult to choose the optimal toilet bowl. The versatility of sloping toilets makes them preferable to a number of analogues, since they are easier to connect to standard sewers.
Features of products of this kind is the presence of a monoblock or separate design.
- Separate toilet bowls provide for a separate location of the tank and bowl. This makes it possible to vary the installation, perform various interior tasks, make the space of the room visually larger. After all, the tank can be built into the wall, or fixed at a height convenient for you. Separate models also give a more efficient flush, as the water moves down at a high speed. In this regard, they are superior to monoblocks.
- Monoblock. Its device is clear from the name. The bowl and the toilet form a single unit. It is easier to mount it, plus the product has a modern look. Plus, it's easier to take care of it. As for the disadvantages, they include a higher cost, as well as the need for more space. Visually, they do not look as compact as separate ones.
Installing a toilet in a new location
Replacing the flexible piping is not necessary if the system is working well. If you still need to change it, then this is done quite simply. First you need a sealer for sewer pipesfor a better fit. Connect the toilet to the riser with a corrugation. The advantage of such corrugated pipes are rubber seals located on both sides. Then we fix the toilet bowl to the floor, optimally on the screws. If the floor is not very level, it is possible to make a small layer of adhesive-cement screed.
Advice! When installing the toilet on the screws, you should never press them without plastic washers, otherwise the base of the toilet may be damaged.
Here are a few tips to help you install the right way:
- The socket of the pipe to which the toilet outlet will be connected must be clean and dry.
- To install the toilet with screws, you need to drill holes in the floor for new fasteners; on a tiled floor, you need to drill holes with a larger drill.
A pre-purchased sealant is applied to the floor, after which a toilet is installed. In order to correctly make holes and spread silicone where necessary, a toilet bowl is applied to a dry floor, the contour of its base is outlined and the holes are marked. After that, holes for the screws are drilled along these marks, and silicone is applied along the contour. After that, it is possible to install a toilet bowl, after the installation of which a corrugation is put on its outlet. Putting the toilet in a new place, you need to make sure that it is stable.
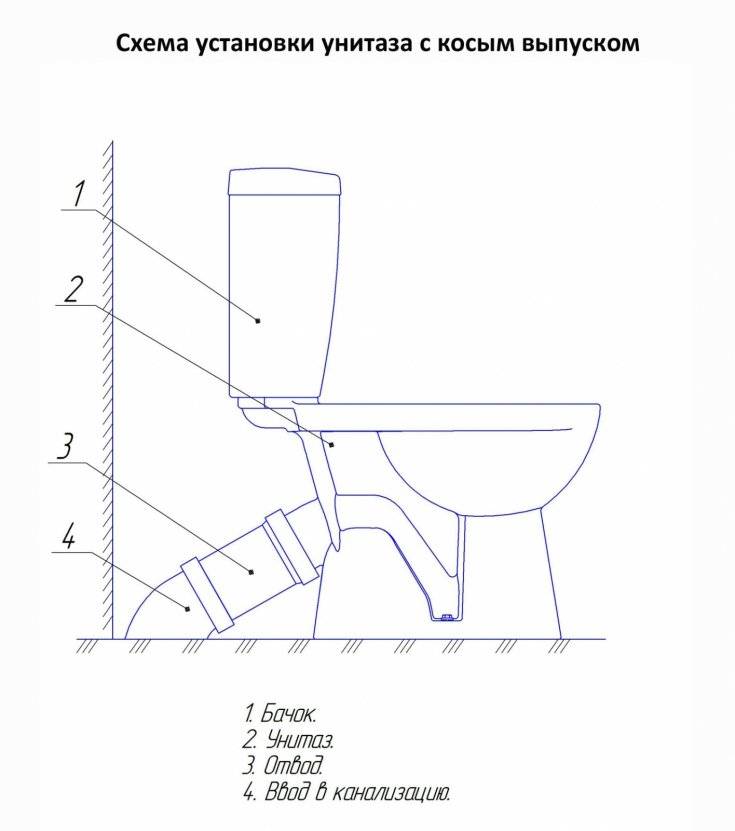
Toilet bowl with oblique outlet: installation features
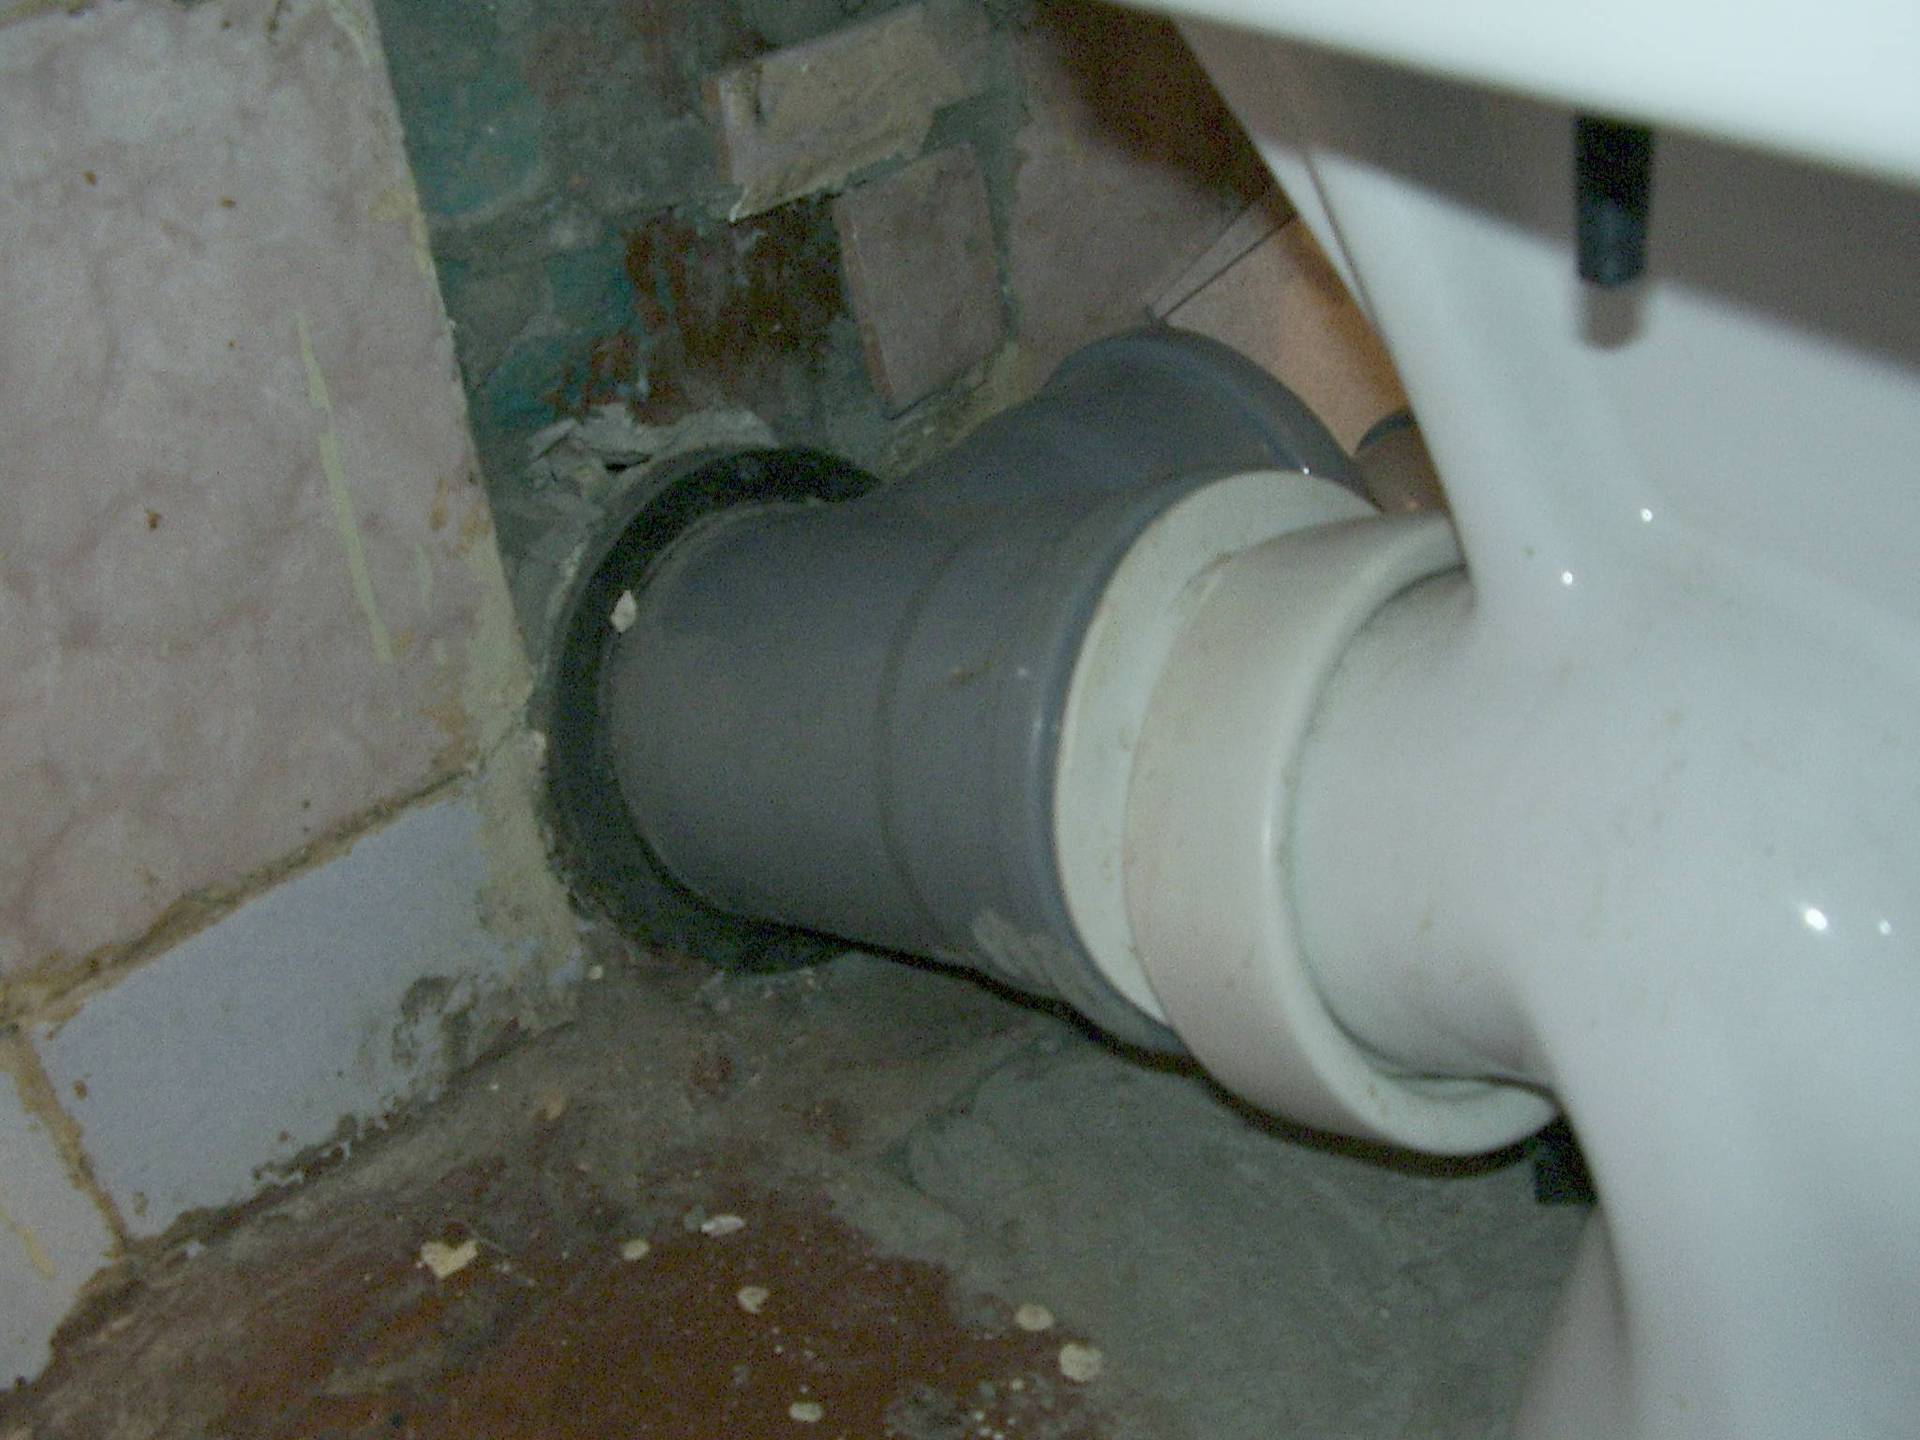
Such plumbing was widely used in the second half of the twentieth century. It was at that time that cast-iron pipes were used to construct the sewer system. This somewhat complicates the installation of the device. Indeed, in such cases, you need to carefully dock the toilet with the sewer socket.


The joint is covered with cement.In this case, it is necessary to ensure that the cement mortar does not get into the sewer riser.
Before starting the toilet bowl into the sewer socket, the outlet is lubricated with a mixture consisting of drying oil and red lead. Then a resin strand is wound around it so that its end remains free. The outlet is re-lubricated with red lead. It remains only to install the toilet and fix it in place.
Also, the connection of a plumbing fixture with a sewer is carried out using rubber cuffs. In order for the connection to be reliable and tight, it is necessary to thoroughly clean the socket from old cement. If the toilet needs to be moved relative to the drain, then it is better to opt for a corrugated pipe.

Video:
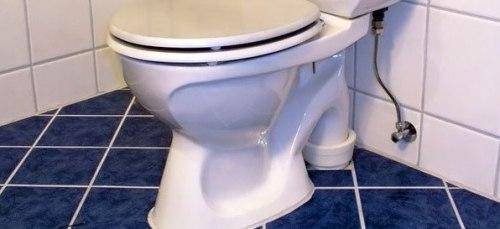
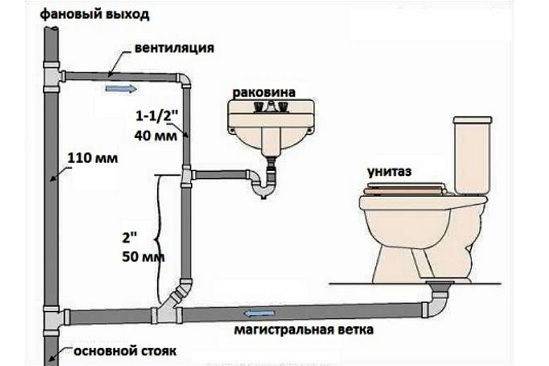
The device of the sanitary unit
Connection node
The sanitary unit consists of:
- toilet bowl,
- platforms for installing a drain tank,
- toilet siphon,
- siphon holes,
- release of the toilet bowl (ceramic branch from its body),
- toilet outlet pipe.
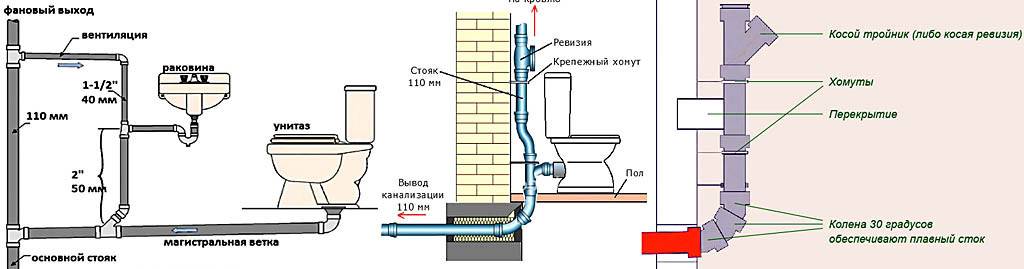
This list includes a connecting "elbow", a sewer riser and connection elements.
The installation method of the node is based on the nature of the drainage into the sewer pipe. Considering the features of the equipment, taking into account the standards for the installation of sewer systems of Western and Chinese manufacturers, more often the choice falls on horizontal and vertical outlets. Domestic manufacturers have increasingly begun to resort to the same schemes for arranging a bathroom, along with the still available oblique outlet for connecting to a vertical common riser, which leads to the need to look for a rare obsolete model of a bathroom and its elements when repairing such a toilet bowl.
What it is
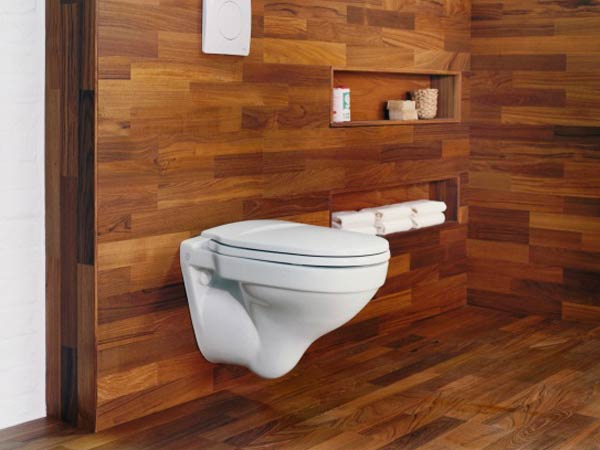
An installation is a wall-mounted type of toilet that is installed on its own support structure. It is a metal frame to which the flush tank and toilet bowl are attached. After installation and finishing, only the toilet bowl with the tank button becomes visible structural elements. All sewer or water pipes, connecting elements, other details remain under the layer of exterior finish. This makes the room neat, devoid of technological details, elements.
Connecting the toilet installation to the sewer
produced through standard fittings, or using our own components.
Most often, the structure can be connected without any problems, since its configuration
designed for standard connection
with the system.
Advantages and disadvantages
Design advantages
are:
all communications are connected in a hidden way, only the bowl with the tank button remains in sight;
hinged mounting allows you to change the flooring, install a heating system without the need to turn off or partially dismantle the toilet;
high degree of sound insulation. The sounds of merging water or a filling tank are almost inaudible;
the quality of cleaning in the toilet improves, the floor under the toilet is free, it does not become a reservoir for bacteria, dirt;
the height of the toilet bowl can be adjusted to the physical characteristics of the owner or members of his family;
it becomes possible to stylishly, neatly decorate the toilet
This is especially important for combined bathrooms.
Disadvantages of such kits:
- relatively high cost;
- complexity of installation, connection to the sewerage;
- repair, maintenance of the kit are difficult.
It must be borne in mind that the installation of the structure is not difficult in itself. Simply, not all plumbers know how to connect the installation to the sewer, what are the subtleties or features of the process
It is important to foresee the possibility of access to all the details so that you do not have to sacrifice the decoration of the room for repairs.
Kinds
On sale there are different types of
kits. By installation type:
- with support on the floor (at 4 points);
- with support on the floor and wall (2 attachment points each);
- mounted (there is no contact between the structure and the floor);
- corner complexes.
According to the type of construction, they distinguish:
- block. They are designed for surface mounting only. Installation requires a solid main wall of sufficient thickness, since you will have to make a niche for the tank. Such designs allow you to save about 15 cm in the length of the room by immersing the tank into the wall;
- frame. These are kits supported by a square tube frame. Such assemblies can be installed both separately and wall-mounted. The bearing capacity reaches half a ton. Reliability, strength of frame structures are highly appreciated by experts, although it will not be possible to save the length of the room when installing a frame installation.
Frame sold separately. it
universal design that is suitable for all models of wall-hung toilets.
When buying a frame, you need to clarify its purpose, since there are varieties for
toilets, sinks or bidets.
Assembly does not represent
significant complexity. There is always an instruction manual included with the delivery.
which has an exact drawing
supporting structure, as well as a diagram
attachment points to walls or floors.The problem area is the sewer for installation
toilet. stand location,
horizontal tubes are sometimes incompatible with frame designs,
size or output shape
toilet. This greatly complicates the installation work. The kit must be connected by experienced craftsmen, not
allowing errors.
Flush control panel
Tank control button
located above the toilet, at a height of 1 m above the floor. She is on
plastic panel, which simultaneously performs the function of an inspection hatch. Through it, you can
some repair work. There are simpler designs with a single button.
There are also advanced models where there are several flush options:
- single;
- double (regular or economical);
- stop flush (water flow can be stopped by pressing the button again).
There are modern models
touch or non-contact water start. They are equipped with a sensor system,
capable of independently determining the moment of flush start. These kits are very
expensive, so use is limited. Usually they are installed in toilets.
restaurants, cafes, bars or in public buildings.


Connecting a toilet to a sewer pipe
- Features of toilet bowls
- Connecting elements
- Required tool
- Proper toilet installation
- Connecting a toilet to a sewer
- Application for joining corrugations
- Connection to the sewer riser
The connection of the toilet bowl to the sewer pipe is an important element of the intra-apartment wiring of the sewer system. Toilets can have a different design, but the basic rules for connecting them are largely the same.All connecting elements for sewerage are sold in a wide range in the form of ready-made standard parts with instructions for their installation. This greatly facilitates the solution of the question of how to connect the toilet to the sewer with your own hands.
Types of toilet systems.
Connecting a toilet without using corrugations: basic rules
If you decide not to use the corrugation, you will need the basic rules by which it is connected in this case:
Connection spigot without corrugation
- If the toilet is connected without a corrugation, then it is necessary to use a pipe, which is also called an adapter or a fan pipe. The connection to the adapter in this case is carried out differently depending on the angle that the toilet has. There are 3 options for this:
- connecting a toilet with an oblique outlet - it is installed on the floor - such an installation is no longer relevant, although it was used very widely in the last century;
- if the outlet of the toilet bowl is vertical, then the installation is carried out at an angle of 90º into the wall;
- if the outlet of the toilet bowl is horizontal, then the installation is carried out into the wall at an angle of 30-40º.
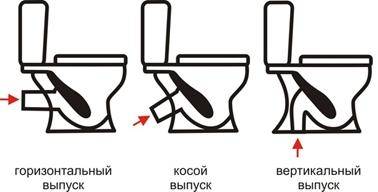
Toilet bowls with different types of release
- In the event that the outlet of the toilet bowl does not correspond to the outlet of the sewer network, then you will either have to choose a different model of the toilet bowl, or use curved adapter pipes at a certain angle.
Now consider in detail the features of the installation of plumbing of each type.
Toilets with vertical outlet
Such models are widely used in European countries. This is largely due to the fact that such plumbing fixtures have a downward-facing outlet and a siphon located in the toilet bowl.This design allows you to put the toilet against the wall at any angle. Installation is simple:
- after marking, a standard screw flange equipped with a lock is installed on the floor;
- a sewer pipe is installed in the round hole located in the center of the flange;
- a toilet bowl is mounted on the flange, rotated until it is fully fixed; the outlet pipe, which has a special sealing ring, while the pipe is automatically pressed against the end of the sewer pipe.
Installed o-ring
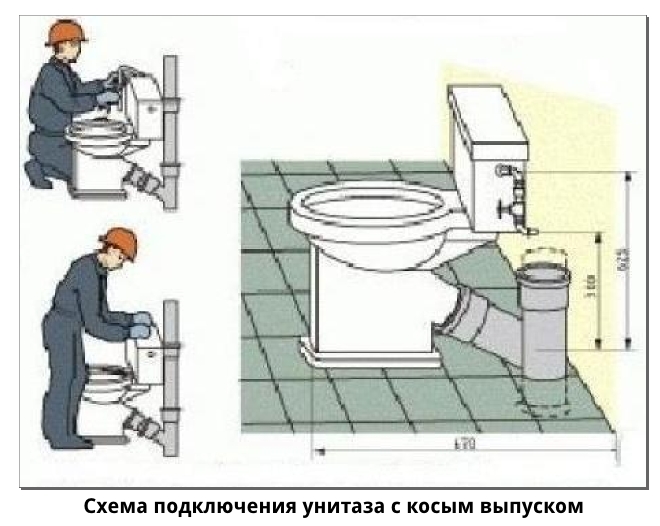
Toilet with horizontal outlet
Connecting a toilet with a horizontal outlet (it also has the name of a toilet with a “wall outlet”) is most relevant for the conditions of our country at the present time, which is associated with the attachment of the bathroom to a specific wall in the bathroom due to the specifics of the sewer system pipe layout in typical Russian houses. Since the outlet of the toilet in this case is directed backwards, it is located in the rear of the bathroom. In this case, the outlet pipe is connected to the sewer pipe using a special sealing cuff.
Connection diagram for a toilet bowl with a horizontal outlet
Particular attention should be paid to fixing the toilet bowl to the floor. As a rule, the legs of the toilet bowl with a horizontal outlet are equipped with special holes that are designed to fix the device to the floor.
Appearance of the finished connection
Pro tip:
Connecting a direct outlet toilet begins with installation, using dowels and screws
Fastening must be carried out carefully, as if the screw is pulled too hard, the surface of the toilet bowl can be damaged.
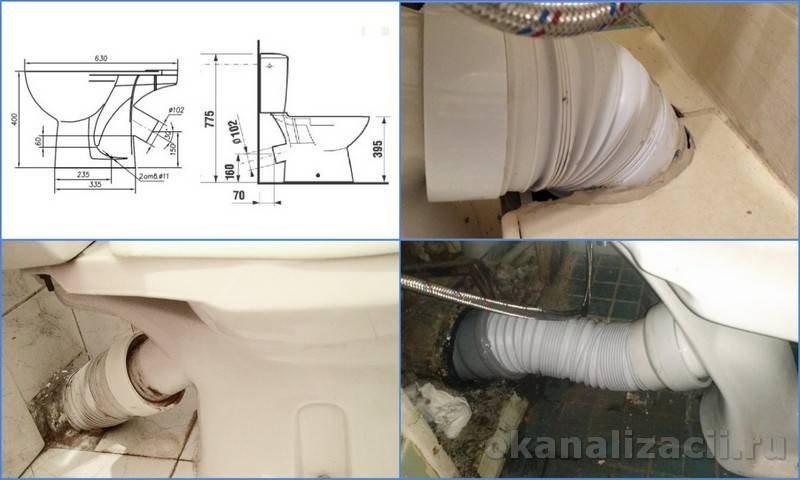
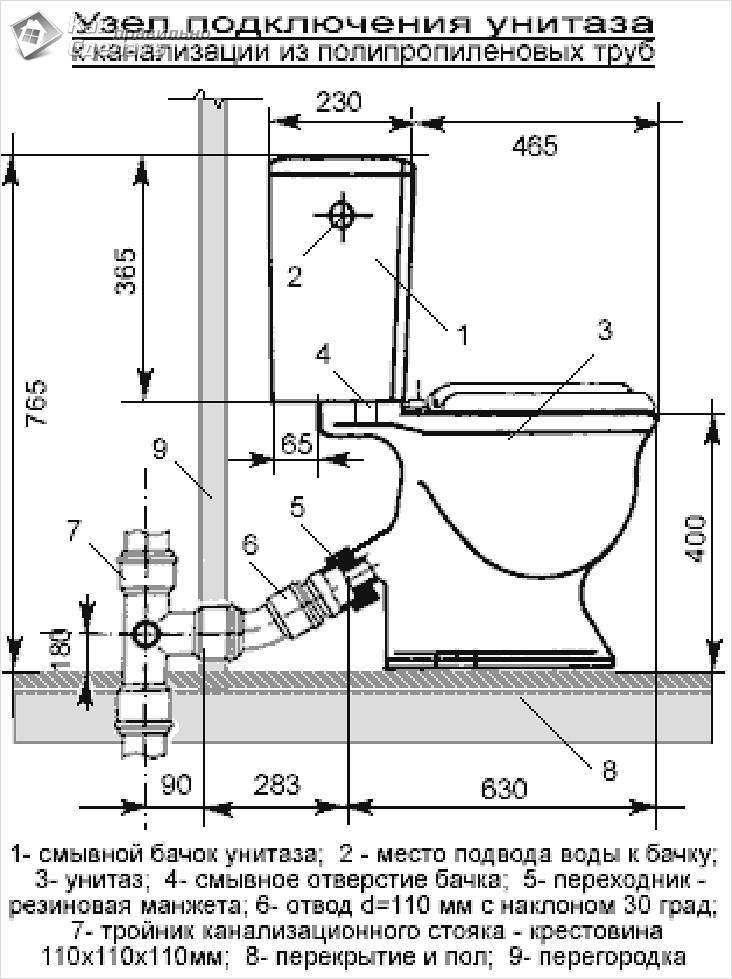
Installation of a toilet equipped with an oblique outlet
The installation technology for this type of toilet is as follows:

Connection diagram for a toilet bowl with an oblique outlet
- Before you properly connect the toilet to the sewer, the outlet of the toilet bowl with the grooves located on it is lubricated with red lead mixed with drying oil.
- A resin strand is wound on top. At the same time, the end of the 0.5 cm process must remain free (otherwise the ends of the strand will fall into the hole and contribute to clogging).
- The wrapped strand is also carefully lubricated with red lead.
- Next, the toilet bowl is installed, fixing the outlet process into the socket of the sewer pipe.
Ready connection
Thus, we examined how to connect a toilet bowl drain of various configurations to a sewer pipe. Thanks to the information received, the installation itself is realistically feasible. Plus, you can save money. However, if you feel that your existing skills are not enough to perform such work, it will still be more economical to use the services of professionals.


Step-by-step instructions for carrying out work
This operation is not so complicated, although it causes some concern, which can be dispelled, like an unpleasant smell, if you know some of the subtleties of the process.
The first thing to do before starting work is to turn off the water in the home. Next, we offer step-by-step instructions.
 Removing an old toilet
Stage one. Replacing an old toilet with a new model is much easier than initially attaching a toilet to a new house or apartment.Therefore, when replacing an old toilet model, you should look at the type of attachment to the sewer network (depending on the type of toilet drain pipe) and purchase the same type of toilet that does not require fitting or, even worse, altering the sewer wiring.
Stage two. If in your house, some time after the installation of the toilet, the floors were redone (their level was raised, floor tiles, tiles were laid), then when connecting the toilet to the pipe, you should use corrugated or eccentric cuffs.
 We connect the corrugation
Stage three. If your house has cast iron pipes, then there may be problems with the tightness of the connection, which can be solved with a sealant. It is applied to the joints only after the toilet is connected to the sewer pipe. Plastic pipes can be hermetically connected to the toilet using eccentric cuffs, during the rotation of which their rubber seals can successfully ensure a reliable connection.
Stage four. If you have not achieved the desired tightness result, then a corrugated cuff, which is easily deformed, bent and stretched, will provide you with a 100% guarantee of this.
It is important to know that:
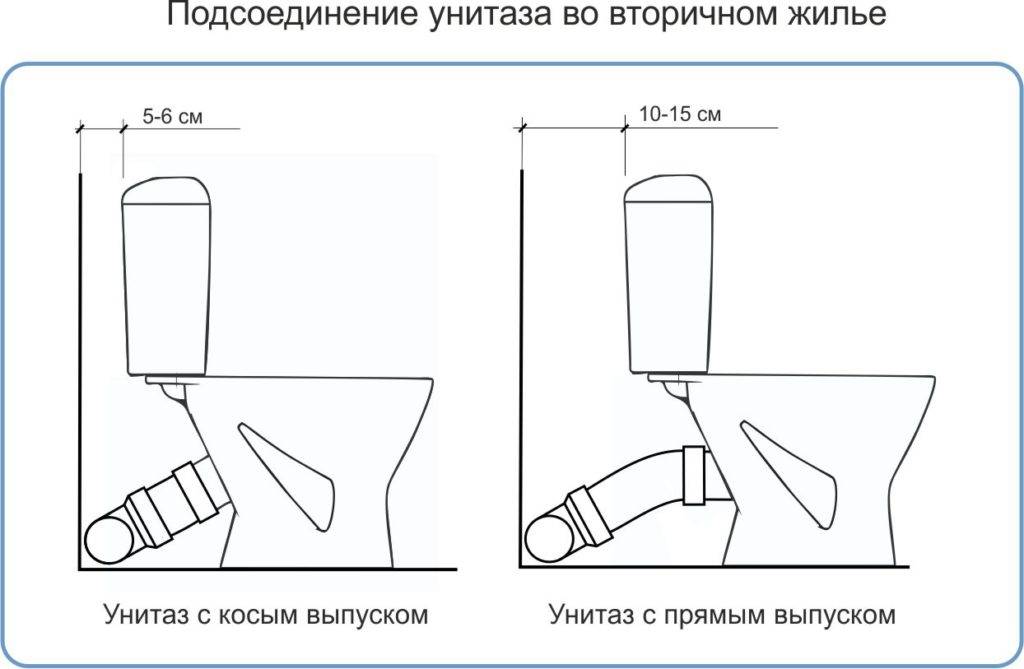
- the toilet should not be fixed to the floor before it is connected to the pipe with the help of a corrugation, as it may need to be moved 10–15 cm in one direction or another;
- corrugations may differ in quality (flexibility, etc.). It is better to use reinforced corrugation with a stainless coating.
 Fixing the toilet to the floor
Stage five. Fixing the toilet to the floor. There are three ways:
- using epoxy glue;
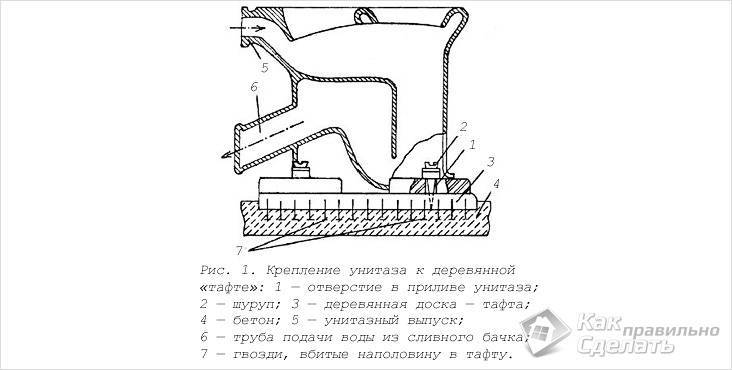
- on taffeta (lacquered ash or oak board) attached to the floor;
- with screws to the cement floor or ceramic tile.
Epoxy glue (or resin) is used on a degreased and dust-free floor surface, applying a layer of 4-5 cm. The smooth surface of the floor should be roughened with a corundum stone for better adhesion to the toilet bowl. The fixed toilet bowl is left alone for 12 hours until the materials are completely dry.
For strong adhesion to the floor, anchors (or nails) are mounted in taffeta. To do this, recesses filled with cement are created in the floor, on which taffeta is installed with nails down.
The toilet after installation must be stable. Otherwise, it is dismantled and the surface is corrected with a cement solution.
The toilet bowl is fixed on the floor tiles with a drill and drills with victorious tips. The so-called "new settlers" are driven into the holes obtained. Under the screws on the toilet, nylon seals are laid.
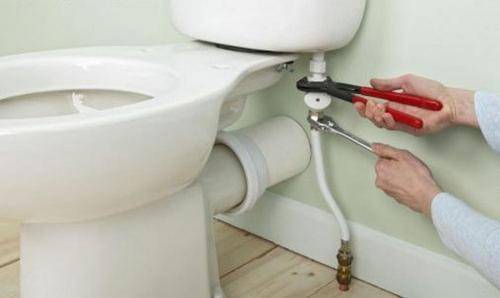
 Connecting a cistern
Stage six. Installing a cistern
It is important to know that the place where the water drains is lubricated with silicone for tightness. The toilet bowl with a drain tank is connected with bolts
Water is supplied to the tank using a flexible hose with union nuts at the ends. The water level in the tank should be 1 cm below the level of the drain mechanism.
An adjusted cistern drain will complete your job of installing the toilet and connecting it to the sewer pipe.
We recommend reading:
- the toilet is clogged, what to do at home;
- how to solder polypropylene pipes for heating.
Connecting with a corrugation
A corrugated pipe, which is intended to connect the toilet to the sewer system, is used if it is simply impossible to use other materials. Installation is carried out in this way:
- a toilet bowl is installed on the selected place;
- outline the areas for drilling the floor covering, marking the places with a pencil installed in the holes that are in the plumbing fixture;
- the toilet after marking is set aside to make holes for the dowels at the marked points;
- install the dowels in the holes made, while fixing the stable position of the toilet bowl;
- one end of the corrugated pipe is inserted into the sewer hole, treating the docking area with silicone sealant;
- the second end of the corrugated pipe is put on the toilet flush;
- perform all other installation manipulations and test the plumbing fixture for strength;
- having drawn water into the drain tank, and having made a control drain, check the reliability of the connection;
- the absence of leaks indicates the hermetic connection of all elements.
Before installing the appliance, check the levelness of the floor covering. During the detection of a height difference, make a self-leveling screed. Otherwise, after installation, the toilet may stagger.
It is recommended to coat the seam between the plumbing fixture and the floor base with colorless silicone. This will prevent dirt from getting under the product, which will greatly facilitate the cleaning of the bathroom.


Features of toilet bowls
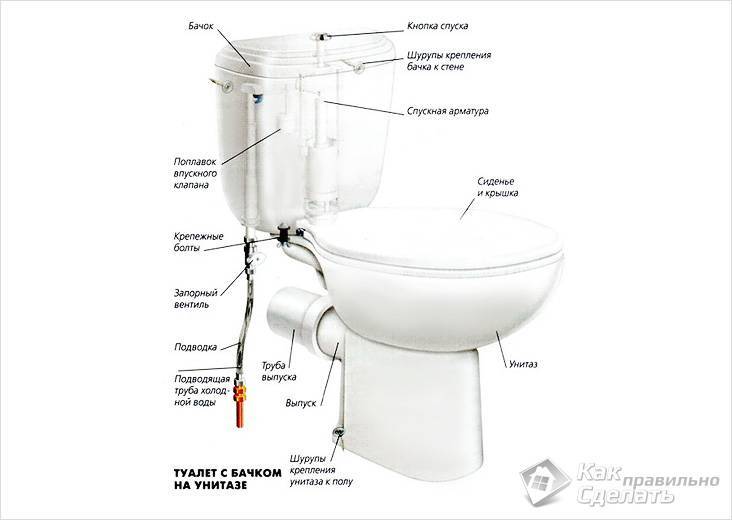
Structurally, the toilet system, in addition to the toilet itself, consists of a cistern, elements for supplying water to the cistern, an articulation system between the toilet bowl and the cistern to provide flushing, and elements for connecting the toilet bowl to the sewer riser of the central sewer or the discharge system in a private house.
The toilet bowl is connected to the sewer through a special ebb in its body, which is made in the form of a branch pipe with different locations. Such a pipe is called an outlet.Depending on its shape, straight and oblique types are distinguished. The oblique outlet provides the necessary slope (60º) for the self-flow of the drain from the toilet bowl. The direct type, taking into account its location, can be horizontal or vertical.
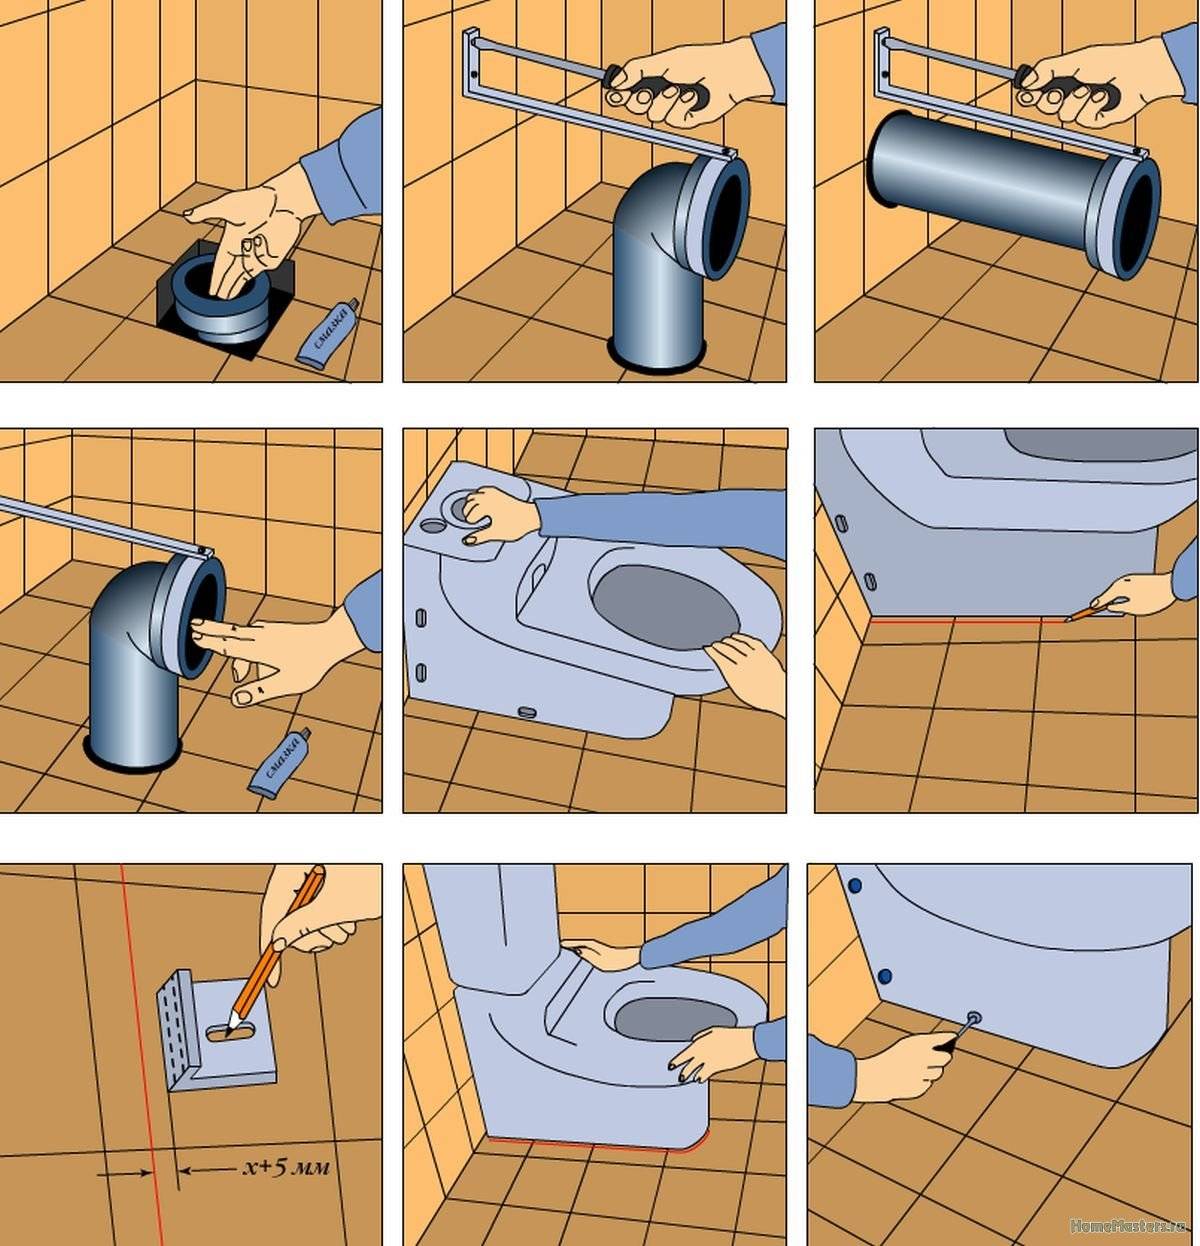
Corrugation installation
Well, what if our choice still stopped at connecting using corrugations?
How to install a toilet on a corrugation?
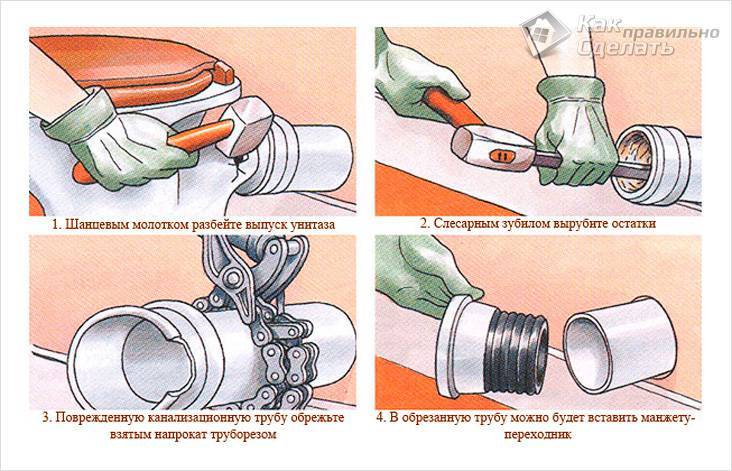
- Thoroughly clean the toilet outlet (unless, of course, it is new) and the sewer socket. The inner surface of the socket should be as clean and even as possible. The remains of cement and the old outlet remaining in the socket are easily cut down with a chisel.
- Wipe the inside of the bell and the outside of the outlet with a dry cloth. Mucus, sewage residues, cement dust and small debris should not be there.
- Put the toilet in working position to mark its fastening. Of course, already with corrugation.
How to put on a corrugation on the toilet? Just push harder, the rubber seal will stretch. Don't be afraid to apply force. If possible, place the toilet at a minimum distance from the socket.
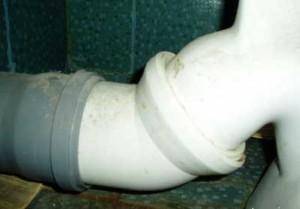
The less stretched the corrugation, the better. The less it sags.
 Debris will accumulate at the bottom of the sagging corrugation. In addition, there is always water
- Drill the marked mounting holes. If there is already a tile on the floor, first drill it with a special drill through the tile with a diameter slightly larger than necessary. Further, in the concrete of the ceiling - with a perforator. Put the plastic dowels in place.
- How to install the corrugation on the toilet so that it is guaranteed not to flow on the joints? Use silicone sealant for sewer pipes.It is applied in a circle to the outlet, then the corrugation is pulled and does not move until the sealant hardens.
 Coating the outside with sealant is useless. It is necessary that the sealant is inside the socket
- We put the toilet in place and tighten the fixing screws.
- It is also better to put the corrugation in the socket on the sealant. This will protect you from unpleasant odors; and in the case of horizontal outlet and from leaks.
Replacing the toilet corrugation is only needed if the old corrugation has flowed. We have already discussed possible reasons for its damage. Replacing the corrugation on the toilet is not accompanied by its dismantling; just remember to remove the remnants of the old sealant. They can be easily scraped off with a sharp knife.
We move the toilet
simple case
The toilet is unfolded or transferred to a small distance, about a dozen or two centimeters.
Dismantling
Dismantling the toilet is highly dependent on the installation method.
If the toilet was mounted on standard fasteners, and its outlet is connected to the sewer with a standard rubber cuff - everything is simple:
- Unscrew the screws securing the toilet to the floor;
- Pulling the toilet toward you strictly along the axis of the socket of the sewer pipe, pull out the toilet outlet from it.
In this case, it is not even necessary to shut off the water to the tank.
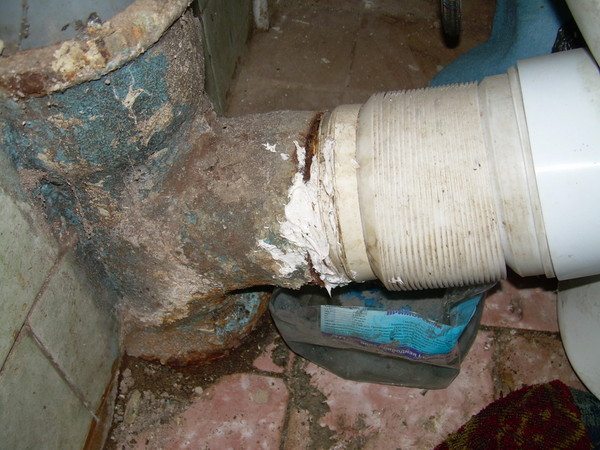
If the toilet is planted on glue or cement, and its outlet is smeared with the same cement in a cast-iron pipe, you will have to tinker:
Armed with a strong screwdriver or a narrow chisel, carefully remove the putty from the space between the sewer socket and the toilet outlet. Be very careful: an unsuccessful move - and you have to go for a new toilet
We have to carefully remove this putty, without splitting the issue.
When the release is released, we will need to loosen the toilet on the floor
A wide chisel is carefully, with little effort, driven in turn from different sides under the base of the toilet bowl. Sooner or later it will sway, announcing that the deed is done
Then, again, we feed the toilet towards ourselves, pulling out its outlet from the sewer socket strictly along its axis. If it gets stuck, don't pull harder, but rock the toilet slightly from side to side. Of course, before that it is better to turn off the water on the tank and drain the water.
Installation at a new location
Since the distance to the sewerage and water pipes will be small, we will not need to alter the sewer system or build up the water pipe.
If the old flexible eyeliner is in good condition, we will not touch it. If it leaks or has insufficient length - just change it to an analogue. The operation is simple and, I think, does not require a separate description.
We will connect the toilet with the sewer with a corrugation. This corrugated pipe, in general, has rubber seals on both sides; but it's a good idea to stock up on sewer pipe silicone sealant.
In addition, you will need a set of fasteners for the toilet.
This is what the whole set will look like.
- Clean the toilet outlet and drain socket of debris and wipe dry.
- Mark new holes in the floor for the toilet mounts and drill them. If there is a tile on top, first pass it with a drill through a tile of a slightly larger diameter.
- Put the corrugation on the toilet outlet, after applying the sealant.
- Pull the toilet to the floor. He needs to stop staggering, nothing more. Cover the gaps between the base and the tile with cement mortar - this will prevent the lateral force from splitting the base of the toilet bowl, creating additional support for it.
- Insert the corrugation into the socket - again on the sealant.
- Enjoy.
As you can see, the result is quite satisfactory. Only the seat is slanted
Difficult case
We have already agreed that within a small room it is easier to connect water with a long flexible eyeliner. Moving a toilet bowl exceeding the length of the corrugation, will be accompanied by an alteration of the sewer.


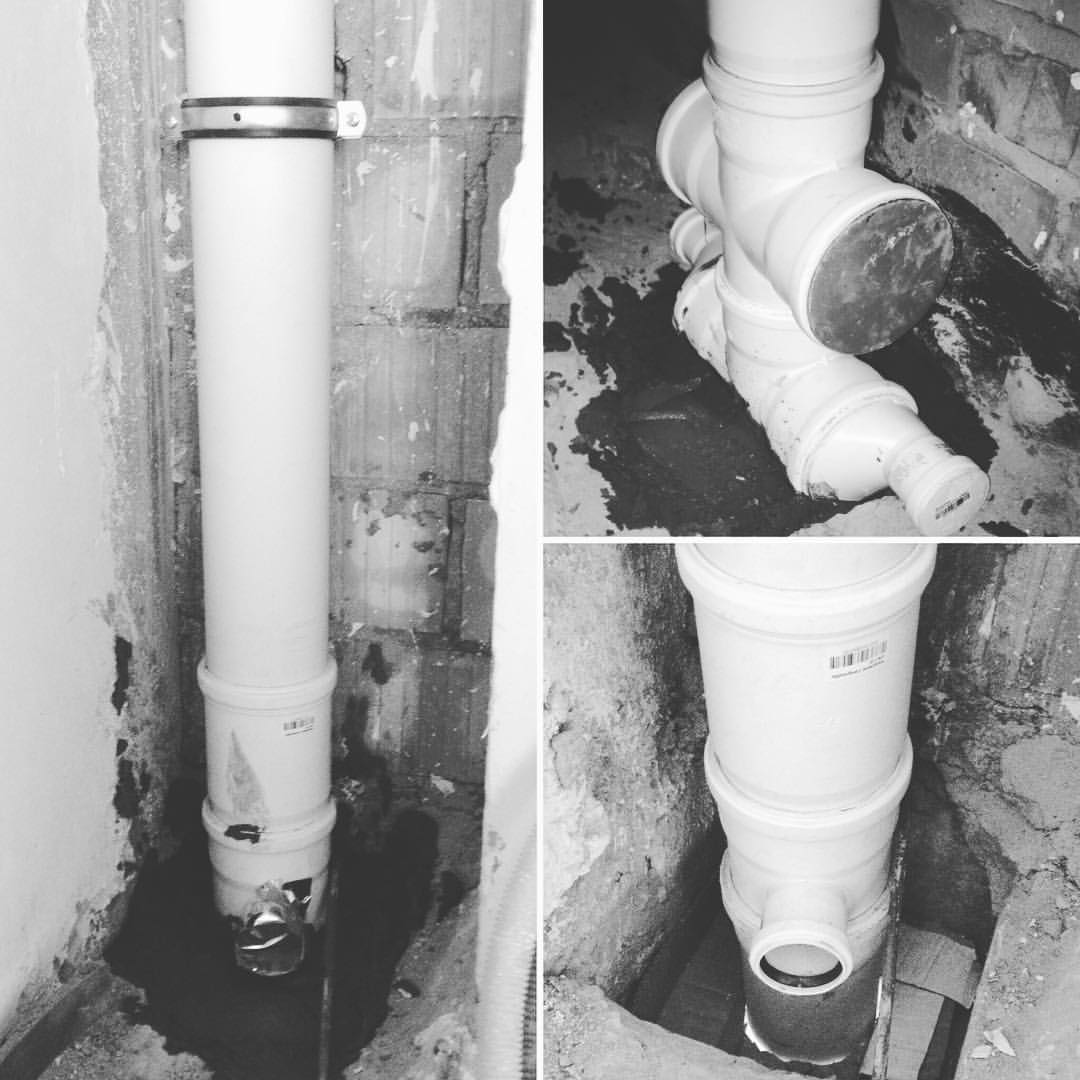
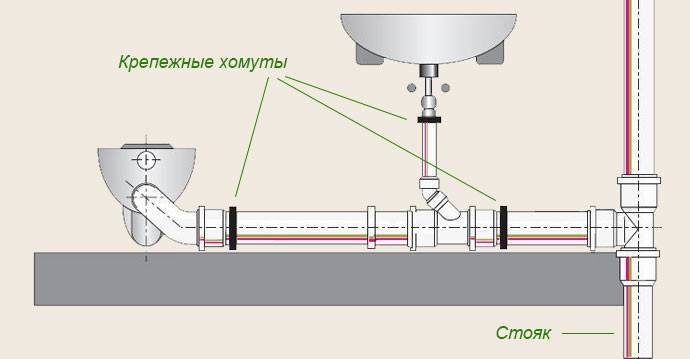
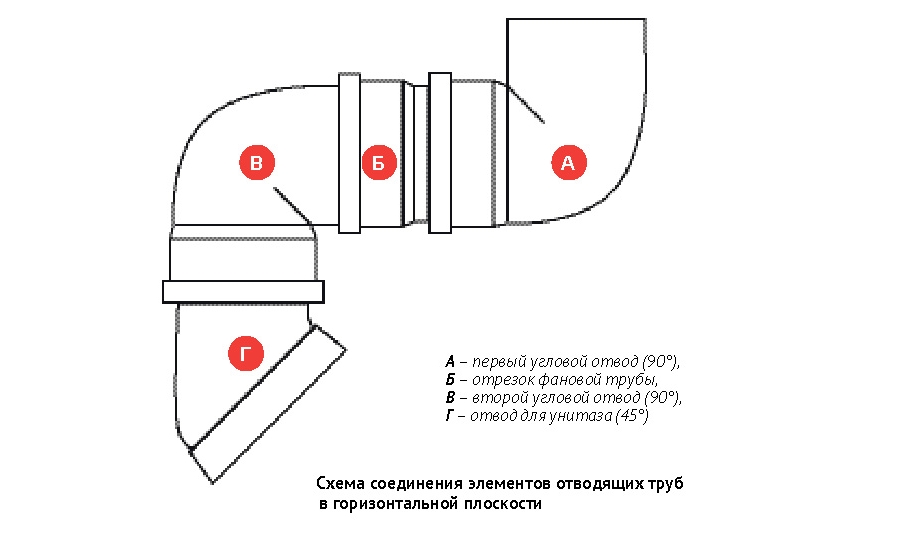
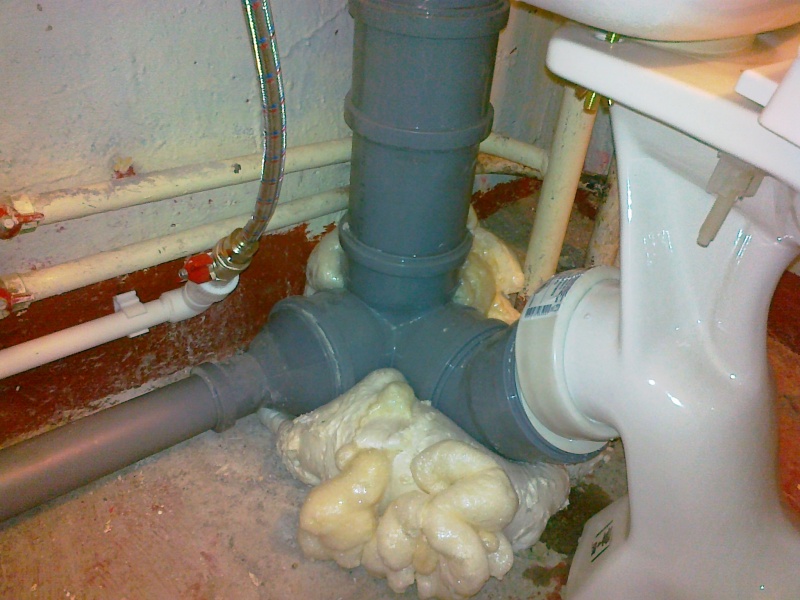
Dismantling and installation will be the same; in order to increase the sewerage, a plastic pipe with a diameter of 110 mm is used. The length and selection of corners depend only on the new position of the toilet.
The assembly of plastic sewerage is extremely simple. It is attached to the wall with clamps or laid directly on the floor.
As always, there are a few subtleties.
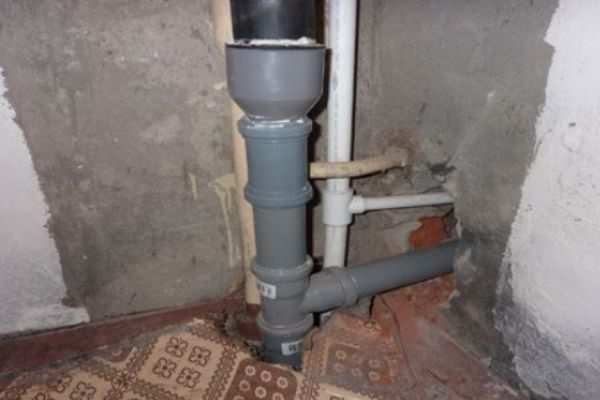
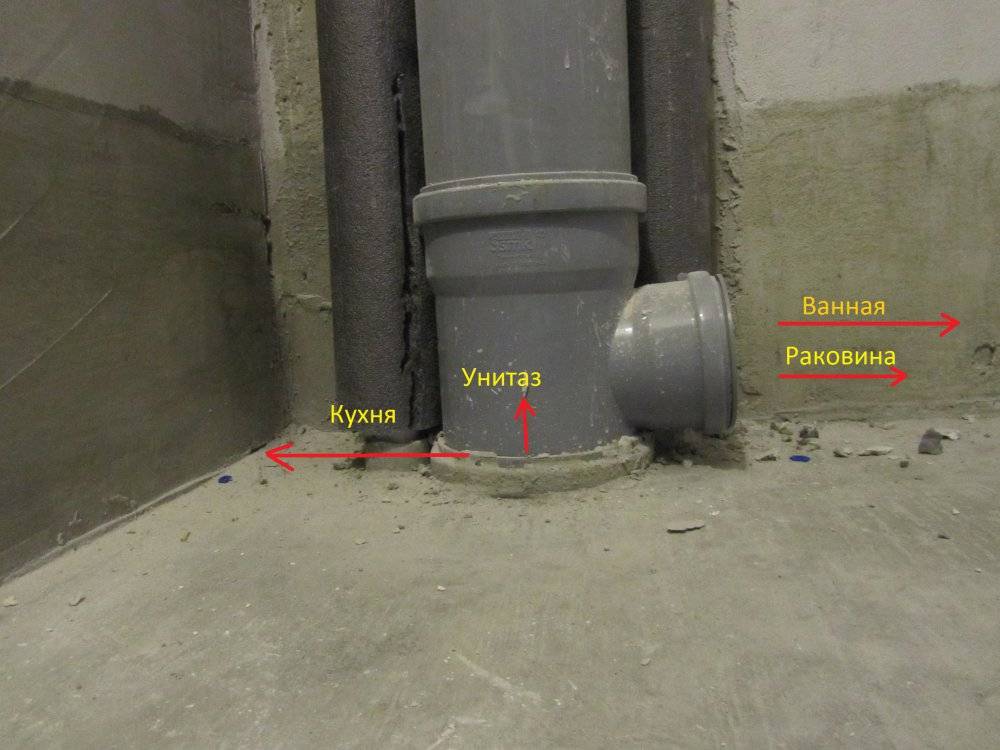
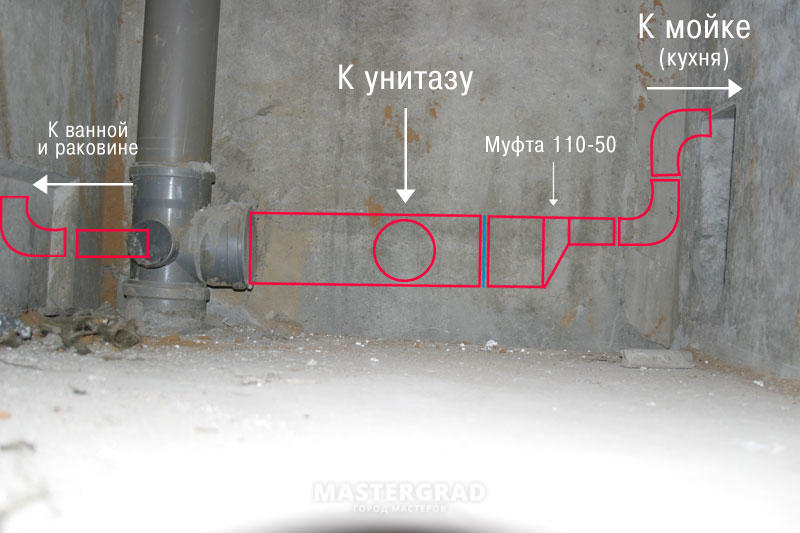
You will probably have to remove the outlet to the toilet from the tee or cross in order to lower the sewer to the floor level. With plastic, this will not cause problems; in the case of cast iron, it is better to preheat the next socket with a blowtorch or gas burner. In this case, the sealant-bond will burn out and the cement putty will crack. Further extraction of the pipe from the socket is a simple matter. It is better to mount the sewer directly from the riser. The tee was wrapped in a bag to get rid of odors.
- To insert a plastic pipe into a cast-iron socket - use a cuff - sealant. It is better to put it on a silicone sealant, first of all, well lubricating its joint with a cast-iron pipe.
- A slope towards the riser is required, but small: 1-2 cm per linear meter of pipe.
- If the joints of cast-iron pipes are filled with sulfur, they are also annealed with a blowtorch, but the smell will be monstrous. Ventilation of the room and a gas mask are required.
- Instead of accurately fitting the plastic sewer to the toilet outlet, you can also use corrugation. There is only one condition: it must be available for replacement. If this is not possible, it is better to do without it.
With modern materials, this option will not create problems either.
How to change the height of the inlet in the riser
If you transfer the receiving hole below, keep in mind that the riser is a common house communication. If you do something wrong and deprive the upstairs neighbors of the opportunity to use the toilet normally, it will not turn out to be good for you.
If you cut the sewer into the riser lower than it is connected, consider the following. Without damage to the floor slab, the minimum height of the inlet from the floor is 2.5 cm. To connect the lounger to the riser, you must use a clamp that blocks the drain hole by at least a quarter of the diameter in each direction.
The diameter of the lounger is 90-110 mm, therefore, in order to lower it lower than 2.5 cm, it is necessary to damage the floor slab.
The process of connecting to the riser is described in detail in the article.
Unless you are a professional builder, do not damage the floor slab. It's life-threatening. Under Russian law, making changes to the design of a building without the approval of the city's architecture department is illegal and punishable by a heavy fine.
If the minimum distance from the floor to the inlet of the riser does not allow you to create the correct slope, raise the inlet of the sunbed. To do this, raise the floor level or the installation level of plumbing fixtures.