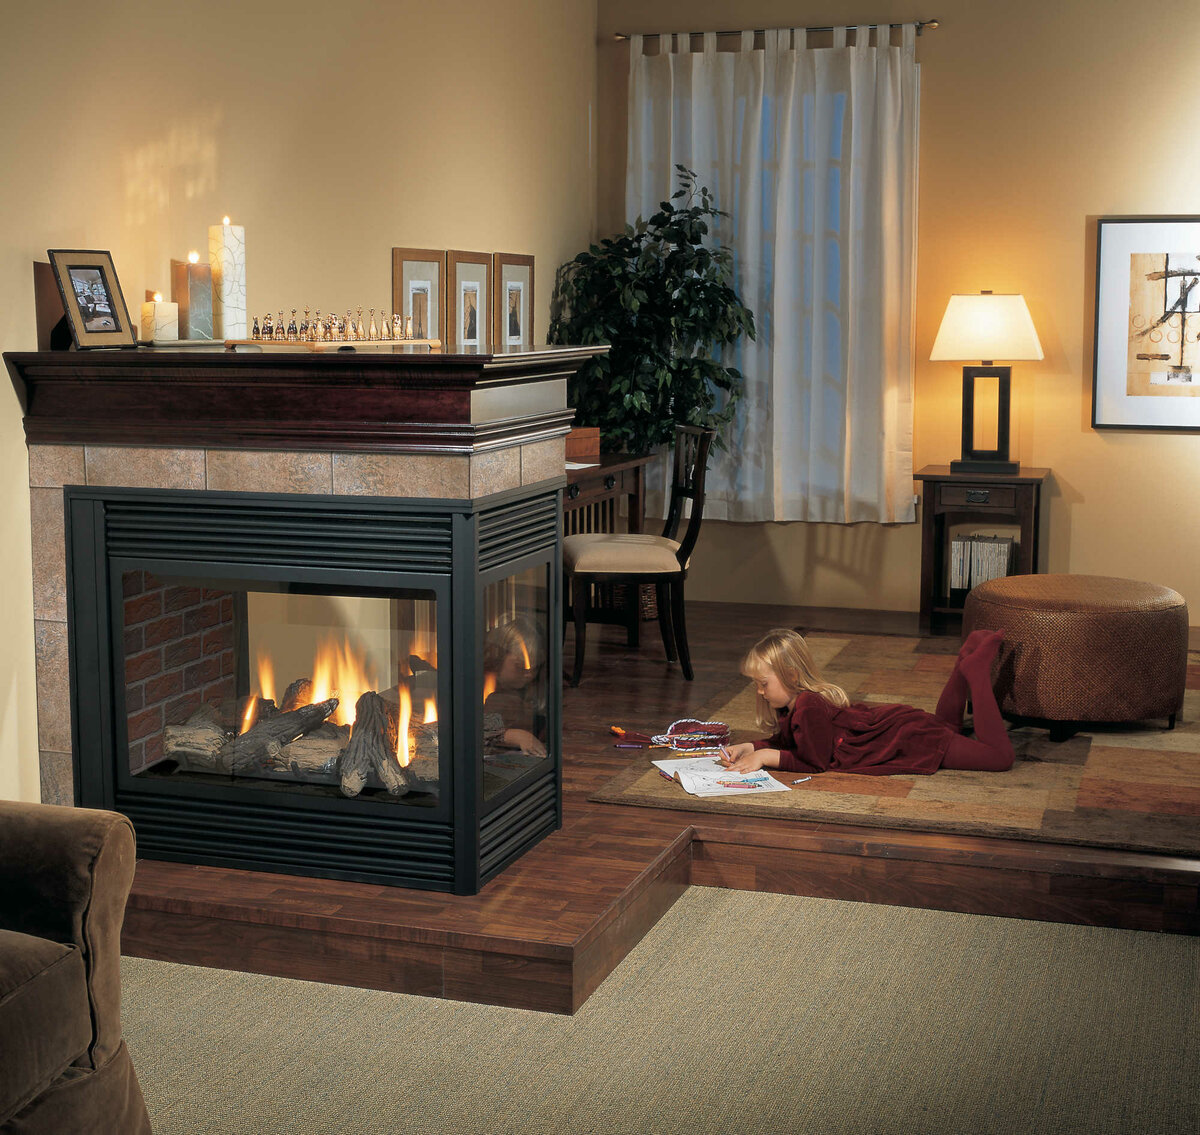
- Tile laying instructions
- Under tile installation
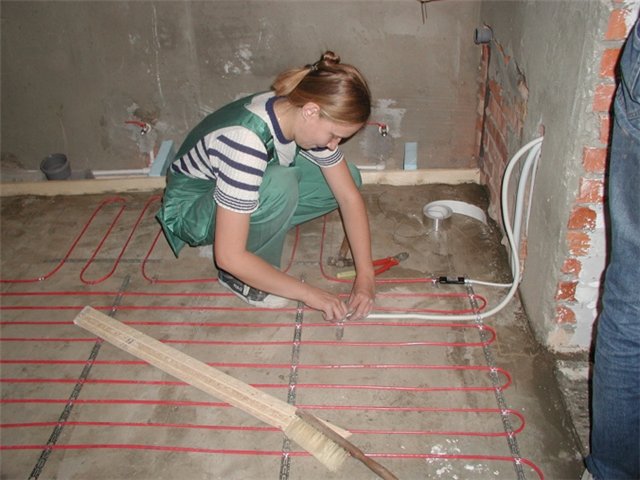
- Stages of installing a water heated floor
- Installation of film underfloor heating
- Which electric floor is better to choose under the tile?
- Cable
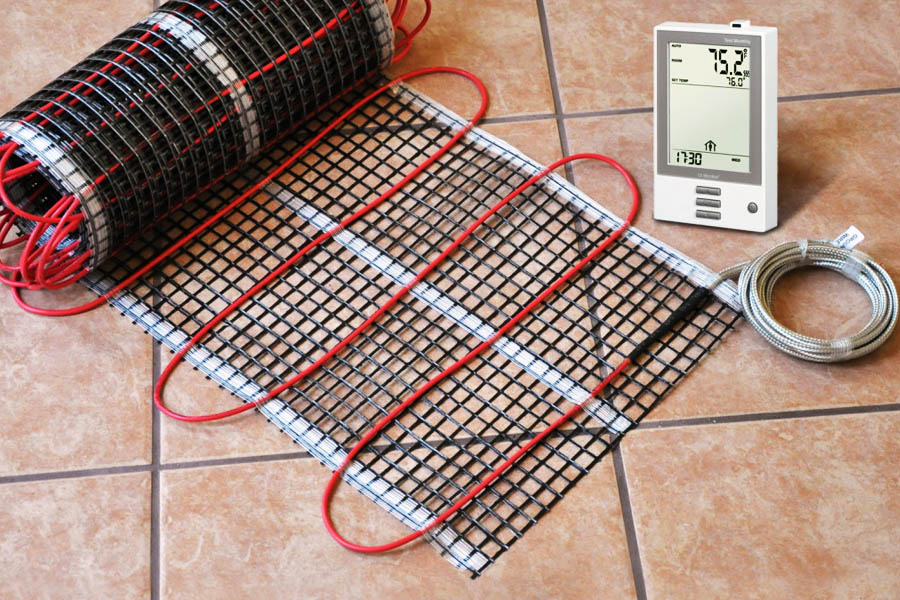
- mats
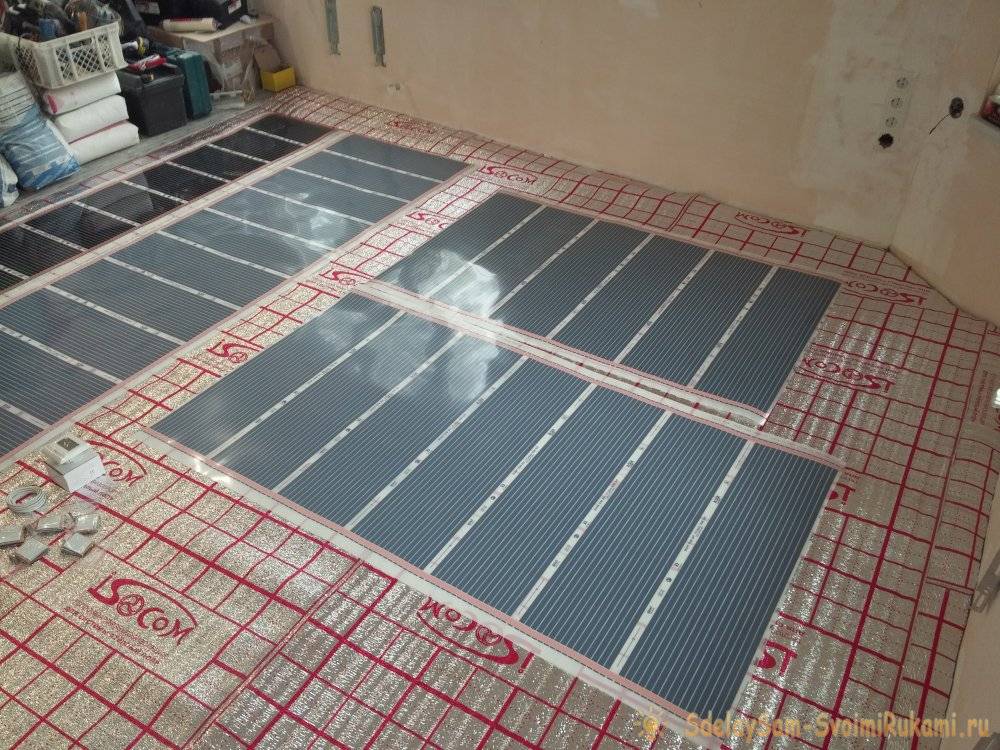
- Film floor heating
- Rod
- Floor installation work
- Heating time
- Technology laying electric underfloor heating methods and tips
- Variety of electric underfloor heating
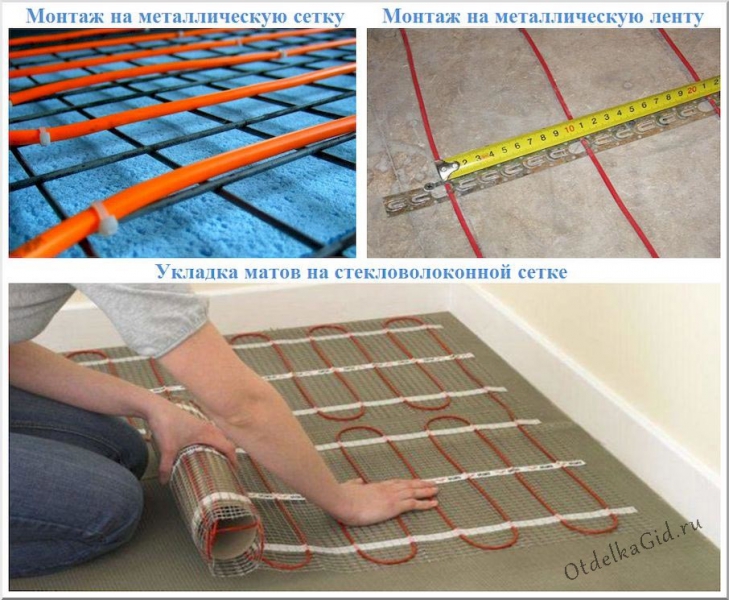
- Method 1. Installation of thermomats
- Method 2. Cable floor installation
- Method 3. Film floor installation
- Laying heating mats
- Understanding the types of underfloor heating
- Infrared film
- Heating mats
- heating cable
- Final conclusions
- How to choose?
- Laying cable or thermomat
- Do-it-yourself installation of a cable underfloor heating under a tile
Tile laying instructions
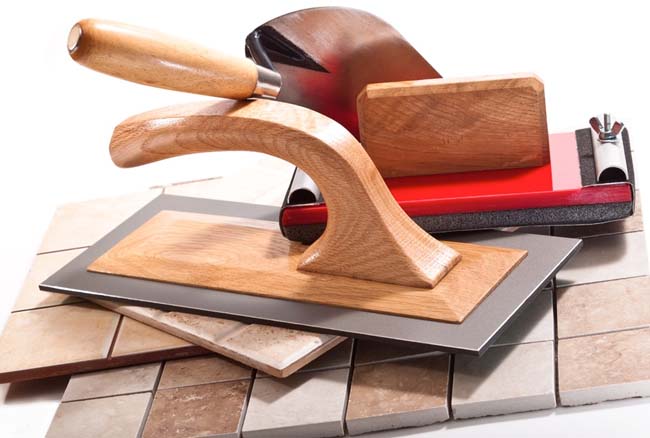
A set of such tools is being prepared for work:
- Level small and large.
- Crosses to form the same seam.
- Rule.
- Three spatulas, notched, regular and rubber.
- Yardstick.
- A device for cutting tiles.
- Chopping cord.
- Drill or perforator.
- Bucket for mixing tile adhesive.
- Construction mixer for mixing glue.
- Pencil.
- Rag to remove adhesive from tiles.
- Building corner.
- Masking tape.
- Tiled floor.
- Brush for priming.
For laying tiles on a warm water floor, the following material is required:
- Ceramic tile.
- Special tile adhesive.
- Grout.
All work consists of several successive stages:
- Surface preparation.
- Markup.
- Primer.
- Glue preparation.
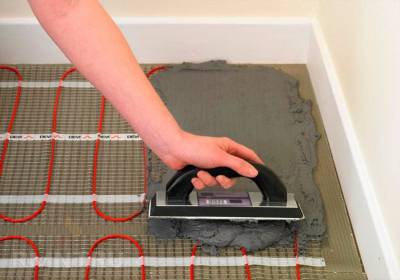
- Tile laying.
- Seam grouting.
The technology of laying tiles on a warm floor is no different from laying on a regular floor. Let's consider each of these stages separately.
Under tile installation
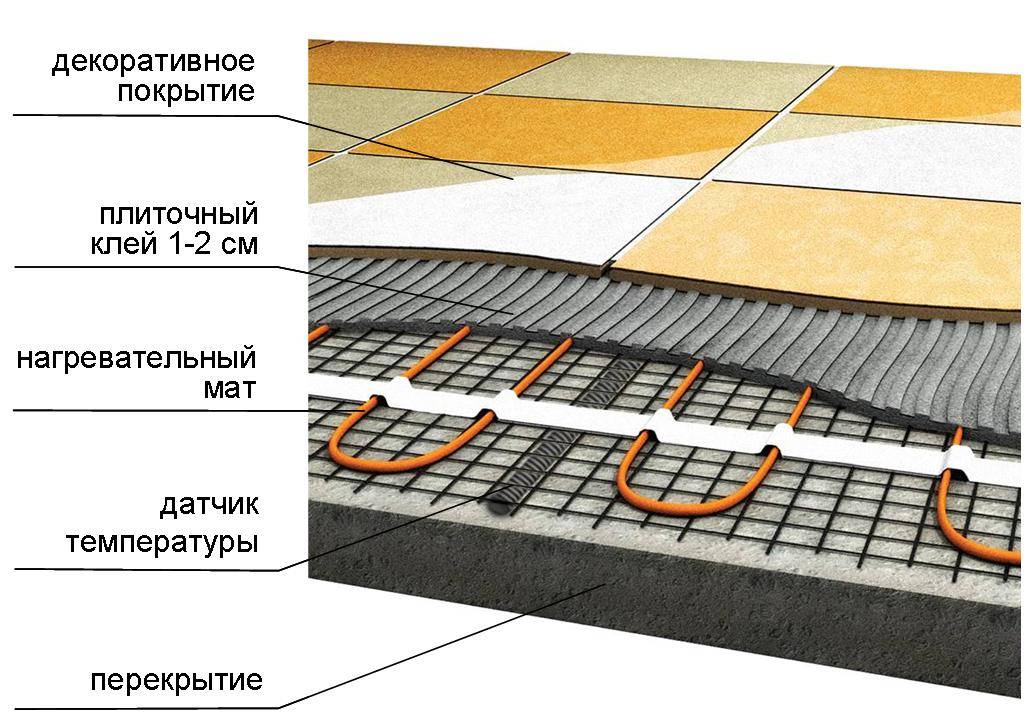
Stages of installing a water heated floor
Laying is carried out on a leveled surface.
If the tie-in will be made into a common heating plant, it will be necessary to calculate the load on the heating system, the design of the heating system.
First, a recess is made in the wall under the manifold cabinet, low above the floor. It contains regulatory elements, docking of the local heating system with the general one (supply and return pipes).
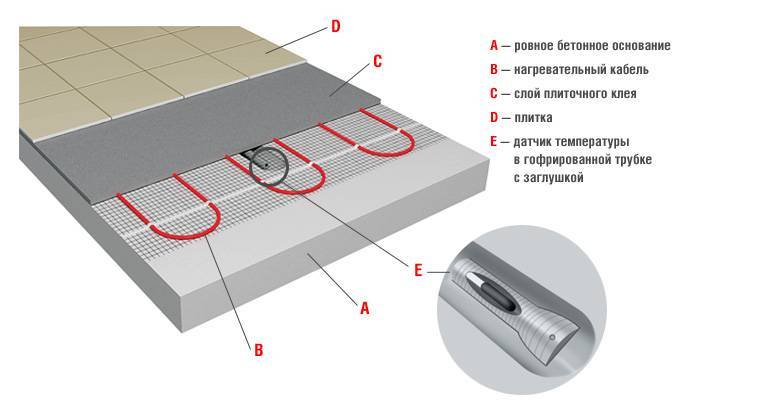
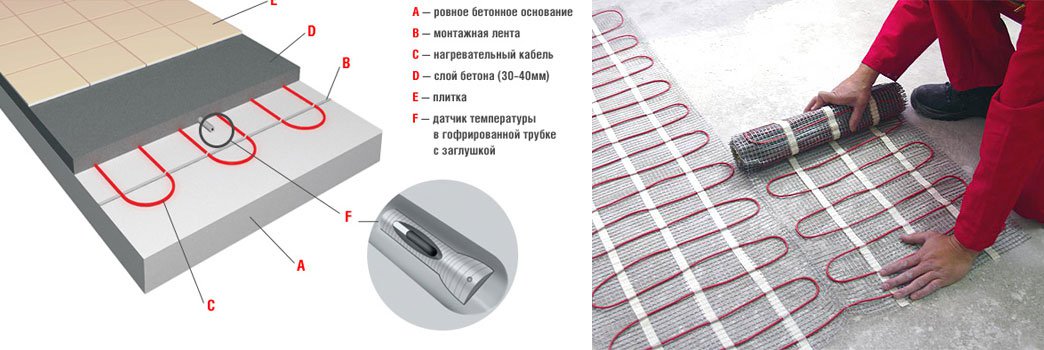
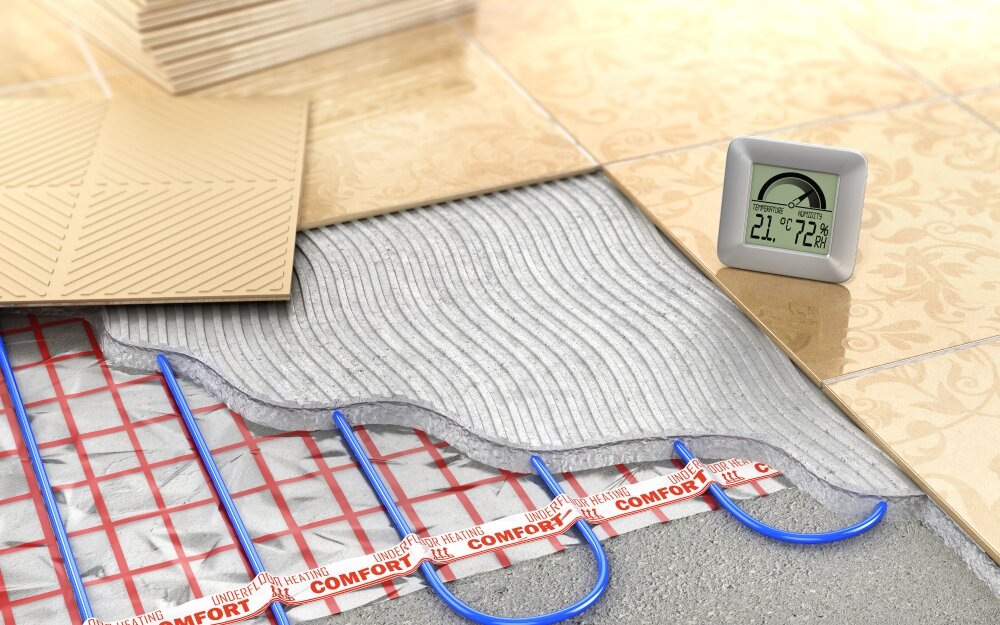
The materials that make up the warm floor, in the order of installation:
- damper tape (along the perimeter of the room, to isolate the thermal circuit and compensate for the thermal expansion of concrete; 20 mm above the level of the screed);
- waterproofing (polyester, hydrocanvas, polyethylene);
- thermal insulation (extruded polystyrene foam; if a turnkey underfloor heating is purchased, thermomats with grooves for laying pipes are included);
- reinforcing mesh;
- heating pipes (special, for underfloor heating, PVC, in coils);
- screed from a sand-cement mixture, with the addition of a plasticizer to avoid cracking of the coating after heating).
Polyethylene joints are glued with waterproof tape.
The thickness of the thermal insulation layer must be such that the thermal resistance is higher than the resistance of the layer above the pipes (in other words: so that the heat passes upwards with less resistance than downwards).
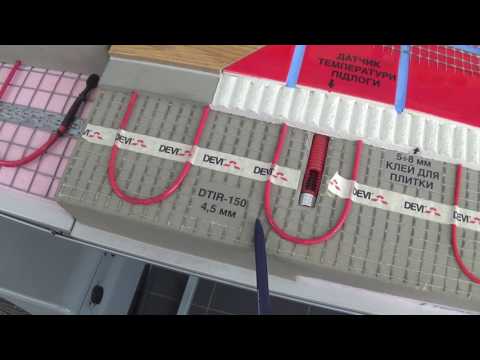
The heating pipe is laid with a "snake" or "spiral", a step of 150-200 mm. The recommended length of a single piece of pipe without joints is 60 m.
One end is brought into the manifold for supply, the other for return. They are fixed to the floor with special clips or clamps, to the grid, step - 1 meter.
Where the pipe passes from the horizontal to the vertical plane, it is reinforced with a protective metal corner (to prevent abrasion).
The connection of the pipe to the manifold is made using a compression fitting. After that, the system is checked for leaks.
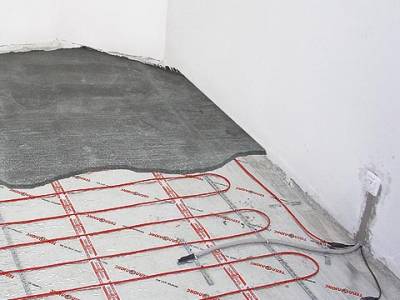
Then a sand-cement screed is produced, with a thickness of 50 to 100 mm. Less will lead to cracking of the plate, more - to a decrease in thermal conductivity.
Work on laying tiles is done no earlier than 28 - 30 days after laying the screed, when the concrete is completely set.
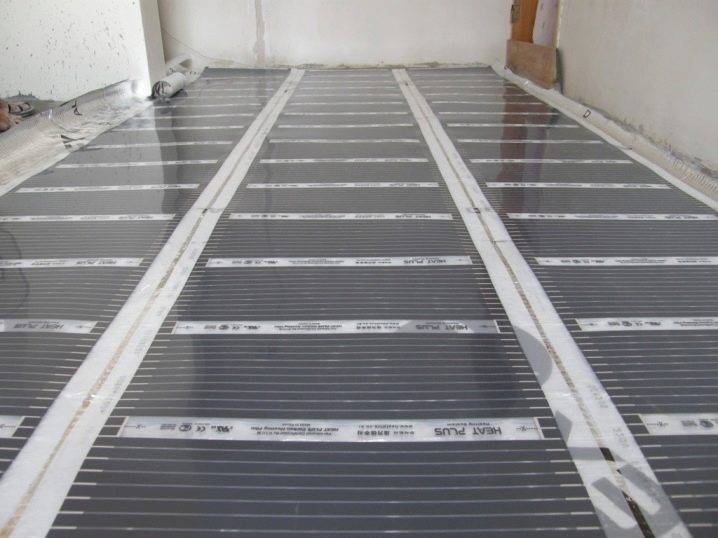
Installation of film underfloor heating
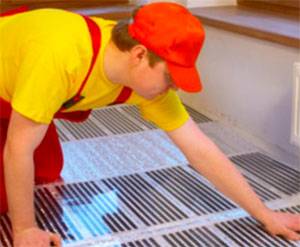 Installation of IR underfloor heating is simple and available for independent work.
This will require:
- polyethylene (according to the area of \u200b\u200bthe room);
- film IR floor;
- clips for contacts (two per strip);
- temperature sensor;
- Temperature regulator;
- heat-reflecting material (isolon covered with a dielectric film);
- double sided tape;
- bituminous mastic;
- electric wire;
- mounting mesh with a small cell (the area is the same as thermal films).
The surface of the base should be flat, without tubercles. Polyethylene is spread, the joints are glued with moisture-resistant tape. A heat-reflecting material is laid on top, the joints are also glued with adhesive tape.
Then the IR film is laid in strips. It is cut strictly in sections, without touching the carbon emitters (black stripes). The strips are connected with adhesive tape (not overlapping!).
Where heavy cabinet furniture will stand, it is not necessary to lay an infrared floor: firstly, there is a load on the floor, and secondly, unnecessary installation and energy costs. There is also no point in finding it closer than 50 cm from the wall.
Copper contacts on the thermal film on one side are insulated with bituminous mastic. On the other hand, they are connected in parallel in a circuit. The clamps are attached to the copper electrode so that one contact is under the film, the other is above it. A wire is inserted into the clamps, crimped with pliers and the contact point is isolated with bituminous mastic.
Silver contacts must also be carefully insulated.
A temperature sensor is attached to the carbon element, on the reverse side of the strip, the wire is led out to the thermostat. In order to avoid excessive load on the temperature sensor and the electric cable, grooves are cut out in the insulating coating for them.
A thermostat is installed on the wall.
It is desirable to connect to the network through the machine, especially if the total system power exceeds 2 kW.
After connecting to the network, they test the operation of the circuit, check by touch how the radiators heat up. The thermostat is set to 30°C.


The ground wire is attached to foil tape glued diagonally to the floor. A mounting grid is spread over the IR floor, fixed with adhesive tape.
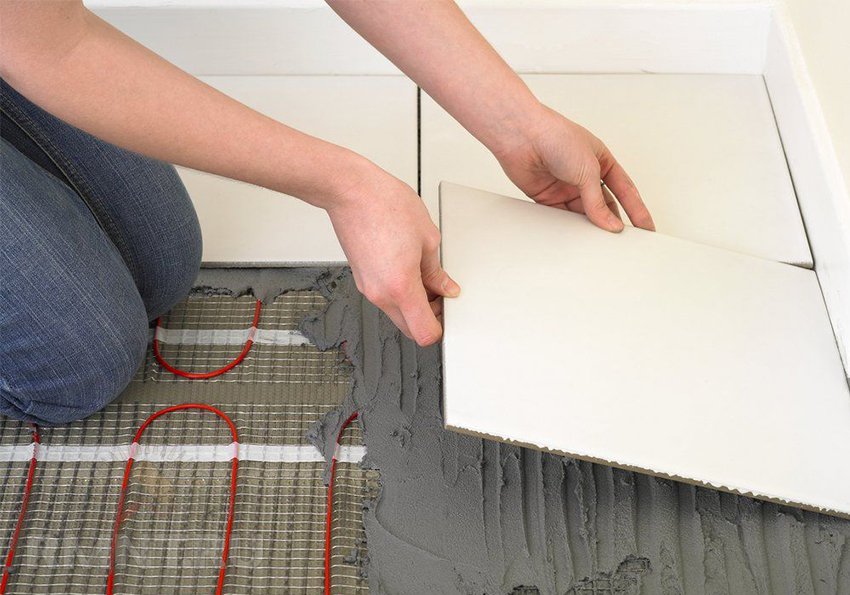
Now you can lay the tiles. The screed is made from the same material as for the water. But its thickness is significantly less, as in the usual laying of tiles.
We offer you to watch a video on how the film floor is laid under the tiles:
Which electric floor is better to choose under the tile?
Electric underfloor heating in stores is offered in four variations:
- cables;
- mats;
- films;
- rods.
Each of these options has its own advantages and nuances of installation. The choice of the most suitable modification for a particular room and the flooring to be laid should be approached wisely and without haste.
Electric floor options
Cable
Warm floors made of heating cables are designed for laying under ceramic tiles and porcelain stoneware. They are mounted in a concrete screed 4–5 cm thick. They are not laid without concrete. If the floors in the house are old and additional overloads are contraindicated for them, then it is better to refuse the cable system.
Consists of a heating cable similar underfloor heating a tile of one or two heating conductors, which are packed in several layers of heat-resistant plastic. Plus, for strength, such a cord usually has a copper wire braid inside. At the same time, the plastic sheath and electric cores are designed for heating up to 70 0C.
The heating cable is:
- resistive;
- self-regulating.
The first is cheaper, but less efficient. It heats up the same throughout. And in the version with self-regulation, the heat transfer of a particular area depends on the ambient temperature. If there is enough heat in some place, then the veins at such a point begin to warm up less by themselves. This eliminates the appearance of tiles on the floor with local overheating and reduces the overall energy consumption.
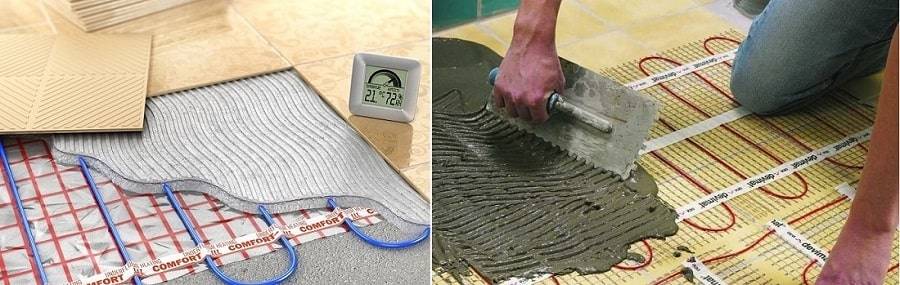
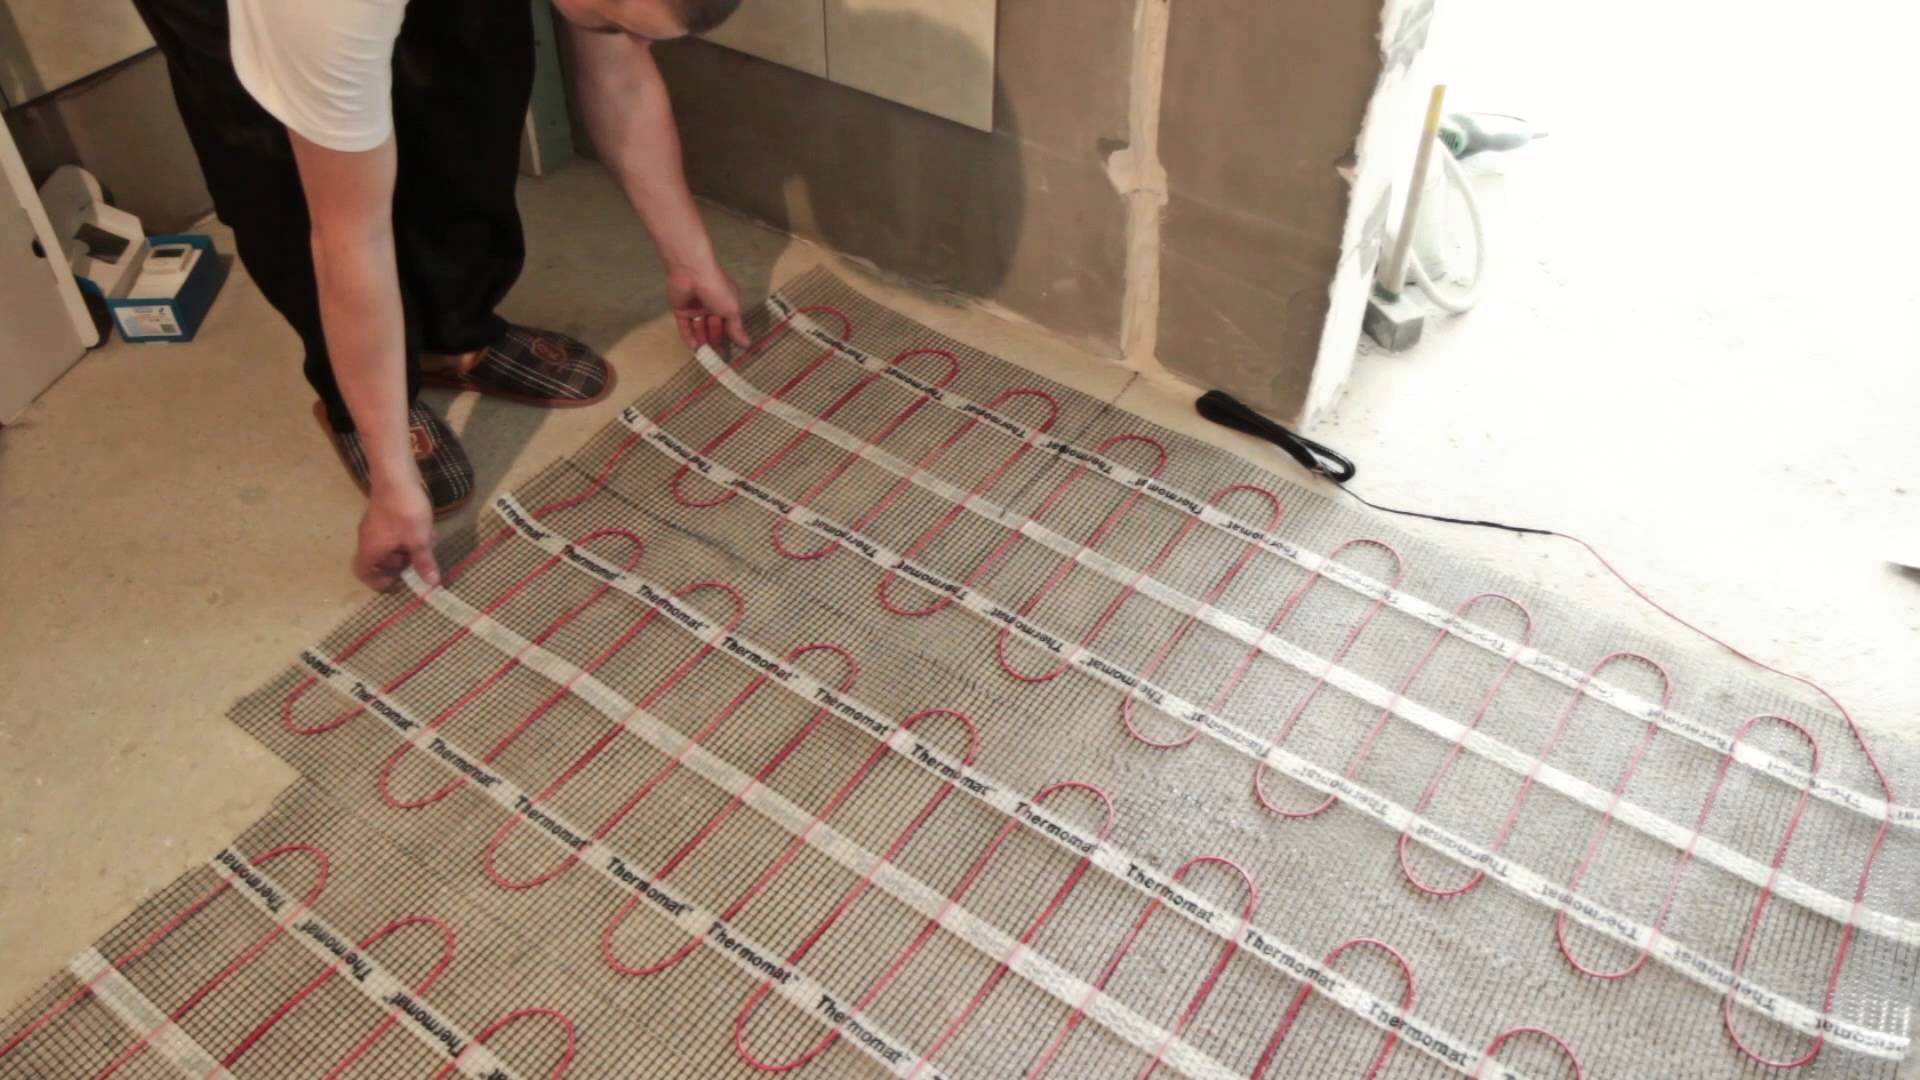
Heating mats and cable floor
mats
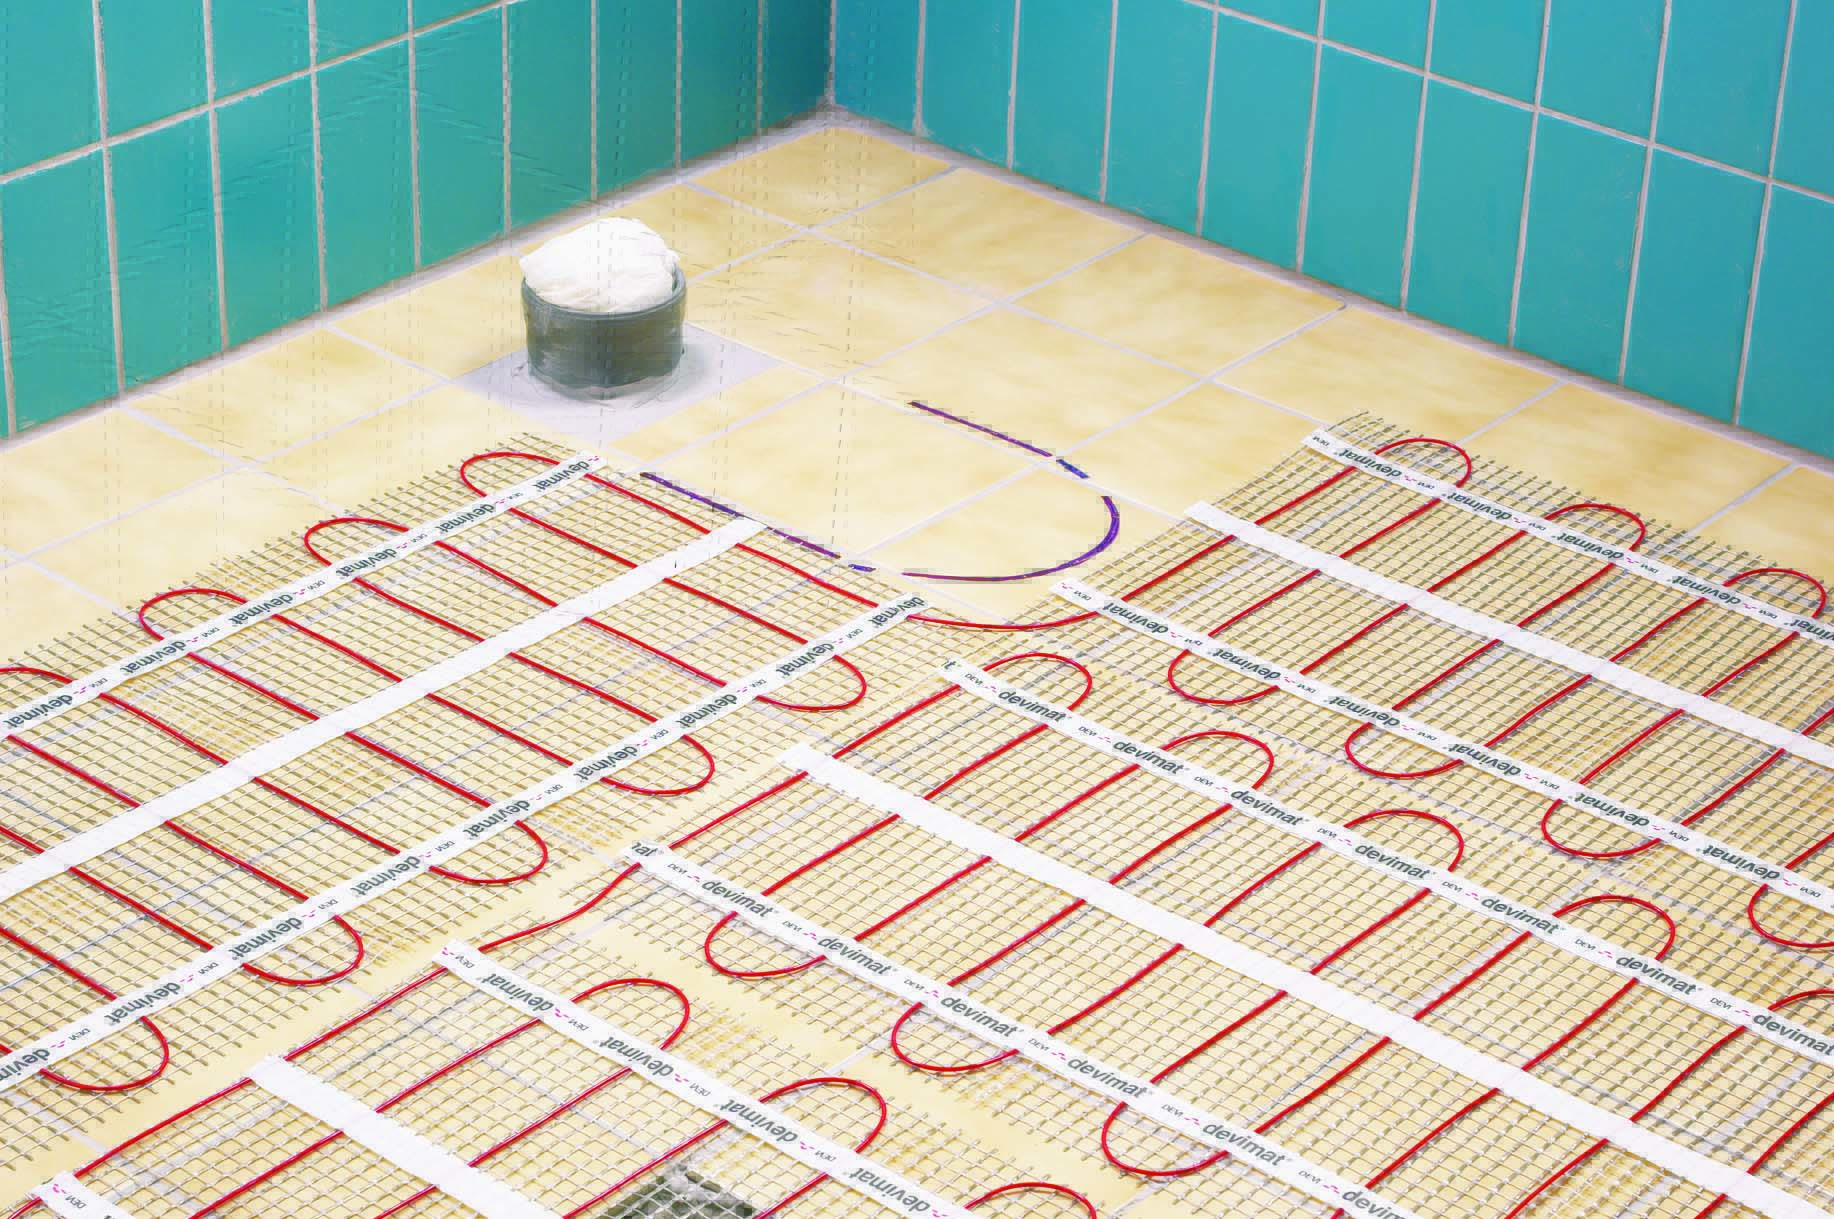
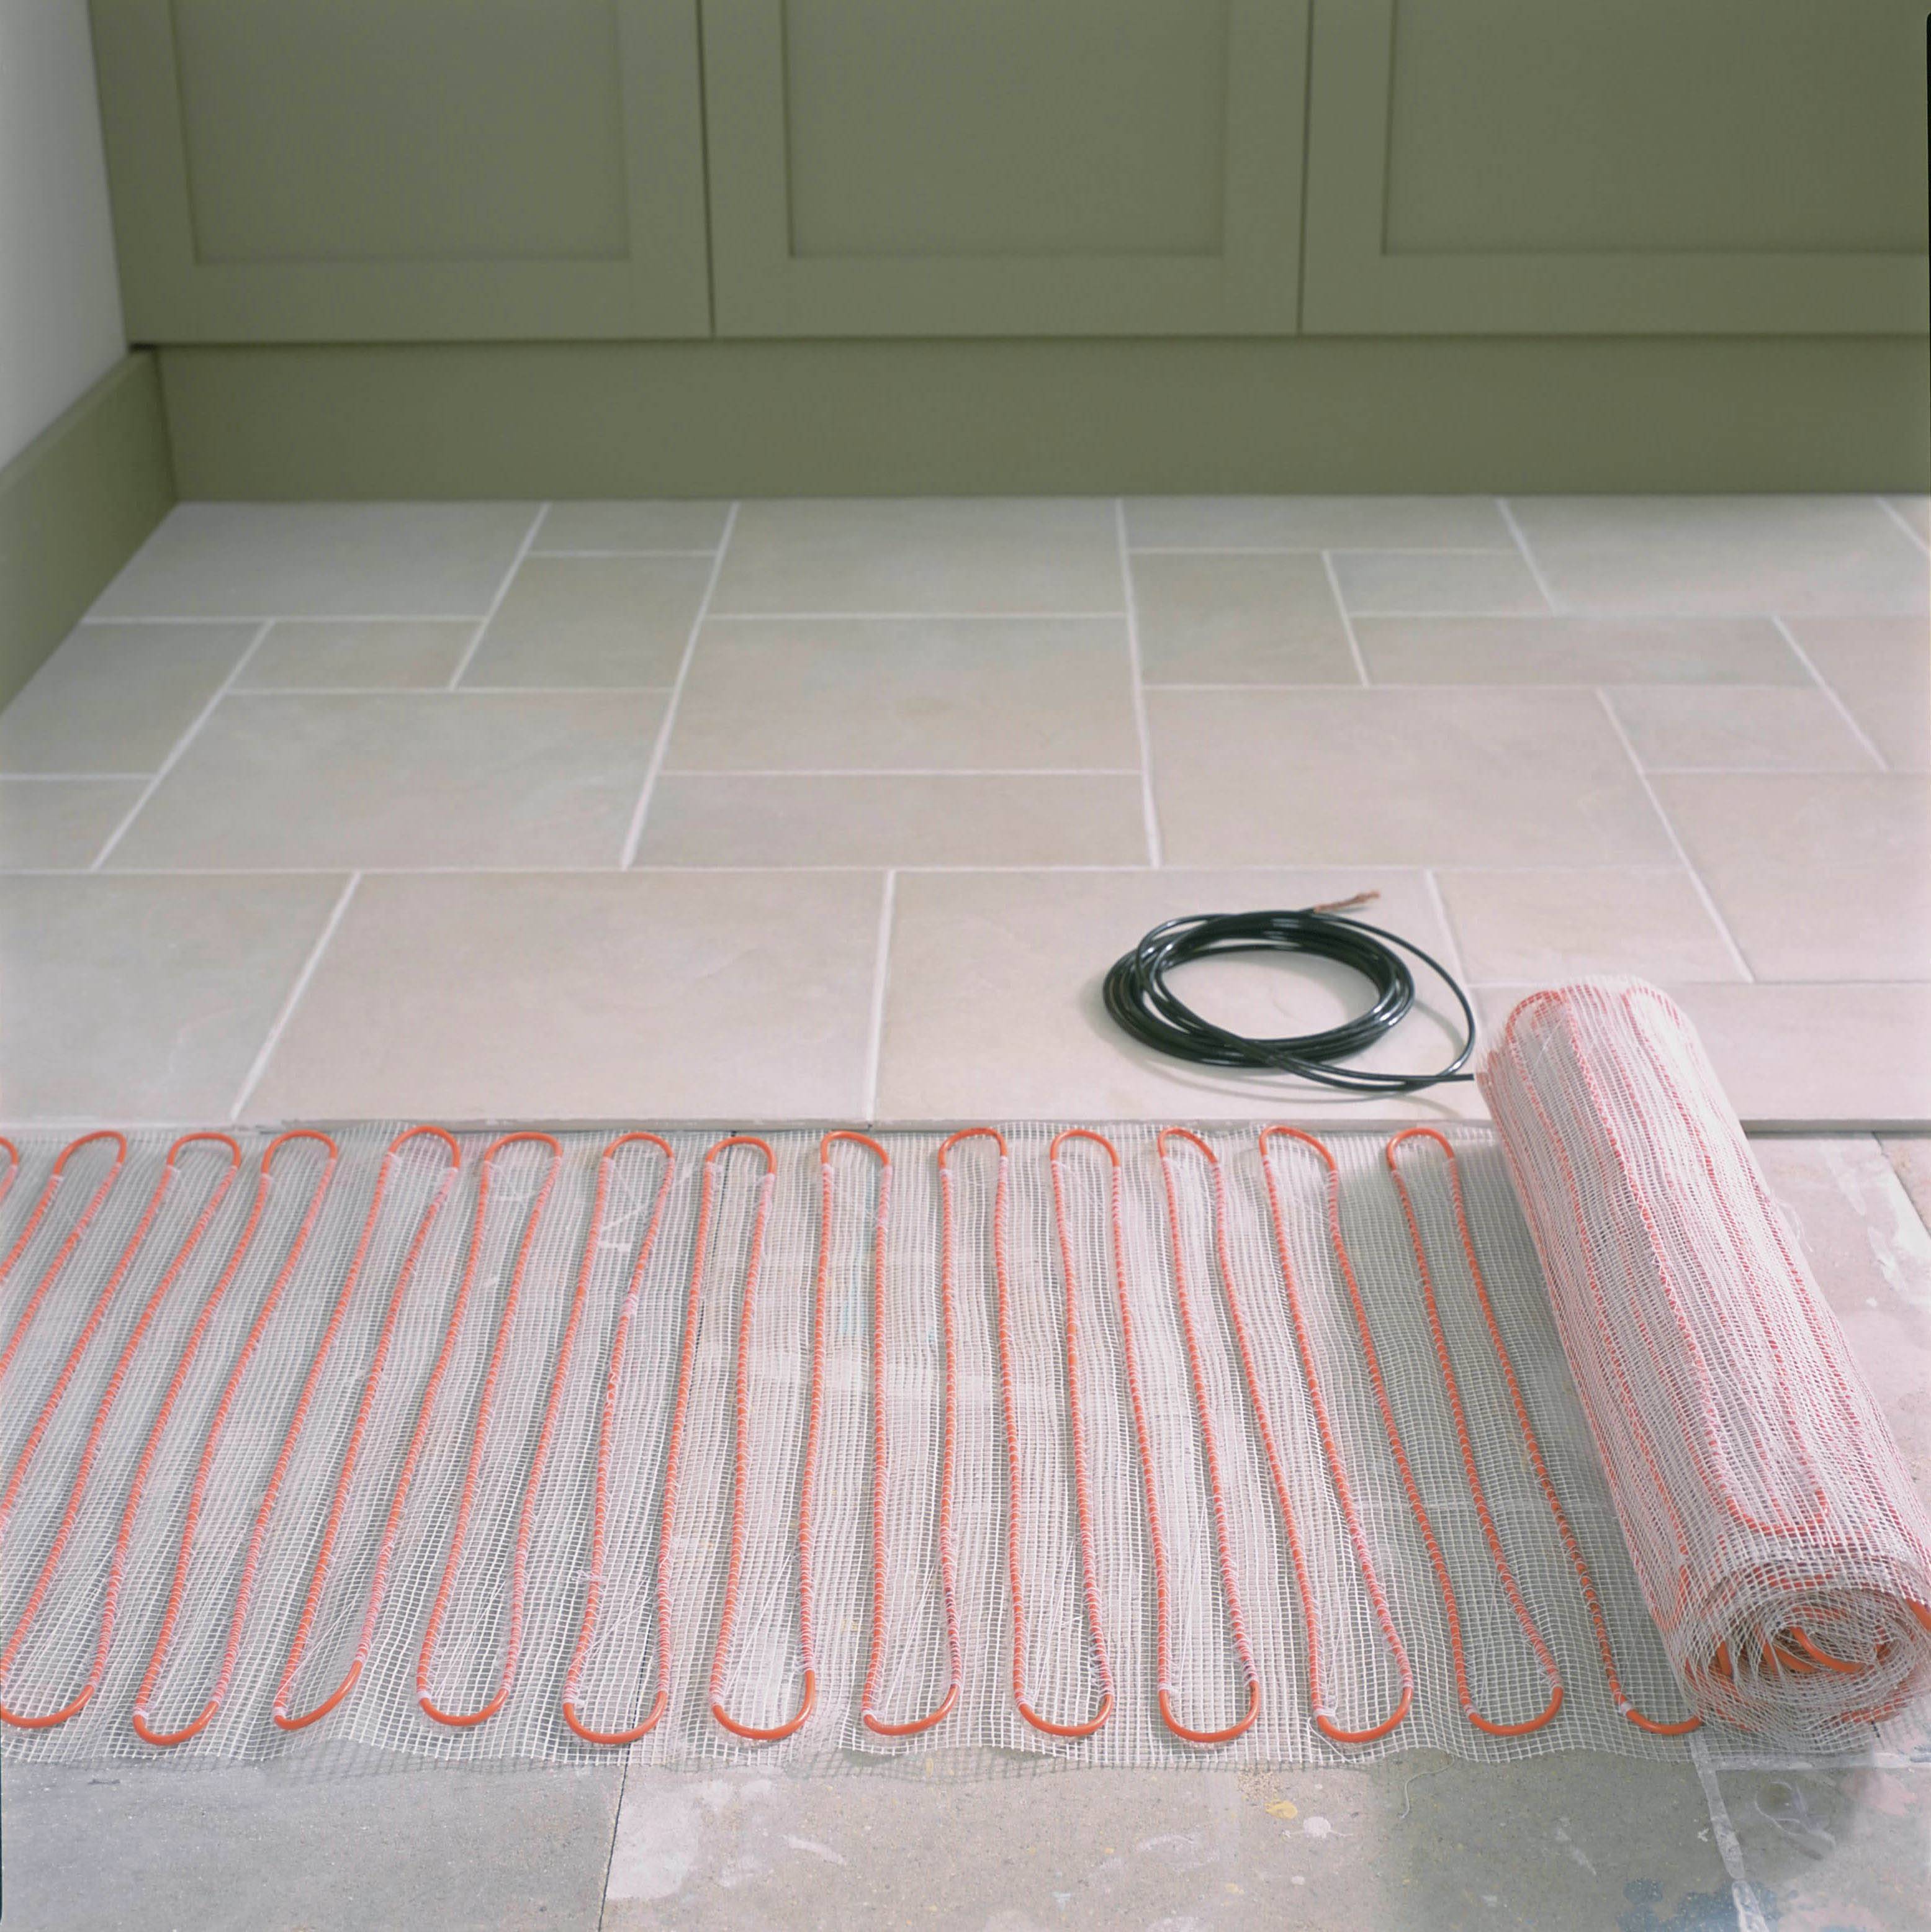
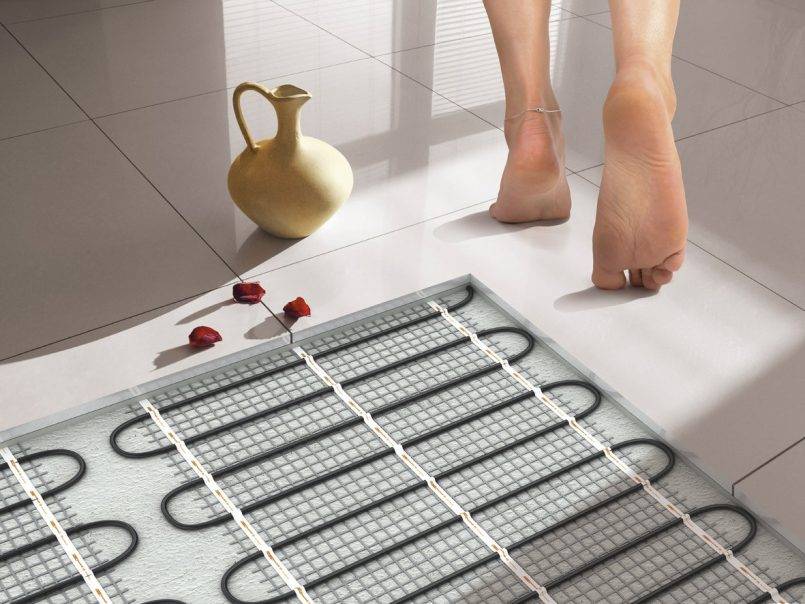
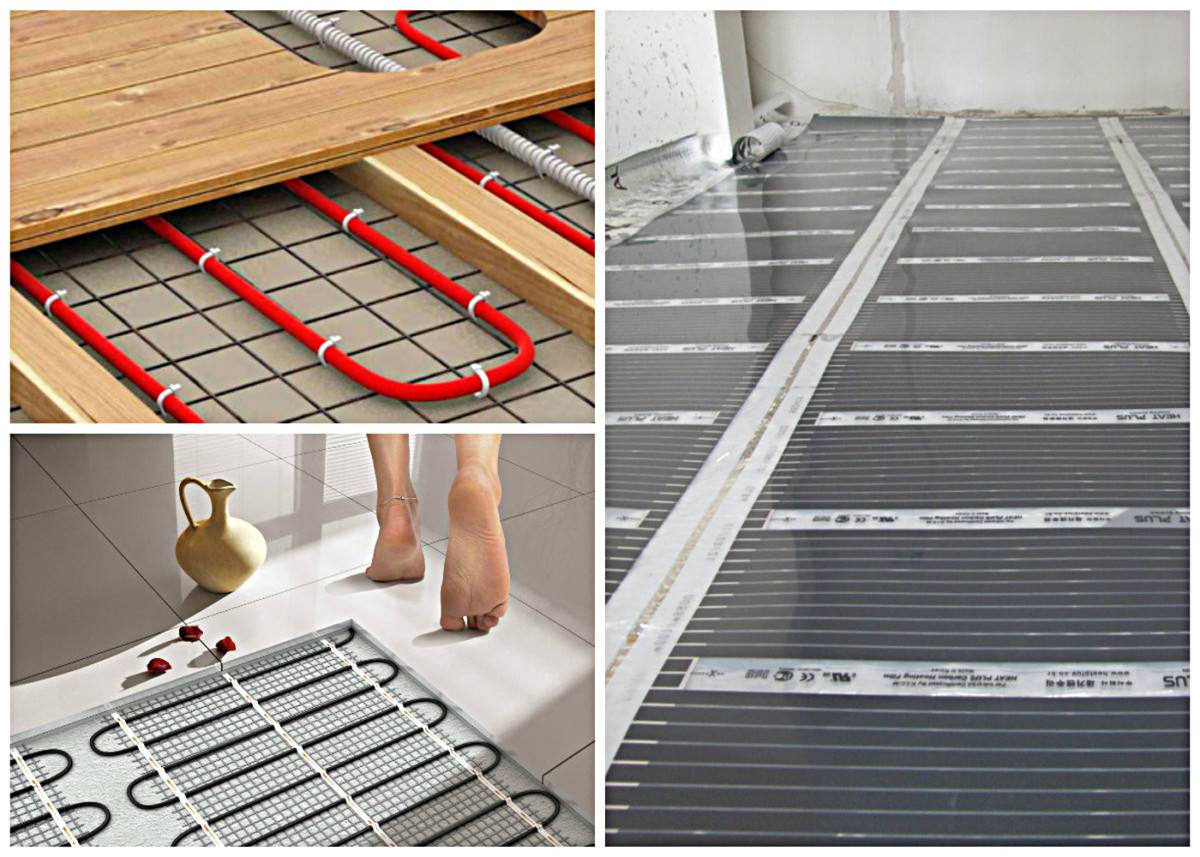
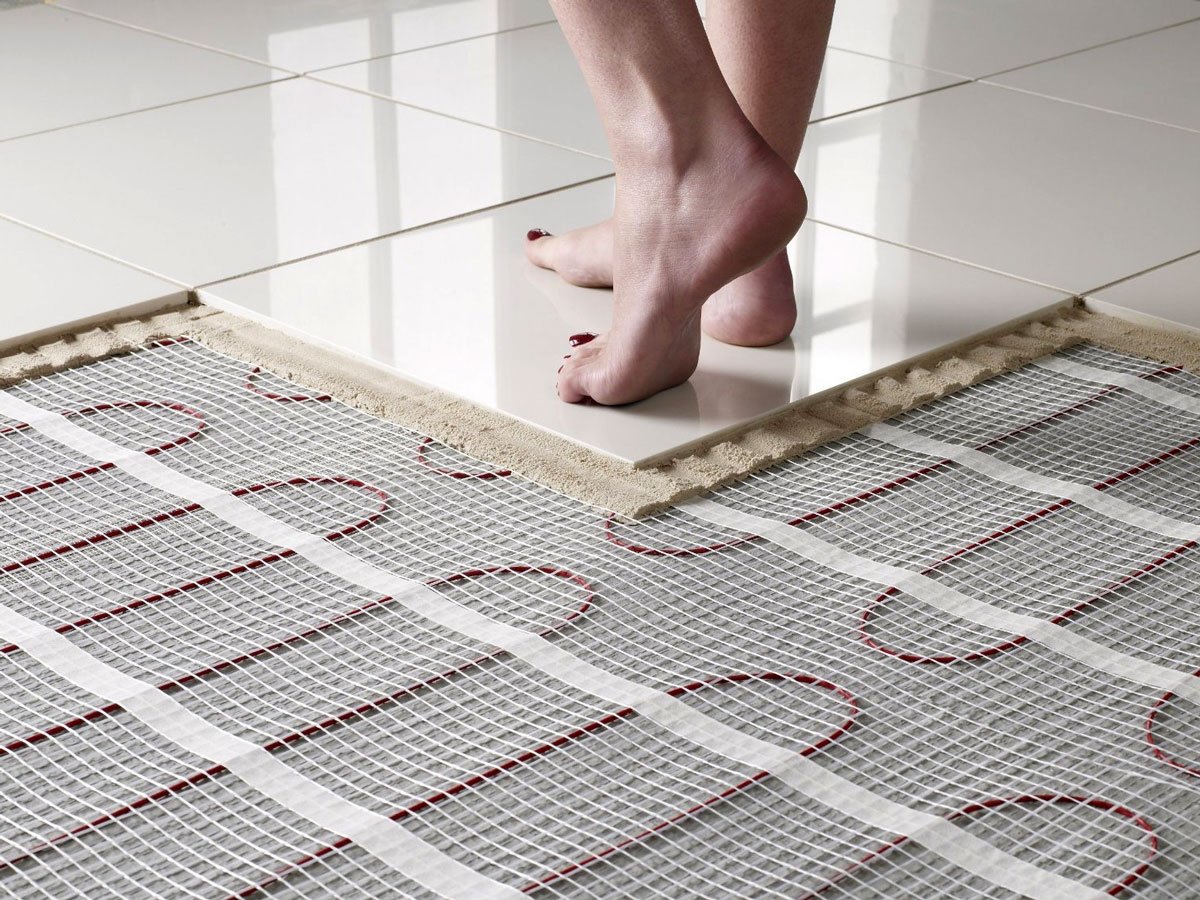
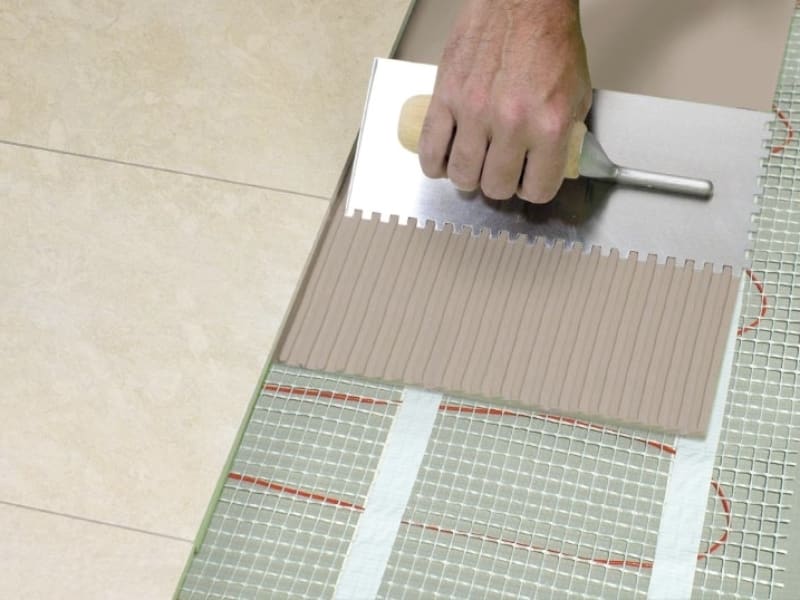
Mats will cost one and a half to two times more expensive than cable when calculated per square meter of heated surface. However, this type of electric underfloor heating is the most optimal for tiles, it is difficult to find a more correct and better option for tiles.
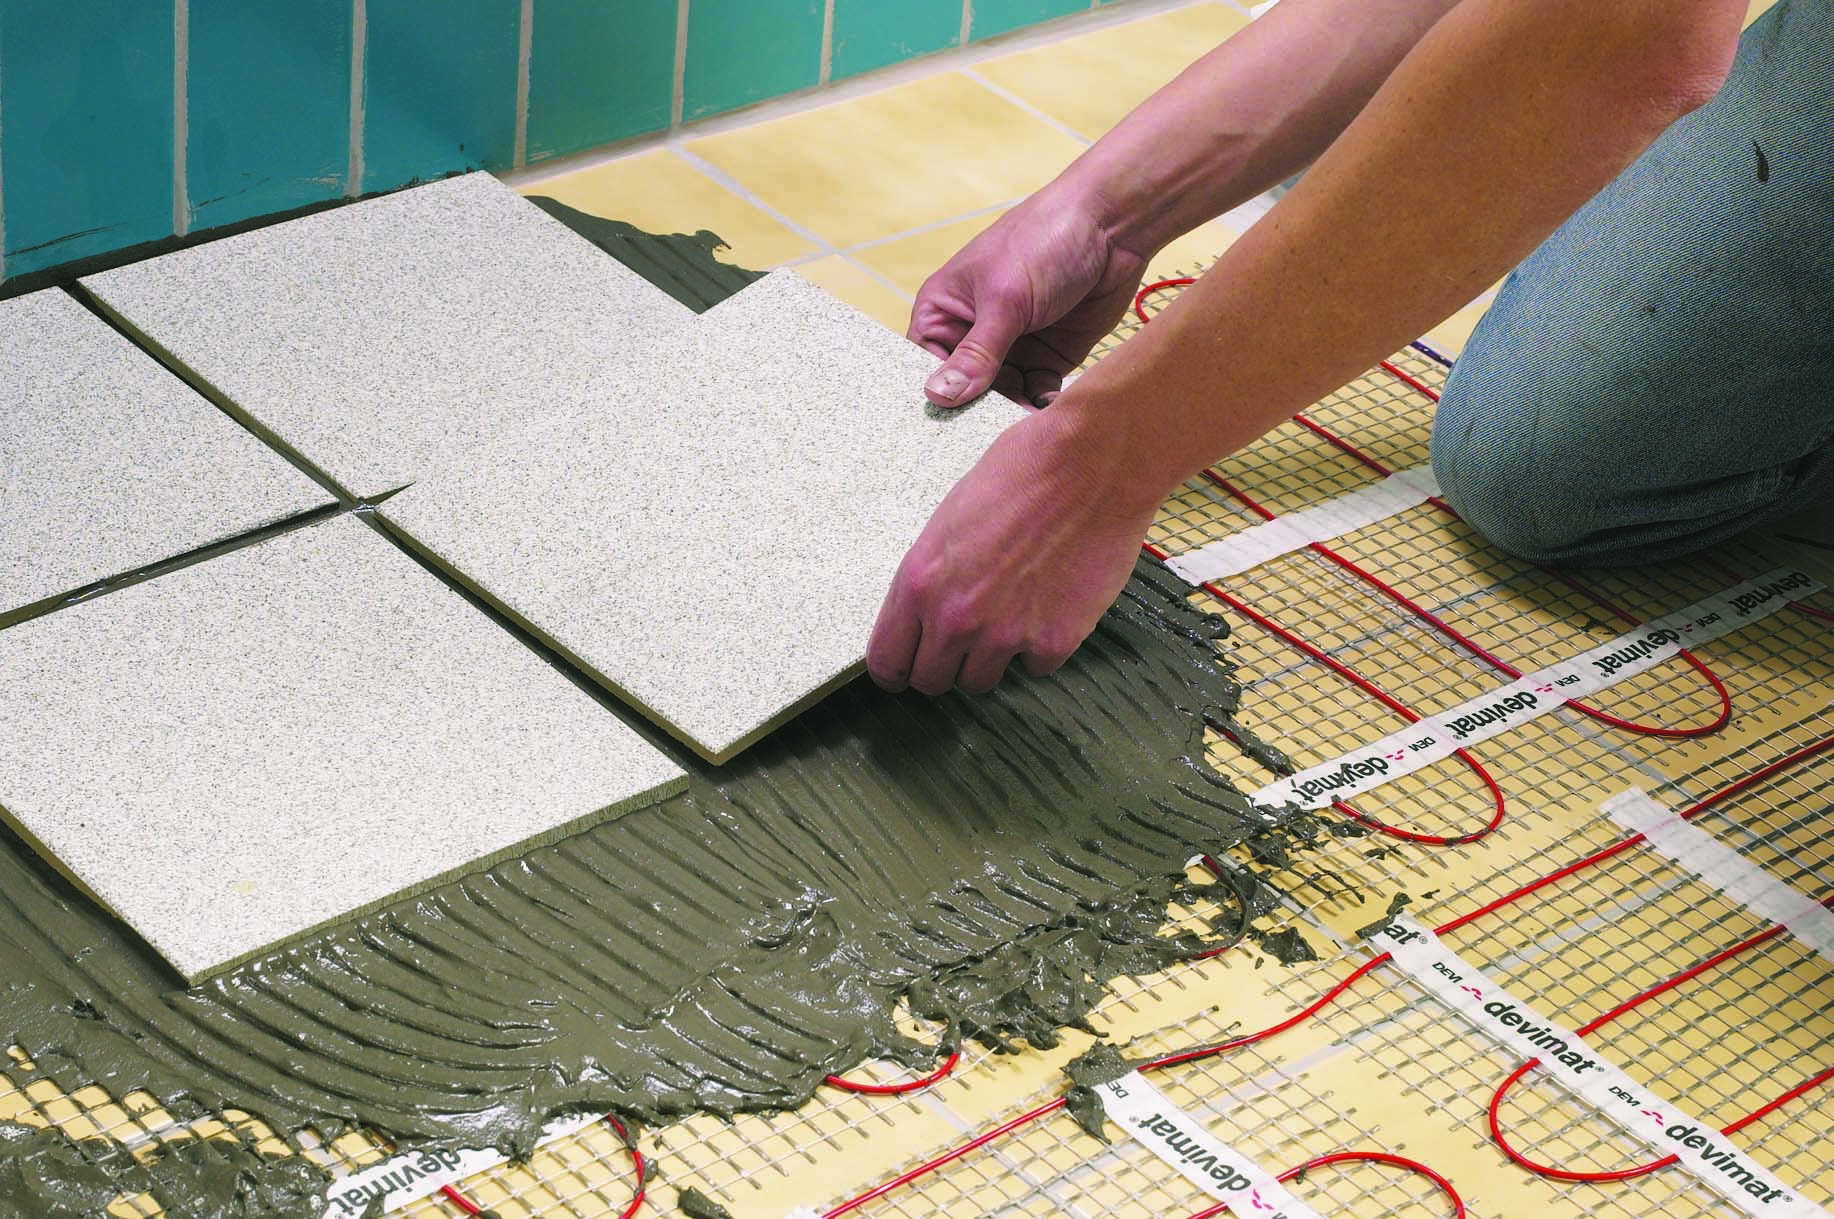
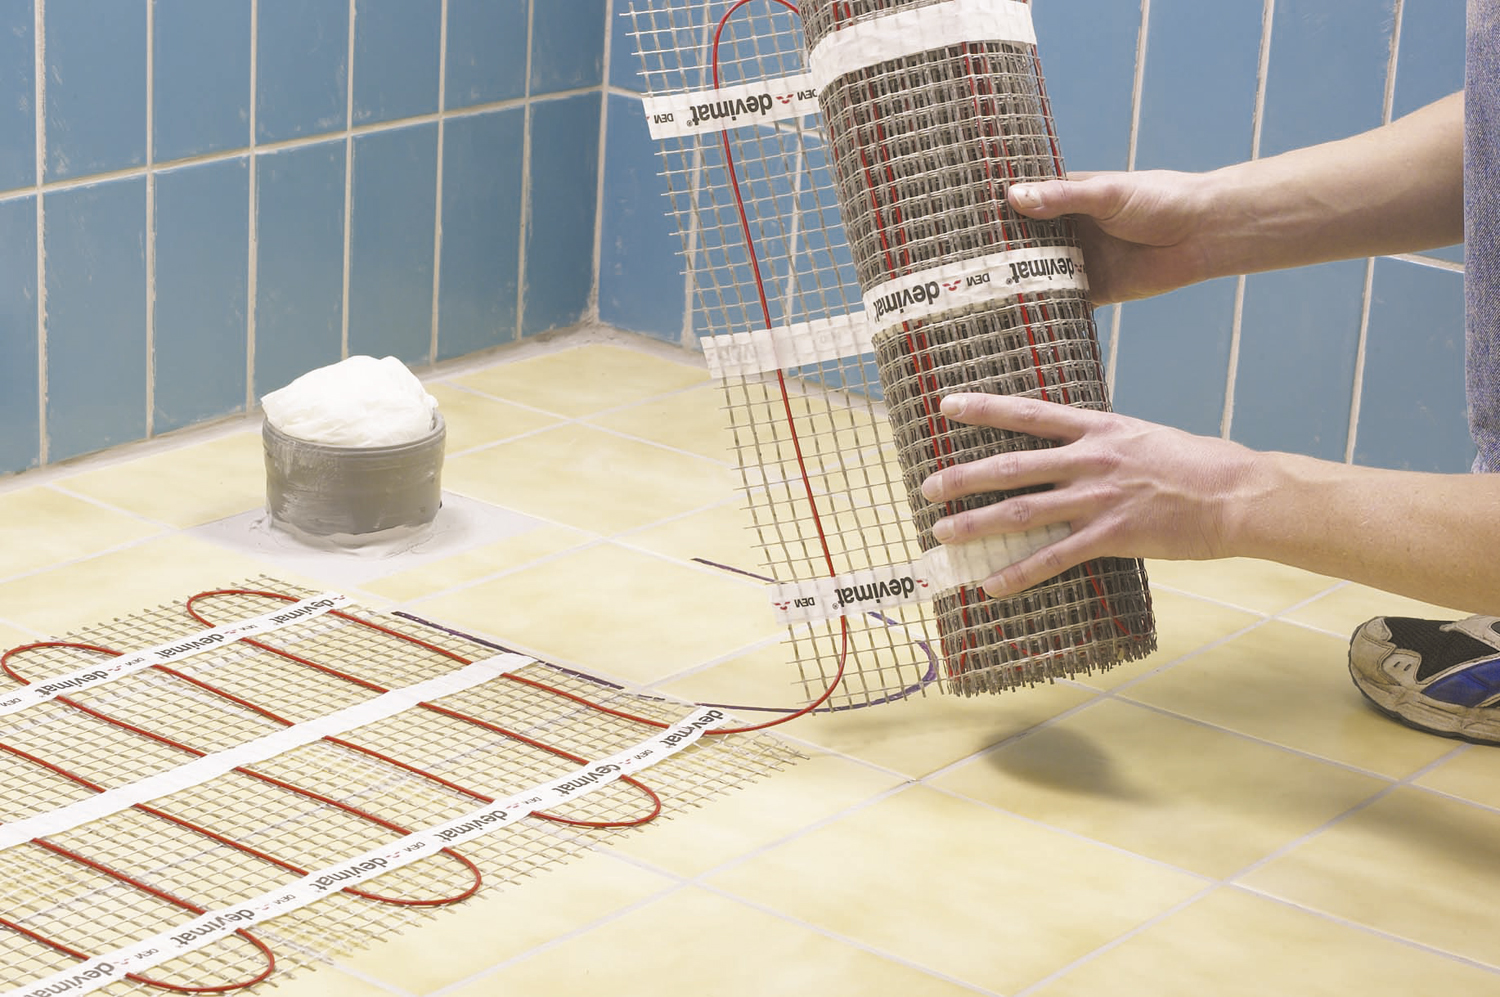
A thermomat is a reinforcing fiberglass mesh on which the heating cable is already fixed with a snake with an ideal pitch. It is enough to roll out such a heating system on a prepared rough base and simply connect it to the power supply. The tile is then glued on top in the usual way without a screed.
How to lay tiles on heating mats
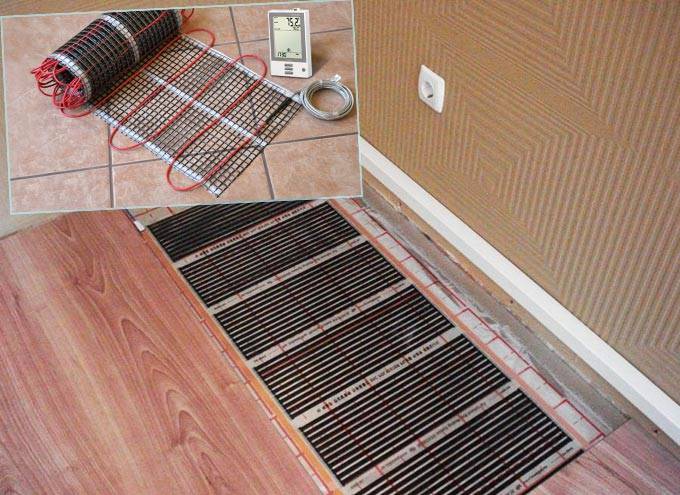
Film floor heating
If in the first two versions a cable with metal cores acts as a heating element, then the films are arranged completely differently. In the film floor heat, carbon-containing materials are heated, which generate infrared radiation when an electric current is applied. Between themselves, these thermoelements are connected by a copper bus, and from above and below they are closed with a sheath made of polyethylene terephthalate.
The thickness of the thermal film for the floor is only 3–4 mm. And it consumes 20–25% less electricity with identical heat transfer than the cable counterpart. However, it is difficult to call such films an ideal choice for tiling. Not every tile adhesive is suitable for them. There are compounds that can dissolve the film shell.
Manufacturers recommend installing this electric underfloor heating under tiles only with moisture and fire-resistant LSU between them. And this is an additional expense. Plus, the thermal film itself is expensive. The result is a fairly impressive amount per square meter.
Film and rod
Rod
The core heat-insulated floor heats also at the expense of infrared radiation. Carbon rod-tubes connected on both sides with conductive tires act as heating elements in it.Such a system is mounted under ceramic tiles in a thin 2–3 cm screed or in a centimeter layer of tile adhesive.
The main advantage of a rod thermofloor is several times lower power consumption compared to a cable. However, the lucky ones who bought this option, in the reviews, point to its excessive high cost and the gradual failure of the rods. As a result, you pay a lot of money, and after a few months, cold spots begin to appear on the floor.
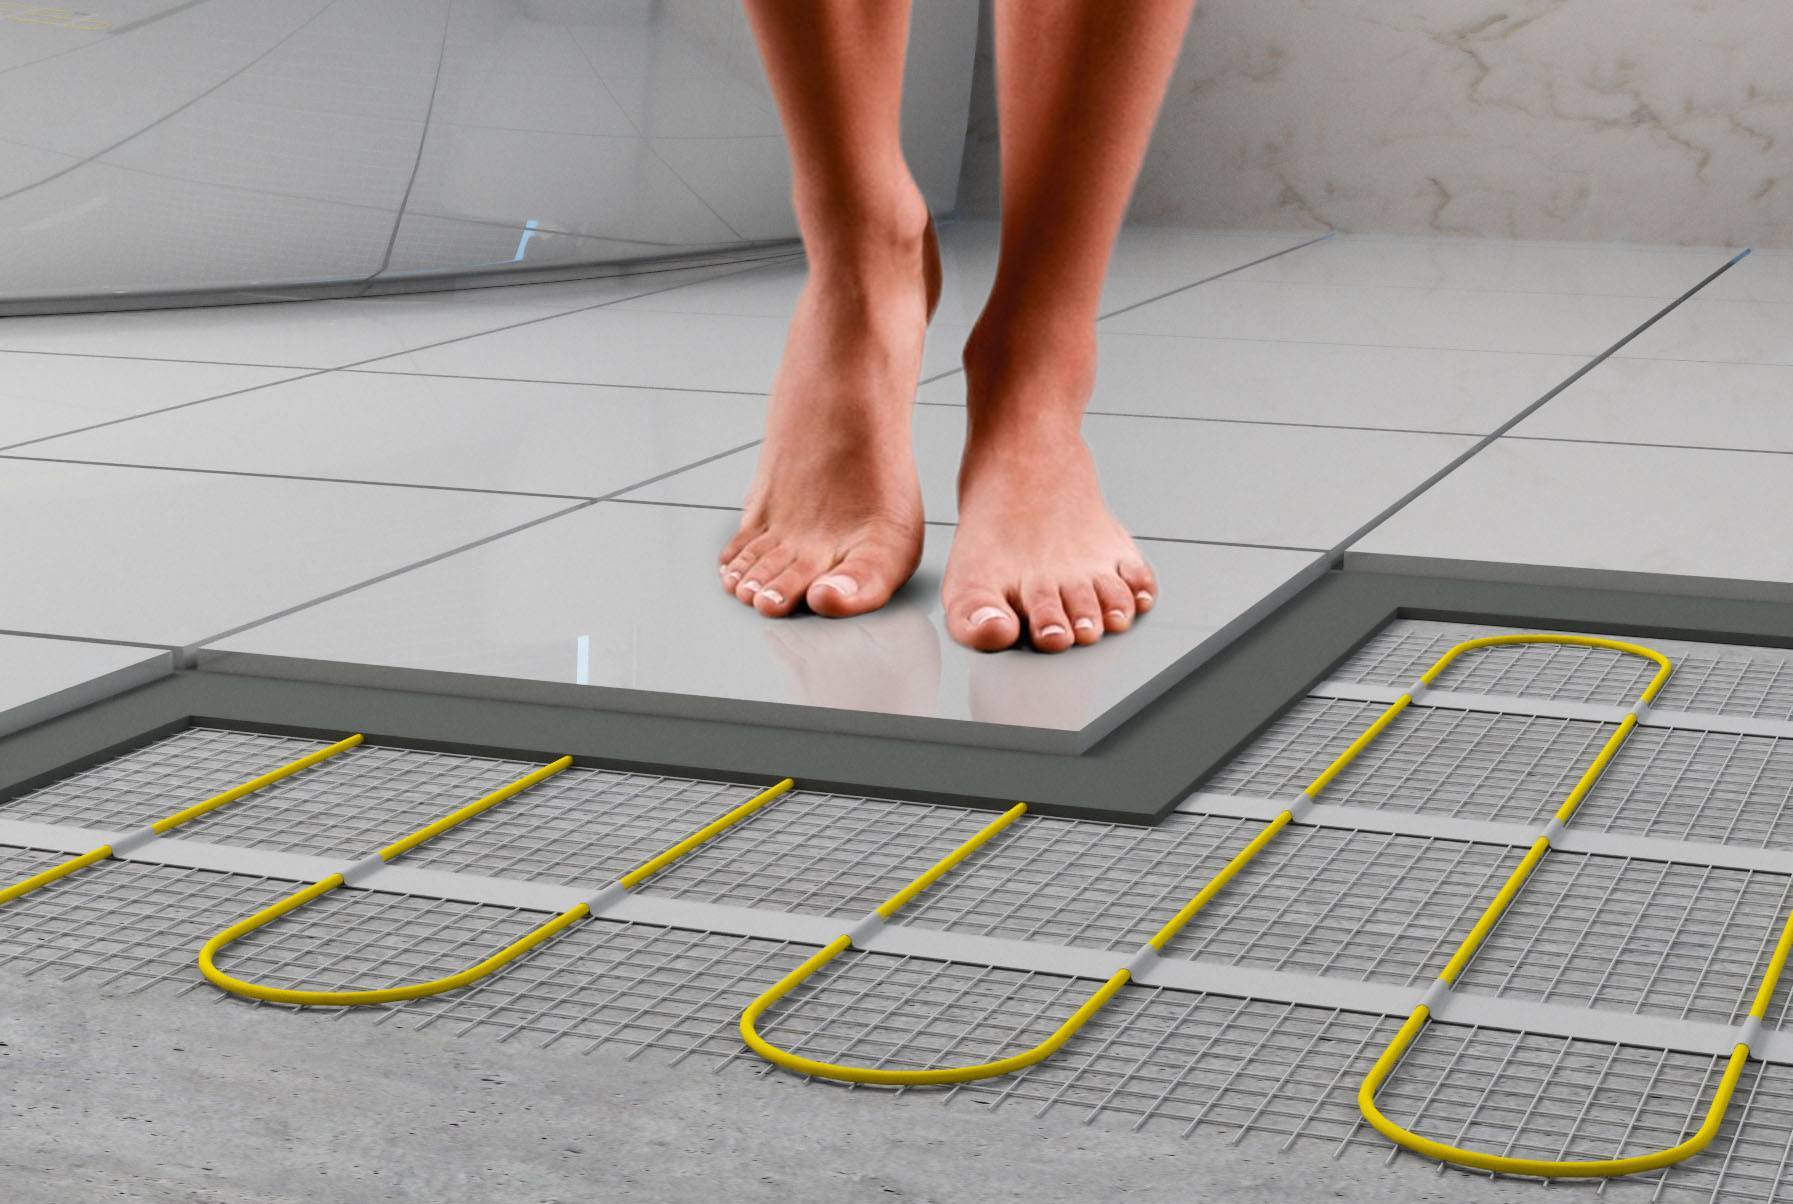
Instructions for laying and connecting underfloor heating systems
Floor installation work
Scheme of installation of electric underfloor heating.
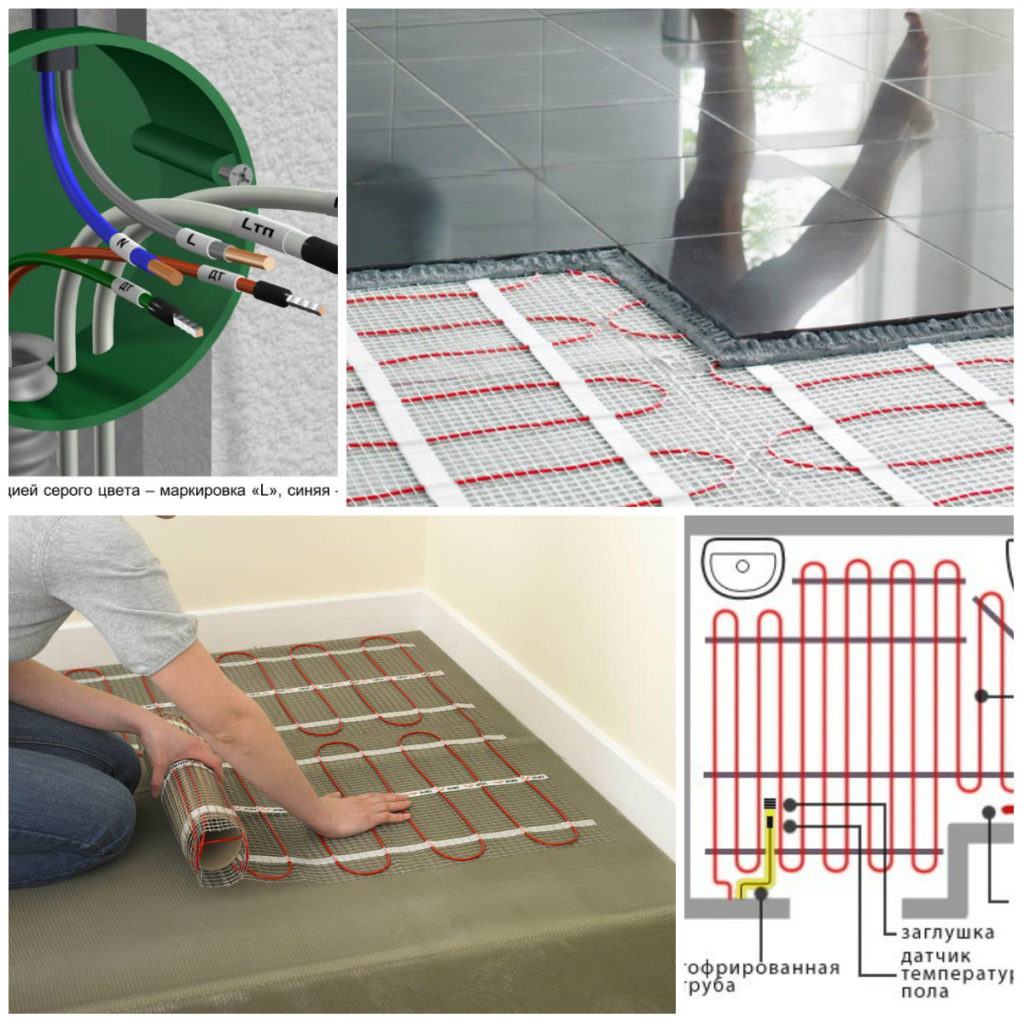
First of all, starting the production of a warm floor, you need to install a thermostat. It is mounted at a height of 50 to 90 cm outdoors, next to the switch. A groove is made in the wall and in the floor using a perforator. A socket box is installed in the upper part of the groove, a supply wire is output into it. A temperature sensor, covered in a protective corrugation, is placed in the same opening. The temperature sensor is connected to the thermostat. A plug is put on the bottom of the corrugation. The strobe in the floor is sealed with mortar.
Laying a warm floor can not be done over the entire surface of the room, but only where the inhabitants of the house can be. If we talk about the bathroom, it is necessary to exclude from the heating area the places where plumbing fixtures, furniture and stationary heating devices are installed. The cable laying pattern, cross-section and length of the heating element depend on the size of the heated surface.
Ready-made kits for the electric floor mainly offer rolls of mounting tape with a pre-glued cable.This greatly simplifies the work of the stacker, helping to maintain the necessary distances between the cable lines and eliminate the possibility of bending it.


Start the installation of a warm floor from the strobe
In the case of working with a sheet having a single-core cable, it is important to unfold the roll so that the end of the sheet is also at the strobe. You can unfold the canvas by cutting the base mesh with metal scissors without damaging the heating element itself. Lead the wires to the socket
Check the working condition of the thermostat and mount it in the socket
Lead the wires to the socket. Check the working condition of the thermostat and mount it in the socket.
Before starting the final pouring, the assembled complex should be checked. Underfloor heating must be in good working condition. To check, you need to turn on the circuit for a few minutes and make sure that the system is working properly. You can use a tester to measure the resistance of a cable. This will also show the performance of the installed underfloor heating system. The required parameters are indicated in the instructions for the set.
After checking all the indicators, making sure that the system is connected correctly, you can proceed to the final screed of the electric underfloor heating. There are 2 options here. You can pre-fill the surface with cement mortar and lay the tiles as the cement mortar hardens and dries completely. But there is a shorter way: the tiles can be laid out immediately after the installation of the heating floor.
The floor screed must be done with care, avoiding the formation of voids.Unfilled areas of the screed can cause premature damage to the heating element, resulting in a breakdown of the entire electric heating system. After pouring, the cement layer should be allowed to dry for 6 days. Only after the screed is completely dry, you can start laying tiles, installing skirting boards, and grouting the spaces between tiles. As a decorative material, you can use not only tiles, but also, if possible, more expensive materials: porcelain stoneware, natural stone tiles. If you have the necessary skills, you can also lay the tiles with your own hands. Otherwise, it is recommended to contact the master tilers. Qualitatively laid out tiled flooring will give the room an exquisite beauty and a finished look.
Not earlier than 35 days after the final finishing, you can start using the electric underfloor heating. The problem is not the ability of a raw fill to provoke a short circuit in the entire network. It's just that some materials, when exposed to heat, have the ability to expand or contract. Both cases can cause deformation of the screed, which will lead to irregularities on the surface or to the formation of small voids.
Cutting tiles with a tile cutter.
Tools and materials:
- single-core or two-core cable;
- mesh for the base;
- thermostat;
- temperature sensor;
- corrugation for the sensor;
- damper tape;
- cement;
- construction sand;
- perforator;
- metal scissors;
- penofol;
- mounting tape;
- reinforcing mesh;
- antiseptic primer;
- roller;
- tile;
- tile adhesive;
- spatula with teeth;
- plinth;
- grout for tiles.
The process of installing a warm floor under a tiled floor is not complicated. It requires studying the installation instructions, accuracy in work and the availability of the necessary skills.
Heating time
The heating time of the electric floor depends on whether the heating system is laid directly under the tiles or embedded in the screed. In other words, it depends on the type of system.
To estimate the heating time, there are certain forms, often understood only by specialists. In this regard, we discard the calculations and give the standard heating time for different types of floors:
- A heating mat laid under a 1.5-2 cm thick tile has a heating time of just under an hour (45-50 minutes);
- Cable system in a screed 5 cm thick without thermal insulation in a heated room - 2-2.5 hours;
- A similar system with thermal insulation - 1.5 hours.
Thus, the system of mats and films installed immediately under the flooring demonstrates the minimum heating time. When using powerful models, the time indicator can be reduced to 30 minutes.
Compared to mats under tiles, cables in screed warm up 3 times longer. However, this value can be reduced by 2 times if the screed is provided with a layer of thermal insulation. It is also necessary in cases where there is an unheated room or soil below.
If the power is calculated incorrectly, the system “does not pull”, the floors do not warm up or warm up for a long time. If the temperature sensor is located too close to the heating element, then it reaches the desired temperature faster than the floors in the room, and turns off ahead of time. In the absence of thermal insulation or insufficient thickness of its layer, heat loss exceeds the heat generated, so it seems that the floors heat up longer, and the desired temperature is not reached.
Technology laying electric underfloor heating methods and tips
This page contains information about underfloor heating based on electricity, as well as methods and technology for installing such floor systems.
Unlike a central heating system, a warm floor evenly heats the entire floor covering and, consequently, the air in the lower part of the room, which is most comfortable for a person. Otherwise, warm air immediately rises to the very ceiling.
Variety of electric underfloor heating
Underfloor heating from electricity is of three types:
- cable,
- thermomat (mesh with attached cable),
- film (the heating element is inside the film).
Choosing the right system is necessary, based on the characteristics of the premises, layout and operating conditions. Of the first two, it is better to buy the second one in order to save time. For the cable, you still have to take mounting tape for fastening. And mats can be cut along the grid to fit the layout. For a film floor, only a “dry” installation is needed, and such a floor is undesirable, for example, for a tiled floor.
The technology of laying an electric underfloor heating directly depends on its type. Let's consider all of them.
Important!!! The base for any underfloor heating system must be flat and clean.
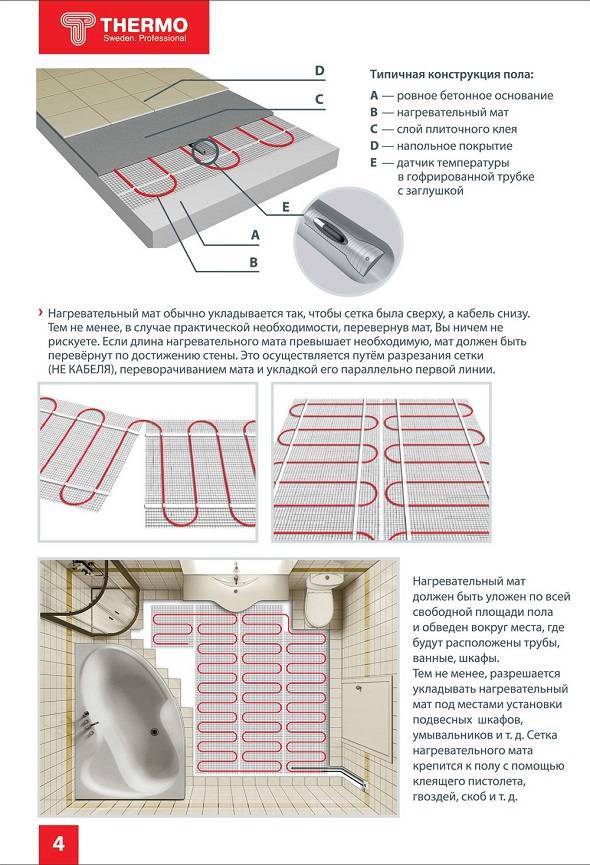
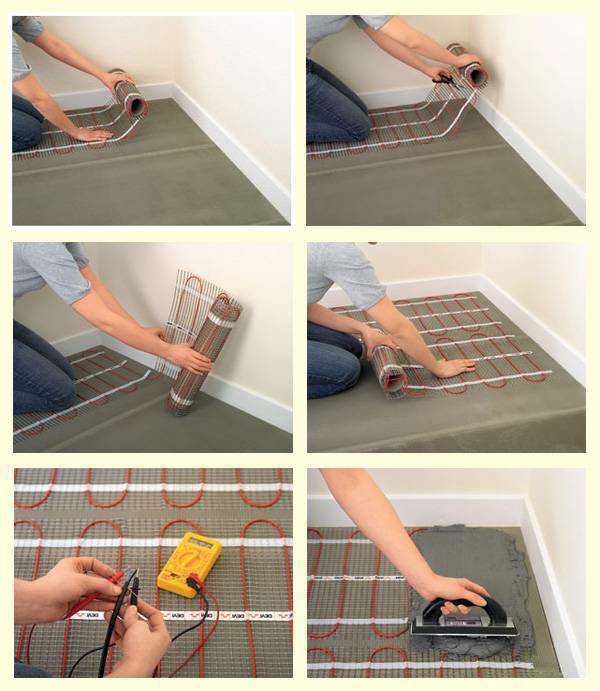
Method 1. Installation of thermomats
This option is the easiest. The thermo mat grid is 50 cm wide, but it can be cut and rotated in the desired direction. The main thing is not to damage the cable. You can fix the thermomat to the floor in any way. Before this, it is recommended to prime the surface to ensure better adhesion. From above - a small layer of screed (3 cm) or tile adhesive, and then the floor covering.


Options for laying thermomats
Method 2. Cable floor installation
This method involves preliminary leveling, thermal insulation and floor screed, which will increase its height. Then the cable of the required size is laid out with a “snake” or “snail” using a special mounting tape with fasteners that maintain the required distance between the cable, excluding the places where pieces of furniture will be located. In addition, be sure to make indents from walls and heating devices by at least 5-7 cm. You need to start laying from the place of connection to the thermostat. As in the case of thermomats, tile adhesive or screed (5 cm thick) is laid under the floor covering.
Attention!!! Do not cut or stretch the cable! Cable lines must not touch!
Cabling
Method 3. Film floor installation
The film floor has a small thickness, so only a small layer of coating is possible above it. As a heater under the film, only materials with low thermal conductivity can be used. The film itself must be cut into strips of the required size, laid them without overlapping one another, and connected with wires to the tires along the edges of the film. To protect a fragile system, it is worth putting plywood or drywall on top, and then the flooring. It is better not to install tiles, as the adhesive will not hold them well enough on the smooth structure of the film. Such a floor can be mounted throughout the room without exception.
Film underfloor heating for different coatings
After laying any electric floor, you need to lay the temperature sensor in a special tube, which must be equidistant from the heating elements and not walled up.Moreover, it must be placed at a distance of at least 50 cm from the floor to the wall for the correct display of data. Then connect it to the thermostat.
Temperature sensor placement
Don't forget to also draw or photograph a floor plan that may be needed for plumbing installations, for example.
Important!!! You can not turn on the electric floor until the fill is completely dry - about a month
Laying heating mats
Before you start laying underfloor heating under the tiles, you need to make some calculations. To begin with, we determine the required thermal power:
There is nothing difficult in the process of laying heating mats, the main thing is to clearly follow the instructions below.
- 180W/1 sq. m - the required capacity of the mats, if the room is located on the ground floor, and the equipment will work as the main source of heat;
- 150W/1 sq. m - power is required when laying electric underfloor heating under tiles on the second floors or on floors with good thermal insulation;
- 130W/1 sq. m - the power of mats when using electric underfloor heating as an auxiliary heat source (for example, in addition to bimetallic or cast iron radiators).
The heating cable is calculated in a similar way, which will be discussed later.
For installation, we need glue for underfloor heating under the tiles (sold in bags in the same place where the tiles themselves are sold), tile or porcelain stoneware, heating mats of suitable power, a thermostat for temperature control, connecting wires, a temperature sensor with a signal wire, leveling compound for floors , Penofol and damper tape, corrugation for laying wires, brackets for fastening mats.As soon as everything is purchased, we proceed to the installation.
Laying electric underfloor heating based on heating mats under the tiles with your own hands is not so difficult. The most difficult will be the final stage - the installation of tiles, since the evenness of the finished floors depends on the straightness or curvature of one's own hands. If you are not confident in your abilities, call a specialist who will install the final floor covering.
At the first stage, it is necessary to paste over thoroughly clean the rough surface for installation work. And here a leveling mixture may be required - fill it with subfloors according to the instructions, level it, wait until it dries completely. As a result of this, you should get a flat surface, ready for styling, without bumps, pits and other irregularities. Next, we spread Penofol with the shiny side up.
You can do without Penofol if you are sure of the excellent thermal insulation properties of the concrete base.
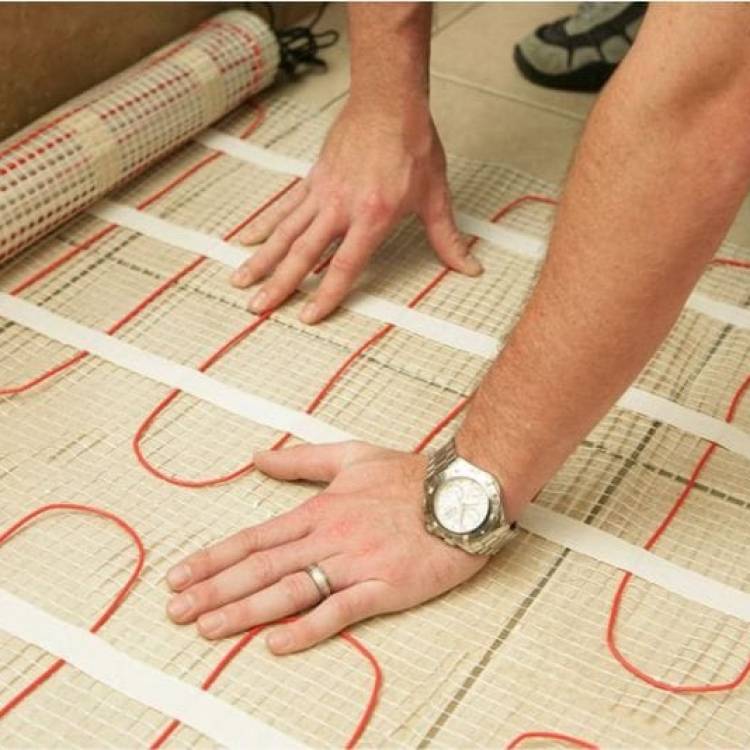
The next step is the laying of heating mats. They are spread on the finished base, and a distance of 100-150 mm is maintained to the nearest walls. It is not recommended to lay them where furniture without legs will stand due to the possible overheating of wooden structures and the electric mats themselves. Mats are fastened with special brackets. Also on sale there are samples with a self-adhesive surface.
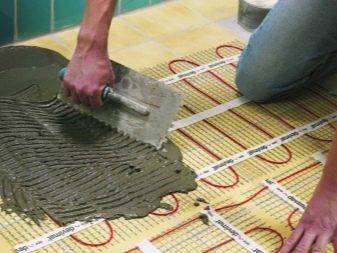
The next step in the installation of an electric underfloor heating under the tiles is the application of tile adhesive. It is applied using a special tool, and its thickness should not be too large. When sinking a warm floor into tile adhesive, make sure that its total thickness, together with the floor covering, is no more than 2-3 centimeters.Do not forget to mount the temperature sensor and lay the wires under it. All wired connections are laid in the thickness of Penofol, where shallow grooves are cut with a knife.
If you do not use Penofol, mount the sensor before laying the heating mats, passing the grooves in the concrete. Lay the connecting wires in the same grooves.
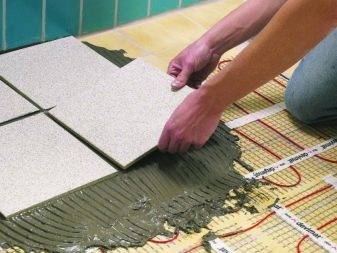
The final stage is the installation of tiles under the electric floor heating. This is done with a special glue. In order to maintain the same distance between the tiles, use special plastic crosses. As soon as the glue hardens, it will be possible to walk on the finished coating without fear of its permission.
Understanding the types of underfloor heating
Installation of underfloor heating under tiles begins with the choice of heating equipment. Some experts and consumers say that it is much more profitable to lay water floors, but this is not always possible. In addition, they have certain disadvantages:
- For laying water pipes, a powerful concrete screed is required - it is poured over the laid pipes, its thickness reaches 70-80 mm;
- Concrete screed creates pressure on subfloors - relevant in multi-storey buildings, where floor slabs are not designed for such loads;
- The water pipe is at risk of failure - this can lead to flooding of neighbors and unnecessary repair costs.
They are more applicable in private households, where it is possible to equip them even at the stage of construction or repair.
Please note that in the event of a breakthrough of water heated floors, you will have to repair not only your apartment, but also someone else's.
Electric underfloor heating for tiles is represented by three main varieties:
- Heating cable is the best option;
- Heating mats - somewhat expensive, but effective;
- Infrared film is not the most reasonable option.
Let's consider the possibility of their use in conjunction with tiles.
Infrared film
When choosing electric underfloor heating for tiles, consumers will certainly get acquainted with infrared film. This film provides heating of floor coverings with the help of infrared radiation, under the influence of which they become warm. But it is not suitable for laying under tiles or porcelain stoneware - a smooth film cannot normally connect with tile adhesive or mortar, which is why the tile simply falls off, if not immediately, but over time.


Also, the electric infrared film will not be able to ensure the connection of the tile adhesive and the main floor, despite the presence of special technological holes. The finished structure turns out to be unreliable and short-lived, it threatens to fall apart piece by piece. We conclude that some other heating equipment is needed under the tiled floor, infrared film is not suitable here.
Heating mats
The aforementioned heating mats provide the ability to mount an electric underfloor heating without a screed under the tiles. They are modular structures, ready for installation work - these are small sections of a strong mesh, on which are fixed segments of the heating cable. We roll it out on a flat surface, apply glue, lay the tiles, let it dry - now everything is ready, you can safely walk on it and put furniture.
Electric underfloor heating for tiles, created on the basis of heating mats, pleases with ease of installation.They do not require a bulky and heavy cement screed, but they are distinguished by their high cost - this is a small minus that you have to put up with. But we can safely mount them on rough surfaces and immediately start laying tiles or porcelain tiles.
heating cable
Underfloor heating under tile is a more standard and cheaper solution than the aforementioned mats. It will please you with warmth and long service life, as well as a low probability of breakage. Electric heated floors of this type are mounted on the basis of three types of cable:
- Single-core is not the most worthy solution. The thing is that this cable format requires connecting wires to two ends at once, and not to one. This is not very convenient and leads to noticeable labor costs;
- Two-core - a more advanced cable for installing an electric underfloor heating under a tile. It is easy to install, as it does not require a ring connection;
- Self-regulating cable - it can be easily cut to almost any length, thanks to the special internal structure, it can automatically adjust the heating temperature.
Using a self-regulating cable for installing an electric underfloor heating under a tile, you get the opportunity to save on electricity. Also, experts and consumers note a more uniform heating, which is difficult to achieve when using heating elements of a different type.
Final conclusions
We can implement electric floor heating under tiles in two ways - using a heating mat or a heating cable.Infrared film is not suitable for our purposes, it is better to use it with a laminate. More precisely, you can use it, but only at your own peril and risk - if you put tiles directly on the film, then no one can guarantee the long service life of such a structure. There is a high probability of its failure in the very near future.
How to choose?
The choice of underfloor heating for tiles depends on the characteristics of the premises and the financial capabilities of the buyer. If you are looking for an inexpensive option, then you can opt for a cable system. Its advantage is that by adjusting the cable laying density, you can select the power depending on the purpose of the room. For example, for a bathroom, it is recommended to choose a floor with a power of 140-150 watts, while for a kitchen, 110-120 watts will be enough. For balconies and other unheated rooms, a power of 150-180 W / sq. m.
A prerequisite for the installation of a cable system is the presence of a screed, which increases the load on the floors and reduces the height of the room. This, in turn, reduces the scope of this type of floors. However, they are well suited for private houses, garages and streets (verandas, gazebos).
According to reviews, the optimal in terms of price and efficiency, when it comes to a warm field for tiles in a bathroom or GVL, is a heating mat. It is easy to mount - the roll is rolled out around the room and attached to the socket, which has a thermostat. The mat is not afraid of exposure to tile adhesive, so additional insulation is not required.
If you want maximum efficiency and “clean” styling, while you are ready to spend a lot of money, choose an infrared floor.It is a smart system with independent temperature control, high heating speed (15-30 minutes) and reliability. If even one unit fails, the rest continue to function.
Laying cable or thermomat
Before starting the installation of a cable underfloor heating, it is necessary to measure the resistance of the cable. The cable is laid with a snake at a distance of a calculated step (at least 10 cm) using a special fastening tape. Sometimes a reinforcing mesh is installed, to which a cable is attached with plastic clamps. Mounting strips with holes can be used to reinforce the cable snake. From the walls you need to retreat up to 20 cm.
When laying a single-core wire, it is necessary to lead its end to the initial installation site, without crossing other turns. In a two-core cable, one wire serves as a heat source, the second closes the circuit, so a coupling is made at the end of the cable. The cable is mounted after preparing the surface, laying thermal insulation (if necessary, waterproofing) and a small layer of concrete screed. Sometimes the cable is laid directly into the concrete screed. The heating surface contour is assembled perpendicular to the wall on which the thermostat is located.
Mesh thermomats consist of a thin cable fixed on a fiberglass mesh. Mats can be installed without prior concrete screed, laying them in tile adhesive, increasing its thickness to 10 cm. Mats with an elastic base can be stretched with a complex configuration of the heating circuit.
 Watch this video on YouTube
Heating mats are laid easier than the cable method: there is no need to calculate the pitch between the turns, the cable bend is excluded. Nevertheless, you need to know how to properly lay a warm floor under the tiles in this way. The mats must be attached to the thermal insulation layer with adhesive tape, keeping the distance between the heating fragments up to 10 cm and retreating about 20 cm from the wall. When making turns, the mats can be cut without touching the cable and perform the necessary turns. After installation, the electrical system must be checked for resistance.
Do-it-yourself installation of a cable underfloor heating under a tile
When choosing this type of heating system, two aspects are important - the correct laying of the cable itself (taking into account the intensity of its heating, the location of massive furnishings) and the correct filling of the screed. Finishing work is carried out according to standard rules, we will not dwell on the nuances of laying tiles here.
The preparation of the floor is carried out in the same way as with the installation of a conventional screed - the partially destroyed and lost strength of the old coating, fragments of the old screed must be removed, all debris and dust are removed. Taking into account the fact that a cable will be laid in the screed, it is necessary to take the waterproofing of the ceiling (subfloor) as carefully as possible and perform thermal insulation under the screed.
Next, the cable laying scheme is determined. The choice depends on the area of \u200b\u200bthe room, the number of individual pieces of wire, its type (single or two-core). Below are some popular schemes.
When choosing a scheme, be sure to take into account the position of furniture that is heavy and tightly attached to the floor, as well as sanitary equipment (if we are talking about a bathroom, toilet or combined bathroom).
The laying spacing (h) is determined based on the total laying area and the required level of heat transfer. Let's say for a bathroom with a total area of 8 sq.m. the laying area will be (minus the dimensions of the shower stall, sink, toilet bowl and washing machine) 4 sq.m. The level of comfortable floor heating requires at least 140…150 W/sq.m. (see table above), and this figure refers to the WHOLE area of the room. Accordingly, when the laying area is halved compared to the total area, 280 ... 300 W / m.kv are required


Next, you need to take into account the heat transfer coefficient of the screed (for ceramic tiles, as mentioned earlier, it may not be taken into account)
If we take an ordinary mortar (cement-sand) with a coefficient of 0.76, about 400 W are required for each square meter to obtain a heat amount of 300 W of initial heating.
Taking the data from the table above, we get a wire length of 91 m (total power 1665 ... 1820 W) for all 4 sq.m. styling. In this case, the laying step is chosen at least 5 ... 10 cable diameters, the first turns are located at least 5 cm from vertical surfaces. You can approximately calculate the laying step using the formula
H=S*100/L,
Where S is the laying area (namely, laying, not premises!); L is the length of the wire.
With the selected parameters
H=4*100/91=4.39cm
Given the need for indentation from the walls, you can take 4 cm.
When planning the installation, it is important to follow the following rules:
- no loops or twists! The cable should not be laid in loops, it is possible to connect individual fragments only with the help of special terminals;
- it is unacceptable to connect the "warm floor" to the house electrical network directly, exclusively through a special regulator (usually included in the delivery);
- to extend the life of the system, protect it from power surges (stabilizers, fuses) and follow the installation technique recommended by the manufacturer.
The sequence of work is as follows:
- the primary layer of the screed is poured, a strobe is made in the material for laying a channel - supplying a cable to the thermostat, usually the supply is made in a corrugated tube;
- on it (after complete curing, of course) thermal insulation is mounted with a heat-reflecting layer;
- cable laying with a reinforcing mesh or tape in compliance with the planned step;
- cable outlet to the thermostat;
- pouring the top layer of the screed (3 ... 4 cm). Connecting the cable to the mains is only permissible after the screed has completely cured.
Unfortunately, if the cable is incorrectly installed or damaged, an error can be detected only when you try to turn it on, therefore, for repairs, you will have to open and redo the screed. Therefore, the masters recommend checking the cable's performance throughout its entire length (including connections and external control devices) before pouring the mixture.