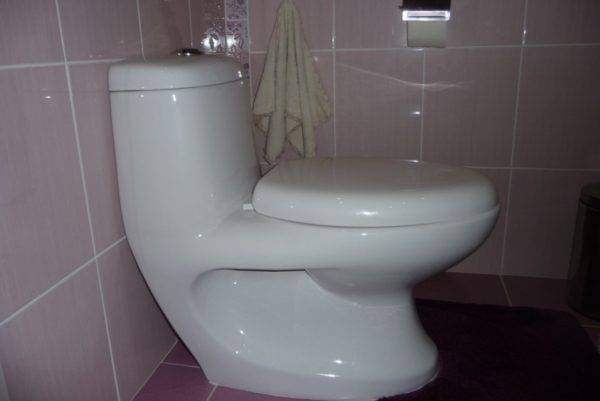
![[instruction] do-it-yourself toilet installation | video](https://fix.housecope.com/wp-content/uploads/e/0/5/e05c3aaa569c15a65a76abf551b1139c.jpg)
- Recommendations for choosing a model
- Features of connecting models "monoblock" and "compact"
- Required Tools
- Connecting the toilet to the sewer
- Toilet close to the wall
- Preparatory work for installation
- Self-installation of plumbing "step by step"
- We fix on the floor: 3 types of fasteners
- Fixing the toilet to the wall
- Types of sealing products
- Seal form
- Material
- How to choose
- Helpful Tips
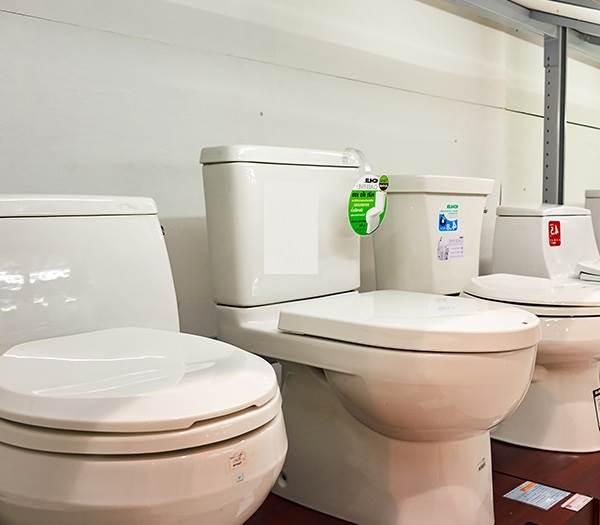
- Choosing a new toilet
- Are there other fixings for the toilet bowl?
- Method No1. Dowel fixing
- Preparatory stage for installing a toilet
- Water floors.
- Conclusions and useful video on the topic
Recommendations for choosing a model
On the modern market there is a wide selection of both domestic and foreign toilet bowls. Our models are cheaper because the price does not include shipping costs and customs duties. The main parameters to consider when choosing are:
- The quality of the bowl. In order for the toilet to be comfortable to use, it must have a good flush. And for this, the bowl must be covered with high-quality glaze - if it is porous, then the dirt will constantly accumulate and you will have to use the brush more often.
- Tank filling speed.The toilet bowl should have modern shut-off valves, then if several people live in the house, it will not be necessary to wait long for the drain to recover after visiting the toilet by other people.
-
Economy mode available. Since now almost all apartments are equipped with water meters, in order to reduce its consumption, it is necessary to purchase models with a double button. In this case, it is possible to perform a full or economical drain.
- Bowl shape. It can be different: round, oval, square, so if possible, it is better to sit on the toilet and practically evaluate its comfort.
-
Material type. Usually, porcelain or faience is used to make toilet bowls. Porcelain products are of higher quality, but their price is higher. Outwardly, it is almost impossible to distinguish porcelain from faience, so it is necessary to study the product documentation. Now you can buy metal, glass models, toilet bowls made of reinforced plastic, natural or artificial stone.
-
Cover quality. It should be rigid, made of Duroplast and have an antibacterial coating. You should not buy a foam cover, as it will be a breeding ground for germs. It is convenient when the lid is equipped with a microlift. It ensures its smooth closing, which occurs without noise and impact.
- Additional functions. Now many manufacturers equip their products with various options, but keep in mind that this increases the cost of the device. Before purchasing such a model, consider whether you need lighting, music from the toilet, or seat heating.
When choosing a toilet bowl, you need to optimally combine your desires and financial capabilities.You can either sacrifice some points and choose a more budget model, or buy a device with additional features.
Features of connecting models "monoblock" and "compact"
The difference between the toilet bowls "compact" and "monoblock" is the type of attachment of the drain tank. If in the first case the tank is attached directly to the shelf located on the bowl, then in the second case the bowl and the tank are made in a single body.
In the "monoblock" toilet bowl, the bowl and the tank are made in a single body
Both types of toilets are mounted on the floor, and the way they are connected to the sewer will depend on the type of descent. Installation is carried out in the same way as shown above. The only difference is that for the "compact" it is necessary to independently install and adjust the shut-off valves, while for the "monoblock" it is already assembled and adjusted by the manufacturer.
Required Tools
Self-installation of the unit does not involve a lot of time or money for preparation, however, it is important to purchase the necessary consumables:
- flexible corrugated cuff (or plastic fan pipe) for connection to the sewerage system
- bendable hose for connecting the tank and the water pipe

Tools and accessories
Directly for installation and fastening you will need:
- Industrial hammer drill (another possible option is an impact drill)
- Drill (for making holes)
- Screwdriver Set
- Adjustable and open end wrenches
- Spear drill for tile work
- Yardstick
- Building level (preferably water)
- Hammer and chisel
- Marker or pencil
- Metallized tape
- FUM tape
- Sealant (preferably silicone)
- cement mortar
Do-it-yourself laminate on a wooden floor: a complete description of the process. Laying schemes, what materials should be used (Photo & Video) + Reviews
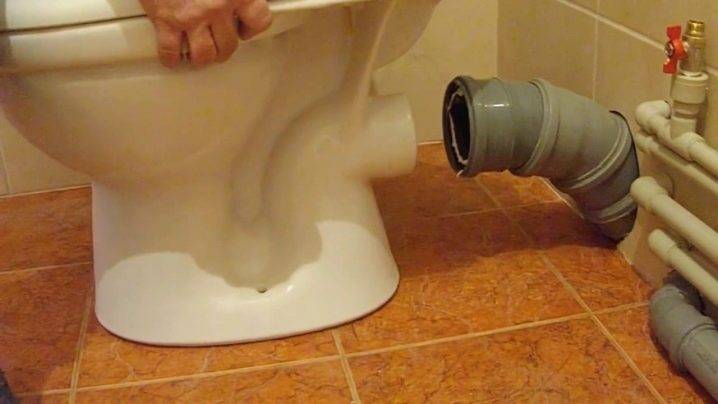
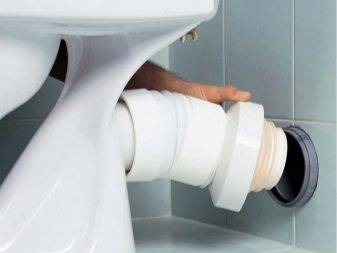
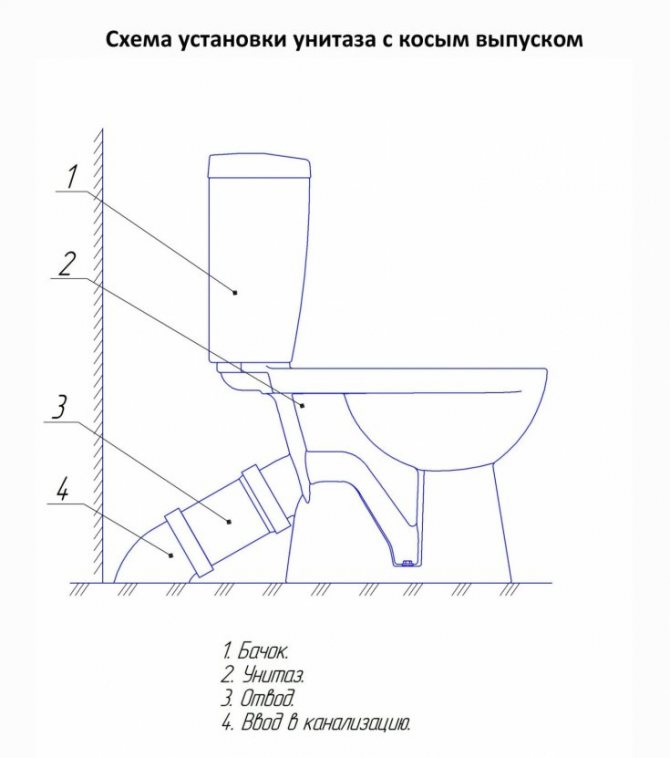
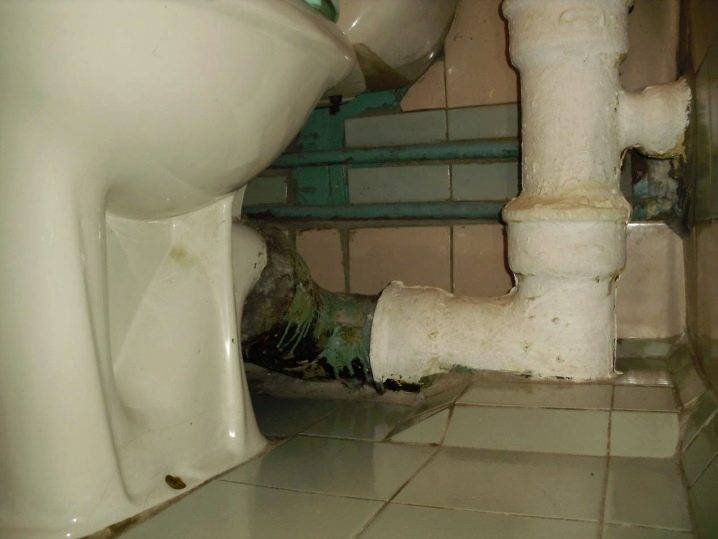
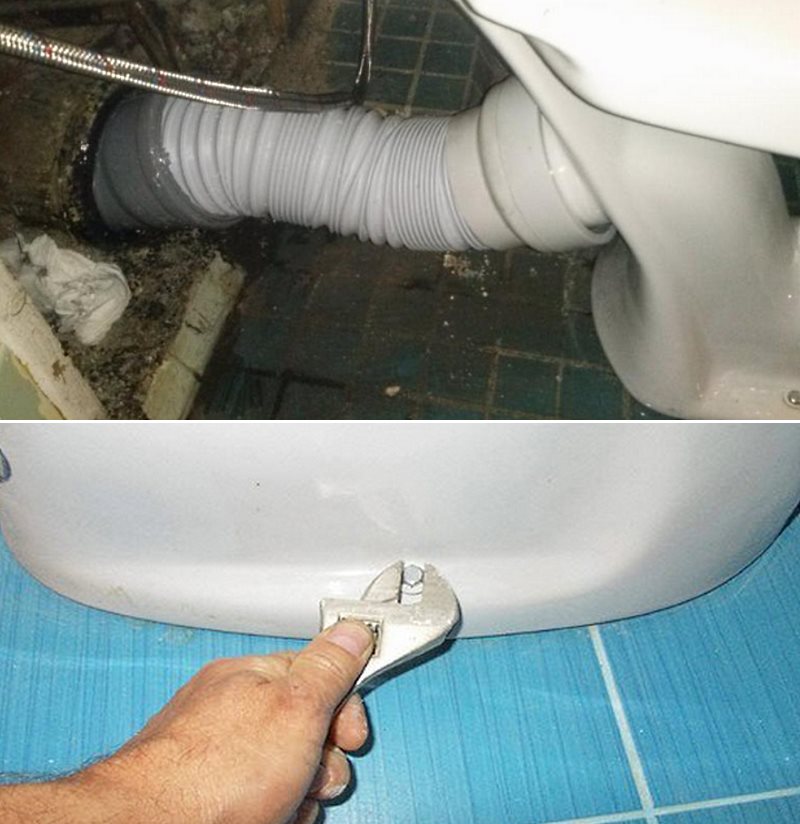
Connecting the toilet to the sewer
The main types of fittings for connecting toilets to the sewer are rubber cuffs, special corrugated pipes with a rigid part, various connecting pipes and bends:
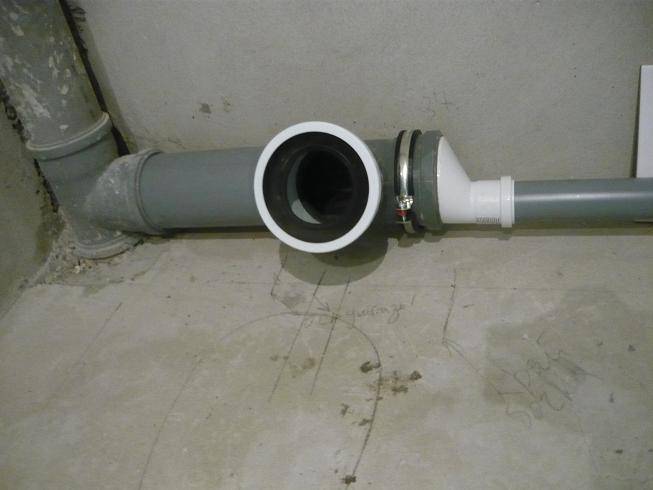
Cuff for connecting toilet bowls - a rubber product, at one end clasping the toilet outlet pipe, and at the other end placed in a 110 mm sewer funnel. The release of toilet bowls is not always coaxial with the sockets of the sewer pipes, and this is taken into account: the cuff can be taken both straight and eccentric (with a shift of the axes by 10-40 mm). The cuff is not considered the best method of connection, since it is not only elastic, but also soft, and often wrinkled in the sockets, which leads to a violation of the tightness of the connection.

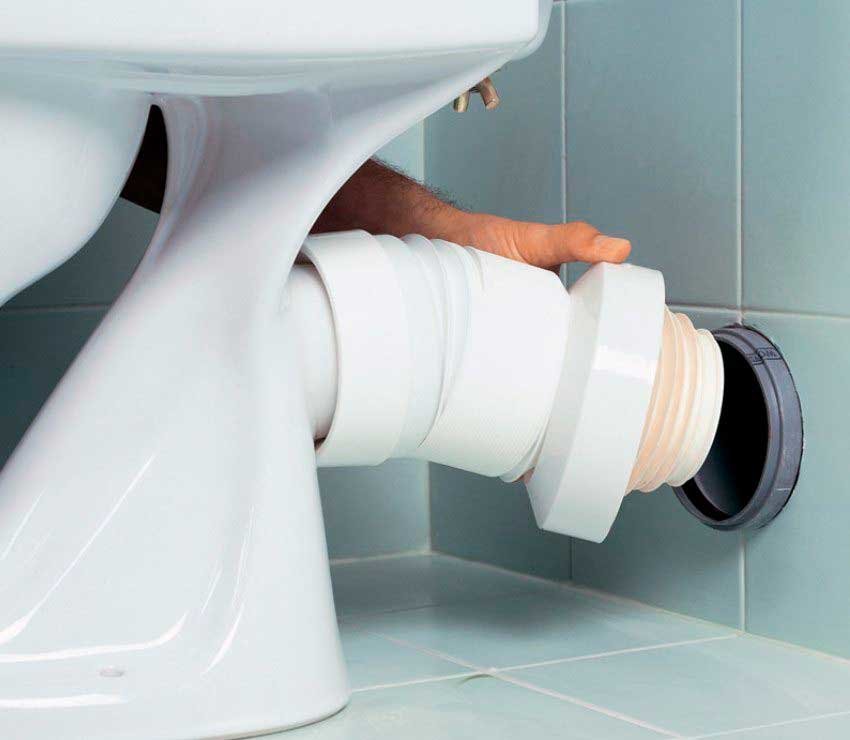
Corrugated pipes for toilet connections have rigid parts with rubber rings to connect to the toilet outlet pipe and smooth pipes 110 to fit the outlet into a standard sewer funnel. The middle is made of a corrugated pipe, compressible, stretchable and able to take on almost any configuration. But with all the convenience and simplicity of such a connection: corrugation in plumbing is a sign of “lazy and bad taste”, since nothing collects dirt like such products. Clogged corrugated pipes are not uncommon, and they wear out faster, and leaks in the toilet connections are an extremely unpleasant situation. Professional plumbers do not advise corrugated connections "for a long time".For a temporary scheme, this is cheap and practical, but for a comfortable bathroom with good plumbing and interior, it is completely unacceptable.

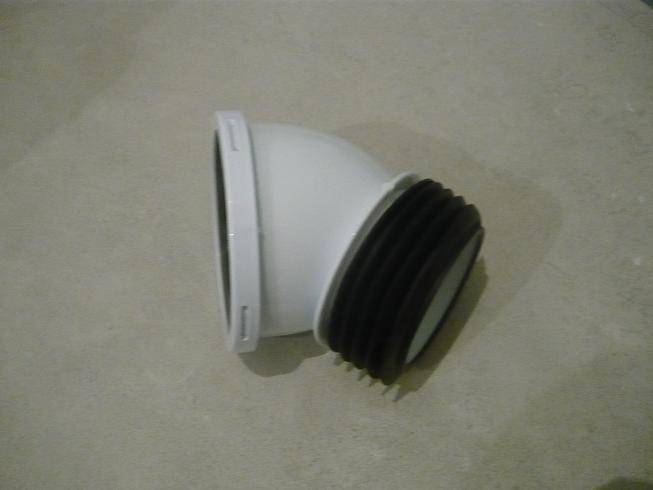
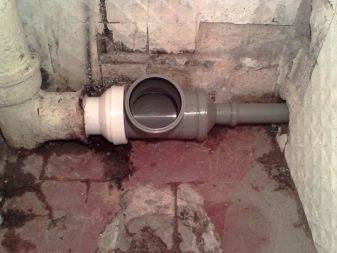
Straight connecting pipe for a toilet bowl - designed for standard connection 110. One end of the pipe is equipped with a cuff for hermetic connection to the outlet-pipe of the toilet bowl, and the other side is an ordinary smooth pipe with a chamfer for a standard pipe socket. Pipe lengths - 15; 25; 40 cm. spigot connection – the most practical and and performed when possible. But it is only suitable for a toilet with a straight or inclined outlet.

For straight and inclined outlets of toilet bowls, eccentric connecting pipes are suitable (they have an axial offset). By design, these products do not differ from straight pipes, but the axis of the coupling connected to the outlet and the pipe itself is shifted by about 1.5 cm. The lengths are 15.5 cm and 25.5 cm. moreover, if the socket comes out of the floor of the bathroom, a special connecting pipe is designed at an angle of 90 degrees, with a standard length of 23 cm. A similar pipe, only bent at an angle of 45 degrees and 13.5 cm long, is suitable for connecting to the toilet sewer socket with a direct outlet. Connecting outlets 22.5 degrees are similar in design, have lengths of 15 and 36 cm, are used for toilet bowls with straight and inclined outlets.
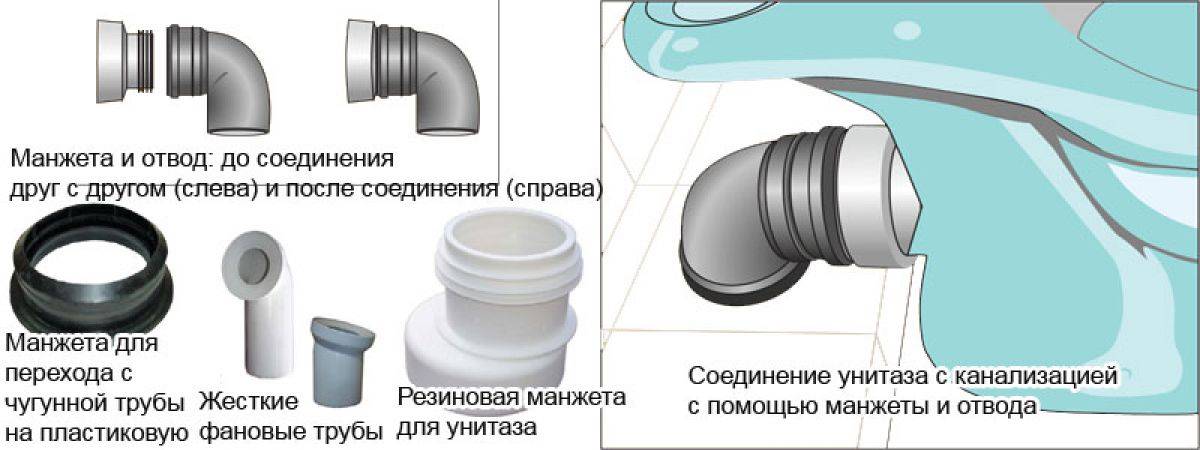
The fitting for connecting the toilet to the sewer is not the element on which it makes sense to save, and it is much more practical to purchase this fitting from a trusted manufacturer, with a quality guarantee.Even toilet pipes are produced by reputable companies in elite colors of beige, cameo or snow white, and the visible part of the sewer inlet will not spoil even the most sophisticated toilet interiors.

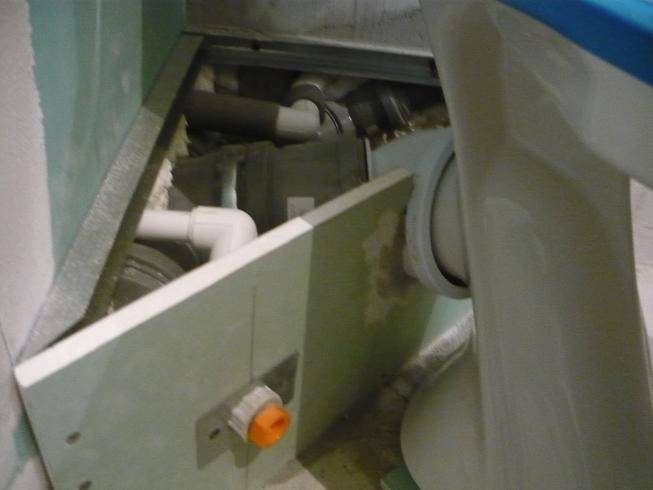
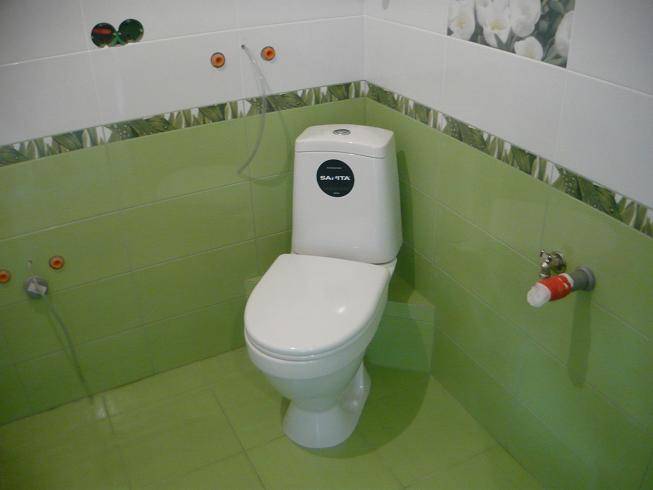
Toilet close to the wall
By this is meant the closest location of the tank to the wall. By the way, there is no need to make the tank
touched the back wall. More practical for washing and maintenance will be a small gap of 5-10 cm between the tank and
wall.
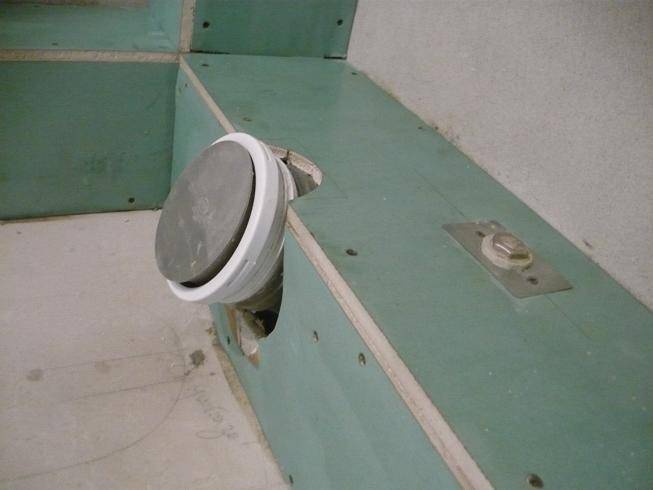
To implement this solution when distributing sewerage, the drain riser should be located as close as possible to
wall if possible. This applies to both vertical risers and horizontal outlets.
∅110 mm.
If the pipes are planned to be sewn up with a drywall box and tiled, the thickness of the plasterboard and the tile with
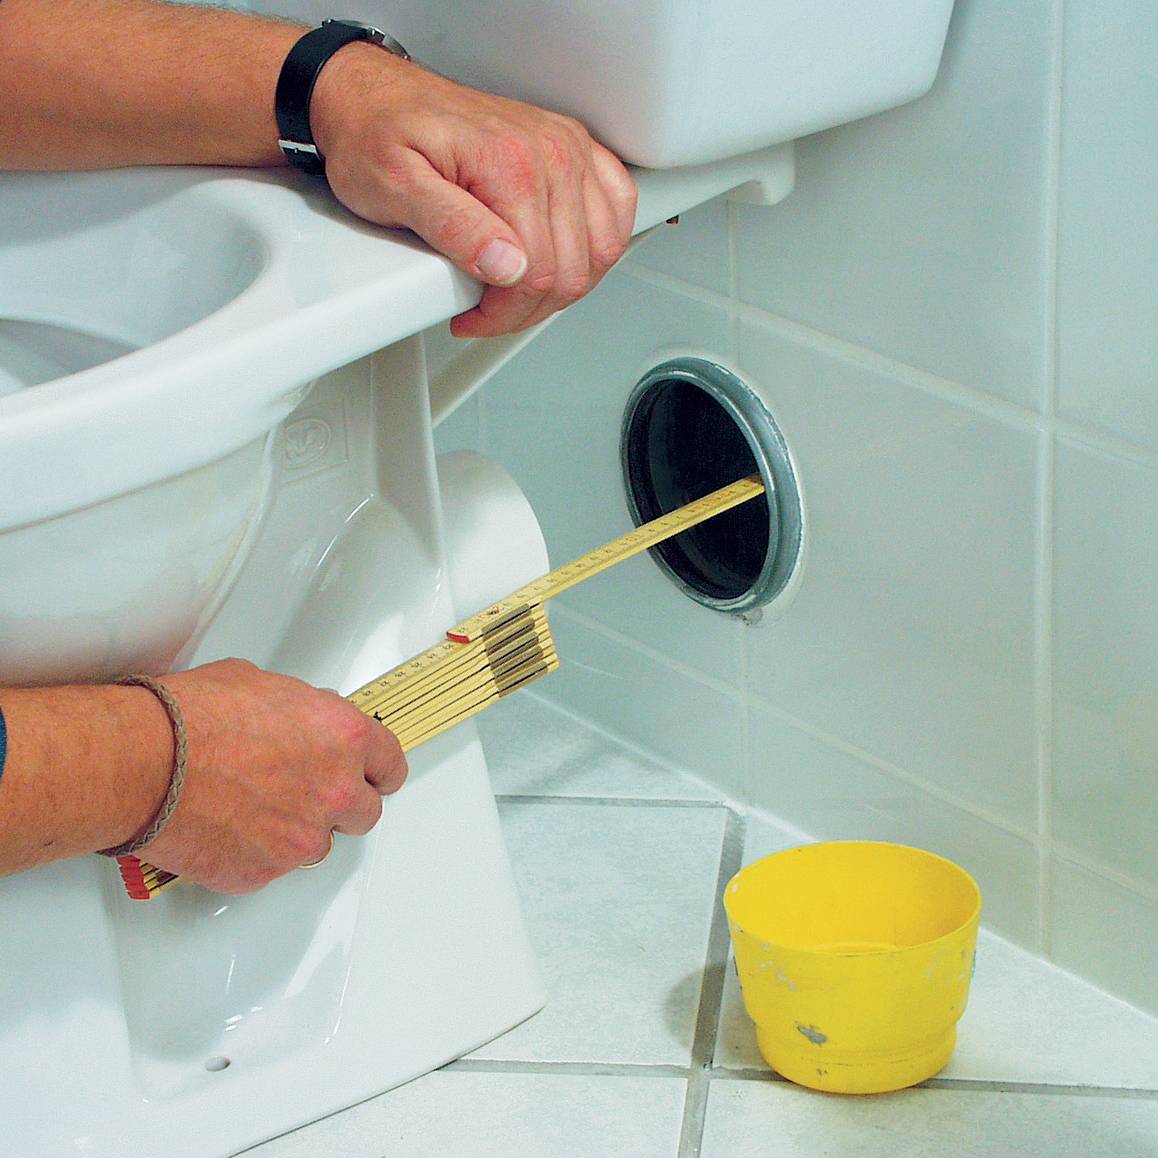
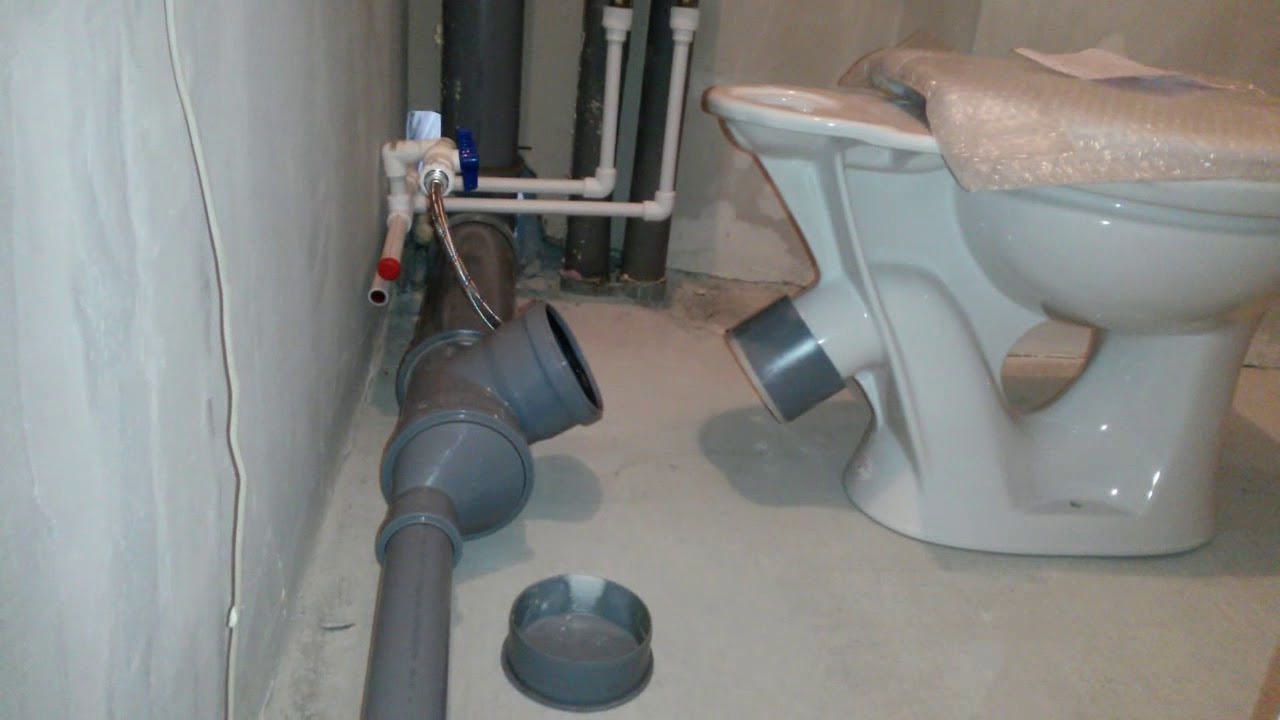
glue. During the installation of the sewer, it is necessary to use the future toilet for fitting on site. During the fitting
the fan pipe can be cut to the estimated length, but it is better to make a few centimeters of margin so as not to
make a mistake. It is better to shorten the pipe several times than to cut too much and buy a new one.

When trying on the toilet bowl and putting the sewer in the right position, you should not forget about the general slope
sewer pipes in the direction of water drainage in 2-4%.

And this is a fitting of a bowl with a direct outlet and installation using a 45 degree corner fan pipe. To take into account the thickness of the floor tiles
with glue, the sole is placed on a small piece of drywall.
I especially singled out the supply of the length of the fan pipe, also due to the fact that when communications are installed, as a rule,
no tiles on the floor yet. Therefore, floor tiles and adhesive thickness should also be taken into account.


If communications are planned to be sewn up with a box, you should also take into account the height of the box with tiles so that the toilet
I didn’t hook it with a part above the outlet where the tank is attached. When the pipes are exposed, the toilet is removed, all the boxes
assembled according to plan.
That's actually all I wanted to talk about connecting the toilet with a fan pipe. And finally
a few photos from the corner installation.


In the following publications, we will definitely consider the installation of the installation.
Rate this post:
- Currently 4.54
Rating: 4.5 (24 votes)
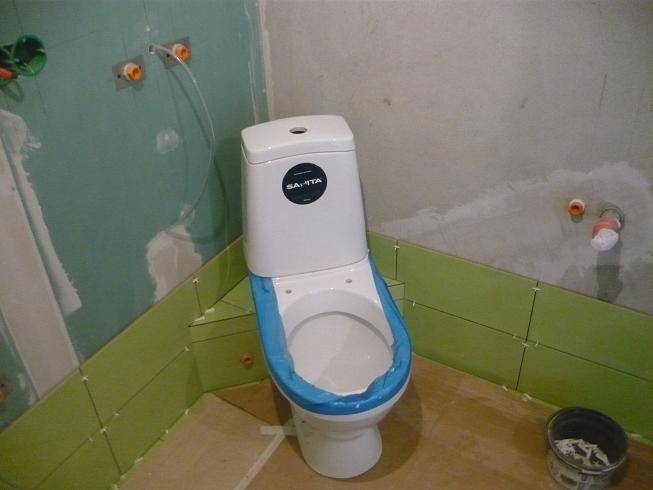
Preparatory work for installation
Regardless of what will cover the floor (tile or regular screed), you need to wait for the mixture to dry on the floor surface. This will take approximately a week. This is due to the fact that the toilet bowl is fixed by means of fasteners and dowels, under which a reliable and solid base is required. In this situation, a hardened solution will act as a similar base.
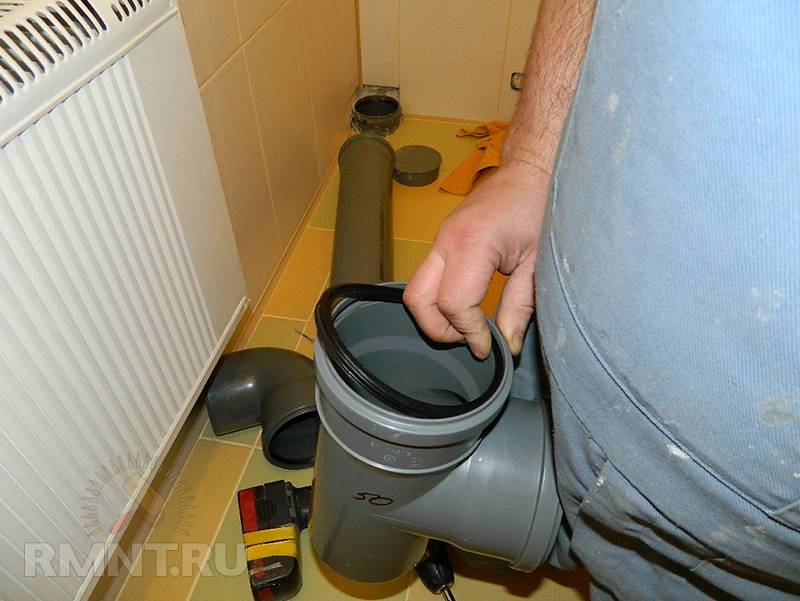
The next step is to prepare those involved in the communication installation process. The area where the drain will be connected must be cleaned in advance of various contaminants and salt deposits. Otherwise, it will not work to connect the toilet to the sewer riser as needed. That is, the corner or corrugation in the outlet cup will not sit tightly, and a leak will definitely appear.
Even at the point of connection of the drain tank, a tap should be installed so that it is possible to carry out repair and cleaning work with incomplete shutdown of water.
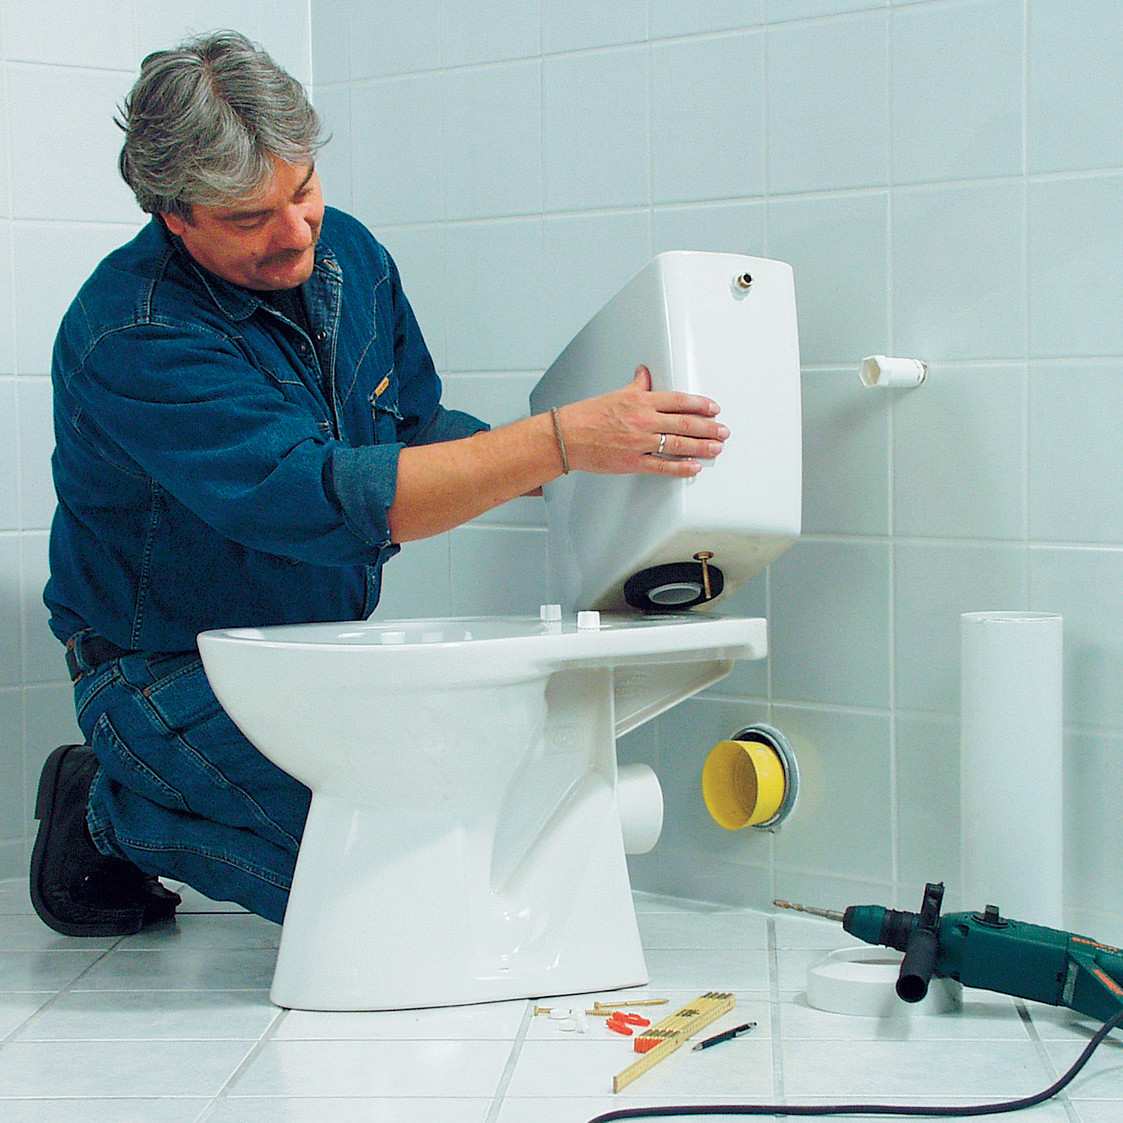
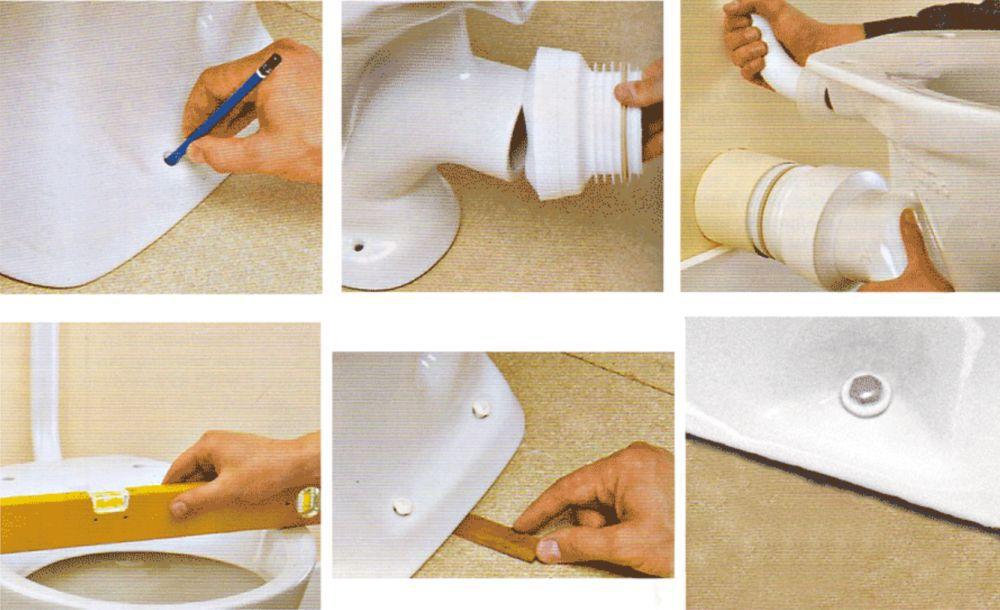
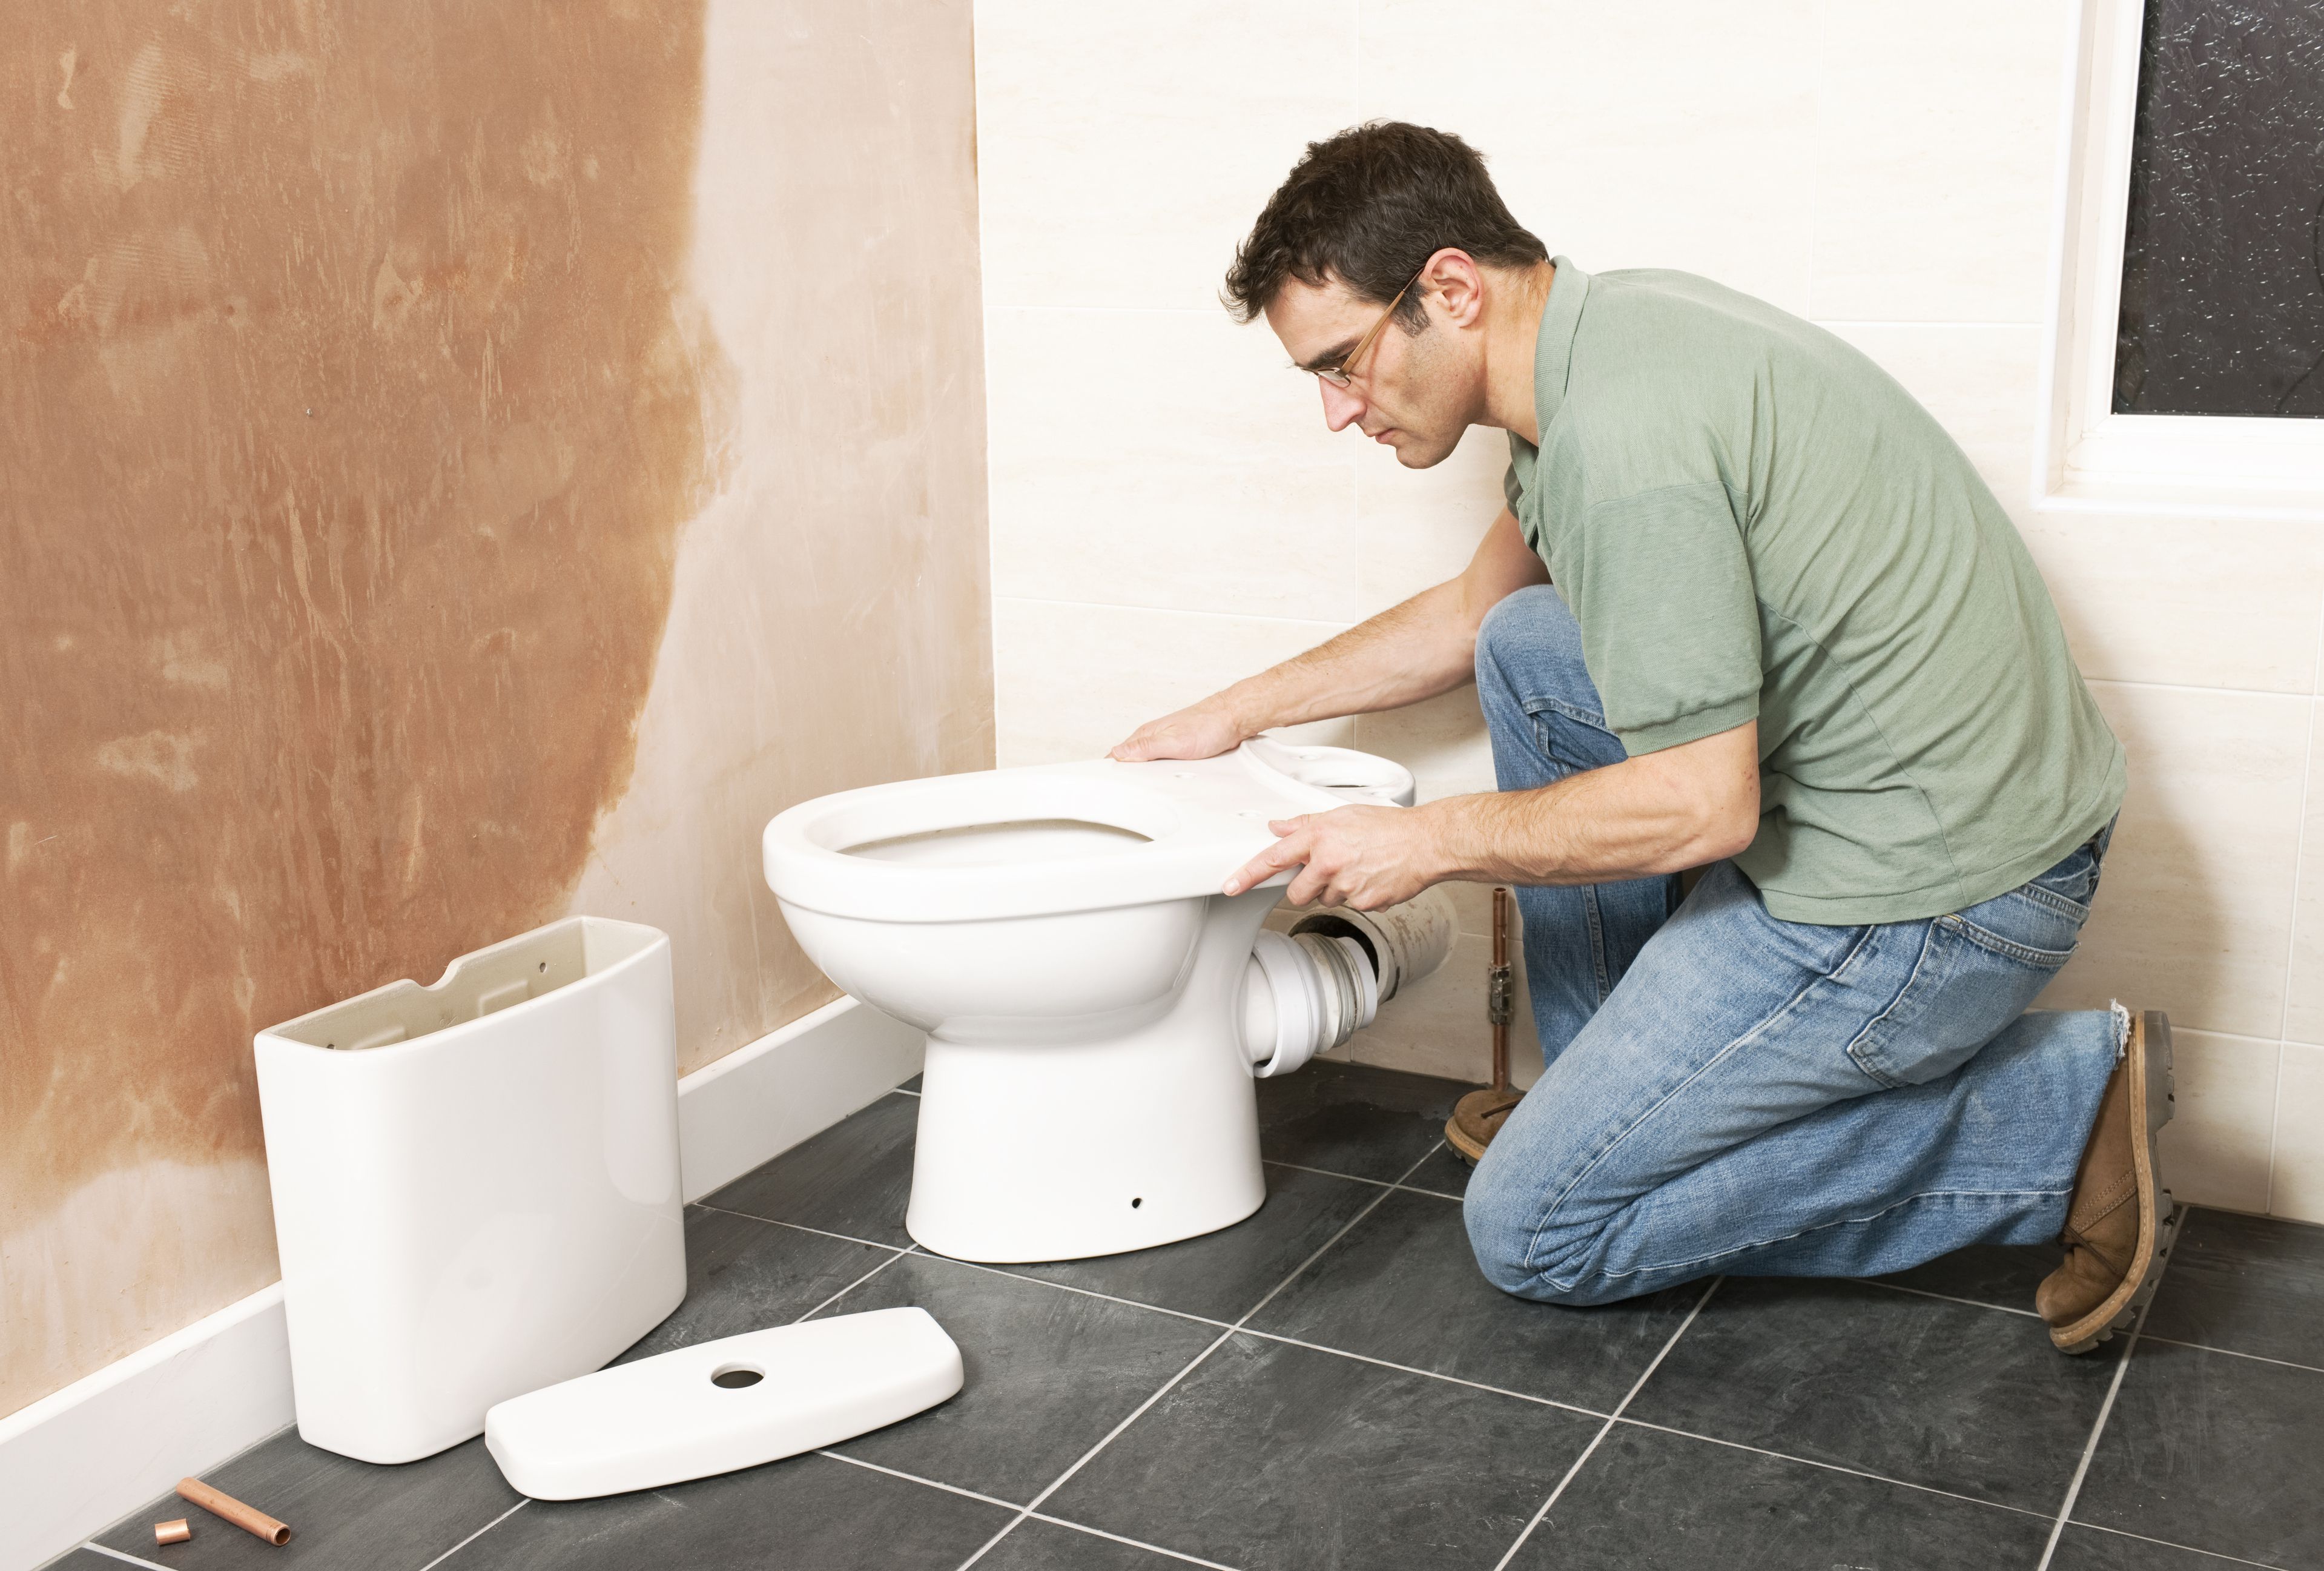
Self-installation of plumbing "step by step"
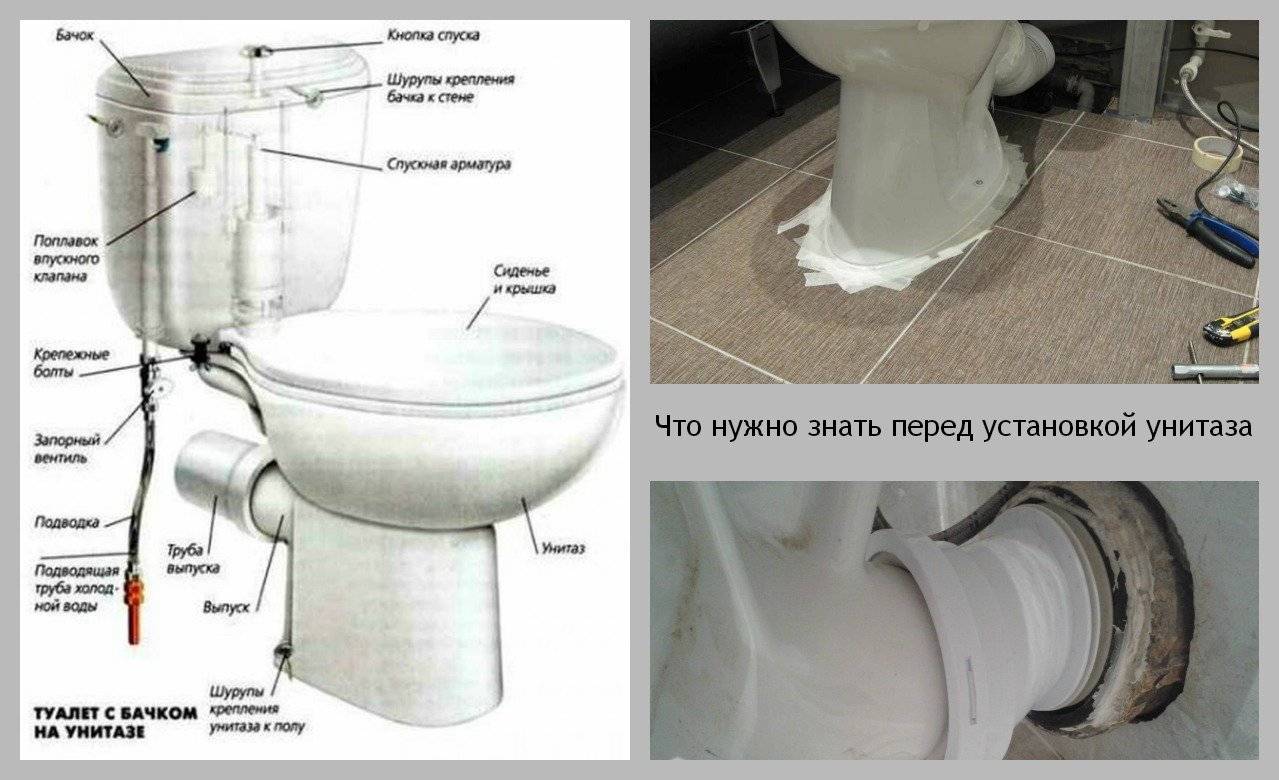
The toilet bowl for normal operation needs a flat, lined or specially prepared surface of the walls and floor.
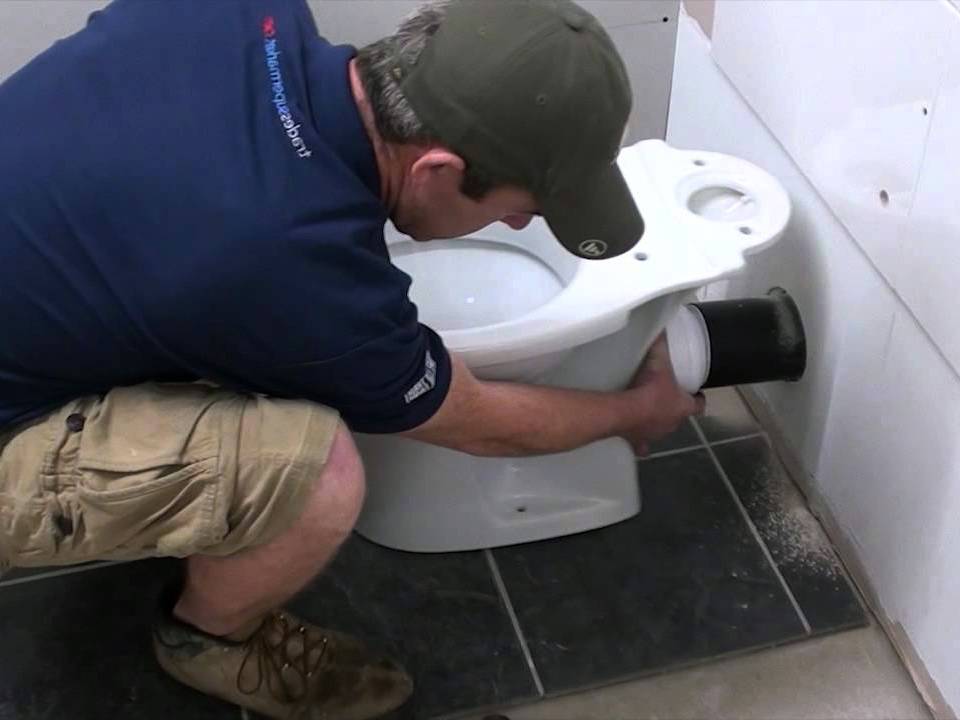
First, we connect the drain of the toilet bowl with the help of a corrugation to the outlet of the sewer pipe-riser. You can also use a hard tube. The best option is if the toilet drain enters the riser without extension corrugations, etc. To seal the drain, we use a ring with a rubber border
It is important to consider that rubber does not tolerate cement and similar coatings on its surface. But the sealant is quite suitable.
To enter water, you need a flexible long enough hose connecting the tap that supplies liquid from the water supply to the tank of your plumbing
Pay attention to both inlet diameters to match the hose with two matching fittings
Obviously, there is no way to screw a 3/4” thread onto a 1/8” pipe.
If the drain is securely connected, you can begin to fix the plumbing.
We fix on the floor: 3 types of fasteners
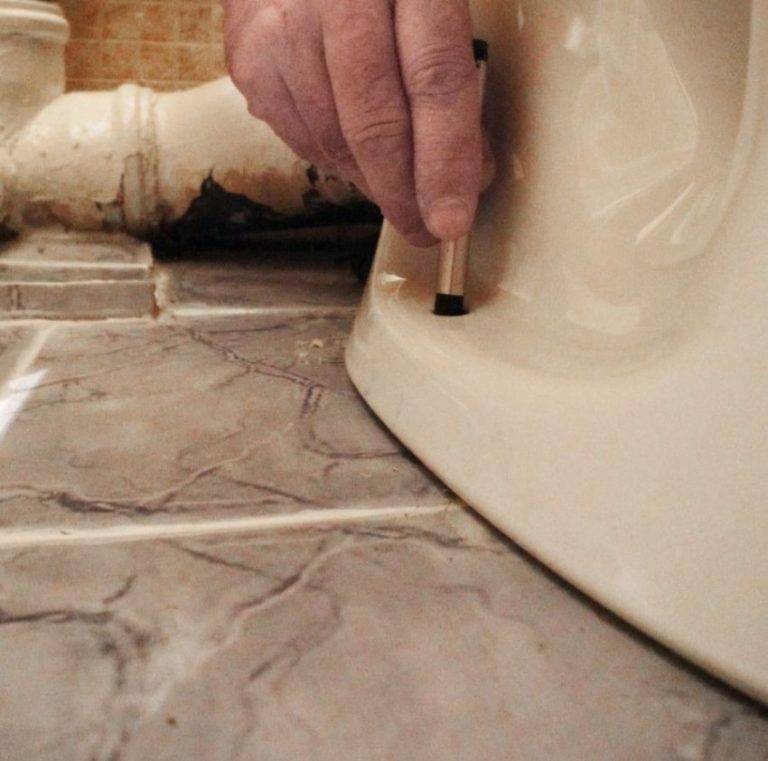
- The first option for floor installation is anchors embedded in the screed. During the pouring of the floor, long anchors are fixed at the place where the toilet bowl and its fasteners will be located. After the screed dries and the floor is finished, a toilet bowl is attached to the anchor. This is the most difficult method of fastening, since it is difficult to install the anchors so evenly that the toilet stands on them without problems. It often happens that inexperienced builders choose too short anchors, on which it is then impossible to screw nuts. The anchor embedded in the floor must be at least 7 cm above the finish surface in order to screw the toilet to it. Gaskets are required under all nuts so that the surface of the toilet does not crack.
-
The second option for securely fixing the toilet bowl on the surface during the overhaul of the toilet is installation on a wooden base. The main thing is that the board strictly matches the size of the base of the toilet bowl. When pouring the floor, the board is prepared by hammering nails into it. Then it is laid in the solution with nails down. After the screed has dried and the room has been finished, the toilet bowl, previously planted on a layer of epoxy resin, is screwed to the board using ordinary screws. Under them, rubber or polymer gaskets are also needed.
-
Fastening to the floor when anchors and board are not provided. To install plumbing on a finished surface, say, on a tile, it is convenient to use dowels. The toilet is placed in the place where it needs to be installed. Attachment points are marked on the floor. Then they need to be drilled deep enough, but without hitting the waterproofing layer in the screed. Before installing the toilet, you need to increase the reliability of the installation with epoxy / sealant. It would be nice to pour a drop of sealant into the holes drilled for the screws. On an epoxy pillow, the toilet will stand like a glove. Screw caps are also needed.
You can fix the toilet with a wall tank without screws, for one resin. True, with this method of fastening, it is first necessary to clean the surface of the tile so that the glue holds better.
When using "epoxy" it is important to allow freshly installed plumbing to dry properly and gain a foothold on the floor surface
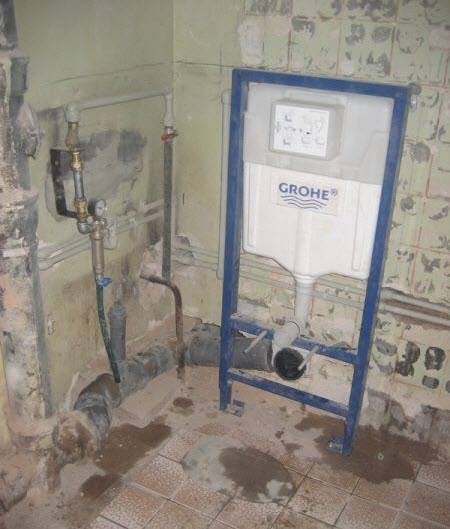
Fixing the toilet to the wall
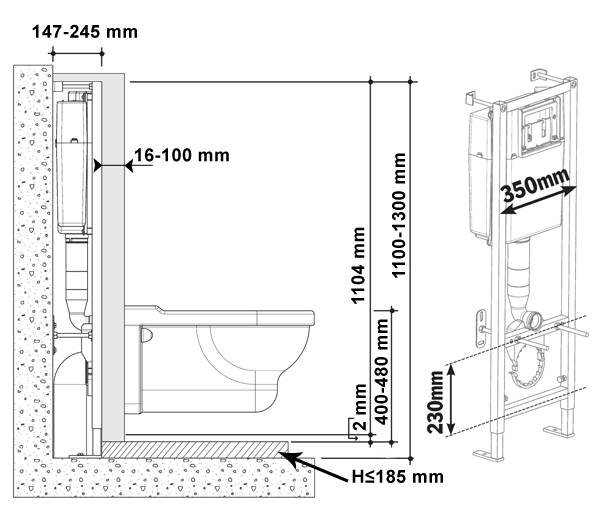
How to install the installation
Wall hung toilets are being used more and more. Their installation is not much more complicated than usual (by the way, you can read about installing a toilet bowl with your own hands on our website).A wall-mounted toilet, as its name implies, will not have contact with the floor surface. It is suspended using a metal frame, which is attached to the load-bearing wall itself. The cistern and pipes of the toilet in this case are behind a false plasterboard wall. If the mounted plumbing has an open tank, then it will be possible to fix it on the wall itself, but then the sewer pipe should be inside the wall. The same anchors embedded in the wall or in the supporting frame will hold the structure.

Installing a toilet on a pedestal
After fixing the toilet bowl on the wall or on the floor, it remains only to assemble the toilet bowl. A tank is placed on the base, already securely fixed, or a pipe is connected to it from a tank hung on the wall.
Installing a toilet on a pedestal
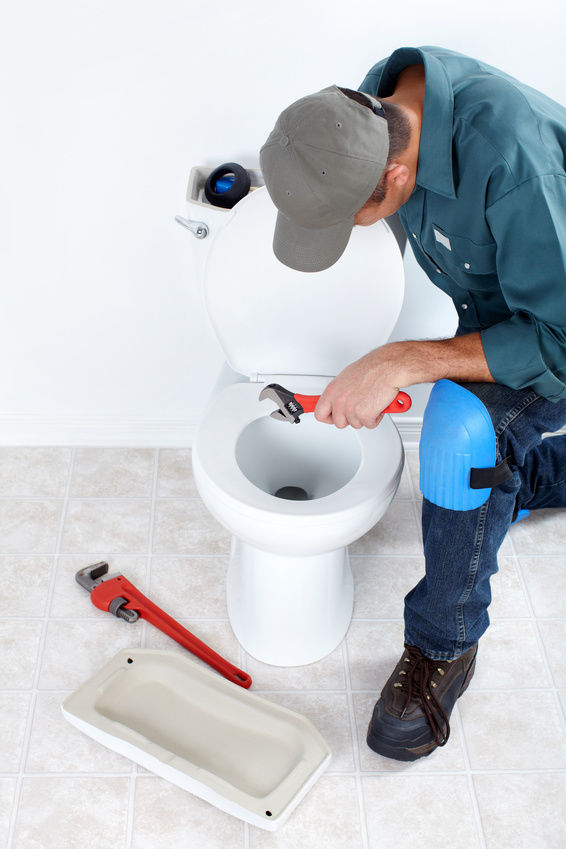
It remains only to check if the toilet is working, and if there are any leaks. Turn on cold water, wait until the tank is filled, adjusting the filling level. We set up the locking mechanism according to the instructions. Rinse and see if it flows from the drain.
The last step is to screw the toilet seat. But here you, for sure, can already handle it yourself.


Types of sealing products
Known types of sealing products differ both in their configuration and in size and material from which they are made. Each of these features has its own characteristics.
Seal form
In accordance with this feature, cuffs for toilet bowls are divided into the following groups:
- oval, resembling a regular ring;
- trapezoidal seals;
- cone products;
- gaskets of complex multi-circuit configuration.
O-rings for toilet bowls are the most common type of cuffs used to articulate the bowl and tank.
They are used in most classic old-style designs. In modern models, gaskets of a more complex shape, resembling a truncated cone, are usually installed.
Recently, trapezoidal seals have become increasingly common in foreign-made products, resembling a triangle with cut-off corners.
In addition to the shape of the cuffs, all of them are characterized by another important property that determines the performance characteristics of the product. It involves classification according to the type of material used in the manufacturing process.
Material
On this basis, all known samples of seals are divided into the following types:
- elastic cuffs, belonging to the category of the most popular and cheapest products;
- silicone blanks, characterized by increased elasticity and higher cost;
- polyurethane seals, which are the most expensive in their class.
Rubber cuffs are easy to manufacture and have a relatively low price. You have to pay for this with poor wear resistance and the need for frequent replacement. In contrast, expensive polyurethane products are very elastic, retain their shape well and have a long service life.
How to choose
As it is not paradoxical, but the correct installation of a toilet bowl begins with its correct choice.When choosing a toilet bowl, one should first of all proceed from what is in the toilet room - how the sewer pipe is connected, what footage, where the pipes with water are located for supplying to the tank, what is the floor, the structure will be mounted on a ready-made tiled surface tiles or not, what is the total footage of the room and many other nuances.
No matter how much you would like to install a smart toilet in the apartment with lighting, heating and music, “floating up” directly from the wall, not touching the floor and devoid of all visible signs of a drain tank, except for a button - do this in one and a half meters of a typical toilet of an ordinary apartment, often resting on elevator shaft, will be either very problematic and expensive, or simply impossible.
Therefore, the most important thing in choosing a toilet bowl is the practical ability to quickly and reliably install it in the room intended for it. All other points depend solely on your own preferences and budget.
Helpful Tips
Before installing and before purchasing a toilet, you should familiarize yourself with the recommendations of experienced plumbers.
By following some rules, many problems can be avoided.
The first thing experts advise to pay attention to is the type of drain
This is especially important if the sewer supply will not change.
With the help of adapters, it is especially difficult to make a high-quality connection of a toilet bowl with an inappropriate type of sewer outlet.
Do not postpone the purchase of plumbing at the last moment, as well as purchase it after repair. It is better if the place in the toilet room is prepared for a specific toilet model in advance.
This will simplify the installation of plumbing.
- You should refuse to save on bolts and anchors.It is better to choose nickel-plated fasteners. They don't rust. This will save the product in the future from ugly streaks, as well as sticking of bolts.
- An eccentric cuff, which is called a corrugation, will help compensate for the difference in floor height before and after repair. To supply water to the tank, it is better to use a flexible hose.
- In the case when the sewer pipe leaves through the floor, it is worth using a rectangular elbow or a flexible corrugated cuff.
Plumbers recommend using small wedges made of wood or plastic. However, with them it is also necessary to use a sealant to evenly distribute the weight of the toilet bowl. When installing a toilet bowl on old cast iron, it is better to use a sealant.
If the water supply is old, it should definitely be replaced. When choosing an eyeliner, you need to know the distance from the junctions on the pipe with water to the attachment to the toilet bowl. Then you need to replace the old flexible water supply. And 15 - 20 cm should also be added to it. Adapters for threads at the joints or FUM tape should be purchased in advance.
To do this, make marks in the right places. A self-tapping screw is attached to them and hit with a hammer several times. After that, you can drill a tile with a puncher or drill, but only without shock mode.


If the sewer riser is made of cast iron, it must be cleaned to metal, then thoroughly washed and dried. After that, a sealant is applied to a dry and clean metal surface. And you need to put it down a little more. After that, it must be connected to the corrugation.
You can also apply sealant to the outer part of the joint.
- In order to easily and without damage remove the corrugation connecting the toilet bowl and the sewer, its exit and the outlet of the toilet bowl are lubricated with wet soap. And only after this procedure is put on a sewer socket.
- Before you make marks with a marker through the holes in the sole of the bowl, you need to sit on it and check how comfortable it is. If necessary, you need to immediately correct the position.
- Do not use plastic dowels that come with toilet bowls. They break quickly, so it is better to give preference to other fasteners.
An additional insert in an old cast-iron sewer pipe can be removed with a perforator or burned out. Under no circumstances should a hammer be used. It is possible to burn out if the cavity was filled with sulfur or clogged with a cable. Before burning it is necessary to take care of sufficient ventilation of the room, remove all flammable means and materials.
When installing a toilet bowl on glue, you can make it yourself. To do this, take 100 parts of epoxy resin ED-6. Then it should be heated to 50 degrees and add 20 parts of a plasticizer or solvent, mix well. Pour 35 parts of the hardener into the resulting solution and mix again. It remains to add 200 parts of cement there and mix until a plastic homogeneous mixture is obtained.
How to install a toilet, see the following video.
Choosing a new toilet
According to their design, floor toilet bowls are divided into several types, differing in the shape of their main nodes.
So, there are the following models according to the shape of the outlet drain:
- horizontal
- oblique (at an angle of 45 degrees)
- vertical
The shape of the bowl distinguish:
- poppet
- visor
- funnel-shaped
The flush tank can be combined with the base of the toilet or mounted separately on the wall, raising it to a sufficient height, and sometimes to the ceiling.
Fixing toilets to the floor are also different. Basically, there are options with two and four direct attachment points, in addition, structures may come across in which special corners are attached to the floor, and the toilet itself is already attached to them.
The way the tank is connected affects the cladding work in the toilet. After all, if a wall mounting method is chosen, then you will need to prepare a place and anchors for installation.
Before you change the toilet, you should take into account the dimensions of the toilet so that the design after installation does not interfere with closing the door and installing the rest of the equipment, if all this is done in a combined bathroom.
Are there other fixings for the toilet bowl?
In addition to the methods described above, there are others. But they are less popular due to various reasons.
Previously, bricking with concrete was very popular: they made a recess in the right place, put the product there and covered its lower part with cement mortar. Therefore, toilets fixed in this way are often found in old apartment buildings. The method is quite reliable, and in execution is relatively simple.
Photo of an old toilet that was bricked up with concrete
However, bricking with concrete has several serious disadvantages. First of all, the joint and the floor at the installation site look unattractive. Another disadvantage of the method is that it will no longer be possible to dismantle the toilet bowl without damage. Simply put, when dismantling, the product will have to be broken, and therefore today the method is no longer relevant.
Another outdated method is the use of taffeta.For those of you who don't know, this is a 5 cm high wooden underlay, which is installed in a recess with cement mortar. On the bottom of the taffeta are many anchors or nails, thanks to which the substrate is attached in solution. The toilet is placed on top of the taffeta and fixed with screws.
Installing a toilet bowl on taffeta. Rarely used lately
The last method for today, albeit not related to the floor, is suspended installation. A metal frame is built next to the wall (should come with a plumbing fixture). A bowl is attached to it. Tellingly, this frame, like the tank, is closed with a false wall made of tiles or drywall. As a result, we get an attractive and durable mount. But the method requires a lot of money and time.
Frame installation
Method No1. Dowel fixing
The use of dowels and bolts is a fairly popular way to fix the toilet bowl. The method is simple and practical, but not without drawbacks. First of all, the tile will have to be drilled
This must be done carefully and carefully, because the slightest mistake can ruin the flooring. In addition, the use of dowels is designed more for light products, and therefore it is better to use the adhesive method to fix a heavy model.
How to fix the toilet with dowels
To fix on the dowels, prepare everything you need:
- roulette;
- ammonia;
- pencil or marker to mark up;
- a napkin or rag (preferably microfiber);
- electric drill;
- drill to it (exclusively for concrete).
Fixture for toilet bowl
Less often, you may need a small piece of linoleum, sealant with a glue gun. Well, everything you need is at hand, so we can proceed directly to the workflow.


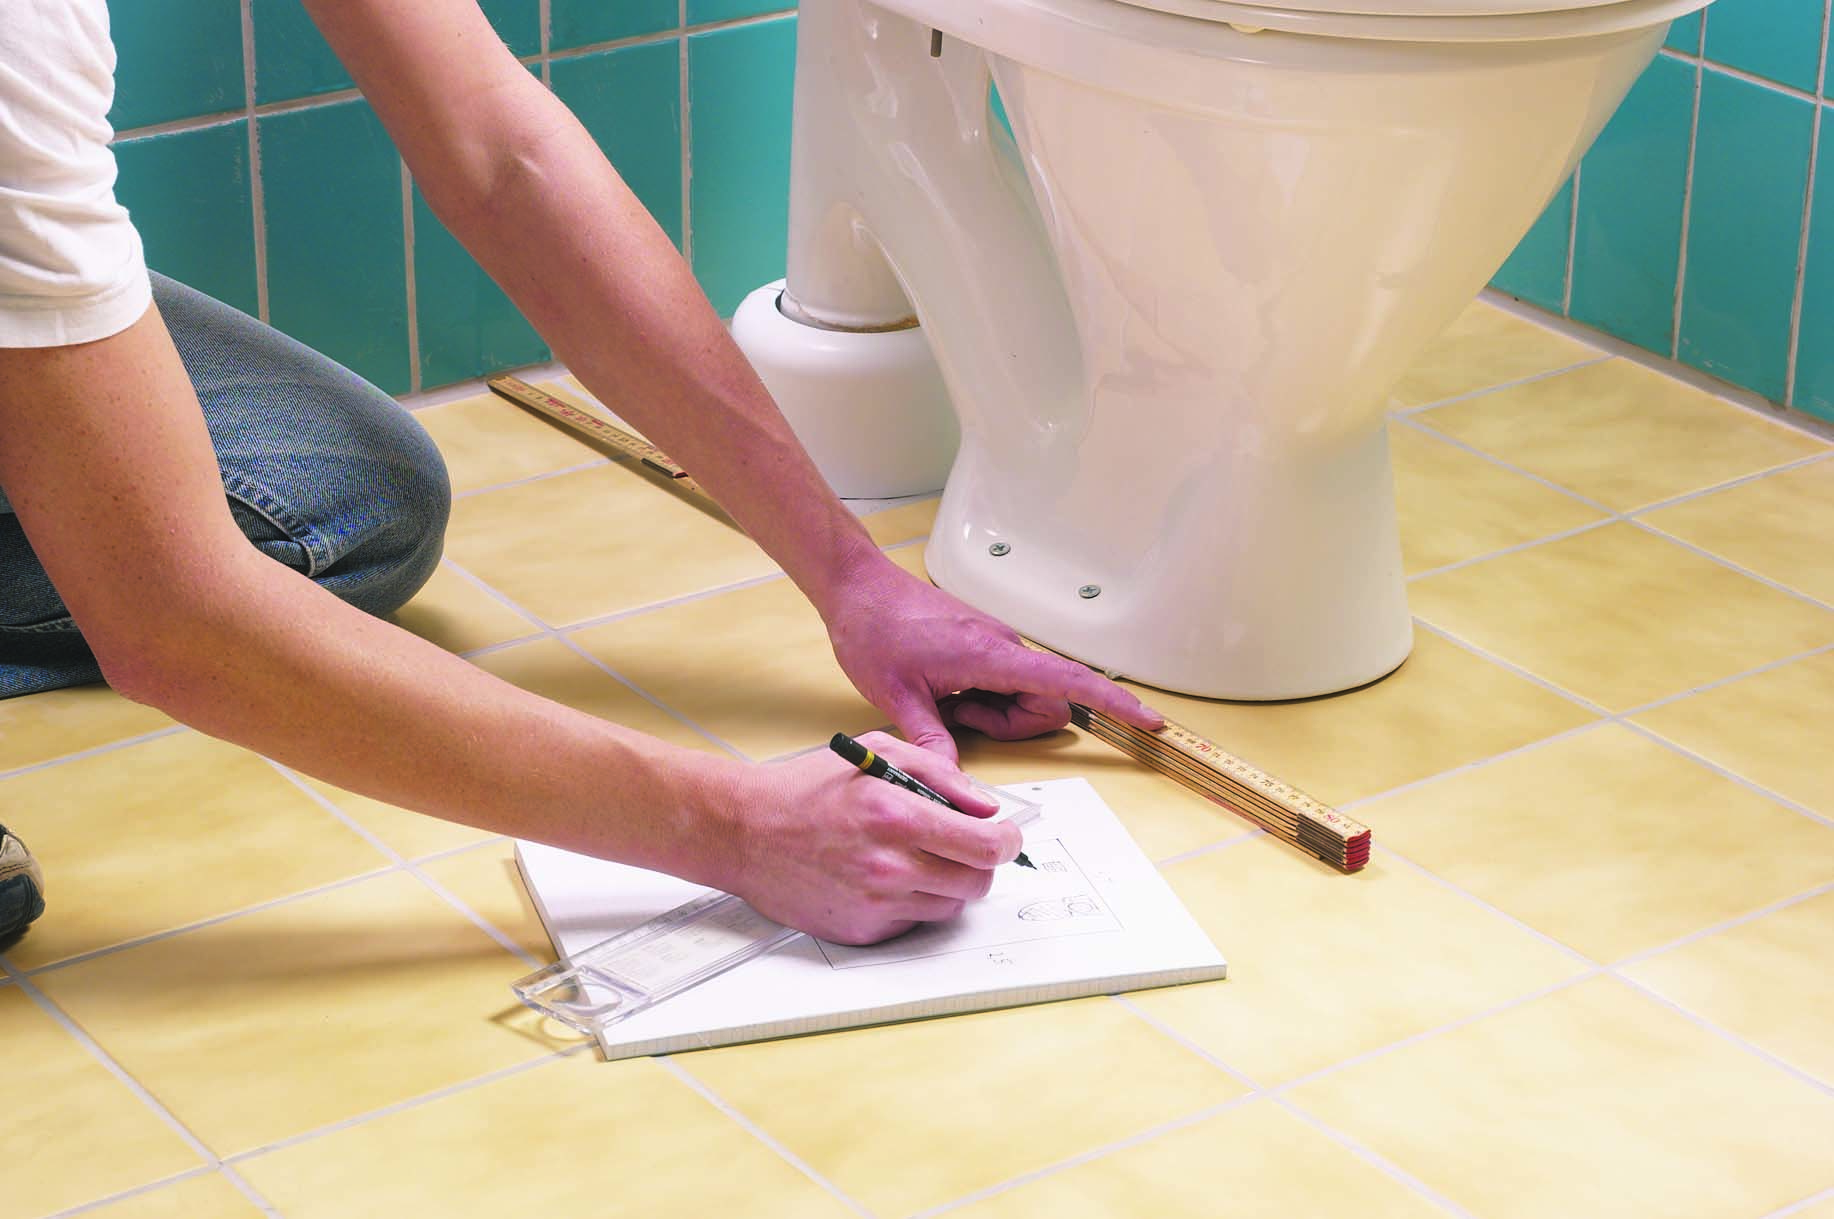


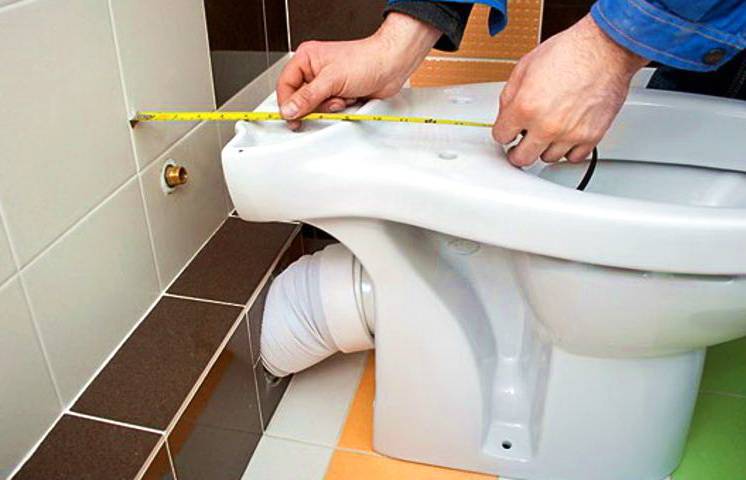
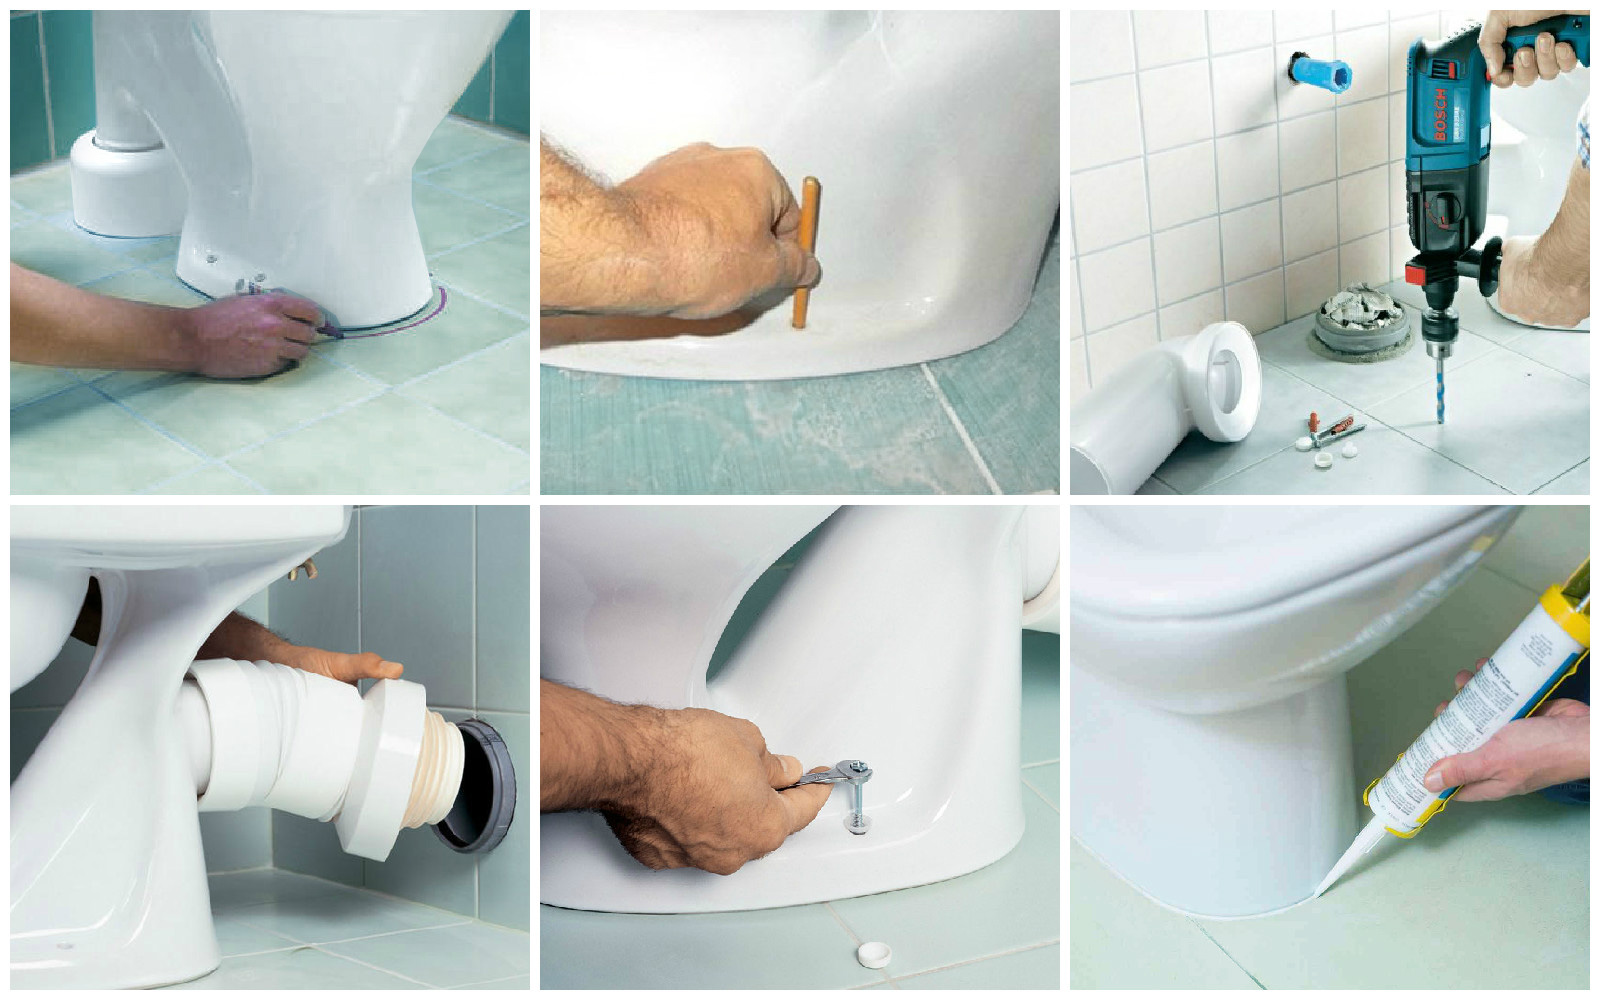
Step 1. First, the toilet is tried on, pre-installed where it will stand. The convenience of its use, the ability to connect to the water supply and sewer systems are evaluated. You can also shake the bowl - this will help determine the evenness of the floor under the toilet.
Pre-installation of the toilet
Step 2. Next, the installation location of the device is determined more accurately, which requires a tape measure. Holes for future fasteners are marked.
Future holes in the floor are marked
Step 3. The product is removed, large cross marks are already made at the marked points.
Putting cross marks
Step 4. Holes are drilled in the tile with an electric drill
It is important to work extremely carefully so as not to damage the tile, and also that the tool runs at low speeds.
The tile is drilled at low speeds Photo of the drilling process The drill needs to be moistened from time to time in cold water
Step 5. Next, the holes are drilled already in the concrete. The speed of the electric drill should be higher, or, alternatively, a rotary hammer can be used instead (it is better suited for this).
Concrete is being drilled Dirt and dust after drilling will be enough
Step 6. The tile is cleaned of dirt and dust (and after drilling this “good” will be enough). Then the surface is degreased with ammonia.
Cleaned tile
Step 7. Now you need to insert dowels into the holes that were made earlier.
Dowels are inserted into the holes
Step 8. The bolts are checked to see if they fit into the dowels normally. You can replace the fasteners with others, if included are of dubious quality.
Bolts included in the kit should fit properly.
Step 9. The toilet is installed. The holes in the tile must match those in the support.
Step 10. If there are no problems, the bolts are inserted into the dowels, while the washers - made of rubber or plastic - should not be forgotten
The bolts are tightened, but carefully, otherwise there will be a risk of damaging the bowl. After that, the hats are hidden with special plastic overlays.
Everything, the toilet bowl is successfully fixed to the floor with dowels!
At the end, the bolts just need to be tightened.
Preparatory stage for installing a toilet
You can install the device yourself, or use the services of specialists. How much it costs to install a toilet in an apartment will depend on the type of product and the mounting option. The average cost of services is 2000 rubles.
If the issue is resolved to start replacing the toilet with your own hands, you should prepare the necessary set of tools and materials:
- puncher or drill with drills for concrete and for ceramic tiles;
- adjustable wrench;
- hammer or chisel;
- rubber spatula;
- flexible hose for connecting the cold water supply;
- fum tape;
- ball valve;
- sealant;
- corrugation or fan pipe;
- toilet mounts;
- cement-sand mortar.

It is impossible to qualitatively install a toilet bowl with your own hands with a minimum set of necessary tools that any owner has in the house
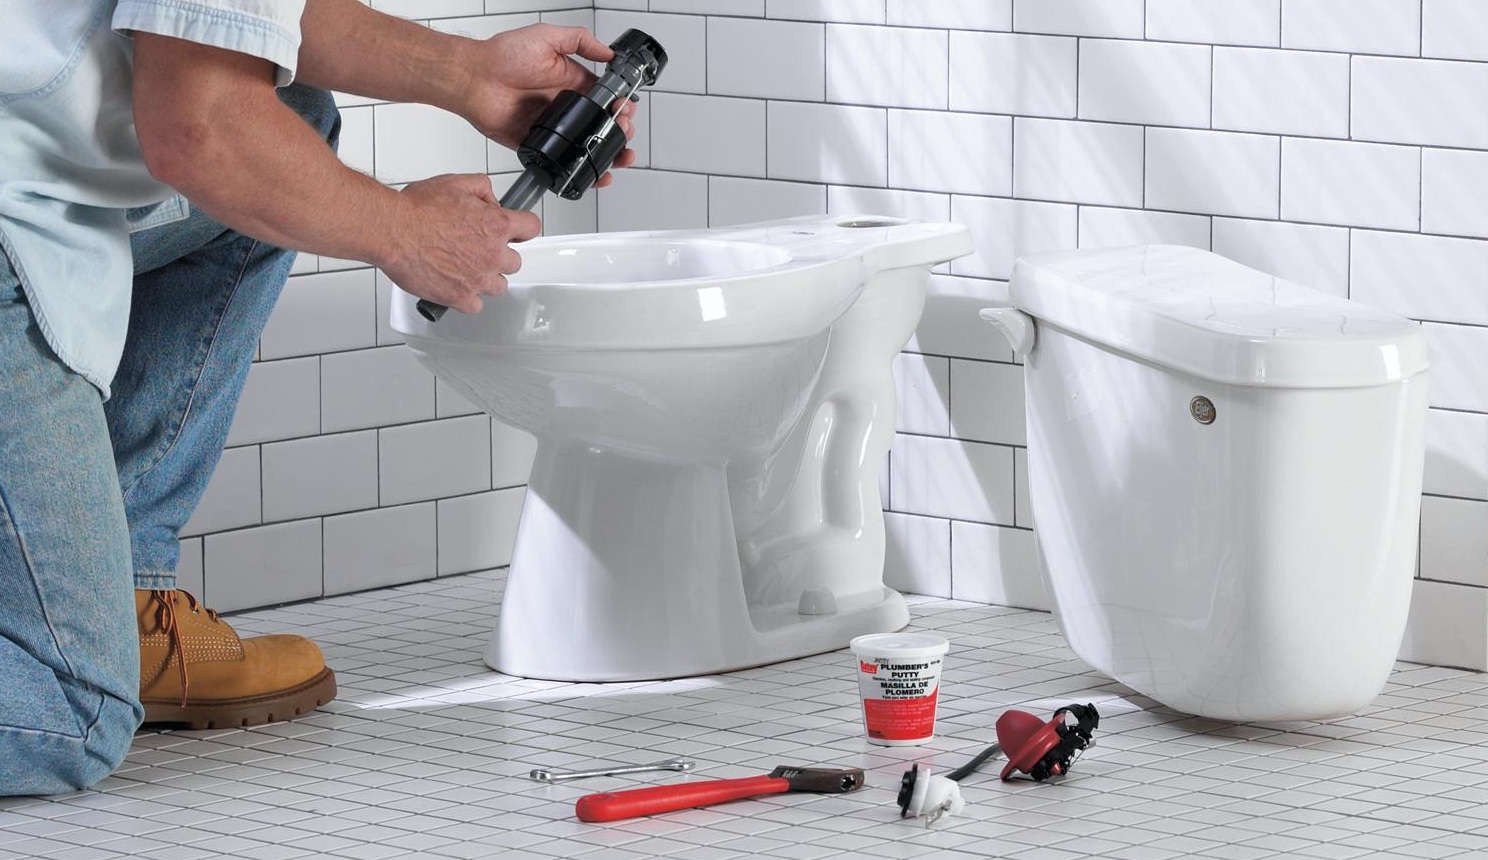
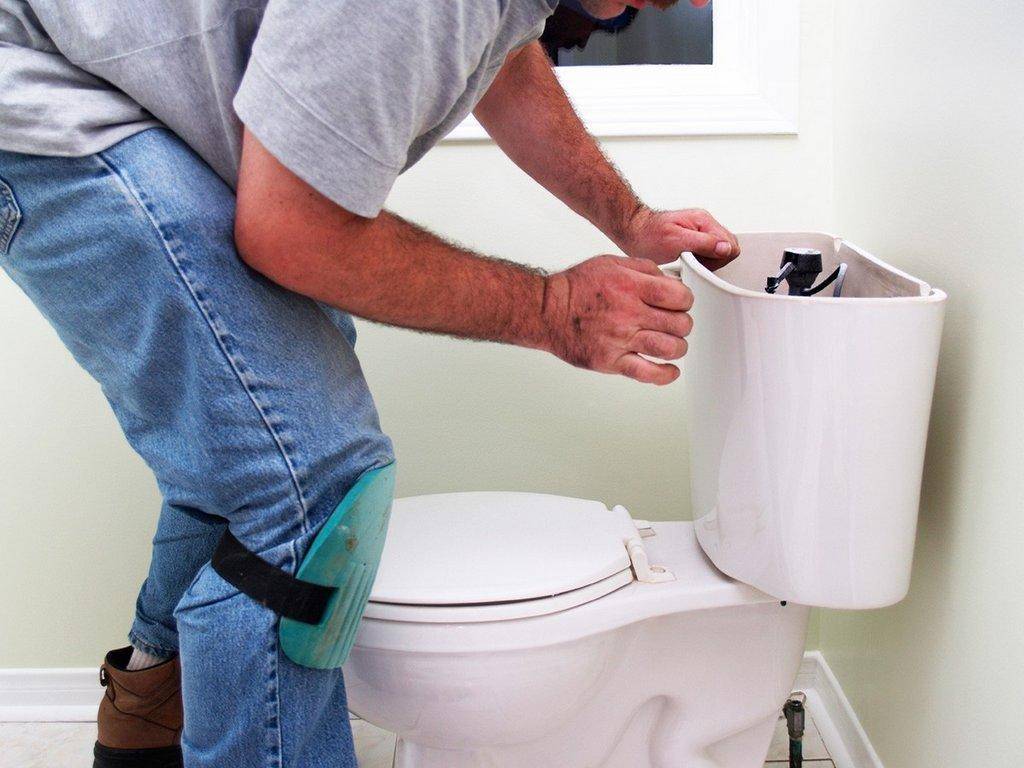
Before you install the toilet with your own hands, you should dismantle the old device. Overlaps cold water supply to the tank, and all liquid is drained from it. Using a wrench, unscrew and remove the hose that connects the tank to the water supply.Next, you should dismantle the tank itself, which was bolted to the toilet bowl with bolts.
Now you need to dismantle the toilet itself. The sequence of actions will depend on the device installation option. If the toilet was bolted to the floor, it is enough to unscrew the fasteners and remove the plumbing fixture. If the bowl is mounted on a wooden pedestal, taffeta, then it is necessary to disconnect the screws from the board. And then remove the taffeta itself. As a result, a recess is formed in the floor, which should be sealed with a cement-sand mortar.


When installing a toilet bowl, the following tasks are solved: connecting to the sewer, sealing the base and firmly fixing it on the floor
If the outlet is sealed with cement mortar, it can be destroyed with a chisel or hammer. The process should be carried out carefully so as not to damage the cast iron outlet itself. To prevent unpleasant odors from the sewer from spreading throughout the room, the hole should be closed with a plug.
If the toilet is mounted with adhesive mastic, it is enough to loosen the seal with a construction knife and hit the front of the bowl properly. Next, you need to pull the release from the cuff.
Water floors.
Professional installation of a toilet bowl with a guarantee.
The dwelling in which we live must necessarily be warm, comfortable and cozy. The heating system in most houses is represented by radiators, although today more and more often warm water floors are used for space heating.
Water floors are characterized by a system of pipes in which warm water is placed between the floor covering and the floor. The water temperature is about forty degrees.
This temperature is enough to heat the room.
To create water floors. you will need: a mini electric boiler, a mini floor up to twelve square meters, automation, collectors and underfloor heating pipes.
The water floor can be installed independently. You just need to have some engineering skills.
First of all, you should make a project. If you are not completely sure of your own competence, consult with specialists, they will help you make a project and choose the right set of pipes for water floors.
However, you can do everything yourself by choosing a set of equipment suitable for self-assembly, they indicate: “For self-assembly”. After that, you can safely proceed to the installation of a water floor.
If the floors and the house are wooden, then the installation is carried out using a flooring system. Such systems are suitable for all types of buildings and are divided into two types: wooden and polystyrene. Floor systems differ from concrete systems in the absence of a wet process, due to which the installation of equipment is much faster.
Most often, a concrete scheme is used, that is, the installed pipeline is poured with concrete. Such a scheme is very convenient because the concrete protects the pipes from damage and holds them firmly. On the base of the floor before installing the pipes, you need to put a heat-insulating material.
After laying the water floor, it is necessary to pressure test the system, that is, fill the pipes with water and conduct a kind of test. If everything is done correctly, the pipes are poured with concrete.
After the concrete has completely hardened, begin laying the flooring. In this case, ceramic tiles, linoleum and laminate are most suitable.
Liked the site? Article Do-it-yourself warm water floors is of interest? Then subscribe to new
Conclusions and useful video on the topic
For a better understanding of the above instructions, it is recommended that you familiarize yourself with the following video review:
Connecting your own toilet to the sewer system is easy. To do this, it is advisable to buy in advance a model of equipment that will most aesthetically fit into the interior of the bathroom.
With a minimum of tools, sealant and properly selected fittings, you can install the toilet using the above instructions in a few minutes.
Do you have practical skills in installing and connecting a toilet bowl to a sewer? Please share your knowledge, experience with our readers or ask questions. The comment form is below.