- What tool to use
- Lighting installation - you don't have to be an electrician to get it right
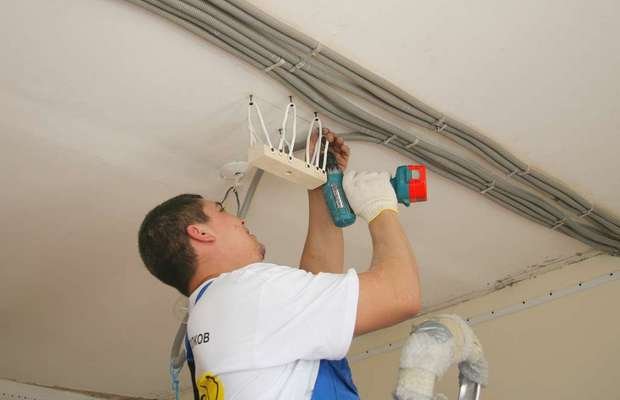
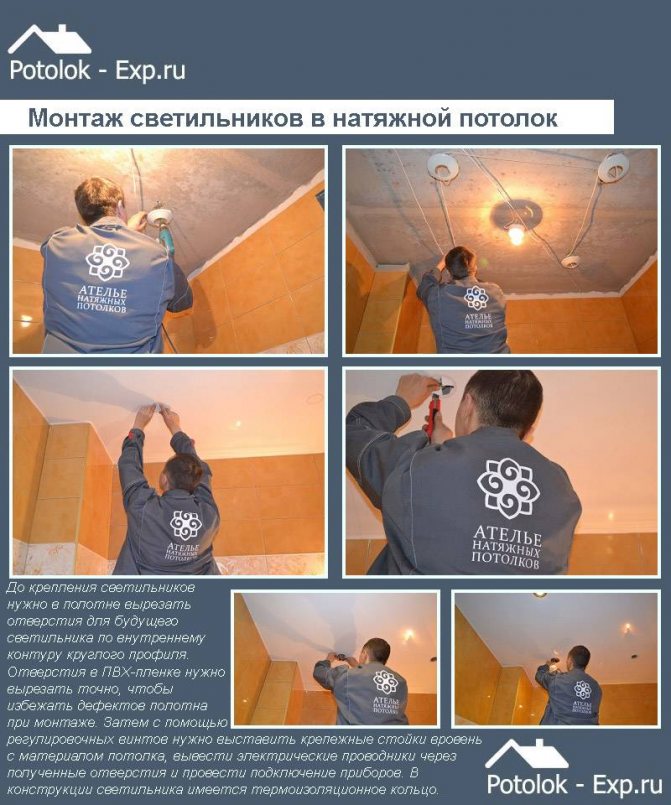
- Installation of fixtures on a plastic ceiling
- Types of bathroom fixtures
- Fixing the chandelier
- On the hook
- Using the bar
- Do-it-yourself installation of a chandelier on a stretch ceiling
- Tools for mounting a chandelier on a stretch ceiling
- Connecting the chandelier to the mains
- How to fix a chandelier on a stretch ceiling
- Decide on the place of installation
- The purpose of the embedded platform
- We make accurate markings of fixtures on the ceiling
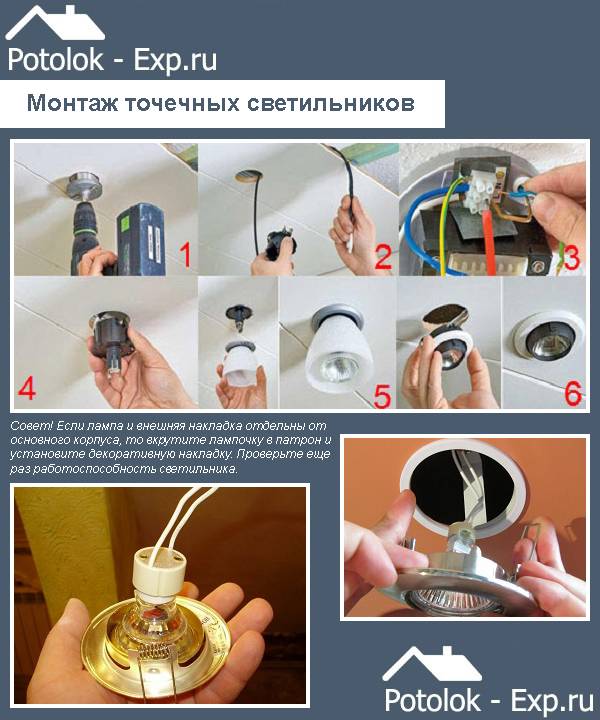
- Installation of point light sources
- We hide installation defects
- Selecting the size (section) of the wire
- Classification of ceiling spots
- Main conclusions
What tool to use
The variety and specificity of the tool used during installation is largely determined by the design and purpose of LED lamps. In normal living conditions, this is the following standard set:
- Electric drill.
- Screwdriver.
- Pliers.
- Wire cutters.
- Yardstick.
- Screwdriver.
- Soldering station with accessories.
In addition, in addition to the lighting devices themselves, you will need the following consumables:
- Wires.
- Mounting hangers, strips.
- Terminals-connectors.
- Dowels, self-tapping screws.
No less importance is attached to the choice of overalls for carrying out this kind of electrical work. The suit must be made of dense cotton fabric, shoes on a thick rubber base, dielectric gloves.
Lighting installation - you don't have to be an electrician to get it right
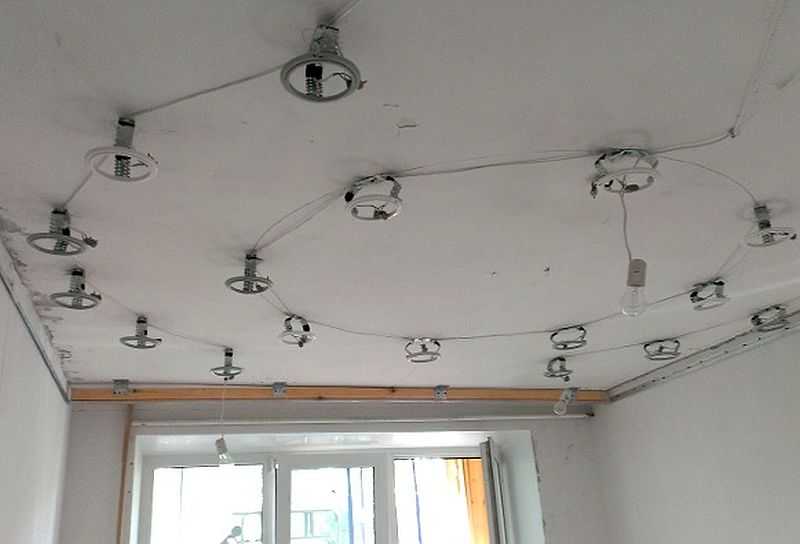
The configuration of the lighting system for ceilings is developed before all elements of the suspended structure are mounted.
This is especially important when you are implementing multi-level ceiling solutions. At this stage, it is important to remember that the luminaires should be at least 0.6 m away from the wall surfaces, and a distance of about 100 cm should be maintained between individual lighting devices.
The design is carried out so that not a single lamp falls on the details of the crate, on which the facing material is subsequently attached.
Installation of fixtures
Also, before the stage of forming the frame, you need to separate the wiring (each lamp must be connected to its own wiring), and then fix the electrical cables. Then it will not be difficult for you to get the wires after drilling holes for the lamps and connect them. It is desirable to fix the wiring with plastic ties. Use tie-downs with some slack in the cable, do not overtighten it. Thus, you will protect the wiring from rupture during its thermal deformation observed during lighting operation.
After installing the ceiling structure, start making holes in the skin. This operation is easiest to perform with a crown on wood. It is also used to prepare recesses for mounting boxes for electrical outlets. The cross section of technological holes is selected as follows.Drilled holes should have a diameter slightly smaller than the size of the inner part of the spot and 3–4 mm larger than the outer part of the lighting device. Typically, the size of the holes is 6-7.5 cm.
Now you can connect the wiring to individual fixtures. Pull out the cable for pre-made loops, cut it along the bend, strip it. After that, connect the wire (one end is connected to the supply core, the second is clamped in the terminal on the spot)
It is important not to make a mistake here. Carefully study the markings on the lighting device (zero is indicated by the letter N, phase - by the letter L)
As you understand, all work with electrical wiring is carried out exclusively in a de-energized room.
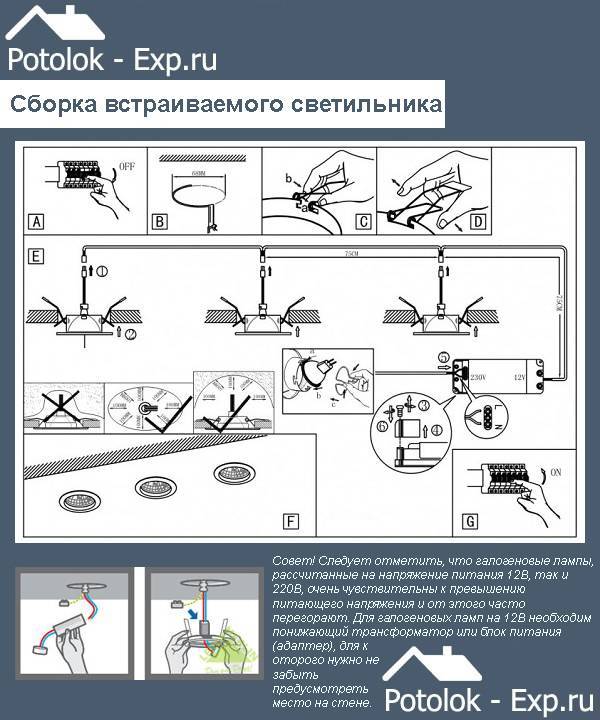
The next step is fixing the fixtures. Everything is elementary here. Bend the brackets on the sides of the spot. Insert them into the ceiling structure. After such an installation, the brackets themselves will press the lighting fixture to the ceiling. Now you can connect the supply main cable to the junction box and switch. Turn on the lights and admire how chic you were able to decorate your ceiling with spot devices. Note that LED lamps are mounted according to the same principle. But they must be connected to a step-down voltage (up to 12 V) power supply.
Installation of fixtures on a plastic ceiling
Ceilings assembled from plastic panels have become fashionable for a long time in repair and construction.
Firstly, they are incredibly cheap - this is perhaps the most economical repair option. Secondly, the ceiling made of plastic panels will last a very long time, because it is easy to care for it.And, thirdly, the abundance of various designs of plastic panels allows you to create an original interior in any room.
 Given that plastic panels are very easy to care for, they do not let moisture through and are easy to clean - this is an ideal solution for a bathroom or kitchen.
Despite the fact that plastic panels on the ceiling have a lot of advantages, they have a significant drawback - they are unstable to high temperatures. Therefore, it is recommended to choose lamps with a power of no more than 40 W for installation on this type of ceiling.
Experts recommend not to use incandescent lamps, but to purchase special light bulbs equipped with a protective metal ring.
Despite the fact that the installation of spotlights in a plastic ceiling should be carried out after the installation of the panels is completed, you should prepare for their connection in advance.
As with the installation of other types of ceiling coverings, before starting their installation, you should take care of the wiring for the fixtures. It should be located under the ceiling covering and pass in those places where it is planned to place spotlights.


If there is no personal experience in wiring electrical wiring, it is better to seek help from professionals. This is the only stage of work where you may need the help of a specialist, everything else can be done independently.
When laying wires, it is important to place them in a special plastic corrugation, which will prevent the spread of fire in the event of a short circuit.
In this case, one end will be connected to the lamp, and the other will lead to the junction box and switch.In order that in the future, if one of the bulbs burns out, all the others do not turn off, you should choose the option of connecting the wiring in parallel.
Read more about what kind of corrugation for electrical wiring can be read below.
For wiring, it is recommended to use a cable with dimensions of 3x1.5. The distance between the fixtures is determined at the discretion of the builder. In this case, the light bulb should be at a distance of at least 60 cm from the wall.
Another factor to consider when installing a ceiling made of plastic panels is that the distance between them and the base must be sufficient to accommodate the luminaire head.
 After all the requirements are met and the plastic panels are laid, you can proceed with the installation of fixtures on the ceiling
In order to install spotlights on a plastic ceiling, you do not need special tools, most of them can be found in every apartment:
- a knife sharp enough to cut plastic;
- electric drill;
- roulette;
- crowns, with which you can drill round holes.
Once the necessary tools are prepared, you can proceed with the installation of fixtures.
To do this, on the ceiling it is necessary to outline the points where the light bulbs will be placed. Further, with the help of crowns and a knife, it is necessary to make holes that will slightly exceed the diameter of the base in diameter.
 Before proceeding with the laying of plastic panels, it is necessary to carry out the wiring and prepare the places where the spotlights will be connected
In order for the connection of the luminaire with the wire to be as reliable as possible, it is recommended to use terminal blocks. With their help, reliable fixation of connections is ensured, but in the future, at least once a year, they should be checked.
After fixing the wires, it is necessary to ensure their reliable insulation. The lamps themselves are installed in a pre-made hole very simply - using metal "paws" located on the back of the device.
Types of bathroom fixtures
When arranging any room, it is important to choose and install lighting devices correctly, which for a combined bathroom or a separate bathroom are divided into subgroups according to several criteria. Light sources can be installed at various points in the room. Depending on this, they are wall-mounted, ceiling-mounted, floor-mounted, built-in in the shower or in the mirror.
Depending on this, they are wall-mounted, ceiling-mounted, floor-mounted, built-in in the shower or in the mirror.
Light sources can be installed at various points in the room. Depending on this, they are wall, ceiling, floor, built-in shower or mirror.
Ceiling variations are in particular demand among consumers. With their help, you can achieve diffused and soft lighting in the bathroom.
There are ordinary and moisture-resistant lamps installed in the ceiling in the bathroom. The second option is designed for installation in rooms that are characterized by high humidity.


Electrical equipment has an IP protection index. The first digit is the degree of protection of the device from mechanical damage, and the second indicates its ability to prevent the penetration of moisture.
Fixtures can be open and recessed. These subgroups differ in the method of their placement - on the ceiling or on the wall of the room. Depending on this factor, they can be point and suspended or wall-mounted.
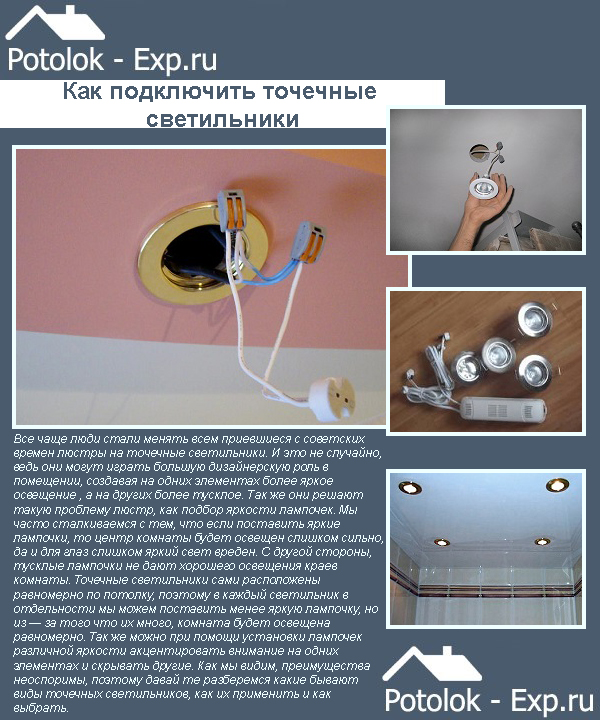
Spotlights mounted in the ceiling structure emit bright light. They can embody the designer's idea - to provide uniform general lighting or emphasize individual zones.
Due to the fact that the bathroom has an increased level of humidity, it is better to use lamps equipped with shades. If you use conventional lamps, the contacts will quickly oxidize. This will render the device unusable.
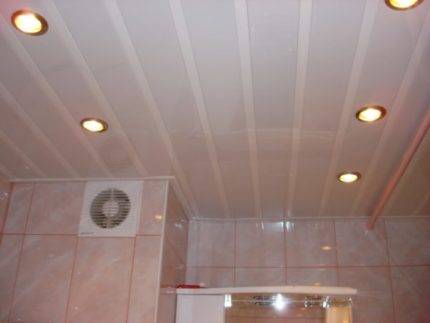
The best options for bathroom lighting: one lamp with a large bulb, several with a medium or small spotlights
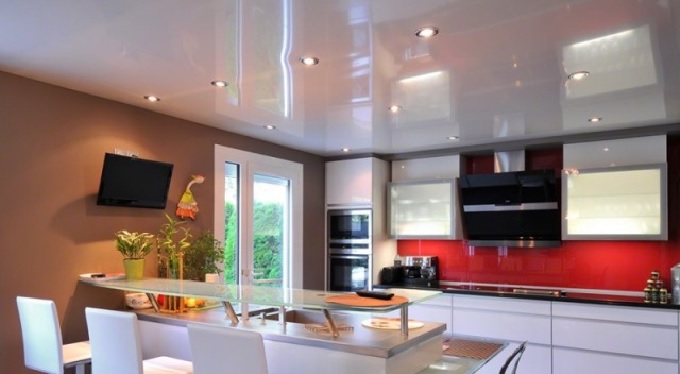
When choosing the location of fixtures, it is necessary to use the luminous flux emitted by them to the maximum. In a room with a small area, it is desirable to mount built-in light sources, placing them around the perimeter of the room.
Spotlights around the perimeter allow you to evenly illuminate the room, create a modern and stylish interior
As for the required number of lamps, here you will need the rules for arranging residential premises. According to sanitary standards, the illumination of the bathroom should be at least 50 lux.
According to the rules of 1 sq. m. area can be illuminated with a 25 or 30 W incandescent lamp, 5-7 W fluorescent or 3-4 W LED
You can calculate how many lamps are needed to illuminate a small bathroom with parameters of 2x3 m. To do this, you will need:
- 2-3 incandescent lamps with a total power of 150-180 W;
- about 4 LEDs with an indicator of 18-24 W;
- or a dozen energy-saving ones at 30-40 watts.
Knowing the power, you can determine the total number of lamps and choose the way they are placed on the ceiling.
It is important when arranging lighting in the bathroom to take care of safety. To do this, you have to check that the wiring in this room is grounded. Another important point is to buy only luminaire models with a sufficient level of protection.
Do not forget that splashes when bathing can easily end up inside electrical appliances, which threatens with serious problems.
Another important point is to buy only models of lamps with a sufficient level of protection. Do not forget that bathing splashes can easily end up inside electrical appliances, which can lead to serious problems.
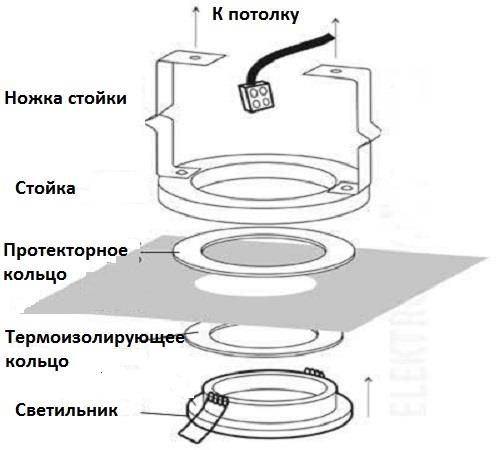
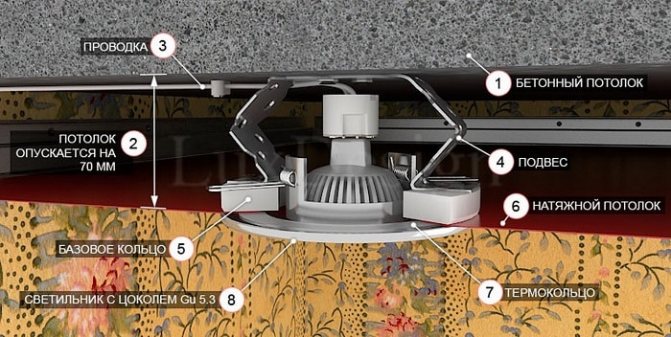
Installation diagram of a popular bathroom spotlight. The device is installed in a ceiling structure made of PVC or plasterboard panels
If the bathroom has stretch ceilings, then lighting fixtures designed for stretch structures will be required to equip the lighting. They are attached to rails or ceiling plates.
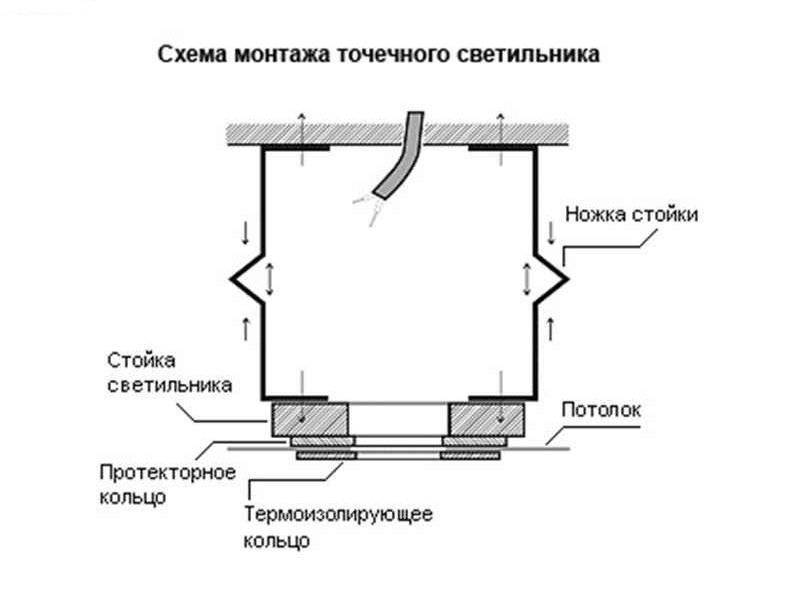
The installation diagram of a compact spotlight on a stretch ceiling allows you to visually study the process of installing a lighting fixture in the bathroom
Fixing the chandelier
The chandelier is mounted in different ways.
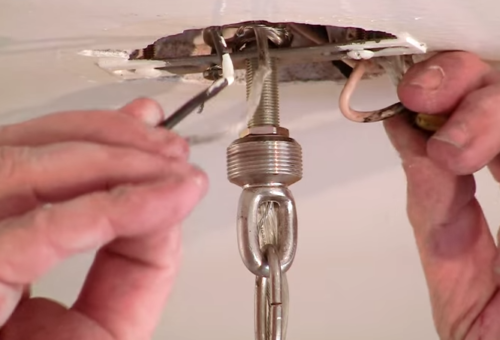
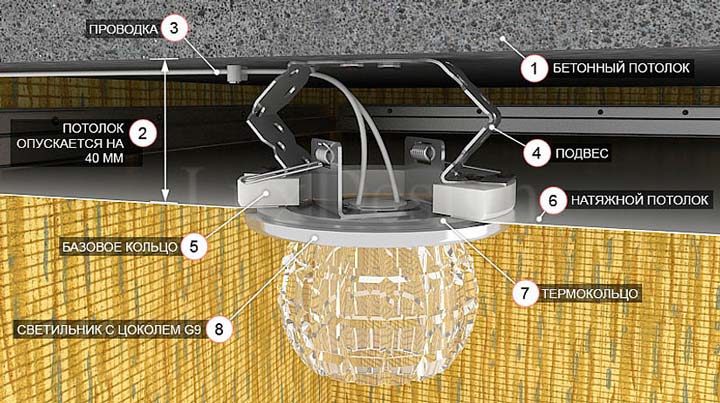
On the hook
This method of installing a chandelier is used most often. The work algorithm will be as follows:
- fix the hook on the building base, test its reliability by hanging the load;
- run the cable;
- after installing the wiring, fix the canvas on the frame;
- mark up to understand where the hook is located;
- fix the thermal ring in the center of the marking with glue on the canvas;
- cut a hole in the material.
After that, you can install the chandelier by hanging the device on a hook.

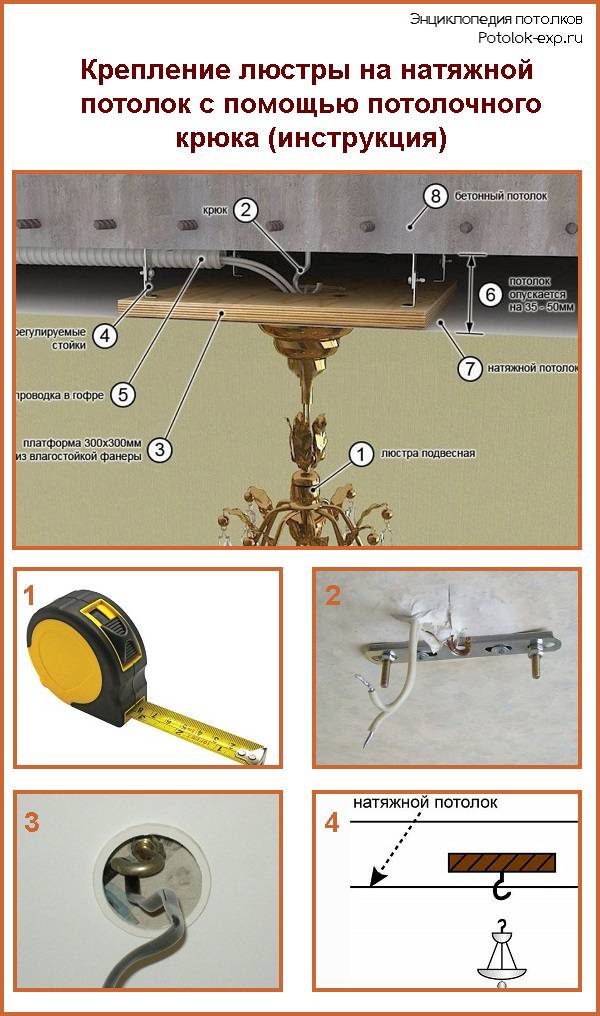
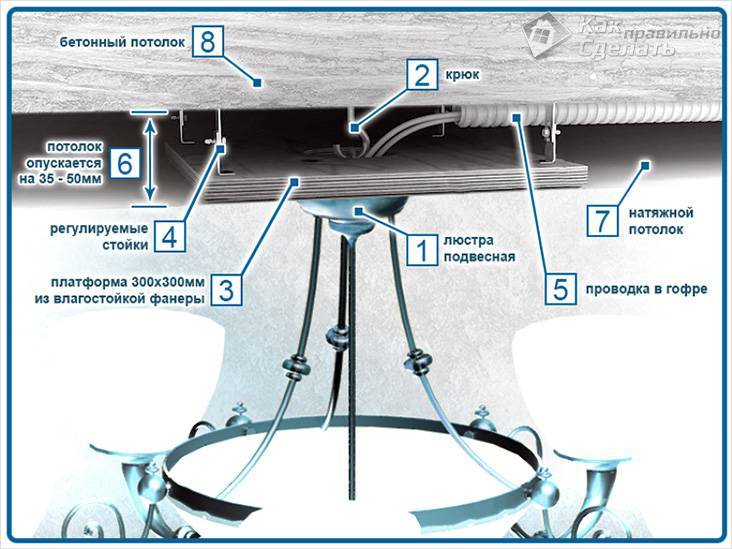
Using the bar
Another way to install the device on structures is with the help of a ceiling strip. To do this, you need to follow the following sequence of actions:
- determine the place of fixation of the chandelier;
- measure the length of the bar and the diameter of the bowl of the device;
- make a wooden beam of appropriate dimensions, while so that the lighting fixture is always fixed in one position and does not swing, make the length of the beam slightly larger than the diameter of the chandelier bowl;
- fix the beam;
- lay electrical wires;
- set the material of construction on the frame;
- put a mark on the film or fabric of the place where the chandelier will be installed;
- using glue on the canvas, fix the thermal ring in the center of the marking;
- cut out the center of the thermal ring to fix the device;
- in the center of the installed beam, fix the mount on which the lighting device is mounted;
- install a chandelier.


In this case, you should follow the rules, as when installing a chandelier with a plank, but plywood should be attached to the timber. Its diameter should be slightly larger than the dimensions of the chandelier bowl.
Another option for fixing a large-sized device is to fasten plywood to a suspension system.
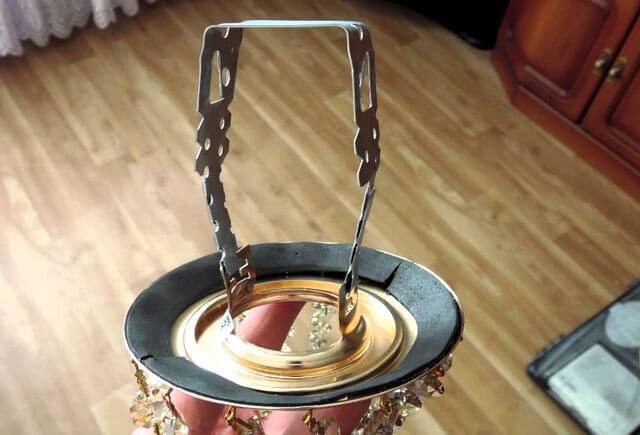
 Fixing the chandelier to the platform
Do-it-yourself installation of a chandelier on a stretch ceiling
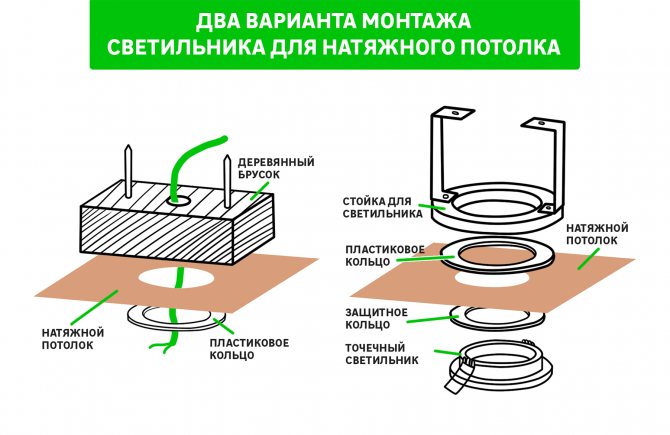
The best way to simplify the process of installing fixtures is to prepare embedded elements in advance or install mounting hangers for a specific type of lighting fixture. In this case, the chandelier is no exception.But it’s far from always possible to plan the installation perfectly, so you have to put the chandelier on a stretch ceiling more often after the installation of the ceiling finish is completed.
Tools for mounting a chandelier on a stretch ceiling
To perform the suspension, you will need a standard set of tools and fixtures. An experienced craftsman can get by with a screwdriver and a knife, but for those who have to face a problem for the first time, it is better to use the entire arsenal:
- Screwdriver or a set of screwdrivers;
- Impact drill or puncher with a set of drills;
- Building level;
- Scissors for cutting metal and a clerical knife;
- Pliers or side cutters for working with electrical wiring.
In addition, consumables will be required - dowels with plugs, insulating tape, adapter rings and special glue. To connect the chandelier, you need a set of connectors or mounting chips that can be used to connect wiring without stripping the insulation.
Connecting the chandelier to the mains
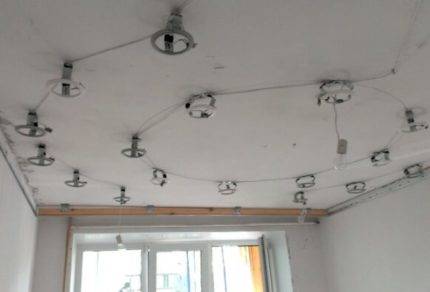
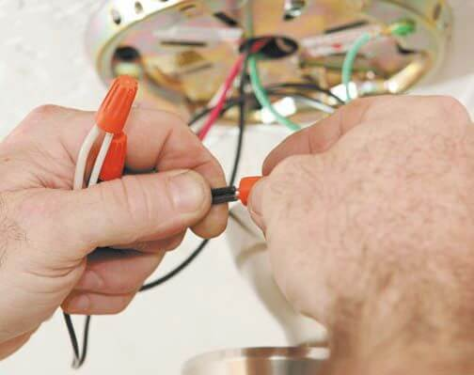
The most difficult stage is the laying of the electrical wiring itself along the ceiling. As a rule, a wire of three cores is pulled from the junction box in series through all points of installation of fixtures, including through the place where the chandelier is suspended. Since the lighting devices are connected in parallel, a wire head with three wires will be displayed at the attachment point of the chandelier.
Before installing the chandelier, it is necessary to determine which of the wires relate to ground, zero and phase. This must be done either by focusing on the colors of the core insulation, or, more preferably, using a special probe.
Important! In the process of connecting the wiring terminals to the contacts of the chandelier, it is important not to confuse the neutral and phase wires.
Otherwise, inadvertently touching the body of the chandelier in the on state, you can get a sensitive electric shock.
How to fix a chandelier on a stretch ceiling
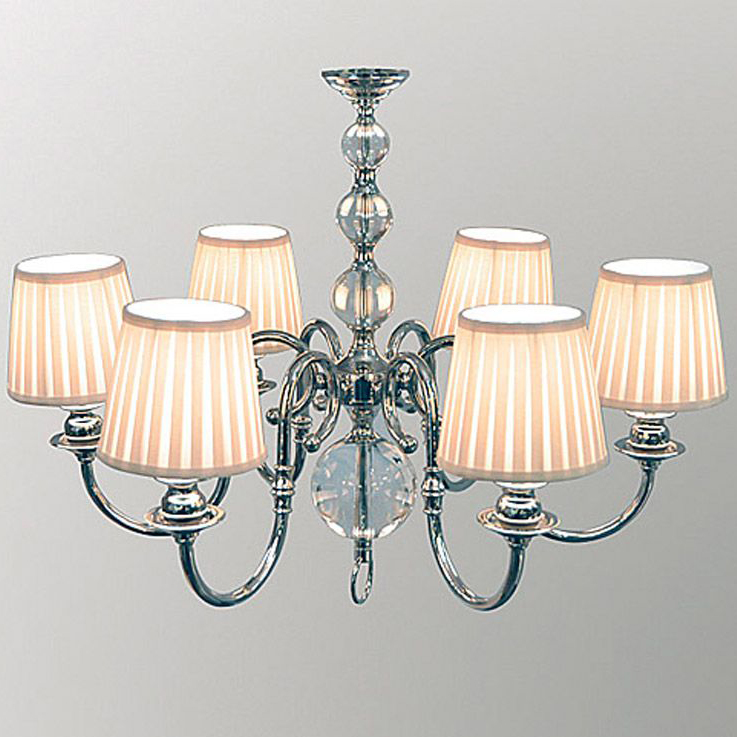
The correct choice of the method of fixing the lamp on the decorative canvas depends on the size and design of the chandelier. The most massive and overall models are mounted using cross fixtures, the larger the horizontal size of the base and cap, the wider the base for attaching the luminaire to the concrete ceiling should be.
For high chandeliers, only hooks and butterfly dowels are used. This type of fastening is referred to as self-leveling. This allows you to reduce, and sometimes completely eliminate the horizontal load on the suspension point. Even if you accidentally touch such a chandelier with your hand, then nothing terrible will happen. If the long and high structure is fixed rigidly, then with a careless movement it is possible to break off the ceiling fixture.
Decide on the place of installation
Absolutely any kind of construction work must begin with careful planning on paper or in any other way available. Many customers prefer to save on expenses, so defects and shortcomings are visible after some of the work has been completed.
If we are talking about installing spotlights, then there is a list of the usual places where they are more often installed:
- Above the bed
- Above the working area;
- In a recreation area and a place for reading;
- In the kitchen or room above the tables.
Installing a chandelier is different from installing spotlights - they do completely different things that seem similar from the outside. For a spotlight, wiring can be led directly from a switchboard in a house or apartment.You can also power this type of lighting from an outlet.


This is interesting: Technical tricks of household sockets: we understand the essence
The purpose of the embedded platform
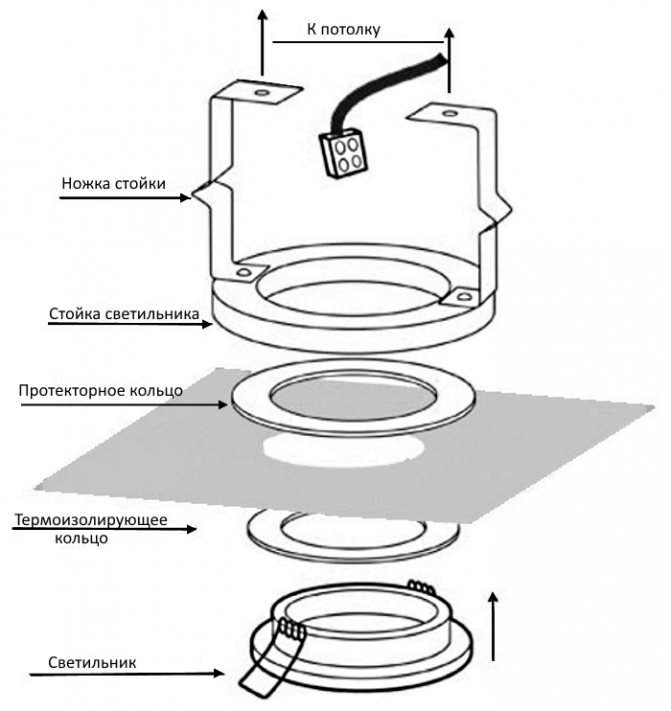
The design is a special element that allows you to securely mount the lighting device on the base ceiling, which will be hidden under the tension cover.
Many craftsmen make embedded elements with their own hands, but such work requires additional time, skills and abilities.
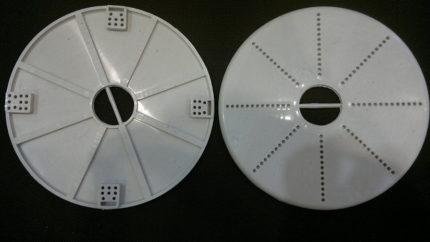 To simplify the installation of a chandelier in a stretch ceiling, ready-made platforms made of durable plastic, which are selected in accordance with the parameters of the lighting device, will help.
The embedded element performs the function of a kind of frame that holds a certain structure. A solid platform avoids the impact of a heavy chandelier on a stretched canvas.
Since such mortgages are often made of heat-resistant plastic, they also perform the function of protecting the stretch ceiling from the heat radiated by the device.
We make accurate markings of fixtures on the ceiling
First, measure the distance from the wall to the last lamp. Next, we evenly divide the distance between the rest of the lamps. With a ceiling height of 2.5 m, extreme spotlights, near the walls, it is recommended to install at a distance of no more than 60 cm, the wall should not remain dark and unlit, between the rest no more than 1 meter, for uniform illumination, the light fluxes of the lamps should intersect.
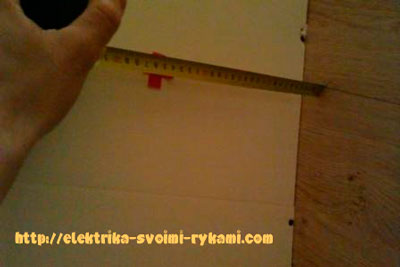 If the ceiling consists of joined panels, as in our case, and the location of the lamp falls on the joint, move it a little to the side.If this is not done, then the manufacture of the hole for the lamp is very likely to damage two panels.

Installation of point light sources
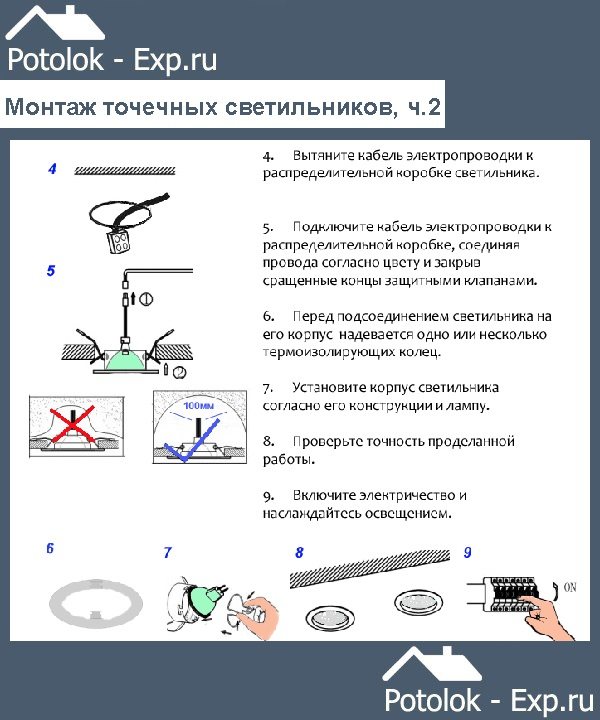
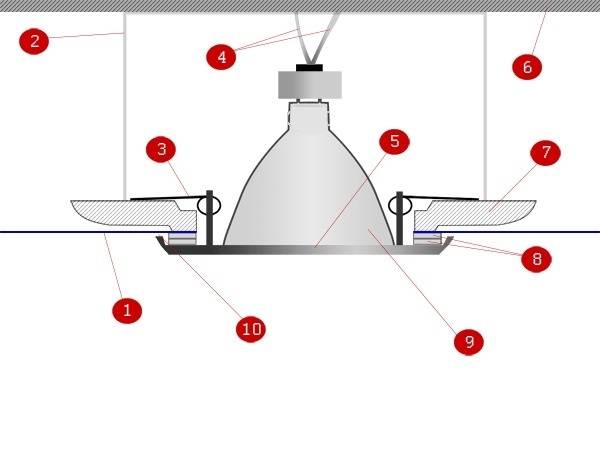
The wiring diagram for recessed luminaires in a suspended ceiling is not complicated. You can even install spotlights on your own. When choosing a circuit for mounting such devices, it must be taken into account that the length of the wiring between them and the current transformer should not exceed 2 meters.
To install fixtures of this type in a suspended ceiling, proceed as follows:
- First of all, lay the wiring.
- Next, mark the ceiling surface.
- A drill makes a hole in the canvas. If the recessed lamp has a square shape, you can use a jigsaw.
- A cable is pulled into the hole made, but before that it must certainly be de-energized.
- Then the cable is brought out.
- The lamp is connected to the cable.
- The installed lighting device must be fixed in the hole made. To do this, use spring clamps, which are located on the body of the light source.
- At the final stage of mounting a spotlight in false ceilings, a light bulb is inserted into it and a decorative ring is put on.
We hide installation defects
One of the most intimidating steps in wiring a spotlight that has been laid into the thickness of a concrete wall is hiding defects. It seems to many that the only option available is to dilute the concrete mixture and use it for its intended purpose.
Expert opinion
Ivan Zaitsev
Lighting specialist, consultant in the building materials department of a large retail chain
Ask an expert
This option is effective, but the use of concrete has a number of disadvantages. First of all, it takes a lot of time for the mixture to dry completely. Moreover, it is extremely sensitive to drafts, temperature changes and other environmental factors that lead to cracks and other visual defects.
Alabaster has become an alternative to concrete for local repair of defects. It looks like a gypsum mixture, and is available in the form of a fine powder. All that needs to be done is to add some water, stir until a homogeneous mixture is obtained, apply to the surface and wait for it to dry. It takes no more than one hour for the moisture to completely evaporate.
Of course, the color of dry alabaster differs from concrete, but the walls are always additionally plastered, painted or wallpapered, so this feature can be successfully hidden from prying eyes. Ultimately, without knowing the place of work, such a site cannot be found!
Selecting the size (section) of the wire
The selection of electrical wiring for supplying power to spotlights is carried out depending on the materials from which the ceiling is made. Most often, for a ceiling made of plasterboard, two-core or three-core wires VVG-2 (3) x 1.5 are used, since drywall refers to refractory materials.


For plastic and MDF, RKGM wire is best suited. Since the cable has an increased level of security, since the outer insulating layer consists of a lacquered winding made of fiberglass.The internal insulation is a heavy-duty silicone rubber. According to the technological parameters, this wire is able to withstand from -60 degrees, up to a maximum of +180 degrees Celsius. Therefore, it is widely used in saunas and baths, where, in addition to high humidity, temperature drops reach critical levels.
Soft wire, consisting of several strands enclosed in insulation, is the best option for mounting fixtures. To connect the cables, special terminal blocks, bolts or sleeves are selected. The bolted connection needs periodic maintenance, as heating is possible at the twist point if the wires are loosened. Therefore, at least 2 times a year, it is necessary to check and, if necessary, tighten the clamping bolts, in contrast to the sleeves, which rigidly fix the junction.
Experts recommend wrapping all electrical wiring connections for protection with insulating tape or using a special tube with a heat-shrink effect to improve insulation.
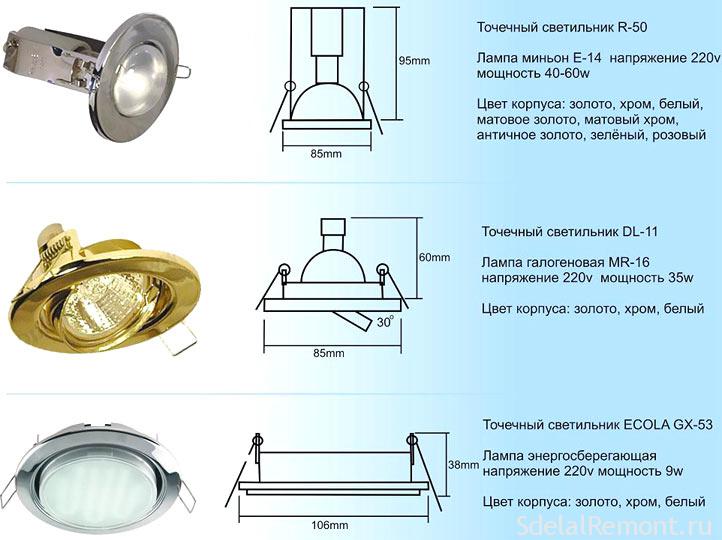
Classification of ceiling spots
Ceiling lamps are widespread and can have a different configuration. The main distinguishing features of the luminaires in terms of design, in addition to their appearance, are their installation method and the type of lamps used.
According to the method of installation, ceiling lamps are distinguished:
- Recessed: often used in combination with suspended or false ceilings, they look very aesthetically pleasing, compact and are distinguished by an easy installation method.
- Suspended: in a broad sense, they are not spots, but belong to the groups of chandeliers, sconces and others.Often used for decorative lighting or when mounted to standard ceilings and custom chandelier fixtures.
- Overhead: fastened directly to the ceiling with dowels and self-tapping screws.
By type of lamps used:
- Halogen: they are efficient and environmentally friendly lamps with a long service life and high light output, but they have significant drawbacks, such as high electrical energy consumption, heating and high sensitivity to voltage drops in the network.
- LED: safe and energy-efficient lighting devices, have a long service life and a wide range of light temperatures, heat up little and have a high efficiency. The disadvantages of this type are: the flickering of lamps when buying cheap Chinese lamps from unknown manufacturers (affects vision and eye fatigue) and a higher price compared to other options.
- Incandescent lamps: losing their popularity due to being uneconomical and short-lived devices, have low efficiency, heat up, but are still used by many consumers due to their very affordable price.
- Fluorescent: as well as LED - very efficient and economical, have a more affordable price. The downside of these lamps is their unsafety in case of damage (contains poisonous vapors of mercury and argon) and environmental friendliness.
Main conclusions
If you know exactly how to install a spotlight or other lighting device in a stretch ceiling, you can do everything yourself. The main thing is to carefully consider the scheme and take seriously the choice of light sources. In the absence of experience, it is better to choose traditional devices and install on the canvas.
If you want to create something original using track systems, spots or LED panels, it is better to turn to professionals. Correcting errors is quite difficult and not profitable. The desire to save money can lead to additional costs.
Previous
Lighting in a stretch ceilingChoosing the best fixtures for stretch ceilings
Next
Lighting in a stretch ceilingHow to make a luminous stretch or suspended ceiling


