- Underfloor heating under tiles
- Materials and tools
- Material Quantity Calculation
- Manifold cabinet installation
- Filling the screed
- Tile selection
- How to prepare a tile for laying on a heat-insulated floor?
- Room layout
- Laying tiles
- Seam processing
- System pressure test
- The nuances of laying floor tiles
- Do-it-yourself laying a film floor under a tile
- Understanding the types of underfloor heating
- Infrared film
- Heating mats
- heating cable
- Final conclusions
- Electric mats
- Water heated floor under the tile
- Water floor heating device
- Characteristics of a water heated floor
- Pros and cons of a water-heated floor under a tile
- Do-it-yourself water-heated floor under the tiles
- Floor installation work
Underfloor heating under tiles
Usually, for the sake of greater efficiency, a warm floor is equipped only under a tile, because this material gives off heat very well due to its high density. And due to porosity, in addition, it also partially accumulates, which allows you to save some money on water heating.
Materials and tools
To build a warm floor on a ready-made base of concrete or reinforced concrete slabs, you will need a small set of tools: a plumbing kit, scissors for cutting metal-plastic, polypropylene, cross-linked polyethylene, a hacksaw or grinder for cutting copper.
You will also need measuring devices as part of a ruler and tape measure. Pencil for marking and marking.
From the materials you will need a film for waterproofing, a dense insulation with a lock, a mesh in cards, clamps for tying pipes, dowels for attaching the mesh. The main material is a pipe, the choice of which depends on the number of fittings and other parts.
Material Quantity Calculation
To determine the required number of pipes for underfloor heating, you will have to perform accurate measurements of the geometry of the room. Multiply each of the two adjacent sides by a step, which is usually 10-15 cm, and summarize the resulting values.
This will be the approximate length of the pipe, which is necessary for laying the underfloor heating system.
It is only important to take into account also the length of the pipe sections for supply to the manifold cabinet, which is usually located in the boiler room
Clamps are attached every 30-40 cm to prevent unwanted rise of the heating main. The grid is bought according to the square of the room.
Manifold cabinet installation
Installation of the collector cabinet is carried out in the boiler room, closer to the heat source. Immediately from there it is output to all rooms by separate circuits. Immediately, a pump is mounted on the collector assembly, a safety valve for protection against overpressure. In order for the pump to turn not constantly, but to maintain the set temperature, a thermostat with an integrated timer is connected to it.
Filling the screed
After the pipe has been laid, proceed with the pouring of the screed. For this, a cement-sand mortar is prepared, which is poured indoors and leveled with a rule.
The recommended thickness of the screed should not exceed 5-6 cm.
Before pouring the solution, a damper tape must be glued around the perimeter of the room.
Tile selection
After the warm floor has been equipped, proceed to the choice of tiles. It can be any, depending on the preferences of the owner. Here the fantasy is limitless, but you should choose something suitable for the existing interior, if any.
How to prepare a tile for laying on a heat-insulated floor?
The tile does not require special preparation when laying it on a warm floor. Choose the right adhesive, which must be adapted to use on slippery surfaces.
The preparation consists in cutting, but it is better to do this after the whole tile has been laid in order to minimize losses due to incorrect cuts. The surface on which the tile will be laid must first be impregnated with a high penetration primer.
We also recommend that you see - How to cut tiles with a manual tile cutter
Room layout
To facilitate the process of marking the room for further laying tiles, you can use the laser level. This is the most convenient and technological option. But you can also use the old-fashioned way - use a lace with coloring powder.


Laying tiles
It is necessary to lay the tiles from the middle, marking the zero line with a perpendicular intersection. It will be convenient to move away from this place in different directions. Control each tile with a level at several points.
Seam processing
The next day, after the glue has dried, it is carefully removed from the seams with a spatula or other device. This is necessary for their decorative grouting.
System pressure test
After the installation of the heating system has been completed, and it is connected to the collector and the boiler, carry out pressure testing.The procedure consists in raising the pressure in it to the maximum limit and holding the system for some time. As a result, all fittings are sealed by internal pressure.
The nuances of laying floor tiles
The process of installing this flooring is not so complicated, but it requires attention and precise adherence to technology. Here, too, you need to start with a project, choose the design and layout of individual elements.
This can be the usual horizontal method, and the diagonal version, and even whole tile paintings. The more complex the design, the more elements will have to be trimmed.
It is not always possible to lay only whole tiles. You need to plan the layout in such a way that the trimmed elements are out of sight: in the far corner, under furniture, etc.
To determine which number of tiles needed for a particular room, you can use one of the online calculators. This is more convenient, although you can perform the calculations manually using the drawn up plan.
For the floor, you should take floor tiles with a rough surface. An important point is the abrasion class of the material. The more people and the more often they visit the premises, the higher this indicator should be. When buying, you should consider not only the design, but also the batch number. All packs of tiles must be from the same lot.
Items with the same design from different batches may vary in shade. The difference is insignificant, but after laying it will become obvious. Even after the installation has begun, keep the packaging with the lot number in case you need to buy more items.
In addition to the tiles, you need to purchase tile adhesive, as well as a notched trowel for applying it, plastic cross-shaped limiters, a primer and a grout. Of the tools, you may also need an ordinary spatula, a rubber spatula for grouting, rags, a tape measure and a building level, a tile cutter, etc.
If the laying of the warm floor is done correctly, the base under the tile will be smooth and clean. It must be treated with a primer in accordance with the instructions and wait for it to dry. After that, proceed directly to laying the tiles. They start either from the corner or from the center, i.e. from the most prominent areas.
First you need to make a markup on the basis. To do this, draw a straight line in the center of the room parallel to the longest wall, and then, again in the center, draw a line perpendicular to the first. In the doorway, a wooden block-limiter is nailed to the floor.
Place a small amount of tile adhesive on the back of a single tile and spread it over the surface with a notched trowel. Sometimes it is more convenient to apply glue not on the tile, but on the base, about one square meter, so that the glue does not dry out.
The floor tiles are laid on a layer of adhesive, and the distance between the individual elements is fixed using cross-shaped dividers
The tile is put in place and lightly pressed to the base. The rest of the elements are laid in the same way. Special cruciform limiters are placed between the tiles. They help maintain the same distance between individual elements over the entire area.
As soon as the first row is laid out, you should carefully check how evenly the tiles lie with the help of a building level. Such a check is performed constantly so that the entire floor is perfectly flat. If there is a drain in the room, then the tiles are laid with a slight slope towards the drain.
The quality of the laying of floor tiles should be constantly checked using a building level in order to correct the position of the elements if necessary.
This moment is usually taken into account even when arranging the base for the tile. After all the tiles are laid, you need to wait at least 12 hours for the tile adhesive to dry. Now you can remove the dividers and start grouting. The composition can be either in tone with the tile or in a contrasting color, it all depends on the design.
The grout is applied in small portions to the seam area and rubbed with a special rubber spatula, the movements should be cruciform, directed in different directions. The remains of grout are immediately removed from the surface with a cloth, for example, from microfiber.


When the grout hardens a little, you need to check how filled the seam is. If there is not enough grout material, grouting in this area should be repeated.
You will learn how the device of a warm floor under linoleum is made from the following article, the contents of which we recommend that you familiarize yourself with.
Do-it-yourself laying a film floor under a tile
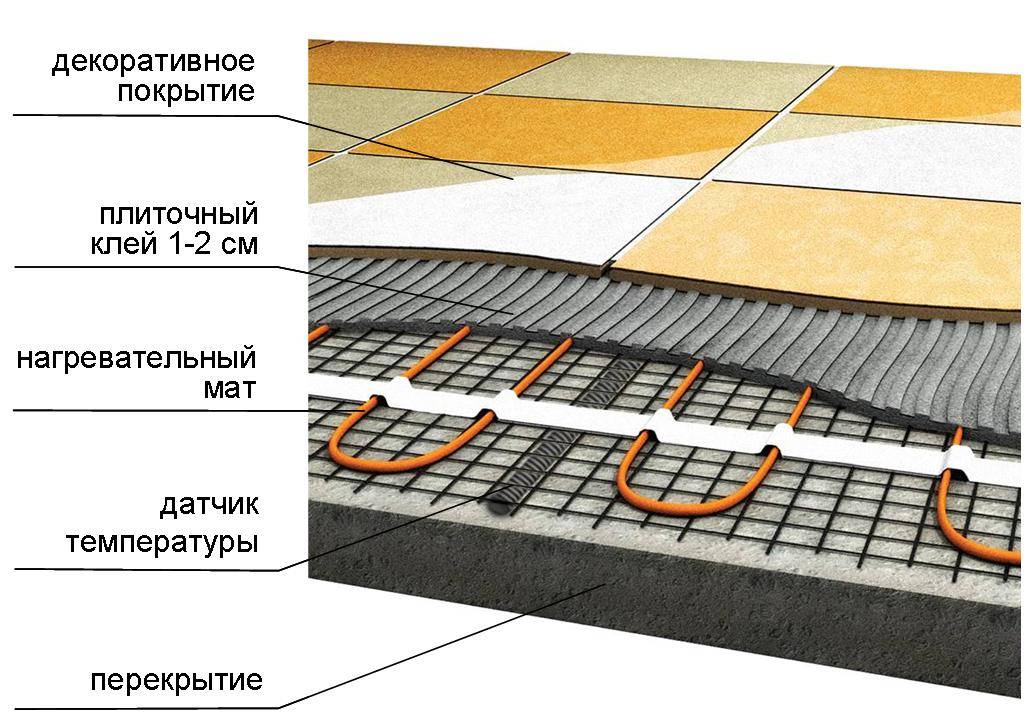
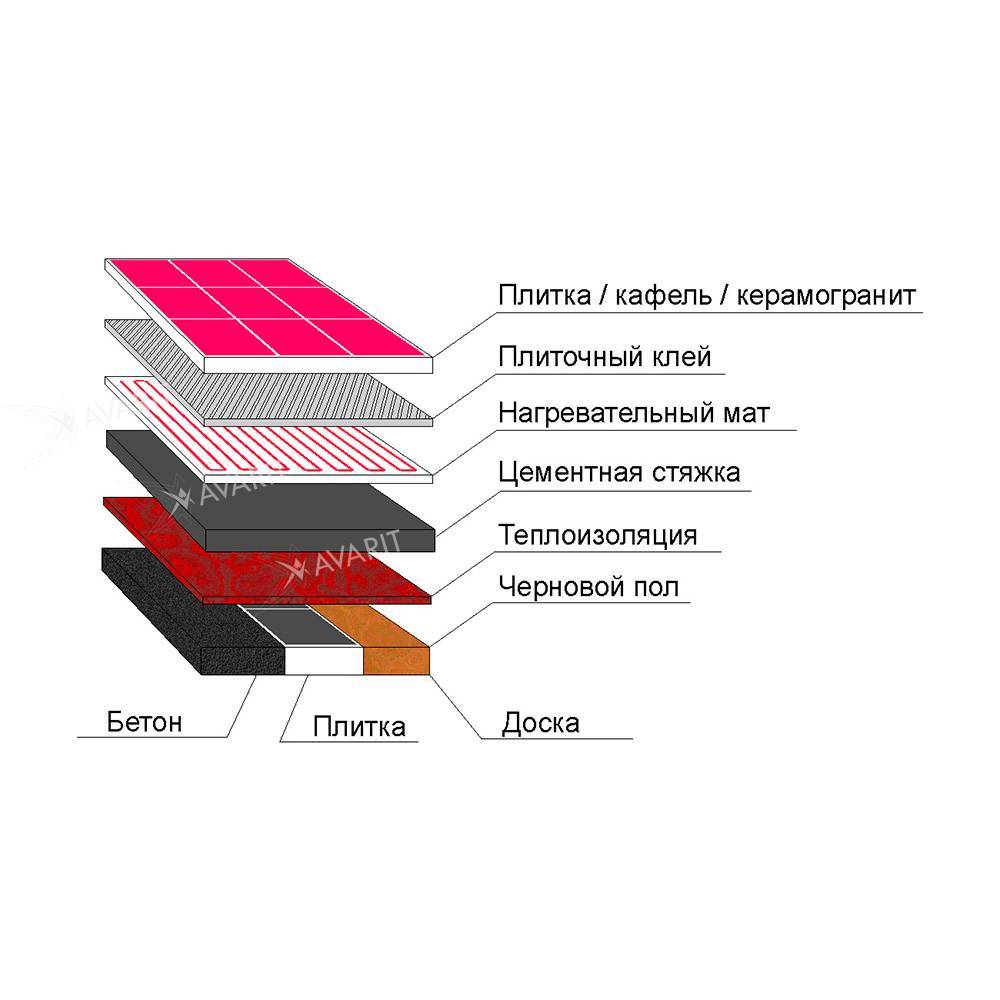
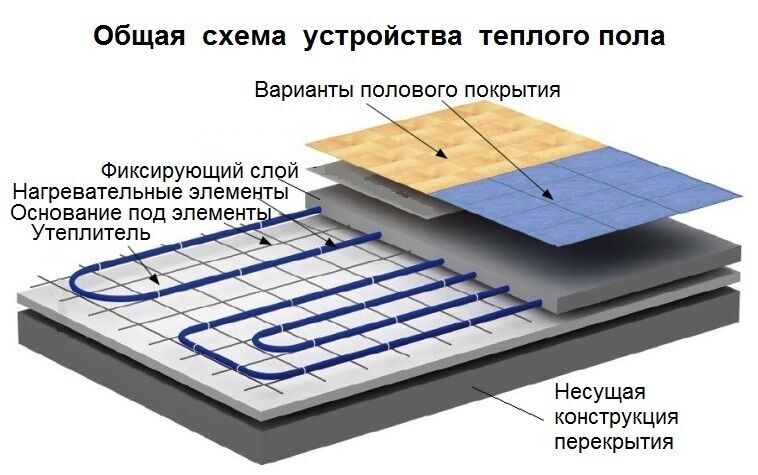
At the initial stage, preparatory work is carried out. The surface is cleaned of debris and leveled. The thickness of the warm floor can reach up to 1.5 cm. An approximate sequential layer of materials to be laid is as follows:
- heat-reflecting substrate - 2-3 mm;
- infrared film - 0.4-0.5 mm;
- paint mesh - up to 2 mm;
- a layer of concrete mortar (or tile adhesive).
Immediately you need to decide on:
- the location of the thermostat;
- effective distribution of the film under the tiles.
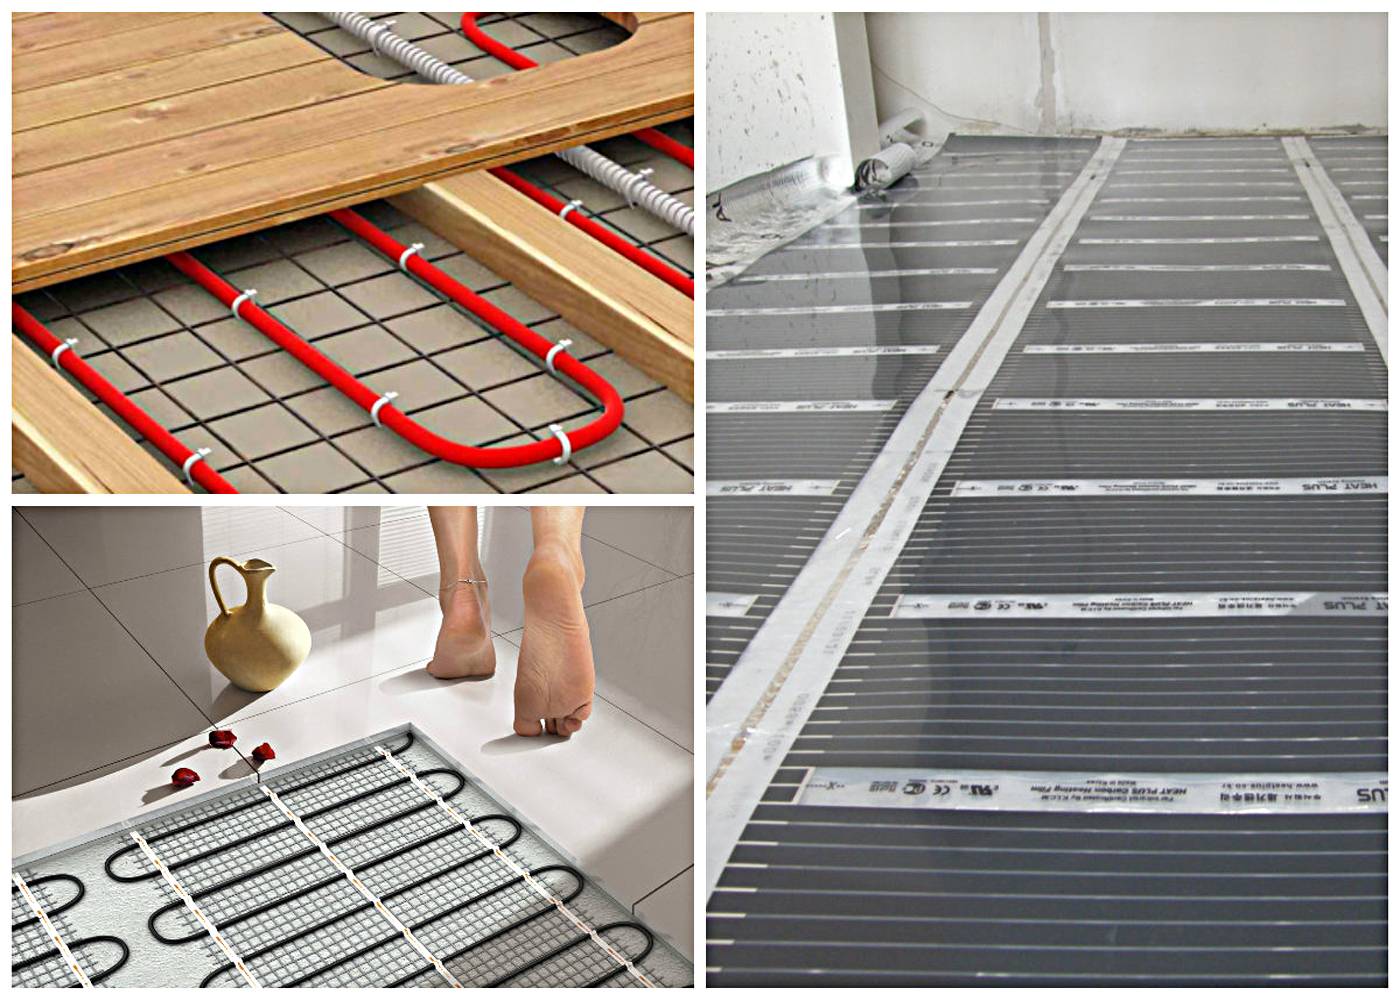
Installation of a warm floor begins with laying a heat-reflecting substrate. The best option would be to use strips, the size of which is 0.6 m. If you purchase a wide material, it should be cut off.
An infrared film is laid on top of the substrate. There are the following requirements for this work:
- do not place stationary furniture on the film (it can lead to system burnout);
- the film should cover up to 70% of the area in the room;
- the presence of indentation from the walls at the level of 10-12 cm;
- the film is not mounted with an overlap.
It is more expedient to distribute the film along the maximum length of the room. The marked heating material is cut off. It is recommended to cut pieces of film in places where there is no graphite layer. If you still need to cut it off along the graphite layer, then this place is subsequently isolated with adhesive tape or electrical tape. The film is attached to the substrate with adhesive tape.
Next you need to do connecting the film floor
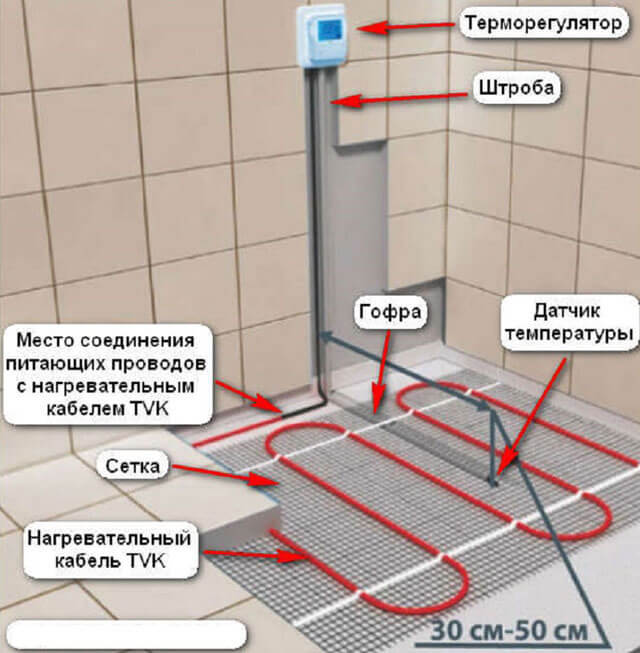
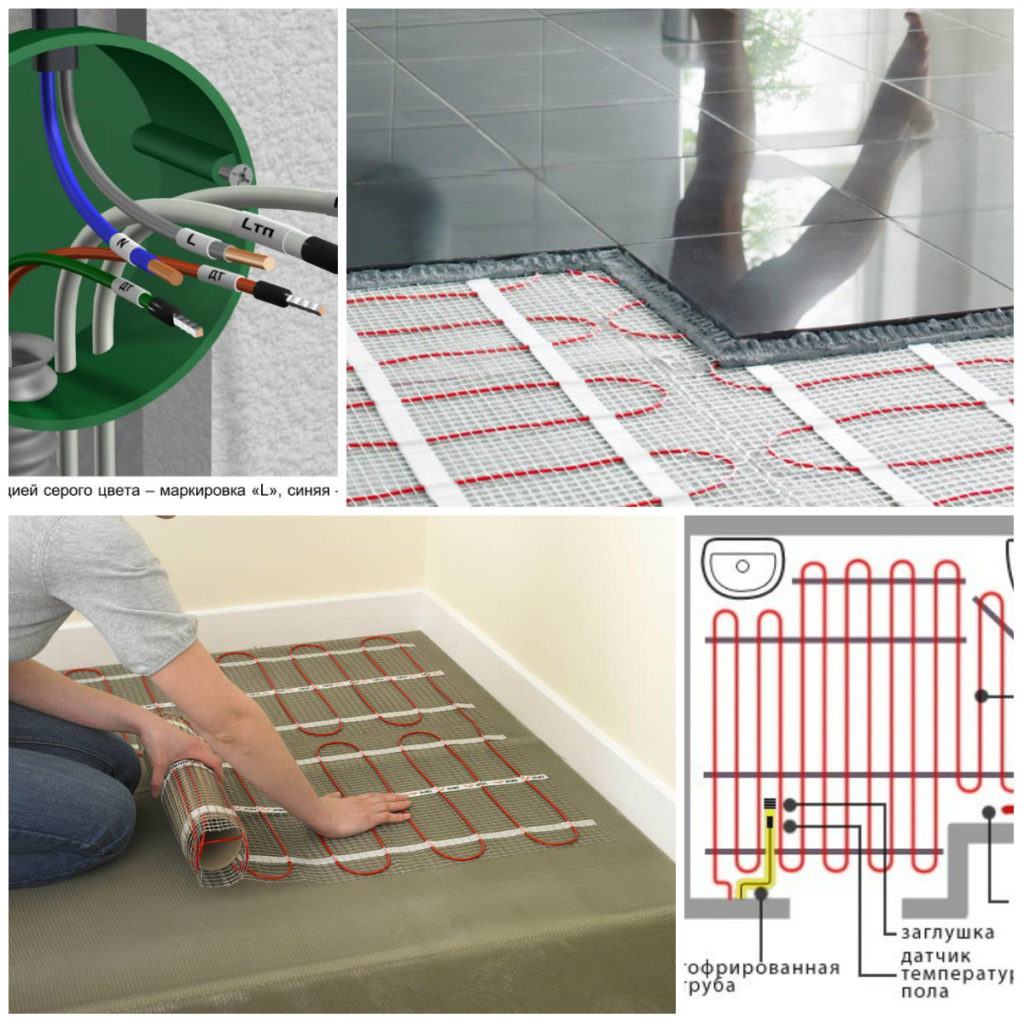
Particular attention is paid to the correct installation of the thermostat and temperature sensor. It’s worth mentioning right away that one thermostat can normally “serve” a room with an area of 12-15 m². It is installed next to the wiring
It is installed next to the wiring.

The cable is fastened to the film using copper clamps. The degree of reliability of the connections is checked using the halves of the clamps, which must be in contact with each other. To isolate the clamps, bituminous tape and silicone sealant are used.
While the sealant dries, the thermostat is mounted. When using an overlay device, the cable is routed outside the wall and placed in a plastic box. If the thermostat is built-in, then a hole is hollowed out in the wall under it and strobes are made for the cable.
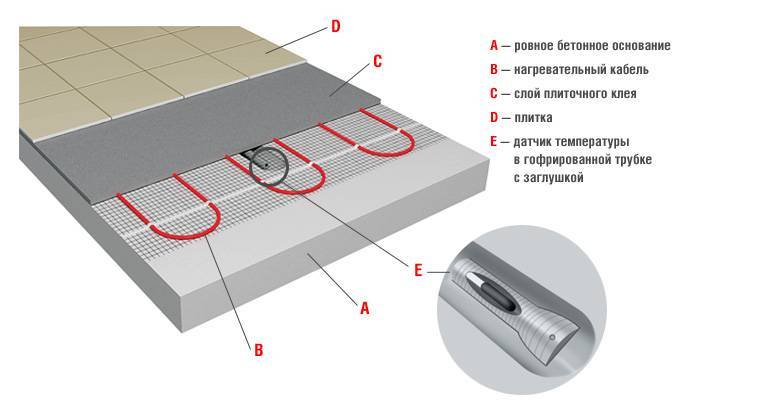
The temperature sensor is mounted under the film. To do this, a groove is made in the base, and the sensor itself is placed in a corrugated tube. The sensor wire is laid in such a way that it is located directly under the tile.
The thermostat is securely attached to the wall and connected to the electrical cable. Foil tape is glued obliquely to the film. To ground the floor, one of its ends is connected to the wire.
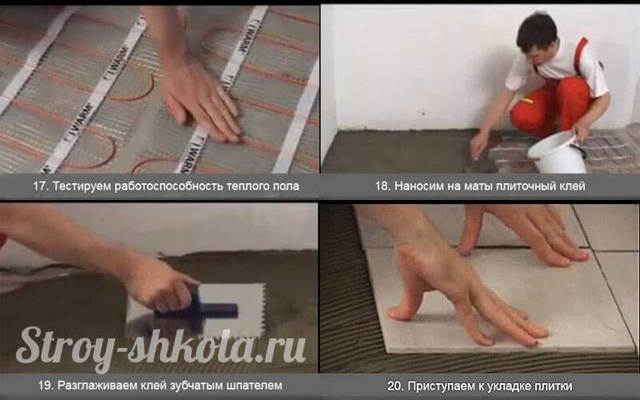
With the help of a test inclusion of the heating system, its performance is checked. All sections should heat up for 5-8 minutes. Using a tester, the places of cuts and joints of the film are checked.
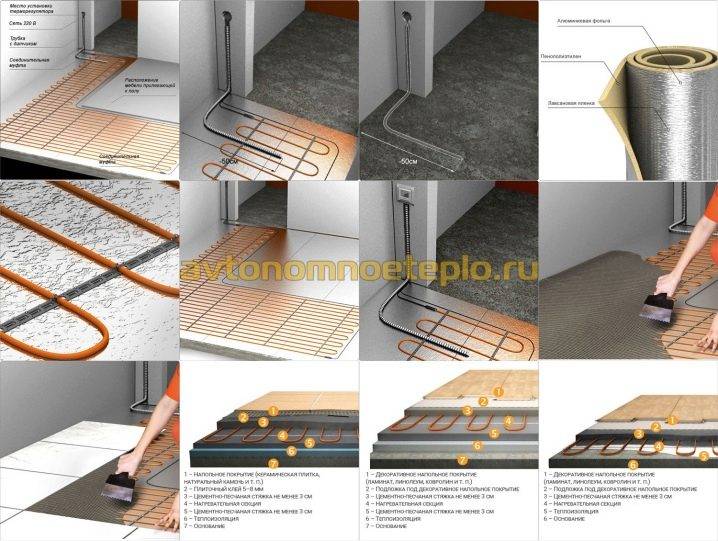
Next, laying the warm floor is performed in the following sequence:
- holes are made;
- dowels are inserted into them;
- a paint grid is attached with self-tapping screws;
- a thin and uniform primary concrete screed is created;
- there is a complete drying of the screed;
- the last check of the functioning of the warm floor is carried out;
- a fixing screed is applied;
- after it dries, a tile is laid.
Screwing in self-tapping screws when attaching the masking grid should be done very carefully. They can damage the surface of the film or contacts, which will cause a break in the electrical circuit. After the final fixation of the mesh, it is necessary to test the warm floor.


When laying the film floor is prohibited:
- work at high humidity and air temperature below 0ºС;
- use nails as fasteners;
- connect the film without grounding;
- bend it at an angle of 90º in a section up to 5 cm long;
- install the film in close proximity to other heating devices.
To avoid mechanical damage to the film, installation work is recommended to be carried out in soft shoes. You can use the infrared warm floor after about a month, when the concrete base under the tiles is completely dry.
Video on the device of the film floor:
Understanding the types of underfloor heating
Installation of underfloor heating under tiles begins with the choice of heating equipment. Some experts and consumers say that it is much more profitable to lay water floors, but this is not always possible. In addition, they have certain disadvantages:
- For laying water pipes, a powerful concrete screed is required - it is poured over the laid pipes, its thickness reaches 70-80 mm;
- Concrete screed creates pressure on subfloors - relevant in multi-storey buildings, where floor slabs are not designed for such loads;
- The water pipe is at risk of failure - this can lead to flooding of neighbors and unnecessary repair costs.
They are more applicable in private households, where it is possible to equip them even at the stage of construction or repair.
Please note that in the event of a breakthrough of water heated floors, you will have to repair not only your apartment, but also someone else's.
Electric underfloor heating for tiles is represented by three main varieties:
- Heating cable is the best option;
- Heating mats - somewhat expensive, but effective;
- Infrared film is not the most reasonable option.
Let's consider the possibility of their use in conjunction with tiles.
Infrared film
When choosing electric underfloor heating for tiles, consumers will certainly get acquainted with infrared film. This film provides heating of floor coverings with the help of infrared radiation, under the influence of which they become warm. But it is not suitable for laying under tiles or porcelain stoneware - a smooth film cannot normally connect with tile adhesive or mortar, which is why the tile simply falls off, if not immediately, but over time.
Also, the electric infrared film will not be able to ensure the connection of the tile adhesive and the main floor, despite the presence of special technological holes. The finished structure turns out to be unreliable and short-lived, it threatens to fall apart piece by piece. We conclude that some other heating equipment is needed under the tiled floor, infrared film is not suitable here.
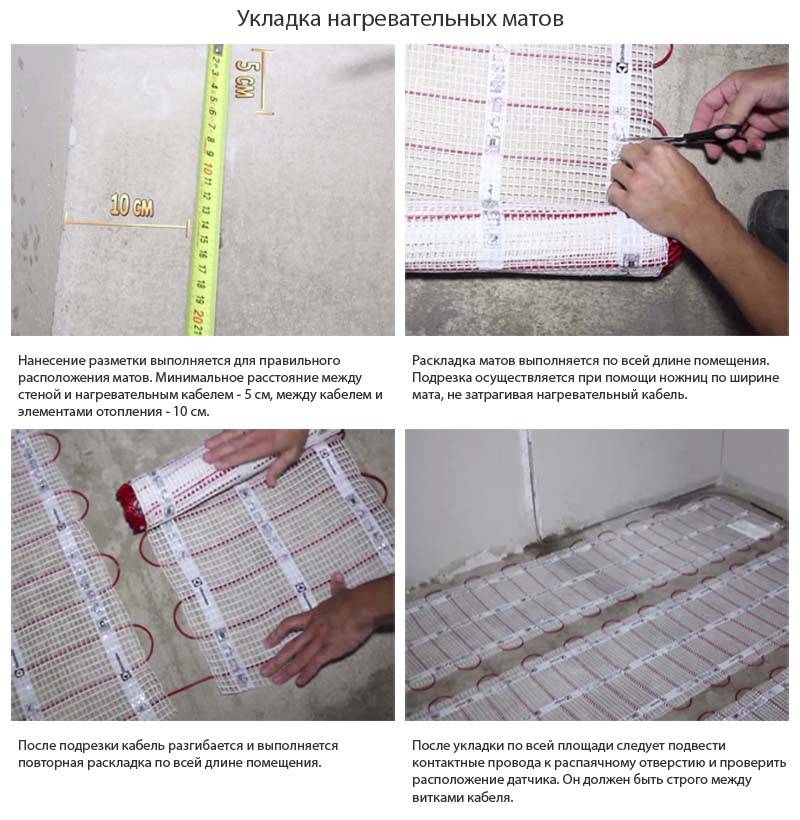
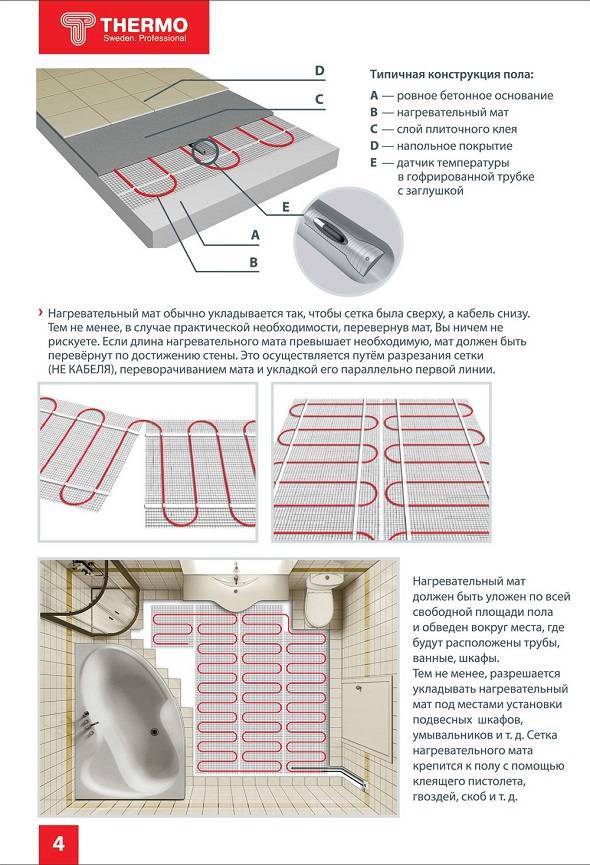
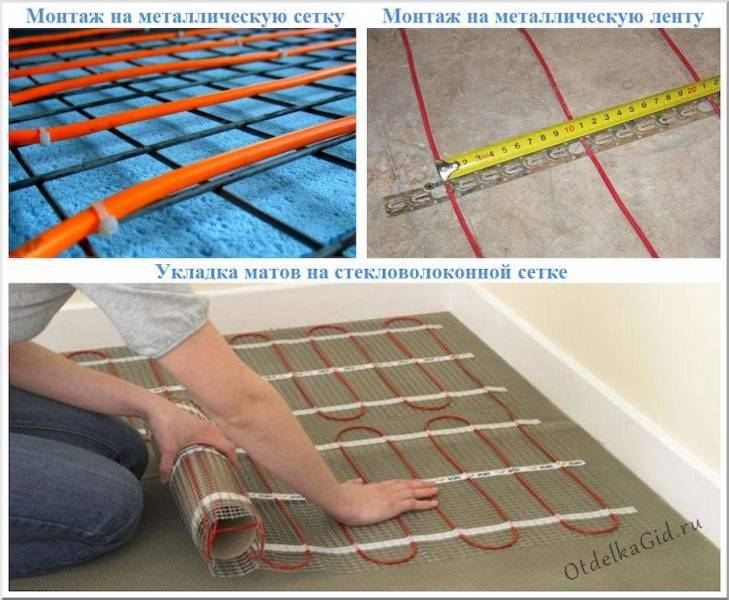
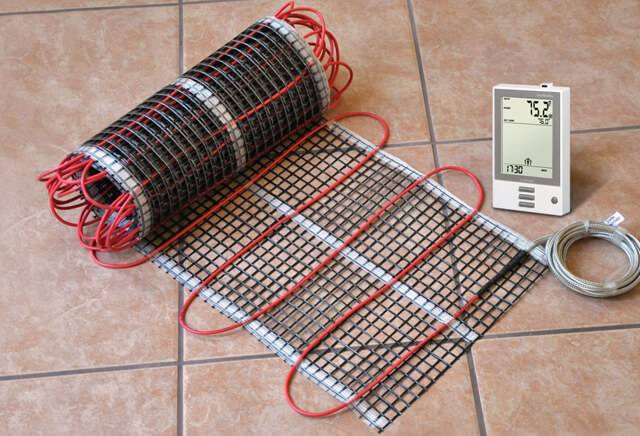
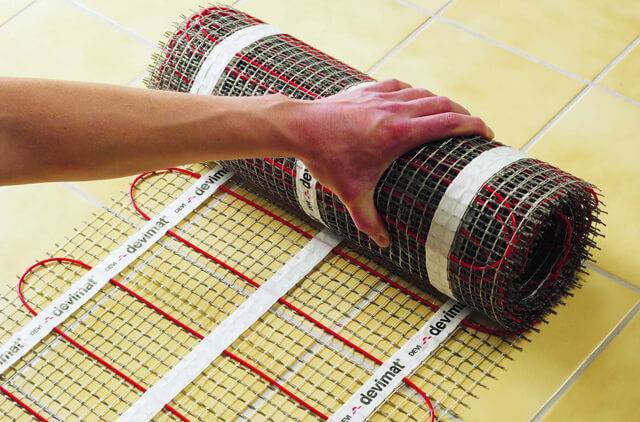
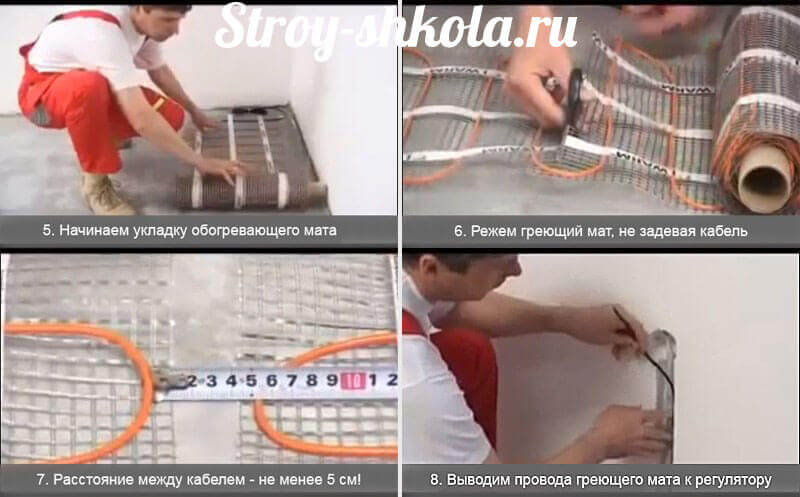
Heating mats
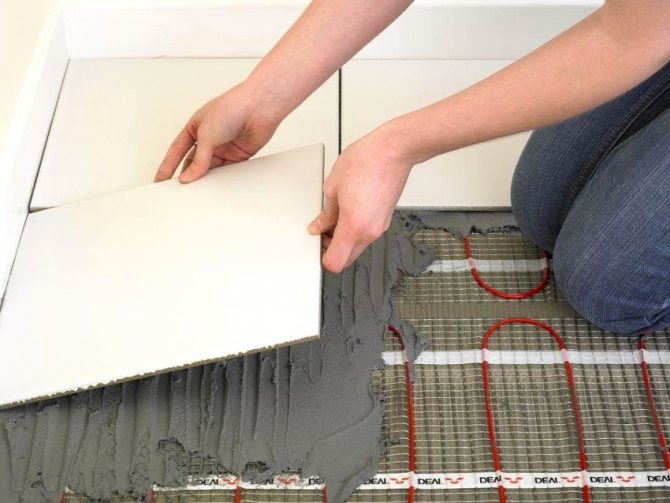
The aforementioned heating mats provide the ability to mount an electric underfloor heating without a screed under the tiles. They are modular structures, ready for installation work - these are small sections of a strong mesh, on which sections of the heating cable are fixed. We roll it out on a flat surface, apply glue, lay the tiles, let it dry - now everything is ready, you can safely walk on it and put furniture.
Electric underfloor heating for tiles, created on the basis of heating mats, pleases with ease of installation.They do not require a bulky and heavy cement screed, but they are distinguished by their high cost - this is a small minus that you have to put up with. But we can safely mount them on rough surfaces and immediately start laying tiles or porcelain tiles.
heating cable
Underfloor heating under tile is a more standard and cheaper solution than the aforementioned mats. It will please you with warmth and long service life, as well as a low probability of breakage. Electric heated floors of this type are mounted on the basis of three types of cable:


- Single-core is not the most worthy solution. The thing is that this cable format requires connecting wires to two ends at once, and not to one. This is not very convenient and leads to noticeable labor costs;
- Two-core - a more advanced cable for installing an electric underfloor heating under a tile. It is easy to install, as it does not require a ring connection;
- Self-regulating cable - it can be easily cut to almost any length, thanks to the special internal structure, it can automatically adjust the heating temperature.
Using a self-regulating cable for installing an electric underfloor heating under a tile, you get the opportunity to save on electricity. Also, experts and consumers note a more uniform heating, which is difficult to achieve when using heating elements of a different type.
Final conclusions
We can implement electric floor heating under tiles in two ways - using a heating mat or a heating cable. Infrared film is not suitable for our purposes, it is better to use it with a laminate.More precisely, you can use it, but only at your own peril and risk - if you put tiles directly on the film, then no one can guarantee the long service life of such a structure. There is a high probability of its failure in the very near future.
Electric mats
Electric mats are also different and differ in the principle of operation:
- Cables heat up themselves, after which they transfer heat to the screed and the floor, and already the air is heated from the floor;
- Carbon mats work in a completely different way. They emit infrared heat, which heats all objects in the room, floors and walls, which subsequently release heat into the air.
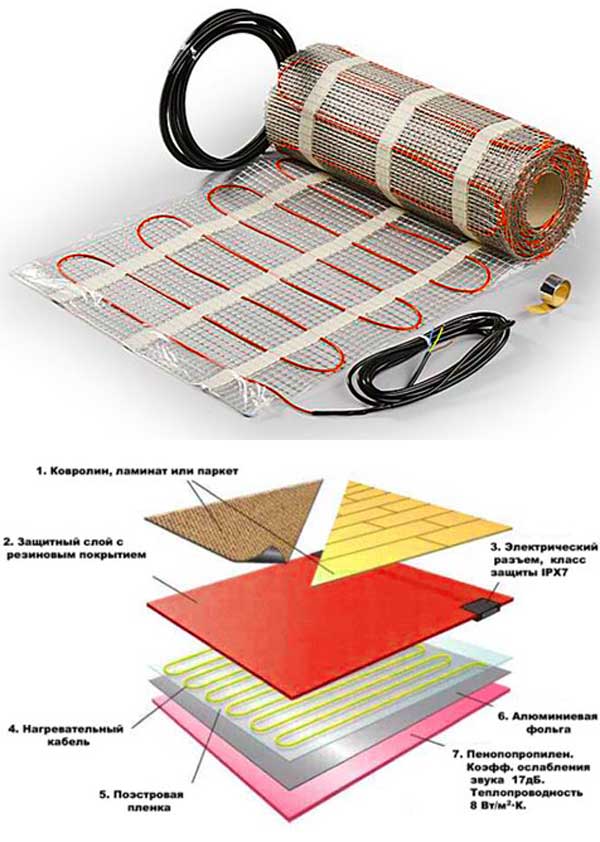
For laying under tiles, a cable mat is best, because it costs less and is almost as good as carbon, so it’s worth stopping at it. A cable mat is a mesh made on the basis of polymers, such as fiberglass, on which a heating element is attached - a cable.
Additionally, the mat is covered with an adhesive composition, protected by a special film, which is removed during installation. The adhesive on the mat makes the job of installing the electric floor much easier.
The cables in the mat may also differ. In total there are two types: two-core and single-core. They have absolutely equal power, but the price of single-core cables is much lower. The advantage of a two-wire cable is that it is easier to connect and creates a smaller electromagnetic field.
They usually include:
- Heating mat 45 cm wide;
- Wall-mounted thermostat
- Thermal sensors;
- Connecting wires;
- Instruction.
Also, the package may include any small things, for example, double-sided tape or corrugated pipes, but this is rare.
Water heated floor under the tile
Liquid heating elements in this case consist of heating pipes forming a collector, water is used as a heat carrier. A properly installed and designed water-heated floor distributes heat in the room no less evenly and efficiently than electrical systems. All main communications are hidden under a concrete screed and do not interfere with the arrangement of furniture.
Water floor heating device
The option under consideration is more suitable for private dwellings with autonomous heating; in a simple city apartment, it is problematic to equip a water-heated floor in a bathroom or other rooms. With proper installation, it can replace standard radiator heating. The main elements of liquid heating systems:
- PVC or metal-plastic pipes;
- thermal insulation;
- damper tape self-adhesive;
- fittings for pipes;
- cranes;
- mounting brackets;
- manifold cabinet;
- boiler;
- pump.
Characteristics of a water heated floor
When calculating liquid systems, slightly different quantities are used than in electrical heating appliances. When solving the problem of how to choose a warm floor for tiles, you need to make an estimate by determining the exact amount of consumables. We obtain the approximate length of the pipe by the formula: L \u003d P / U x 1.1 + K x 2. For correct calculations, you will need the following values:
- P is the area of the rooms;
- Y - laying step;
- K is the distance from the entry point to the manifold cabinet.
The main characteristics of the liquid floor:
- The water floor temperature is up to 29°C (33°C in bathrooms).
- The maximum length of pipes in one circuit is 120 m.
- Pipe diameter - 16-25 mm.
- Water consumption - up to 30 l / h.
- The optimum temperature in the boiler is 40-55°C.
Pros and cons of a water-heated floor under a tile
The advantages of liquid heaters installed in the screed make up an impressive list. Water heated floor under the tile has the following advantages:
- The radiation method is used to heat the space.
- No wall mounted radiators needed.
- Optimum humidity in the rooms.
- Easy to operate.
- There are no risks of burns.
- Saving up to 30%.
- Durability.
- Safety.
Cons of water floors:
- Difficult to implement in an apartment building.
- The thickness of the warm floor under the tiles, taking into account insulation, pipes and other elements, is up to 14-15 cm, which causes some loss in the height of the room.
Do-it-yourself water-heated floor under the tiles
Work on the installation of liquid heating with bottom heating is carried out quickly, this is a simple task for a qualified locksmith. The main stages of how the underfloor heating is installed under the tile:
- We level and clean the base of debris.
- Installing a switch cabinet.
- We lay thermal insulation (styrofoam, polystyrene foam).
- Lay out the damper tape.
- We fix the reinforcing mesh.
- We collect the pipeline on the floor.
- Type of pipe laying - snake or snail.
- We fill and test the warm floor under the tiles with a pressure 1.5 times higher than the nominal pressure.
- Fill the finishing screed 3-6 cm.
- After drying, lay the tiles.
Floor installation work
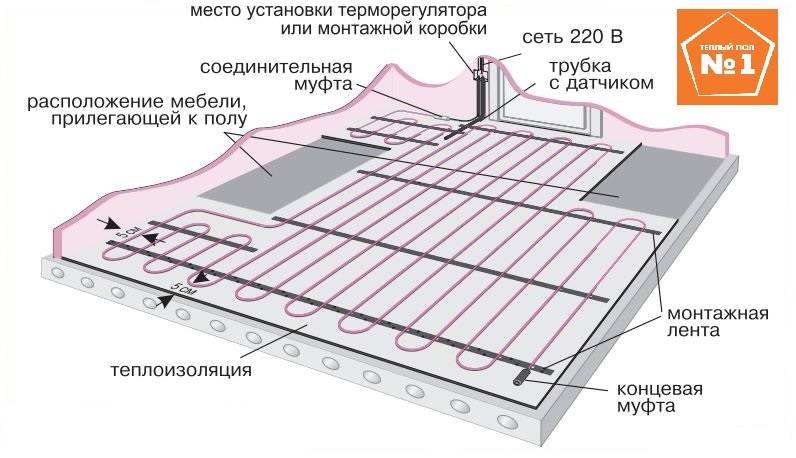
Scheme of installation of electric underfloor heating.
First of all, starting the production of a warm floor, you need to install a thermostat. It is mounted at a height of 50 to 90 cm outdoors, next to the switch. A groove is made in the wall and in the floor using a perforator.A socket box is installed in the upper part of the groove, a supply wire is output into it. A temperature sensor, covered in a protective corrugation, is placed in the same opening. The temperature sensor is connected to the thermostat. A plug is put on the bottom of the corrugation. The strobe in the floor is sealed with mortar.

Laying a warm floor can not be done over the entire surface of the room, but only where the inhabitants of the house can be. If we talk about the bathroom, it is necessary to exclude from the heating area the places where plumbing fixtures, furniture and stationary heating devices are installed. The cable laying pattern, cross-section and length of the heating element depend on the size of the heated surface.
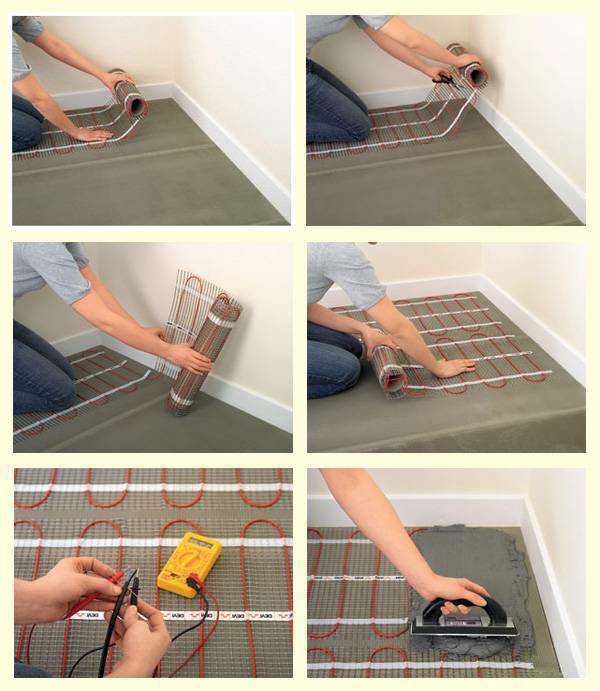
Ready-made kits for the electric floor mainly offer rolls of mounting tape with a pre-glued cable. This greatly simplifies the work of the stacker, helping to maintain the necessary distances between the cable lines and eliminate the possibility of bending it.
Start the installation of a warm floor from the strobe
In the case of working with a sheet having a single-core cable, it is important to unfold the roll so that the end of the sheet is also at the strobe. You can unfold the canvas by cutting the base mesh with metal scissors without damaging the heating element itself. Lead the wires to the socket
Check the working condition of the thermostat and mount it in the socket
Lead the wires to the socket. Check the working condition of the thermostat and mount it in the socket.
Before starting the final pouring, the assembled complex should be checked. Underfloor heating must be in good working condition. To check, you need to turn on the circuit for a few minutes and make sure that the system is working properly.You can use a tester to measure the resistance of a cable. This will also show the performance of the installed underfloor heating system. The required parameters are indicated in the instructions for the set.
After checking all the indicators, making sure that the system is connected correctly, you can proceed to the final screed of the electric underfloor heating. There are 2 options here. You can pre-fill the surface with cement mortar and lay the tiles as the cement mortar hardens and dries completely. But there is a shorter way: the tiles can be laid out immediately after the installation of the heating floor.
The floor screed must be done with care, avoiding the formation of voids. Unfilled areas of the screed can cause premature damage to the heating element, resulting in a breakdown of the entire electric heating system. After pouring, the cement layer should be allowed to dry for 6 days. Only after the screed is completely dry, you can start laying tiles, installing skirting boards, and grouting the spaces between tiles. As a decorative material, you can use not only tiles, but also, if possible, more expensive materials: porcelain stoneware, natural stone tiles. If you have the necessary skills, you can also lay the tiles with your own hands. Otherwise, it is recommended to contact the master tilers. Qualitatively laid out tiled flooring will give the room an exquisite beauty and a finished look.
Not earlier than 35 days after the final finishing, you can start using the electric underfloor heating. The problem is not the ability of a raw fill to provoke a short circuit in the entire network.It's just that some materials, when exposed to heat, have the ability to expand or contract. Both cases can cause deformation of the screed, which will lead to irregularities on the surface or to the formation of small voids.
Cutting tiles with a tile cutter.
Tools and materials:
- single-core or two-core cable;
- mesh for the base;
- thermostat;
- temperature sensor;
- corrugation for the sensor;
- damper tape;
- cement;
- construction sand;
- perforator;
- metal scissors;
- penofol;
- mounting tape;
- reinforcing mesh;
- antiseptic primer;
- roller;
- tile;
- tile adhesive;
- spatula with teeth;
- plinth;
- grout for tiles.
The process of installing a warm floor under a tiled floor is not complicated. It requires studying the installation instructions, accuracy in work and the availability of the necessary skills.


