
- Features of laying film underfloor heating under laminate
- Starting the heating system after connecting it to the thermostat
- Wiring diagram for infrared floor heating
- How to properly prepare the base
- Installation of electric heating
- infrared heating
- Mounting Features
- Preparatory work
- Connection and isolation
- The technology of laying infrared floor under the laminate
- Drawing and laying scheme
- Subfloor preparation
- Mounting
- Connection and test run of the system
- Laying laminate
- Drawing up a laying scheme for laminate flooring - how to lay it correctly
- Floor laying technology at home
- Step-by-step instructions on how to lay the infrared floor with your own hands
- Installation and its features
Features of laying film underfloor heating under laminate
After completing the preparation process, you can proceed directly to the installation of the IR film. The algorithm for installing a film underfloor heating under a laminate is as follows:
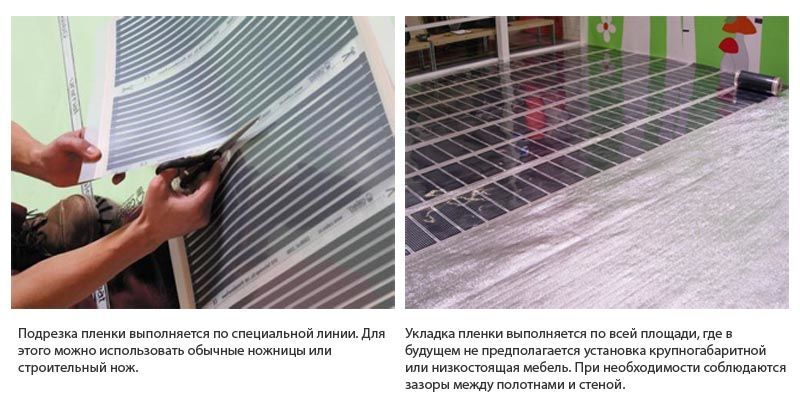
First of all, you need to cut the material. The length of the strip should not be more than 8 m;
Before laying the infrared film under the laminate, it must be properly cut
- at the second stage laying of strips is made.In order to reduce the number of joints, experts recommend laying sheets of infrared material along a long wall. The distance from the edge of the film to the wall should be at least 10 cm, and the distance between adjacent canvases should be at least 5 cm. It is best to install a film underfloor heating using a parallel method;
- next, you need to splice the wires and insulate the unused contacts. The wires are connected by means of special clamps - terminals. And for insulation, a special bitumen tape is used, which has a high sealing coefficient;
- then the wires of the infrared floor are connected under the laminate. To do this, you need to connect the wire to the terminal and insulate it;
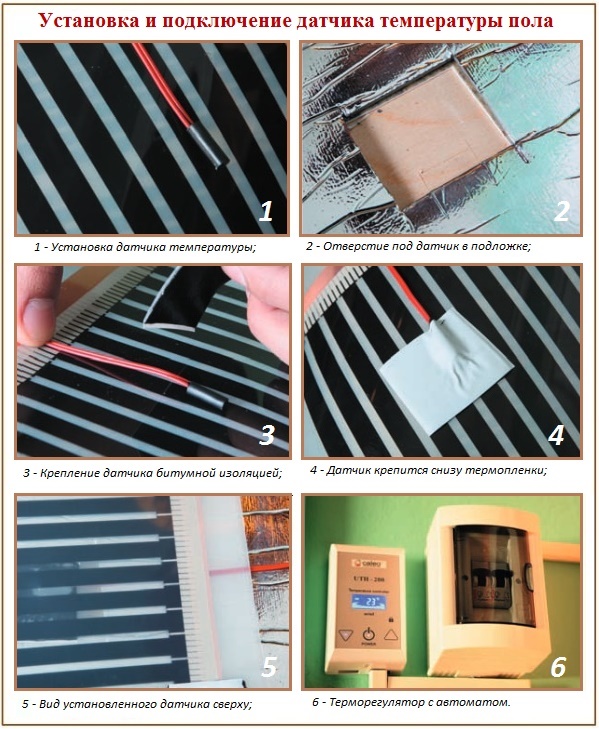
- at this stage, the temperature sensor(s) are mounted. Experts advise to start these elements under the second canvas (closer to the midpoint). The sensor is installed in this way: it must be glued to the underside of the canvas on the black strip;
- then the infrared underfloor heating is connected to the thermostatic device. To do this, it is necessary to bring wires from the film and the temperature sensor to it. The connection itself is made through the RCD;
When carrying out work on the installation of IR films, only special types of laminate should be used, which are designed just for such systems.
- further it is necessary to check how the mounted communication functions. To do this, its trial run is carried out;
- The last stage of the infrared floor installation takes into account the laying of the appropriate floor covering on top of it, which in this case is represented by a laminate.
It is recommended to leave it in the room for 2-3 days before laying the laminate flooring.This is necessary so that it acquires the appropriate temperature, which in the future will avoid its expansion. To get acquainted with the features of using IR film in this case, it is recommended to read reviews on specialized sites. Film heated floors under the laminate are the most common today.
Starting the heating system after connecting it to the thermostat
The sequence of connection to the thermostatic device will be as follows:
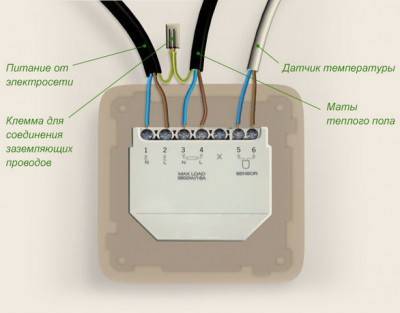
- After all laying work is completed, all wires will need to be connected to the thermostat. It is worth considering one important nuance - if several zones of a warm floor are connected to one control device, then there should be no twisting of wires. Wires must be connected only with special terminal connections.
- The connection of wires to the connectors of the control unit of the thermostat must be carried out according to the diagram, which is present in the technical documentation. In it you can always find the power entry points (L and N - phase and zero), grounding, temperature sensor, as well as heating elements, which in this case are the load. As a rule, next to the resistor icon is the maximum load in watts or amperes. After supplying all the wires, they are hidden in a special channel, and the thermostat is installed in a specially designated place.
- They proceed to a trial run of the system after an additional complete check of all connections. With the correct functioning of the installed system, it is de-energized and the laying of the laminate is started.
- To make film heaters even safer, they can be additionally protected from possible damage during the laying of the covering panels.It will be possible to prevent accidental spillage of liquid on them in the event of a spill on the floor of large volumes of water. For this, laying a layer of 200 micron polyethylene film is perfect - it will not impair the effectiveness of infrared radiation. Separate segments of such a film are laid with an overlap of 150-200 mm, and the joints are sealed with adhesive tape.
- Laying laminate over an infrared film floor for heating is largely based on the same principles as conventional laying. It is necessary to be guided by the recommendations for a specific model of flooring, taking into account the configuration of the room.
At the end of the laying of the laminate flooring, it will be possible to use a heating system based on an infrared film floor. It is worth noting that in this case it is worth being especially careful so that the laminate has time to adapt to the heating conditions.
It is recommended not to turn on the heating immediately to the maximum, but first set the temperature within 15-20 ° C, increasing by 5 degrees every day, bringing the temperature to the desired level. This approach will allow, among other things, by selecting the temperature to determine the most suitable mode of operation of the "warm floor".
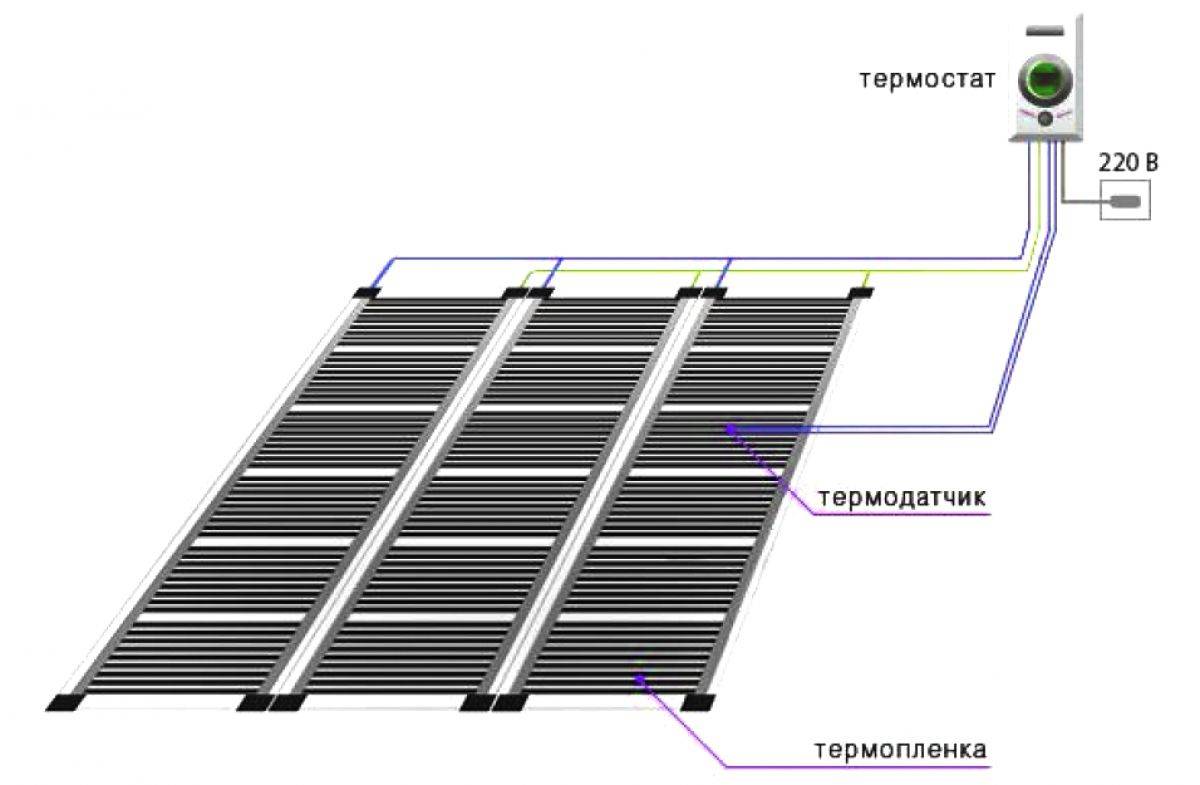
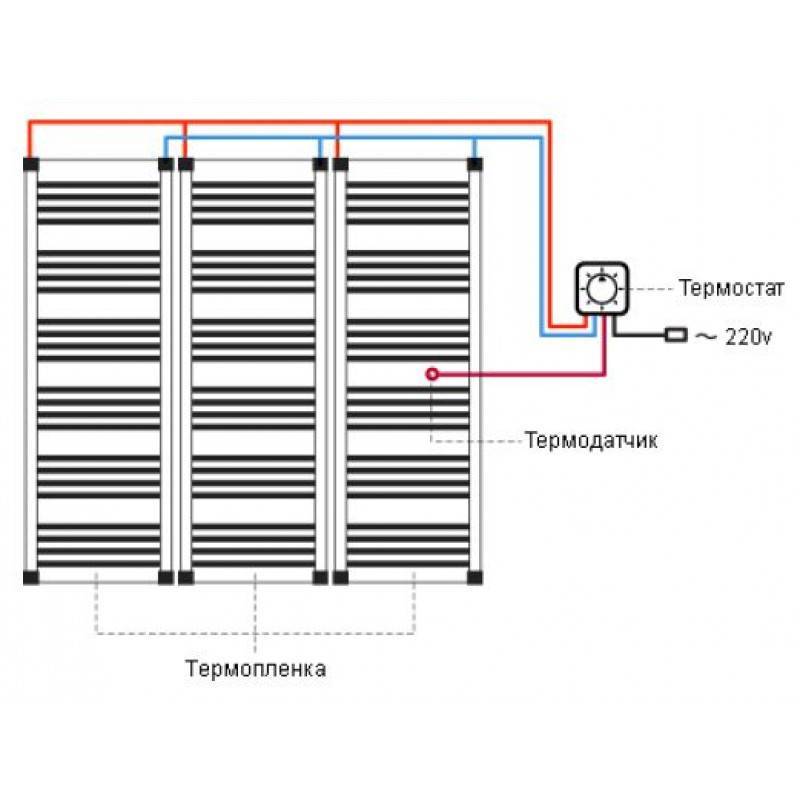
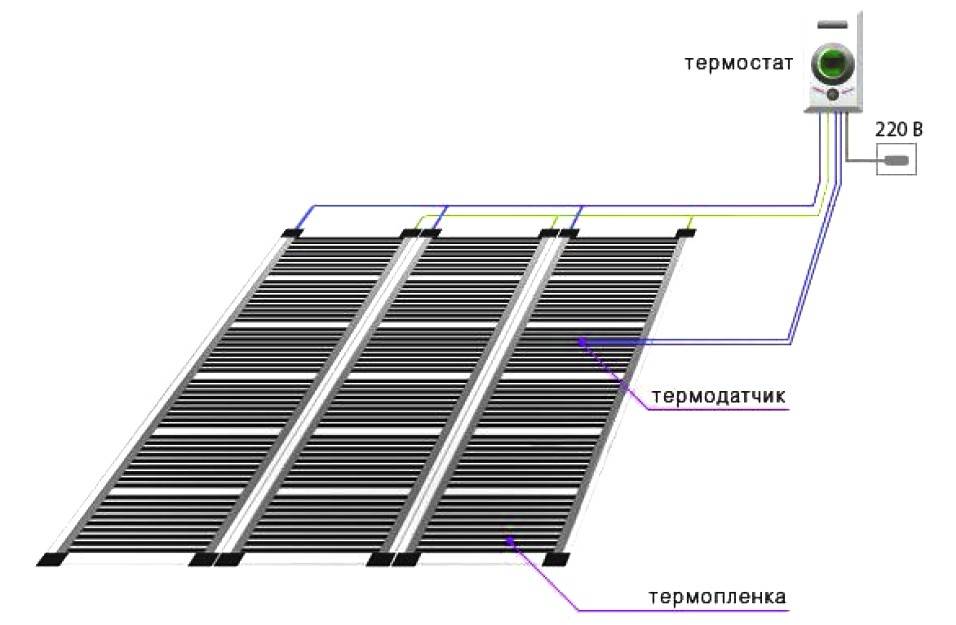
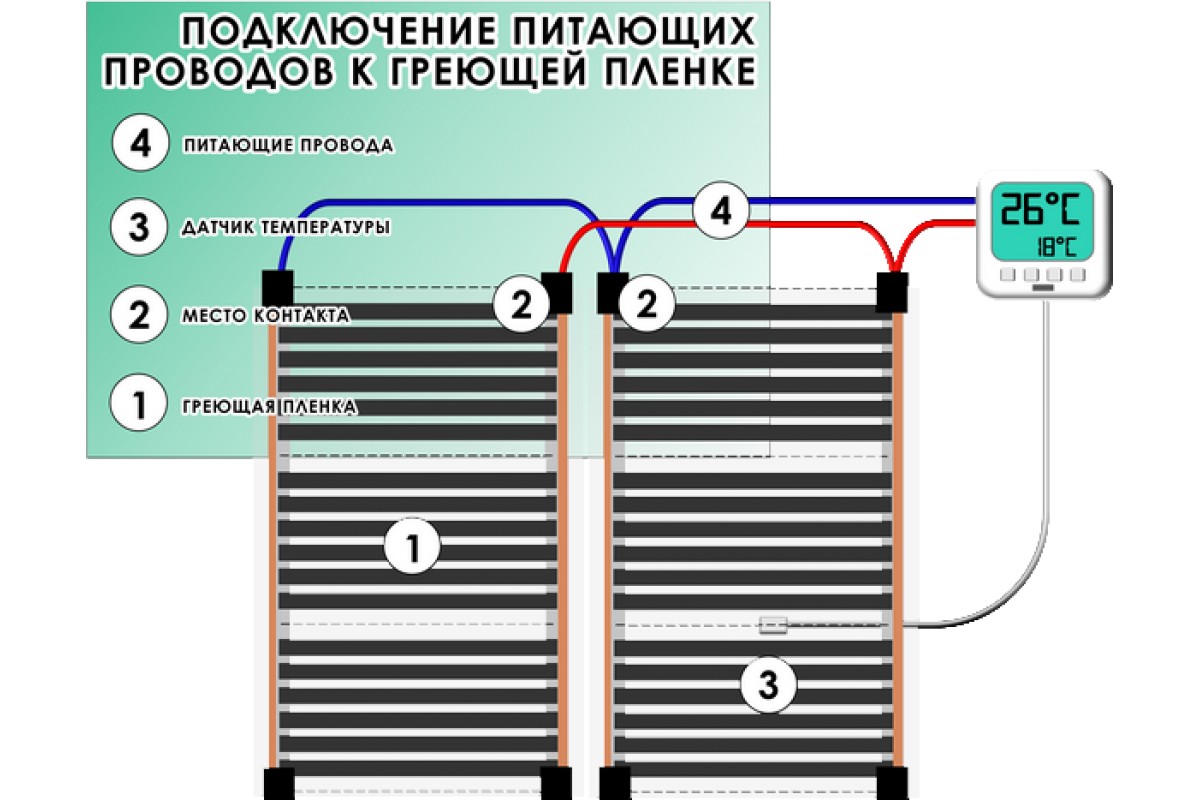
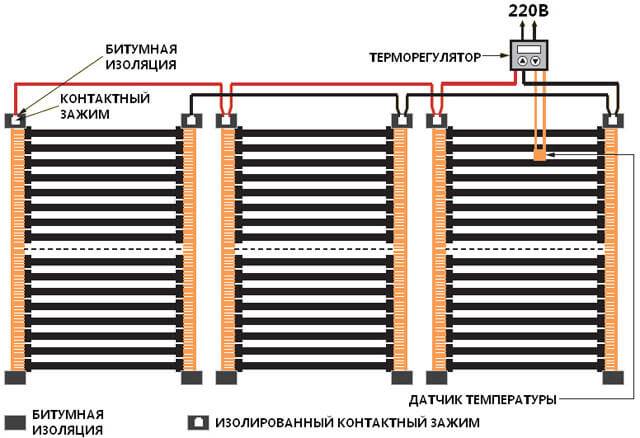
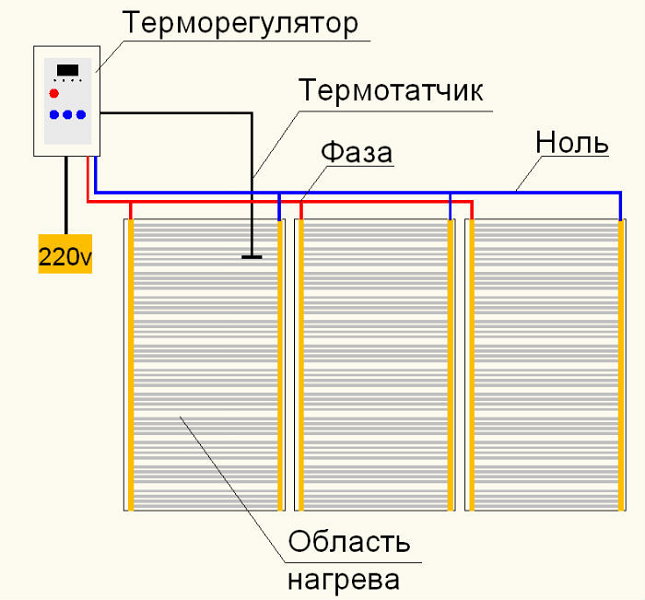
Wiring diagram for infrared floor heating
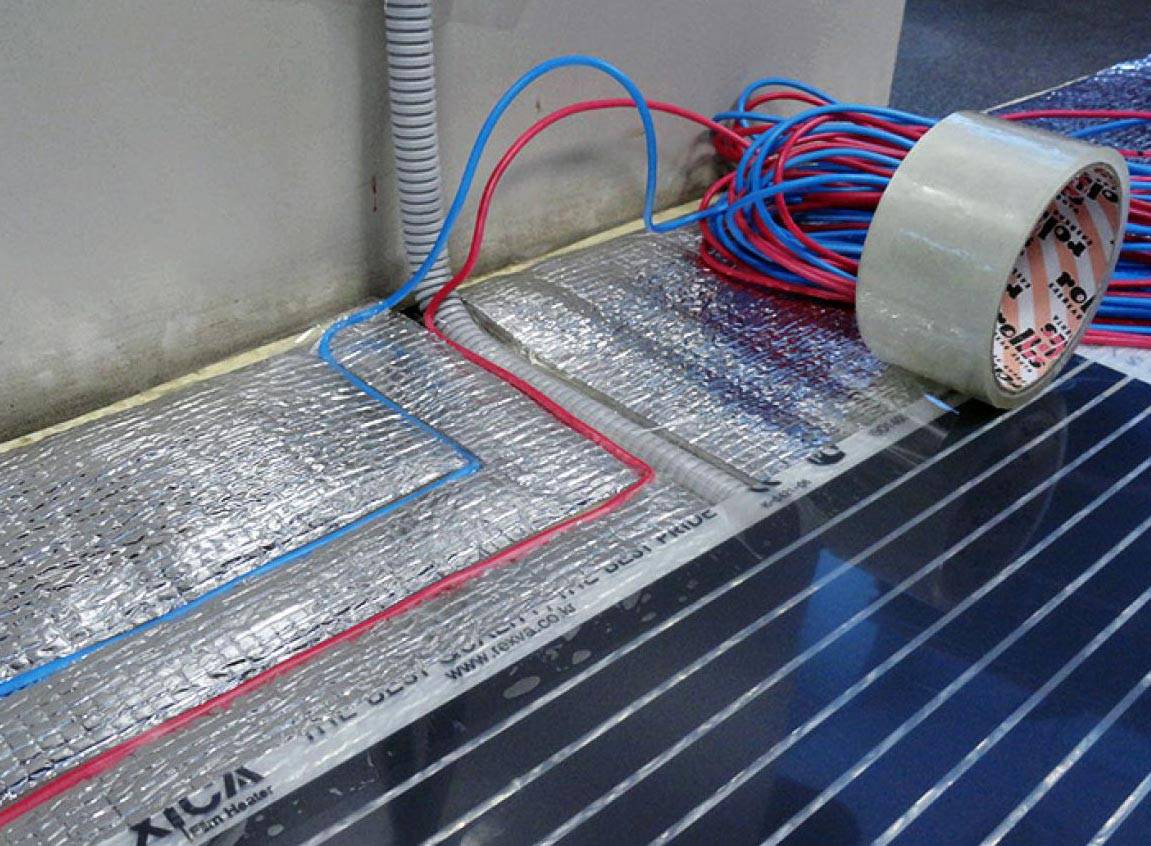
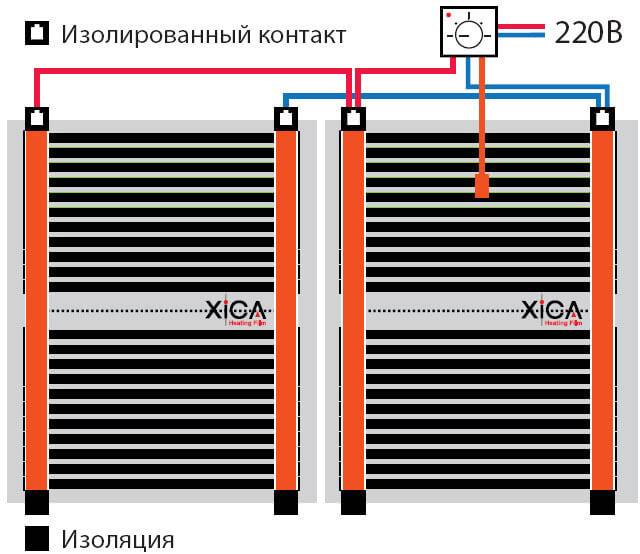
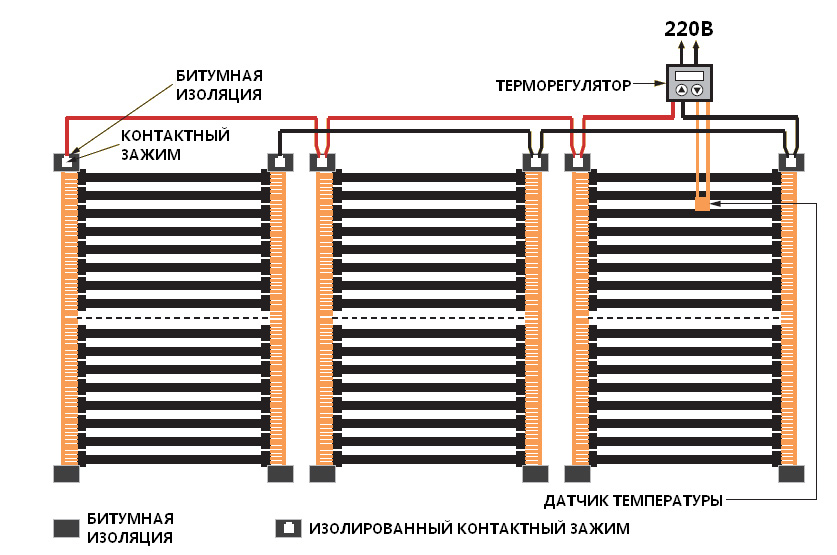
Two wires should come out of each section of the infrared film and be connected to the contacts of the thermostat. There are two ways to connect wires to an infrared warm floor. In both versions, the scheme of parallel connection of sections to each other is used.
The first way from each piece of film, the supply wires (phase and zero) are brought out to the socket or junction box, where the wires are connected in parallel to each other.After that, their conclusions are connected to the thermostat.
The disadvantage of this connection is a large number of connected wires. In addition, to connect the wires, you need to bring them into some kind of box. And where can I get it if the repair is already completed?
The second way is simpler. Connect by looping. For example, a phase wire approaches the bus of one piece of film, connects in a terminal, and then goes to the terminal of another piece of film. And so on. Moreover, the connection should be made with a solid wire (you do not need to cut it near the terminals).
The neutral wire is connected in the same way. As a result, we get a parallel connection without desoldering.


How to properly prepare the base
There are several ways to prepare wood flooring for underfloor heating. The best replacement for a concrete screed is the installation of chipboard from 16 to 22 mm thick. It will be able to withstand a significant load, stabilize the wooden base and will not crush the heating elements. Both electric and water heating elements can be laid on it.
Flooring device in a wooden base for underfloor heating
- The plate is laid on the logs. It is better that the step size is no more than 60 cm, otherwise the installation of additional bars will be required.
- Before laying the slab, waterproofing and insulating material are laid, so that it is in the gaps between the lags.
- The next steps depend on the type of heating you have chosen. If these are electric heating elements in the form of a film or mats, then you need a soft foil substrate that will reflect heat into the room.The water and cable version of heating will require fasteners or guides, between which the heating elements will be located.
Installation of electric heating
What type of heating is better to choose for a wooden base? Installation of the cable version will require effort in the form of installing fasteners or elements between which the cable will be located. Such elements can be sawn grooves in the boards, aluminum rails or wooden plates.
Step by step installation of electric underfloor heating
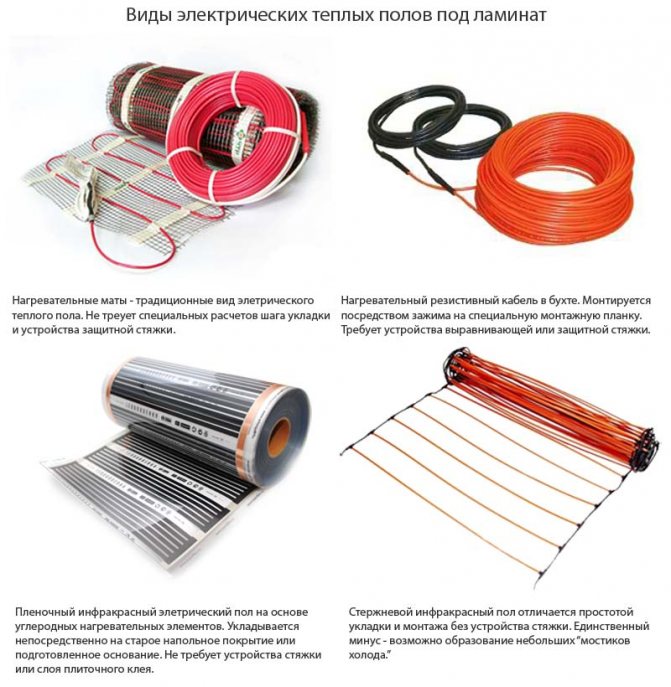
Therefore, the best option for a wooden base under a laminate can be considered an electric warm mat or infrared film. Why?
-
The flat warm mat and infrared film are heavy duty and built for effortless installation.
- They can be laid under laminate flooring without an additional slab, provided that the wood flooring is sufficiently even and strong. In this case, all the cracks between the boards are foamed, the boards are leveled in height, and all irregularities are eliminated. Foil insulation is laid on the waterproofing film, and mats or infrared film are placed on top.
- Infrared warm mat or film was created specifically for laminate flooring, this is the most gentle warm floor option for such a coating.
The disadvantages of electric heating is that it will require a significant amount of electricity. With any, even the most economical option, this is a tangible amount. The most economical models of electric mats, equipped with various technical innovations, are quite expensive. Therefore, we are returning to the cable version of electric heating, which, with all the costs and labor, is more economical in the end.
Pros and cons of electric underfloor heating
infrared heating
When faced with a choice between electric mats and infrared film, do not hesitate to choose which one to choose. The most convenient and profitable option of all available is film, for several reasons. It was really conceived by the creators as an option for additional heating for such coatings as laminate, linoleum, carpet.
Connection of an infrared heat-insulated floor
Taking into account the latest achievements in this field, Kaleo infrared floors are unique in their characteristics. They can withstand significant loads, are versatile, easy to install, and can heat up to + 60 degrees. Kaleo produces several types of infrared film and mats, from budget to expensive options. They can effectively warm up the room even in the presence of a concrete screed.
Undoubted advantages:
Benefits of infrared film
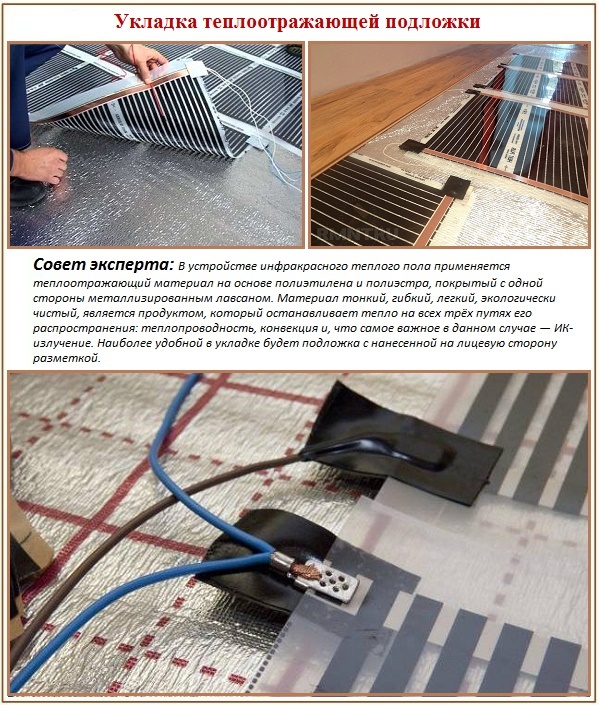
What insulation is recommended to use under such a film? The manufacturer offers it as a set, as it is made using special technologies from lavsan.
Mounting Features
Laminate can be considered the most popular flooring installation. Due to the long service life, aesthetic appearance and affordable price. But we must not forget about the quality of space heating. If you lay the laminate just on a concrete screed, then in winter the apartment is unlikely to be warm. Therefore, experts recommend installing an infrared heating film between the concrete floor and the laminate.
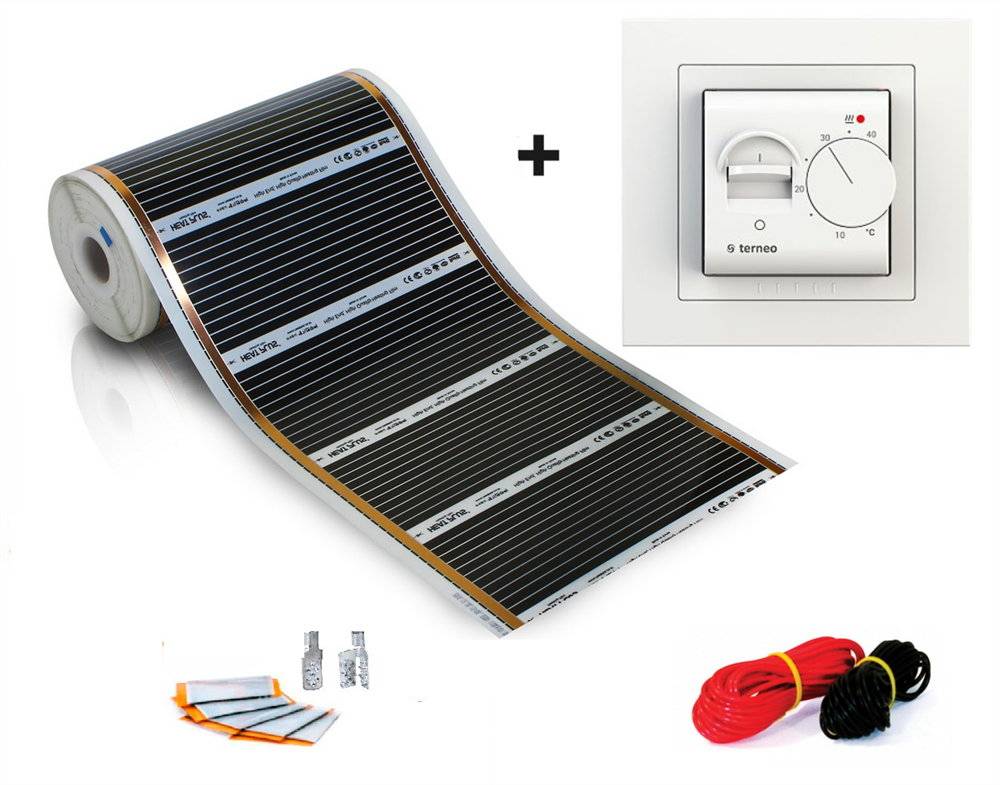


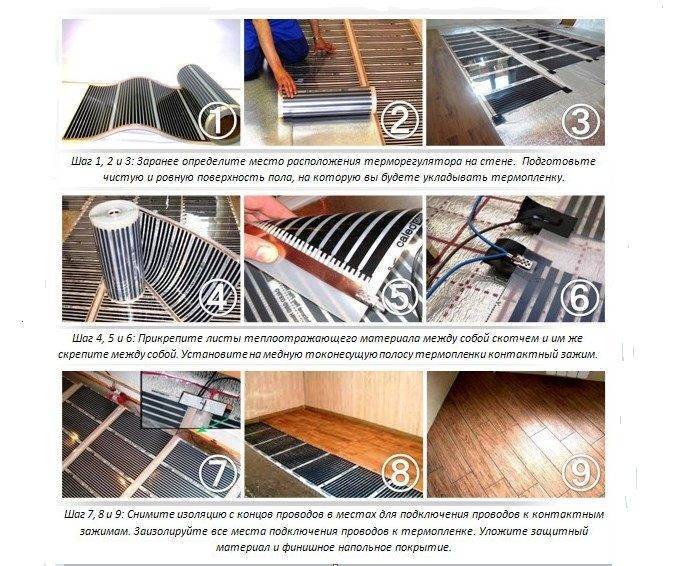

Installing an infrared underfloor heating system under a laminate does not require special knowledge and work skills. If you read the step-by-step instructions, you can do it yourself. The following tools and accessories are required for correct installation:
- Buy thermal film in a roll.
- Heat reflective material and protective polyethylene film.
- Tape and scissors.
- Bituminous insulation (set) and terminals.
- Electrical wiring, thermostat, stapler, pliers, screwdriver.
Preparatory work for laying is carried out using different methods. For example, it is customary to level the floor using a self-leveling mixture. After sufficient drying, you can start laying film floors.
Preparatory work
First you need to determine the size of the area for laying the thermal film. It is necessary to take into account the places where the furniture will be installed, since there is no installation
It is necessary to pay attention to the primary subfloor, it must be level to avoid damage to the film.
The next step is choosing a place to install the thermostat. Then the heat-reflecting material is laid over the entire floor area. If the surface is wooden, it is necessary to fix the material with a stapler. If the ceiling is made of concrete, double-sided tape can be used. After fastening, it is necessary to fix the strips of heat-reflecting material between themselves with adhesive tape. The use of heat-reflecting foil-based material is prohibited.
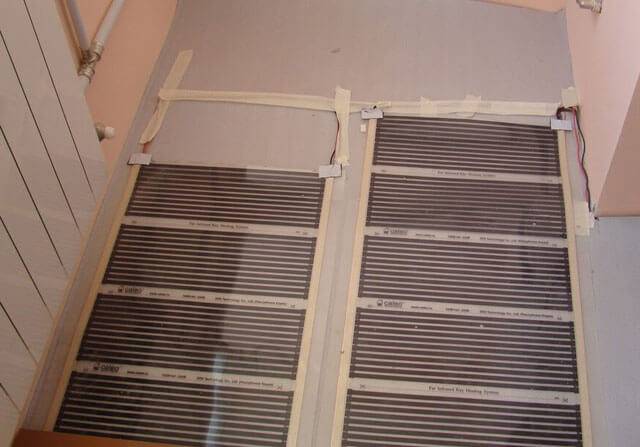
Next, roll out the film warm floor with a measured strip down. Cut strips to desired size. The distance from the edge of the walls should be at least 10 centimeters. Fix the strips of film together. It should be noted that overlapping thermal film is strictly prohibited. The film is laid with a copper strip down.
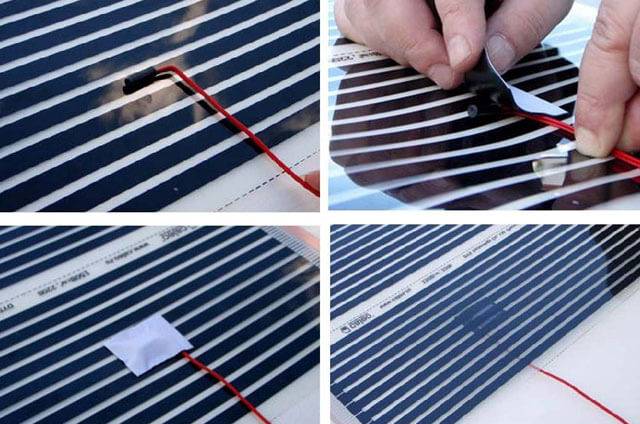
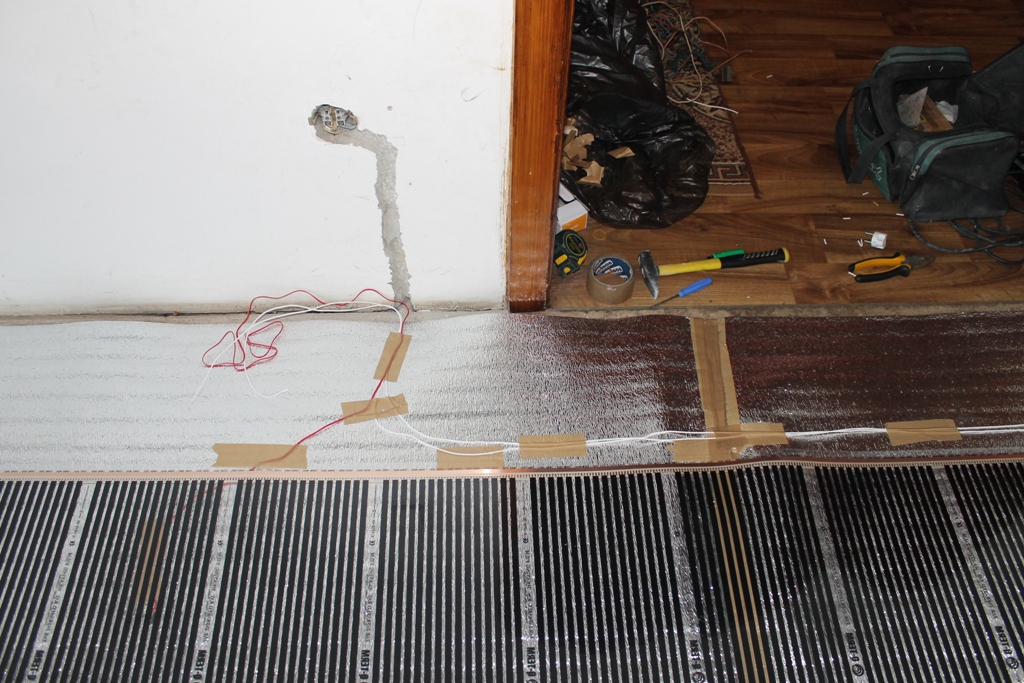
Connection and isolation
After laying the infrared film floor, it is necessary to insulate the places where the copper bus is cut with bituminous insulation.The insulation must cover the entire adjacent surface of the copper base of the connection of the heating carbon strips. Then we fix the contact connectors, while capturing the reverse side of the film and the copper strip. Tightly clamp the contact clamp with pliers.
Insert and fix the wires in the terminals. Insulate all connection points with pieces of bituminous insulation. It must be ensured that the silver ends of the clamps are completely insulated from contact with the floor. After carefully check all connections and contacts.
Next, you need to connect. The floor temperature sensor is included with the thermostat. It is attached to the film on the black strip of the heater using bituminous insulation. Make cutouts in the reflective floor material for sensors, wires, and other accessories. This is necessary to maintain a flat floor surface. when installing laminate.
Connect the wires to the thermostat according to the manufacturer's instructions. If the system will have a power of more than 2 kW, it is necessary to connect the thermostat through the machine. Testing is carried out at a given temperature of 30 degrees. It is necessary to check the heating of all sections of the film, the absence of sparking and heating of the joints.
After that, you can install the laminate directly on the polyethylene surface of the floor covering. Laying a laminate on an infrared film floor is not particularly difficult. There is no need to lay additional funds for the intermediate substrate.Observing the technology of installing a laminate, you can make a floor set directly on the surface of the plastic film.
The technology of laying infrared floor under the laminate
The installation instructions for infrared floor heating contain several main points that need to be considered in detail. These items are:
- Drawing up a drawing and laying scheme;
- Foundation preparation;
- Laying infrared floor heating under the laminate - installation of elements;
- Connection and trial run of the system;
- Laminate laying.
Drawing and laying scheme
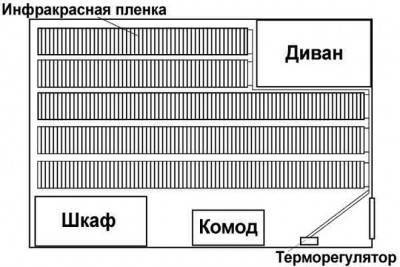
Before carrying out work, it is necessary to draw up a scheme according to which the films will be laid. You can make it in the form of a drawing, on which it is necessary to indicate where the sensors and the temperature controller will be located. Film cutting is also carried out according to a pre-prepared scheme.
Subfloor preparation
Since this is a substrate for laying laminate, it must be prepared in accordance with the requirements that are necessary for the flooring of this flooring. The concrete base must be, if necessary, repaired and treated with special compounds. It is also necessary to perform the following work before laying IR floor films:


- Remove debris and dust;
- To produce a flooring of thermally reflective foil material (2-3 mm thick). The foil side of the material should be outside;
- Fix the strips of material on double-sided tape and connect them with a special adhesive tape;
- Make cutouts in the material for the sensors and the regulator, in the places indicated on the diagram.
Mounting
Do-it-yourself installation of a film floor implies a certain order of work.In order to achieve the desired result, you must follow the action plan:
- Carry out cutting of film elements, in accordance with the scheme. It should be borne in mind that cuts in conductive parts should not be allowed;
- The film is laid face up with the copper conductor at the bottom. The distance between the films should not exceed 10 cm;
- Those places where the film was cut along the contact connections must be sealed with a sealing tape, which is included in the kit;
- Fix the films with adhesive tape to the reflective material and to each other;
- Install the clip-on clip in a special cut with one half, while the second will be located below the film element. Then crimp it with pliers and isolate;
- Place the thermostat under the film and secure with bituminous insulation. At the same time, it should be approximately in the center of the sheet. Contacting the working part with a black radiating strip;
- Terminals and wires are placed in recesses prepared in the reflective material and fixed with adhesive tape.
Connection and test run of the system
After the main work on laying the underfloor heating film with your own hands is completed. The system needs to be connected. To do this, follow the procedure:
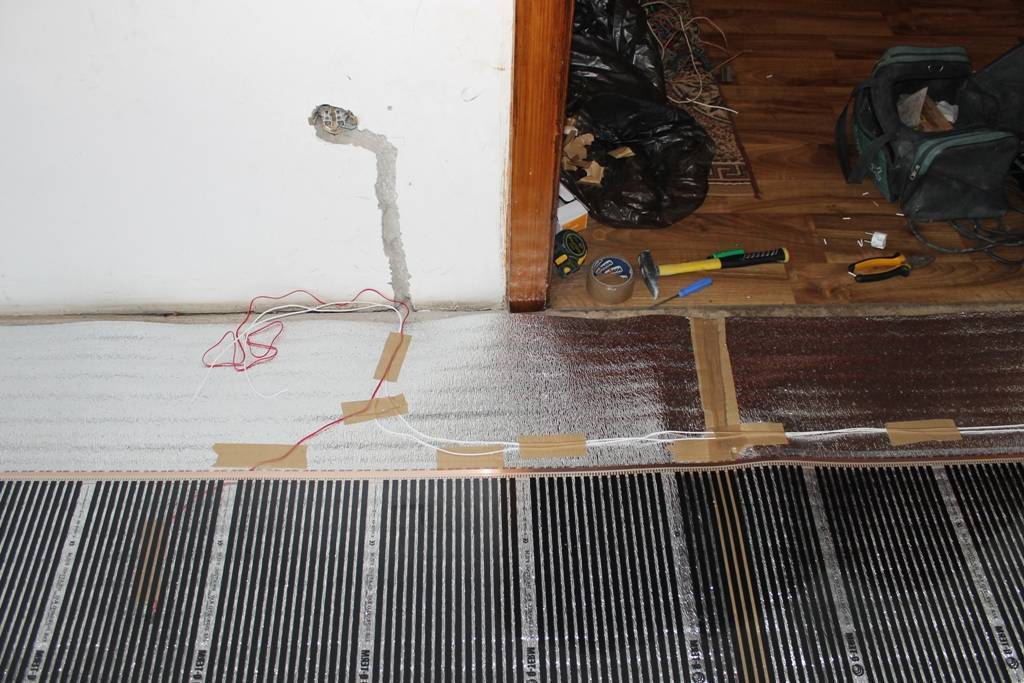
- Lead the wires to the thermoregulation unit;
- If necessary, use standard connectors;
- Connection is best done under the supervision of a specialist or use the connection instructions supplied with the underfloor heating kit.
After connecting and verifying that all connections are correct, you can test run the system.
Laying laminate
After the system has been fully prepared and a test run has been completed, you can start laying the laminate.
Between the laminated coating and the IR floor heating, it is necessary to lay a polyethylene film or waterproofing material. The cuts must be overlapped and glued together with adhesive tape. This is necessary to ensure the safe operation of the underfloor heating and to ensure protection against damage and excessive moisture.
Next, do the laying of the laminated flooring with your own hands, in accordance with the instructions for this floor material.
Drawing up a laying scheme for laminate flooring - how to lay it correctly
The first step on the way to arranging a film underfloor heating system is to draw up a detailed layout of the heating elements, control units and connect them to a power source. This work must be done before the purchase of components.
To draw up a diagram, it is important to consider the following principles:
According to the instructions, the film underfloor heating under the laminate should not cover the entire surface. Areas where heavy furniture will be placed are left free
This is important because in an enclosed space the heat exchange between the laminate surface and the surrounding air will be impaired. As a result, furniture and even laminate will begin to deteriorate due to overheating, and the heating elements of the underfloor heating film will consume excess energy and quickly fail.
For similar reasons, infrared film should be placed away from walls and fixed heating devices such as pipes or radiators.
According to the norms, this distance should be at least 25-30 cm.
Film underfloor heating should be rolled out along a long wall to minimize the number of joints.
In no case should infrared film underfloor heating be cut in places where there is no special graphic marking - this will lead to damage to the material.
If it is necessary to lay the heating elements of the infrared film in several rows, a distance of 5 cm must be set between them. In no case should such a film be overlapped.
As a rule, comfortable conditions in the room can be created if about 60-70% of the coverage area is covered with infrared film floors. In children's rooms or recreation areas for adults, you can additionally lay underfloor heating.
A very important aspect when connecting a warm floor under a laminate is cable laying. It is worth deciding in advance on the localization of the control unit, that is, the thermostat. This node must be installed at least 50 cm from the floor surface. In addition, the location of the thermostat is affected by the convenience of wiring the 220 V supply cable, as well as connecting the wires from the heating elements.


The total power of infrared underfloor heating in the house can reach high rates. Therefore, before connecting a warm floor under a laminate, it is worthwhile to draw a separate power line for it with a cable of the required section and a machine. The best option is when there is an RCD device in the circuit that ensures safety. It is not recommended to connect a warm floor to stationary household sockets.
Commercially available thermostats are usually suitable for installation in a standard wall socket.To bring a cable to it, in the wall to the floor level, you will have to punch strobes with parameters of 20 × 20 mm, into which a corrugated pipe with a cross section of 16 mm will be placed. A hidden wire will pass through it. Alternatively, a cable channel, that is, a decorative box, can be fixed under the cable on the wall.
Please note that the electrical wires on the floor surface must not intersect. In this case, you can choose different schemes for connecting an infrared film underfloor heating, based on specific conditions.
Most often, it is preferred to connect the power cables to one side of the heating elements.
In some cases, the wiring diagram will have to be complicated
If you need to connect the phase and neutral wires on opposite sides of the film floor, you should be especially careful. In no case should two contacts be connected to one copper bus at once - otherwise, a short circuit cannot be avoided.
A well-designed scheme for laying a film underfloor heating will allow you to determine the required number of components so that you can start work.
Floor laying technology at home
For work you will need:
Roll of infrared film;
When choosing a film floor, you should pay attention to the power consumption of the structure, temperature conditions and environmental parameters.
A high-quality infrared coating emits negative ions that fill the room and prevent the appearance of mold, dust and various types of fungi.
The ideal option would be a film with two modes of operation: room heating and heat retention.An approximate calculation of electricity consumption should not exceed 40 watts / m² .. The most economical option will be mechanical models
They are easy to use and perfect for small spaces.
Contact clamps;
Clamps are small metal fasteners that are useful for connecting the film floor to the network cable.
thermostat;
The thermostat is not included in the set of underfloor heating, so you will have to purchase it separately.
The most economical option would be mechanical models. They are easy to use and perfect for small spaces.
For large areas it is better to use programmable controllers. So you can control the temperature by setting the operating modes of the system yourself, thereby reducing energy costs.
The electronic thermostat will always show you the exact temperature of the floor thanks to the display. Its touch counterpart will also provide you with information about air heating.
Electrical wiring and insulation;
Usually included with infrared film.
Heat reflective material;
The presence of such a layer between the floor and infrared plates will minimize heat loss.
When choosing, consider the planned flooring. For linoleum and carpet, choose materials with a soft layer, and for laminate and tiles - with a hard one.
Please note that aluminum foil is not included in the composition. It is better to give preference to mylar film
Scotch;
Noise canceling underlay.
Plastic film is also suitable for laminate, and hardboard for carpet.
Step-by-step instructions on how to lay the infrared floor with your own hands
- Measure the areas you want to heat. At the same time, please note that in the future they should not contain household appliances and furniture without legs. In addition, all heat sources such as fireplaces, ovens and heating pipes must be at least 20 centimeters from the film;
Choose a suitable place on the wall to install the thermostat;
Clean the floor surface from foreign objects and debris;
Unfold the infrared film roll and cut it along the heating strips along the specially marked lines.
At the same time, try to keep the maximum length (within 8 linear meters). This will significantly reduce the number of connected wires;
Lay the heat-reflecting material on the cleaned base and secure the sheets together with adhesive tape;
Lay out the prepared film strips on top of the reflective layer so that the copper strip is at the bottom. Direct all contacts towards the intended location of the thermostat. Make sure that the film does not intersect anywhere with skirting boards and other decorative elements;
Fasten the terminals with pliers, a hammer or a special riveter to metal current-carrying strips.
The clamp should be placed in such a way that the rivet is attached to the current-carrying side, and the clamp itself is between the layers of the film (two-layer film on copper inserts). Make sure the fastening is strong;
Use the supplied bituminous insulation on the cut lines of the copper strip and on the cut of the silver contacts inside the infrared film;
Tape the film to the heat reflective material.
Installation and its features
As in any business, when arranging heating with infrared underfloor heating, there are certain principles and rules that you should know and adhere to during the installation process.
The main requirements for the installation of IR equipment for the floor are as follows:
- Infrared floor heating should only be installed on a dry, clean base, and only in places where it is not planned to install heavy furniture without legs.
- If the room does not provide for other heating sources, then the coverage of the infrared heating system should be more than two thirds of the area of the entire room.
- Infrared film underfloor heating should be laid at a distance of 10 to 40 centimeters from the walls.
- The length of the strips of the heating film coating should not exceed 8 meters.
- It is strictly forbidden to lay the film floor heating with an overlap.
- To fix the elements of the infrared coating, it is unacceptable to use nails or screws.
- The location of the air temperature sensor should not be in an open place, otherwise its operation will not be correct enough.
- Do not place the infrared coating near other heating devices or appliances.
- It is very undesirable to install an IR underfloor heating at high humidity or sub-zero temperatures.
- The thermostat should be located at a distance of 10-15 centimeters from the floor.
The most recommended way to connect the thermostat is a stationary version, but it is also possible to connect it like a conventional electrical appliance through a socket. Most of the wires connecting the infrared thermostat should be located under the baseboard.


During installation, one part of the terminal clamps is placed in the external conductive zone, and the other part is in the internal one. It is recommended to use clips from the same manufacturer as the coating itself. They are fixed with pliers or other special tools.
The individual strips of infrared film are joined at the installation site. In the areas where the cuts of the contact busbars are located, insulation is made using a bituminous mixture, which is included in the infrared coating kit.


