- Determination of the optimal diameter
- How to make a heating system in a private house with your own hands
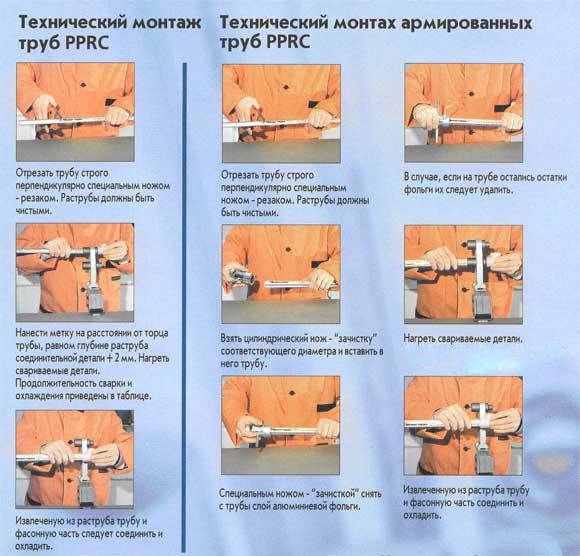
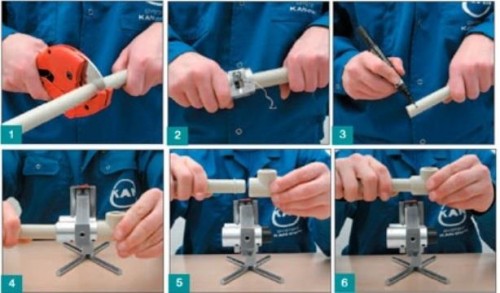
- Mounting tools
- Stages of work, scheme of the heating structure
- Soldering in hard-to-reach places and corners
- 4 Applicable wiring diagrams
- n1.doc
- Types of polypropylene pipes
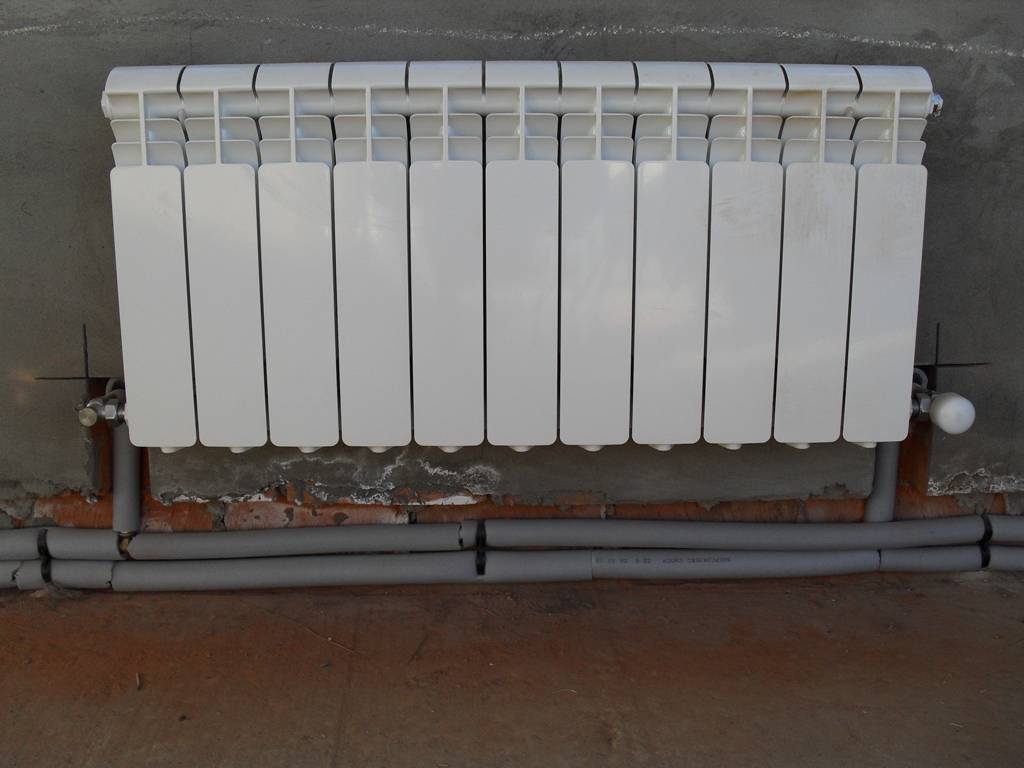
- Installation of a heating system made of polypropylene
- Installation of polypropylene pipes
- Pipe fixture
- Video lesson on soldering pipes
- Solder heating time
- Welding of polypropylene pipes of the heating system
- First stage
- Soldering technology for polypropylene heating pipes
- Features of welding polypropylene pipes
- Equipment for diffuse socket welding of polypropylene pipes
- Diameters of polypropylene pipes
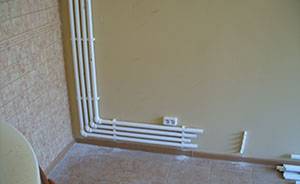
- Mounting diagram
Determination of the optimal diameter
The installation of the line is always preceded by a preliminary calculation of polypropylene pipes. It is carried out in order to determine the number and optimal diameter of products for a particular pipeline system, based on its purpose.
Properly selected diameter ensures minimum losses and necessary pressure in the system even during the hours of maximum (peak) water consumption. Calculation is especially important when designing a water supply system for an apartment building with a large number of plumbing fixtures.
You can calculate the internal diameter of the pipe yourself using the formula:
- where Qtot is the maximum (total) water consumption,
- V is the speed at which water is transported through the pipes.
For thick pipes, the velocity value is taken equal to 2 m / s, and for thinner pipes - 0.8 - 1.2 m / s.
But, owners of apartments and small country houses should not waste time on complex calculations. Considering that the overall permeability of the pipeline system depends on the throughput of the narrowest point, it is sufficient to purchase pipes with a diameter of 20.0 mm, provided that the length of the water supply system does not exceed 10 meters. With a standard number of sanitary appliances (sinks, toilet bowls, washbasins), the throughput of pipes of this diameter will be sufficient.
With a total length of the pipeline up to 30 meters, it is necessary to use 25 mm products in diameter, and with a length of more than 30 meters - 32 mm.
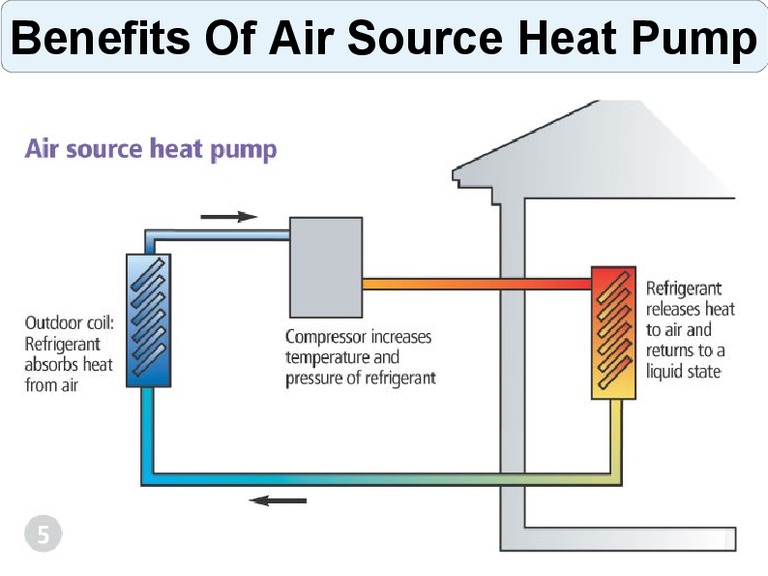
How to make a heating system in a private house with your own hands
There are a large number of heating systems. Each system has its own characteristics and is used to solve specific problems.
When choosing, you should pay attention to the following initial data:
- Floors and area of the house. For heating several floors, complex systems are used with the calculation of hydrodynamic resistance. A distribution system with a riser, the “Tichelmann loop”, is suitable. For a one-story building with a simple layout, the Leningradka one-pipe system, a simple bottom spill system, will be optimal.
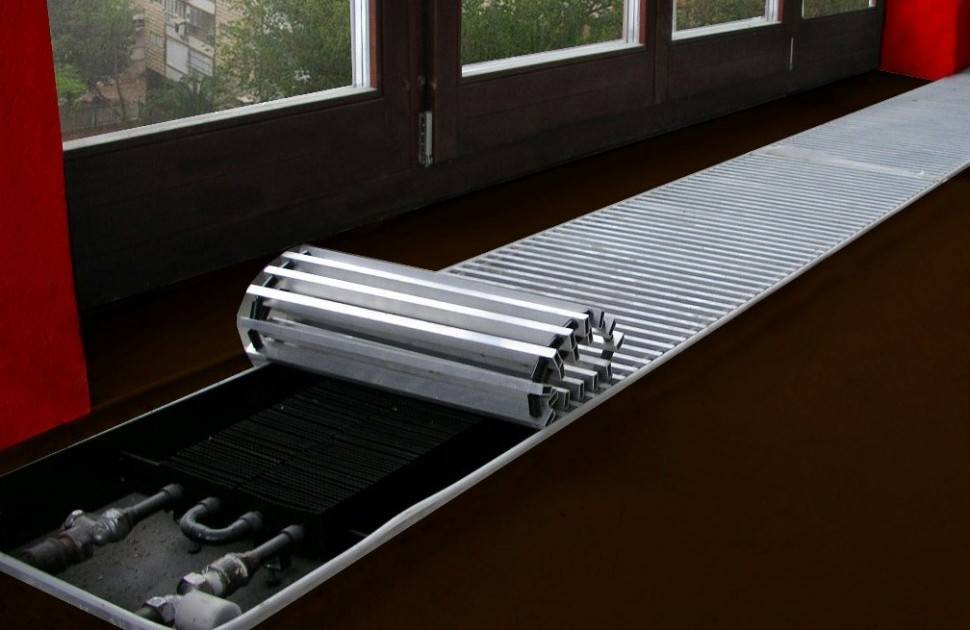
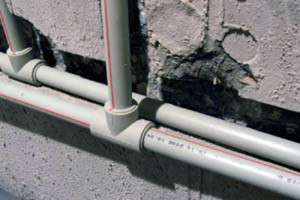
- layout and aesthetic considerations. So that the pipes do not spoil the appearance of the walls and do not interfere with the installation of furniture, you can design decorative screens for the upper spill, hide the lower spill in the walls or floor screed.Pipes should not pass under the doors, do not interfere with walking. Heat is evenly distributed throughout the heated room.
- Energy dependence. If there are frequent and prolonged power outages in the house, it is better to design a gravity system with an open expansion tank. If there are no power outages, a more efficient closed system with a membrane expansion tank and forced circulation is used. Pipes may be smaller.
- Power. Depends on the heat loss of the house. The greater the power of the system, the larger the diameter of the pipes to facilitate the circulation of the coolant.
Mounting tools
To assemble the system, you will need an inexpensive and affordable set of tools.
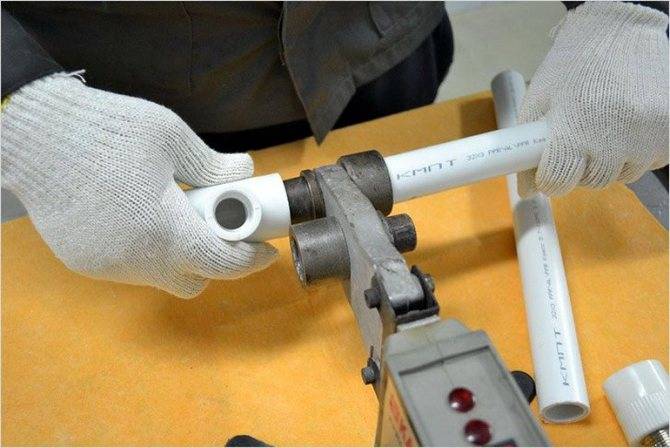
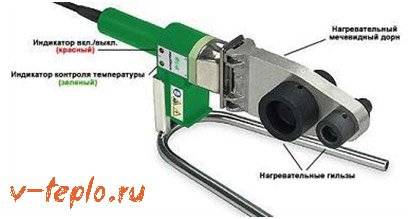
Tools for working with polypropylene. This is a soldering iron, pipe cutter, rags, ruler, pencil, degreaser. To remove aluminum reinforcement, a reamer of the appropriate diameter is required.

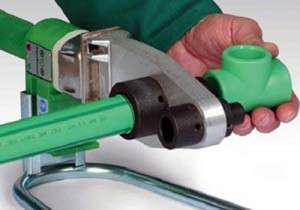
Photo 2. Special soldering iron for connection polypropylene pipes. The device has two holes of different diameters.
- A set of plumbing accessories - open-end and adjustable wrenches, fum-tape, pliers.
- A set of construction tools: puncher, grinder, foam gun, mixer.
Stages of work, scheme of the heating structure
The assembly of the heating system is carried out in successive logical steps.
Marking the installation of the boiler and batteries. Radiators are placed at the entrance and under the windows to create the right convection currents in the room. The boiler can be installed in a boiler room, some types can be placed near any external wall.
Determining the places where pipes pass.Be sure to design compensation loops - the length of polypropylene pipes changes when heated.
Hanging the boiler and its strapping. If necessary, we connect water supply, gas to it. The piping of a solid fuel boiler is best made of metal. The gas boiler is connected with polypropylene pipes with heat-resistant characteristics.
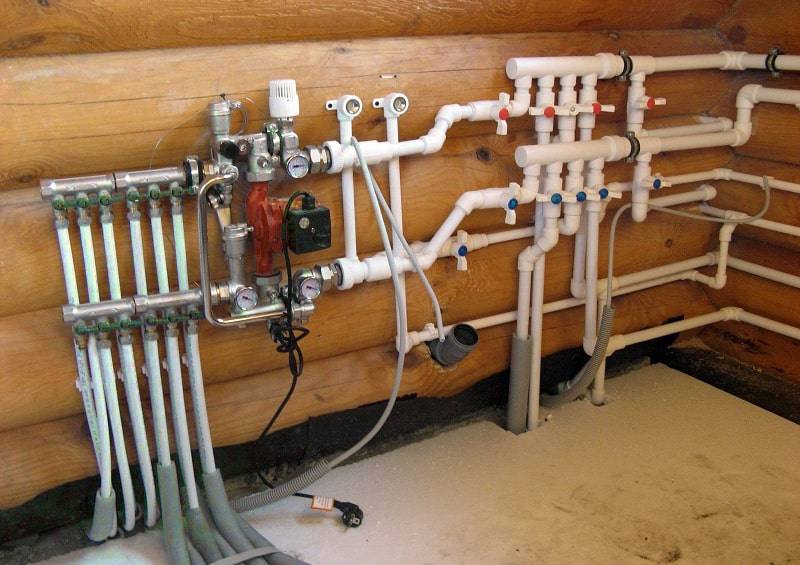
With a collector system, we connect a “comb” - a distributor. If the system is two-arm, you can get by with tees.
Install the expansion tank and safety group. The volume of the expansion tank is calculated based on the volume of water in the system.
We fix fasteners to the floor or wall. If the system is with gravitational circulation, we observe slopes. We mount pipes, connect batteries.
After completion of installation, we pressurize the system. We turn off the batteries, turn off all the exits with plugs. We supply air under pressure of 8-10 atmospheres. If fistulas are revealed, we eliminate them.
We connect the batteries, boiler, expansion tank.
We fill the system with water, remove air from the upper points.
Conducting a trial run
We pay attention to pipes, joints, connection points. We verify the uniformity of heating of the batteries. We close the pipes in the screed, wall or decorative box
We close up pipes in a coupler, a wall or a decorative box.
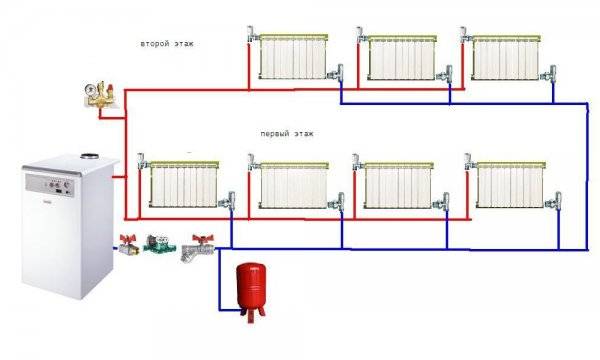
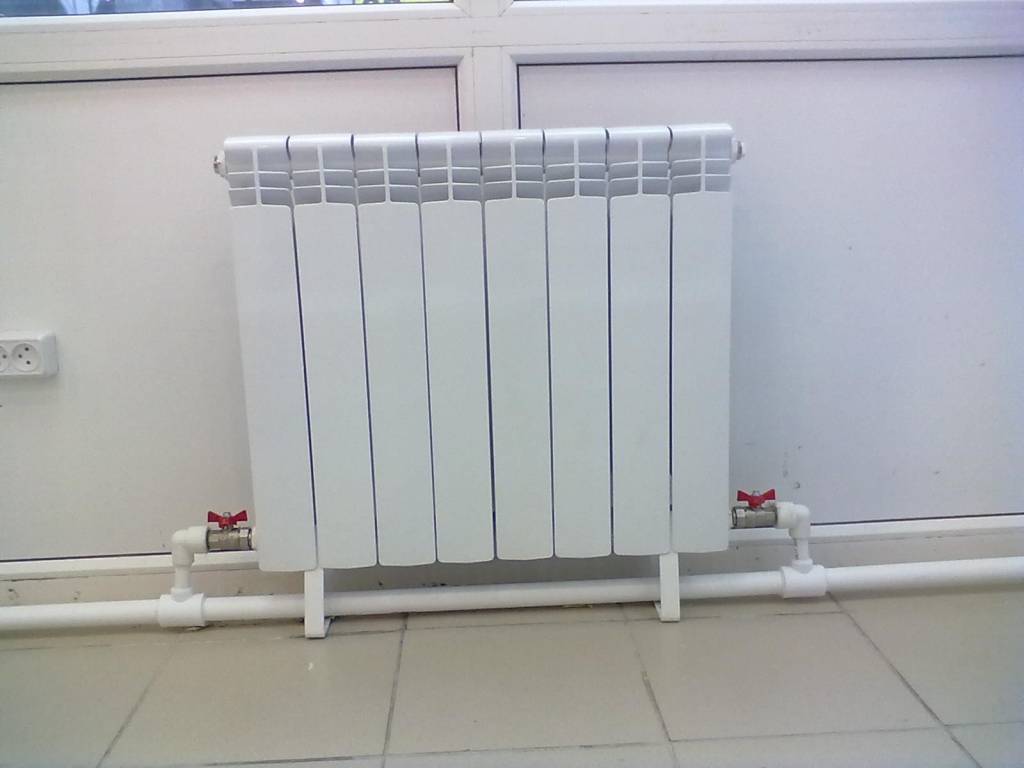
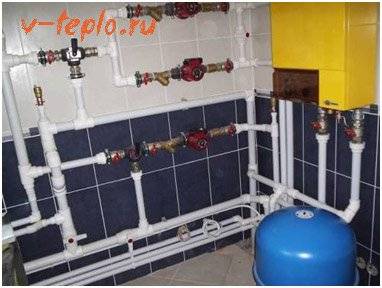
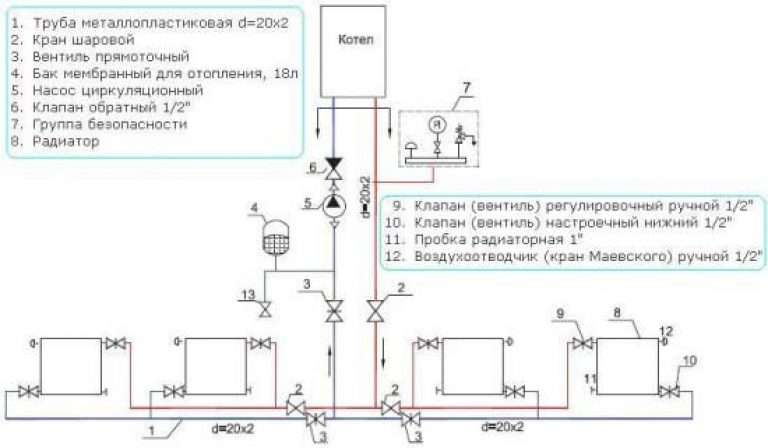
Photo 3. Scheme of the heating system of a two-story house using polypropylene pipes.
Soldering in hard-to-reach places and corners
The work of assembling a heat pipe in hard-to-reach places is more difficult than in conditions of sufficient space. Such places usually include the ceiling area, the corners of rooms and cramped conditions when it is not possible to install the soldering iron on a stand.
In such situations, resort to secret tricks:
- the soldering iron is hung on a hook;
- special corner adapters are welded in the corners;
- if the pipe sections to be soldered are too close to the wall, then the straight and mating sections of the joint are heated alternately. In this case, the first part is heated a little longer than expected, and then the counterpart is heated for a shorter time, but at a higher temperature on the nozzles (the thermostat is installed to heat pipes of a larger diameter);
- in order not to hold the parts on weight when welding on the walls, it is more convenient to fix the pipe with clips and move them as needed.
4 Applicable wiring diagrams
The standard frequently used schemes for connecting heaters to the main, used for the installation of polypropylene pipes, do not differ from those of other types of materials. Here it is possible to classify schemes according to three parameters:
- According to the location of waterways.
- By the number of stands.
- By the number of pipes for the circulation of the coolant.
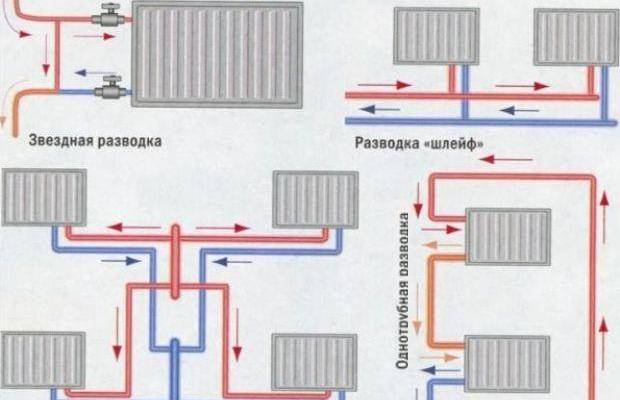
Existing schemes for connecting heating devices to the main
Scheme Implementation Options according to the location of the waterway
There are 2 types of coolant supply:
- 1. Top eyeliner. In this case, the water supply system, through which the hot coolant is supplied, is located on top. This can be an attic space or fixing on the ceiling under a layer of finishing materials. The lower, return channel is laid under the floor or in the basement. The heaters are fed with coolant through vertical risers. The advantage of such wiring is that there is no need for a circulating boiler, which will be relevant if a private household is located in an area with power outages.
- 2. Bottom eyeliner.In this case, water supply and drainage is carried out through pipelines located from the bottom of the room, in the floor, or in the basement. The advantages of this system are savings on materials and uniform heating of all heating devices, a significant drawback is the impossibility of implementation without the use of a forced circulation pump.
Wiring according to the number of risers
Depending on the number of risers supplying hot coolant, the following options are possible:
- 1. Scheme with one riser. This option is suitable for use in small two - three-story cottages, when the area of \u200b\u200beach floor is relatively small. The water supply here is carried out by one riser to all floors, from which further wiring is carried out to all rooms of the floors.
- 2. Scheme with several risers. In this case, several risers are installed, which feed one radiator in separate rooms on each floor. The risers are connected to the boiler by separate lines. This scheme is perfect for large houses. Due to the autonomy of each riser, in the event of a breakdown, there is no need to turn off the entire system, it is enough to close one riser to which the damaged element is connected and make repairs.
Wiring by the number of pipelines
Here, two options for mounting the highway are possible for implementation:
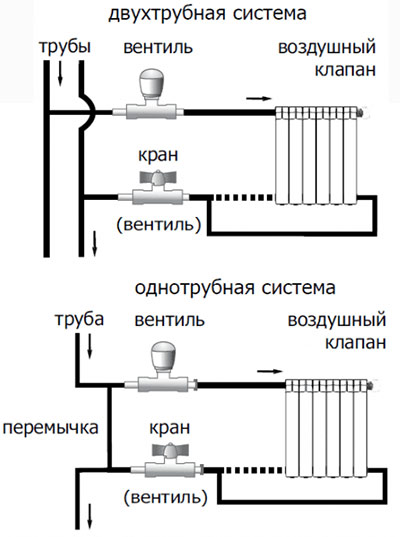
- 1. One-pipe line. With this scheme, the coolant is supplied to the heating devices through one pipeline, in series, from device to device.A significant disadvantage of this scheme is the sequential cooling of the coolant, as a result of which the heaters that are located at the end of the line will not warm up well. Therefore, the use of this method is advisable in small houses with no more than three heating radiators.
- 2. Two-pipe line. Here, the coolant is supplied through the primary pipeline in parallel to all radiators, and the outlet is carried out through the return channel. Due to this, the temperature of all radiators is the same and can be adjusted individually, with a special regulator. The advantage of the system is the possibility of shutting down one of the heating devices in case of its failure, without stopping the entire system.
Thus, choosing a scheme installation of a heating pipeline in a private house, it is worth taking a closer look at the option with one riser and a two-pipe system on every floor and bottom connection with a two-pipe scheme in the case of a one-story building. These methods are the most practical, maintainable and economical.


n1.doc
TYPICAL TECHNOLOGICAL CHART (TTK) INSTALLATION OF RISERS AND HEATING DEVICES OF A SINGLE-PIPE SYSTEM OF CENTRAL HEATING DURING MAJOR REPAIRS OF RESIDENTIAL HOUSESI. Scope of the map II. Organization and technology of the construction process 21. Basic requirements for the quality of work: Safety regulations: III. Technical and economic indicators
| Labor intensity for one riser of a four-story building (with two radiators in each floor) | 2.76 man-days |
| Output per worker per shift | 0.42 riser |
IV. Material and technical resources
| N p / p | Name | unit of measurement | Quantity | |
| Main design, semi-finished products and materials | ||||
| 1. | Risers made of steel pipes | PCS. | 1 | |
| 2. | Steel pipes for radiators | PCS. | 20 | |
| 3. | Radiators | PCS. | 10 | |
| 4. | Brackets for radiators | PCS. | 30 | |
| 5. | Clamps, metal sleeves for passing the riser through the floors | PCS. | 5+5 | |
| 6. | Drives | PCS. | 20 | |
| 7 | Valves of one adjustment + couplings | PCS. | 10+10 | |
| 8. | Lock nuts + radiator liners | PCS. | 20+20 | |
| 9. | Radiator plugs | PCS. | 20 | |
| 10. | Linen | PCS. | 35 | |
| 11. | Minium (whitewash) | PCS. | 150 | |
| 12. | Welding wire | PCS. | 750 | |
| Machinery, equipment, tools, inventory and fixtures | ||||
| 1. | Construction and mounting gun SMP-1 | PCS. | 1 | |
| 2. | Gas welding machine with a set of tools | PCS. | 1 | |
| 3. | Pipe wrenches No. 2 | PCS. | 1 | |
| 4. | hacksaw | PCS. | 1 | |
| 5. | Hacksaw blades | PCS. | 2 | |
| 6. | plumb line | PCS. | 1 | |
| 6. | Trowel (trowel) | PCS. | 2 | |
| 7. | Locksmith's hammer 500-800 g | PCS. | 2 | |
| 8. | Bench chisel | PCS. | 1 | |
| 9. | Sliding wrenches | PCS. | 1 | |
| 10. | folding meter | PCS. | 2 | |
| 11. | pliers | PCS. | 1 | |
| 12. | Jumper | PCS. | 2 | |
| 13. | Electric drill | PCS. | 1 | |
| 14. | Syringe Grigoriev | PCS. | 1 | |
| 15. | Portable ladder | PCS. | 1 | |
| 16. | carpentry level | PCS. | 1 | |
| 17. | Klupp pipe with a set of dies | PCS. | 1 | |
| 18. | Pipe clamp | PCS. | 1 |
V. Schedule, work performance
| N p / p | Name of works | Unit of measurement | Scope of work | Labor intensity, per unit of measure people - h | Labor capacity for the entire scope of work, people - day | Profession, rank and quantity, used mechanisms | Hourly work schedule | ||||||
| 1 | 2 | 3 | 4 | 5 | 6 | 7 | |||||||
| 1. | Installation of radiators with marking places, drilling holes and installing brackets | 1 device | 10 | 0,71 | 0,90 | Locksmith4 res. - 13 digits - 1 Gas welder: 5 digits - one | — | 3— | |||||
| 2. | Installation of a riser pipeline and connections to radiators with marking and drilling holes in ceilings, partitions, gas welding | 1m pipe-wire | 34,0 | 0,34 | 1,46 | Gas welding machineConstruction and assembly gun SMP-1 | — | 3— | — | — | — | ||
| Total | 2,36 |
VI. Labor costing Table 3
| N p / p | Grounds for the adopted norms for ENiR | Scope of work | Unit of measurement | Scope of work | Norm time unit of measurement, people - h | Priced per unit of measurement, rub. - kop. | Labor costs for the entire scope of work, people - h | The cost of labor costs for the entire scope of work, rub. - kop |
| 1. | 9-1-1, paragraph 1. 2, 3 | Marking places for laying and drawing measurement sketches of pipelines | 100 m | 34,0 | 3,75 | 2-97 | 0,16 | 1-00 |
| 2. | 9-1-31, vol. 2, item 2 | Drilling holes in floors | 100 holes | 4 | 7,1 | 3-94 | 0,04 | 0-16 |
| 3. | 9-1-2, vol. 2, item 2, | Laying of steel pipelines | 1m | 34,0 | 0,25 | 0-14,8 | 1,06 | 4-85 |
| 4. | 22-17, p. 9 | Gas welding of pipelines (fixed vertical joint) | 10 joints | 5 | 0,95 | 0-66,7 | 0,05 | 0-35 |
| 5. | 9-1-12, vol. 3 | Installation of radiators with drilling holes in the walls | 1 device | 10 | 0,71 | 0-40,3 | 0,90 | 4-03 |
| 6. | 22-17, p. 14 | Gas welding of pipelines (fixed horizontal joint) | 10 m | 10 | 1,1 | 0-77,2 | 0,15 | 0-75 |
| Total | 2,36 | 11-14 |
Types of polypropylene pipes
PP pipes are divided into two main types:
- reinforced;
- unreinforced.
The former are used where high pressure and temperature are expected. Such pipes are classified as "stabilized", they have a minimum coefficient of thermal deformation.
Non-reinforced pipes are used in technical systems for the circulation of liquids without heating. Such PP pipes are also used for cold water supply systems, which are also easy to install with your own hands.
Table 1
| Marking | Application area | Characteristics |
| PN10 | Plumbing low-temperature systems with a minimum level of pressure | 10 atmospheres, 45 °C |
| PN16 | Plumbing systems for cold water | 16 atmospheres, 60 °C |
| PN20 | Hot water systems, not for heating systems | 20 atmospheres, 95 °C |
| PN25 | Hot water systems, heating systems | 25 atmospheres, 95 °C |
| PPR | Heating, hot water supply. Not suitable for arranging in-house cold water supply systems. | 25 atmospheres, 95 °C |
The thickness of polypropylene pipes also matters. The value ranges from 1.9 to 18.4 mm, depending on the type and purpose of the pipe.
It's important to know! Pipes with the PPR index are used only for industrial purposes, use them for drinking water supply not recommended by the manufacturer. The standard size of a polypropylene pipe of any diameter is 6 meters
Specialized polypropylene pipes are used for the installation of "warm floor" systems. Such pipes are supplied for underfloor heating in a bay, and most often they are not welded together, but are fastened at the joints with the coolant collector with compression couplings.
The underfloor heating circuit is a seamless system. Various types of underfloor heating are used. The geometry of any of the selected methods - "snail" or "along the contour" - determines the ability of the pipe to bend along the smallest radius. Excessive bending leads to irreversible deformation of the pipe.
The PP pipe for underfloor heating is laid on the prepared base. Most often, this is a heat insulator in the form of a polyurethane foam layer, supplemented with heat-reflecting foil.
Good to know! Crimp sleeves are securely fixed with special pliers; the kit also includes a template to control the correct installation. Crimping pliers are quite expensive, it is more profitable to rent them for the time of final assembly and commissioning of the system.
Installation of a heating system made of polypropylene
Preparing for installation
At the preparatory stage, you need to perform the following work:
- Draw up a heating project.Designing a heating system is a difficult task that not everyone can afford. Based on the calculations, the type of heating system, heating boiler, heaters, additional equipment and pipeline fittings are selected. An integral part of the project is the specification of materials indicating the length and diameter of pipes, types and number of fittings
- Buy materials and tools
- Install a homemade heating boiler, radiators and additional equipment
- In the instructions for the soldering iron or reference literature, find out the time of welding and cooling of the pipes used, make a control soldering
- Bring pipes and fittings into the room so that they warm up to room temperature
Pipe laying methods
In the first case, they are attached to the walls on metal or plastic brackets.
In the second, they are laid in grooves (strobes) made in the walls or behind finishing materials (drywall, plastic, etc.).
Installation of heating pipes
Installation is carried out in the following sequence:
- Pipes with special scissors or a roller pipe cutter are cut into pieces of the desired length
- If the foil is located close to the outer surface of the pipe and interferes with soldering, it is removed with a shaver
- Cutter removes burrs and chamfers
- Soldering points are degreased with alcohol
- Soldering, especially for people without experience, is best done together.
- A piece of pipe and a fitting are put on soldering iron nozzles, held for the right time, removed, connected without scrolling and fixed for the time required for cooling
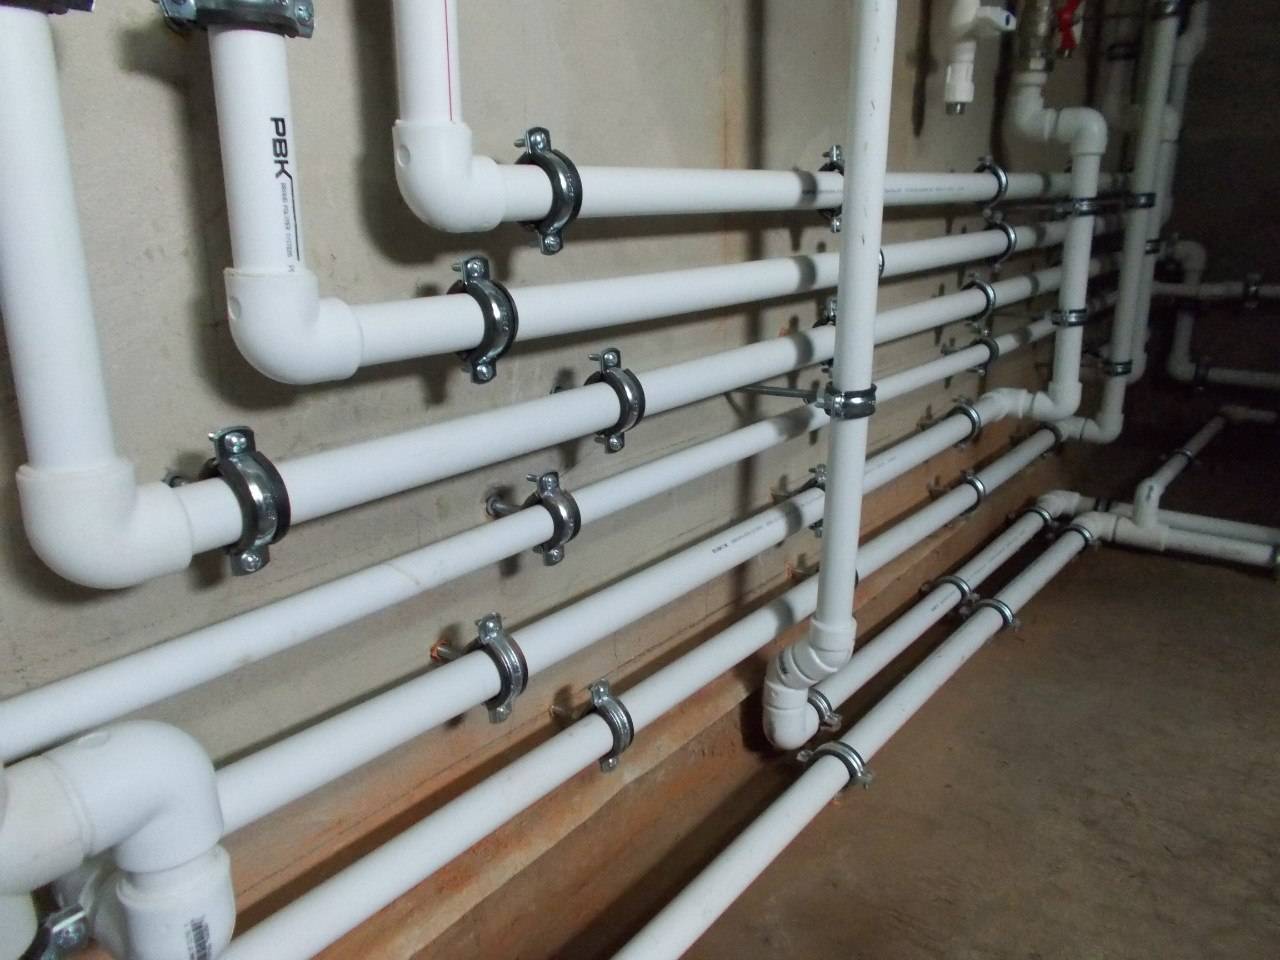
- The connected pipes are attached to the walls with clips after 50 - 70 cm
- Separate parts of the pipeline are connected on site using a portable soldering iron
- Sections of the heating system are purged with a pressure test pump to make sure there are no plugs (sealing), and the finished system is tested with water for leaks
When installing pipes, adhere to the following rules:
- Comply with the design pipe slopes (0.02 - 0.06 from the boiler to the last radiator for a straight pipe and the same slope from the last radiator to the boiler for the return pipe)
- The return pipe is laid above the inlet pipe of the heating boiler
- To avoid overheating, polypropylene pipes are connected to the boiler through a piece of metal pipe and laid at a distance from heating devices
- Heating appliances are connected to pipes using quick-release connections - "American"
- Pipes are laid in such a way as to reduce the likelihood of mechanical damage, to exclude direct sunlight
- The pipes are connected to each other using couplings or “pipe to socket”, in the latter case, the socket is made by expanding one of the ends of the pipe
- Pipes thicker than 40 mm solder joint to joint
Also, in addition to heating, sewerage should be provided in a private house. Read about the features of its arrangement here.
Since installation costs often exceed the cost of materials, installation polypropylene heating on your own can save you a lot of money.
Experienced specialists will do this work in one day, but for beginners it is better not to rush and carefully follow the recommendations. The result will not be long in coming - in a few days you will have an efficient heating system that requires almost no maintenance.
Installation of polypropylene pipes
Important! Due to the fact that the strength of polypropylene pipes is not as great as, for example, steel pipes, then the fasteners during installation should be installed more often, somewhere every fifty centimeters. So, let's look at the main components of such a heating system.
So, let's look at the main components of such a heating system.
- Fasteners necessary to ensure that the entire structure remains stationary.
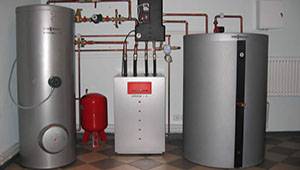
- AGV, or maybe any other heating boiler.
- Expansion tank, necessary so that the water, which expands at high temperatures, cannot damage the entire system.
- Radiators, other heat-releasing elements.
- And, in fact, a pipeline that allows the coolant to circulate between the radiators and the heating device.
Pipe fixture
For such soldering, special soldering irons are used. They heat up the material to two hundred and sixty degrees, after which it becomes a homogeneous monolithic compound. This is explained by the fact that the atoms in it, as it were, penetrate from one piece of pipe to another. Moreover, such a connection is characterized by strength and tightness.


Video lesson on soldering pipes
Soldering consists of several stages, consider them:
- The soldering iron turns on. We wait until the signal indicator on it goes out a second time.
-
We cut a piece of pipe according to the dimensions we need, for this we use specialized scissors, which are sold with a soldering iron.
- We clean the cut ends of the pipes from everything superfluous, in particular, from the foil. To do this, you can use a regular knife, or you can use a channel.
- The pipe is inserted into the fitting and held there for some time.
Important! The time that the pipe must spend in the fitting depends entirely on its diameter, a special table must be included with the soldering iron, which indicates all these values. The parts are neatly joined, there should not be any distortions.
We hold them like this for some time, it is forbidden to turn the channel.
The parts are neatly joined, there should not be any distortions. We hold them like this for some time, it is forbidden to turn the channel.
Particular attention should be paid to swivel fittings, especially for polypropylene pipes. Be sure to check if they are set correctly, because if the turn is directed in the wrong direction, the entire assembly will have to be completely redone, and the attached part will completely become unusable
The pipes are interconnected by means of "American women" - special devices that are quickly put on and taken off. They are attached to pipe ends. So that during thermal expansion deformation does not occur (after all, pipe reinforcement does not completely save from this, it only reduces it), all pipes should be securely fastened to the surface of the walls and ceiling, while the step, as already mentioned, should be no more than fifty centimeters.
For fixing radiators, special devices are also used, they must be present in the kit. It is not advisable to use hand-made appliances for radiators. The fact is that factory fasteners were specially calculated for the weight of radiators completely filled with coolant, so home-made fasteners may simply not withstand it.
Solder heating time
In order for pipe soldering to be as efficient as possible, it is strongly recommended to adhere to the specified warm-up time. You can find out about it from the table below.
| Diameter cm | 11 | 9 | 7.5 | 6.3 | 5 | 4 | 3.2 | 2.5 | 2 |
| Warm-up time, sec | 50 | 40 | 30 | 24 | 18 | 12 | 8 | 7 | 7 |
| Time to connect, sec | 12 | 11 | 10 | 8 | 6 | 6 | 6 | 4 | 4 |
| Cooling, min | 8 | 8 | 8 | 6 | 5 | 4 | 4 | 3 | 2 |
| What should be the seam, cm | 4.2 | 3.8 | 3.2 | 2.9 | 2.6 | 2.2 | 2 | 1.8 | 1.6 |
It is important to know that if the part is heated to a higher temperature than the soldering technology requires, then it will simply deform. And if the heating is insufficient, then the full fusion of the material will not occur, which in the future will cause leaks
We talked about fastening to the walls, the step there is 50 centimeters. In the case of ceiling mounting, this distance should be the same, but not greater.


It is desirable to use movable clamps, and any suspended compensating devices are not needed. It should also be fastened firmly, reliably, because the thermal expansion of the pipe can deform it.
In general, we figured out how to make a heating installation from polypropylene pipes. We hope the article will be useful to you.
Welding of polypropylene pipes of the heating system
Plastic (polypropylene) pipes have recently become the most used for creating water heating systems in homes.
You can entrust the installation of heating with plastic pipes to specialists who have all the necessary equipment for welding. But the process of welding polypropylene pipes is not very complicated and is quite accessible to everyone to do it on their own. The main thing is to follow the step-by-step recommendations.
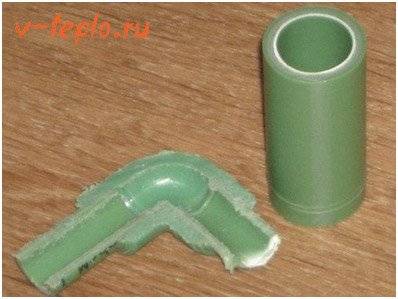
The whole welding process consists in heating the pipe and the coupling, followed by a neat connection of the parts.In this case, strong adhesion occurs due to the mixing of the heated polypropylene of the two connected elements and the formation of a monolithic structure at the junction. The characteristics of the seam in this case practically do not differ from the properties of the original parts.
You can get an idea of how to weld plastic pipes by watching the following video:
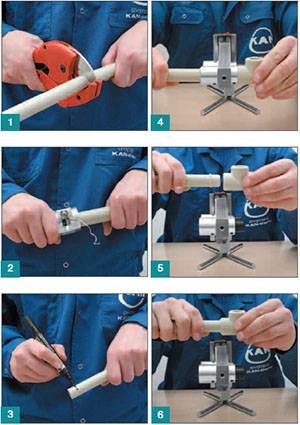
First stage
At the initial stage, the parts to be joined are prepared for soldering. In this case, it is necessary:
- Cut the pipes into pieces of the required length.
- Remove the chamfer from the outside of the pipe.
- Remove dirt from the parts to be joined, degrease them.
The chamfer parameters are regulated by both Russian and foreign standards:
- according to the German standard: chamfer slope - 15 degrees, depth - 2-3 mm;
- according to the Russian standard: chamfer slope - 45 degrees, depth - 1/3 of the pipe thickness.
To make a chamfer, you can use any tools that will allow you to remove the required layer of material fairly evenly.
In addition, you will need to find (purchase) and prepare an apparatus for soldering plastic pipes:
- Install the device on a stable special stand.
- Set the temperature controller to 260 °C. This temperature will ensure uniform and safe melting of polypropylene and will not damage the Teflon nozzles of the unit.
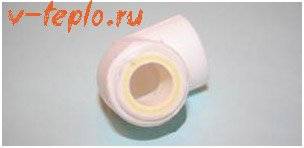
Chamfer on a polypropylene pipe for welding
Soldering technology for polypropylene heating pipes
Instructions for welding polypropylene pipes involves the following sequence of actions:
- Wait for the soldering iron to heat up to a certain temperature (usually 260 degrees).
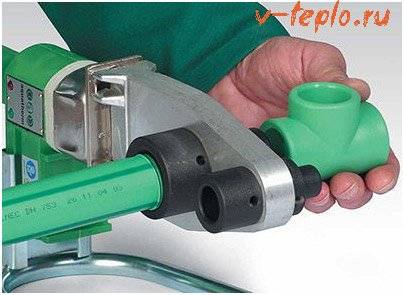
- At the same time, put the fitting on the mandrel (special nozzle on the soldering iron) and insert the pipe into the sleeve.
- Maintain the heating time specified in the instructions for the device. It depends on the wall thickness of the pipe and its diameter.
- At the same time, remove the parts from the nozzles and connect them.
- Wait for spontaneous cooling of the assembled structure.
This, in fact, ends the process. The system is now ready for performance testing.
Features of welding polypropylene pipes
However, there are some features that should be considered in the production of welding work:
The nozzles of the welding machine are made in such a way that they form a cone with a slight inclination (up to 5 degrees) and have a diameter equal to the nominal diameter of the pipe only in the middle. Therefore, the pipe will fit into the sleeve with some effort. The same applies to fitting the fitting on the mandrel. Insert the pipe into the sleeve until it stops. You can't push any further!
Technology soldering of polypropylene pipes
- To designate a “border” that should not be crossed and to control the correctness of the process, you can mark a distance on the outside of the part equal to the depth of the sleeve.
- It is necessary to connect heated parts as quickly as possible to avoid cooling of the molten material.
- It is impossible to displace (shift, rotate) the hot connected parts of the system relative to each other. Otherwise, you can get a poor-quality connection, which will soon fail.
Equipment for diffuse socket welding of polypropylene pipes
For work you will need:
Pipe cutter. The most common option is scissors. for pipe cutting. However, such a pipe cutter does not guarantee an even cut and may partially deform the pipe.A smoother cut is achieved when using a circular pipe cutter for plastic pipes. In the absence of a special cutting tool, you can use a hacksaw with a fine tooth and a miter box.
Trimmer. When using metal foil reinforced pipes in systems heating and hot water supply to prevent delamination of pipe walls during water hammer at high temperatures, it is recommended to remove the inner foil layer for up to 2 mm. Also, the trimmer allows you to get a smooth cut chamfer and remove possible burrs.
Ruler and pencil. On the pipe it is necessary to measure and mark the recommended welding depth. If you do not comply with the norms for deepening pipes into fittings during welding, polypropylene rollers can form inside, narrowing the pipe clearance. Also marks on pipe and fittings are useful for pipe welding in a certain relative position.
Alcohol wipes. The place of welding of a polypropylene pipe must be thoroughly dedusted and degreased to prevent the formation of capillary passages in the thickness of the material to be welded.
Welding machine with interchangeable socket nozzles (mandrel couplings). For most cases, a conventional and inexpensive welding machine with a sword-shaped heating element with a power of up to 1 kW is suitable. Such a device can provide welding of pipes with a diameter of up to 63 mm. Professional welding machines are more powerful, more accurate in temperature control. Also, professional devices allow you to simultaneously heat two pairs of sockets of different diameters, so as not to waste time replacing them when welding pipes of different diameters.For welding PPR pipes in hard-to-reach places, there are welding machines with a thin round heating element, which can be located both directly and at an angle of 90 degrees
The sockets for such welding machines are made as a single unit with a hole for the heating element between the sleeve and the mandrel.
When choosing a welding machine, it is important to pay attention that the sockets in the kit are coated with a Teflon non-stick coating (referred to as PTFE) to prevent plastic from sticking to the sockets. In domestic use, two heating indicator lights are sufficient: red (operating indicator) and green (indicating that the set temperature has been reached)
The handle of the heating regulator must have a clear graduation and good fixation in the selected position.
There will be no extra clamp on the stand of the welding machine: it allows you to fix the machine so that it does not move when the heated pipes are disconnected.
Diameters of polypropylene pipes
Pipes with the largest diameter - from two hundred millimeters and above. Polypropylene pipes of this type are most often used for the construction of shops, large shopping centers, hospitals and other institutions in which the load on the pipe will be maximum due to the heating of large areas.
For the construction of houses, polypropylene pipes are more relevant, having a smaller diameter - from twenty to thirty-two millimeters. As numerous reviews say, they have significant throughput properties and, moreover, they take the necessary shape quite easily and without problems, which is an indisputable plus.
A twenty-millimeter pipe is most suitable for systems involved in hot water supply.Twenty-five millimeter - for risers and installation of centralized heating systems. The smallest diameter of sixteen millimeters is for mounting a floor heating system.
Thus, we found out what diameter polypropylene pipes can generally have, as well as the main areas of use for these pipes. Next, we will talk about what constitutes a wiring diagram.
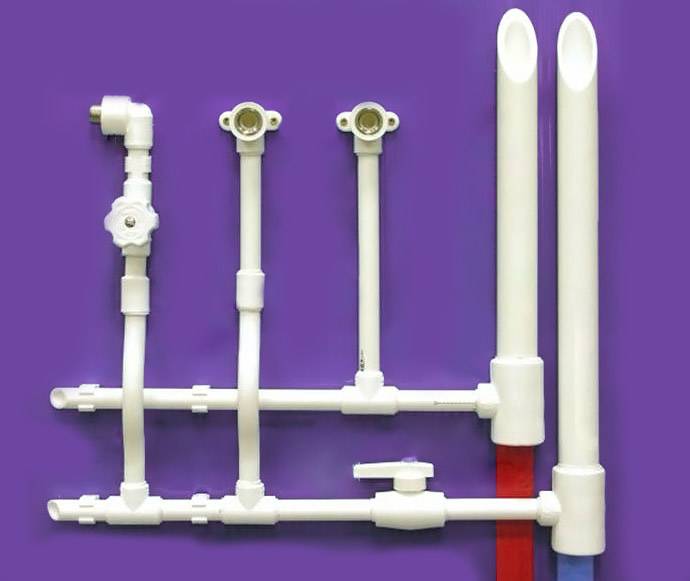
Mounting diagram
Specialized sites provide detailed instructions in the form of photo or video materials regarding pipe installation schemes. How the scheme of installation of a polypropylene pipe system looks like in general, we will consider below.
Heating and the installation itself take into account several important nuances that greatly simplify the work and increase the durability of the system.
Installation of polypropylene pipes
First of all, installation work of this type must be carried out at an ambient temperature exceeding five degrees Celsius. Installation is carried out on a surface cleaned of all kinds of dirt and irregularities, which ensures better sealing of the system.
The use of open flame and threading when installing polypropylene pipes is unacceptable - this significantly reduces the quality of the heating system and spoils the material used. Of the devices for mounting the heating system, you will need special tongs, with which polypropylene pipes will be cut, an electric welding machine, with which polyfusion welding will be carried out, and a compensator.


Installation of polypropylene pipes
Below is a diagram of the installation and the sequence of work.
- Measuring and cutting the pipe to the required length. When welding a foil-type pipe, the upper and middle layers are first removed.
- Cleaning the end of the pipe from bumps.
- Mark with a marker of the depth necessary for the exact entry of the fitting. Between it and the end, in order to avoid narrowing the passage, an indent of about a millimeter should be left.
- Marking the point of convergence on the fitting and pipe surfaces with a marker.
- Simultaneous heating of the parts by pushing the pipe and fitting onto the welding machine.
- Connection of elements after heating, taking into account the marks made in advance. All defects and distortions in the mount should be immediately corrected.
- Seam cooling, which lasts about twenty-five seconds.
- Similar connection of other elements.
When mounting the compensator, it must be installed strictly with a loop downwards. This will help to avoid the accumulation of air in its upper part, which leads to a stop in the circulation of water in the heating system and, over time, to its irreversible breakdown.
For better and faster mounting of your system, it is better to familiarize yourself with video tutorials on this topic. This will give a visual example of work and will greatly simplify the installation process, reducing the time spent on installing the system with your own hands.
As for the search for materials, here you should carefully study the base of proposals in terms of the price-quality ratio of polypropylene pipes and the materials necessary for installation. Having spent some time looking for the most suitable option, you thereby get the highest quality product that will provide pipes and heating itself with durability and stability.
Polypropylene pipes are resistant to external influences and heavy loads on the system if the correct scheme is used.Their indisputable advantage is that such a system is extremely simple to install and it is not difficult to make heating with your own hands. To do this, you need the necessary materials, an exact scheme of work and several video installation instructions.
Thus, knowing what heating is, and having an idea about the features of the heating system made of polypropylene pipes, you get maximum comfort, warmth and coziness in your home or in another room.
Installation of pipes for heating
More and more often, polymeric materials are used in the installation of communication lines. They have excellent technical characteristics and are devoid of the disadvantages inherent in metal products. And the installation of heating from polypropylene pipes is simple and does not require any auxiliary materials.