- The second stage of the installation of a split system
- How and where to install the air conditioner
- Installing a window air conditioner
- Air conditioner installation process
- Proper installation of a split system
- The internal structure of the air conditioner and the principle of its operation
- Basic installation rules
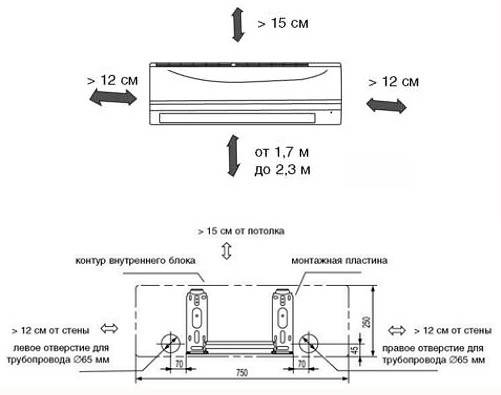
- Mounting diagram
- Tools and consumables
- Installation of air conditioner
- How to vacuum an air conditioner
- Which is more profitable: professional installation or do-it-yourself installation of a split system
- Where to locate the outdoor unit
- On the balcony or loggia
- Under or next to a window
- What is an air split
- Fixing the outdoor unit
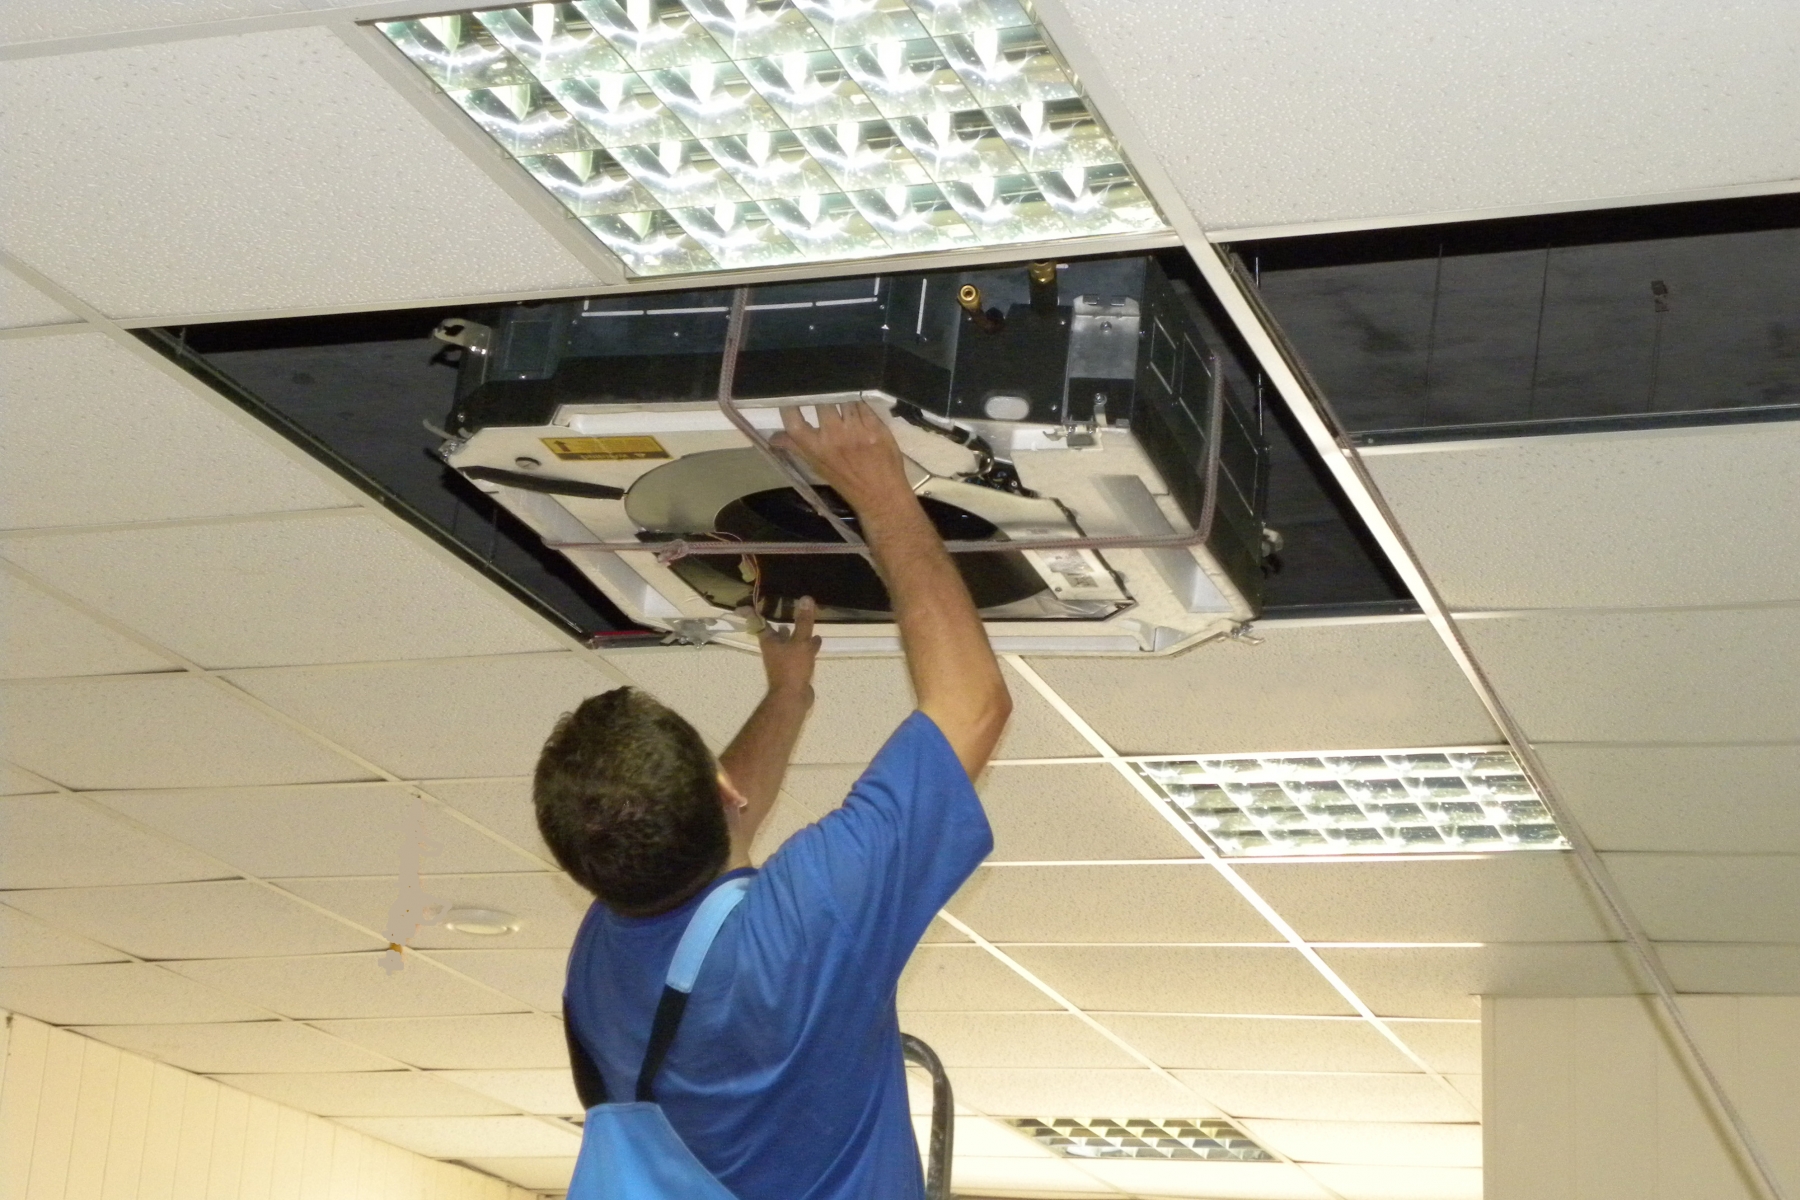
The second stage of the installation of a split system
Correctly installing the indoor unit is very important, since the quality of the entire system directly depends on it. The best option is to fix the device on the wall with self-tapping screws, if the walls are finished with gypsum plaster, then you should definitely insert plastic spacers into it, since such material is quite loose and the self-tapping screws will quickly loosen from vibration
If the wall is made of brick, then wooden or plastic “caps” are inserted into the holes drilled for self-tapping screws, and then a plate for the block is fastened with self-tapping screws.Be sure to check with the help of the building level evenness of the fastening of the plate.
The next step is to use a perforator to drill a through hole in the wall for the cold pipe. Be sure to ensure a slope of at least 15 degrees. It should be out, not in.
Next, you need to connect the copper pipes to the indoor device of the air conditioner, as well as the drain pipe to the special hose on the device. The electrical cable can now be connected to the indoor equipment. For split systems, the cooling capacity of which is not more than 4 kW, you should use a cable with a cross section of at least 1.5 mm (5-core).
How and where to install the air conditioner
By choosing the air conditioner that meets your requirements and wishes. You can start installing it indoors. To operate the equipment normally, you need to decide where to mount it. There are certain recommendations on where to install air conditioning in the apartment. In order to solve this problem correctly, you need to focus not only on the advice of installers, but also on the features of this room.
The best place for mounting air conditioning devices is in the near corner near the window. With this arrangement, the length of the freon line was no more than 5 m. For some models of equipment during standard refueling, the recommended minimum length is 3 m, and for certain models even 7. Such an installation is very profitable in terms of finances, as well as in terms of equipment performance. If your room is huge, then it is advisable to increase the length of the line so that the air flows, cold or hot, are evenly distributed.In this case, you lose about 5% of performance, but this loss is necessary.
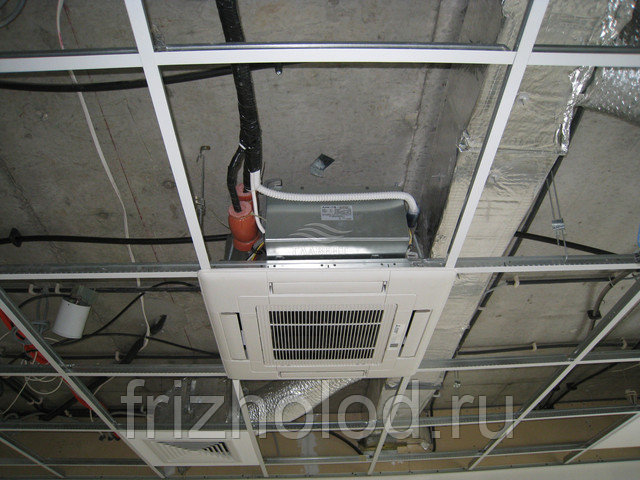
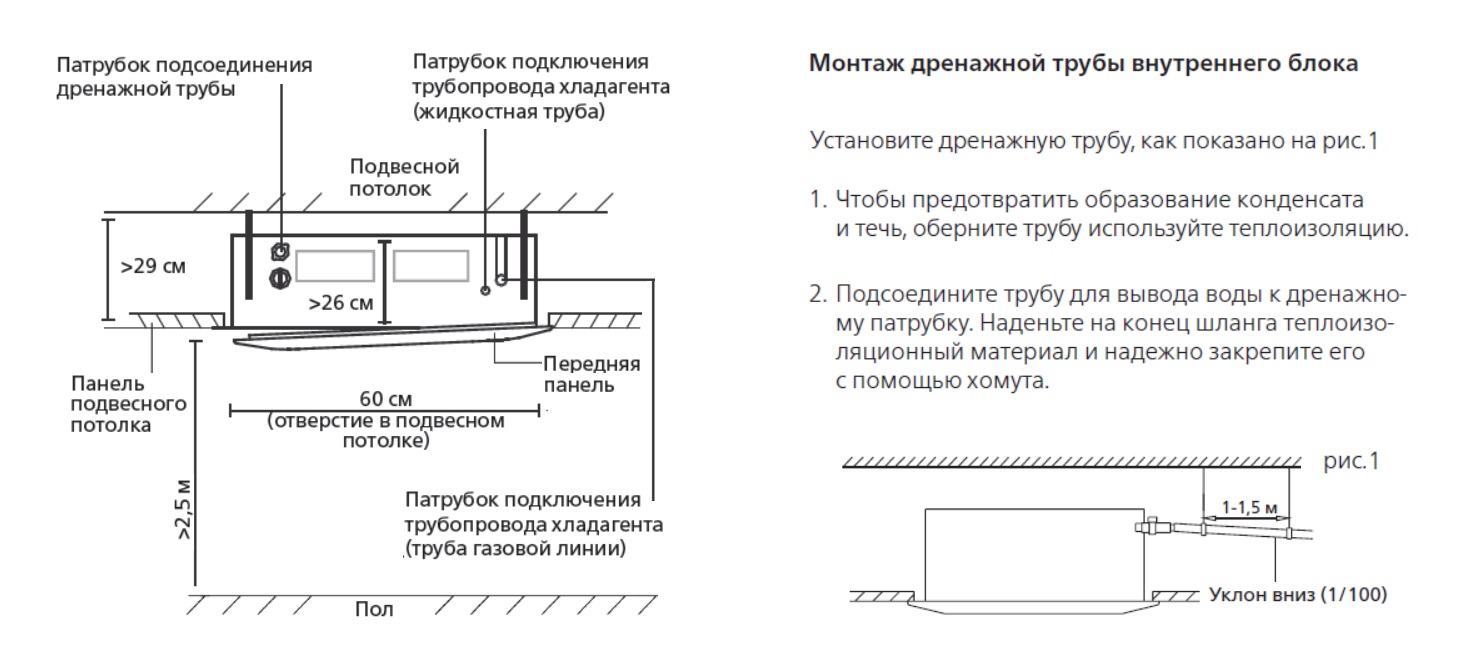
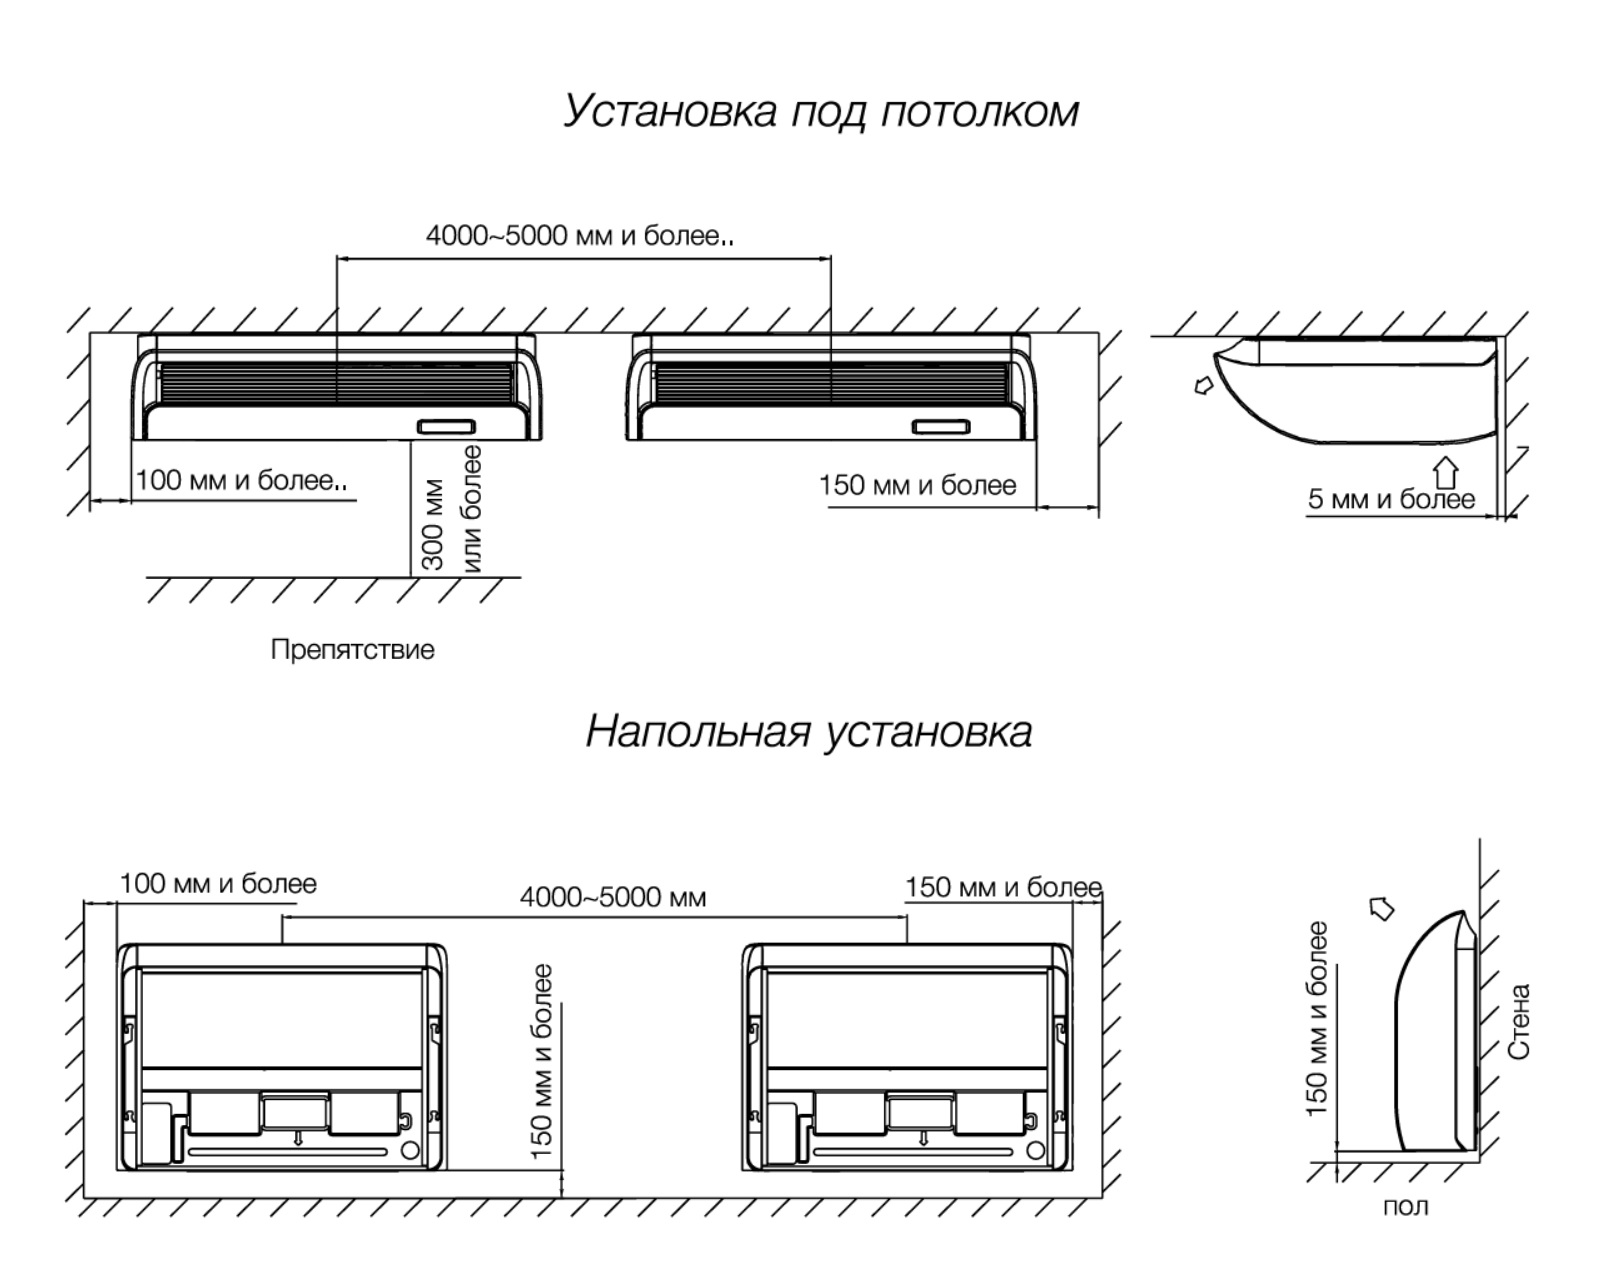
If the air conditioner is mounted under the ceiling, then the distance between the indoor and outdoor units should be at least 10 cm. When installing the cabinet above furniture, the height from it to the equipment should be at least 70 cm, or better even 1 m
This is important for efficient air circulation. When mounting the device above the bed, make sure that cold streams do not blow on you during sleep
If the installation is planned in the office, then it is necessary that the main air flow circulates between the workplace and does not blow in your back.
You have already decided on the place, which means it's time to find out how the air conditioner is installed in the apartment:
- Before proceeding with the installation, the length of the future route is calculated with the selection of a kit for installing the air conditioner. The main length increases for the stock by 0.5 m. The length does not exceed 6 m. Otherwise, better consider the installation location of the blocks. The smallest length of the installation kit for the air conditioning system recommended by installers should be 1.5 m.
- Now start the installation. The first step is to attach the plate for the indoor unit. Mark up by level. If your indoor unit is not level, then the condensate that forms during the operation of the equipment will not drain into the drainage pipe, but will simply drip onto the floor.
- The next step is drilling a through hole. Its diameter should be at least 5 cm. When you drill, estimate your indoor unit on the installed plate, and now attach the base of the case. In order to avoid stagnation of condensate, you should drill a hole with an inclination to the bottom.
- Now the installation of the street block of equipment is underway. It is very difficult to do this alone, because of its severity. The two brackets hold the outdoor unit of your air conditioning system. On the outer wall, the brackets are attached to anchor bolts. They must lie in the same plane in order to evenly install the street block. When you fix the brackets, you can put the block, and then bolt it on.
- Now the track is attached to the indoor unit, and the unit is attached to the plate. After the copper tubes are straightened, and the desired length is cut off from them. Put nuts on the tubes and flare their ends.
- The tubes are aligned with the pipeline of the drainage system and the electric wire, applied to the tubes of the indoor unit. Then aligned in place. Now wrap your line with metallic tape.
- The next step is to connect the trace and the external block. To do this, the drain tube is put on the fitting protruding from the indoor unit. When you connect the wire, mark which of them goes to which contact. Make sure that the fitting is evenly joined with the tubes. Only now the nuts are tightened. Do not be too zealous so that the nut does not burst. The other end of the route is closed with tape and a bag to prevent debris from getting there. It is then pushed outward from the through hole in the wall. Before that, you already need to mount the decorative case, otherwise you will need to remove the entire highway. After preparing the indoor unit, the connection of the route to the street begins.
- The outdoor unit must be connected in the same way as the indoor unit, but the drain pipe is not connected to it. He goes down. Now do a vacuum. This is done in two ways: "zilch" or high-tech vacuuming.As soon as you finish removing moisture from the tubes, open the liquid as well as the gas cock all the way. Check tightness.
Air conditioning installed.
Installing a window air conditioner
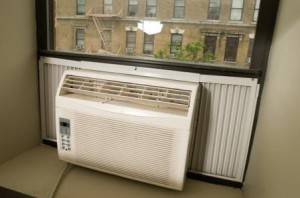
window air conditioner
Installing a window climate control device is a time-consuming task that requires maximum care and accuracy from the contractor. Such an air conditioner is a one-piece unit, which simplifies installation a little. All work is performed in the following sequence:
- First you need to decide on the installation site of the air conditioner and carefully prepare a double-glazed window for this. The window is marked according to the size of the apparatus, then the glass is removed and a jumper is inserted. The place for installation is ready, the free space of the frame must be carefully glazed;
- Then the bracket and the device itself are installed. In this case, it is necessary to ensure that the back wall is slightly inclined to drain condensate;
- Next, you need to attach a hose to drain the condensate. The hose must be perfectly flat, without kinks;
- A separate electrical line is being brought under the air conditioner;
- Grounding is connected.
After that, it is worth checking the operation of the window air conditioner. If it does not turn on, it is worth checking all contacts and troubleshooting.
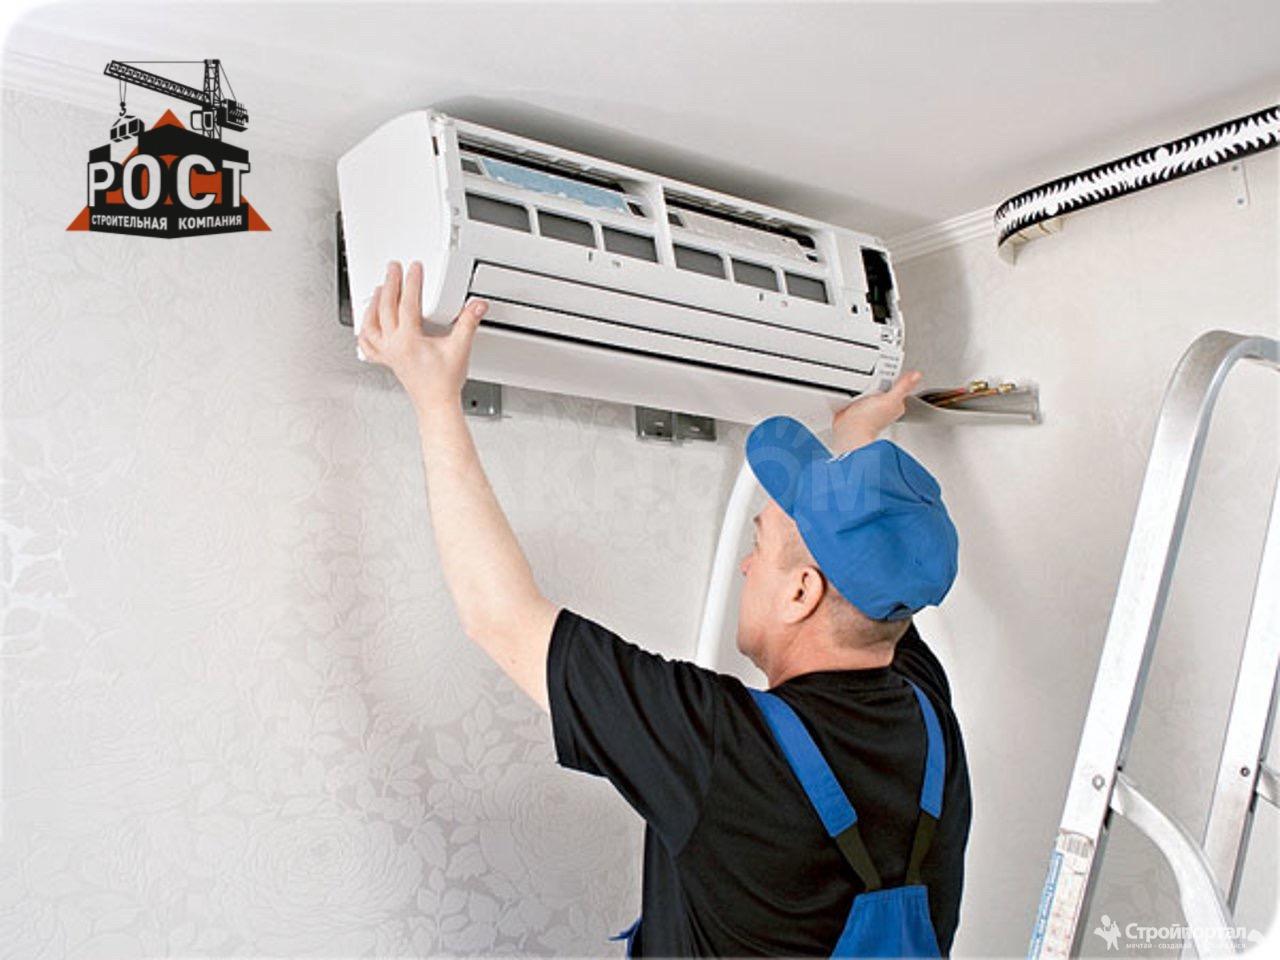
Air conditioner installation process
Installing an air conditioner with your own hands is possible, the main thing is to use a proven scheme, following which you can get the desired result.
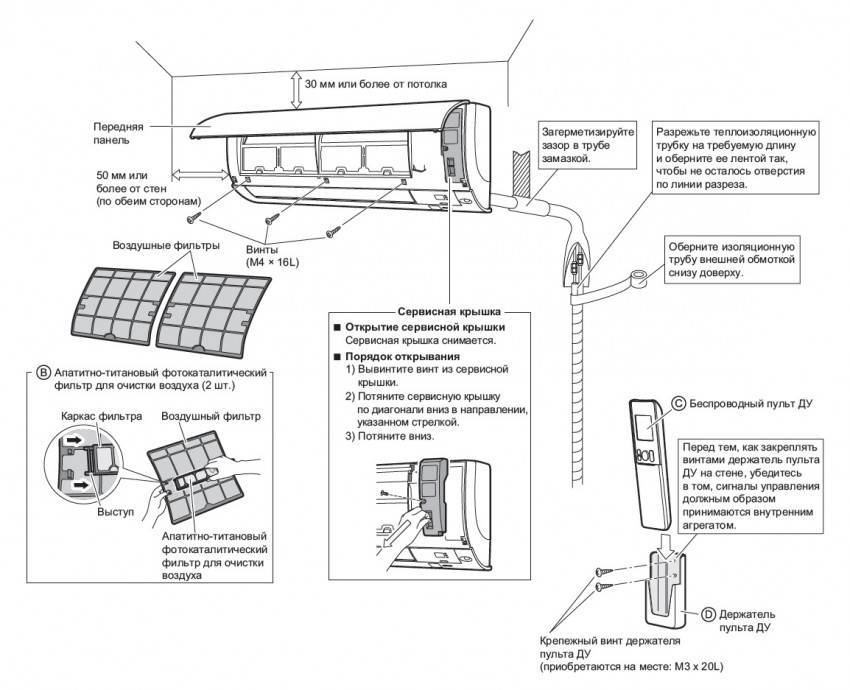
Before proceeding with the installation, it is necessary to determine exactly the place where the air conditioner will hang (distance from the ceiling, furniture, etc.). When the calculations are completed, you need to make a markup on the wall, checking its fidelity with a building level and then attach the mounting plate.You can easily fix such a bar with dowels.
The next step in installing the air conditioning system is drilling a hole in the wall through which communications and drainage will pass. As an actual tool, you can use a 45 mm drill. The place for the hole must be chosen in the corner of the wall at the same level with the bar


![[instruction] do-it-yourself air conditioner installation](https://fix.housecope.com/wp-content/uploads/4/b/f/4bf44a65ce7a4b69c8a7bc8b8c932920.jpg)


Drilling the wall must always be at an angle - this is important for the normal operation of the air conditioner and the free flow of condensate.
When the hole is ready, it's time to start installing the track. To do this, measure the pipes and cut them
It is impossible to use a hacksaw for metal to work with copper pipes, since chips are formed during the sawing process, which will subsequently ruin the compressor. The best option for working with pipes is a pipe cutter. Finished pipes must be connected to the block inside the apartment. In order for the connection to be of high quality and not to let freon through, it is important to perform copper rolling. The nut that will be used to secure the pipe is important to put on before the rolling process begins, as this will not work later. It is worth making sure that the nut is screwed as tightly as possible.
It will be necessary to connect the wires necessary to control the system, as well as drainage, to the inside of the air conditioner. All this is important to qualitatively insulate and wrap with insulating tape. After the free ends of the insulated pipes, drainage and wires must be brought out through the drilled hole. The indoor unit is attached to the mounting plate at this time.
When the work in the room is over, the stage of installing the outdoor unit of the air conditioner begins.It is immediately worth noting that this process involves risk, since you will have to work from the outside of the house. To avoid an unpleasant development of events, it is necessary to securely fasten with ropes that can withstand the desired weight. The rope is fixed on a special belt. In this case, it will not hurt to consult professionals regarding installation work at height. To install the outdoor unit, you will need to measure the distance between its legs and mark it on the facade with marks, according to which you need to install the brackets afterwards.
When fixing the brackets, it is important to understand where it will be best to install the outdoor unit of the air conditioner. From the experience of professionals, the best place is the area below the window. The external device of the air conditioner under the window will be convenient to maintain and repair. It is important that the brackets can withstand the weight of the outer part for a long time, so it is better to use self-tapping screws with a diameter of 12 mm or more for fastening.
After the brackets are fixed, you need to lower the outdoor unit onto them. This should be done carefully and be sure to do it together. It is also important to insure the block with a rope.
When the outer part of the air conditioner is on the brackets, without removing the insurance, you need to fix it with screws and only after making sure that the unit is securely fixed, release it from the rope.
When the external device is installed, attention must be paid to connecting communications. In order not to confuse the holes for pipes and drainage, you can focus on the connections of the unit indoors.
Do not forget that the air conditioner requires a vacuum in the drainage
In order to create this vacuum, a special pump is used. Connect it to the air conditioner by means of hoses and a manifold equipped with a pressure gauge. In this case, you need to open the port. When the connection is established, you need to turn on the pump, which will successfully pump moisture and dust out of the air conditioner. Stop this process only after the pressure gauge shows a vacuum. Do not immediately disconnect the pressure gauge and hoses - it is important to make sure that all connections are tight and air does not enter the system.
When there is no doubt about the tightness of the connections, freon can be supplied to the system. After turning on the air conditioner, you must wait 15-20 minutes, and after measuring the pressure, disconnect the pump.
Proper installation of a split system
There are several important points that you need to know before buying air conditioning equipment and in order to install a split system yourself.
Dimensions. Being impressed by the abundance of air conditioner functions, when choosing, you can forget almost the most important thing - the size of the device.
Pay attention to this first of all so that you don’t have to, then puzzle over where to attach the purchase, the dimensions of the equipment may not fit into the installation location you want.
The second, but no less important aspect is energy consumption. Make sure that your network will pull the air conditioner you are purchasing
By doing this, you will save yourself from unnecessary and unnecessary hassle and spare other household appliances in the house.
Appearance. High-quality equipment is protected by a special acrylic coating, which prevents premature wear of equipment much better than standard paint.
- drilling holes in the wall;
- fastening of external and internal blocks;
- installation of drainage and installation of an external unit;
- installation of the pipeline;
- installation of electrical connecting parts;
- oxygen withdrawal and test run.

Installation is best done during repairs, as it is impossible to avoid drilling holes in the wall. Some points when mounting the external unit of the air conditioner: Installing it on an unglazed balcony provides convenient access to the unit in case of prevention, which, by the way, is necessary. If there is no unglazed balcony, it should be installed within reach.
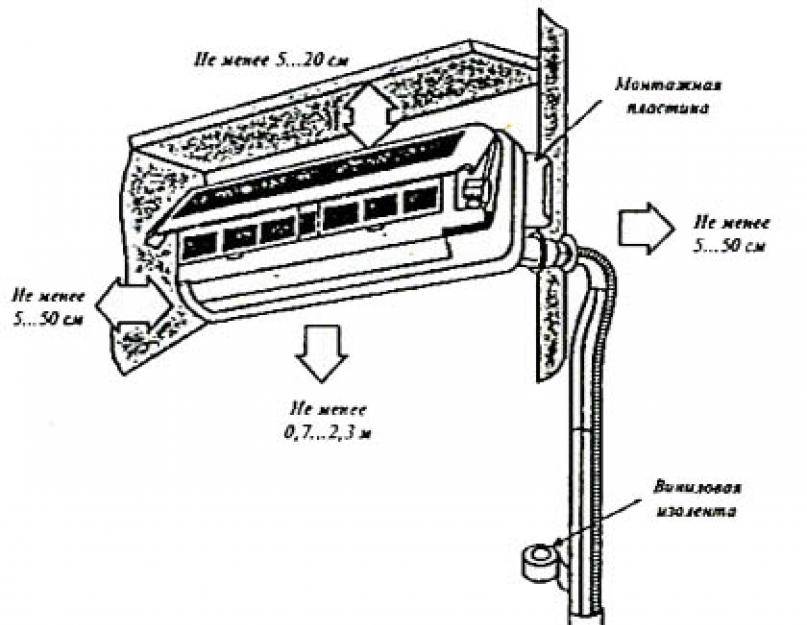
The external unit of the split system must be located at a distance of at least 10 cm from the wall, in order to avoid overheating of the compressor motor itself and, as a result, its exit from the working state. For fastening the external unit, holes are drilled in the wall and the necessary fasteners are used, which are designed to withstand the mass of the device. At whatever height the split system is, it is highly desirable to mount a special canopy above it to protect it from precipitation.
The indoor unit is located on legs attached to the wall or, when installed on top, to the ceiling and must be mounted relatively evenly, otherwise liquid will pour out of it, which will be discharged from the outside through the drainage pipe, often to the street.
The indoor unit is not mounted above heat sources and at high temperatures, this position makes it work through the measure, which leads to a quick decommissioning of the system from working condition. You should also not engage in installation at high levels of vibration and noise. Such fluctuations can knock down the control of the electronics, which will adversely affect its proper operation.
Such an independent installation of a split system and installation of an indoor unit must be carried out under the condition of proper air circulation. The total dimensions in relation to the wall and equipment should be about 2-3 meters, otherwise the oxygen leaving the device, “fighting off” obstacles, will return with the same temperature, and the air conditioner settings will show that the indoor climate is set, which will lead to turning it off. Save your health and do not install the indoor unit directly above the bed. We all perfectly understand that the heat is sometimes unbearable and how pleasant it is to lie under the cold breezes of the air conditioner, but you must be aware that this will not lead to anything good and then you will have to pay the price for a moment of weakness in the form of a cold. This is especially true if there are children in the house.
The process of mounting the pipeline is one of the most important steps. It is strictly forbidden to bend the tube with freon. If these tubes are twisted in a circle, it will complicate the pumping of the compressor with cold, which will subsequently lead to malfunctions and out of balance of the unit. For fastening the drainage pipeline, only reinforced tube should be used, which is designed specifically for such work and will be easily bent.
The pipeline of the system must be dry and clean, without moisture and air inside, which, when combined with freon, have an adverse effect on the performance of the device. The use of a vacuum pump is recommended. Do not neglect this operation if you want your air conditioner to serve for a long time.
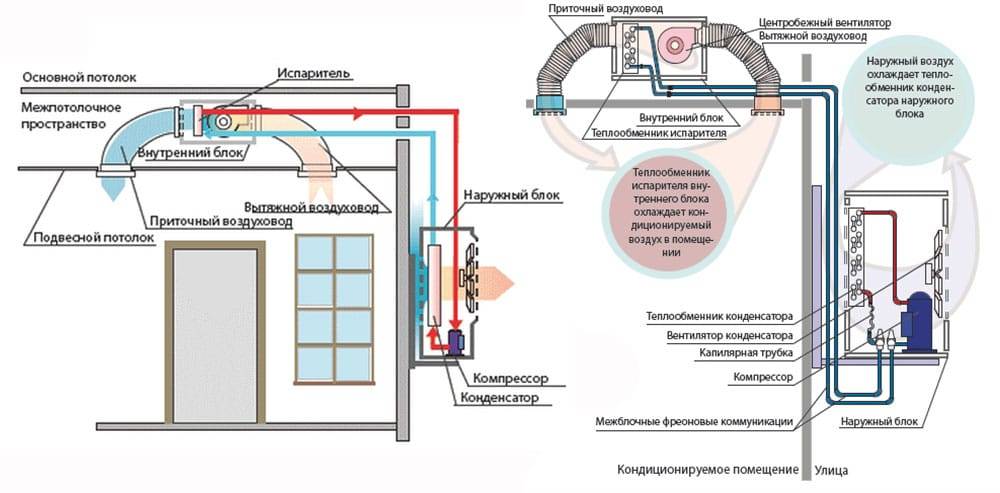
The internal structure of the air conditioner and the principle of its operation
Before you install an air conditioner in a house or apartment, be sure to familiarize yourself with the principle of operation of this device, as well as with its structural structure. This knowledge will not only speed up installation work, but also perform them correctly.
The air conditioner consists of a compressor and an evaporator unit connected by tubes.
Split systems consist of an evaporative unit and a compressor. These elements are interconnected by tubes. For installation of an external unit or compressor, the plane of the outer wall is used, and the evaporator is placed in the room. In expensive models of climate equipment, there may be several indoor units. All of them are connected to one compressor.
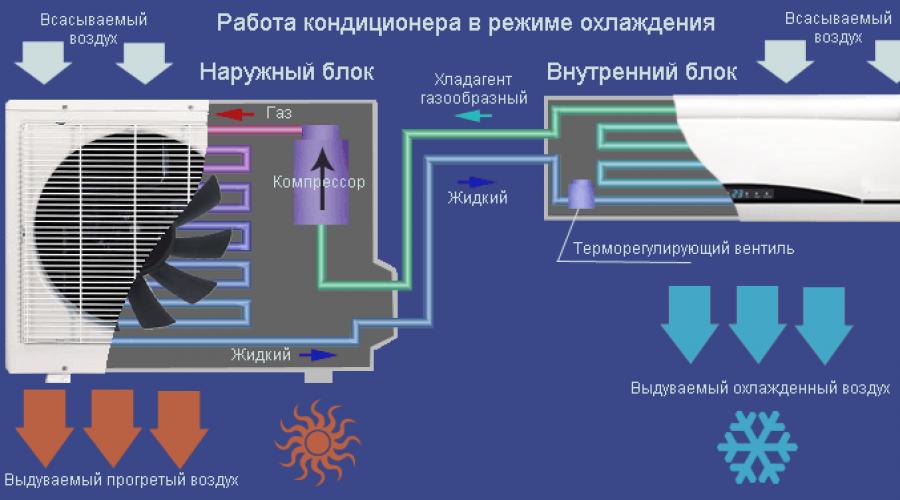
The principle of operation of split systems:
- Under the influence of high pressure, refrigerant is supplied through the nozzle into the evaporator chamber.
- There, the working substance expands and boils. The vapors formed during this process absorb heat.
- As a result of this process, water condensate is formed, which settles on the radiator in the evaporative unit.
- From there, moisture enters a special reservoir and is removed from the room through a tube.
During the operation of the air conditioner with the working substance, the following occurs:
- The compressor pumps out vapors and increases pressure.
- There is a heating of the working substance, which from a liquid state passes into a gaseous state.
- In the form of a dense mist, the refrigerant enters the condensate collection chamber.
- The fan cools the condensate vapor, which again turns into a liquid state.
- Then the working substance, driven by pressure, again enters the evaporator nozzle. The cycle is repeated.
To properly install everything, you should have an idea about the device and the principle of operation of the air conditioner.
The efficiency of air conditioning equipment, as well as electricity consumption, depend on the conditions under which the air conditioner operates. If a heater is installed nearby, the electricity consumption will increase.


On a note! If you want to install air conditioning in the apartment, be sure to take into account the position of the heating devices. Their close proximity increases the load on the climate equipment, which can cause it to fail.
Basic installation rules
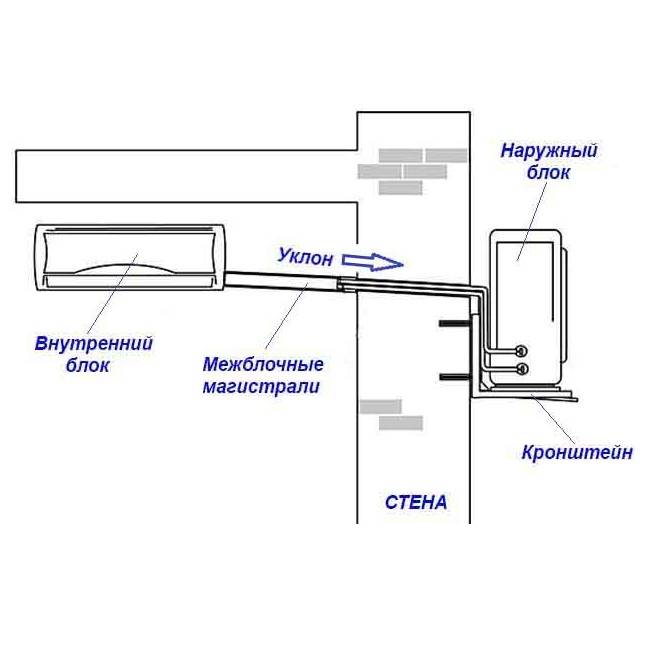
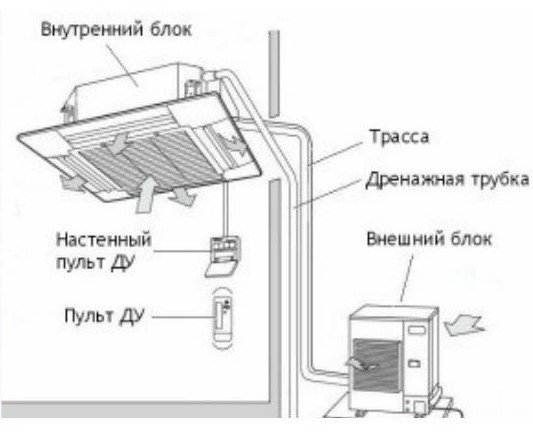
The system consists of two blocks: external (compressor) and internal (evaporator). Plus remote control.
Between the blocks there are copper tubes for freon circulation and a connecting electric cable. The indoor unit is equipped with a drain pipe through which condensate is discharged into the sewer or through the outer wall to the street.
Plastic elements of the indoor unit
There are several general requirements for the placement of air conditioner components:
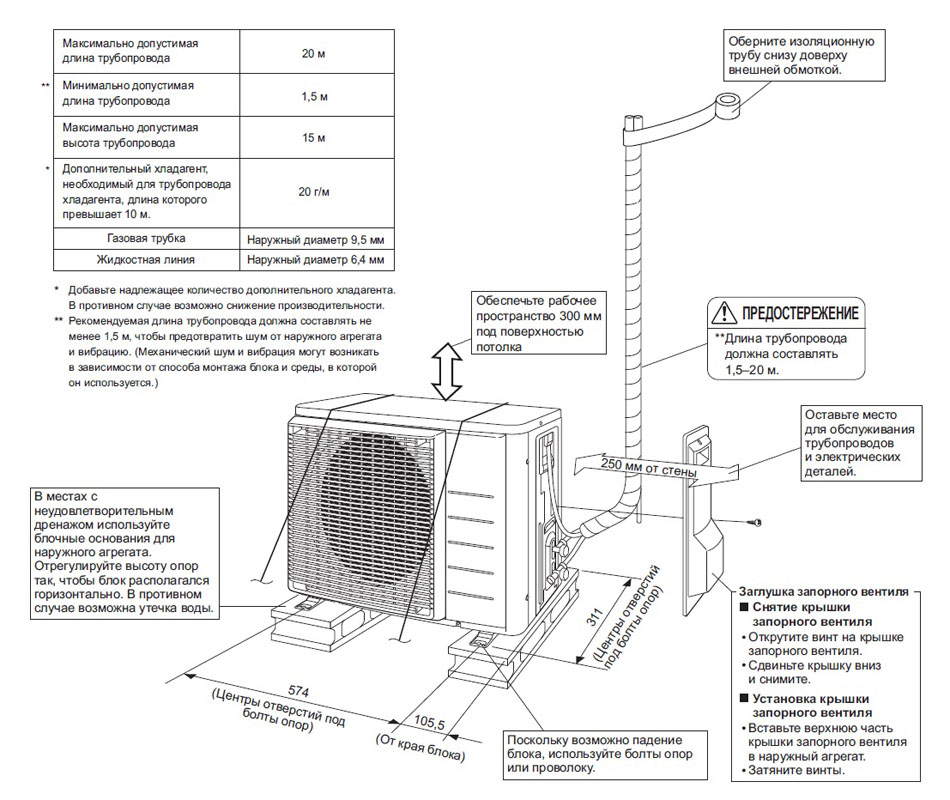
- The outdoor unit is mounted on a flat solid wall strictly horizontally in accordance with the level, away from heat sources.
- There should be a ventilation gap of about 10 centimeters between the unit and the wall.
- It is necessary to ensure that the tubes are bent as little as possible: the kinks interfere with the pumping of freon. It is desirable that the distance between the component parts of the system be small and the connection geometry as simple as possible.
- The indoor unit should not be installed directly above radiators, in direct sunlight or in enclosed spaces. You can not block curtains and bulky things.
- It is not recommended to install the indoor unit in a room where there is vibration.High frequency vibrations will interfere with the correct operation of the processor.
- The indoor unit is placed strictly horizontally and in such a way that the condensate can flow freely through the drain pipe.
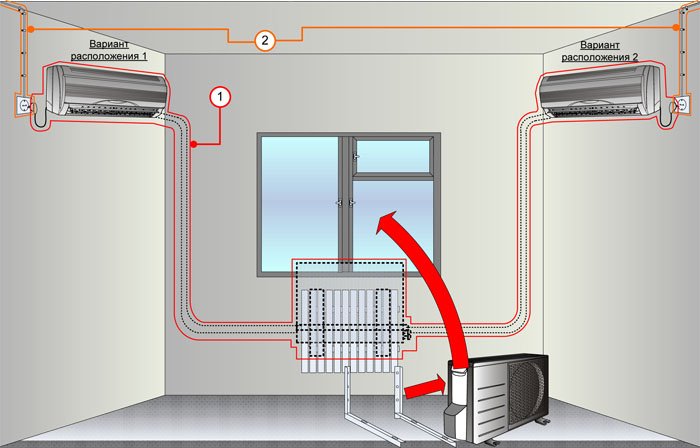
Mounting diagram
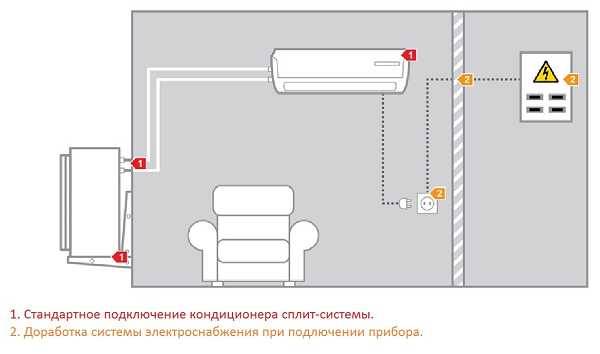
HVAC installation companies distinguish between standard and non-standard installation. Standard means:
- Installation of the outdoor unit - on the wall section under the window, carried out from the apartment;
- Between blocks up to five meters of communications;
- Laying of communications without wall chasing;
- Connecting to an outlet.
In the non-standard case:
- Hanging the outer side out of the window is not possible, you have to hire a tower or industrial climbers;
- Long communication highway;
- Complications for working on the facade (ventilated or wet facade, etc.);
- The need for wall chasing;
- Summing up the power cable;
- Drainage pump;
- Conclusion of drainage to the sewer.
In most cases, household air conditioners are mounted in a standard way, but all these features must be taken into account when preparing for the installation of a split system on your own:
- Is it possible to connect to an outlet, or do you need to pull the cable and install a separate machine on the shield. In old houses, wiring for heavy loads is not designed; when the air conditioner is running simultaneously with other household appliances, the plugs will knock out;
- Is there a possibility for a standard placement of the outdoor unit. If, for example, the window is deaf, decide what is cheaper for you: dismantle the window while installing the air conditioner or call a team of climbers;
- Are there ways for the unimpeded outflow of condensate (i.e., the ability to provide the necessary slope), or is it necessary to install a drainage pump;
- Communications can be laid in gates or in a decorative box. You need to consider how it will be combined with interior design.
Tools and consumables
- Perforator / impact drill.
- Pipe cutter.
- Manual rolling tool.
- Tool for cleaning the cut edges of tubes (scraping).
- Quarter and half inch copper tubing (if not included).
- Drainage hose with a section of 1.6 cm.
- Electric cable one and a half millimeters.
- Insulating box for tubes.
- Waterproofing and insulation for electric cable and drainage pipe.
- Vacuum pump for pumping air out of the system.
- Fasteners: brackets, self-tapping screws, dowels, plugs.
Additionally, you may need:
- Decorative box for communications;
- pump for drainage;
- Protective peak for the external block.
Installation of air conditioner
Before proceeding with the installation of the air conditioner, you need to take care of the availability of the necessary funds. You will need the following tool for installing split systems:
- drilling hammer;
- pipe cutter;
- flaring tool;
- pump;
- a device that measures the pressure in a liquid.
Installation of the device includes the following operations:
- Initially, you should open the front panel and unscrew the screws from the cover that closes the electrical box, it must be pulled out.
- An electric cable is connected to the unit and the cover is put in place. A couple of useful notes, the unit itself should not be lower than 2m 30 cm from the floor surface, the socket should be close to the element, and have a ground connection.
How to vacuum an air conditioner
The evacuation procedure is necessary to remove residual argon and air from the system. This will extend the life of the equipment.This will require a vacuum pump with two pressure gauges to control system pressure. This tool connects to the charging port on the outdoor unit. Within 15-20 min. nitrogen and air residues will be completely removed from the system.
After the specified time has elapsed, the pump must not be disconnected immediately. It turns off and remains in this position for another half an hour. During this period, you need to carefully monitor the readings of the pressure gauges. If they change, it means that the system is leaky. In most cases, the problem is in the area where the copper pipes are connected. This fault must be corrected.
If the readings remain unchanged, fully open the bottom valve without disconnecting the pump. When noise appears, this will mean that freon has begun to fill the system. You need to put on gloves and quickly disconnect the pump hose, and then open the top valve on the track.

Installation of a split system necessarily ends with a vacuum procedure
The procedure for installing an air conditioner with your own hands without a vacuum pump:
- Unscrew one plug on the top port and two on the bottom.
- To exit the lower port, which is placed perpendicular to the side wall of the split, it is necessary to select a hex wrench of the appropriate size.
- The key is inserted into the socket and rotated counterclockwise by 90° for 1 second. The working substance will begin to come out of the block.
- The same port has an output with a spool. For a fraction of a second, you need to press the spool with a long object, but not with your fingers. A hiss will appear, indicating that a mixture of gases is escaping from the unit. You don't have to release it completely.
It is necessary to repeat the cycle again: open the freon supply for a fraction of a second with a hex key, and then release the mixture of gases. For a track 4 m long, this will be enough. It remains only to tighten the plug at the outlet with the spool and, using a hex wrench, open the valves on the upper and lower ports in order to release the working substance into the system.


This completes the installation of air conditioning equipment. Vacuuming the air conditioner without a pump can be used as an alternative solution if a tool is not available, but there is a possibility that there will be a small freon leak.

After installing the split system, all excess air and moisture should be removed from its device.
Installing an air conditioner is a complex procedure. However, subject to all the requirements and recommendations, it is quite possible to carry out this event on your own.
Which is more profitable: professional installation or do-it-yourself installation of a split system
The price of installing an air conditioner depends on the complexity of the work, on the power and size of the equipment. To make the comparison correct, the cost of professional services for the installation of a small power household appliance, for example, 3.5 kW, can be considered as a basis.
This service includes:
- installation and connection of both units;
- harness laying (up to 5 m);
- formation of through holes in the wall.
Also, the cost of installing an air conditioner includes the cost of consumables. On average, professional installation of low-power split systems costs the client 5500-8000 rubles.
Average prices for renting a tool and purchasing materials for installing an air conditioner in an apartment with your own hands:
- Perforator ("Makita") - 500 rubles per day.
- Two-stage pump - 700 rubles / day.
- Installation kit + communications (5 m) - 2500 rubles.
Independent installation of a split system saves from 1500 to 4000 rubles
In some cases, equipment is leased only on security. It is approximately 4000-8000 rubles. The amount of the deposit depends on the value of the equipment rented. If pipe rolling is required, then tool kits designed for this purpose will have to be added to the list. The cost of their rent is 350-500 rubles per day.
The total amount reaches 3700 rubles. To this value you need to add 10%, which will cover unforeseen costs and the purchase of consumables. The result will be about 4000 rubles. This means that self-installation of a split system saves from 1,500 to 4,000 rubles.
It is worth noting that the minimum amount for a professional installation does not always include a complete list of work. You may have to pay extra for some of them. With this in mind, we can conclude that the savings are about 2500-3500 rubles.
The cost of installing an air conditioner includes the cost of consumables.
Where to locate the outdoor unit
In fact, this is not the easiest task - to choose a place for the outdoor unit. Not all buildings allow them to be placed on the walls. In this case, there are only two ways out: install the outdoor unit of the split system in a specially designated place - air conditioning. If there is no such room, only a balcony or loggia remains. In such buildings, they are usually glazed, so the placement of the block does not affect the appearance.
But in this case, it is necessary to provide a system for cooling the equipment and removing exhaust air.If the balcony is spacious enough, for the duration of its operation, open windows for ventilation or providing fresh air in some other way. The way out is simple and clear, but it leads to overheating of the equipment, and this is fraught with breakdowns and frequent replacement of the damaged outdoor unit.
Mounting on a balcony is sometimes the only way out
Installing fans for a more active air exchange can slightly improve the situation. It is right to fence off a small room, to make effective ventilation in it, separate ventilation ducts for the removal and supply of air. And they must be separate. This is done with the help of air ducts that lead out instead of part of the glazing. In general, in this case, installing an air conditioner with your own hands is a problematic task precisely in terms of ensuring normal operating conditions for the equipment.


On the balcony or loggia
If there are no prohibitions on placing foreign devices on the walls of the building, usually the outdoor unit of the air conditioner is hung on the balcony railing (side or front) or on the wall, but so that it can be reached for maintenance - wash, clean, check, repair.
If the balcony is glazed, there should be an opening window sash above it. Otherwise, it will be very difficult to serve it. To protect against precipitation and objects that may fall from the window, a visor is placed above the block. The choice of materials is something similar to finishing a balcony or a white plastic visor, but only full-bodied. It is better not to use hollow and metal ones (including corrugated board and metal tiles), because during rain they turn into a drum, and during hail they can generally stun.
Standard ways to install the outdoor unit of the split system on the balcony
If the block is placed on the loggia, of all the above options, only the one in the picture on the right remains. it is inconvenient to place it next to the wall, perhaps under the window, but this already belongs to another section.
One more thing: how to run the track - on the ceiling or on the floor? You will have to ditch in both cases, but in the case of the floor, it is possible that you will make it from boards, then the pipes and cables connecting the outdoor and indoor units can be laid on the surface, but better in a box.
Under or next to a window
In those rooms where there is no balcony or loggia, the outer part of the split system is hung on the wall from the outside. It is more convenient if it is located under the window or to the side of it. Moreover, under or next to the opening part. In this case, service is possible without calling a climber.
The outdoor unit of the air conditioner can be installed under or next to the window
When installing the outdoor unit of the air conditioner with your own hands on the wall next to the window, consider the height of its installation. You can position the top surface of the block flush with the top edge of the window. In this case, leaning out of the window and insured, it will be possible to carry out work standing on the windowsill. The second option is to align the lower edge flush with the lower border of the window opening. Here you can lie on your stomach on the windowsill, but you won’t be able to get to the outlet of the pipes. That is, you still have to call industrial climbers.
What is an air split
A split system differs from a household, conventional air conditioner in that it consists of separated blocks. One of them is external, the compressor works in it, and condensate is also collected.The second block is internal, in which the thermostatic fluid evaporates. Many modern split systems not only cool the air in the room, but also heat it up to the required temperature. When the air is heated, the cycle works in reverse, and the refrigerant condenses in the indoor unit, while evaporation occurs in the outdoor unit. For this reason, in general, blocks are simply referred to as external (external) and internal.
It also happens that several internal ones work with one external unit. At the same time, they can work separately, and cool and heat the air. But this is found only in expensive models of split systems. Such air conditioning systems, although expensive, in the process of work are more economical than their cheaper counterparts. This is because in such a situation, the heat exchange inside the room does not interfere, but helps the air conditioner to work.
Fixing the outdoor unit
Installation on the wall of a multi-storey building
Now let's logically move on to another part of the split system - the external unit. Many questions may arise here as well. In general, where can you fix it?
If you install it on the bare wall of a 16-story building, while you live on the tenth floor, then get ready to shell out a considerable amount periodically, firstly, during its installation, and secondly, during preventive maintenance. The ideal place to mount the outdoor unit is, for example, a balcony or other convenient place.
Air conditioning in the glazed loggia
Outdoor unit installed very low
It is undesirable for the unit to be installed on the sunny side. Direct sunlight will heat the device, its efficiency will decrease, and it will fail faster.The unit is best installed on the leeward side of the wall. If the wind is strong, it will be difficult to remove heat from the room, which will lead to fan failure. Unfortunately, not all residents of apartment buildings can follow these recommendations, since the windows of their apartment most often face one side and it is this side that can turn out to be sunny.
It is forbidden to install an external device in the following places:
- Next to a tree.
- Close to the ground.
- Close to gas communications.
Firstly, if the external part of the air conditioner is installed next to the crown of a tree, then the heat exchanger of the unit will periodically become clogged with leaves and other debris flying from the trees in the wind. In addition, branches can constantly beat against the body of the unit, which sooner or later will lead to its breakdown. If there was no other place where the outdoor unit could be installed, it will be necessary, contrary to love for wildlife, to shorten the crown of a nearby tree.


Secondly, if the air conditioner is fixed at a low height, then it will be constantly polluted not only by the earth itself, but also by snow. If the reasons for such installation are due to technical necessity, then you can purchase or make a special stand yourself.
Thirdly, the air conditioner should not be installed near the gas pipe. In the event of a gas leak, this could lead to an explosion.
Not every neighbor will agree to plug his ears
It is impossible not to say that an ethical question may also arise. The outdoor unit makes noise during operation, which will create some inconvenience for people living in the neighborhood. You will not avoid trouble if it monotonously hums over the window of your neighbors.Troubles can also arise if the condensate from the tube regularly drips onto the heads of passers-by.
You can share your impressions, wishes and knowledge based on personal experience by leaving a comment at the end of the article.
We also recommend that you read additional material. Read articles:
- How air conditioner works.
- We repair the air conditioner.


