- How to plan plastic ventilation in the house
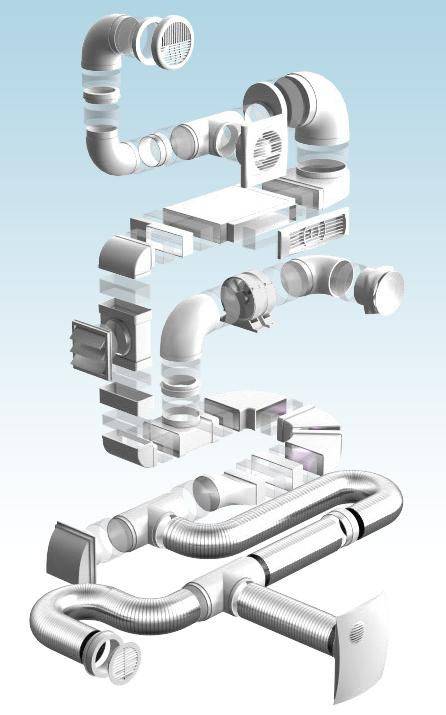
- Connection options for assembling ventilation ducts
- Varieties and materials for the production of plastic pipes
- Polyvinyl chloride (PVC)
- Polyurethane
- Polypropylene
- Calculation of ventilation for a private house
- Calculation of ventilation for a private house
- Features of ventilation of the sewer system
- Design nuances
- How to combine plasterboard ceiling with air ducts
- Hiding in the ceiling space
- We close the box
- Plastic ducts for ventilation: methods and types of connection
- System construction process
- Circuit design or development
- Detailing and assembly of the system
- Advantages of plastic ventilation
- Why is sewer ventilation necessary?
How to plan plastic ventilation in the house
If you decide to build ventilation from plastic pipes at home with your own hands, take it responsibly. Before getting down to business, entrust the design of all proposed hood elements to an experienced specialist. Only a master with experience and qualifications will be able to most accurately calculate the performance of the system and make an estimate.
Discuss a number of important points with the designer:
- Extraction of exhaust air from premises of various purposes (kitchen, bathroom and living rooms) should occur through separate air ducts;
- to remove accumulated condensate from the exhaust ducts, special holes must be equipped in them, even though the plastic pipes used for ventilation are not afraid of moisture;
- if it is not possible to avoid laying long horizontal sections of air ducts, then they will have to be equipped with fans for forced exhaust;
- so that the fan does not drive air from one room to another in vain, check valves must be installed in certain places of the ventilation system made of plastic pipes.
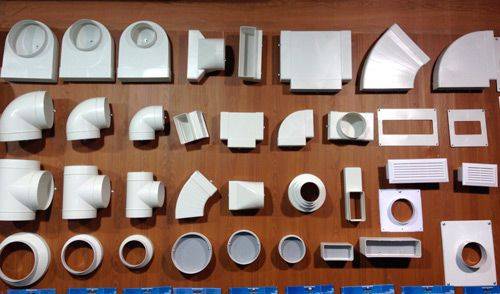
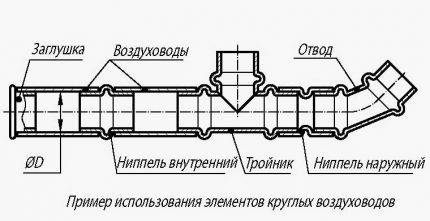
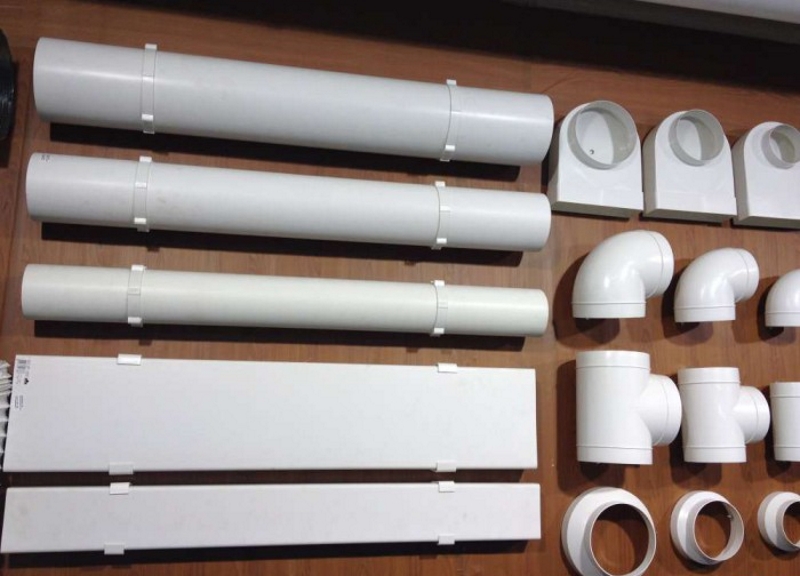
When constructing ventilation from plastic pipes, you will certainly have to use couplings, turns, tees and other parts to connect them.
But at the same time, make sure that each plastic ventilation pipe runs as smoothly as possible, without unnecessary turns. The duct system should also not have too many joints, try to use solid pipes as much as possible. You will have two reasons to strive for the optimal configuration of ventilation ducts:
- Each of the joints and sharp turns of the plastic pipe for ventilation reduces the speed of the air flow and increases the noise.
- Additional costs for numerous fittings lead to an increase in the cost of the entire system.
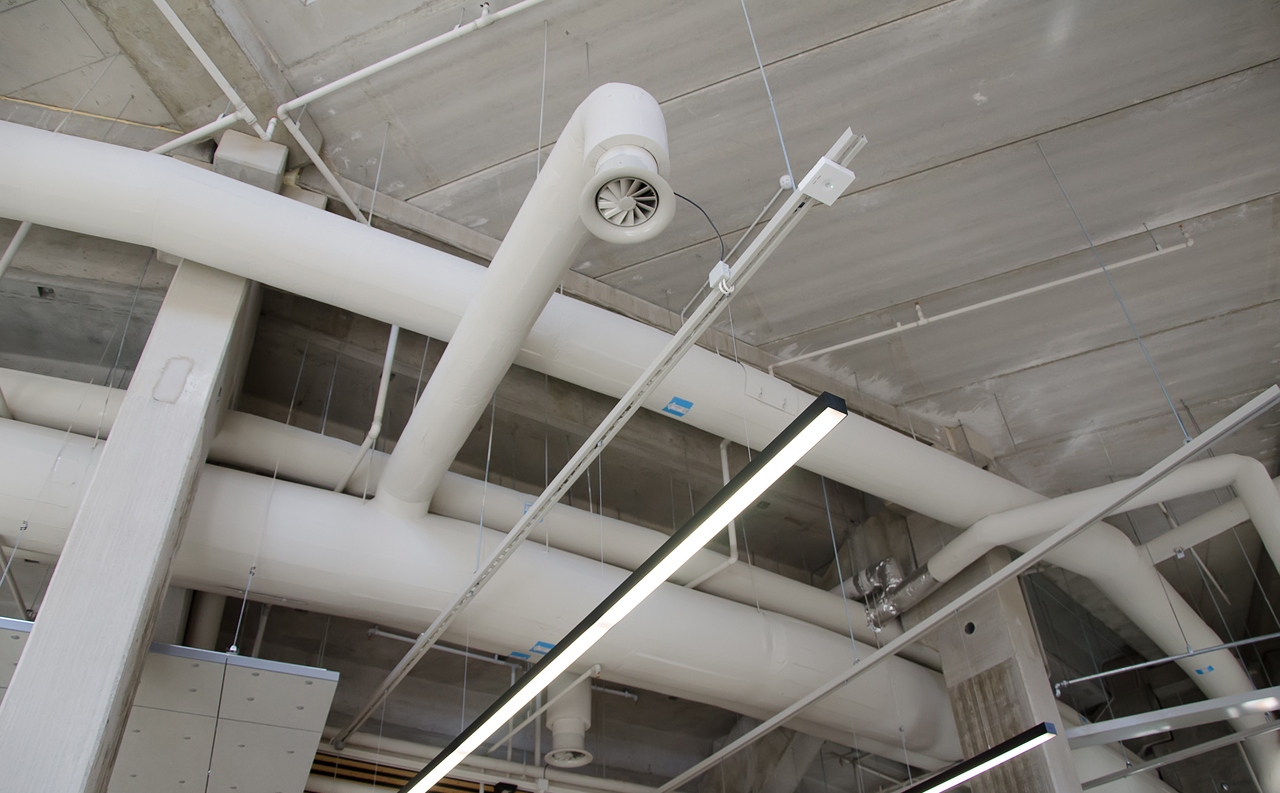
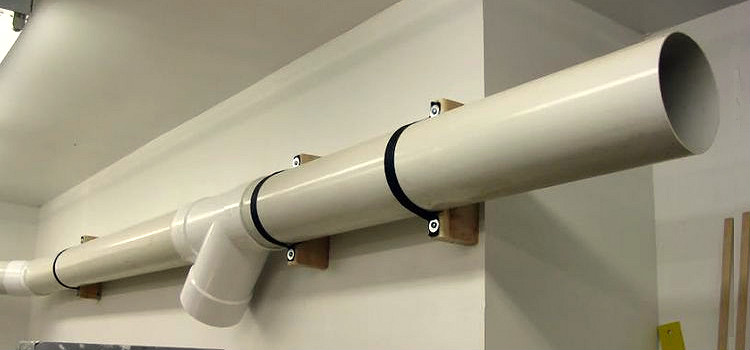
Another thing is a plastic kitchen vent pipe designed for exhaust. Here, open air ducts are more often used, and so that they do not violate the harmony of the design, the pipes for kitchen ventilation can be painted in the chosen color if desired.In the kitchen, ventilation from plastic pipes is especially relevant, and making it with your own hands is not only easy, but also prestigious.
Connection options for assembling ventilation ducts
Air ducts are assembled from separate parts. Docking is carried out using flanges or other connecting elements.
Corner flanges are installed at the ends of the connected sections. On them holes drilled under fixing bolts. Gaskets are placed between the flanges.
For the strength of flange connections, the bolts are carefully tightened with nuts and a wrench of a suitable size. The nuts are on one side of the joint. When installing vertical pipes, the nuts are located on the side of the lower flange.
The disadvantages of such a connection are a significant weighting of the structure, high metal consumption, and high labor intensity of work.
A sealing tape is placed between the flanges of the parts to be joined. Its edges should not go into the inner space of the pipe and close the holes for the bolts. For the manufacture of the gland, dense or porous rubber, foam rubber are used.
Lighter flanges are made from profiled galvanized strip. Z-shaped flanges are connected using a rail having a section in the form of the letter C and a seal.
The connecting bus resembles a collapsible flange. It is made of a galvanized metal profile in the form of the letter G. The length of the larger side is from 20 to 30 mm. Comes with seal and corner. The advantages include low labor intensity and low financial costs.
Among the flangeless connections used to assemble round ducts, the most commonly used:
- nipple;
- bandage.
The thickness of the nipple must not be less than the thickness of the pipes.
The nipple is inserted inside or put on over the joined elements in such a way that its width captures both sides of equal length for pipe diameters:
- 100 - 315 mm - at least 50 mm;
- 355 - 800 mm - not less than 80 mm;
- 900 - 1250 mm - not less than 1000 mm.
Instead of the name nipple, the term coupling is often used.
The tightness of the nipple connection is ensured by the rubber gasket included in the delivery. In its absence, the fastening is sealed with adhesive tape with a polymer or reinforced coating. Every 200 mm of the circumference, the coupling is tightened with rivets or self-tapping screws with a diameter of 4-5 mm. The number of fasteners should not be less than three


The bandage connection is considered to be a connection of a high degree of strength and reliability. The edges of the straight and shaped parts of the air ducts are bent and combined. Then, a bandage filled with sealant is applied to the pipes at the seam and tightened.
When connecting air ducts, the seams are sealed:
- elastoplastic tapes of the Guerlain type at temperatures up to 40 degrees;
- non-hardening mastic based on synthetic rubber (for example, Buteprol), silicone and other sealants that can withstand heat up to 70 ° C.
The seam of the pipe or box is located on top.
When moving an air mixture with a temperature above 70 ° C, elastic bundles made of polyisobutylene, bituminous mastic (PMZH) and other fire-resistant non-combustible materials are used as a sealant.
Before joining the channel elements with thermal insulation, the insulation is carefully bent from both ends. The sections are hermetically connected and the insulating layer is returned to its place.
The seam in the thermal insulation is clogged with aluminum tape or clamps.
Varieties and materials for the production of plastic pipes
There are several types of modern plastics:
- Polyvinyl chloride (PVC).
- Polyurethane.
- Polypropylene.
Each has its own advantages and almost all have one single drawback.
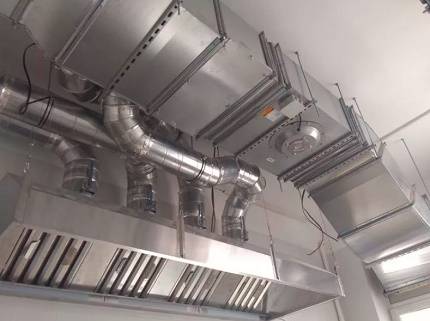
The use of polypropylene pipes for arranging ventilation of an industrial building
Polyvinyl chloride (PVC)
This is the cheapest, lightest and most durable option, easily processed both industrially and at home. Under normal climatic conditions, it is practically eternal and harmless: it decomposes, if not hundreds, then certainly decades, so that ventilation ducts and various products from it will outlive the house itself.
But there is one severe limitation in use. This plastic contains chlorine, and the decomposition temperature of PVC (160-180°C) is lower than the plasticity temperature (200-220°C). Therefore, it cannot be formed with a burner and, moreover, it cannot be used where relatively high temperatures are used.
Round ventilation pipe made of polyvinyl chloride (PVC)
During decomposition, chlorine compounds and, first of all, HCl will be released. This gas with moisture forms hydrochloric acid itself, therefore it is dangerous for the eyes and respiratory tract, although in everything else it is simply unpleasant or almost invisible.
Thus, polyvinyl chloride is an ideal plastic for ventilation, partially excluding the kitchen, water heater, fireplace and those places where temperatures in excess of 120 ° C can occur (it is believed that this is the “top bar” for human safety).
Rectangular flat PVC pipes for arranging air ducts
Polyurethane
This plastic differs little from PVC, but can withstand temperatures up to 280 ° C without problems. At a higher temperature, decomposition begins with the release of nitrogen compounds, which is many times more dangerous than chlorine compounds.
Its high cost is considered a relative disadvantage, but it combines two seemingly incongruous factors: ductility and wear resistance. The plasticity of polyurethanes exceeds the resistance of granite and steel to fracture stresses. The finished product made of polyurethane can be bent an infinite number of times - it will not crack and will retain its original shape as soon as the stress disappears.
Polyurethane is ideal for domestic temperature parts, especially where shifts and distortions are possible: coupling rings, all kinds of nozzles and areas where there may be high domestic temperatures.
Polyurethane hose for installation of exhaust ventilation systems
Polypropylene
This plastic is ideal for molding. Already at 180°C, it is surprisingly plastic, so that any pipe can be twisted even just in hot steam, and the burner can be bent at any angle. At the same time, it is durable, and at high temperatures it does not emit anything dangerous by itself (impurity dyes or special additives can be dangerous). It is in the middle price category, but sufficient to make it not only the components of plastic ventilation systems, but also heating batteries.


Polypropylene is a relatively expensive but versatile safe plastic.
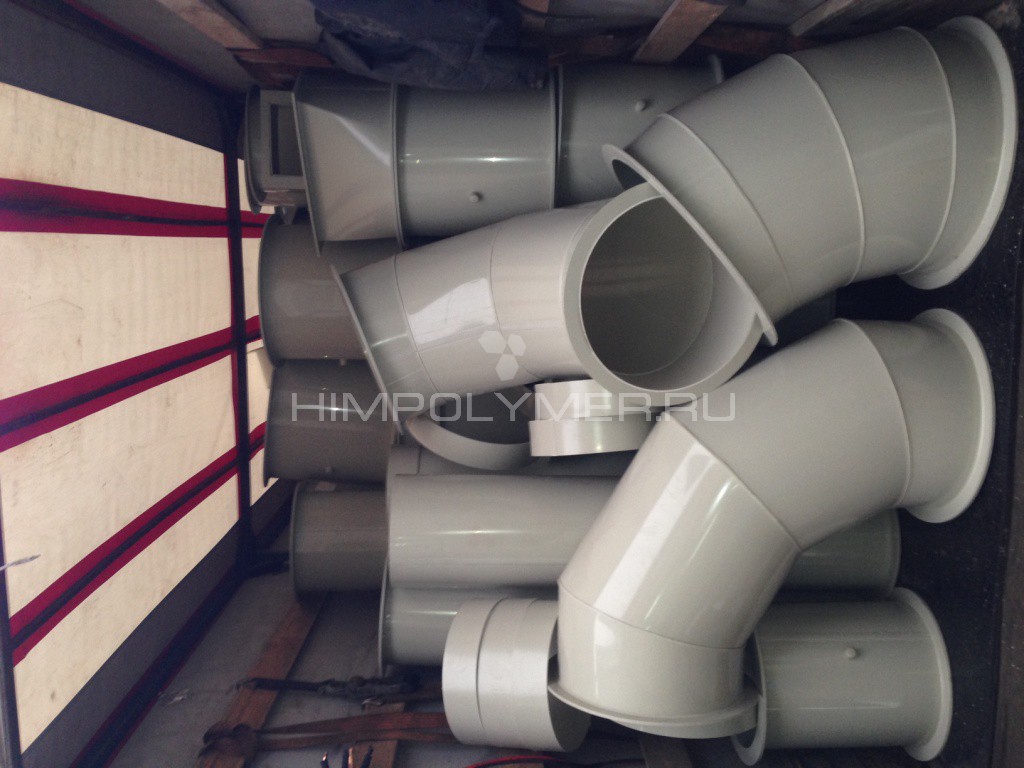
Ventilation pipes and components made of polypropylene
Calculation of ventilation for a private house
In order to make the right choice, you first need to perform some calculations:
Find out the number of each individual room.
The number of family members who are invariably in.
Take into account all electrical devices that in any way can affect the state of the air.
Analyze the speed of movement and replacement of air masses in the house.
Consider whether it will be possible to hide ventilation in niches.
Apply wiring to paper design.
Select the profile and diameter of the pipes.
Consider what area the house is in. If your housing is located in a gassed city center, then filter elements must be in the ventilation system without fail
This is extremely important, because then there will be no special meaning and health benefits. At a time when your area has a quiet outskirts or a place near a forest belt, then such an installation will not be useful to you.
Choose a place for air intake. The installation of a ventilation system must begin with the design
At this stage, the performance of all elements should be calculated, otherwise you may encounter the problem of insufficient air circulation or strong noise during operation.
The installation of a ventilation system must begin with the design. At this stage, the performance of all elements should be calculated, otherwise you may encounter the problem of insufficient air circulation or strong noise during operation.
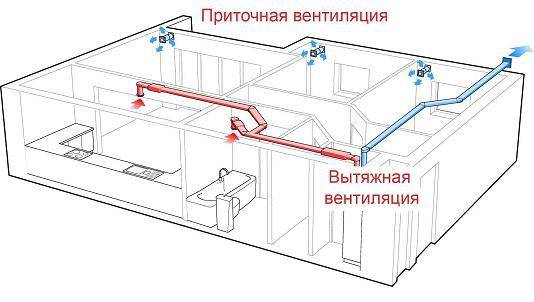
The calculation of the indoor and outdoor climate is carried out in accordance with the regulations. It is necessary to determine the required heat exchange and the volume of air consumed per person per hour. Already on the basis of these data, the type of ventilation is selected: general exchange or local, supply and exhaust or exhaust, natural, mechanical or mixed.
Calculation of air distribution is carried out in different ways: displacement or mixing, supply and removal of air from the bottom-top, types of supply air jets, designing the number and types of air distributors. Correct calculation at the design stage will avoid the rapid destruction of components and costly repairs. Basically, in the kitchen it is customary to install supply and exhaust ventilation systems. One element draws in exhaust air, the second part is responsible for the supply of fresh air.
When designing, you should draw up a graphic diagram and indicate such basic parameters as:
- length of pipes for distributing air channels;
- the number of air ducts, their localization;
- placement of air intakes, grilles and other equipment;
- description of the materials used.
Calculation of ventilation for a private house
In order to make the right choice, you first need to perform some calculations:
Find out the number of each individual room.
The number of family members who are invariably in.
Take into account all electrical devices that in any way can affect the state of the air.
Analyze the speed of movement and replacement of air masses in the house.
Consider whether it will be possible to hide ventilation in niches.
Apply wiring to paper design.
Select the profile and diameter of the pipes.
Consider what area the house is in. If your housing is located in a gassed city center, then filter elements must be in the ventilation system without fail
This is extremely important, because then there will be no special meaning and health benefits.At a time when your area has a quiet outskirts or a place near a forest belt, then such an installation will not be useful to you.
Select an air intake location.
The installation of a ventilation system must begin with the design. At this stage, the performance of all elements should be calculated, otherwise you may encounter the problem of insufficient air circulation or strong noise during operation.
The calculation of the indoor and outdoor climate is carried out in accordance with the regulations. It is necessary to determine the required heat exchange and the volume of air consumed per person per hour. Already on the basis of these data, the type of ventilation is selected: general exchange or local, supply and exhaust or exhaust, natural, mechanical or mixed.
Calculation of air distribution is carried out in different ways: displacement or mixing, supply and removal of air from the bottom-top, types of supply air jets, designing the number and types of air distributors. Correct calculation at the design stage will avoid the rapid destruction of components and costly repairs. Basically, in the kitchen it is customary to install supply and exhaust ventilation systems. One element draws in exhaust air, the second part is responsible for the supply of fresh air.
When designing, you should draw up a graphic diagram and indicate such basic parameters as:
- length of pipes for distributing air channels;
- the number of air ducts, their localization;
- placement of air intakes, grilles and other equipment;
- description of the materials used.
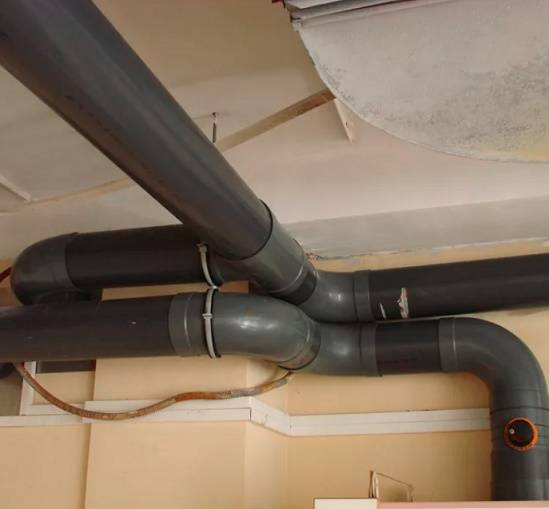
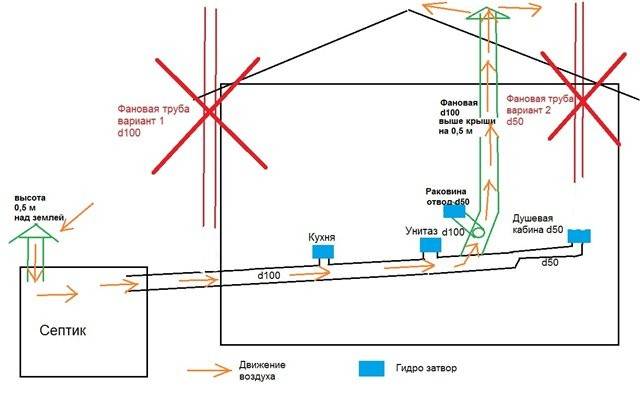
Features of ventilation of the sewer system

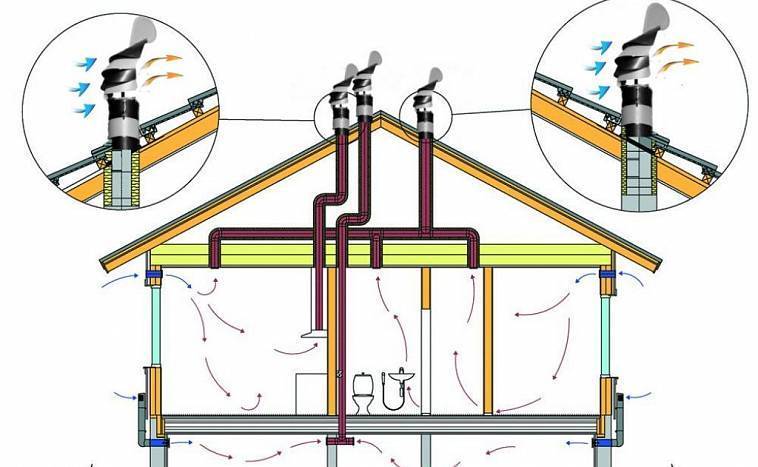
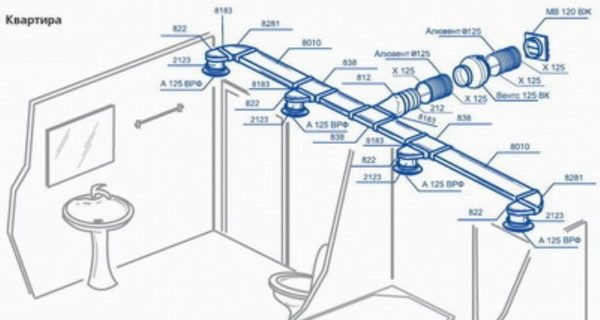
Scheme of internal and external ventilation of the sewer system
Sewer ventilation in multi-storey buildings is carried out by installing ventilation ducts based on an exhaust pipe, which is installed in the following places:
- Inside the building - the pipe is connected to the sink, toilet or bath riser without connecting to a common ventilation system and exhaust hood. The exact attachment point is determined at the design stage of sewerage and water supply;
- Outside the building - the drain pipe is mounted to the drain system outside the building. The ventilation outlet with a pipe is fixed on the outer wall of the building or located on any other section of the drain with a vertical surface.
When creating an internal type of ventilation and a sewer system, a pipe of the same diameter is selected. Professional plumbers recommend using products with a cross section of 50 or 110 mm.


When installing external ventilation, the height of the exhaust pipe above the roof level must be at least 100 cm. The outlet of the ventilation duct is not closed with a tight plug. Otherwise, condensation will accumulate under the hood. This is fraught with the formation of ice plugs and damage to the pipe.
It is not advisable to mount the exhaust pipe in the immediate vicinity of the roof overhang. This may damage the ventilation due to large volumes of snow falling.
Design nuances
General ventilation scheme for sewerage using a fan pipe
In private two- and three-story houses, in the presence of several bathrooms on different floors, the "discharge" of the air increases. In this case, the best solution would be to bring the ventilation pipe through the roof of the house.The total height of the pipe must be more than 3.5 m, which will prevent the occurrence of an air lock during the simultaneous drain.
The ventilation duct for sewerage is designed in advance and mounted during the construction of the house. If there is no ventilation system project, then the ventilation pipes are removed through the load-bearing walls after the construction of the house. When installing ventilation in houses located in regions with very low temperatures, in winter the outer part of the pipe must be insulated to prevent icing.
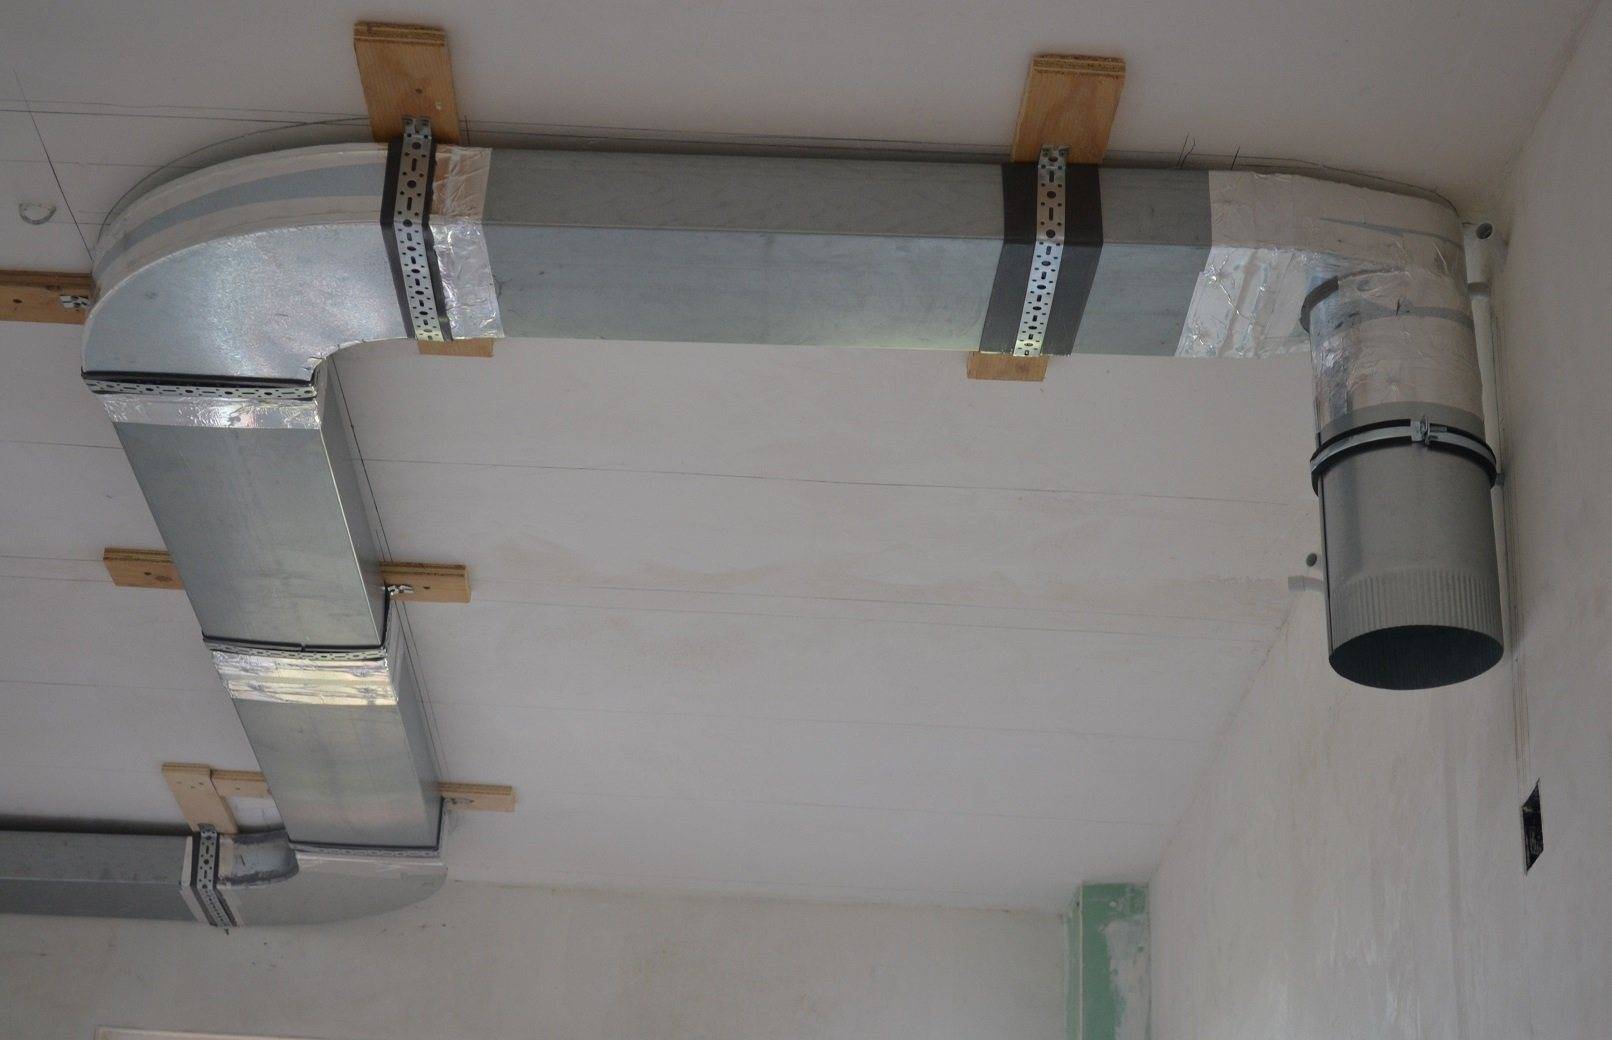
How to combine plasterboard ceiling with air ducts
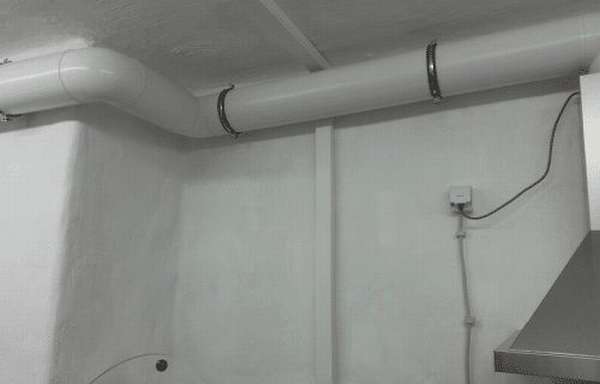
Air ducts perfectly "get along" with plasterboard ceilings. The hollow space between the ceiling and the plasterboard is great for laying ventilation communications. An alternative option is to close the duct with a drywall box.
Hiding in the ceiling space
If the ceilings in the room are high enough, there will be no problems with masking the ventilation ducts. For installation in such cases, flat channels of rectangular cross section, with a heat-insulating coating, are most suitable. Air ducts are fixed as usual. In this case, contact with the metal profile frame must be excluded so that vibration and noise are not transmitted to it.

What is installed first is a matter of personal preferences of the installers. You can, for example, mark the ceiling suspensions, then assemble the ventilation, and after it - the frame for drywall
At the same time, it is important to combine the mounting fittings of both structures on the ceiling area without violating the standards. Sheets are hemmed after testing the ventilation system
We close the box
When the apartment already has low ceilings, you can hide the air ducts in another way.To do this, the main ceiling made of gypsum plasterboard is “pressed” to the ceiling as much as possible, and the ventilation switches are mounted along the walls under the ceiling box of the second level. Of course, at the same time, the cost of air ducts and fittings will increase slightly, and a two-level design will cost more.

If the space is really bad, the ceiling is plastered for painting, and a mini-box of plasterboard is assembled for the ventilation duct. At the same time, a small amount of the starting profile and one sheet of drywall will be enough for the room. When calculating, it must be taken into account that there should be a small space between the duct and the walls of the duct for air circulation.
As in any business, when installing ventilation systems, a creative and innovative approach is welcome. However, do not forget about the main thing: any violation of the standards and rules for attaching air ducts to the ceiling leads to unnecessary problems.
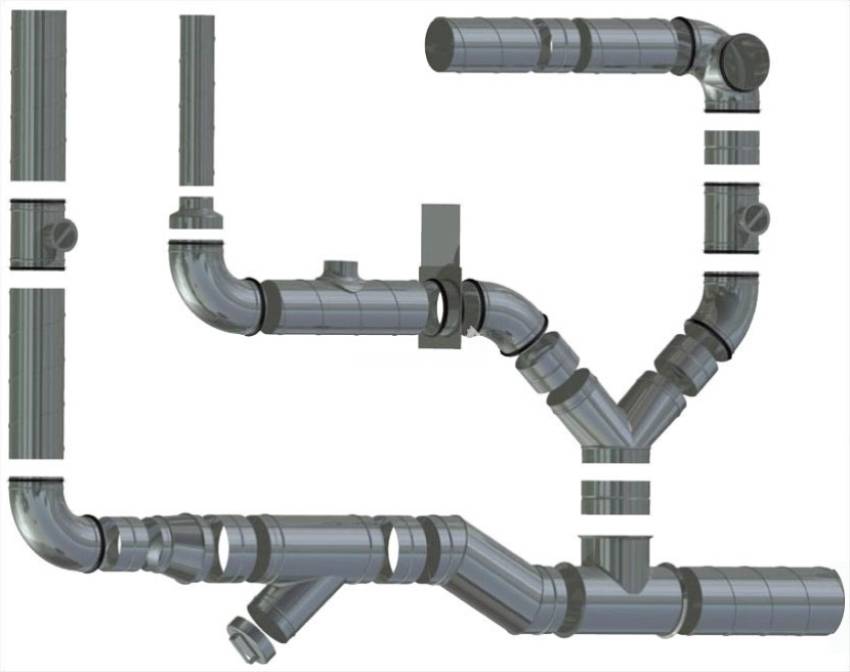
Plastic ducts for ventilation: methods and types of connection
The most common ways to connect duct sections are flanged and wafer connections. The basis of the first is the installation of flanges, which are attached to sections of the ventilation duct with rivets or self-tapping screws. Tightness at the joints is achieved with the help of rubber and other seals.
The flangeless connection is made using a bandage made of thin sheet steel and metal rails.
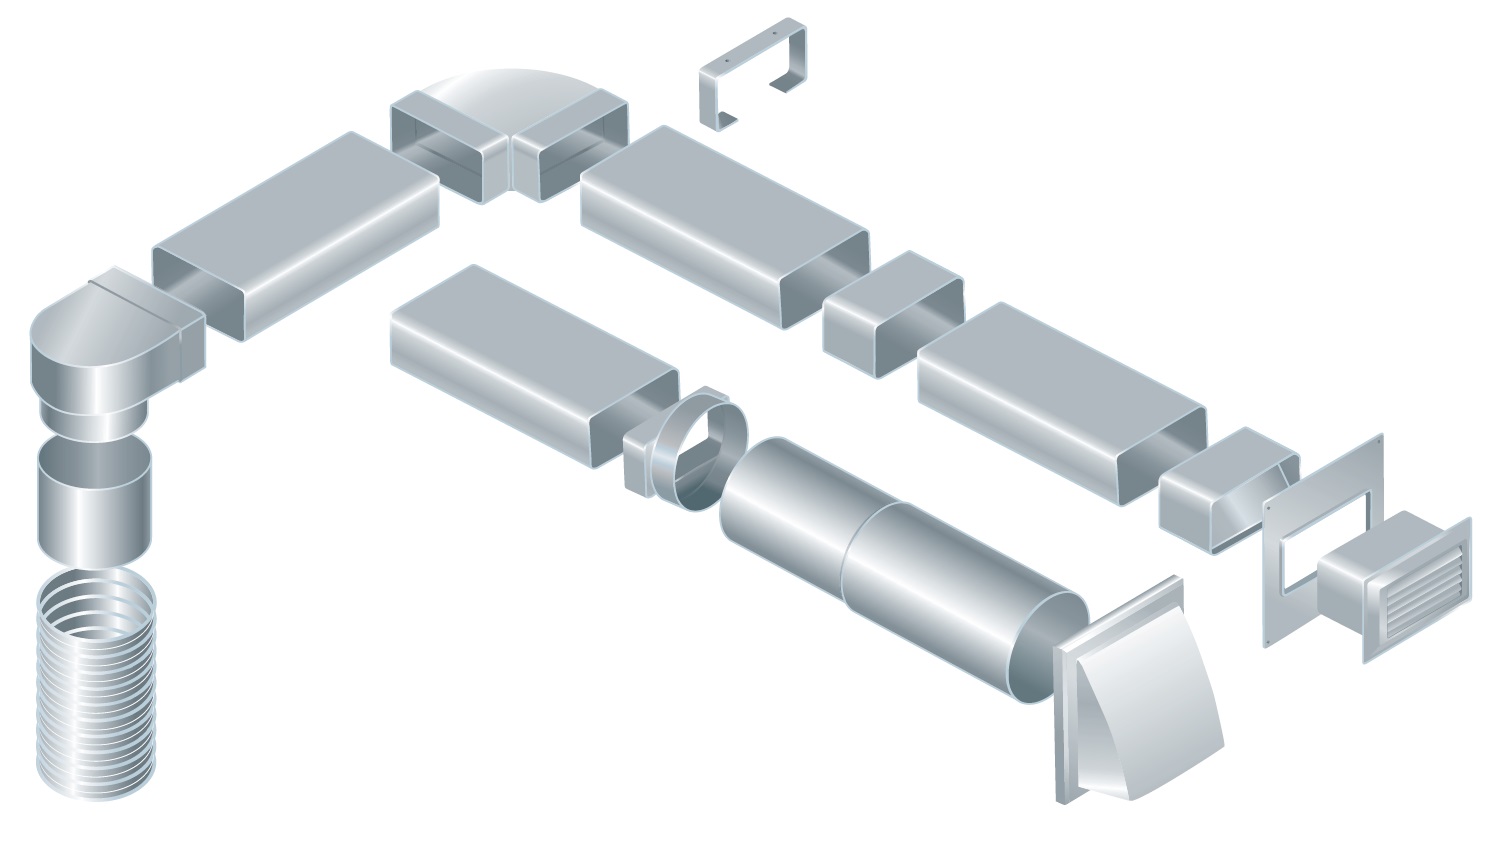
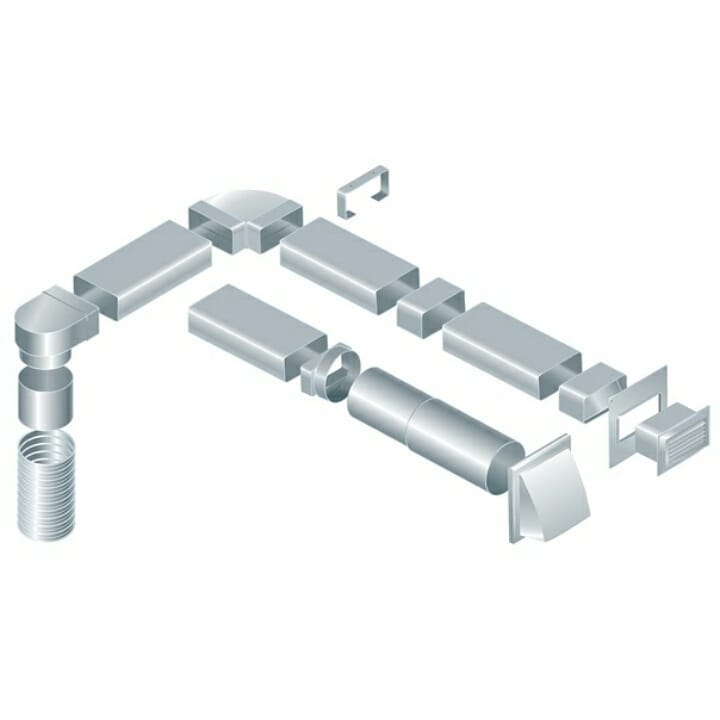
The main types of air pipe connections are:
- tees (in places of conjugation or branching of the system);
- knees and bends (in places where the channel turns);
- adapters (for switching from a round duct to a rectangular duct or, conversely, connecting parts of different sections);
- confusers and diffusers (in places of transition to another size). The first narrow the channel, and the second - expand.
Design of ventilation and air conditioning systems
System construction process
The exhaust ventilation device in the kitchen or in the bathroom begins with the layout of the entire system. After that, materials are selected and calculated. Never rush into calculations. Everything must be done in a measured and calm manner.


When designing, keep in mind that what matters in ventilation is its functionality, with the ability to make the most of all the conditions in each room. If you make a mistake, you will have to use mechanical air blowers, which will significantly increase the cost of the system.
For normal operation of the gravity type system, it is desirable that the ducts have as few turns as possible. It is recommended to install turbine deflectors on chimneys towering above the roof - they will increase the outflow
Installation steps:
- Ventilation design.
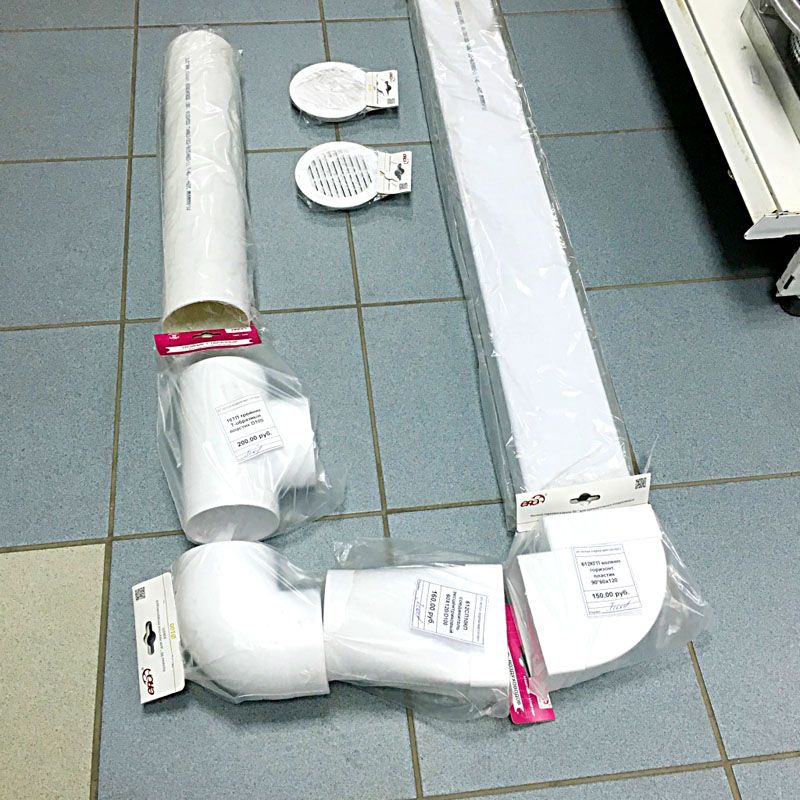
- Purchase of equipment: sewer pipes, installation products, fasteners, fittings, mounting metal tapes.
- Installation of brackets and clamps at the places of ventilation communications.
- A ventilation riser is assembled from large pipes.
- Assembly and installation of air ducts.
- Connecting all branches to each other.
- Sealing connections. There is no special need for this, but it does not hurt.
- Installation of fans and valves, if provided.
- Installation of ventilation dampers.
The finish of all types of installation work is testing the system for performance. All actions are to check the traction.To do this, attach a piece of paper or a napkin to the exhaust channels.
Circuit design or development
The creation of a ventilation project begins with elementary calculations and the collection of information, then:
- Calculate the rate of air exchange throughout the house. This indicator depends on the volume of all premises, their purpose and the number of residents. In living rooms, the air must be completely replaced 1 time per 1 hour, and in technical rooms (toilet / bath) - at least 3 times per 1 hour. Adding the resulting numbers, we get a performance indicator, taking into account which the diameter and height of the ventilation equipment will be selected.
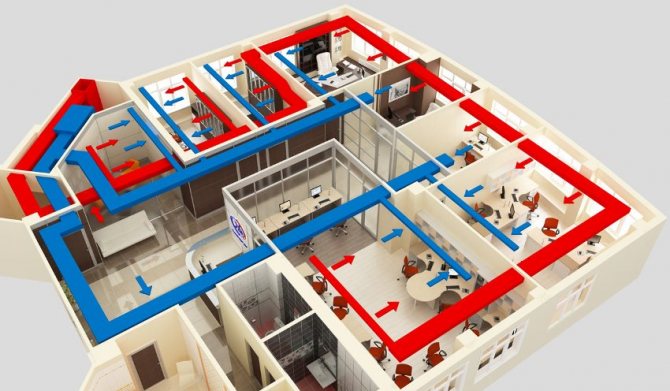
- Draw a diagram of the movement of air currents. Immediately estimate the position of the intake and supply channels.
- Draw a duct diagram. For now, ignore the details, stick to the rules and try to fit the system without complicating the design. This is the most difficult stage of the work. Hiding ventilation from bulky plastic pipes is not so easy.
Sketches are ready. Take some time to think about what devices you will have embedded in the system and where they will be located.
Detailing and assembly of the system
Having solved all the questions on the scheme and giving it a final look, it's time to move on to detailing.
First, calculations are also carried out, the components of the system, equipment are selected and the budget is reduced, then:
- The cross section and area of air ducts are calculated. The maximum speed of quiet air movement is taken into account - otherwise there will be a rumble in the house.
- All dimensions are transferred to the diagram.
- Detailing. A list of all the necessary elements is compiled, indicating the sections.
- The total cost of the components of the ventilation system is calculated.Match your desires to your budget. At this stage, you will have to change the components several times, abandoning the desired in favor of the real.
- The final project is drawn. Do not forget about the nodes of the passage of ventilation channels through the roof, ceiling, walls, insulating and consumable materials, ventilation grilles, fasteners and all other little things that will eventually result in a decent amount.
It remains to find, buy and install. Not much has been written, but it will take a lot of nerves, time and effort to implement the plan. Having mounted the entire system, it is still impossible to say that everything is ready.
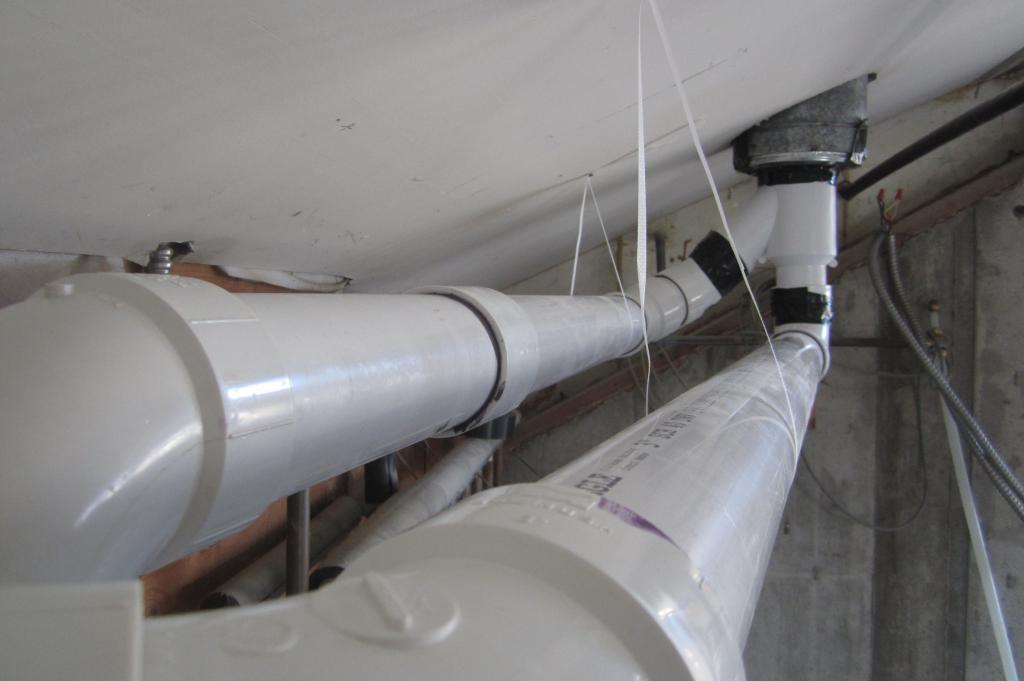
Air ducts from sewer pipes are assembled in accordance with the draft. PP pipes and fittings are connected by butt soldering, PVC by cold welding
The ventilation system made of plastic sewer pipes still needs to be tested and refined during operation. It is also not so easy to achieve coordinated work of each element of the system. If the natural ventilation option is not effective enough, it is worth upgrading by installing exhaust valves or their supply counterparts.
Advantages of plastic ventilation
The advantages of ventilation from plastic pipes are their physical characteristics. These include high strength and optimal weight. This makes it easy to transport pipes not only over long distances, but also within the premises where ventilation is being installed.
The full list of benefits should include:
- non-susceptibility of plastic to corrosion, which threatens tin and iron;
- low cost of plastic pipes, unlike metal pipes, the price of which is constantly increasing;
- the technological properties of plastic pipes are much higher than those of metal pipes.The fact is that the metal in the process of forming, rolling and processing becomes rough. If these roughnesses form on the inner surface of the pipes, air currents will increase the level of static resistance in the entire system as a whole. Plastic does not have such a drawback, which must be taken into account in the process of designing ventilation systems;
- simple installation of plastic ventilation, since pipes can be cut directly at the place where the ventilation is mounted. During the installation and installation of plastic pipes, it is easy to adjust the pipeline;
- the safety of plastic pipes, since they do not emit harmful substances into the atmosphere.
The combination of these properties allows you to save not only on installation, but also on the maintenance of the ventilation system.
Why is sewer ventilation necessary?
Imagine that the sewer system of the house is equipped in the simplest way: all toilets, sinks, bathtubs and bidets are connected to the septic tank through pipes through a common riser. How does such a system work?
When flushing from the toilet, feces enter the riser, and then into the septic tank. The septic tank is not hermetic, so the air displaced by feces is released into the atmosphere on the street, and unpleasantly smelling gases are reliably cut off by water in the water seal.
However, this happens only if the volume of the washed-off liquid is small and does not fill the entire lumen of the riser.
If the volume of liquid is large (for example, when water is released from baths simultaneously on two or three floors), a piston is formed in the riser from the liquid, which descends.
As with any piston pump, this will cause a rarefaction of air above the piston and suction of water from all plumbing fixtures into the riser and then into the septic tank.
After such a drain, polluted air with an unpleasant odor freely penetrates through all plumbing fixtures into all bathrooms at once.
This effect is most pronounced when the contents of the septic tank are quickly pumped into the sewage truck.
Unpleasant smell in the house is not limited. During the decomposition of feces in a septic tank, gases dangerous to humans are formed: hydrogen sulfide and methane.


Thus, the ventilation of sewer risers must constantly remove gases from the system into the atmosphere and reliably block their penetration into the room when draining and pumping out the contents of the septic tank.


