- Installation of an external drainage system
- Video: heating gutters and drain pipes
- Drainage calculations
- Price overview
- Features of gutters
- Varieties of ebbs
- Factors that influence the choice of tide
- Plastic ebbs
- Calculation of the required drainage diameter
- Why do you need a drain
- Gutter functions
- Types of drains
- Materials for homemade gutters
- Why is a gutter installation required?
- Do-it-yourself installation of a metal roof drain - Practical advice
- Installation of a metal roof drain - Serious installation errors
- Types of brackets
- How to install a gutter for a roof with your own hands - a step-by-step diagram
- Step 1: Calculation of materials
- Step 2: Mounting the brackets
- Step 3: Installing the gutter
- Step 4: Installation of gutters
- Step 5: Fixing the pipes
- System installation process
- Mounting methods
- Pipeline system
- Water drain organization
- Original alternatives: rain chains
- Rules for installing an external and internal gutter
- Gutter fastening methods
- Advantages of metal gutters
- The main elements of the drainage structure
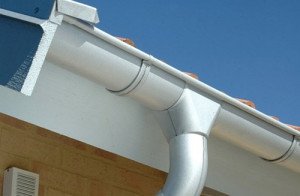
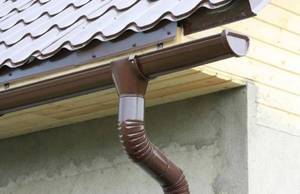
Installation of an external drainage system
The system of external drainage of water from the roof can be:
- unorganized. In this case, the water descends arbitrarily, this method is usually used for small outbuildings;
- organized.Water is collected in gutters, after which it is discharged outside the building through drain pipes.
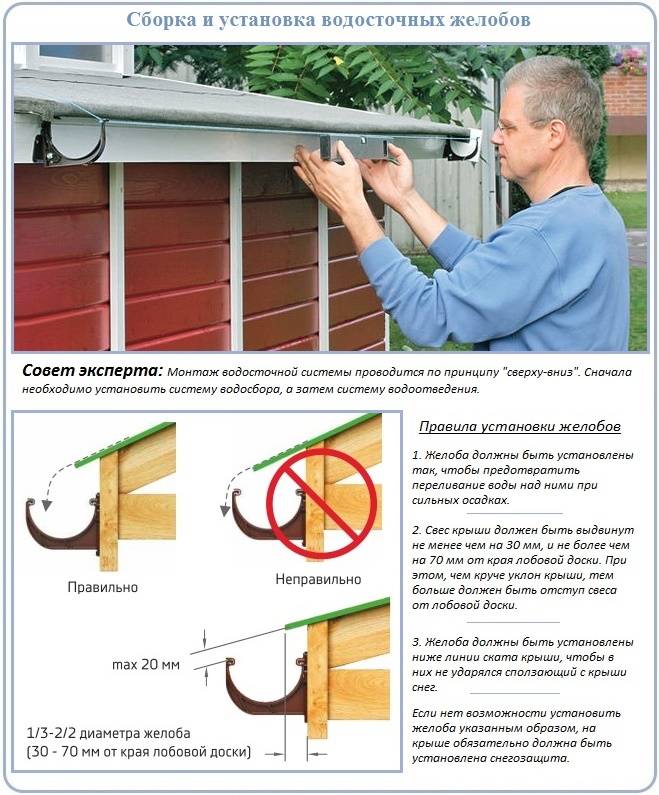
When creating an external drain, the gutters are attached using special brackets that you can make yourself, but it is better to purchase ready-made ones.
When creating an external drain, the gutters must be mounted at a slope, this will ensure the effective removal of water coming from the roof. It is not difficult to create an external drainage system with your own hands. Now on sale there are all necessary elements. It is enough to draw up a diagram and calculate how many and what elements are needed, after which you can simply and quickly install them.
It is quite possible to mount an external drainage system with your own hands, because all the necessary components are on sale to facilitate this process.
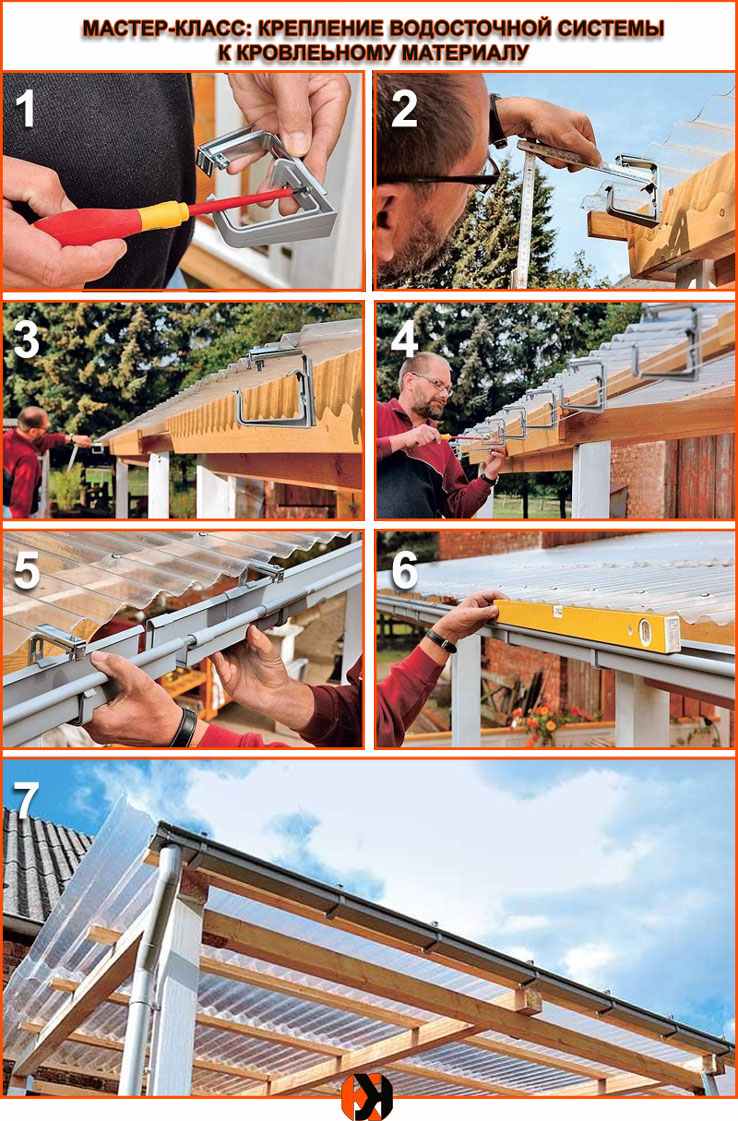
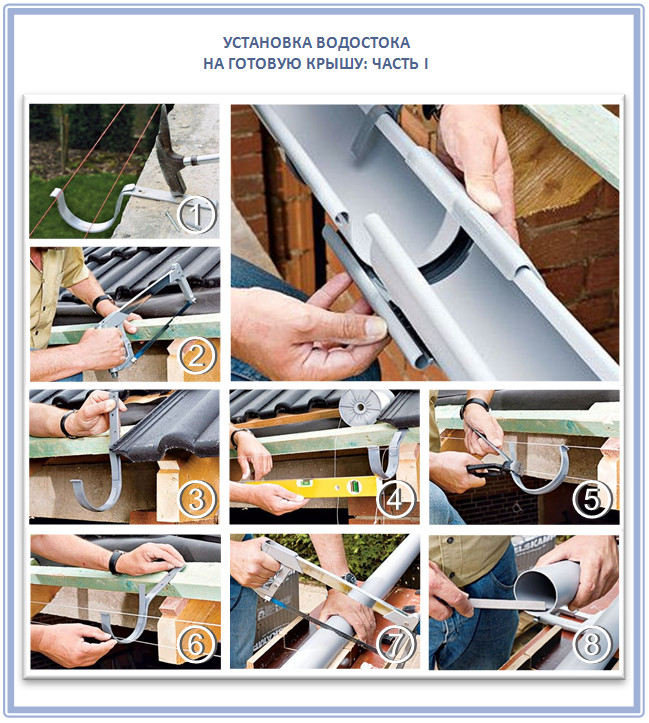
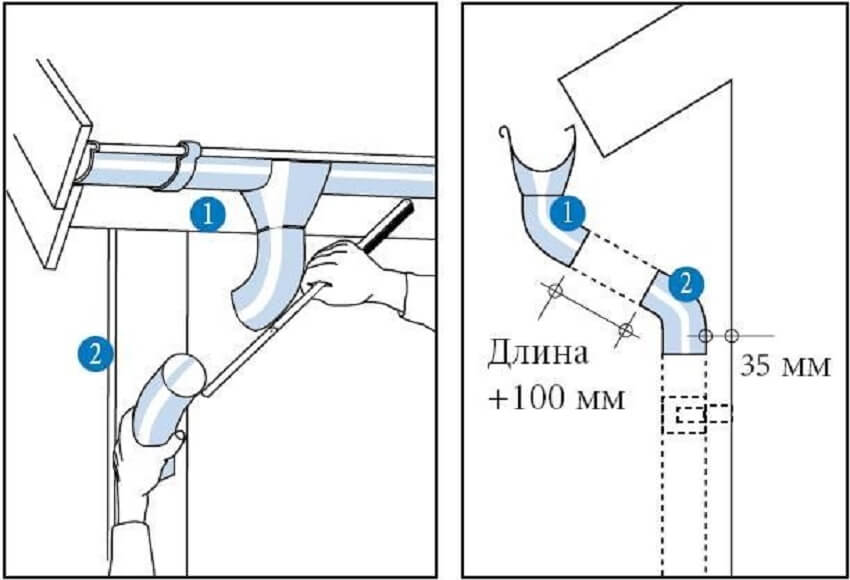
Installation of an external drainage system is carried out in the following order.
- Calculation of the required amount of materials. It is necessary to determine the number of holders, gutters, drain pipes and elbows.
- Marking places for attaching hooks. After the attachment points are marked, the hooks are bent to the required angle and fixed.
-
Preparation of sites for funnels. Holes for the funnels are prepared in the gutters, after which they are fixed.
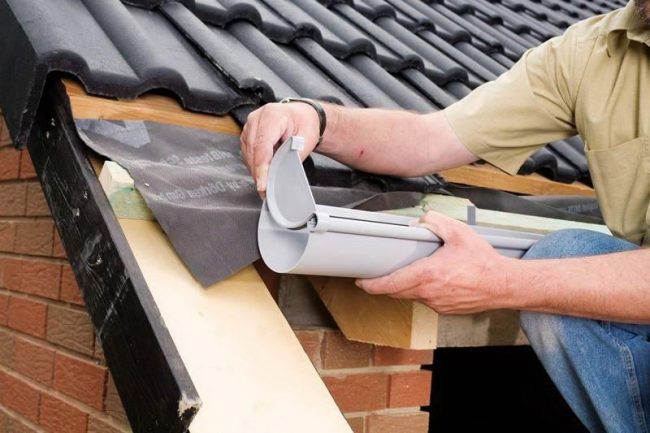
- Gutter laying. The gutters with installed funnels are placed in holders and fixed.
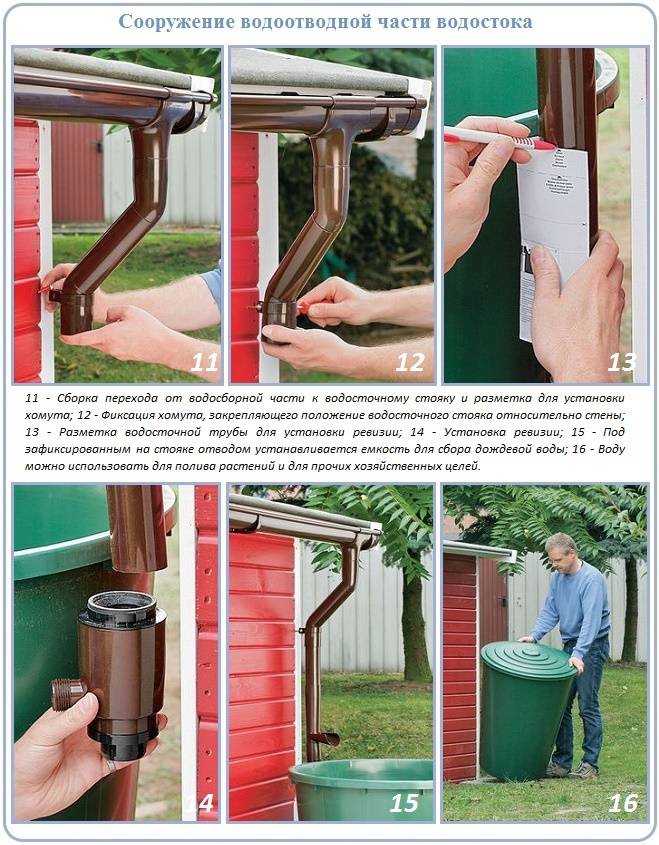
- Installation of drain pipes. They are attached to the wall using special brackets.
-
Connection of drain pipes and funnels. With the help of elbows with the required angle of inclination, the drain pipe and the funnel are connected.
A properly executed external drainage system reliably protects the roof, walls and foundation of the building from water penetration into them.In the cold season, during frequent thaws, the drain pipes of the drains may freeze, so the water will not be removed effectively. To avoid such a problem, you can install the heating of these elements. For this, a self-regulating or resistive cable is used, which is attached to gutters and pipes. The electric current passing through the cable causes it to heat up, as a result of which the elements of the drainage system remain warm, so the water in them does not freeze.
Video: heating gutters and drain pipes
The main requirements for the drainage system are the removal of water from the roof of the house, as well as high strength, tightness and long service life. It is necessary to rely on such a system to be able to withstand heavy loads; in winter, a large amount of ice can accumulate on it. In order for the self-installed system to meet all the requirements, it is necessary to correctly calculate it, and then carry out the installation in compliance with the developed technologies.
Drainage calculations
Any design requires drawing up drawings. Installation of a metal drainage system should also begin with this. But first of all, you need to make calculations to determine the cross section and dimensions of all elements.
First of all, the dimensions of the gutter are determined. According to the existing rules, for each square meter of the roof there should be one and a half square centimeters of section. But here you should also take into account the natural features in your region. If there is a lot of rain, then the throughput of the metal drain should be greater.
Before starting any work, you should calculate the required amount of materials.To do this work before installing a metal roof drain, you can use the following recommendations from professional builders and roofers:
- Calculating the number of gutters is easy. Since the drain will run along the entire perimeter of the roof, you should first find out this value. Further, the resulting figure must be divided by the length of one gutter that you have chosen in the store. The resulting value should be rounded up;
- The number of funnels is determined based on the area of \u200b\u200bthe roof. So, if products with dimensions of 125 by 90 millimeters are used, then it is able to pass water from an area of 100-120 square meters;
- The number of drainpipes will be equal to the number of funnels. But here the aesthetic side should also be taken into account. As a rule, the installation of downpipes is carried out at the corners of the house. So it will be more beautiful. But if the wall is too long, then additional pipes must be installed;
- The number of brackets is determined based on the fact that one attachment point is required for each meter of metal drain. Most professional builders and roofers recommend reducing this distance to 60 or even 50 centimeters. The same goes for piping.
Ready-made gutters and pipes for a metal drain are produced with certain standard sizes. This makes the choice easier. The most popular are the sizes of gutters of 100 centimeters in cross section, and downpipes of 75 centimeters. It is in this combination that they are used in systems. Such products easily cope with the flow of rain and melt water from a roof of 200 square meters.
In addition, it is worth considering a number of other nuances.For example, a metal or any other drain is mounted on a roof whose slope angle is at least fifteen degrees. Pipes should be installed so that there is a distance of no more than 24 meters between them.
After all the calculations have been made, a plan or drawing of the future drainage system should be drawn up. It takes into account all the attachment points and the location of the main structural elements
In addition, when drawing up a plan, it is worth taking into account the design of the roof. It is necessary to think over everything so that the elements of the metal drain do not “spoil” the appearance, but become its decoration
Price overview
Installing simple gutters with your own hands is quite easy, but if you do not have the proper experience, then it is better to seek help from specialists. We propose to consider what is the cost of installing gutters in different cities of the CIS (the price list is taken from the websites of the most popular companies in Russia):
| City | Price, including individual plastic elements |
| Belgorod | 3150 |
| Volgograd | 3050 |
| Voronezh | 3000 |
| Kazan | 3150 |
| Kaluga | 3050 |
| Kyiv | 3300 |
| Krasnodar | 3050 |
| Sochi | 3150 |
| Stavropol | 3050 |
| Ulyanovsk | 3150 |
| Ufa | 3150 |
| Chelyabinsk | 3050 |
| Samara | 3000 |
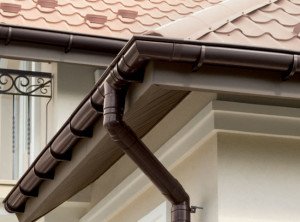
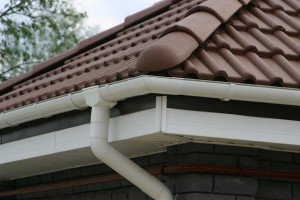
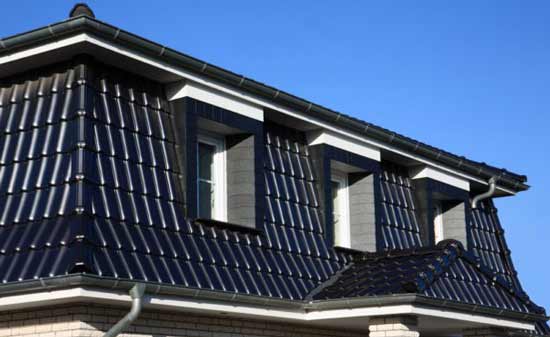 Photo - Gutter around the perimeter of the house
The most popular brands of rectangular and round gutters for country houses: Devi, EKAROS P.V.M. AS, Flamingo, Murol. They are sold at dealerships and partner stores. The same brands are often installed for skylights. It is better to buy drainpipes in bulk, the delivery is carried out at the expense of the seller company.
Features of gutters
Before we move on to practical tips on how to make an external roof drain, you should pay a little attention to the choice of these systems. Previously, galvanized products were very popular.
Their main advantage can only be called low cost, in all other respects they are clearly inferior to their competitors. Firstly, the material is quite soft and the pipes can simply come apart at the seams during frosts due to the formation of ice. Secondly, their service life is not more than fifteen years, and the material is resistant to corrosion.


More expensive, but at the same time, plastic gutters will be of high quality, they are not afraid of either frost or destructive corrosion, and installation is much easier than in the case of metal products, you can do it yourself without the help of special teams. The life of such elements reaches fifty years. But the disadvantages include the thermal expansion of the material. But if you use special components during assembly, the consequences of such a problem can be avoided.

Polymer-coated steel gutters have proven to be excellent, they are distinguished by excellent strength characteristics. But it is better to entrust the installation of such products to professionals, in addition, there may be some difficulties with transportation. The title of the premium class is rightfully attached to gutters made of non-ferrous metals (titanium-zinc and copper), but not everyone can afford them.
Varieties of ebbs
Ebbs can be made from absolutely any materials, as well as in any form. The main task of this design is to collect water from the roof surface, and then transport it to the drainage or sewer system.
Differences of ebbs according to materials:
- Outflows from galvanized steel.The thickness of this design does not exceed one millimeter. For these ebbs, a coating using plastisol or polyester is provided, this is done in order to muffle the noise of falling raindrops, otherwise the steel surface will only amplify this sound;
- Outflows from aluminium. The thickness of this design is also about one millimeter. Aluminum sills are treated with a special varnish on both sides in order to preserve the product from possible corrosion;
- Raw copper is also a material for the manufacture of ebbs. These structures are additionally processed with an alloy of zinc and copper. They are characterized by attractive appearance and high quality, although the price of ebbs can be very high for some consumers.
- Castings made of plastisol and polyester have high durability and strength. In addition, they are resistant to ultraviolet rays and light weight. Due to these characteristics, they are very popular today. Also pleased with the convenient installation of products that you can do yourself;
- Plastic moldings will help to highlight the individuality of your home, offering a huge range of colors for the manufacture of structures. These products do not need special care, they are not afraid of temperature changes. The huge popularity of plastic ebbs is also explained by the fact that they almost do not create noise in the rain and have an affordable price.
Factors that influence the choice of tide
- high resistance to external factors, including precipitation and sudden changes in temperature;
- an aesthetic function that provides a beautiful appearance to your home;
- protection of the roof and walls from moisture.
The choice of low tide depends precisely on the absence or presence of these basic characteristics. Each of the above materials has its own specific advantages, but some are more pronounced, others are not so visible.
To date, preference is given to ebbs made of plastic and metal. Such products are covered with a special layer that protects them from corrosion. The quality of the product greatly depends on the grade of steel and its thickness.
Ebbs made of non-ferrous metals are also popular due to their high quality, attractive appearance and durability. But their price is an order of magnitude higher than conventional products, therefore they are available only to those people who are ready to allocate the necessary (considerable) amount of money for the installation of this system.
Plastic ebbs
These ebbs will serve perfectly if the attic of the house is used as a living room.
The main advantages of installing plastic ebbs include:
- Ease of use and speed of installation are achieved due to the low weight of the product;
- Affordable price;
- The size of the ebb is equal to the length of the perimeter of the structure;
- A convenient connection method is a kleimer lock;
- Corrosion resistance;
- Several types of material - polyethylene and PVC;
- Resistance to temperature extremes and weather phenomena;
- Plastic ebbs are varied in color and design, this makes it possible to choose the required option clearly for the project of the house.
It should be noted that ebbs made of PVC are a little more reliable, this is due to their heat resistance. But still they can not withstand low temperatures. Also, when installing as a supplement, you will need a pipe with a cross section of at least 45 mm.
Calculation of the required drainage diameter
Before starting work on the installation of the ebb, you need to make calculations of its dimensions, otherwise you risk building a structure that will not perform its main functions.
The roof area can be calculated according to this principle: the area is equal to the length of the roof, including the height of the roof plus the length of the slope, this value is divided in half.
It is also necessary to take into account the distances between the drains and between the turning points of the gutter. Gutters must be above the drainage system.
For each roof slope, it is necessary to consider installing two gutters, the diameter of one structure should be no more than 125 millimeters.
Why do you need a drain
An external drain is a complex of open gutters that collects moisture from the roof and directs it into vertical outlet pipes. The places where the structure ends are equipped with water collection tanks or storm sewers.
The gutter protects the house from the damaging effects of moisture
Gutter functions
The drain performs the following functions:
- Protective. It consists in diverting wastewater from the walls and basement of the house.
- Decorative. A beautiful homemade gutter will decorate your home or gazebo.
- Cumulative. With the help of such a system, storm water can be filled with a special reservoir for irrigation.
Industrial drains are made of special plastic or galvanized steel and their cost is quite high. And if you add plugs, funnels, corners and knees, then the price will double. Finished parts have their own advantage - they are easy to assemble, like a designer. To save money, the craftsmen found an alternative and began to independently manufacture drainage systems from improvised means, for example, from plastic sewer pipes.Therefore, if there is already a house or cottage, but there is no drain, then you can risk making it yourself.


Homemade gutter can last for many years
If you approach the matter wisely and choose the right material, then a home-made drain can be used as the main one.
Types of drains
Drainage is of the following types:
- External or external. This type is suitable for self-assembly.
- Internal, which is also provided for in the project. Most often, this type is installed on flat roofs; pipes made of any material are suitable for it.
Materials for homemade gutters
Previously, only metal was used to assemble ebb systems. More often - galvanized or polymer-coated steel, less often - copper or aluminum. Now the range of suitable materials has increased significantly:
-
Gutters made of galvanized steel. They are durable, reliable, resistant to loads and temperature fluctuations. Their disadvantage is noise and susceptibility to corrosion.
Galvanized steel is one of the most popular gutter materials.
-
PVC drainage systems. They are lightweight and low noise, easy to assemble and well resist temperature changes.
PVC drain - reliable and silent
-
Drainage systems from sewer pipes. Thanks to convenient installation and a wide variety of adapters, such pipes have become an excellent replacement for PVC industrial drains.
Sewer pipes are an excellent material for draining
-
Ceramic pipes and gutters. They will need special clay and pottery skill.
Ceramic pipes are very durable
-
Ebbs from plastic bottles. They are quick to install, but are suitable as a temporary alternative.
Bottle plastic is the most affordable material for creating drainage
-
Wooden gutters. Made by hand, they last a long time only in case of special processing.
The wooden gutter is very decorative.
-
Copper drains. Suitable for long-term use, but become covered with patina over time.
Copper gutters look noble and prestigious
This is interesting: Wall treatment before wallpapering: the whole point
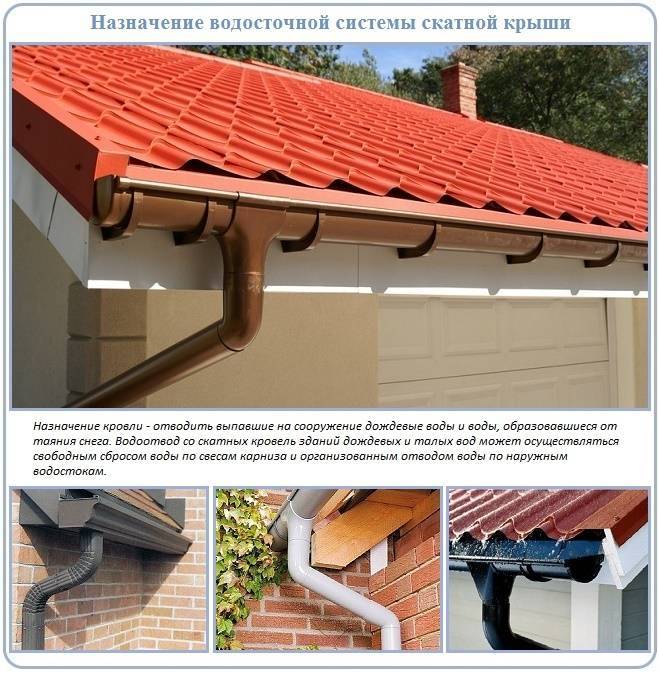
Why is a gutter installation required?
The gutter system is a complex of different structural elements installed in a certain sequence on the facade and roof of the building. The main purpose of this system is the organized collection of precipitation that accumulates as a result of bad weather (rain, melting snow). As a result, the roof, facade, foundation and walls of the building are protected from the negative effects of a large amount of moisture.
With a variety of accessories gutters can be attached to roofs buildings of absolutely any design. At the same time, modern systems can rightly be called part of the decor. So, having correctly selected these elements, it turns out to skillfully emphasize the features of the roofing material, the unusual configuration of the roof and give the building integrity. The principle of operation of gutters is as follows: melted or rainwater flows into the gutters, and they already direct it to the storm sewer system. In most cases, the walls and foundation remain dry, even when it rains outside, which means that their service life increases. It will also be possible to avoid such troubles as streaks on the walls, dampness indoors, etc.
Do-it-yourself installation of a metal roof drain - Practical advice
To create a conduit and carry out high-quality installation, a metal roof drain for a roof with your own hands, you should have the following set of tools:
- Tool for rolling;
- various sizes and weights, hammers;
- different types, scissors for metal;
- mold for making gutters;
- marking tool.
Before performing the installation of a metal roof drain for the roof with your own hands, you should calculate the dimensions, the required number of fasteners and elements, and the drainage structure.

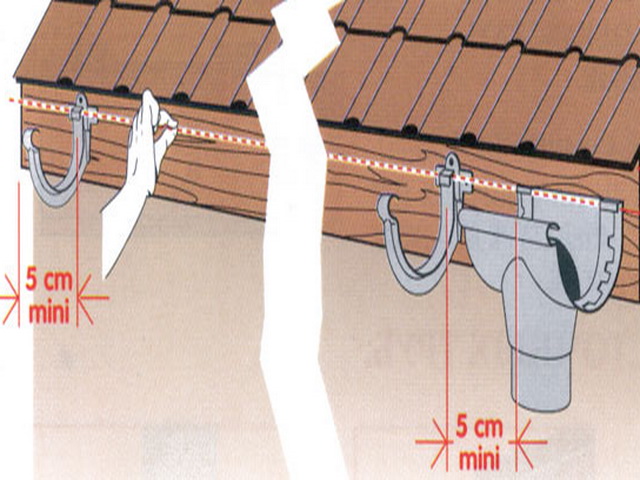
Structure calculation formula
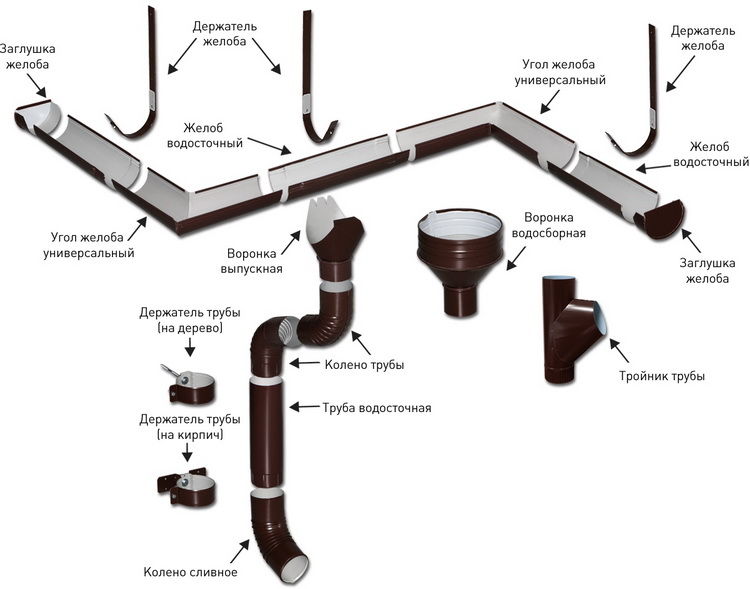
The gutters of the conduit are fixed, as a rule, with the help of brackets. They are located from each other, at a distance of 50 to 60 cm. In order to correctly determine and set the slope, you must first fix the initial and final brackets, and then, between them, pull the cord. Subsequent brackets must be set strictly along the line of the stretched cord.


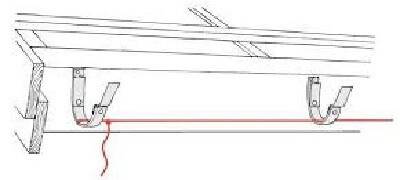
Slope setting method
The slope of the drainage structure should be 5-7 mm per meter. With a small slope of the drainage structure, water overflow is possible, and too steep a slope will give the structure an unaesthetic appearance.
Gutter structures are too long, it is recommended to build on the ground. Since it is quite difficult and inconvenient to compose and fix, at the top. The fastening of the gutters mainly occurs with the help of sealant and rivets. For a high-quality connection of pipe fragments, overlap is made, one into the other, by at least 20 mm, and then securely fixed with clamps.
The location of the conduit pipes, as a rule, is controlled by a plumb line and is set strictly vertically.First you need to mount the upper clamp and hang a plumb line on it, and then mark the location of the rest. The pipe should be fastened to the clamps in the direction of the water flow.
The construction of bends
Installation of a metal roof drain - Serious installation errors
- Horizontal installation of gutters. An incorrectly leveled drainage structure can lead to accumulation of water in the corners of the system and the gutter. As you know, water, when the temperature changes, freezes and thaws, creating ice jams that prevent the removal of liquid. Such a negative phenomenon, after a couple of years, will destroy the roof drainage system.
- Error when choosing the diameter of the pipe and the number of funnels. The conduit will not cope with the flow of liquid, which means that the system will not work properly.
- Installation of gutters with a slope to the walls of the house or in the opposite direction. In heavy rain, the liquid will overflow over the edges of the gutter.
- Installation of pipes close to the walls of the building or too high, drain removed. There is a high probability of water getting on the walls of the capital structure.
- Installation of a small number of brackets. Such a gutter, drainage structure may not be able to cope with the load and burst.
- Incorrectly assembled plastic pipes. High probability of leakage and damage to downpipes.
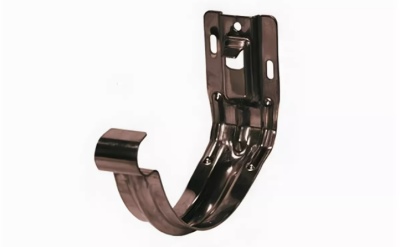
Types of brackets
A bracket is an element designed to fasten a drainage pipe system. The standard option is a long product that is used if there is no batten on the roof. Short products are needed for mounting on a frontal board or wall at home. But this option is not the most convenient, since the screws will not be screwed in securely.
It is better to stop on general-purpose types.These are collapsible parts that can be used to fix the drain in any situation. The size of the shanks can be changed depending on your needs. This is the main advantage of this product.
How to install a gutter for a roof with your own hands - a step-by-step diagram
Step 1: Calculation of materials
To select the optimal size of pipes and gutters, it is necessary to calculate the area of \u200b\u200bthe roof slope by multiplying its width by its length. Further, based on these values, structural elements are selected. So, for 30 squares, a pipe with a cross section of 80 mm is enough, 50 m2 - 90 mm, and pipes of 10 cm are used with a slope area of \u200b\u200bmore than 125 squares. The number of pipes is calculated relative to the perimeter of the building, the distance between adjacent elements should not exceed 24 m.
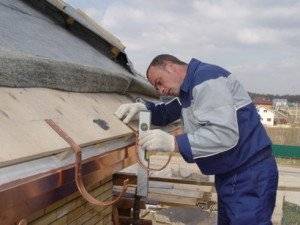
Step 2: Mounting the brackets
After the purchase, you can proceed directly to the installation work. First of all, brackets are attached at a distance of half a meter from each other (for a plastic gutter), for metal products this parameter can reach one and a half meters. They are fixed in the frontal part of the roof, and if there is none, then the rafter legs will fit. First, the extreme elements are installed, after which the twine is pulled between them and, focusing on it, intermediate
At the same time, it is very important to make the correct slope, it is 2–5 mm per linear meter
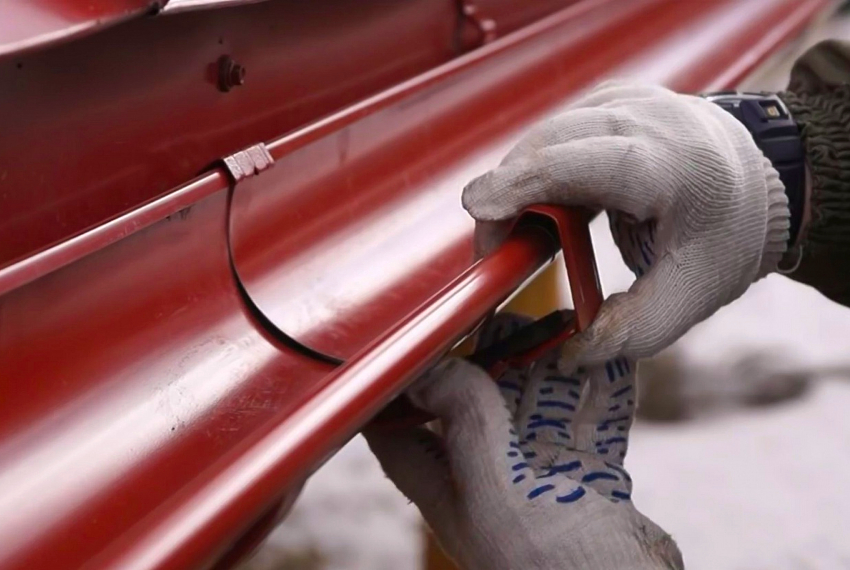
Step 3: Installing the gutter
Further, the gutter itself is mounted on the already fixed hooks. This is done as follows: under the bent part of the bracket, the front edge of the gutter is inserted and turned 90 °, so it will fall into place. To fix this component, special plates are used.Corner joints are made using special elements, while open ends are closed with plugs.
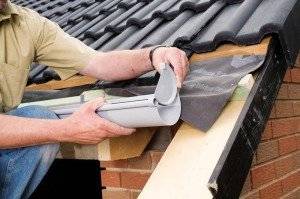
Step 4: Installation of gutters
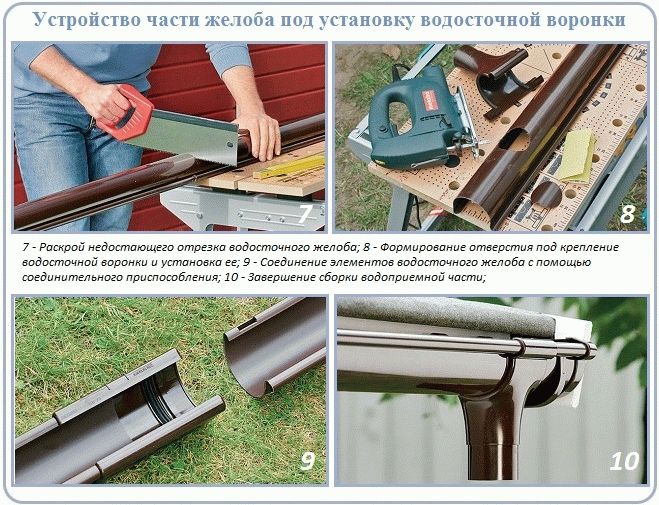
This step begins with the installation of outlet funnels. It is necessary to make a hole at the location of the funnel, for this a hacksaw with a small tooth is useful. Be sure to clean the edges of the cut, then apply two strips of glue, maintaining a distance of 5 cm between them. Then you need to put a funnel under the gutter and, connecting these two elements together, heat the plastic on both sides. There is another way to fix the elements of the plastic structure - through the sealing gum. Each of these options has its own advantages and disadvantages. So, when using cold welding, the fastening will turn out to be more reliable, but the thermal expansion of the material can play a cruel joke. And in the second case, linear expansions are not terrible, but rubber loses its properties over time.
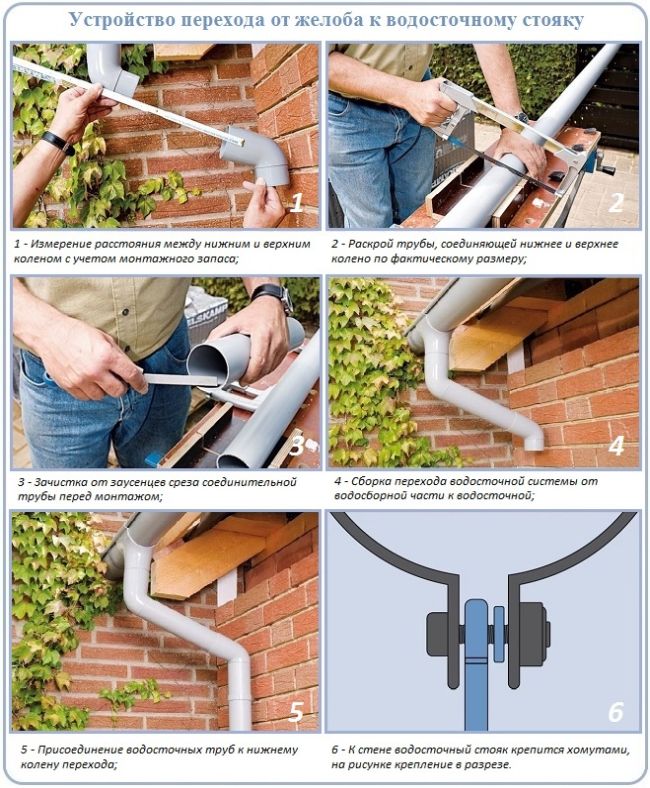
Step 5: Fixing the pipes
And now we have reached the last stage. These vertical elements are attached to the facade of the building from top to bottom by means of special clamps. The distance from the pipe to the wall must be at least 3 cm, otherwise the building will become damp. Fasteners are installed at the junction of two pipes, while maintaining a step of 1–2 m. The distance between the drain elbow and the blind area should be at least 20 centimeters. It is not difficult to do everything described with your own hands, but if you take a few minutes to watch our video on installing roof drains, you will work more confidently.
System installation process
Installation work begins after the settlement of higher issues. The standard work plan for the installation of a drain consists of:
- Hook fixings;
- Installation of gutters, funnels, pipes;
- Organization of drainage.
Each process has its own characteristics that must be taken into account for durable and reliable water drainage.
Mounting methods
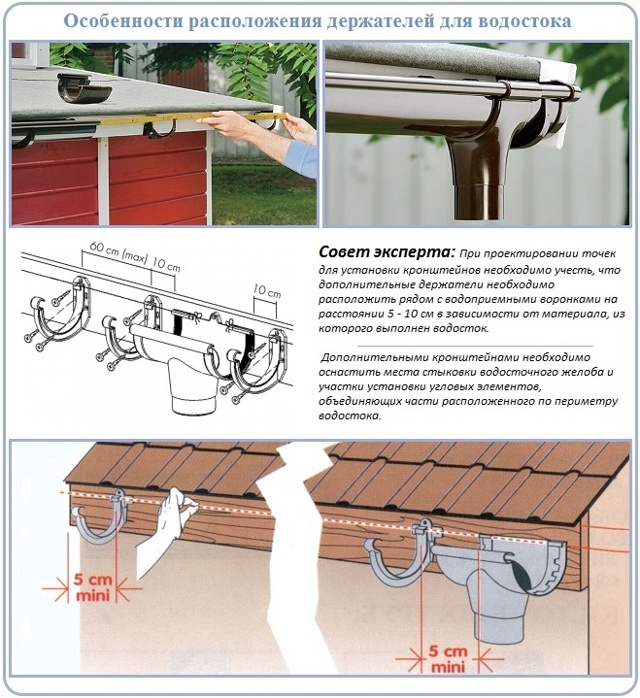
Important elements are special hooks that secure the gutters around the perimeter of the wall of the house. It is customary to distinguish the following types:
- Flat brackets of a curved shape that are attached to rafters, battens or wooden decking.
- Frontal models mounted on a windboard. A distinctive feature is the presence of an adjustment mechanism.
- Versatile parts that can be used for mounting on any surface.
The organization of the drain varies depending on the method of fastening the brackets. The main types of installation according to this criterion include the installation of the system to:
- rafters;
- wind board;
- end board nailed to the top of the deck.
When creating a system for draining water from the roof of a house, it is important to ensure that the parameters of the hooks and gutters match
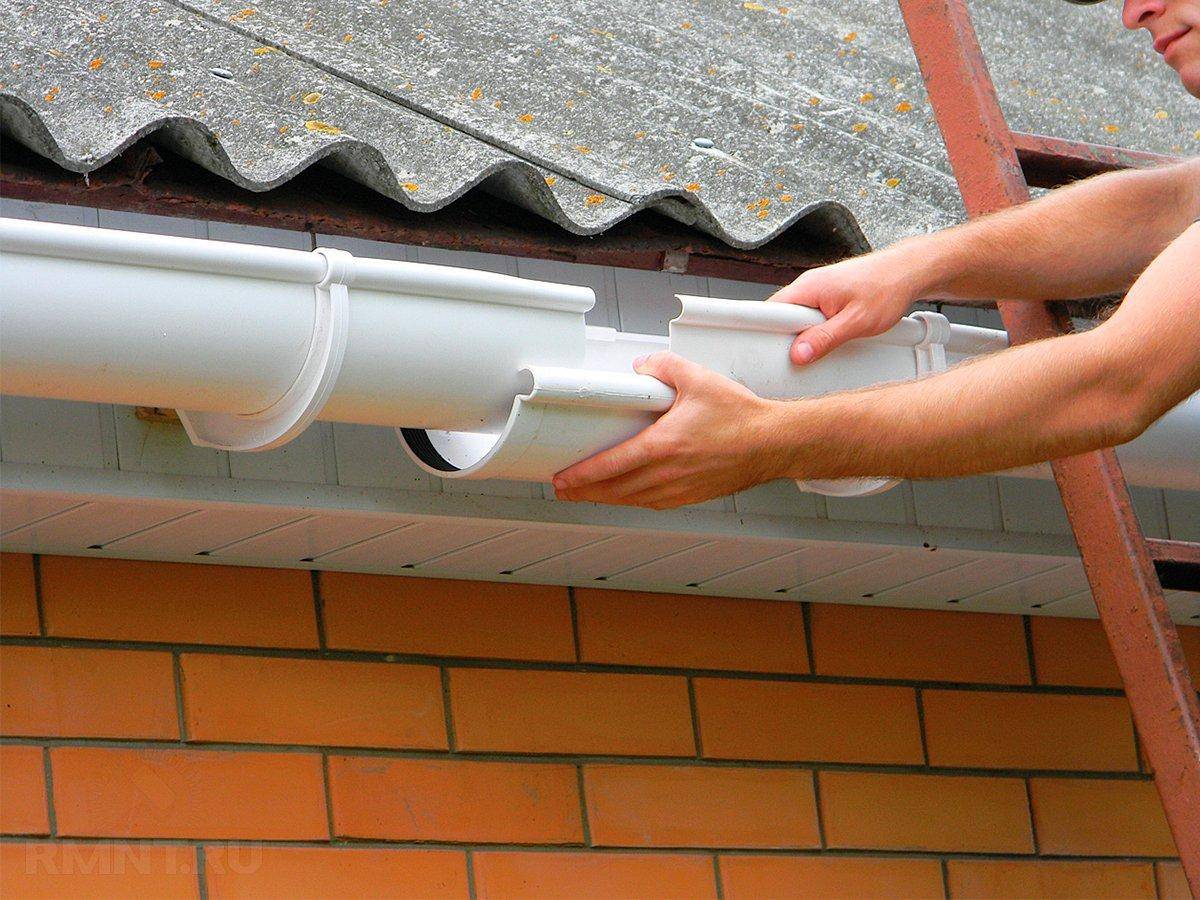
Pipeline system
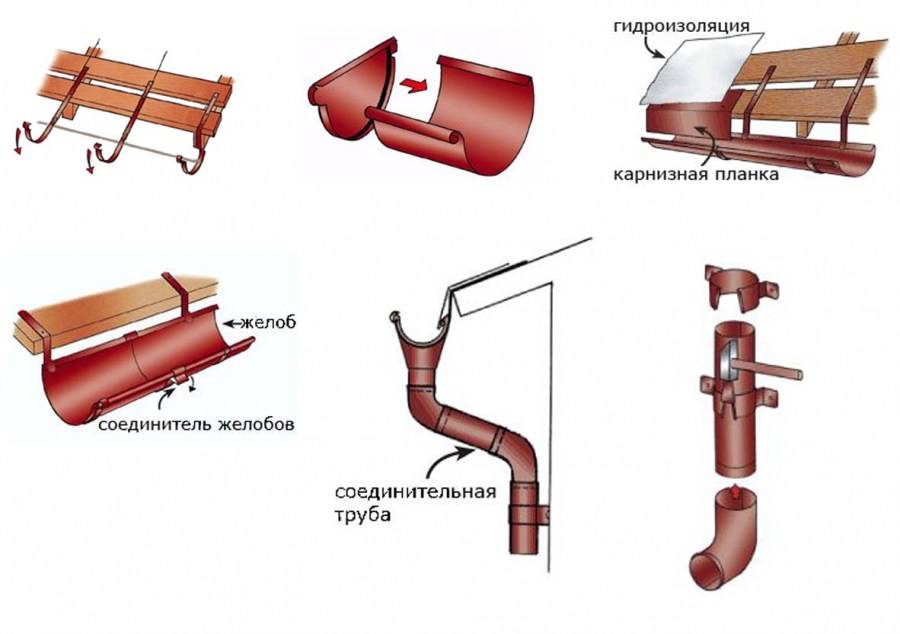
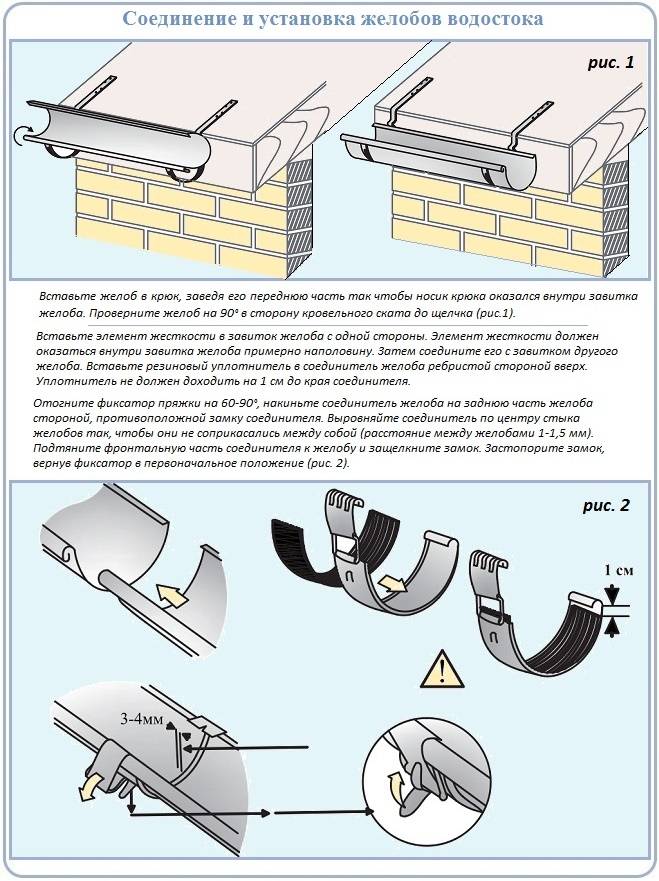
It is recommended to pre-assemble the gutters for the drain before installation. Elements with a length of 1, 2 or 2.5 m are interconnected using a rubber seal. To close the gutter at the edges, plugs are used that do not allow water to spill out of the drain system.


Water drain organization
After finding out the features of the external piping system, it is important to determine where to divert water from the roof. Surface drainage is a collection of trenches containing rain trays and covered with special gratings.
Such a system allows you to divert rainwater from the roof of the building and the entire territory of the site.It is customary to use special tanks in which liquid from the roof is collected and filtered. Subsequently, mine water from the roof is used for their own needs (for example, watering the site).
Deep drainage is a widely used method of water diversion. This option provides for the installation of a pipeline system in the ground at a depth of up to 1 m. Water is drained into a pipe surrounded by crushed stone or geotextile.
The vertical drainage system provides for the creation of several wells. Often a drainage pump is installed, which serves to pump out water.

Owners of country houses have the opportunity to use several drainage options:
- Using a container. This method involves the installation of water tanks near the house. You can place the barrel at a distance of 0.5 - 5 m from the ground or bury it in the soil. Practical owners of summer cottages, after the accumulation of mineral water in a container, use it for irrigation.
- A popular method of draining water is to create an absorbent well. At a distance of at least 200 cm from the house, they dig a foundation pit and fill it with rubble. This base will serve to create a concrete well. Crushed stone with sand will become a natural filter, thanks to which the residents of the house will receive clean water.
- Water runoff can be drained into the sewer system. This option is carried out subject to the availability of a connection to the central sewerage system and after obtaining the consent of the communal structures.
- Another place where rainwater can be diverted is a local reservoir or ditch.

Original alternatives: rain chains
Classical drainage systems can be replaced by the installation of rain chains.They are tautly attached to the exit of the gutter, which contributes to the accurate flow of water from the roof into tanks or soil. Rain chains are optimally installed at a distance of 50 cm from the edge of the roof rafters. This practice will reduce the likelihood of contamination of the facade of the building.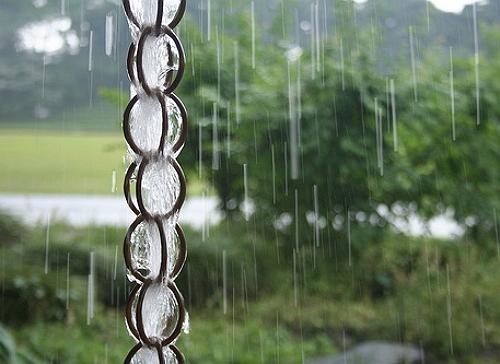
An interesting design solution will be the connection of the drain with a drainage device. When it enters the pipe, rainwater will immediately be discharged into a nearby container. If the tank overflows, excess liquid will drain into the drainage system. In the future, the reservoir will serve as a good well.
Rules for installing an external and internal gutter
If you do not follow the rules for installing a drainage system, you can get flooded walls, foundations and basements. To avoid this, you need to follow the simple instructions:
- The outer gutter is installed with a slope of 1%.
- The outer chute must be interrupted no more than three times. In the case when, due to the complex geometry of the roof, this rule cannot be fulfilled, it is necessary to install another downpipe. But its installation is best done on the outer corners of the walls.
The main thing in the drainage system is the correct organization of the direction of the water flow. It should not merge at the entrance doors and near the main paths, as in winter this will lead to the formation of a decent layer of ice, which is fraught with serious injury.
It is also important to provide the desired slope of the external gutters, which depends on the size of the slope. If the value of the length of the roof slope is more than 12 meters, then the slope must be made in both directions and two drainage systems must be installed
It often happens that the cornice is not located in a horizontal plane, and the slope of the gutter must be carried out taking this fact into account.
A pitched roof, compared to a flat one, has another weak point - the so-called valley. This is the internal joint of the roof slopes, which is most subject to the pressure of the water flow, which increases the likelihood of its penetration under the roof in this particular place.
Therefore, it is necessary to pay special attention to the drainage from the valleys and install internal gutters there, which will retain moisture, bring it out, and therefore prevent water from entering under the roof. It is attached to a boardwalk (which should protrude 40 cm beyond the axis of the internal gutter) or a crate
The process itself takes place in several stages:
- Two bars should be nailed onto the crate or boardwalk in 5–10 cm increments. There should be a small gap between the bars and the crate to ensure ventilation.
- Nail the crate, bring the ends of the wooden bars to the axes of the gutter.
- Strengthen the main crate in the valley area, for which nail a few more bars.
-
Drive two wooden blocks between the crate in the place where there is free space.
- Bring the ends of the bars into the middle of the inner groove, clamp them.
-
Bend the gutter so that the bend angle is slightly greater than the valley bend angle.
- Lay the gutter from the eaves in the direction from top to bottom.
- Fasten using metal staples.
Gutter fastening methods
To fix the gutters, you can use brackets that are combined with clamps.
Bracket mounting methods:
- Mounting on the frontal board is the simplest method used when the roof is already laid.This type of bracket is used for plastic drains. And to ensure strength, power ribs are provided in the brackets.
- Mounting on rafters - the method is used for large areas of slopes to the roofing with a rafter pitch of not more than 60 cm. In this case, brackets with an extension are used, with which the bracket is attached to the rafters.
-
Mounting on the wall - in the absence of a frontal board and access to the rafter legs, the gutters are fastened to the walls with the help of crutches and studs.
- Fastening to the crate - with a rafter pitch exceeding 60 cm, the gutter is fastened with long brackets if the roof is made of metal tiles or ondulin. Or use combined brackets in the case of bitumen tiles.
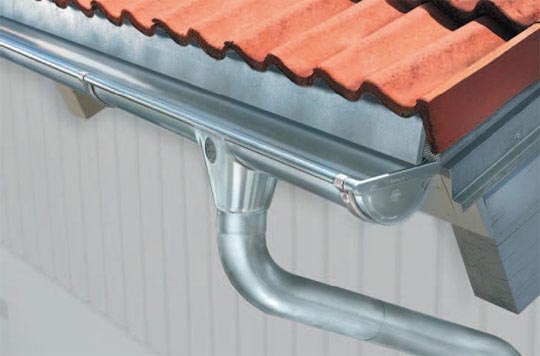
Advantages of metal gutters
Drainage equipment for a metal roof is very popular due to the possibility of their self-installation and a number of important characteristics:
- The drainage system is made of zinc-alloyed steel, which does not react and is not subject to corrosion. Therefore, metal gutters have a long service life;
- Metal gutters are strong enough and designed for a significant load, including snow. The arrangement of all nodes of such a drainage system is so reliable that debris (branches, leaves) that accidentally enters the system cannot cause significant harm to it;
- Metal drainage system fully complies with fire safety standards;
- The steel parts of the system are resistant to significant temperature changes without losing their main characteristics.
The main competitor of a metal drain is plastic drains made of PVC.With a number of positive factors, such as greater tightness, ease of installation and decorativeness, PVC gutters show a number of disadvantages. Plastic is less resistant to mechanical stress, cannot be repaired and has a high coefficient of linear expansion.


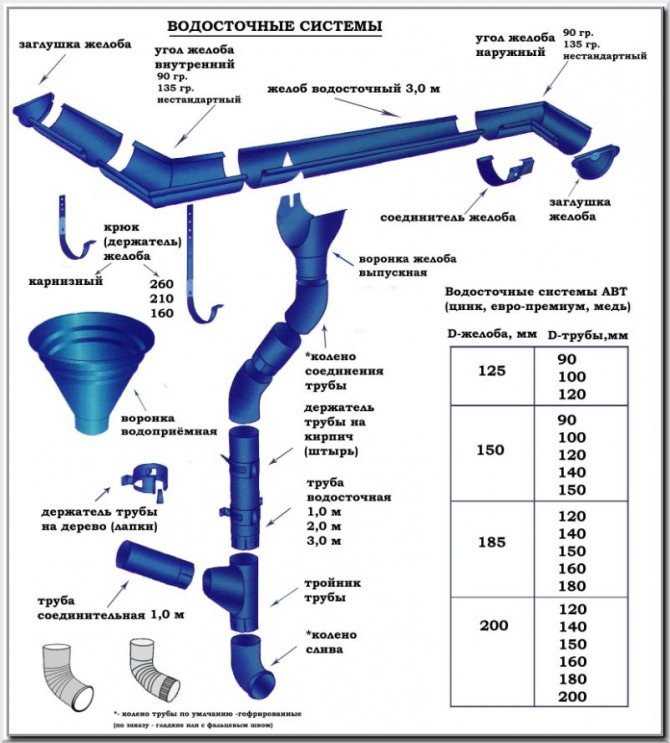


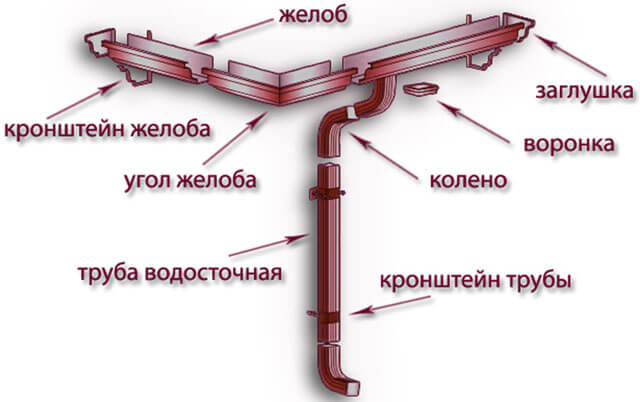
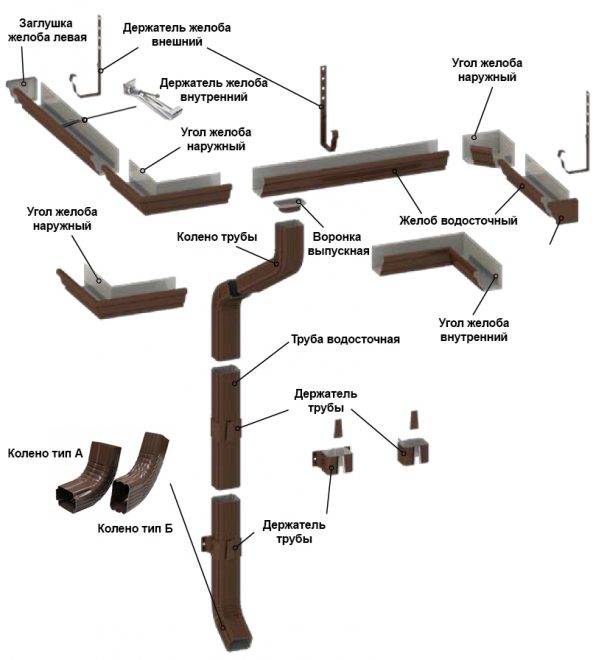
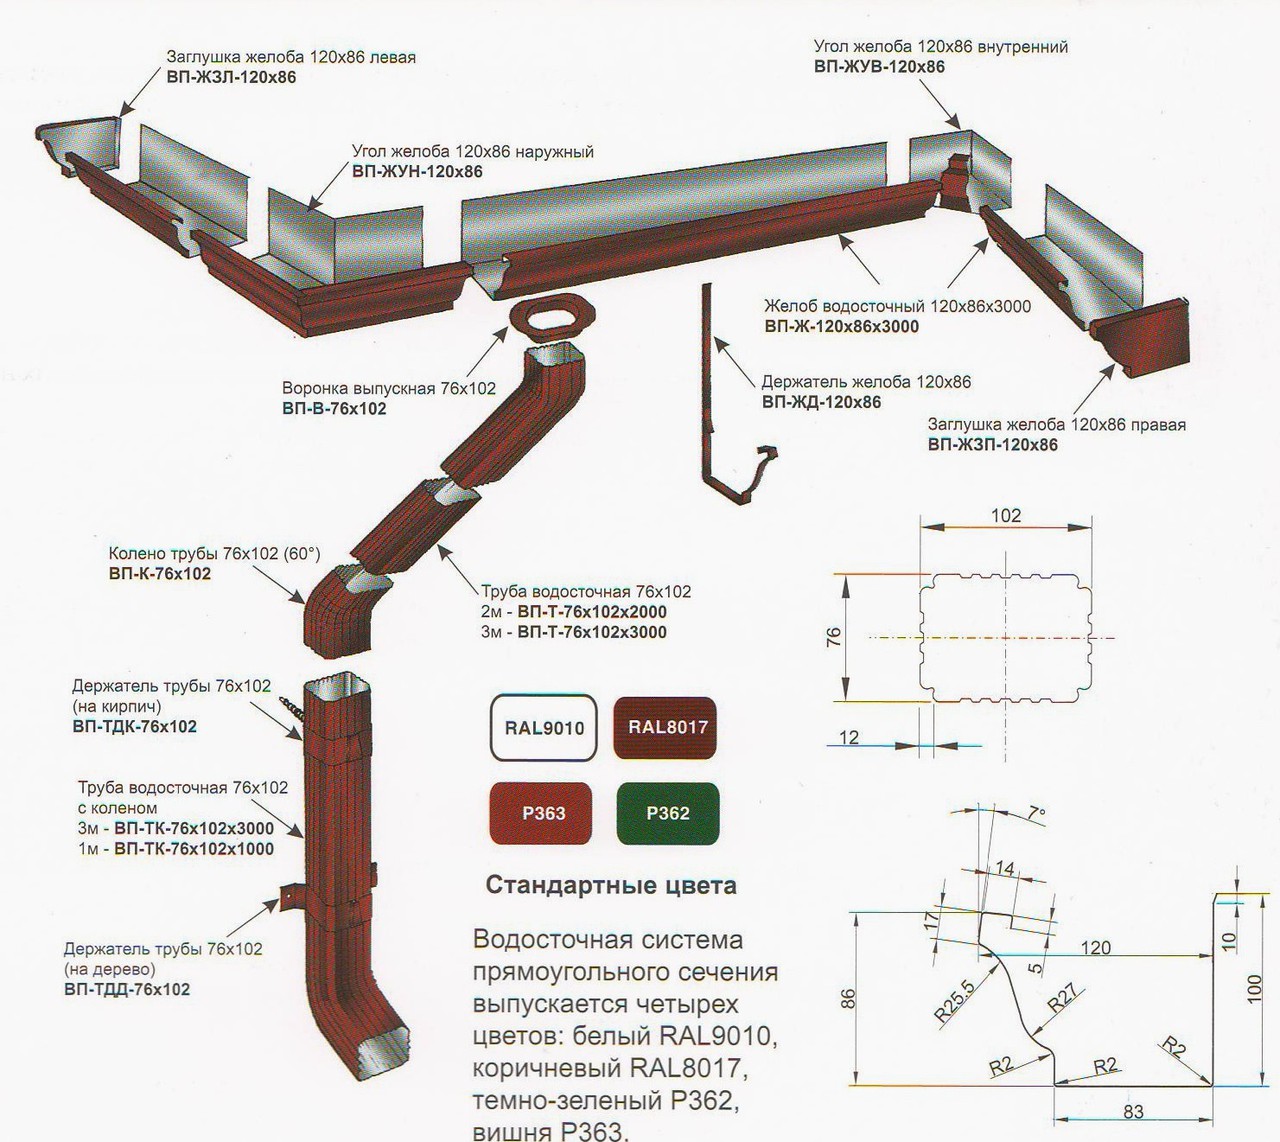
The main elements of the drainage structure
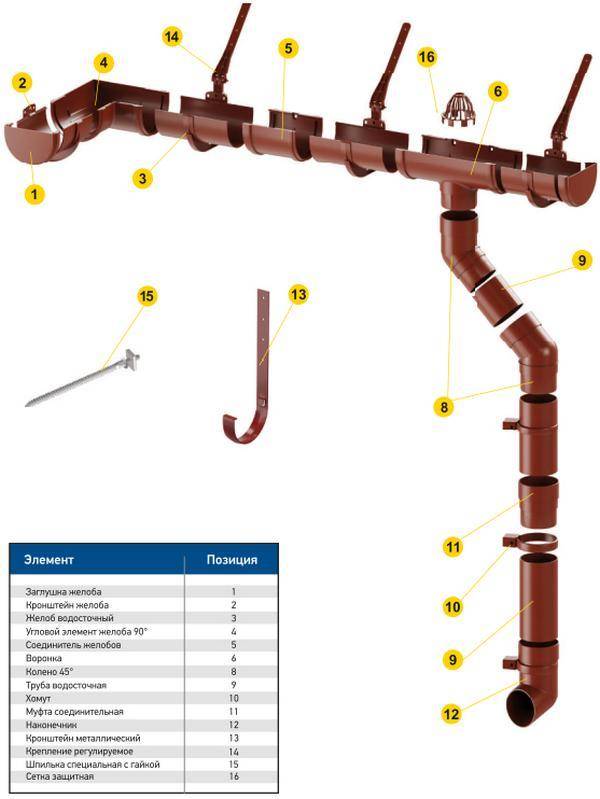
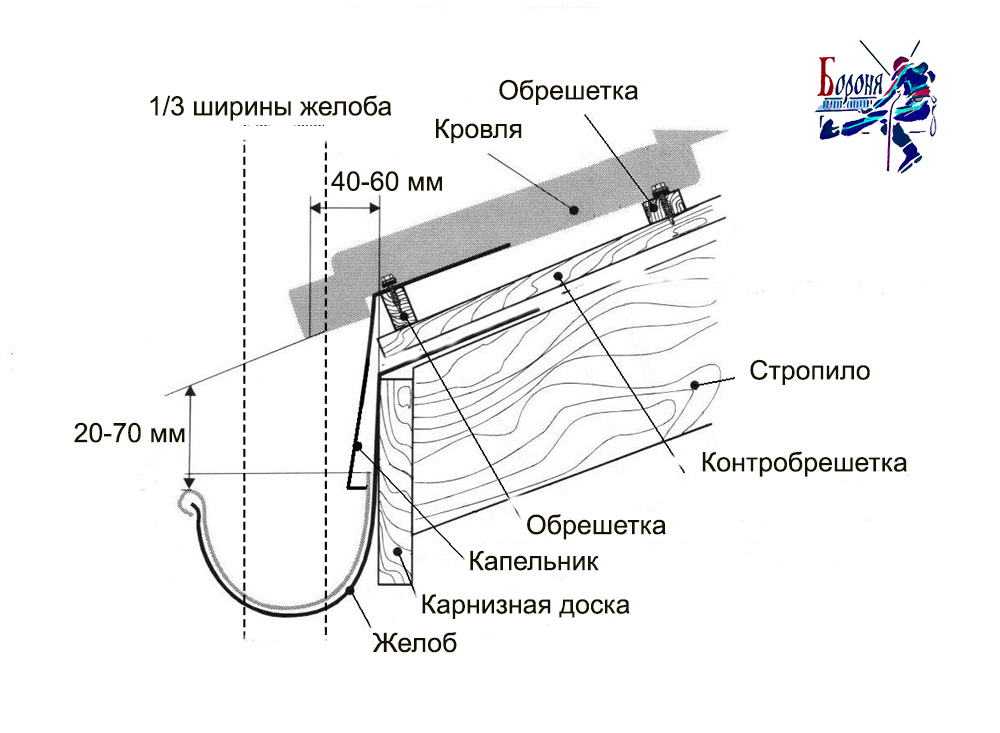
Gutter systems are made in various variations, however, the features of their structure are generally common and consist of the same elements:
- Gutter - the main part of the structure that collects water flowing from the roof; has a length of up to 3-4 meters.
- Hooks-brackets - the gutter is laid on them.
- Caps for the edge sections of the gutter on the right and left.
- Funnels mounted to the edge sections or to the middle of the gutter (fixed by adhesive bonding, less often with the help of grooves and seals).
- Coupling for attaching the gutter, mounted in the same way (adhesive or grooved).
- Drain pipe equipped with a coupling.
- Clamps for tightening and fastening various elements.
- A tee for joining pipes to each other.
- Transition coupling - is used if it is necessary to connect pipes of different diameters.
- Elbows connecting pipes, with a bend of 60-70 °.
- Mark, or knee with an angle of 45 ° - directs water flowing from the roof into the storm sewer storm sewer.
- Metal hook-bracket.
- Cornice strip - sometimes included in the finished drainage systems instead of brackets or together with them.