- Mounting with mounting plate
- The best option
- Tips for safe installation and possible problems when installing a chandelier
- How to install a chandelier on a stretch ceiling
- What stretch ceilings can be made with your own hands
- Mortgages under the lamp in the stretch ceiling
- The purpose of the embedded platform
- Mounting the chandelier on the mounting platform
- Prices for LED chandeliers
- Video - Installation of a chandelier on a stretch ceiling
- A little about the stretch ceiling
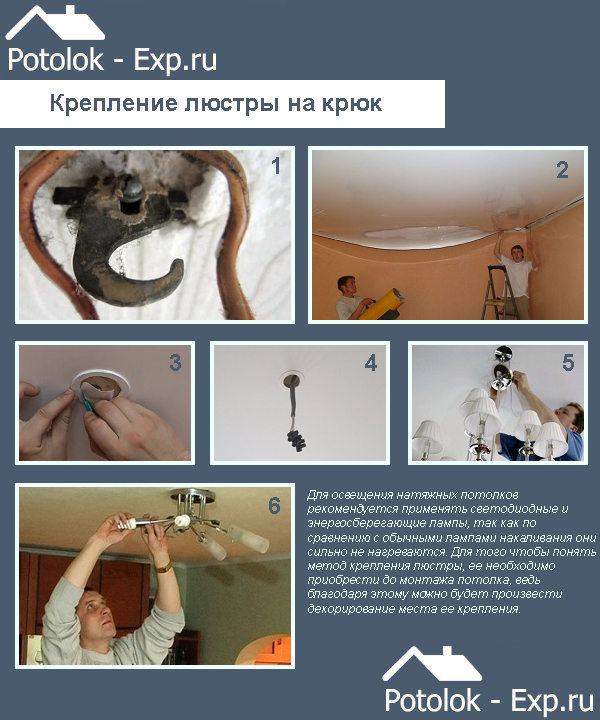
- Mounting a chandelier on a hook
Mounting with mounting plate
How about using a mounting plate? When buying a lamp, the kit includes a metal profile necessary for its fastening. It is equipped with special studs, on which the lamp itself will subsequently be put on. Then you should close the fasteners with decorative nuts.
Mounting instructions in this way include steps such as:
- The first step is to install a wooden beam to the top surface using self-tapping screws or dowels. It depends on the thickness and material from which the ceiling itself is made. In this case, the thickness of the bar should not exceed the distance between the main ceiling and its tension base. In the absence of such a wooden product, it is quite possible to replace it with a base made of moisture-resistant plywood with legs for fasteners.
- After stretching the film, a thermal ring is glued to the place where the bar is already screwed, in which a hole is made for the exit. The luminaire is attached directly to the bar studs.
- The place of fastening is decorated with nuts.
 Mounting plate for chandelier
The above two installation methods are similar to each other, but still have some differences. The first is considered the most common due to the ready-made fastening mechanism in apartments, the second is more labor-intensive, but the view is more attractive. And at the same time, it allows you to mount various types of lamps, which is impossible in the first case.
The best option
Installation of the device must be carried out before the installation of a new surface is started. Initially, any lamp, lamp or other lighting device is attached. Installing it after painting or wallpapering is completely easy. Chandeliers for a stretch ceiling will need special ones, despite the fact that the installation process itself is relatively laborious.
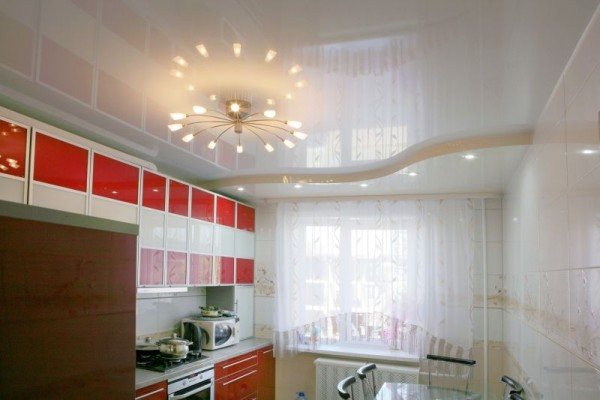
Which chandelier to choose for a stretch ceiling? It must be built-in or overhead type. It is known that the selection of a product is to some extent determined by the design of the room and the method of fastening. Not all options can be mounted in a stretch film.
In addition, do not install chandeliers in a stretch ceiling if the latter is made on the basis of PVC. This is due to the fact that there is a possibility of changing their color and size due to constant temperature pressure. Halogen lamps are used in the formation of lighting, the direction of the light beam is organized down or to the side, but not on the surface of the tension product. For a chandelier with a halogen lamp, a ceiling lamp is required, otherwise the surface of the film will be damaged.
Which chandelier to choose for a stretch ceiling? When choosing, pay attention to the main characteristics of the fixtures. You can hang an option that has a plate shape, while its base should not be metal
The metal is able to heat the canvas very strongly, which is by no means allowed.
When choosing the appropriate option, one more rule must be taken into account: the ceiling lamps on the lamp can be directed downwards or on different sides. This will prevent negative impact on the materials from which the film is made. Tension products become darker due to the influence of the rays of the lighting device, which are directed specifically at them.
How to choose a chandelier? In stores, you need to consider those types of chandeliers for stretch ceilings that operate on energy-saving lamps. This will not only save the family budget, but also protect the surface material from excessive overheating. In addition, ceiling chandeliers for stretch ceilings should not be too complex, otherwise it will complicate the installation process.
Tips for safe installation and possible problems when installing a chandelier
- Do not use excessive force when screwing the lamp, otherwise you may deform the ceiling sheet.
- When installing the base, study where the wiring goes on the old ceiling, be sure to turn off the power before starting work.
- Protect external wiring with corrugated hose. It will protect the flammable plastic sheet from sparks.
- Insulate all wiring connections with heat shrink or electrical tape.
If the chandelier does not work after installation:
- Start by checking the bulbs. Maybe you forgot to screw them in? Or are the bulbs themselves not working? Try screwing others.
- Check the switch on the wall. Burnt contacts can be a sign of a malfunction.
- The most unpleasant option is damage to the wiring on the way from the switch to the chandelier. Remove the chandelier and check with an indicator screwdriver for voltage in the wires.
- If the wiring is in order, then the problem is in the chandelier itself. You will have to disassemble it and check all the connections.
How to install a chandelier on a stretch ceiling
The chandelier can be mounted on a hook, as well as on linear or cruciform strips.
Hook. Depending on the number of plafonds at the chandelier, the hook can be threaded - it is screwed into a dowel or a cork hammered into a drilled hole. Used for chandeliers with 3-5 arms. For heavier lighting fixtures, a butterfly hook is used. To do this, holes are drilled in the concrete floor to the inner cavity of the slab. A hook is driven into it until the petals open.
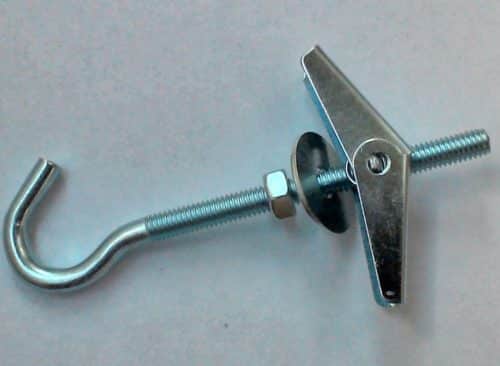 Butterfly hook for heavy chandeliers.
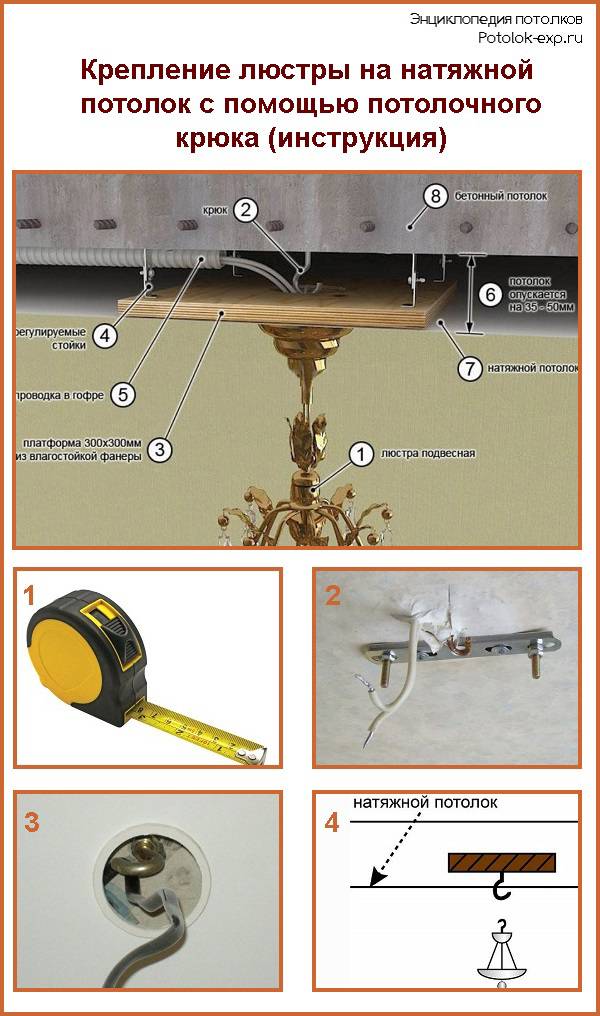
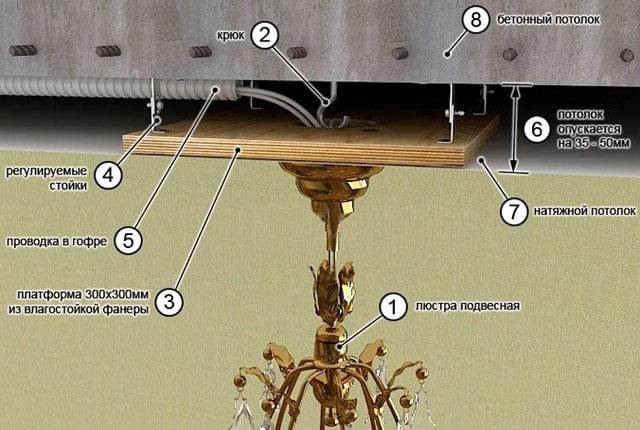
In order for the decorative cap to have a rigid stop and fix the lighting device over the stretched film, a rigid plywood frame is attached to the ceiling ceiling. To do this, a round hole for wires and a suspension (cable or chain) is cut out in the middle with a puncher or drill with a crown nozzle.


Then, using a perforated tape of dowels and self-tapping screws, the plywood is attached to the main ceiling so that the hook and cable are above the cut hole. The length of a direct suspension or perforated tape should be with a margin.
As in the case of built-in lamps, the platform is pressed against the floor with hands, so that after finishing work on the stretch ceiling, it can be pulled down until it comes into contact with a PVC film or polyester fabric.
 Chandelier fixtures.
After installing the stretch ceiling, a hole is cut out in the canvas, but only after sticking a plastic ring (you can cut it yourself from any plastic, since thermal protection of the film is not required, but only to prevent its rupture).
Through the holes in the film and plywood, the chandelier is connected through the terminal block to the wires, and then hung on a hook. If you hang it right away, it is difficult to connect the wires. The process is completed by raising the decorative cap to the ceiling, until it stops. If, nevertheless, the plywood does not fit tightly and the cap leaves a mark on the canvas, then you need to lower either the frame or the cap.
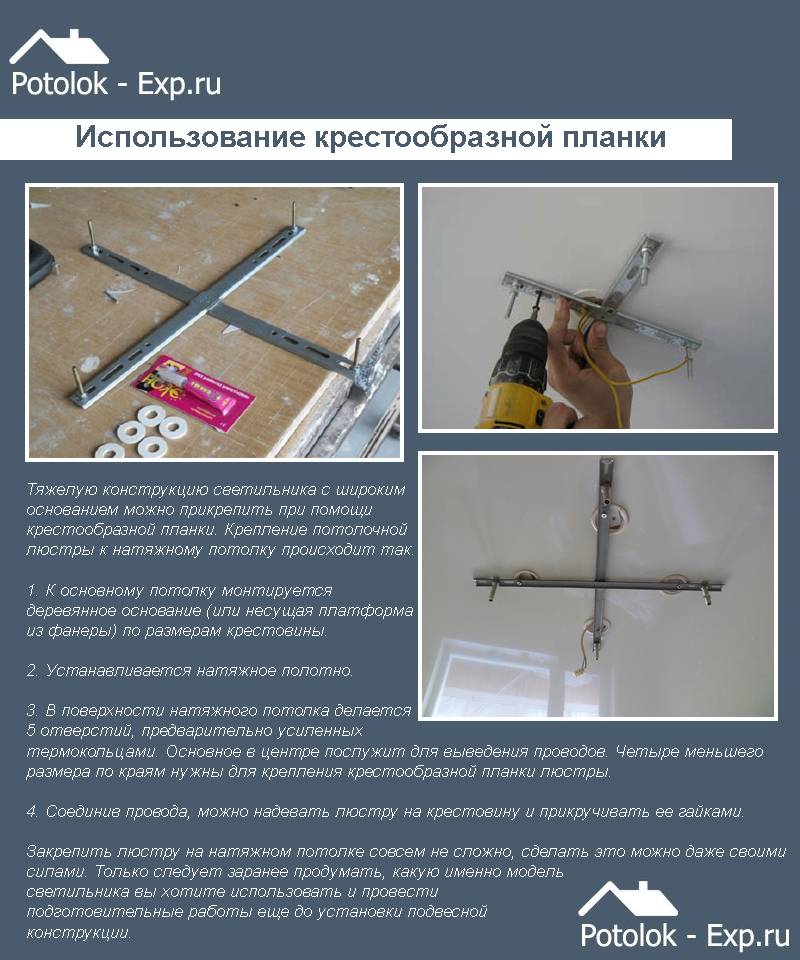
Plank. Manufacturers of chandeliers also use one or two strips to mount them to the ceiling (they are arranged in a cross at a right angle). In this case, a beam is taken under each plank (a little longer so that the chandelier does not swing) and fastened to the ceiling with a perforated metal tape. But before that, a bolt hole is drilled in the middle of a solid beam.
If the chandelier is light, the bolt can be replaced with a self-tapping screw. Then there is no need to drill a hole. The second beam is cut in half and also attached to the ceiling, and for greater stability with the help of corner fasteners and to the first plank. The length of the mounting racks should be with a margin so that, if necessary, the beam can be lowered down to the stretched ceiling.
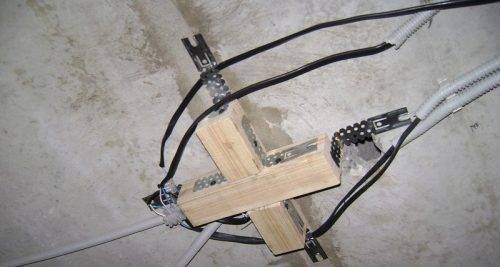 The cruciform base for fixing the chandelier is fixed with dowels and self-tapping screws.
After the PVC or polyester film is stretched to install the chandelier, you must:
- wrap the ends of the strips with inserted bolts with electrical tape so that the ceiling sheet is not damaged;
- attach the overhead bar to the beam;
- connect the chandelier through the terminals to the mains;
- attach the chandelier body to the slats;
- close the attachment point with a decorative cap - raise it to the stretched ceiling.
 A decorative cap will hide the wires and the hole.
What stretch ceilings can be made with your own hands
According to the manufacturing technology, there are two types of stretch ceilings:
- Film.
- Fabric.
The main difference is the fabric material. In the first case, a thin PVC film is used, in the second, a synthetic fabric made of polyester impregnated with polyurethane. Each material has both pluses and minuses.
The main advantages of PVC film:
- water resistance - when flooded, the stretch ceiling retains water, and after the liquid is drained, it returns to its previous form;
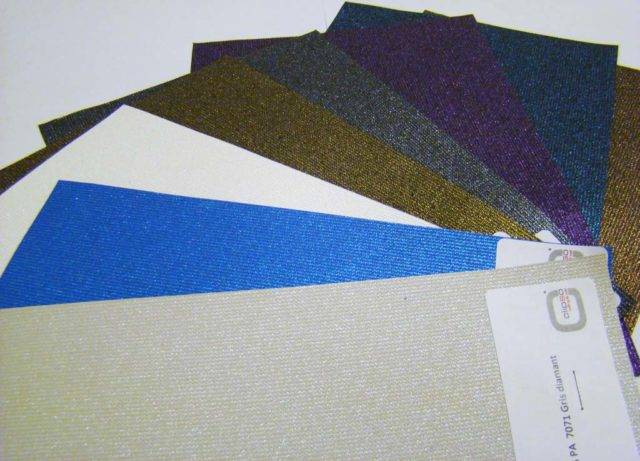
- many color variations - more than 250 shades of various textures are produced (glossy, matte, satin, textured, with patterns or photo printing);
- the possibility of wet cleaning - thanks to this, the ceiling is easy to care for and remove even the most persistent dirt.


Advantages of fabric cloths:
- frost resistance - polyester can withstand negative temperatures up to -50ºC without losing properties;
- large web width - 5.1 m against the maximum 3.2 m for film, which allows you to make seamless ceilings in almost any room;
- durability - withstands an accidental blow or a flying cork from champagne;
- breathability - thanks to microscopic holes in the structure of the material, the canvas does not interfere with air exchange in the room.
The disadvantages of film ceilings include low strength - PVC breaks from contact with sharp objects and does not tolerate negative temperatures. The main disadvantages of fabric canvases are the high cost and a modest choice of colors - only about 20 shades of mostly pastel colors.


Do-it-yourself installation of a stretch ceiling is possible for both options, but there is a difference in the installation technology. The PVC film is preheated so that the material becomes elastic and stretched. To do this, use a gas heat gun. After cooling, the film stretches and forms a flat surface. Polyester fabric does not require heating and immediately after installation has a finished look.
Previously, we have already described in detail the technology for installing a fabric stretch ceiling, in this article we will consider how to stretch a PVC sheet.
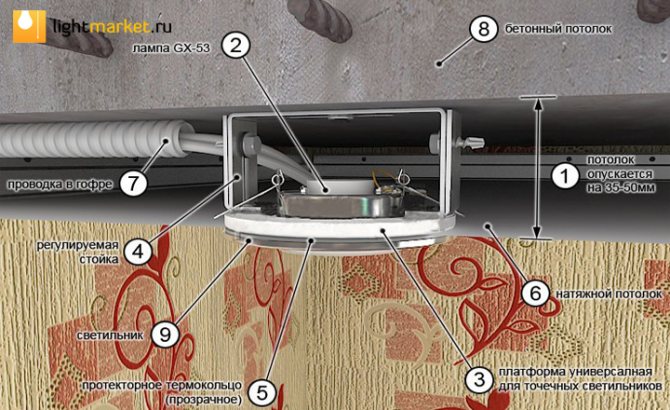
Mortgages under the lamp in the stretch ceiling
In this case, it means that you need to attach special elements to the base base, which will then hold the device and prevent it from spoiling the coating by sagging. Depending on the type of lighting device and its weight, mortgages will differ slightly.
Spotlights. For this reason, it is recommended to choose the location of point spots in advance. The fact is that without mortgages it is impossible to install them. And to create such structural elements, the absence of a canvas is required.
Mortgages in this case will be different. There are generic options. They look like pyramids and are made of soft plastic.A ring of the desired diameter is cut out and installed using metal adjustable racks. There are certain sizes available. For example: with a luminaire cut-out diameter of 50 mm.
If the lamp has an unusual shape, then the mortgage can be created only for it from special plastic.
To install such a part of the structure, first bring all the necessary wires, attach the profiles to the walls. Then adjustable racks (aluminum suspensions) are connected to embedded screws, and then they are attached to the base ceiling. First, you should definitely make a markup and see how exactly the location meets your idea.
Remember, fixtures cannot be lower than the installed profiles. So this point needs to be checked carefully.
Chandelier. The choice of the chandelier itself is of great importance for the stretch coating. Not all types of chandeliers will be successfully combined technically with stretch fabrics. The fact is that flat lamps, which are very close to the canvas, will heat it during operation, from which it may begin to melt.
Therefore, it is best to choose options in the form of suspensions, not very heavy. The bonds themselves are different. There are home-made options, and factory ones.
To create a mortgage for a chandelier in a stretch ceiling with your own hands, it is better to take special plywood or plastic. Such a mortgage does not deteriorate over the years under the influence of moisture, does not dry out. It is not recommended to use an ordinary tree, as it can crack, which will lead to the fall of the chandelier and deformation of the tension coating.
A small square or rectangle is cut out of plywood. A hole is made in its center through which the wires will pass.
Be sure to go over all the edges with embedded sandpaper, as roughness or pieces of exfoliated material can damage a smooth canvas. Then this platform is mounted on adjustable racks.
Remember, markup matters a lot. First, mark the place where the chandelier will be attached. And only then can you start creating a mortgage. Follow the level of this design.
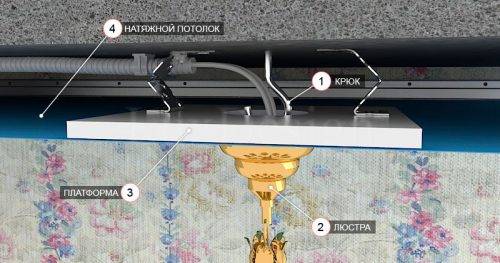
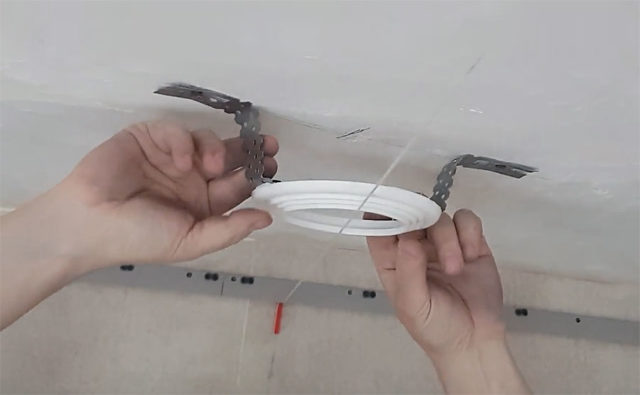
The purpose of the embedded platform
The design is a special element that allows you to securely mount the lighting device on the base ceiling, which will be hidden under the tension cover.
Many craftsmen make embedded elements with their own hands, but such work requires additional time, skills and abilities.
To simplify the installation of a chandelier in a stretch ceiling, ready-made platforms made of durable plastic, which are selected in accordance with the parameters of the lighting device, will help.
The embedded element performs the function of a kind of frame that holds a certain structure. A solid platform avoids the impact of a heavy chandelier on a stretched canvas.


Since such mortgages are often made of heat-resistant plastic, they also perform the function of protecting the stretch ceiling from the heat radiated by the device.
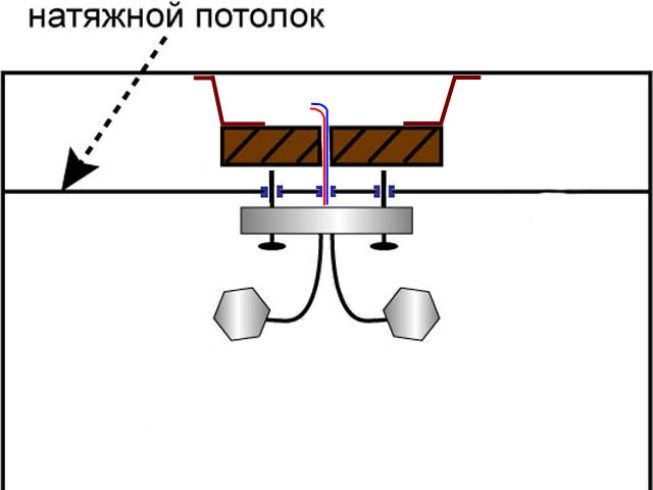
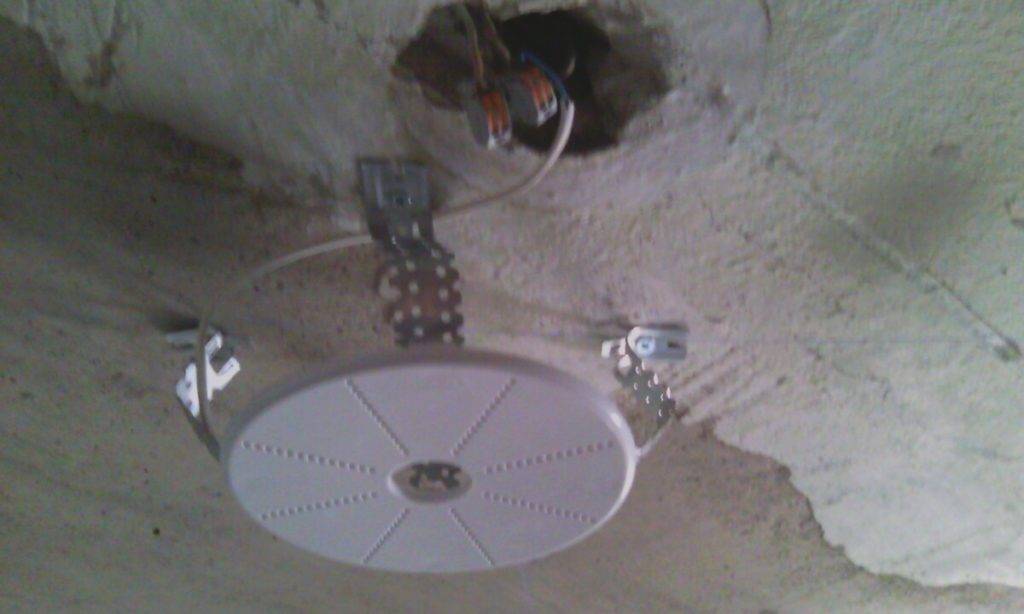
Mounting the chandelier on the mounting platform
This method is used when mounting on a longitudinal or cruciform mounting plate is provided. The size of the platform is determined based on the size of the bar, and its thickness depends on the weight of the lamp.Mount the bar when installing baguettes, keeping it flush with the guides.
The platform is made from a bar, board or piece of plywood. You will also need plastic mounting rings to mount the lamp. The diameter of the ring for the longitudinal bar should allow wires to be threaded inside it and the bar to be fixed on self-tapping screws. For a cruciform bar, five rings of different diameters are needed.
Prices for LED chandeliers
chandelier led
Mortgage foundation
mounting ring
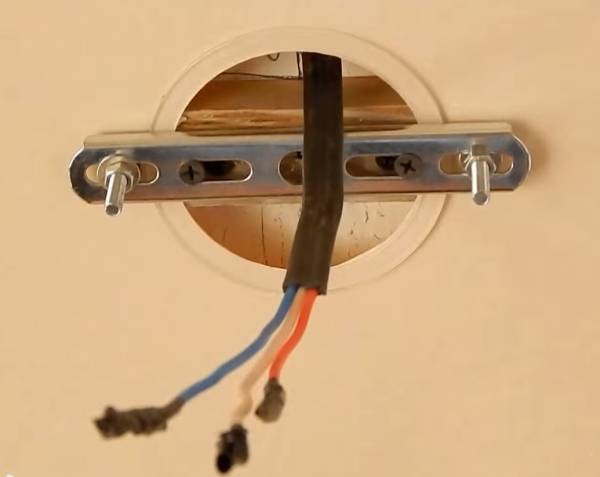
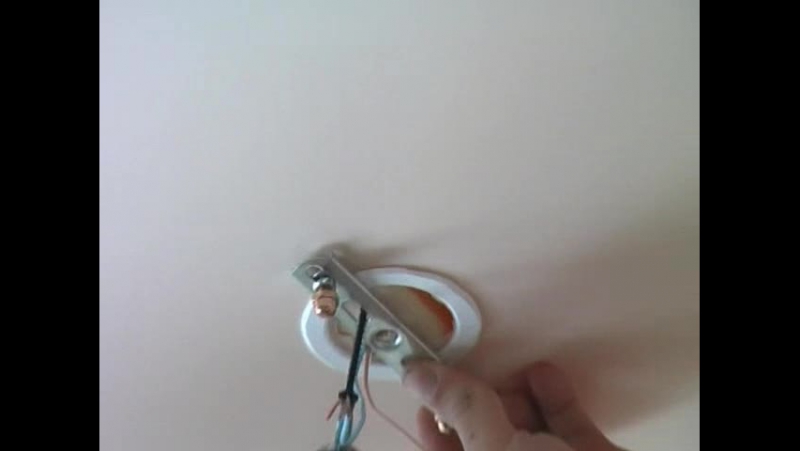
The place for installing the lamp on the mounting platform is determined by the design project. If the chandelier is hung in place of a standard hook, the latter is cut down or insulated inside the slab, and the hole is sealed with gypsum-based putty, after checking and stretching the wiring as much as possible.
Step 1. If the ceiling level drops slightly, to mount the luminaire on a small longitudinal bar, it is enough to fix a mortgage bar in the right place on the ceiling. They do it this way: drill two holes with a diameter of 2-3 mm in a bar. In order to lay the wires, a shallow groove is cut in the center of the bar. They mark the ceiling and drill holes with a puncher, after which they fix the bar and lay the wires in it.
For a cruciform mounting plate, the platform is also made cruciform, fixing it with perforated brackets.
Cross mounting plate
Step 2. With a significant change in the level of the ceiling, for example, when installing two-tier structures, use the prefabricated structure of the mounting platform. To make a platform from a piece of plywood 6-12 mm thick, cut out a rectangular platform of the required size.Its length should be several centimeters longer than the length of the luminaire strip, and its width should be slightly larger than the diameter of the mounting ring. For a cruciform plank, the platform is made square.
A hole for wires with a diameter of 10-15 mm is drilled in the center, after which the front side of the platform is carefully polished so as not to damage the ceiling canvas. At the corners of the platform, brackets are attached to wood screws.
Step 3. Apply the platform to the ceiling and check its level - it must match the calculated level of the finished ceiling. Adjust the height of the platform with the help of brackets, bending them. Fix the platform to the ceiling with self-tapping screws and dowels.
Step 4. Install guides around the perimeter of the room, checking that the levels of the mounting platform and baguettes match. Stretch the ceiling fabric according to the usual technology. After it cools down and acquires the necessary elasticity, proceed to the installation of the lamp. By touch, they determine the hole for the wires and fix the mounting ring around it with glue. Carefully cut out the canvas inside the ring and lead the wires through it.
To attach the cruciform bar, it is necessary to fix five rings of different diameters on the canvas - one in the center for wires and four in the places where the bar is attached, their diameter can be small, the main thing is to pull the bar to the platform.
Step 5 Mounting studs are installed on the mounting plate and pulled onto the locknut. They need to be tightened well, otherwise it will be impossible to fix the lamp later. Fasten the bar with screws to the platform.


Mounting the chandelier on the mounting platform
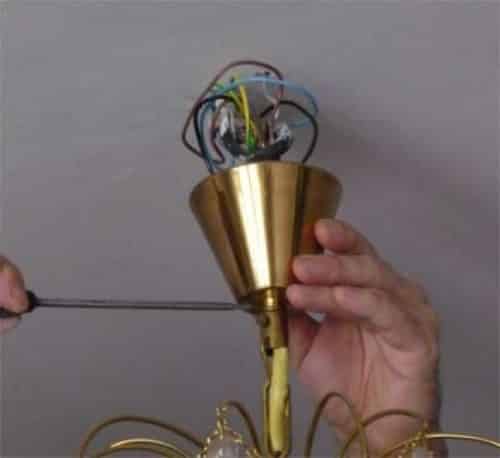
Step 6 Remove sharp parts, light bulbs from the lamp, prepare the terminal block for wiring.It is better to hang the chandelier together - one holds the lamp, and the second connects the wires and tightens the union decorative nuts on the lamp body.
Step 7. Screw the lamps, install shades and decorative elements on the lamp, check the operation of the lamp, as well as heating, as described above.
To better understand the process of attaching a chandelier, you can watch a video.
Video - Installation of a chandelier on a stretch ceiling
Installing a chandelier on a stretch ceiling is not such a difficult matter if you follow all the steps of the instructions.
It is important not to damage the canvas and securely fix the lamp, as well as connect it correctly. If you do not have the skills to carry out electrical work, you can install the chandelier yourself, and it is better to entrust the connection to a professional - not only your safety, but also the durability of the ceiling depends on this.
A little about the stretch ceiling
Constant attempts to decorate your home, as well as premises intended for receiving people (restaurants, cafes, etc.) leads to the fact that new finishing materials appear. This applies to all components of the room, including the ceiling.
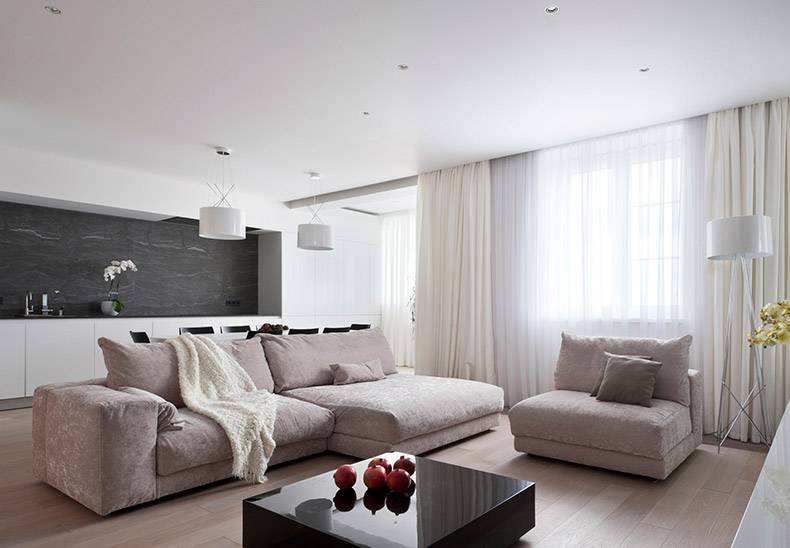
Many different materials are used to finish the ceiling. One of the most popular now is the stretch ceiling.
It is a dense film, strongly stretched over the entire area of \u200b\u200bthe room.
This allows you to create a perfectly flat flow surface without any transitions or joints. It looks really beautiful.
But the film itself is not placed on the surface of the ceiling, it is fixed on a special frame fixed on the walls of the room, at a small distance from the main ceiling.
In a way, a stretch ceiling can be called a false ceiling that hides the main one.
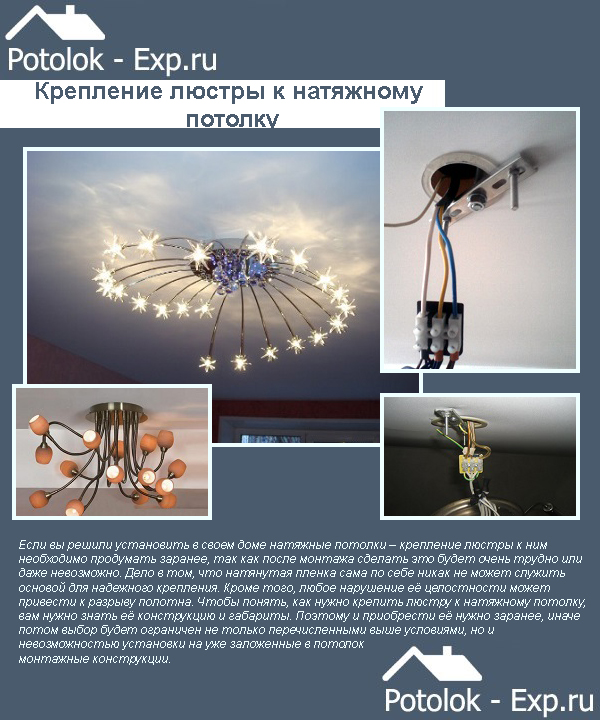
Such a ceiling finish looks aesthetically pleasing and beautiful, but there is a small nuance - the film cannot be a carrier, an attempt to fix something on it will lead to its stretching or tearing. This leads to the fact that it is necessary to think in advance about fixing lighting equipment - chandeliers, ceiling lamps, etc.


The stretch ceiling provides for the installation of chandeliers, but this operation has its own characteristics, which we will describe.
So, it was decided to decorate the room with a stretch ceiling. You won’t be able to stretch the film yourself, but you can do the preparatory work to fix the chandelier.
Mounting a chandelier on a hook
Most often, with the help of a hook, standard lamps are installed, which are devices on a long rod, equipped with several shades. To mask the attachment point of the chandelier, a decorative bowl is used, pulled up to the ceiling itself. Fixing a chandelier in this way is simple, but installing a hook for a chandelier in a stretch ceiling in the right place is difficult, since it largely depends on the planned ceiling design.
If there is an initially installed hook in the center of the room, the task is greatly simplified (of course, only if the chandelier is installed in this place). To mount the structure on such a hook, you just need to extend it with a chain with a hook at the end and mount all the necessary wiring.The suspension chain and wires can be temporarily removed from the hole in the ceiling.
If there is no hook, then before you screw the chandelier to the stretch ceiling, you will have to mount the fasteners yourself. To do this, you must first measure the distance between the ceiling and the stretch ceiling in the area where the chandelier will be installed. In the same place, you need to fix the beam, due to which the level of the structure will be lowered to the required distance.
Two holes are drilled along the edges of the beam at a distance of about 5 cm. Also in the bar you need to drill a large hole through which the electrical wiring will pass. In accordance with the bar, you need to mark the base for the chandelier and make mounting holes in it. Wires are inserted into the bar, after which it is fixed with dowels and self-tapping screws. The threaded hook should be screwed into the beam after the blade has been installed.
If we hang a chandelier weighing more than 5 kg on a stretch ceiling, it would be much better to use anchors. To install these elements, it is necessary to drill a hole in the concrete floor, the diameter of which will correspond to the diameter of the anchor sleeve. The sleeve is inserted into the ceiling, after which the hook is twisted until it stops, as a result of which the anchor is fixed. If the distance between the ceiling and the stretch fabric is less than 5-7 cm, the chandelier can be hung directly on the hook, otherwise the structure will have to be extended with a chain.
When the canvas is stretched, you need to determine where the hook or support bar is. In the place where the chandelier will be located, you need to glue the plastic mounting ring for the chandelier to the stretch ceiling. The diameter of this ring should be slightly smaller than the inner diameter of the chandelier bowl.The part of the tension web, located inside the perimeter of the ring, is carefully cut out.
Fixture chandeliers on the stretch ceiling is mounted to the bar. If the hook is originally built into the ceiling, then it must be leveled using a chain. In any case, the next step is to extract the wiring. The wires need to be straightened and a terminal block installed on them, which will allow you to connect the lamp.
Immediately before you hang the chandelier on a stretch ceiling, you need to remove from it all sharp and protruding elements that can damage the canvas, and lamps. The chandelier is suspended from a hook and connected to the mains. The wires must be placed around the rod so that the elements that do not have insulation are located at a distance from the details of the chandelier itself. The design is covered with a decorative bowl and fixed at the required level, and the canvas should not be stretched after installation.
Light bulbs are screwed into the installed chandelier, after which the lamp must be checked for operability. If everything works fine, then the light turns off, and the ceiling lamps and those elements that were previously removed are installed on the device. A fully assembled chandelier is turned on and held in this state for 15-20 minutes. In the process of work, you need to check if the ceiling near the chandelier is heating up - if the temperature is too high and can damage the canvas, it is worth replacing the lamps with less powerful ones.


