- Pros and cons of individual gas heating
- General requirements
- Gas supply: main stages
- What is a heat exchanger
- Materials for heat exchangers
- Wiring diagram
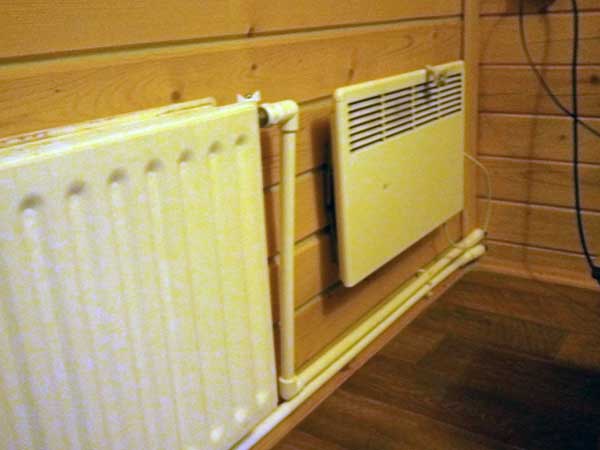
- Installation of a gas stove and convectors
- Choosing a water convector
- Water convector installation
- Installation of heating convectors, taking into account the calculation of power
- Work specifics
- General requirements
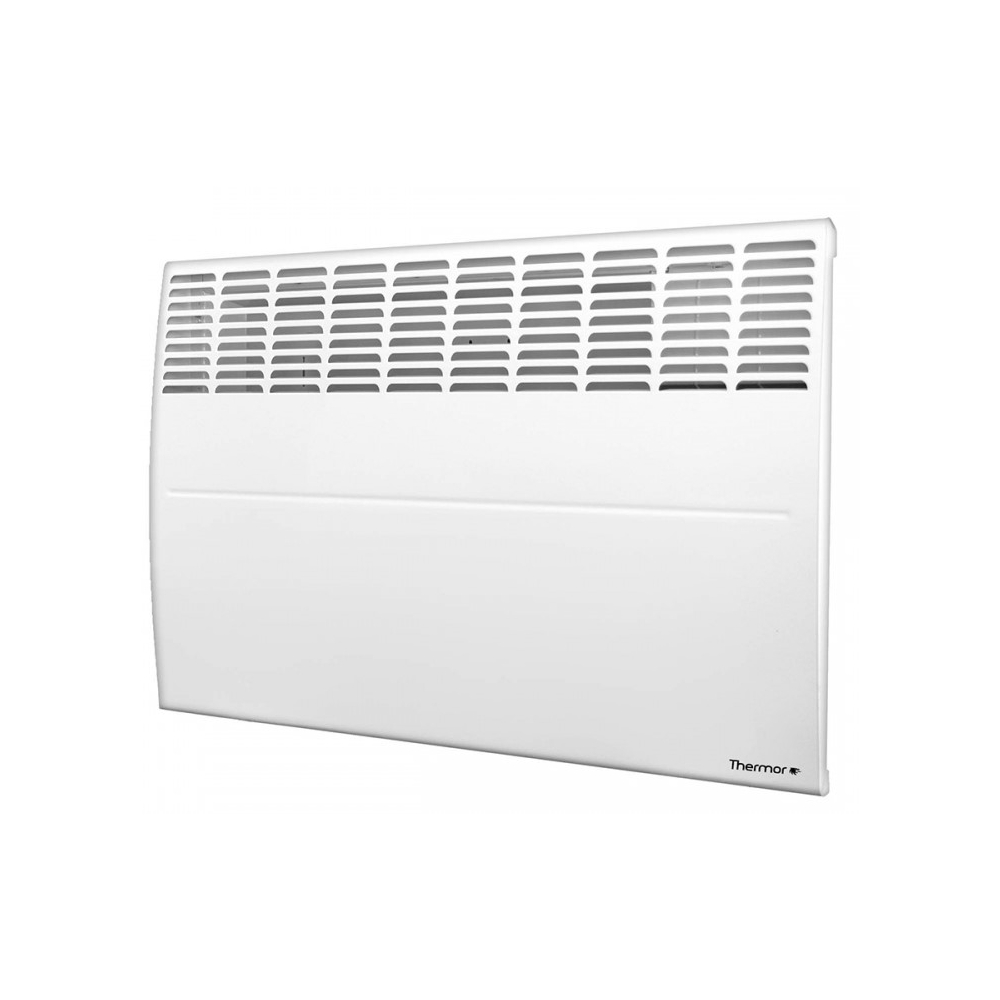
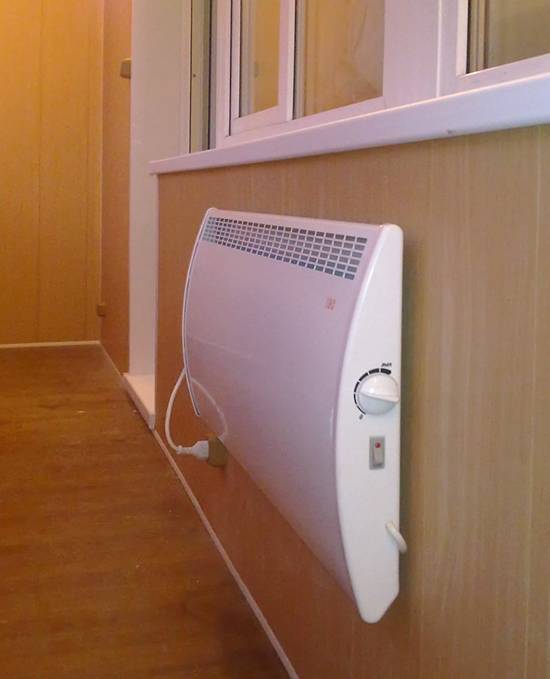
- Installation of electric convectors
- Troubleshooting
- Installation of radiators in a niche
Pros and cons of individual gas heating
Please note that the quality of the device, as well as the duration of its successful operation, directly depend on the price of the gas convector. Is it possible to buy a cheap unit and connect it in the house? Yes, but keep in mind that an inexpensive model will last you no more than a year. At the same time, it is unlikely that such a convector will be able to be repaired if it fails.
At the same time, it is unlikely that such a convector will be repaired if it fails.
Consider the advantages of gas heaters, based on the fact that you did not save money when buying and purchased a quality unit.
Advantages of gas convectors:
- room heats up quickly
- economical use of fuel,
- the device can be easily installed indoors by yourself,
- democratic price,
- the gas convector does not need to install a heating system,
- does not destroy oxygen in the room,
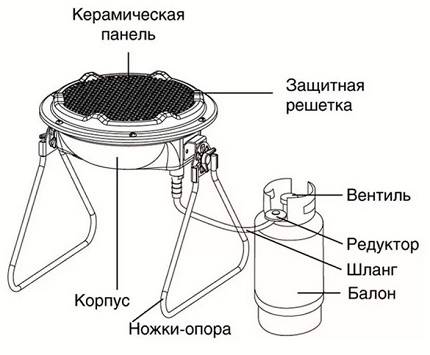
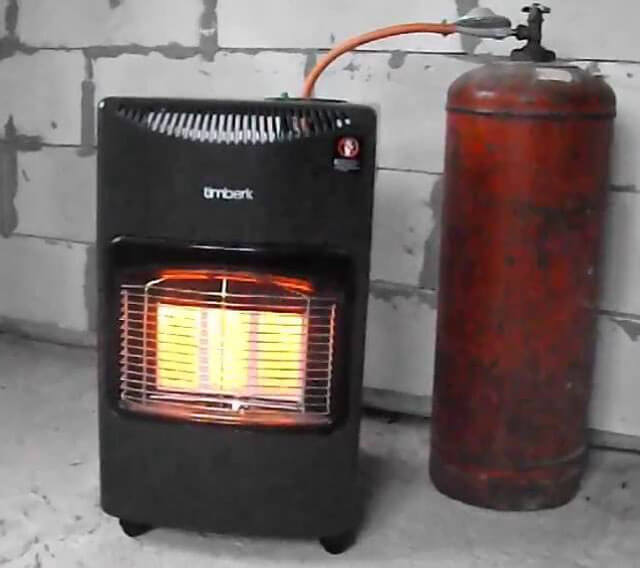
- the heater can be mounted to the gas cylinder,
- the device works in stand-alone mode,
- if the convector works according to the principle of natural circulation, then it does not depend on the power supply.
Important: gas convectors with a closed combustion chamber can be installed safely in any room, including the bedroom. Cons of gas convectors: Cons of gas convectors:
Cons of gas convectors:
- in order to correctly install a gas convector with connection to a centralized system, it is necessary to obtain permission from the relevant municipal authorities,
- the gas convector connection diagram requires punching a through hole in the outer wall of the building, in the place where the device is planned to be installed,
- impressive size,
- if you plan to use several gas convectors for heating an apartment or house, then each of them will have to be individually supplied with gas outside the building.
Important: experts insist on choosing models with a built-in fan. They are more efficient than comparable natural convection appliances.
General requirements
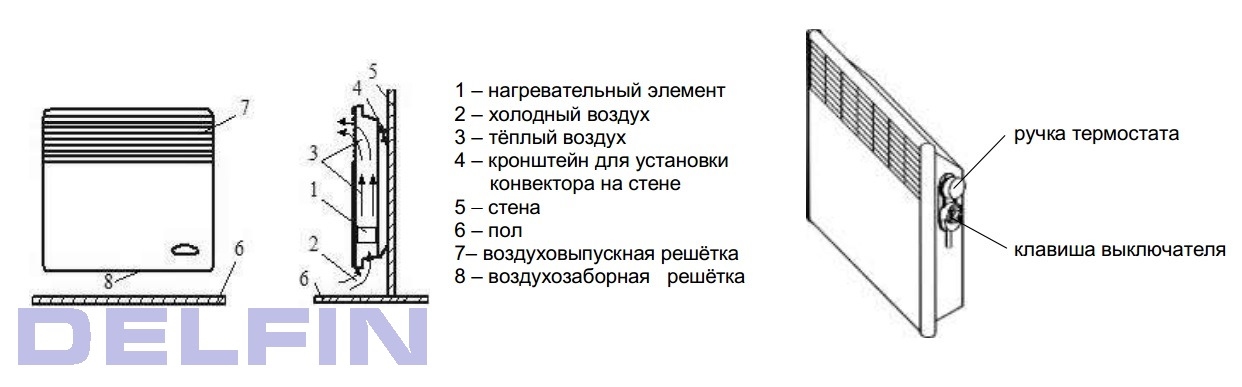
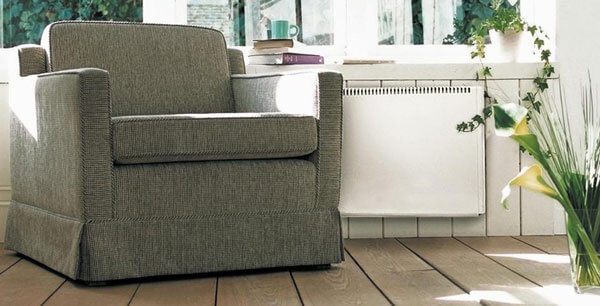
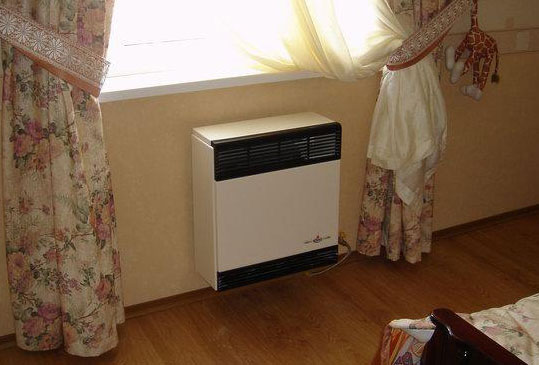
In some cases, the best way out of the situation will be the installation of a gas convector. This heater is mounted on the wall and is powered by a gas cylinder. The possibility of power supply from the highway is also provided. If gas appears in your locality in the near future, purchase gas convectors. The requirements for their installation are:
- Mandatory exposure of distances to the nearest objects and walls in accordance with the instructions for installation and operation;
- The gas pipe is supplied along the street;
- When installing in a home with wooden walls, it is necessary to consider thermal insulation;
- Do not install the convector at a great distance from the floor, as this will reduce the efficiency and intensity of the convection process.
Let's see how such a convector is installed on the wall.
Gas supply: main stages
The installation of the gas convector has been completed, now you need to deal with the gas supply. This stage is quite complex and responsible at the same time. To supply gas, do the following:
Scheme of operation of a gas convector.
- According to regulatory documents, the pipe suitable for the convector must run along the street. There are two options here: the first - the pipe has a pre-extracted threaded connection, the second - there is no such connection. If there is a thread, then you can screw on the gas valve yourself, which will shut off the gas supply to the convector. In the absence of a withdrawal, it must be done. To do this, call professional gas welders from the local Gorgaz or a similar office.
- After installing the gas cock, it is necessary to lead a metal-plastic pipe to the convector itself. Using a tape measure, calculate the length of the pipe, simultaneously determining the presence of fittings.
- You need to buy a pipe and fittings. The principle of the purchase is that the seller needs to clarify the presence of a certificate of conformity of these pipes and fittings for this type of work.
- Lay the pipe, fix it with clips every m. To install the clips, you need to drill holes in the wall.
- When installing the necessary fittings, carefully lubricate the pipe and the fitting itself with silicone, which will give an additional seal. The silicone will also act as a lubricant and make pipe installation easier.
As a result of the work, you should get a convector mounted on the wall with a gas pipe connected to it.
Now the last stage of the installation remains. A test run is required.
Scheme of installation of a gas convector.
Before starting, open the gas cock and go over all the joints of the fittings and threaded connections with a brush moistened with an aqueous solution of soap or shampoo. So you can notice the inflated bubbles (if any), which indicate gas leaks. If this happens, close the gas supply valve immediately. After checking the joints, start the convector. To do this, hold down the gas supply button for one minute. So the gas will have time to pass through the pipes and get into the combustion chamber. Press the piezo igniter, the spark should ignite the gas. A blue flame will ignite in the furnace.


Adjust the operation of the convector by setting a comfortable temperature. During the first few hours of operation, you may experience an unpleasant smell of burning oil. This is normal, since the convector is new and the combustion chamber is burning. If the smell lingers for a long time, then it is worth turning off the gas and re-checking all joints and threaded connections.
It is advisable that all work on the installation of gas convectors be performed by a professional who has sufficient experience in performing such work. This is also due to the fact that self-installation of the convector can void your warranty for the device. The gas convector must be taken over by Gorgaz. You must have documentary permission for the tie-in in your hands. In addition, all installation decisions, as well as the conclusions of the commissioning commission of the device, must be documented and signed in an appropriate way.
What is a heat exchanger
This is a technical device made of a material with a high thermal conductivity, in which two media with different temperatures come into contact through a partition. It is through the wall of the device that the temperature is transferred from one medium to another.
There are two types of heat exchangers:
- Recuperators. That is, those in which the temperature transfer occurs through the partition.
- Regenerators. In them, media with different temperatures are in contact with a single surface in turn.
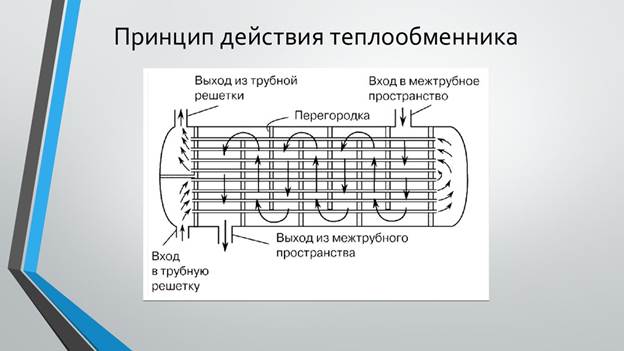
The principle of operation of the heat exchanger There are several varieties of heat exchangers that differ from each other in a purely constructive design. These are the commonly used options:
- A coil is a tube wound around a chimney through which water moves.
- Pipe in a pipe. This is a cylinder-shaped structure mounted on a chimney. Water flows inside it, which enters the structure through the lower pipe, and exits through the pipe installed at the top of the heat exchanger. The heating of the liquid occurs through the wall of the chimney.
- Spiral. They are rarely used in everyday life, because structurally it is a container into which a pipe is laid in a spiral (along the inner walls), a hot medium moves inside. Unfortunately, the chimney will not work in this form.
- Shell and tube. This is not a home appliance. Its design is a container in which a large number of tubes are inserted. A medium with a high temperature moves along them, and water moves between the tubes.
- Lamellar, they are also called convectors. This model is the same as the previous one. Only in it, instead of tubes, hollow panels are installed, along which a medium with a high temperature moves. And between them is water.The efficiency of thermal energy transfer here depends on the direction in which the media move relative to each other. Optimally - towards each other.
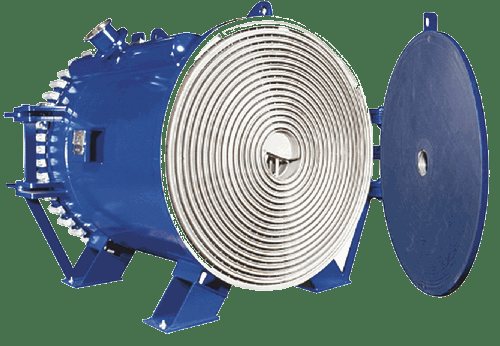
Heat exchanger of spiral type
There is another classification in which heat exchangers are divided into water and air. The first has been written above. As for the latter, they mainly organize additional space heating. A prominent representative of such units is corrugated heat exchangers.
To do this, use steel corrugated pipes (they are flexible), which wrap around. It turns out that high-temperature carbon monoxide gases coming from the furnace furnace give off part of the heat to the air passing inside the corrugation. The latter is connected to the street, usually it is introduced into the room through a hole located close to the floor. Sometimes a low-power fan is installed to give the air a low speed. The opposite end of the corrugation is installed in the room where you want to raise the temperature.
Materials for heat exchangers
Usually the chimney is assembled from metal pipes. Rarely, ceramic or glass chimneys are installed in the steam room of a bath or other premises, except for the main house. Too expensive. Therefore, we can safely say that these structures have a high thermal efficiency. Therefore, a heat exchanger can be mounted on them.

Copper pipe serpentine
The material for the heat exchanger itself is selected on the basis of withstanding large thermal loads, because the temperature of carbon monoxide can reach up to + 500C. Plus, it is necessary to take into account the negative effect of water on the metal.Therefore, coil tubes must be made of either copper alloy or stainless steel.
If it is decided to build a pipe-in-pipe heat exchanger, then for its manufacture it is better to use a stainless steel or galvanized structure.
Wiring diagram
Water convectors are specialized equipment, so it is best to entrust its installation to professionals, especially when it comes to installing floor or basement types. Independently it is allowed to carry out only the installation of wall-mounted water convectors. In this case, it is necessary to follow a strict sequence of actions.
- It is necessary to mark the wall - use the level to determine the location of the convector itself, the place of connection of water and, if necessary, electricity. Here you can either attach the radiator itself to the wall, or make markings with a ruler using the data in the product passport.
- Then the wall is drilled according to the marked markings and screwed into the dowel holes.
- Carry out the supply of pipes and cables of electricity.
- The back of the convector is screwed to the wall with the screws that come with the kit. At the same time, at first it is simply baited on the screws, then the accuracy of fastening is measured with a level, and only when they are convinced of this, the installation panel is screwed to the end.
- The heat exchanger block must now be attached to the installation panel. Only the screws and fasteners provided by the manufacturer may be used for this.
- Now the electricity cable is connected to the terminal box. In this case, the main connection parameter is the manufacturer's instructions and electronic circuit. It is necessary to act strictly in accordance with it.
- Install the fan and, if necessary, adjust its position using a special device - a potentiometer.
- Now you can start connecting additional fittings. A thermostatic valve is installed at the inlet of the pipes, and a special threaded connection is installed at the outlet. It is imperative to check the tightness of the entire structure using an air compressor.
- Now you need to connect the pipes to the heating system. This must be done in strict accordance with the project.
- Finally, you can proceed to the collection and installation of the water convector itself. To do this, in accordance with the scheme, a frame, a grill and a thermostatic head are installed, and the walls of the radiator are attached.
- Using special adjusting screws, they calibrate the location of the device on the wall, focusing on the level.
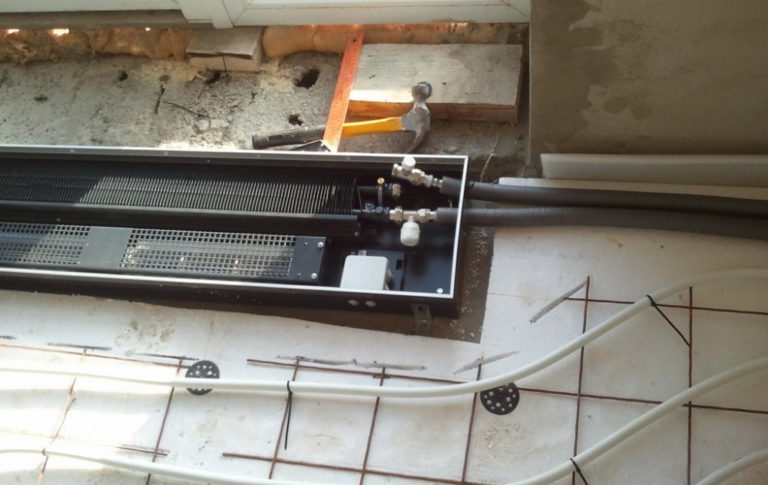
In principle, the installation of a built-in intra-sexual water convector is carried out in approximately the same way. Only at first, special built-in boxes are made in the floor when making a rough screed, into which the radiator itself will be placed in the future.
Without any skills, it will be quite difficult to perform such an installation of a water heating convector for the first time on your own. Therefore, here it is either necessary to call a specialist, or be patient and act as carefully and slowly as possible.
Installation of a gas stove and convectors
It is forbidden to install the convector at a distance of less than 4 meters from open sources of fire, including a gas stove. The hose suitable for the convector must have a dielectric insert, this will prevent a fire in the event of a short circuit in the wiring in a wooden house.
An important factor is the grounding of sockets located near the gas stove and convectors, although in a wooden house they must be grounded a priori.
There are three types of supply hoses that are allowed to a gas stove in a wooden house, namely:
- Rubber fabric - its plus is that it does not conduct electric current, but it is more susceptible to mechanical damage compared to analogues;
- Metal sleeve - when using it, a dielectric insert is necessarily inserted from the gas stove to the main, and otherwise it has the best performance among analogues. In addition, it is recommended by the latest approved standards. Its only disadvantage is the price, it bites;
- Rubber with a metal braid - it is more able to withstand severe shocks, and also, thanks to the rubber core, does not conduct current.
When buying a metal hose, you should pay attention to its coating, some manufacturers oriented to other markets, with other standards, use yellow insulation, which does not fulfill its main functions. Always ask for supporting documents when purchasing, and keep them in a safe place
Choosing a water convector
To select a water convector, it is necessary to determine the installation location and type of construction, after which you can proceed to the thermal calculation and selection of parameters
When choosing a model, it is important to consider the following characteristics
The thermal power of the convector is a parameter showing what area the device is able to heat. For 1 m2 of an apartment or house with a standard ceiling height, 100 W of heat output is required.Heat loss through windows is higher than through walls, so an additional 200 watts must be added to each window.


Calculation example: for a room of 20 m2 with two windows, 20 100 + 2 200 \u003d 2400 W, or 2.4 kW, is required. It is better to distribute this value evenly over several convectors by connecting them in parallel or in series. In this case, the temperature in the room will be more stable and uniform.
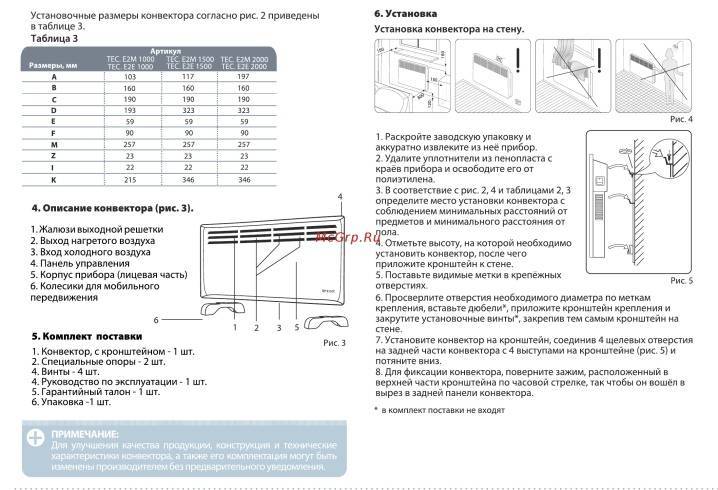
What you need to know about heating convectors
Overall dimensions are another important characteristic. The possibility of installing the convector in the chosen place depends on it.
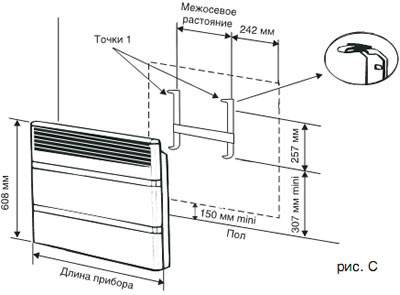
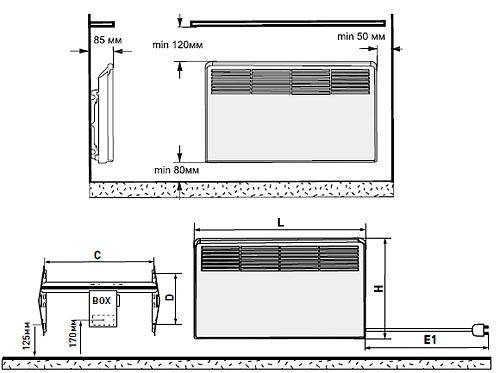
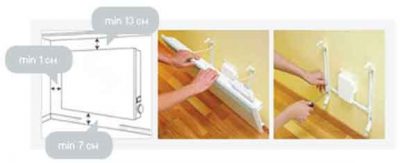
At the same time, it is important to take into account not only the dimensions of the device itself, but also the necessary distances to the floor, walls and other structures (indicated in the passport for a specific convector model). For wall-mounted convectors, the distance from the floor must be at least 80 mm, to the window sill - 100 mm
Moisture protection is an important parameter when choosing convectors for installation in a bathroom, swimming pool, sauna washroom or greenhouse. Convectors can be designed for dry rooms with an average annual humidity of up to 85% or for damp rooms with a humidity above 85%. In the second case, corrosion-resistant materials and coatings are used, and in the case of floor convectors, drainage systems are used.
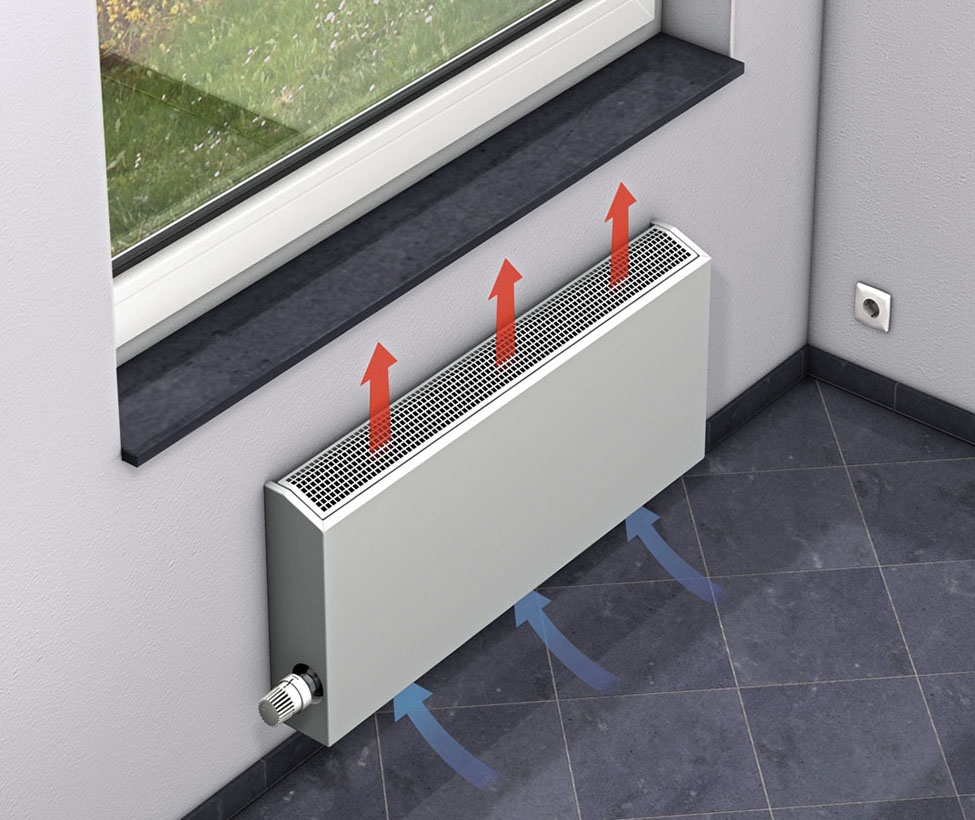
The type of circulation (natural (KBE marking) or forced (KVP)) is important for creating the necessary microclimate. Convectors with a fan are able to create an effective thermal curtain at doors and windows, at the same time they actively raise dust and cause drafts. The noise level of convectors with forced circulation is also higher.The fan in the convectors runs on 12 V DC, for which you need to provide a power supply.
Floor convector with tangential fan
Working pressure - a characteristic that needs to be clarified when installing water convectors, in central heating systems according to SNiP 2.04.05-91 is within 8-9.5 bar, in autonomous systems it usually does not exceed 3 bar. Most models of water convectors are designed for a working pressure of 1 MPa and a pressure test of 1.6-2.0 MPa, which is equal to 10 and 16-20 bar, respectively. Subject to this condition, convectors can be installed in autonomous heating in an apartment building without restrictions.
The internal volume of the heat exchanger is the most important parameter for autonomous heating systems when calculating the volume of the coolant. On average, it is 0.7-2 liters and depends on the number of pipes and the length of the device.

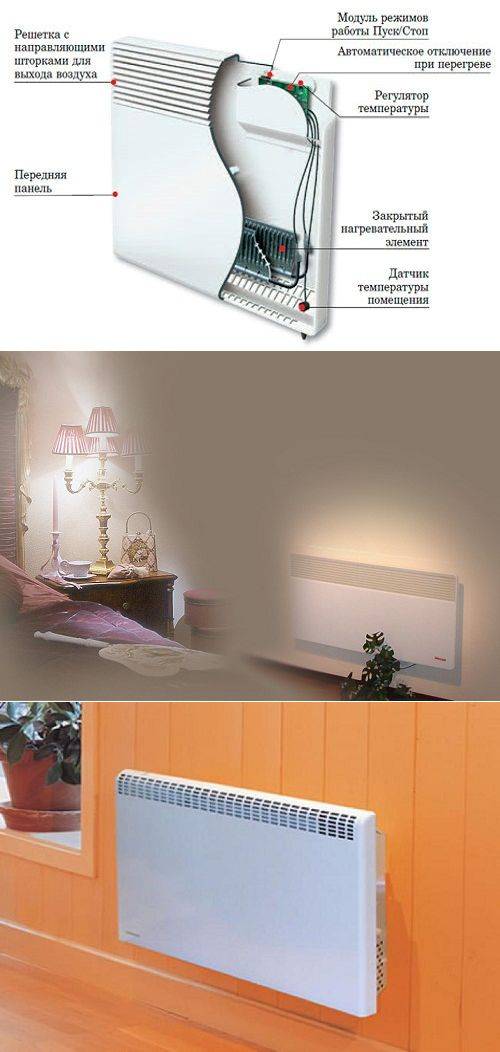
Convector scheme
The maximum temperature for water convectors is usually +120-130 degrees Celsius, which is much higher than the allowable temperature in heating systems. At the same time, for safety of use, the maximum temperature of the device case should not exceed +60 degrees according to the passport.
The mass of the convector is important when mounting wall models on walls and partitions made of plasterboard or other material with low strength. Taking into account the coolant, the mass of water convectors usually does not exceed 14-24 kg.
The degree of automation is a characteristic that takes into account the possibility of precise temperature control. Regulation is carried out by means of a thermostat and a valve, with their help, the amount of coolant necessary to maintain a given microclimate is supplied to the heat exchanger.
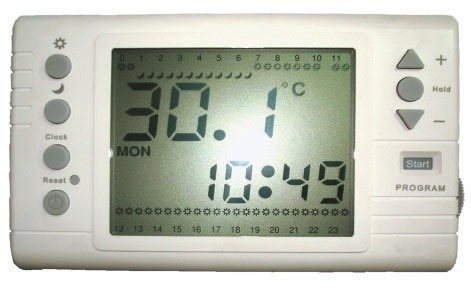
thermostat
Water convector installation
The basic component of this convector is a heating battery. The main goal during the use of water heating is that it is necessary to make the correct calculation of heating convectors in order to create the most comfortable and optimal conditions in the room by choosing the right heating convector power. How to calculate the power of a heating convector, a specialist, instructions and special formulas will help. When installing the battery, it is also necessary to take into account the fact that radiators are made of various materials.
During the installation of such convectors, it is necessary to use connecting components made of copper, and they are not cheap. Such radiators are mainly used to facilitate the design of the heating system. Aluminum radiators and bimetallic ones are used much more often. However, these radiators also require the purchase of expensive connecting components.


The cheapest device is considered to be a heating convector made of steel. Such a battery can have two types of connection:
- Bottom connection;
- Side connection.
Installation of a water convector, first of all, begins with fixing the radiator to the wall. To do this, you need to drill the necessary holes and fix the hooks with which the battery will be held on the wall. After that, it will be necessary to hang the convector sections on these hooks. After that, through the pipes, you can connect the heating convectors to the heating system. For this, a heating convector connection diagram is used.
If you use steel pipes, you will need to call a specialist, and in the case of plastic pipes, you can make the connection yourself using a plastic welding iron. However, if you are not sure, it is better to invite a specialist as well.
Installation of heating convectors, taking into account the calculation of power
The main purpose of household convectors is the heating of a dwelling. There is a division of this type of equipment in accordance with the features of the installation, as well as based on the coolant used in the design.
Speaking about installation methods, you can find floor and wall models, and the use of one or another coolant divides these devices into mechanisms that work using water, electricity and gas
At the same time, it is important to remember that gas-type heating convectors can only be installed on walls in a vertical position, while water and electrical systems can be installed both on the wall and on the floor (read: “Household convector: principle of operation and installation”)
Work specifics
Today, various types of heat exchangers are produced. In general, the features of their work, as well as the design characteristics, are similar. The properties of the structure of such an element:
- Full body available.
- The presence of output and output pipes.
- Brake mechanism for combustion products. Its role is played by valves with cutouts that are installed on the axles.
The shutters can be rotated. A zigzag chimney of various lengths is formed. Valves can be adjusted to achieve the most effective ratio of thrust and heat transfer. Safety standards are followed.
In this video you will learn how to make a heat exchanger:
General requirements
In some cases, the best way out of the situation will be the installation of a gas convector. This heater is mounted on the wall and is powered by a gas cylinder. The possibility of power supply from the highway is also provided. If gas appears in your locality in the near future, purchase gas convectors. The requirements for their installation are:
- Mandatory exposure of distances to the nearest objects and walls in accordance with the instructions for installation and operation;
- The gas pipe is supplied along the street;
- When installing in a home with wooden walls, it is necessary to consider thermal insulation;
- Do not install the convector at a great distance from the floor, as this will reduce the efficiency and intensity of the convection process.
Let's see how such a convector is installed on the wall.
Installation of electric convectors
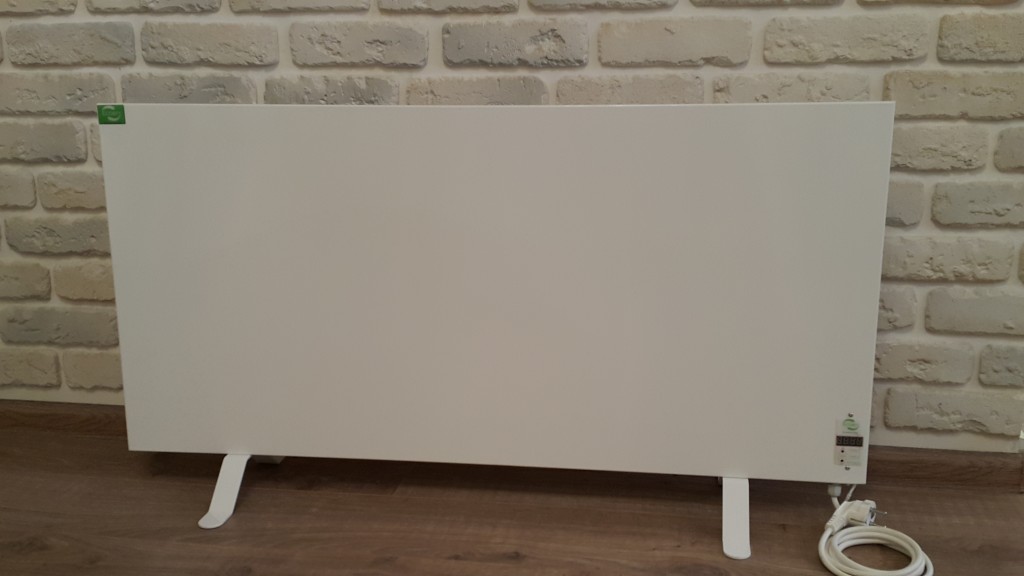
Another option for such equipment is electric convectors.
These models can be installed and connected by hand, but it is very important to correctly calculate the power of this type of convector
The procedure for installing this device should be as follows:
- the device must be released from packaging;
- then it is necessary to remove the protective film from the convector;
- Next, you should decide where the mechanism will be installed.
When calculating the power of a heating convector that operates with the help of electricity, as well as when connecting it, it is extremely important to follow a large number of recommendations, which, nevertheless, will allow you to install the equipment with high quality. Here is some of them:
Here is some of them:
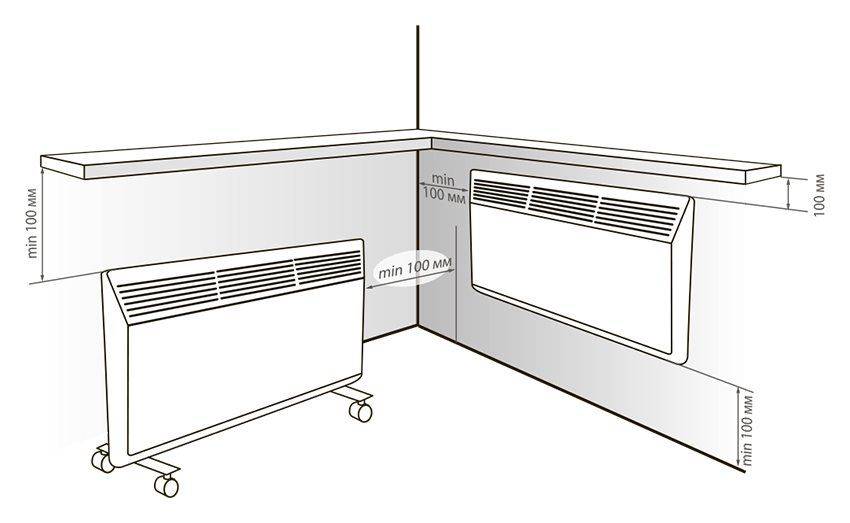
- the minimum distance from the floor to the convector is 20 - 25 cm;
- the device should be located at least 25 cm from nearby objects, above and in front - at least 24 - 55 cm;
- arrange the convector from the wall at a distance of 25 cm, and from the ceiling it should be located at least 35 cm;
- It is strictly not recommended to mount the device behind curtains and doors, as well as under openings intended for ventilation.
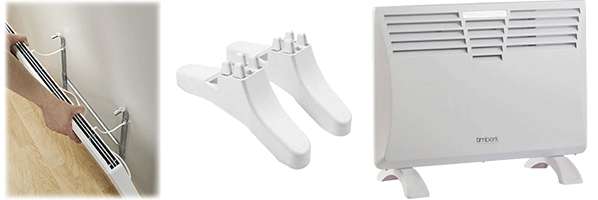
Directly the process of installing an electric convector is as follows:
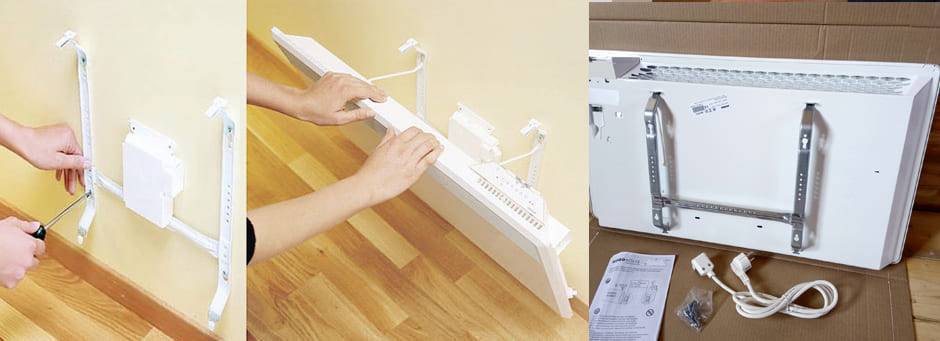
- having unscrewed the fixing bolts, it is required to extend the bracket;
- using a drill, you need to make pre-marked holes for fastening the mechanism;
- next you need to fix the bracket;
- then you need to insert the electric convector into the latch with its lower part;
- stretch marks should be placed on the equipment;
- in the mounted extensions it is necessary to place the upper part of the device;
- after that, all the clamps must be tightly fixed, and the fixing bolts must be screwed;
- the convector operation regulator should be set in the off mode and power must be supplied to the device;
- after the LED on the device lights up, the equipment can be put into operation.
In the event that the electric convector used is floor-standing, then its connection is as follows:
- the unit must be turned over and the fixing legs equipped with wheels fixed on it. Regular bolts can act as fasteners;
- after that, the convector can be turned on and the desired operating mode can be set on it.
It is important to remember that the power consumption of a convector is one factor that must be taken into account when choosing and installing equipment.
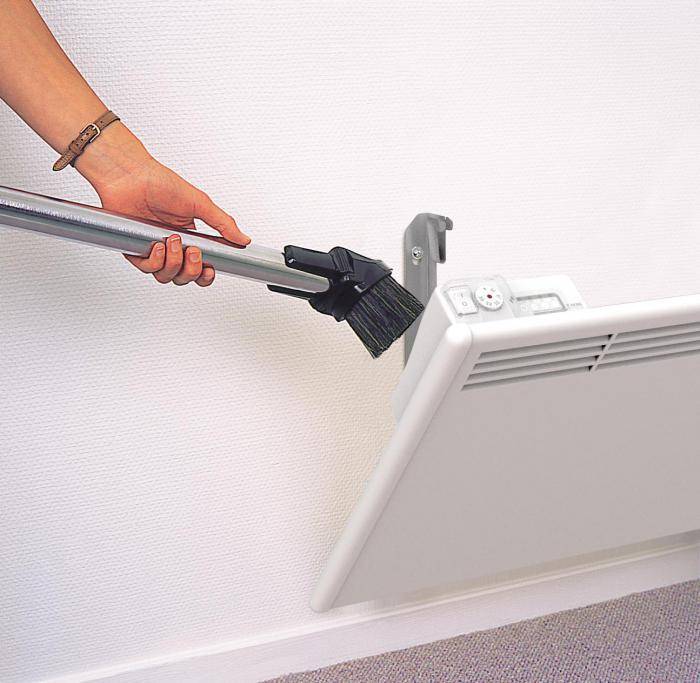
Troubleshooting

As you can see, there is nothing complicated in the design of a gas convector. Due to its simplicity, this equipment serves for a long time and with high quality. But sometimes it happens that in his work there are incomprehensible interruptions. If you notice that the flame burns unevenly or does not ignite at all, then the problem is often a clogged nozzle.


Simply put, the hole through which the gas escapes is clogged with soot or other contaminants. In this case, you may well do the cleaning yourself. All you need for this is a thin needle. Use it to carefully clean the hole.
Very important: before starting work, be sure to shut off the blue fuel supply to the equipment. For this, a special valve is provided on the supply pipe.
It is absolutely impossible to work with the device when gas enters there!
It is absolutely impossible to work with the device when gas enters there!
If after cleaning the problem has not disappeared, then the most reasonable option for further action would be to call a wizard from a specialized organization. Remember that gas equipment has a high fire hazard. All more or less serious work with it should be carried out only by masters who have the appropriate license.
If you decide independently repair the gas convector, but do something wrong, this is fraught not only with subsequent fines from the gas service, but also with the possibility of a fire. You should not take on such responsibility, be sure to invite specialists to fix serious problems. Good luck and warm home!
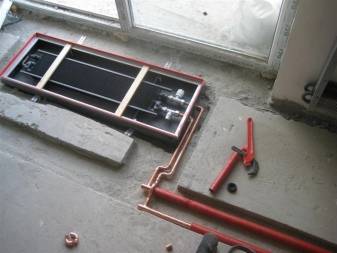
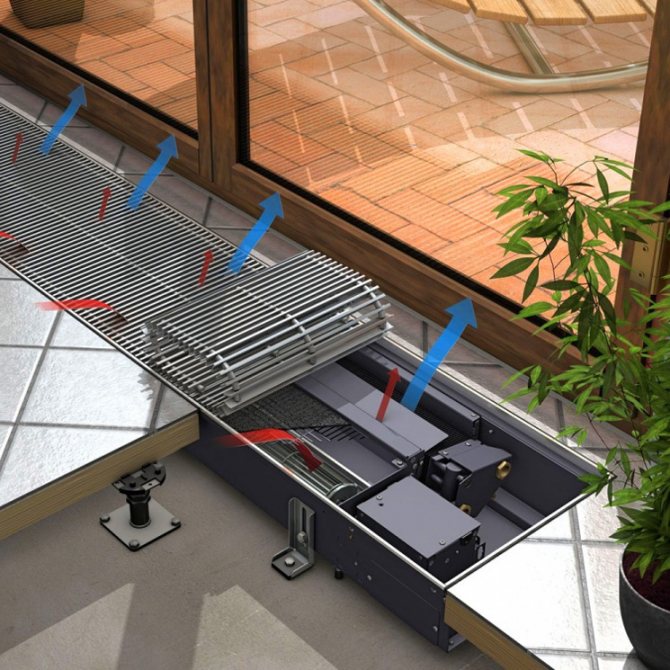
Installation of radiators in a niche
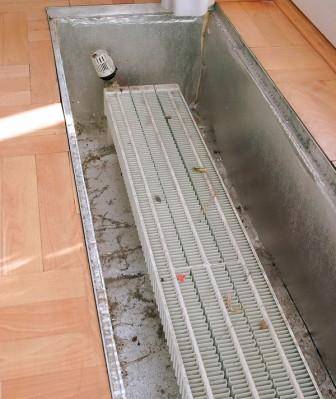
We are considering the simplest convector built into the floor. This is a convector with natural circulation.The niche for the convector built into the floor is already ready, we proceed to the installation of the heat exchanger.
The coolant moves through a two-pipe heating system. With one pipe it is supplied, with the second pipe it is removed from the radiator. A thermostat with a Mayevsky tap is placed at the input, and a shut-off valve is placed at the output. Everything is the same as when installing radiators on the wall, only in a horizontal plane.
The four-pipe heat exchanger is connected as in the photo, with a snake.
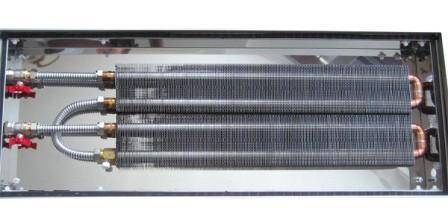
The system is tested with a pressure of 25 bar. Working pressure does not exceed 15 bar. For the coolant, you can use antifreeze or other artificial “non-freezing” coolants.
This topic has 15 replies, 6 participants, and was last updated by Alex_bdr on Aug 30'17 at 04:27.
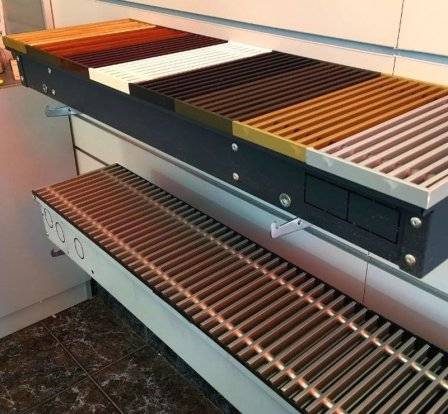
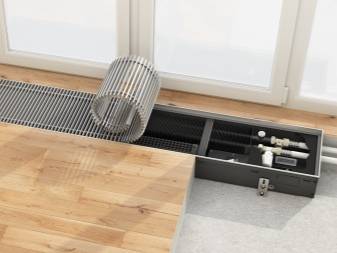
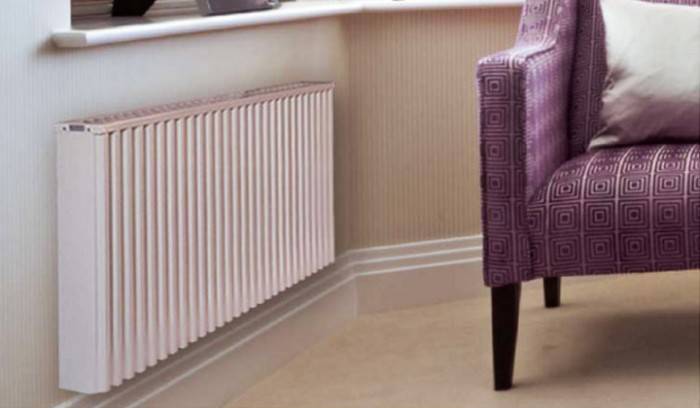
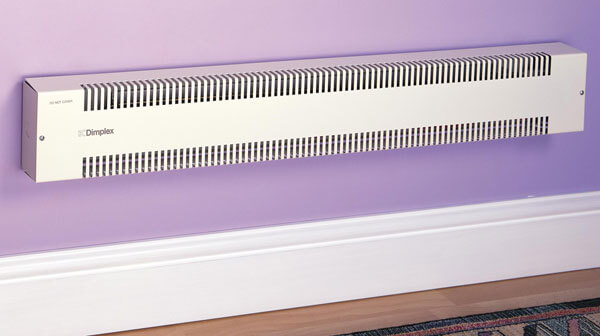
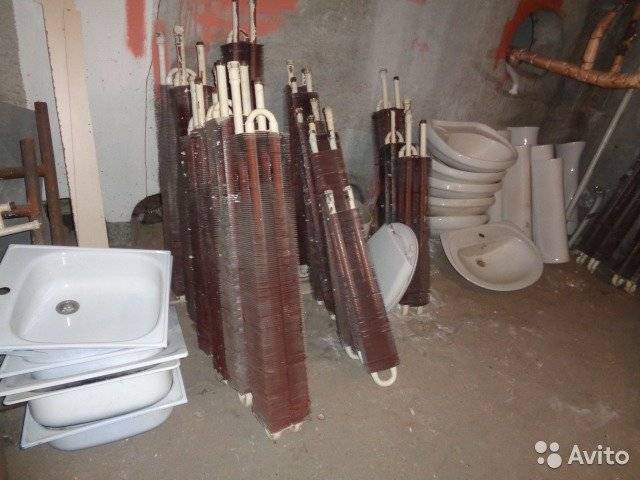
Gentlemen, an urgent question: there is a 2-storey residential building. So far, only the first floor has been heated. Electric boiler + aluminum radiators. It is urgent to start heating on the 2nd floor. The power of the electric boiler is enough. But on the second floor, the windows are to the floor - and for convectors built into the floor, the price tag is absolutely inadequate. I'm interested in the possibility of putting ordinary Soviet-era steel convectors without a decorative screen into the prepared niche, covering the entire wall with windows. It is embarrassing that they are designed for main heating with a high temperature. At the same time, in rooms of 18 sq.m. there was a 1.5 m convector. I plan on 18 sq.m. install a 3 m convector along the wall. Will there be sufficient heat transfer on the second floor compared to the first floor when using one boiler, or is a separate boiler needed? Convectors are planned as in the picture
Rodionovo
I'm on the phone, so I don't want to write a lot about the pros and cons and features of this solution, I'll just share an idea that, in my opinion, has more life ... We take a square pipe. A rectangular one is better. The bigger, the better. We muffle it from both sides, make tie-ins and mount it on the floor. Here is a flight of fancy, depending on the aesthetics and scheme of CO. It can be cast into the floor, with a wide surface flush with the floor. But then everything is welded and with thermal pads. The result is an inertial heating device. If it is terminal with a single pipe, then in general it is possible to embed directly into the highway. Karoch, further nuances .... Oops ... this scheme is only for the French. The rest is classic...
If you have panoramic windows, then in any case you need to install floor convectors. Reviews indicate that to create a powerful thermal curtain, you need to use radiators with forced convection. They are available in different lengths, you need to pick up a little less than the window opening.