- Arguments for and against IR panels
- General principles for connecting a thermostat
- Connecting a mechanical thermostat
- Installation of an electronic thermostat
- How to connect a wireless thermostat?
- Main Process
- Chassis suspension
- Electric installation work
- Varieties
- Choosing an infrared heater
- Connecting an infrared heater and work safety
- How does a thermostat work?
- Typical types of thermostats
- How to connect a thermostat to an infrared heater?
- Efficient infrared emitter
Arguments for and against IR panels
Those who plan to install infrared heating panels in their homes naturally want to know not only about their advantages, but also about the moments that can cause inconvenience. Therefore, an objective assessment of both the positive aspects and the disadvantages of this heating method is presented below.
In favor of infrared panels, the following pros can be given:
- Impact resistance and increased strength. IR panels are not afraid of even bumps and falls. And all thanks to its shockproof body and heavy-duty materials.
- Easy installation and simple operation. It is only necessary to fix the panel on the wall or ceiling and plug it into a power outlet. This does not require any special knowledge, welding machine, etc.
- Small energy consumption. Firstly, there are no energy losses for air heating. Secondly, IR radiation reduces the overall temperature of the space by 3-5 ºС, which saves up to 25% energy. That is, the air temperature is felt on average 5 degrees higher than that shown by the thermometer during measurement. And all because not only the air that is measured is heated, but also the objects in the room and even the person himself.
- Quiet operation. Such heaters will not “crack” or “gurgle”, which means they will not interfere with sleep and other vital processes.
- Independence from power surges. Even if the voltage changes, this will not affect the operation of the heater in any way.
- Preservation of normal air humidity. IR thermal panels do not dry out the air, like other electric convectors, which make breathing difficult and dry the mucous membranes. They do not allow mixing of air (cold / warm), so the dust caused by heated air masses does not rise.
- Compact dimensions and lack of related equipment. No need to install bulky piping, radiators, boilers.
However, quite often on the Internet you can find information about the dangers of infrared radiation and the negative effect on the human body. Such myths have no scientific justification under them.
Radiant heating benefits in that it evenly warms up the room without creating zones of "stagnation" of warm masses.
On the contrary, in this sense they are “more useful” than other common heating methods, because:
- do not dry the air and do not burn out the air;
- do not raise dust, as there is no convection;
- keep the body in good shape due to a slight temperature contrast.
In addition, such heaters are even recommended for people suffering from joint diseases, since they warm up the human body itself well, as a result of which inflammation and pain soon disappear.
When long-wave infrared rays hit the skin, its receptors are irritated, to which the hypothalamus reacts, the smooth muscles of the vessels relax, as a result of which they expand.
Thus, infrared rays contribute to the stimulation and improvement of blood circulation.
Please note that they are absolutely harmless to the skin, unlike UV rays, which can even cause pigmentation changes. If you use infrared radiation rationally, it will be difficult to find flaws
Infrared heating panels are not harmful to health. On the contrary, they help to cure diseases of the joints, it is not for nothing that they are used in medicine.
In cases of poor-quality service and negligent attitude of devices, the following not very pleasant consequences are possible:
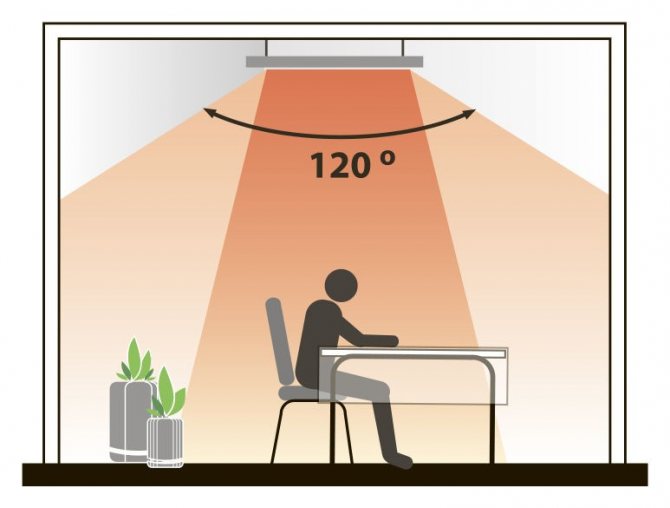
- If installed incorrectly, the space will warm up in the wrong area that would need to be processed in the first place. Infrared radiation is characterized by a clearly defined segment of action.
- The infrared heating system does not always fit harmoniously into the surrounding space.
- Excessive radiation can adversely affect electronics (TV, computer and other electrical appliances). However, it all depends on whether the operating standards are observed and what the dimensions of the room are.
Infrared panels are a new generation heating system. It provides safe and efficient home heating at minimal financial cost.You will not encounter any significant drawbacks when installing or using the panels, because they simply do not exist.
General principles for connecting a thermostat
The method and schemes for connecting the thermostat to the heating equipment itself can be found in the technical data sheet of the gas boiler. Modern equipment, regardless of manufacturer, requires connection points for a thermostat. The connection is made using the terminals on the boiler or the temperature controller cable included in the delivery.
In the case of using a wireless thermostat, the measuring unit should only be placed in a residential area. This may be the coldest room or the room where the largest number of people most often gather, the nursery.
Installing a thermostat unit in a kitchen, hall or boiler room, where the temperature is not constant, is not practical.
 The thermostat should not be exposed to sunlight, it should not be located in a draft, next to heating appliances and electrical equipment that emit a large amount of heat - thermal interference has a bad effect on the operation of the device
Connection of various types and models of thermostats may have its own characteristics, installation is carried out in accordance with the manufacturer's instructions, which is attached to the device.
The recommendations include a comprehensive description of the regulator's operation, the method and wiring diagrams. Next, we will tell you how to properly connect the thermostat to a gas boiler and about the installation features of the most typical models of the regulator.


Connecting a mechanical thermostat
The mechanical type thermostat is distinguished by its reliability and simplicity of design, low cost, and long-term operation.
At the same time, it supports only one temperature mode, which is set by changing the position of the knob at the temperature scale mark. Most thermostats operate in the temperature range from 10 to 30°C.
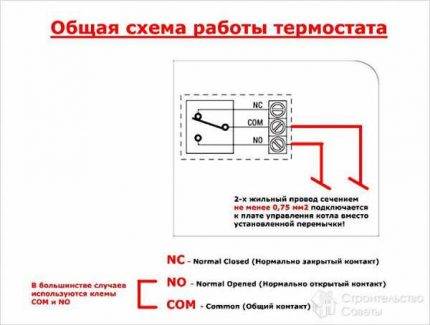 To connect a mechanical thermostat to an air conditioner, use the NC terminal, to gas or any other heating equipment - the NO terminal
The mechanical thermostat has the simplest principle of operation and works through the opening and opening of the circuit, which occurs with the help of a bimetallic plate. The thermostat is connected to the boiler through the terminal box on the boiler control board.
When connecting the thermostat, pay attention to the marking - it is present on almost all models. If there are no symbols, use a tester: pressing one probe to the middle terminal, check the side terminals with the second and determine a pair of open contacts
Installation of an electronic thermostat
The design of the electronic thermostat assumes the presence of an electronic board that is responsible for controlling the device.
The control signal is the potential - a voltage is transmitted to the boiler input, which leads to the closing or opening of the contact. It is necessary to supply a voltage of 220 or 24 volts to the thermostat.
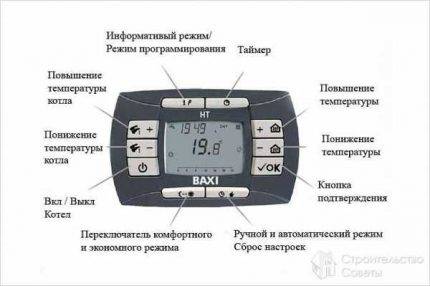 Electronic thermostats allow for more complex settings of the heating system. When connecting an electronic thermostat, a power wire and a neutral are connected to it. The device transmits voltage to the boiler input, which starts the operation of the equipment
An electronically controlled thermostat is used to organize the operation of complex climate systems.It will help in managing not only an atmospheric or turbine gas boiler, but also a pump, an air conditioner, a servo drive in the heating system.
How to connect a wireless thermostat?
The wireless temperature controller consists of two blocks, one of which is installed in the living room and acts as a transmitter. The second block is mounted near the heating boiler and connected to its valve or controller.
Data transmission from one block to another is carried out via radio. To control the device, the control unit is equipped with an LCD display and a small keyboard. To connect a thermostat, set the sensor address and install the unit at a point with a stable signal.
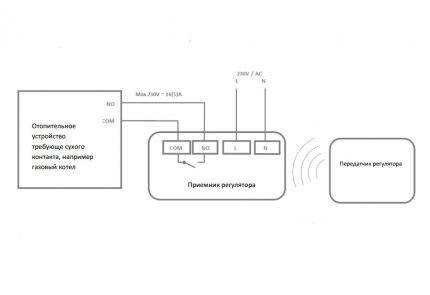 The connection diagram of the thermostat by breaking the circuit - the equipment is turned on at the moment the current appears. A similar scheme is used when connecting a mechanical thermostat
The main disadvantage of a wireless temperature controller is that the remote unit is powered by batteries, which have a limited resource and therefore require frequent replacement. To ensure uninterrupted operation, the device is equipped with an alarm function that warns of the need to replace the battery.
Main Process
Chassis suspension
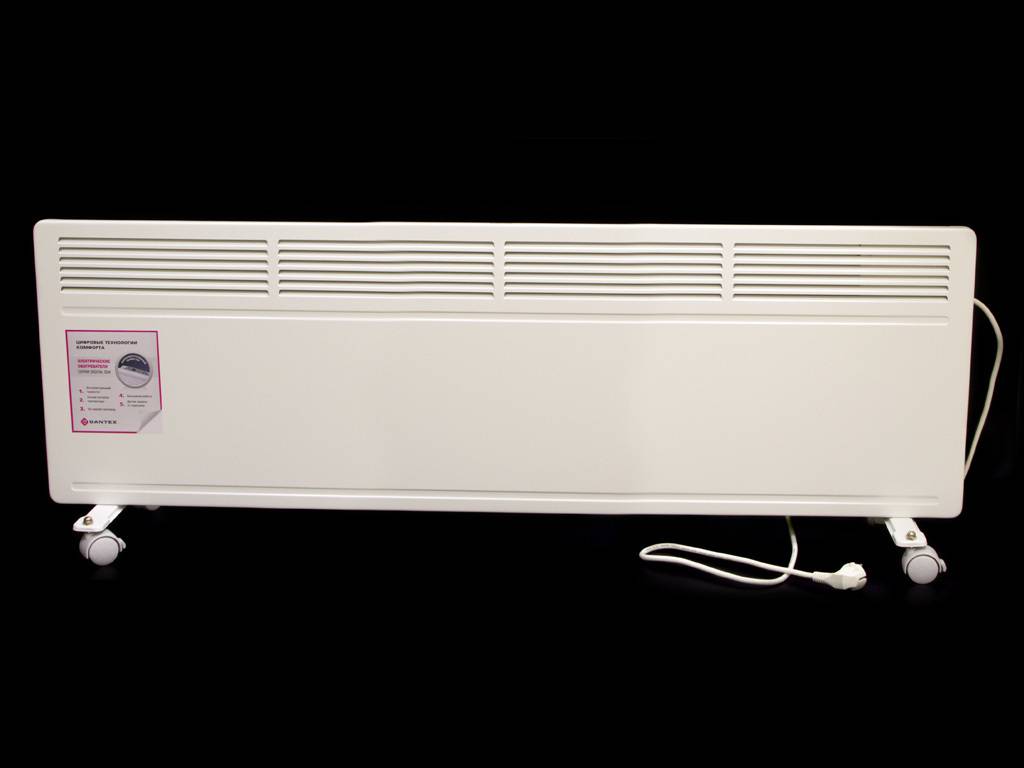
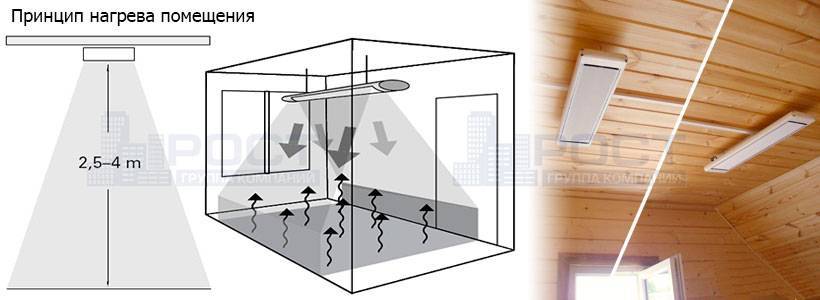
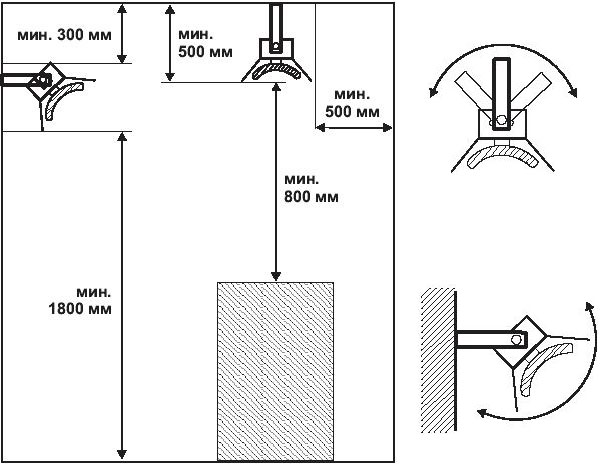
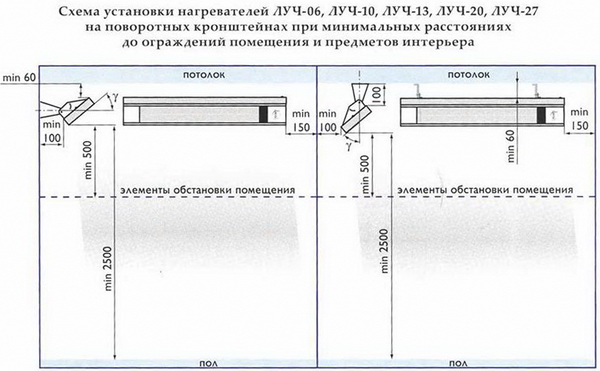
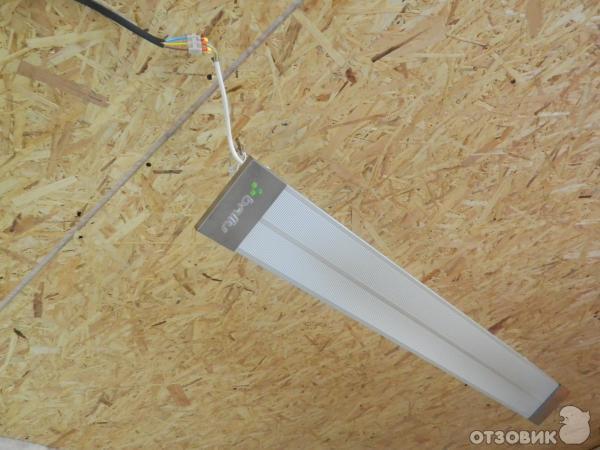
First you need to determine the installation location of the infrared heater in the house (or apartment). As we said above, the case can be placed both on the ceiling and on the walls, depending on the individual preferences of the owners.
First of all, you need to mark the places for installing the fasteners yourself. To do this, use a tape measure, which measure the same distance from the ceiling to the selected area.It is also recommended to use a building level, with which you can evenly set the brackets in a horizontal plane.
After marking, proceed to drilling. If the ceiling (or wall) is made of wood, drill holes with a drill. If you have to deal with concrete, you can not do without a puncher. It is necessary to drive dowels into the created holes and screw in the brackets, after which you can install the infrared heater in its place.


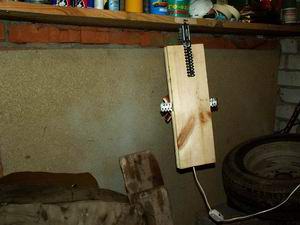
We draw your attention to the fact that the design of the unit is different. Some products have guides fixed in brackets. A simpler option is chains fixed in the ceiling (special holders cling to them)
Also on the market you can see infrared heaters on the leg, which are simply placed on the floor.
A simpler option is chains fixed in the ceiling (special holders cling to them). Also on the market you can see infrared heaters on the leg, which are simply placed on the floor.
Electric installation work
As we said at the beginning, the process of connecting an infrared heater to the network will be carried out using a temperature controller.
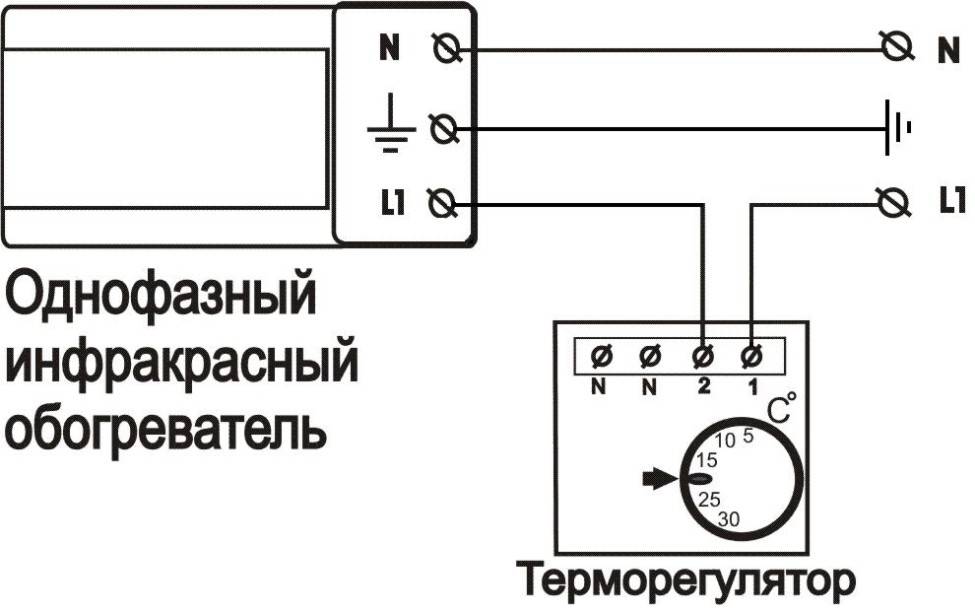
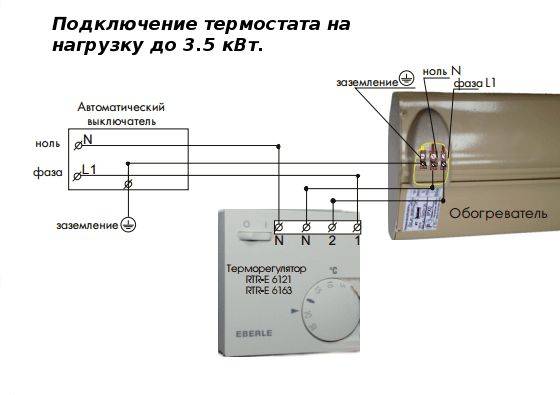
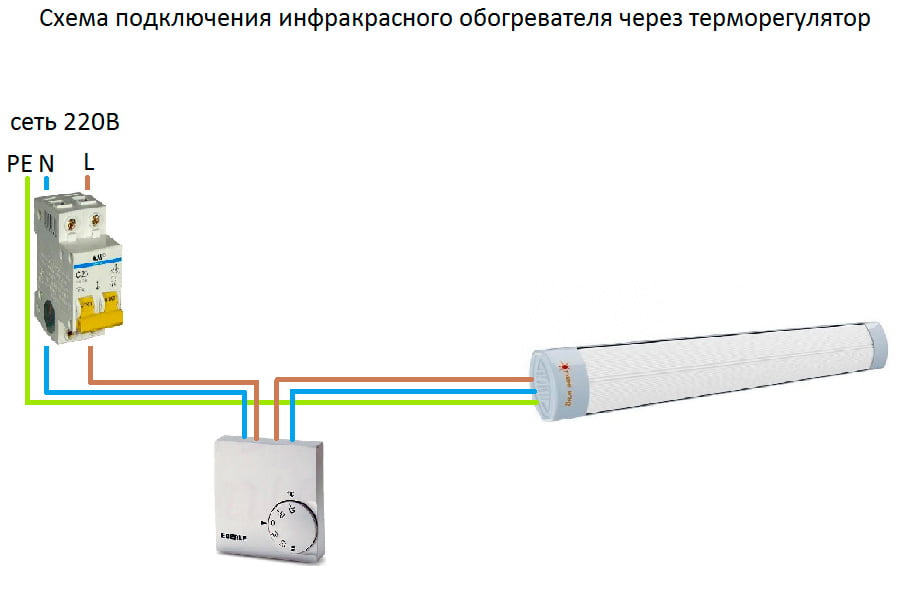
First you need to connect the contacts of the collapsible electrical plug to the terminal blocks of the thermostat, which are installed in the product case. Each "socket" has its own designation: N - zero, L - phase. It should be noted that both zero and phase terminals are at least two each (from the network to the regulator and from the regulator to the heater). Everything is quite simple - you strip the wires, insert them into the seats until they click (or tighten the screws). Be sure to follow the color coding of the wires so that the connection is correct.

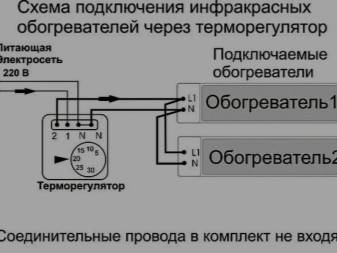
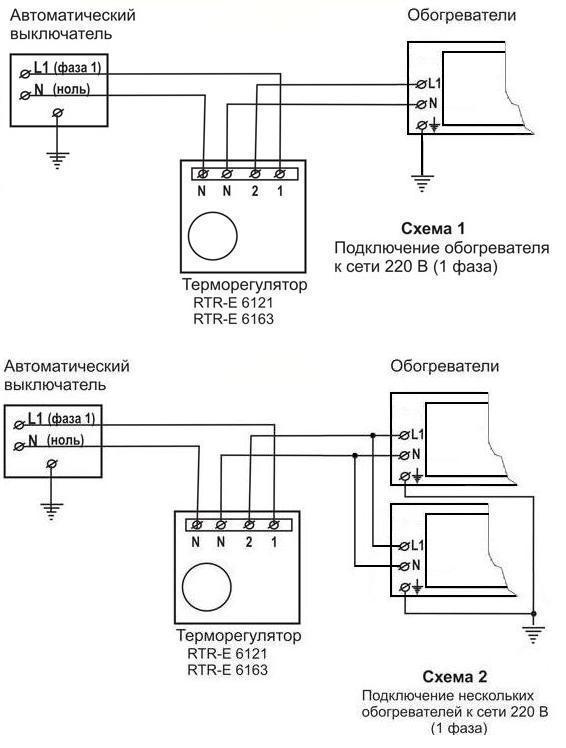
To your attention schemes of the correct connection:
As you can see, connecting an infrared heater through a thermostat is quite simple, the main thing is not to confuse the wires and carefully tighten them in the terminal blocks.
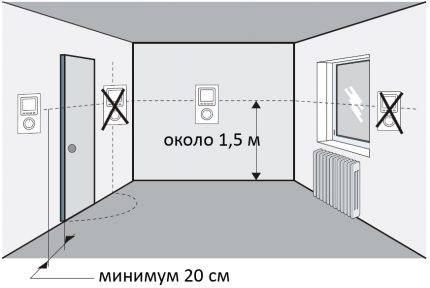
A very important nuance is the correct choice of the location of the regulator. Do not install the product next to a heater, as in this case, warm air entering will adversely affect the measurement accuracy. It is best to place the device in a more remote area, at a height of one and a half meters above the floor.
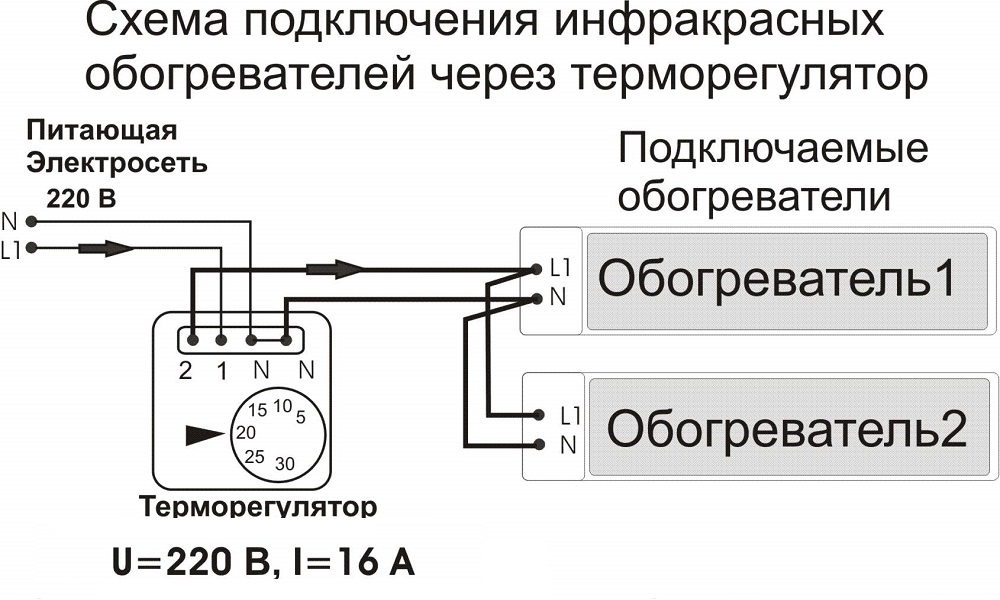
Also note that you need to install the controller in the coldest room, otherwise the heating problem will not be completely solved. As for the number of infrared devices serviced by one temperature controller, it all depends on the power of the heaters. Usually one 3 kW controller is used for several products, the total power is not more than 2.5 kW (so that there is a margin of at least 15%)
Usually one 3 kW controller is used for several products, the total power is not more than 2.5 kW (so that there is a margin of at least 15%).
You can read more about connecting a thermostat to an IR heater in our separate article, which provides several installation schemes!
So that you can clearly see the whole process of connecting with your own hands, we provide these lessons for viewing:
Video instruction: do-it-yourself infrared heater connection


How to connect a temperature controller
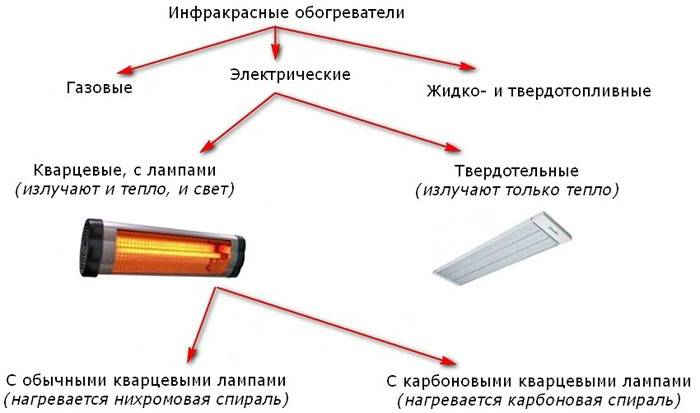
Varieties
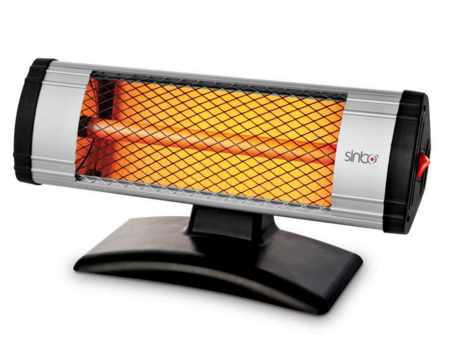
They are divided into two categories - these are electrical and gas appliances. The first ones work from the household power supply and are equipped with electric emitters.They are characterized by extreme structural simplicity, due to which their compactness is achieved. However, this comes at the cost of high power consumption.
Gas infraredheaters run on liquefied gas. Their main advantage is autonomy - they do not need access to the mains for their operation. They are of little demand at home, most often they are used for heating open street sites and industrial buildings. Some models work by built-in miniature gas cartridges.
Choosing an infrared heater
When choosing this device, it is necessary to choose its power correctly. You need to choose the power of these devices using a special calculator. In this case, you need to discard all stocks. In some cases, you can enter sizes and types of windows through which heat can escape. If you can outweigh the lamps, then you cannot move the windows. That is why you need to rationally calculate the volume of temperature.
Thanks to this, you can independently connect an infrared heater. If necessary, you need to break this heating system into cascades. Depending on the required temperature outside the window, the power of the heaters can be changed.
Read: The cheapest home heating.
Connecting an infrared heater and work safety
Now it's time to learn about connecting an infrared heater. When connecting electrical appliances, you need to be safe. When you connect an infrared heater you need to use a differential circuit breaker.
- The differential machine in its design has a transformer, the winding of which will catch both the input and output current.
- If an imbalance occurs, then the core can move. In doing so, it will open the power relay.
- Sometimes a group of fuses can be added to this design. They will further protect your devices.
Infrared heaters have high power. Their warmth is distributed throughout the room. In addition, they are the most economical way to maintain heat. Sometimes people connect an infrared heater to a thermostat. Thanks to this, they manage to get rid of heating and use only this heater. For this case, quartz heaters may be suitable for you. If necessary, you can create combined heating systems.
Quartz lamps have a fairly high heating temperature. As a result, you can put your life in danger. To make the connection correctly, you will need wiring diagrams for the infrared heater.
Infrared heaters with a metal emitter have a heating temperature of 200 degrees. If you are using hanging heaters then there is a high risk of falling down. Carpet or laminate from this temperature will immediately light up. If you use a special sensor, then it will not allow a fire problem. To control the temperature in the infrared heater, you need to use three thermal fuses.
This is necessary to avoid the following problems:
- If the heater fell from the ceiling, but did not lose power.
- The heater fell on a chair.
- If the fuse is attached to one of the edges, you will not be able to measure the temperature in the center.
If you are connecting an infrared heater, then you should use the following items to protect it:
- Circuit breakers.
- External thermostats.
- Differential protection devices.
Without them, the infrared heater connection diagram will be incomplete. After installing these devices, you can be completely sure of its safety.
Also, when choosing infrared heaters, be sure to pay attention to its safety class.
How does a thermostat work?
Such a regulator consists of two main nodes:
- Temperature sensor installed near the heat source and / or in the heated room.
- The control unit that processes the signals of the temperature sensor.
These structural elements interact with each other according to the following scheme:
- The control unit receives the heater operation program, which indicates the temperature regime in the room or the degree of heating of the heating element.
- The temperature sensor reads the "degrees" in the room and / or at the heating element, transmitting this information to the control unit.
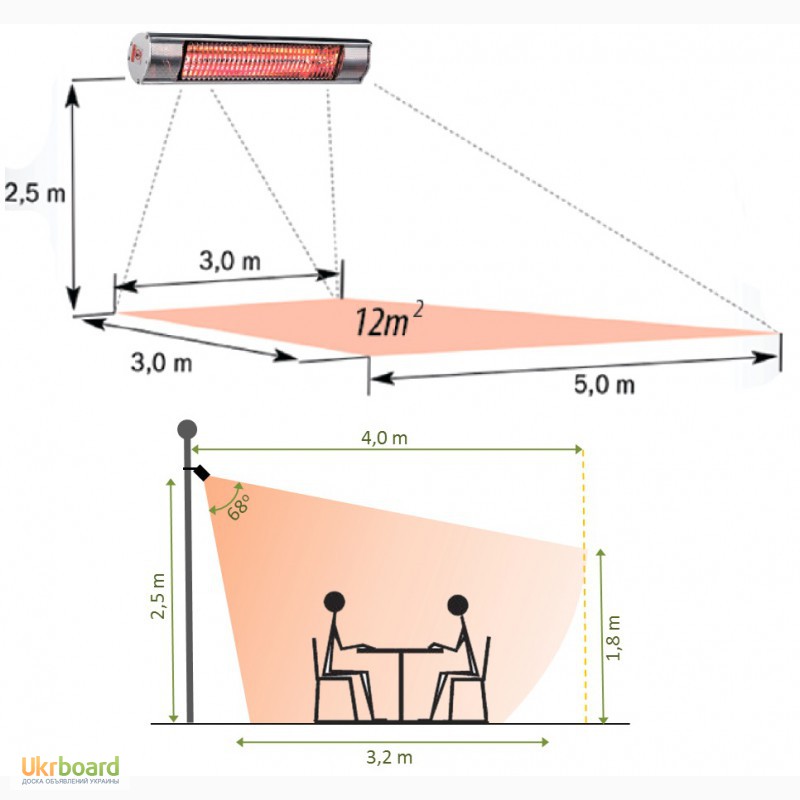
- The control unit turns on the heating element if the temperature transmitted by the sensor is less than the programmed value. And turns off the infrared panel if the temperature in the room or at the heating plate exceeds the programmed parameter.
As a result, ceiling and wall mounted infrared heaters with a thermostat, they consume only the required “volume” of electricity, heating the room only to the desired temperature. In this case, the calibration of heat transfer and temperature is carried out in steps of 0.1-1.0 °C
Typical types of thermostats
Modern manufacturers produce two types of thermostats:
Mechanical devices. For such regulators, a special plate or diaphragm made of a material sensitive to temperature deformations is used as a temperature sensor. Therefore, thermomechanical regulators, in fact, do not have a control unit. The plate closes or opens the contacts of the electrical circuit that feeds the infrared heater, under the "influence" of the actual temperature in the house. And all regulation consists in fixing the set temperature with the help of a mechanical lever, with which the elements of the plate temperature sensor are positioned.


- The main advantage of such a regulator is the ability to work without supplying electricity to the device.
- The main disadvantage is the low accuracy of calibration - from 0.5 to 1 °C.
Scheme of connecting an infrared heater to a thermostat
Electronic devices. The temperature sensor of such a device captures thermal radiation by reading electromagnetic waves of a certain frequency. At the same time, both the temperature "overboard" and the degrees in the house are controlled. The control unit of such a controller receives signals from the sensor and processes them according to the embedded algorithm (program). Electronic instruments have only digital controls. The signal processing algorithm from the sensor is set using factory programs or buttons on the case. Information about the temperature and operating modes is displayed.
- The main advantage of such a device is its high accuracy - calibration is carried out in steps of 0.1 °C. In addition, there is some autonomy of control.For example, infrared heaters with a thermostat for summer cottages can be programmed for a week of work on the air temperature outside the house and not even go out of town to control and adjust the operation of the heating system. Mechanical regulators cannot do this - the user will have to “turn the wheel” of the settings almost daily.
- The main disadvantage is that it only works when there is voltage in the network.
How to connect a thermostat to an infrared heater?
When installing a thermostat, you need to focus on the following generally accepted rules:
- A separate regulator is installed in each heated room.
- A heat-reflecting screen must be installed between the temperature sensor and the supporting surface.
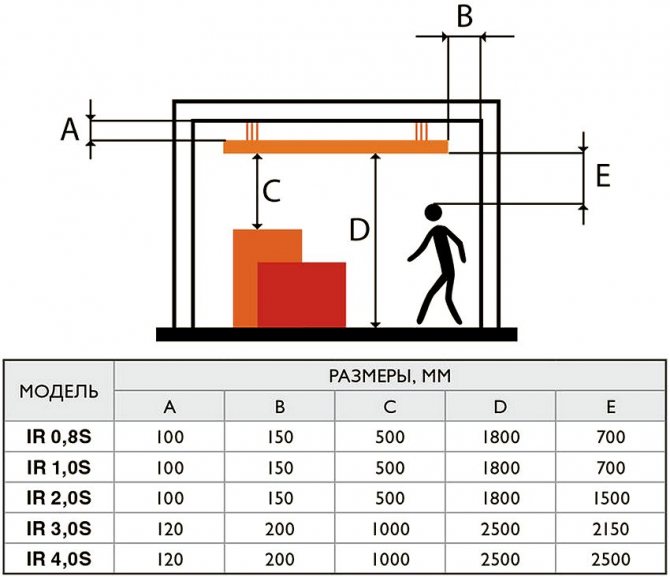
- Ceiling infrared heaters with a thermostat cannot be more powerful than 3 kW.
- The recommended placement height is 1.5 meters from the floor level.
The installation of the device itself is carried out as follows:
- A separate line is “pulled” from the central shield to the regulator, which ends at the incoming “zero” and “phase” terminals.
- A power supply line is pulled from the regulator to the heater, starting from the outgoing terminals of "zero" and "phase".
- External temperature sensors are connected to the corresponding connectors of the temperature controller, connected to the controller using separate lines or wireless communication protocols.
Exact installation diagrams are given in the passports for specific models of control devices.
Efficient infrared emitter
Any infrared emitter that is used to heat a room is distinguished by its efficiency and high efficiency.All this is achieved thanks to the unique principle of operation. Waves in the infrared spectrum do not interact with the air, but increase the surface temperature of objects in the room.
Those subsequently transfer heat energy to the air. Thus, the maximum of radiant energy transforms into thermal energy. It is precisely because of the high efficiency and efficiency, and also because of the low cost of structural elements, that infrared heaters are increasingly being made independently by ordinary people.
IR emitter based on graphite dust. Homemade room heaters,
Epoxy adhesive.
operating in the infrared spectrum, can be made from the following elements:
- powdered graphite;
- epoxy adhesive;
- two pieces of transparent plastic or glass of the same size;
- wire with a plug;
- copper terminals;
- thermostat (optional)
- wooden frame, commensurate with pieces of plastic;
- tassel.
crushed graphite.
First, prepare the work surface. For this, two pieces of glass of the same size are taken, for example, 1 m by 1 m. The material is cleaned of contaminants: paint residue, greasy hand marks. This is where alcohol comes in handy. After drying, the surfaces proceed to the preparation of the heating element.
The heating element here is graphite dust. It is a conductor of electric current with high resistance. When connected to the mains, graphite dust will begin to heat up. Having gained a sufficient temperature, it will begin to emit infrared waves and we get a do-it-yourself IR heater for the house. But first, our conductor needs to be fixed on the work surface.To do this, mix the carbon powder with the adhesive until a homogeneous mass is formed.
Homemade room heater.
Using a brush, we make paths from a mixture of graphite and epoxy onto the surface of previously cleaned glasses. This is done in a zigzag pattern. The loops of each zigzag should not reach the edge of the glass by 5 cm, while the graphite strip should end and begin on one side. In this case, it is not necessary to make indents from the edge of the glass. Terminals for connecting electricity will be attached to these places.
We put the glasses on top of each other with those sides on which graphite is applied, and fasten them with glue. For greater reliability, the resulting workpiece is placed in a wooden frame. Copper terminals and a wire are attached to the exit points of the graphite conductor on different sides of the glass to connect the device to the mains. Next, home-made heaters for the room must be dried for 1 day. You can connect a thermostat in a chain. This will simplify the operation of the equipment.
What are the advantages of the resulting device? It is made from improvised means, and therefore, it has a low cost. It heats up no higher than 60 ° C, and therefore it is impossible to burn yourself on its surface. The glass surface can be decorated at your discretion with a film with a variety of patterns, which will not violate the integrity of the interior composition. Do you want to make homemade gas heaters for your home? The video will help solve this problem.


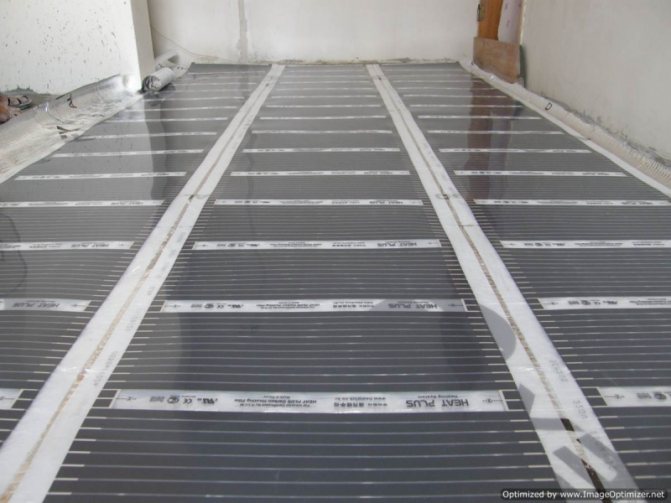
Film infrared heating device. For full heating of a medium-sized room, it is recommended to use ready-made film materials capable of emitting IR waves. They are present in abundance in today's market.
Required structural elements:
- IR film 500 mm by 1250 mm (two sheets); Homemade film heater for the apartment.
- foil, foamed, self-adhesive polystyrene;
- decorative corner;
- two-core wire with a plug;
- polymer adhesive for wall tiles;
- decorative material, preferably natural fabric;
- decorative corners 15 cm by 15 cm.
Preparing the wall surface for a home-made heater for an apartment begins with fixing the thermal insulation. Its thickness should be at least 5 cm. To do this, the protective film is removed from the self-adhesive layer and the polystyrene is attached to the surface with the foil up. In this case, the material must be pressed tightly against the wall. An hour after the end of work, you can proceed to the next step.
Sheets of IR film are interconnected in series. Glue is applied to the back of the material with a spatula. All this is attached to the previously mounted polystyrene. It will take 2 hours to securely fix the heater. Next, a cord with a plug and a thermostat are attached to the film. The final step is decoration. To do this, the prepared fabric is attached over the film using decorative corners.