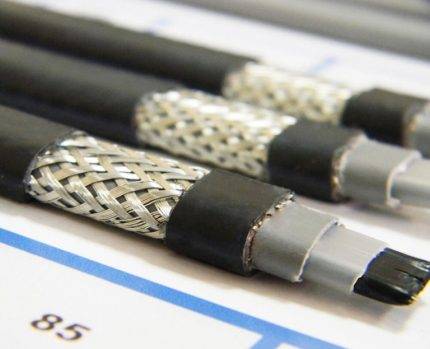
- Varieties
- Types of heating cable
- resistive
- Self-regulating
- How to choose a heating cable for a domestic pipeline
- How to choose the right cable?
- What is a heating cable, how it works
- Laying methods
- Line Editing
- Spiral mounting
- Internal installation
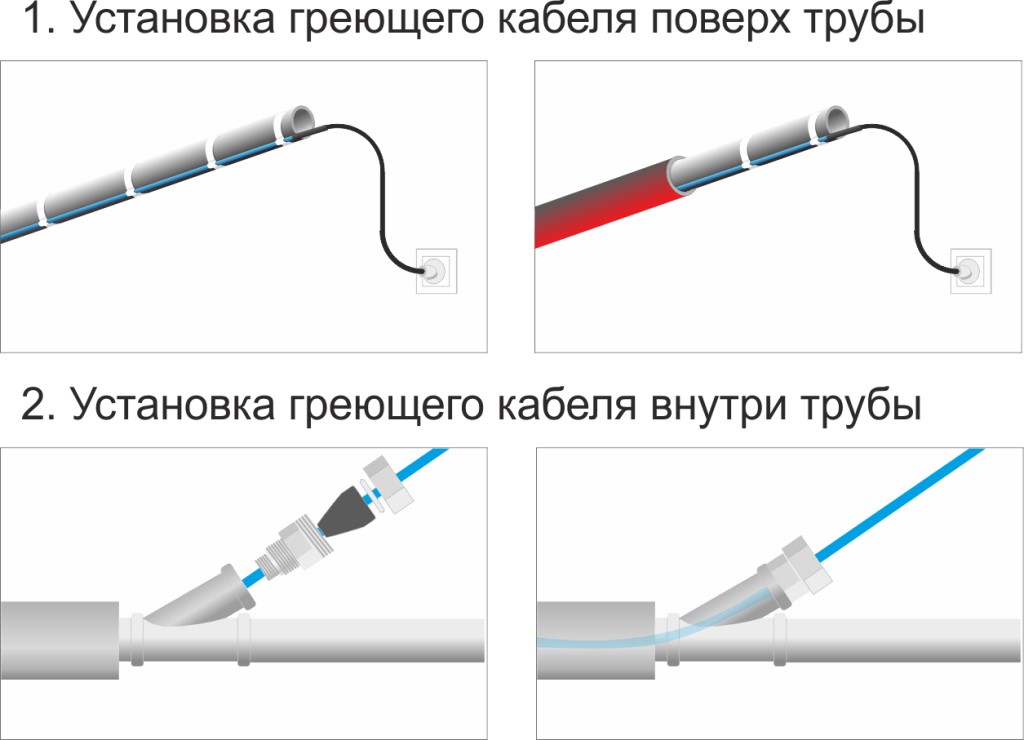
- How to lay the heating cable outside the pipe
- Heating circuit installation methods
- Outdoor installation instructions
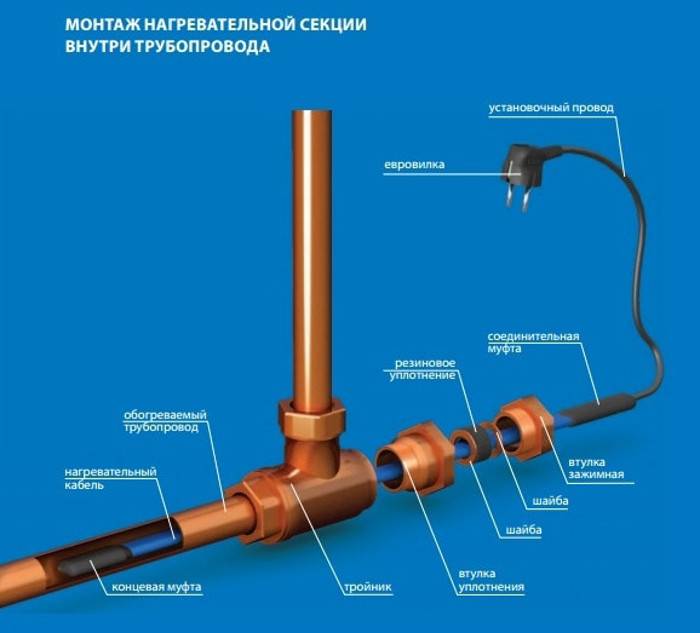
- We embed the circuit in the pipe
- Rules and recommendations for installation
- Varieties of cables for heating pipes
- Conclusions and useful video on the topic
Varieties
There are two types of heating cable: resistive and self-regulating. The first model uses the property of the metal to heat up after the passage of electricity. Here there is a gradual heating of the metal conductor. A characteristic feature of a resistive cable is the constant release of the same amount of heat. At the same time, the temperature of the environment is unimportant. Heating will be carried out at full capacity, the amount of electricity consumed will be identical.
To reduce costs in warm seasons, temperature sensors and thermostats are installed (similar to those used in the "warm floor" system).Parts of such a design should not be brought close to each other and crossed, otherwise overheating and failure will occur.
As pluses it is possible to note:
- high heat transfer and the power degree of the circuit, which is considered the main parameter for products with a large diameter, the need for heating numerous components (fittings, adapters, taps);
- ease of use, low cost.
The disadvantages of the system are:
- Additional financial costs for the purchase and installation of temperature sensors, automation and control units.
- A ready-made set of resistive cable is sold in a fixed length, moreover, it is not possible to change the footage on your own. The contact sleeve is made strictly in the factory.
Instances differ in the connection process. So, single-core are connected to the outlet at both ends. The two-core ones are equipped with a plug at one end, and at the other they are fixed with a conventional power cord with a plug for plugging into a 220 V network. Keep in mind that the resistive conductor will cease to function after being cut. When buying a bay larger than necessary, you need to lay it completely.
Self-regulating wire is a metal-polymer matrix. Here, electricity is conducted with the help of cables, and the polymer located between the two conductors is heated. The material has an interesting property: as the temperature increases, the amount of heat generated decreases, and vice versa. These processes take place regardless of nearby wiring nodes. Thus, it independently controls the level of heat, for which it got its name.
This variety has solid advantages:
- the possibility of crossing and fireproof;
- cuttable (there is a marking indicating the cut lines), but then a termination is required.
The only drawback is the high price, but the period of operation (subject to the rules of operation) is about 10 years.
When choosing this type of thermal cable, pay special attention to:
- internal insulation. Its resistance should be at least 1 ohm. The structure must be solid and have adequate thermal conductivity.
- Shielding film in the wire. Thanks to it, the cord becomes stronger and gets zero in weight. In more budget options, the presence of such a "screen" is not provided.
- Type of protective layer. When carrying out installation measures in anti-icing structures, the heating device must be covered with a protective sheath made of thermoplastic or polyolefin, which is resistant to ultraviolet rays. For laying in water supply, experts recommend giving preference to a thermal device covered with an external insulating fluoroplastic layer.
- The use of wires in an aggressive environment will require the presence of a fluoropolymer layer.
- The heating level of the conductors. The heating temperature is 65-190 ° C. Low temperature conductors are intended to heat a pipe with a small diameter. The medium temperature option is suitable for networks with a large diameter, roofs. The high temperature sample is used for industrial purposes.
Types of heating cable
For electric heating of pipelines, 2 types of cords are used:
- resistive;
- self-regulating.
resistive

The stability of operating parameters ensures uniform power consumption.To reduce heating costs (for example, during thaws or in the spring and autumn), sensors and a current regulator are introduced into the design of the water pipe heating system.
Resistive type heating cable is made with 1 or 2 cores. Single-core wires are connected to the household AC mains from 2 sides. Two-core products are equipped with a connector for connecting to the network or a piece of installation wire with a factory-installed plug.
The opposite side of the cord is closed with a sealed plug (end sleeve). A metal insert is located inside the end element, which ensures the closure of the electrical circuit.
The design of resistive conductors does not provide for cutting the material into sections of the required length. Manufacturers prohibit laying excess wire in a coil; it is necessary to mount the entire existing cord on the pipe section.
When laying resistive elements, the arrangement of highways next to each other is prohibited. With close placement or intersection of laying routes, the metal cores overheat and the products fail.


Self-regulating
 The principle of operation of the heating cable
The polymer material, as the temperature increases, passes a lesser current, which reduces the degree of heating. When the polymer is cooled, the conducted current increases, and the heat transfer of the substance increases. Due to this physical feature of the material, the hot water cable automatically regulates the heating temperature of the pipeline or adapters.
Cords with self-regulating heating can be laid overlapping and next to each other.It is possible to cut the product into sections; there are notches on the outer shell that determine the allowable size of the segment.
After separating the required fragment, it is required to install a protective end sleeve. The disadvantage of the product is the increased cost (compared to resistive elements), but the service life increased to 10-12 years compensates for the increase in the cost of purchasing the material.
How to choose a heating cable for a domestic pipeline
In everyday life, the installation of a heating cable is carried out on water supply, fire, sewer and drainage metal, metal-plastic, plastic pipelines, meters. Resistor systems require constant human supervision and are therefore rarely used.
Criteria for choosing a self-regulating heating cable for pipeline:
- purpose (industrial or household);
- internal or external;
- in a set or cut;
- power;
- presence/absence of shielding.
For domestic use, you should not buy a product designed to work at high temperatures or aggressive environments. This means that you do not need to pay extra for a high protection class and a particularly durable shell.
Self-regulating plumbing heating cable can be installed inside or outside. The choice depends on the situation. For a previously installed pipeline, a product is purchased for installation inside. On pipes with a small diameter, the wire can only be mounted from the outside.
 Internal installation
Installing the heating cable inside has the following advantages:
- reducing the risk of mechanical damage;
- saving electricity by heating water, not pipes;
- more attractive piping.
Important! There is also a drawback - a food shell is required. Such electrical cables are produced in Europe, and they are expensive.
 outdoor installation
Outside, the cable can be laid along the pipe (one or more wires in parallel) or in a spiral. The method is selected depending on the heat dissipation and the diameter of the pipe. When buying, you need to study the power table in the instructions for use.
There are 2 types of self-regulating heating systems for outdoor heating: complete and cut. There is almost no difference in cost. Cut-off products require additional components and tools. It is enough to install the kit on the pipe and connect it to the network with a cord and plug.
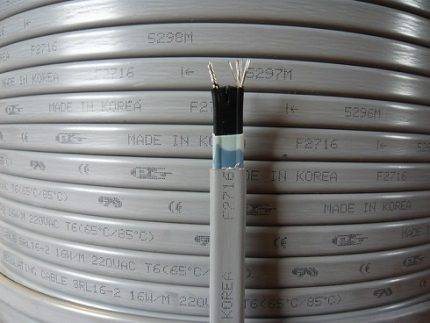
If you plan to install a heating cable with your own hands, the complete product is more convenient. Recently, Samreg cables from Korea, which have an affordable cost, have been quite popular. The length in the kit is 1-30 m, the cut product is sold in coils of various sizes, so you can create a system for a pipeline of any length.
The power of the heating cable depends on the installation location and the diameter of the pipe. For domestic use, 16-24 W / m is sufficient for outdoor installation and 13 W / m for indoor. An additional power reserve is required in regions where winter temperatures are below -30°C.
Important! For the drainage and sewer system, you can buy a cable without grounding (protective screen). For the water supply system, the heating cable must be grounded
How to choose the right cable?
When choosing a suitable hot cable, it is necessary to determine not only its type, but also the right power.
In this case, it is necessary to take into account such parameters as:
- the purpose of the structure (for sewerage and water supply, calculations are performed differently);
- the material from which the sewerage is made;
- pipeline diameter;
- features of the area to be heated;
- characteristics of the heat-insulating material used.
Based on this information, heat losses are calculated for each meter of the structure, the type of cable, its power are selected, and then the appropriate length of the kit is determined. Calculations can be performed using a special formula, according to calculation tables or using an online calculator.
The calculation formula looks like this:
Qtr - heat loss of the pipe (W); - coefficient of thermal conductivity of the heater; Ltr is the length of the heated pipe (m); tin is the temperature of the contents of the pipe (C), tout is the minimum ambient temperature (C); D is the outer diameter of communications, taking into account the insulation (m); d - outer diameter of communications (m); 1.3 - safety factor
When heat losses are calculated, the length of the system should be calculated. To do this, the resulting value must be divided by the specific power of the cable of the heating device. The result should be increased, taking into account the heating of additional elements. The power of the cable for sewerage starts from 17 W / m and can exceed 30 W / m.


If we are talking about sewer pipelines made of polyethylene and PVC, then 17 W / m is the maximum power. If you use a more productive cable, then there is a high probability of overheating and damage to the pipe. Information about the characteristics of the product can be found in its technical data sheet.
Using the table, choosing the right option is a little easier.To do this, you first need to find out the diameter of the pipe and the thickness of the thermal insulation, as well as the expected difference between the temperature of the air and the contents of the pipeline. The latter indicator can be found using reference data depending on the region.
At the intersection of the corresponding row and column, you can find the value of heat loss per meter of pipe. Then the total length of the cable should be calculated. To do this, the size of the specific heat loss obtained from the table must be multiplied by the length of the pipeline and by a factor of 1.3.
 The table allows you to find the size of the specific heat loss of a pipe of a specific diameter, taking into account the thickness of the heat-insulating material and the operating conditions of the pipeline (+)
The result obtained should be divided by the specific power of the cable. Then you need to take into account the influence of additional elements, if any. On specialized sites you can find convenient online calculators. In the appropriate fields, you need to enter the necessary data, for example, pipe diameter, insulation thickness, ambient and working fluid temperature, region, etc.
Such programs usually offer the user additional options, for example, they help to calculate the required diameter of the sewer, the dimensions of the thermal insulation layer, the type of insulation, etc.
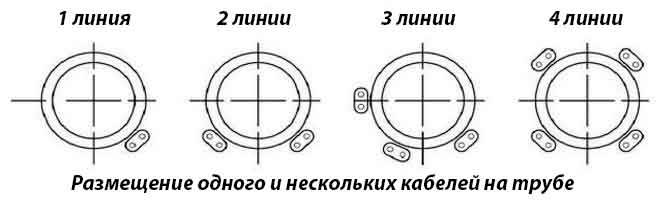
Optionally, you can choose the type of laying, find out the appropriate step when installing the heating cable in a spiral, get a list and the number of components that will be needed for laying the system.
When choosing a self-regulating cable, it is important to correctly consider the diameter of the structure on which it will be installed. For example, for pipes with a diameter of 110 mm it is recommended to take the Lavita GWS30-2 brand or a similar version from another manufacturer
For a 50 mm pipe, the Lavita GWS24-2 cable is suitable, for structures with a diameter of 32 mm - Lavita GWS16-2, etc.
Complex calculations will not be needed for sewers that are not used often, for example, in a summer cottage or in a house that is used only occasionally. In such a situation, they simply take a cable with a power of 17 W / m with a length corresponding to the dimensions of the pipe. A cable of this power can be used both outside and inside the pipe, while installing a gland is not necessary.
When choosing a suitable option for a heating cable, its performance should be correlated with the calculated data on the likely heat loss of the sewer pipe
For laying a heating cable inside a pipe, a cable with special protection against aggressive effects, for example, DVU-13, is selected. In some cases, for installation inside, the brand Lavita RGS 30-2CR is used. This is not entirely correct, but a valid solution.
This cable is designed for heating roofs or storm drains, so it is not protected against corrosive substances. It can only be considered as a temporary option, since with prolonged use in inappropriate conditions, the Lavita RGS 30-2CR cable will inevitably break.
What is a heating cable, how it works
Heating of external pipelines is very common in many regions of Russia. The heating cable for plumbing can be installed both inside the pipe and outside, and is essentially a simple wire. And due to the presence of resistance, one of the possibilities of a conductor made of metal was used - passing an electric current through itself, the metal has the ability to heat up.
Accordingly, the higher the resistance level, the more the device will heat up.It is clear that a self-regulating electrical wire must be protected by good waterproofing, because it is in the water.
Turn on the heating cable at a temperature of + 5 degrees inside the water supply. When the ambient temperature drops, the resistance on the wire increases, thus, the desired water temperature is maintained in the water supply system.
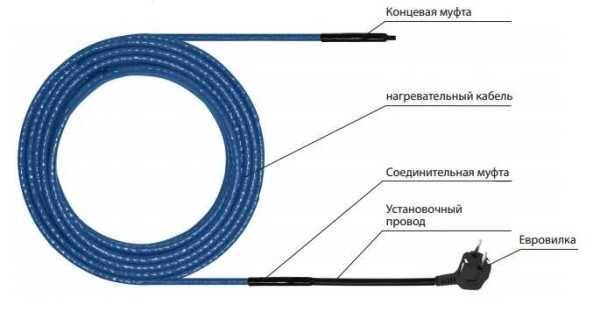
This cable is available in various lengths. These can be views from two to twenty meters. They allow you to warm up with a wire part of the water supply, or the entire line, if it is located in the freezing zone.
Watch the video
At first glance, such a cable seems to be a very simple device that you can install with your own hands and effectively heat the water supply. But, in order to correctly select and mount the heating cable inside the pipe, you must carefully study all the information that will be presented below.
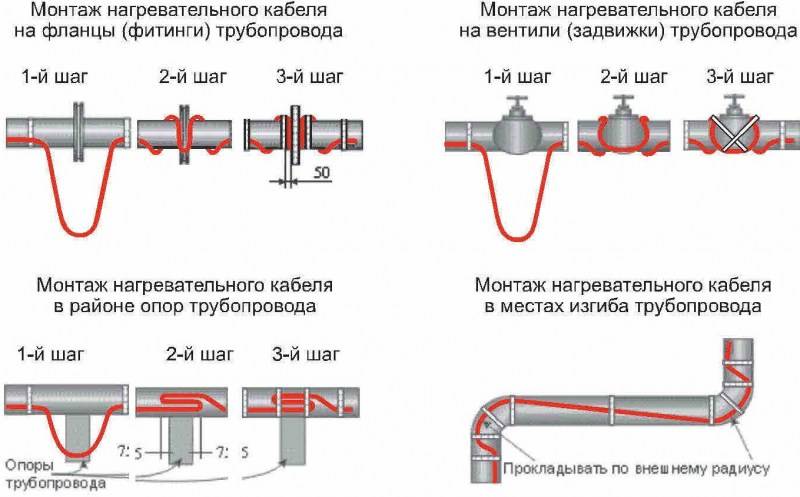
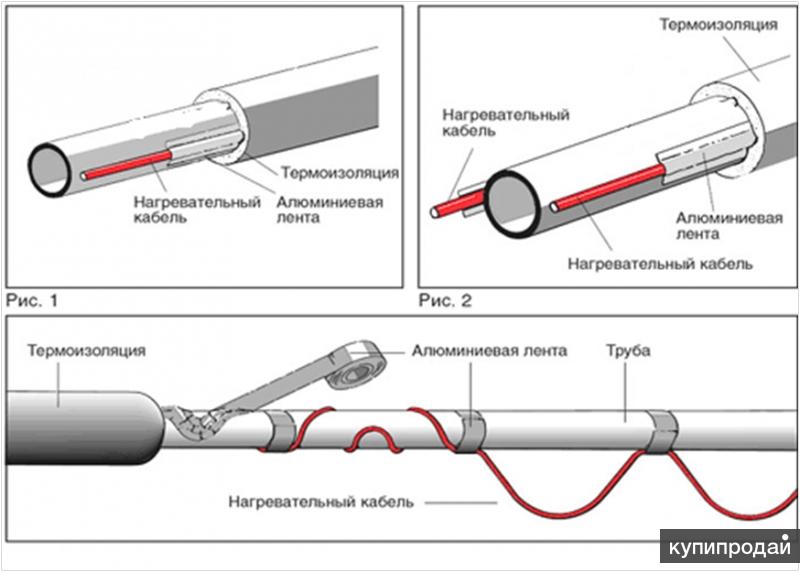
Laying methods
Installation of the heating cable installation can be performed from the outside or inside of the pipeline. The external method is divided into linear and spiral laying.
Line Editing
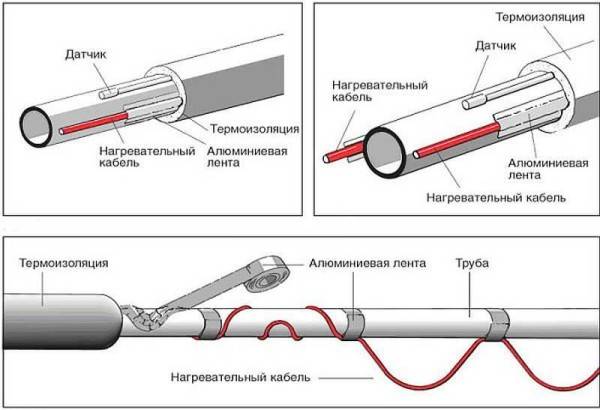
According to experts, the linear laying method is considered the most convenient. In this case, the heating element is pulled along the entire pipe. In this case, the wiring must be located on the underside of the product, which will protect it from mechanical damage. As for fastening, it is better to choose aluminum tape for CSR. In this case, the quality of fastening and heat transfer of the conductor will increase.
Spiral mounting
This installation method requires special care and accuracy, otherwise the heating cable will fail due to sharp and repeated bends. The wire can be laid close to the pipe or with sagging. In the first case, the heating element is carefully unwound from the coupling and wound onto the pipeline at a certain interval. In the second version, the cable is laid in a spiral way so that its lower part sags, and does not adhere to the product.

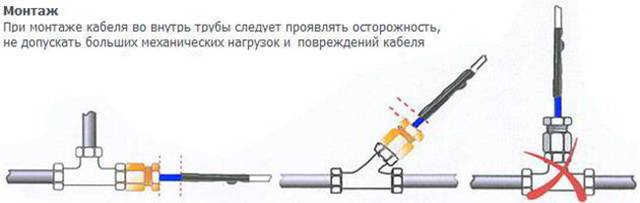
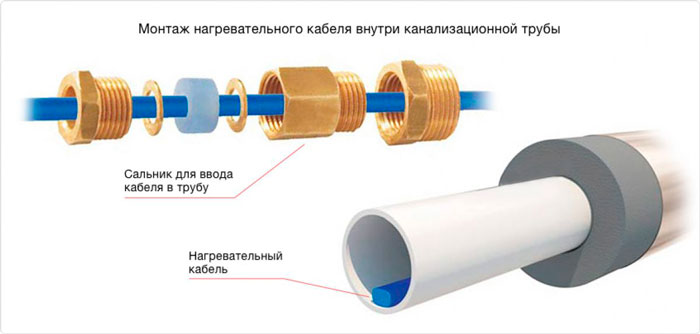
Internal installation
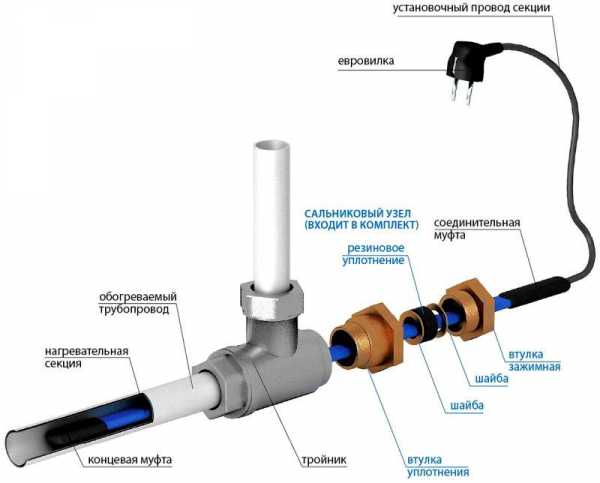
The internal method of laying KSO is performed from the inside of the pipe. Most often, this option is used in cases where there is no access to the outer sides of the water supply. To perform internal installation, you will need to install a tee in the right place in the pipe, through which to stretch the cable to the problem area. Then tighten the gland assembly and seal.


How to lay the heating cable outside the pipe
To mount on the outside you will need:
the cable itself
aluminum tape
It should be tape with a good metallic coating. Cheap lavsan film with a metallized coating will not work.
nylon ties
thermal insulation
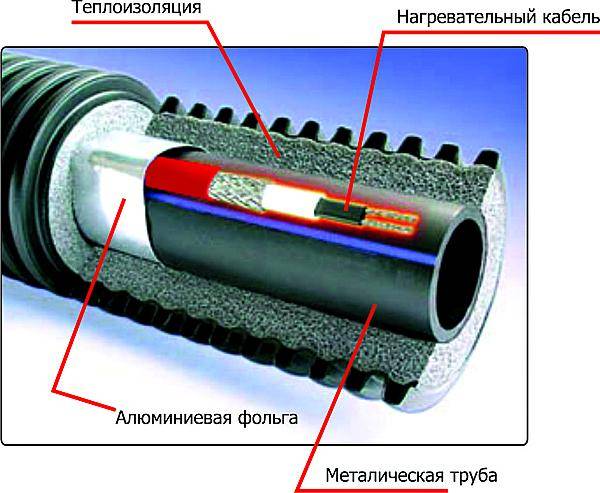
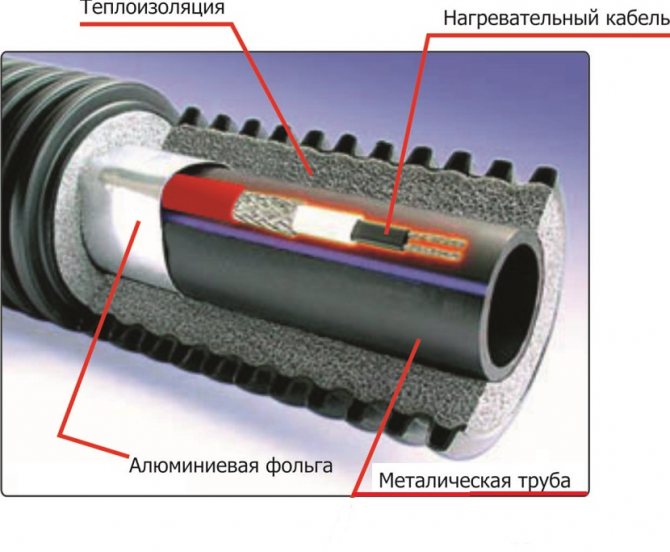
To distribute heat evenly along the entire length, wrap the insulated area with foil tape.
Mistake #6
In this case, there is no need to wrap the entire pipe entirely.
Let's say you have a pipe weaving or more. Glue one strip of tape along it and that's it. It is not necessary to spend the material on the entire surface.
Mistake #7
Steel and copper pipes generally do not need to be wrapped with tape.
This applies equally to metal corrugated. Only the top layer will be enough for them.
Next, you need to fix the cable.
Mistake #8
Most often this is done with the same aluminum tape.
However, this is fraught with the fact that the wire eventually “bulges out” and begins to move away from the wall, which reduces heat transfer by several times.
To prevent this from happening, use nylon ties. The distance between the ties is 15-20 cm.
The cable itself can be laid both in a flat strip and in rings around. The first option is considered more rational for sewers and pipes of small diameter.
In this case, the overlapping spiral gasket will cost you a pretty penny. But often only this method allows you to normally warm up a large-section pipe in severe frosts.
Mistake #9
When laying the cable in a straight line, it must be placed not on top or side, but on the bottom of the pipe.
The warmer the water, the lower its density, which means that when heated, it will rise up. If installed incorrectly, the bottom of the pipe may turn out to be cold, and this is fraught with freezing, especially in sewer systems.
They have water flowing underneath them. In addition, such pipes are never full.
Another layer of foil tape is glued over the cable.
After that, thermal insulation in the form of foamed polyethylene is put on all this “pie” (pipe-adhesive-cable-screed-adhesive tape).
Its use is mandatory. It keeps all the heat inside and reduces energy consumption.
The heat-insulating seam is sealed with reinforcing tape.
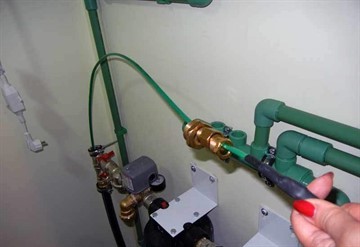
Otherwise, maximum tightness cannot be achieved. If you have a ready-made kit with a plug at the end of the cable, then, in principle, the entire installation is over. Plug the cable into the outlet and forget what freezing pipes are, once and for all.


Heating circuit installation methods
Water heating thermal cables are mounted in two ways - outside and inside the pipe, each of them has its pros and cons. The advantages of the first option are as follows:
- the conductor does not block part of the flow section of the line;
- in this way it is easier to arrange heating of extended sections and valves;
- no need to install and maintain special units for cable entry into the pipeline.
External electrical heating requires more power elements. If it is customary to lay a wire from the inside with a heat output of 10-13 W / m, then it will be necessary to heat the pipe from the outside with a cable with a power of 15-40 W / m, which reduces the efficiency of the system.
The second unpleasant moment is the difficulty of repairing products buried in a trench. It is possible that in order to determine the location of the malfunction, you will have to dig out the entire highway. Conversely, when sealing a gust or replacing pipes, the cable heater can be accidentally damaged.
Heating the pipeline from the inside is not only more economical, but also more practical in terms of maintenance. True, for a hermetic launch of the conductor inside, you will have to put an additional pass-through node. Again, with a long street water supply, you need to increase the diameter of the pipe just to successfully push the cable through. And if a valve or a crane is provided on the highway, then internal installation is not possible at all.
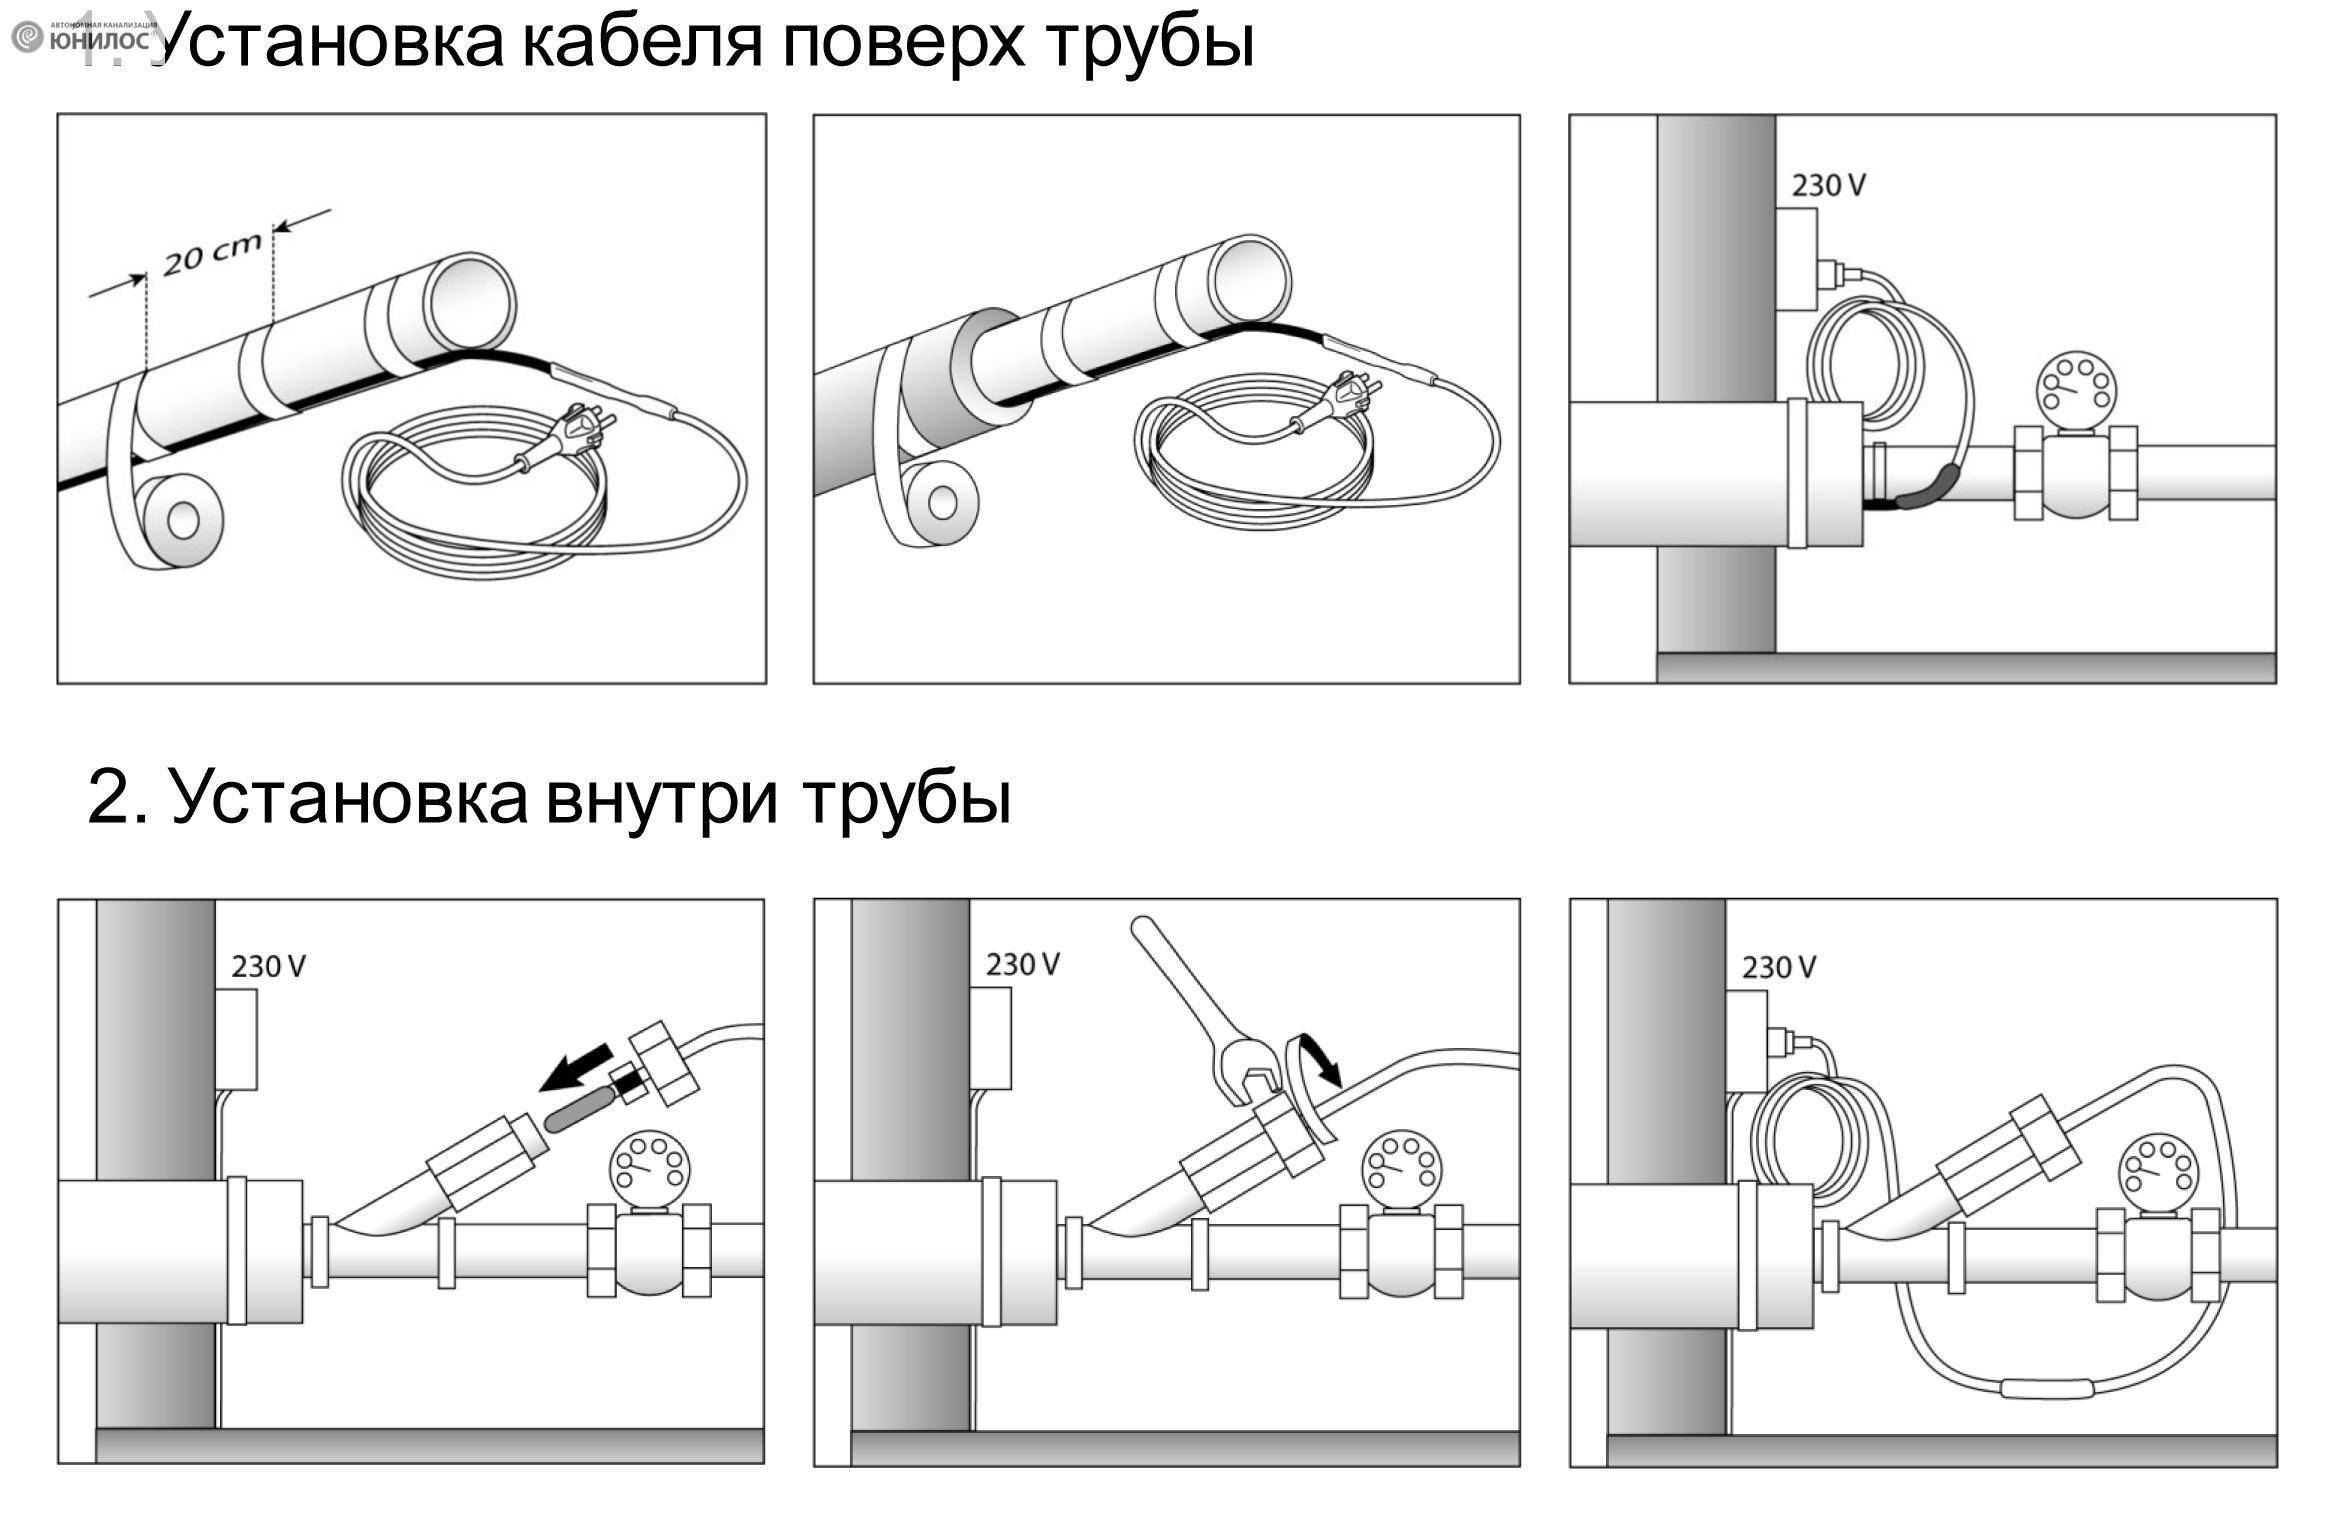
Outdoor installation instructions
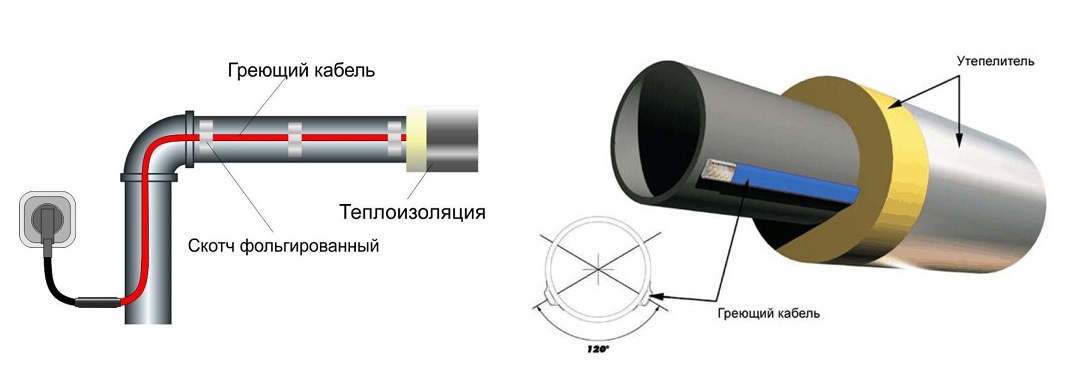
To make an external hot water circuit, in addition to the wires themselves, you will need fastening means - aluminum tape and plastic clamps - puffs. The work is carried out in the following order:
- Along the bottom of the pipe where you plan to attach the heating cable for the plumbing, stick a strip of aluminum tape. It will serve as a good heat distributor.
- Attach a flat self-regulating conductor to the pipeline without twisting and fix it on top with a second strip of foil.
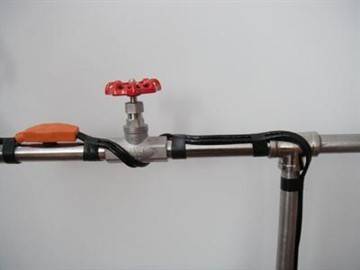
- Fix the heating element by pulling it to the line with clamps every 20 cm, as shown in the photo below.
- To protect the valves from the cold, it is necessary to leave an allowance in the form of a hanging loop and continue mounting the straight section. Then loop around the tap or valve, glue it with tape and attach it with clamps.
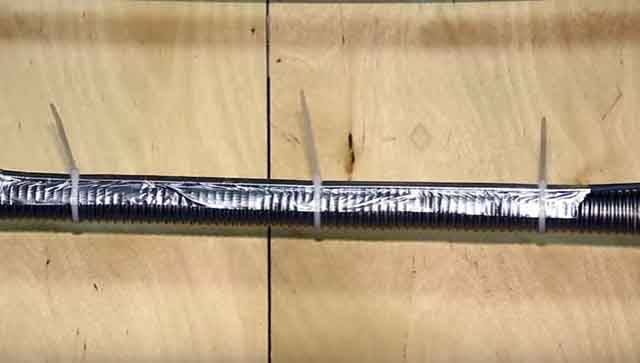
On water mains running along the street, it is better to lay the cable in the form of a spiral, providing more efficient heating. The same applies to large diameter pipes, when spiral installation becomes more profitable than laying 3-4 straight lines. The fastening technology remains unchanged - gluing the foil and fixing with clamps is carried out on all types of pipes - plastic and metal.

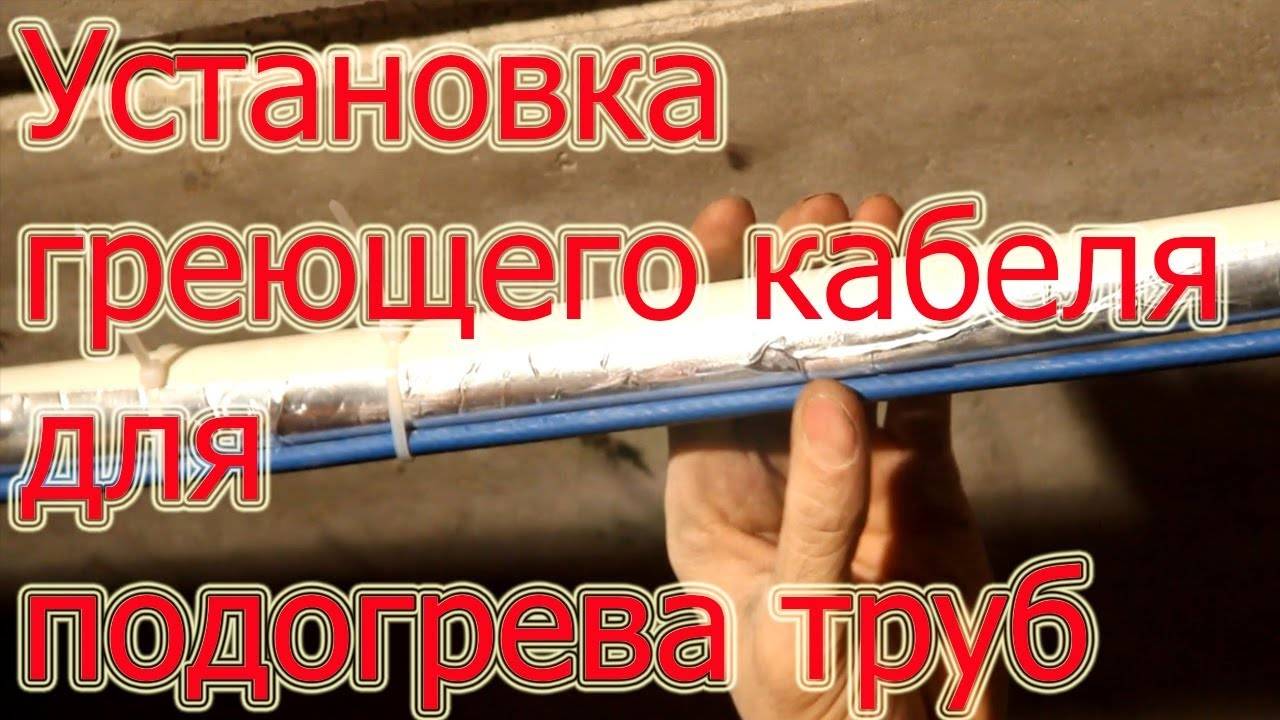
The last stage is the thermal insulation of the pipeline, without which its heating loses all meaning. For insulation, sleeves made of foamed polyethylene or foam shells are used. Before installing the heat-insulating layer, do not forget to check the operability of the cable heating of your communications. The process is shown in more detail in the video:
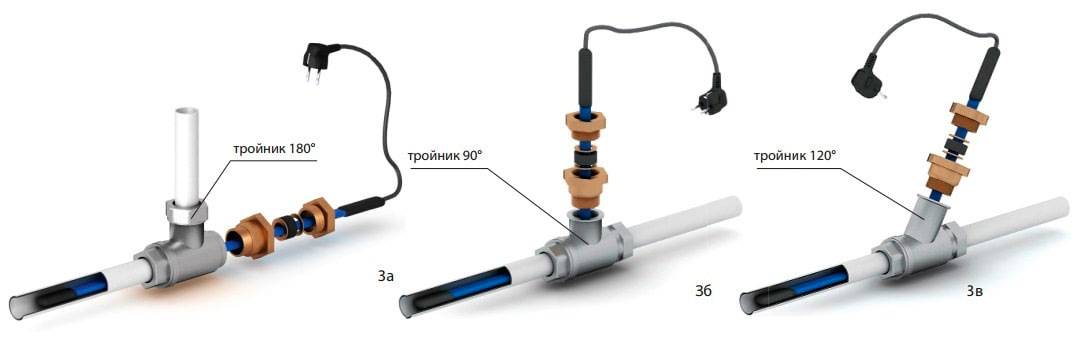
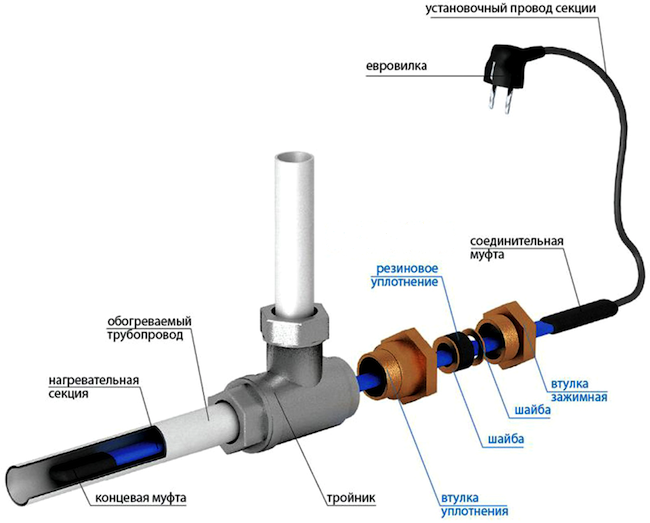
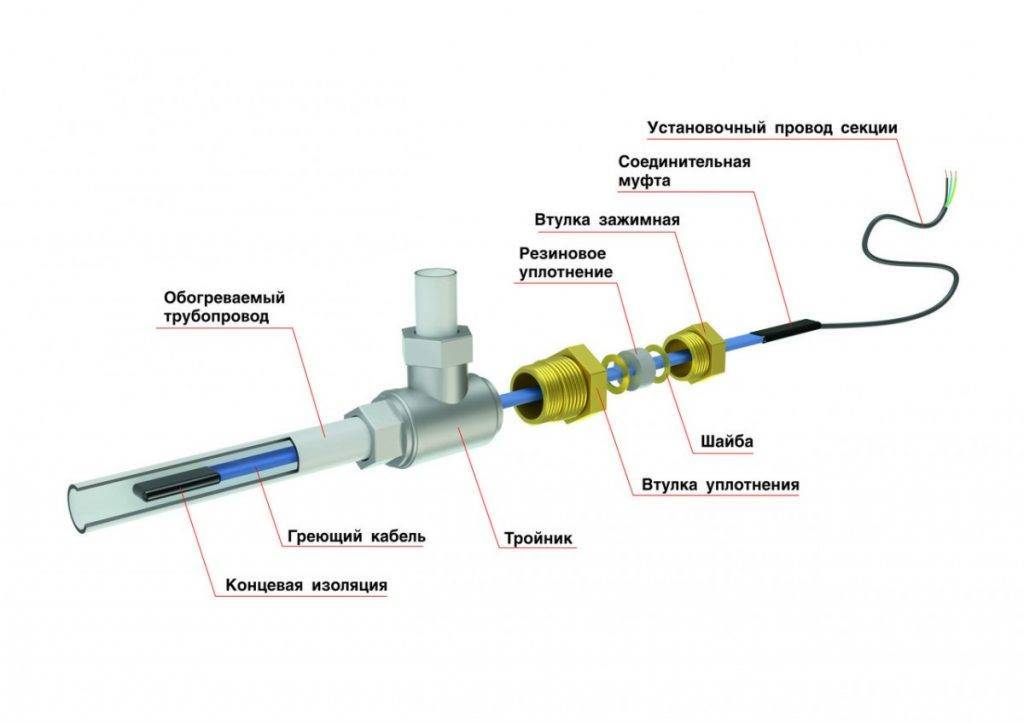
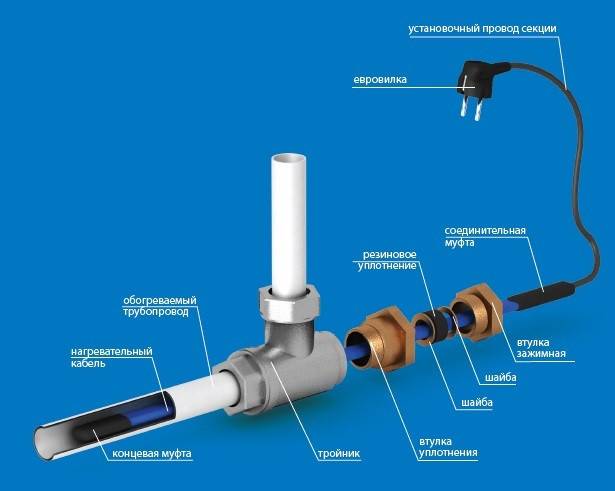
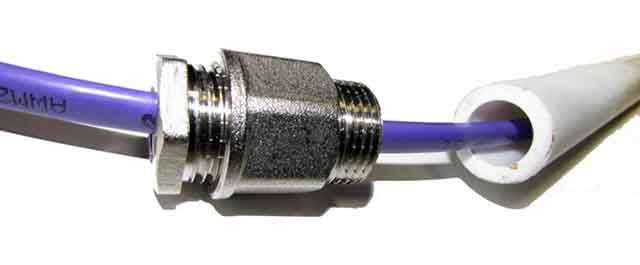
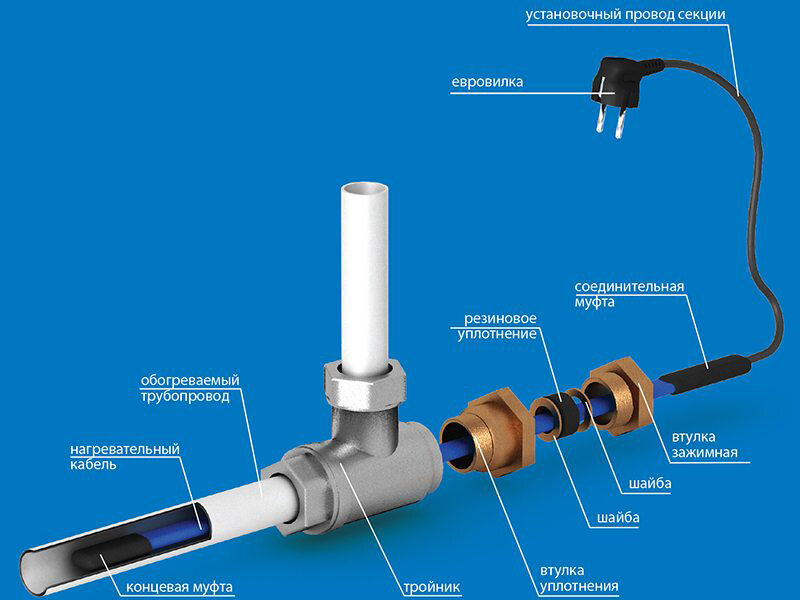
We embed the circuit in the pipe
To successfully push the heating cable into the pipeline, you should select a ready-made bushing kit of the desired diameter. It includes the following details:
- housing with external or internal thread;
- rubber seal;
- 2 bronze washers;
- hollow clamping nut.
The node is installed in the place where the water supply makes a turn of 90 °, only instead of a knee, a tee is mounted at this point. It is also very desirable that all turns on the supply line be made in a natural way - due to the permissible bending of the pipe (excluding steel and polypropylene). When there are no fittings on the line, pushing the heating conductor is much easier, as well as pulling it out for repairs.
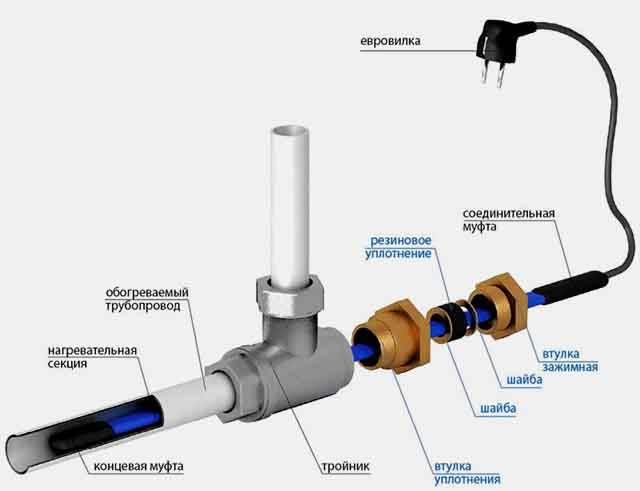
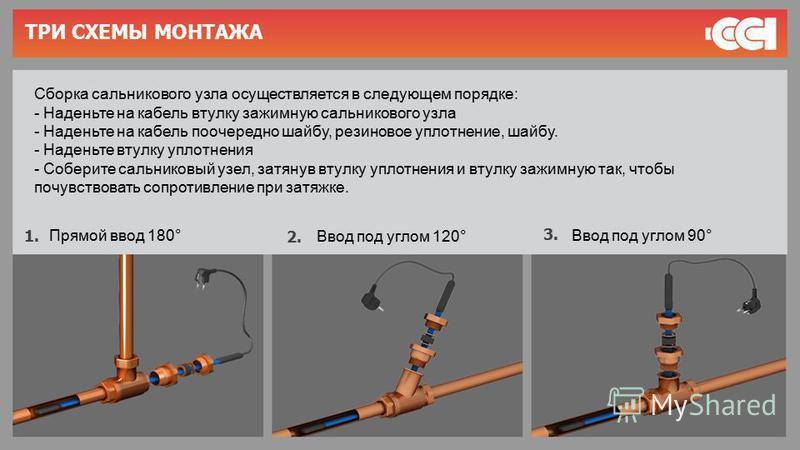
Installation is carried out in the following sequence:
- Place a brass tee at the turn of the water line.
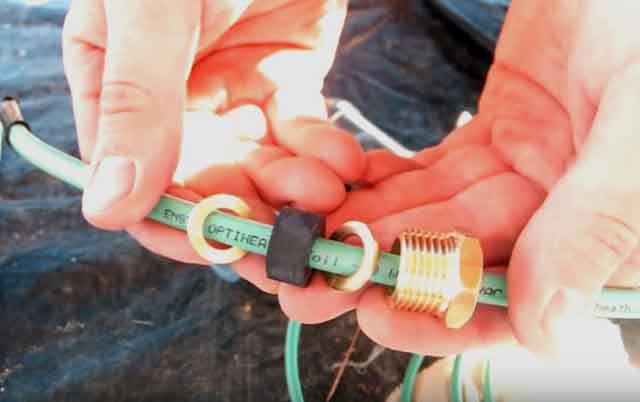
- If possible, straighten the twisted cable and pull the parts over it in this order: nut, first washer, gland, second washer.
- Screw the body of the bushing into the tee, insert the wire there and push it to the required depth.
- Put the washers together with the stuffing box into the socket and tighten the nut.
Parts installation sequence
It is important here to assemble all the parts in the correct order, and before cutting the cable and installing the end sleeve, otherwise it is difficult to tighten the gland. According to reviews on the forums, this method of heating communications is quite often practiced at the inputs to frame houses built on pile foundations.
The subtleties of installation work are demonstrated in the next video:
Rules and recommendations for installation
Operational problems will not appear if you follow the general rules. In accordance with the rules for the installation of electrical appliances (PUE), the frost protection system must be equipped with a residual current device (RCD). Mounting on non-conductive surfaces and units is carried out only with a protective braid. The cables trimmed with such a coating are also installed on synthetic pipes.
During installation, the air temperature matters: work is carried out if it is not colder than -15 ° C. Already after installation, they arrange mandatory thermal insulation. To reduce heat loss, the thickness of this layer is adjusted exactly to the diameter of the pipe. Moreover, exceeding this indicator will not lead to anything bad, but it will only get better.


The heating wire is considered functional if the bending radius reaches at least 3 product diameters. That is, if the radius of an imaginary circle, the center of which is located directly on the edge of the cable bend zone, is at least three times the diameter and 6 times the radius of the wire itself.
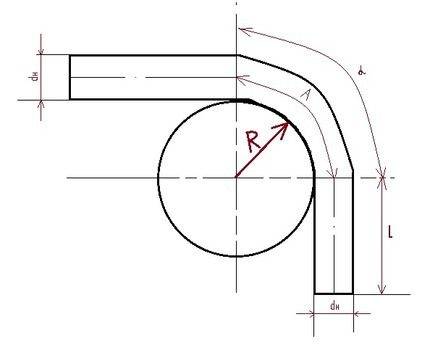 In the figure, R is the bending radius, dh is the cable diameter, A is the length of the bent part, L is the length of the straight part, α is the flat angle between two imaginary straight lines that intersect at the center of the imaginary circle
After work, the thermal insulation and the cable itself are checked for resistance. Then marks are made on the trench and pipeline with a warning about the presence of a heating element. Additionally, a sign is installed.
Cable installation allows designers to place the pipe in a convenient location. In this case, there is no need for laying, taking into account the level of soil freezing.
Varieties of cables for heating pipes
A properly selected heating system is the key to long-term frost protection of any type of pipeline. Therefore, before dwelling on a specific product, let's take a closer look at the assortment offered by the market.
Commercially available cable products are divided into 2 types depending on the type of installation - designed to be placed outside and inside the pipe.
Let us consider in more detail the second option, which in turn is divided into 2 types depending on the purpose of the pipeline:
- for food purposes;
- for household needs and other tasks.
In the first case, the cable has a protective coating made of a food-grade polymer that does not affect the composition and quality of water, for example, polyolefin, fluoropolymer.
In the second case, there are no strict requirements for the type of coating, but such a system cannot be used to heat food pipelines. Another difference between the cables lies in the principle of operation.
All heating cable options offered to the user are divided into two main groups:
- resistive;
- self-regulating.
In the first case, we are talking about a single or two-core product. The manufacturer, as a rule, immediately releases a ready-made system for installation, which has a certain length. The cable is often equipped with a plug for connecting to the network. The resistive system additionally includes a temperature controller and a temperature sensor.
And in the case of a self-regulating product, additional sensors and regulators are not needed. In it, a semi-conductive matrix is responsible for the level of heating, capable of turning the system on and off automatically when certain temperature indicators are reached.
 Heating cable with semiconductor matrix. On its two sides, two veins run in parallel, independent of each other. What allows you to divide such a cable into segments of the required length
Conclusions and useful video on the topic
Detailed installation of the heating cable system inside the pipeline is discussed in the following video:
Features of various types of cables from manufacturers and recommendations to the future buyer:
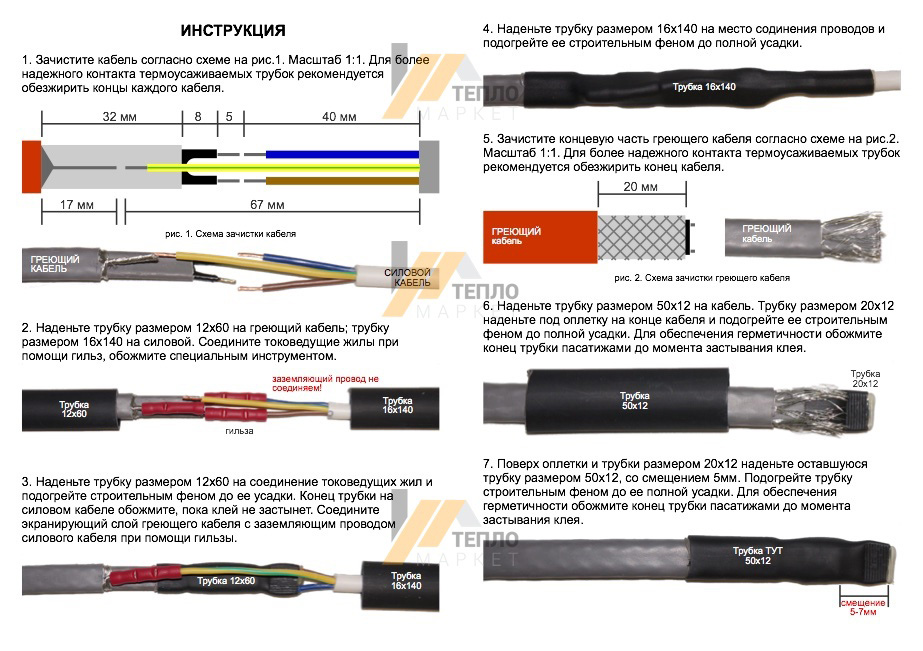
Information about the end insulation and detailed instructions for splicing with the supply wire in the following video:
If you choose good materials and follow the installation technology, you can independently install it inside the pipe and connect the heating cable
At the same time, it is important to carefully follow each step, securely connect the cores and ensure tightness.
And the above expert advice and video instructions will help to understand in detail the installation process for home craftsmen who do not have experience in performing such work. If you doubt your own abilities, then it is easier to turn to an experienced master, who is praised and recommended by friends and other grateful customers.
Please write comments in the block below, ask questions, post photos on the topic of the article. Tell us about how you installed the heating cable yourself or your friends equipped their pipeline. It is possible that your information will be useful to site visitors.


