- Calculation of the amount of materials
- Possible wiring methods
- Wire selection
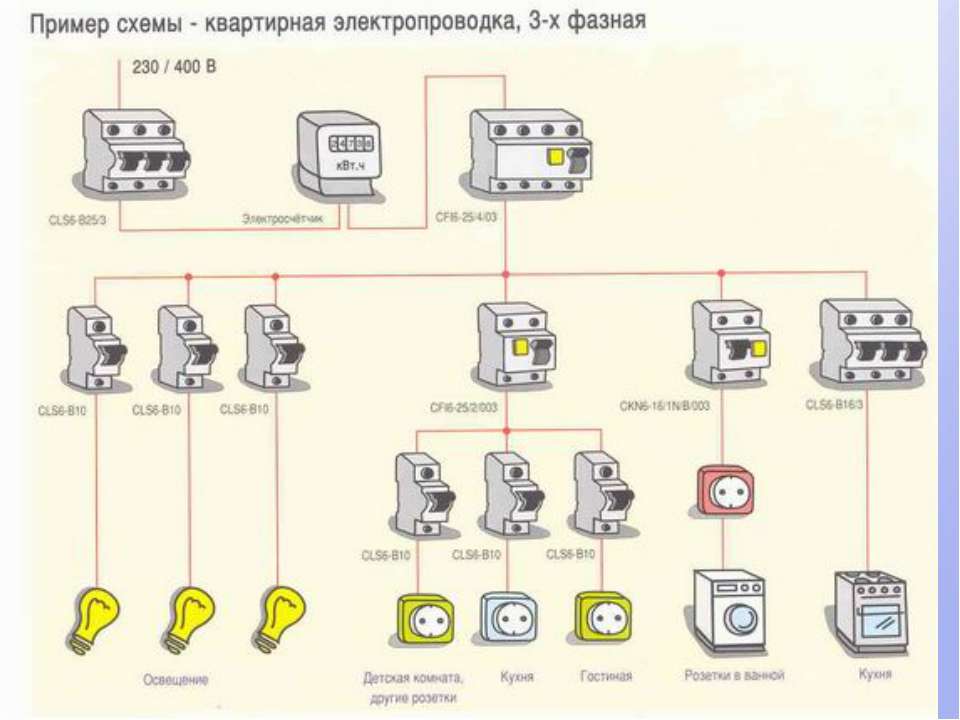
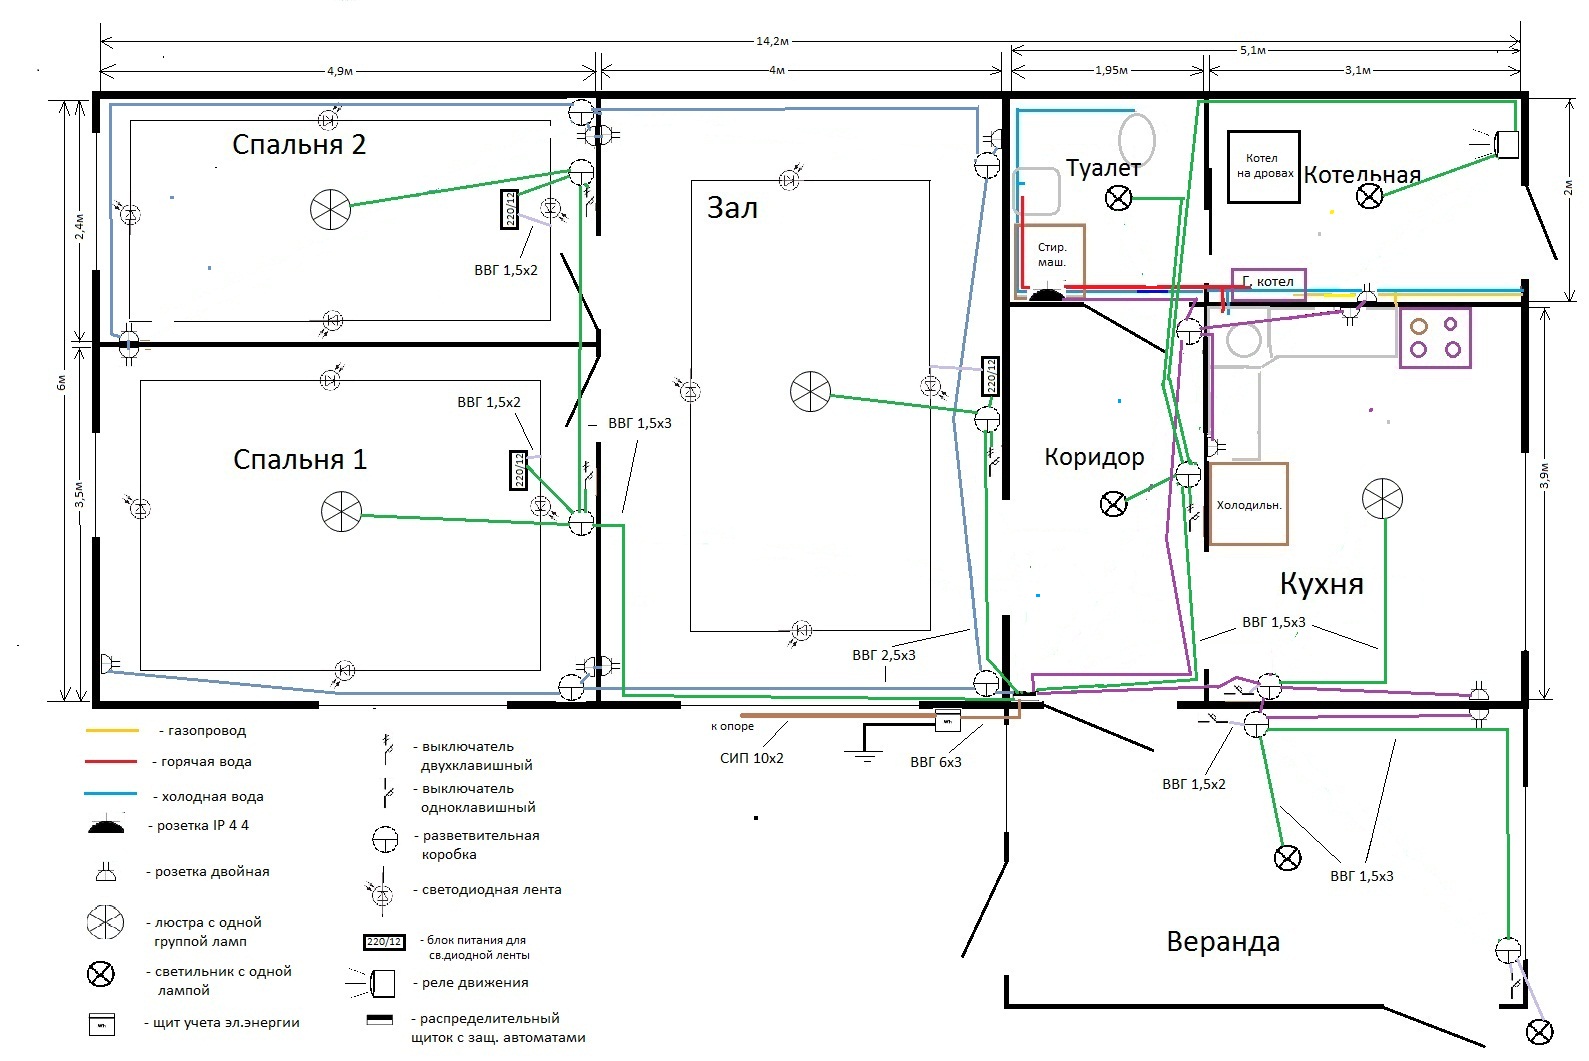
- Scheme options for an apartment
- How to start electrical wiring in an apartment
- Step-by-step installation of open wiring
- Number of groups per room
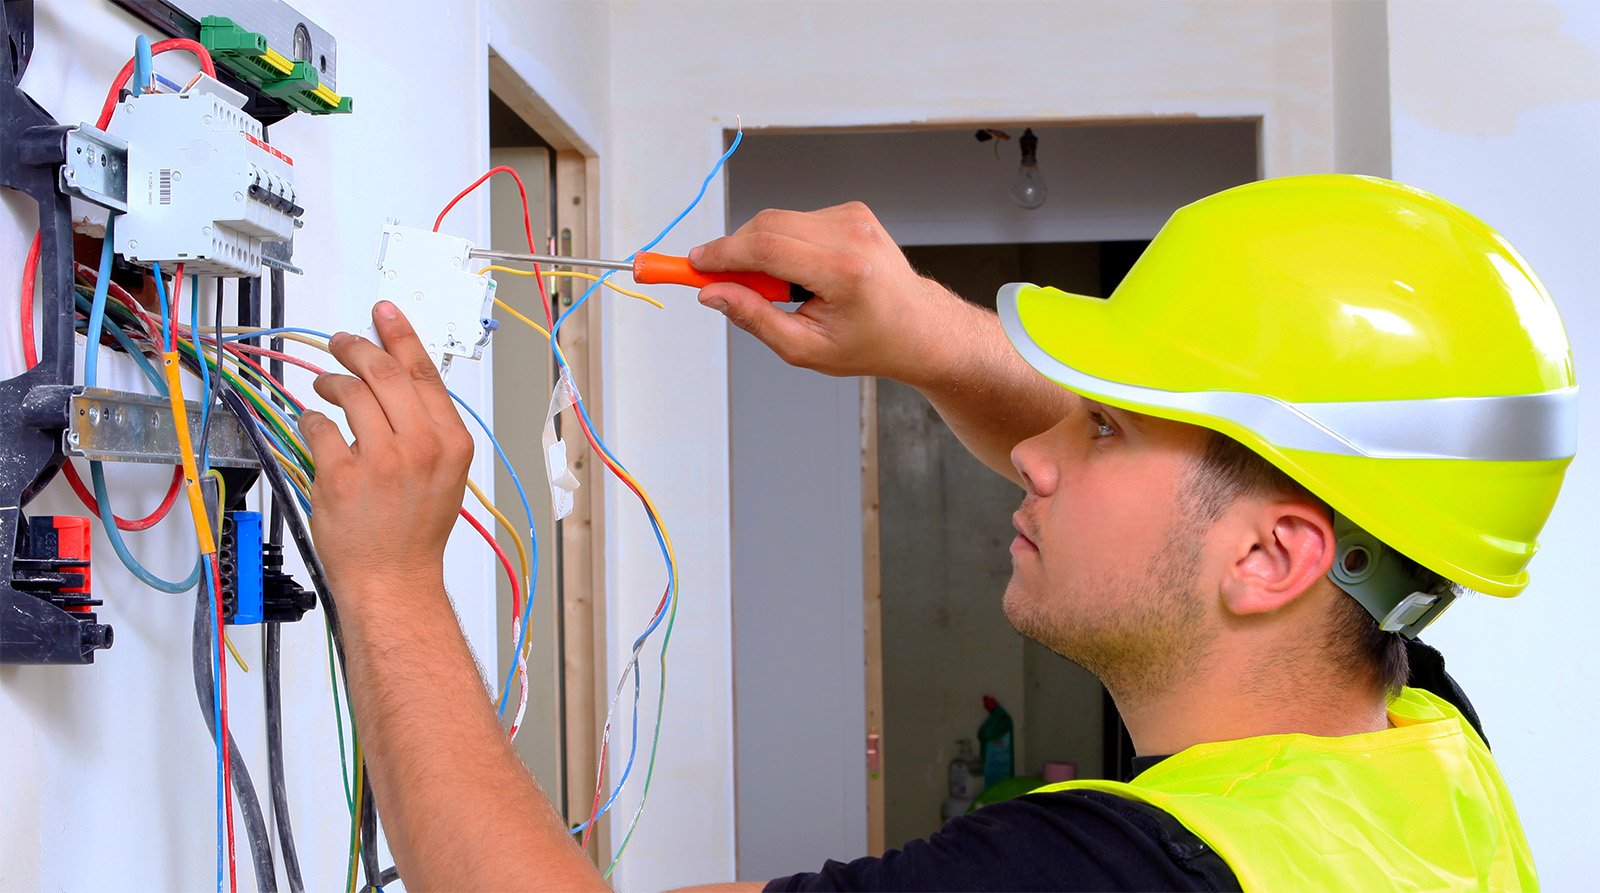
- Do-it-yourself wiring: where to start?
- Installation of wiring in an apartment or a private house: stages of work and step-by-step instructions
- What cables to use for wiring in an apartment or private house
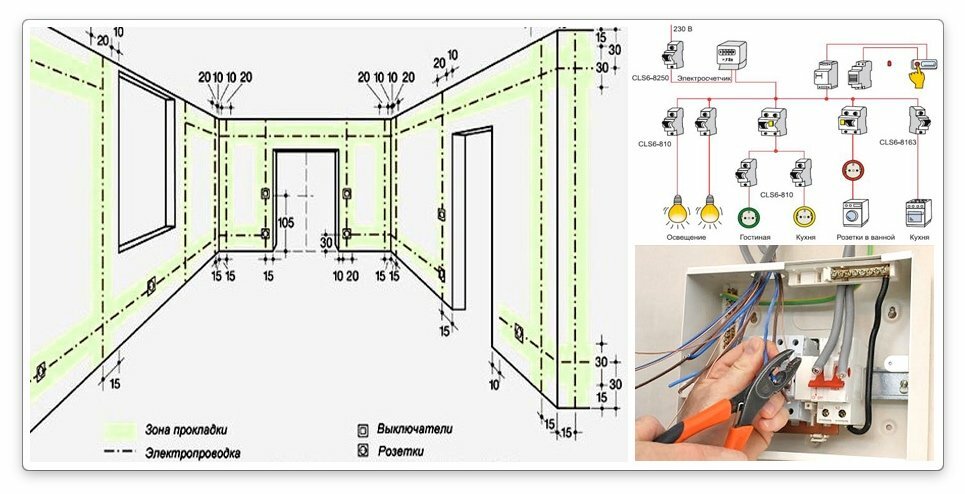
- Wall marking according to the wiring diagram in the apartment
- Features of installing hidden and open wiring in the house with your own hands
- Brief step-by-step instructions for laying wiring in an apartment
- About the cross-section of cables and wires and their color marking
- Which cables and wires to choose
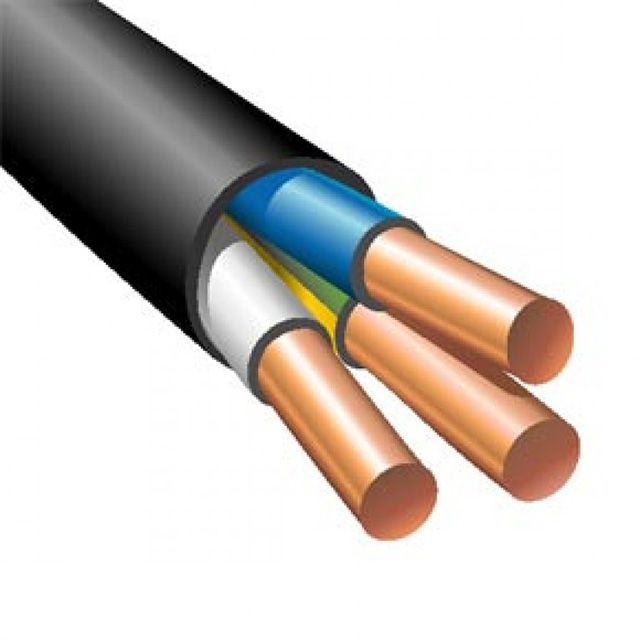
- VVG cable
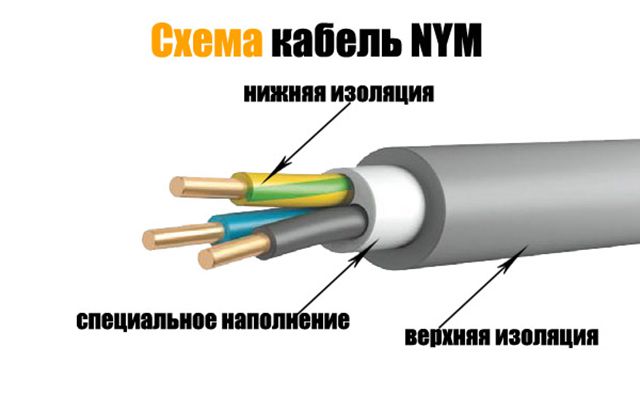
- NYM cable
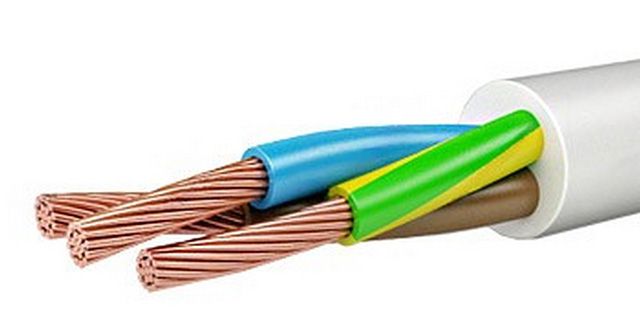
- PVC wire
- Wire PV1
- PV3 wire
- Cables and wires for low current systems
Calculation of the amount of materials
After creating the circuit, it is necessary to proceed to the next stage - counting the amount of materials for electrical installation. First, count the amount of cable. Please note that the wiring in the garage will be both internal and external (for laying from the pole to the meter and input), so you will need to purchase materials for all types of work.SIP wire is usually laid from the pole, its cross section will be indicated to you in the technical conditions for connection, while according to PUE 7.1.34 and in table 2.4.2 “The smallest cross section or diameter of branch wires from overhead lines to inputs”, the cross section of aluminum conductors is allowed to use no less than 16 sq. mm or more than 2.5 sq. mm, if this is the power supply of a separate electrical equipment (the garage is not one).
Based on the above (PUE 7.1.34), the wiring inside the garage must be made with a copper wire or cable. For wiring inside the garage, use VVGng-LS.
In order to correctly calculate the cable cross-section, it is necessary to accurately determine which electrical appliances will be installed indoors. The total power of all electrical appliances must be multiplied by a factor of "1.2" (a power margin of 20%), on the basis of which, according to the table, select the appropriate value. Lay a cable with a cross section of conductive wires of 2.5 square meters on the sockets. mm, to individual devices - calculate by power.
As for the length, we must take it with a margin, because. the conductor will be cut into pieces (from the socket to the shield, from the switch to the lamp, etc.). For each wire connection, it is necessary to take a margin of 10-15 cm.
Calculate the exact number of outlets in the garage. There must be at least 2 of them. One for an extension cord (in case of machine repair), and the second for a stationary electrical appliance (for example, a compressor or a welding machine). There will be two switches: one for a viewing hole, the second for the main lighting. If necessary, you can add more switches to control the light on each of the walls, for example.
Special attention must be paid to the lamps.In our time, LED and fluorescent lamps are popular. The first option is more economical and durable, but at the same time more expensive.
The first option is more economical and durable, but at the same time more expensive.
At the same time, it will be great if the lamp itself has a high class of dust and moisture protection - IP54 and higher
This is especially important if the garage is unheated and condensation may accumulate.
If the installation of open wiring in the garage is carried out, it is also necessary to calculate the number of fasteners, corrugations or cable channels. According to SNiP 3.05.06-85 (table 2), the fastening step of open wiring in pipes with a diameter of 20 mm is not more than 1 m, 32 mm is not more than 1.4 meters. Such requirements can be applied to cable laying in corrugation. At the same time, there are requirements for fastening a cable without pipes and corrugations with open wiring, they are described in VSN 180-84. clause 7.2., where it is said: "The distance between the attachment points of wires and cables must be at least 500 mm for horizontal installation and 1000 mm for vertical installation." In this case, you need to take into account the requirements, but in fact you need to fix the corrugation every 0.3-0.7 meters, so that it does not sag.
Installation of wiring in a hidden way, we do not recommend using, because. it is more time-consuming and is unlikely to improve the interior of the room. After all the elements are calculated, we proceed to the main process.
Possible wiring methods
Replacing old wiring in a panel house begins with drawing up a new scheme. Also, the replacement of electrical wiring is divided into two options: partial or complete.
If it is necessary to completely replace all cables in a panel house, then a new circuit should be made.To do everything right, a specialist will need an old scheme. The new scheme will serve as step-by-step instructions for performing electrical work.
First you need to determine where what will be the load. For example, the kitchen usually consumes the most electricity. If we talk about an ordinary room, then one or two sockets per 5 square meters are enough. Given the needs of the kitchen, four sockets will be needed for the same room. Also, do not forget that for devices with high power consumption, it is necessary to pull separate lines from the shield. For some household appliances, you need to lay a copper cable with a cross section of up to 4-6 squares
Another room that requires special attention is the bathroom, because it is characterized by high humidity. Therefore, sockets should be connected through a differential machine or RCD
Also, an RCD must be installed to protect individual electrical appliances, the most dangerous in terms of electric shock - a washing machine, a water heater, a hydromassage box, a hydromassage bath. The kitchen has a dishwasher and an electric oven.
When replacing electrical wiring in a panel house, several methods of laying a new cable are used:
- in ceiling slabs;
- under the ceiling;
- on the walls - under plaster, under drywall;
- on the floor in a screed.
The most common way to lay the cable is to lay the cable under the plaster. In order to carry out the installation, it is necessary to make holes in which the cable will be laid and fixed. After laying, a layer of plaster is applied over the cables. Using this method, you can draw several lines in one strobe.You can also separately lay cables for lighting, various appliances, air conditioners, and other heating devices.
It is ideal to lay cables along the old channels, because then you can lay the wires without gating, and save time. Therefore, it is desirable to use the paths along which the old cables were laid. In general, you can use places where aluminum cables were simply plastered, for example, in the seams between the wall and the ceiling. Seams are places where it is easy to run new wiring.

When replacing old cables, it should be remembered that the channels in which they were located can be used to bring a new copper cable to a socket or switch. However, the channel can only be used if the fittings remain in their original places and if the old cable can be pulled out during dismantling.
In most cases, it is very difficult to find and use channels, so some experts recommend not spending time searching and cleaning channels. Therefore, for horizontal installation in a panel house, it would be more expedient to stretch the cable along the upper joint between the wall and the ceiling. There is usually a gap in this place, which is either plastered or clogged with cotton.
An alternative option is to conduct electrical wiring along the ceiling and make strobes only in places of descent to sockets and switches. You can hide the cable attached from above by making a stretch or suspended ceiling.
When replacing electrical wiring in a panel house, it is first necessary to determine what the replacement will be: partial or complete. Also be sure to use the old channels.In order to carry out this work, you need to have a good tool. However, it is preferable that the replacement of electricians in a panel house is carried out by a specialist.
Wire selection
For apartment wiring, wires and cables with single or stranded conductors, made of copper or aluminum, are used, taking into account the fact that the maximum current load through them will not exceed the maximum allowable, determined by the laying method, material and cross section of the conductors.
Although the rules allow the use of aluminum wires as electrical wiring, this is not recommended for the following reasons:
- Aluminum has lower allowable currents and higher ohmic resistance. Because of this, wires need a larger cross section than copper;
- Such wires are less mechanically strong. In places of kinks or in case of improper stripping of the insulation, the aluminum core breaks very easily;
- When installing electrical devices, sockets, switches, aluminum wire in the terminals tends to "flow" over time, that is, change its shape. This leads to a relaxation of the contact and an increase in the transient resistance. Because of this, the terminals of the devices begin to overheat, which leads to even greater deformation of the aluminum conductors and, ultimately, to burnout at the point of contact;
- It is impossible to solder aluminum wires;
- The biggest problems arise when it is necessary to connect copper and aluminum conductors.
The only plus of aluminum wires is lower cost. The electrical wiring carried out in the houses of the old buildings, for the most part, is aluminum and needs to be completely replaced.
To conduct lighting circuits, a two-wire wire is enough, but to connect sockets, you need to use a special three-core cable, one of the cores of which has a two-color color - yellow with a green stripe. This core is used to connect to the ground terminals in modern sockets. Modern lighting fixtures are often also equipped with terminals for connecting a ground wire.
Important! Never use a yellow-green core to supply power to devices, no matter what will go through it: phase or zero!
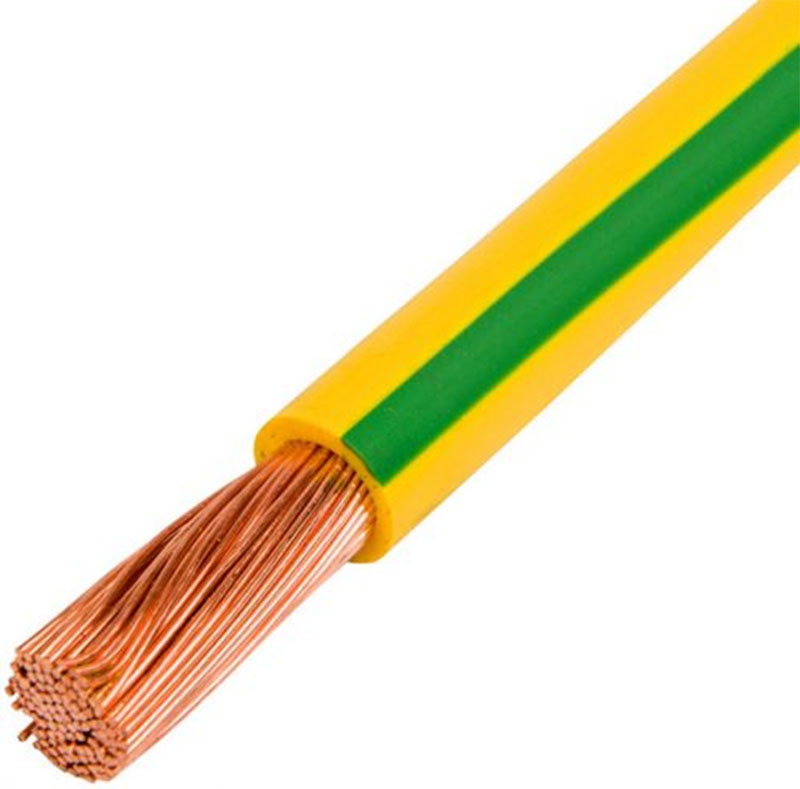 Ground conductor
Among the many brands of cables for electrical wiring, the VVGng type cable is very popular. This type of cable is made with polyvinyl chloride general insulation and each core separately. Cores can be single or multi-wire. The symbols "ng" indicate a reduced flammability of the cable. An even better option is a VVGngls cable with reduced smoke emission, however, it is somewhat more expensive, but if possible, it is better to purchase it.
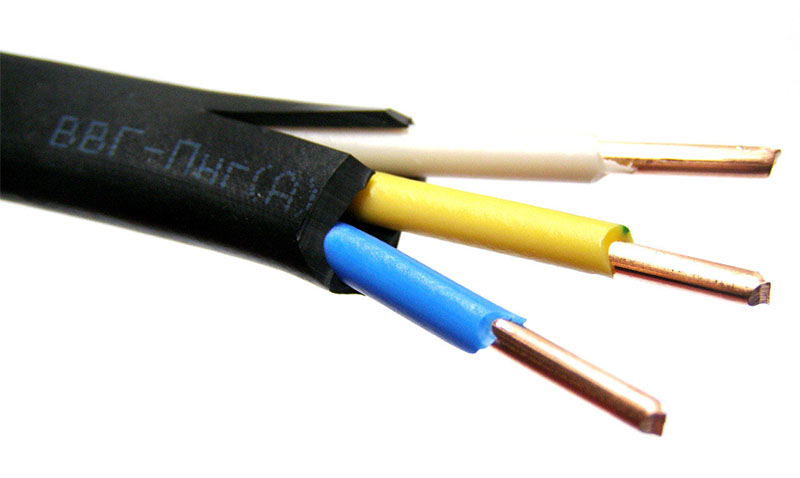 VVG cable
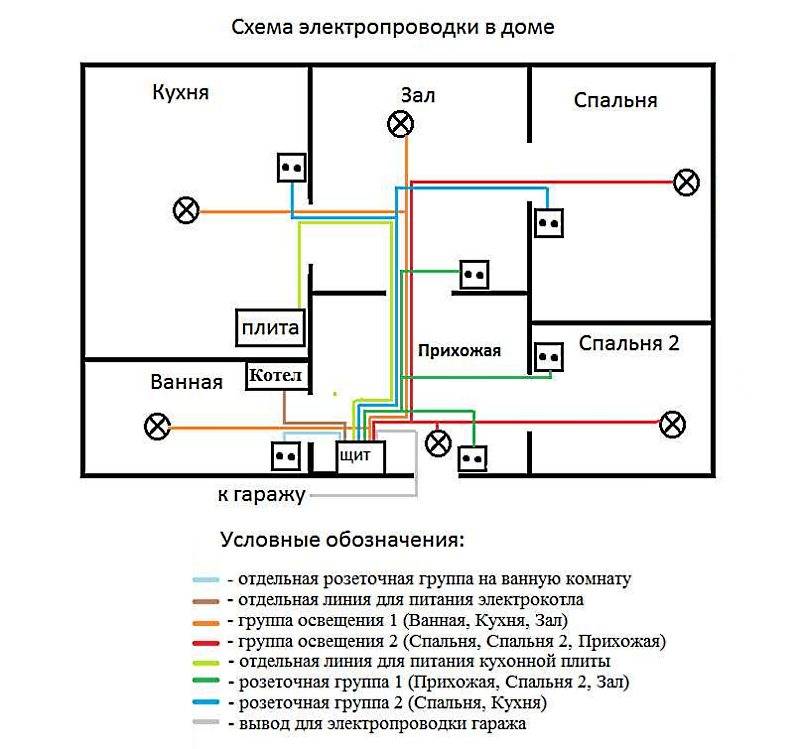
Scheme options for an apartment
Much when choosing a wiring diagram for an apartment depends on its area and the number of rooms. However, the breakdown into consumer groups should be carried out in any case. Even for a small studio, at least three lines must be made - one for lighting, the second for sockets, and the third for the bathroom.
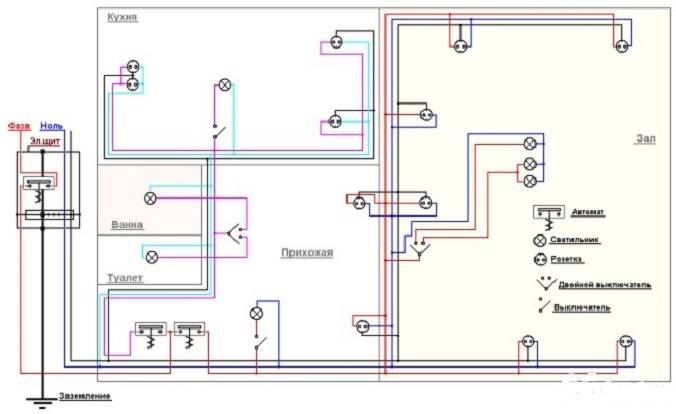
Approximate wiring diagram for a one-room apartment
In two- and three-room apartments, groups will have to be allocated much more. There will be many more electrical appliances here. And it is best to power them on separate lines in order to guarantee yourself the safety and stability of the operation of the intra-apartment electrical network.
How to start electrical wiring in an apartment
Work on the installation of electrical wiring in an apartment or other residential area should always begin in the same way - with the preparation of an electrical wiring plan. And that's why. Let's say you made repairs, not really thinking about the final result. As they wanted, they did it.
Arranged furniture in places, placed consumer electronics. And what did we get? Catastrophe! All sockets were in the "cold reserve": one was blocked by a closet, another by a sofa, a third by a chest of drawers, and a fourth by a bedside table. Even for connecting a TV and a favorite stereo system, as according to the law of meanness, there were no sockets within a radius of 3-4 meters.
And here begins a very fun and exciting game called "Scatter extension cords and pilots throughout the apartment." The question is: why did you make new electrical wiring, so that later you could walk and trip over extension cords? Imagine how much money and nerves can be wasted.
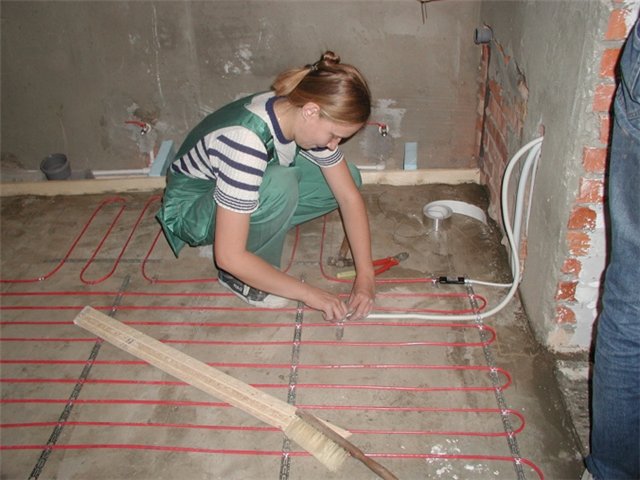
Step-by-step installation of open wiring
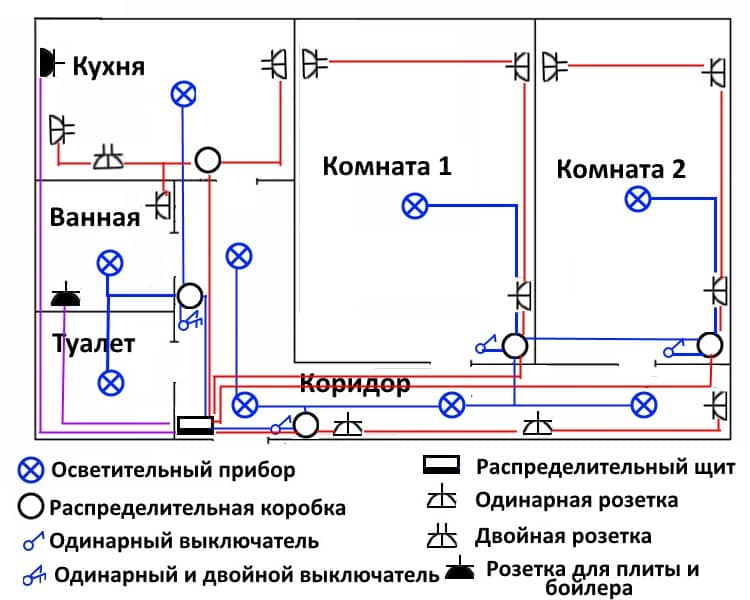
STEP 1 (general) Drawing up the wiring diagram
This stage is common when laying both hidden and open wiring.
We determine the installation locations for sockets, switches, lamps and an electrical panel (if needed). For example, let's draw up the following wiring diagram in one of the rooms.

We determined where we want to install sockets, a switch, where the lamp will be located, and also where we will install the electrical panel and made a wiring diagram. Now you can proceed directly to its installation.
STAGE 2 (Open wiring installation) Electrical installation
To begin with, we will stipulate that the most common ways of laying open wiring are laying in a box and laying on brackets, so we will consider them.
For convenience, it is recommended to start the installation of open wiring with the installation of sockets, switches, junction boxes and a switchboard, the installation technique is similar to each other, so we will not pay too much attention to this:
Installation video:
STAGE 3 (Installation of open wiring) Installation of boxes (cable channels), cable laying.
Now that everything is in place, we can proceed with the installation of the box (cable channel) along the planned lines for laying electrical wiring.
A cable channel is a plastic box in which electrical wiring is laid. It consists of a base and a lid.
Boxes come in a variety of sizes and colors, and typically have a standard length of 2 meters. For installation, the boxes are cut into pieces of the required length (usually the box is cut with a hacksaw), for example, we need to cut the box into the following sections:
Segments 2 meters long - 2 pcs
Segments 1.5 meters long - 3 pcs
Segments 0.5 meters long - 2 pcs
Segments 0.3 meters long - 1 pc.
Segments 0.2 meters long - 1 pc
In total, the total length of the box we need is 10 meters (that is, you can buy 5 strips of the box, 2 meters each).
After the boxes are cut, you can proceed with their installation, they are mounted very simply: you need to open the lid of the box and screw the base of the box to the wall with self-tapping screws (in case the wall is made of wood or drywall) or on plastic dowel-nails (in case the wall is brick , concrete, etc.). After the box is attached to the wall, a cable is laid in it and the box is closed with a lid.The corners of the box can be closed with special plastic corners, it is also possible to make corners with the box trimmed at 45º.
Video of the installation of the box (the video is not the best, but nothing better could be found on the Internet, maybe in the future we will shoot our own video on this topic, but for now we have to use what we have):
If you decide to install the wiring on brackets, then instead of installing the box, after installing sockets, switches and everything else, a cable is immediately laid, which is attached to the wall with brackets. Staples (clips) for fastening cables are plastic in different sizes, designed for certain types and sizes of cables. Also, brackets can be universal.
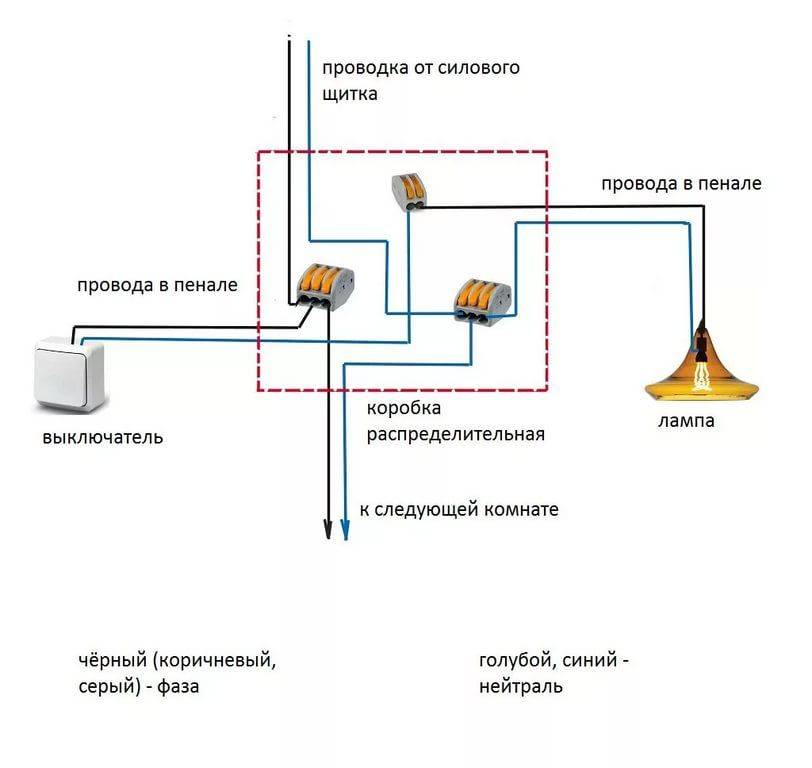
IMPORTANT! When laying the wiring on the brackets, remember that in this way it is forbidden to fasten ordinary cables to combustible bases (for example, to a wooden wall), for this you must use special flame-retardant cables (not spreading combustion). STEP 4 (Fixed Wiring) Circuit Assembly
STEP 4 (Fixed wiring) Assembling the circuit.
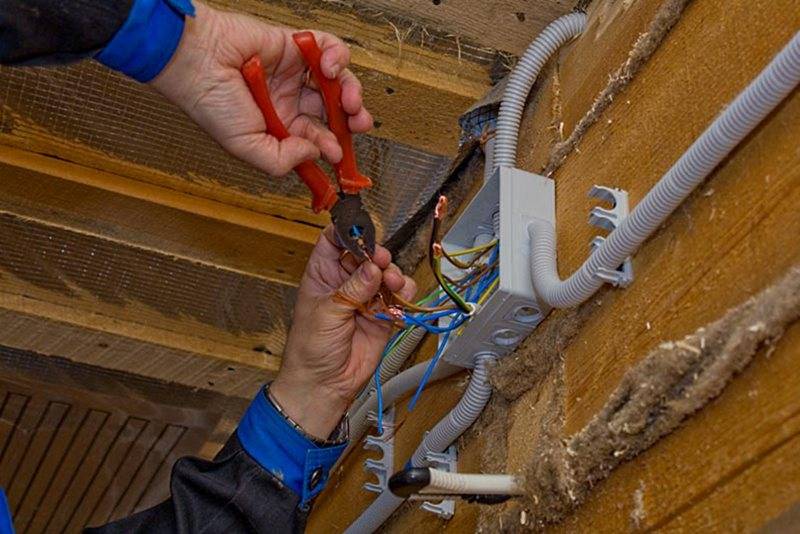
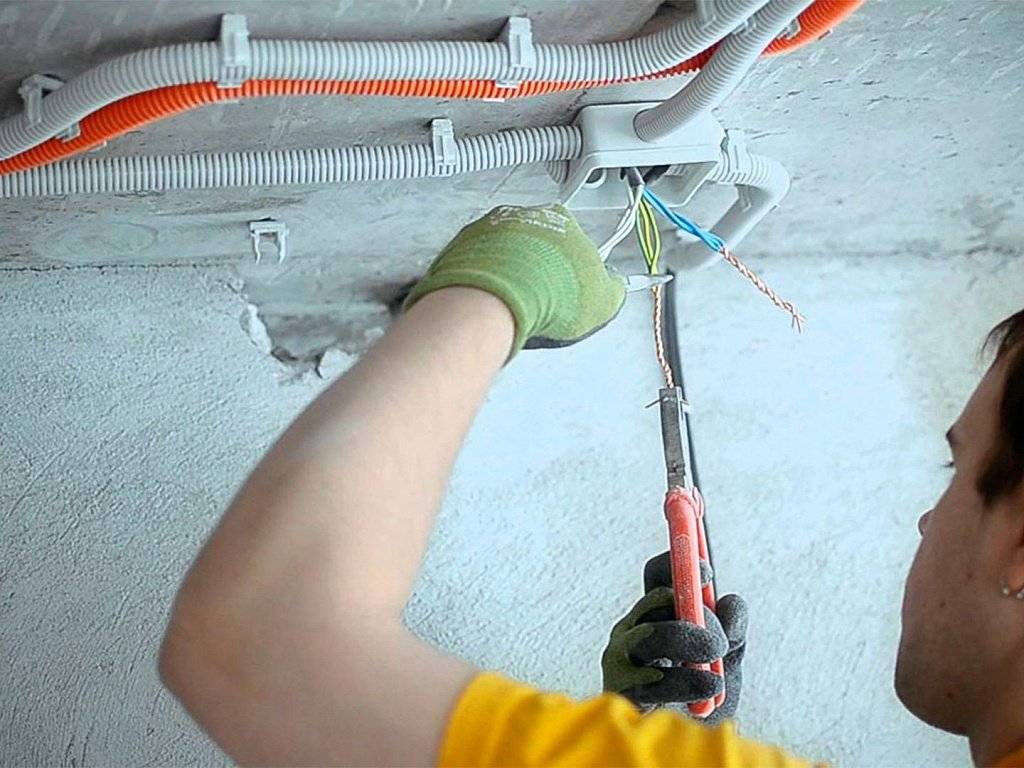
Now that everything is mounted and the cabling is done along the walls, you can start connecting sockets, switches, lamps and assembling the wiring diagram by connecting the wires in the junction boxes.
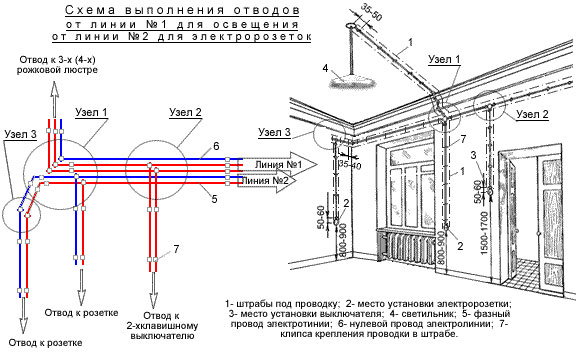
Number of groups per room
Where and how many cable routes should be laid? As for the living quarters (hall, bedroom), they used to have only two lines.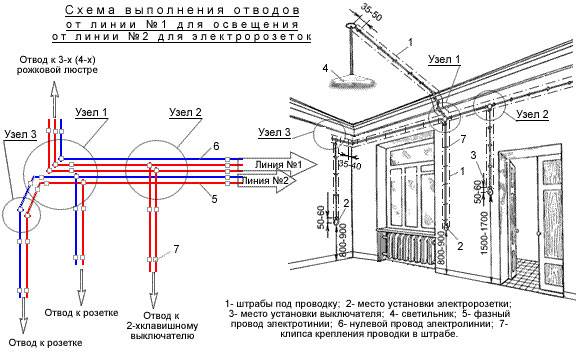
To date, three have become practically the norm:
sockets
lighting
plus air conditioning or other powerful appliances
If your child is busy watching cartoons, then the rest of the sockets in the nursery are turned off in the switchboard.At the same time, you will be absolutely calm that a curious child will not climb anywhere.

It turns out that at least two cables are brought into the living room:
lighting
sockets
Three on average:
lighting
sockets
air conditioner
For children - four.
As for the kitchen, the situation is a little different. Electricity consumption in the kitchen is the largest in the entire apartment.
Among the powerful and responsible devices for which a separate cable goes, the following stand out:
washing machine
boiler
dryer
dishwasher
microwave
hob
fridge
oven
Separate lines are also started from the shield to each block of sockets above the work surface. That is, if you have 2-3 blocks of socket boxes on your work surface, then a separate group should go to each of these blocks.
What is it for? At the moment, kitchen electrical appliances are very energy-intensive, and so that when using a bread machine with a kettle and a toaster at the same time, the machine does not knock out and the contacts do not heat up, so many separate lines are initially laid.
Thanks to this, you can safely use all the necessary electronic devices and not be afraid that something will burn or melt somewhere. This is especially true during the holidays, when cooking in the kitchen is in full swing.
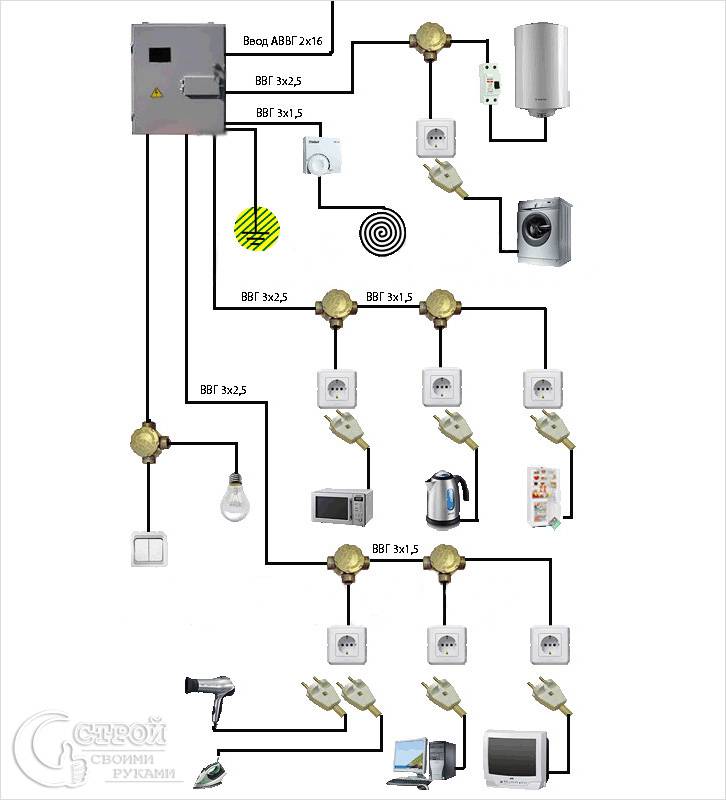
It turns out that at least 10 cable lines need to be brought into the kitchen.
The cable cross section must be selected based on the following recommendations:
for low-power devices and lighting - copper cable with a cross section of 3 * 1.5 mm2
for sockets and air conditioning - 3 * 2.5mm2
oven - 3*4mm2
electric stove, hob, instantaneous water heater - 3 * 6mm2
Cable brand VVGnG-Ls or NYM.
If we sum up all the above routes, it turns out that in a two- or three-room apartment, on average, about 30 power lines start up.
These are the realities of today.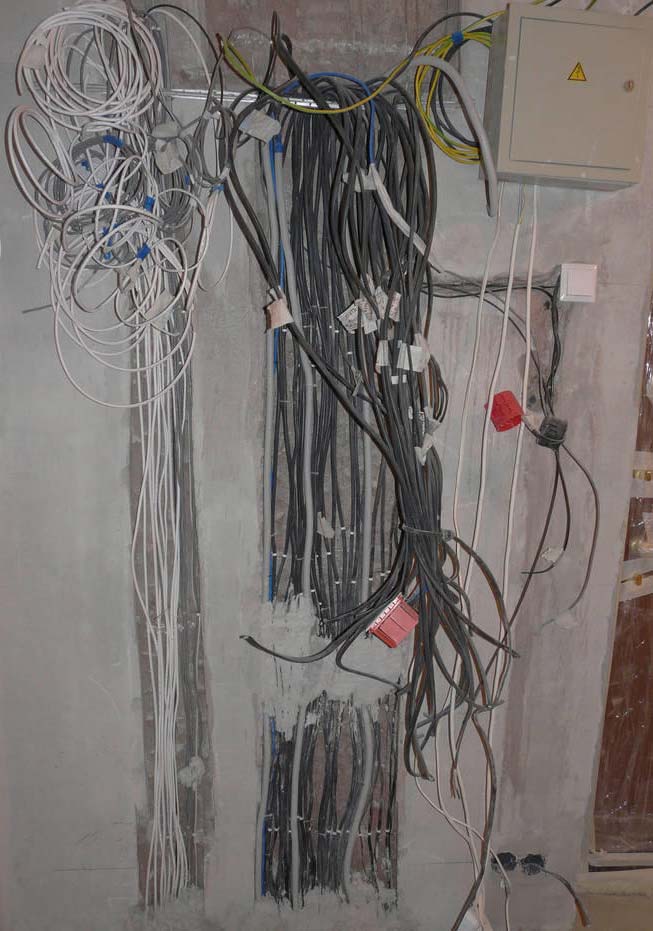
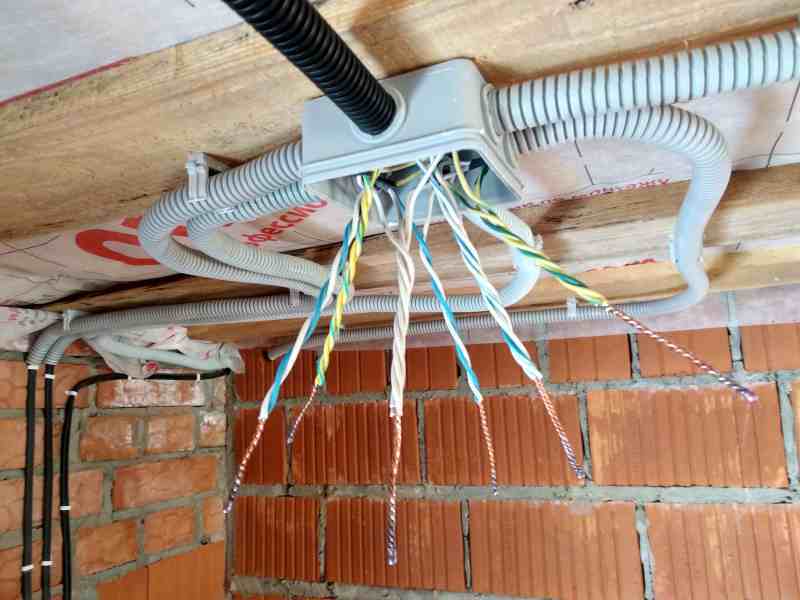
As for the low current, then two twisted pairs of a UTP or FTP cable are connected to each access point where there will be Internet or a TV.
Plus, don't forget shielded TV cable.
It can also be started both directly and provide a separate television outlet. Thanks to her, your video equipment will not be tied to any one place.

Do-it-yourself wiring: where to start?
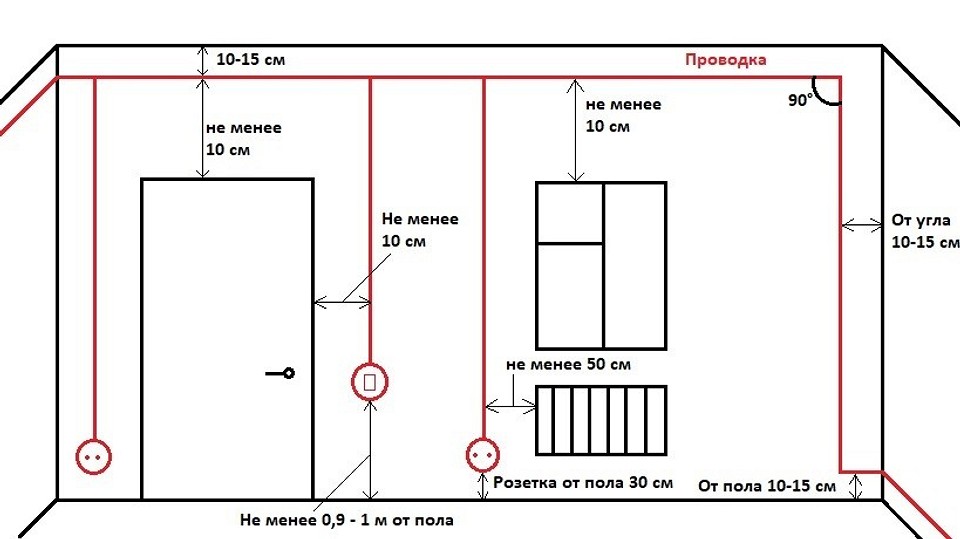
If it is necessary to conduct an electrical wire in the house, the following rules, regulations and prescriptions must be strictly adhered to:
- It is necessary to provide free access to junction boxes, as well as to electrical metering equipment.
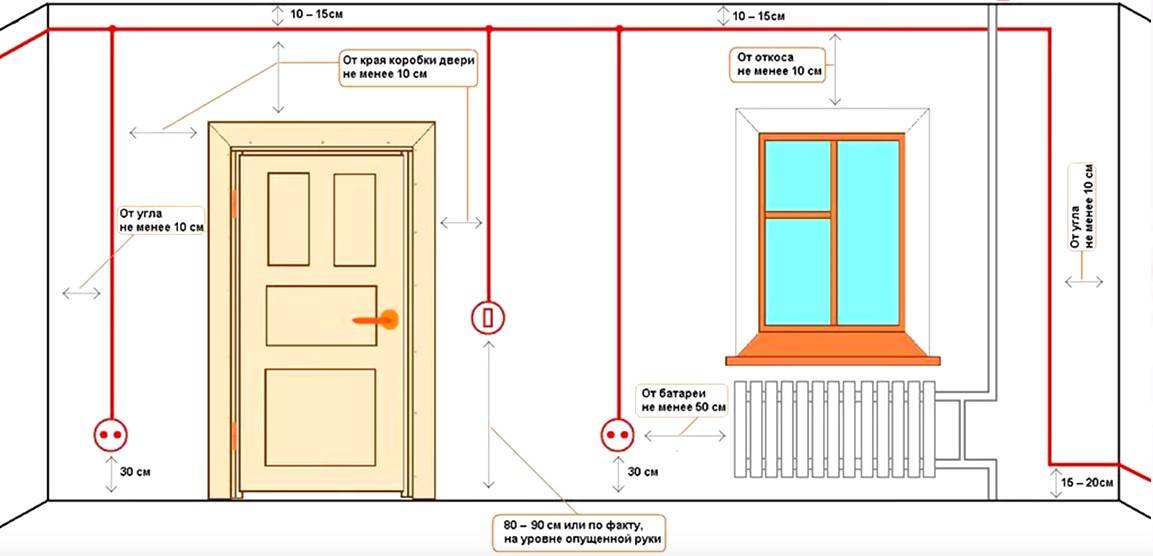
- Sockets and switches should be mounted at a level of 0.-1.5 m from the floor. And these elements should also be freely available.
- Open doors should not block access to the equipment specified in paragraph 1.2.
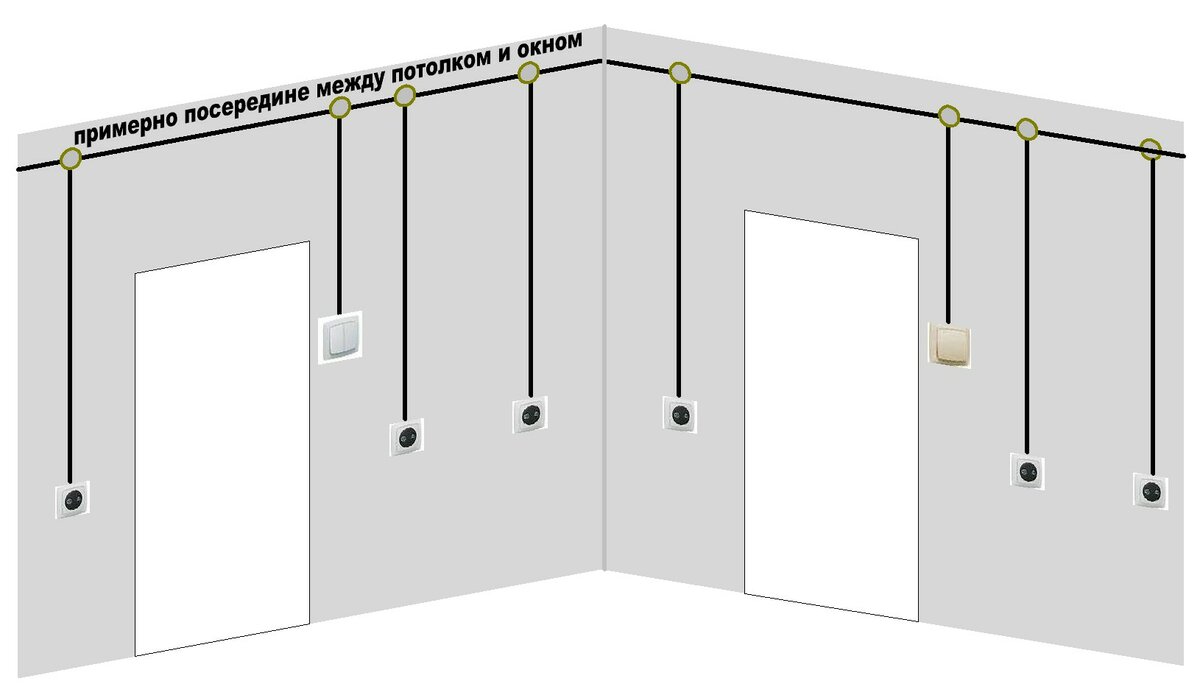
- The number of outlets in a residential area is calculated at the rate of 1 per 6 sq. m.
- In the kitchen, sockets are placed according to the number of household appliances.
- For the power supply of the bathroom, a separate voltage-lowering transformer should be provided. And it must be installed outside of this room.
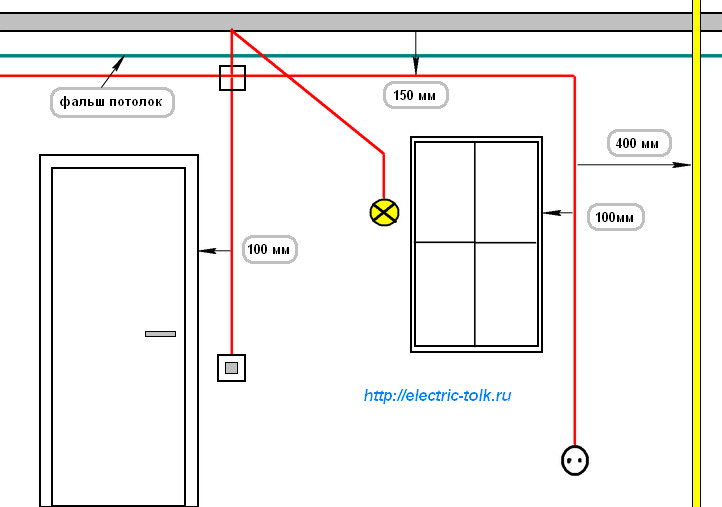
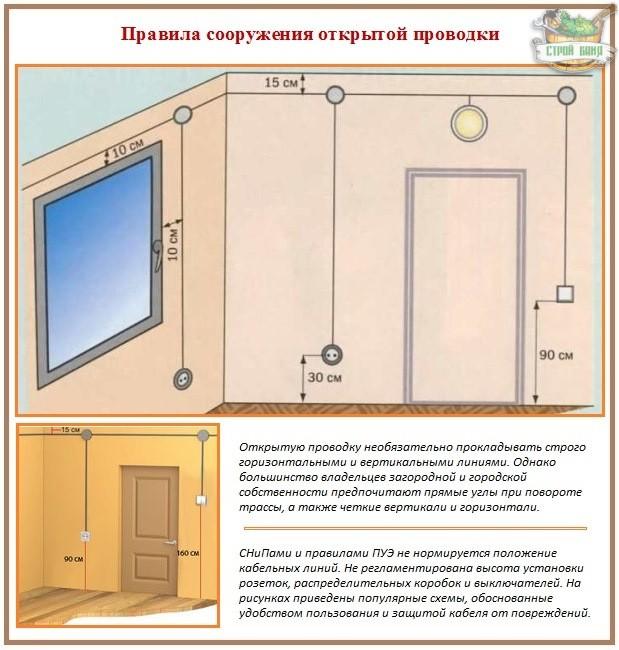
- The cable must be laid, strictly observing the vertical / horizontal, without any sags and deflections, as well as diagonal directions. Otherwise, it is likely to be damaged during installation work and perforation.
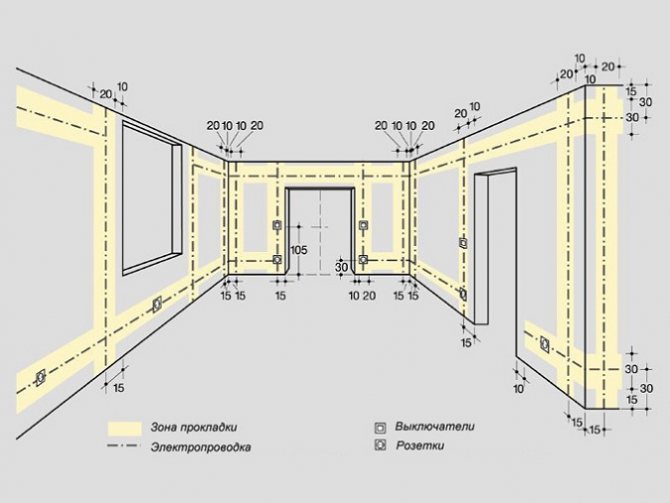
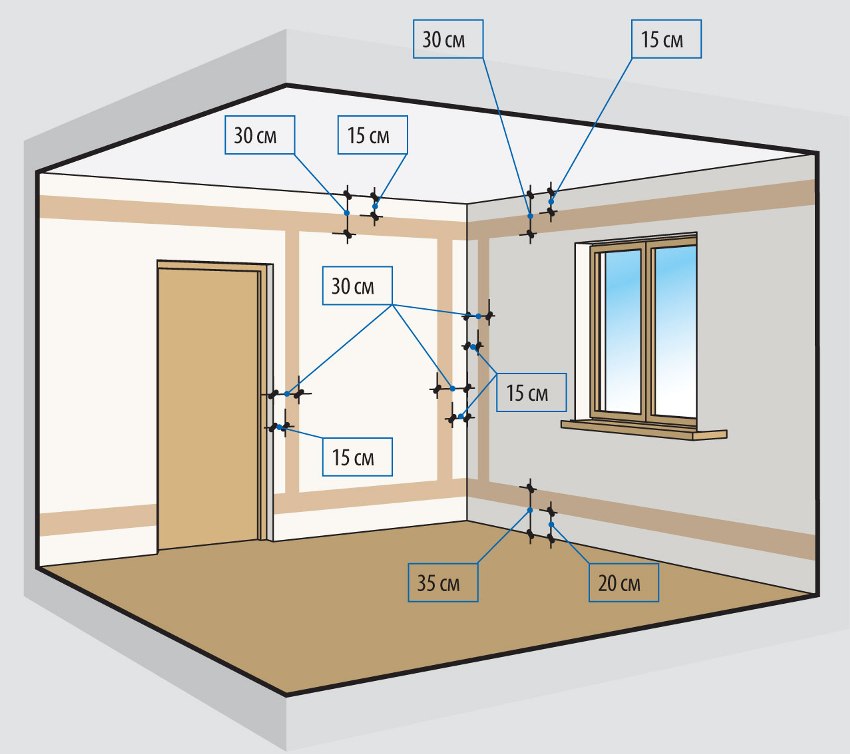
- Horizontal cables are laid at a distance of:
- from ceilings and cornices - 5-10 cm,
- from the floor and ceilings - 15 cm.
- Vertical cables are laid at a distance of:
- from window and door openings - 10 cm, not less;
- from gas pipes - 40 cm, no less.
- Special boxes are used for wiring and connecting cables.
- Any electrically conductive connection must be properly insulated.
- It is FORBIDDEN to connect aluminum wires with copper wires!
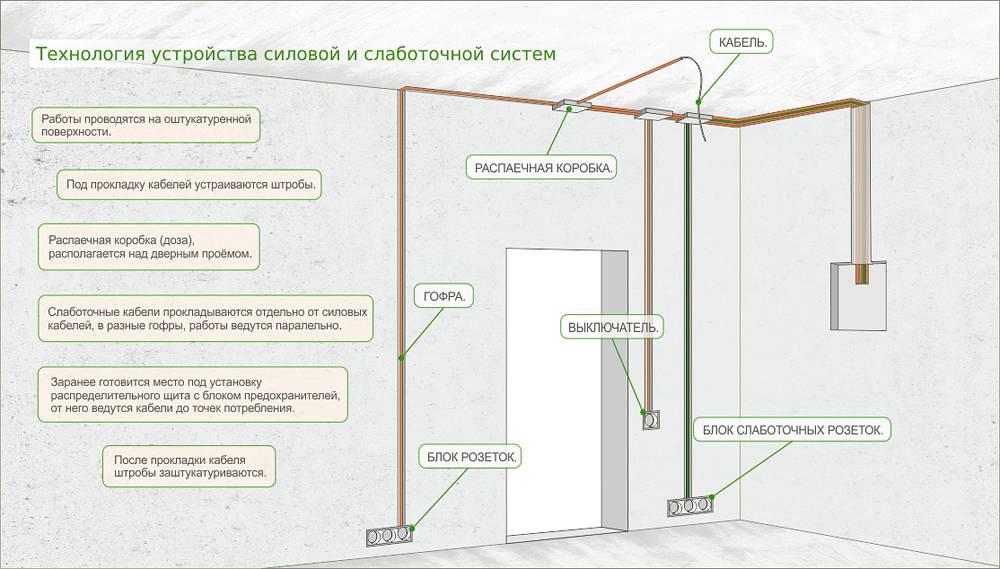
Installation of wiring in an apartment or a private house: stages of work and step-by-step instructions
Any work, and even more so electrical installation, must be carried out with strict adherence to a certain algorithm. Everything must be done in stages, and not rush to perform any actions without completing the previous ones. Having drawn up a wiring diagram in the house with your own hands, we step by step do the following:
- We calculate the cross section of the cables.
- We do marking and trimming.
- We lay the cable in channels and perform switching in junction boxes.
- We make a switch in the switchboard.
Connections can be isolated using special caps
Let's consider these actions in more detail.
What cables to use for wiring in an apartment or private house
Information on the choice of section has already been provided in our article, and therefore we will not consider the issue again. As for the number of cores, for single-phase systems without grounding, a two-core cable is used, and if there is a circuit, then a three-core cable. For three-phase without a circuit - 4 cores, and with grounding, five-core products are used.
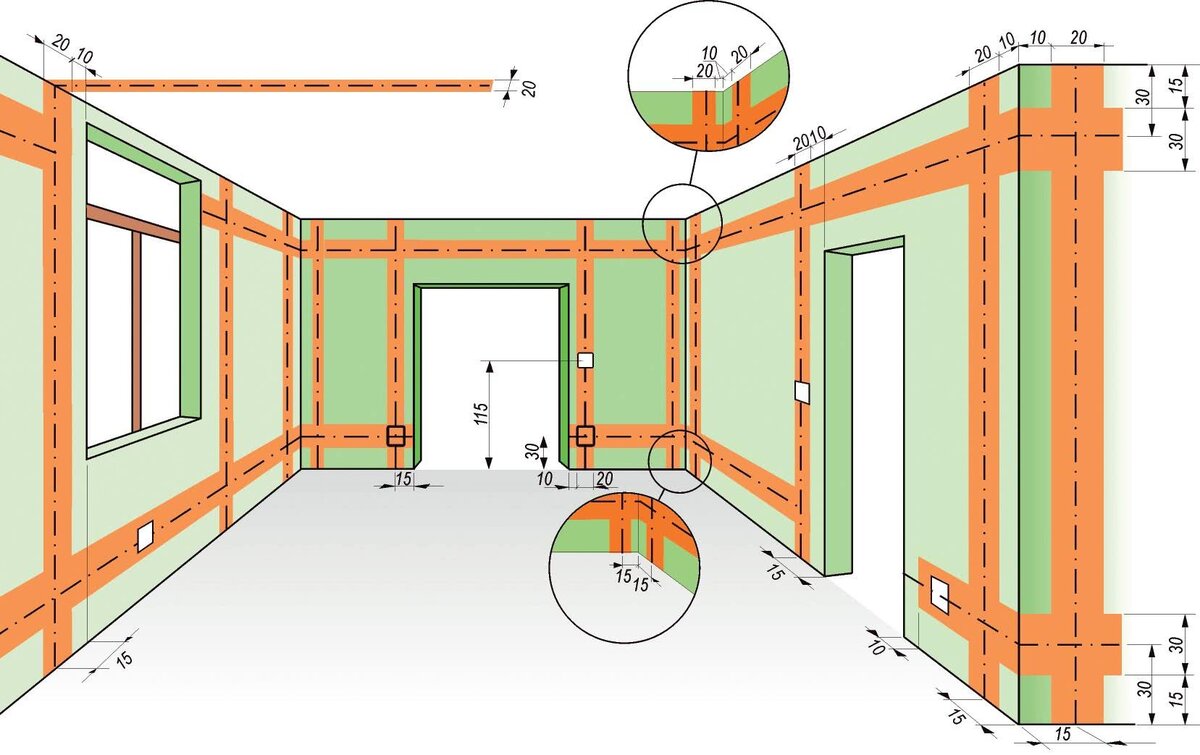
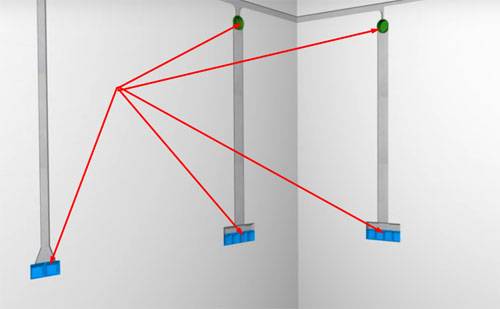
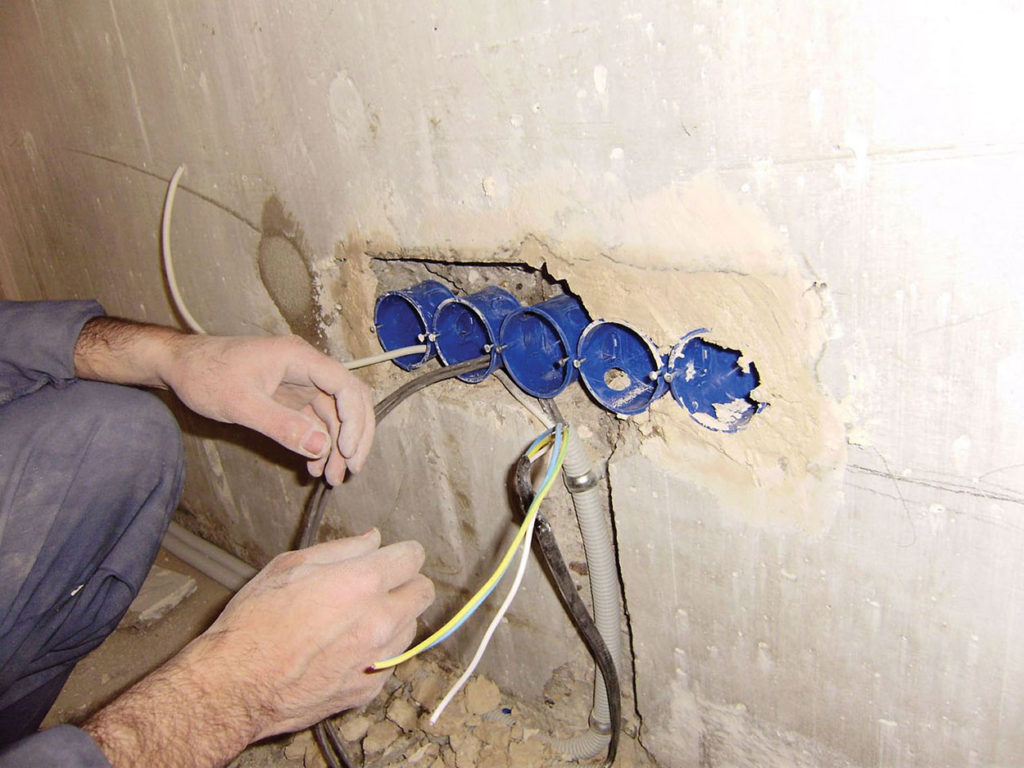
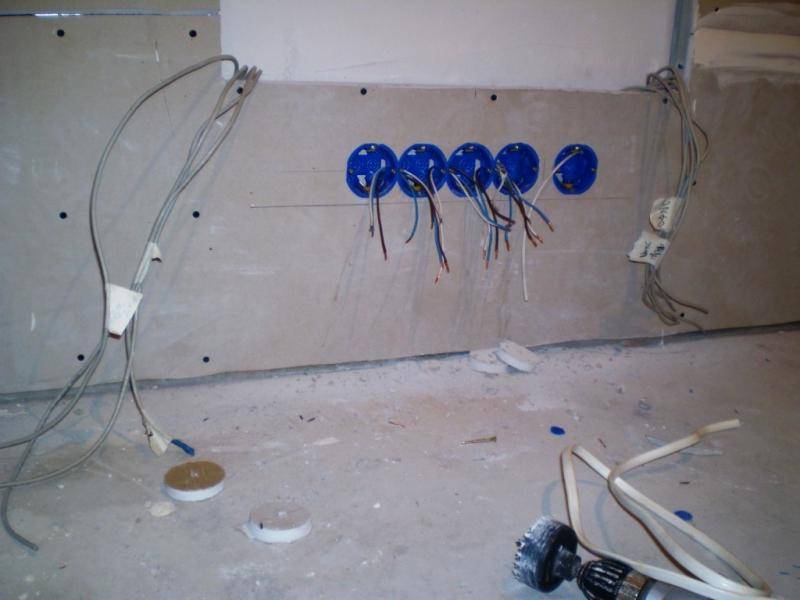
Wall marking according to the wiring diagram in the apartment
Before you make the wiring in the apartment, you should correctly mark the cable routes and the location of the power points. Having a diagram in front of your eyes, it will not be difficult to do this.To speed up and simplify the process for marking trails, it is better to use a marker cord. Although, if you have a laser level with a tripod at hand, you can use it.
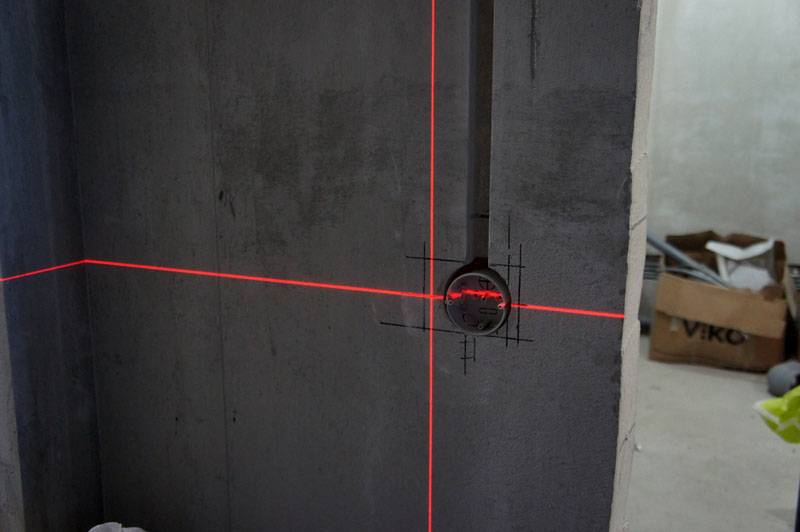 The laser level is also very convenient when marking walls.
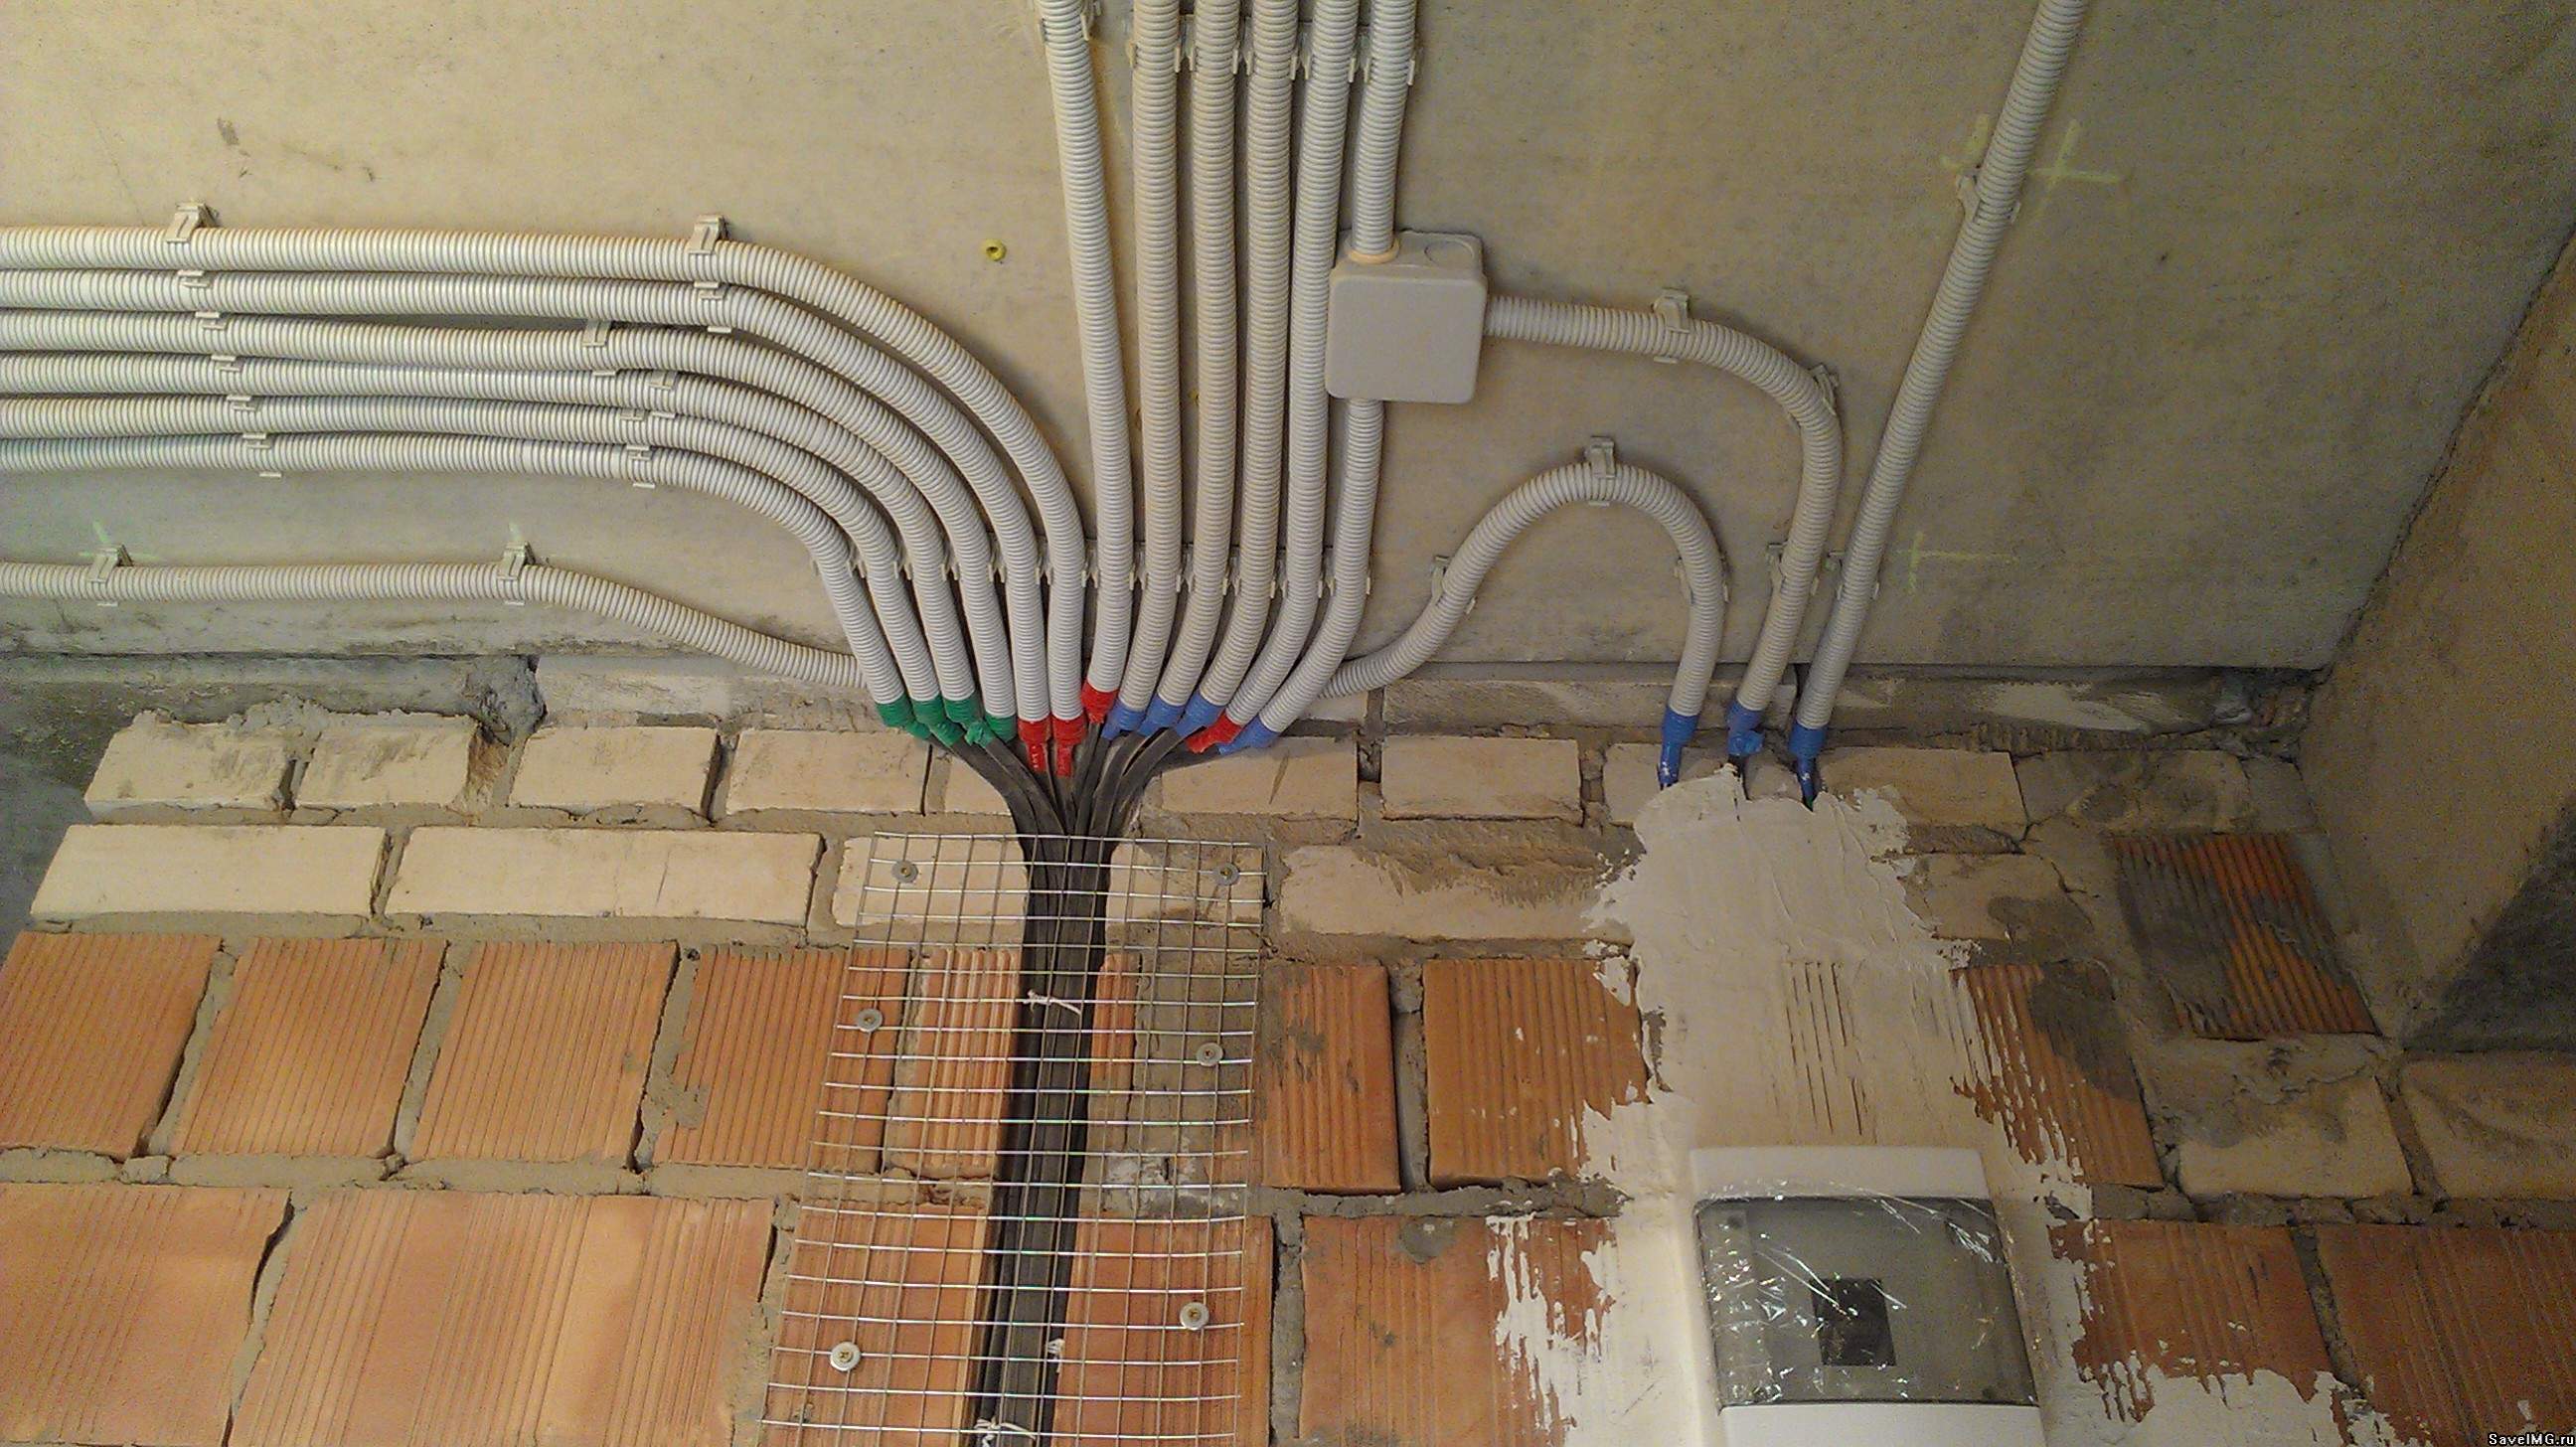
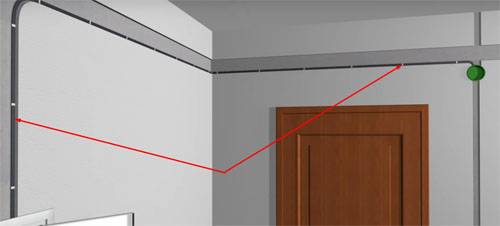
Features of installing hidden and open wiring in the house with your own hands
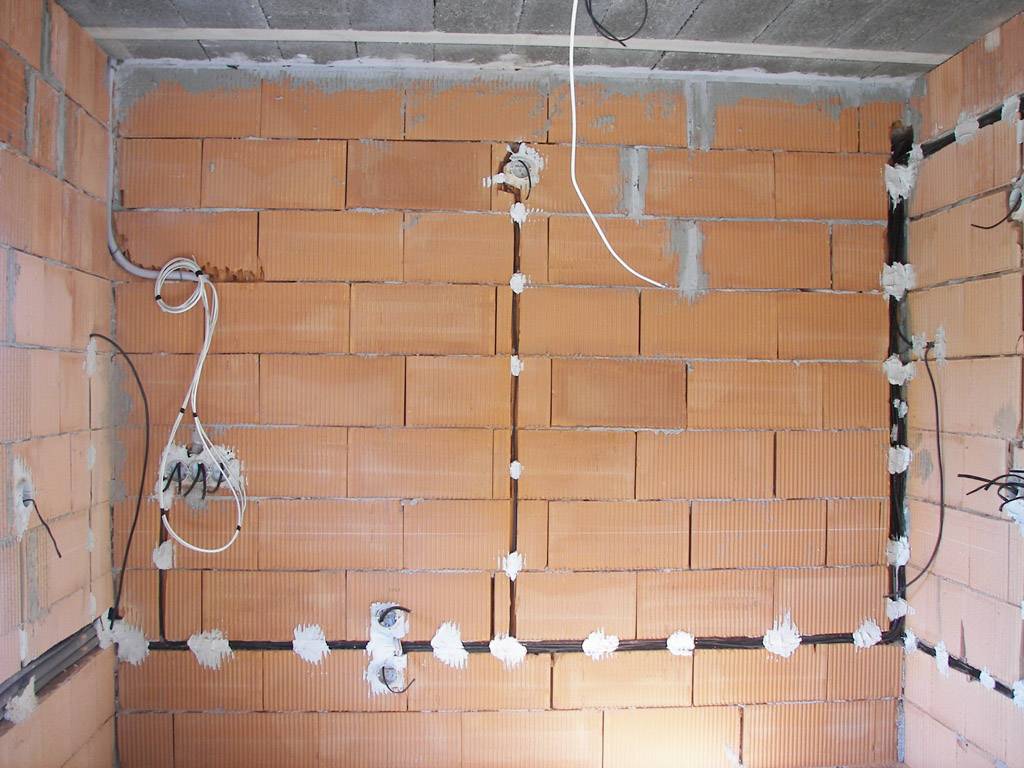
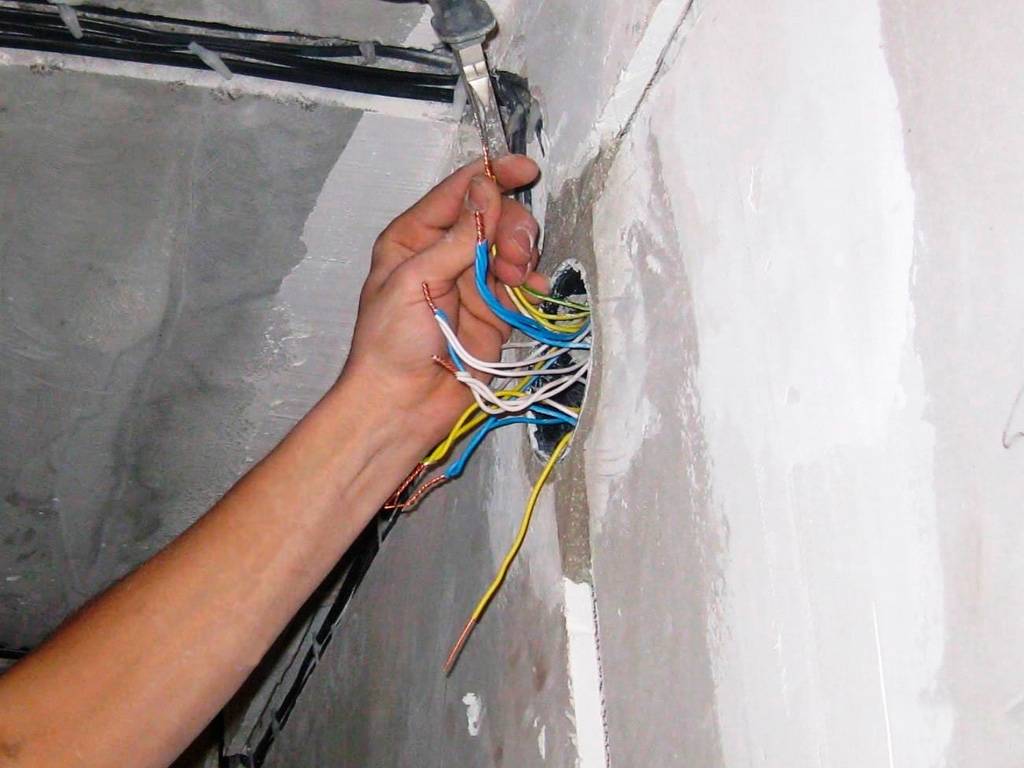
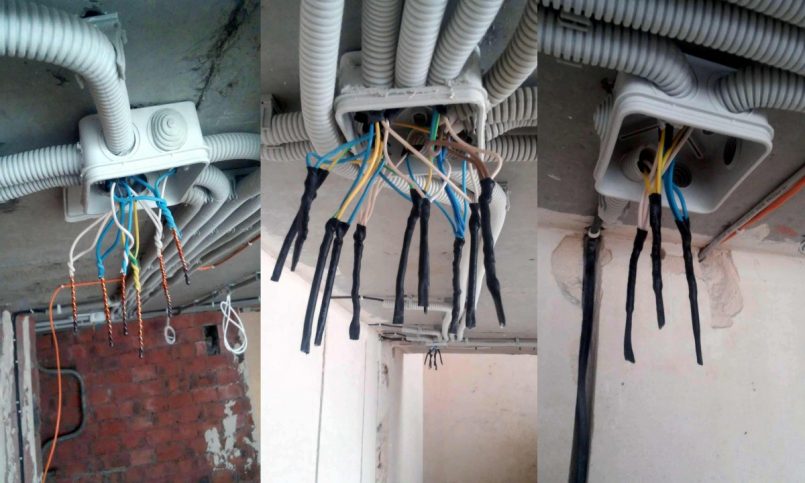
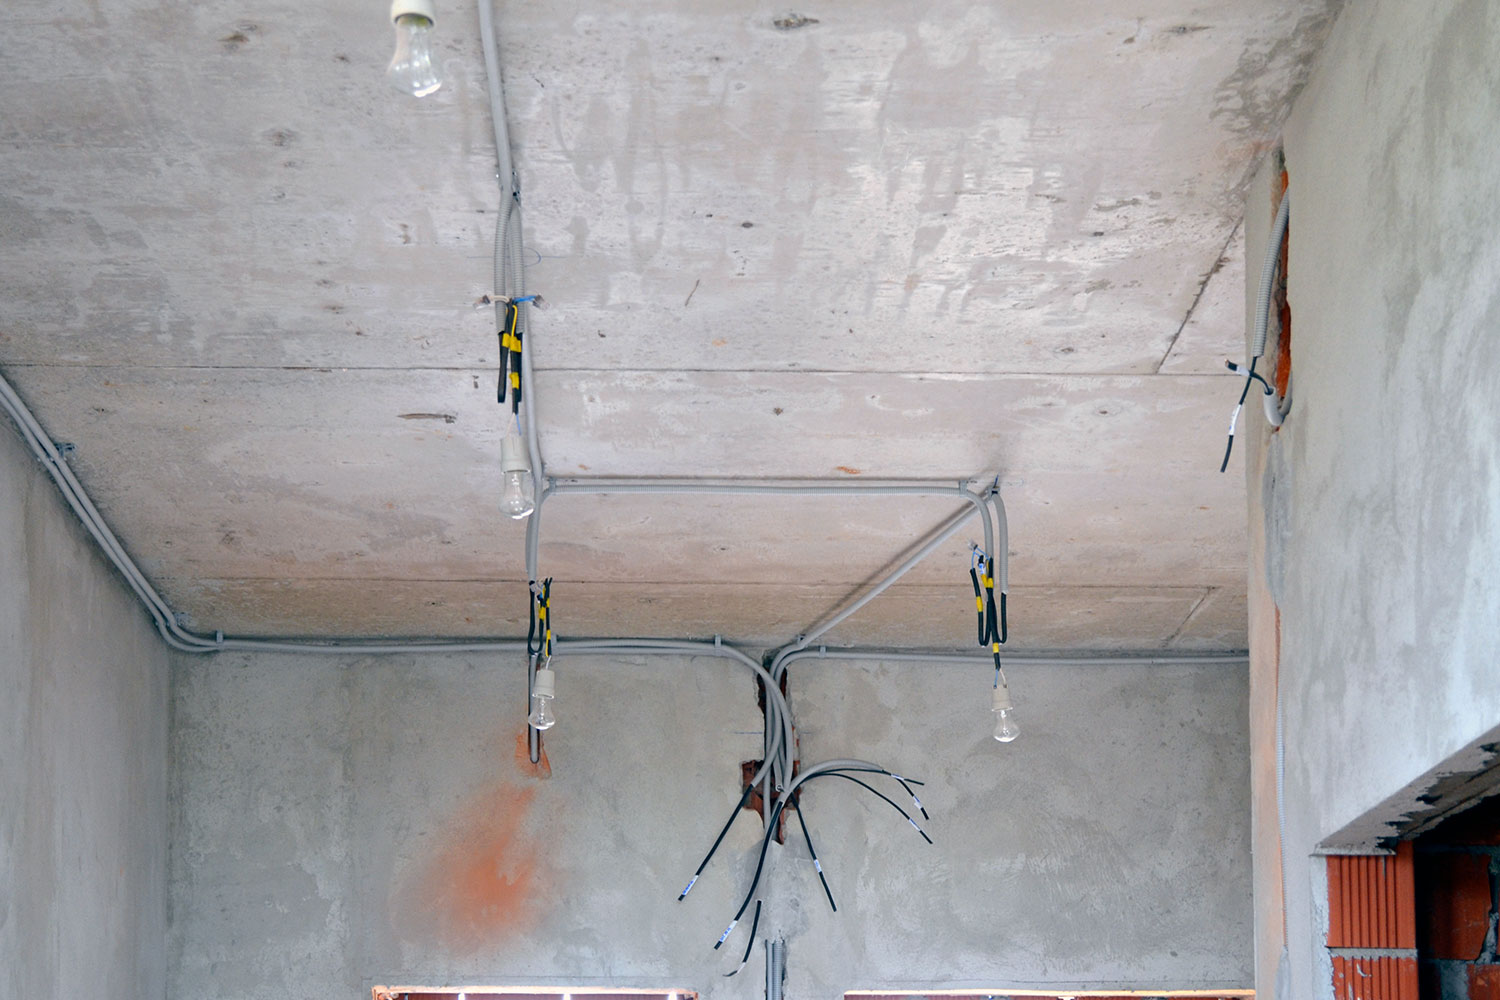
Along the marked routes, it is necessary to fix the cable channels of the corresponding size with the help of self-tapping screws or to punch grooves for laying wires. Junction boxes are installed at intersections (outlets and switches). Their size should be selected based on the number of connections that are planned to be made in them. When installing hidden wiring, it is necessary to use special crowns, with which a hole is drilled for socket boxes or round junction boxes. For square, a perforator chipper is used.
Brief step-by-step instructions for laying wiring in an apartment
Let's analyze the information presented on photo examples in general terms.
| Illustration | Action Description |
 | After marking, we make strobes and recesses for installing junction boxes, sockets and switches. All lines must be strictly vertical or horizontal. |
 | We install plastic boxes and socket boxes. Previously, it was allowed to mount metal ones, but now the PUE prohibits this. |
 | We stretch the cables separately for each of the groups. The work is carried out in stages with the obligatory marking of the direction of the wire. |
 | When switching in a junction box, it makes sense to note where this or that wire goes. This will help in future repairs. |
 | The laid cables will look like this.Now it remains to plaster the walls and finish the finish. |
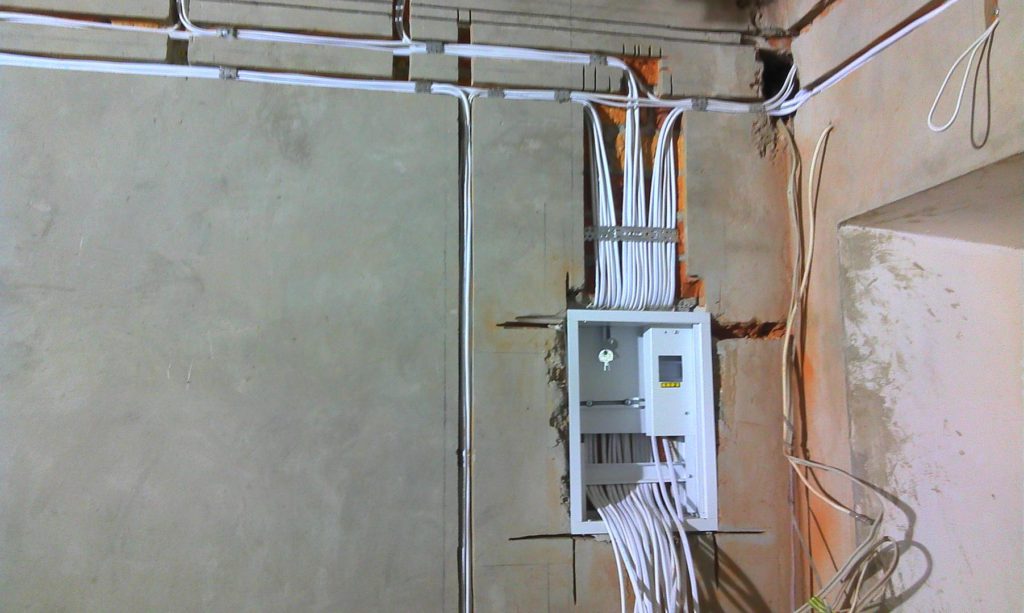
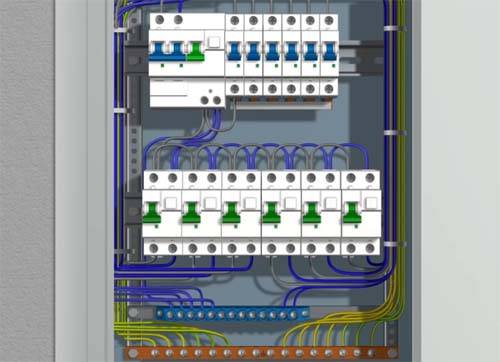 | Introductory shield in the apartment. It will have a similar appearance when the main power shield is located on the stairwell. |
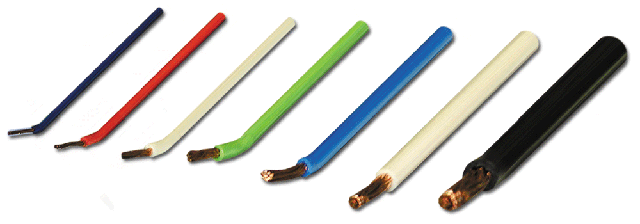
About the cross-section of cables and wires and their color marking
The cross-sectional area is the most important characteristic. When this indicator is taken into account, the wire or cable will be able to pass the required amount of current. The options for the different options are listed below.
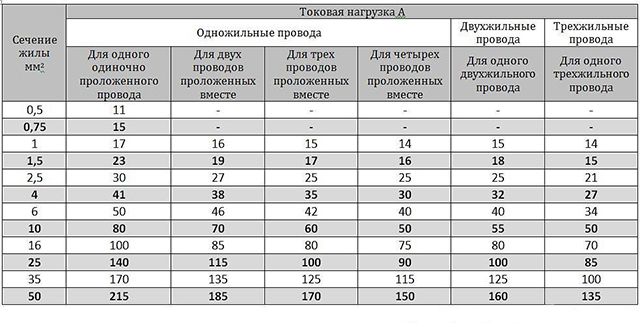
Thus, the value of the level of permissible current will depend on the number of wires
It is important to remember that cables get hot when a large amount of current flows.
Any high-quality wire has its own color marking, unchanged throughout the world. You can see more in the picture.
Which cables and wires to choose
In any store, a non-professional has a lot of questions, because the choice of cable products is quite large. It is better, of course, to seek help from professionals. And not just to a store employee, but to an electrician who will help you buy a new product for long-term use.
VVG cable
Used most often. Helps to transmit and distribute electricity indoors and outdoors. Can be with two, three and five cores. Various section options are available.
NYM cable
An excellent alternative to the previous cable. Manufactured according to German standards, has a PVC sheath. They are used to equip a stationary power and lighting pad.
PVC wire
Helps to connect lighting, because it has a flexible structure. PVA 2*1.5 or PVA 3*1.5 is used. To connect chandeliers, use PVA 4 * 1.5 or PVA 5 * 1.5. Be sure to use tips.
Wire PV1
Element for arrangement inside electrical panels. PVC insulation in different colors and copper monocore. The most commonly used wires with a cross section of 4 mm2 and 6 mm2.
PV3 wire
An analogue of the previous version, only the conductive conductor is stranded, facilitating the entire installation. PVC insulation. Required for laying potential equalization systems.
Cables and wires for low current systems
When installing electrical wiring, the arrangement of low-voltage systems is required. Wires can be for:
- computers;
- video surveillance systems;
- sensors and more.
They have a separate gasket, without creating a problem for power and lighting lines.