- Construction stages
- Video description
- How to choose the best place for a septic tank
- Pit preparation
- Installation of rings and sewer pipes
- Sealing and waterproofing
- Manhole installation and backfill
- How does the septic tank start up
- What rules must be observed when maintaining a septic tank
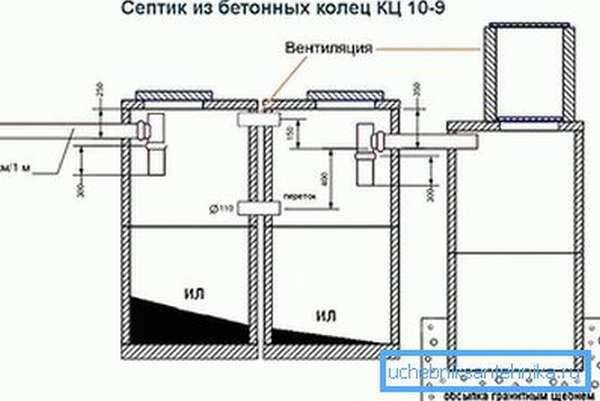
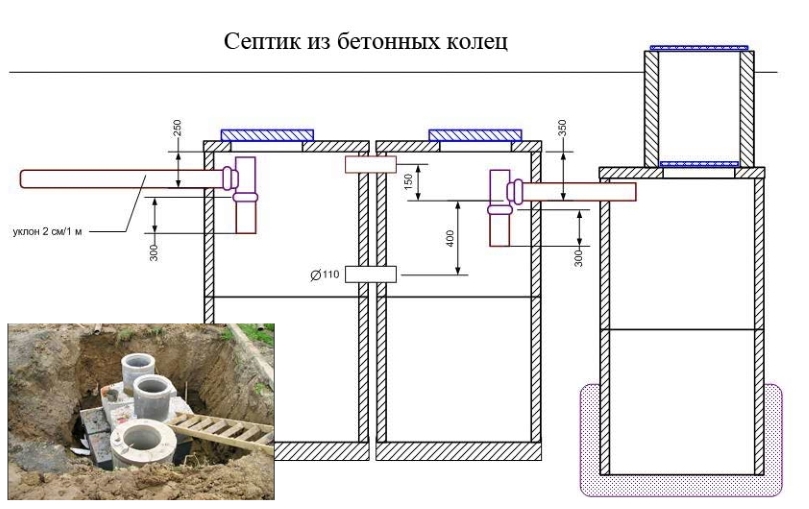
- The device of a septic tank from concrete rings
- How to make a septic tank from concrete rings: step-by-step installation instructions
- Excavation
- Installation and connection of rings
- Step by step guide for building
- The first stage - earthworks
- Strengthening reinforcement and erecting formwork
- Concreting of the walls of a monolithic septic tank
- Ceiling and ventilation installation
- Septic tank without pumping (principle diagram)
- Basic Information
- Postulate 1. Position correctly
- Postulate 2. Look at the GWL
- Postulate 3. Calculate the volume of the septic tank with a margin
- Postulate 4. Hire people to develop the pit
- Postulate 5. Order rings with delivery and installation
- Postulate 6. Use only red pipes
- Postulate 7. The filtration field occupies a large area
- Necessary tools and materials
- Work cycle and material consumption
- We calculate materials
- Schemes of sewerage from concrete rings
- We make a septic tank out of concrete with our own hands step by step
Construction stages
Installation is carried out in the following order:
- A place is selected, an installation scheme is built, and the parameters of the septic tank are calculated.
- A hole is being dug.
- Rings are installed, pipes are connected.
- Sealing and waterproofing works are underway.
- Covers are installed.
- Backfilling is underway.
Video description
The order of work and the installation of a septic tank from concrete rings on the video:
How to choose the best place for a septic tank
The structure is mounted above the groundwater level. The best location is at the maximum distance from the house (at least 7 meters, but not more than 20, so as not to increase the cost of pipeline construction). It is logical to have a septic tank on the border of the site, next to the road. This will reduce operating costs, since the cost of leaving the tanker-vacuum truck is affected by access to the system and the length of the hose. In addition, with the correct location, the sewage truck does not need to drive into the yard, but hoses will not fall on beds or paths (otherwise, when the hose is rolled up, waste may fall into the garden).
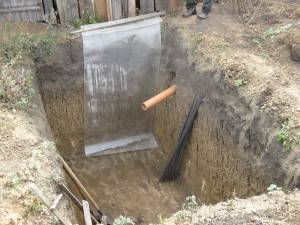
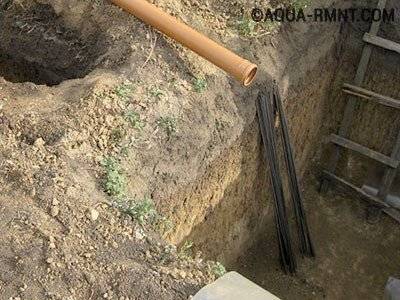
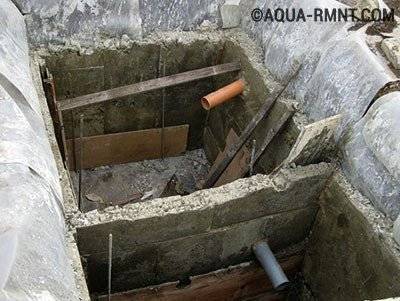
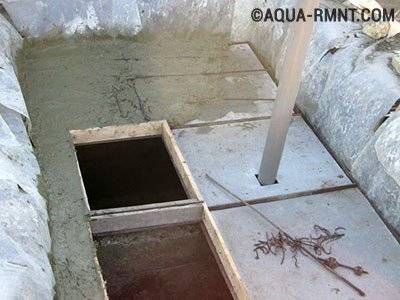
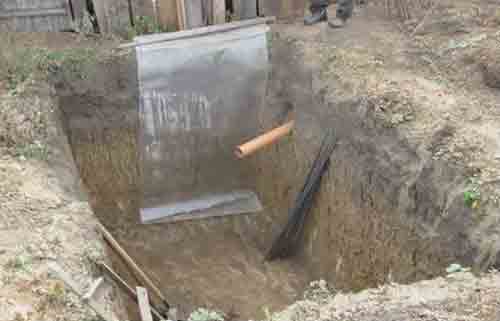
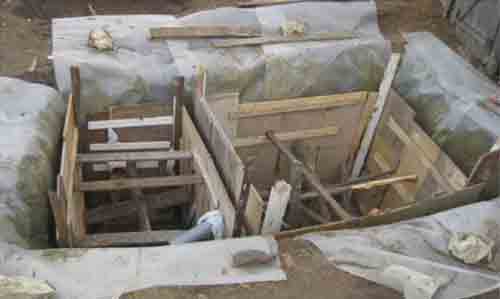
Pit preparation
Ground work using an excavator takes 2-3 hours. The size of the pit should be slightly larger than the dimensions of the wells. This is necessary for the smooth installation of rings and their waterproofing. The bottom is covered with rubble and concreted.
Training pit for a septic tank from concrete ringsSource
Installation of rings and sewer pipes
Rings for a septic tank are installed using lifting equipment, which saves a lot of time (when compared with manual installation). Fixation of the seams is provided with cement mortar, metal ties (brackets, plates) are additionally placed.
The crucial moment is the process of installing rings
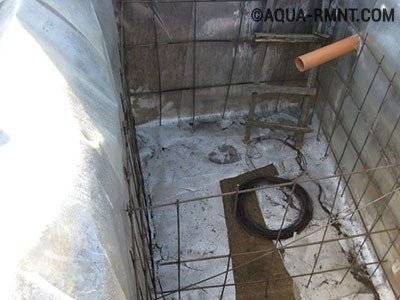
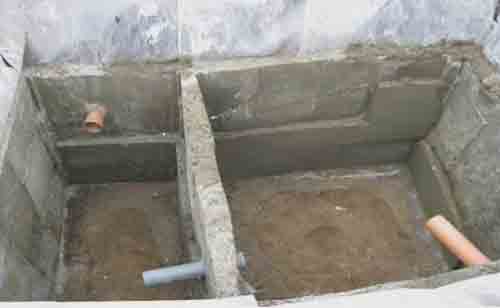
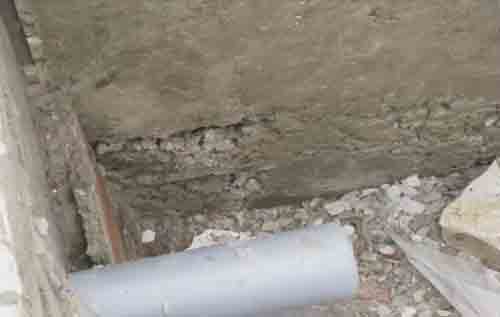
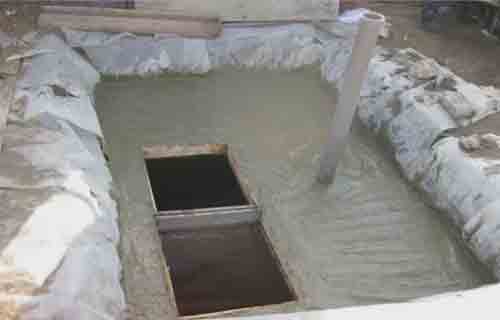
Sealing and waterproofing
Sealing the seams of the septic tank from concrete rings is carried out on both sides of the structure. For this, cement and coating protective solutions are used. Inside the well, you can install ready-made plastic cylinders. Such additional costs will make the system 100% hermetic.
In the process waterproofing concrete rings for a septic tank, connections are processed with liquid glass, mastic based on bitumen or polymer, concrete mix. To prevent freezing (and destruction) of the structure in winter, it is recommended to insulate it with a layer of polystyrene foam.
Sealing joints and waterproofing a septic tank from concrete rings
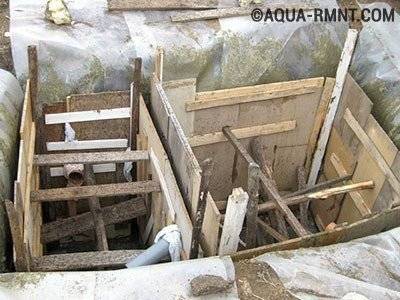
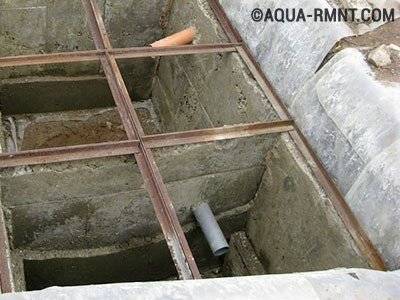
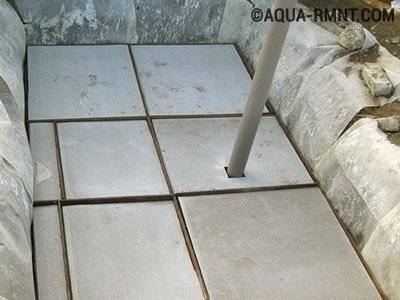
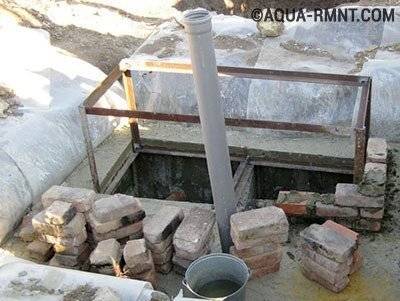
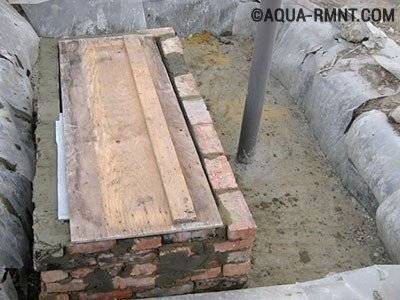
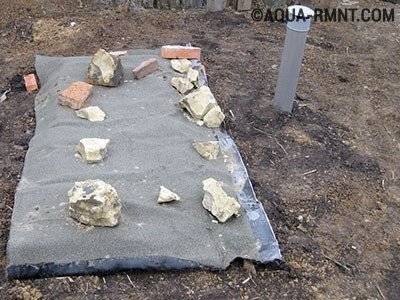
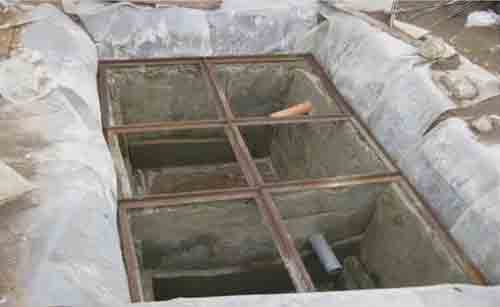
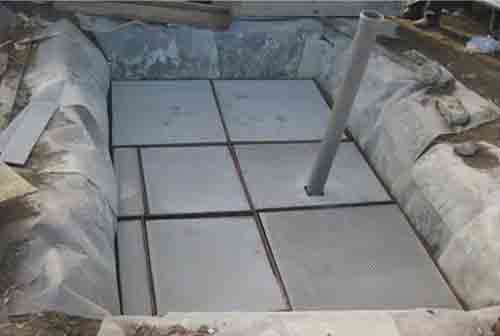
Manhole installation and backfill
The wells are covered with concrete slabs, with holes for manholes. In the first two wells, ventilation is necessary to remove methane (gas appears as a result of the vital activity of anaerobic bacteria). To backfill the installed floors, use the soil taken out of the pit (backfill).
Backfilling of finished wells
How does the septic tank start up
In order for the system to begin to function effectively, the erected septic tank must be saturated with anaerobic microflora. The natural accumulation process takes several months, so it is accelerated by saturating the septic tank with imported microflora. You can do this in two ways:
- A new septic tank is filled with wastewater and defended for 10-14 days. Then it is loaded with sludge from an operating anaerobic septic tank (2 buckets per cubic meter).
- You can buy ready-made bioactivators (bacterial strains) in the store (the main thing here is not to confuse them with aerobes that are intended for other treatment systems).
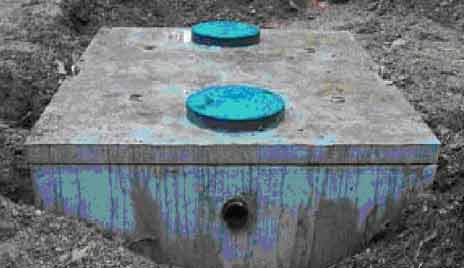
Ready to run septic tank from the rings
What rules must be observed when maintaining a septic tank
There are simple rules that support the quality of the system.
- Cleaning. Twice a year, in addition to cleaning the drains, the septic tank must be inspected and the pipelines cleaned. Once every 5 years (and preferably in 2-3 years), bottom heavy fats are cleaned. The volume of sludge must not exceed 25% of the volume of the tank. During cleaning, part of the sludge is left to restore the microflora.
- Quality of work. Effluent at the outlet of the system must be cleaned by 70%. Analysis of wastewater in the laboratory will determine the acidity index, which will allow you to know the quality of the drainage system.
- Security measures:
- Work inside the septic tank is allowed only after enhanced ventilation and using a safety belt (gases formed inside can be dangerous to human life).
- Increased safety measures are required when working with power tools (wet environment).
A septic tank made of concrete rings makes private housing more autonomous and, despite its shortcomings, it is one of the most reliable and durable options for treatment facilities for suburban real estate.
The device of a septic tank from concrete rings
At the first stage, it is necessary to import all necessary material prepare tool. To begin with, we need a container for mixing the solution. Accordingly, sand, cement grade m500 will be required. For the construction of a drainage base, it will be necessary to bring in pebbles and crushed stone of the required volume. You should buy mounting foam, sewer pipes, transitions and fittings.
Once everything is ready, you should start marking. And in order to determine the place for installing a well pit, we know all the necessary conditions.Thus, having decided on the place, they make markings, after which they call an excavator or do the work by hand. It depends on your financial capabilities, as well as on whether you have access to the place of work for special equipment.
The recommended time for work is late autumn, when frosts have already set in, or a hot season. At this point, groundwater is at its lowest point. Of course, it is recommended to work using special equipment, since proper waterproofing involves not only filling the seams from the inside of the well rings, but also from the outside.
Previously, we considered that drainage pit will consist of two tanks, and therefore, in order for the second tank to absorb the maximum volume, it is necessary to deepen it by about 50 cm
In compliance with all building regulations, it is important that there is at least 50 cm of space between two separate tanks. Ideally, two different holes should be dug for each tank separately. Even if you are digging with special equipment, finishing the work, the bottom of the trench must be leveled with a shovel, making a slope of about 2-3 cm per linear meter
Even if you are digging with special equipment, finishing the work, the bottom of the trench must be leveled with a shovel, making a slope of about 2-3 cm per linear meter.
On the base of the excavated trench, in which the pipe will lie, supplying wastewater to the first tank, it is necessary to pour sand, which should also be rammed. You should prepare a solution in advance, which should contain 1 bucket of cement and 3 buckets of sand. That is, we make a solution of one to three. The ideal option would be to dig the base for laying future tanks drain water in advance, then tamp the sand and spill it with water so that it is maximally compacted.
How to make a septic tank from concrete rings: step-by-step installation instructions
In addition to calculations, the preparatory work also includes the choice of location and consideration of natural features.
a concrete cascade to protect against atmospheric moisture and ensure the gravity movement of wastewater inside the treatment system should not be located in a relief depression;
there must be at least 5 m between the cleaning device and the foundation;
distance to underground drinking sources - 50 m, and to reservoirs and streams - 30 m;
if the supply pipeline has a length of more than 10 m, then a manhole must be installed on it;
with high GWL and poorly permeable soil, the filtration well must be replaced with one of the types of filtration fields or a storage tank;
it is important to take into account the possibility of a sewer truck access;
pipelines must run below zero ground temperatures.
Having chosen a site for mounting containers, you can start buying equipment and preparing all the tools:

The device of a septic tank from two tanks: scheme
- First of all, reinforced concrete rings will be needed. For the sump and biological treatment tank, the first element can be purchased with an existing bottom, or pour it yourself during installation. Floor slabs are also needed from reinforced concrete products.
- You need to buy cast-iron or plastic hatches in an amount equal to the number of tanks.
- Pipes for ventilation and connection of chambers with each other and with domestic sewage and fittings for them.
- Sand for leveling trenches for pipes.
- Crushed stone for a filtration well.
- Waterproofing for joints between rings, e.g. bitumen.
- Ruberoid for external waterproofing of tanks.
- Cement, liquid glass.
- Devices for cutting and connecting polyethylene pipes.
- Shovel.
- Trowel and brush.
It is also important to agree on the hiring of lifting and digging equipment. You can prepare the pit manually, but it will take much more time.
Excavation
 Before digging, markup is usually done:
- a peg is placed in the center of the proposed pit;
- a twine is tied to it;
- a second peg is tied to the free end of the rope at a distance equal to the outer radius of the concrete ring, plus another 20-30 cm;
- the resulting system outlines the contours of the pit.
This is done for each tank. The depth of the pit should be slightly greater than the total height of the rings, since bottom preparation must be taken into account. The bottom is leveled at the construction level and rammed. Then a concrete base is poured, if rings with a blank bottom are not purchased.


For a filtration well, a cement base is not needed; instead, a crushed stone filter is poured.
At the stage of digging a pit, trenches are prepared for the inlet pipeline and pipes connecting the tanks, not forgetting a slope of 5 mm per linear meter. The bottom of the ditches is covered with a layer of sand of 10 mm.
Now you can proceed directly to the installation work.
Installation and connection of rings
- With the help of a crane, the rings are released strictly on top of each other, treating the joints between them with a mixture of liquid glass and cement.
- From the inside of the tank, the seams are additionally covered with bitumen for waterproofing and connected for structural strength with metal brackets.
- Summing up the external sewer pipeline.
- Holes are made in the walls of the working tanks for the inlet and connecting pipes. The junction of tanks 1 and 2 must be 0.3 m higher than between chambers 2 and 3.
- Fittings are installed in the holes.
- A ventilation pipe is mounted to the first tank.
- Lay connecting pipes.
- Dock tanks with all pipes. All joints are treated with a sealant, for example, liquid glass.
- Cover the outside of all containers with roofing material.
- If necessary, a compressor is released into the second tank and activated sludge is loaded.
- Install ceilings and hatches.
- Cover with insulation and backfill.
The device is ready for use. The simplest septic tanks can enter the operating mode within six months. This procedure is accelerated by adding special bacteria to the containers. Proper operation depends on regular maintenance.
Step by step guide for building
Having made the necessary calculations and having decided on the size and location of the structure, we begin to build a concrete septic tank with our own hands. Consider an example of the construction of a two-chamber structure.
The first stage - earthworks
An independent device of a concrete septic tank begins with earthworks. They are made either by hand or with the help of machinery. In the second option, the process will be faster, especially on heavy ground, but you will have to provide transport access.
The walls of the excavated pit should be extremely even. The strength of the structure depends on this. At this stage it is necessary to dig trenches from home to septic tank and from the septic tank to the drainage system. Lay pipes and fill. The depth of their laying should be sufficient so that the system does not freeze through. Otherwise, you will have to take care of the insulation of the pipeline.
Laying pipes in trenches must be carried out before the walls are poured
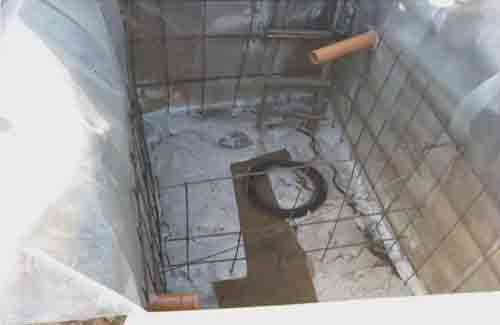
Strengthening reinforcement and erecting formwork
To prevent untreated sewage from entering the ground, the walls of the excavation are covered with waterproofing material. Its edge should protrude above the walls of the pit.

To prevent the penetration of untreated effluents into the soil, waterproofing material is laid around the perimeter of the pit
Next, the armature is attached. For it, special rods or long cylindrical metal products with sufficient bending strength are used. For a sealed container, the bottom of the pit is covered with 20 centimeters of sand, compacted and poured with concrete. Then you need to let it dry for a couple of days.
The use of reinforcement increases the strength of the walls and the durability of the septic tank
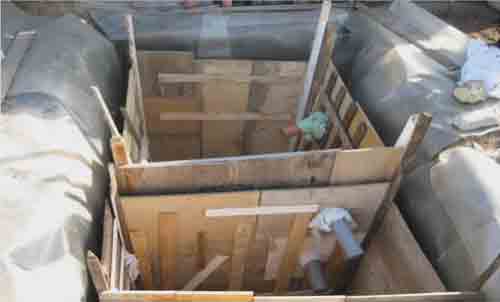
Formwork for a septic tank is constructed from improvised material. Any inch boards or OSB sheets will do.
With insufficient material, sliding formwork can be erected. That is, install boards for the construction of half of the septic tank, and after the concrete has hardened, remove it and use it to fill the rest of the structure.
To make the chambers separate, it is necessary to insert a double-sided formwork. At the same stage, a hole is cut out and the pipe is attached
For the partition of the septic tank, a double-sided formwork is installed into which the overflow pipe is inserted. Longitudinal bars made of solid wood inside the formwork will strengthen its walls and will not allow the structure to fall apart under the action of the concrete mass.
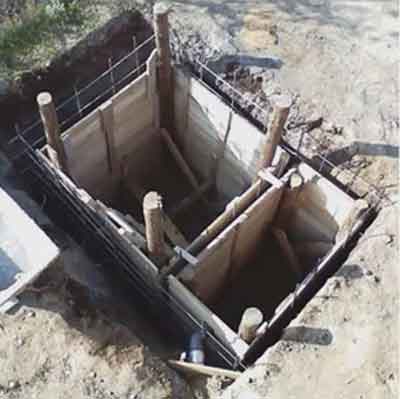
Concreting of the walls of a monolithic septic tank
Having installed and fixed the formwork, they begin to mix the concrete. The ratio of sand to cement in our case is 1:3. Fine crushed stone is used as a filler.If kneading is done manually, the solution is prepared in portions and poured. It is necessary to ensure that voids do not form in the walls of the septic tank. This reduces the strength of the structure.
The formwork is removed only after the concrete has completely cured.
After completing the work, you need to wait a couple of weeks until the solution completely solidifies. Only after that formwork can be removed. Internal waterproofing of a concrete septic tank is not carried out due to the fact that under the action of moisture, the strength of concrete increases. The main thing is that there are no cracks in the walls of the structure.
Ceiling and ventilation installation
On top of the concrete septic tank, metal corners are laid, and on top of them is a ceiling of flat slate or boards. At this stage, a ventilation pipe is inserted into the concrete septic tank.
Installing metal corners will give the floor additional strength
When constructing the ceiling, do not forget to insert the ventilation pipe. It should rise above the septic tank by at least 2 meters
A hole is also left for the possibility of cleaning the septic tank. The resulting hole is protected by boards mounted on the edge. The top of the structure is reinforced with improvised material and poured with mortar.


For structural strength, be sure to use reinforcement when pouring concrete over the septic tank
After the concrete has hardened, a box of corners is installed on the control hatch. The sides of the box are laid with bricks, and the top is closed with a board.
The overlap of the septic tank is covered with expanded clay and earth, and the hatch is closed with roofing material.
A frame for the control hatch is made from metal corners
The control hatch around the perimeter is laid with bricks, and covered with a board from above
The top of the septic tank is insulated with expanded clay, and the hatch is closed with roofing material
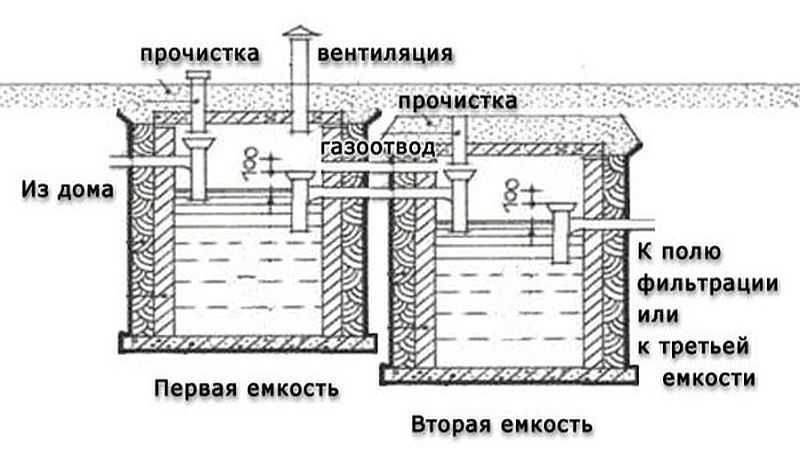
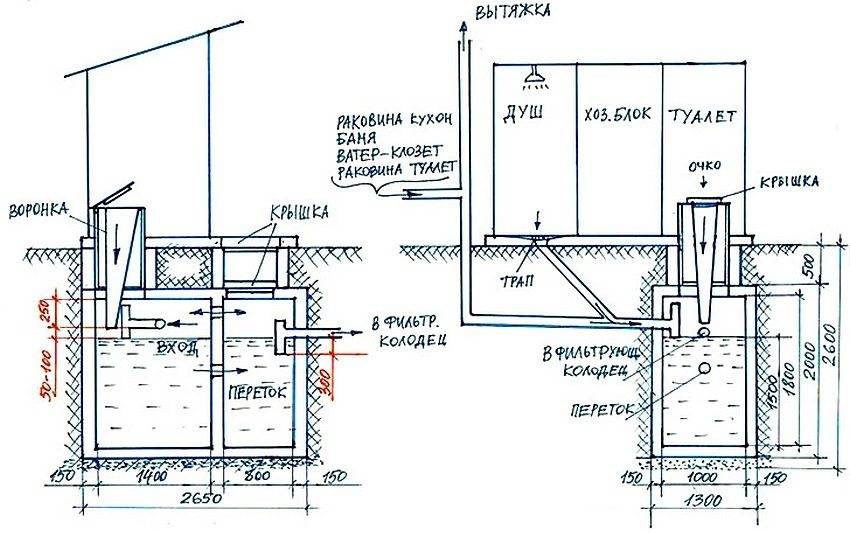
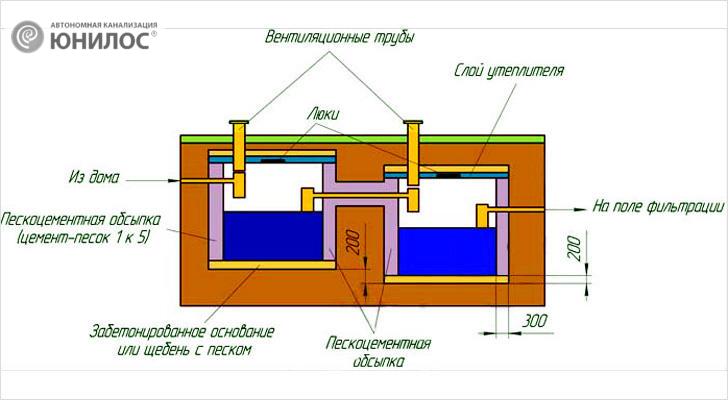
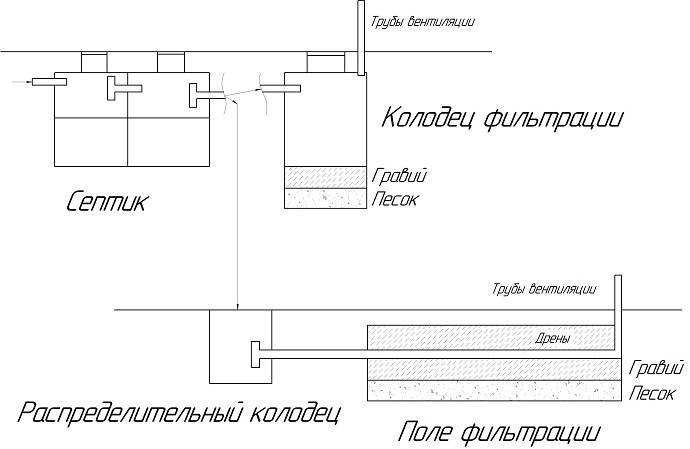
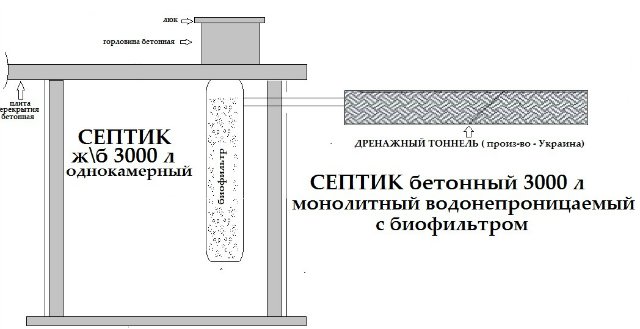
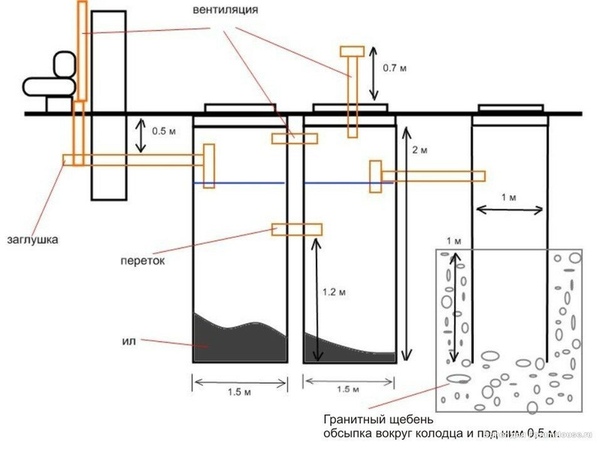
Septic tank without pumping (principle diagram)
Like any construction work, the creation of an autonomous sewage system must begin with the preparation of a project. The scheme should display, in fact, the capacity of the septic tank, made do it yourself from bricks or concrete rings. It can be two or three chamber. The latter option, as practice shows, is more effective.
An example of a compiled project is shown in the figure.
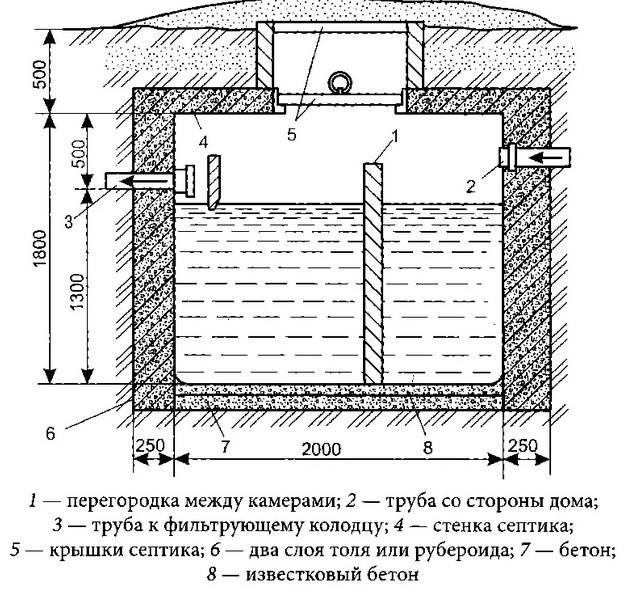
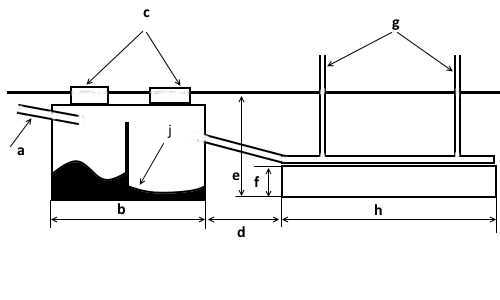 Plan-scheme (drawing) of autonomous sewage
Designations on the project:
- a - a pipe to which a toilet and other drains from the house are connected;
- b - the capacity of a two-chamber septic tank;
- c - a cover that closes the hatch through which the containers are cleaned;
- d - overflow pipe (made from two meters or more long);
- e is the depth of the filtration field (from 1.5 to 2 m);
- f is the thickness of the filter pad (biofilter) from 0.5 m;
- g- ventilation pipes;
- h - drain filtration fields (surface drainage) with a length of 5 to 20 m;
- j - bottom with accumulated sediment.
Basic Information
Postulate 1. Position correctly
Place for a septic tank choose on the highest platform of the site. This is necessary so that storm drains do not flow into it.
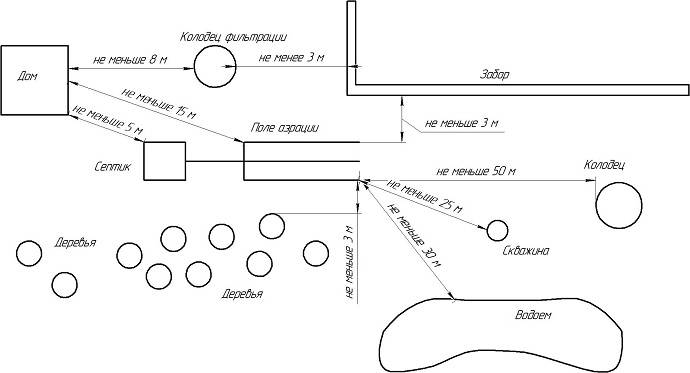
For the placement of the septic tank, see SP 32.13330.2012, the distances to it should be as follows:
- from home - 5 m;
- from the reservoir - 30 m;
- from the river - 10 m;
- from the well - 50 m;
- from the road - 5 m;
- from the fence - 3 m;
- from the well - 25 m;
- from trees - 3 m
Postulate 2. Look at the GWL
If the groundwater level (GWL) is high, i.e. water accumulates in the pit already at a depth of 1-1.5 m, then this is a reason to think about choosing a different design of the septic tank, possibly a plastic sump or biological treatment plants. We discussed in detail about ready-made VOC options in this article.
If you firmly settled on the wells, then you should wait until the GWL is lower. For example, summer or winter. This will simplify the development of the pit and the construction of wells: you will not stand knee-deep in water and will be able to concrete the bottom normally and make the seams between the rings airtight.
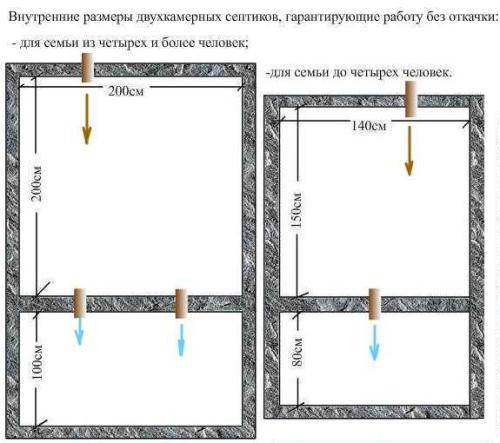
Postulate 3. Calculate the volume of the septic tank with a margin
Carefully calculate the volume of the septic tank. Please note that the rule according to SP 32.13330.2012, in which the volume must be more than 3 times the volume of wastewater discharged into the sewer per day, is valid only on sandy soils and at low GWL. The rules assume that 1 person per day will discharge 200 liters of wastewater. And this means that in this case you need a septic tank with a volume of 600 liters.
In other cases, the worse the soil drains, the larger the volume of the septic tank. There is a working rule: for a family of 4-5 people with permanent residence, depending on the soil, the septic tank will be 30 m³ - on clay, 25 m³ - on loam, 20 m³ - on sandy loam, 15 m³ - on sand.
| Number of people | Septic tank volume, m³ (working values) | |||
|---|---|---|---|---|
| Sand | sandy loam | Loam | Clay | |
| 1 | 4 | 7 | 10 | 15 |
| 2 | 7 | 12 | 17 | 22 |
| 3 | 10 | 15 | 20 | 25 |
| 4 | 15 | 20 | 25 | 30 |
| 5 | 15 | 20 | 25 | 30 |
| 6 | 17 | 23 | 27 | 35 |
| 7 | 20 | 25 | 30 | 35 |
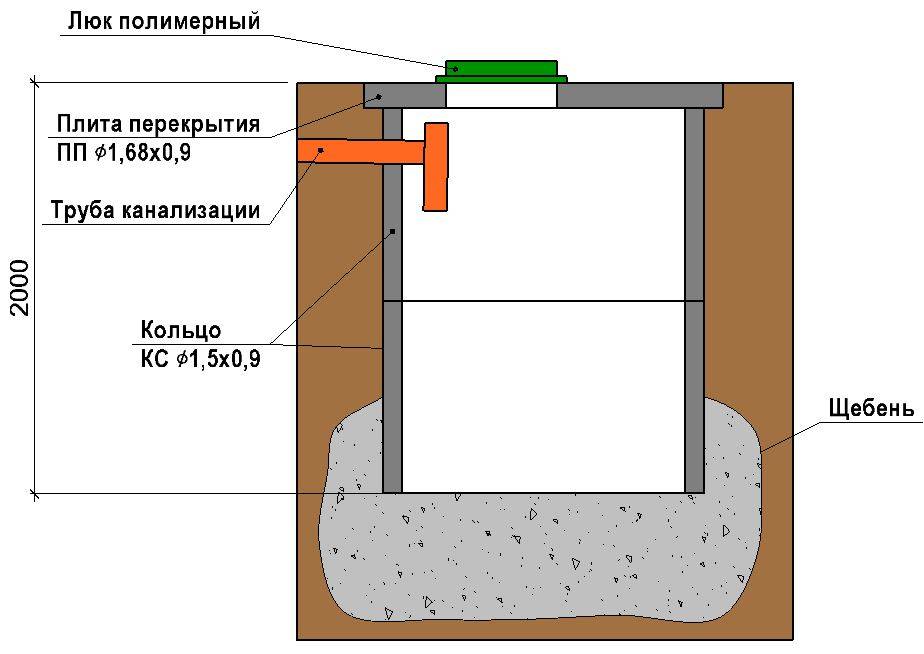
It is necessary to vary the volume of the septic tank not by the depth of the wells, but by the diameter of the rings. Those. if you have a choice of rings with a diameter of 1.5 m and a height of 0.9 m, or a diameter of 1 m and a height of 0.9 m, then it is better to take the first ones. They will need a smaller amount to obtain the desired volume. This means that a not so deep pit is required, there will be fewer seams in the wells.
Postulate 4. Hire people to develop the pit
If you are not a 20-year-old young man, and you do not have a couple of the same assistants who are ready to work for barbecue and beer, then entrust all earthworks to hired workers or hire an excavator.

The pit must be larger than the volume of the treatment plant, i.e. the distance from the wells to the walls of the pit is 30-50 cm. Subsequently, this volume must be covered with a sand-gravel mixture (SGM) or sand.
Postulate 5. Order rings with delivery and installation
Order rings only after the foundation pit is ready. Immediately with the installation, i.e. a truck with a crane-manipulator should arrive.
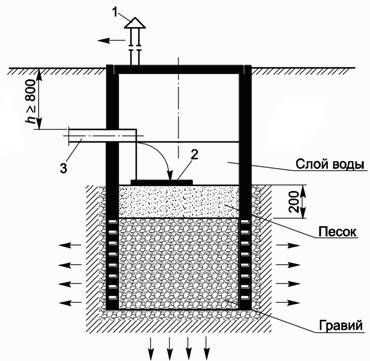
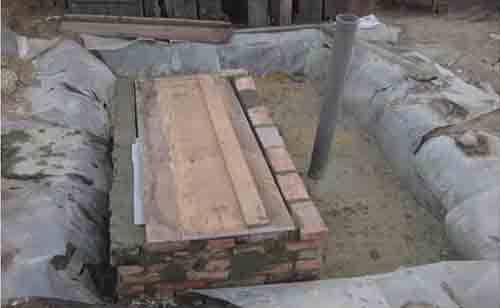
All lower rings must be bottomed. They are factory-made - convenient and reliable. The exception is filter wells, which are made on well-draining soils. But on clay by no means DO NOT DO IT like the picture below!
After 1-2 years, the bottom of the filtering well becomes silted and does not allow runoff to pass through, you have to call a sewage truck to clean the well, but this does not give a long-term effect.
Postulate 6. Use only red pipes
Pipes are only red, with a diameter of 110 mm, for external sewage. They need to be insulated only if they are in the open air in some area. Everything in the ground does not need to be insulated.


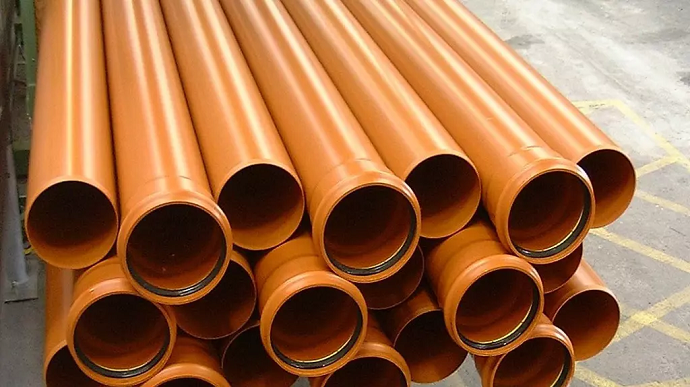
redheads pipes specially designed for outdoor sewerage. They are multi-layered, withstand the pressure of the soil. Gray pipes are designed for work inside the house, they are single-layer and the soil will simply crush them.
Pipes are laid in trenches on a compacted sand cushion with a slope of 2 cm per 1 m. Avoid turns of 90 degrees, maximum - 45. Top and sides pour a layer of ASG or crushed stone 30 cm thick. Further soil.
Postulate 7. The filtration field occupies a large area
The filtration field is needed at a high GWL, at a low one, you can get by with a filter well. On average, expect that for 1 person the area of the drainage field should be at least 10 m².
It is appropriate to make a filtration well on well-draining soils: sand and sandy loam. On clay and loam, significantly larger areas are needed from which drainage will be carried out. Underground filtration fields allow this to be done.
Pipes in the filtration field must be laid with a slope of 1 cm by 1 m, so that the treated drains have time to seep through the holes into the crushed stone layer.
Necessary tools and materials
To install a concrete septic tank with your own hands, you will need the following materials:
- PGS (2.5 tons).
- Cement (18 bags of 50 kg).
- Liquid bitumen (20 kg).
- Iron corner 40 x 40 (25 m).
- Iron sheet 2 mm thick 1.250 x 2.0 m (1 pc.).
- Plywood sheets 1.5 X 1.5 m (8 sheets).
- Flat slate 1500x1000x6 (6 l).
- Polyethylene film (two to three cuts with a total area of 13 x 9).
- Boards 40 x 100 mm.
- Plasticizer (depending on the type, per 5.9 cubic meters of concrete).
- Wire rod with a cross section of 0.6 mm (the footage depends on the mesh density).
- Bars 50 x 50 mm.
- Bricks (120 pcs.).
- Pipes for external sewerage (individually, depending on the distance).
- Pipes for internal sewerage (individually, depending on the design).
- Branch pipes (individually, depends on the design).
- Fittings (according to the number of pipe connections).
- Sealant (1 pc.).
- Screws (300 pcs.).
- Cutting disc for metal (1 pc.).
- Grinding attachment for angle grinders (1 pc.).
For mounting concrete septic tank You will need the following tools and equipment:
Image gallery
Photo from
A concrete mixer will significantly speed up the process of preparing and pouring the solution when constructing a monolithic septic tank. With its help, the entire volume in the formwork can be poured in one day
A bayonet shovel is needed to level the walls of the pit. Pickup is used to remove excess soil
An angle grinder will be needed for cutting iron corners, iron for hatches and grinding. Protective goggles must be worn when using this tool.
It will be needed to assemble the formwork. It is better to fix the form for pouring concrete on self-tapping screws, since it will be faster and easier to disassemble this structure
The building level is constantly required to control the horizontality and verticality of individual elements and the structure as a whole, it is necessary to level the surface of the walls and the bottom of the pit. The optimal length for excavation is 100 - 200 cm
The square is necessary for marking the pit. It also helps to correct the angle of the walls. Also needed when sawing plywood for formwork
A laser level is useful at all stages of the installation of a concrete septic tank. In the absence of an expensive device, it can be replaced by a tape measure and a plumb line, which are needed to determine the boundaries and depth of the pit, the formwork and the upper floor
Useful for transporting heavy building materials such as bricks, cement and ABCs. It also serves to transport the soil extracted from the pit
Solution mixing equipment
Hand tools for the production of works
grinder cutting machine
Drill and screwdriver for formwork assembly
Marking tool
Laser scaling tool
Wheelbarrow for transportation of various goods
All calculations of materials are made for a monolithic concrete septic tank with dimensions: width - 2 m, length - 3 m, depth - 2.30 m.
This is interesting: Septic tank for a summer residence without pumping and odor hands - construction work
Work cycle and material consumption
The sewer pipe extending from the dacha must be thermally insulated and laid to a depth of half a meter (depending on the degree of freezing of the soil). Its slope is 1.5–2 cm per linear meter (preferably 3 cm), a revision is arranged every 15 m. It is insulated, usually with polystyrene foam, it is also possible to lay a heating cable that is connected in frost. The final level of the outlet pipe will be the height of the entry into the first tank.
The bottom of the chamber is at a level not lower than 3.5 m - this is the length of the sewer machine pump.
We calculate materials
The volume of a reinforced concrete ring with a diameter of 1 m is 0.7 m3;
1.5 m - 1.59 m3;
2 m - 2.83 m3.
For a typical reinforced concrete septic tank with two chambers, two one and a half meter rings or four one meter ones will suffice.
In the case of independent production of a casting for a similar design, about 400 kg of Portland cement, 600 kg of sifted sand, 200 liters of water, as well as reinforcing bars, formwork boards, and plastic film will be required.
Schemes of sewerage from concrete rings
Sewerage from concrete rings is done according to different schemes. The specific type depends on the seasonality of residence, the intensity of operation, the financial possibilities for the purchase of additional equipment and the payment of operating costs.


The following options can be distinguished:
- Storage septic. Behind this name lies an ordinary cesspool with a waterproof bottom and walls.Tightness is a mandatory requirement, failure to comply with which, according to the administrative code of the Russian Federation, is regarded as damage to the land. When the drains fill the tank, they call a sewage truck.
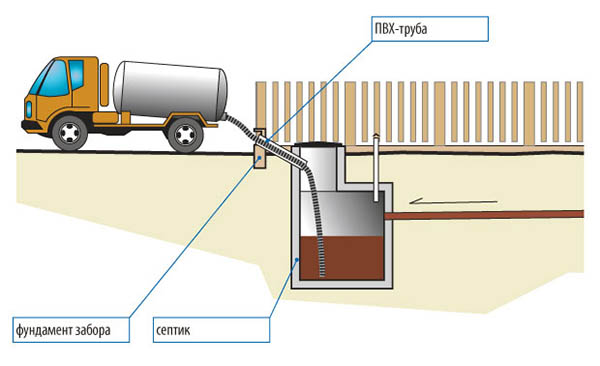
A storage septic tank is simply a container into which wastewater is collected.
The smaller the capacity and the higher the intensity of operation of points connected to the sewer, the more often you need to call the car. Often this is how they arrange country sewage from concrete rings.
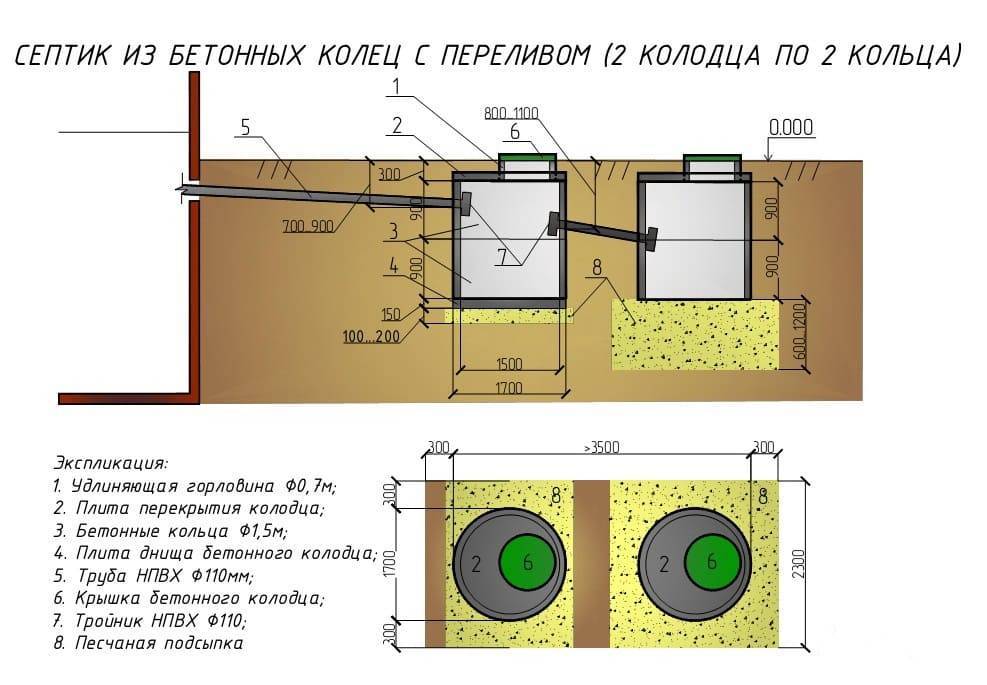
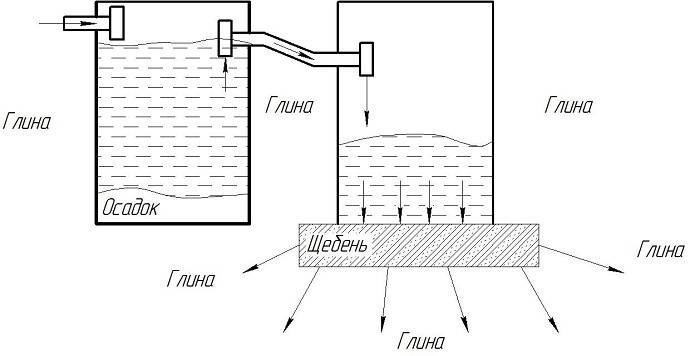
- Anaerobic septic tank. Two-, less often single-chamber, septic tanks, in sealed containers of which wastewater is cleaned by anaerobic bacteria (without oxygen). The number of chambers and their volume are chosen in such a way that the drains at the outlet of the septic tank are cleaned by 65-75%. Post-treatment takes place in filtration wells (“without a bottom”), trenches or fields with aerobic bacteria (it is called “biological treatment”). Only then can the effluent be discharged into the ground. The scheme is very popular among owners of country houses and cottages because of the simplicity of the device and energy independence. The disadvantage of the scheme is that it is necessary to periodically change the sand and gravel in the filtering facilities, while they have to be opened, and the used material to be disposed of (although this is done infrequently).

Scheme of an anaerobic septic tank from reinforced concrete rings
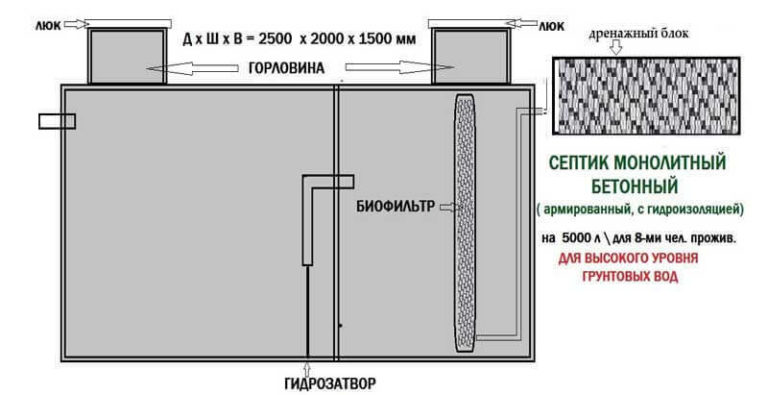
- Aerobic septic tanks and biological treatment plants. There is also a phase of primary accumulation and partial processing of faeces with the help of anaerobic bacteria. The principle of operation consists in clarifying wastewater in the absence of oxygen, and post-treatment in the last chamber with aerobic bacteria under conditions of forced air injection. The purity of the wastewater at the outlet is considered to be 95-98%, and they can be discharged into the ground or used for irrigation.The disadvantage is that aerobic bacteria die if the air supply compressor does not work. And this happens with a bad network due to power outages.
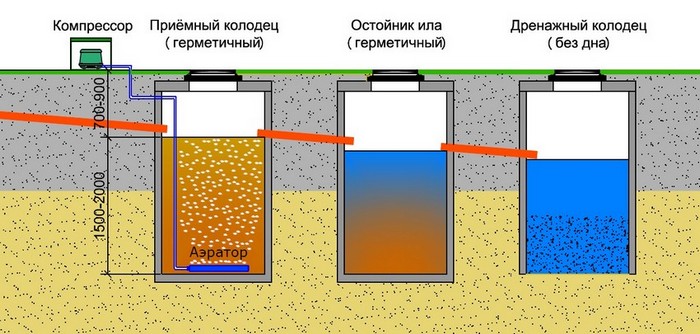
The principle of operation of aerobic septic tanks - electricity is required for operation
We make a septic tank out of concrete with our own hands step by step
Consider the sequence of making a septic tank from concrete with your own hands.
In the selected place, a pit of the required volume is dug:
If the soil is clayey, then around the perimeter you can do without external formwork, but simply lay a film to prevent water from leaving the concrete. If the soil is sandy and the walls of the pit crumble, then you will have to put up the outer formwork from the boards.
You will also need fittings, for which you can take any suitable iron trash: cuttings of pipes, angles, fittings, etc. If nothing was found in the yard, it is not necessary to spend money on new fittings, you can buy by weight at the scrap metal collection point ...
So, we laid a film around the perimeter of the pit and installed reinforcement:
We connect the fittings with a special knitting wire, and not by welding.
From any improvised materials (boards, plywood, OSB, chipboard, flat slate, old doors, etc., etc.) we put the formwork:
If the partition nevertheless decided to also pour concrete, then in the formwork of the partition we immediately lay pipes for air and overflow, and in the side walls - for the sewer inlet and outlet:
We put spacers between the opposite walls of the formwork and pour concrete into the formwork to the top.
Important! When pouring concrete, it must be bayoneted - rammed with a crowbar or a wooden stick of a suitable section, for example, a shovel handle, a bar, etc.It is necessary to bayonet concrete so that there are no shells with air in it, which make the wall loose, porous, because of which it can collapse ... well, or it will simply let water through
It is necessary to bayonet the concrete so that there are no shells with air in it, which make the wall loose, porous, because of which it can collapse ... well, or it will simply let water through.
At least two weeks, your concrete septic tank should stand in the formwork. At this time, we pour water on the exposed parts of the concrete to prevent it from drying out and, as a result, cracking.
After two weeks, we remove the formwork, continuing to pour concrete for another week, you can cover it with a film:
At the same time, we concrete the bottom.
If you have porous walls:
- this is bad, as already mentioned above! Fix it! How? Well, at least get it right. (Although, I assume that you are reading this article before you started making a septic tank with your own hands, so do not allow poor-quality work.)
After all of the above above we make a cover for a septic tank. We use any improvised means. In the photo, the frame is welded from the corner:


Steel sheets can be laid on top:
And on top, reinforce and pour concrete, having previously arranged formwork for hatches and installing a ventilation pipe:
But we managed without welding, using all the suitable iron that was available on the site: pipes, pieces of reinforcement, corners and backs from an iron bed (but not a mesh - it has too small cells, the solution almost does not pass through them, and those the very pores to be avoided!). They laid all this across the pit and tied it together with steel (not copper and not aluminum!) Wire.From below, to the resulting reinforcing cage, we tied old doors, you can put together shields from unnecessary boards. It is clear that we have left the doors below forever, and the plank shield can then be dismantled and the boards pulled out through the hatch. There must be gaps between the reinforcement and formwork panels so that the concrete covers the reinforcement from all sides; gaps are achieved by laying stones, pieces of bricks (red), tiles, etc.
The size of hatches is not regulated by any norms, except for those that in the future will allow you, if necessary, to climb into them.
Hatches rise above ground level brickwork from red brick or, if desired, formwork can be made and cast from concrete:
As a result, we get something like this:
We make the height of the hatches taking into account the likelihood of raising the soil level (perhaps you want to bring black soil to the site, or you will concrete the area around, or you want to arrange a flower bed on top, or simply pour earth to insulate the septic tank ... or all of the above together).
This is how it is quite easy to make a septic tank out of concrete with your own hands.
do-it-yourself concrete septic tank


