- Russian oven masonry: technology and construction tips
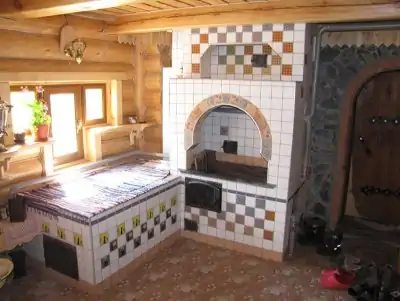
- Ways to finish Russian stoves
- The nuances of laying Russian stoves
- The process of building a small-sized furnace
- Masonry order
- Standard Russian stove: dimensions
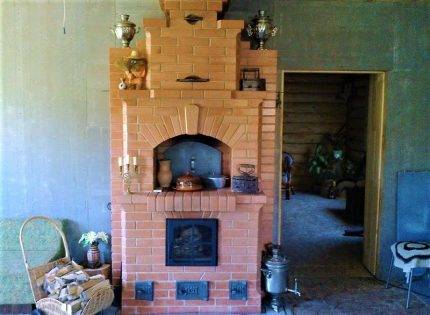
- The design of the Russian stove
- Stove with stove and bench, its dimensions
- trial firebox
- Recommendations for using a small stove
- Preparatory work
- Location selection
- Masonry tools
- Necessary materials
- Brick selection
- Foundation
- Masonry mortar
- Clay Quality Check
- Features of furnace heating
- Possible complications for the stove
- Installing a mini oven
- A miniature oven from a can
- The first stage is the preparation of components
- The second stage is the manufacture of the template
- The third stage is the preparation of a large jar
- The fourth stage is the preparation of the middle can
- Fifth stage - assembly of the stove
- The sixth stage - the manufacture of the burner
- The seventh stage - checking the stove
- What materials will be needed for construction
- Distinctive features of the Russian mini-oven
- A few tips for safe operation
Russian oven masonry: technology and construction tips
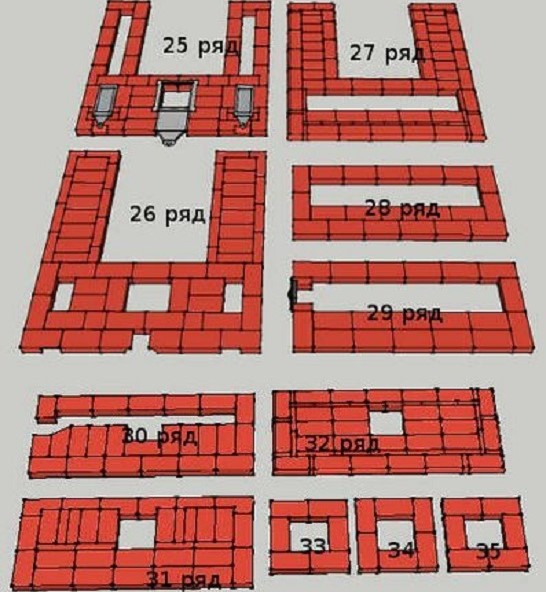
In order to fold a simple Russian stove, you need from 1.5 to 2 thousand bricks. Bricks are stacked in rows. A standard oven includes 25-31 rows (excluding chimney).
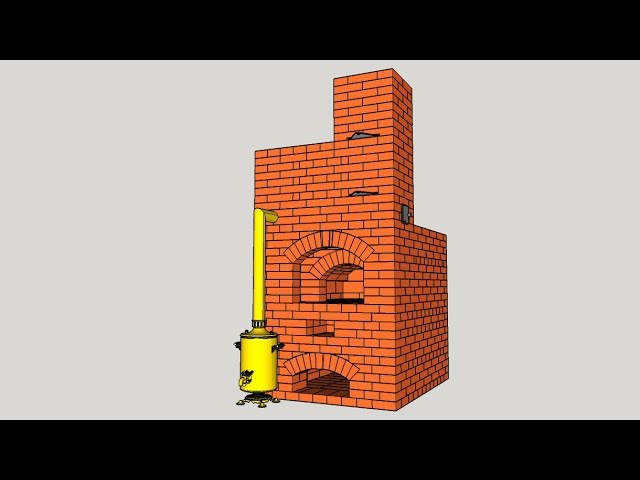
It is better to lay the first row of the furnace with waterproof overheated bricks. We lay down the walls of the crucible with a thickness of one brick, and the front of the hob - half as much. In the opening of the furnace, usually, a formwork made of wood is placed. When laying the vaults of the furnace and the furnace, it is best to use wedge-shaped bricks. They can be easily made with your own hands, as the manufacture includes the processing of ordinary bricks.
Ways to finish Russian stoves
Decorating a Russian stove is done in several ways:
- bricklaying;
- plastering;
- finishing with ceramic tiles or tiles.
Jointing on brickwork is the easiest way, which is quite good for modern interiors. The main thing is that such a method of decoration is planned from the very beginning, since the aesthetics of the design directly depends on the quality of the material and the accuracy of the masonry. As a rule, facing bricks with smooth side walls are used for laying exterior walls.
If the goal is to build a Russian stove according to the old canons, then it must be plastered with a special clay mortar with the addition of chaff. After drying, the outer surfaces are covered with a solution of white clay in water. Such whitewashing is an environmentally friendly, safe coating for others. In addition, thanks to her, the basis for the final finish - painting is being prepared. The patterns that cover the walls of the oven can repeat the national ornament or scenes from fairy tales, represent floral curlicues, Gzhel, Khokhloma stylization, etc. - it all depends on the created mood and the preferences of the owner.A wide selection of plaster mixtures allows you to replace the old composition with a more modern "bark beetle" or "lamb".
For finishing with ceramic tiles, only heat-resistant types of tiles are used - terracotta, majolica, heat-resistant clinker or porcelain stoneware. In addition, Russian stoves are often laid out with tiles. Note that although decorating with ceramic tiles is one of the most beautiful and practical ways of finishing, after it the arrogance and luxury of the “Dutch women” begin to be seen in the design, and not everyone will like this.
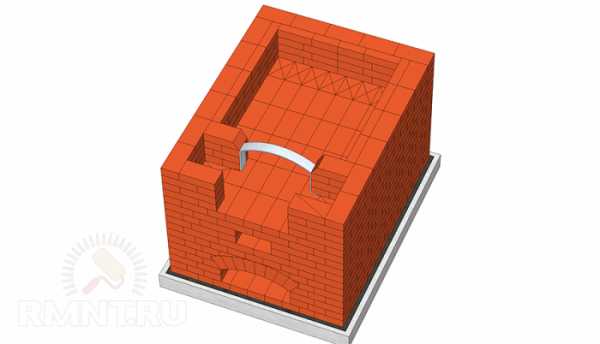
The nuances of laying Russian stoves
In the case when the foundation is designed, it must be done with high quality, controlling the horizontal level of the base under the furnace. After it is ready, proceed to the main stage of work. To figure out how to properly fold a Russian stove, a drawing can help. The main thing when laying bricks is to stick to the order.
To make the design as safe as possible, a real Russian stove is made absolutely sealed. For this reason, cracked bricks are not used.
The thickness of the seams between rows can be from 5 to 8 millimeters. When ensuring tightness, stove-makers are not advised to use clay, coating the walls with it from the inside. The fact is that after that, during the operation of the unit, soot begins to collect on them and the degree of their thermal conductivity decreases.
The outer walls are laid in one or one and a half bricks, and the inner walls are also in half a brick. If you make the inner walls into a whole brick, then they will turn out to be too thick and will take longer to warm up, which means that the principle of operation of the Russian stove will be violated, and fuel consumption will increase.
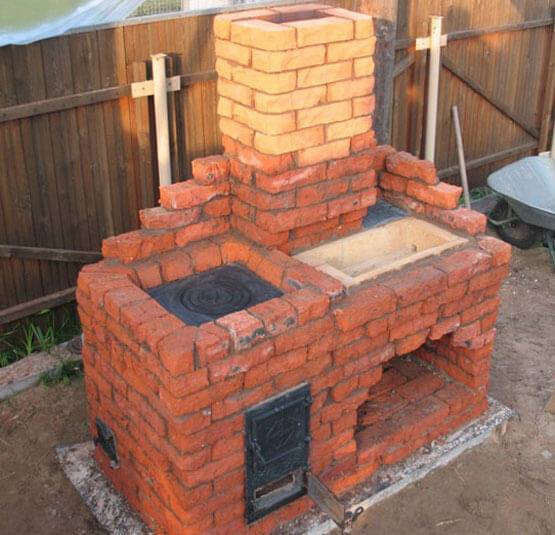
The process of building a small-sized furnace
Due to the relatively light weight of the mini-oven, it does not need a foundation, but in this case a thick, durable board should be used for the floor, well fixed on the logs.
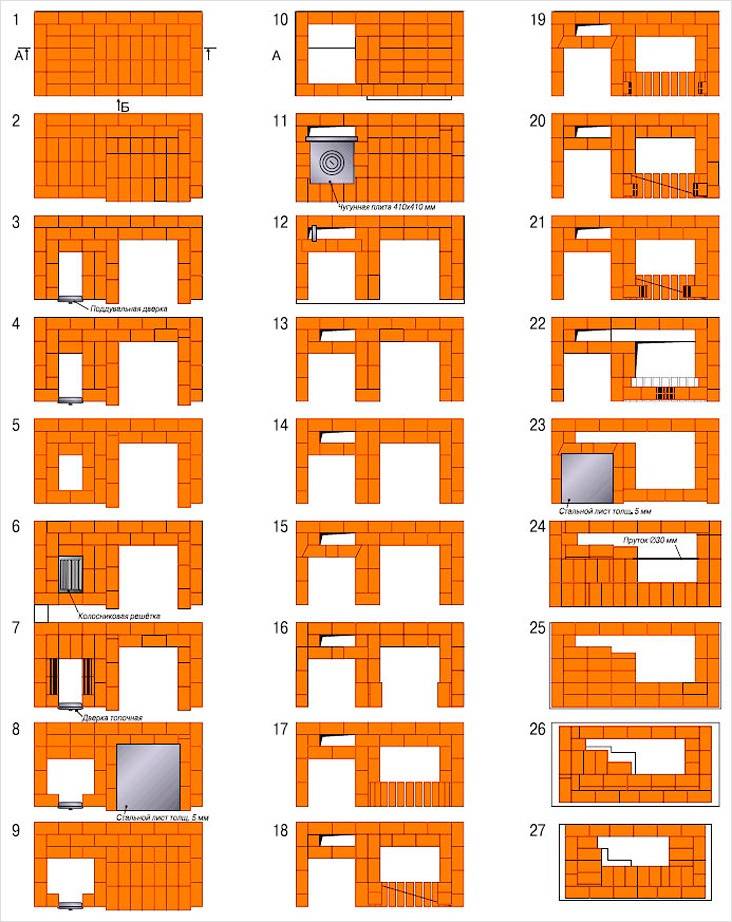
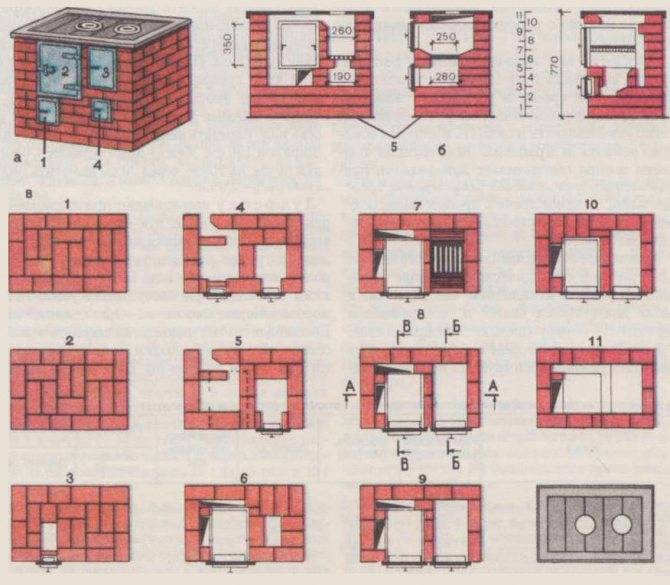
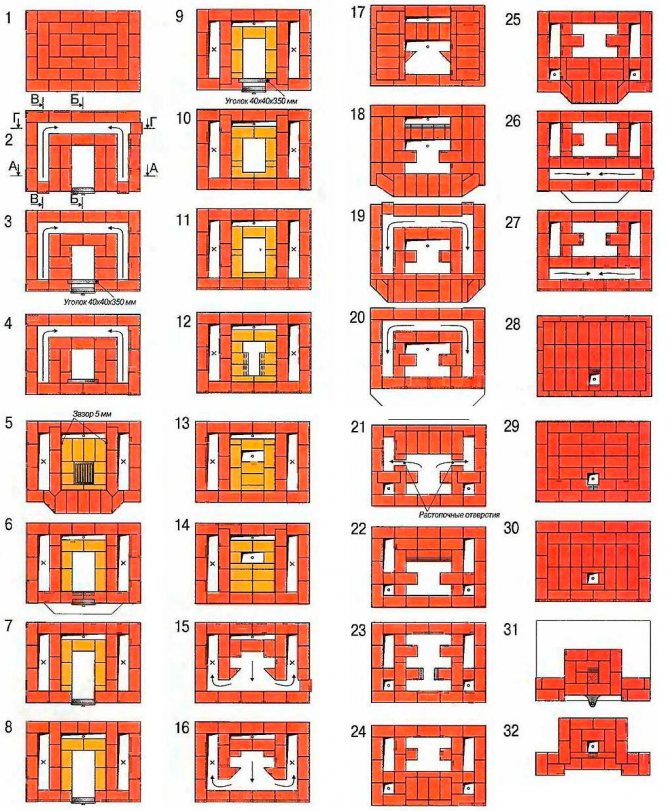
Masonry order
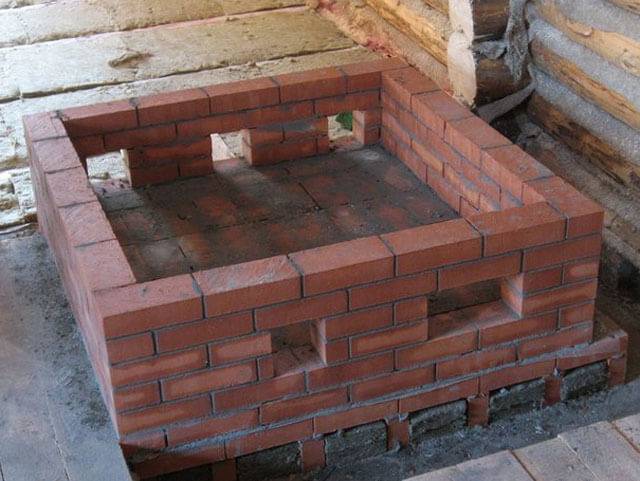
- The first stage is traditionally the choice of a place and its preparation for the construction of the furnace. To do this, it is necessary to lay a piece of plastic film, roofing felt, hydrosol or glassine 78 by 53 centimeters in size on the surface. Pour dry sand over the bedding (layer thickness 1 cm) and level it.
The first brick row is laid out on the sand (12 bricks without fastening are used) strictly horizontally, which can be checked with a level. On top of the first row, we thinly apply a solution of clay and install a blower door. Pre-wrap the door with a piece of asbestos cardboard or wrap it with a cord. Secure it with wire.
- We are laying the second row of our oven.
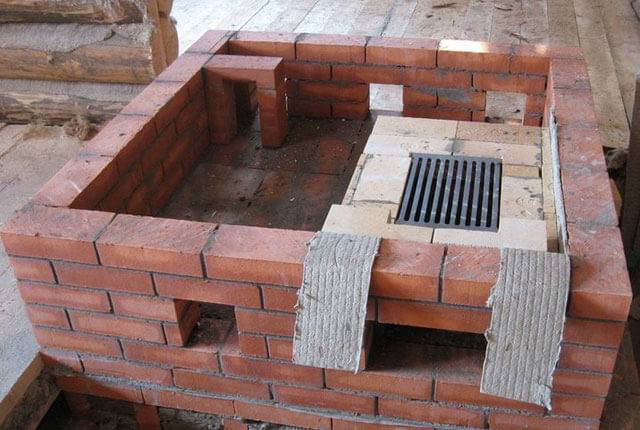
- The third row is laid out from fireclay bricks. We install a grate on it, which will be located strictly above the blower.
- In the fourth row, the bricks are laid edgewise. And inside the chimney, a stand is mounted on which an internal partition will be installed. When laying the back wall of the stove, do not use clay, but provide for the so-called knockout bricks (for this they should protrude slightly).
- The next mandatory element of any stove is the firebox door. Wrap it with asbestos cord before installation. We fix the door with wire, use two bricks for temporary fixation: one at the back, the second at the first, and install the door on top of them.
- Bricks in the fifth row are laid flat, repeating the contours of the fourth row.
- We put the bricks of the sixth row on the edge, and then we rub the walls of the furnace with a damp rag.
- For the seventh row, lay the bricks flat again. At the same time, in order to ensure a bunch of this and the next rows, you need to start with a three-quarter. Then put two bricks on the edge and proceed to the construction of the back wall.
Standard Russian stove: dimensions
The dimensions of the Russian stove depend on its type. So, the most cumbersome will be stoves with a fireplace and bottom heating, the stove is rough (coarse). Such designs have undeniable advantages: they are multifunctional, look attractive and are able to heat a large room. In addition, such ovens can be easily located outdoors. But, unfortunately, they are not always possible to put in the house.
The classic Russian stove has a width of 150 and a length of 200 cm. At the same time, a bench in a traditional stove should be located at a height of 180 cm, and a hearth - 45 cm.
The small Russian stove is 153 cm wide and 165.5 long. The Little Housekeeper is 100 cm wide and 130 cm long. And the popular “Swede” Buslaeva is even smaller - 116x90 cm. At the same time, the location of the hobs and furnaces determines the growth of the hostess.


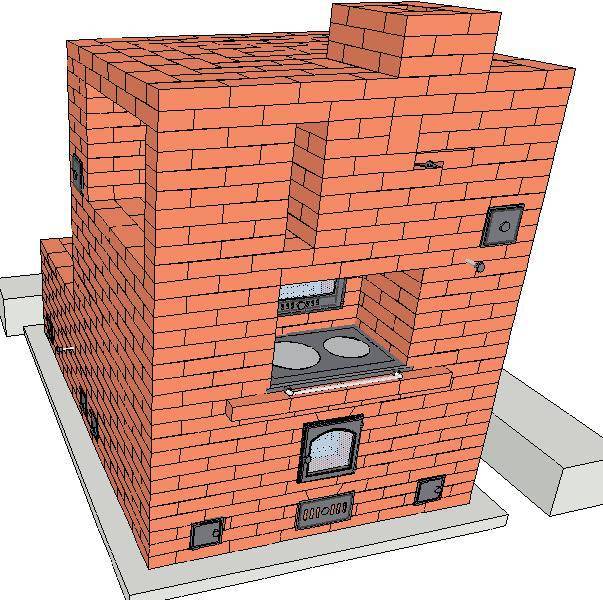


That is, the stove must be of such power that it is able to provide the house with heat throughout the night, until the next furnace. In order to carry out calculations, you can use the generally accepted data, according to which for heating a room up to 10 sq. m. you should choose a stove with dimensions of 150x150x200 cm.
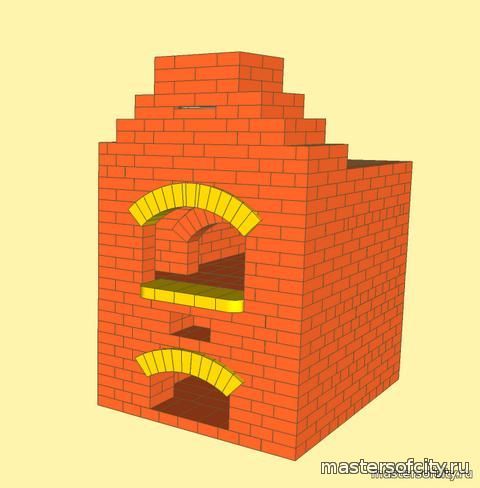
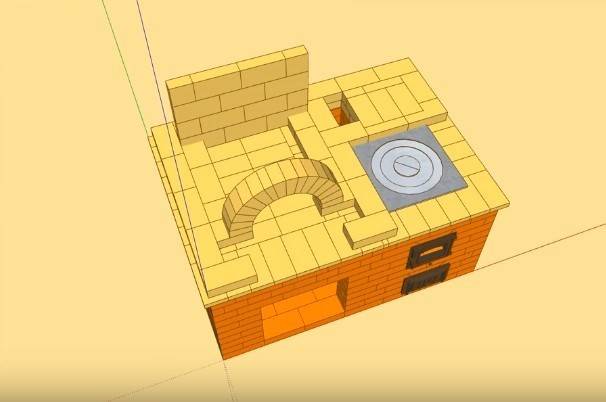
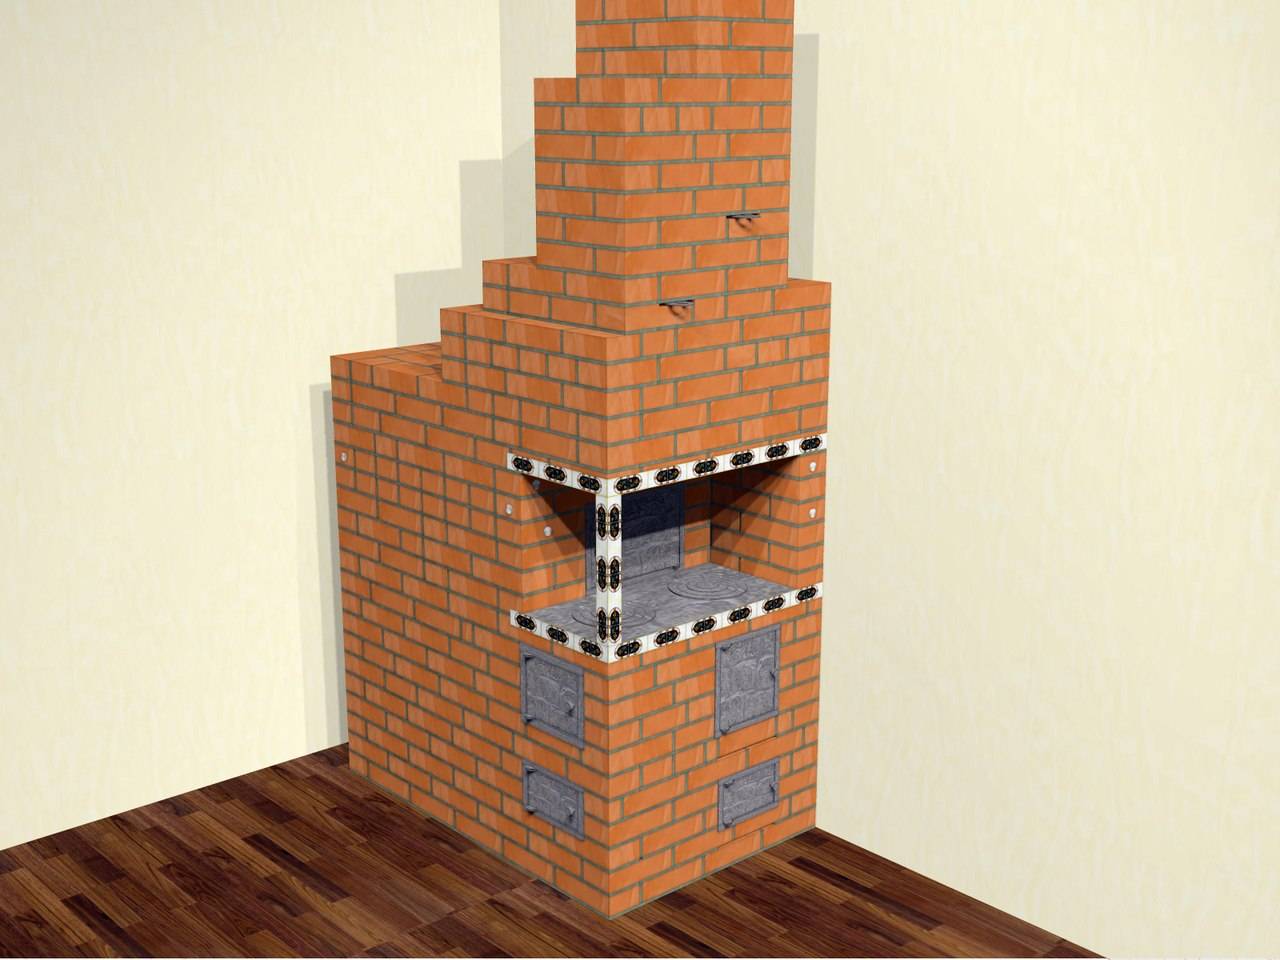
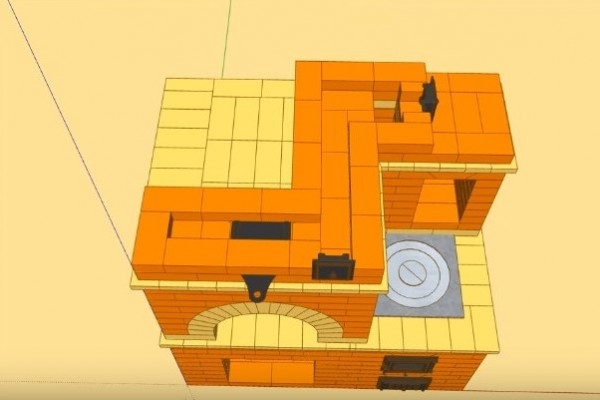
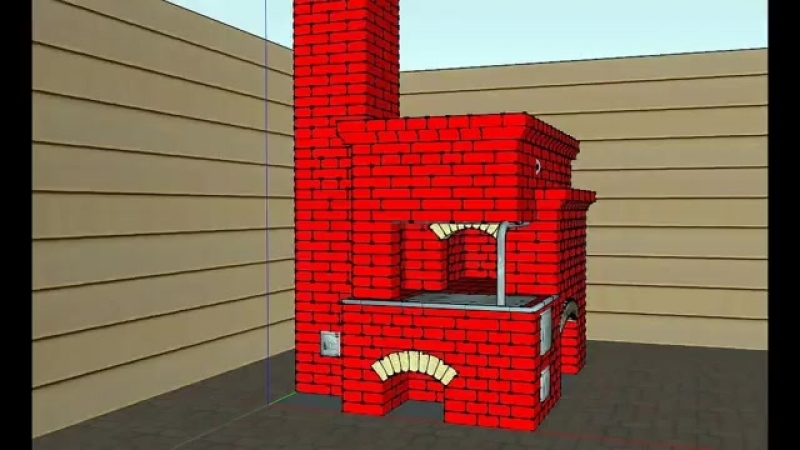
The design of the Russian stove
Any mistake made during the construction process leads to the fact that the entire structure has to be redone. The masonry scheme of the Russian stove, which is attached to the drawing and can be very different, can help in this matter.
Depending on the size, these heating units are divided into mini, medium and large. They are used for heating and cooking. They certainly have a couch. To build them yourself, you need to study how the Russian stove works.
If you look at the diagram of a traditional design, you can see that it consists of:
- the stove used for drying firewood is not always made;
- a cold stove for storing kitchen utensils, it may also not be;
- a sixth - a niche in front of the crucible. A hob is placed in it. In the case when the stove is located in a different place, food is kept in the hearth so that it is warm;
- hearth - the bottom of the furnace. It is built with a slight slope towards the entrance to the chamber in order to make it easier to move the dishes in it.
- crucible or cooking chamber used for heat-resistant dishes and fuel laying. The vault of the chamber is similarly done with a slight slope towards the entrance. Due to this design feature, hot air is collected under the ceiling, due to which the stove bench and side walls are warmed up;
- cheeks - the front wall of the crucible;
- the mouth of the furnace - the holes between the cheeks;
- overtubes - niches above which the chimney pipe begins;
- views - windows with a door that serves to cover the chimney. Through it, you can get to the damper that regulates traction;
- benches located behind the chimney above the crucible. When the oven is on, it heats up.
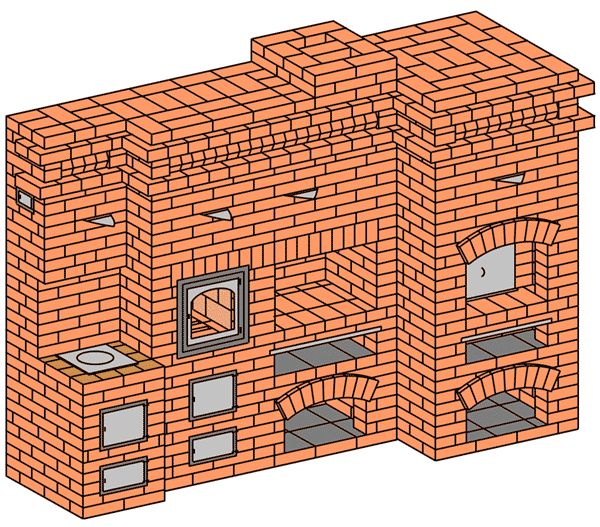
On the masonry scheme of a Russian stove with a stove, you can see different departments. Their presence allows not to heat the entire room in the summer, but to use exclusively the hob.As a result, a pleasant microclimate is maintained in the house and fuel consumption is reduced. In winter frosts, all departments are heated in the stove, and then not only the oven, water and stove are heated, but the house itself.
Before you fold the Russian stove with your own hands, they perform a number of preparatory activities, which begin with the choice of its location.
Stove with stove and bench, its dimensions
The main distinguishing feature of such a device is the large dimensions of the furnace. In order for an adult to fit on the floors, the length of the entire structure must exceed two, and the width is one and a half meters. The bed itself is located above the crucible, which is elongated in length, which ensures a constant flow of heat.
Previously, in traditional models, the beds were located under the ceiling, at a height of about 1.8 m, climbed onto them along an attached ladder.
This ensured a longer preservation of heat - when the hut got cold in the morning, on the floors, due to the distance from the floor, the temperature was still quite high.
Nowadays, the bench is placed at a convenient level of about one meter, because modern materials have better thermal insulation at home.
Reference. In previous years, a high furnace was traditionally built - in addition to heating functions, it was used as a home mini-bath, so it had to accommodate a person, which also affected the height of the beds.
The scheme, which includes both a hob and a stove bench, remains the most common. For the construction of such a structure, lightweight schemes have been developed that even a not very experienced builder can handle. The disadvantage of such a furnace will be reduced, in comparison with other models, the efficiency of heating the room.
trial firebox
After drying is completed, a test furnace is performed in the following sequence:
-
the combustion chamber is loaded as much as possible with dry firewood, stacking them in dense rows and set on fire. At this moment, the valve should be fully open, and the wellhead flap, on the contrary, should be tightly closed;
-
after the first batch of firewood burns out, the next portion of wood is loaded, but only 2/3 of the furnace is already filled;
-
the intensity of fuel combustion is regulated by a valve;
-
complete closing of the valve is possible after all the firewood has burned out and the formed coals have gone out.
The next furnace can be carried out only after the stove has completely cooled down.
Recommendations for using a small stove
In order for the furnace to be useful and save money, it is necessary to monitor its condition. Even a slight crack increases the loss of efficiency. For better heating, only dry firewood is used for kindling. Be sure to close the view.


Major cleaning of soot is carried out once - in summer, in winter they do with minor cleaning, but at least 3-4 times per season. The accumulated soot reduces the heat output of the device. In the event of a malfunction of the view, valves or doors, it is impossible to melt the stove, because it is they who control the draft and help the carbon monoxide evaporate.
Despite all the nuances in the construction and operation of a mini-oven, it acts as an excellent heating device and can compete with modern gadgets in the speed and delicacy of cooking many dishes. No wonder our ancestors considered the stove to be the soul of the house and put the structure in the middle of the hut.
Less than a few centuries later, she returned to us, only in a slightly different form.But its small size is not the main thing, because in terms of functions and the wonderful atmosphere that is created in every home, the device is very similar to the good old Russian stove.
Preparatory work
Before you start building a Russian stove, you should make sure that everything you need is available.
Location selection
A lot depends on the choice of a place to build a furnace. It is necessary to maintain a gap to the walls of combustible material of 30-40 cm or provide their protective sheathing with asbestos. Gaps will also be required for access to the outer walls of the stove for the purpose of their inspection and repair.
For a heavy unit weighing several tons, you need a solid foundation (foundation), protected from ground moisture. A place is provided in advance where the chimney will pass through the ceiling and roof ceilings. There should not be a ridge or rafters.
Masonry tools
The main working tools of the stove:
- a narrow trowel (trowel) for laying the mortar and stripping the excess from the seams;
- hammer-pick for giving a solid brick the required shape;
- building level and plumb.
To mix the solution, you need a shovel and a container.
stove-maker's tool
Now cutting bricks into a wedge, removing corners and grinding the cladding is done with a hand-held power tool (grinder) with diamond wheels. This greatly simplifies the work of the master.
Necessary materials
The main materials for building a reliable hearth: brick and refractory mortar
Their quality is given close attention. You will also need: cast iron for doors, dampers, gate valves, grates and a cooking stove
Brick selection
The correct selection of bricks for work is a key factor in the efficiency of heat transfer and the long service life of the future hearth.Therefore, it makes sense to purchase only the first grade red clay brick of the M150-M200 brand. Hollow material for oven masonry is unsuitable.
Not suitable for such work and bricks with obvious traces of marriage:
- non-compliance with the standard (230x125x65 mm), to which all standard orders are oriented;
- with traces of overburning, warping, shape and surface defects;
- with shells after the release of gases;
- having cracks and scuffs from cutting.
Special grades of top quality bricks, called hearth bricks, are sold individually and are ideal for laying stoves.
Foundation
The base of a heavy furnace is arranged on a concrete foundation, which is cast on a compacted crushed stone cushion in a pit up to half a meter deep. Horizontal waterproofing from groundwater is performed from 2 layers of roofing material on bituminous mastic.
Masonry mortar
The requirements for a solution suitable for furnace work are seriously different from the usual ones.
The material is required:
- resistance to high temperatures;
- coefficient of thermal expansion, as close as possible to that of masonry bricks.
Refractory mixture for laying furnaces
Since the quality of the clay plays a leading role here, it is better to buy a ready-made dry mix at a hardware store.
Clay Quality Check
The suitability of clay for masonry can be checked in a folk way. From the solution, make a spherical lump the size of a child's fist and slowly squeeze between two planks. If the clay is of high quality, the lump will crack only after being compressed to half the size. Skinny bad clay does not deform at all, and medium-quality material will burst after being compressed by about a third.


Features of furnace heating
Stove heating has a number of advantages, thanks to which wood-fired brick ovens have not lost their popularity for several centuries. The most important advantage is the ability of ceramic bricks, from which stoves are laid, to accumulate and give off heat for a long time.
At the same time, radiant energy useful for the human body is released into the space, giving a feeling of warmth and comfort. With regular heating in the cold season, the house is always warm and dry, and due to stove draft, natural ventilation is formed. In the heat, the stove, on the contrary, cools the rooms by removing excess heat into the ground and air through the foundation and chimney.
In addition to creating a comfortable microclimate, a brick oven can carry additional functions, the presence of which depends on the design:
- cooking - boiling, frying, stewing and baking;
- drying clothes, shoes, food;
- heating beds for sleeping;
- the opportunity to admire the open flame.
Furnaces that provide several functions are called combined. These types of stoves include heating and cooking stoves, fireplace stoves, as well as several popular basic models, including a Russian stove.
Stove heating also has disadvantages, these include the inability to effectively heat remote rooms. Therefore, in large-area houses, several stoves with separate or combined chimneys are usually installed, or stove heating is combined with other types of heating.
In compact houses, consisting of one or more rooms, the stove is usually located in the center, so that its walls are located in all rooms.The hob and oven are placed on the side of the kitchen, the stove bench is in the bedroom or nursery, and the open fireplace insert is in the living room or dining room.
Possible complications for the stove
In a country house built according to a standard project, the location of the furnace, the chimney outlet, and convenient places for maintenance and operation are usually provided in advance. It is much more difficult to arrange a heating and cooking unit in a house built according to an individual idea. Even more difficult if the house is already built.
It happens that after choosing a successful, in the opinion of the owner, location of the furnace, and even after building the foundation, they suddenly discover that the chimney will cross the floor beam or rafter. How to act in such a situation?
The way out in this case is associated with two difficult and rather expensive options. In the first of them, you will have to sort out the ceiling and change the position of the beams and rafter legs, in the second - to destroy and rebuild the foundation of the stove.
In order to eliminate such troubles, before marking and building a foundation in a built house, it should be determined whether the chimney will violate the integrity of existing structures. If there is a possibility and access to beams that have not yet been sheathed, it is necessary to check the exact position of the components of the furnace to be marked with a plumb line.
If it is most convenient to place a brick oven in a house being built with your own hands exactly in the place whose projection intersects the elements of the roofing system, it is better to displace them. In general, of all the options, it is desirable to choose the one that will be easier and cheaper to implement.
When designing a furnace and selecting a suitable model, the following rules should be considered:
Installing a mini oven
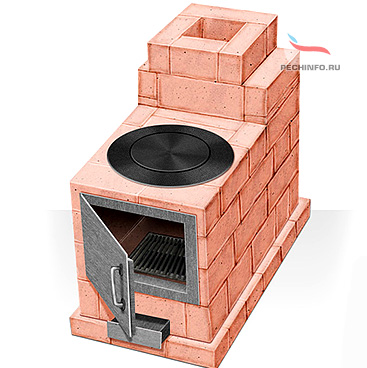
Brick is a traditional stove lining material that has been used for centuries. A mini brick oven is made of bricks, but it is best to use two types of them during construction.
- To build a working one, it is often worth using refractory material. He will be able to withstand the firebox even with coal.
- For finishing, the front material is quite suitable.
We make masonry Having prepared the right amount of bricks, you can start work, the instructions are given below:
First of all, you should decide on a place for a mini-oven. Its effectiveness largely depends on this.
A mini brick oven for a bath will occupy an area of \u200b\u200babout 800x550 mm. It is only necessary to lay a fire protection layer, as well as a layer of waterproofing. Roofing material can be used as a waterproofing layer, and sheet asbestos can be used as a fireproof layer if the base is wooden.
A layer of sand is poured onto the waterproofing layer, about 10 mm thick.
The first row of bricks is laid on top of the sand, without the use of mortar. This row is aligned strictly horizontally, hammering peeking bricks with a rubber mallet.
A thin layer of clay mortar is applied to this brick row and the blower door is immediately installed. The door is set strictly horizontally and strictly vertically, after which it is securely fixed. After fixing it, you can begin to lay out the second row.
The 3rd and subsequent rows are laid out with refractory bricks (chamotte). After laying out the 3rd row, a grate should be installed, which should be in the center of the blower.
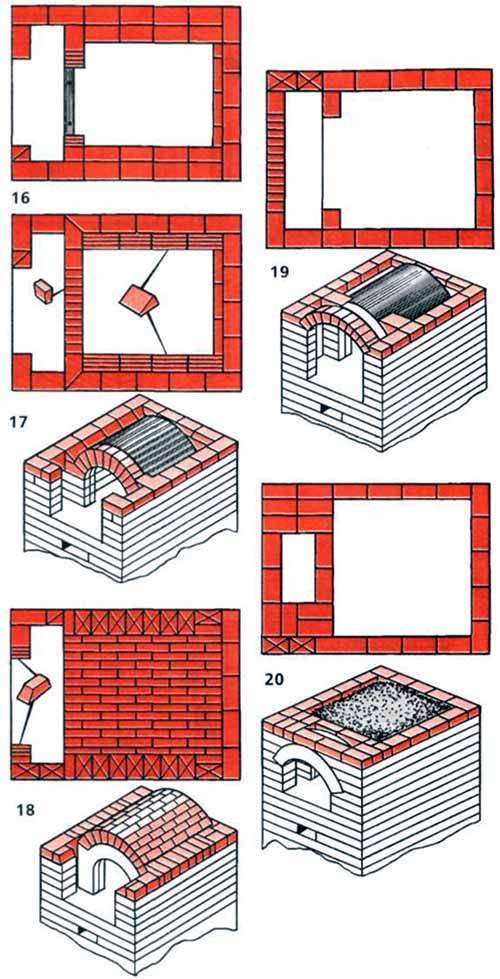
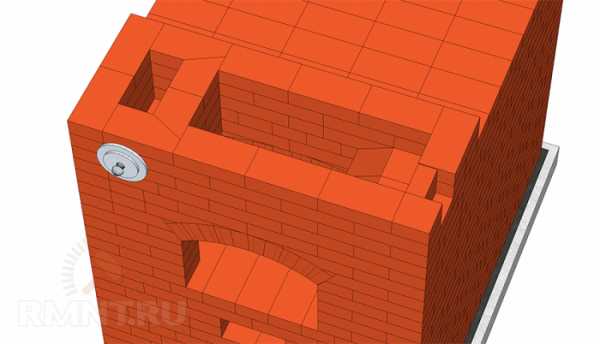
The 4th row is laid out in a quarter of a brick (on the edge), regardless of how the previous rows were laid out.The back wall is laid out without mortar. In the future, these bricks will be removed.
After the 4th row, they begin to install the firebox door. It is installed in such a way that it opens from the bottom up. It is fastened in the same way as the blower, with the help of wire, the ends of which are embedded between the bricks that form rows of masonry. The door is exposed and securely fixed.
The 5th row of bricks is laid out according to the 4th row, but the bricks lie flat.
Then the last row of the 6th is laid out, which lies on the edge. The walls of the chimney and the inner surface of the bricks are cleaned of mortar and wiped with a damp cloth.
The next row lies flat, while the back wall is laid out on an edge in two bricks.
This row closes the level of the firebox and in this row a brick is installed at an angle so that it hangs over the firebox, as it were, shifting the flame closer to the center of the stove. This operation is done on the eighth row. This brick is effective when the stove is used as a fireplace, working with the firebox door open.
The 9th row is shifted somewhat back, which allows you to maintain an open door. To ensure the tightness of the joints of the slab and brick, an asbestos cord is used. Laying a cast-iron stove on clay is not recommended.
On the 10th row, a place is formed for installing the pipe. In this case, an attached metal pipe made of light iron is used. A brick pipe for such a mini-stove will be heavy.
The latch, sealed with asbestos cord, is installed on the 11th row.
With the help of the following rows, a part of the pipe is formed, which is joined to a metal pipe - a chimney.
The final stage in the construction of mini-ovens is its whitewashing, but decorative tiling can be done. Unfortunately, whitewashing is not practical: approximately once a year, whitewashing will have to be repeated, and tiles will not only decorate the stove, but also save you from constant whitewashing.
Before whitewashing, it is advisable to clean the stove of debris and make a trial ignition. If the stove is working and there are no problems, you can start whitewashing or cladding, after which you need to give time for complete drying.
This is very important and you should not rush to ignite the mini-stove so as not to harm. You should prepare for the heating season in advance, then the winter will not seem so cold.
A miniature oven from a can
This version of the stove is perfect for those who like to relax in nature. The finished product has a minimum weight and takes up very little space in a hiking backpack. Despite the simplicity of the design, the stove from the can is very convenient and productive - a liter of water can be boiled by spending a few small dry branches on it.
At the same time, such a home-made stove can work not only on branches, but also on leaves, cones and even hay. You definitely won't leave hungry!
The first stage is the preparation of components
Prepare three tin cans of different sizes in advance. Canned food containers are great. From the largest jar you will make the body of the furnace, place a medium-sized jar in the body, and make an impromptu burner from a small container.


Additionally, prepare scissors, a bar, an electric drill and a felt-tip pen.
The second stage is the manufacture of the template
First step.Insert a wooden block vertically into the largest jar and, approximately at the level of the lid, mark a couple of lines on the wood at a distance of about 8 mm.
Second step. Saw out a rectangular recess of such a size that the top edge of the container can freely enter into it.
Third step. Set the bar so that the can rests steadily on it, while the upper edge of the large can, at the same time, is kept in the previously prepared recess in the bar.
The third stage is the preparation of a large jar
First step. Draw a line over the bottom edge of the largest jar. This line will serve as a markup to create vents. The line can be applied with an ordinary felt-tip pen.
Second step. Drill holes along the marking line. The optimal number of holes can only be selected empirically. Excessive ventilation will lead to too rapid combustion of the fuel, and if there is insufficient draft, the stove simply cannot work normally.
Therefore, make a small number of holes to begin with, and then, if necessary, drill them after the initial tests of the furnace.
The fourth stage is the preparation of the middle can
Drill many holes in the bottom of a medium-sized container. Choose the size and number of these holes so that the loaded fuel does not fall out in the future. As a result, the bottom of the can will look like a sieve.
Fifth stage - assembly of the stove
Insert a medium-sized jar into the largest container. The pairing should be sufficiently rigid, but not tight - a small gap is required between the walls of two cans for air circulation.
The sixth stage - the manufacture of the burner
To create a burner, use the smallest tin can.
First step.Prepare holes in the side of the jar in the same way as you did with the previous containers.
Second step. Cut out the bottom of the can with metal shears.
Third step. Carefully align the edges of the burner and clean them with a file.
The seventh stage - checking the stove
Take the main part of the stove (medium container inserted into the large one) and load fuel into it (cones, wood chips, leaves, small branches, etc.). If possible, load dry knots directly from the trees into the oven, as fuel from the ground may be damp.
Ignite the load and let it warm up. At first, you may not be very good at it, but very soon you will learn how to kindle the stove with literally a couple of matches.
Let the fuel flare up intensely, place a burner on the stove, and a pot, kettle or other container on it.
What materials will be needed for construction
- red brick - 750 pieces;
- chamotte clay;
- sand;
- felt or asbestos fiber for insulation;
- roofing material on the bottom layer also for heat and waterproofing;
- fasteners;
- metal corner, sheet and steel wire;
- grate - 2 pcs.;
- doors for the combustion chamber and blower - 2 pcs.;
- damper - 1 pc.;
- valve - 1 pc.
... and tools:
- building level;
- spatulas;
- Master OK;
- drill with a nozzle mixer for mixing the solution;
- buckets;
- sieve for sifting clay and sand.
Do not forget about the tools: spatula, trowel, drill with a mixer. Additionally, have buckets or tanks, a sieve on hand. To make the oven even, use a level.
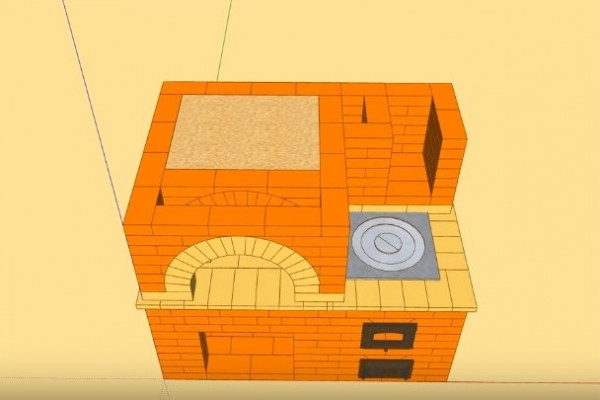
Distinctive features of the Russian mini-oven
Fundamentally, a miniature stove does not differ from an ordinary Russian stove - it has a similar design, the same functions, the same design.The main distinguishing feature is the size: it takes up much less space on the floor due to the fact that the stove and the crucible are arranged and located side by side.


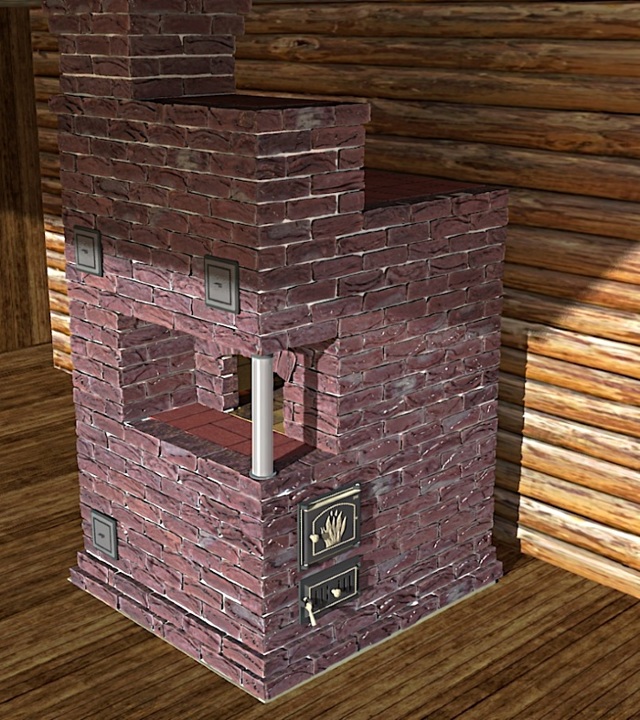


The floor area occupied by the structure is usually no more than 1 m x 1.3 m, but other options are possible, a little more or less. The height of the structure is the same as usual: the main part at the top smoothly rebuilds into a re-tube and ends with a pipe extending into the ceiling.
Both the large cooking chamber and the stove are actively used for cooking. A small firebox melts quickly enough, so it is used in the summer when heating the whole house is not needed. On the burners, you can easily place 2-3 pans at once, and if a large oven is also heated, then bake bread.
It is easier to choose a place for a mini-stove: it can be successfully installed both in the corner and in the center of the room, as well as built into a partition or wall
The stove also stays hot for a long time, so it can be used for reheating or simply for keeping breakfast or lunch warm.
A feature of a compact stove is the preservation of two fireboxes, which are used with the same activity. But they are often located on two opposite sides - in this case, a free approach will be required both in front and behind.
 After the firebox, the walls of the structure retain heat for a long time, and although the mini-stove is inferior in size, the heat transfer is enough to heat a room of 25-30 m²
It must be remembered that a mini-copy does not differ in the level of danger from a large Russian stove, therefore, during construction, it is also necessary to insulate the foundation and nearby surfaces that are prone to fire.Walls, wooden sections of the floor, the edges of the opening in the ceiling are sheathed with metal or asbestos sheets.
 Difficulties may arise for those who want to build a couch - of course, the mini-version does not imply a full-fledged place to relax, the occupied area is too small. However, you can build a niche for drying, as well as install a small boiler
A few tips for safe operation
- After a long period of inactivity, be sure to check all visible surfaces for tightness of the seams. Cracks that appear must be repaired with clay mortar.
- Before each firebox, check the draft. If smoke from the crucible enters the room, the stove should never be operated. Perhaps one of the valves is closed or the chimney needs to be cleaned.
- You can close the view only after the firewood has completely burned out.
- It is recommended to remove soot from the inside of the stove at the beginning of each season. In fact, the furnace is very slightly contaminated and after construction it will not require cleaning for several years. However, it all depends on the smoke and the quality of the fuel used.


