- Radiator leak
- What is a gas water heater for?
- Design and operation principle of PGV "Neva"
- The principle of operation of a gas column with ignition from a hydraulic turbine
- Choice
- Advantages of the membrane for the gas column "Neva"
- Main burner does not start
- Principle of operation
- How to change the membrane in a geyser: choose and install yourself
- Membrane functions, causes of failure
- Signs of breakdown
- How to choose a new part
- Self repair
- How to solder a gas column heat exchanger
- Preparation for soldering
- Soldering methods
- Powerful soldering iron
- Burner with gas bottle
- cold welding
- How to check tightness
- Too frequent pump starts
- Rule out other column problems
- External inspection of the water heater
- Troubleshooting inside the column
- Conclusions and useful video on the topic
- Conclusion
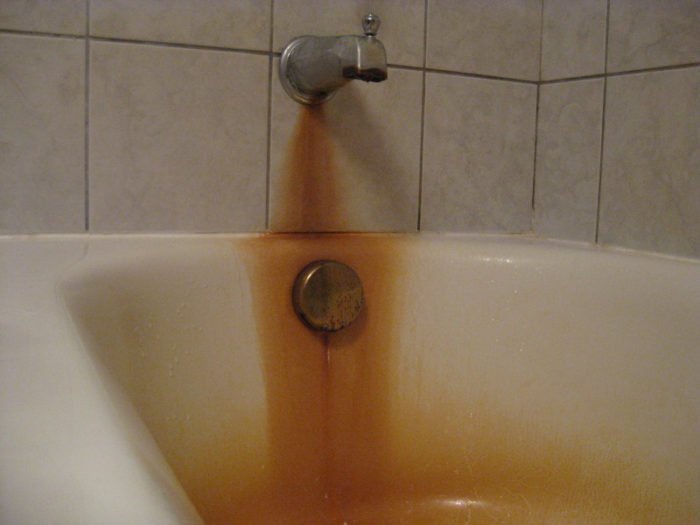
Radiator leak
Hot water appears thanks to the existing heat exchanger. The heat exchanger radiator is metal pipes and plates located close to each other. The plates are in direct contact with the fire, due to which soot appears on them during operation.
The signs of soot accumulation are:
- The flame is yellow;
- When burning, the fire deviates to the side and heats the body (the flame should strive upwards);
- Soot falls off the gas column;
- Even when operating at full power, there is a slight heating of the water.
To remove soot, you will need to remove the casing by unscrewing the bolts (latches) that secure it.
After the assembly is removed, it must be washed by putting it in a container of water for several hours to deoxidize the soot. This will facilitate washing the space between the heat exchanger plates. For high-quality cleaning, it is recommended to use running water, a brush with a long bristle and detergents. After drying, the radiator is put in place.
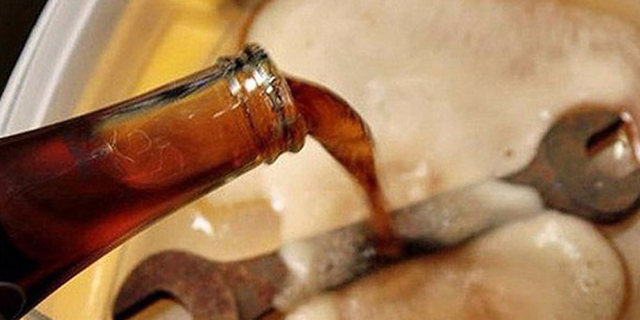
Green spots on the heat exchanger indicate the presence of cracks and holes.
If the geyser is leaking due to the failure of the heat exchanger radiator, then the actions should be as follows:
- Water pipes must be closed to prevent water from entering the gas column. After that, the hoses are disconnected and the remaining water is drained. The remaining liquid in the coil is removed by a pump or vacuum cleaner, you can try to blow the water out with your mouth using a hose. This must be done, since the remaining moisture takes on heat during the soldering process, and it will not be possible to heat the metal to the desired temperature.
- Damaged areas (they are green) will need to be cleaned with sandpaper and degreased with a solvent, and then wiped dry.
- Crushed rosin or an aspirin tablet should be sprinkled on the work surface. Rosin and aspirin will serve as solder here.
- With a soldering iron with a power of at least 100 W (since they will have to work at a temperature of 180 degrees), it is necessary to increase the solder to a height of approximately two millimeters. If the soldering is loose, this means that the working surface is not warm enough.You can additionally heat up the soldering place with an iron or another soldering iron.
- You will need to solder each through damage in this way.
- After the soldering work is completed, it is necessary to wait until the working surface has completely cooled down and assemble the geyser.
- Before full operation, the equipment is launched in a test mode.
If the geyser is leaking, but no leaks are visible on the radiator, then perhaps they are located where it is turned to the body. In this case, it will be necessary to remove the heat exchanger from the housing, for which you will have to disassemble the entire column. Before starting the procedure, it is advisable to familiarize yourself with the diagram in the passport, since this is a rather time-consuming process and knowing the device of a particular model will simplify the work.
Soldering damage to pipes can only be used as a temporary measure to eliminate the cause of the geyser leak, since the repaired surface remains vulnerable. The best option for troubleshooting, due to which water drips from the column, is to replace worn elements with new ones.
What is a gas water heater for?
This water heater is the most efficient device that prepares hot water. Heating water by burning natural gas is much cheaper than heating water in an electric boiler. The geyser belongs to the water heaters of the flow type and has the simplest device. This device is not only economical, but also safe. With proper maintenance gas water heater is capable of trouble-free operation for several decades, and if a water filter or a water softening cartridge is used in an apartment or house, then the column lasts even longer.
Design and operation principle of PGV "Neva"
The series of flowing gas water heaters (PGV) of the Neva trademark includes many models and modifications. To date, the most popular are NEVA-4510M, NEVA-4511, NEVA 4513M with electric ignition.
They are manufactured at the factories of the domestic company BaltGaz Group in accordance with GOST 31856-2012 and include:
- metal case;
- gas path;
- water circuit;
- burner;
- combustion path;
- security system;
- control system;
- adjustment block.
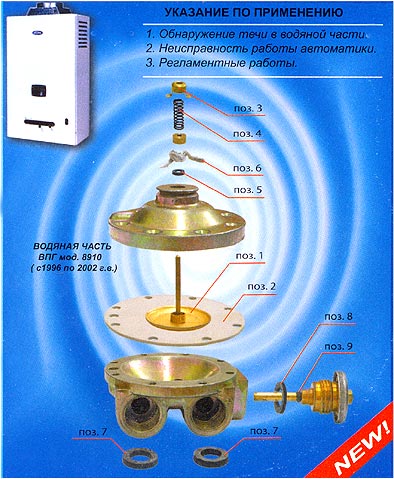
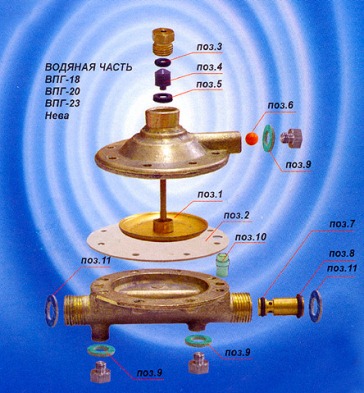
The listed nodes consist of many elements, some of which are shown in the diagram below.
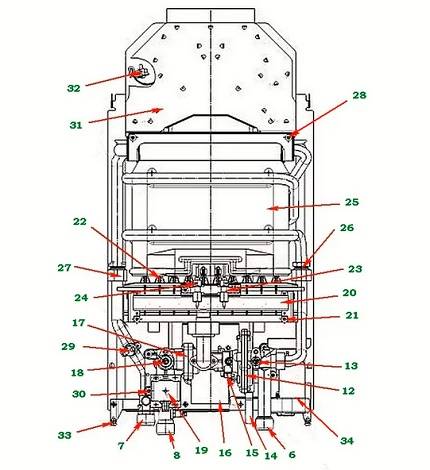
Main positions: 6, 7, 8 - branch pipes for water supply, hot water supply and gas pipes; 12 - water block; 13 - valve for adjusting the water flow; 15 - microswitch; 16 - control unit, 17 - gas block; 18 - gas flow adjustment valve; 19 - electromagnetic gas valve; 20 - burner; 23 - candle; 24 – flame burning sensor; 25 - heat exchanger; 29 and 32 - overheating and thrust sensors; 34 ¬ battery compartment
The water circuit begins with a branch pipe connected to a pipeline with cold water, and is pumped through a hot water supply pipe. This includes the water block, which plays a key role in electric ignition. It consists of a lower and upper chamber, between which there is an elastic membrane.
When the tap is turned on, the flow of cold water rushes to the heat exchanger, but along the way it passes the lower chamber and completely fills it. Under water pressure, the gas column membrane bends and presses on the poppet valve of the stem located in the upper chamber.
The stem of the water block extends through the hole and acts on the coaxially located stem of the gas block.That, in turn, acts on a mechanical gas valve, the plate of which moves away and allows the passage of gas, which instantly fills the burner manifold.
At the same time, when the rod moves, the microswitch plate is activated, closing the electrical circuit.
Electric current is supplied from batteries located in the battery compartment and provides power to the control unit, which applies electrical voltage to the glow plug and opens the solenoid valve. Spark discharges occur between the burner nozzle and the candle electrode, igniting the burner.
The heat generated by burning the gas is transferred to a heat exchanger tube through which water flows. As a result, a few minutes after turning on the tap, hot water flows out of it. When the tap is turned off, the reverse processes occur, and the burner goes out.
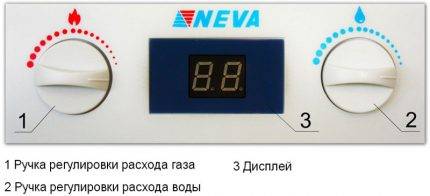
On the front side of the cladding there are adjustment knobs, as well as a display that displays the water temperature at the water intake point.
Gas is one of the cleanest types of fuel in the ecological sense, but even when it is burned, carbon dioxide, water vapor, and nitrogen are released. They are removed from the combustion chamber through the gas outlet pipe and the chimney of the gas boiler. Removal of combustion products is possible only if there is proper draft in the chimney.
To control the operation of the column and ensure its safe operation, the following sensors are included in the design:
- the presence of a flame;
- the presence of traction;
- water temperature.
Thanks to these components, gas flows to the burner only when the tap is on and there is water in the water supply. If the burner goes out for any reason, the gas supply is immediately stopped.
The automatic shutdown of the water heater is caused by the lack of proper draft in the chimney, an increase in the water temperature at the water intake point to 90 ° C. If the pressure in the water circuit reaches a critical value of 1000 kPa, an emergency valve is activated and excess water is drained.

Modern models are equipped not only with water and gas flow adjustment knobs, but also with a Winter / Summer knob, which is set to the desired position depending on the time of year
Now that you have become familiar with the device and design of the Neva gas water heater, you can proceed to the next chapter of the article, in which we will list the most common malfunctions, their causes and solutions.
Please note that the manufacturer recommends that for maintenance and repair work related to the dismantling of the gas-water unit, call the employees of the service center with which the contract for the supply of gaseous fuel and equipment maintenance has been concluded.
The principle of operation of a gas column with ignition from a hydraulic turbine
A gas water heater with a hydroturbine differs from the usual electric column in a sealed combustion chamber, the air in which is blown by a special fan. The electronic unit controls the gas equipment. Often, burners with flame modulation are installed in columns of this type. Such burners make the use of several taps more comfortable by maintaining a constant water temperature. The igniter is ignited by a spark generated by a hydraulic turbine.


 Gas column with ignition from a hydro turbine does not burn oxygen
To place a coaxial (double-circuit) pipe, it will be enough to make a small hole in the wall. This allows you to reduce the cost of equipping chimneys in private homes. An example of a water heater with a coaxial chamber would be Heis JSG20-10E1 and Bosch Therm 4000 S (WT 13AM1E) gas water heaters.
Choice
First of all, it should be said that in making a choice membranes for gas columns, it is necessary to take into account the brand of the manufacturer producing such a device, because in each case there will be an individual approach.
In some columns, the diaphragms are round, in others they have a rather complex shape. If you cannot find a round diaphragm that fits your water heater, you can buy and install a part with the same diameter for a column from another manufacturer, for example, a diaphragm with a diameter of 73 mm.
If the geyser has been operating for more than five years, then it is better to give preference to parts with plastic parts that are adjacent to it.
By the way, there is PVC membrane for flat roofs.
Advantages of the membrane for the gas column "Neva"
To replace a broken membrane yourself, you will need certain knowledge and skills. Repair of the Neva-4513 column can be performed with the help of service center specialists, but it will cost several times more
Before buying a part, it is important to study the device of a particular geyser
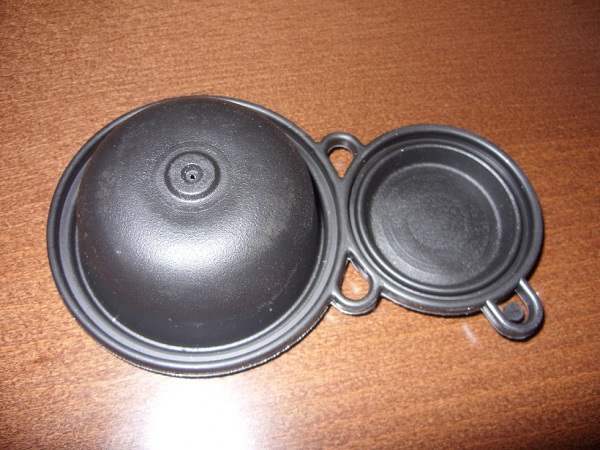
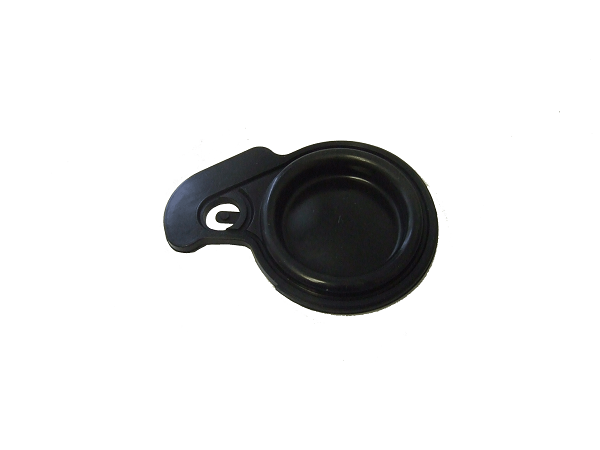
The rubber diaphragm designed to regulate the flow is designed to be used for five years. The real time of its serviceability largely depends on the quality and hardness of the water, the intensity of the column
When buying a membrane, it is important to pay attention to the rating and reviews of the manufacturer of the product.
Membrane Advantages:
- Made from high quality rubber.
- In the presence of an arcuate branch, having the shape of an eye.
- If the membrane is damaged, then the geyser does not produce hot water.
No matter how high quality the membrane is, over time it will become unusable. Modern technologies allow you to purchase the highest quality membrane without leaving your home. On specialized sites, the membrane can be ordered online. You can also buy a membrane in specialized stores, where you can consult with a specialist in real time.
Main burner does not start
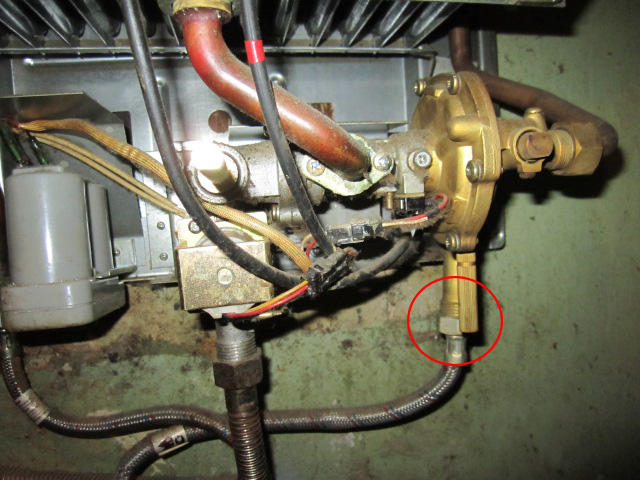
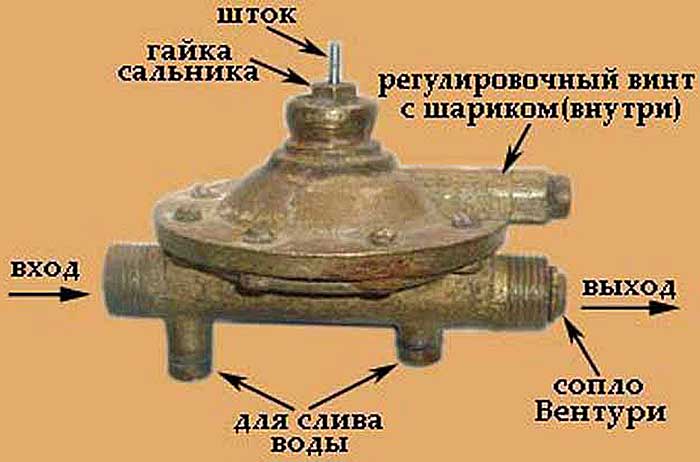
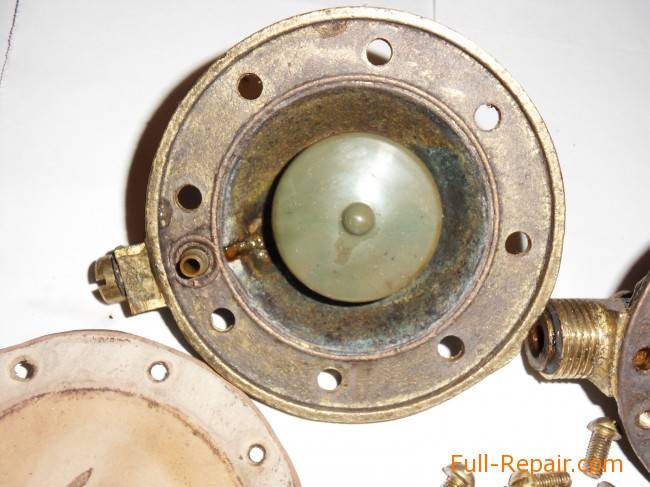
One of the main devices that guard the safety of the unit is a water unit (in a simple way - a “frog”). If there is sufficient water pressure, the frog presses the actuator of the gas valve with its stem and it supplies fuel to the main burner (in conventional columns). In automatic heaters, the water unit provides fuel access to the igniter, and the gas supply to the main nozzles is already a function of the gas unit.
When the water assembly fails, fuel will not be supplied to the burner and, in the case of automatic heaters, to the igniter. It happens that when the hot water valve is opened to the maximum, the frog still works, but this only indicates the presence of small cracks in the working diaphragm. The device can be brought to life with your own hands, for this you need to purchase a repair kit and change the membrane, which will be discussed below.
There are frequent situations in which the wick ignites, but burns poorly, weakly. Looking closely, you can see that the color of the fire is yellow rather than blue.When fuel is supplied to the main burner, pops are heard due to the fact that it does not flare up immediately and has time to fill the combustion chamber. Here, to repair the column, you need to clean the tube and the igniter jet. The latter in many models is easily removed and can be cleaned, as shown in the video:
Principle of operation
To correctly understand the principle of operation of a gas column, you must first understand how its security system works.
If the device is turned off, the control unit of the geyser stops receiving power, because. the electrical circuit in the switch is broken. This is due to the fact that the pushing mechanism presses the switch plate and keeps it off.
The solenoid valve on the geyser is also in the closed state and shuts off the gas flow from the inlet pipe, because. It also does not receive power. However, not only does it prevent the passage of gas: the spring valve located in the gas module is also turned off, and the outflow of gas into the manifold is completely closed.
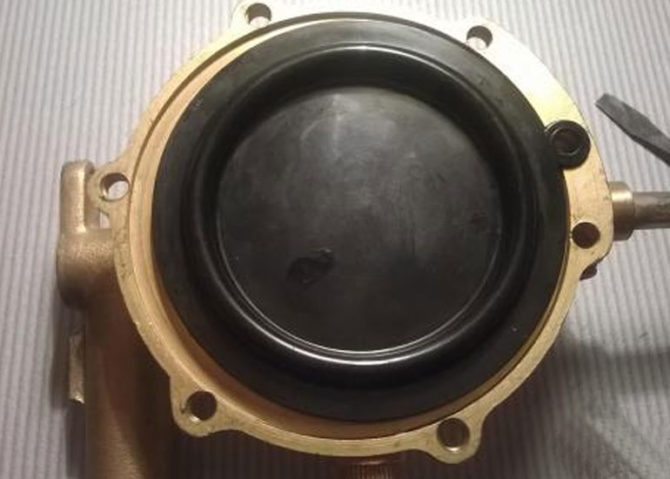
The main element of the gas column water reducer is a two-chamber module with a bendable membrane, popularly referred to as a “frog”. These modules communicate with each other using the appropriate channel. If the water supply is turned off, the pressure in the chambers equalizes.
How to change the membrane in a geyser: choose and install yourself
The efficient operation of the water heater depends on the serviceability of all components and mechanisms. The membrane in the geyser is one of the important parts, but wears out over time. How to make a replacement with your own hands? To do this, we have a detailed work plan.
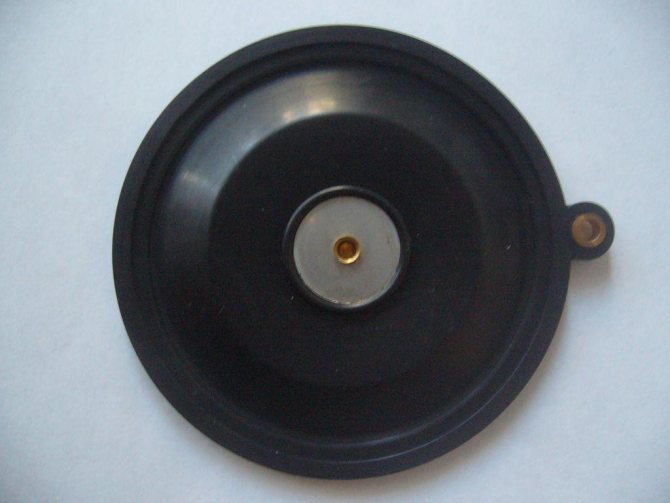
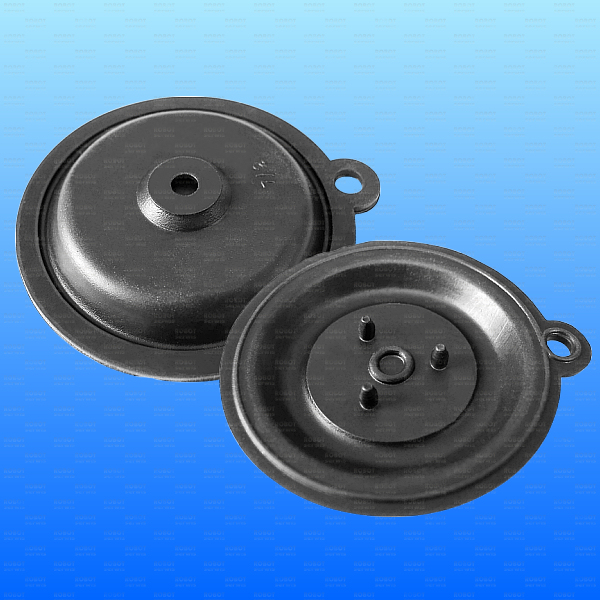
Membrane functions, causes of failure
The elastic membrane is located at the base of the water unit, reacts to pressure drops in the system. As soon as you open the faucet, the rubber element bends under pressure and pushes the stem out. The stem in turn actuates the gas valve. This is how fuel enters the burner.


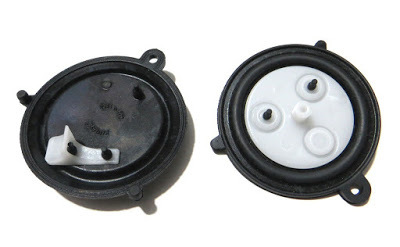

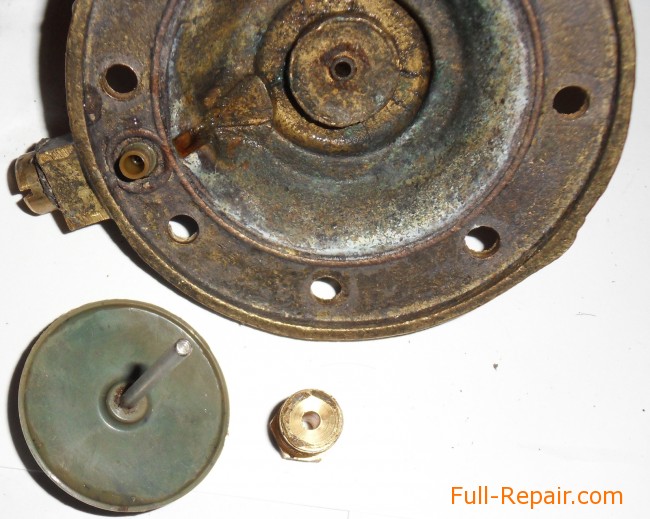


With intensive use of the column "Vector", "Neva", "Oasis", the membrane wears out. The rubber is stretched, clogged and damaged. As a result, the fuel does not enter the burner: the column does not ignite or ignites, but immediately goes out.
Signs of breakdown
How do you know when it's time to change the rubber diaphragm? You need to pay attention to:
- The pressure force of gas and water in the system. Open the tap, count how many liters are consumed per minute. Normally, there should be at least two or three liters. The gas supply can be calculated visually by looking at the strength of the fire.
- Flame location. In appliances with wick ignition, the fire should burn from the edge of the burner, be at least 3-5 centimeters high. Does not match? Then check the jets for blockage. After cleaning, look at the flame again. If the situation has not changed, the problem is in the diaphragm.

- The piezo ignition technique should click when the button is pressed. This means that the diaphragm has worked. If no sounds are heard, the part may be damaged or torn.
- In some models, a rod that controls the operation of the control unit will help determine the breakdown. Remove the protective cover and open the water. If the stem is not moving, the diaphragm needs to be replaced.
After you have found a breakdown, you need to choose the right part for replacement.
How to choose a new part
For each column ("Termet", "Ariston", "Beretta") the membrane is selected individually.For foreign models, finding a replacement is the most difficult, since you can only purchase goods from an official supplier. In this case, you have a choice: invest in a new element or buy a new column.
With domestic technology, everything is easier. Replacement can be found in stores or ordered online.
If you think that the principle of construction of all membranes is the same, it is not so. For example, in Ariston water heaters, special elements are installed - "eights". They are made of dense rubber, have a special shape. Their cost is from 300 to 500 rubles.
According to the principle of the "eight" the membrane works in the Electrolux devices. But its price is much lower - from 200 rubles.
There are universal options, but they are only suitable for temporary installation. It is impossible to accurately tune the equipment without factory parts.
Self repair
For repairs, you will need to disassemble the entire water and gas unit. You will need:
- slotted and Phillips screwdriver;
- wrenches for 19 and 24;
- repair kit;
- new item.
First of all, shut off the water and gas supply. After that, open the faucet in the bathroom, drain the remaining water.
- Remove the controls from the case by pulling them towards you.
- If there is a display, disconnect the wiring leading to it.
- Now you need to remove the cover. In some models, it is bolted on top and bottom, in others it “sits” on latches. Pull the cover towards you and up.
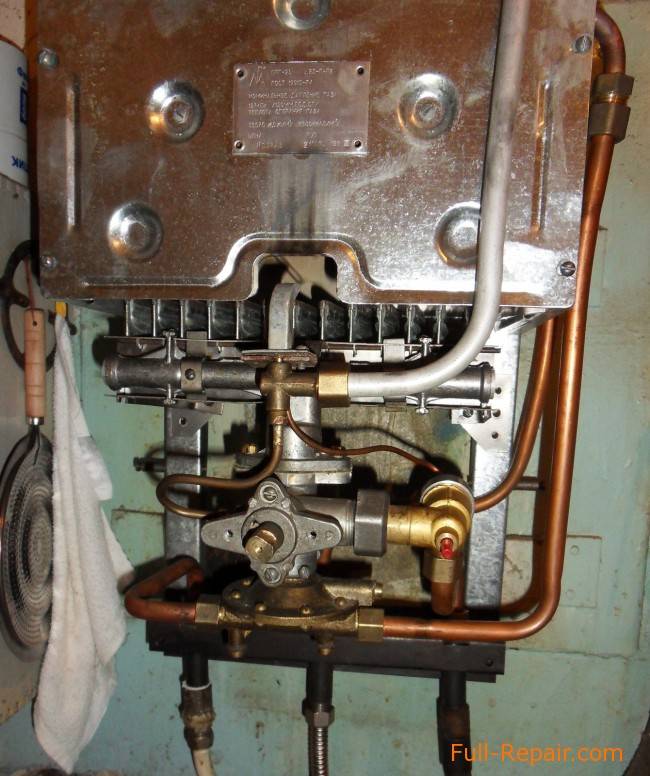
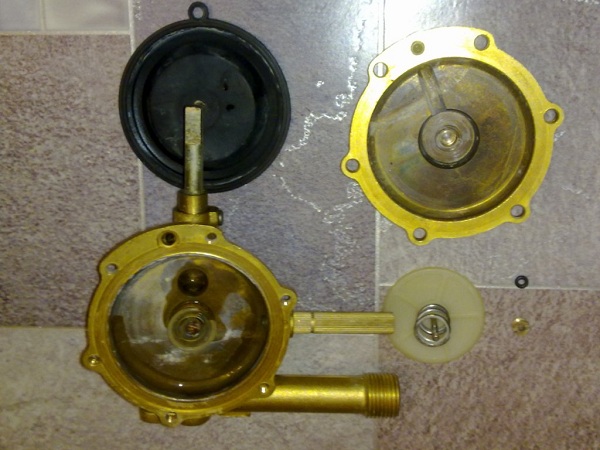
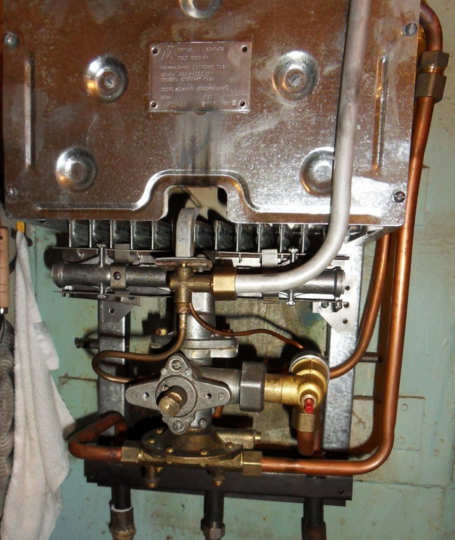
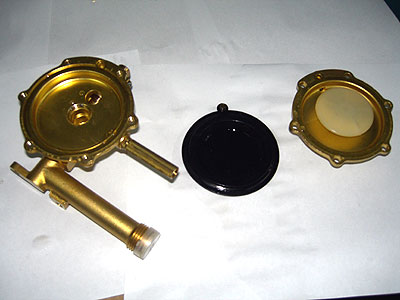
A water node will open in front of you. In earlier models, it is located separately, vertically. A gas block is installed on top, a water supply is organized on the left, and a heat exchanger is on the right.
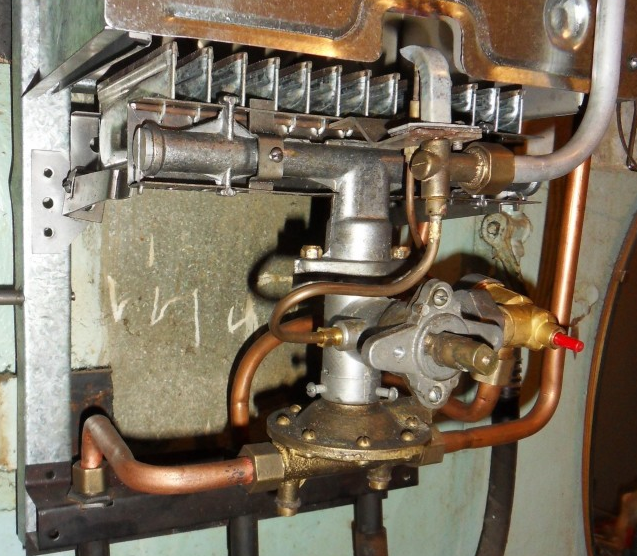
To unmount such an element:
- Loosen the two nuts on the water pipes. Use key on 24.
- Remove the two fixing screws, pull down and remove.
In the latest models, the water unit is placed horizontally. Below there is a special tap through which the remaining water is drained.
- Unscrew the fixing nuts with a 19 wrench.
- Disable supply sensors.
- Remove the bolts that secure the block to the base.
- Remove the burner.
- Unscrew the fasteners of the water-gas unit with the manifold.
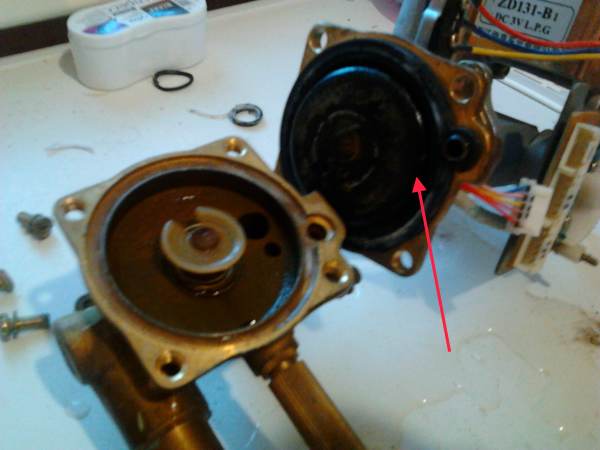
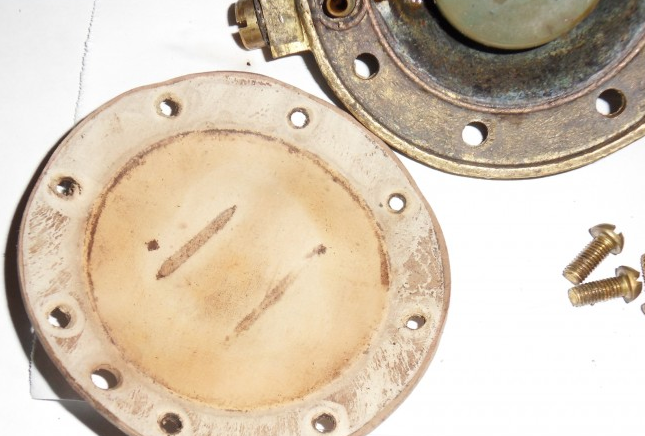
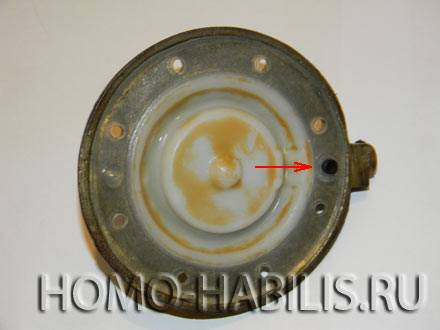
You can start disassembly. In the old variations of Astra and Neva, eight bolts must be unscrewed to separate the assembly. In modern Neva models 4513, 4511, 4510, Oasis, Vector, only four screws hold it.
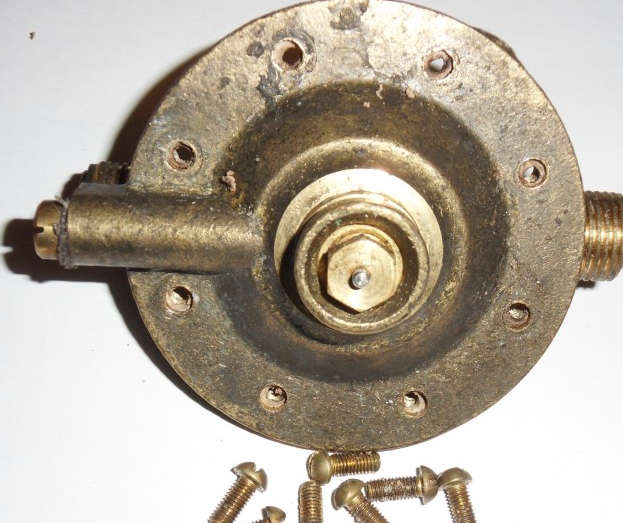
It remains to get the worn out membrane and install a new one.

Reassemble in reverse order. Check at the end of the work. Gradually opening the water supply, inspect all connections for leaks. Then open the faucet to full. Everything is fine? Put on the cover, supply fuel - use hot water to your heart's content.


On the video, they change the aperture for some models:
How to solder a gas column heat exchanger
Preparation for soldering
First of all, you need to remove the casing from the column. This must be done carefully, first disconnecting the wires from the display. In some models of water heaters, for example Neva 4510, the gas and pressure regulators must be removed before this.
Next, the water is turned on and the place of the leak is located. Often it is located at the bend of the heat exchanger tubes near the crate. If it is easily accessible, it will be possible to seal the fistula without removing the column.
If there is no direct access, and the fistula is located inside the radiator, it will be necessary to disassemble the column and remove the heat exchanger.
In modern columns there is a special plug for draining water, by opening which the liquid is poured into a substituted container. Remaining moisture is blown out with a compressor or vacuum cleaner.
This is important because during soldering, the liquid will boil and evaporate, creating pressure and blowing the solder through the fistula. The last stage of preparation is cleaning and degreasing the leak. This is done with fine-grained sandpaper.
Cleaning must be done carefully so as not to make a through hole, since the pipes in the heat exchanger can be very thin. After that, the cleaned tube is wiped with any solvent or white spirit to remove any remaining dirt and grease.
This is done with fine-grained sandpaper. Cleaning must be done carefully so as not to make a through hole, since the pipes in the heat exchanger can be very thin. After that, the cleaned tube is wiped with any solvent or white spirit to remove any remaining dirt and grease.
The last stage of preparation is cleaning and degreasing the leak. This is done with fine-grained sandpaper. Cleaning must be done carefully so as not to make a through hole, since the pipes in the heat exchanger can be very thin. After that, the cleaned tube is wiped with any solvent or white spirit to remove any remaining dirt and grease.
Soldering methods
There are three ways to solder the gas column heat exchanger:
Powerful soldering iron
To solder the fistula site with your own hands, you will need a soldering iron with a power of about 110 W, flux and solder.
The first stage of soldering is the application of flux. This is a substance that cleans the surface of the material from oxides and allows the solder to spread more evenly. Flux paste with copper content is best.If it is not available, you can use ordinary rosin or an aspirin tablet.
Burner with gas bottle
You will need a burner, a small gas bottle, flux, solder. The burner is connected to the cylinder and ignited. It is necessary to choose a flame that is not very strong so as not to damage the radiator of the column.
First, the leak site warms up well. This is done so that the remaining moisture in the pipes evaporates. After that, the pipe is heated and solder is supplied to it.
After soldering, it is imperative to remove the flux residues, because it contains acid and can later corrode the walls of the heat exchanger pipes.
cold welding
It is important to choose a cold weld that will not melt from hot water. All actions must be carried out with protective gloves. A small amount of cold welding comes out of the package
You need to knead it in your hands for about three minutes. As soon as the material begins to harden, you need to attach it to the site of the fistula and hold it firmly until completely solidified.
A small amount of cold welding comes out of the package. You need to knead it in your hands for about three minutes. As soon as the material begins to harden, you need to attach it to the site of the fistula and hold it firmly until completely solidified.
If there are several fistulas nearby on the heat exchanger tube or the hole in the tube is large, you need to solder a copper patch. You can also solder from a piece of copper pipe.
How to check tightness
After soldering the geysers, you need to check the tightness of all pipes. To do this, they are carefully examined to see even the smallest fistulas - small green spots indicate their presence. In order to avoid re-parsing the column in the near future, these defects are also cleaned and soldered.
After that, you need to connect water to the gas column with a brazed heat exchanger and open the tap.
At the very end, a boiler with a geyser is turned on to check its performance when in contact with hot water. At the same time, soldering areas can be wiped with a dry cloth to detect the slightest sign of moisture.


Too frequent pump starts
This phenomenon indicates a lack of air pressure in the tank for water supply systems. Therefore, the very first thing to do is to check the pressure gauge readings.
Here you need to take into account the fact that this device may show incorrect values. Therefore, you can simply completely bleed the air from the system through the air injection valve and pump it again. If the pressure gauge is out of order, you need to replace it.
Another possible reason is a failed pressure control switch. In this case, you need to adjust it. It is possible that the problem will be fixed.
Failure of the pressure switch is also one of the possible malfunctions.
You also need to inspect the accumulator itself - if the integrity of the case is violated, the air will be bled. Depending on the size of the damage, you will either need to seal it or buy a new one.
Another common cause is a failed air nipple. If so, then you just need to change it. To do this, you need to disconnect the hydraulic accumulator from the water supply system and bleed air from it. After that, you need to unscrew the old nipple and insert a new one into place.
Then air is pumped into the tank up to 1.5 atmospheres, and then water is drawn into the membrane.
Rule out other column problems
Most often, you may encounter a situation where the column initially does not kindle a flame. First you need to determine what specifically led to this. After all, the problem may not be in the heat exchanger at all, but, for example, in dead batteries. Therefore, diagnostics is indispensable. Moreover, some of the breakdowns can be eliminated with your own hands, and in some cases you will have to call a specialist from the gas service.
External inspection of the water heater
Competent diagnostics will allow you to quickly carry out repairs on your own.
It is not recommended to carry out self-repairs if the geyser is under warranty. The service department can remove the device from warranty service
There are a number of elementary steps that should be performed before you go to explore the water heater from the inside:
- Replacing the battery and cleaning the power contacts.
- Checking the draft of the chimney and the presence of pressure in the cold water supply system.
- Checking the fuse (for turbocharged speakers). You can turn the plug in the switch to change the phase location - relevant for imported models, as they are quite sensitive to this.
- Mesh filter cleaning. This is a sump that can be found on a pipe that supplies cold water. Often the mesh is a constructive component of the water node.
- Observe the ignition electrodes. To do this, just open the hot water tap, after which sparks should form. If the chamber is closed, then you can listen to the body. Characteristic sounds like clicking charges should be heard.
The above steps may not always help. Then you have to look inside the column, for which you have to remove the case.
Each gas column repair should begin with checking the batteries and cleaning the contacts if they are oxidized. You also need to inspect and clean the igniter. There are speaker models that have a small window for access to the electrodes, which can be cleaned with a brush.
Troubleshooting inside the column
If external inspection and replacement of batteries did not help, then you can start troubleshooting directly inside the device.
To do this, remove the casing of the water heater and check the main components one by one. It is better to perform all actions with an assistant. He should be asked to open hot water, and he himself needs to monitor the movements of the stem. The responsibility of this element is to act on the pressure plate to move it away from the microswitch button.
In the case when the pusher does not perform any movements, then with a probability of 100% the problem lies in the water block. If this problem occurs, it is necessary to disassemble the unit in order to clean and change the membrane in it.
Also, the stem can press on the plate, but the button will remain pressed. In this case, it is necessary to check the water regulator for scale. It must be found and cleaned.
If all the above elements work in normal mode, the button is pressed, but no sparks are formed, then in this situation the microswitch itself may be the culprit. To verify this, you need to disconnect its connectors and clamp the two terminals with a screwdriver. If in this case sparks immediately begin to form, then the switch is out of order and should be replaced.
It is necessary to check by closing the connector that is connected to the impulse block. The plug of the microswitch must not be touched.
The solenoid valve may also fail, due to which gas will not be supplied. To do this, check each of the sensors in the circuit by alternately closing. You can also use a multimeter to dial.
Conclusions and useful video on the topic
You can learn how to repair a Chinese water heater frog from the following video:
About the repair of the Vaillant 24 \ 2 GRXI gas column VU is simple and clear in this video:
The water unit of the Bosch Group of Companies may seem very complicated. However, many parts cannot be replaced individually, so you will have to buy a complete assembly. It's good that dismantling and assembling the assembly is simple:


The video explains why you should not delay replacing the stem seals as soon as you notice the appearance of droplets. Shows how to disassemble the stem, replace the glands and reassemble:
In general, the device of any water block of a household geyser is quite reliably designed and executed. If the installation was done correctly, and preventive inspections with the timely replacement of consumables are carried out regularly, then problems with the operation of the speakers do not happen often. A gas company specialist is not always needed to repair the water heater assembly. Many types of work can be done independently.
Conclusion
Fearing to seem intrusive, the author will remind you once again: if you have even the slightest doubt in your abilities, for any problems with gas, contact a specialized service. Additional information about gas equipment, as always, will be offered by the video in this article. Good luck!
There are special lubricants for gas taps, they belong to the Greases group.Applications: It has been successfully used in natural gas shut-off valves in main and secondary lines in household appliances, instantaneous water heaters and similar equipment. Lubrication of smaller faucets made of metal, glass or plastic.
Features: high water resistance, no drop point, thus no melting or leakage from lubrication points.
You understand correctly, Viktor Yurievich! The lubricant must meet certain requirements. According to GOST R 50696-2006, the lubricant must be inert to hydrocarbon gases, moisture, low and high temperatures. Until now, GOST has not standardized the formulation of such lubricants. Repair services of regional gas companies use lubricants SK-1, 1-13S, NK-50, LZ GAZ-41. For example, the composition of the lubricant SK-1, parts by weight: cylinder oil No. 2-68, technical stearin - 13, aluminum stearin oil - 2, highly dispersed graphite (C-1) - 16, caustic lithium - 1.
You will not find in the trade these domestic lubricants approved and permitted for applications in natural gas environments and liquefied petroleum gas, because they are intended for industry.
From imported lubricants in Moscow, products of the American manufacturer of specialty lubricants Huskey are available. For shutoff valves of gas pipelines (cone valves), sealing reinforcing grease HUSKEY No. 3 GENERAL PURPOSE VALVE LUBRICANT & SEALANT. HUSKEY HVS-100 SILICONE GREASE is used for plug valves of household gas stoves and other gas equipment.
I want to warn you against the thoughtless use of any silicone grease from the nearest auto shop on the cork taps of household gas stoves.It absolutely cannot be done! The main properties of greases do not depend on the oil, in this case it is silicone, but on the thickener.
To prevent rust and plaque from appearing, you need to choose a good gas lubricant.
Gas equipment can be affected by negative environments - water, chemical compounds, so I can advise Dow Corning Molykote 111 Compound, it lubricates well, seals the nodes and also acts as an electrical insulator.
The compound ensures the tightness of gas valves, protects them from jamming, salt deposits and corrosion, thereby extending their service life.
«>