- Distribution header selection
- Horizontal systems (features)
- What elements does the collection system consist of?
- What to look for when choosing a collector (comb)
- materials
- Pipes
- Radiators
- Positive qualities and disadvantages
- Single pipe horizontal
- Advantages and disadvantages of the scheme
- Features of the installation of a single-pipe horizontal system
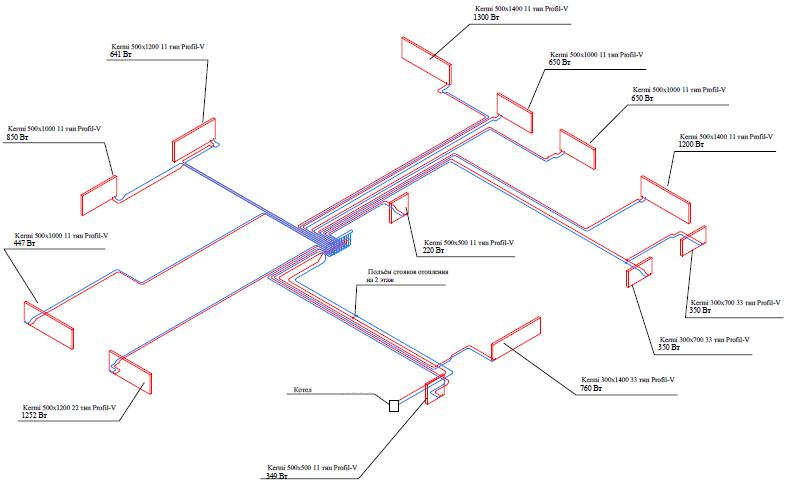
- Beam wiring and underfloor heating
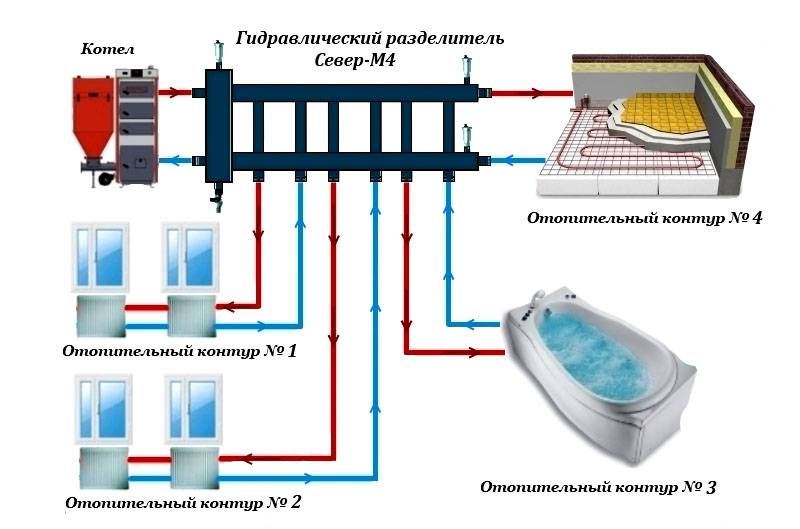
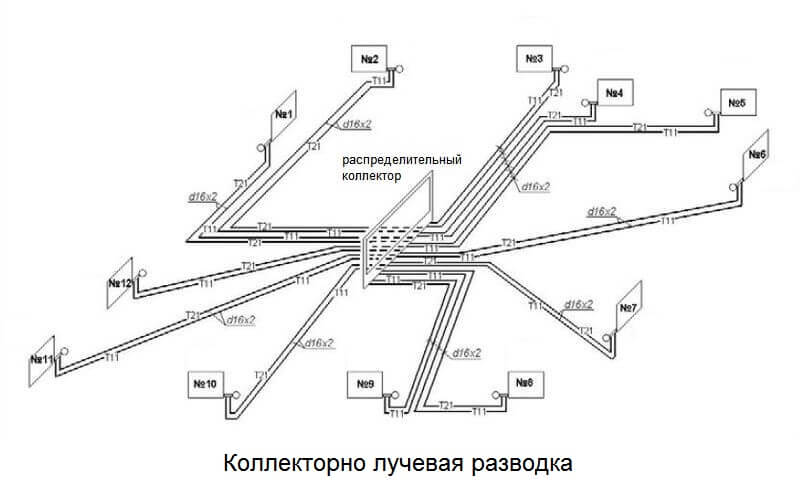
Distribution header selection
It is also called a comb. It is necessary for supplying liquid to a warm floor, radiators, convectors, etc. With the help of it, an outflow is carried out along the return circuit, from where the liquid is then sent to the boiler or mixed again in the circuit for temperature adjustment. The collector copes with a maximum of twelve branches.
As a rule, combs have redundant locking-regulating and temperature-regulating elements. With the help of them, it is possible to adjust the rational flow of the heat carrier for all heating circuits. The presence of air blowers can guarantee the quality and stability of the system.
Why do you need a safety valve in the heating system?
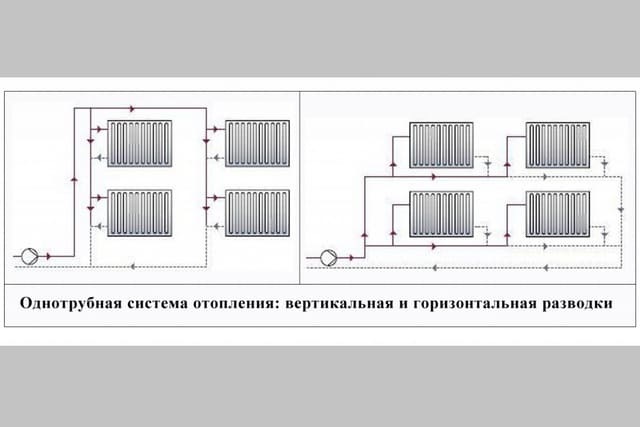
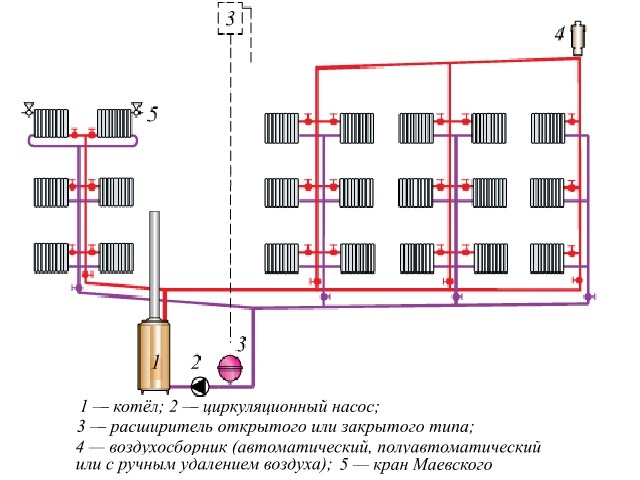
Horizontal systems (features)
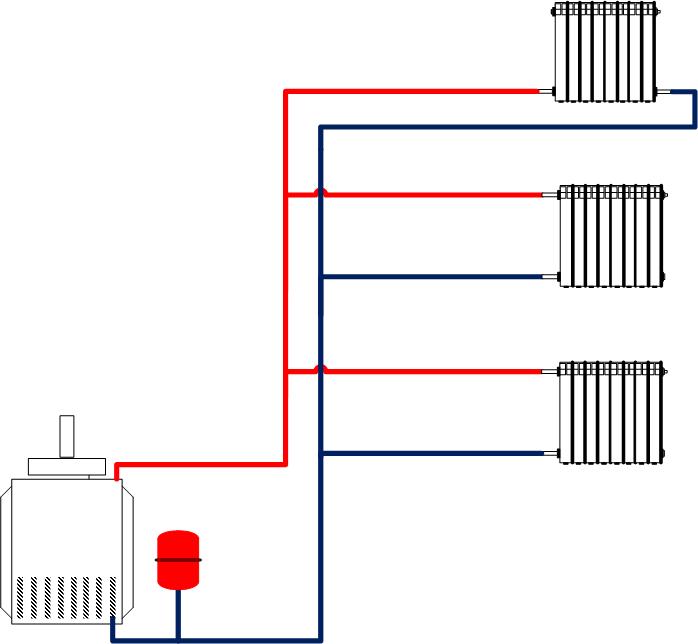
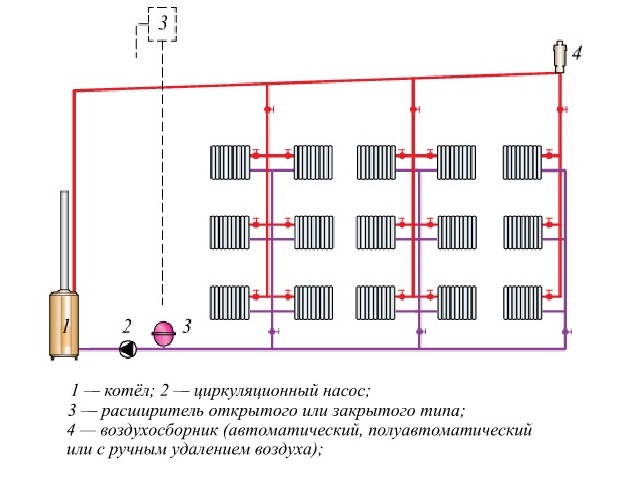
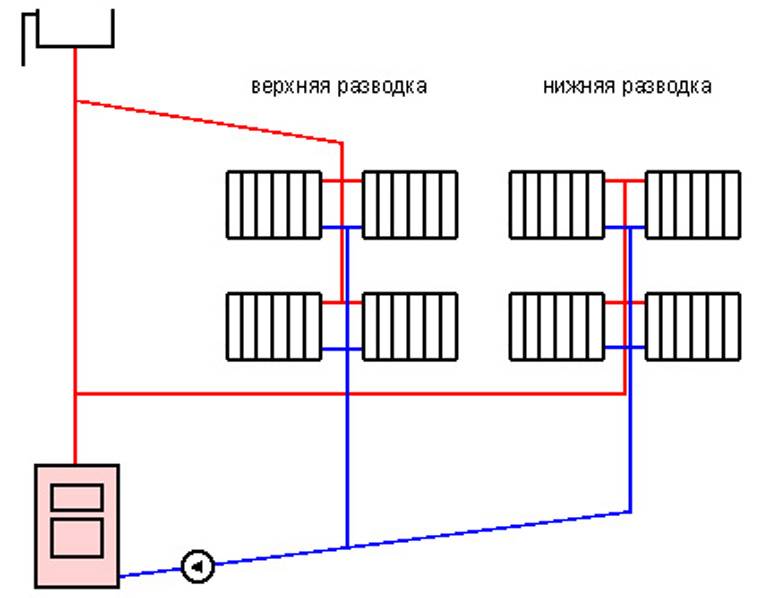
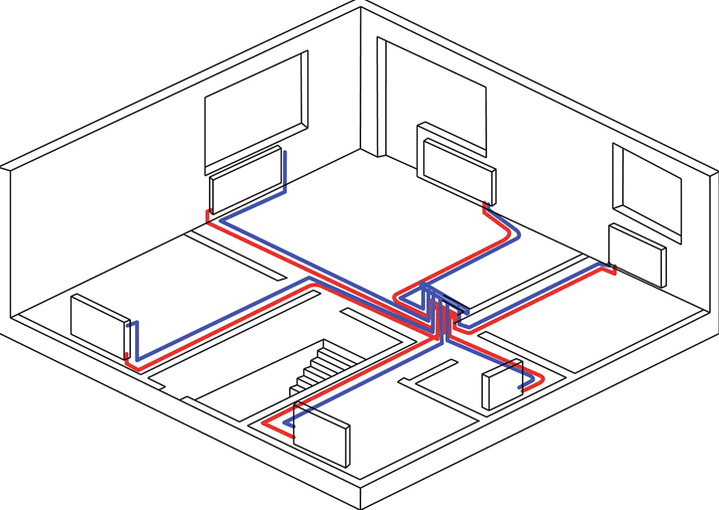
This is a closed two-pipe system in which horizontal branches are laid instead of vertical risers, and a certain number of heating devices are connected to them. As in the previous case, branches can have top, bottom and combined wiring, only now this happens within the same floor, as shown in the diagrams:
As can be seen in the figure, a top-wired system requires pipes to be laid under the ceiling of the premises or in the attic and will hardly fit into the interior, not to mention the consumption of materials. For these reasons, the scheme is used infrequently, for example, for heating basements or when the boiler room is located on the roof of a building. But if the circulation pump is correctly selected and the system is set up, then it is better to let it go down from the roof boiler pipe, any homeowner will agree with this.
Combined wiring is indispensable when you need to install a two-pipe gravity system, where the coolant moves naturally due to convection. Such schemes are still relevant in areas with unreliable power supply and in houses of small area and number of storeys. Its disadvantages are that many pipes of large diameter pass through all the rooms, it is very difficult to hide them. Plus the high material consumption of the project.
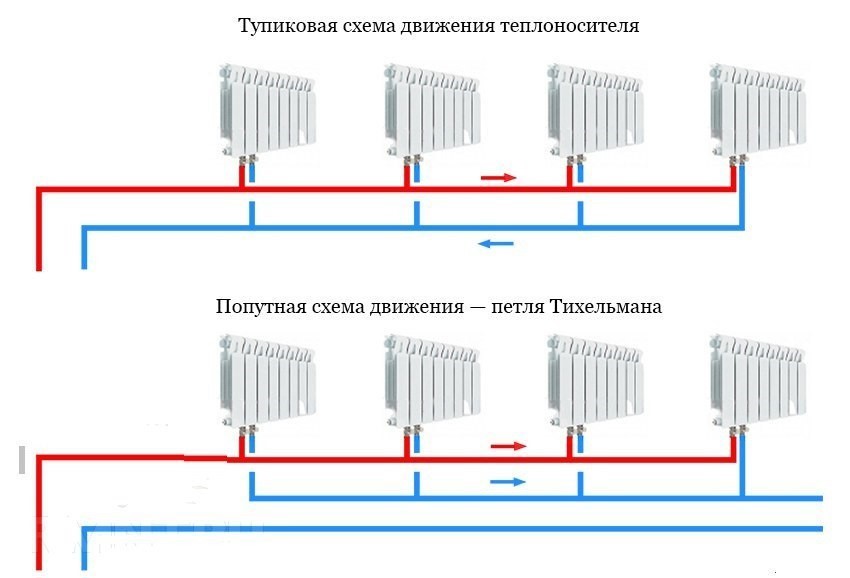
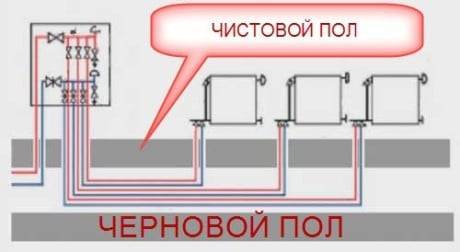
And finally, a horizontal system with a lower wiring. It is no coincidence that it is the most popular, because the scheme combines a lot of advantages and has almost no drawbacks. The connections to the radiators are short, the pipes can always be hidden behind a decorative screen or cast into a floor screed. At the same time, the consumption of materials is acceptable, and from the point of view of work efficiency, it is difficult to find a better option.Especially when a more advanced associated system is used, as shown in the diagram below:
Its main advantage is that the water in the supply and return pipes runs the same distance and flows in the same direction. Therefore, hydraulically, this is the most stable and reliable scheme, provided that all calculations are carried out correctly and installation features are taken into account. By the way, the nuances of systems with a passing movement of the coolant lie in the complexity of the arrangement of ring circuits. Pipes often need to cross doorways and other obstacles, which can increase the cost of the project.
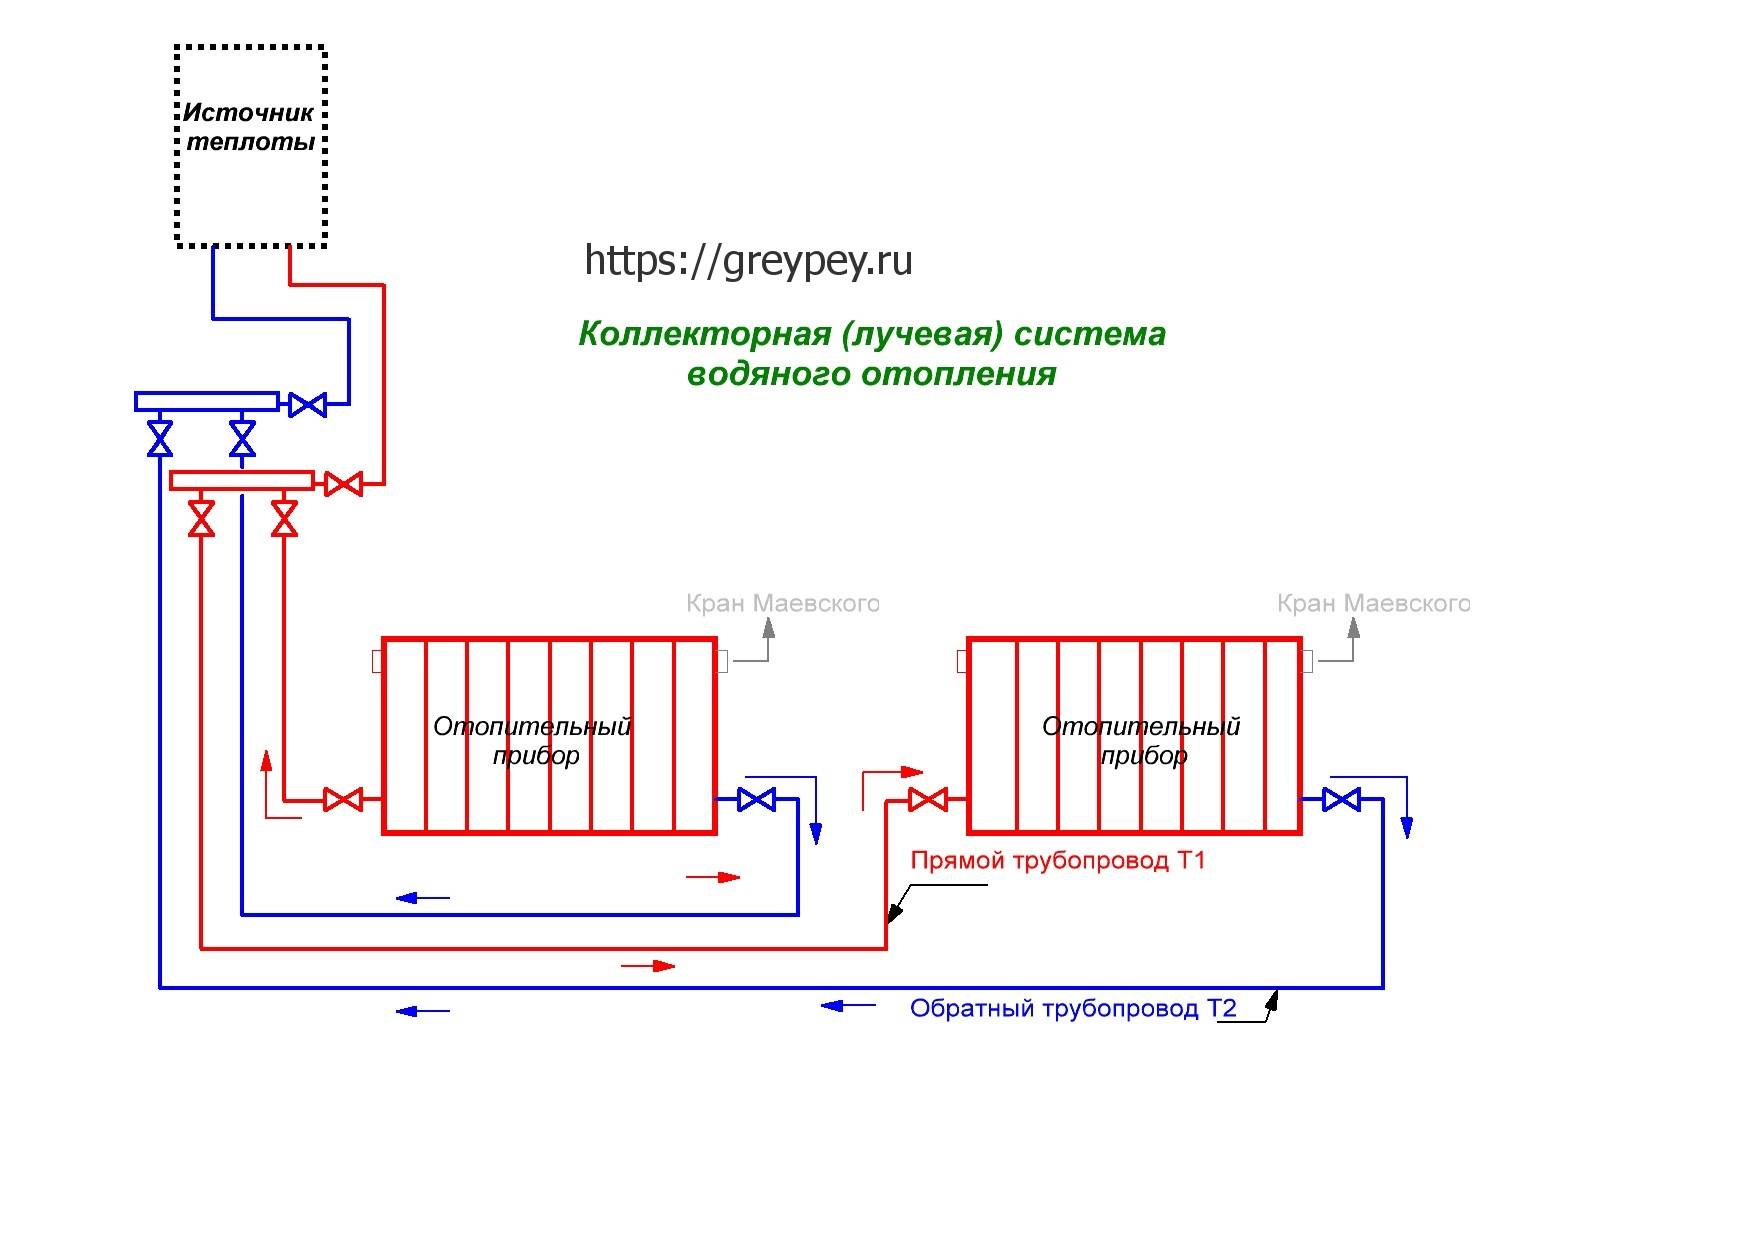
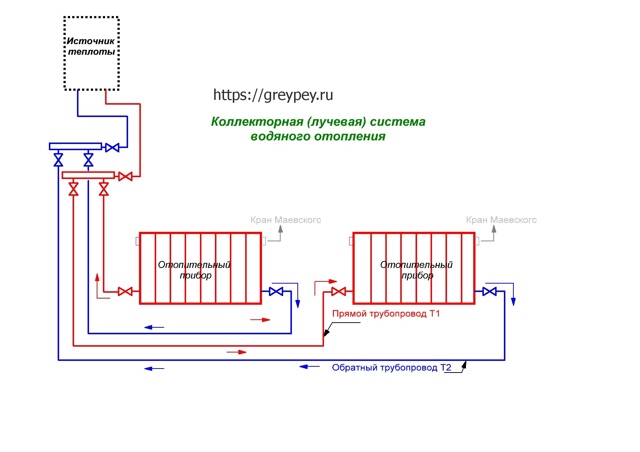
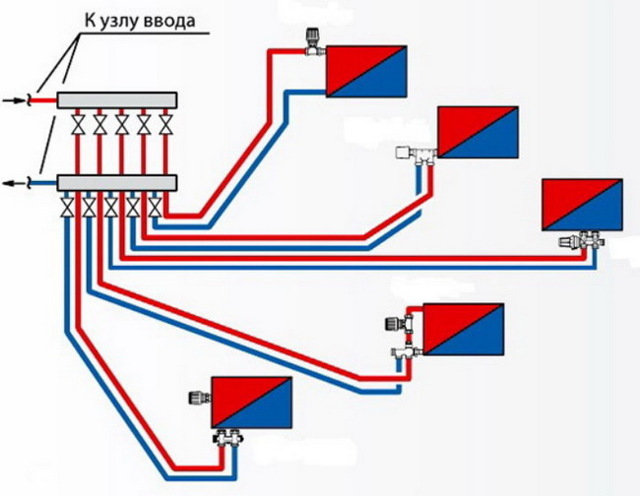
What elements does the collection system consist of?
Boiler. The central element, as in any other heating system, is the boiler. From it, the heated coolant is supplied through pipes to the radiators.
When choosing a heat generator, it is important to correctly calculate the required power, taking into account the heat loss of a particular house.
Pump. It is installed for forced circulation of water in the system. When choosing a pump, you need to focus on the dimensions of the pipes, materials and features of the operation of heating devices
An important parameter when choosing a pump is the pumping speed of the coolant, in second place in importance is the power of the device
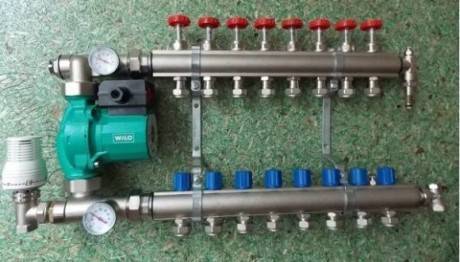
Collector. For external resemblance to a comb, a structural element is also called a comb. This is a distribution system that is installed to transfer the coolant to all heating devices. Shut-off and control devices can be installed on the collector, which will allow you to control the coolant flow in each "loop".By equipping the comb with automatic venting systems and thermostats, you can achieve maximum heating performance with minimum energy consumption.


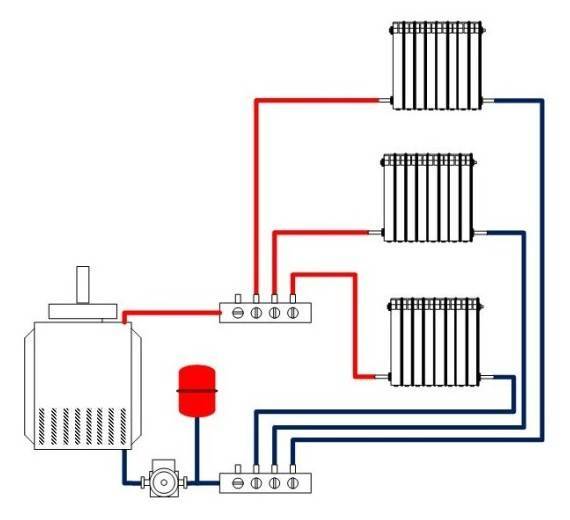
collector cabinets. These are structures in which combs are installed. There are a variety of models - from the simplest hanging boxes to "invisible" cabinets, which are built into the walls and "masked" with finishing materials so that they become almost invisible in the interior. The collector cabinets contain the most important elements of the beam system - the comb itself, valves, pipelines.
What to look for when choosing a collector (comb)
Combs may vary depending on the material from which they are made, the number of contours, the type of additional elements. Devices are made from the following materials:
- steel;
- copper;
- brass;
- polymers.
Contours can be 2-12 depending on the model. The peculiarity of the comb is that, if necessary, you can add additional contours.
By design, collectors are:
- simple, consisting only of basic elements, without any additional control equipment;
- advanced, in which the manufacturer installs automation, sensors and other additional elements.
Simple designs are ordinary tubes with branches and connecting holes. Advanced ones can have temperature and pressure sensors, thermostats, electronic valves, mixers.
When choosing a collector, you should decide on the material and design of the devices, as well as take into account the following nuances:
- throughput of the comb;
- the number of contours;
- the maximum allowable pressure at which the collector is able to work;
- power consumption for the operation of the device;
- reputation of the manufacturer in the market of heating equipment.
materials
Pipes
When manifolding radiators and when laying a water-heated floor, the same types of pipes are used. They have a common feature: pipes are sold in coils with a length of at least 100 meters. Here is a list of materials used:
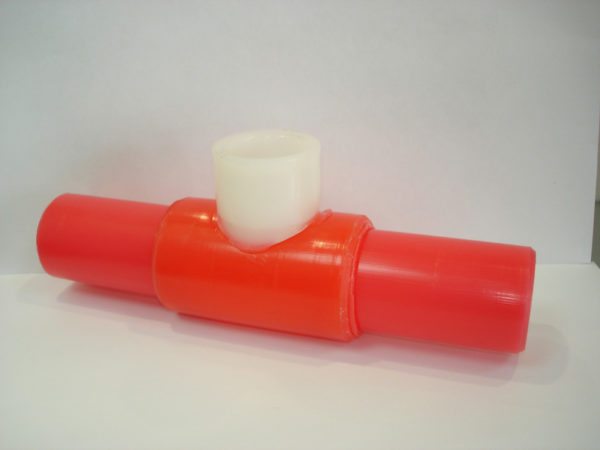
Cross-linked polyethylene (PEX). It differs from the usual one by cross-links between polymer molecules, which change its physical properties: the softening temperature of the material and its mechanical strength increase. Cross-linked polyethylene has an interesting feature - shape memory. This property is used when assembling fitting connections: the pipe is stretched by an expander, put on a herringbone fitting and, after a few seconds, tightly compresses it;

Fitting for PEX pipes. The pipe stretched by the expander is put on the fitting and fixed with a slipped sleeve.
Thermally modified PERT polyethylene. It is inferior to cross-linked in strength and surpasses it in heat resistance (up to 110-115 ° C). Connections are made by compression fittings or low-temperature welding;
Socket weld on PERT pipe.
Metal-plastic. Metal-polymer pipes are a pair of layers of PEX polyethylene (less often - PERT or PE) with a reinforcing aluminum layer glued between them. Advantages of metal-plastic - affordable price (from 33 rubles per linear meter) and high tensile strength (working pressure of at least 16 atmospheres); its disadvantage is a large minimum bending radius. When trying to bend a pipe with a small radius, its aluminum core breaks;


The warm floor is laid with metal-plastic. When laying, avoid bends with a small radius.
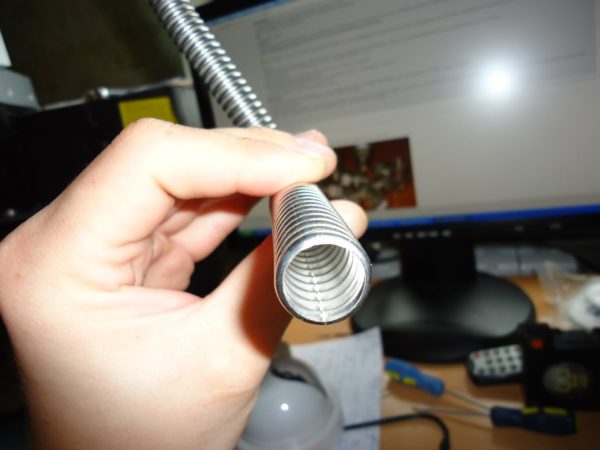
Corrugated stainless steel pipe. The destructive pressure is 210 atmospheres, the service life is not limited by the manufacturer.
Radiators
Which radiators will provide the maximum heat transfer at the lowest price?
For an autonomous heating system, the best choice is sectional aluminum batteries. An aluminum radiator section costs from 250 rubles and gives off up to 200 watts of heat. The relatively low strength is compensated by the sparing operation mode: in a properly designed autonomous circuit, there are no pressure surges or water hammers.
Aluminum sectional radiator provides an optimal ratio of price and heat transfer.
In the DH system, the picture is different. A quickly open faucet on a riser or a fall of the cheeks of a valve may well provoke a water hammer, so our choice is durable bimetallic radiators.
Positive qualities and disadvantages
The main differences between closed heat supply networks and outdated open systems with natural circulation are the lack of contact with the atmosphere and the use of transfer pumps. This gives rise to a number of advantages:
- the required pipe diameters are reduced by 2-3 times;
- the slopes of the highways are made minimal, since they serve to drain water for the purpose of flushing or repair;
- the coolant is not lost by evaporation from an open tank, respectively, you can safely fill pipelines and batteries with antifreeze;
- ZSO is more economical in terms of heating efficiency and cost of materials;
- closed heating lends itself better to regulation and automation, can act in conjunction with solar collectors;
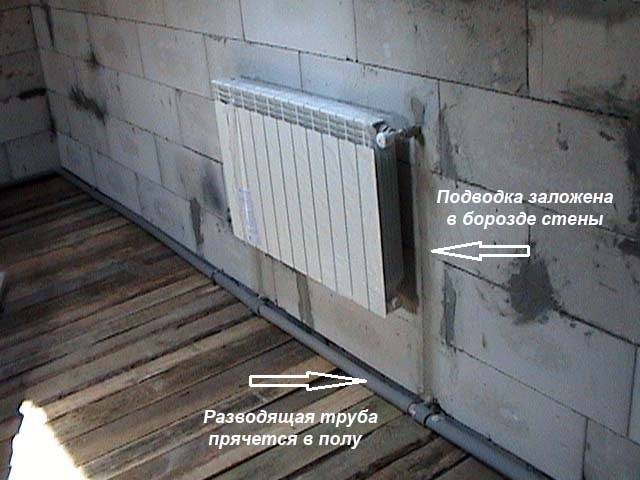
- forced flow of the coolant allows you to organize floor heating with pipes embedded inside the screed or in the furrows of the walls.
The gravitational (gravity-flowing) open system outperforms the ZSO in terms of energy independence - the latter is unable to operate normally without a circulation pump. Moment two: a closed network contains much less water and in case of overheating, for example, a TT boiler, there is a high probability of boiling and the formation of a vapor lock.
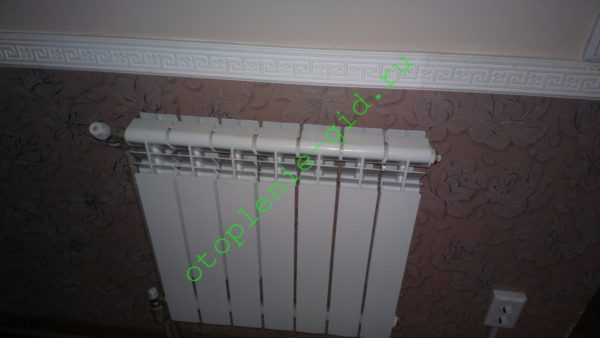
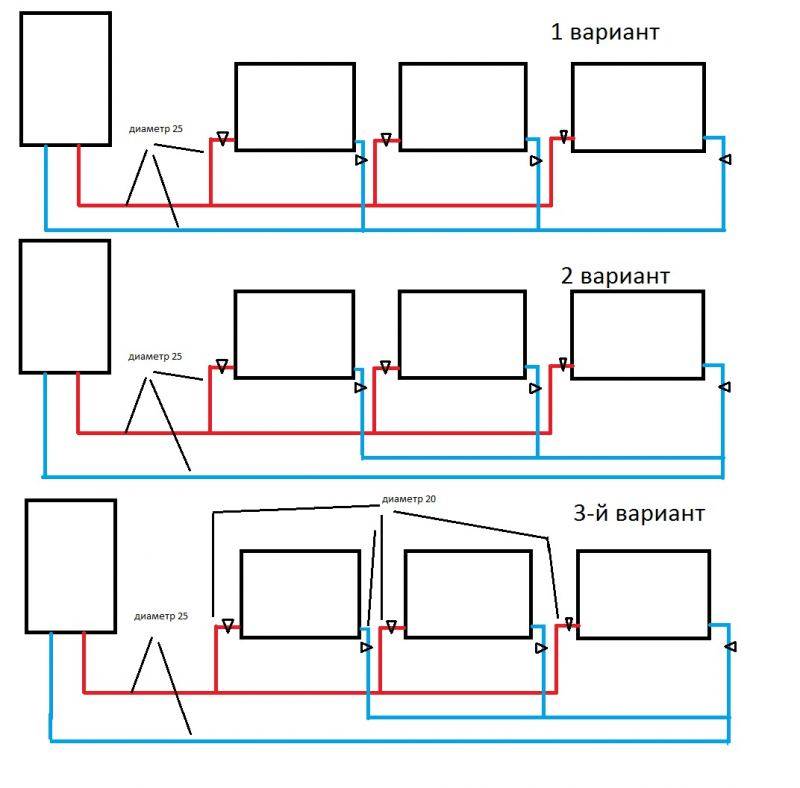
Single pipe horizontal
The simplest version of a single-pipe horizontal heating system with a bottom connection.
When creating a heating system for a private house with your own hands, a single-pipe wiring scheme can be the most profitable and cheapest. It is equally well suited for both single-story houses and two-story houses. In the case of a one-story house, it looks very simple - the radiators are connected in series - in order to ensure the consistent flow of the coolant. After the last radiator, the coolant is sent through a solid return pipe to the boiler.

Advantages and disadvantages of the scheme
To begin with, we will consider the main advantages of the scheme:
- ease of implementation;
- great option for small houses;
- saving materials.
A single-pipe horizontal heating scheme is an excellent option for small rooms with a minimum number of rooms.
The scheme is really very simple and understandable, so even a beginner can handle its implementation. It provides for a serial connection of all installed radiators.This is an ideal heating layout for a small private house. For example, if this is a one-room or two-room house, then “fencing” a more complex two-pipe system does not make much sense.
Looking at the photo of such a scheme, we can note that the return pipe here is solid, it does not pass through the radiators. Therefore, such a scheme is more economical in terms of material consumption. If you do not have extra money, such a wiring will be the most optimal for you - it will save money and allow you to provide the house with heat.
As for the shortcomings, they are few. The main disadvantage is that the last battery in the house will be colder than the very first one. This is due to the sequential passage of the coolant through the batteries, where it gives off the accumulated heat to the atmosphere. Another disadvantage of a single-pipe horizontal circuit is that if one battery fails, the entire system will have to be turned off at once.
Despite certain disadvantages, this heating scheme continues to be used in many private houses of a small area.
Features of the installation of a single-pipe horizontal system
Creating water heating of a private house with your own hands, a scheme with a single-pipe horizontal wiring will be the easiest to implement. During the installation process, it is necessary to mount the radiators, and then connect them with pipe sections. After connecting the last radiator, it is necessary to turn the system in the opposite direction - it is desirable that the outlet pipe runs along the opposite wall.
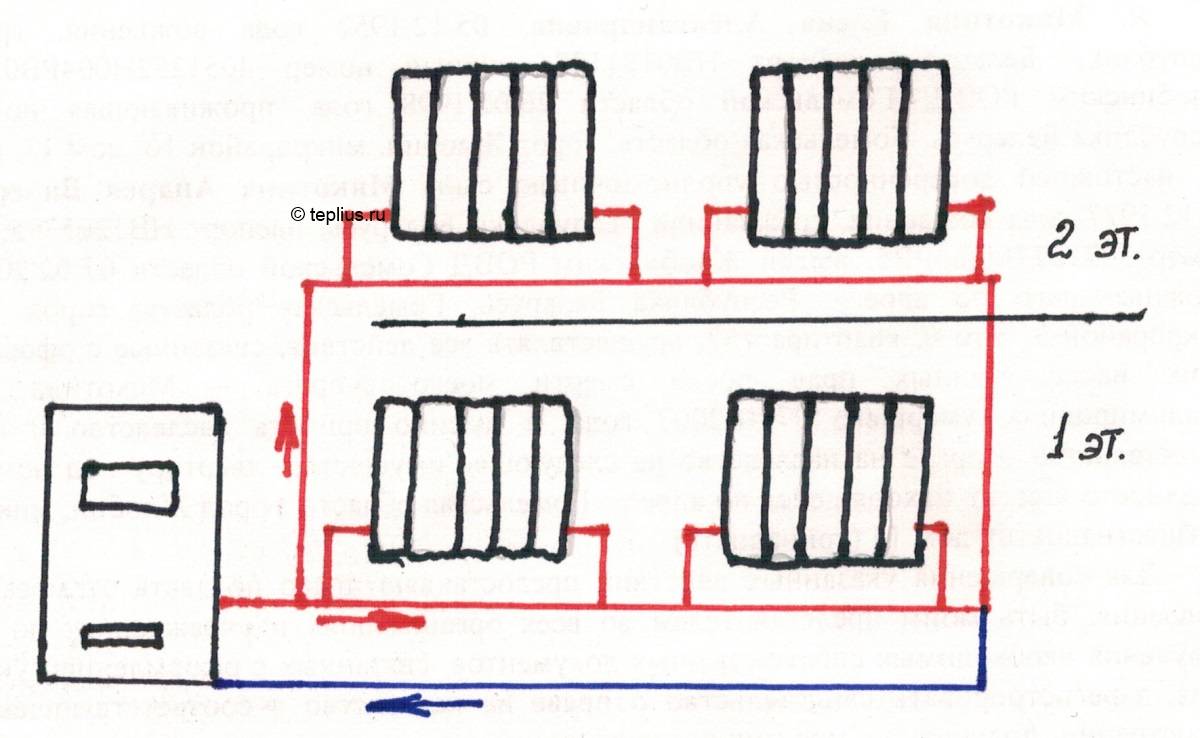
A single-pipe horizontal heating scheme can also be used in two-story houses, each floor is connected in parallel here.
The larger your home, the more windows it has and the more radiators it has. Accordingly, heat losses also increase, as a result of which it becomes noticeably cooler in the last rooms. You can compensate for the drop in temperature by increasing the number of sections on the last radiators. But it is best to mount a system with bypasses or with forced circulation of the coolant - we will talk about this a little later.
A similar heating scheme can be used to heat two-story houses. To do this, two chains of radiators are created (on the first and second floors), which are connected in parallel to each other. There is only one return pipe in this battery connection scheme; it starts from the last radiator on the first floor. A return pipe is also connected there, descending from the second floor.
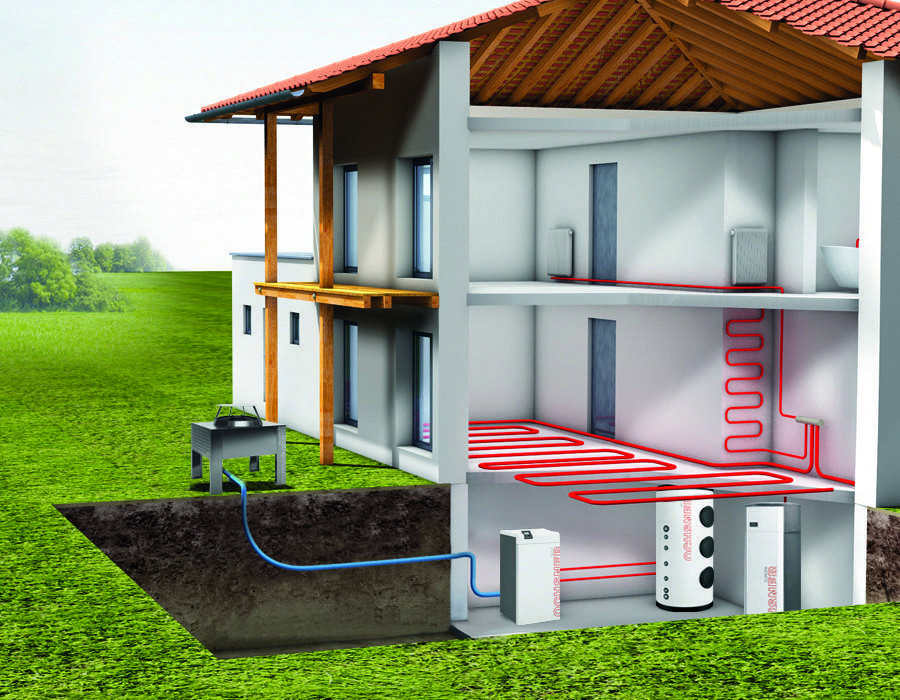
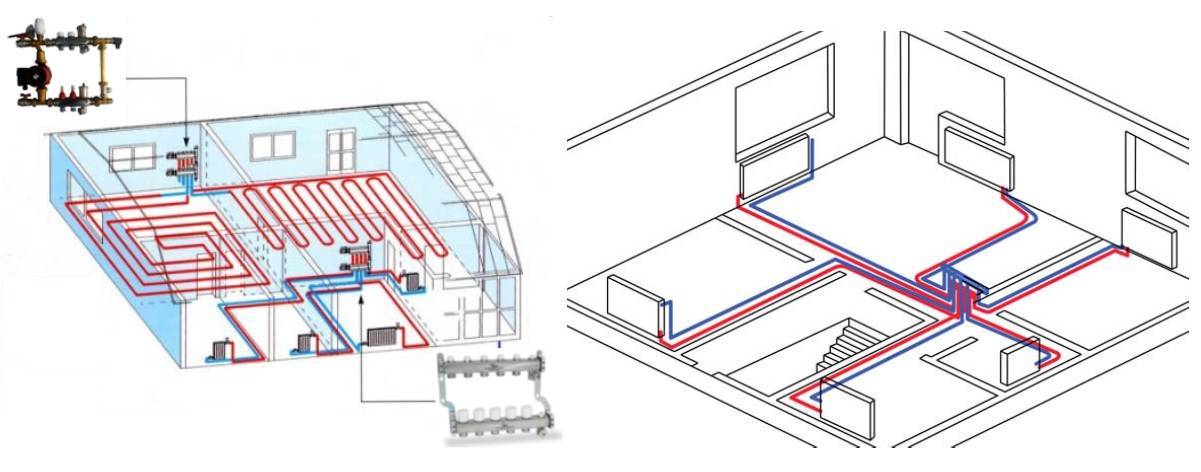
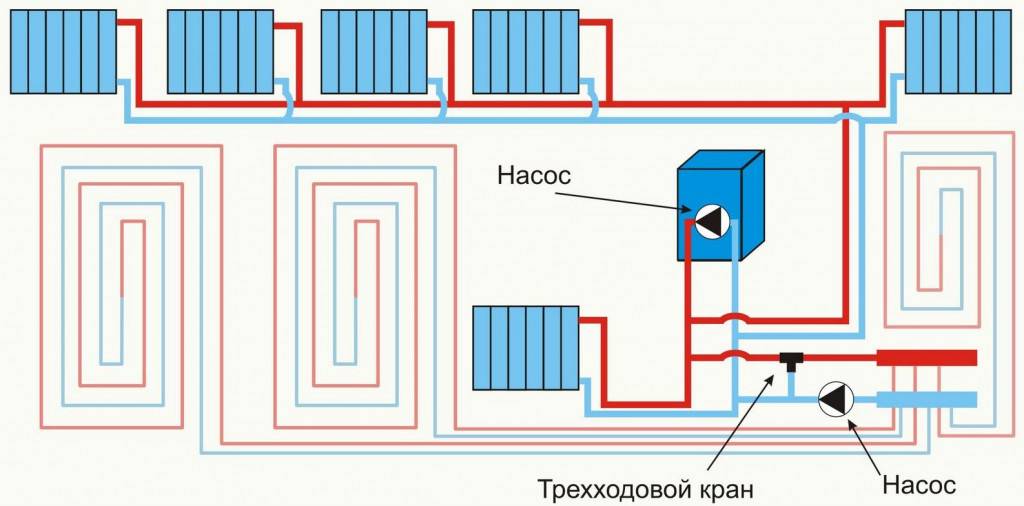
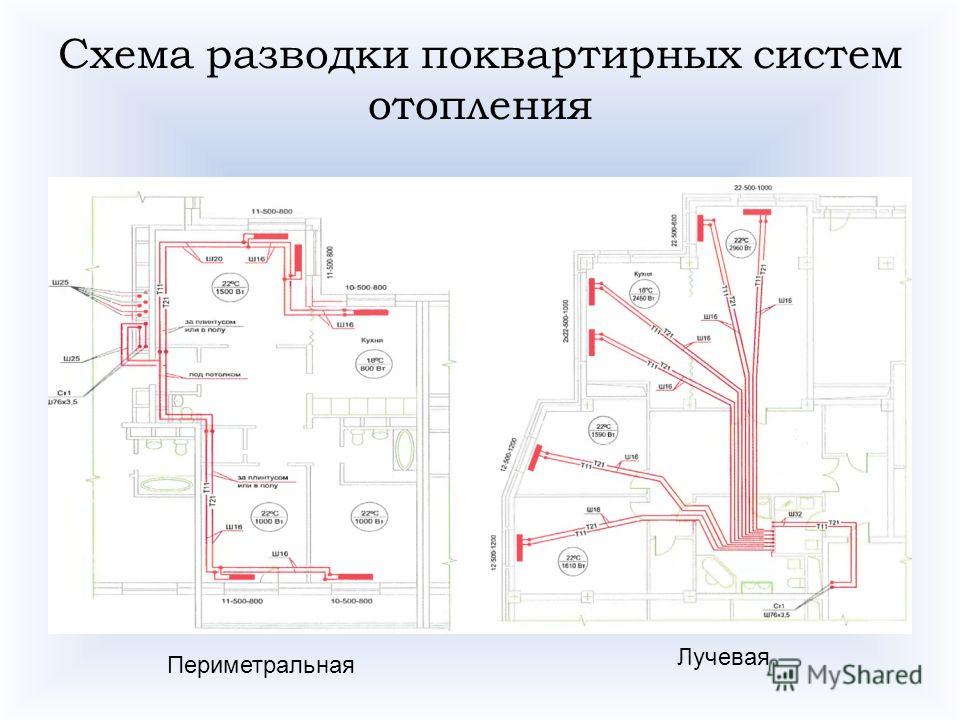
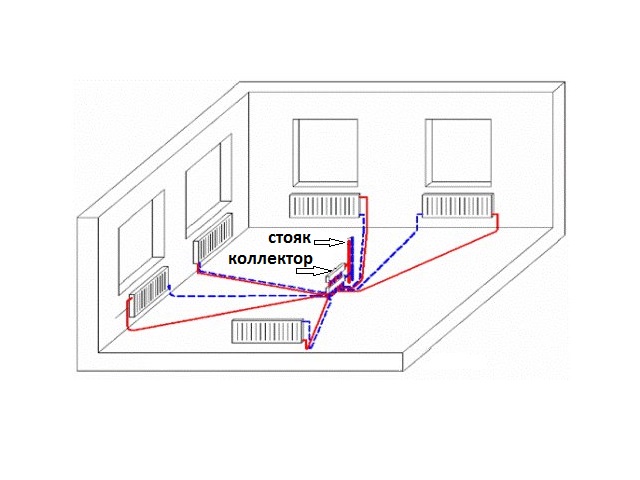
Beam wiring and underfloor heating
The beam scheme can also be used to equip the "warm" floor system. With a well-designed project, taking into account all factors, it is possible to abandon radiators, making a warm floor the main source for heating.
Heat flows will be evenly distributed throughout the room, without creating a convection effect, unlike radiators. As a result, there is no circulation of dust in the air.


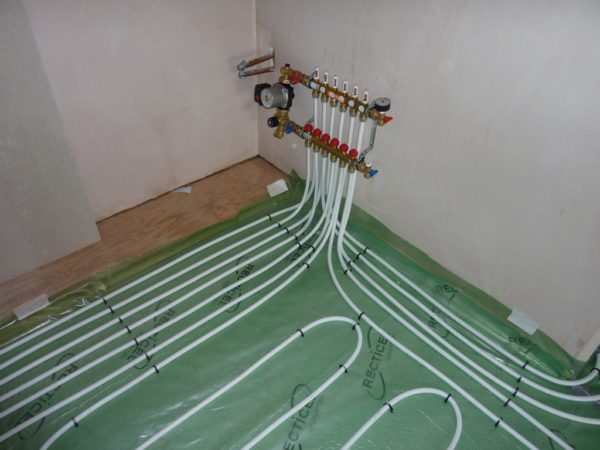
Before embarking on the implementation of the idea of \u200b\u200binstalling water-heated floors, it is important to consider the following features:
- a reflective screen with a layer of thermal insulation is laid on a concrete or wooden base;
- pipes are laid on top in a loop-like pattern;
- before pouring concrete, a hydraulic pressure test of the system is carried out throughout the day;
- the finishing layer is a screed or flooring.
The collector of each circuit must be equipped with flow meters and thermostatic valves, which allow precise control of the flow of the coolant and regulation of its temperature.
When distributing pipes, thermostatic heads and servomotors can be used. These devices allow you to automate the operation of a warm floor. The system will respond to changes in room temperature by adjusting the comfort mode for each room.
Radiant distribution for underfloor heating requires the collector to be equipped with several components that allow you to control, automate and manage underfloor heating to achieve maximum comfort and energy efficiency
During installation, it is extremely important to properly fix the pipes before pouring everything with a screed. To do this, you can use a heater with grooves, reinforcing mesh or staples. Before laying the pipeline, it is necessary to clearly define the route that the coolant will overcome to heat the floor (avoid crossing pipes)
It is best to cut the pipe only after complete installation and connection to the return and supply manifolds
Before laying the pipeline, it is necessary to clearly define the route that the coolant will overcome to heat the floor (avoid crossing pipes). It is best to cut off the pipe only after complete installation and connection to the return and supply manifolds.
It is important that the pipeline is under pressure during filling. Until the concrete mixture has completely hardened and three weeks have passed, it is impossible to supply a coolant with a working temperature.Only then we start from 25ºС and after 4 days we finish with the design temperature
Only then we start from 25ºС and after 4 days we finish with the design temperature.