- Installation instructions for piping the boiler
- Causes of leaks and their elimination
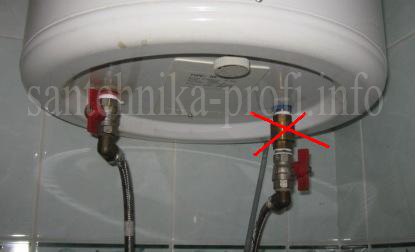
- In the process of natural leakage or valve failure
- In case of excessive internal pressure
- If the problem is in the container itself (tank)
- Types of security groups and the principle of choosing the appropriate model
- Lever models
- Models without lever
- Safety knots for large water heaters
- Models of the original performance
- Case marking difference
- Other types of valves
- The main types of breakdowns of water heaters
- Reasons for leaking safety valve
- Professional installation advice
- Why is the safety valve on the water heater so important?
- How a safety valve works
- How does the valve work
- Types of leaks
- Installation and adjustment of the safety node
- Replacing the safety valve on the water heater
- Peripheral secondary
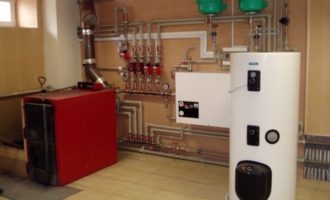
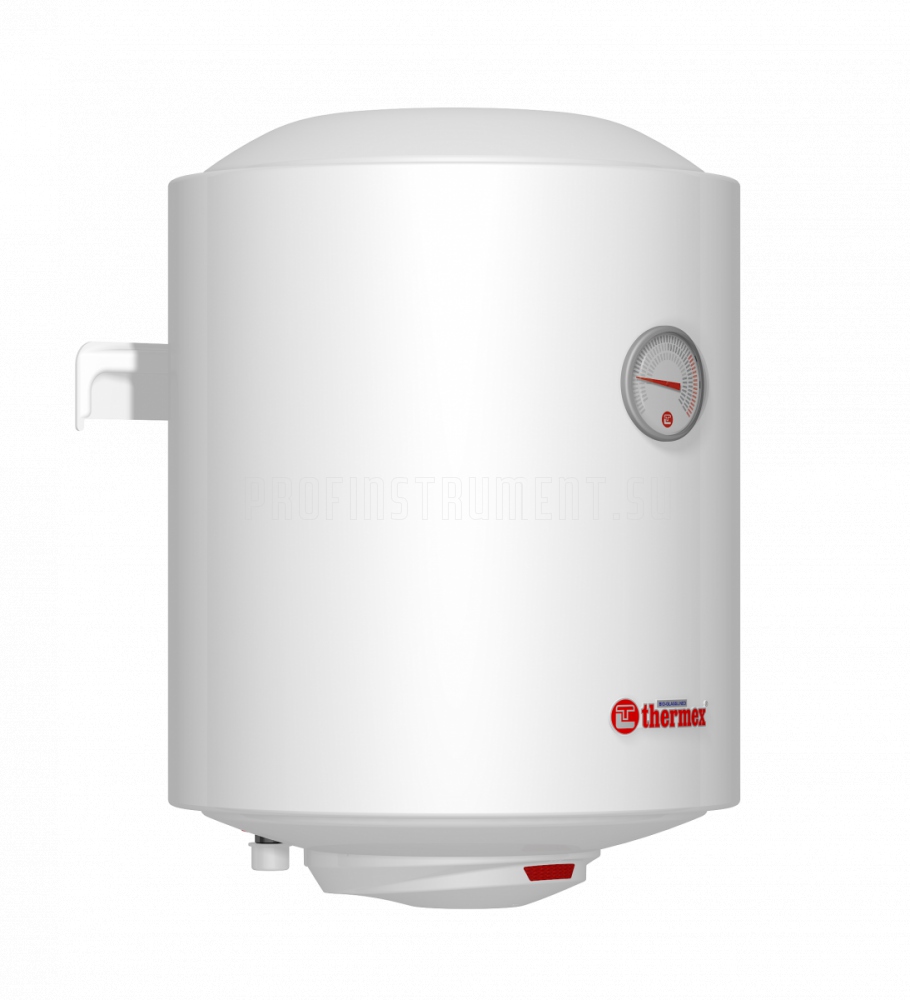
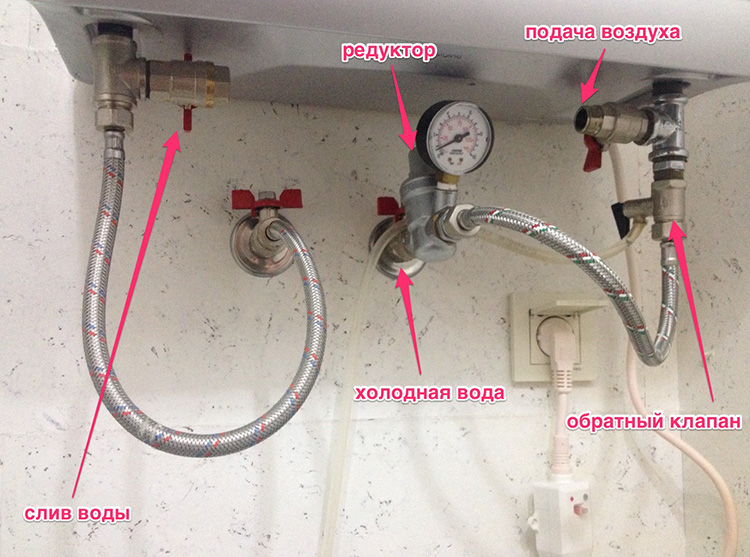
Installation instructions for piping the boiler
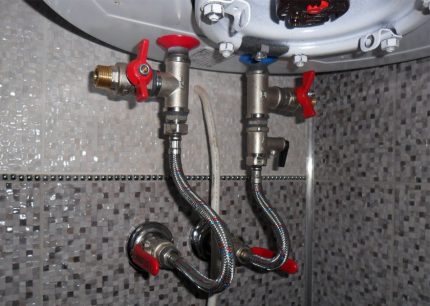
The installation of a protective safety valve is one of the stages of piping the boiler. The minimum set of parts for supplying the cold water line is a polypropylene pipe and a safety valve.
But we will consider another option, in which, in addition to the named elements, a tee, a drain tap and an American are involved. In addition, PP fittings will be required in order to move the water supply lines to the wall.
Image gallery
Photo from
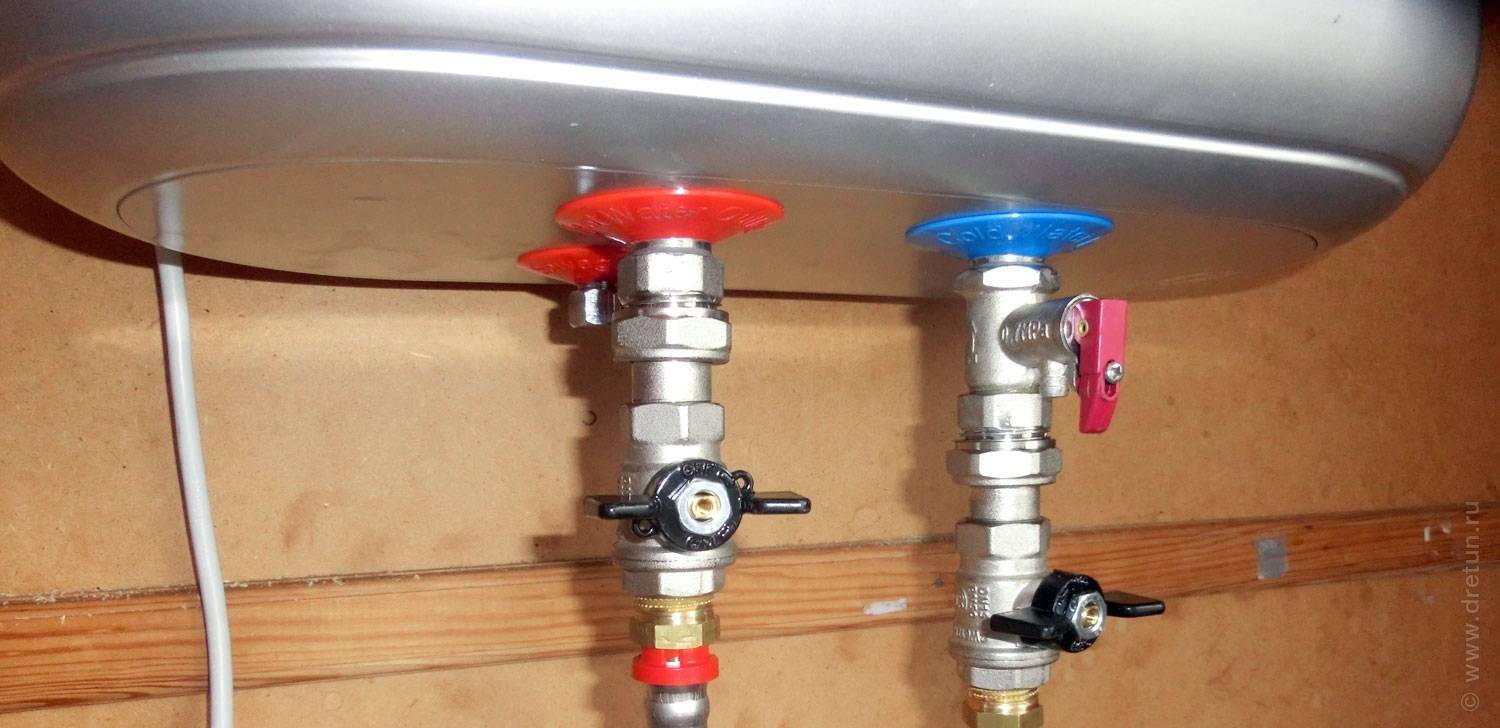
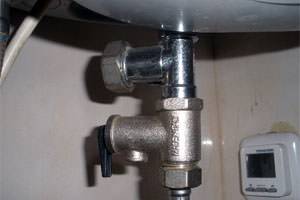
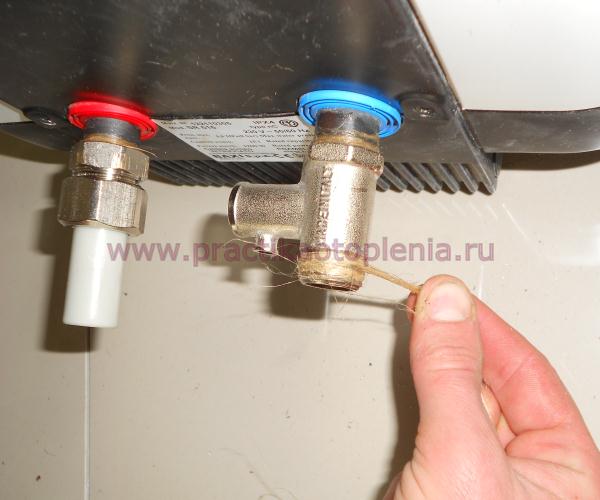
 The first part is a ½ inch brass tee needed to mount the check valve. It is attached with tow and special paste, twisting 3-4 turns
 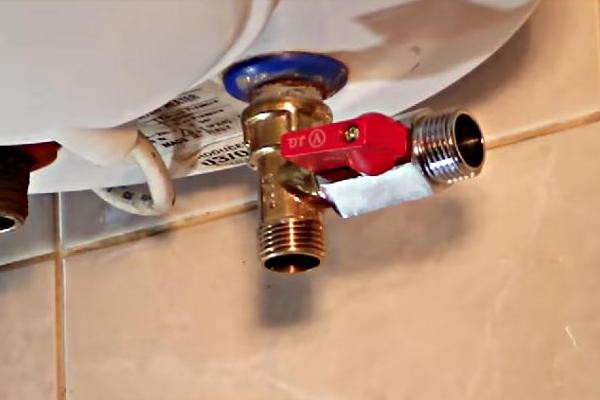 A shut-off valve is necessary to organize an additional drain of water for repair and maintenance work. It cannot be installed without a tee.
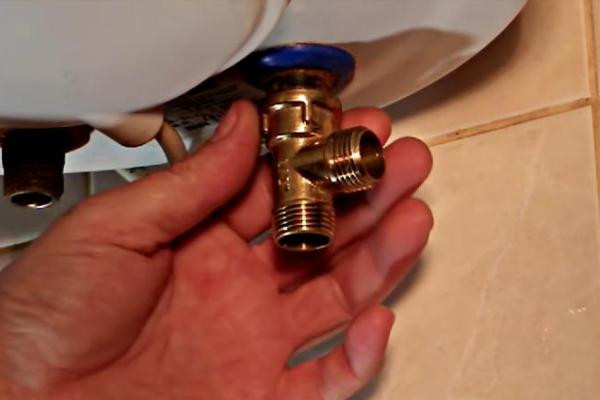
 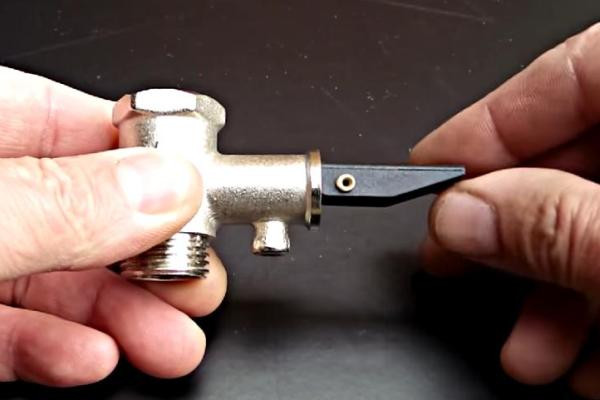 The metal valve is taken from the starter kit, since the boiler is new. It is necessary to carefully inspect it from all sides, check the presence of springs and the serviceability of the lever
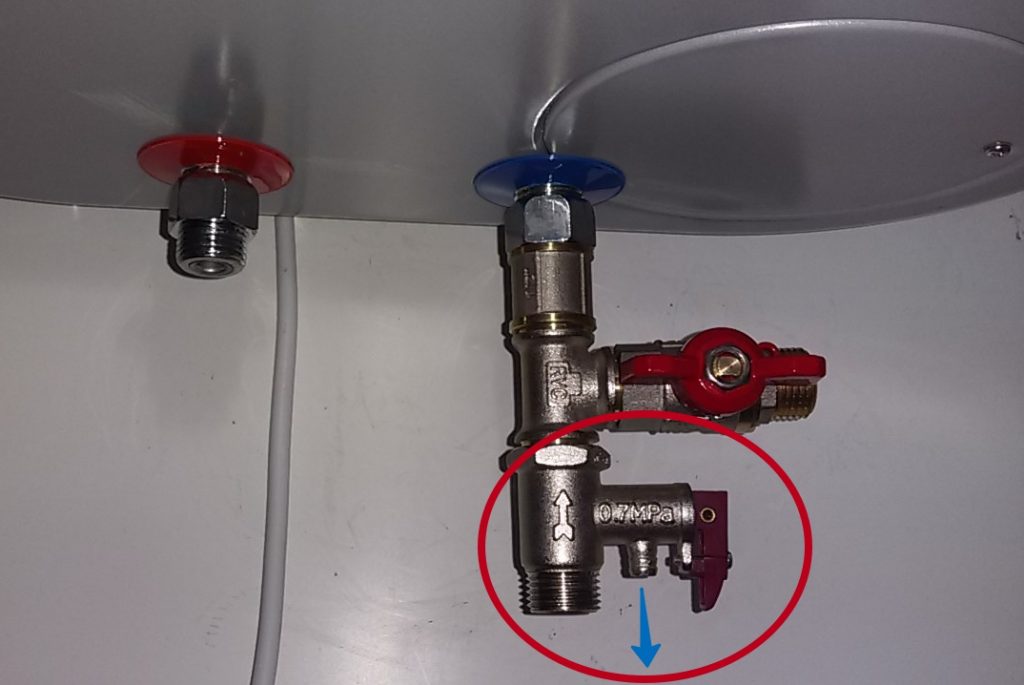
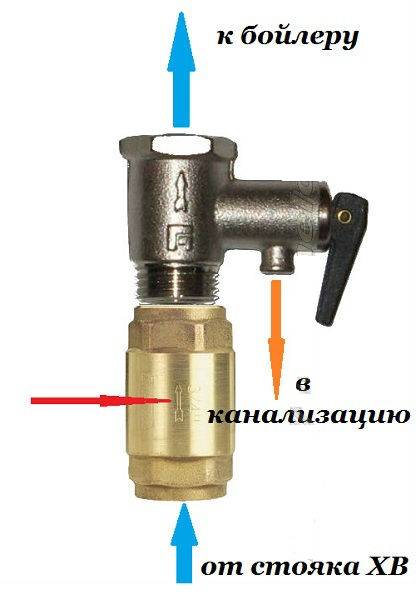
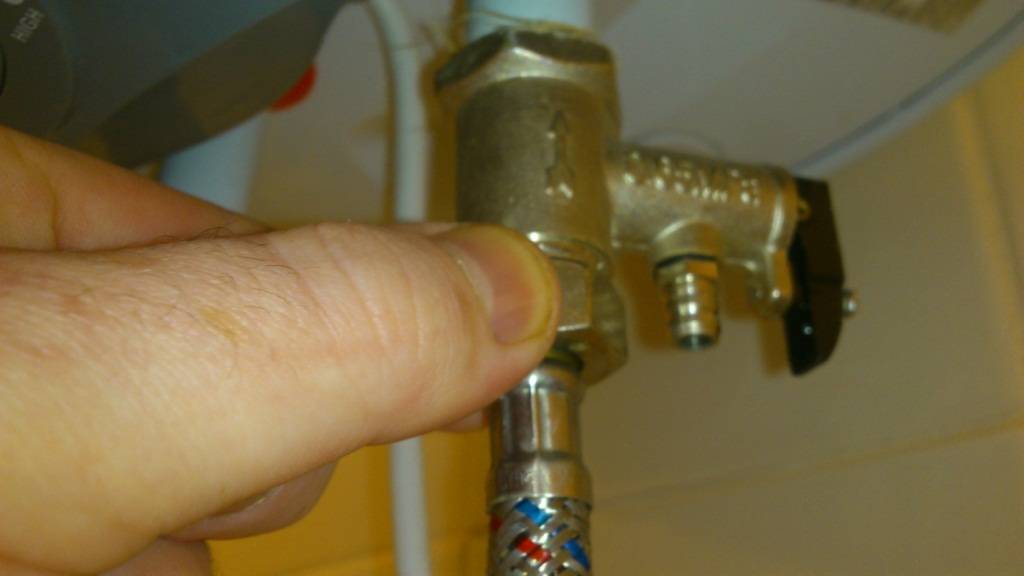
 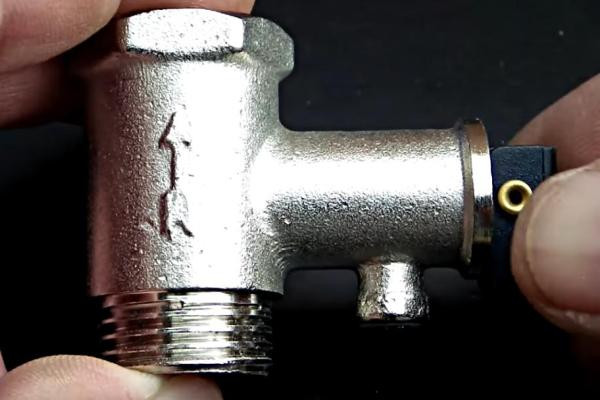 An arrow is embossed on the surface of the body on one side, showing the direction in which the water should move. The device must be fixed on the pipe so that the arrow points up and the drain hole points down.
 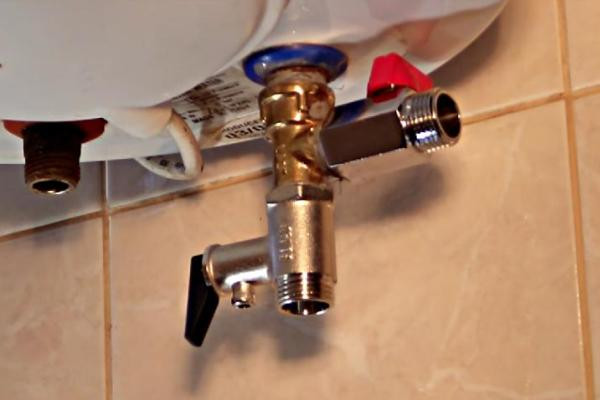 The valve is fixed with a threaded connection, using all the same tow and mounting paste. If there is an emergency discharge of excess water from the tank, it will flow from the downward opening
  An “American” is screwed directly to the safety valve - a shut-off valve. For fixing, a union nut with a rubber insert is used. An "American" is also installed on the second pipe of the boiler
 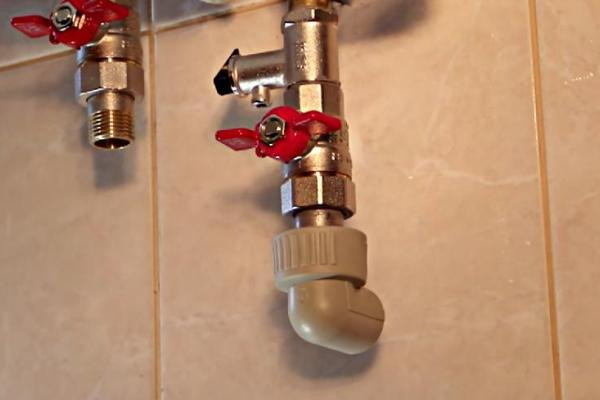 Adapters are needed to divert the water supply lines closer to the wall. If they do not interfere, then polypropylene pipes are attached directly to the lower valve - "American"
 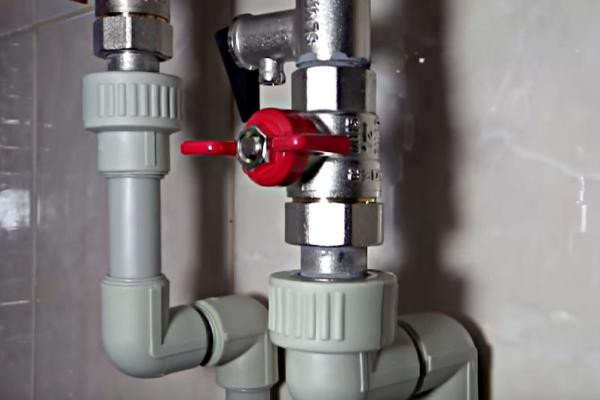 Plastic, most often polypropylene, pipes are attached by welding and by means of fittings. It remains to connect the drain pipe to the fuse
Step 1 - installation of a tee for a drain tap
Step 2 - Installing the check valve on the outlet
Step 3 - Selecting or Preparing a Relief Valve
Step 4 - Proper location of the fuse on the pipe
Step 5 - Mounting the Relief Valve on the Tee
Step 6 - installing an "American" to connect to the pipe
Step 7 - installation of polypropylene adapters
Step 8 - connecting to the cold water system
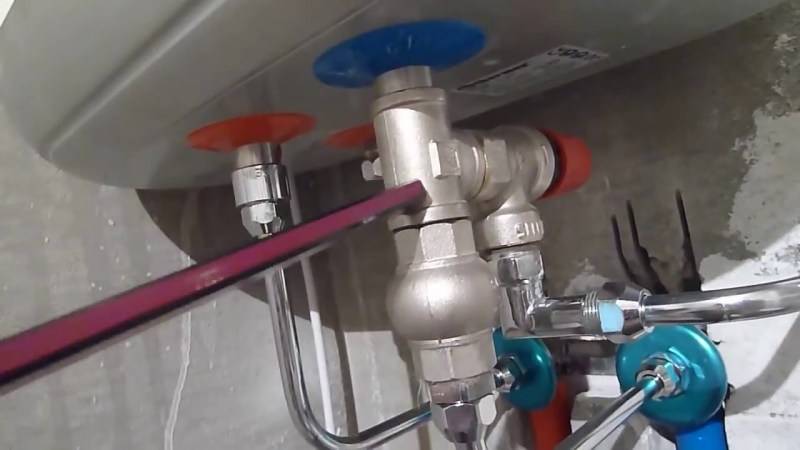
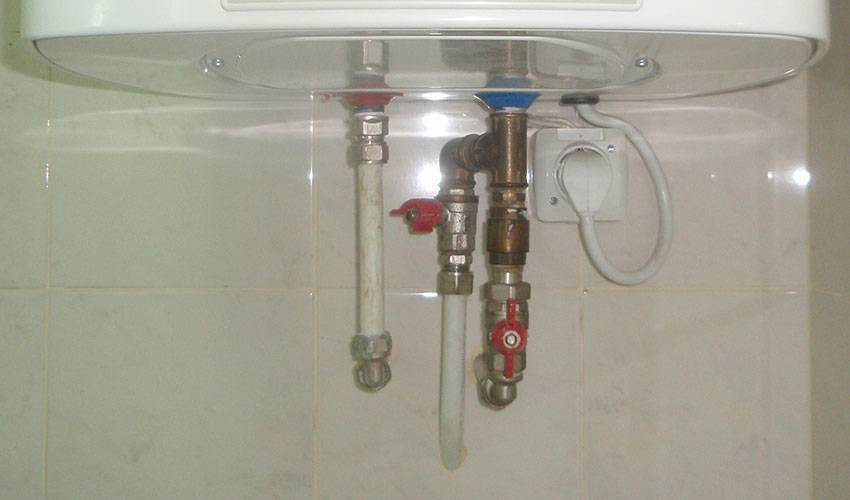
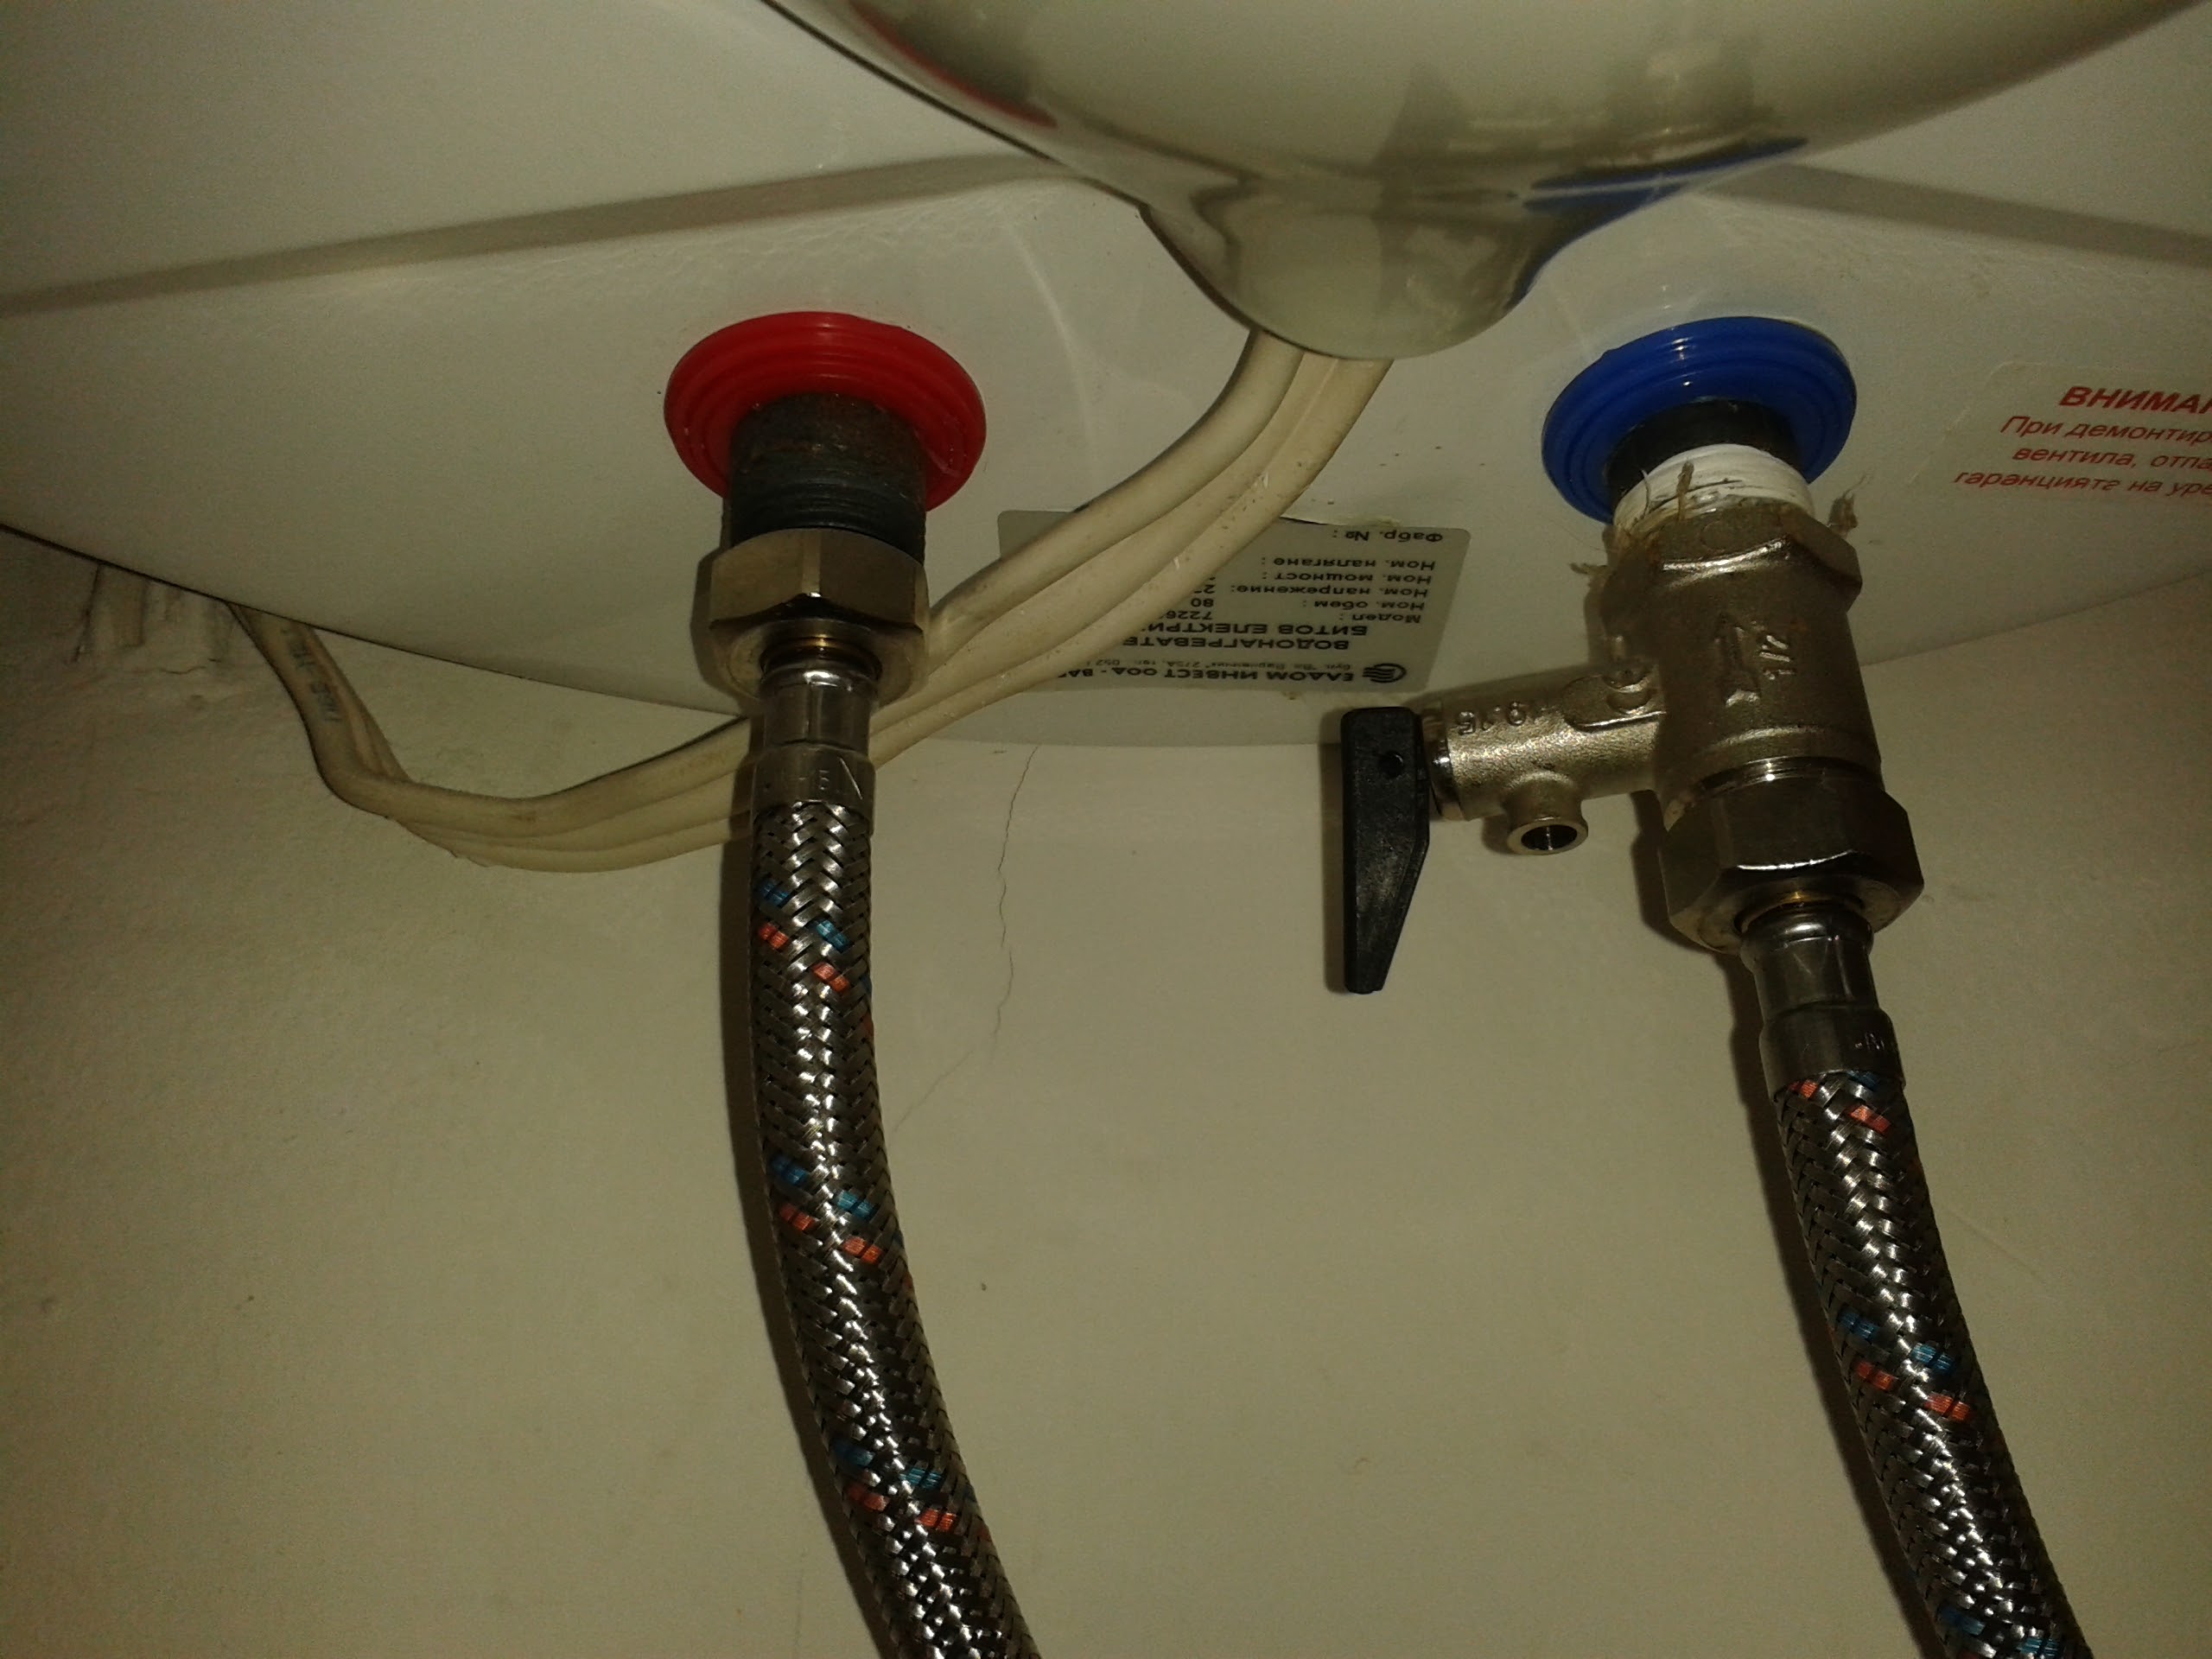
A sophisticated security node is not always used. Some installers find that one safety valve is sufficient. This is the minimum option for tying the boiler.
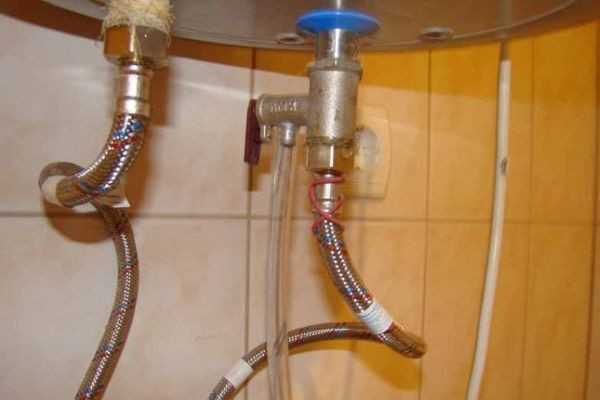
If tees or other adapters are not used, the fuse is fixed directly on the boiler pipe. It can hide behind the case or go down 1-2 cm lower, which is more convenient for connection.
Installation option when the safety device is strung directly on the boiler fitting. The thread of both elements is ½ inch. Tow was used for sealing, which is considered specifically for such connections better than fum tape
It remains to provide drain for water through the hole in the fuse. To do this, use a flexible plastic tube of a suitable diameter. It is white, colored or transparent.
With one end, the tube is put on the mini-pipe of the valve, with the other end it is led into the sewer tee or directly into the outlet. Consider possible installation options.
Image gallery
Photo from
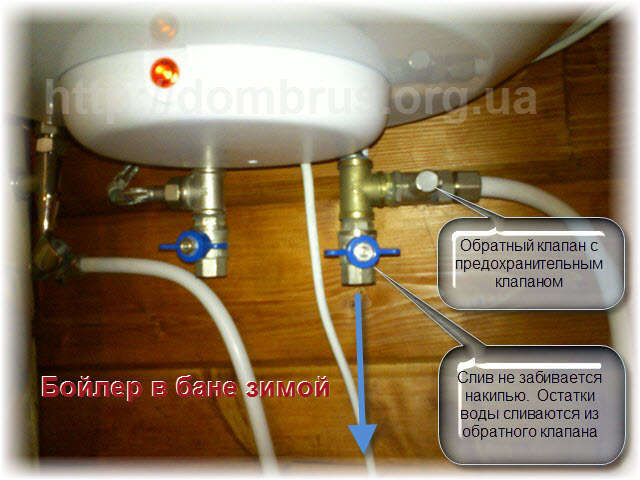
 A transparent tube is good in that it provides an opportunity to observe the process of draining liquid into the sewer. Approximate volumes of discharged liquid can be determined
 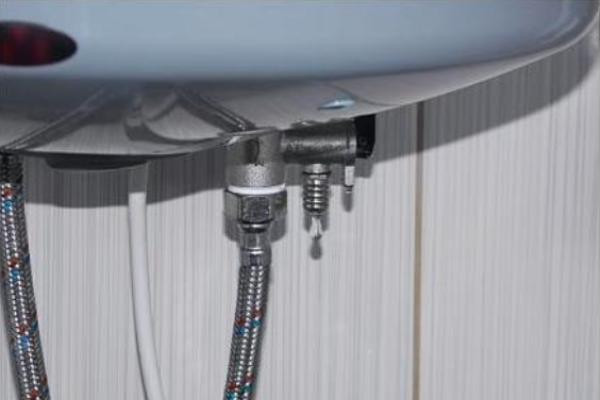 If you do not install the tube, from time to time water dripping from the hole will fall on the floor or furniture, create high humidity and conditions for the development of mold and fungus
 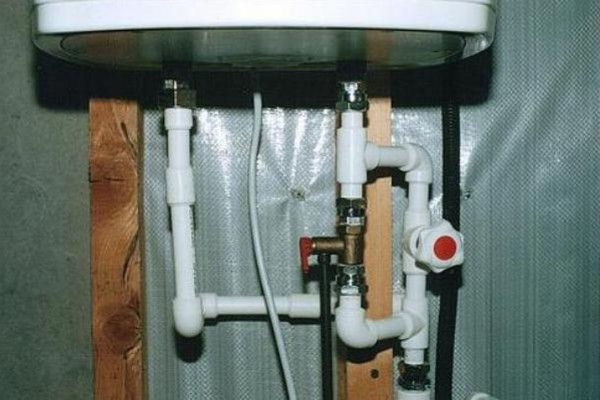 With such a piping, forced draining can be achieved using a drain and a shut-off valve specially installed for this purpose.The safety device only works as intended.
Plastic tube for liquid drainage
Dripping water from a hole
Installing the tube and shutoff valve
Option to connect the tube to the sewer
Unforeseen homeowners lower the drain tube into a bucket or jar - this is wrong. If the container saves, then only from constant digging.
In an emergency, the volume of water moving through the tube increases, and the capacity may simply not be enough. The only right solution is to drain the drain into the sewer pipe by inserting it into a tee or a separate entrance.


Causes of leaks and their elimination
If water drips from the safety valve, and this gives you a number of inconveniences, you can try to deal with this problem yourself. The decision to make will depend on when exactly the leak occurs and for what reason.
In the process of natural leakage or valve failure
If water drips only periodically during the process of heating the tank itself and at the same time its amount is very small, then the problem can be solved simply by placing a water collector under the valve, as mentioned above.
You can also connect a rubber hose to the water heater valve and direct the other end into a toilet or a container on the floor, if you find it inconvenient to attach a liquid collector directly under the tank. Just make sure that the outer end of this tube is not in the water, otherwise all efforts will be useless.
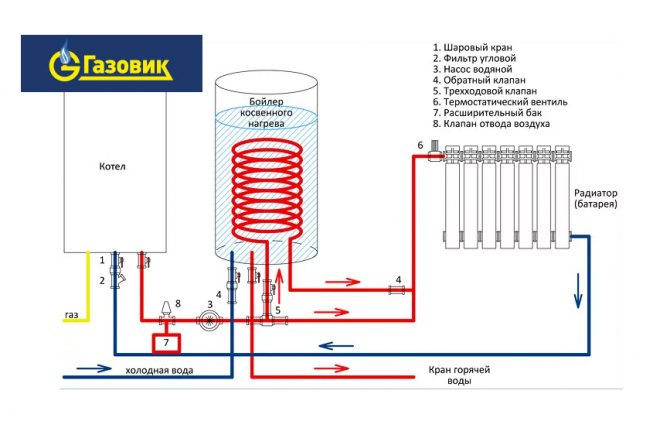
Water heater connection diagram.
And now let's look at some more complex cases, when dripping from the water heater occurs constantly, no matter what state the tank is in.Just this should already alert you, since such a phenomenon is not considered normal. The first thing to do is to call a specialist to unscrew the valve and check it for serviceability.
But if the cause of the leak is in the water heater valve itself, it must be replaced with a completely new one. It is also recommended to install it with the help of a specialist, since you yourself will not be able to fasten it according to all the rules.
In case of excessive internal pressure
But very often it happens that the valve is in perfect order. What then can be the cause of such a violent leakage from the tank? Then it's all about pressure. The fact is that sometimes the pressure is so strong that the boiler is unable to withstand it, even if the water in it is cold and not in a state of heating. This happens very rarely, but finds a place in everyday situations.
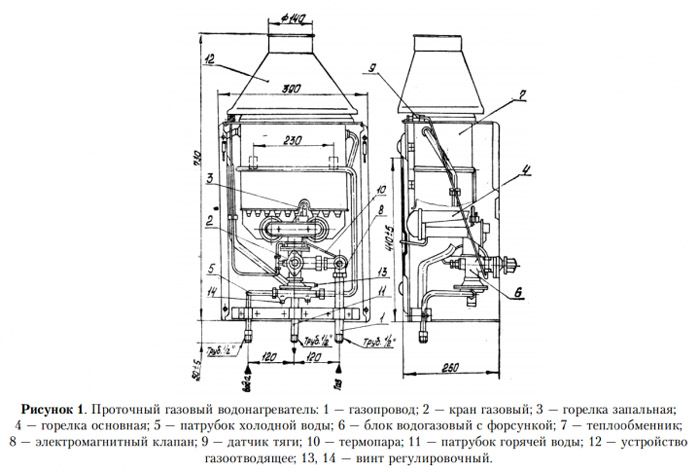
Scheme of the water heater.
Then you have two ways to solve such a problem.
The first way is to install a pressure reducer. This is a special device that is not very expensive and is installed for additional equalization of water pressure in the tank. Often in houses where specialists have already encountered a similar problem, they offer to immediately buy it and mount it to the tank even during the installation of the boiler itself.
The second way is to install a special device called an expansion tank. This is already a more expensive installation, which will require more time and skills for installation. But installing a tank is usually used only in extreme and rare cases, when nothing else helps. The tank simply has great power, which is capable of greatly lowering the water pressure even at the inlet to the tank.
If the problem is in the container itself (tank)
Often there are cases of water leakage from the boiler itself, when the valve has absolutely nothing to do with it. This phenomenon is considered absolutely abnormal, no matter how you look at it. First you need to find out where exactly the leak is coming from.
So, if the heating tank is damaged outside the body, which immediately becomes visible to the naked eye, as a result of which water drips from its wall, then there can be only one way out - replacing the boiler. Sealing or soldering is unlikely to be of any help here. And if they give an effect, it will be very short-lived. This phenomenon usually occurs after many years of using a quality tank or when the product turned out to be a fake. Additional reasons may be insufficiently high-quality protective coating of the water heater against corrosion and scale from the inside.
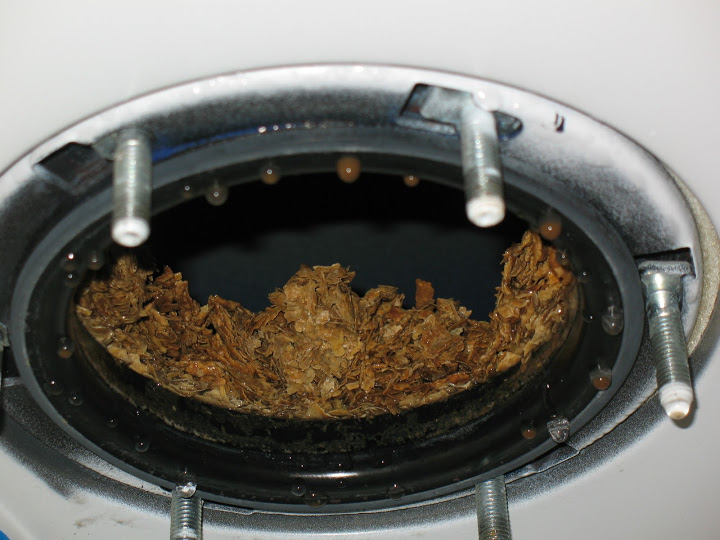
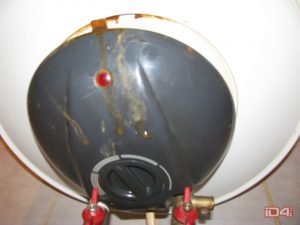
If you see that the walls of the tank are absolutely safe and sound, and the water is still dripping, look under tank bottom cover. It's most likely where the leak is coming from. In this case, to solve the problem, it is necessary to completely disconnect the boiler from the power supply system, remove the tank from the canopies and unscrew the cover.
There you will see in the center a tube (small hatch) of the water heater, on which a rubber gasket is put on. This gasket needs to be replaced with a new one. After that, close the tank and hang it in place. Connect power and see if the leak is fixed. If the actions did not give any effect, then you need to call a specialist. But, most likely, you will have to change the tank completely.
- Steel radiators: how to calculate heat?
- How to make an electric boiler with your own hands?
- Pyrolysis boiler connection diagram
- How to fold the oven with your own hands
- Do-it-yourself ecowool installation
- How to properly clean radiators
- Characteristics and installation of a two-pipe horizontal heating system
Types of security groups and the principle of choosing the appropriate model
Standard Safety boiler valve in execution may differ in several design features. These nuances do not change the functionality of the device, but only simplify the use and maintenance. To choose the right safety unit, you need to know what kind of safety valves for boilers are and how they differ.
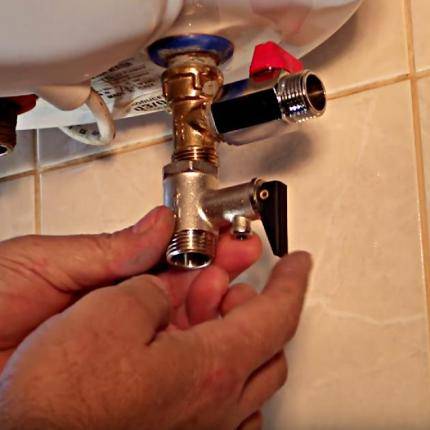
Lever models
The most common type of standard safety knot is the lever model. Such a mechanism can be activated manually, which is convenient when checking or draining water from the boiler tank. They do it like this:
- horizontally located lever is installed vertically;
- direct connection to the stem actuates the spring mechanism;
- the plate of the safety valve forcibly opens the hole and water begins to flow from the fitting.
Even if complete emptying of the tank is not required, a control drain is performed monthly to check the operation of the safety assembly.
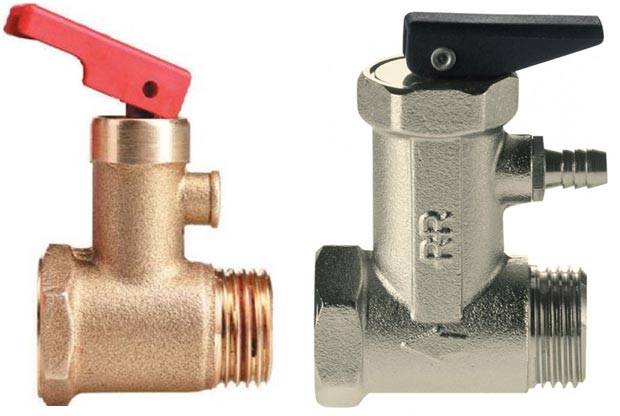
Products differ in the design of the lever and the fitting for discharging water. If possible, it is better to choose a model with a flag fixed to the body. The fastening is made with a bolt that prevents manual opening of the lever by children. The product has a convenient herringbone shape with three threads, which ensures a secure fit of the hose.
The cheaper model does not have a flag lock. The lever can be accidentally caught by hand and unnecessary draining of water will begin.The fitting is short, with only one threaded ring. Fixing the hose to such a ledge is inconvenient and can be torn off with strong pressure.
Models without lever

Relief valves without a lever are the cheapest and most inconvenient option. Such models often come with a water heater. Experienced plumbers simply throw them away. The nodes work similarly to lever models, only there is no way to manually perform a control drain or empty the boiler tank.
Models without a lever come in two versions: with a cover at the end of the body and deaf. The first option is more convenient. When clogged, the cover can be unscrewed to clean the mechanism. A deaf model cannot be checked for performance and descaled. The liquid discharge fittings for both valves are short with one threaded ring.


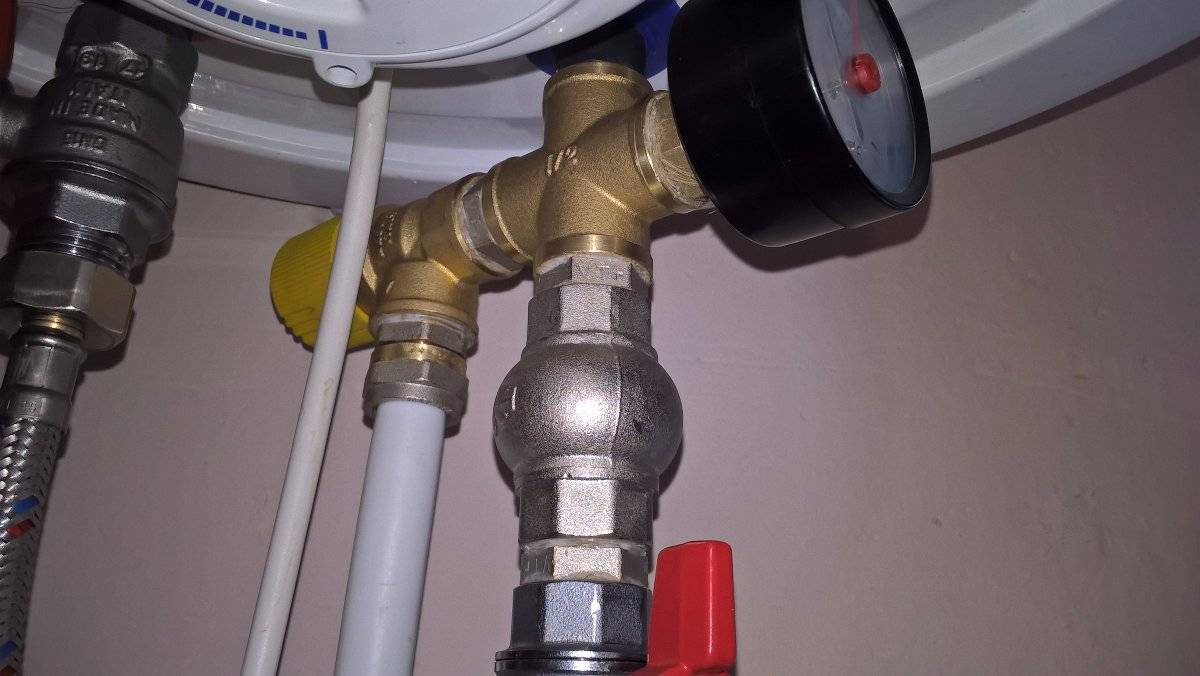


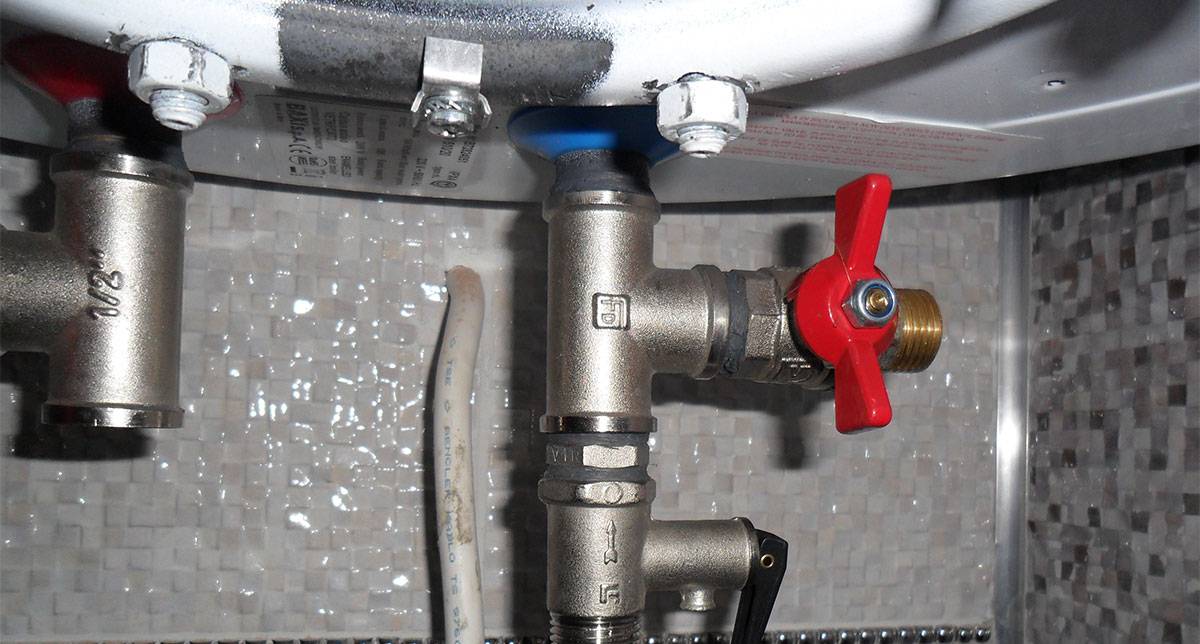
Safety knots for large water heaters
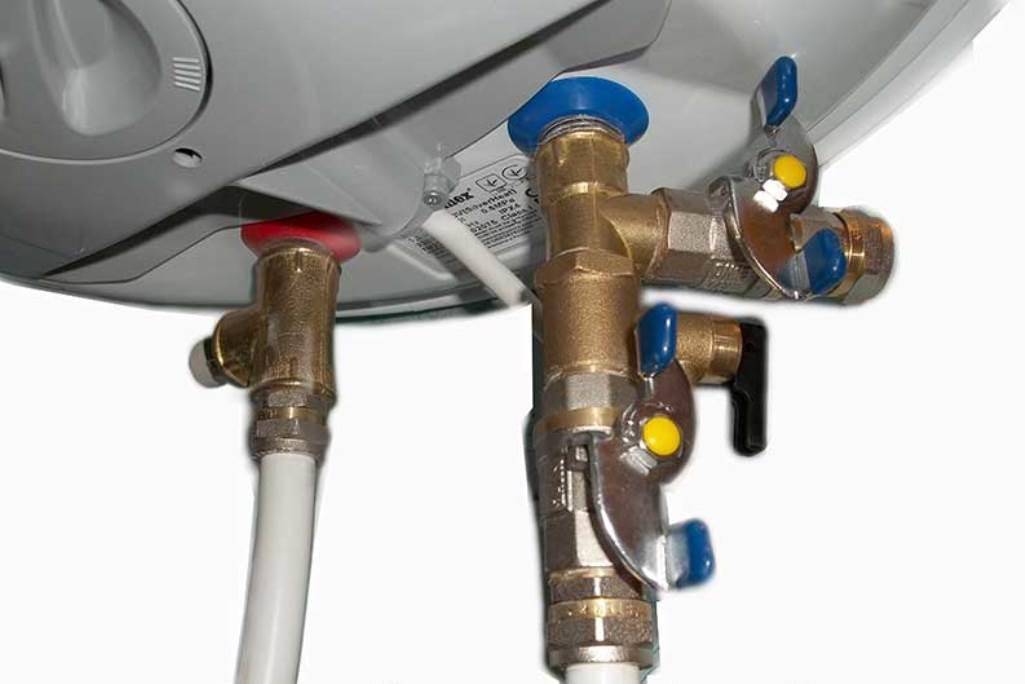
Improved safety valves are installed on water heaters with a storage tank capacity of 100 liters or more. They work in a similar way, only they are additionally equipped with a ball valve for forced draining, as well as a pressure gauge.

Particular attention should be paid to the fluid outlet fitting. He's carved. Reliable fastening prevents the hose from being torn off by strong pressure and eliminates the inconvenient use of the clamp
Reliable fastening prevents the hose from being torn off by strong pressure and eliminates the inconvenient use of the clamp.
Models of the original performance
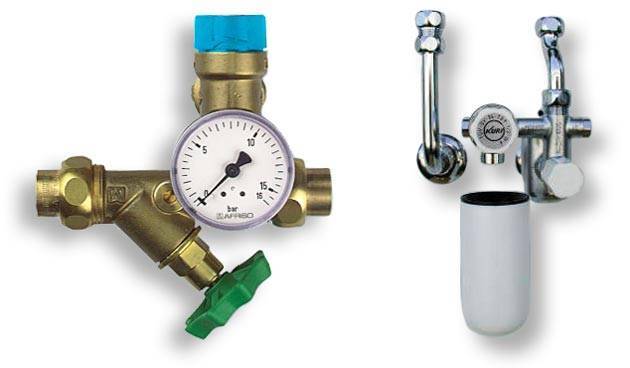
For lovers of aesthetics and comfort, manufacturers offer safety nodes in the original design. The product is completed with a pressure gauge, chrome-plated, gives an elegant shape. Products look beautiful, but their cost is high.
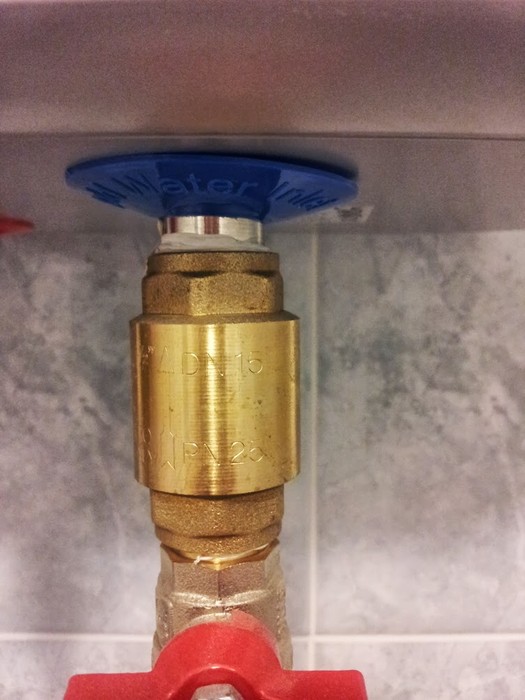
Case marking difference
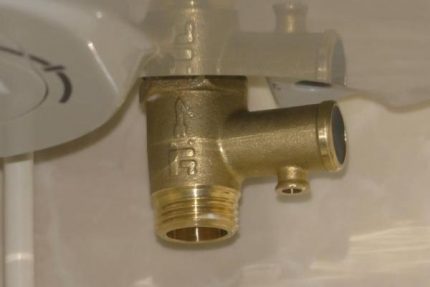
Quality products on the case must be marked. The manufacturer indicates the maximum allowable pressure, as well as the direction of water movement. The second marking is an arrow. It helps to determine which side to put the part on the boiler pipe.
On cheap Chinese models, markings are often missing. You can figure out the direction of the liquid without an arrow. The check valve plate must open upwards in relation to the boiler nozzle so that water from the water supply enters the tank. But it will not be possible to determine the permissible pressure without marking. If the indicator does not match, the safety unit will constantly leak or, in general, will not work in an emergency.
Other types of valves
When they try to save money on the security group, they try to install a blast valve designed for the heating system on the water heater. The nodes are similar in functionality, but there is one caveat. The blast valve is not able to gradually release the liquid. The mechanism will work when the excess pressure reaches a critical point. The blast valve can only bleed all the water from the tank in case of an accident.
Separately, it is worth considering the installation of only a check valve. The mechanism of this node, on the contrary, locks the water inside the tank, preventing it from draining into the pipeline. With excess pressure, the working plate with the rod is not able to work in the opposite direction, which will lead to a rupture of the tank.
The main types of breakdowns of water heaters
The scheme of all components of the safe operation of water heaters The main types of breakdowns of water heaters are as follows:
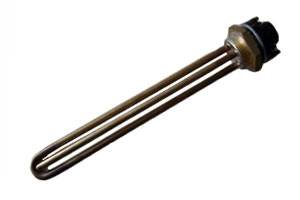
- It makes a lot of noise - the first sign of the presence of scale on the heating element.Noise is created as a result of the fact that initially it is necessary to warm up the lime coating, and then the water. In such a situation, there is an excess consumption of electricity. If the problem is not fixed, then soon the heating element will fail.
- The presence of scale on the internal elements. The first sign of such a problem is rusty water. It is enough to carry out a scheduled cleaning of the internal elements.
- Water does not heat up - indicates a malfunction of the heating element. The solution is to replace the heating element.
- Water overheating - indicates that the thermostat is not performing its functions. The part is not repairable and needs to be replaced.
- It beats with current. The problem appears in the event of a voltage breakdown on the case, if the heating element shell is damaged and the heating element begins to contact directly with water. To solve it, it is enough to replace the heating element.
- Leakage of water from the tank. It mainly occurs when the storage tank is damaged by corrosion. The worn-out container should be replaced, but if a leak is observed from under the plastic cover, then the boiler must be completely replaced.
- The device does not turn on or off. To determine the cause of this problem, you will need to diagnose the device.
To make minor repairs, which include the replacement of external parts, it is enough to read the instructions for the water heater and you can get to work. But if the problem lies inside the device, then it is better not to conduct experiments and contact the service center for qualified assistance.
Reasons for leaking safety valve
- Discard excess volume. When the liquid inside the tank is heated, the volume also increases. That is, when a full tank is heated, the volume will increase by 2-3%. These percentages will be merged.Therefore, there is nothing to be afraid of here, since dripping water enters the process of operation of household appliances.
- Part failure. It is worth distinguishing where the volume is being reset, and where the component has failed. If the water heater is turned on, the water is heated but not used, then a small amount of it should flow out. For the average operation of the water heater (cooking, washing dishes), the liquid should flow out periodically and a little more than usual. Accordingly, during long work, for example, taking a shower, it will flow out even more. If water drips constantly, regardless of the level of work, then this indicates a breakdown of the device.
- blockage. The spring opens the valve, but cannot close it, as pieces of scale or any other debris interfere. In this case, water will always flow out, even when the boiler is turned off.
- High pressure in the water supply. In this case, it will also flow all the time, regardless of the state of the boiler. In order to understand that the reason is in it, and not in the blockage, it is necessary to measure the pressure of cold water in the water supply. If it is more than the set pressure, then the safety mechanism will come into action, and this will lead to leakage.
Professional installation advice
Even such a simple procedure as the installation of valves is based on the implementation of certain rules. For example, room design often requires piping masking and a security group.
You can hide devices, but subject to three conditions:
- the length of the flexible connection or pipe from the fuse to the tank should not exceed 2 m, otherwise there will be excessive additional pressure on the valve spring;
- ideal fuse installation - directly to the boiler fitting, and if it doesn’t work, then installing a tee is still excluded;
- for valve maintenance, a technical hatch should be equipped.
Many are worried when they see drops of water on the valve nozzle. This is normal and indicates the health of the device.
From time to time, small pressure surges occur in the line, which provoke a minimal discharge of fluid. You need to worry when water either does not appear at all, or it pours continuously.
The line segment between the water heater and the fuse must be kept to a minimum. This is necessary not for aesthetic reasons, but in order not to create additional pressure in the pipes.
It should be remembered that self-modernization of safety devices is strictly prohibited. If you need a 0.8 MPa valve, then you need to purchase just such a new product, and not try to somehow alter or adjust the 0.7 MPa device.
If there are any doubts about the operation of the safety valve, you should dismantle it and check if the spring or seal is clogged. Having problems with the water heater itself and you do not know what to do? We recommend that you familiarize yourself with the frequent boiler breakdowns and repairs. Not enough skills - invite a specialist from the service center.
Why is the safety valve on the water heater so important?
To understand the importance of this safety device, you need to familiarize yourself with its design and principle of operation.
How a safety valve works
The device of the safety valve for the water heater is quite simple. Structurally, these are two cylinders with a common cavity, located perpendicular to each other.


- Inside the large cylinder there is a poppet valve, preloaded by a spring, which ensures the free flow of water in one direction. In fact, this is a familiar non-return valve. The cylinder ends at both ends with a threaded part for connecting the valve to the heater and pipe system.
- The second cylinder, placed perpendicularly, is smaller in diameter. It is muffled from the outside, and a drain (drainage) pipe is made on its body. A poppet valve is also placed inside it, but with the opposite direction of actuation.
Often this device is equipped with a handle (lever) that allows you to forcefully open the drainage hole.
How does the valve work
 The principle of operation of the safety valve is simple.
The pressure of cold water in the water supply presses the “plate” of the check valve and ensures the filling of the heater tank.
Upon filling the tank, when the pressure inside it exceeds the external one, the valve will close, and as the water is consumed, it will again ensure its timely replenishment.
The spring of the second valve is more powerful, and is designed for increased pressure in the boiler tank, which necessarily increases as the water heats up.
If the pressure exceeds the maximum allowable value, the spring compresses, slightly opening the drainage hole, where excess water drains, thereby equalizing the pressure to normal.
Importance of proper valve operation
Perhaps the description of the device and the principle of operation of the valve did not bring complete clarity to the question of its extreme importance.Let's try to simulate situations where its absence can lead to
So, let's say there is no valve at the inlet to the heater that blocks the return flow of water supplied to the tank.
Even if the pressure in the plumbing system is stable, the device will not work correctly. Everything is explained simply - according to the laws of thermodynamics, when water is heated in a tank with a constant volume, pressure necessarily increases.
 At a certain point, it will exceed the supply pressure, and the heated water will be discharged into the plumbing system.
Hot water can come from cold faucets or go into the toilet bowl.
The thermostat in this case continues to work properly, and the heating elements consume expensive energy for nothing.
The situation will become even more critical if, for one reason or another, the pressure in the water supply system suddenly drops, which is practiced quite often, for example, when the load at water stations is reduced at night.
Or if the pipes turn out to be empty as a result of an accident or repair work. The contents of the boiler tank are simply drained into the water supply, and the heating elements heat the air, which inevitably leads to their rapid burnout.
It may be objected that the automation should prevent idle operation of the heater. But, firstly, not all models provide such a function, and secondly, the automation may fail.
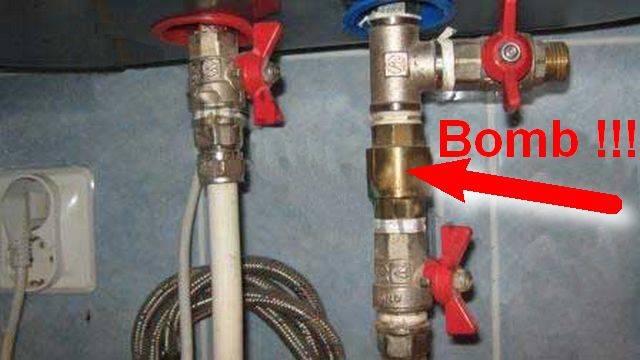
It would seem that in order to avoid such situations, you can limit yourself to installing a conventional check valve? Some “wise men” do this, not fully realizing that by doing so they are literally “planting a bomb” in their home.
It is scary to imagine what can happen if the thermostat fails.
Water reaches the boiling point in the tank, and since there is no exit from the closed volume, the pressure rises, and with increased pressure, the boiling point of water becomes much higher.
Well, if it ends with cracking of the enamel on the inside of the tank - this will be the least evil.
When the pressure drops (crack formation, open faucet, etc.), the boiling point of water drops again to the normal 100 degrees, but the temperature inside is much higher.
There is an instantaneous boiling of the entire volume of liquid with the formation of a huge amount of steam, and as a result - a powerful explosion.
All this will not happen if a serviceable valve is installed. So, let's summarize its direct purpose:
- Do not allow water to flow back from the heater tank into the plumbing system.
- Smooth out possible pressure surges in the water supply, including hydraulic shocks.
- Discard excess liquid when it is heated, thus keeping the pressure within safe limits.
- If the valve is equipped with a lever, it can be used to drain water from the water heater during maintenance.
Types of leaks
If the boiler is leaking from above or below
It is necessary to disconnect it from the mains, substitute a basin and make a thorough visual inspection. Water leaks can be different: water can simply drip, or it can flow under pressure. In most cases, water flows from the bottom of the water heater. Use a flashlight to find the source of the leak.


The simplest case is when the leakage comes from the safety valve. It is adjusted at the factory so that excess pressure during water heating is released through a small fitting.
A simple solution to this issue is to divert this water to the sewer using a plastic flexible pipe with a diameter of approximately 8 mm. In this case, you need to think about where to connect the second end of the tube. If the boiler is hanging in the toilet, you can bring this tube into the flush tank;
Leakage from connections
The source of the leak may be from loose connections in the inlet and outlet pipes in the boiler itself. This is easily eliminated - all threaded connections are repackaged;
Leakage from under the cover
Next, with the help of a flashlight, the place where the water flows from is determined. If leaks are found from under the cap, this is one of the best options. Since the cover is pressed against the boiler body through the gasket, you can try to eliminate the leak by tightening the nuts of the bolts on the cover.
If this does not work, it is necessary to drain the water from the boiler, remove the cover and change the gasket. And before that, you must disconnect all electrical wires.
Advice: in order not to be confused in the future, you can first take a picture of all connections on a digital camera or smartphone and display it on the laptop screen.
These are, perhaps, all the options in which boiler leaks can be eliminated without replacing it. However, in most cases, about 80 percent, the leak comes from the top or bottom of the boiler body.
It's important to know:
often it is almost impossible to determine the location of the fistula in the body, since it is covered with heat-insulating material and an outer casing. Water can flow down under the thermal insulation or flow out in the area of the thermometer. In the lower part of the boiler there are special holes, in case of water leakage from which it is possible to determine exactly that it is the water heating tank that is flowing.
In the lower part of the boiler there are special holes, in case of water leakage from which it is possible to accurately determine that it is the water heating tank that is flowing.
These are the most difficult and unprofitable options. All of the listed leak options refer to the most common brands on the market, such as Ariston and Termex.
Installation and adjustment of the safety node
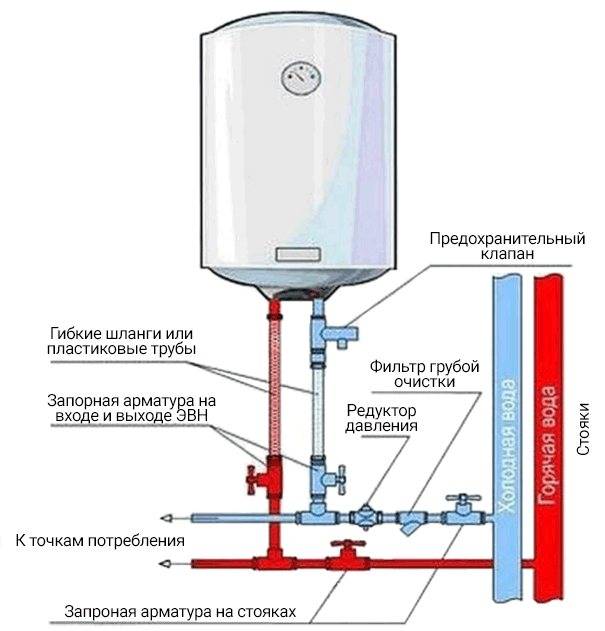
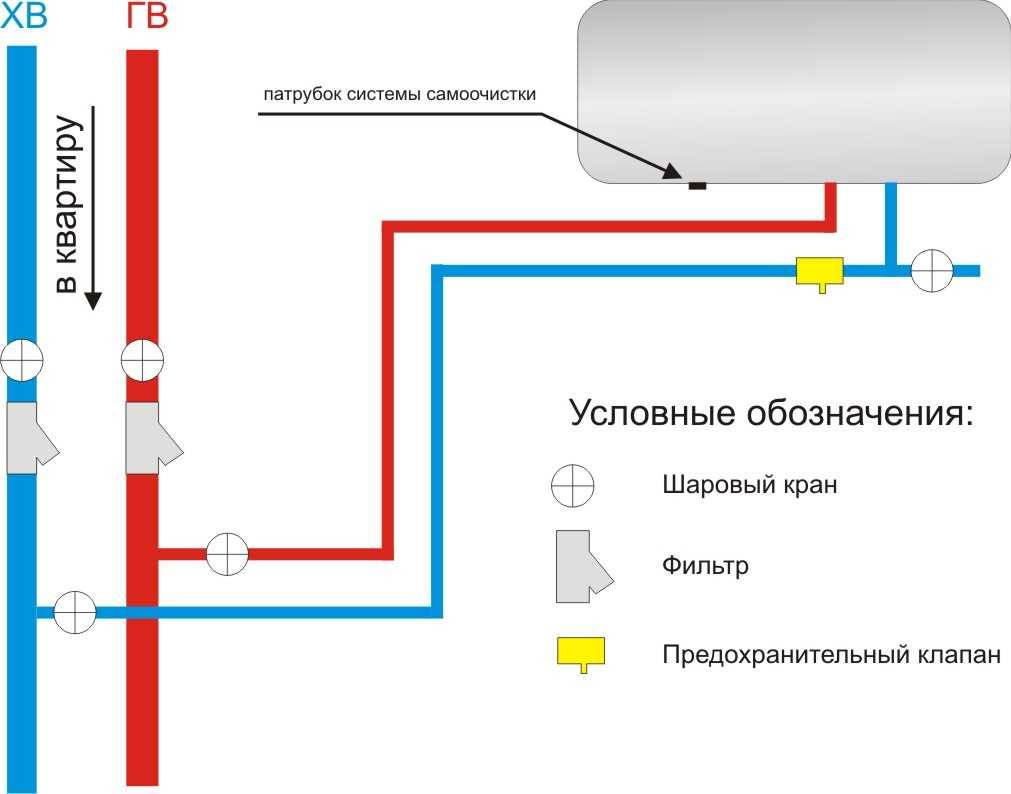
Any person can install a safety valve on a boiler without the help of a plumber. The correct wiring diagram indicates that the safety assembly is attached to the cold water inlet pipe to the water heater. Below are taps, filters and other piping elements.
The valve is installed on the water heater in the following sequence:
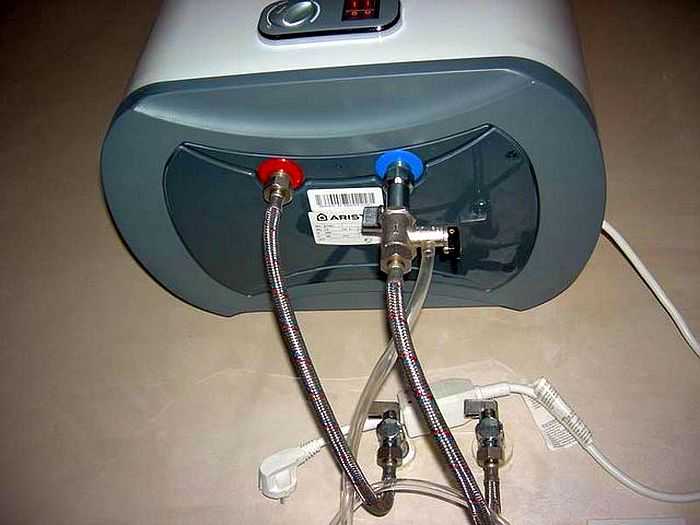
- The safety valve is installed directly on the cold water inlet pipe going into the water heater. Often a detachable adapter is placed between them - an “American” for ease of dismantling during maintenance.
- Fum tape is wound on the thread of the pipe or adapter to seal the connection. The safety knot is wound so that the arrow on the body is directed towards the boiler.
- When winding the safety valve onto the water heater, you need to stop when you feel the stop. On cheap models, there is no mounting fuse. The part is screwed in four turns. You can't rotate anymore. The thread of the pipe will close the channel of the fitting for draining the water.
After installation, it is worth looking inside the body from the side of the check valve. Inside the hole you can see the saddle and the plate of the locking mechanism itself. To check the performance with a finger or pencil, press the plate.It should go inward, and when released, return to its original place.
When the entire circuit is assembled, proceed to adjust the safety node:
- The water heater is filled with water, voltage is applied and the maximum temperature is set on the thermostat. You have to wait until full heating occurs, and the automation will turn off the heating element.
- Drops of liquid should appear from the fitting. If not, turn the adjusting screw until a positive result is obtained.
- After adjusting the lever, a little water is bled from the tank, after which the mechanism is returned to the closed state. The dripping from the nozzle will stop. A new portion of water will enter the tank. The heating element will heat it up, and the liquid will again begin to drip from the fitting.
- The mechanism adjusted to the maximum temperature will always work when the permissible limit is exceeded. Now it is possible to set a lower operating temperature on the regulator, for example, 50–60°C. When this threshold is reached, liquid will not drip from the nozzle.
The safety group is checked for operability of the forced drain lever and operation at maximum temperature once a month. If there is no adjusting screw and the mechanism does not work according to the required parameters, the part is replaced.
Replacing the safety valve on the water heater
Before installing the water seal, it is necessary to de-energize the heater and drain the water from it. For work you will need:
- check valve;
- wrench (2 pieces);
- fum tape / tow;
- dry rag.
The process is quite simple. The water should be turned off. Then, it is necessary to hold the hydraulic damper body with one key, and disconnect the hose from the inlet with the second. After disconnecting the hose, unscrew the device from the boiler.Clean the threaded connection of the titanium intake pipe from the old tow or fum-tape.
Apply several new turns of fum-tape or tow on the inlet pipe and screw on a new water seal. Then do not stretch the connection with an adjustable wrench. After that, apply a couple of layers of fum-tape or tow to the “dad” fitting of the check valve. Then screw on the connecting nut of the water hose. Open faucets and check connections for leaks. Everything, the installation is completed.


If water drips from the drain hole, do not worry, as this is normal. The check valve works and performs its direct function. You can put a thin transparent hose on the outlet and direct it to the drain or sewer.
Some heater owners try to hide the check valve out of sight. Pursuing their goal, they can put it at a considerable distance from the boiler. The scheme for the remote placement of a water seal is not prohibited, but in this case, shut-off units or taps cannot be installed in this gap. In addition, a long vertical line can create additional pressure, which will lead to regular idle leakage.
The allowable distance between titanium and the water seal should not be more than two meters. Exceeding the regulated distance leads to inefficient operation of the protective device.
In the case of a regular pressure drop in the water supply, it is recommended to install a water reducer in front of the check valve.
Peripheral secondary
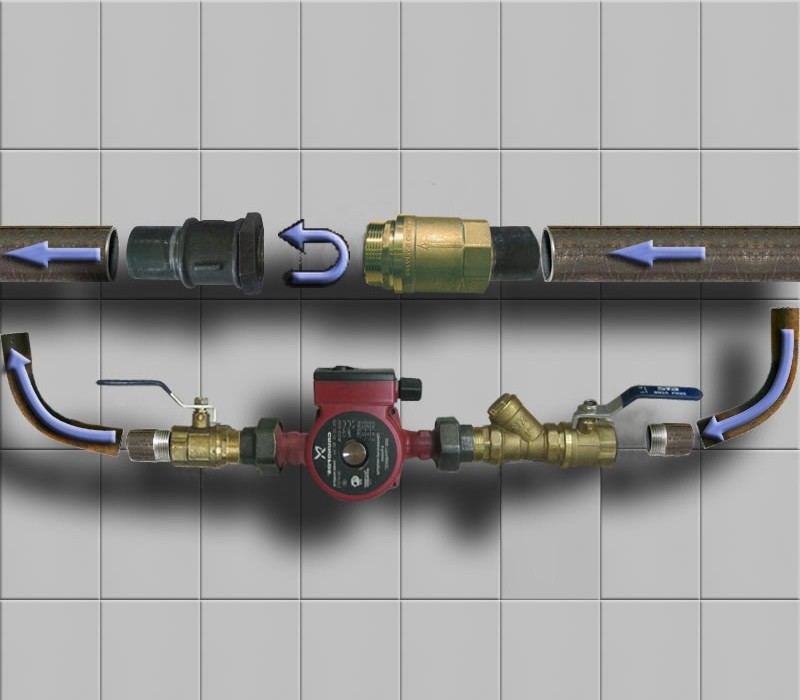
Check valve - an element of the heating system, consisting of a plastic or metal base, which performs the function of completely shutting off the coolant supply.This happens when the flow begins to move in the opposite direction. The metal disk is attached to a spring, which is under pressure when the flow moves in one direction, and when in reverse motion, the spring is actuated by blocking the passage in the pipe. The valve device has not only a disc and a spring, but also a sealing gasket. This component helps keep the drive in place tightly. Because of this, there is practically no possibility of pipe leakage. Butterfly valves are widely used in domestic heating systems.
Consider the principle of operation and an example of when check valves are necessary and when not. In the operating mode of circuits where circulation is present, the presence of a valve is optional. For example, if you look at a classic boiler room, where there are three parallel circuits. This can be a radiator circuit with a pump, a floor heating circuit with its own pump, and a boiler loading circuit. Often such schemes are used in work with floor boilers, which are called pump priority schemes.
Pump priorities are the definition of alternating pump operation. For example, the use of check valves occurs when only one pump remains in operation.
The installation of valves is completely eliminated if there is a hydraulic arrow on the diagram. This allows, during pressure drops in certain pumps, to get rid of this problem without the use of check valves. The hydraulic arrow indicates the closing section, which works to restore pressure in one of the pumps.
The presence of a floor-standing boiler in the circuit also allows you not to install check valves for heating.This happens due to its barrel, which bridges a certain place from the drop, which is considered to be zero resistance or a hydraulic arrow. The capacity of such barrels sometimes reaches 50 liters.
Check valves in heating are used if the boiler is placed at a sufficiently large distance from the pumps. Also, if the nodes and the boiler are at a distance of 5 meters, but the pipes are too narrow, this creates losses. In this case, a non-working pump can create circulation and pressure on other components, so it is worth putting a check valve on all three circuits.
Another example of using check valves is when there is a wall-mounted boiler, and in parallel with it, two nodes work. Most often, wall-mounted boilers have one radiator system, and the second is a mixing wall module, along with a warm floor. Check valves do not need to be installed, if the mixing unit operates only in a constant mode, then in the idle state, the valves will have nothing to regulate, because this circuit will be closed.
There are times when the pump does not work on the mixing wall unit. This sometimes happens when the room thermostat pump turns off during a certain room temperature. In this case a valve is needed because the circulation will continue in the node.
Now the market offers modern mixing units, when all the loops on the collector are turned off. In order for the pump not to idle, a bypass with a bypass valve is also added to the manifold. They also use a power switch that turns off the pump when all the loops on the collector are closed. The lack of proper elements can provoke a short-circuited node.
These are all cases where check valves are not needed. In most other conditions check valves are not required. Valves are used only in a couple of cases:
- When there are three parallel connection nodes and one of them is missing work.
- When installing modern collectors.
Cases where check valves are used are very rare, so now they are gradually being removed from use.