- How to fix the toilet on taffeta?
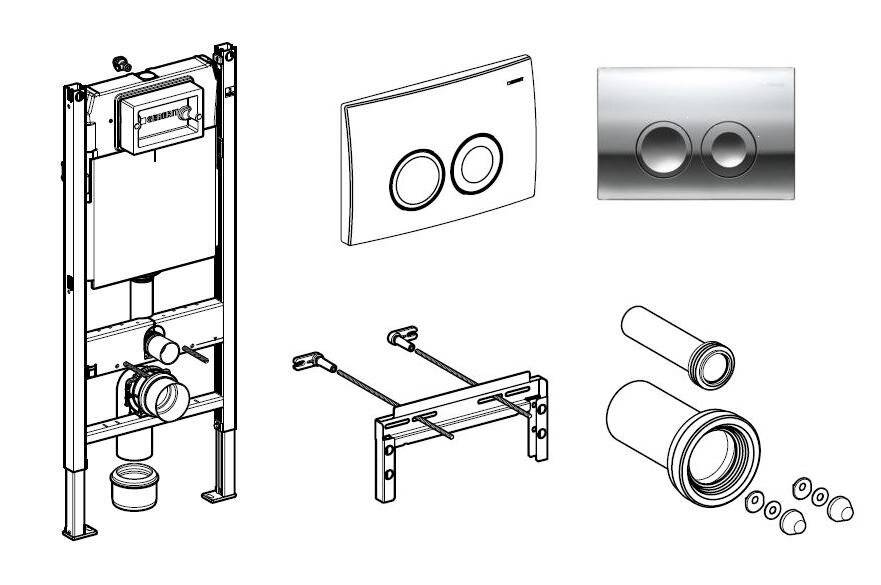
- Frame installation installation
- How to install a conventional toilet
- Preparations before installation
- The basics of choosing the right toilet for your home
- The procedure for connecting the toilet with corrugations
- Note to installers: useful tips
- Replacing the corrugation on the toilet
- Corrugations for the toilet bowl and their purpose
- Self-assembly
- Installation Quality Check
- What to focus on?
- How to choose a toilet
- Cutting and joining sewer pipes
- Suspended structure device
- With installation
- On a concrete plinth
- Installation installation
How to fix the toilet on taffeta?
Most often this method is used for mounting compacts on a wooden floor. Taffeta - a gasket made of high-strength wood with a thickness of 28 to 32 millimeters - is cut to fit the size of the support column of the plumbing fixture.
When installing plumbing on a wooden substrate, it is necessary to cover it with drying oil or waterproof varnish, thus protecting it from the high humidity natural for the bathroom and potentially rotting
From below, anchors are attached to the part or ordinary nails are driven in in a checkerboard pattern so that they protrude 2.5-3 centimeters from the base. A recess previously made in the floor is poured with a cement solution. Taffeta is inserted from above with anchors down.As a result, it should become flush with the overall surface of the floor.
After 12-15 hours, when the solution dries and hardens, a toilet bowl is screwed to the resulting wooden base. Rubber or silicone gaskets are certainly placed under the heads so that the structure is held more securely and does not lose stability during operation.
In order, if necessary, to easily make all the necessary repairs and easily unscrew the screws, it is recommended to pre-lubricate them with graphite or grease
According to plumbers, a wooden part may well be replaced by a rubber one. It is cut out of high-density material (average thickness 5-15 mm). So that the edges of the rubber do not stick out, it is cut out slightly smaller than the size of the base base of the toilet sole.
The photo gallery will acquaint you with the stages of work on installing a toilet bowl on taffeta:
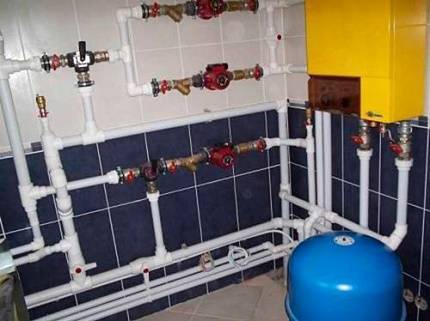
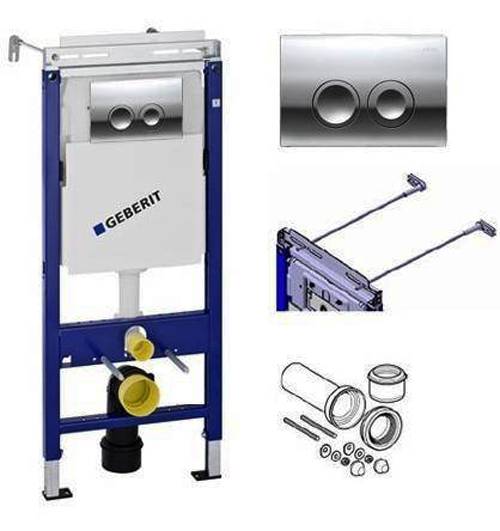
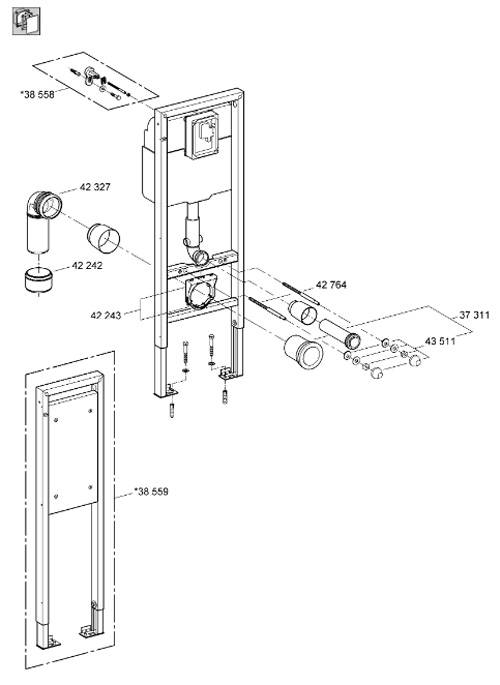
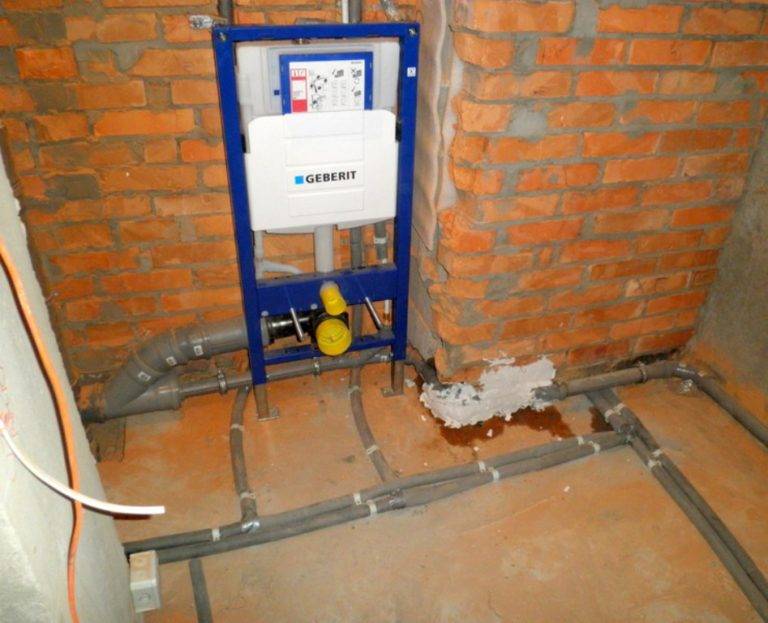
Frame installation installation
frame construction
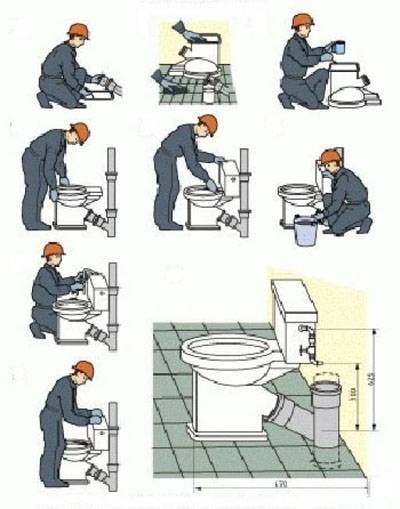
Installation of the frame installation of the toilet bowl is carried out in accordance with the step-by-step instructions:
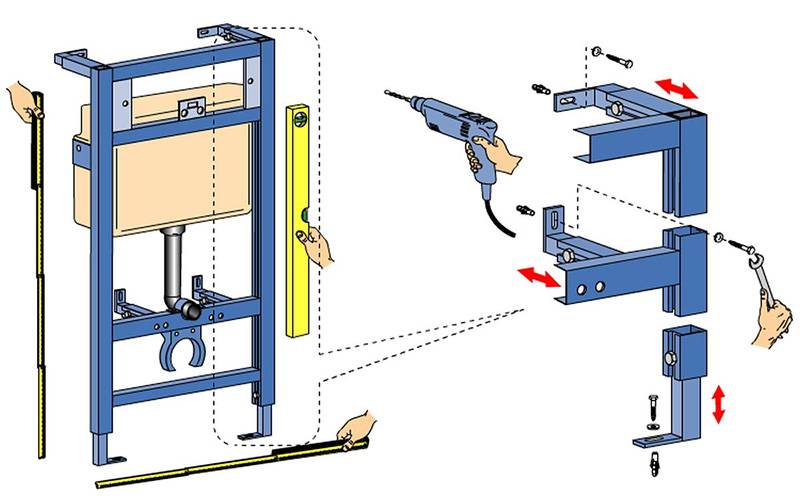
- The frame is fixed at least at four points with dowels. First, holes are drilled under the fasteners slightly smaller in diameter than the dowel itself, and then, by changing the drill, they expand it to the dimensions corresponding to the diameter of the dowel. Then the hole will turn out to be the desired diameter with smooth edges.
- Fix the lower part of the structure. Then, after checking the evenness of the installation with a level, fix the upper part. Anchors and brackets are used as fasteners. Nuts are tightened with open end wrenches.
- The 90 degree bend is fixed with a plastic clamp-fastener. When connecting tubular elements, silicone sealant is used.
- Connect the water pipe to the toilet tank. The water supply point can be located on the side or on top.It is better not to use flexible hoses - they are short-lived. Preference should be given to polymer pipes or stainless steel bellows connectors.
- After installing the pipes, check the system for leaks.
- Upon completion of the installation of the frame, the openings of the pipes, the drain tank and the mounting studs are closed with plugs.
- The wall is covered with moisture-resistant drywall. The drywall profile is attached to the installation and to the wall.
- Install the tile, after cutting out the necessary holes in it for pipes and studs. Hanging the toilet after tiling is possible only after the tile adhesive has completely cured - after 7 days.
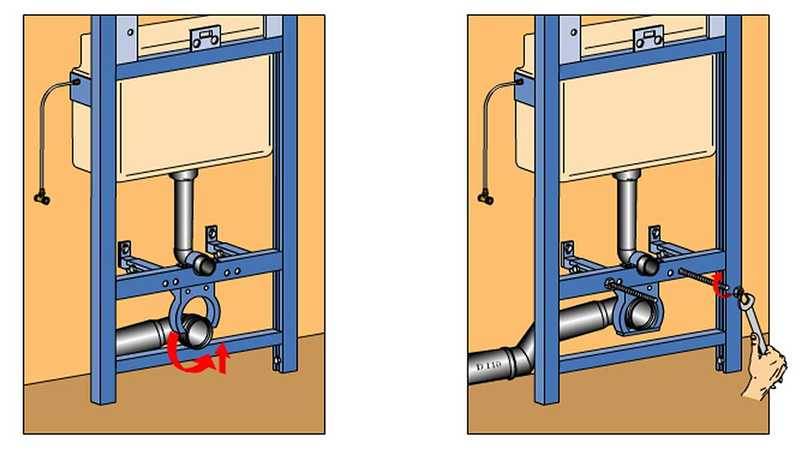
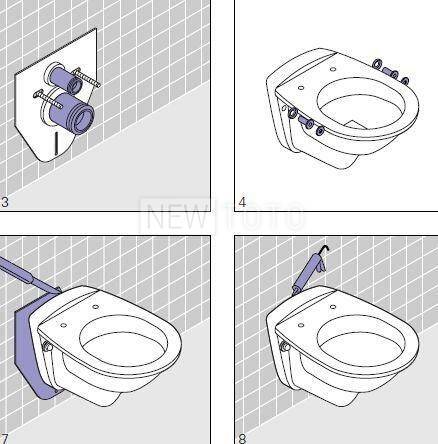
- The pipe included in the kit is connected to the toilet drain. Then, using a level or other even object, draw a line coinciding with the plane defined by the edges of the toilet bowl.
- Measure the depth of the pipe in the installation. From the markings on the pipe connected to the toilet, set aside this distance and cut it off. The same is done with the pipe for supplying water to the toilet.
- Silicone sealant is applied to the rubber cuffs and the rubber elements are inserted into the pipes, and the pipes themselves into the toilet. Moreover, the nozzles must be inserted first into the toilet, and then the device is fixed with them, and not vice versa. Otherwise, the rubber bands will let water through.
- An insulating gasket is fixed on the studs and plumbing is installed, having previously lubricated the reciprocal holes in the pipes with a sealant.
- Putting the toilet on the studs, mount the gum, washer and nut. The fastener is clamped, after which caps are put on it so that the bolts and studs are not visible. Do not tighten the fasteners as tightly as possible, due to tension, the bowl may burst.
Wall hung toilet installed.Now, using a clerical knife, the insulating gasket is cut along the contour of the device.
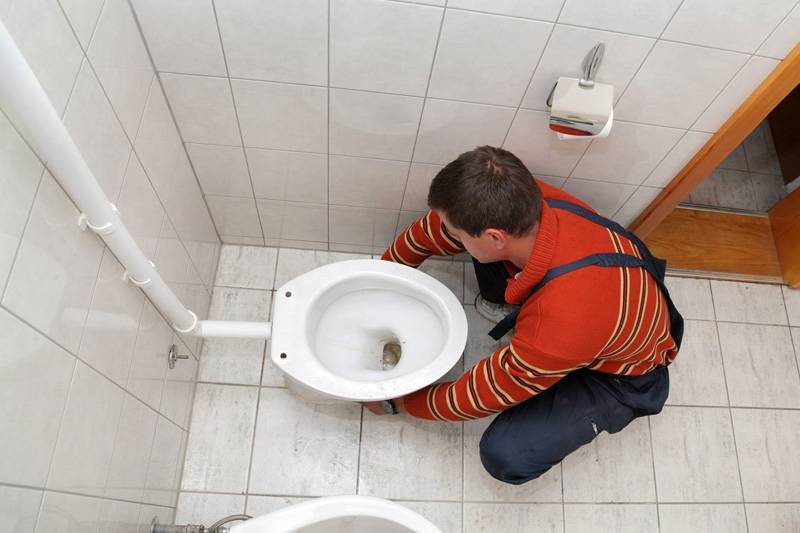
How to install a conventional toilet
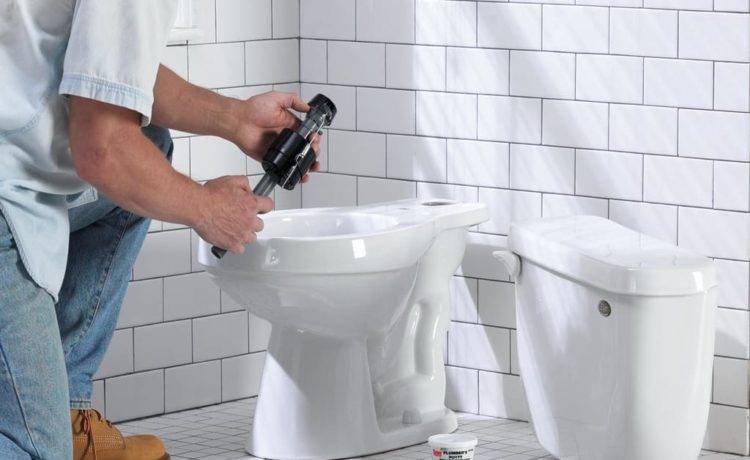
Installation of a floor-standing toilet bowl Compact or Monoblock
As a rule, when selling, the toilet bowl and the tank are disconnected. The internal fittings of the barrel are most often already assembled, which greatly simplifies the installation process.
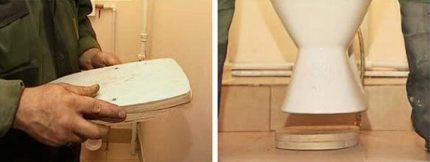
First step. We put the toilet bowl in its place and make marks at the attachment points.
MarkingMarkings on the floor for fasteners
Second step. We remove the toilet bowl and drill mounting holes in the marked places.
Drilling holes in tiles for dowels
Third step. We drive the dowels into the mounting holes.
Fourth step. Installing the bowl. We insert fasteners through special sealing gaskets. Tighten fasteners. You should not pull too hard - you can damage either the fasteners or even the toilet itself. We pull until the sanitary ware is firmly attached to the surface. From above we close the fasteners with plugs.
Tighten the nuts Close the capMake sure the toilet is level
Fifth step. We mount the cover and seat. The manual for their assembly usually comes with the toilet, so we will not dwell on this event separately.
Sixth step. We connect the toilet to the sewer. The procedure depends on how the toilet outlet is connected.
We put the corrugation. We coat the connection of the corrugation with the sewer pipe with sealant. We pull the corrugation onto the outlet of the toilet bowl without additional seals
Prices for accessories for toilets and urinals
Accessories for toilet bowls and urinals
If the release is done into the wall, we work like this:
- we check whether the outlet of the toilet bowl coincides with the sewer pipe.If everything is in order, we connect with the help of a cuff-seal. In the presence of displacements, we use corrugation;
- we process the ends of the connecting element with silicone sealant and connect the toilet bowl to the sewer;
- fasten the plumbing fixture to the floor.
If the release to the floor is being arranged, we do the following:
- we install on the floor, at the exit of the drain pipe, a screw flange with a lock;
- we see a hole in the center of the flange. The sewer pipe must go into it;
- install a toilet. The collar of the screw flange must fit into the outlet socket of the toilet bowl. We turn the cuff, ensuring complete fixation;
- seal the connection with a special silicone compound.
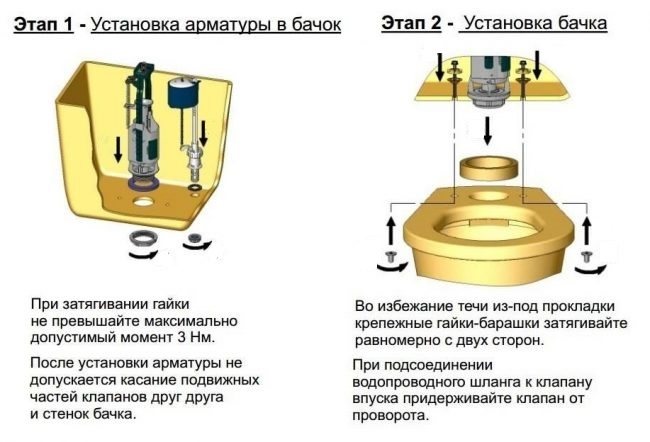
Seventh step. We carry out the installation of the tank. Drain mechanisms, as a rule, are sold already assembled. If the mechanism is disassembled, assemble it according to the manufacturer's instructions (the assembly order for different models may vary slightly).


Lubricate the tank ring with sealant Connecting the drain tank Fixing the tank Tighten the tank bolts Close the lid
We take the gasket from the kit and install it in the water hole in our toilet. Install the tank on the gasket and tighten the bolts.
Fasteners are most conveniently installed like this:
- we twist the first bolt so that the tank warps in its direction by about 1.5-2 cm;
- we press the raised edge of the tank with our hand and tighten the second bolt.
Eighth step. We connect the tank to the water supply using a flexible hose. We turn on the water supply and check the quality of the system. If it digs somewhere, tighten the nuts a little.The level of filling the tank with water is adjustable by moving the float lower or higher.
Connecting the water supply hose
We let the tank fill several times and drain the water. If everything is fine, we take the toilet into permanent operation.
Preparations before installation
Regardless of how it is decided to fix the toilet to the floor of the bathroom, work always begins with the collection of the cistern. The process directly depends on the compact model and is usually described in detail in the instructions that came with the equipment.
At the second stage, the water supply and discharge units are prepared. If the connection is made to an old, cast-iron riser, it is pre-cleaned and dried well so that later there are no problems with the tightness of the corrugation.
Having completed these two steps, they proceed to the third and ensure the availability of all connecting elements, materials and a suitable tool for carrying out the necessary installation and plumbing measures.
The basics of choosing the right toilet for your home
When choosing the right model, you should consider the features of the bathroom
Worthy of attention:
- The area of \u200b\u200bthe room, affecting the dimensions of the purchased plumbing;
- Availability, geometric parameters and location of the external water supply pipe. Consider how far it will be from the intended installation site of the toilet bowl;
- The location of the sewer pipe;
- Release angle. The best option is to mount a model with an oblique outlet. If the measurement shows a slight match, you should purchase a special adapter together with the plumbing - a drain corrugation.
 The dimensions of the selected model should be related to the area of \u200b\u200bthe toilet
Manufacturers offer plumbing fixtures of various configurations, which have their own mounting features. The division can be made on the floor and mounted models. The latter require less space to install and are more attractive. This is a suitable option for a small bathroom. Floor models are more reliable and practical.
 The location of the sewer pipe can affect the model of the toilet
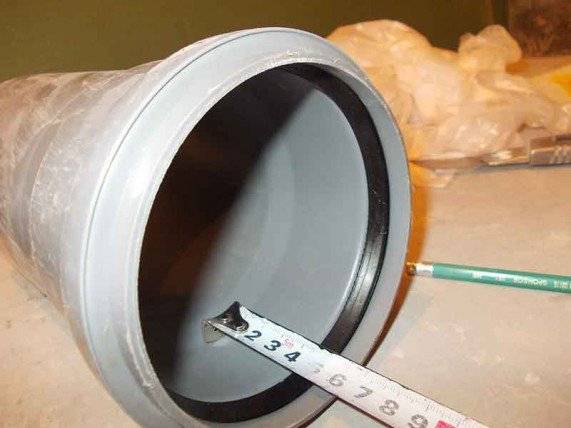
The procedure for connecting the toilet with corrugations
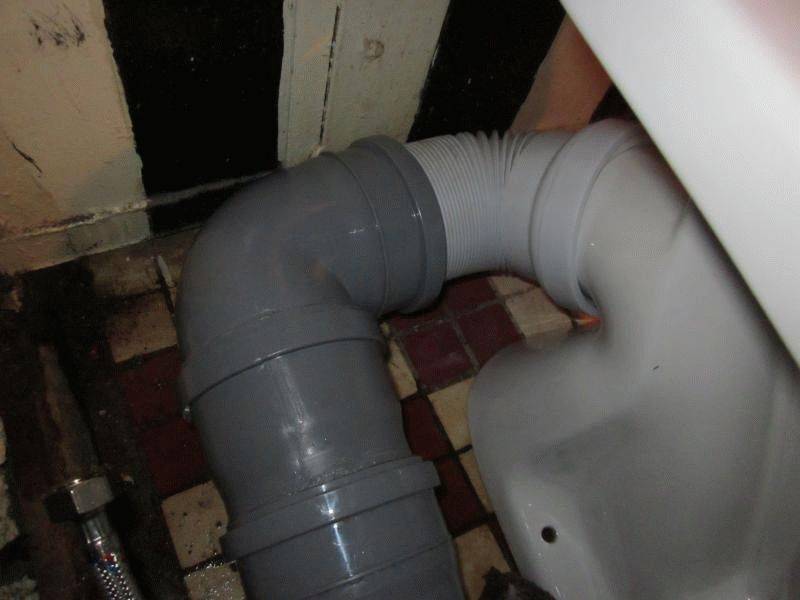
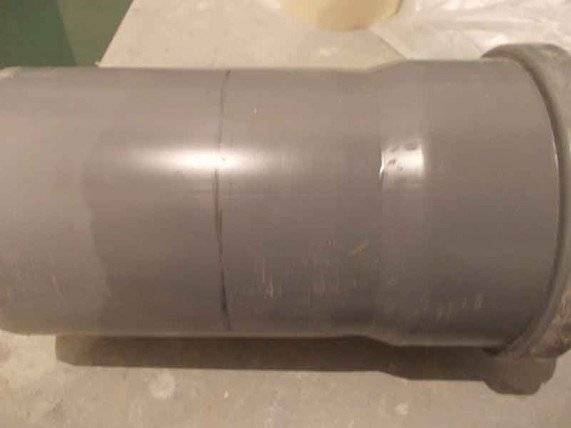
The work of connecting the toilet is not difficult, but a certain sequence of actions must be followed. It is more convenient to start installing the corrugation to the toilet bowl, both to the new one and the old one, even before it is fixed in a permanent place.
When nothing needs to be done with a product just brought from the store, then the outlet of the old device must be freed from deposits of cement or sealant.
The photo shows the sequence of connecting the toilet using corrugations. Some experts believe that it is not worth sealing the connection of the corrugation with the sewer, because. silicone can destroy rubber over time
You also need to clean the socket of the sewer pipe. If this place is not freed from the remnants of materials, it will be difficult to ensure the tightness of the connection.
Then they act according to the following scheme:
- The end of the pipe, which is going to be connected to the sewer, is treated with silicone. The end of the outlet must be evenly blocked by a 50-60 mm outlet. You need to tighten with a turn, without allowing any distortions. To facilitate the process of tightening the corrugations, smear the rubber seal in the socket with soap.
- A corrugated pipe is inserted into the inlet of the system at one end, and the other end is connected to the toilet.
- Pour water into the toilet to check the joints.
- Mark the toilet attachment points on the floor by disconnecting the corrugation before that.
- Drill holes and coat with sealant.
- Attach the toilet to the floor. At the same time, the fixing bolts are attracted until the device stops staggering and becomes perpendicular to the floor. With increasing effort, you can split the base.
- Reconnect the adapter, process the joints with plumbing sealant and check them again for leaks.
- The screed is poured and the floor surface is finished.
The release form of the floor toilet can be vertical‚ horizontal‚ oblique. In each case, connecting the toilet bowl has its own characteristics. In old houses, vertical and oblique outlets are most often found, and in new ones, horizontal ones.
To connect the toilet bowl to a sewer pipe, the outlet of which is in the floor, a corrugation with a socket bent at 90⁰ is suitable. For a plumbing fixture with a horizontal outlet, a corrugation with a 45⁰ socket rotation is mainly used.
It happens that in a bathroom with a small area it is necessary to place a lot of plumbing fixtures. To do this, it is necessary that there are many branches on the sewer pipe, and this is not always realistic.


The only way out is to use a corrugated toilet bowl with a tap. It is the only alternative when the bathroom is located almost right next to the toilet.
It happens that for some reason the corrugation becomes unusable. It's easy to replace it. To do this, you don’t even have to dismantle the toilet, but you need to prepare rags and buckets.
Block the flow of water into the toilet drain, then disconnect the tube intended for the flow of water. The tank is freed from water and removed. The corrugated pipe is simply compressed and disconnected from the device. Next, take it out of the socket.
Corrugation for draining is a universal product. With its help, the toilet bowl can be connected both to the sewer, made of plastic pipes, and to old pipes made of cast iron
A new pipe is inserted into the socket, compressed, pulled over the outlet of the toilet bowl. All this can be done with a stretched corrugation. If it is extremely compressed, nothing will work. This is a nuance that must be taken into account even during the initial installation.
We have other useful articles on our website with detailed instructions for installing toilet bowls of various types and designs:
- How to install a toilet with an oblique outlet: detailed technical instructions
- Toilet with vertical outlet: how it works and works, pros and cons, step-by-step installation instructions
- Corner toilet with a cistern: pros and cons, scheme and features of installing a toilet in a corner
- How to connect a toilet to a sewer: an overview of installation technologies for all types of toilets
Note to installers: useful tips
Plumbing fixtures are made from strong but fragile materials. Therefore, when fixing a porcelain or faience appliance with screws (bolts), it is not recommended to use maximum efforts for screeding. Be sure to use soft gaskets (silicone, rubber, plastic), placing them under the screw heads.
Fasten the toilet to the metal screws carefully, using moderate force. It is highly recommended to place pads of soft material under the screw heads.If glue is used for fasteners, the quality of cleaning and degreasing of the surfaces to be glued is of great importance in achieving the strength of the connection.
If glue is used for fasteners, the quality of cleaning and degreasing of the surfaces to be glued is of great importance in achieving the strength of the connection.
When using epoxy resin, it is necessary to strictly observe the ratio of resin and solvent in the process of preparing the adhesive mass. The adhesive must be applied evenly to the surface, to prevent the formation of air cushions.
When installing the device “on taffeta”, it is advisable to choose hardwood as a material. You can use multi-layer plywood, but in any case, you should provide high-quality waterproofing for taffeta. Humid environment dramatically reduces the durability of any wood.
Replacing the corrugation on the toilet
Thanks to the increasing introduction of new technologies into our lives, the technologies for conducting various communications are also changing. Until recently, it was considered a big problem not only to replace the toilet, but also to change the drain tank or hermetically connect this very toilet to the sewerage system. For most citizens, installing new plumbing or replacing an old one caused a headache. And not by accident. When choosing a new toilet bowl, it was first of all necessary to take into account that the cast-iron sewer outlet exactly coincided with the outlet of the toilet bowl. Otherwise, great difficulties arose, either the replacement of the toilet bowl or the replacement of a section of the sewer pipe was required.
Plastic corrugated pipes greatly facilitate their replacement, repair and installation.
With the advent of a variety of plastic products, replacing and installing a toilet bowl in a regular place has been greatly simplified. In order to install a toilet bowl and a drain tank, there is no longer a need to seek help from plumbers, and now replacing the toilet corrugation is not a problem.
Corrugations for the toilet bowl and their purpose
A flexible plastic corrugation (or just a bend) came to the aid of the owner, which allows you to change the toilet bowl and tank in the toilet without special knowledge and qualifications
This miracle piece can take the desired shape and stretch significantly, while having durability and, importantly, low cost.
Corrugations of various diameters are produced: for a toilet, bathtub, washbasin or sink.
The difference is only in the diameter of the corrugations.
Schematic representation of a corrugated pipe with dimensions.
Self-assembly
First you need to remove the old corrugation on the toilet and clean the joints both on the toilet itself and on the sewer pipe. After preliminary preparation, put the corrugation directly on the toilet outlet, if possible without stretching unnecessarily. After that, we install the toilet in a comfortable position and, stretching the corrugation, insert the end with the external seal until it stops into the sewer hole. We will install the drain tank after we make sure that the replacement was successful. That's all. Easier not to think!


Of course, as in any business, there are some tricks and subtleties. For example, for greater reliability and tightness, a sealant can be used. To do this, it must be applied in advance to the contact surfaces of the corrugations and allowed to dry.
Phased installation of corrugations to the toilet bowl and general sewerage.
It must be remembered that plastic is not cast iron, and it is easy to deform or tear if, for example, you install it with great effort or put a weight on it. It is not recommended to completely stretch the plastic corrugation, the walls become much thinner and, as a result, strength decreases and sagging occurs.
One more moment. It is advisable to install from the first time, since subsequent attempts may violate the tightness of the rubber seals. First of all, this concerns cheap and, as a rule, low-quality corrugations.
Installation Quality Check
After the installation is completed, it is necessary to once again pay attention to the fact that there are no distortions in the joints and sagging. Now you can start testing
Before you install the tank, you can spill the toilet with water from a bucket. We carefully examine everything for tightness, especially at the joints
Now you can start testing. Before you install the tank, you can spill the toilet with water from a bucket. We carefully examine everything for tightness, especially at the joints.
The appearance of water leaks is unacceptable, otherwise sooner or later you will have to use a sealant or a new corrugation (it is preferable to change it anyway). After we are convinced of the reliability of the connection, we install a drain tank and do a few more control descents of water.
What to focus on?
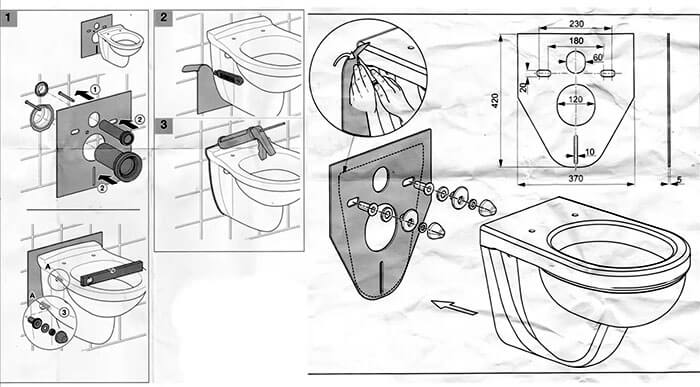
When buying a wall hung toilet, you should first of all pay attention to its material and shape. The materials used are very different, but the vast majority of devices are traditionally made of two types of ceramics:
The materials used are very different, but the vast majority of devices are traditionally made of two types of ceramics:
- Earthenware: the material is inexpensive, but due to the porous structure, indelible yellow stains soon appear on it.
- Porcelain: there are no pores in this material, so the appearance of the product remains attractive longer. But it also costs a little more.
Other materials have the following advantages:
- stainless steel: not afraid of impacts, therefore suitable for public areas;
- acrylic and other types of plastic: a budget option;
- natural stone: elite toilet bowls, so to speak, of a representative class.
Most preferred are round or oval bowls. Rectangular ones are also made, but, as practice has shown, they are less convenient to use.
Do not forget to make sure that the chosen model fits well indoors: for convenient use, there should be at least 60 cm of free space in front of the toilet.
How to choose a toilet
 Block installation
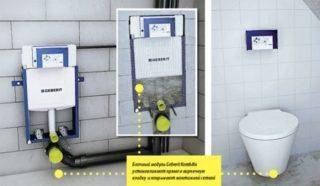
On the installation, you can fix not only a hanging, but also a floor-standing toilet. The tank will be hidden in the wall. Basic requirements for a plumbing fixture:
- strength;
- comfort;
- hygiene (easy to clean, gentle flushing without splashing);
- compatibility with the interior of the bathroom in size and appearance.
There are two types of installations:
- Block - are a block that is attached to the wall. It must be installed in a niche. It is fixed with anchors and it is on these fasteners that the main load falls. This option is best suited for the installation of a floor toilet.
- Frame - attached to the floor and wall, have legs.The main load falls on the lower part of the structure. The legs are adjustable in length, so you can set the toilet to the desired height.
The first installation option will cost less, but it is only suitable for main walls. The second type of structures is attached not only to brick and block walls, but also built into plasterboard partitions. Low and wide frame installations are suitable for wooden walls.
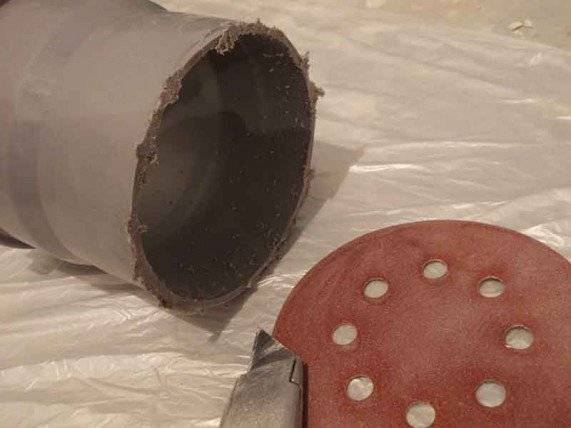
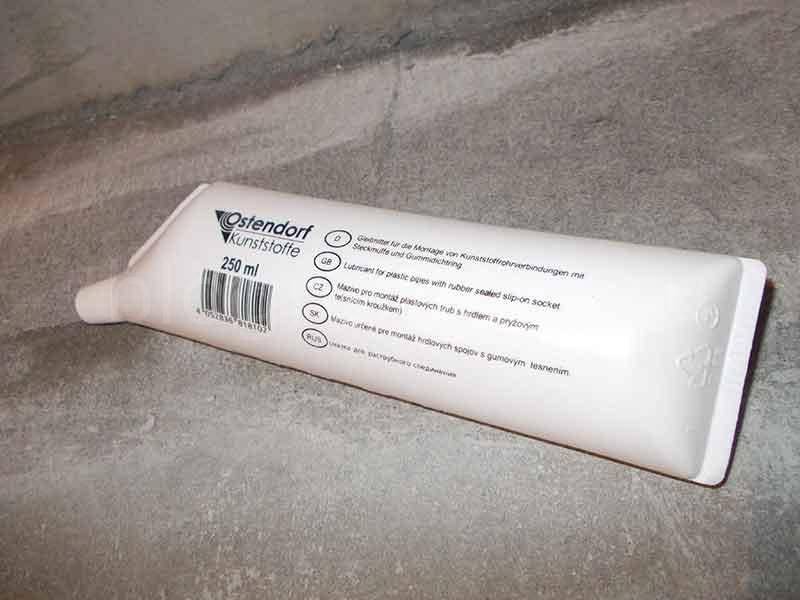
Cutting and joining sewer pipes
You can cut the sewer pipe with a hacksaw or grinder. Bulgarian is more convenient and faster, you just need to slow down. Having taken measurements, we turn on the grinder and cut the plastic, the edges of which are noticeably melted and “twisted”


Now we will correct the edges under the cone with the same grinder and process them with sandpaper, getting rid of any unnecessary things that can detain and attract the attention of washed particles

To connect sewer pipes, I recommend using plumbing vaseline, which should be lubricated with gaskets, protecting them from deformation.
I just want to recommend, as in advertising: “Use only natural, natural petroleum jelly.”
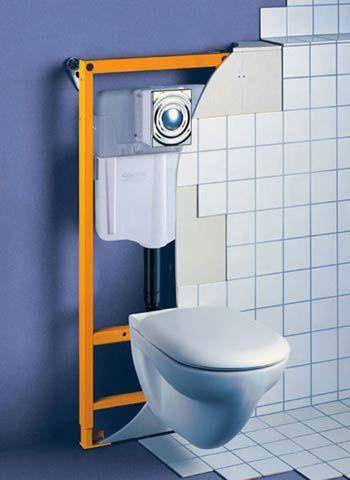
Suspended structure device
Unlike a floor-standing toilet, a wall-mounted one has a more complex design and, accordingly, complicated installation. Similar models differ depending on the method of attachment. The toilet bowl can be installed using:
- frames - is a metal frame;
- base - usually made of concrete.
With installation
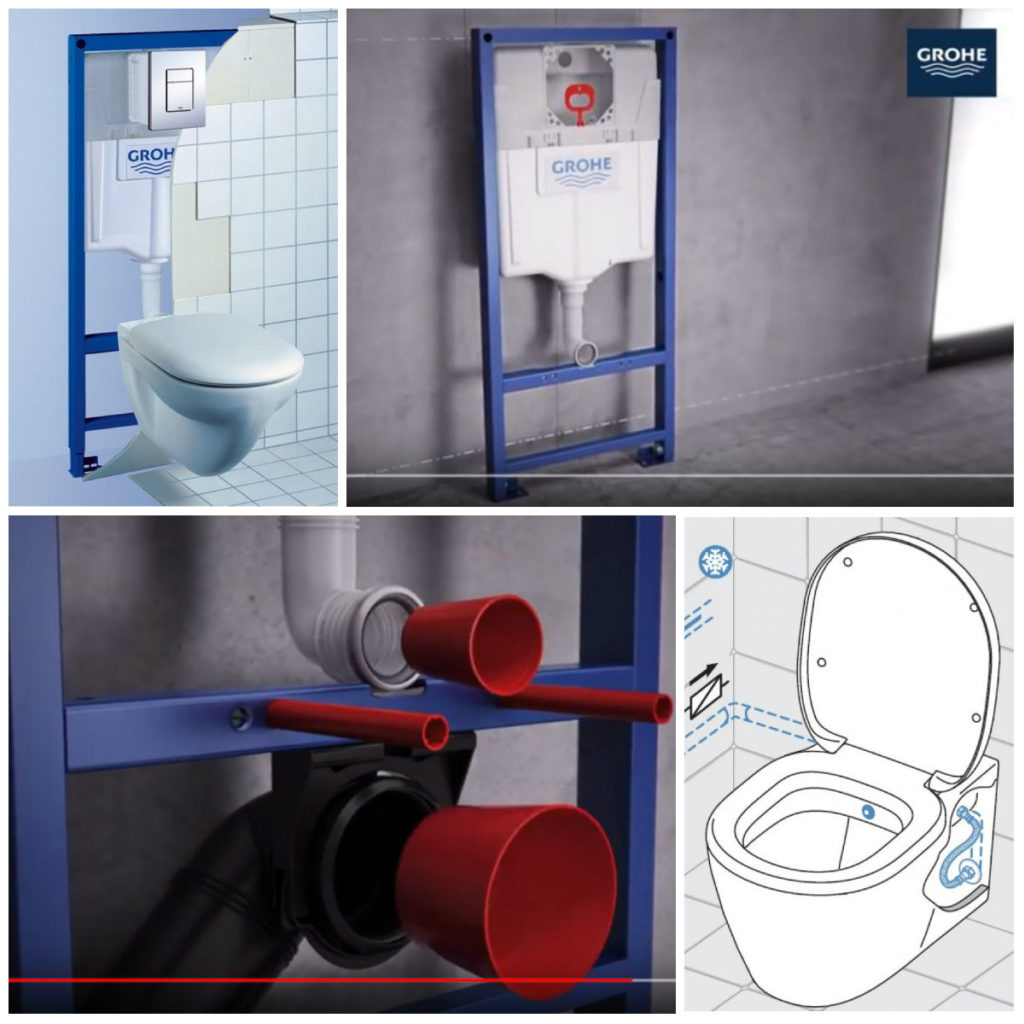
The design consists of the following elements:
- the steel frame is the main component because it is on it that the tank and other elements are fastened.The frame must be of high quality and have increased strength and reliability. As a rule, it can withstand up to 400 kg;
- the drain tank, together with communications, is hidden behind a false wall or trim. It is most often made of durable plastic and covered with a special material that prevents condensation on the walls;
- the toilet bowl is the only visible component of the plumbing system. In most cases, it is selected based on the personal preferences of the residents and the interior style of the room.
Of the features of this type, it should be noted the need for a capital (or very strong) wall. Because fastening is carried out on the floor and wall; in the presence of plasterboard walls, this type of system cannot be used.
The drain tank differs in small thickness and the increased width. On one of its sides there is a hole through which the flush button is connected, also through this hole the parts of the internal mechanism of the tank are removed when they break. A feature of such a tank is the possibility of a half drain, which can significantly reduce fluid consumption.
Benefits of installing a wall hung toilet:
- beautiful appearance that will suit almost any bathroom design;
- visual increase in free space;
- simplification of cleaning due to the lack of a toilet base and concealment of communications;
- no need to damage the flooring for plumbing installation;
- the possibility of installing a double flush button.
 Disadvantages and controversial points:
- the actual increase in free space in the toilet occurs only if there is a niche in the wall for installation. However, it is usually not available, so it should be borne in mind that an additional 15 cm of installation space is required. Also, do not forget about the thickness of the erected false walls and finishes;
- the hidden connection of the water supply and sewerage pipes is an advantage only if the communications are not disrupted. In the event of any malfunctions, it will be necessary to disassemble the false wall and, possibly, the installation. Such repairs and subsequent restoration of the appearance will require significant financial investments;
- the high cost of the steel module, due to which the total price of plumbing increases significantly. You can save some money by doing the installation yourself.
On a concrete plinth
Installation of a hanging toilet can also be carried out on a concrete base. Self-construction of the pedestal does not require much time and is quite simple. Installation installation in most cases is an expensive procedure, so many choose a more budgetary analogue - installation on a concrete pedestal.
This method provides 2 options for placing the tank:
- hanging tank located above the toilet;
- a tank built into the wall with a drain button brought out to the outside. Outwardly, this option practically does not differ from the model with the installation.
The design consists of a bowl, which is mounted in the base and the wall by means of 2 strong rods, the pedestal itself and the sewer pipe, which is also fixed with concrete. It should be noted that installation can only be made on a main wall.
Installation installation
Installing a do-it-yourself toilet installation on a special frame fixed to the wall is a more expensive process, but faster and more reliable. The installation will be fixed to the floor and a solid wall.
The technological sequence is as follows:
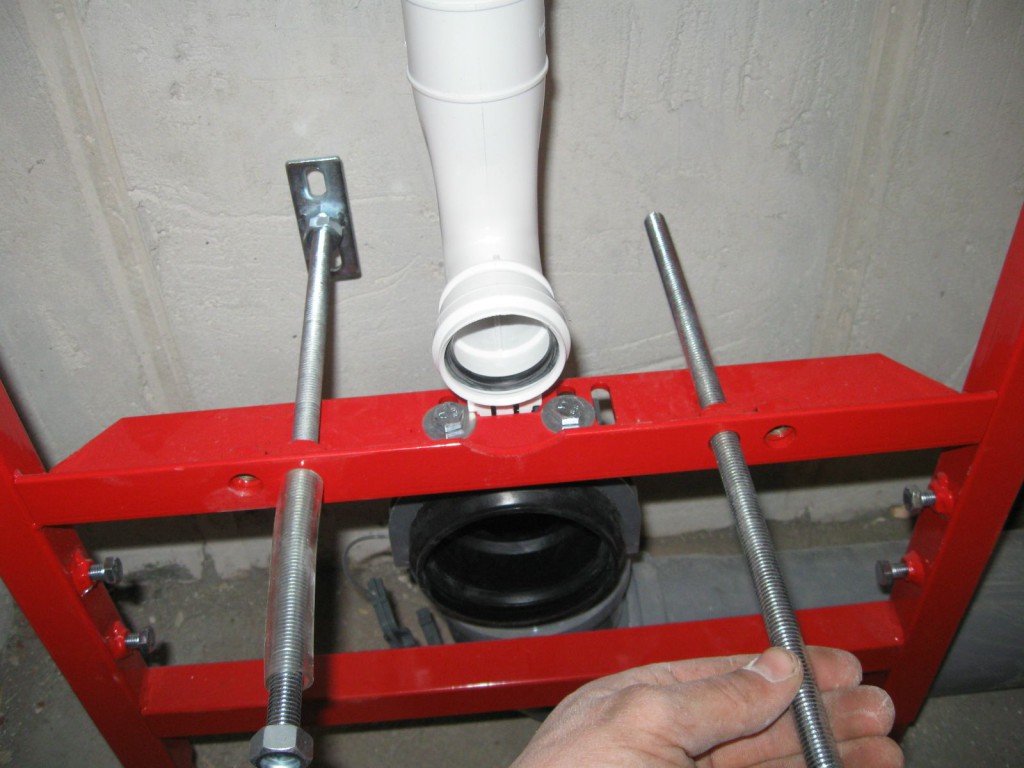
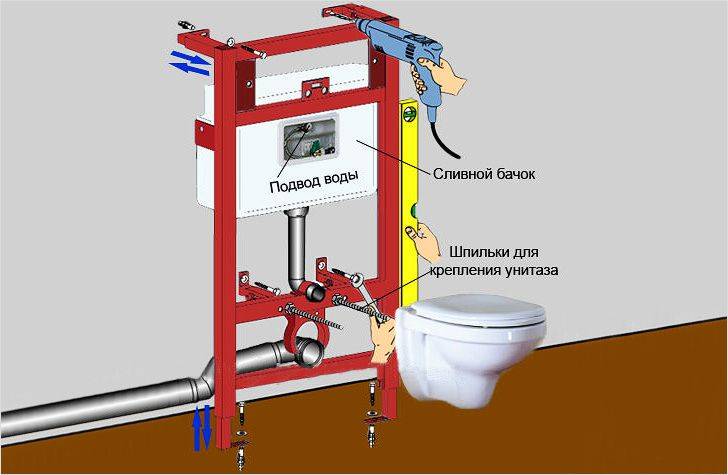
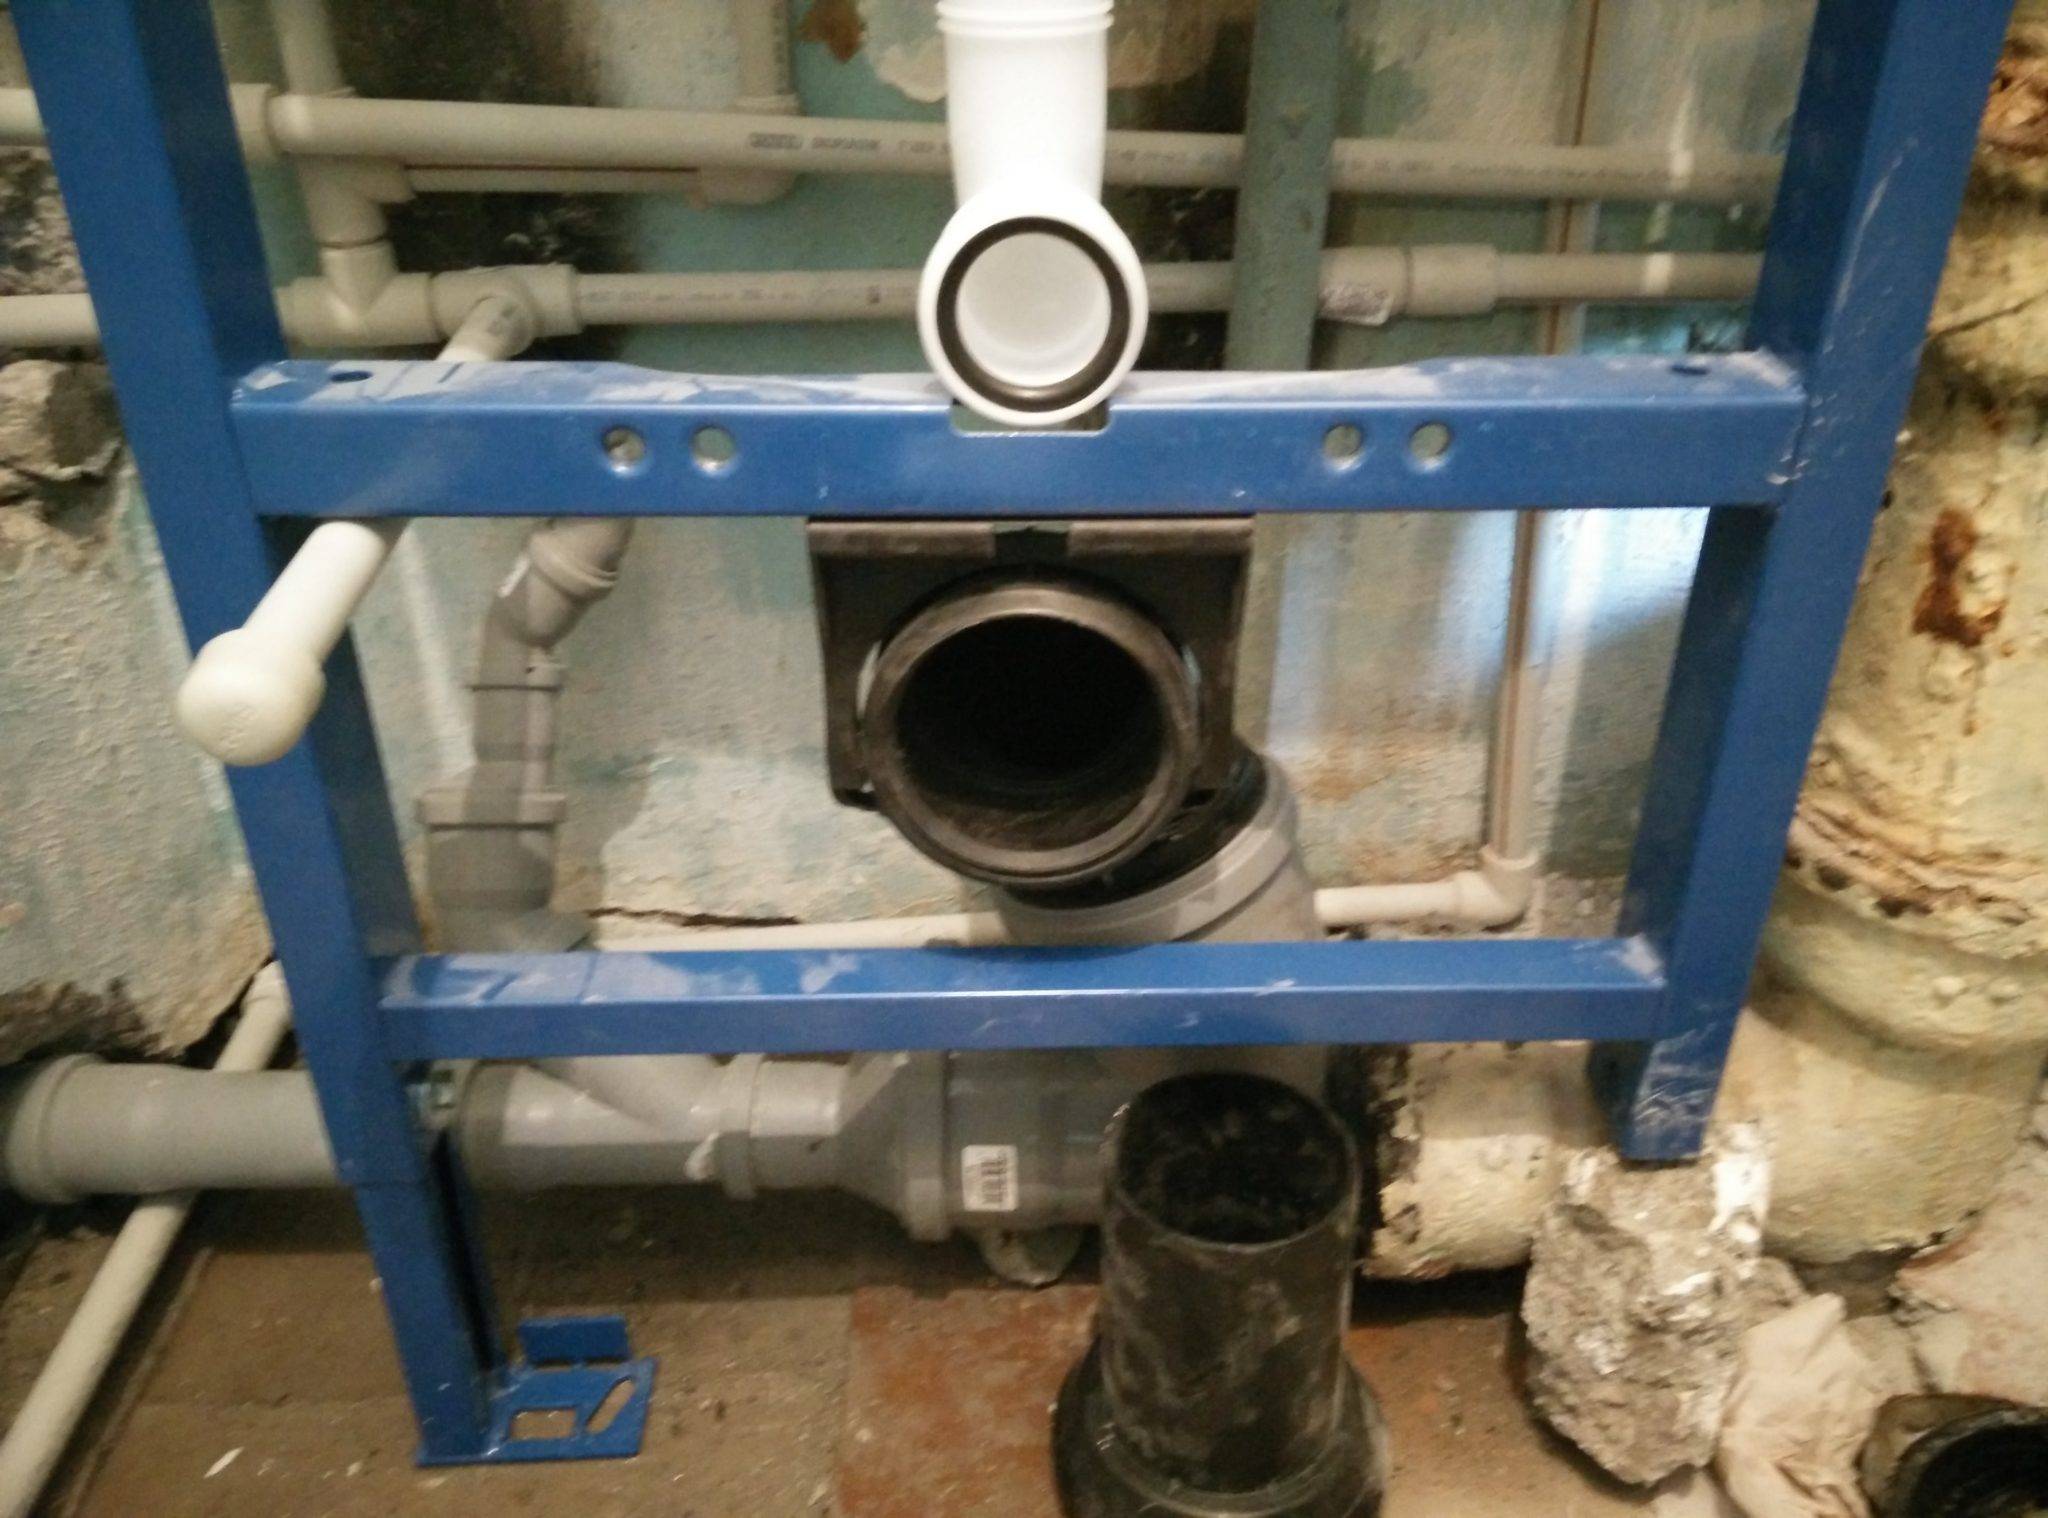
1. Fixing the metal frame. It has corresponding holes with which it is fixed to the surfaces with dowels. Two points for fixing to the floor and two to the wall. Sewer and water pipes are connected to the installation site. The installed frame must be checked for evenness using a spirit level. It is necessary to maintain exact parallelism to the wall to be installed, because even slight distortions can lead to interruptions in operation and even breakdowns. Horizontal adjustment is carried out using wall mounts that change their position.
This stage also involves setting the height of the hanging toilet. It will depend on the height of the residents, usually 0.4 m. The height of the bowl can be adjusted in the future.
2. Leading to the drain tank of water. You can use a flexible or rigid system. Professionals often use hard, because. she can last longer. Flexible hoses can also be used, but if they fail, it will not be possible to get to them and replace them quickly. During the installation of the liner, the valve valve of the tank, as well as the drain from it, must be closed.
After connecting, check the reliability of the connections. To do this, open the water supply and start filling the tank. If there are leaks, they are fixed. Water may remain in the tank.
3. Connection to the sewer.The toilet drain hole must be inserted into the outlet of the sewer pipe using the appropriate corrugation, but some models can be connected without using it. At the end of the connection, check the tightness of the system by test drains. To do this, you will need to temporarily screw the bowl to the frame. After that, remove it again, it will be installed in the final installation.


The correct connection of the sewer pipe must be performed even before the installation is started. Pipe diameter - 100 mm. It must be laid with an appropriate slope. You can read about it in the corresponding article.
4. Closing with plasterboard sheets. The installation of a wall-hung toilet must be accompanied by a decorative finish of functional elements. To finish the bathrooms, you must purchase a waterproof double drywall. It is more durable than normal. Sheets are required to be mounted to metal profiles and directly to the toilet frame. The installation instructions must contain the necessary information on the cutting method, indicating the points for cutting holes.
Sheathing can be done in two ways: over the entire wall area or only along the installation plane. The second method involves the formation of a small shelf above the bowl, which can be used to place the necessary items.
Subsequently, the installed barrier is finished with tiles or panels together with the rest of the area of \u200b\u200bthe room.
5. In conclusion, it is necessary to install the toilet on the installation, namely the bowl. It should be hung in the appropriate place using two fasteners.
6.The last, most simple step is to install the flush button. They are pneumatic and mechanical. The process is not difficult, because. everything should already be connected to the required opening in the wall. The mechanical button is installed using special pins with their subsequent adjustment. For pneumatic, you only need to connect the appropriate tubes, everything is ready.
In the process of activity, it is necessary to especially control the process of mounting the installation frame,
because the course of further installation will depend on the correctness. Figuring out how to install a toilet installation is actually not difficult. It is enough to follow the recommendations of the installation instructions, and in addition to watch the corresponding video about the process, and you will succeed.
Suspended plumbing fixtures are gradually gaining popularity, especially among owners of small bathrooms. However, not everyone likes hanging toilets - outwardly they seem unstable and unreliable. This impression is deceptive, because it is carried out using the installation system, which is hidden behind the finishing material of the wall. Let us consider in more detail the advantages of suspended plumbing objects and get acquainted with the instructions for their installation.