- Dismantling and repair
- Removing the old seat
- Problems under the shelf
- Broken plastic pieces
- Broken toilet ears and shelf
- Removing the old seat
- Features of new designs
- Installing a new cover
- Toilet lid repair how to remove the old one and fix the new one
- Choosing a new lid
- Material
- Seat shape and inserts for babies
- Removing the old seat
- Step 1: Toilet device
- Step 2: Rags and newspapers
- Step 3: Drain the Water
- Step 4: Turn off the toilet
- Step 5: Loosen the Base
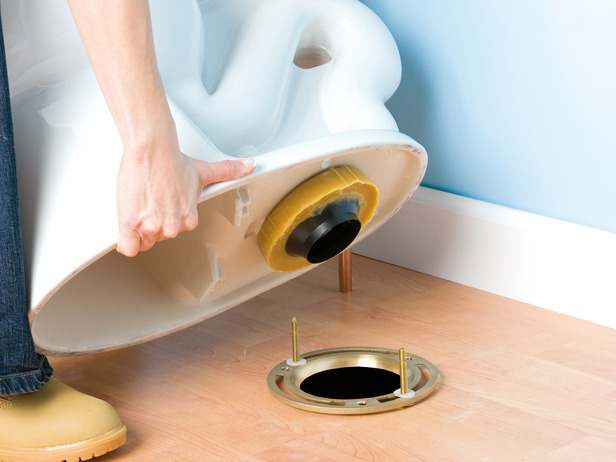
- Step 6: Installing a New Toilet
- Step 8: Attach to the floor
- Step 9: bolts, fasteners, covers
- Step 13: Place the lid on the toilet cistern
- Dismantling of the old product
- Methods for dealing with rusted steel fasteners
- Removing the old cover
- Microlift device
- Mounting options for seat cover
- First aid in case of breakdowns
Dismantling and repair
Let's look at a few typical problems of seats and fastening to them.
Removing the old seat
It may not be the trivial matter it seems.
The amount of work is determined primarily by what bolts were between the seat and the toilet.
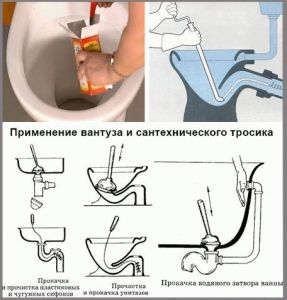
- If the seat used plastic bolts - they usually unwind without undue effort.. In extreme cases, a plastic bolt can simply be cut off with an old knife that is of little value.It is enough just to heat it red-hot over a gas stove. Do not be afraid to stain the toilet with plastic drips: it will be removed from the smooth surface of earthenware or porcelain without much effort.
- As a rule, there are no special problems with brass bolts either.. If the nut does not want to budge with little effort, drop a little kerosene or WD-40 grease containing it, which is easy to find in auto parts stores, onto the threads.
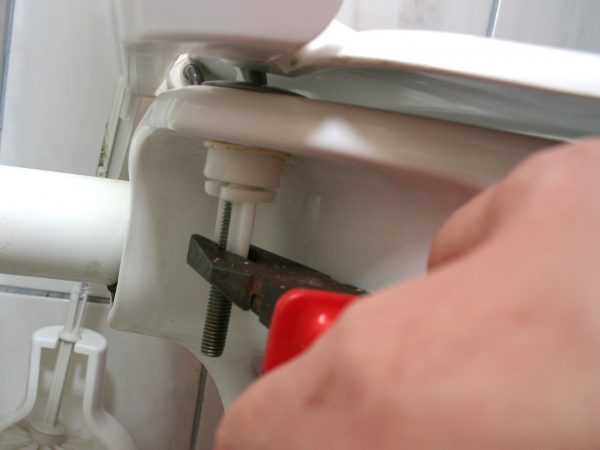
- Steel bolts are the worst. As already mentioned, it is absolutely not worth using them in a humid atmosphere of a toilet room. If they still ended up there (most often between the ears of the toilet bowl and the shelf of the tank, with the seat fasteners in the middle) - you have two ways.
You can carefully cut off the bolt head protruding upwards with a grinder with a metal disc. And you can, by inserting any object between the tank and the shelf as a wedge, cut the bolt with a hacksaw for metal or a canvas from it. The canvas will pass through the bolt, cutting the plastic fastener of the toilet seat
The canvas will pass through the bolt, cutting through the plastic fastener of the toilet seat.
Problems under the shelf
In the case of a separate shelf when replacing the seat, another problem awaits us. The shelf with the toilet is connected by a rubber cuff in the form of a truncated cone.
Replacing the seat is accompanied by displacements of the shelf, while the cuff often begins to flow.
Broken plastic pieces
Often, fasteners or seats crack or break. There can be a lot of reasons for this: someone unsuccessfully stood on the seat; a heavy object fell from above; the user of the water closet, impatiently, pulled the lid up too hard ...
The result is the same: the plastic is cracked or broken. Going for a new seat is not always desirable.
How to glue plastic?
- Acetone dissolves most plastics. It is enough to apply a little acetone to both parts of the broken part along the fracture, connect and let the material dry without displacing the connection.
- Dichloroethane works in a similar way. Not all plastics, but many. Be careful, it's toxic.
- Cyanoacrylate, which is part of a variety of superglues, also glues many plastics remarkably.
The most capricious materials - polyethylene and polypropylene - are not glued, but welded together. It is enough to slightly melt the edges and connect them. After hardening, the plastic squeezed out along the edges of the seam is carefully polished, after which the connection becomes almost invisible.
Broken toilet ears and shelf
If the entire weight of the tank falls on the mount for the toilet seat, without any additional props, sooner or later the consequences will not be avoided. It is enough to lean on the tank with your back, sitting on the toilet, or accidentally push it - and now the toilet is decorated with a broken eye. The alternative is a broken shelf.
Forget about all imported universal adhesives: the good old epoxy resin, a two-component adhesive from the resin itself and a hardener, will help us out.
- We clean the chipped surface from crumbs, dust and other debris. First of all, this applies to situations where a significant time has passed since the appearance of the defect.
- Completely dry the surface of the future gluing site. There should be no moisture at all.
- Degrease with acetone or gasoline. Of course, except for those cases when the chip is completely fresh.
- With a match, mix a small amount of resin and hardener in a sacrificed container. It is better to choose an unnecessary dish - it will not be washed off. Even a matchbox will do.
- Apply epoxy glue to both surfaces and press them together. The extruded resin is immediately removed; we fix the connection in any way - with a spacer, rubber band or tape.
- After the resin has hardened, put the tank with a shelf and the seat with a lid in place. Lastly, we mount the fasteners for the toilet lid - it will pull the shelf, seat and toilet together. Do not forget to prop up the tank so that the tragedy does not happen again.
Epoxy is the best toilet glue.
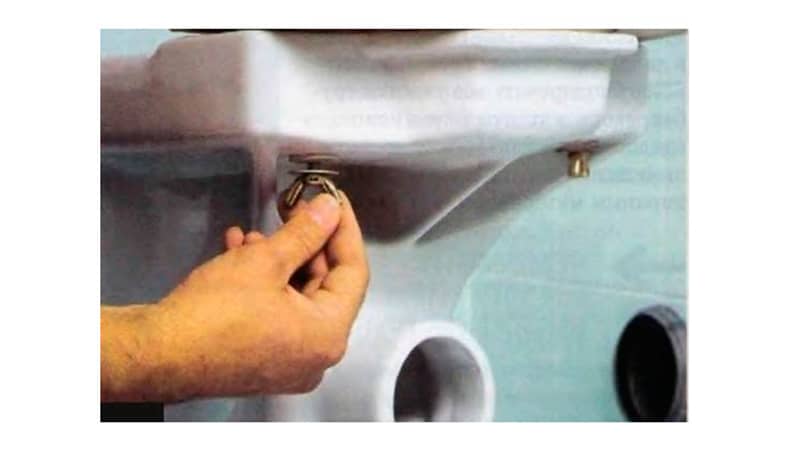
Removing the old seat
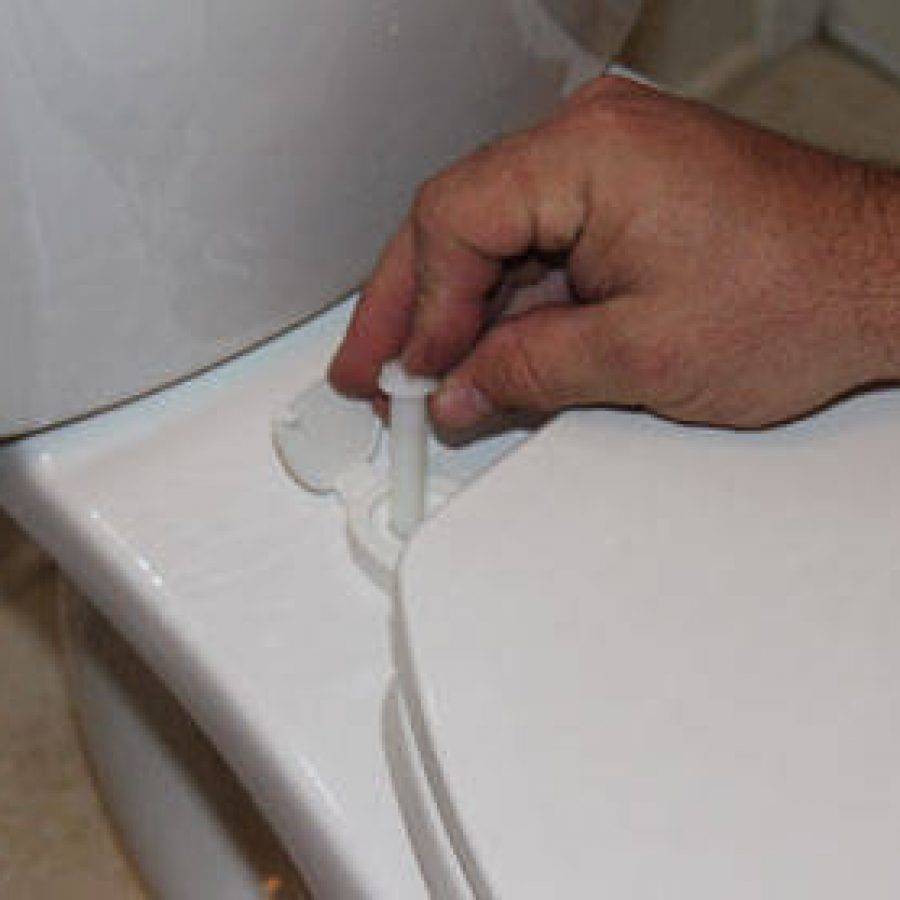
Before removing the old seat, you need to prepare the necessary tools. The degree of complexity of the work will depend on the material of the bolts. If they plastic
, then you can simply cut them off with some old knife, previously heated on fire. Even if melted plastic gets on the toilet, there will be no particular problems with its removal.
Breakage of cover fasteners is the most common cause of repair
We tried to tell all the secrets in our review.
brass
the bolts can also be removed fairly quickly. If the nut on them does not give in even with a little effort, moisten the thread with a drop of kerosene or kerosene grease (from an auto shop).
Harder to deal with steel
bolts. High humidity in the restroom can negatively affect them - rusty, they are difficult to physically attack. You can remove them using one of two methods.
- Carefully cutting off the heads with a grinder for metal.
- Sawed with a hacksaw for metal, after placing plywood or thick paper under the cut so as not to touch the toilet itself.
Features of new designs
The most popular type of such products are the "Compact" toilet bowls, in which the tank is located directly on the shelf of the bowl.Previously, there were only two plumbing control mechanisms: a ball (handle) connected to a pear using a retractable rod, or a lever that was located on the side surface of the tank.


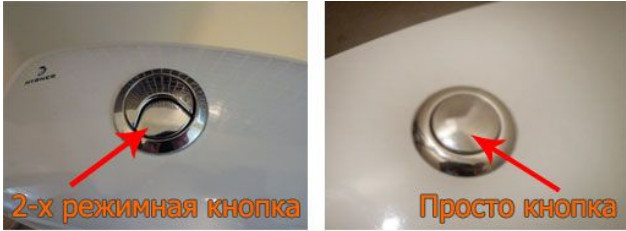
Dismantling the design of the old model was an elementary matter: it was only necessary to unscrew the cap from the stem. After this operation, you can easily remove the cover. Now almost all existing models have a different type of instrument control: These are the most convenient buttons. Tanks can be equipped with:
- one button, which provides for the discharge of the entire volume of water at once;
- two buttons, or one key, but divided into two independent parts.
The first toilet bowls are relatively simple, but their main drawback is the irrational use of water. The second option is much more complicated, but it has an undeniable advantage over single-button models. Such designs are distinguished by a more complex control system, but they guarantee a quick payback for the toilet, because they allow the use of plumbing in two modes - in normal and economical.
- If one button is pressed, then the water is completely drained from the tank.
- When the second is pressed, only part of the water is poured out. As a rule, this is half the volume.
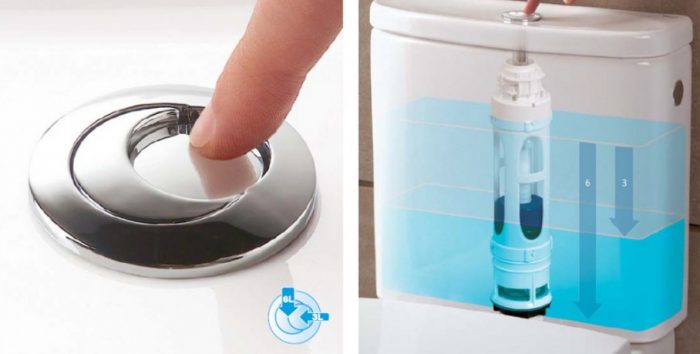
Thus, a dual-mode unit makes it possible to save a certain amount of water, and this is important. High fluid consumption for household needs is a problem that is growing along with utility bills
Two-button models allow you to achieve significant savings.
There is another variety that does not differ in great ease of use. These are tanks that have two modes, but only one key. Dosing of liquid in them is provided by different duration or intensity of pressing the button when it is required to drain the water.
Installing a new cover
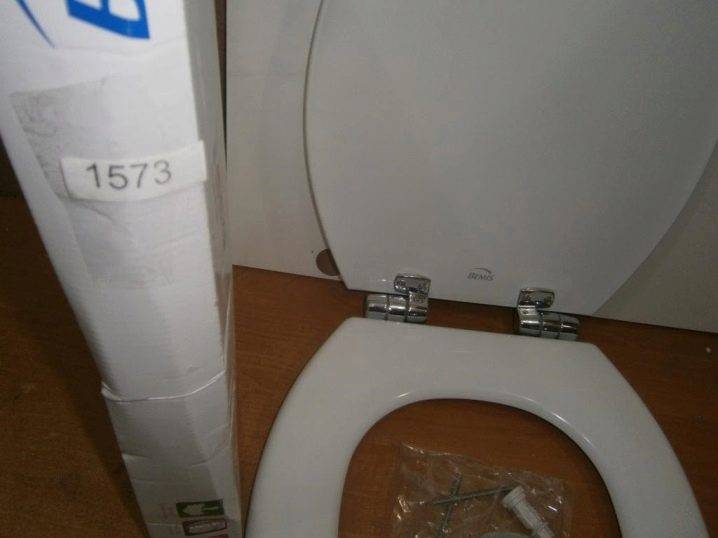
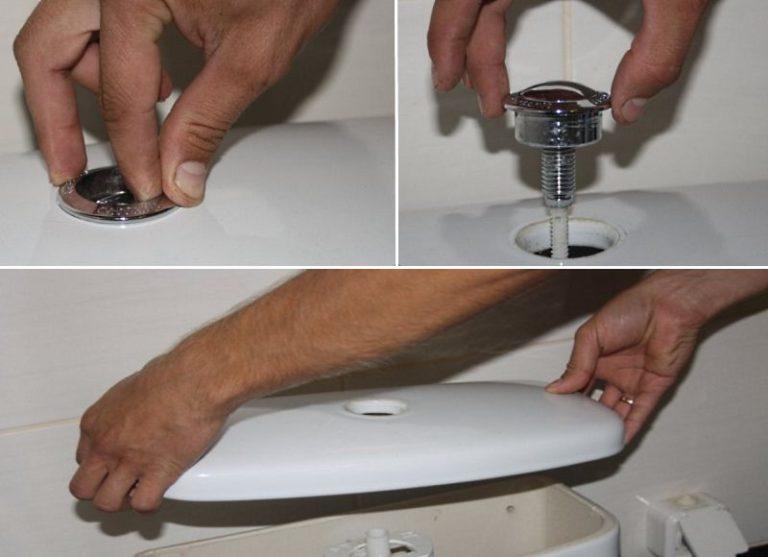
Each type of toilet seat has its own installation features. Even a teenager can easily cope with a simple plastic toilet seat. If you bought an expensive seat with high-quality fasteners, do not neglect the familiarity with the instructions.
General recommendation for seat covers of all types: before installing a new cover, thoroughly clean and dry the surface of the toilet bowl and mounting holes
This is important not only from the point of view of hygiene, but also for a snug fit of the mounts.
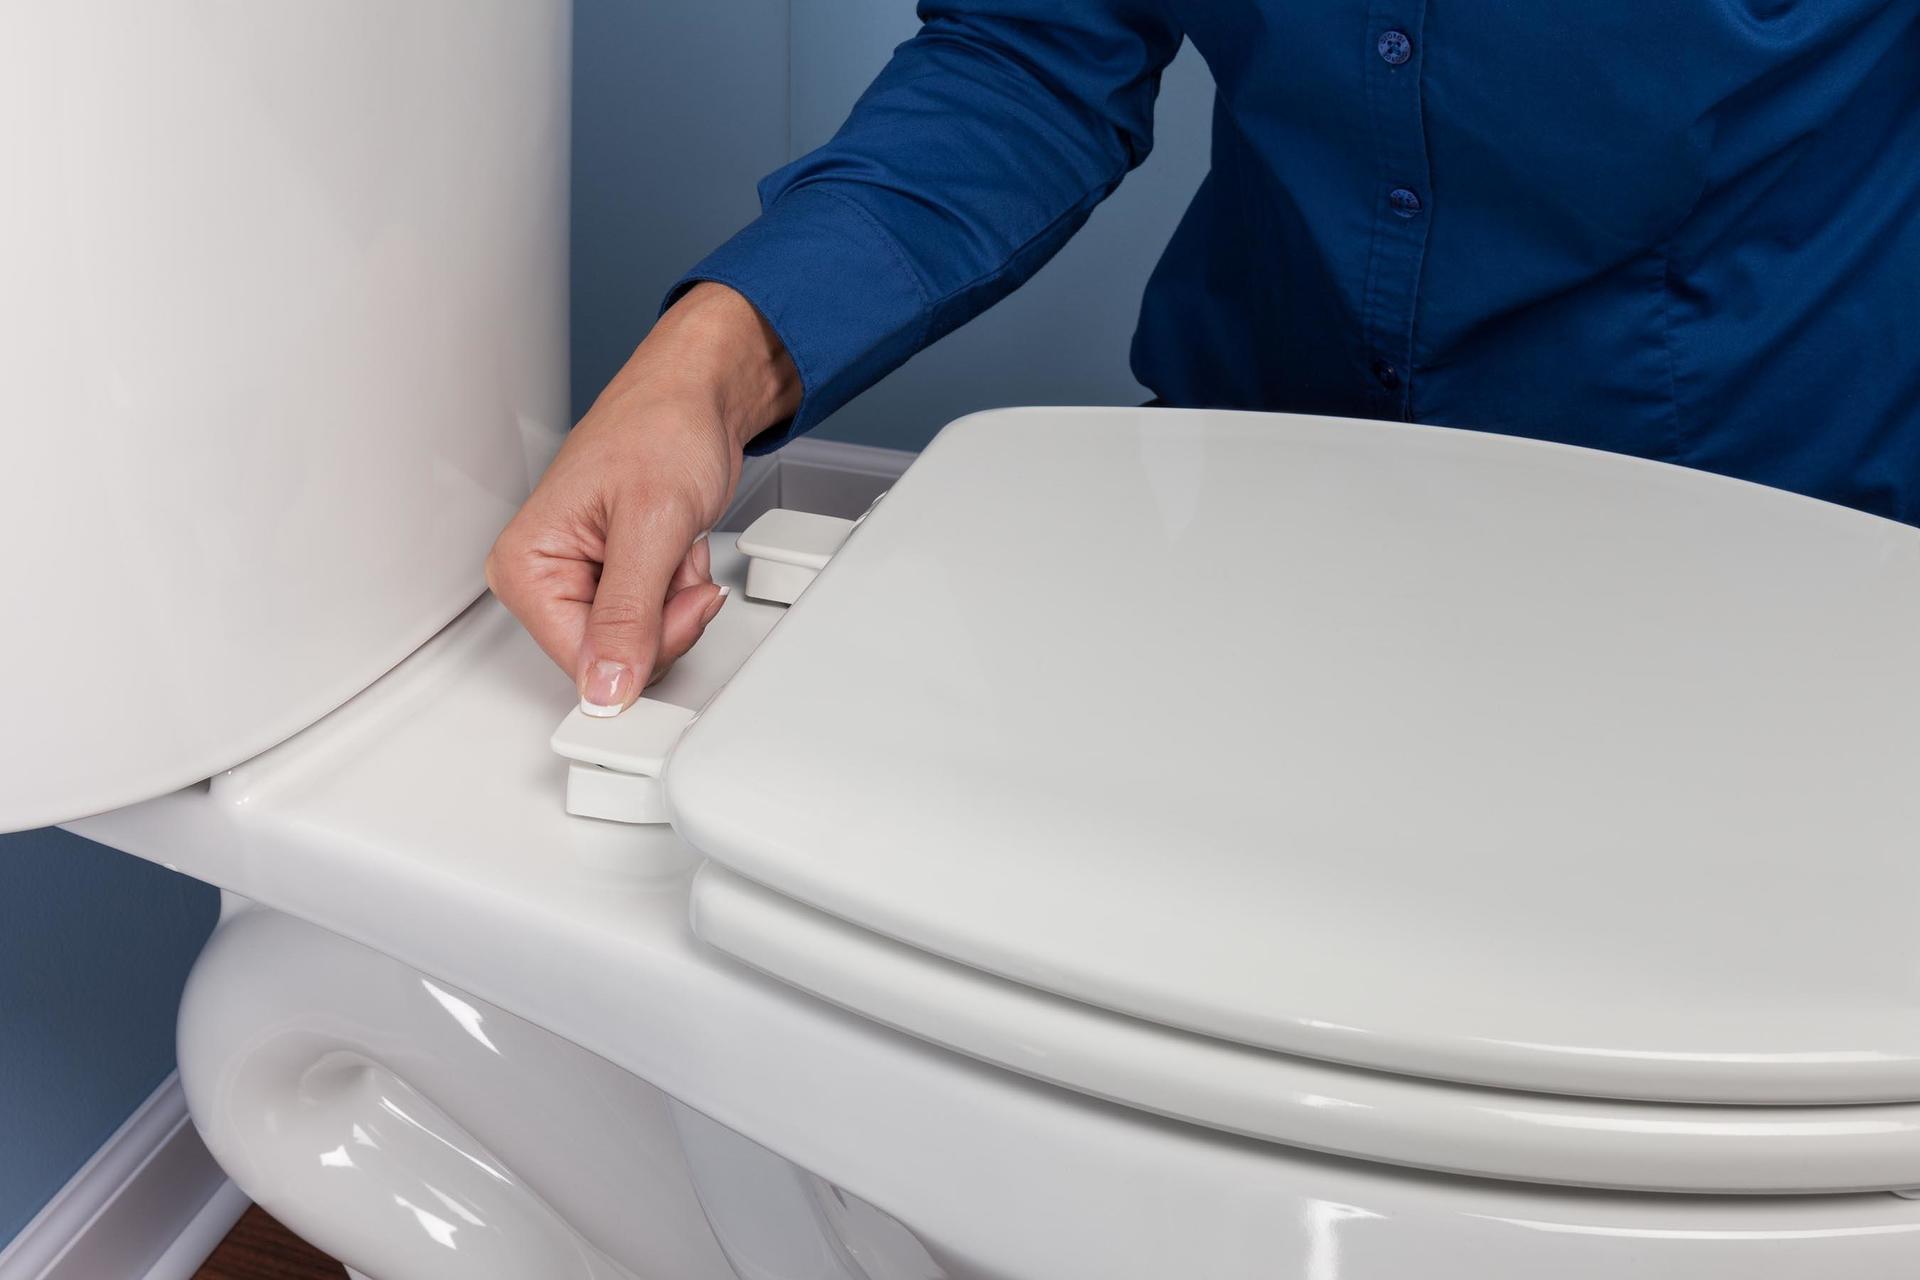
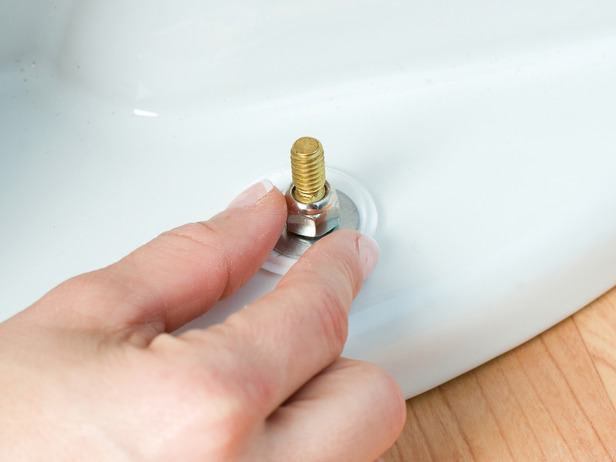
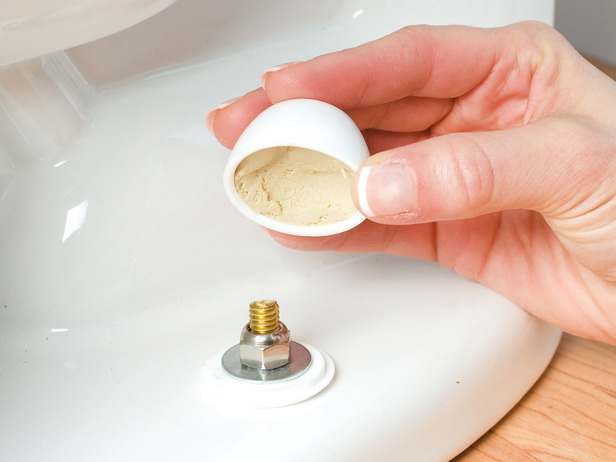
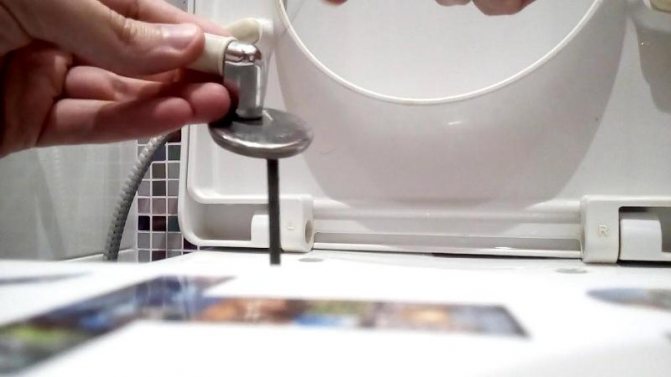
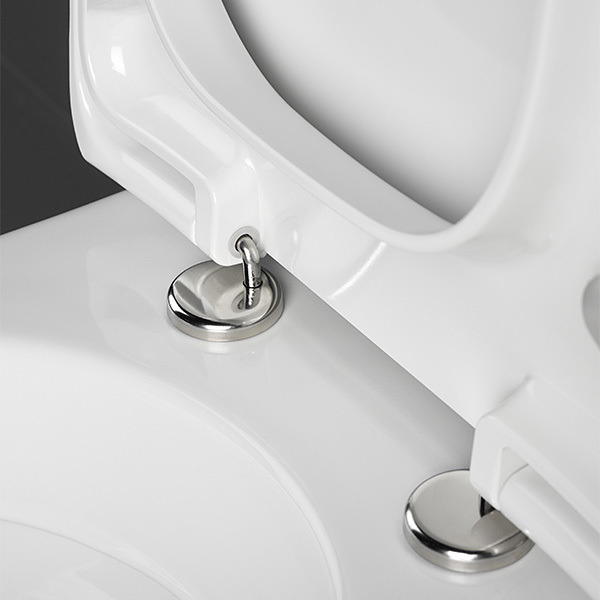
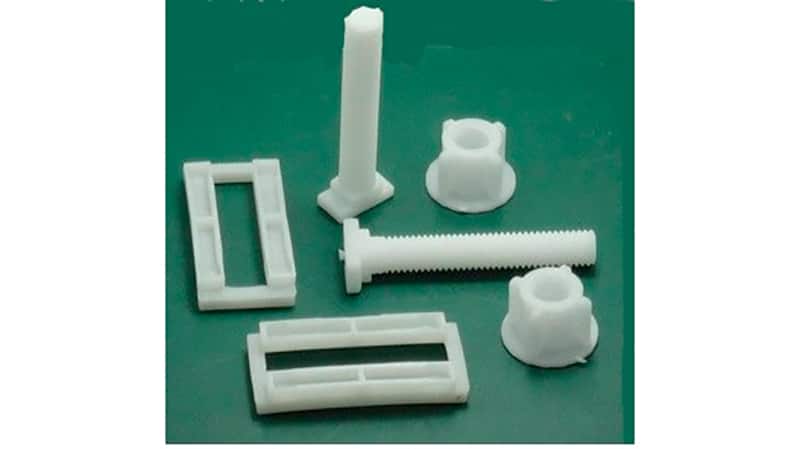
Inexpensive seat covers use simple fasteners: a bolt and a nut. To fix the lid, you just need to put it in place, align the mounting holes on the lid and the mounting holes on the toilet, insert the bolts. We fix the fasteners with nuts from below.
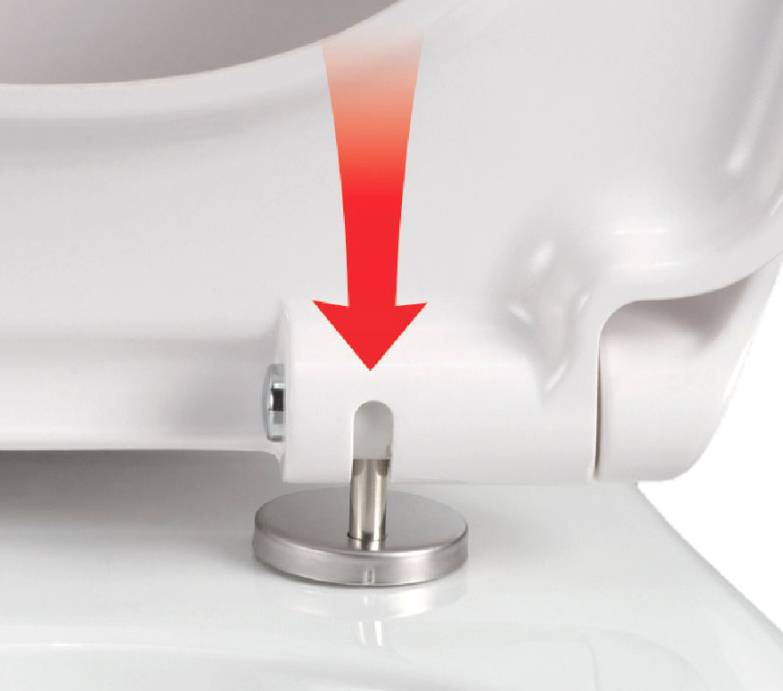
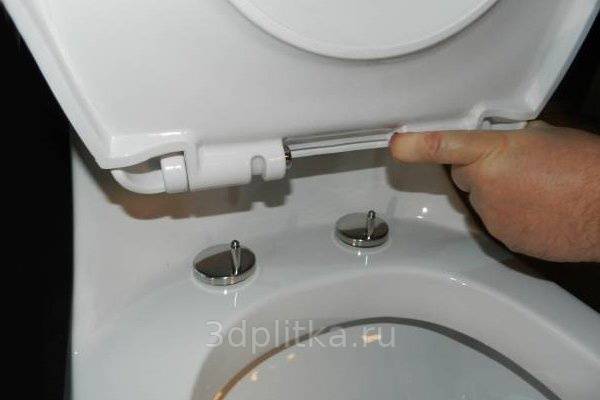
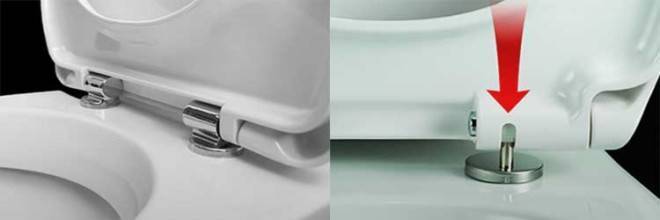
For modern toilets, seats are produced with more complex fasteners with adjusting cups. Such fasteners hold the seat tightly, evenly and do not allow it to loosen for a long time. They are usually equipped with seats with a microlift.
Fixing the cover in this case happens like this:
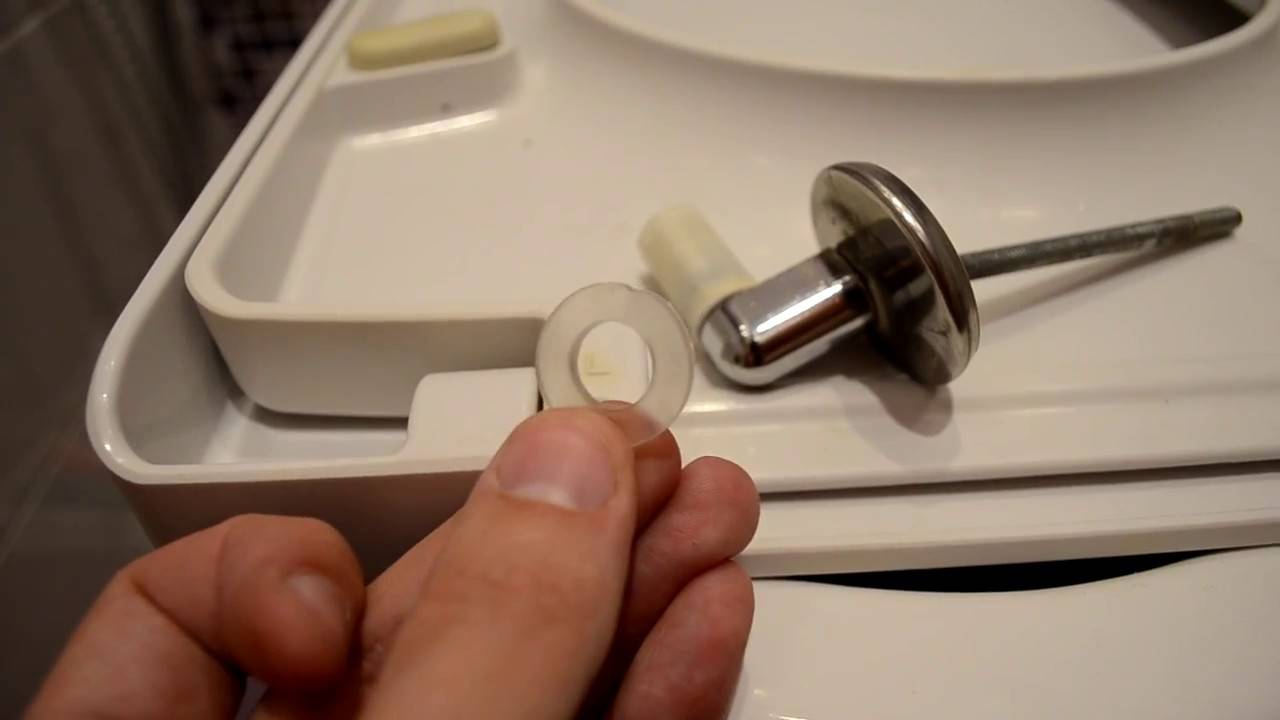
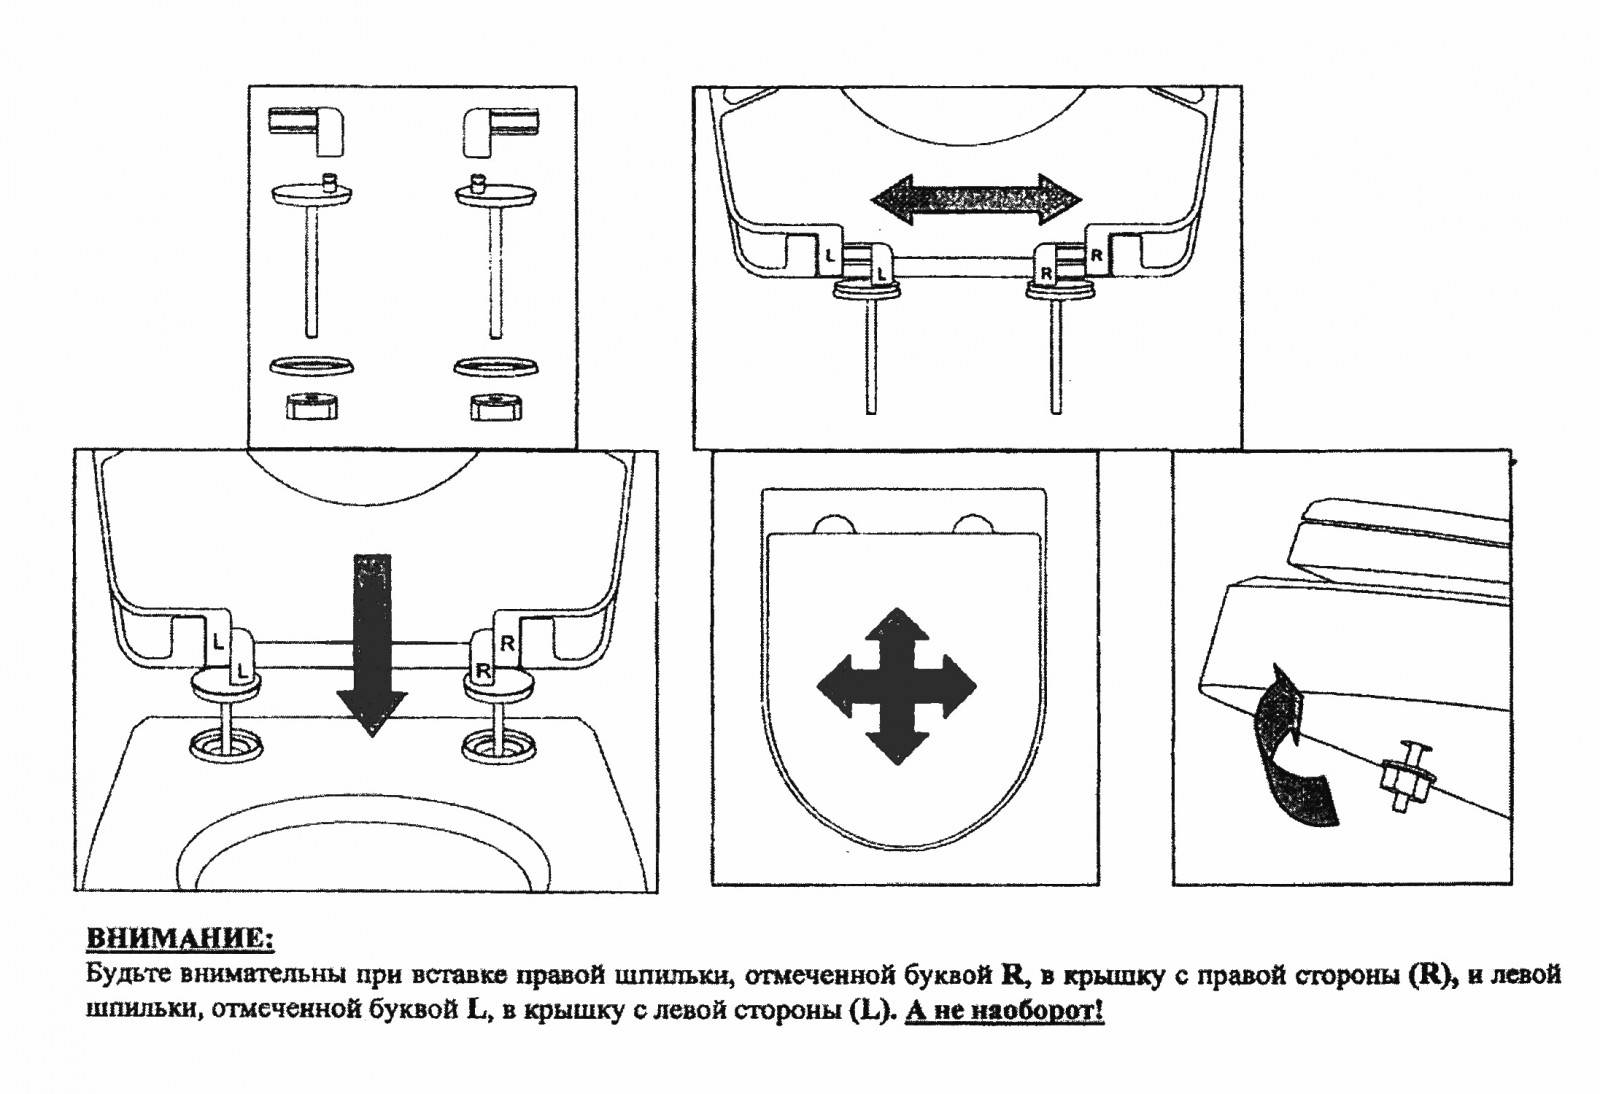
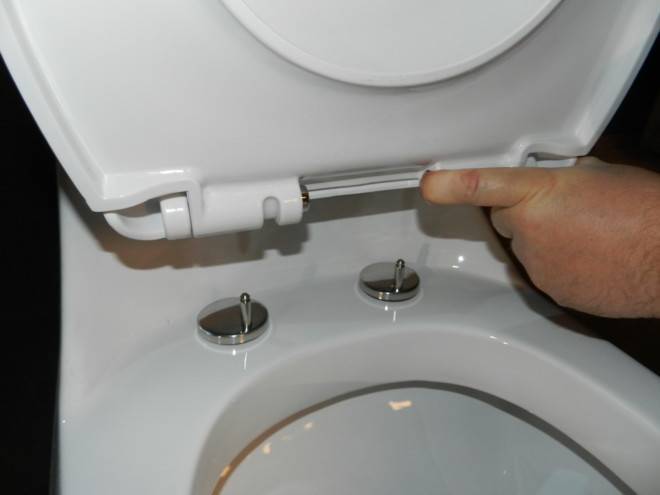
L-shaped threaded pins with a short part are inserted into special holes on the toilet lid.
Adjusting cups are screwed onto the long part of the pins, and gaskets under them
It is important not to confuse the right and left parts!
The pins are inserted into the holes on the toilet.
Seals and nuts are strung on the pins from below.
The lid is pressed against the toilet and its position is leveled.
Tighten the nuts to the end and fix the structure .. You can also buy quick-release seat covers in stores
In this case, special mounting pads with pins are screwed directly onto the toilet bowl. The seat itself is fixed on the pins and removed from them using the click-clack system.
In stores, you can also buy quick-release seat covers. In this case, special mounting pads with pins are screwed directly onto the toilet bowl. The seat itself is fixed on the pins and removed from them using the click-clack system.
Plumbing manufacturers recommend carefully aligning the position of the installation sites under the seat cover. Otherwise, the cover will lie crooked. If the product is equipped with a microlift, incorrect installation may damage the device.
Toilet lid repair how to remove the old one and fix the new one
Repair plumbing, as a rule, does not bring much trouble. Of the frequent breakdowns, there is a leakage of the tank, damage to the fasteners or the seat itself.
In the first case, you can tinker a little with it yourself and fix the situation. In others, you will need a new seat with a cover. Repairing the old, most often, will not work. Therefore, it would be better to go to the store.
But before visiting the store, you need to decide on the material and shape of the seat.
Choosing a new lid
You can pick up a toilet lid without any problems. Moreover, not only classic models are available, but also versions with additional options: an intestinal gas analyzer, a microlift or the possibility of heating.
Modern toilet lids can be equipped with additional features
There are even seats with a built-in radio tuner and acoustic system to improve the psychological mood of the client. Sometimes a manufacturer builds a speaker into the toilet lid that makes the sound of flowing water to improve the process of emptying the bladder.


Material
The material can also be selected from various options:
- Plastic. Seats of this type rest on bottom ribs with rubber or plastic inserts. Their advantage is low price, the disadvantage is low strength.
- Duroplast. This material is a more durable type of plastic, and looks like ceramic. Of the advantages of it should be noted bacteriological and acid resistance and a pleasant appearance. A conditional disadvantage is a higher cost than plastic.
- Plywood. This type of seat, rather, greetings from the past. True, sometimes they can be found in the store, but now you can use them, except perhaps in the country. Their advantage is an extremely low price, but the disadvantage - unpresentability - significantly limits their use in apartments and cottages.
Soft pads on the toilet lid
Plastic with foam. The seat is upholstered in various fabrics. The advantages are in its comfort, and the disadvantages are in its fragility.
Wood and wood materials. The quality of such seats depends on the manufacturer. Their advantages are in possible interesting forms of covers and seats, the disadvantage is a lot of weight.
Seat shape and inserts for babies
In addition to the material, the shape of the seat also plays an important role: for example, for a square toilet, a round seat will not only be illogical, but also uncomfortable.
In order not to miscalculate with the shape of the seat and lid, you can take a picture of your toilet on a mobile phone, measure and record its overall data and the distance between the fixing bolts on the toilet.
This distance must match the one on the purchased cover, otherwise the installation will fail.
Our review of which toilet is better to choose - read in a separate article.
Most of the lids offered in the store have a semi-oval shape. Rectangular models are much smaller; their corners are rounded so that the client does not get hurt during use. For those who want to create a positive atmosphere in the restroom, you can pick up original covers with ducks, frogs or flowers, in the form of folk instruments (guitars or domras).
Pad for small children and a seat with a step
If there are small children in the family, for whom the pots are already small, and the toilets are still large, you can look at a special seat with an insert for babies.
pay attention to bidet toilet attachments
Removing the old seat
Before removing the old seat, you need to prepare the necessary tools. The degree of complexity of the work will depend on the material of the bolts. If they are plastic, then you can simply cut them off with some old knife, previously heated on fire. Even if melted plastic gets on the toilet, there will be no particular problems with its removal.
Breakage of cover fasteners is the most common cause of repair
We tried to tell all the secrets of repairing a toilet bowl with our own hands in our review.
Brass bolts can also be removed fairly quickly.If the nut on them does not give in even with a little effort, moisten the thread with a drop of kerosene or kerosene grease (from an auto shop).
Harder to handle with steel bolts. High humidity in the restroom can negatively affect them - rusty, they are difficult to physically attack. You can remove them using one of two methods.
- Carefully cutting off the heads with a grinder for metal.
- Sawed with a hacksaw for metal, after placing plywood or thick paper under the cut so as not to touch the toilet itself.
Step 1: Toilet device
The standard version of the toilet, where the tank is located in the back, is popular because it is compact and easy to install.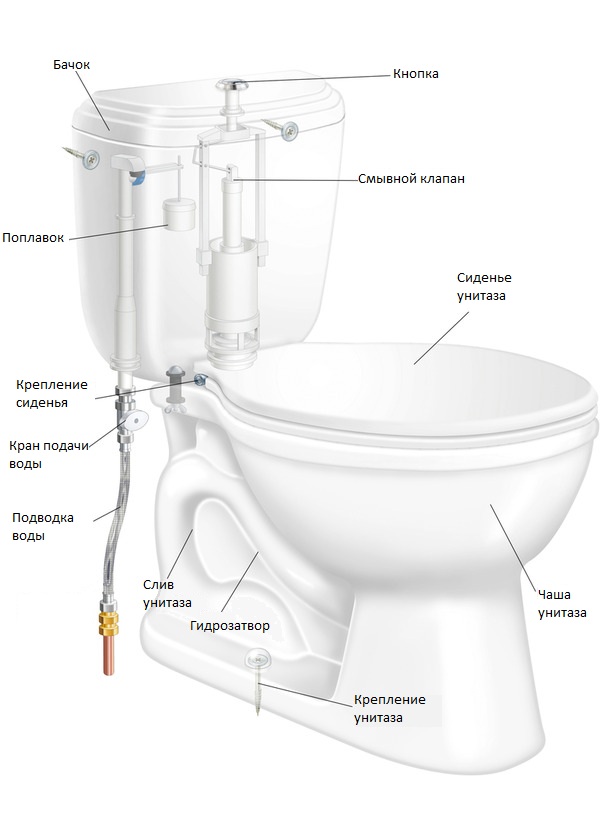
Step 2: Rags and newspapers
Before you start collecting the necessary equipment. You will need newspapers or old towels to install the toilet after you remove the old one. A dropped toilet can damage floor tiles. Also, make sure the new toilet will fit in place of the old one. Some new models are larger than traditional designs and may not fit in the room.
Step 3: Drain the Water
Turn off the water supply to the toilet. After the water supply is turned off, flush the toilet several times. Flush all the water from the tank and from the toilet bowl. If you leave water in an old toilet, it may leak out when you carry it through your house.
Step 4: Turn off the toilet
Remove the nuts that secure the toilet to the water line. Then remove the covers covering the bolts on the toilet. Unscrew the nuts located under the covers.


Step 5: Loosen the Base
Use a knife to loosen the base and then rock the toilet from side to side.Raise the toilet and place it on old towels or newspapers. Remove the sealant with a spatula or similar tool. Cover the sewer pipe with a rag to prevent odor leakage.

Step 6: Installing a New Toilet
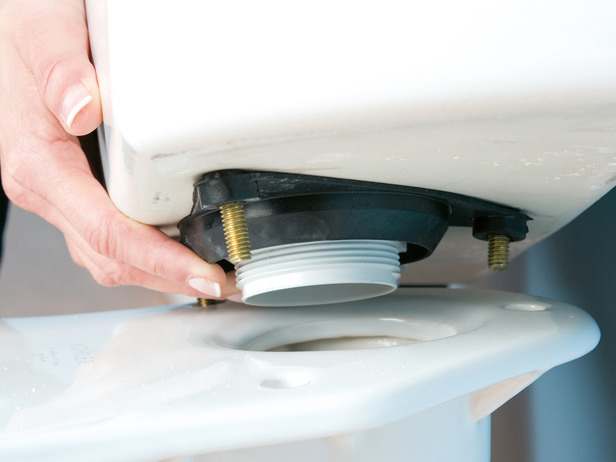
Insert a new gasket at the outlet of the new bowl. The tapered side faces away from the bowl. Double check that the toilet flange is tight and not corroded. In the toilet, the flange helps to seal the toilet and the sewer.
Apply sealant to the toilet drain. Remove the rag from the drainpipe. Lower the toilet bowl onto the pipe.
Step 8: Attach to the floor
Carefully tighten the washers and nuts onto the bolts. But do not overdo it, if you tighten it too much, the porcelain may crack.
Step 9: bolts, fasteners, covers
If the toilet is not firmly on the floor, use gaskets. Fill the decorative caps with tap water putty and install in place.
Screw the mounting bolts to the tank. Place the tank over the bowl and gently lower it into place.
Fasten the nuts and washers to secure the bowl to the tank. Make sure the tank is level.
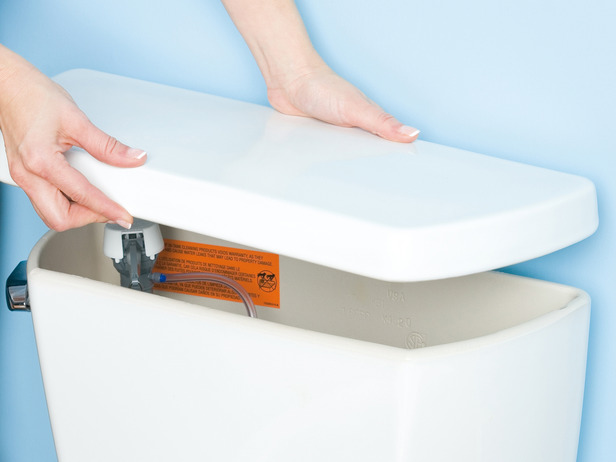
Step 13: Place the lid on the toilet cistern
When the tank is level and secured, install the cover on top of the tank. Do not seal the joint between the lid and the tank.
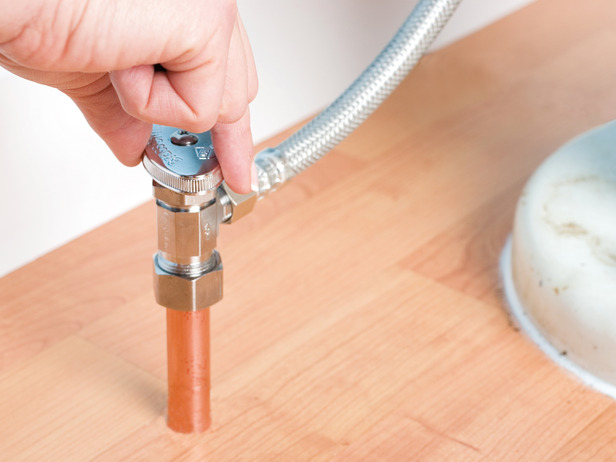
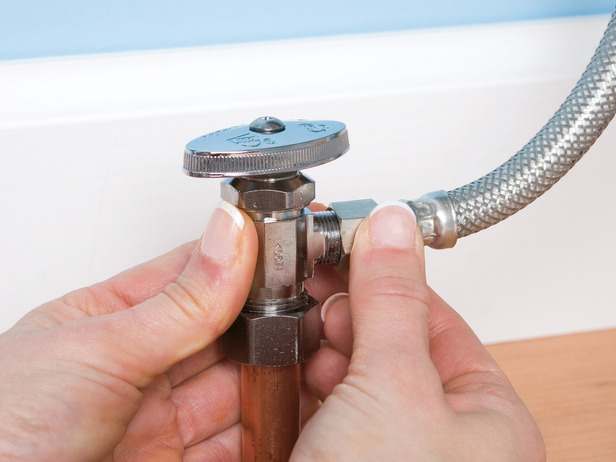
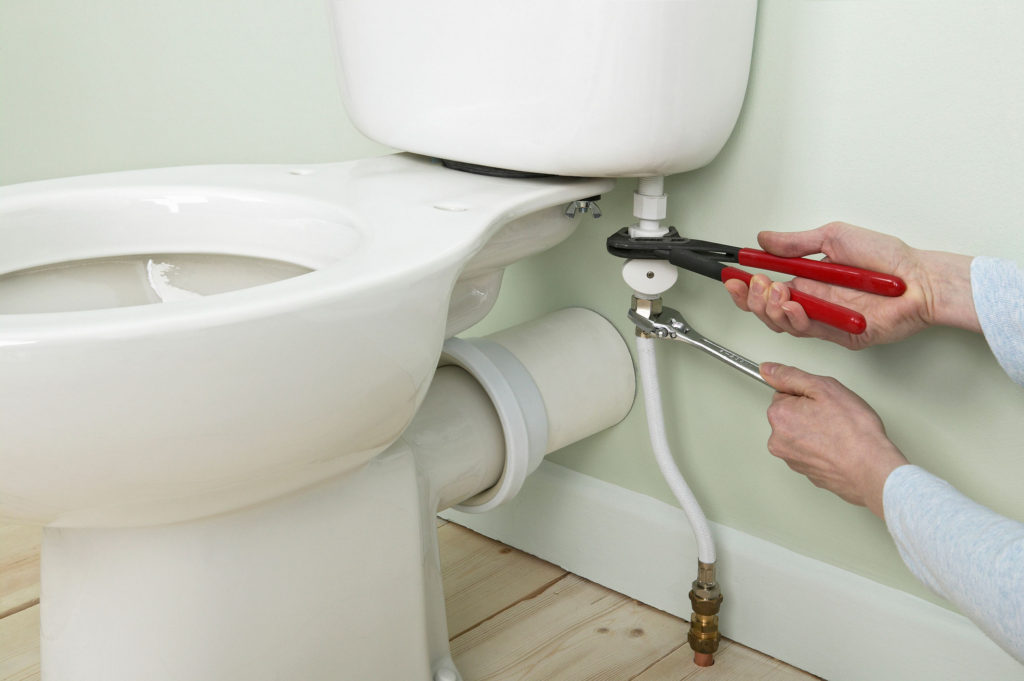
Connect the water supply hose to the tank.
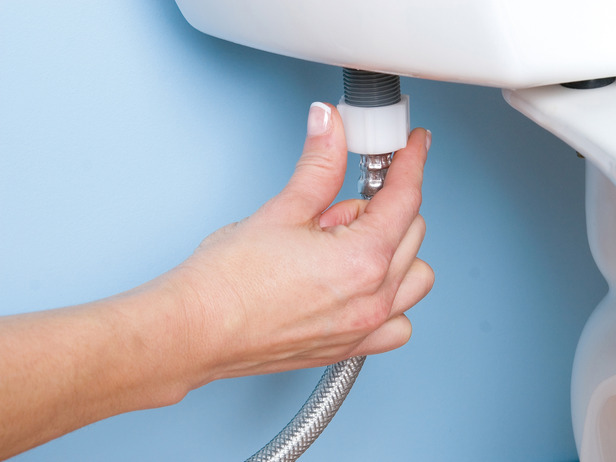
To complete the toilet connection, tighten the nuts on the hose and turn on the faucet.
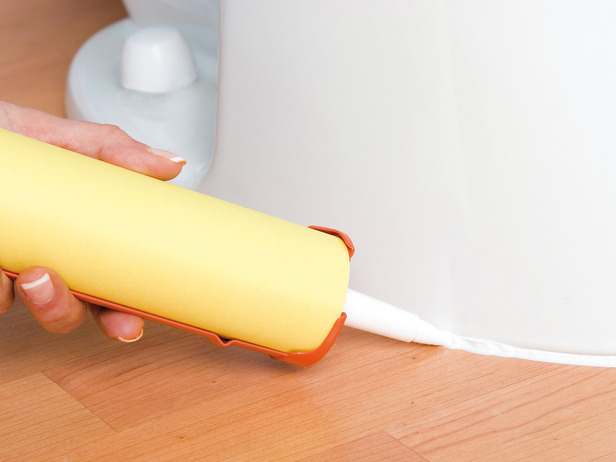
The joint between the toilet and the floor must be smeared with sealant.
Dismantling of the old product
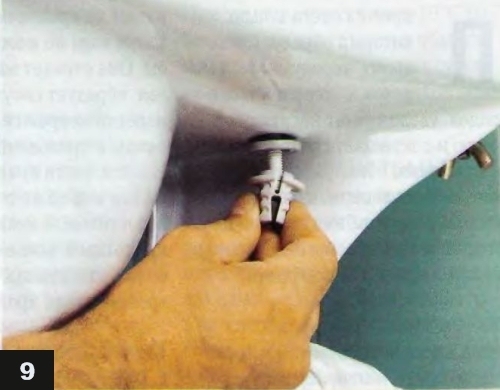
There is nothing particularly difficult in the process of removing the toilet lid, however, in some cases, real problems arise. It all depends on which toilet lid mount was previously installed:
- Plastic is removed very easily, usually the bolts do not "resist" and are easily unscrewed. But if the product has been used for a long time and is dirty in order, effort may be required. In the case when plastic bolts do not want to be removed, they can simply be cut off with a hot knife blade. There is no need to be afraid that the molten material will stain the toilet bowl: after hardening, plastic is easily eliminated from ceramics / faience.
- Brass also does not cause problems when replacing the cover, but if any bolt decides to “be capricious”, it will not be difficult to calm him down with the help of ordinary kerosene.
- Steel often just becomes a source of problems. Fasteners made of this material are generally not recommended to be installed in places with high humidity, as excessive moisture provokes the formation of rust. But, if, nevertheless, such an incident occurred, there are several ways to correct the situation.
Methods for dealing with rusted steel fasteners
When the bolts are so soldered to the body that it is not clear how to remove the seat from the toilet without brute physical force and damage to the entire structure, you need to go for a trick. First of all, you will have to go to the store to purchase a special lubricant that tends to penetrate into the gaps between materials and freeze rust. This effect works very simply - old pieces of deposits begin to crack and release the bolts. To achieve an even greater result, it is recommended, after thorough lubrication, to wrap the problem area with a cloth for 15 minutes, and then try to unscrew the bolts.


 Plastic fixing toilet lid
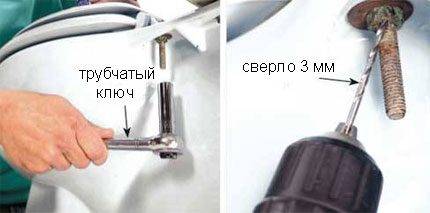
If the steel bolts are so "grown" into the product that they are not taken by the penetrating compound, you can resort to using an ordinary electric drill with several drills. To begin with, using a ¼ inch drill, you need to drill around the circumference of the junction of the nut with the bolt. The main thing with this manipulation is slowness and accuracy, since in a hurry it is easy to hurt and damage the rest of the structure.
Then you need to change the drill to 1/16-inch and continue "drilling". And then, with the help of a socket wrench, it is necessary not only to unscrew the bolt, but to loosen it in the grooves. This procedure may take some time, but in the end, the design will give in.
If there is a choice of fasteners, then it is best to buy plastic products. They are not only easy to install and turn out without the participation of any special tools, but also simply removed even when dirty. Steel structures complicate the process of dismantling the toilet lid many times, so it is better not to purchase them for the needs of the bathroom.
Removing the old cover
Before installing a new seat on the toilet, you must remove the old one. This process is done like this:
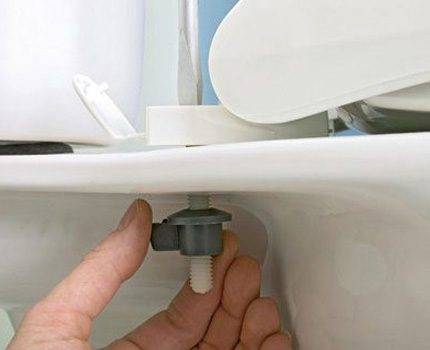
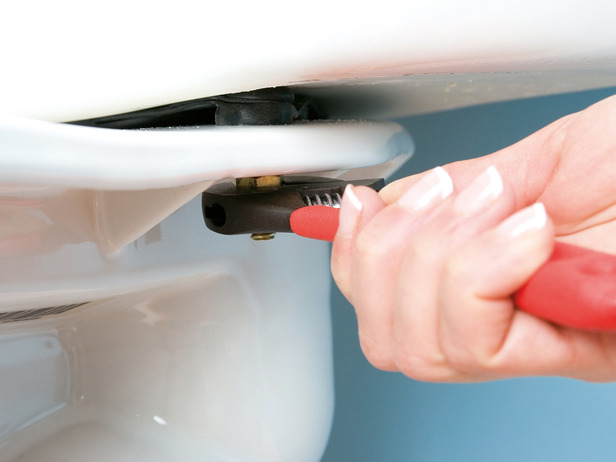
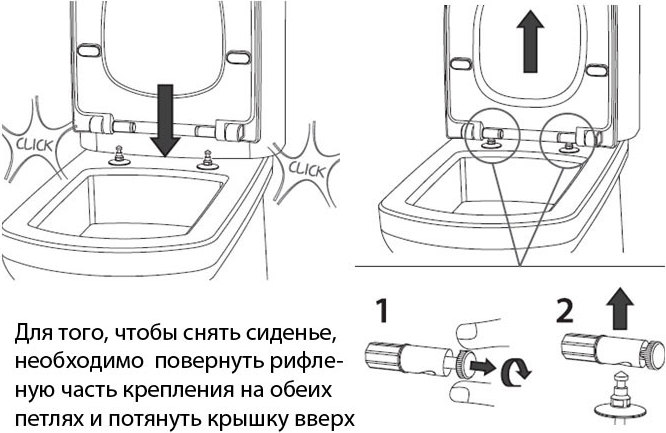
- Raise the toilet lid, lower the toilet seat.
- Find the nut on the left under the rear edge of the toilet bowl and unscrew it.
- Carry out the same procedure on the other side.
- Remove the toilet seat with cover.
If the nut is made of plastic, then it will not be difficult to unscrew it by hand. Such fittings must not be overtightened, because the plastic bolt may break due to a strong constriction.
Problems with removing the old cover can arise in a situation where plumbing has not been changed for many years. Steel bolts and nuts are susceptible to corrosion. Due to the presence water in the sump the air in the room is too humid, which contributes to the rusting of the thread. If twisting the nut is not possible even with a wrench, then you will have to resort to other methods.
An electric drill is filled with a drill with a slightly smaller diameter than the wall of the nut. After drilling the nut from its lower to the upper edge, a metal rod is inserted into the hole. It is gently swayed, trying to "break" the nut.
If the plastic fittings are damaged, then it will not be possible to easily remove the cover either. But even here there is a way out: the nuts can be cut with a knife, the blade of which is heated to 120-130 degrees.
Part of the fasteners can be made of brass and bronze, which can oxidize. Wetting such connections will help to wet them with machine oil. It is convenient to carry out with a disposable plastic syringe.
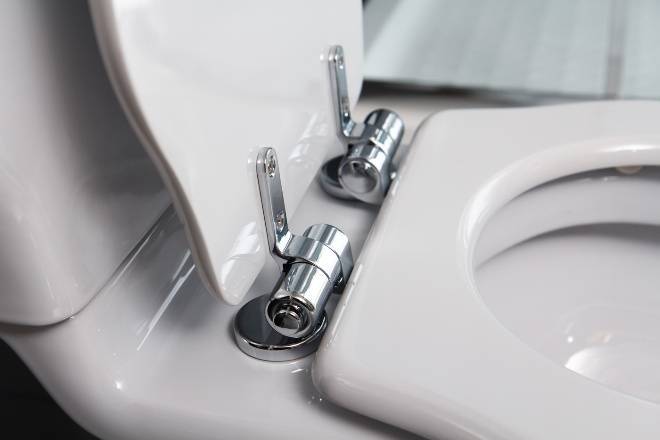
Microlift device
Plumbing manufacturers are improving their models. There is a mechanism for lowering the lid called a microlift. It lies in the fact that the toilet closes on its own.
You need to fix the structure in much the same way as a regular model. The differences are in the hinge mechanism. If the cover has to be replaced, it will be useful to study the operation of the device.
Details that make up the microlift:
- cylinder;
- stock;
- piston;
- spring.

Breakdowns are usually associated with a malfunction of one of the listed parts. It is difficult to make repairs without experience, although sometimes the problem is hidden in the lack of the right amount of lubricant on the surface of the piston cylinders. This is due to improper operation of the mechanism, when a person tries to close the lid by force.
The design should be disassembled, try to evenly distribute the lubricant over the entire area of \u200b\u200bthe cylinder. Some owners decide to purchase a new seat cover. There are those who find a microlift system for a specific model.
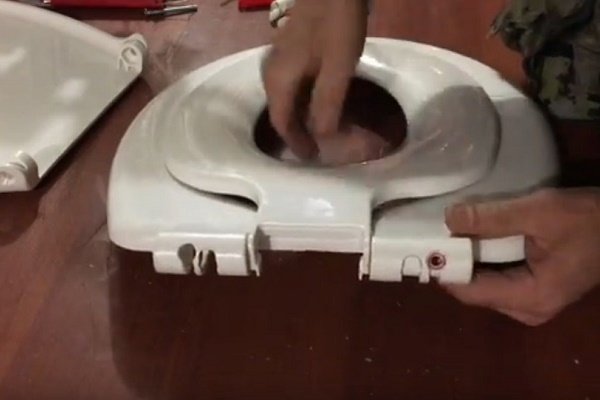
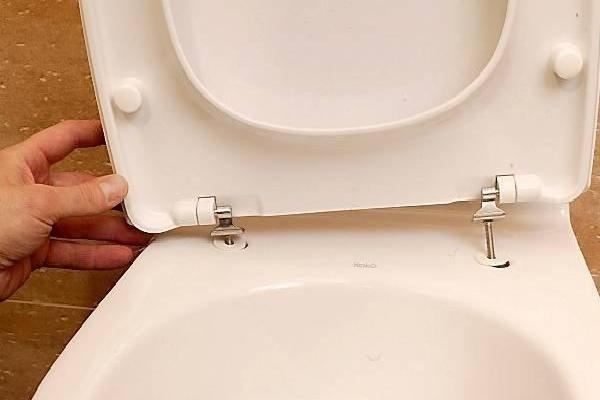
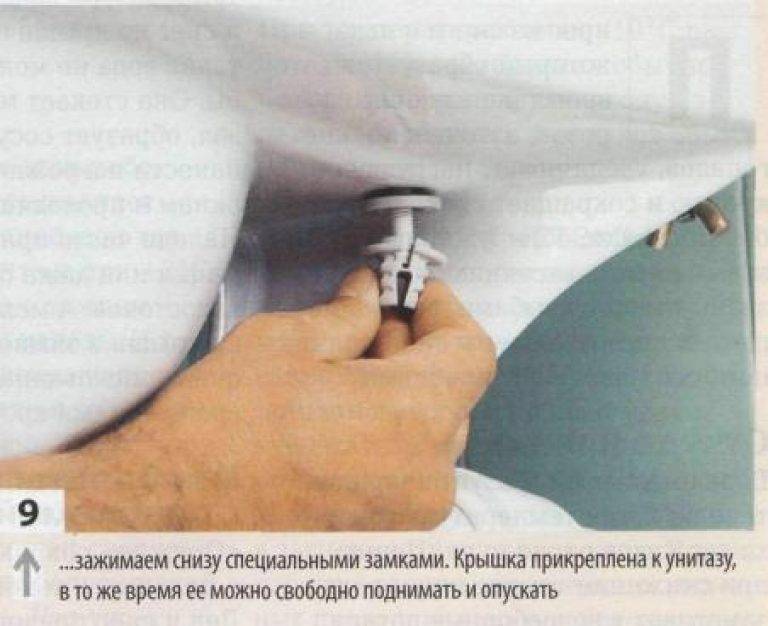
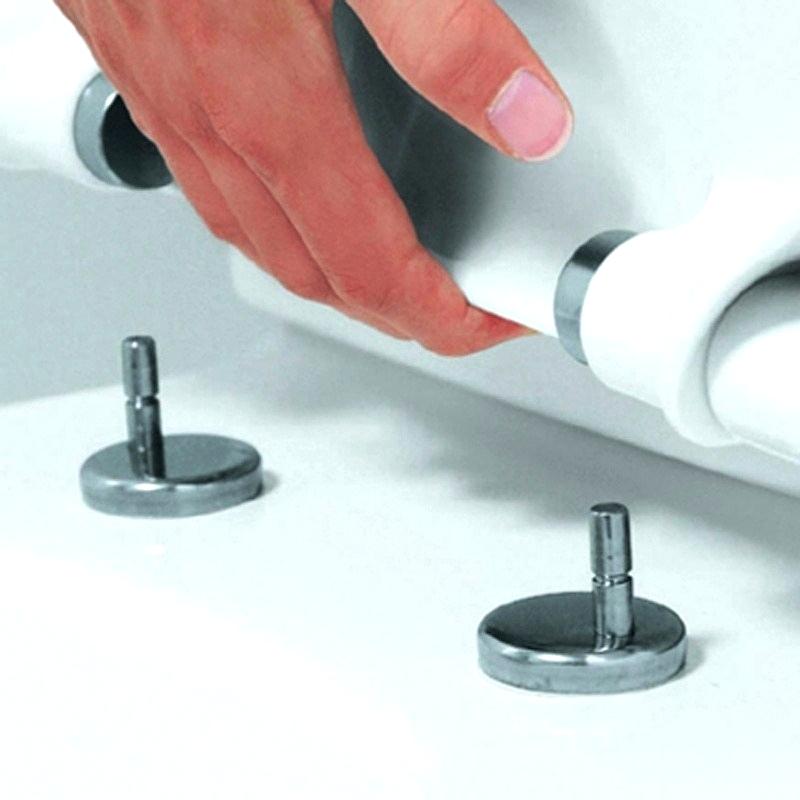
To install a new cover, you need to perform a number of actions:
- Place microlifts on the pins of the patches-platforms.
- Place the seat cover on the floor, side up.
- Place microlift bushings into the holes of the ears.
- The left one is marked with the Latin letter L, the right one is marked with R.
- Gaskets must be placed on top of the holes located on the rear edge of the toilet.
- The design, together with the microlift, is installed on the toilet bowl, the studs are inserted into the holes.
- Everything is fastened with nuts that are included in the kit.
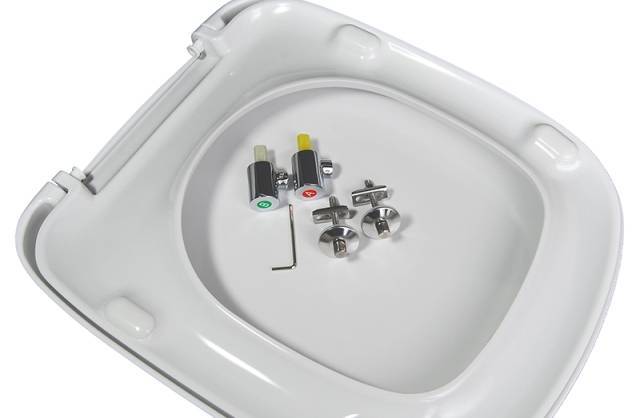
There are models that are much easier to mount, just use a hex key. It is usually included in the package.
There are all kinds of seat covers on the market, which differ in the type of material, the presence of additional functions. Good toilet bowls and related products cannot be cheap. In order not to face the constant replacement of the lid and toilet seat from the toilet, you should choose a design for quality, and not external data.


Mounting options for seat cover
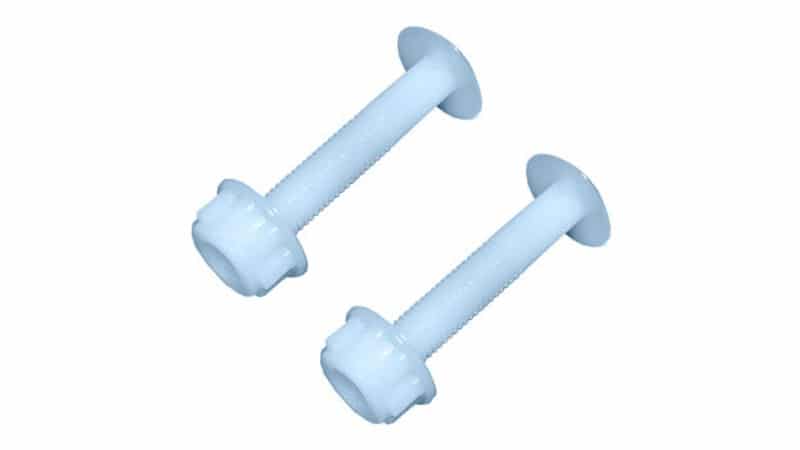
The type of toilet shelf plays a fundamental role in the installation process, since the overhead copy, popularly referred to as “eared”, will require more employment and attention than a one-piece model. This is due to the need to fix the cover in the same holes where the water tank is attached. Before you attach the lid to the toilet with "ears", you need to purchase auxiliary equipment - polyethylene clamps. They will be needed to fix the bolts holding the entire structure.
Mounting brackets for toilet lid
A few tips to make the process easier:
- optimal fastening of the toilet lid is plastic or brass;
- when screwing in brass parts, it is advisable to use intermediate washers made of plastic (otherwise you can easily break the entire toilet bowl);
- you should not choose steel elements for new designs and, if possible, replace them with old toilets;
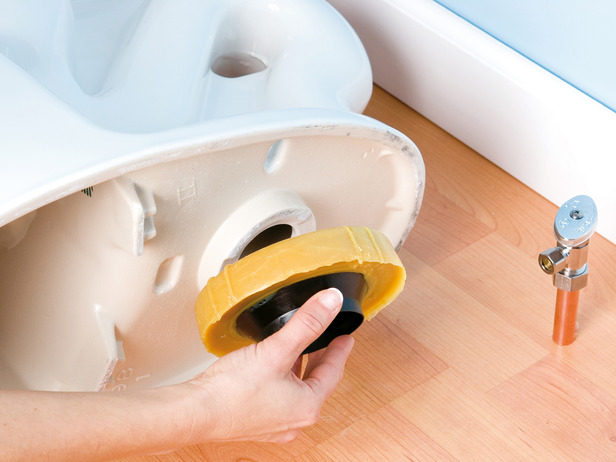
- if, after installing a new seat, the toilet shelf shifts and water begins to leak, you need to check the rubber cuff (for this you need a flashlight and looking under the rim: if the structure just squinted, it is enough to fix it with wire, and if there is a gap or dilapidated element, a complete replacement will be required).
Mounting the toilet lid
Manipulation to replace the cuff is simple, but it still takes time. First you need to shut off the water supply, then disconnect the drain tank, and then remove the cuff itself. Before installing a new part, it is advisable to thoroughly clean the attachment point from lime and plaque. And then proceed with the installation:
- the narrow part of the product is put on the toilet shelf;
- the water tank returns to its rightful place;
- the cuff is straightened and thrown over the wide part of the body bell;
- by draining the water, the reliability and absence of leaks are checked.

Mounting the toilet lid on metal fasteners
On a solid shelf, fasteners for a toilet seat are installed as easy as shelling pears: in such options, separate mounting holes and special clamps for the “clamp” are already prepared.
First aid in case of breakdowns
It is not uncommon for a toilet seat lid or seat to break.There can be a lot of reasons for this: a long service life and regular wear, careless handling of the owners, a blow with something heavy, too much load on the surface of the product (for example, if you stand up with your feet), and many other options. If there is no opportunity or desire to purchase a new model, you can try to "reanimate" the old one.
Screw on the lid tightly
Acetone or dichloroethane will help to eliminate a crack on the surface of a plastic seat: just drop a little liquid on the accident site and tightly join the edges, then let it dry thoroughly.
Damaged polypropylene or polyethylene elements are subject to fire: the fracture points must be carefully melted to a soft state, connected and allowed to cool. And then sand lightly. With care, the joints will become almost invisible.
The "eared" toilet bowls have a characteristic unpleasant feature: with an erroneous initial installation, the weight is unevenly distributed during use and for the most part there is an emphasis on the plastic structure. Sometimes it’s enough just to lean harder on the tank or carelessly touch the product with your foot so that the surface of the lid or seat bursts and the “ears” fall off. The easiest fix is to buy a new cover and install it carefully. However, you can fix everything with your own hands.
This will require:
- thoroughly clean the damaged area from dirt and plaque;
- dry thoroughly (you can resort to using a hair dryer);
- completely degrease (for example, acetone, gasoline);
- mix epoxy resin and hardener in any not too valuable container;
- gently smear the cleavage points with the resulting composition, while it is very desirable to remove the excess mixture immediately, since the composition quickly hardens and is difficult to remove;
- evenly connect the edges of the chips and press firmly against each other.
After the final hardening, you can put everything in place, while it is advisable not to forget about the cause of the damage and put up supports or correct the entire structure. Otherwise, after some time, the same problems will be revealed, but on a larger scale, which will require a complete replacement of the structure.
Plumbing, like any other technique, breaks down sooner or later. However, in most cases, it is not difficult to fix these breakdowns on your own. In this article, we will look at how to dismantle and install the seat cover.